Table of Contents for
Node.js for Embedded Systems
 Node.js for Embedded Systems
Published by
O'Reilly Media, Inc., 2016
Node.js for Embedded Systems
Published by
O'Reilly Media, Inc., 2016
- Cover
- nav
- Node.js for Embedded Systems
- Node.js for Embedded Systems
- Foreword
- Preface
- 1. Connecting Worlds
- 2. Blink with Arduino
- 3. Espruino
- 4. The Tessel 2
- 5. Particle Photon
- 6. Single-Board Computers
- 7. Components for Prototyping
- 8. Node.js Libraries for Hardware
- 9. Exploring Network Protocols
- 10. Web Frontends for Things
- 11. Entering the Cloud
- 12. Making Robots with Node.js
- 13. Wireless Data with Bluetooth
- 14. Toward the Physical Internet
- 15. From Products to Toolkits
- A. Node.js
- B. Early Hardware for IoT Systems
- Index
- About the Authors
- Colophon
Chapter 3. Espruino
Espruino is a “mini Node.js” for microcontrollers. It eliminates the need for a translation layer like Firmata with Arduino.
The Espruino project by Gordon Williams was funded via a Kickstarter campaign in 2014 and has been continuously improved since. To run JavaScript code on Espruino, you don’t need to install an IDE or specific device drivers. You can use the Espruino Web IDE or use a simple serial terminal to program a device.
Similar to Arduino, Espruino has both hardware and software components. Espruino boards have a strong microcontroller core (a 32-bit ARM Cortex processor), and are faster and provide more memory (64–96 KB RAM and 256–512 KB flash) than an Arduino Uno. The better MCU is needed in order to parse JavaScript and libraries.
Espruino is completely open source. A variety of ports of the Espruino runtime have been made to other boards and processors. For example, boards with an ESP8266 are now supported. Although boards with an ESP8266 are popular due to cost and performance considerations, in order to support further development of the Espruino project, it is a good idea to buy the Espruino directly from the Espruino website.
The Espruino Hardware
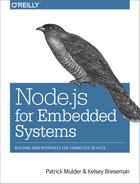
On the hardware side, there are two main flavors: the original Espruino board (Figure 3-1) and the Espruino Pico (Figure 3-2). To quickly get started, the Espruino Pico (around $30) is a good option. As you can see in Figure 3-1, there are several digital and analog pins. Compared to Arduino, the Pico has more pins to support PWM.
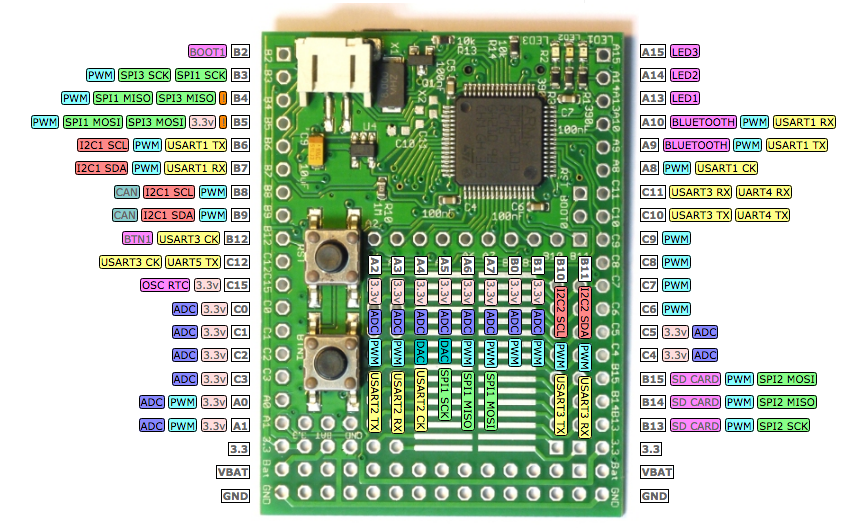
Figure 3-1. The Original Espruino pinout from http://www.espruino.com/EspruinoBoard
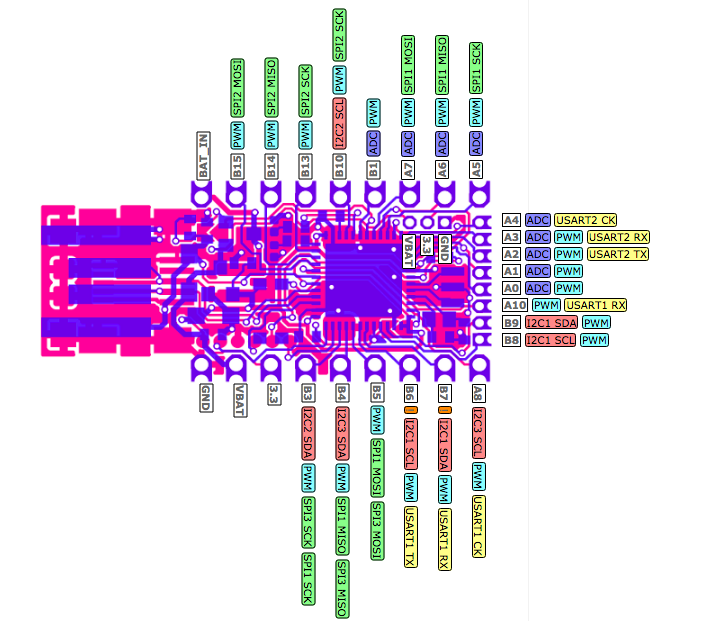
Figure 3-2. The Espruino Pico pinout from http://www.espruino.com/Pico
A good way to learn about JavaScript on Espruino is with a simple blinking LED. For this example, you can mount a Pico with an LED and resistor on a breadboard, as shown in Figure 3-3, between pin B3 and GND. (If you are new to electronics: breadboards and components will be discussed in Chapter 7.)
Figure 3-3. An Espruino Pico on a breadboard
To explore the analog pins, you can add a potentiometer to analog input pin A5, as shown in Figure 3-4.
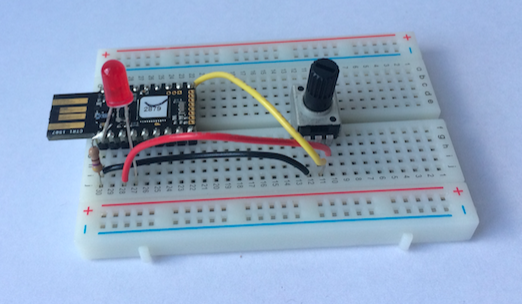
Figure 3-4. An Espruino Pico with LED and potentiometer
Instead of a breadboard setup, you can mount an Espruino on a special board called a shim, which makes it easier to attach devices. You can purchase a shim collection containing various shims for your Pico. Also, there is an adapter board (“Arduino Shim”) to make an Espruino pin compatible with the Arduino form factor.
For software engineers without much soldering experience, it’s worthwhile to take a look at Espruino’s support of Grove headers. This allows you to add the Espruino Pico to the Arduino Shim and plug it straight into the Grove header.
Because Espruino is an open source project, you can study the Espruino board designs to build your own Espruino-compatible devices. For example, the Eagle CAD outlines for the Pico can be found at http://www.espruino.com/Pico#embedding-the-pico.
Programming Espruino
For programming with Espruino, check out the tutorial at http://www.espruino.com/Quick+Start first. Linux and Mac OS X users can just plug in the board. Windows users might need to install a driver.
Espruino comes with an open source web IDE, as shown in Figure 3-5. The source code of the WebIDE can be downloaded from https://github.com/espruino/EspruinoWebIDE. The WebIDE talks with the Espruino hardware via the Chrome serialport library. This means you are able to program the Espruino with JavaScript directly from a web browser!
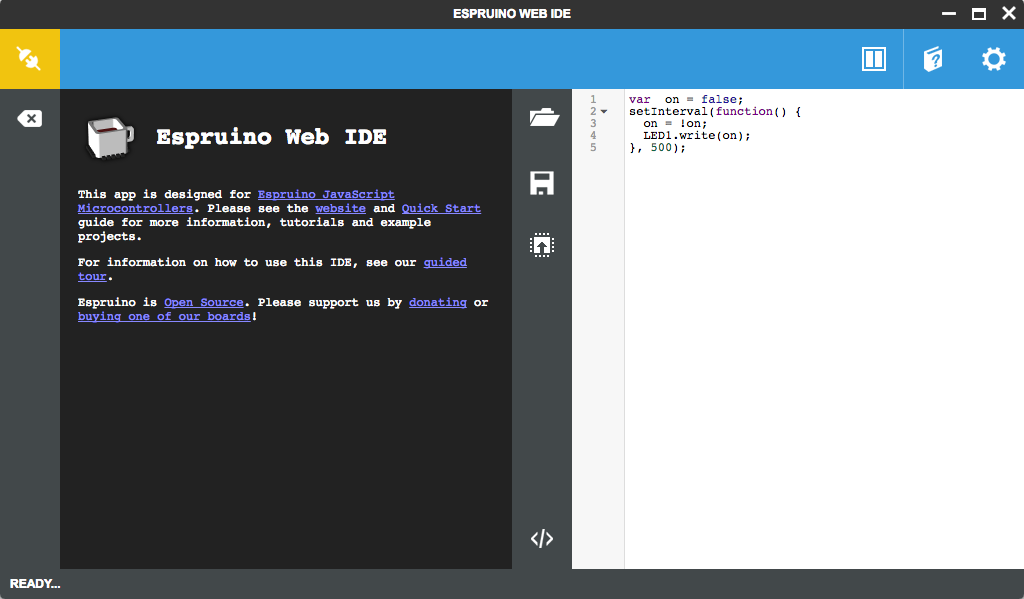
Figure 3-5. The Espruino WEB IDE
Besides support to upload JavaScript code on an Espruino, you can also control the device with a REPL. Figure 3-6 shows how you connect the Espruino to the web IDE.
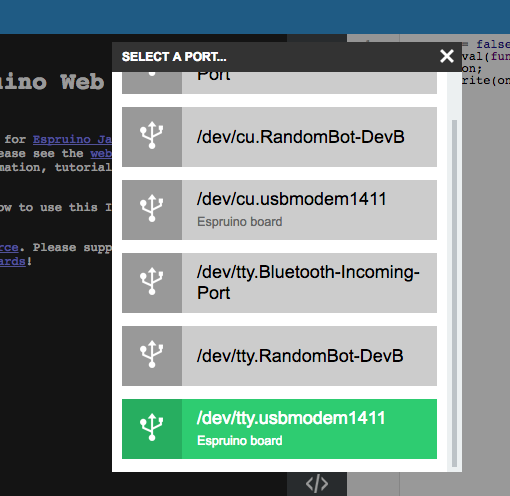
Figure 3-6. Connect to an Espruino
Once connected, you can turn the LED on B3 ON with:
> digitalWrite(B3, HIGH);
And OFF with:
> digitalWrite(B3, LOW);
Instead of LOW and HIGH, you can also simply use 0 and 1.
In addition to web IDE, you can also use serial communication to blink the LED. For this, you connect to the Espruino with a terminal program.
To use the Espruino command-line interface, you must install it first with:
$ npm install -g espruino-cli
If you want to use a terminal program, a good terminal for Mac OS X and Linux is screen, while “hterm” is a popular choice on Windows machines.
For example, on Mac OS X, you can connect to the Espruino from the command line using screen:
$ screen /dev/cu.usbmodem141 9600
Once you are connected, you should see the welcome screen shown in Figure 3-7. In the REPL, you can run the same commands as from the WebIDE.
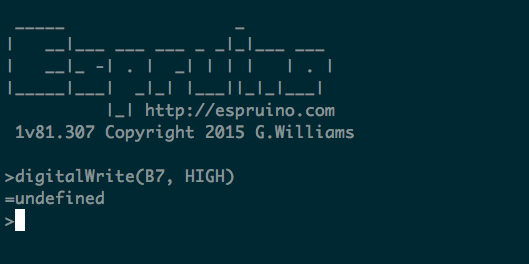
Figure 3-7. The welcome screen after connecting to the Espruino
Let’s compare the Espruino experience so far with an Arduino.
We can make the following observations: first, the Espruino has built-in JavaScript functions to talk with the pins of the microcontroller. These JavaScript functions look similar to the Arduino—take digitalWrite, for example.
Second, the Espruino provides a read-eval-print loop (REPL) by default. With this, you can easily control electronic signals without compiling and flashing the device all the time. The REPL will be used a number of times in the book. The Espruino gives you a good start here.
Finally, Espruino programs do not have a main loop. Instead, you can use the event loop from JavaScript to run programs endlessly.
For example, to blink an LED endlessly, you can call setInterval():
var ledOn = false;
function blink() {
  ledOn = !ledOn;
  LED1.write(ledOn);
  console.log(ledOn);
}
setInterval(blink, 500);
Every 500 ms, there will be a call to the blink function. The event loop will run as long as the device has power.
Instead of setInterval, you can invoke a counter recursively with setTimeout:
var ledOn = false;
var delay = 500;
function blink() {
  digitalWrite(LED, ledOn);
  ledOn = !ledOn;
  setTimeout(blink, delay);
}
blink();
Note
If you want to do something every second, it’s better to use setInterval, which is more accurate. Using setTimeout adds the time it takes to execute JavaScript code to each iteration.
Espruino also provides a function called digitalPulse to work with a timer directly. In this case, you can blink an LED with:
digitalPulse(LED1,1,delay);
When you write code as a series of small functions, the event loop can help you to process things almost in parallel. With the following JavaScript functions from the Espruino API, the Espruino interpreter can appear to do many things at once:
setTimeout-
Emit an event to call a function once after a specified length of time
setInterval-
It is like
setTimeoutbut repeats setWatch-
For checking input pin changes
Serial1.on(data, function() {})-
Subscribe to events when data comes in
An example of an event-based application is the REPL. This small process runs as just another task, effectively responding to USB.on('data'...) events.
Also, doing work only when an event happens can help you save power. If you use setInterval(.., 60000) then for 99.99% of that minute, Espruino can be totally asleep, saving a bunch of power.
By comparison, on an Arduino the default behavior is an endless loop() over the main program. With this, the Arduino never knows when the MCU is busy or when it isn’t. The microcontroller of Arduino can’t fall asleep automatically unless you explicitly tell it to.
When the board is ready, you can subscribe to the onInit event. This is comparable to the setup() function of Arduino.
Note that when you save or upload a program, Espruino saves the current state of the interpreter (not the code that you uploaded).
Variable Blink
Instead of defining a blink delay in the program, let’s look at reading a delay time from a user via a potentiometer, as shown in Figure 3-4.
Assuming a potentiometer on the analog input pin A5, with:
var delay = 400 + 600 * analogRead(A5);
analogRead returns a value between 0 and 1. Compared to Arduino (which returns a value from 0 to 1024), you can just multiply this value to a maximum range value as you need it.
Adjust the blink frequency with the variable delay:
setInterval(function() {
  var delay = 400 + 600 * analogRead(A5);
  digitalWrite(LED1,1);
  setTimeout(function() {
    digitalWrite(LED1,0); },
  delay);
}, 1000);
Instead of adjusting the blink frequency, you can adjust the brightness of the LED with analogWrite:
setInterval(function() {
  var brightness = analogRead(A5);
    analogWrite(LED1,delay);
  }, 100);
Depending on the board and pins you want to use for PWM, you must enable a software PWM signal. Software PWM can be enabled by adding a parameter to analogWrite: (LED1,delay,{soft:true});.
Modules
Espruino supports working with JavaScript objects, modules from npm, and special Espruino modules.
To load a module, you simply write in the editor pane of the web IDE:
var _ = require('concat-string');
The web IDE will automatically look up the module from npm. You can also load JavaScript drivers for many components from the Espruino repository. For example, to work with a display, you can require a module as described at http://www.espruino.com/PCD8544. A full example for a small animation on a display can be found at http://www.espruino.com/Pico+LCD+Hello+World.
Flashing Espruino Firmware
The Espruino firmware is continuously improving. To check the firmware version, click the setting button in the web IDE and scroll down to see the firmware version. For firmware updates, see http://www.espruino.com/Quick+Start#software-updates.
You can get the latest version of Espruino in a ZIP file from the Espruino download page. The firmware is tested and you should use the combined version.
As mentioned earlier, you can install the Espruino firmware on other boards. Interesting boards include ESP8266-based boards or the BBC MicroBit. For this, you can use a Flash utility written in Node.js: https://github.com/thingsSDK/flasher.js.