Table of Contents for
Node.js for Embedded Systems
 Node.js for Embedded Systems
Published by
O'Reilly Media, Inc., 2016
Node.js for Embedded Systems
Published by
O'Reilly Media, Inc., 2016
- Cover
- nav
- Node.js for Embedded Systems
- Node.js for Embedded Systems
- Foreword
- Preface
- 1. Connecting Worlds
- 2. Blink with Arduino
- 3. Espruino
- 4. The Tessel 2
- 5. Particle Photon
- 6. Single-Board Computers
- 7. Components for Prototyping
- 8. Node.js Libraries for Hardware
- 9. Exploring Network Protocols
- 10. Web Frontends for Things
- 11. Entering the Cloud
- 12. Making Robots with Node.js
- 13. Wireless Data with Bluetooth
- 14. Toward the Physical Internet
- 15. From Products to Toolkits
- A. Node.js
- B. Early Hardware for IoT Systems
- Index
- About the Authors
- Colophon
Appendix B. Early Hardware for IoT Systems
Raspberry Pi
The Raspberry Pi is an SBC that was built for students to learn about Linux and programming. But its goals are more ambitious. Jack Lang, chairman of the Raspberry Pi Foundation, said it like this: “We want to revolutionize the desktop.”
To make that happen, the Raspberry Pi iterated a number of revisions. There is the Model 1 and Model 2. Model 1 comes in a version A and B. The differences lie in the amount of RAM, CPU performance, price points, and options for connectvity. For example, while Raspberry Pi Model B allows you to have Ethernet by default, a Raspberry Pi Model A needs some workarounds to set up an Internet connection.
One of the most popular variants of the Raspberry Pi is the B+, as shown in Figure B-1. The core of this board is a Broadcom BCM2835 system-on-chip with integrated CPU, GPU, and a USB port. The boards include an SD card slot so you can run Linux from an SD card.
As you can see, the Raspberry Pi form factor is different from an Arduino. Compared to an Arduino, the “Raspi” has an SD card drive, multiple USB ports, a display adapter, and some pins for digital inputs and outputs. The pinout for the Raspi pin headers are found here: http://pi.gadgetoid.com/pinout. While an Arduino has digital and analog I/O, the Raspi only has digital pins.
The different form factor is one of the reasons you can’t leverage an Arduino project by default on the Raspberry Pi. But besides the difference in physical connections, the system voltage on a Raspberry Pi is 3.3V compared to the 5V of most Arduino boards. This means that you risk destroying your board when connecting 5V components from an Arduino to a Raspberry Pi.
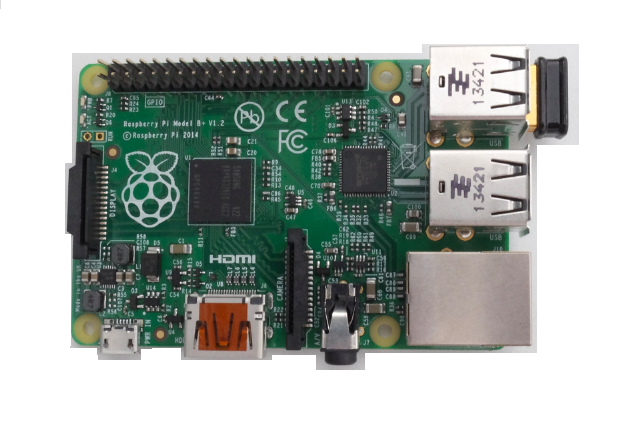
Figure B-1. The Raspberry Pi B+
Another difference between Raspberry Pi and Arduino is connectivity. The Raspberry Pi supports Ethernet by default. But for WiFi, you must add a WiFi dongle into one of the USB ports.
The default Linux image for the board is a Debian image that you can download here: https://www.raspberrypi.org/downloads. “Using Embedded Linux” explores the setup of an SD card. It is important to know that as soon as you switch on the device, it loads its operating system from a flash drive.
Once the board has booted, you can log into it with an SSH shell session. Exploring ways to connect is covered in “Network Configuration”. A nice command to get more information on computing power on a board is:
$ cat /proc/cpuinfo
BeagleBone
The BeagleBone project was launched by Texas Instruments, DigiKey, and Element14 in 2008. BeagleBone boards have gone through a number of revisions already.
One of the newest and cheapest is the BeagleBone Black, shown in Figure B-2. The board has an AM335 ARM Cortex A8 processor, 256 MB of RAM, and a clock frequency of 1 GHz. It has 2 GB of onboard flash memory.
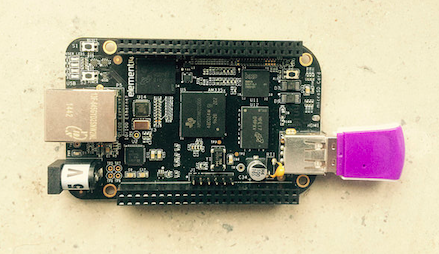
Figure B-2. The BeagleBone Black with a WiFi dongle
The board has a number of peripherals, such as a microHDMI connector for video output and an SD card slot for external storage. It has an Ethernet port for easy network connectivity. If you want to use WiFi, you must add a WiFi dongle.
The board comes preloaded with a Debian Linux distribution. BeagleBone Black comes with a JavaScript runtime called BoneScript.
The BeagleBone supports multiple I2C and SPI busses. In contrast to a Raspberry Pi, a BeagleBone has onboard ADC for analog-to-digital conversion.
To get started you can follow the instructions at: http://beagleboard.org/getting-started.
Intel Galileo
As you can see from Figure B-3, the Galileo is pin-compatible with an Arduino Uno. This means that the board offers 13 digital pins, 5 analog inputs, a power header, an ICSP header, and a UART port. To connect to networks, you can use the Ethernet interface of the board.
The core of the board is a 32-bit Quark microprocessor, which is a Pentium class microprocessor that runs on 400 MHz and has 256 MB of RAM.
Intel has released two versions of Galileo:
-
The Gen 1 board uses a Cinch connector as serial debugging output. You can find adapter cables at SparkFun or on eBay.
-
The Gen 2 board provides FTDI header pins for connecting to the board. It also provides a USB Type A connector for peripheral devices.

Figure B-3. Intel Galileo with a Quark SoC 1000
Similar to the Raspberry Pi, the Galileo loads an embedded Linux operating system from an SD card. By default, the Galileo comes with an SPI (serial-peripherial-interface) flash memory with a small Linux distribution preinstalled.
The board schematics are open source and you can download them from here. A reference PCB to build your own boards is available for download here.
To configure connectivity via Ethernet, you would first log in via the serial terminal. Another option is to use Arduino sketches to obtain basic network settings. The Arduino sketches for Galileo allow you to run Linux commands on the board.
The embedded 8 MB flash memory is too small to run Node.js, and you must run Node.js from an SD card. A number of images are prebuilt.