Table of Contents for
Node.js for Embedded Systems
 Node.js for Embedded Systems
Published by
O'Reilly Media, Inc., 2016
Node.js for Embedded Systems
Published by
O'Reilly Media, Inc., 2016
- Cover
- nav
- Node.js for Embedded Systems
- Node.js for Embedded Systems
- Foreword
- Preface
- 1. Connecting Worlds
- 2. Blink with Arduino
- 3. Espruino
- 4. The Tessel 2
- 5. Particle Photon
- 6. Single-Board Computers
- 7. Components for Prototyping
- 8. Node.js Libraries for Hardware
- 9. Exploring Network Protocols
- 10. Web Frontends for Things
- 11. Entering the Cloud
- 12. Making Robots with Node.js
- 13. Wireless Data with Bluetooth
- 14. Toward the Physical Internet
- 15. From Products to Toolkits
- A. Node.js
- B. Early Hardware for IoT Systems
- Index
- About the Authors
- Colophon
Chapter 6. Single-Board Computers
In addition to boards with microcontrollers and system-on-chips, there is another category of hardware that supports running Node.js: single-board computers (SBCs). SBCs integrate computer peripherals such as graphics cards and embedded memory on a single board. These kinds of devices are more similar to your laptop or desktop PC than they are to an Arduino.
The Raspberry Pi is a well-known example of an SBC. Intel Edison is also an SBC, with integrated peripherals for WiFi and Bluetooth communication.
Working with an SBC often means that you need to put some effort into installing an operating system and configuring it to your network. Getting an SBC to boot can quickly become challenging. Luckily, you will find many users to share ideas and help online. If you have worked with web applications before, configuration of an SBC feels a bit similar to server administration.
When your operating system is booting and you have a working Internet connection, adding Node.js to the device is often the easy part.
The Raspberry Pi
Computers such as Raspberry Pi consume more current (300–500 mA) than a microcontroller (10–30 mA). To work with a Raspberry Pi, you must ensure that your power supply can handle the large current draw of the processor. In addition to a special power supply, you should also have an HDMI cable for adding a display and a USB keyboard to access the device.
Raspberry Pis offer relatively high computing power for network access and building multimedia experiences. By using an embedded Linux operating system, you can directly run Node.js (and other programming languages) on the device, but without a microcontroller component, you lose real-time control over the GPIOs. If you work with analog data from sensors or for driving a motor, you often must fall back to simple binary protocols and external chips. Still, the Raspberry Pi and others are very popular, as there are still a bunch of digital pins with 3.3V voltage level that can be used to control circuits.
The Raspberry Pi comes in different models: Model A, Model B, Model 2, the Zero, and Model 3. Most models support Internet connections by Ethernet and RJ45 cables. If you want to build wireless solutions, you must add WiFi USB dongles. For boards without Ethernet access (e.g., Model A and Zero), it is good to get a USB-to-Ethernet adapter.
BeagleBone
The BeagleBone project was launched by Texas Instruments, DigiKey, and Element14 in 2008. BeagleBone boards have been revised a number of times already since the product’s launch.
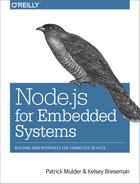
One of the most popular versions of BeagleBone is the BeagleBone Black. The board has an AM335 ARM Cortex A8 processor, 256 MB of RAM, and a clock frequency of 1 GHz. It has 2 GB of onboard flash memory.
The board has a number of peripherals, such as a micro-HDMI connector for video output and an SD card slot for external storage. It also has an Ethernet port for easy network connectivity. If you want to use WiFi, you must add a WiFi dongle, as shown in Figure 6-1.
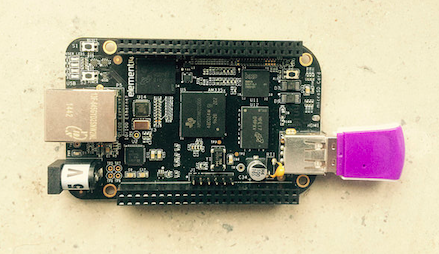
Figure 6-1. The BeagleBone Black with a WiFi dongle
The board comes preloaded with a Debian Linux distribution. BeagleBone Black comes with a JavaScript runtime that is called BoneScript.
The BeagleBone supports multiple I2C and SPI busses. The newer and cheaper BeagleBone Green also has Grove headers for adding I2C devices.
In contrast to a Raspberry Pi, a BeagleBone has onboard ADC for analog-to-digital conversion.
To get started, you can follow the instructions available at “Getting Started with BeagleBone & BeagleBone Black”.
The Intel Edison
The trend to build smaller, increasingly compact computers is ongoing. Intel introduced a “computer-on-module” with the Intel Edison in 2014. The module has an x86 Atom processor (the class found in tablet computers) and 4 GB embedded flash memory. This provides enough computing power to run network services or even a small database.
To see what “computer-on-module” means, have a look at the Edison datasheet to see how the module is built (Figure 6-2).
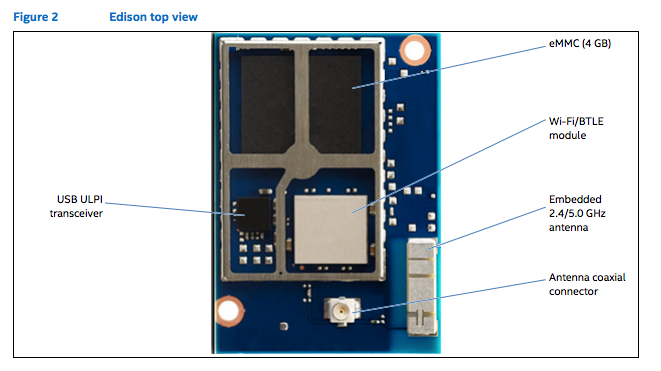
Figure 6-2. The Intel Edison module top
The main components are on top:
-
eMMC (embedded memory)
-
A WiFi transceiver with antenna: the Edison supports wireless connectivity out of the box. If you want to work with Ethernet, take a look at the Intel Galileo board (see “Intel Galileo”). That board is a bit older than the Edison, but can be interesting for smart home applications, e.g., where you have access to Ethernet.
-
Bluetooth transceiver: Bluetooth will play an important role in the future of the Internet. We’ll postpone the Bluetooth discussion until Chapter 15.
-
USB transceiver
On the bottom of the module, there are the main processing blocks and a component for power management (Figure 6-3):
-
Processor and DDR memory
-
Power management IC (PMIC )
-
A 70-pin Hirose connector
Figure 6-3. The Intel Edison module bottom
With an Intel Edison, you can build highly integrated computers. But take note that the logical levels of the core processor are on 1.8V. On the one hand, this is nice for low-power consumption. On the other hand, this makes it harder to connect “classical” components made for an Arduino or Raspberry Pi.
To solve this problem for prototyping purposes, you can use so-called “breakout boards” (Figure 6-4). This will be discussed further in the next chapter. At this stage, let’s briefly review how the software stack works on Edison.
While the Edison has an embedded flash memory with a default operating system, you will need to tune the operating system to your needs. In other words, you may wish to run a firmware update and install some extra packages on your Edison. Luckily, Node.js is preinstalled on the latest Yocto Linux images.
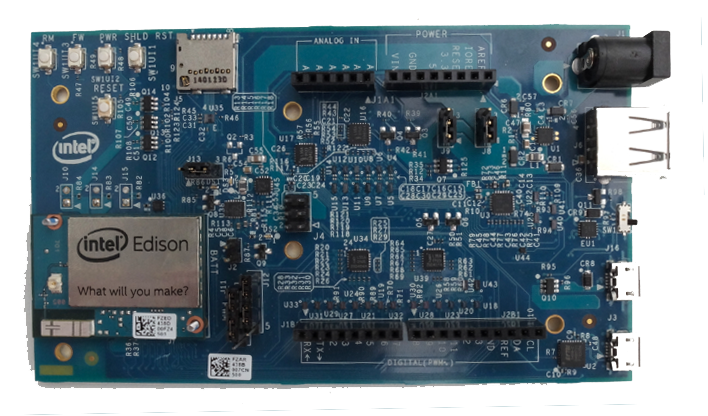
Figure 6-4. The Edison package on an Arduino breakout board
With a special breakout board from Tektyte, you can make the Intel Edison compatible to the header pins of a Raspberry Pi.
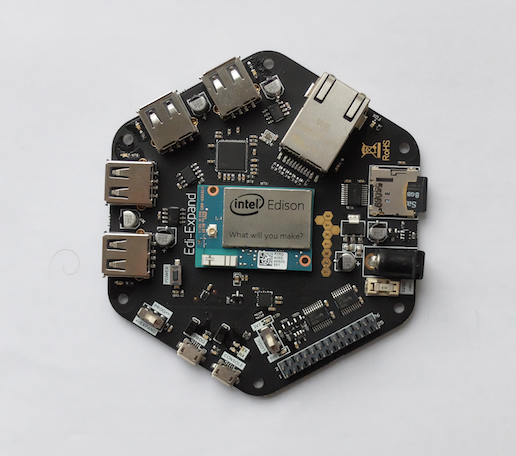
Figure 6-5. The Edison mounted on the Edi-Expand from Tektyte
Boards with 64-Bit Instruction Sets
If you need more performance on a single board, it makes sense to look at processors that support 64-bit instruction sets. These boards not only have processors with high performance, but also high-speed IOs for network or USB access. In the upper price range for SBCs, boards have an x86 processor where you can use the same software and operating systems as larger desktop computers.
The Upboard and Minnowboard Turbot, shown in Figure 6-6, are two examples of SBCs with x86 processors.
The Upboard was successfully funded through a Kickstarter campaign. The board has Gigabit Ethernet and a 40-pin header that is compatible with a Raspberry Pi. It has 2 GB of RAM and 32 GB of embedded flash. The main community for this board can be found at http://www.up-community.org/forum. The price point is around $99.
The MinnowBoard Turbot is an open source hardware project based on a 64-bit Intel Atom system-on-chip. It has Gigabit Ethernet and a USB 3.0 port. The better performance of the board comes at the higher price of $145.
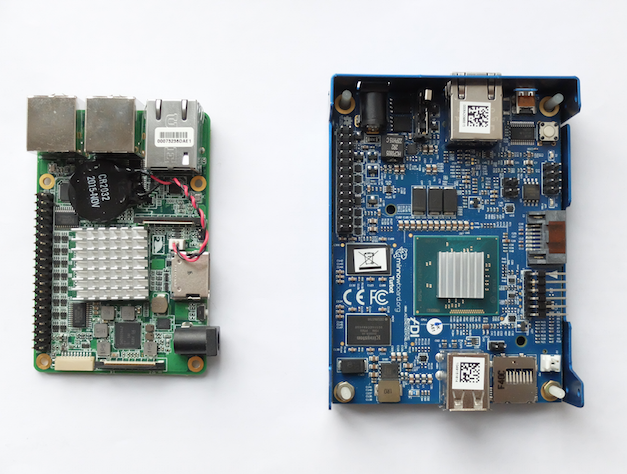
Figure 6-6. The Upboard (left) and Minnowboard Turbot (right) both use an x86 processor
If you are interested in more x86-based SBCs, check out Kickstarter—new boards are launched frequently.
Using Embedded Linux
An operating system such as embedded Linux is needed to capture the computing power of SBCs. This often requires that you prepare an SD card or USB memory stick first. After the operating system is installed, you will need to configure a network. Pending successful board setup, you can install and run Node.js inside an embedded device. If you are working with a Tessel 2, you will not need to do this; Node.js and the board’s operating system come pre-installed.
Working with SD Cards
To run Node.js inside a board, you may have to prepare an SD card with an operating system and Node.js first. This is true for Raspberry Pi, Beaglebone, Upboard, and Intel Edison, among others. Let’s look how this is done, and why it is needed.
Most boards require micro SD cards. With an adapter (shown in Figure 6-7), you can easily use the card in older (nonmicro SD) card readers or a Raspberry Pi model A too. It is a good idea to buy several SD cards of 4 GB or more from eBay so you can experiment easily with different settings and operating systems.
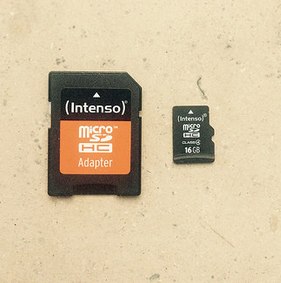
Figure 6-7. An SD card with adapter
Once you have the cards, you must download the image of an operating system.
When using a Raspberry Pi, you can download a Debian image. For Raspberry Pi, there are many articles that discuss how to install the image. For example, good instructions can be found here.
When using an Intel Edison or Galileo, you can download the “IOT Kit SDK Image” from Intel.
Using a terminal or archive program, you can extract the image to a temporary location. To burn an image onto the SD card, you can copy blocks 1:1 from the source file to a destination drive.
When you are on Linux or Mac OS X, you can do this by using the dd command. You may need to check the location of your SD card in the filesystem and unmount it first. On a Mac, this can be done with:
$ diskutil list
$ diskutil unmountDisk /dev/diskN
N is the location of the card, such as 1, 2, or another drive.
Warning
Be careful when using the dd command to flash an SD card from the command line. If you hit the wrong partition, you can format the wrong drive of your laptop.
Then, copy the image over to the SD card:
$ sudo dd if=iot-devkit-YYYYMMDDHHMM-mmcblkp0.direct of=/dev/disk1 bs=8m
Note that you copy the image directly onto the drive, not to a partition. This is important in order to obtain a card that can boot. bs specifies the “blocksize” for the copy process. Generally, an 8 MB block provides a good compromise between quality and speed of the copying process. Note that on some machines you must use a capital “M” for this (e.g., bs=8M).
Now that you have a board where we can install and run Node.js, let’s review the role of the operating system.
Embedded Linux Distributions
There are different Linux distributions. One main parameter in choosing an operating system distribution is its size.
If you prepare an SD card for an Intel Galileo and boot from it, you’ll see all kinds of processes running, as shown in Figure 6-8.
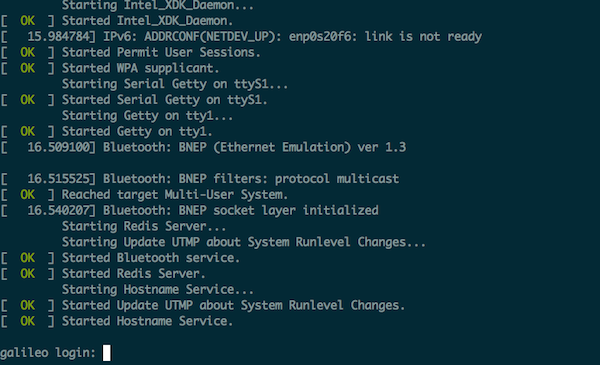
Figure 6-8. Booting a Galileo with the SD card image
Once an operating system is loaded, it manages the board’s resources, including disk space, memory, and computing capacity.
When you then run a web server or a logger process for temperature, for example, you request resources from the operating system at different levels. Hardware resources are managed inside a “kernel.” In Linux, these resources are mounted in the filesystem with “drivers” or “kernel modules.”
In addition to providing better management of computing resources, operating systems often support running Node.js inside of an embedded system.
Because an operating system influences the way we develop with an embedded system and Node.js, let’s briefly review some popular operating systems for embedded Node.js. This discussion is important to better understand board configuration.
OpenWRT
The history of OpenWRT is interesting. The company Linksys had to release its router firmware because it violated the GPL license of some Linux tools inside. The first public release of WRT to OpenWRT was in 2003.
With OpenWRT, it was possible for others to extend and configure router firmware as needed. One such project is Linino, which can be found in the Arduino Yun project. Another offspring of OpenWRT is the Freifunk project, a community-driven wireless network approach. OpenWRT is at the heart of the Tessel 2 and Onion Omega development boards.
The package manager of OpenWRT is called opkg and is similar to Debian’s dpkg. Node.js can be installed, for example, with:
$ opkg update
$ opkg install node
A number of Node.js modules are available for OpenWRT, such as node-serialport.
Debian
Debian is one of the Unix distributions that runs on many different kinds of hardware, from servers to desktop computers to embedded devices.
As a first step, it is often good advice to configure the connectivity of the device. This is done with some entries in the networks directory.
For users of the Raspberry Pi, a popular Debian distribution is the Raspbian distribution. For users of x86-embedded boards, such as an Intel Edison or UpBoard, a good choice is Ubilinux.
Once installed, you can easily run the Aptitude package manager:
# apt-get update
To ensure scripts are started during startup, you can place links to scripts in the directory /etc/init.d/.
Yocto
The Yocto project provides tools and packages specifically for embedded systems. The project was announced 2010.
The package manager of Yocto is “smart” (more information about “smart” is available in the blog post “Get smart with smart package manager”).
The Intel Edison runs Poky Linux image by default, which is based on a Yocto image. One difference from the Poky image to the Debian one is handling services. Poky uses the newer systemd to manage services and configurations of the board.
Network Configuration
To install packages from Node.js, it is often necessary to configure network access first. Network configuration is also important when you plan to develop systems with multiple devices.
A good start is to check whether you have network access or not. The Linux command that displays network information is:
$ ifconfig
The output may look like this:
enp0s20f6 Link encap:Ethernet  HWaddr 98:4F:EE:05:13:94
          UP BROADCAST MULTICAST  MTU:1500  Metric:1
          RX packets:0 errors:0 dropped:0 overruns:0 frame:0
          TX packets:6 errors:0 dropped:0 overruns:0 carrier:0
          collisions:0 txqueuelen:1000
          RX bytes:0 (0.0 B)  TX bytes:980 (980.0 B)
          Interrupt:49 Base address:0xc000
enp0s20f6:avahi Link encap:Ethernet  HWaddr 98:4F:EE:05:13:94
          inet addr:169.254.6.107  Bcast:169.254.255.255  Mask:255.255.0.0
          UP BROADCAST MULTICAST  MTU:1500  Metric:1
          Interrupt:49 Base address:0xc000
lo        Link encap:Local Loopback
          inet addr:127.0.0.1  Mask:255.0.0.0
          inet6 addr: ::1/128 Scope:Host
          UP LOOPBACK RUNNING  MTU:65536  Metric:1
          RX packets:480 errors:0 dropped:0 overruns:0 frame:0
          TX packets:480 errors:0 dropped:0 overruns:0 carrier:0
          collisions:0 txqueuelen:0
          RX bytes:37600 (36.7 KiB)  TX bytes:37600 (36.7 KiB)
This tells you the board has an Ethernet interface that is assigned the IP address 169.254.6.107. In most cases, you need to configure this address to fit your network. Let’s look at how to do that.
You can assign a static IP address or get one dynamically. For a static IP address, you would add these lines in /etc/ifaces:
auto eth0
iface eth0 inet static
   address 192.168.3.200
   netmask 255.255.255.0
A static IP address is a good idea for the first setup of a board. With a static IP address, you don’t need to search the whole network for your device, but you can directly say:
$ ssh 192.168.3.200
You can also connect directly to your board through a USB-to-serial converting cable. You can run this line on the board:
$ ifconfig
Now, you’ll see an IP address next to your MAC address of the network interface. You can share an Internet connection from a connected laptop with some steps.
When using a WiFi network just for Internet access from the board, a dynamic IP address often is simpler. For this, you could add a WiFi network with DHCP by writing a few more lines in the network interface file:
auto wlan0
iface wlan0 inet dhcp
    wpa-ssid "mynetwork"
    wpa-psk  "sesameopen"
Now if you run:
# ifconfig
We see the basic subnet 255.255.255.0.
There are some special IP addresses—for example, 192.168.0.1, most routers’ default IP.
Many humans prefer dealing with words rather than numbers. As such, a “domain name service,” or DNS, helps to map IP addresses to domain names. To set the name of a device, you can use:
# hostname device1
To permanently change the hostname of a device, you must set the hostname in a file in /etc/hostname.
To check that the hostname changed, write:
# hostname
upboard
After changing the hostname, it is a good idea to reboot the board. You can then check that the IP address of the device maps correctly to the new device name:
127.0.0.1    localhost.localdomain localhost
127.0.1.1    device1
Debugging Network Settings
Some Unix tools are especially helpful to debug network settings.
For example, you want to see what network services are running on the board. For this, you can use the Unix command:
$ netstat -tulpn
To see if you can reach some other device in the network, it can be helpful to “ping” the device. One of the best ways to understand what is going on is to simply ping a server:
$ ping google.com
You can also follow the route of packets with traceroute:
$ traceroute google.com
You can find more information at http://www.unixdude.org/2012/12/use-traceroute-to-check-for-open-ports.
Running Node.js
For the Linux distributions above, there is good support for Node.js.
For example, for Debian, you can install Node.js with its package manager dpkg. Another option is aptitude. Installing Node.js with aptitude is as simple as:
$ apt-get update
$ apt-get install nodejs
The Node Version Manager, nvm, is also supported on some boards.
Deploy Projects with Git
It can take patience to configure and boot an SBC to get the first LED to blink with JavaScript. With a complete filesystem and hardware for Internet, some more scripts and tools are useful.
A tool for version control can help to synchronize the state of a project between devices or to copy a project from your laptop to an embedded device. Basically, this does the same thing as the Tessel 2 commands from Chapter 4 (t2 run or t2 push).
Note
If you are new to Git, take a look at https://git-scm.com. The basic commands are git init, git add, and git commit. Once you have added and committed code to a repository, you can track the project history with git log. What makes Git especially interesting is its capacity to work with remote repositories. You can easily apply the same concepts that you find at GitHub or Heroku to working with embedded devices.
First, on a remote device, let’s initialize a bare Git repository. For example, on an Edison, this could look like:
$ ssh root@eddie.local
# mkdir -p git/led13.git && cd $_
# git init --bare
Initialized empty Git repository in /home/root/projects/buttons/git/led13.git/
A bare repository looks more like a database than a copy of a project. However, the bare repository can be addressed from other places, and once you update it, you can push changes automatically to copies of the repository.
Let’s try this. First, you clone the bare repository on the device:
# cd projects
# git clone /home/root/git/led13.git
For automatic updates, let’s create a post-receive hook for automatic deployment.
# cat > hooks/post-receive
#!/bin/sh
cd /home/root/projects/led13
unset GIT_DIR
git pull
echo "post receive finish"
The post-receive hook is executed as soon as there are new objects in the repository. In this example, we update the repository in /home/root/projects/led13 with a git pull command.
To let Git run the script, you must make it executable with:
# chmod u+x hooks/post-receive
Let’s now test that this works by pushing a JavaScript file to the device via the repositories above.
First, clone the bare repository on your local machine:
$ git clone ssh://root@eddie.local:/home/root/git/led13.git
Next, let’s init the project by creating a file package.json:
$ npm init
This utility will walk you through creating a package.json file.
It only covers the most common items, and tries to guess sensible defaults.
See `npm help json` for definitive documentation on these fields
and exactly what they do.
Use `npm install <pkg> --save` afterwards to install a package and
save it as a dependency in the package.json file.
Press ^C at any time to quit.
name: (inputs)
version: (1.0.0)
description:
entry point: (index.js)
test command:
git repository:
keywords:
author:
license: (ISC)
You can answer all questions with “yes” by running:
$ npm init -y
Next, you add this file to the repository with:
$ git add .
$ git commit -m "init"
$ git push origin master
You can see that after pushing the commit to the embedded device, the post-receive script is executed. If you now log in to that device and check the directory, you can check the latest commit with:
# git log