Table of Contents for
Node.js for Embedded Systems
 Node.js for Embedded Systems
Published by
O'Reilly Media, Inc., 2016
Node.js for Embedded Systems
Published by
O'Reilly Media, Inc., 2016
- Cover
- nav
- Node.js for Embedded Systems
- Node.js for Embedded Systems
- Foreword
- Preface
- 1. Connecting Worlds
- 2. Blink with Arduino
- 3. Espruino
- 4. The Tessel 2
- 5. Particle Photon
- 6. Single-Board Computers
- 7. Components for Prototyping
- 8. Node.js Libraries for Hardware
- 9. Exploring Network Protocols
- 10. Web Frontends for Things
- 11. Entering the Cloud
- 12. Making Robots with Node.js
- 13. Wireless Data with Bluetooth
- 14. Toward the Physical Internet
- 15. From Products to Toolkits
- A. Node.js
- B. Early Hardware for IoT Systems
- Index
- About the Authors
- Colophon
Chapter 9. Exploring Network Protocols
Network protocols are an important piece of a connected system. Network protocols define rules about how devices at different locations should communicate.
Using a weather station as an example, we will discuss different roles that devices can play in a network. The Hypertext Transfer Protocol (HTTP) is based on requests and responses.1 When a weather display requests information from a server, the embedded device acts as client. When an embedded device provides weather data, it can act as server. Sometimes, a device can be both client and server.
While HTTP is stateless, other network protocols support maintaining “connections” between devices. For example, with the transmission control protocol (TCP) or websockets, transmissions of data packets can happen without prior requests. The WebSocket protocol is particularly popular for pushing data to a web browser—for example, whenever new data is available.
In the Node.js ecosystem, there are libraries to work with all kinds of network protocols. Support for HTTP and TCP comes in the form of Node.js core modules. For the WebSocket protocol, you can fetch open source libraries via npm.
Another important network protocol is the MQTT protocol, which is used to send messages across networks. MQTT will be discussed in Chapter 11 in the context of cloud services for connected devices.
The Hypertext Transfer Protocol
HTTP describes the transfer of state between client and server. HTTP is one of the pillars behind the World Wide Web. With HTTP, an embedded device can answer requests from other places in a network, or it can itself send updates or fetch instructions from a server.
Requesting the Weather
Due to their simplicity, weather displays and stations offer an easy-to-understand illustration of the usage of requests and responses of HTTP with embedded devices. On the hardware side, you could build a simple weather display with Grove components (discussed in Chapter 7). Another option would be to buy a small display and temperature/humidity sensors from eBay, SparkFun, or Adafruit and solder them together.
Gathering the components for a weather display might take some time. In the meantime, you can study its functions by looking at the weather app on your smartphone first. What happens if you request the weather for a certain location?
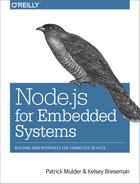
As you can see on the left side of Figure 9-1, your smartphone acts as a user agent that requests weather data from a public weather database. The smartphone is an “output” device that consists of a display and a network connection.
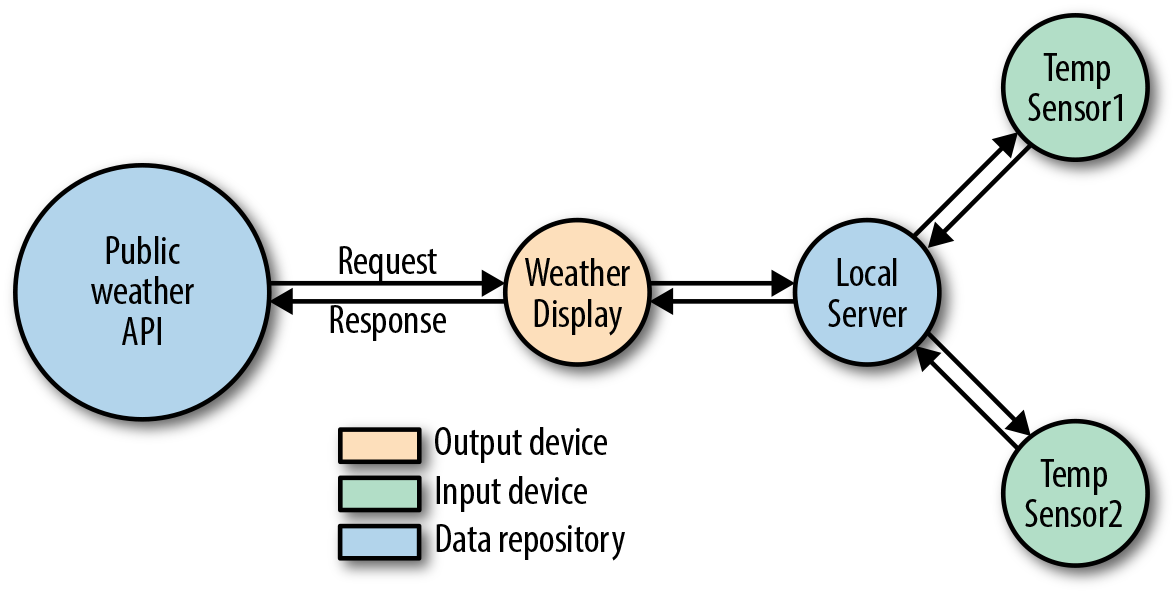
Figure 9-1. Weather information comes from different locations and has different outputs (displays) and inputs (sensors)
By adding “input” devices with sensors, you could connect your own weather stations to a weather display. This is shown on the right side of Figure 9-1.
Input and output devices do not translate directly to requests and responses of HTTP. According to RFC2616, responses provide a status code and an information body. It is this information body that should be processed and rendered on the display.
JavaScript allows you to prototype a weather display in a web browser, on the command line, and on the embedded devices. Instead of a web browser, the Node.js script acts as “user agent.” The script requests the weather station on behalf of the user. Different weather displays can fetch weather data from the same (public) database as shown in Figure 9-2.
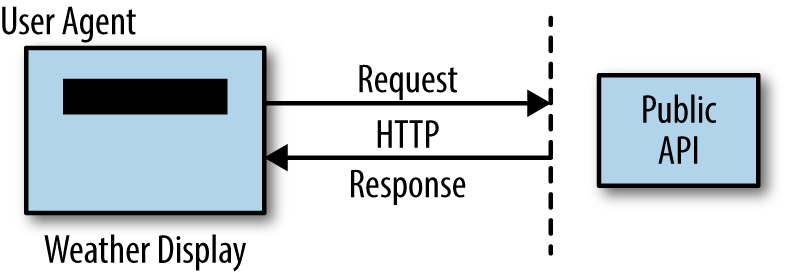
Figure 9-2. Clients for weather data and weather stations
There are different public databases that provide weather data. And at npm you will find different modules to work with weather data. A good option is weather-js.
In a new directory, you first initialize the project and install the module with:
$ npm init -y
$ npm install weather-js
Next, you can set up a script to fetch the weather data from the MSN weather forecast service:
// hello_weather.jsvarweather=require('weather-js');varlocation='Paris, France';vardegreeType='C';weather.find({search:location,degreeType:degreeType},function(err,result){if(err){console.log(err);process.exit(0);}console.log(result);});
Behind the scenes, the Node.js modules request and xml2js make an HTTP request and provide the response as a JSON object. Before attaching an embedded device to interact with the weather, let’s quickly check that the API works from the command line.
If you run:
$ node hello_weather.js
You’ll see:
current:
 { temperature: '10',
   skycode: '31',
   skytext: 'Clear',
   date: '2016-03-27',
   observationtime: '22:00:00',
   observationpoint: 'Paris, Paris, France',
   feelslike: '7',
   humidity: '66',
   winddisplay: '28 km/h South',
   day: 'Sunday',
   shortday: 'Sun',
   windspeed: '28 km/h',
   imageUrl: 'http://blob.weather.microsoft.com/static/weather4/en-us/law/31.gif' },
forecast: ...
The next step is to allow users of an embedded device to fetch weather data with the press of a button. Instead of the computer console, we want to display the result to an output (i.e., a screen).
Putting together hardware for a weather display with an Arduino can be as simple as the setup shown in Figure 9-3. You can connect a button to D4 on a Grove shield and an LCD display to the I2C bus.
Figure 9-3. Arduino with push button and LCD display
Programming the screen on a button press is similar to the examples from the previous chapters. With the Johnny-Five library, it looks like this:
$ npm install --save johnny-five
Then, capture a button press as follows:
// weather_display.jsvarfive=require('johnny-five');varboard=newfive.Board();board.on('ready',function(){varbutton=newfive.Button(4);// To display weather informationvarlcd=newfive.LCD({controller:"JHD1313M1"});// Update screen on button pressbutton.on('press',function(){console.log('press');lcd.clear();lcd.("hello");});});
Last, you can add the hello_weather.js script to the Johnny-Five Arduino wrapper:
// weather_display.jsvarweather=require('weather-js');varlocation='Paris, France';vardegreeType='C';varfive=require('johnny-five');varboard=newfive.Board();board.on('ready',function(){varbutton=newfive.Button(4);varlcd=newfive.LCD({controller:"JHD1313M1"});// on press, fetch the weatherbutton.on('press',function(){lcd.clear();weather.find({search:location,degreeType:degreeType},function(err,result){if(err){console.log("problem fetching weather");console.log(err);process.exit(0);}lcd.cursor(0,0).(location);lcd.cursor(1,0).("temp: "+result[0].current.temperature);});});});
If successful, you’ll see the temperature of the requested place on the LCD.
Prepare the HTTP Client
Before building your own HTTP server that acts as a weather station, it is a good idea to prepare an API client for testing. As shown in Figure 9-4, an API client handles GET requests to fetch state, and POST requests to update state.
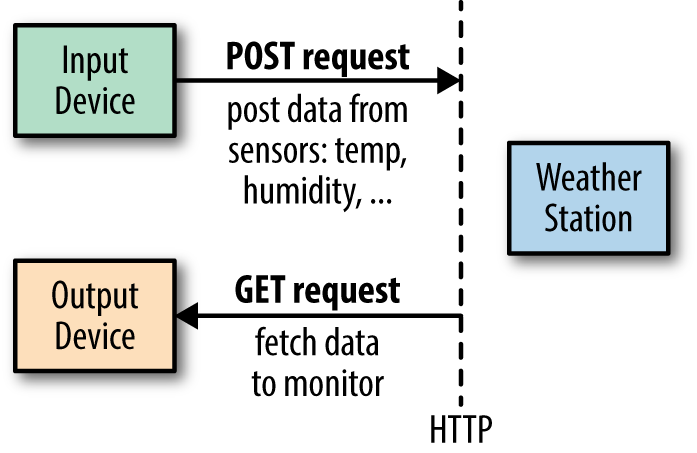
Figure 9-4. Different usages for POST and GET requests
On npmjs.com, you’ll find many libraries that help you write custom HTTP clients. The most popular are request and superagent. We’ll use request as it is one of the most popular Node.js modules.
In a new project, install the request module with:
$ npm install --save request
A get request allows you to fetch data via a uniform resource locator (URL).
To have a script act as a user agent:
// get_request.jsvarrequest=require('request');// take url from command linevarurl=process.argv[2];if(!url){console.log('You must add a path.');}console.log('GET url: '+url);varheaders={'User-Agent':'Sensor Agent'};request.get(url,{headers:headers}).on('error',function(err){console.log(err)}).pipe(process.stdout);
On Linux systems, you can make the code executable with the hash-bang syntax. In front of the script, you can add:
#!/usr/bin/env node
Now to test this agent, let’s query data from the book website:
$ ./simple_agent.js http://embeddednodejs.com/dummy_data.json
GET url: http://embeddednodejs.com/dummy_data.json
[{"time":"00:00", "data": 0}, {"time":"11:11", "data": 1}]
Similarly, you can invoke POST and PUT requests:
// post_requestvarrequest=require('request');// the URL for the weather station to comevarurl="http://localhost:4000/measurements";varheaders={'User-Agent':'Sensor Agent','content-type':'application/json'};vardata={temp:25};request({url:url,method:'POST',form:data,headers:headers}).on('error',function(err){console.log(err)}).pipe(process.stdout);
You can automate running scripts to fetch or post data with forever:
$forever start -o log.txt --spinSleepTime1000get_request.js$npm install -g forever
Building a Weather Station
A weather station should manage weather data from multiple sensor devices. For this, it must deal with a couple of paths or HTTP routes to manage measurements at a weather station, as illustrated in Figure 9-5. To store data, the server must process POST requests from a sensor device. To display data, the server should response to GET requests.
Let’s start by creating a web server locally on your laptop. Later, you can transfer the web server to a device with embedded Linux.
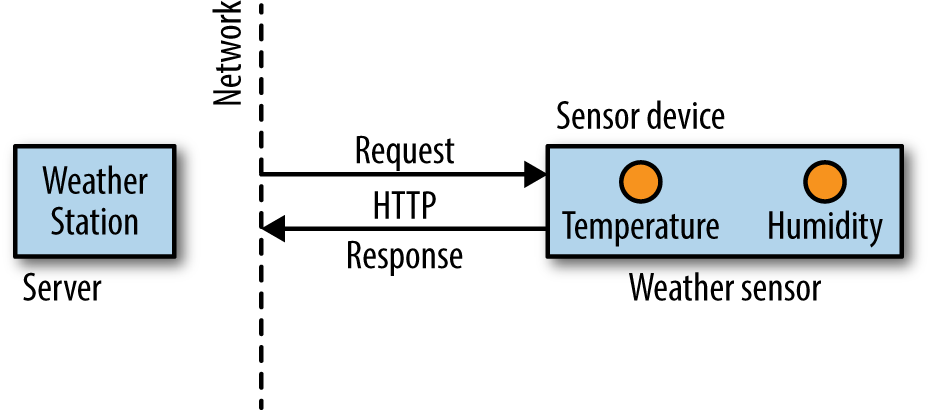
Figure 9-5. A weather station can process requests from sensor devices
You can set up a file weather_server.js as follows:
// weather_server.jsvarexpress=require('express');// to create a servervarmorgan=require('morgan');// to log HTTP requestsvarbodyParser=require('body-parser');// to process incoming POST requestsvarport=4000;// create servervarapp=express();app.use(morgan('combined'));app.use(bodyParser.urlencoded({extended:false}));// basic routesapp.get('/',function(req,res){res.writeHead(200);res.write('weather station is up');res.end();});// measurementsapp.get('/measurements/:measurement_id',function(req,res){res.writeHead(200);res.write('data from measurement');res.end();});app.post('/measurements',function(req,res){console.log('temp is: '+req.body.temp);res.writeHead(200);res.write('storing data.');res.end();});varserver=app.listen(port);
The first thing we do is create a server. In this example, the Express.js framework is used. To log HTTP requests, the middleware morgan is used. To process data from incoming POST requests, the middleware bodyParser is added as well.
Note
There are plenty of server frameworks that can help you automate the basic setup of a server, including Hapi.js and Meteor. For a nice overview of web servers, check out “Node.js Frameworks: The 10 Best for Web and Apps Development”.
After the middleware, a number of routes for HTTP requests are added—for example, requests to receive information about a measurement and requests to process POST requests from sensor agents.
Note that the req and res objects of the route callbacks are called streams. This means that to build a response, you write res.write(). To end the processing, you need to close the request with res.end() to transport the response back to the client.
To see this server in action, you must start the server with:
$ node weather_station
Then you can navigate your browser to localhost:4000. Or, you can send a request with the user agent from the previous section:
$ node get_measurements
[]
An empty response is expected as the weather station is not yet recording data.
If you have a Tessel 2, you can follow a nice walkthrough to a web server project here: http://tessel.github.io/t2-start/webserver.html. The Tessel 2 web server also supports websockets, which will be discussed later in this chapter.
Adding a Database
To store data from a sensor in the weather station, you need a database. A simple database for embedded devices is SQLite. SQLite is a file-based relational database management system (RDBMS). You can install and run SQLite with embedded Linux.
To connect to the database from JavaScript, you need a connection manager. In Node.js, a good choice is Knex. You can install it as follows:
$ npm install -g knex
$ npm install --save knex
$ npm install --save sqlite3
With the next step, you init a config file for the database connection:
$ knex init
Created ./knexfile.js
The config file can be adapted to your needs. In this case, let’s only use the development version:
// knexfile.js// update with your config settings.module.exports={development:{client:'sqlite3',connection:{filename:'./dev.sqlite3'}}};
After the database connection is established, Knex provides tools to easily manage tables in a database. For the simple weather station, the plan is to use a database schema with two tables.
One table tracks measurements from a device and another table stores data snapshots from the sensors. In the language of SQL, this means a measurement has many snapshots and a snapshot belongs to a measurement.
To build this schema, Knex can help with simple scripts:
$ knex migrate:make createMeasurements
Then, you add the table data:
// migrations/createMeasurementsvartable=function(t){t.increments().primary();t.string('name');t.string('comment');t.timestamps();}exports.up=function(knex,Promise){returnknex.schema.createTable('measurements',table).then(function(){console.log('Measurements table is created!');});};exports.down=function(knex,Promise){returnknex.schema.dropTable('measurements',table).then(function(){console.log('Measurements table was dropped!');});};
The snapshots table can be created with:
$ knex migrate:make createSnapshots
Then you need to define a schema for the snapshots as follows:
vartable=function(table){table.increments().primary();table.integer('time');table.integer('temp');table.integer('measurement_id').references('id').inTable('measurements');table.timestamps();}exports.up=function(knex,Promise){returnknex.schema.createTable('weather_events',table).then(function(){console.log('weather events table is created!');});};exports.down=function(knex,Promise){returnknex.schema.dropTable('weather_events',table).then(function(){console.log('weather events table was dropped!');});};
To use this connection from other scripts, you need to add “models” with the Bookshelf.js ORM. For a simple weather station, two models will do: one for measurements and one for weather snapshots. Here is the measurements snapshot:
// models/measurement.js// load the database configvarbookshelf=require('../config');varSnapshot=require('./snapshot');varMeasurement=bookshelf.Model.extend({tableName:'measurements',hasTimestamps:true,snapshots:function(){returnthis.hasMany('Snapshot');}});module.exports=bookshelf.model('Measurement',Measurement);
Next, the weather snapshot:
// models/snapshot.js// load the database configvarbookshelf=require('../config');varMeasurement=require('./measurement');varSnapshot=bookshelf.Model.extend({tableName:'snapshots',hasTimestamps:true,measurements:function(){returnthis.hasMany('Measurement');}});module.exports=bookshelf.model('Snapshot',Snapshot);
To test this setup, you can create scripts to add new measurements and snapshots to the database:
// scripts/add_measurement.jsvarbookshelf=require('./config');varMeasurement=require('./models/measurement');varmeasurement=Measurement.forge({name:'Sensor 1'});measurement.save().then(function(){returnbookshelf.knex.destroy();});
Then run:
$ node scripts/add_measurement.js
Now, you can see an entry in the database:
$sqlite3 dev.sqlite3 SQLite version 3.8.10.2 2015-05-20 18:17:19 Enter".help"forusage hints. sqlite>select* from measurements;1|Sensor 1||1461187585457|1461187585457
And a similar script to add snapshots:
// scripts/add_measurement.jsvarbookshelf=require('../config');varSnapshot=require('../models/snapshot');varsnapshot=Snapshot.forge({measurement_id:1,temp:23});snapshot.save().then(function(){returnbookshelf.knex.destroy();});
Last, you need to integrate the database with the web server. Connecting the parts in file server.js can look like this:
// server_with_db.jsvarexpress=require('express');varbodyParser=require('body-parser');// connect with dbvarbookshelf=require('./config');varMeasurement=require('./models/measurement');varport=4000;varapp=express();app.use(bodyParser.urlencoded({extended:false}));// basic routesapp.get('/',function(req,res){res.writeHead(200);res.write('server is running');res.end();});// measurementsapp.get('/measurements/:measurement_id',function(req,res){res.writeHead(200);Measurement.collection().fetch({withRelated:['snapshots']}).then(function(collection){returncollection.mapThen(function(model){returnmodel.toJSON();})}).then(function(results){res.write(JSON.stringify(results,null,' '));res.end();}).catch(function(e){console.log(e);res.write('problem');res.end();});});app.post('/measurements',function(req,res){varsnapshot=Snapshot.forge({measurement_id:req.body.id,temp:req.body.temp});snapshot.save().then(function(){res.writeHead(200);res.write('snapshot saved');res.end();}).catch(function(err){res.writeHead(200);res.write('problem saving snapshot');res.write(err);res.end();});});app.post('/measurements/:id',function(req,res){varsnapshot=Snapshot.forge({measurement_id:req.body.id,temp:req.body.temp});snapshot.save().then(function(){res.writeHead(200);res.write('snapshot saved');res.end();}).catch(function(err){res.writeHead(200);res.write('problem saving snapshot');res.write(err);res.end();});});varserver=app.listen(port);
Now, the whole setup can be tested with the user agents from the weather display. To test this, you run:
// get measurements$nodeget_measurements.jsGETurl:http://localhost:4000/measurements/1[{"id":1,"name":"Sensor 1","created_at":1461188045864,"updated_at":1461188045864,"snapshots":[{"id":1,"temp":23,"measurement_id":1,"created_at":1461188049036,"updated_at":1461188049036}]}
Now you can post weather data from different places in a network. Let’s take a look at how to post data from embedded devices to the measurement station.
The Transmission Control Protocol and User Datagram Protocol
While HTTP is very popular, there are more efficient network protocols for transporting data from sensors, including the Transmission Control Protocol (TCP) or the User Datagram Protocol (UDP).
TCP and UDP are very similar. The main difference is that TCP provides feedback on whether a packet was received, whereas UDP is “fire-and-forget,” meaning a server does not know whether a client received the data. UDP can be a good choice when you want to stream data from sensors where you know that data redundancy is high enough. For example, if you are simply sending temperature readings from a room to a monitoring station, the “cheap” data transmissions from UPD might be acceptable.
Assuming an Intel Galileo connected via Ethernet, you can easily send UDP packages with the following server:
varfive=require('johnny-five');varGalileo=require('galileo-io');varboard=newfive.Board({repl:false,io:newGalileo});vardgram=require('dgram');varserver=dgram.createSocket('udp4');varport=9888;varserver,temperature;board.on("ready",function(){startupServer();temperature=0;// measure temperature with Grove sensorvartemperature=newfive.Thermometer({controller:'GROVE',pin:"A1"});temperature.on("data",function(){if(temperature===Math.round(this.celsius)){return;}varmessage=''+temperature;temperature=Math.round(this.celsius);})})// send temperaturefunctionsendTemperature(server,remote){varmessage=newBuffer('Time: '+(newDate())+' Temp: '+temperature+'\n');server.send(message,0,message.length,remote.port,remote.address,function(err,bytes){if(err){console.log(err);}else{console.log('tx: '+message);}});}functionstartupServer(){// handle main events from serverserver.on('listening',function(){varaddress=server.address();console.log('UDP Server listening on '+address.address+":"+address.port);});server.on('close',function(){console.log('Client closed connection');});server.on('message',function(message,remote){for(vari=0;i<10;i++){sendTemperature(server,remote);}});// bind server to portserver.bind(port);}
And on the client, you can have:
// subscribe_udp.jsvardgram=require('dgram');varclient=dgram.createSocket('udp4');varaddress='galileo';varport=1288;client.on('message',function(message,remote){console.log(remote.address+':'+remote.port+' - '+message);client.close();});varmessage=newBuffer('request temp');client.send(message,0,message.length,port,address,function(err,bytes){if(err)throwerr;console.log('UDP message sent to '+address+':'+port);});
If you now start the processes on both sides, you get:
$ node subscribe_udp.js
UDP message sent to galileo:1288
192.168.3.102:1288 - Time: Mon Jan 04 2016 20:40:25 GMT+0000 (UTC)  Temp: 21
Using Node.js modules, you can explore protocols and messages on a high level. Once your system works, it is possible to optimize other parameters such as system cost or size.
The WebSocket Protocol
Another important protocol for data transport is the WebSocket Protocol (RFC6455). In contrast to TCP and UDP, websockets is an application-level protocol that solves some problems with HTTP. Websockets are extensively used for building real-time web applications and have two advantages over using HTTP:
-
Websockets add less communication overhead to a network because they do not use headers for every communication request.
-
With websockets, you can listen for certain messages and push state directly to a client.
The examples using HTTP do not “automatically” update the state of an device. As a result, a user must fetch state “manually.” For many situations, we want to broadcast data from an embedded device. This is when pushing state with websockets becomes interesting.
Note
A number of Node modules for websockets exist. One interesting library is socket.io, which offers a number of fallbacks when websockets are not available. Websockets is one possible transport for socket.io (others are flashsocket, html file, xhr-polling, and jsonp-polling).
The WebSocket protocol negotiates over HTTP if an existing HTTP connection can be upgraded to bi-directional communication via a handshake. After a successfull handshake, client and server can send and receives messages at will.
The ws Module
To start, we are going to use the ws module. Install the module with:
$ npm install --save ws
Websockets provide bidirectional communication, which means you can send and receive messages with websockets. This is nice to control device outputs or to receive data from inputs such as sensors.
You can explore the workings of websockets for embedded devices with an Arduino and LED attached. To push data from that device with websockets, write the following:
varfive=require('johnny-five');varhttp=require('http');varport=4000;varboard=newfive.Board({repl:false});// set up WebSocketServer to push bytesfunctionsetupServer(board){// import a websocket servervarWebSocketServer=require('ws').Server;// prepare servervarserver=http.createServer(function(req,res){res.write('ok');res.end();}).listen(port);varwss=newWebSocketServer({server:server});// connection is set upwss.on('connection',function(ws){console.log('websocket connected');// incoming messagesws.on('message',function(message){console.log('received: %s',message);varstate=parseInt(message);state==1?board.led.on():board.led.off();});});}// start up connectionboard.on('ready',function(){this.led=newfive.Led(3);setupServer(this);});
To test websockets from the command line, you can install a nice command-line tool called wscat:
$ npm install -g wscat
And run:
$wscat -c ws://localhost:4000 connected(press CTRL+C to quit)> 1 > 0
This should result in switching the LED on the embedded device. Similarly, you can “push” bytes from an embedded device to a websockets client. To see how this works, connect a button to the Arduino on pin 4.
Then you can add a button to the board object as follows:
board.on('ready',function(){this.button=newfive.Button(9);setupServer(this);});
And, hook into the button press event:
// set up WebSocketServer to push bytesfunctionsetupServer(board){varWebSocketServer=require('ws').Server;// prepare servervarserver=http.createServer(function(req,res){res.write('ok');res.end();}).listen(port);varwss=newWebSocketServer({server:server});wss.on('connection',functionconnection(ws){console.log('websocket connected');board.button.on('press',function(){ws.send('button push');});});}
To see how it works, you simply make a connection to the web server. Now you can observe events from the button:
$wscat -c ws://localhost:4000 connected(press CTRL+C to quit)< button push < button push < button push
Instead of the command-line tool wscat, you can write a small client with the ws module as follows:
varWebSocket=require('ws');varclient=newWebSocket('ws://localhost:4000');client.on('open',function(){client.on('message',function(){console.log('push');});});
Websockets are also handy to communicate between an embedded device and a web browser. Connections to the web browser will be explored in the next chapter.
Remote Procedure Calls over Websockets
Based on the WebSocket protocol, you build a medium for remote procedure calls (RPCs). With RPCs, you can invoke methods on objects that come from other devices. Figure 9-6 illustrates how this can be useful.
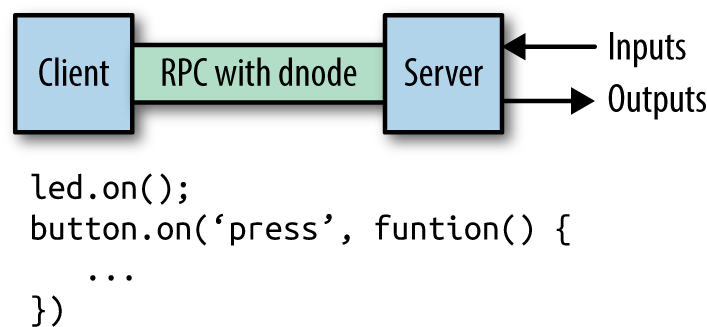
Figure 9-6. With RPCs, you can invoke functions from remote servers attached to outputs (LEDs, displays) and inputs (sensors)
To begin, take a simple board setup with an LED attached. Without RPCs involved, you can only control the objects within the scope of a script. The initial setup might look like this:
// led_control.jsvarport=4000;// set up boardvarfive=require('johnny-five');// select a board adapter// var Edison = require('edison-io');// var Galileo = require('galileo-io');// var BeagleBone = require('beaglebone-io');varboard=newfive.Board({// add the adapter here// io: new Galileo()});board.on("ready",function(){varled=newfive.Led(3);this.repl.inject({led:led});});
You can use the LED object on the device with the following commands:
# node led_control.js
1452444373827 Device(s) Intel Galileo Gen 2
1452444373883 Connected Intel Galileo Gen 2
1452444373969 Repl Initialized
>> led.on();
Now, with RPCs you can call the LED object from a different location and context in a network. To see how this works, you must build a web server with support for RPC.
One option is to use the dnode module by James Halliday. You can install this with:
$ npm install --save dnode
Then, wire up the server as follows:
// dnode_server.js// port to listen tovarport=4000;// set up boardvarfive=require('johnny-five');// board adapters// var Edison = require('edison-io');// var Galileo = require('galileo-io');// var BeagleBone = require('beaglebone-io');varboard=newfive.Board({repl:false});board.on("ready",function(){// place the pin connected to an LEDthis.led=newfive.Led(13);// now start up serverstartupServer(this);});functionstartupServer(board){vardnode=require('dnode');varnet=require('net');// create local web servervarserver=net.createServer(function(conn){// set up RPC objectsvarrpc=dnode({// these functions can be invoked from other placesledOn:function(){console.log('on');board.led.on();},ledOff:function(){board.led.off();}});// connect local dnode objects with remoteconn.pipe(rpc).pipe(conn);});server.listen(port,function(){console.log('Server running on port: '+port);});}
And the client:
// dnode_client.jsvarnet=require('net');vardnode=require('dnode');varport=4000;varrpc=dnode();rpc.on('remote',function(remote){remote.ledOn();// this function will be invoked on the server});varconn=net.connect(port,'galileo');conn.pipe(objects).pipe(conn);
Now you can turn the LED on and off from other places if you run:
$ node dnode_client.js