Table of Contents for
Node.js for Embedded Systems
 Node.js for Embedded Systems
Published by
O'Reilly Media, Inc., 2016
Node.js for Embedded Systems
Published by
O'Reilly Media, Inc., 2016
- Cover
- nav
- Node.js for Embedded Systems
- Node.js for Embedded Systems
- Foreword
- Preface
- 1. Connecting Worlds
- 2. Blink with Arduino
- 3. Espruino
- 4. The Tessel 2
- 5. Particle Photon
- 6. Single-Board Computers
- 7. Components for Prototyping
- 8. Node.js Libraries for Hardware
- 9. Exploring Network Protocols
- 10. Web Frontends for Things
- 11. Entering the Cloud
- 12. Making Robots with Node.js
- 13. Wireless Data with Bluetooth
- 14. Toward the Physical Internet
- 15. From Products to Toolkits
- A. Node.js
- B. Early Hardware for IoT Systems
- Index
- About the Authors
- Colophon
Chapter 5. Particle Photon
When cost or power put constraints on your hardware design budget, working with microcontrollers can be a relevant option. With a special transceiver chip for Internet access, boards such as the Particle Photon can, for example, act as sensor nodes in a room. Of interest to the book, much of the Particle toolchain is developed in JavaScript. This sets the background for this chapter.
The Particle (formerly Spark.io) family of boards talks to networks with different chips. The Photon board uses a WiFi chip from Broadcom (BCM43362) that handles the WiFi RF and protocol layer. Besides boards with WiFi, there are Particle boards that support 3G cellular networks.
The Particle Photon
From the perspective of the physical layer, an embedded device can either support Internet access on the same chip (as the Tessel 2 shows) or with specialized chips that handle the Internet connection.
In this chapter, let’s look at a strategy to add building blocks for WiFi with an external chip such as the Particle Photon. The Particle Photon has a small form factor and low power consumption. But as with much of engineering, there are tradeoffs in selecting the “best” approach. From a JavaScript viewpoint, the Particle Photon is interesting because of its Node.js-based toolchain to develop applications with a Photon. The Particle Photon is shown in Figure 5-1.
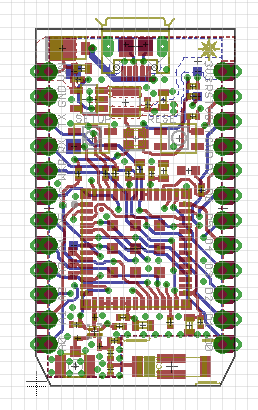
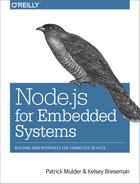
Figure 5-1. The Photon Particle board
While the WiFi chip handles Internet connectivity, an STM32 microcontroller handles the main application. The Particle boards use a “real-time operating system” FreeRTOS to manage device access and user code. With this approach, you can flash a Particle Photon with user code via the WiFi.
The boards from Particle are designed for products that are connected to the Internet. To improve the development experience for connected devices, Particle provides a web IDE to develop applications. With this platform, you can flash a device “over-the-air” (OTA). Alternatively, there is a downloadable IDE called Particle Dev, which is based on GitHub’s Atom project.
Note
Particle and Arduino have some similar ideas about how open source communities can support innovation and product development. Similar to Arduino, you can find Particle board layouts on GitHub. Sharing toolchains and layouts leads to new products. One such product that is compatible with both Arduino and the Particle Photon is the Redbear Duo from Redbear Labs. The Redbear Duo can be connected to the Particle cloud and can be programmed with the Arduino IDE.
The Particle cloud and boards come with a cloud-based messaging platform that lets you easily send messages to—and from—the devices in a secure way regardless of where you are. That platform is included for free.
The current Particle boards support different libraries from the Arduino ecosystem. But Particle is not a completely Arduino-compatible product; you can’t (yet) use the Arduino IDE, and Particle products have a different footprint. The boards are more similar to an Arduino Nano than Uno.
Many of the tools in the Particle toolchain are based on Node.js. Let’s review how that works.
Particle Command-Line Interface
First, you must install the Particle command-line tools via npm. This is done with:
$ npm install -g particle-cli
With this, you have access to your particle via USB:
$ particle
Welcome to the Particle Command line utility!
Version 1.9.1
https://github.com/spark/particle-cli
Usage: particle <command_name> <arguments>
Common Commands:
setup, list, call, get, device, identify, flash, subscribe
compile, monitor, login, logout, help
Less Common Commands:
    token, binary, cloud, config, function, keys, serial, udp
    update, variable, webhook, wireless
For more information Run: particle help <command_name>
Next, you must set up the board, with the setup command:
$ particle setup
                  _   _      _        _
 _ __   __ _ _ __| |_(_) ___| | ___  (_) ___
| '_ \ / _` | '__| __| |/ __| |/ _ \ | |/ _ \
| |_) | (_| | |  | |_| | (__| |  __/_| | (_) |
| .__/ \__,_|_|   \__|_|\___|_|\___(_)_|\___/
|_|                     https://particle.io/
> Setup is easy! Let's get started...
> It appears as though you are already logged in as hello@embeddednodejs.com
? Would you like to log in with a different account? No
One indicator of the state of the board is the blink of the RGB color LED:
! PROTIP: Hold the MODE/SETUP button on your device until it blinks blue!
! PROTIP: Please make sure you are connected to the Internet.
Then you get asked some questions about your Internet connection:
> I have detected a Photon connected via USB.
? Would you like to continue with this one? Yes
! The Photon supports secure Wi-Fi setup. We'll try that first.
? Found "Photon-PRVL". Would you like to perform setup on this one now? Yes
> Obtained magical secure claim code.
> Hey! We successfully connected to Photon-PRVL
> Now to configure our precious Photon-PRVL
> Wi-Fi Network: TheWiFi
> Password: letsconnect
> Security: WPA2 AES
? Would you like to continue with the information shown above? Yes
> Obtaining device information...
> Setting up device id 2B003.......
> Requesting public key from the device...
> Setting the magical cloud claim code...
> Telling the Photon to apply your Wi-Fi configuration...
> The Photon will now attempt to connect to your Wi-Fi network...
To check that your device is working, run the following:
$ particle list
<no name> [2b00350013473.....] (Photon) is online
  Functions:
    int digitalread(String args)
From now on, you can program your device via the web IDE.
OTA Code Deploys
After you have set up a Particle device, you can use the Particle platform build.particle.io to deploy code via the network. These wireless firmware updates are called “over-the-air” updates. A simple example is shown in Figure 5-2.
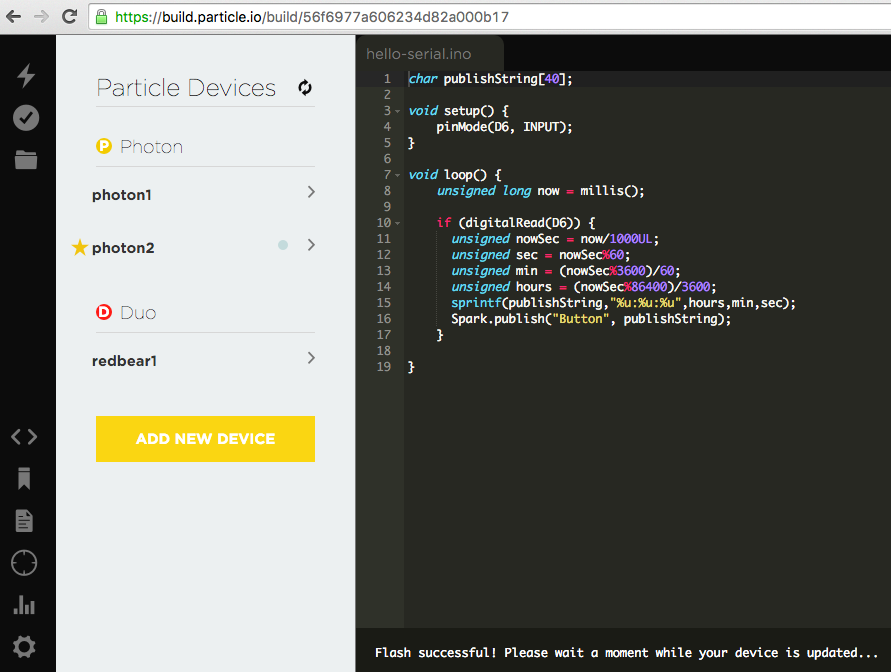
Figure 5-2. The platform build.particle.io allows you to update firmware over the air
As a basic example for using the Particle toolchain, consider a simple button connected to the Particle Photon via Grove connectors, as shown in Figure 5-3.
Figure 5-3. A Particle Photon with Grove headers
You can use the following code to capture the input press and publish an event to the Particle cloud:
// publishTime.ino
char publishString[40];
void setup() {
    pinMode(D6, INPUT);
}
void loop() {
    unsigned long now = millis();
    if (digitalRead(D6)) {
      unsigned nowSec = now/1000UL;
      unsigned sec = nowSec%60;
      unsigned min = (nowSec%3600)/60;
      unsigned hours = (nowSec%86400)/3600;
      sprintf(publishString,"%u:%u:%u",hours,min,sec);
      Spark.publish("Button", publishString);
    }
}
Next, you must update the firmware on the Particle Photon. When you now press the button, you can see events from the boards in the dashboard of build.particle.io, as shown in Figure 5-4.
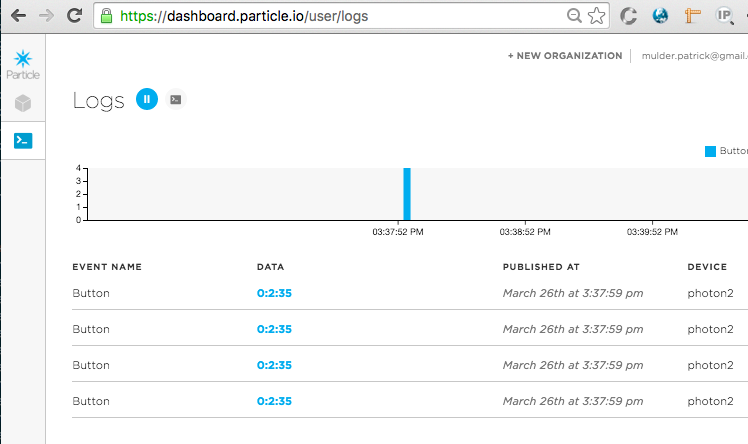
Figure 5-4. Events from a button press
The same events can be accessed through the Particle API from any web page.
Node.js for the ESP8266
Another popular approach to connecting a microcontroller to the Internet involves using ESP8266-based boards. This chip is one of the cheapest approaches to controlling physical objects through the Internet. However, the ESP8266 requires some more hardware skill and a bit more time to get started. For example, with some ESP8266 boards, you must solder special boards to flash the device and install a number of extra tools. Some projects, such as the NodeMCU, try to solve this problem.
If you want to explore ESP8266 development with Node.js, a good place to start is https://github.com/thingsSDK/flasher.js.