Chapter 3
Using PowerPoint in Forensic Presentations
This chapter discusses aspects of using PowerPoint 2007 for the presentation of the results of forensic analytic tests. PowerPoint has many features that make it a useful complimentary tool for forensic analytics. There are three activities related to forensic investigations where presentations come into play. The activities are:
1. Presenting the results of a forensic investigation to executive management.
2. Presenting the results of a fraud risk assessment study to managers and executive management.
3. Presenting the techniques and results of forensic or continuous monitoring techniques, methods, and systems to colleagues at an in-house retreat or to accounting professionals at a conference.
Even though each of these activities is related to forensic matters, the presentation dynamics differ quite markedly from each other. For example, some humor would be appropriate at an in-house retreat or at a presentation at a conference, but would usually be inappropriate when presenting the results of a forensic investigation to management. This chapter reviews considerations and techniques that are appropriate in these various scenarios. The PowerPoint review and the discussion section of this chapter are reasonably brief and additional coverage, with examples, is given in the companion site to this book.
Overview of Forensic Presentations
PowerPoint is an effective presentation tool because it has the flexibility to include (a) text, (b) complex diagrams (perhaps showing the internal control deficiency that was taken advantage of by the fraudster), and (c) images (photos and screenshots of scanned invoices or websites). The best situation is where PowerPoint enhances a presentation rather than PowerPoint being the presentation. The PowerPoint presentation should be subservient to the presenter. PowerPoint should not be the equivalent of the lights and smoke show at a rock concert.
The presenter should carefully consider the audience's gain and loss for each slide. The gain should be that they can find it easier to understand or appreciate some point. The loss related to a slide is not always so obvious. The loss is that the audience now has its attention divided between the presenter and the PowerPoint screen. There are now two focal points in the room. This “divided attention” issue is made more acute the greater the distance between the presenter and the screen. The audience has to decide when to look at the presenter and when to look at the screen.
One way to overcome the “divided attention” issue is for the presenter to “mute” the PowerPoint presentation when the audience should be looking at them. A screen with text or images will cause the audience to look at the screen even after the presenter has finished reviewing the contents of the screen and has moved ahead to another topic. The introduction to the new topic might be missed because the audience is still looking at the slide dealing with the prior topic. PowerPoint does not have an easy “one click” way to turn it off during a presentation and the presenter should look to see if the projection console has a “presentation mute” button. If this is not the case then a second person could mute the presentation when needed, or the presenter could use a blank slide as the transition from one topic to the next.
PowerPoint is used for forensic presentations with information in the form of text, diagrams, and images being shown on slides. PowerPoint includes features for every aspect of the presentation, namely the slides themselves, presentation notes, an outline, and handouts. Microsoft has extensive help available on the Microsoft website. The page dedicated to PowerPoint help is http://office.microsoft.com/en-us/powerpoint-help/.
The PowerPoint window is similar to the Access window in that the window is divided into panes with each pane related to some aspect of the presentation. The PowerPoint window is shown in Figure 3.1.
Figure 3.1 PowerPoint Window with a Prepared Presentation
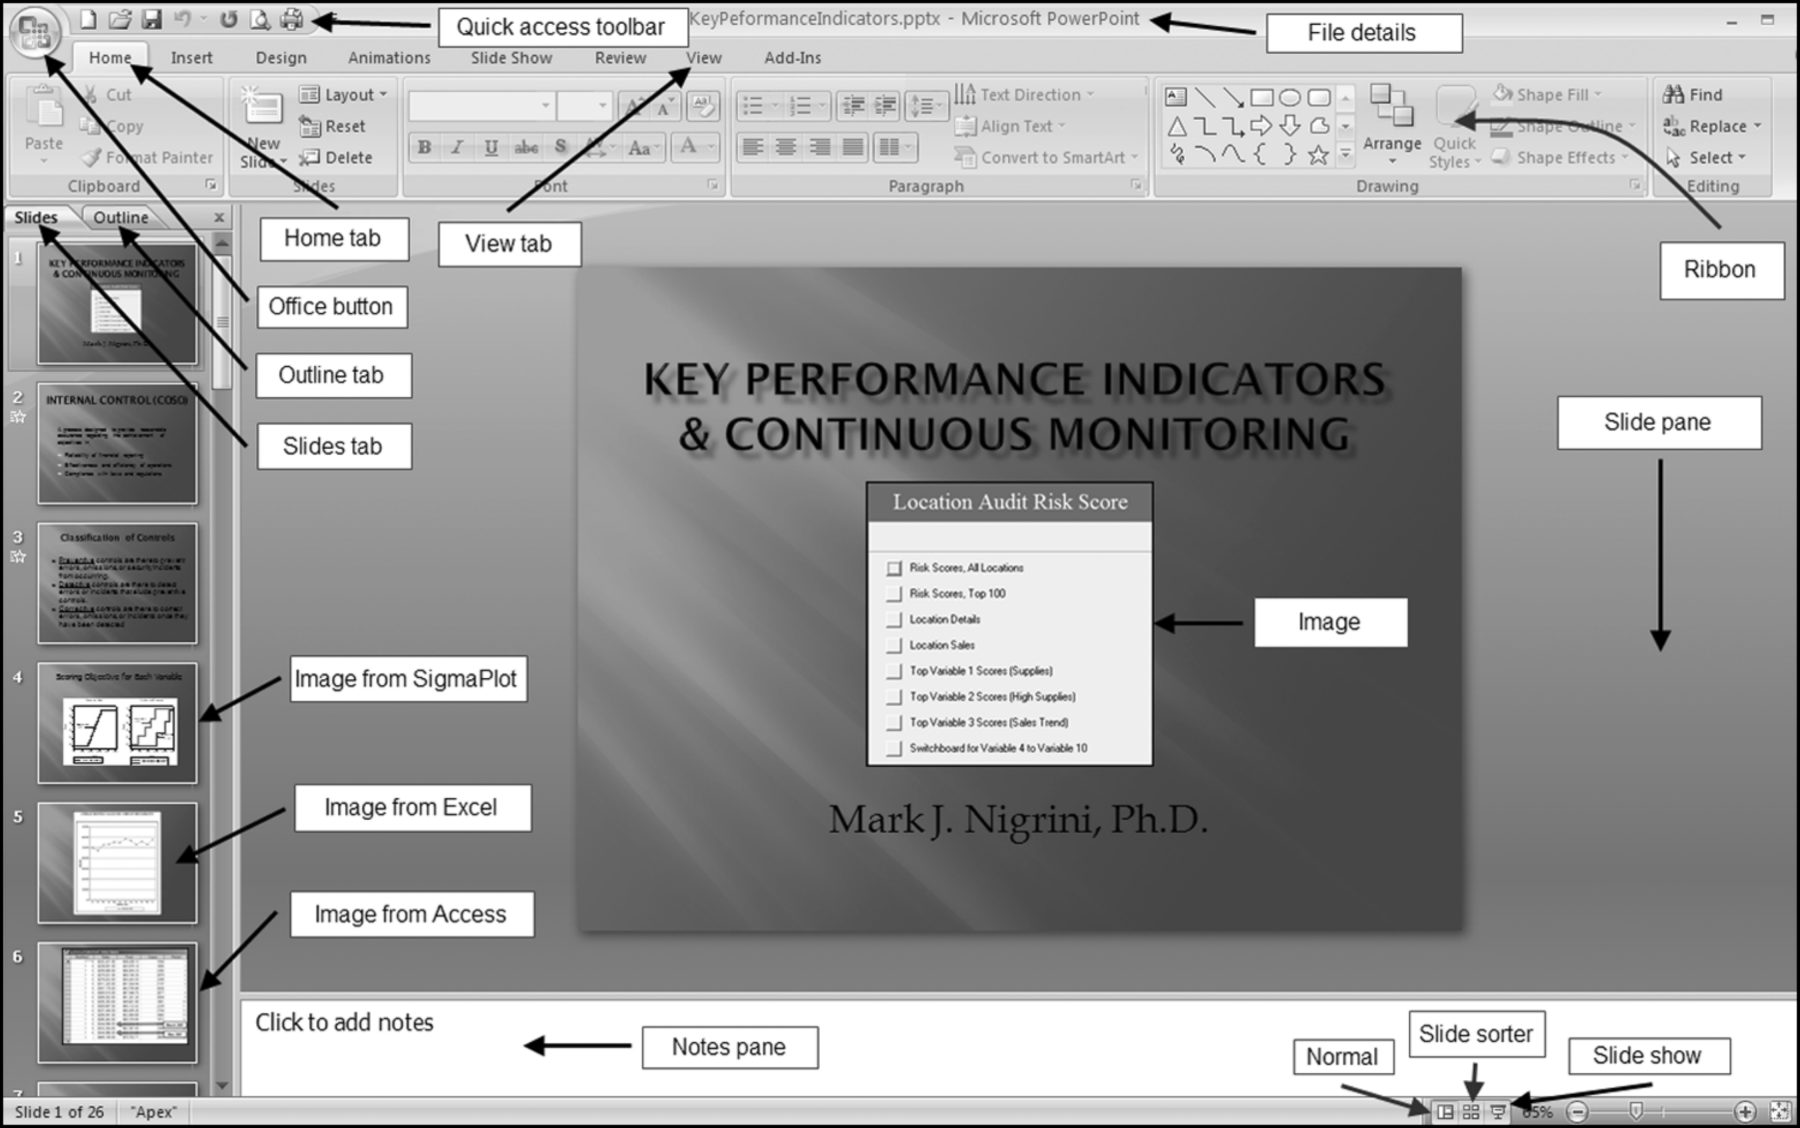
The largest section is the Slide pane, which shows the current slide. The slide shown is the opening slide with the name of the presentation, an image below the title and the name of the author or presenter. The slide pane is the pane that is used most often for preparing a presentation and printed reduced-size slide panes are used as handouts or as a speaker aid during the presentation. The Notes pane is used for notes that function as presenter reminders during the presentation. The notes can be printed as notes pages and they can also be displayed if the presentation is saved as a Web page. The Slides tab is visible when PowerPoint is opened. This tab shows the numbered slides as a column with thumbnails (small images) so that the user can see a small sequence of several slides at once. The Outline tab shows an outline of the text on each slide. The remainder of the PowerPoint window is fairly self-explanatory. The Normal view is usually the best environment for work on preparing and editing slides.
Presentations, just like forensic analytic projects, need to be planned. The planning phase includes deciding whether PowerPoint is the best medium to use during the presentation. For example, neither differential calculus classes nor Japanese language classes are well-suited to PowerPoint. For a forensic report the planning phase should consider:
- The purpose of the presentation, which in a forensic case might be to inform management of a fraud and the results of the investigation.
- The message of the presentation would be to describe the fraud, the investigation, and corrective and planned future actions.
- The target audience would be selected members of management and other carefully chosen parties such as legal counsel. If the fraudster was a member of the management team then they would not be a part of the audience.
- The length of the presentation needs to be considered and the length should take into account audience questions.
- The presentation environment should be considered and in a forensic case the venue should be safe from casual eavesdropping.
- The presenter's characteristics should be taken into account including the experience level of the person and also whether they personally did the forensic work.
- Audience questions should be considered and anticipated. The planning phase should consider whether audience questions will be encouraged and allowed during the presentation or whether questions should be saved for the end.
The forensic topic could be a purchasing card fraud that was discovered during a forensic analytics project similar to that shown in Chapter 18. PowerPoint should be supported with other presentation aids, where appropriate. The primary presentation tool is the presenter, who should be appropriately dressed with a professional demeanor and body language. Other supporting aids could include physical objects (such as the employee's purchasing card) or documents evidencing the fraud (copies should be used for presentations and the originals kept under lock and key). Whiteboards and flipcharts can also be used but these are not recommended for a forensic presentation. Writing while talking is distracting and all documents and papers related to the case will inevitably be requested by the defense attorneys. Videos are also possible supplements to a presentation, but would probably not be too relevant in a forensic report. In addition to visual supplements, there are also auditory (acoustic or sound) supplements. The primary auditory tool is the presenter's voice and voice can impart the tone of the presentation and can emphasize certain parts or points in the presentation. Other auditory supplements would include recorded sounds or conversations and any soundtrack accompanying video.
Color Schemes for Forensic Presentations
Choosing an appropriate color scheme is an important early decision in the preparation of the PowerPoint part of the presentation. A consistent and appropriate color scheme sets the tone and the mood of the presentation. Microsoft has a large selection of templates available at http://office.microsoft.com/en-us/templates/?CTT=1.
The Presentations section of the resources has a large selection of PowerPoint presentations and slides available for download. A problem with most of the backgrounds and templates is that they are generally too flashy and bold for a forensic-related presentation. A flashy background or one that suggests drama is not really appropriate for a forensic presentation. The background colors set the mood of the presentation. Whatever colors are chosen, they should be consistent throughout the presentation. For example, bright neon colors (that indicate drama) should be avoided. Word documents are usually printed on white paper, but PowerPoint slides might never be printed at all. Microsoft has backgrounds for PowerPoint presentations that can be accessed at http://office.microsoft.com/en-us/templates/CT010117272.aspx.
The website has templates, backgrounds, and outlines for various types of presentations. A review of these backgrounds indicates that they are generally too flashy for a forensic presentation. A forensic presentation should have a completely neutral background precisely because we are not trying to create a mood of drama, excitement, or suspense. The suggested format is a plain background that tries to strike a balance between professionalism and attractiveness. Even a plain background has a color and Table 3.1 outlines some color considerations for a presentation based on a forensic report or a fraud risk survey.
Table 3.1 Background and Text Colors with Comments as to Their Suitability in a Forensic-Based Presentation.
| Background Color | Comments |
| Dark blue | First choice for a background color. |
| Black | Second choice for a background color. Black uses a lot of ink for printing as handouts. |
| Light blue | Third choice for a background color. Uses less ink for printing handouts and speaker notes. |
| Light gray | Fourth choice for a background color. Uses the least amount of ink for printing handouts and speaker notes. |
| White | Avoid white even though white is the background color in all printed books (except children's books). |
| Other colors | Other background colors such as red, orange, yellow, neon colors, green, brown, purple or pink are not appropriate for a forensic setting. |
| Text Color | |
| Yellow | First color choice for text on a dark background. |
| White | Second color choice for text on a dark background. |
| Black | Third color choice for text against a light blue or light gray background. |
| Red | Not recommended for text except for negative numbers. |
| Blue | Not recommended for text against a blue or black background. |
| Pastels, gray | Not recommended against black, blue, or gray backgrounds. |
| Green | Avoid green because of the chances that someone in the audience will not be able to see green. |
| Brown | Avoid brown for text. |
| Purple, pink | Avoid in a formal forensic setting. |
Background and text color choices are shown in Table 3.1. In summary, dark blue is a good choice for a background and yellow would be a good choice for text. Microsoft has a good article on color choices on their website at http://office.microsoft.com/en-us/powerpoint-help/choose-the-right-colors-for-your-powerpoint-presentation-HA001012072.aspx.
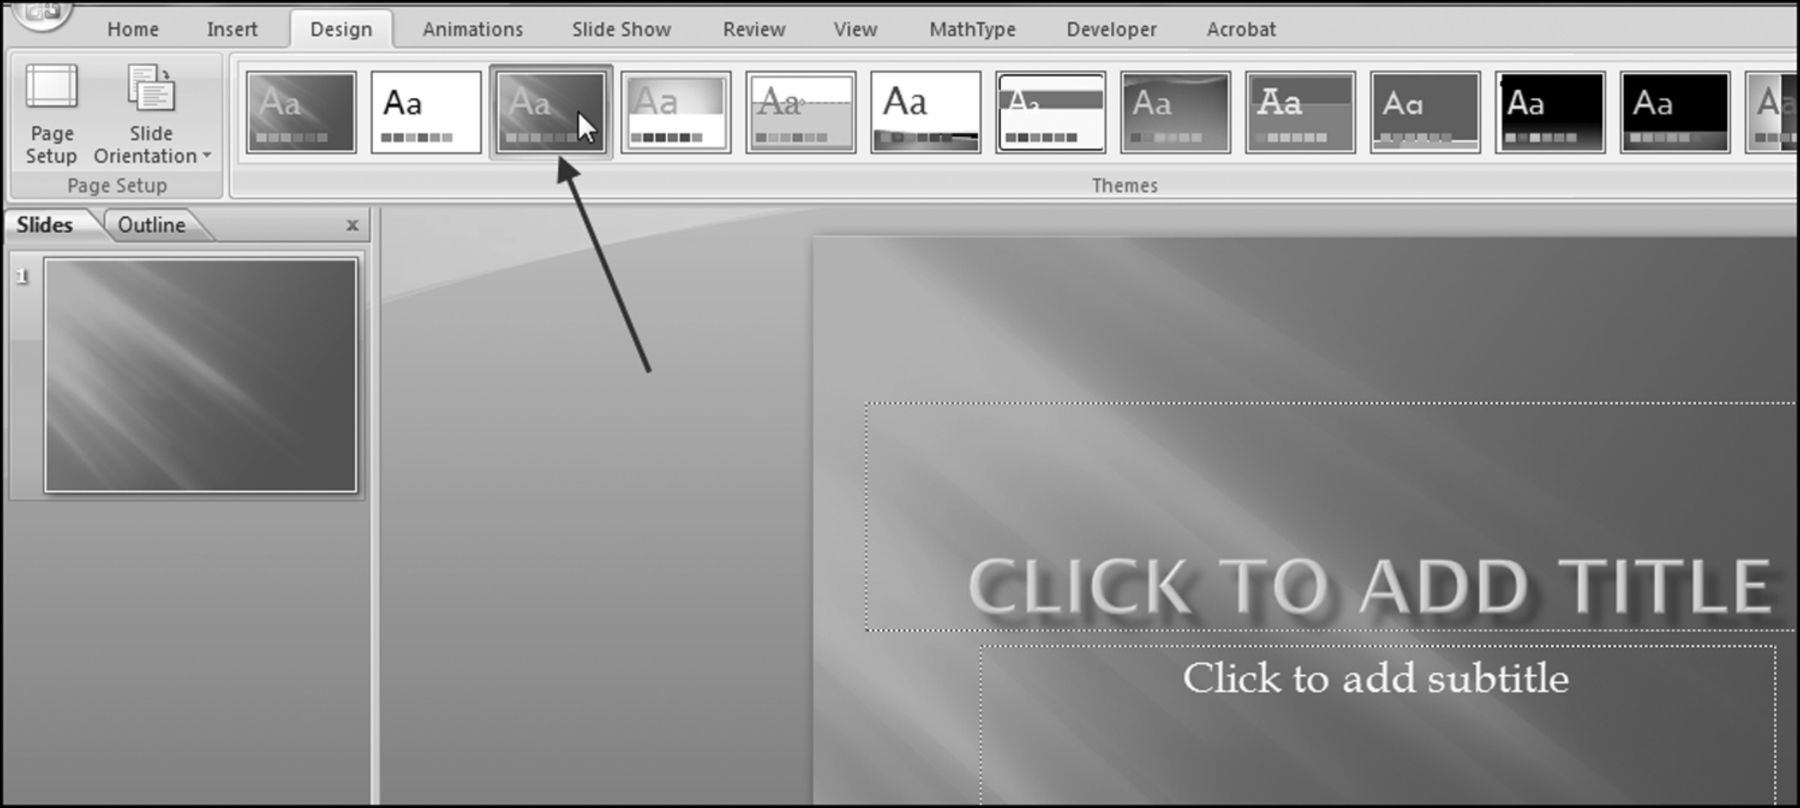
The color choices can be put into action by opening PowerPoint and then by selecting Design→Themes followed by Apex as is shown in Figure 3.2.
Figure 3.2 Selection of the Apex Theme for a PowerPoint Presentation
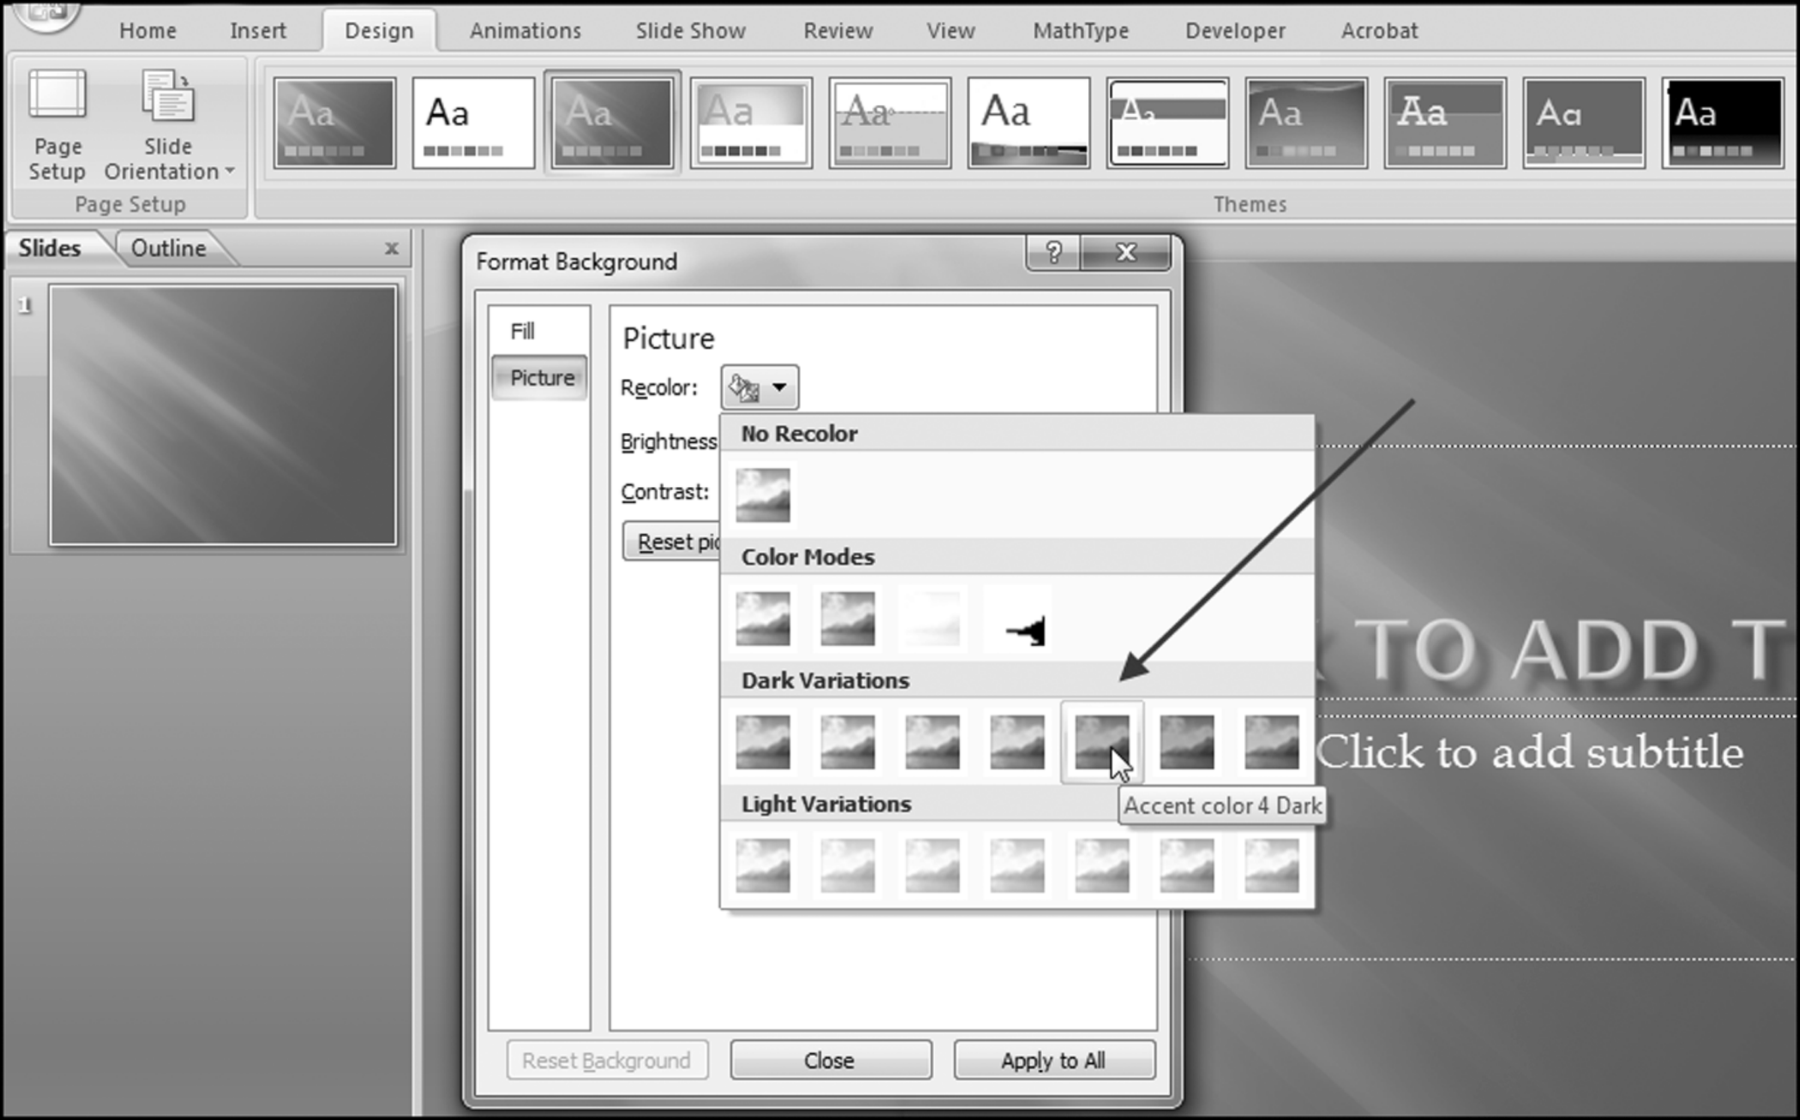
After selecting the Apex theme as is shown in Figure 3.2, that pattern will also be displayed in the Slides tab. The default color of the Apex theme is a light gray and we need to change the light gray to a darker blue. This is done by clicking on the Dialog box launcher in Design→Background. The Dialog Box launcher is the small icon in the bottom-right corner of a group, from which you can open a dialog box related to that group. The icon has two straight lines joined at 90 degrees and a small arrow pointing in a southeast direction. The dialog box can also be launched by right-clicking on the slide in the Slides tab and selecting Format Background. In the Format Background dialog box choose Picture→Recolor and then choose Accent color 4 Dark as is shown in Figure 3.3.
Figure 3.3 Selection of a Blue Color for a PowerPoint Background
The original light gray is changed to a medium blue. Click Accent color 4 Dark and then click Apply to All followed by Close. The colors to the right of Accent color 4 Dark are closer to being purple than blue and blue is preferred to purple. The presentation now consists of just one (appropriately colored) slide. Since the presentation will consist of several slides the next step is to create a few working copies of the blank background. This is done by right-clicking on the slide and then clicking on Duplicate Slide twice. This will create a presentation with three blank title slides.
The next step is to add a layout to the second slide. This is done by clicking on the second slide and then selecting Layout followed by Title and Content. The final step is shown in Figure 3.4.
Figure 3.4 Selection of a Title and Content Layout for the Second Slide
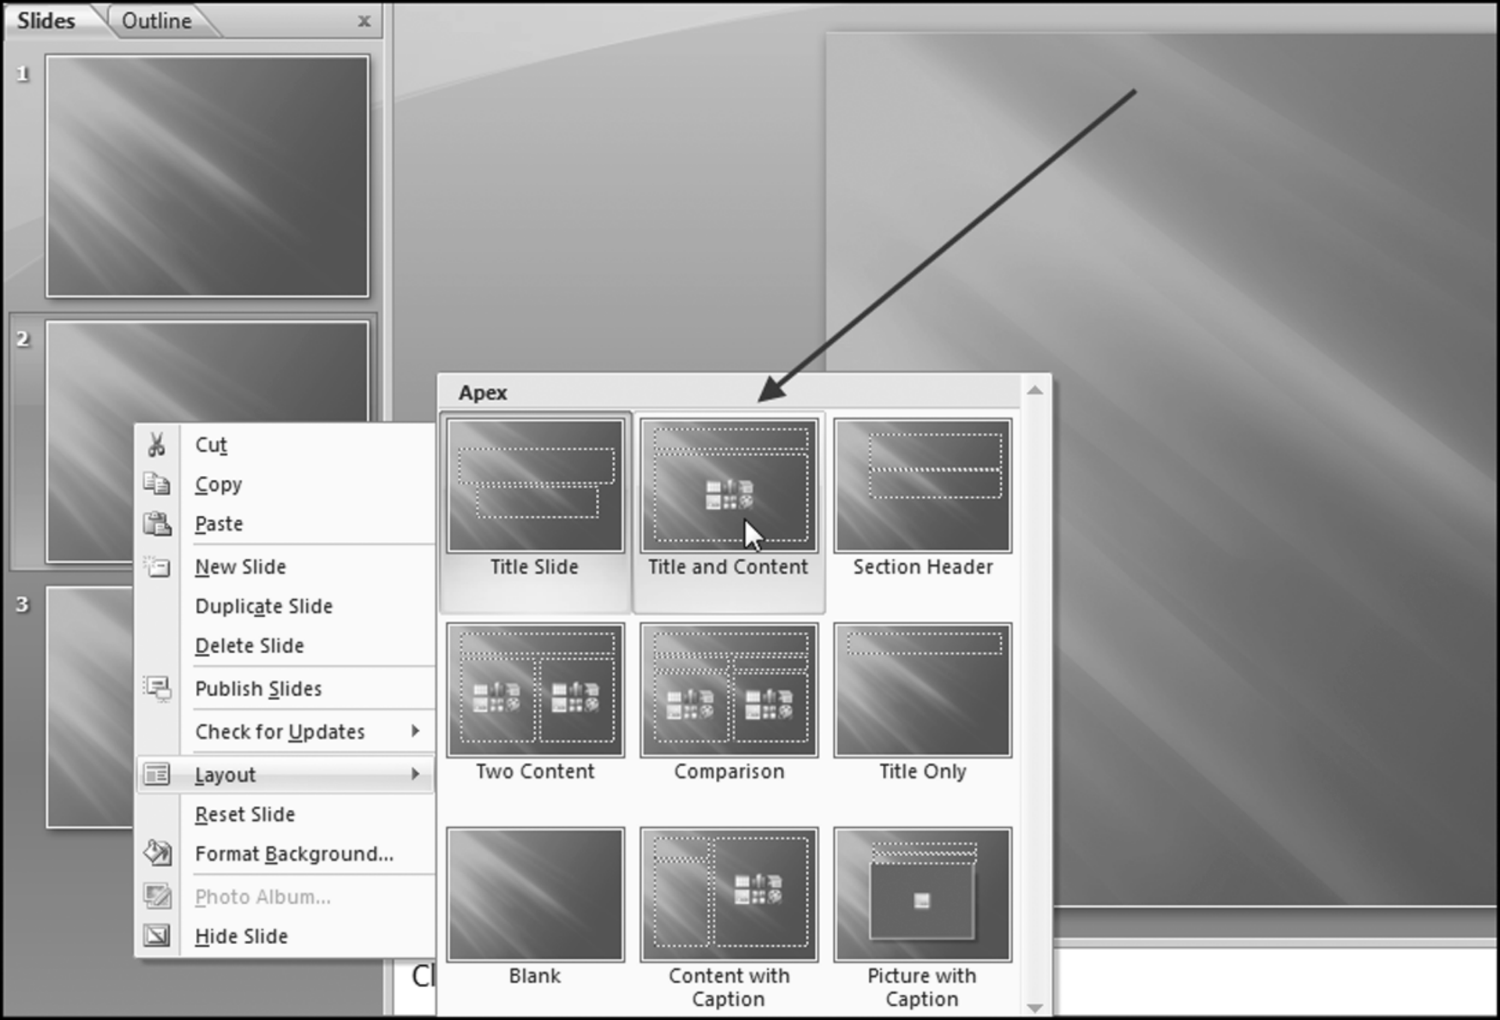
The layout of the second slide is changed to the Title and Content format in Figure 3.4. The same procedure should be applied to the third slide, but here the Title Only layout should be chosen. By using the Duplicate Slide command (activated by a right-click on the slide in the Slides tab) it is possible to duplicate any slide and the layouts in slides 2 and 3 should work well for most slides in a forensic presentation.
Not only are colors important but also the way that they are blended together. The predefined color schemes within PowerPoint have been well-chosen and it is usually best to use these as the color scheme unless circumstances are special (perhaps using the corporate logo colors is seen as a sign of loyalty). The colors and the way that they blend together might look different when projected onto a screen and it is a good idea to look at a presentation on the projection equipment before the actual presentation. When using graphs and charts in a presentation it is a nice touch to use one of the graph colors in the heading text in PowerPoint. The color combinations will tie the elements of the slides together for a uniform look.
A general guide is to choose a background color (such as a blue or dark blue) together with up to three additional colors of text for maximum impact. The third color should be used quite sparingly. When choosing a background it is important to think about both the color and the texture of the color. A solid background color can look quite dull. The color texture option can be found at Design→Background→Format Background→Texture. The title text should be three to six words that are larger than the body text. Because the body text is smaller, the color contrast between the body text and the background should be more dramatic, because the body text is in a smaller font.
Some caveats to remember are that some colors have various associations in society. For example, red might mean “stop” or “danger,” and green might mean “go.” It is best to avoid using colors in contexts because these meanings might differ across various nationalities. Finally, the presenter should not rely too much on color to present the message, there should be a balance between professionalism and attractiveness, and everyone, including those who have sight challenges, should get all the information from the presentation, and not the color scheme.
Problems with Forensic Reports
The presentation envisioned in this chapter is based on a forensic fraud report or a fraud risk assessment report. If the original study or the original document has issues or problems then the presentation will also have issues or problems. A dazzling presenter and a polished set of slides cannot convert a second-rate report into a noteworthy achievement. A good discussion of investigation reports is given in Golden, Skalak, and Clayton (2006). This section reviews some of the shortcomings and issues found in forensic reports that might influence the presentation.
Forensic reports should identify all of the relevant evidence that was used to conclude on the allegations under investigation. This report is important because the organization will use it as a basis for corporate filings, lawsuits, employment actions, and changes to accounting and financial systems. Forensic reports are discussed in the Fraud Examiners Manual of the Association of Certified Fraud Examiners (www.acfe.com). Some important considerations are:
- Organization and work flow. A good report flows from organizing each stage of the investigation from the initial allegation, to data gathering, and to the forensic analytics and corroboration.
- Accuracy. A high-quality report should be accurate with respect to the basic data, dates, events, monetary amounts, names, and places. In addition to factual accuracy, a good report should be well-written with no grammatical, typing, or spelling errors.
- Clarity. The report should be written in such a way so as to avoid any misunderstandings. This requires stating the facts and conclusions in language and terms that jurors can understand.
- Impartiality. A forensic report should be unbiased. The facts should speak for themselves and personal opinions and impressions should be avoided.
- Relevance. Only facts and other matters relevant to the investigation should be included in the report. It would be irrelevant to include details of a domestic dispute involving the accused in the forensic report.
- Timeliness. The report and the information gathered to support the fraud should be prepared in a timely manner. Written records of interviews should be prepared soon after the time of the interview.
The above points are good characteristics of a forensic report and the forensic presentation. Grisso (2010) examines several forensic reports and identifies the types of faults found in these forensic reports. Although these reports deal with forensic matters related to psychology, it would seem that these faults could fit quite well with forensic reports related to fraud. Grisso develops a set of prescriptive statements that have been slightly adapted to fit a fraud report. These prescriptive statements are:
- Introductory material. These should accurately identify the forensic investigator and all dates relevant to the investigation. The way in which the alleged perpetrator was informed of the purpose of the investigation should be documented. The sources of the data evaluated should be listed. The report should state the legal standard that permitted the analysis of the data and the interview process.
- Organization and style. The report should be organized in a way that is logical and that helps the reader to understand the fraud and the environment within which the act was committed. The data section should only report on the supporting data and should not include any inferences. Any inferences and conclusions should be stated in a section of the report that uses the earlier data but offers no new data. The language used should reflect no bias on the part of the investigator. The document should be professionally written with few, if any, typographical errors, grammatical errors, or colloquialisms.
- Data reporting. The investigation should obtain and use all the data that would be important to addressing the alleged fraud. The report should discuss only the data that is relevant to the investigation. The sources of the data should be clearly described. The report should document efforts to obtain data that was thought to be relevant but which was not forthcoming or was unavailable for some reason.
- Interpretations and opinions. The conclusions should address only the fraud investigation at hand. Each opinion or conclusion should be supported by a clear explanation. The report should describe any important ways in which the conclusions reached have some reasonable margin of error. With reference to those opinions or conclusions that require some specialized knowledge, the report preparer should only express opinions on those matters for which they are qualified and competent.
Other important issues include evidence considerations and the chain of custody because the evidence needs to be admissible and used at trial. The forensic report is an important document with serious implications for the accused if done right and implications for the prosecution if the document is flawed.
Copying from Word to PowerPoint
The Internal Revenue Service (IRS) has a summary of fraud examples in the Examples of Corporate Fraud Investigations of their website (www.irs.gov). The case below can be found by searching for “Charlene Corley” on the IRS website. The case is headed “South Carolina Woman Sentenced for Defrauding the Department of Defense of Over $20 Million.” A summary of the case is given below:
On March 2, 2009, in Columbia, S.C., Charlene Corley was sentenced to 78 months in prison, to be followed by three years of supervised release, and ordered to pay over $15 million in restitution. Corley pleaded guilty in August 2007 to conspiracy to commit wire fraud and conspiracy to commit money laundering. Information presented in court indicated that beginning in 1997 and continuing through September 2006, Corley and her sister, Darlene Wooten, owned C&D Distributors, LLC, a Lexington-based company that submitted electronic bids via computer to the Department of Defense to supply small hardware components, plumbing fixtures, electronic equipment, and various other items. Along with the cost of the items sold, C&D made claims for shipping costs. These shipping claims were processed automatically to streamline the resupply of items to combat troops in Iraq and Afghanistan. The fictitious shipping costs ranged into the hundreds of thousands of dollars, despite the fact that the value of the items shipped rarely exceeded $100. As an example, in September 2006, C&D billed the Department of Defense $998,798 to ship two flat washers that cost $0.19 each. Over the course of the conspiracy, the defendants obtained approximately $20,576,925 in fraudulent shipping costs. The money was used to purchase beach houses, high-end automobiles, boats, jewelry, vacations, and other items. Darlene Wooten committed suicide last October, after being contacted by federal investigators about the fraud.
This high-profile fraud is reported on the IRS's website even though the case did not involve tax evasion. The court records include several actual examples of shipping charges, some of which were paid and other that were not paid. This is an example of a table that would be highly relevant in a forensic fraud report. The first 10 records are shown in Table 3.2.
Table 3.2 The First 10 Items in the Table of Invoices and Shipping Charges in U.S. v. Charlene Corley
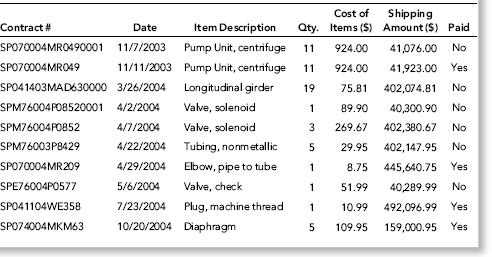
An extract from the invoices and shipping charges exhibit in U.S. v. Charlene Corley is shown in Table 3.2. The table's format is a good example of what would be found in a forensic fraud report. This table, in whole or in part, would also be included in the forensic presentation. The table can be copied reasonably easily from Word to a PowerPoint slide. If the table is embedded in the slide then it can be edited using Word's table commands.
The way to copy a table to a slide begins with an open PowerPoint presentation with the relevant slide highlighted. In the example, the blank slide is Slide 4. The first step uses Insert→Text→Object to give the Insert Object dialog box. The usual procedure would be to select Create from file and then to use the Browse button to open the Browse dialog box. The final step is to navigate to the Word file with the table. This transfer works best if the table is saved in a Word file by itself. The Link check box should not be selected. The dialog box is shown in Figure 3.5.
Figure 3.5 The Insert Object Dialog Box Used to Insert a Table from Word

The dialog box used to insert a table from Word is shown in Figure 3.5. The table is copied from Word by clicking OK. The result is shown in Figure 3.6.
Figure 3.6 The Table Copied from Word into PowerPoint
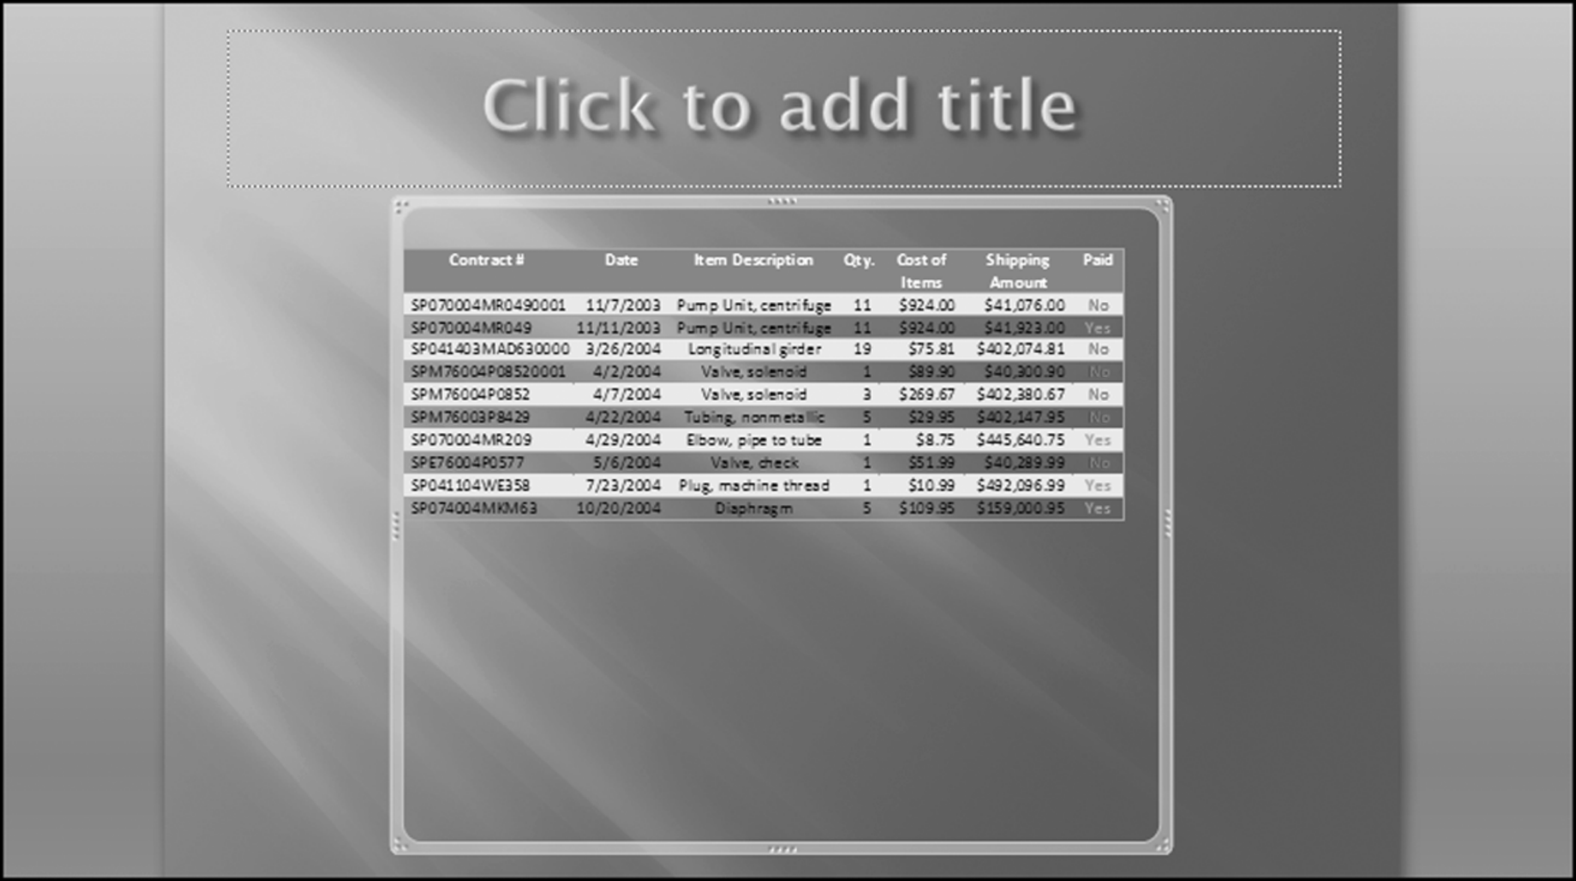
The first version of the image is small and not exactly where it should be for a presentation. The table should be resized so that it is as big as possible and fits into the lower part of the slide without overlapping any other images or the slide title. The table is resized by dragging the corner sizing handles. The object border might have to be dragged beyond the edges of the slide to make the table clearly visible on the slide. It might be necessary to zoom out to (say) 30 percent or 40 percent to be able to drag the handles as far down as needed.
A second option to copy a Word table is to select the table in Word itself. This option involves clicking anywhere in the table and then using Layout→Table→Select→Select Table. The table is then copied to the clipboard using Home→Clipboard→Copy. After switching to PowerPoint and making the relevant slide the active slide, the table is inserted using Home→Clipboard→Paste. The table will usually need some resizing and perhaps even some font color changes.
The first option using Insert Object is preferred. With this method it is easier to modify the embedded table by clicking anywhere in the shipping costs table while in PowerPoint. The embedded table object then becomes active in Word. After the changes have been made it is possible to leave Word and to get back to the PowerPoint file by using File→Close, followed by Cancel to prevent getting out of PowerPoint entirely.
Copying from Excel to PowerPoint
Chapter 18 includes a case study using forensic analytic tests on purchasing card data. These tests include a periodic graph showing that September has the highest monthly total and it would appear that employees might be spending the money “left in the budget.” A related presentation should include the Excel graph (also shown in Figure 2.15 in Chapter 2). The graph is copied to PowerPoint by first opening Excel and then selecting the relevant graph. The selected graph will have three dots curving around the corners and the midpoint of each of the borders will have four dots visible. The procedure to copy the graph is to click Copy in Home→Clipboard→Copy (while still in Excel). The next step is to move over to PowerPoint and then to highlight the relevant slide. The graph is pasted using Home-Clipboard→Paste→Paste. The result (for the purchasing card graph) is shown in Figure 3.7.
Figure 3.7 An Excel Graph that Has Been Copied to PowerPoint
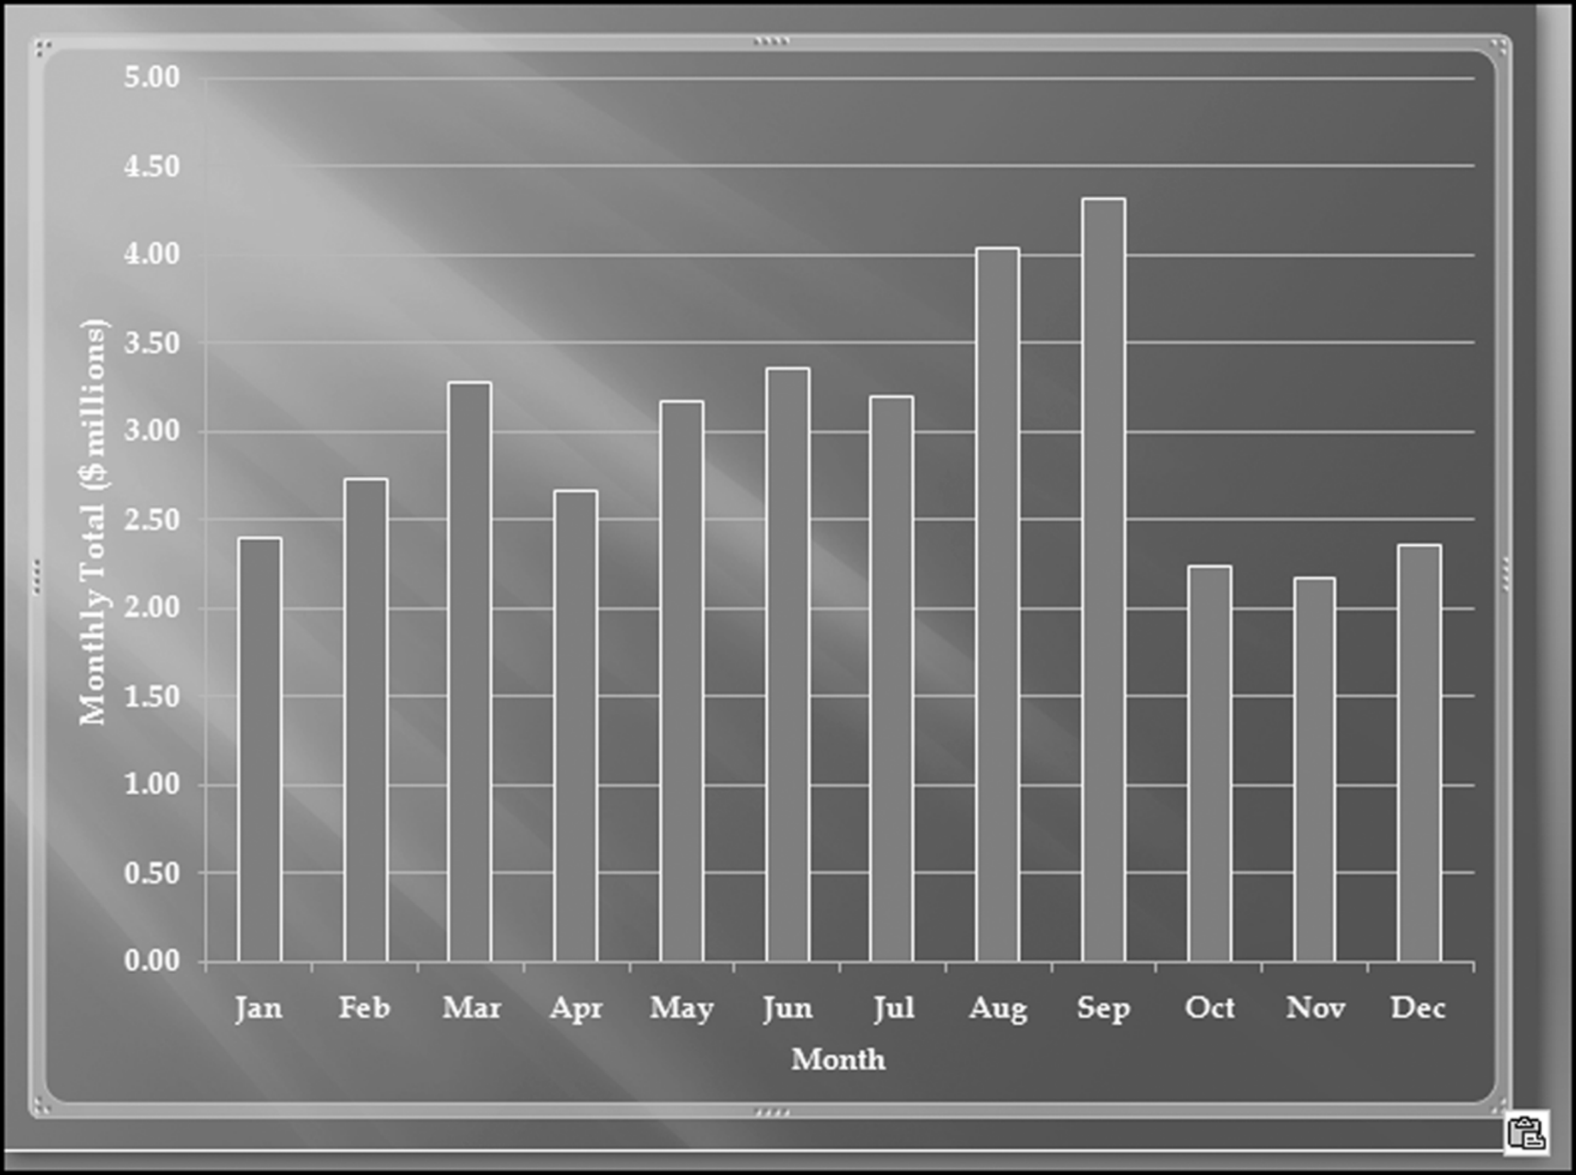
The result of the Copy and Paste operation is shown in Figure 3.7. This result is not exactly what was wanted because the graph is too big and it is also transparent. To format the graph requires the Paste Options dialog box that is visible in the bottom right-hand corner. The Paste Options dialog box has some options including Paste as Picture. The next step is to open the Paste Options dialog box and to choose Paste as Picture. The graph will then look just as it did in Excel. The procedure to reduce the graph's size is to right click on the graph and to use the Size and Position dialog box. A scale of 85 percent might work well. The result after adding a title might be as is shown in Figure 3.8.
Figure 3.8 The Excel Graph after Tidying Up the Original Copy and Paste Procedure
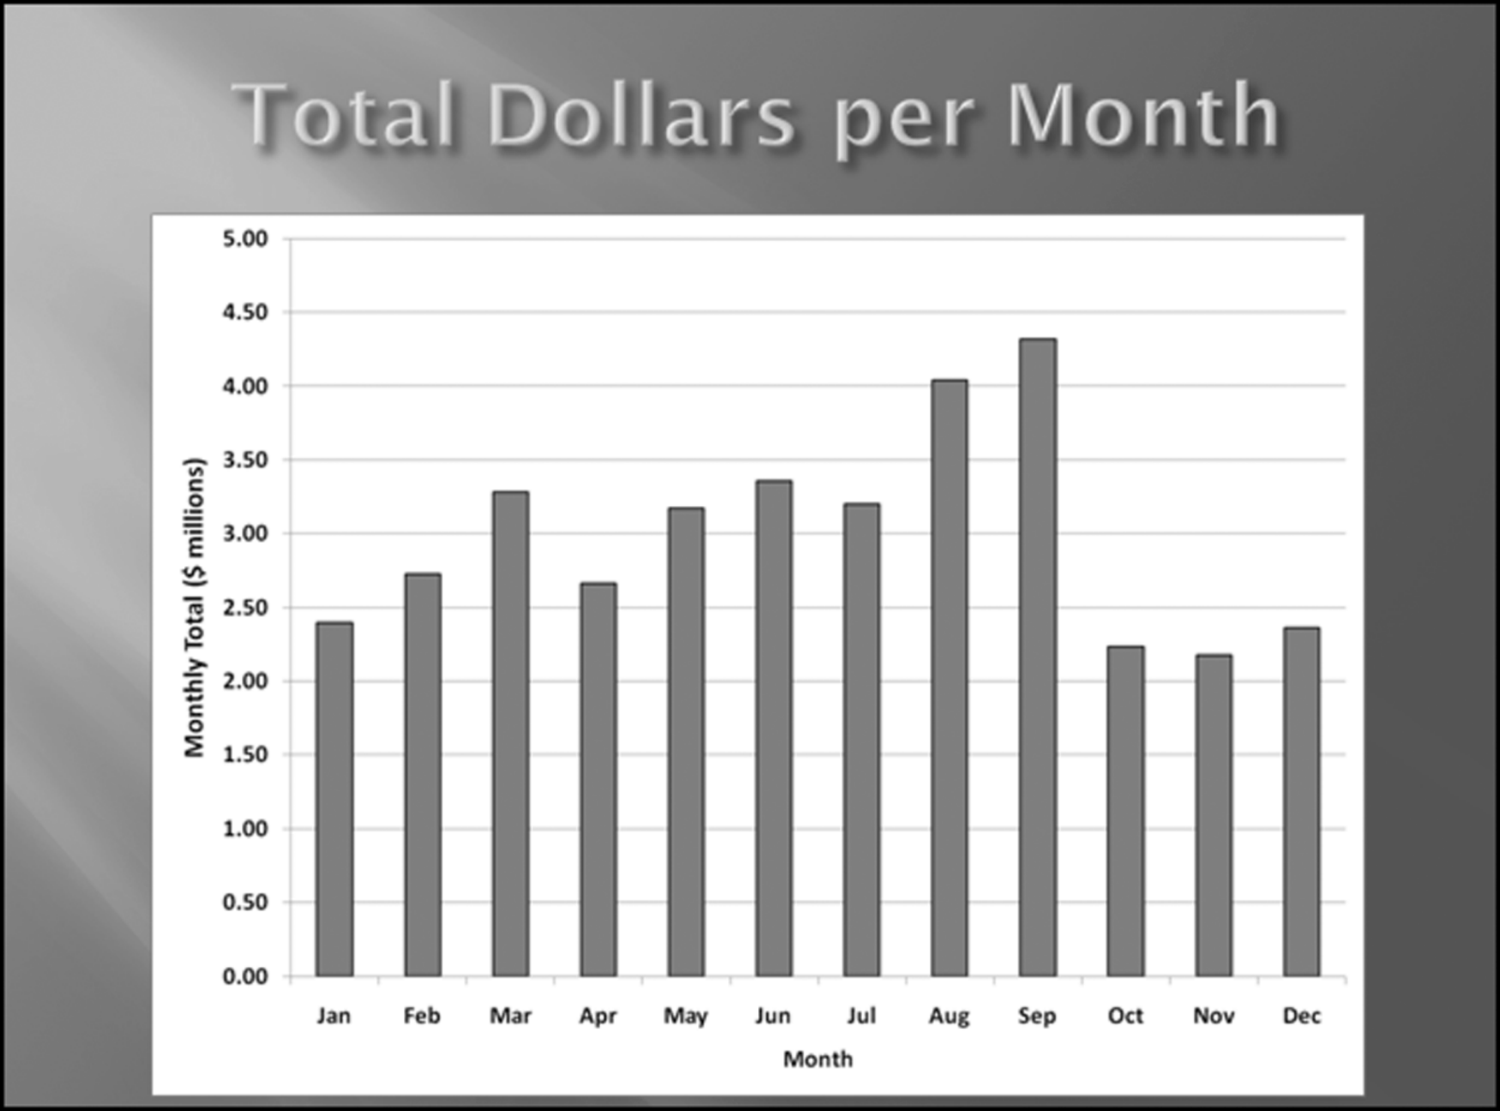
The completed periodic graph slide is shown in Figure 3.8. The graph has been formatted as a picture and it has been resized. A title has also been added to the slide. With this transfer method the only way to now make changes to the graph is to make the changes in Excel and then to redo the Copy and Paste sequence. For a forensic presentation a little work on the borders would work well, and for a less formal presentation it might be appropriate to add some more pizzazz to the graph borders. The image's borders can be changed to one of many options by left double-clicking the graph which will activate the Picture Styles group on the Format tab. The result is shown in Figure 3.9.
Figure 3.9 The Picture Styles Available in PowerPoint
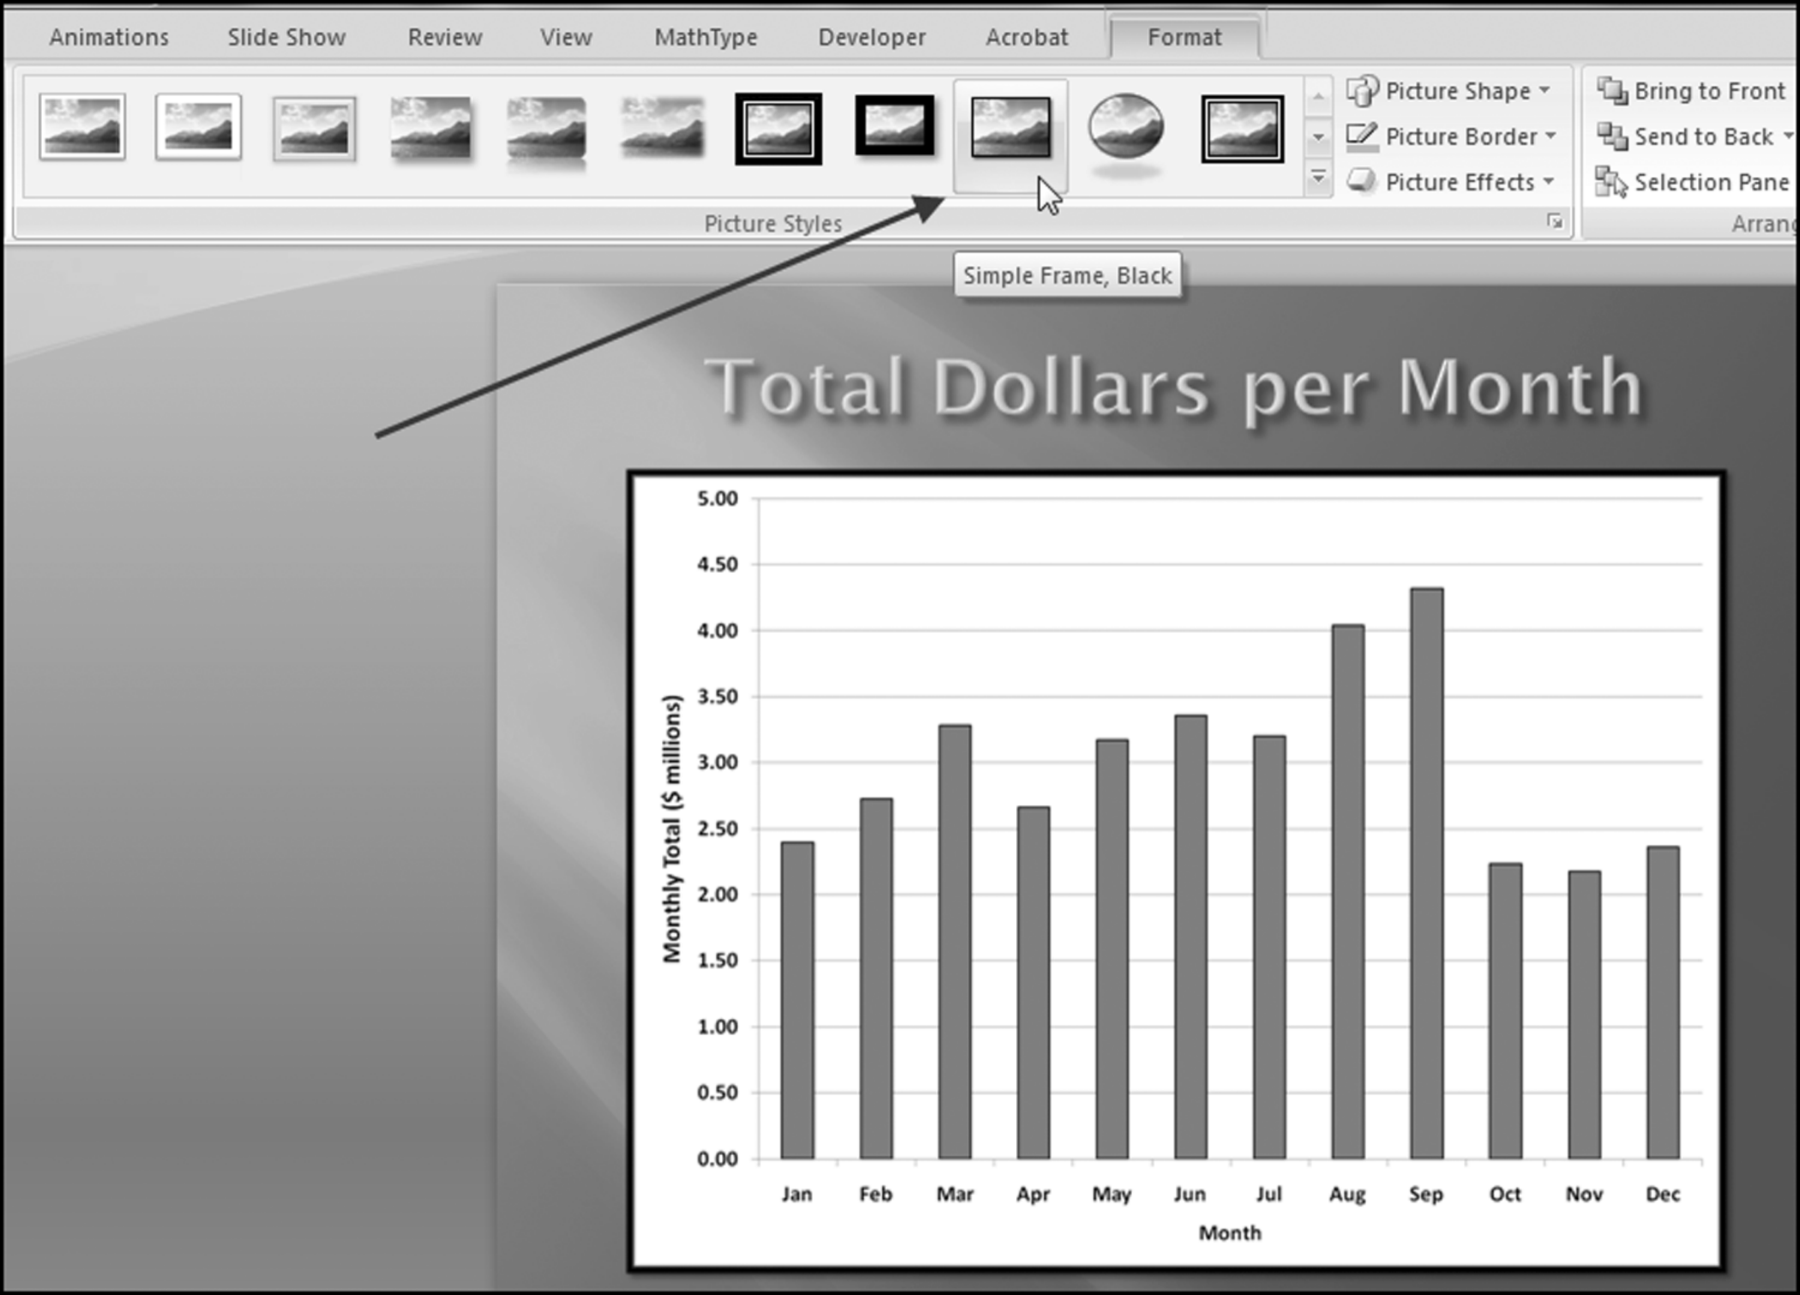
Figure 3.9 shows the choice of “Simple Frame, Black,” which would work well in a forensic fraud report. In presentations that are less formal, PowerPoint offers many other formats. For example, the Picture Styles group also has a set of Picture Effects options and the use of an effect such as 3-D Rotation and Perspective Right makes for an interesting presentation. It is important to have the same theme for all the graphs and charts. The graphs should be prepared the same way in Excel (e.g., same color schemes and same fonts for the axes and same format for the legends) and they should have the same or similar Picture Styles (picture shapes, picture borders, and picture effects). All graphs should also be similarly formatted in the forensic fraud report.
Copying a Screenshot to PowerPoint
A forensic analytics presentation might include screenshots from a Web-based activity such as information gathering. It is always safer to rerun the tests and then to show screenshots of the computer screen than to access the Internet during the presentation. Moving from PowerPoint to Internet Explorer (and back again) will use valuable time, and the connection might not work or it might be slow, or it might need passwords to be activated. By way of an example, you might want to make the point that fraudsters do, in fact, get sentenced and do end up going to prison. This can be demonstrated by using the Inmate Locator on the website of the Federal Bureau of Prisons (www.bop.gov). Rather than running a live search for “Charlene Corley” (the case discussed earlier in this chapter) you can run the search while preparing your presentation and you can then paste the results into your PowerPoint presentation. The procedure to copy the screen is to use alt+Print Screen to copy the current screen to the clipboard. The Print Screen key might be abbreviated “Prt Scr” or “Prt Sc” or something similar. The procedure to paste the image on a slide is either the Paste command or the shortcut for Paste, which is Control + V. The result of pasting the Inmate Locator screen is shown in Word in Figure 3.10.
Figure 3.10 A Screenshot of the Inmate Locator Page of the Federal Bureau of Prisons
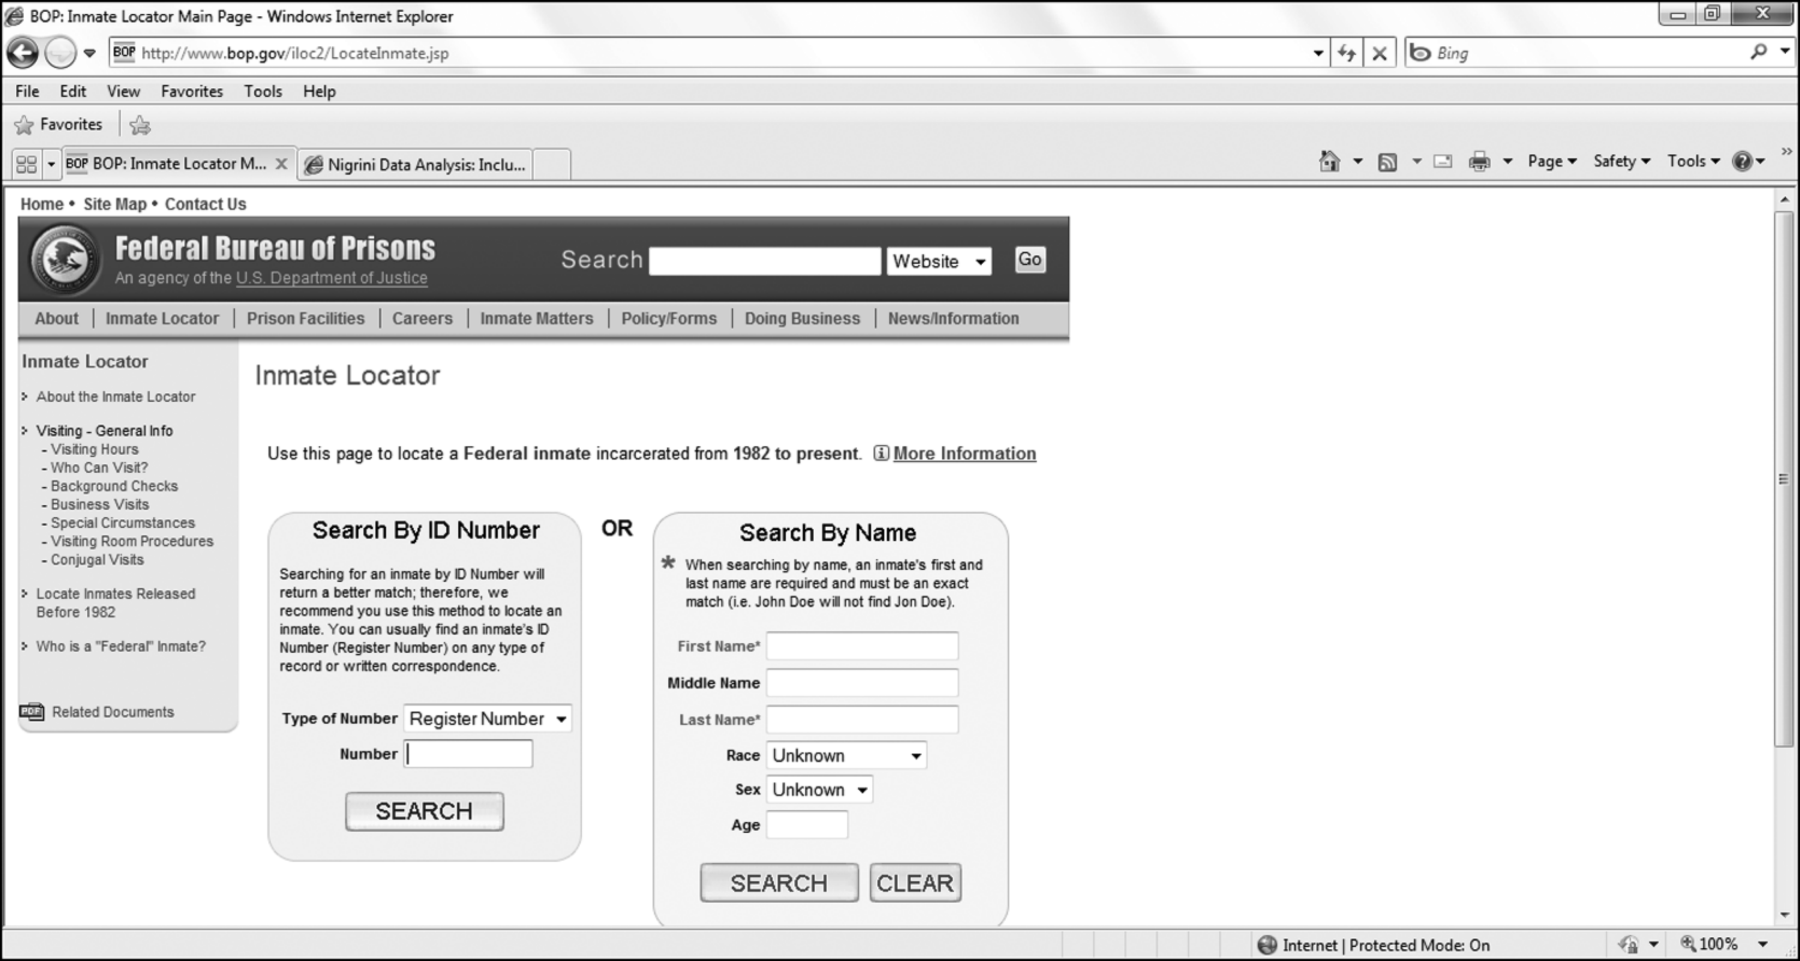
After pasting the image into PowerPoint the image will usually be too big for the slide, and will contain additional details that should best be edited away. The Size and Position dialog box will help with both size and position. The dialog box can be accessed with a right-click on the image, or by using the dialog box launcher from the Format→Size group. By using the Scale and Crop from options in the Size tab, and the options in the Position tab, the image can be resized, cropped, and repositioned perfectly. The final result is shown in Figure 3.11.
Figure 3.11 The Cropped and Resized Image on a PowerPoint Slide

The cropped and resized image is shown in Figure 3.11. The Windows Print Screen key is useful for copying a basic screen image to a PowerPoint slide. If this task is going to be done repeatedly, then a program that can add some special effects (see the textboxes and arrows in Figure 3.1) is Snagit. The company's website is http://www.techsmith.com/snagit/.
Snagit is reasonably priced and works well. A free trial is available. The software also allows for some details to be blurred as is done in Figure 2.2 where the cardholder's names are blurred. The use of blurring is useful in a setting where you might not want the audience to see absolutely everything.
Notes on Graphs and Charts
Excel books use the words “chart” and “graph” interchangeably. In this book a graph is a function or a line, usually in the first quadrant (where both x and y are positive) drawn on the Cartesian plane (so named after Rene Descartes) or the coordinate plane. A graph therefore is a diagram representing a system of connections or interrelations among two or more phenomena or facts through the use of lines, bars, or points. In contrast, a chart is everything else that is a diagrammatic representation of one or more facts or phenomena. An often-used chart is a pie chart.
During the presentation each graph or chart should be discussed. Each graph should have the x-axis and the y-axis clearly labeled. The presenter should not expect the audience to immediately understand what is being shown on graph. A graph that took much time to prepare can probably not be understood by an audience in 15 seconds without any supporting explanations.
The starting point for a useful and relevant graph is to first determine the message, which is the point that you would like to make. The type of graph depends on the point that is being made or emphasized. The second step is to consider the phenomena or facts that are being compared. This will also influence the choice of the type of graph or chart. There are several types of comparisons. These comparisons are (a) a component comparison (customer X always favored cashier Y), (b) a ranking of items, (c) a time-series graph that shows changes over time, (d) a frequency distribution showing group membership, and (e) a pattern showing correlation or the lack thereof. For example, Figure 13.1 shows some highly correlated gasoline prices. The third step in graph preparation is to select the graph or chart form in Excel. A mismatch between the comparison being made and the graph form reflects poorly on the abilities of the forensic investigator.
Notes on PowerPoint Animations
PowerPoint has a large selection of animations. The subtle animations are highly appropriate to a formal forensic-related presentation, while the exciting animations are not well-suited to this type of presentation. For example, in a forensic presentation it is often appropriate to list the bullet points one at a time so that each can be briefly reviewed without the audience reading ahead. The abbreviated list of predictors in Figure 3.10 is drawn from the monthly reporting risk scoring application described in Chapter 17. The steps used to get the bullet points to appear one at a time on a mouse click are in the Animations tab in the Animations group. The procedure to use the animations is to highlight the bullet points and then to use Animations→Animations followed by the Animate drop down box to give several options. A good choice is Fly In and By 1st Level Paragraphs.
Figure 3.12 How to Animate the Bullet Points
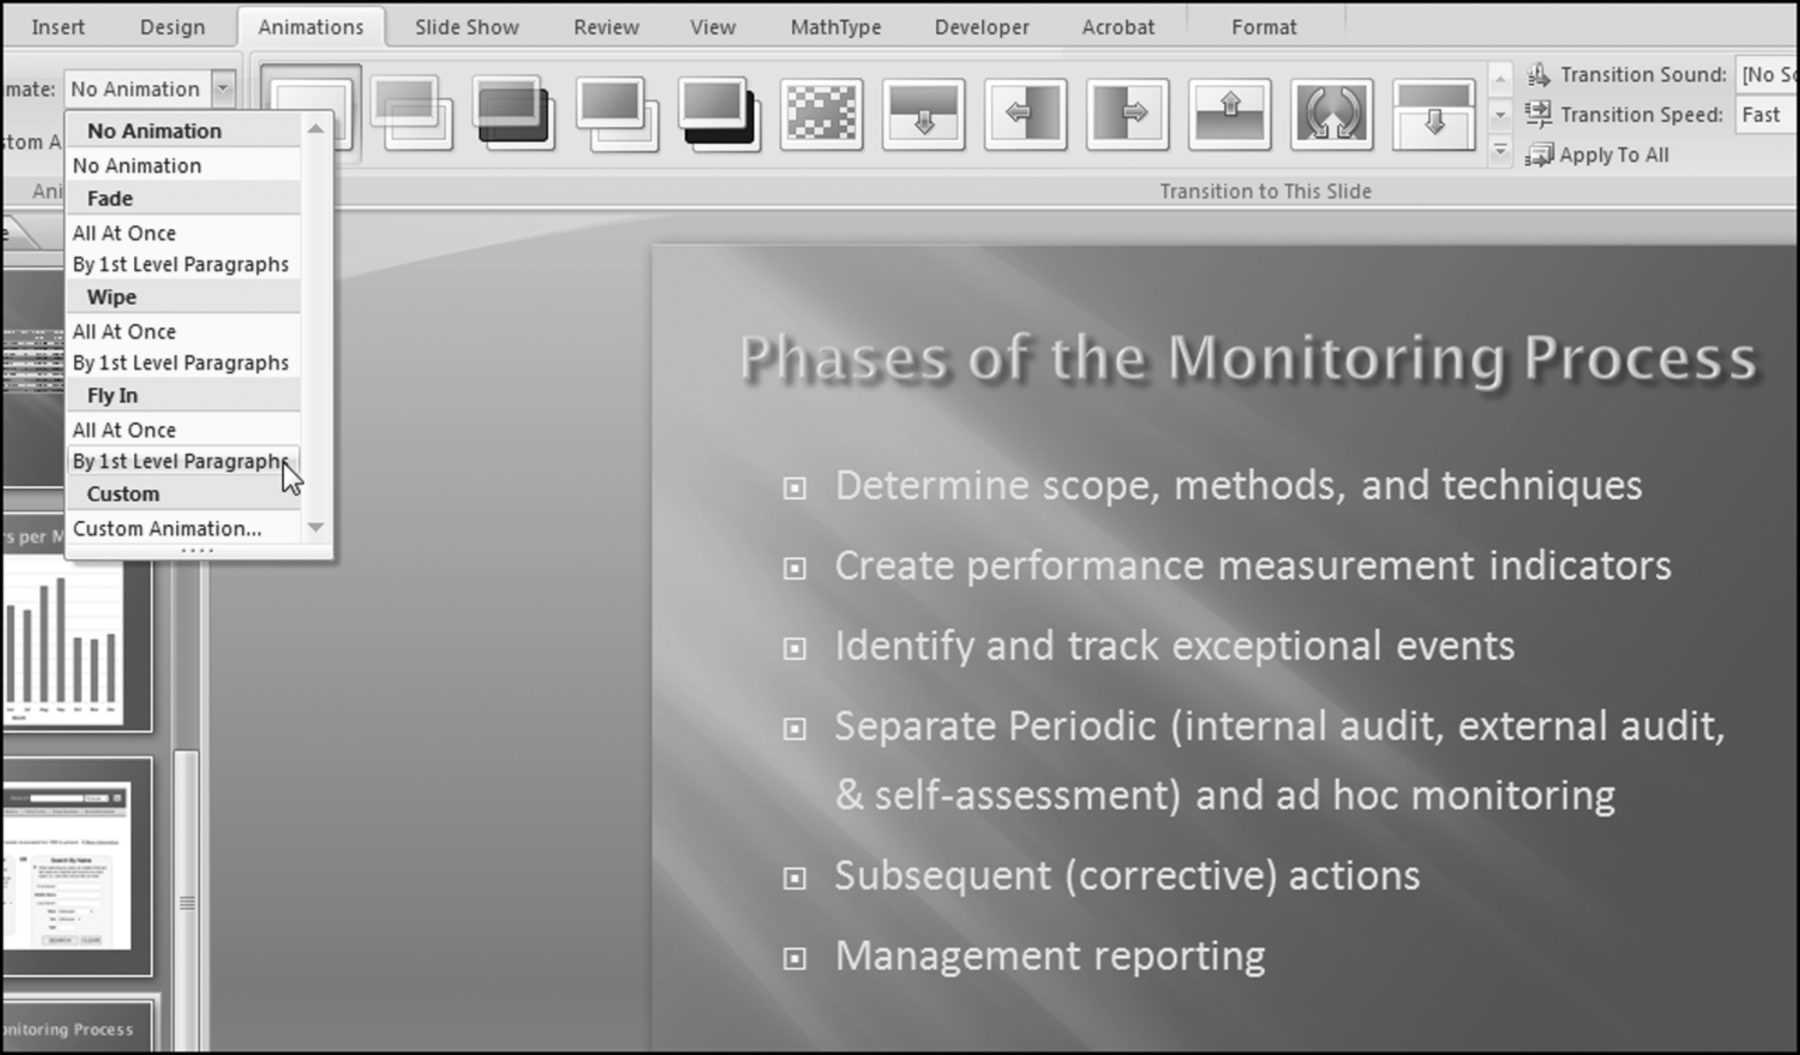
The way to animate the bullet points is shown in Figure 3.12. The Animations tab also includes an option for the transitions of the entire presentation in Transitions to This Slide. The best choice is a transition that is simple and the Wipe Right transition accomplishes this. It is important to use an appropriate transition and also to have all the transitions being consistent from slide to slide (use the Apply To All button).
Miscellaneous PowerPoint Notes
This section includes some miscellaneous presentation and PowerPoint notes. The observations were made from watching the presentations of others and also by reflecting back on my own work. The notes are listed below:
What did they do with that money? They each bought $96,000 matching Mercedes, they bought four beach houses, they bought luxury cars for their friends and their family. They bought a $250,000 box in Clemson stadium, they bought hundreds of thousands of dollars of jewelry. The list of assets that we gave you was ten pages, single spaced.
- It is best not to read from PowerPoint slides especially when the presenter's back is turned to the audience. The audience can read the slides silently in their heads far quicker than any presenter can read out aloud. The presenter should talk about the point or points on the slide without reading the words out aloud.
- Slides should be kept simple with brief amounts of text, or only one diagram, or one or two images on each slide.
- PowerPoint's gimmicks should be avoided during a forensic-related presentation. These gimmicks have their time and place in perhaps a presentation to fifth graders.
- Include images only when they make an issue become more true to life. For example, in the sentencing hearing of Charlene Corley the prosecutor notes that,
If the sentencing hearing was done with a PowerPoint presentation then the presentation would be made more true to life by including images of these assets. In a forensic fraud presentation the photos should be photos of the exact items. Photos of generic expensive cars or generic beach houses would not be appropriate. Avoid using low-quality (grainy) images unless the presentation is about the Kimberly Hole in 1872, in which case we would expect a low resolution.
- Presenters should avoid using cartoon images in forensic-related presentations. They will invariably set an incorrect tone for the presentation.
- Presenters should use sounds in a presentation only if they are important to delivering, complementing, or enhancing your message. Including sound in a presentation (e.g., 30 seconds from a recorded conversation) is tricky especially if the presentation is prepared on one computer and presented on another computer with the PowerPoint file on a USB flash drive. This is because the sound file might be in C:/Forensic on the presenter's computer but it is not in that location on the presentation computer.
- Presenters should spend time crafting the opening and closing remarks. Words should be chosen carefully in a forensic environment. For example, the investigator's job is not to call for justice, restitution, and a sentence that acts as a deterrent for future employees or customers. That is the public prosecutor's job.
- Keeping to the time limit is difficult for most presenters. One tactic is to divide the presentation into (say) four equal time segments. The presenter should make bold indications in their notes to the effect that slide #4 should be presented by 8:10, slide #10 by 8:20, slide #14 by 8:30, and concluding remarks should be started at around 8:40. These intermediate targets will help to ensure an on-time ending. It is often the case that presenters add unnecessary fluff at the start of a talk only to have to make a unflattering rush at the end to finish. This is an issue when it was the conclusions and suggestions for future work that drew the audience to the talk in question.
A well-prepared presentation will be well-received and people with presentation skills are in high demand in corporations. It is often the case that inexperienced presenters will spend 5 minutes answering a question on a tangential issue without realizing that those 5 minutes are squeezing the remaining points into an even more compressed time frame. With experience comes the ability to use all the presentation minutes for the maximum effectiveness. It is much easier to prepare a 90-minute presentation than it is to prepare a 20-minute presentation. The fast pace of corporate life does not allow for 90-minute marathons.
PowerPoint causes the audience's attention to be divided between the presenter and the screen. The presenter should work to keep the focus on their persona and PowerPoint should be used to enhance the presentation. PowerPoint should not be the presentation. The chapter covered a number of issues related to using PowerPoint in a forensic-related presentation. The chapter also covered some common problems related to forensic reports mainly related to organization and style and interpretations and opinions.
In a forensic environment the first consideration is the color scheme and background colors. Dark background colors are preferred. PowerPoint is seamlessly compatible with Word and Excel. Files with images and content from the Office suite programs can be easily included in PowerPoint slides. The chapter concludes with a discussion of miscellaneous presentation issues, which have the general theme that a forensic-related presentation is a serious matter, the time constraints should be adhered to, the slides should enhance the presentation, and flashy gimmicks should be avoided.