Table of Contents for
Professional WordPress® Plugin Development
 Professional WordPress® Plugin Development
Published by
Wrox, 2011
Professional WordPress® Plugin Development
Published by
Wrox, 2011
- Copyright
- CREDITS
- ABOUT THE AUTHORS
- ACKNOWLEDGMENTS
- FOREWORD
- INTRODUCTION
- 1. An Introduction to Plugins
- 2. Plugin Foundation
- 3. Hooks
- 4. Integrating in WordPress
- 5. Internationalization
- 6. Plugin Security
- 7. Plugin Settings
- 8. Users
- 9. HTTP API
- 10. The Shortcode API
- 11. Extending Posts: Metadata, Custom Post Types, and Taxonomies
- 12. JavaScript and Ajax in WordPress
- 13. Cron
- 14. The Rewrite API
- 15. Multisite
- 16. Debugging and Optimizing
- 17. Marketing Your Plugin
- 18. The Developer Toolbox
WHAT'S IN THIS CHAPTER?
Keeping updated with WordPress
Debugging your plugins
Logging debug errors
Caching data for optimal speed
You can debug and optimize code in many ways. WordPress provides several simple-to-use tools that make plugin developers' lives easier. One of the largest problems in the community is that many plugin developers simply don't use these basic techniques, leaving loads of room for improvement.
Throughout this chapter, you learn how to deal with outdated versions of WordPress, debug issues with your plugins, and cache (store) data for later use. The topics presented in this chapter are all simple features that you can use to make a better plugin.
As a developer, it's easy to think that you should maintain backward compatibility with older versions of software. It usually makes sense to do this to capture the largest possible audience and please users.
However, the WordPress philosophy on maintaining compatibility with old versions is quite different. In the WordPress development community, backward compatibility may sometimes even be looked down upon. Users are expected to stay updated with the latest version of the software. This philosophy comes down to a few key points.
Users are given an "update nag" at the top of their WordPress admin screens, which prompts them to update.
There is a multitude of ways to update. Users can even do this with a couple of mouse clicks from their WordPress admin.
WordPress core release cycles are frequent, usually every three to four months.
WordPress doesn't maintain security updates for older versions. Using the latest version is the only way to be sure you use the most secure version of WordPress.
For those reasons, a developer should expect users to be as updated as possible when developing publicly available plugins.
Being too far ahead of users can also be a bad thing. Some backward compatibility to give users time to transition between new WordPress versions is good practice. A good rule of thumb is to maintain backward compatibility for one major release cycle. This way, you stay current with new WordPress functionality and allow a three-to-four-month window for users to update.
Some plugins will simply be backward compatible because they use no new functions. However, if your plugin takes advantage of a function in a new release, you can use the PHP function function_exists() to check if the user is using the latest version before executing the specific function.
Suppose you want to use the WordPress 3.1 function get_users() but also wanted to maintain compatibility with users still using WordPress 3.0. Your code would look like this.
<?php

/* If the get_users() function is available. */
if ( function_exists( 'get_users' ) ) {

    /* Use the get_users() function. */
    $users = get_users();
}

/* If the get_users() function is not available. */
else {

    /* Perform alternate functionality. */
}

?>
The code snippet uses function_exists() to check if the get_users() function exists. If it does exist, this means the user is using WordPress 3.1 or a newer version and the plugin can use the get_users() function. If the function does not exist, the plugin can fall back to an alternative way to handle the functionality.
To be a great plugin developer for the WordPress platform, it's paramount that you keep up with WordPress development. WordPress is constantly being developed. Not a day will go by without a core code committer or contributor thinking about or coding solutions for old problems, new features, or proposing different ideas about the direction of WordPress. It's a large community with many moving parts and avenues of information.
At minimum, you need to keep up with the development of the core WordPress code. Some benefits for plugin developers follow:
Staying current with WordPress development is crucial for developing the best plugins. You can sometimes cut out many lines of code when new features or functions are introduced. You can clean out old functionality and replace it with new functionality when functions are deprecated. And you can make your own life easier by not putting in workarounds for WordPress bugs that have been holding back development of your plugin.
You should also know how releases are handled within WordPress. Understanding this simple concept can enable you to know when you need to do an overview of your plugins to see if an update is needed. The two types of releases are major releases and point (or minor) releases.
Major releases come in the form of 3.0, 3.1, and 3.2. These releases are made available every few months with new features, new functions, and bug fixes. Many code changes are made between major releases.
Point releases are minor releases between major releases. Between the version 3.1 and version 3.2 major releases, you might have versions 3.1.1, 3.1.2, and so on. These releases are generally bug fixes and security releases. New functions are rarely added.
Being involved in the WordPress community can help your plugin development. Many sites and blogs keep up with development and trends in WordPress. However, the most important place to keep track of development is the WordPress issue and development tracker: http://core.trac.wordpress.org. This is where the latest development takes place.
It may take a little time to understand how the system works, but when you do, you'll probably even find yourself getting involved in WordPress development. The best way to start learning the system is to simply start reading each ticket placed on the site and follow the development flow.
Note
It'll be tough to find better ways of becoming a good plugin developer than getting involved in core WordPress development. It helps you stay on top of new functionality and gives you an intimate understanding of the core code.
A deprecated function is a function being phased out of WordPress. It has been explicitly marked as something that developers should no longer use in their plugins. Typically, deprecated functions have a replacement function. PHP functions aren't the only things deprecated in WordPress. Sometimes files and function parameters or arguments are deprecated.
You can usually find deprecated functions within one of several files WordPress uses to house these functions.
wp-includes/deprecated.php— General deprecated functionswp-includes/ms-deprecated.php— Deprecated multisite functionswp-includes/pluggable-deprecated.php— Deprecated pluggable functionswp-admin/includes/deprecated.php— Deprecated admin functions
Browsing through the core code for deprecated functions can be tedious at times. It's a good method for viewing all the deprecated functions. However, you'll most likely deal with deprecated functions when debugging, which is described later in this chapter.
When you release publicly available plugins, you have no control over whether the users keep their WordPress installation up to date. When you deal directly with clients, you can communicate directly with the clients and sometimes have access to their WordPress install.
If you work with clients who use an outdated version of WordPress, you should consider it your responsibility to make sure they use the latest and most secure version of WordPress. If the clients don't want to update, it's always nice to have a handy list of reasons why they should update.
Some benefits to keeping your clients' installs updated include the following:
It makes developing clients' plugins easier. It can cut back on development time and cost.
Your clients use the most secure version, so there's less of a chance of their site being hacked.
Clients may want you to update the site for them and keep it updated, which can be great for repeat business.
If you deal with clients that don't want to update for whatever reason, the biggest thing you can stress is security. Clients tend to listen when you let them know the horrors of getting their site hacked.
If upgrading clients' sites, the most important thing you can do is keep multiple backups. The WordPress update process is simple, but the moment you get lazy with backups is usually the moment you need one.
One of the biggest problems that plagues WordPress plugins today is that most plugins haven't been properly debugged. This could be from a lack of understanding of what debugging is, knowledge about the subject, or motivation to fix the issues. By following the steps outlined in this section, you can be a few steps ahead of the competition by simply cleaning up your code.
Debugging is the act of finding "bugs" in software. Bugs are errors found within the code. In PHP, major issues can crash an entire Web page and display an error message on the page. However, some issues are hidden in many cases. WordPress has a method for exposing these issues.
As a plugin developer, you should always develop plugins with debugging enabled. Some benefits of debugging include the following:
Knowing exactly where a bug is in your code
Fixing minor issues that don't necessarily affect the functionality of your plugin but could potentially expose larger, unseen issues
Correcting major issues that affect functionality of the plugin but are tough to find by browsing the code
Getting notices when WordPress has deprecated a function, parameter, argument, or file
Don't let the idea of debugging scare you away from doing it. Most debugging issues are minor problems that take only minutes to correct. Plus, debugging can help you become a better developer by pointing out common mistakes you might make.
In this section, you enable debugging for your WordPress install. You need to enable debugging whenever developing plugins. It can make your plugin better by letting you know what issues arise during the development phase.
In your WordPress install, open the wp-config.php file, which is at the root of the install by default. The wp-config.php file will have a line that looks like this:
define('WP_DEBUG', false);What this line does is tell WordPress that debug mode should be disabled, so no debug messages should be shown. You don't want debugging disabled on your development install. You need to enable it.
To turn debugging on, change false to true. The debugging line in your wp-config.php file should now look like the following.
define('WP_DEBUG', true);Enabling debugging makes two important things possible for debugging your plugins:
Displays debug messages directly on the screen as they happen. This is the default behavior when
WP_DEBUGis set totrue.Enables you to use the error logging feature of WordPress, which is covered in the "Error Logging" section of this chapter.
After you enable debugging, view your WordPress install. If you're running any other plugins, you'll most likely see numerous error messages displayed in various places on the page. This is because most plugins aren't coded to the standards they should be. You have the advantage of this chapter, so there's no excuse for any of your plugins to be displaying debug errors.
Now take a look at what a deprecated function looks like when used with debugging enabled. Suppose you wanted to check if a specific taxonomy exists. Prior to WordPress 3.0, the function you would use for this would be the is_taxonomy() function. However, this function was deprecated in WordPress 3.0 and a new function was introduced. If you wanted to display a message that the "category" taxonomy exists pre-3.0, your code would look like this.
<?php

if ( is_taxonomy( 'category' ) )
    echo 'The category taxonomy exists.';

?>
Using this code can produce the debug message shown in Figure 16-1.

The debug message tells you several things about using the is_taxonomy() function.
The deprecated function is
is_taxonomy().The version the function was deprecated is 3.0.
The replacement function is
taxonomy_exists().
This is usually all you need to know to update your plugin's code. To update the code you just used, you would replace the deprecated function with the given replacement function. In some instances, no replacement function will be displayed. You'll have to deal with those scenarios on a case-by-case basis because each might have a different solution.
To update the use of the is_taxonomy() function with its replacement function, change is_taxonomy to taxonomy_exists.
<?php

if ( taxonomy_exists( 'category' ) )
    echo 'The category taxonomy is exists.';

?>
Making this simple change can bring your code up to date and remove any debug messages relating to it from the site.
Most debug messages are created by PHP notices. Some developers may even laugh off notices as "harmless" issues because they're not crashing the site. Although this may be true to some degree, some cases actually reveal larger problems with the code. You should consider it your responsibility to always clear out all debug issues within your plugins.
In this section, you see three of the most common debug messages and how to fix each within your plugins.
Deprecated WordPress functions
Undefined variable/property notice
Trying to get property of a nonobject notice
To see debug messages in action, you must write a bad plugin. This will be the only time in this book that you'll be prompted to create such horrible code, but you're allowed to do it this time because it's a learning exercise.
For this example, keep it simple. Your plugin will attempt to add a post author information box at the end of posts that shows the author name and description. Create a new plugin file called boj-error-plugin.php in your WordPress plugins directory and add the following code to the file.
<?php
/*
Plugin Name: Error Plugin
Plugin URI: http://example.com
Description: Plugin that creates debug errors.
Version: 0.1
Author: WROX
Author URI: http://wrox.com
*/

/* Filter 'the_content'. */
add_filter( 'the_content', 'boj_error_plugin_author_box' );

/* Appends an author box to the end of posts. */
function boj_error_plugin_author_box( $content ) {

    /* If viewing a post with the 'post' post type. */
    if ( 'post' == $post->post_type ) {

        /* Open the author box <div>. */
        $author_box = '<div class="author-box">';

        /* Display the author name. */
        $author_box .= '<h3>' . get_the_author_meta( 'display_name' ) . '</h3>';

        /* Display the author description. */
        $author_box .= '<p>' . get_the_author_description() . '</p>';

        /* Close the author box. */
        $author_box .= '</div>';
    }
/* Append the author box to the content. */
$content = $content . $author_box;
/* Return the content. */
return $content;
}
?>Code snippet boj-error-plugin.php
There are several issues with this plugin. Because you enabled debugging on your WordPress install, you're probably looking at a screen with three debug messages, as shown in Figure 16-2. There are actually four issues, but one issue isn't revealed because the rest of the code is so bad it never has a chance to execute.
The biggest issue with the code is this line.
if ( 'post' == $post->post_type ) {It's trying to check if it's viewing a post with the post type of post. The first issue is an "undefined variable" issue. The $post variable isn't defined anywhere. Because it's not defined, it definitely isn't an object. You get a Trying to Get Property of Nonobject error in this case. Both of the first two issues can be fixed by getting the global $post variable, which is done by adding a single line before the preceding line.
global $post;
After fixing these issues, the third debug message disappears when viewing blog posts but reappears for other post types such as pages. This message is caused by the next line of the plugin, resulting in an Undefined Variable notice.
$content = $content . $author_box;
The problem with this line is that the $author_box variable will not always be set. This notice is one of the issues you'll run into the most and is one the easiest issues to fix. It is good practice to either explicitly set your variables early in the function or check if they've been set before trying to use them in other parts of your code. In this instance, you use the PHP isset() function to check if the $author_box variable has been set before appending it to the $content variable.
if ( isset( $author_box ) )
    $content = $content . $author_box;
After fixing the first three issues, you'll notice a fourth issue appear. The debug message lets you know that you used a deprecated function: get_the_author_description(). The message also tells you that it has been replaced by get_the_author_meta('description'). This debug message is caused by this line of the plugin:
$author_box .= '<p>' . get_the_author_description() . '</p>';
Again, this is a simple change. You need to replace only the deprecated function with the new function. Your new code would look like the following.
$author_box .= '<p>' . get_the_author_meta( 'description' ) . '</p>';
Making these small changes clears the plugin of debug messages completely. It can also make the intended functionality of the plugin work. After completing each change, your code appears as shown in the following plugin.
<?php
/*
Plugin Name: Error Plugin Fixed
Plugin URI: http://example.com
Description: Errors fixed in the "Error Plugin."
Version: 0.1
Author: WROX
Author URI: http://wrox.com
*/

/* Filter 'the_content'. */
add_filter( 'the_content', 'boj_error_plugin_author_box' );

/* Appends an author box to the end of posts. */
function boj_error_plugin_author_box( $content ) {
    global $post;

    /* If viewing a post with the 'post' post type. */
    if ( 'post' == $post->post_type ) {

        /* Open the author box <div>. */
        $author_box = '<div class="author-box">';

        /* Display the author name. */
        $author_box .= '<h3>' . get_the_author_meta( 'display_name' ) . '</h3>';

        /* Display the author description. */
        $author_box .= '<p>' . get_the_author_meta( 'description' ) . '</p>';
/* Close the author box. */
$author_box .= '</div>';
}
/* Append the author box to the content. */
if ( isset( $author_box ) )
$content = $content . $author_box;
/* Return the content. */
return $content;
}
?>Code snippet boj-error-plugin-fixed.php
WordPress offers another useful tool for debugging your site: error logging. This feature is an extension of the debugging process previously described. It creates an error log file that keeps track of issues as they happen on your WordPress installation.
This feature is useful for debugging issues with plugins because it logs each error into a specific file, which enables you to easily read through all issues at once. However, perhaps more important, this is useful for live sites. Generally, you wouldn't display debug messages on a live site, but you might want to keep track of them in a file that's hidden from the eyes of site visitors.
By enabling error logging, you gain an easy way to keep track of all debug messages on your site. This can give you an exact debug message and the date/time the error occurred. Error log messages are saved in a debug.log file within the WordPress install's wp-content directory by default.
To enable error logging, you need to edit your WordPress install's wp-config.php file as you did in the debugging section. You turned WP_DEBUG mode on in that section. Now, you need to turn on WP_DEBUG_LOG by adding the following code to the file.
define( 'WP_DEBUG_LOG', true );
The debugging section of your wp-config.php file would now look like this:
define( 'WP_DEBUG', true );
define( 'WP_DEBUG_LOG', true );
What these two lines do is tell WordPress that you want to enable debugging and that debug messages should be saved in an error log file.
You can also optionally disable the display of debug messages on the site and save them only in the debug file. This is a useful technique if you want to keep track of debug messages on a live site rather than a development install. To do this, you need to add two new lines to your wp-config.php file.
define( 'WP_DEBUG_DISPLAY', false );
ini_set( 'display_errors', 0 );
When error logging is enabled, WordPress creates a debug.log error log file in the wp-content folder. In most situations, this location and filename will work fine. However, if you want to change it to something else, you have the option to do so.
After enabling error logging, you may optionally add the following line to change the path and filename.
ini_set( 'error_log', '/example/example.com/wp-content/logs/debug.log' );
This tells WordPress that you want your debug log to be in a logs folder. One important thing to note is that you need to use the correct directory path here rather than a URI path.
The debug.log file created by enabling error logging can be read with any basic text editor, so you shouldn't have any trouble opening it and reading its contents.
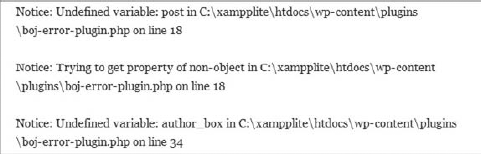
In the "Debugging" section, you created an error plugin. You also learned how to correct debug messages displayed on the screen. The error log file is another way to view those debug messages, and the messages saved in the log file will look much the same as what you saw onscreen. Following is a view of a log file that the error plugin you created would produce when first using it.
[27-Oct-2010 16:07:37] PHP Notice:  Undefined variable: post in
    C:\xampplite\htdocs\wp-content\plugins\boj-error-plugin.php on line 18

[27-Oct-2010 16:07:37] PHP Notice:  Trying to get property of non-object in
    C:\xampplite\htdocs\wp-content\plugins\boj-error-plugin.php on line 18

[27-Oct-2010 16:07:37] PHP Notice:  Undefined variable: author_box in
    C:\xampplite\htdocs\wp-content\plugins\boj-error-plugin.php on line 34
As you can see, each message creates a new line (or entry) within the file. The message looks nearly the same as what you looked at in the "Debugging" section. The only exception here is that you have an exact time and date of when the issue occurred.
After reading through your error log messages, you need to revisit the "Debugging" section to work through the issues. One thing about the error log is that messages aren't cleared from the file after you've fixed the issue on the site. Notice the timestamp as you clear away issues so that you're not looking for issues you've already fixed.
Caching is a way to store data for later use. People use many different types of caching and different methods to cache data on their sites. You would typically save data that's expensive to generate so that it can be loaded quickly whenever it's needed. It's a way to optimize page load times.
Rather than focusing on building in caching within individual plugins, WordPress provides a method for plugins to handle caching. WordPress has the WordPress Object Cache feature, which is a PHP class that plugins can use for storing data. WordPress doesn't store this data on its own. It provides a way for caching plugins to cache the data. This method allows for different caching solutions based on user needs.
Two great benefits exist for using WordPress' built-in method for caching.
There's a single set of functions that all plugins can use without conflicting with other plugins.
Caching plugins can be created to handle persistent caching, which saves data across multiple page views.
Using the WordPress Object Cache will not speed up your plugins directly. By default, cached data is saved only for the web page view it is executed on. For example, you could store data once and use it multiple times on a single page without having to execute the same code. When using a persistent-caching plugin, this data can be stored and accessed across multiple page views.
The biggest reason to use this system is that it enables your plugin users to choose the caching method that benefits them the most or works with their server setup the best. WordPress simply provides the needed functions as an all-encompassing API that multiple plugins can use.
Note
In Chapter 7, "Plugin Settings," you learned how transients work. Transients are a way to ensure that data is cached for a specific amount of time. However, if a user has installed a persistent-caching plugin, transients will be served using the WordPress Object Cache.
WordPress provides several easy-to-use PHP functions for working within the caching system. Each function enables you to save, update, load, or delete cached data. There are other cache-related functions than what's provided in this chapter; however, the functions you'll learn are the functions you'll use the most often.
Each function uses at least one of the following parameters.
$key— A unique ID to store and retrieve data by. The cache key doesn't need to be unique across multiple cache groups, but it must be unique within an individual group.$data— The data your plugin wants to save and retrieve.$group— A way to group multiple pieces of cached data. For example, multiple cache keys can be grouped together. This parameter is optional.$expire— How long the data should be stored in seconds. This parameter is optional and defaults to0, allowing the data to be stored indefinitely.
The wp_cache_add() function should be used when your plugin needs to store data to a cache key that doesn't already exist. If the cache key does exist, no data will be added.
<?php
wp_cache_add( $key, $data, $group, $expire );
?>
The wp_cache_replace() function enables plugins to overwrite previously saved data for the cache key.
<?php
wp_cache_replace( $key, $data, $group, $expire );
?>
The wp_cache_set() function is a combination of the wp_cache_add() and wp_cache_replace() function. If the data for the cache key is not already saved, it will create it. If it does exist, it will overwrite the preexisting data.
<?php
wp_cache_set( $key, $data, $group, $expire );
?>
The wp_cache_get() function provides a way for plugins to load cached data by cache key and group. It returns false if no data is found. It returns the cached data if it exists.
<?php
wp_cache_get( $key, $group );
?>
In this section, you create a simple plugin that caches a list of related posts to append to the content of single post views. Each blog post on the site stores its data with a unique cache key based on the post ID in a boj_related_posts cache group.
Use two of the caching functions for this simple exercise. Use the wp_cache_set() function to cache the related posts list and the wp_cache_get() function to get the cached posts.
Your new Cache Related Posts plugin has a filename of boj-cache-related-posts.php.
<?php
/*
Plugin Name: Cache Related Posts
Plugin URI: http://example.com
Description: A related posts plugin that uses the object cache.
Version: 0.1
Author: WROX
Author URI: http://wrox.com
*/

/* Add related posts to the content. */
add_filter( 'the_content', 'boj_cache_related_posts' );

/* Appends a list of related posts on single post pages. */
function boj_cache_related_posts( $content ) {

    /* If not viewing a single post, return the content. */
    if ( !is_singular( 'post' ) )
        return $content;

    /* Get the current post ID. */
    $post_id = get_the_ID();

    /* Get cached data for the specific post. */
    $cache = wp_cache_get( $post_id, 'boj_related_posts' );

    /* If no data has been cached. */
    if ( empty( $cache ) ) {

        /* Get the post categories. */
        $categories = get_the_category();

        /* Get related posts by category. */
        $posts = get_posts(
            array(
                'category' => absint( $categories[0]->term_id ),
                'post__not_in' => array( $post_id ),
                'numberposts' => 5
            )
        );

        /* If posts are found. */
        if ( !empty( $posts ) ) {

            /* Create header and open unordered list. */
            $cache = '<h3>Related Posts</h3>';
            $cache .= '<ul>';

            /* Loop through each post, getting a link to its single post page. */
foreach ( $posts as $post ) {
$cache .= '<li><a href="' . get_permalink( $post->ID ) . '">' .
get_the_title( $post->ID ) . '</a></li>';
}
/* Close the unordered list. */
$cache .= '</ul>';
/* Cache the related post list for 12 hours. */
wp_cache_set( $post_id, $cache, 'boj_related_posts', 60 * 60 * 12 );
}
}
/* If there's cached data, append it to the content. */
if ( !empty( $cache ) )
$content .= $cache;
/* Return the content. */
return $content;
}
?>Code snippet boj-cache-related-posts.php
The first cache function used in the plugin was wp_cache_get(). It checks if a list of related posts has been cached using the key of the current post's ID, $post_id. It also checks if this data has been stored in the boj_related_posts group. If the related posts are saved with that specific key and group, this list is appended to the content. It bypasses the need to regenerate the related posts list.
The wp_cache_set() function caches the related posts list for later. This enables the posts list to be retrieved with the wp_cache_get() function. It is used after the related posts list was created. The list was then saved based on the post's ID and the boj_related_posts group. You also set a 12-hour time limit on the cached data.
Basic caching functionality usually requires only two things, which this plugin does:
Check if there's any cached data. If so, use that data and skip over the functionality required to generate it.
If no cached data exists, generate and cache it. It can then be used later.
Entire books could be written on debugging and optimization alone. The purpose of this chapter was not to cover every possible avenue you may take. The goal was to present you with a starting point to work from and to give you a look into the features that WordPress provides.
Some of the most important things you can do are keep updated, debug your plugins, and use the built-in cache system. Your plugins can use the most up-to-date functionality, be less prone to issues, and make users happy by working with their preferred caching solution. All these things require little time and can make your plugins better.