Table of Contents for
Professional WordPress® Plugin Development
 Professional WordPress® Plugin Development
Published by
Wrox, 2011
Professional WordPress® Plugin Development
Published by
Wrox, 2011
- Copyright
- CREDITS
- ABOUT THE AUTHORS
- ACKNOWLEDGMENTS
- FOREWORD
- INTRODUCTION
- 1. An Introduction to Plugins
- 2. Plugin Foundation
- 3. Hooks
- 4. Integrating in WordPress
- 5. Internationalization
- 6. Plugin Security
- 7. Plugin Settings
- 8. Users
- 9. HTTP API
- 10. The Shortcode API
- 11. Extending Posts: Metadata, Custom Post Types, and Taxonomies
- 12. JavaScript and Ajax in WordPress
- 13. Cron
- 14. The Rewrite API
- 15. Multisite
- 16. Debugging and Optimizing
- 17. Marketing Your Plugin
- 18. The Developer Toolbox
The Rewrite API is often considered as one of the trickiest areas in WordPress and is certainly one of the least documented on the Web. This chapter first gives you some background information on why URLs are rewritten, then explains how to do this in WordPress, and finally shows you real-life client situations in which you can leverage the Rewrite API.
Dynamic sites use URLs that generate content from query string parameters. These URLs are often rewritten to resemble URLs for static pages on a site with a subdirectory hierarchy. For example, the URL to a wiki page might be http://example.com/index.php?title=Rewrite_URL and be actually rewritten to http://example.com/Rewrite_URL. A request to this latter, prettier URL will be transparently rewritten by the web server to the former URL.
This introductory section familiarizes you with the concept of "pretty permalinks" (sometimes called "fancy URLs" in web applications) and URL rewriting, in general and specifically in WordPress.
Web applications and sites can have two completely different audiences: human readers and search engines. Online resources should be both search engine and user friendly.
Suppose you have coded a complete online store for a client, with various products and categories. From a programmer's perspective, each URL of the site would be similar to http://example.com/shop.php?action=display&category=12&subcat=4. This URL easily maps to variables that can then typically fetch information from a database or perform actions.
The problem with that URL is that search engines may index it or just index http://example.com/shop.php, which may not even return something intelligible.
As a human user, you want a URL to be easy to understand and, if possible, memorable. For instance, consider the two URLs that would actually display the same product page:
example.com/shop.php?action=display&category=123&subcat=7&product_id=43
example.com/shop/liquor/whisky/lagavulin/
The first URL is long and cryptic, whereas the second one is shorter and self-explanatory.
Even when URLs are not obscure like the first one, having a directory-like structure makes it much more understandable. The following two URLs would, for instance, point to the same page on a WordPress powered site:
http://example.com/index.php?year=2011&paged=6http://example.com/2011/page/6/
Web server developers have imagined ways to rewrite URLs, from something programmatically convenient (shop.php?product=43) to something user and search engine friendly (/buy/ardbeg/). This section highlights how this is done with the Apache web server, but other web server software (Lighttpd, Nginx, IIS, and so on) all have similar techniques.
The key module for permalinks in Apache is mod_rewrite, a module that enables defining rewrite rules typically found in the .htaccess file. A classic rewrite rule consists in the following code block:
<IfModule mod_rewrite.c>
RewriteEngine on
RewriteRule [ pattern] [ substitution ] [ optional flag(s) ]
</IfModule>
The pattern and substitution parameters can use regular expressions. Consider for instance the following rewrite rule:
RewriteRule /buy/([^/]+)/ /shop.php?product=$1 [L]
Now, when a client requests a URL that starts with /buy/ followed several times by a character that is not a slash ([∧/]+) and then a slash, the web server internally redirects the request to /shop.php and passes the parameter product with the value caught inside the parentheses of the pattern.
If you want to learn more about mod_rewrite and URL rewriting in a non-WordPress environment, you can read a thorough guide at http://articles.sitepoint.com/article/guide-url-rewriting.
A typical WordPress URL such as /2011/03/hello-world/ doesn't match an actual physical path on the web server. (No "hello-world" directory is in a "03" directory, which is in a "2011" folder.) At some point, the URL was therefore rewritten.
Note
If your WordPress setup runs on a capable server (usually Apache with mod_rewrite), you can enable "Pretty Permalinks" to benefit from the user and search engine-friendly URLs, such as example.com/2011/03/hello-world/ instead of example.com/index.php?p=1. Read more about this beginner feature on the Codex at http://codex.wordpress.org/Using_Permalinks.
When installed, WordPress creates an .htaccess file in its root directory that contains the following block:
<IfModule mod_rewrite.c>
RewriteEngine On
RewriteBase /
RewriteRule ^index\.php$ - [L]
RewriteCond %{REQUEST_FILENAME} !-f
RewriteCond %{REQUEST_FILENAME} !-d
RewriteRule . /index.php [L]
</IfModule>
This mod_rewrite directive contains a conditional rewrite rule, which tells the following to the web server:
If the request is
index.php, redirect to this file and don't try to match any other rewrite rule. (The[L]flag stands for Last.)If the request is not a file (
%{REQUEST_FILENAME} !-f)...... and if the request is not a directory (
%{REQUEST_FILENAME} !-d)...... then rewrite the URL to
index.phpand don't try to apply another rewrite rule.
This .htaccess directive redirects requests such as /2011/page/6/ to /index.php. This means that practically all requests in the frontend area of a WordPress site are internally redirected to index.php, which then has to guess how to interpret the request. Enter the Rewrite API.
You now know that when a visitor loads a WordPress powered page, the file actually loaded is index.php. For instance if you request http://example.com/2011/03/hello-world/, WordPress internally redirects this URL into http://example.com/index.php?p=1 and eventually fetches from the database data for the post with ID 1. How is the translation from a URL to a MySQL query done?
The following section explains what magic happens when the web server displays a WordPress powered page and how plugins can interfere with this process.
You need to understand how and when events occur within WordPress because this can highlight the parts where your plugin can interfere with the process. You can now dissect the flow of events when a page is requested and determine which files are included and which functions are called:
The root
index.phpfile is loaded, as per the.htaccessrewrite rule, and loads the filewp-blog-header.php.This file loads
wp-load.php, which searches and includeswp-config.php, which will in turn loadwp-settings.phpthat includes the function files, active plugins, and then pluggable functions.Two new objects are instantiated:
$wp_queryand$wp_rewrite. You learn about these later.A few other files are loaded, such as translation files and the theme's functions file.
Note
If you have not done it already, read the source of
wp-settings.php: This file explains the flow of initial events, of which you've read an overview in Chapter 1, "An Introduction to Plugins."
WordPress is now fully loaded and plugins can start interacting, but it doesn't know yet what to display and what page has been requested. Back to wp-blog-header.php: After everything is loaded, this file calls the function wp(), which starts the magic — the function WP::parse_request().
The function parse_request() from the WP class (found in wp-includes/classes.php) prepares everything WordPress needs to know to understand the page request:
This function fetches the list of all the registered rewrite rules. Just as previously explained with
mod_rewrite, it consists in a list of pattern => replacement pairs, to tell WordPress that/category/tutorials/page/2/actually means/index.php?category_name=tutorials&paged=2.The function goes through each rewrite rule, compares it to the requested URL, and tries to find a match. If no match is eventually found, this is a 404 error.
At this point, if the page is not a 404 error, WordPress now has a permalink translation pattern with query variable placeholders, such as
index.php?category_name=<string>&paged=<number>. It now needs to get the values of these query variables.The function
parse_request()now obtains the list of the registered query variables, and for each variable checks if a value has been set by the permalink pattern, byPOST, or byGETsubmission.Now, WordPress knows everything it needs to convert the initial URL request into a proper MySQL database query, get post data, load the required theme template, and display the requested page.
Two expressions may have caught your attention in the preceding flow description: "registered rewrite rules" and "registered query variables." If at some point these are registered, maybe there's a way for plugins to modify them? Of course there is!
The $wp_rewrite object, previously introduced, is the first object you mess with when playing with the Rewrite API. Have a look at its content: Using a simple print_r( $wp_rewrite ) displays the following information:
WP_Rewrite Object (
...
[permalink_structure] => /%year%/%postname%/
[use_trailing_slashes] => 1
...
[rules] => Array (
  [category/(.+?)/?$] => index.php?category_name=$matches[1]
  [tag/([^/]+)/page/?([0-9]{1,})/?$] => index.php?tag=$matches[1]&paged=$matches[2]
  [tag/([^/]+)/?$] => index.php?tag=$matches[1]
  [(.+?)/trackback/?$] => index.php?pagename=$matches[1]&tb=1
  ...
  )
[endpoints] => Array ()
...
)
Some of the preceding properties should already be familiar to you: The rules array contains the list of all registered rewrite rules. The $rewrite object contains all the information related to the permalink structure of your site, such as the complete set of rewrite rules that were fetched at the previous flow or the list of registered feeds and their URL structure (/feed/rss2/ for instance).
Similarly and before you learn how to alter it, have an inner look at the $wp_query object, with a print_r() call when requesting the page /2011/hello-world/ on a WordPress powered site:
WP_Query Object (
  [query_vars] => Array (
    [page] => 0
    [year] => 2011
    [month] => 03
    [pagename] =>
    [category_name] =>
[name] => hello-world
...
)
...
[is_single] => 1
[is_preview] =>
[is_page] =>
...
[query] => Array (
[year] => 2011
[name] => hello-world
)
...
)The $wp_query object defines the list of authorized query variables that can be matched by the rewrite rules and collects all the information needed to translate the initial page request into a MySQL query.
Using functions of the Rewrite API, plugins can interfere with the $wp_rewrite and $wp_query objects, for instance to perform the following actions as you will learn in the next section, "Practical Uses":
Create your own rewrite rules, and define how WordPress will interpret them.
Integrate a WordPress site with non-WordPress pages and keep a consistent URL pattern and site layout.
Create a custom feed with a custom feed permalink.
Now that you know the underlying concepts of the Rewrite API, it's time for you to write actual code.
You will now dive into practical examples of use and code for real life situations. You will learn to:
Leverage the Rewrite API to easily generate an arbitrary number of sub pages under the hierarchy of one parent page.
Define a custom permalink structure to easily integrate non-WordPress content into a WordPress powered site.
Register new services with URL endpoints, for instance to display QR codes.
Generate feeds for any custom content, such as the last uploaded images.
You've just redesigned the site of your latest client, a big retail company with dozens of stores across the country. You now have to list these stores within their web site. How can you do this?
Option 1: Manually create a page for each store. Ewww. No fun.
Option 2: Create one page at
http://example.com/shops/and automatically make WordPress understand thathttp://example.com/shops/somecity/needs to display the information page for that store located in that particular city. Much more fun!
The function that creates a new rewrite rule is add_rewrite_rule(), which needs two arguments, similar to how mod_rewrite works: a string defining the URL pattern to be matched and another string for the URL replacement. In your Rewrite Rules Shop plugin, write the following:
<?php
// Add rules
add_action( 'init', 'boj_rrs_add_rules' );
function boj_rrs_add_rules() {
    add_rewrite_rule( 'stores/?([^/]*)',
        'index.php?pagename=stores&store_id=$matches[1]', 'top' );
}
?>
This internally redirects all requests to the URL stores/something/ to the page Stores with an additional parameter, that is, index.php?pagename=stores&store_id=something.
Note that you passed a third parameter to add_rewrite_rule(), 'top', to specify that this list will be added before all rewrite rules, to make sure it is matched early and before built-in rules.
Now you need to add this additional parameter store_id to the list of registered query variables:
<?php
// Add the store_id var so that WP recognizes it
add_filter( 'query_vars', 'boj_rrs_add_query_var' );
function boj_rrs_add_query_var( $vars ) {
    $vars[] = 'store_id';
    return $vars;
}
?>
So far, you have modified the list of defined rewrite rules held in the $wp_rewrite object and the list of authorized query variables, kept in the $wp_query object. You're almost done!
The trick with rewrite rules is that when they are modified (if you add, modify, or delete one), you need to tell WordPress to refresh and rebuild the list. To do so, you can either visit the Permalink Options page in the admin area or use the function flush_rewrite_rules(). You can do this on plugin activation and plugin deactivation:
<?php

// Add the rewrite rule and flush on plugin activation
register_activation_hook( __FILE__, 'boj_rrs_activate' );
function boj_rrs_activate() {
    boj_rrs_add_rules();
    flush_rewrite_rules();
}

// Flush when deactivated
register_deactivation_hook( __FILE__, 'boj_rrs_deactivate' );
function boj_rrs_deactivate() {
    flush_rewrite_rules();
}
?>
Note the best practices when adding new rewrite rules:
On plugin activation, add the rule and flush.
On
init, also add the rule, in case another plugin flushes the rules.Don't flush rules on every page request (for example hooking in
init); that would cause unnecessary overhead.On plugin deactivation, flush the rules again to clear the list.
You can now review the whole plugin.
<?php
/*
Plugin Name: List Stores
Plugin URI: http://example.com/
Description: A rewrite rule to list stores as children of the Stores page
Version: 1.0
Author: Ozh
Author URI: http://wrox.com
*/

// Add the rewrite rule and flush on plugin activation
register_activation_hook( __FILE__, 'boj_rrs_activate' );
function boj_rrs_activate() {
    boj_rrs_add_rules();
    flush_rewrite_rules();
}

// Flush when deactivated
register_deactivation_hook( __FILE__, 'boj_rrs_deactivate' );
function boj_rrs_deactivate() {
flush_rewrite_rules();
}
// Add the rewrite rule
add_action( 'init', 'boj_rrs_add_rules' );
function boj_rrs_add_rules() {
add_rewrite_rule( 'stores/?([^/]*)',
'index.php?pagename=stores&store_id=$matches[1]', 'top' );
}
// Add the store_id var so that WP recognizes it
add_filter( 'query_vars', 'boj_rrs_add_query_var' );
function boj_rrs_add_query_var( $vars ) {
$vars[] = 'store_id';
return $vars;
}
?>Code snippet boj_rewrite_shops/plugin.php
That's it for the plugin part: Now http://example.com/stores/denver/ redirects to the Stores WordPress parent page with the additional internal parameter store_id. You can now create that page and do a simple theme modification.
The additional internal parameter store_id is a query variable, which value can be read using the function get_query_var(), as following:
<?php
// Get store id
$store = get_query_var( 'store_id' );
?>
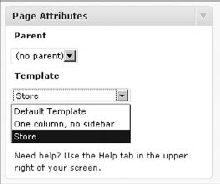
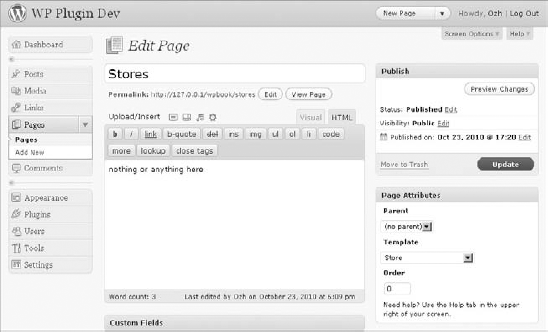
You can now create a regular WordPress page using the Add New Page admin page, but there is a twist: This page uses a page template.
When WordPress displays a Page (as opposed to a Post), it looks for the template file page.php within the current theme directory. You can set individual pages to use a more specific template file stores.php, simply by creating a new file within the theme directory and starting it as follows:
<?php
/*
Template Name: Store
*/
?>
Now in the Page write interface, within the Page Attribute meta box, you will be given the option to select this page template in the drop-down, as shown in Figure 14-1.
The page template code and layout depend on how your theme is coded, for instance how <div> elements are used and named. In this example you can assume the client's site is running WordPress' default theme, TwentyTen, so your store.php page template will have the same structure as the original page.php:
<?php
/*
Template Name: Store
*/
?>
<?php get_header(); ?>
<div id="container">
<div id="content" role="main">
</div><!-- #content -->
</div><!-- #container -->
<?php get_sidebar(); ?>
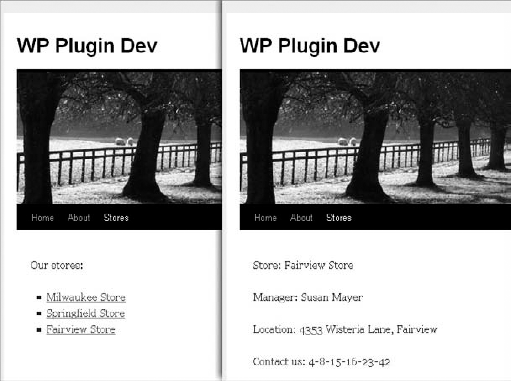
<?php get_footer(); ?>Within the <div id="content"> now resides the code that either lists all stores (if http://example.com/stores/ is requested) or displays a specific store information (when the requested page is for instance http://example.com/stores/miami/). To do so, you can simply do the following:
Define an array of store data: store name, manager name, address, and phone number for every existing store.
Check the value of
get_query_var( 'store_id' )and if it matches the ID of an existing store, display data for that given store.If
get_query_var( 'store_id' )doesn't match an existing store or is empty, list all stores.
The complete page template store.php you can save into the theme directory follows:
<?php
/*
Template Name: Store
*/
?>

<?php get_header(); ?>

<div id="container">
    <div id="content" role="main">
    <?php

    // define all stores
    $stores = array(
'milwaukee' => array(
'name' => "Milwaukee Store",
'manager' => 'Richie Cunningham',
'address' => '565 N Clinton Drive, Milwaukee',
'phone' => '555-31337-1337'
),
'springfield' => array(
'name' => "Springfield Store",
'manager' => 'Bart Simpson',
'address' => 'Evergreen Terrace, Springfield',
'phone' => '555-666-696969'
),
'fairview' => array(
'name' => "Fairview Store",
'manager' => 'Susan Mayer',
'address' => '4353 Wisteria Lane, Fairview',
'phone' => '4-8-15-16-23-42'
)
);
// Get store id
$store = get_query_var( 'store_id' );
// if store exists, display info
if( array_key_exists( $store, $stores ) ) {
extract( $stores[$store] );
echo "<p>Store: $name</p>";
echo "<p>Manager: $manager</p>";
echo "<p>Location: $address</p>";
echo "<p>Contact us: $phone</p>";
// if store does not exist, list them all
} else {
// Get current page URL
global $post;
$page = untrailingslashit( get_permalink( $post->ID ) );
echo '<p>Our stores:</p>';
echo '<ul>';
foreach( $stores as $store => $info ) {
$name = $info['name'];
echo "<li><a href='$page/$store/'>$name</a></li>\n";
}
echo '</ul>';
}
?>
</div><!-- #content -->
</div><!-- #container -->
<?php get_sidebar(); ?>
<?php get_footer(); ?>Code snippet boj_rewrite_shops/store.php
You can now create a regular page within WordPress, using this page template, as shown in Figure 14-2.
On the front side of the site, you can now access the main Stores page, located at http://example.com/stores/, which lists all stores and links to each individual store page, for instance http://example.com/stores/fairview/ as shown in Figure 14-3:
In the previous plugin, you created a WordPress page to handle URLs rewritten to it. You can now create other rewrite rules using a different approach.
The client you're now working with already has a product listing script and wants you to integrate it in its new web site you created for them. You can make WordPress handle all requests to http://example.com/shop/something/ and use the existing listing script.
In the Permalink Options settings page, you can define custom permalinks using tags such as %year% or %monthnum%. You can now define a new tag %product% and use it in the permalink structure of the site:
<?php
// Create new tag %product% and handle /shop/%product% URLs
add_action('init', 'boj_products_rewrite');
function boj_products_rewrite() {
    add_rewrite_tag( '%product%', '([^/]+)' );
    add_permastruct( 'product', 'shop' . '/%product%' );
}
?>
The first function call, add_rewrite_tag(), defines the tag and what can match it. Here, the tag %product% matches one or more characters that are not a forward slash, using the regular expression ([∧/]+). This function call also registers a new query variable with the same name product.
The tag defined, the function add_permastruct(), describes a new permalink structure, with two parameters: an arbitrary name for the structure and how URLs and tags should be formed.
Now look at the rewrite rules that have been added to the $wp_rewrite object and its rules property:
[shop/([^/]+)/feed/(feed|rdf|rss|rss2|atom)/?$]
    => index.php?product=$matches[1]&feed=$matches[2]
[shop/([^/]+)/(feed|rdf|rss|rss2|atom)/?$]
    => index.php?product=$matches[1]&feed=$matches[2]
[shop/([^/]+)/page/?([0-9]{1,})/?$]
    => index.php?product=$matches[1]&paged=$matches[2]
[shop/([^/]+)/?$]
    => index.php?product=$matches[1]
Example URLs matching these rewrite rules could be the following:
http://example.com/shop/something/feed/rss2/http://example.com/shop/stuff/atom/http://example.com/shop/thing/page/3/http://example.com/shop/item/
These URLs can internally redirect to the following:
http://example.com/index.php?product=something&feed=rss2http://example.com/index.php?product=stuff&feed=atomhttp://example.com/index.php?product=thing&paged=3http://example.com/index.php?product=item
Congratulations: Using just two function calls, you created a complete, new permalink structure that can handle pagination and feed generation!
Now that requests to /shop/something/ successfully redirect to /index.php?product=something, you can integrate the existing product listing script. Here the actual script integration is commented and replaced with a simple output:
<?php
// If query var product as a value, include product listing
add_action( 'template_redirect', 'boj_products_display' );
function boj_products_display() {
    if ( $product = get_query_var( 'product' ) ) {
        // include( 'display_product.php' );
        echo "Here goes information for product <strong>$product</strong>";
        exit;
    }
}
?>
By hooking into the early action 'template_redirect', you can hijack the normal page display and, if the query variable product (registered by the previous add_rewrite_tag() function call) has a value, include the shop listing script. Don't forget to use exit() so that WordPress does not try to further handle the page display and, unable to find a post, output a 404 error.
To test for pagination or feed generation, you can also check the values of get_query_var('paged') and get_query_var( 'feed' ).
Flush the rewrite rules when they're created the first time, and your plugin is now complete and functional.
You can now review the whole plugin.
<?php
/*
Plugin Name: Products Permalink Structure
Plugin URI: http://example.com/
Description: Create a whole permalink structure
Version: 1.0
Author: Ozh
Author URI: http://wrox.com
*/

// Add permalink structure and flush on plugin activation
register_activation_hook( __FILE__, 'boj_products_activate' );
function boj_products_activate() {
    boj_products_rewrite();
    flush_rewrite_rules();
}

// Flush on plugin deactivation
register_deactivation_hook( __FILE__, 'boj_products_deactivate' );
function boj_products_deactivate() {
    flush_rewrite_rules();
}

// Create new tag %product% and handle /shop/%product% URLs
add_action('init', 'boj_products_rewrite');
function boj_products_rewrite() {
    add_rewrite_tag( '%product%', '([^/]+)' );
    add_permastruct( 'product', 'shop' . '/%product%' );
}

// If query var product as a value, include product listing
add_action( 'template_redirect', 'boj_products_display' );
function boj_products_display() {
    if ( $product = get_query_var( 'product' ) ) {
        // include( 'display_product.php' );
        echo "searching for product $product ?";
        exit;
    }
}
Code snippet boj_rewrite_products/plugin.php
A URL endpoint defines a new service, like /trackback/ on WordPress singular URLs. You can code a plugin that adds a "format" endpoint, so the user will add /format/XXX/ to any URL and turn your site into a fun API:
Appending
/format/qr/to URLs displays the QR code of the current URL./format/json/on a singular URL (a post, a page) returns the post data as a JSON encoded string.
Note
A QR Code, also sometimes called flash code in a mobile application, is a black-and-white square pattern readable by QR scanners, mobile phones, and smartphones with a camera. It contains encoded information, which can be text, URL, or other data such as a phone number. Common in Japan, QR Codes are being adopted by more and more mainstream brands.
To define the endpoint for your service, you can use the function add_rewrite_endpoint(), which needs two parameters: a string for the syntax of the endpoint (here format) and a number to identify on which "places," that is types of URLs, the endpoint will be added.
The file wp-includes/rewrite.php defines several constants to match "places" where endpoint will be added. For example with EP_CATEGORIES (which has a value of 512), you can match only URLs under the /category/ permalink, such as http://example.com/category/tshirts/format/qr/.
Following is a complete list of constants.
CONSTANT | VALUE, FOR INFORMATION | PLACES |
|---|---|---|
|
| None |
|
| Permalinks |
|
| Attachment pages |
|
| Date pages |
|
| Year pages |
|
| Month pages |
|
| Day pages |
|
| Root page |
|
| Comment pages |
|
| Search pages |
|
| Category pages |
|
| Tag pages |
|
| Author pages |
|
| "Pages" pages |
|
| Everything |
For instance, if you want to add an endpoint to author pages, you can write add_rewrite_endpoint('something', 2048) or add_rewrite_endpoint('something', EP_AUTHORS).
If you want to append an endpoint to both author pages and search pages, add the two place values: add_rewrite_endpoint('something', EP_AUTHORS + EP_SEARCH).
In your plugin add the endpoint to all URLs:
<?php
// Add the endpoint rewrite rules
add_filter( 'init', 'boj_ep_add_rules' );
function boj_ep_add_rules() {
 add_rewrite_endpoint( 'format', EP_ALL );
}
?>
This single function call registers /format/ as a valid endpoint to all URLs, and registers a new query variable, also named format. This enables URLs such as /tag/tshirt/format/qr/ to be internally rewritten to /index.php?tag=tshirt&format=qr.
You can now check the value of the query var format and modify the page output:
<?php
// Handle the custom format display if needed
add_filter( 'template_redirect', 'boj_ep_template_redirect' );
function boj_ep_template_redirect() {
 switch( get_query_var( 'format' ) ) {
 case 'qr':
 boj_ep_display_qr();
 exit;
 case 'json':
 if( is_singular() ) {
 boj_ep_display_json();
 exit;
 }
 }
}
?>
To finalize your plugin, you now need to add the following functions or features:
boj_ep_display_json()encodes the global variable$postusingjson_encode()and displays it.boj_ep_display_qr()determines the current URL being visited, fetches an image from Google's QR Code API using functions covered in the HTTP API chapter, and then displays it.Activation and deactivation hooks add the endpoint and flush the rewrite rules.
You can now review the whole plugin.
<?php
/*
Plugin Name: Format endpoint
Plugin URI: http://example.com/
Description: Add a /format/ endpoint to all URLs
Version: 1.0
Author: Ozh
Author URI: http://wrox.com
*/


// Add permalink structure and flush on plugin activation
register_activation_hook( __FILE__, 'boj_ep_activate' );
function boj_ep_activate() {
 boj_ep_add_rules();
 flush_rewrite_rules();
}

// Flush on plugin deactivation
register_deactivation_hook( __FILE__, 'boj_ep_deactivate' );
function boj_ep_deactivate(){
 flush_rewrite_rules();
}


// Add the endpoint rewrite rules
add_filter( 'init', 'boj_ep_add_rules' );
function boj_ep_add_rules() {
 add_rewrite_endpoint( 'format', EP_ALL );
}

// Handle the custom format display if needed
add_filter( 'template_redirect', 'boj_ep_template_redirect' );
function boj_ep_template_redirect() {
  switch( get_query_var( 'format' ) ) {
 case 'qr':
 boj_ep_display_qr();
 exit;
 case 'json':
 if( is_singular() ) {
 boj_ep_display_json();
 exit;
 }
 }
}

// Display JSON information about the post
function boj_ep_display_json() {
 global $post;
 // Tell the browser this is a JSON file
 header('Content-type: application/json');
 echo json_encode( $post );
 exit;
}

// Display a QR code
function boj_ep_display_qr() {
 // get current location and strip /format/qr/ from the URL
 $url = ( is_ssl() ? 'https://' : 'http://' )
 . $_SERVER['HTTP_HOST']
 . preg_replace( '!/format/qr/$!', '/', $_SERVER['REQUEST_URI'] );
// encode URL so it can be used for the QR code query $url = urlencode( $url ); // Google QR code URL: $qr = "http://chart.apis.google.com/chart?chs=150x150&cht=qr&chl=" . $url . "&chld=L|0"; // Get the image generated by Google $image = wp_remote_retrieve_body( wp_remote_get( $qr ) ); // Display QR code image header( 'Content-Type: image/png' ); echo $image; exit; } ?>
Code snippet boj_endpoints_format/plugin.php
By default WordPress generates several feed formats (RSS, RSS2, and ATOM) and their permalink structure is defined in the $wp_rewrite object. For example, out-of-the-box, you can display the following:
An Atom feed of all the posts:
http://example.com/feed/atom/An RSS feed of posts tagged "beer":
http://example.com/tag/beer/feed/rss/An RDF feed of the comments to a given post:
http://example.com/2011/hello-world/feed/rdf/
With a plugin you can define your own feeds and what they output, for instance a feed of the latest images uploaded within WordPress, available at http://example.com/feed/img/.
The Rewrite API function you use to register a new feed is add_feed(), which needs two arguments: the feed name such as "atom" or, here, img, and the callback function that can output content.
<?php

// Register the feed
add_filter( 'init', 'boj_addfeed_add_feed' );
function boj_addfeed_add_feed() {
 add_feed( 'img', 'boj_addfeed_do_feed' );
}
?>
From now on, the URL http://example.com/feed/img/ will be handled by the callback function boj_addfeed_do_feed(). Because images in WordPress are actually the custom post type "attachment" as covered in Chapter 11, "Extending Posts," you can easily build your own $post and Loop to display the latest images in an XML ATOM manner. As usual flush the rules on activation and deactivation, and the plugin is complete.
You can now review the whole plugin.
<?php
/*
Plugin Name: Image feed
Plugin URI: http://example.com/
Description: Add a feed for latest uploaded images
Version: 1.0
Author: Ozh
Author URI: http://wrox.com
*/

// Add permalink structure and flush on plugin activation
register_activation_hook( __FILE__, 'boj_addfeed_activate' );
function boj_addfeed_activate() {
 boj_addfeed_add_feed();
 flush_rewrite_rules();
}

// Flush on plugin deactivation
register_deactivation_hook( __FILE__, 'boj_addfeed_deactivate' );
function boj_addfeed_deactivate() {
 flush_rewrite_rules();
}

// Register the feed
add_filter( 'init', 'boj_addfeed_add_feed' );
function boj_addfeed_add_feed() {
 add_feed( 'img', 'boj_addfeed_do_feed' );
}

// Callback function: echo the feed
function boj_addfeed_do_feed( $in ) {

 // Make custom query to get latest attachments
 query_posts(array( 'post_type' => 'attachment', 'post_status' => 'inherit' ));

 // Send content header and start ATOM output
 header('Content-Type: application/atom+xml');
 echo '<?xml version="1.0" encoding="'.get_option('blog_charset').'"?'.'>';
 ?>

<feed xmlns="http://www.w3.org/2005/Atom">
 <title type="text">Latest images on <?php bloginfo_rss('name'); ?></title>
 <?php
 // Start the Loop
 while (have_posts()) : the_post();
 ?>
 <entry>
<title><![CDATA[<?php the_title_rss() ?>]]></title>
<link href="<?php the_permalink_rss() ?>" />
<published><?php echo get_post_time('Y-m-d\TH:i:s\Z'); ?></published>
<content type="html"><![CDATA[<?php the_content() ?>]]></content>
</entry>
<?php
// End of the Loop
endwhile ;
?>
</feed>
<?php
}
?>Code snippet boj_addfeed/plugin.php
The goal of this chapter was to demystify the area of URL rewriting in WordPress, frequently considered to be a complicated subject. With the concrete plugin examples crafted here, you can now make your own way in this field. The Rewrite API will be invaluable, especially when you will have to integrate into WordPress existing content and existing scripts, which can happen frequently with clients who already have a presence on the web.
The Rewrite API is often deemed hard to understand because it's less used and known than most other APIs, and indeed it's not the API you will employ on a daily basis. Knowing what it can do and mastering it can definitely be a plus over your competitors!