Table of Contents for
Professional WordPress® Plugin Development
 Professional WordPress® Plugin Development
Published by
Wrox, 2011
Professional WordPress® Plugin Development
Published by
Wrox, 2011
- Copyright
- CREDITS
- ABOUT THE AUTHORS
- ACKNOWLEDGMENTS
- FOREWORD
- INTRODUCTION
- 1. An Introduction to Plugins
- 2. Plugin Foundation
- 3. Hooks
- 4. Integrating in WordPress
- 5. Internationalization
- 6. Plugin Security
- 7. Plugin Settings
- 8. Users
- 9. HTTP API
- 10. The Shortcode API
- 11. Extending Posts: Metadata, Custom Post Types, and Taxonomies
- 12. JavaScript and Ajax in WordPress
- 13. Cron
- 14. The Rewrite API
- 15. Multisite
- 16. Debugging and Optimizing
- 17. Marketing Your Plugin
- 18. The Developer Toolbox
WHAT'S IN THIS CHAPTER?
In WordPress, posts represent the content of the site. Content is typically the most important aspect of having a web site. Taxonomies are a way to classify or categorize posts. Metadata is additional information about individual posts. Each of these things can be brought together to make any type of web site imaginable.
Throughout this chapter, you work on building a single plugin that houses a user's music collection. Both the post types and taxonomies sections of this chapter contribute to the overall plugin. Nearly every snippet of code provided within this chapter contributes to the plugin and gives you a view of how the topics presented work together to manage content.
One important thing to note about post types, post metadata, and taxonomies is that their display is typically controlled by themes when on the frontend of the site, so plugin developers don't always have complete control over how this is handled. Of course, this depends on what functionality the plugin is providing to the user. WordPress theme development is outside the scope of this book, but learning how themes work within the WordPress environment can make your plugin development skills stronger.
By default, WordPress has several predefined post types that enable users to create and manage the content of their site. For the average blog user, these post types are all they ever need.
Post — Blog posts typically presented in order from newest to oldest on the site
Page — Top-level, hierarchical types of content such as About, Contact, and a myriad of other pages
Attachment — Media attached to other post types, such as images and videos for a post
Revision — Revisions of other post types used as a backup system in case a user needs to revert to an older copy
Nav Menu Item — Items added to nav menus using WordPress' built-in menu management system
As WordPress becomes a more widely used system, other types of content are necessary for running sites that don't fit within this predefined mold, which has traditionally catered to running blogs. WordPress enables plugin developers to create other content types to handle many different scenarios.
When WordPress 3.0 was released, it opened the door to an endless number of possibilities. Users could use the platform to run any type of web site. WordPress became a serious contender with other, more robust content management systems (CMS). It would no longer need to be considered simply a blogging platform.
Today, you can use custom post types in WordPress to define any type of content. Following is a sample list of ideas that custom post types can handle:
WordPress makes it easy for developers to step in and create new post types with little code. Before diving into the post type creation process, you need to understand the main function used for creating post types and its arguments.
You use the register_post_type() function to create new post types for a site. It's simple to use and gives plugin developers a lot of flexibility when creating post types.
<?php
register_post_type( $post_type, $args );
?>
The register_post_type() function returns the post type object and accepts two parameters.
$post_type— The name of the post type. This should contain only alphanumeric characters and underscores.$args— An array of arguments that define the post type and how it should be handled within WordPress.
WordPress enables many different arguments for the $args parameter, each with its own unique functionality that helps define how your post type will work within the WordPress environment. The following descriptions give you a basic understanding of each.
The argument that handles whether the post type should be shown on the frontend of the site and backend. By default, this is set to false. This is a catchall argument that defines the show_ui, publicly_queryable, and exclude_from_search arguments if they are not set individually.
show_ui controls whether administration screens should be shown for the post type in the admin. This defaults to the value set by the public argument.
publicy_queryable controls whether the post type should be publicly queryable from the frontend of the site. This defaults to the value set by the public argument.
This argument enables you to exclude your post type's posts from search results on the site. By default, this is set to the value of the public argument.
The supports argument enables plugins to define what features their post types support. It accepts an array of values that WordPress checks for internally. However, WordPress-supported features aren't the only features the post type can support. Other plugins/themes may optionally check for support of certain features.
WordPress checks for support of the following features. If your plugin does not set this argument, it defaults to the title and editor arguments.
title— Enables users to enter a post title.editor— Displays a content editor on the post editing screen with a media uploader.author— Offers a select box to choose the author of the post.thumbnail— Presents a featured image box for the post.excerpt— Creates an excerpt editor on the post editing screen.comments— Shows whether comments will be enabled for posts of this type.trackbacks— Shows whether trackbacks and pingbacks will be enabled for posts of this type.custom-fields— Shows the custom field editing area on the post edit screen.page-attributes— Displays the attributes box for choosing the post order. Thehierarchicalargument must be set totruefor this to work.revisions— Saves revisions of posts of this type.
The labels argument is an array of text strings shown in various places in the admin for the post type. See the "Setting Post Type Labels" section for details on each label.
This argument enables you to add a custom set of capabilities. It acts as a catchall term from which new capabilities are created. The capabilities argument can overwrite individual capabilities set by this argument. By default, its value is post.
The capabilities argument is an array of custom capabilities required for editing, deleting, reading, and publishing posts of this type. See the "Using Custom Capabilities" section for details on each capability.
The hierarchical argument enables you to set the posts of this type to be ordered hierarchically (such as the WordPress "page" post type) or nonhierarchically (such as the WordPress "post" post type). If set to true, posts can be arranged in a hierarchical, tree-like structure. By default, the argument is set to false.
The has_archive argument creates an archive page for the post type, much like the WordPress posts page that displays the site's latest blog posts. How these posts are displayed is dependent on the theme the user has installed. By default, this argument is set to false. If it is set to true, WordPress will create the archive.
This argument is the name of the query variable for posts of this type. For example, you would use this when querying posts of this type from the database.
The rewrite argument creates unique permalinks for this post type. Valid values for it are true, false, or an array. If set to true, it will create permalinks from the query_var argument and the individual post title. If set to false, no permalink structure will be created.
If using an array, you may set several values:
with_front— Whether to prefix permalinks with the permalink front base. By default, this is set totrue.slug— A unique string to use before the post title in the permalink. This defaults to thequery_varargument.feeds— Whether the post type should have feeds for its posts. Thehas_archiveargument needs to be set to true for this to take effect. Its value will default to thehas_archivevalue if neither is set.pages— Whether post type archive pages should be paginated. By default, it is set totrue. This feature is only useful if thehas_archiveargument is also set totrue.
This argument enables you to add support for preexisting taxonomies to the post type. It accepts an array of taxonomy names as its value. See the "Attaching Existing Taxonomies" section for more details on how to do this.
menu_position enables you to set the position in which the administration menu item shows in the admin menu. By default, new post types are added after the Comments menu item.
If you want to allow posts of this type to appear in WordPress nav menus, set this to true; otherwise, set it to false. By default, it is set to the value of the public argument.
WordPress has an import/export feature that enables users to import or export posts. This argument enables you to set whether users can export posts of this type. It is set to true by default.
Plugins can add meta boxes to the edit post screen. This argument enables plugins to set a custom callback function for adding custom meta boxes within the add_meta_box() function for this post type (see Chapter 4, "Integrating in WordPress," for details on using meta boxes).
Now that you've reviewed the arguments of the register_post_type() function, it's time to create your first post type, which is the theme of this chapter.
The first step is to create a new plugin file called boj-music-collection-post-types.php to hold your new plugin called "Music Collection Post Types." Using the following code, you register a post type called music_album.
<?php
/*
Plugin Name: Music Collection Post Types
Plugin URI: http://example.com
Description: Creates the music_album post type.
Version: 0.1
Author: WROX
Author URI: http://wrox.com
*/

/* Set up the post types. */
add_action( 'init', 'boj_music_collection_register_post_types' );

/* Registers post types. */
function boj_music_collection_register_post_types() {

    /* Set up the arguments for the 'music_album' post type. */
    $album_args = array(
        'public' => true,
        'query_var' => 'music_album',
        'rewrite' => array(
            'slug' => 'music/albums',
            'with_front' => false,
        ),
        'supports' => array(
            'title',
            'thumbnail'
        ),
        'labels' => array(
            'name' => 'Albums',
            'singular_name' => 'Album',
            'add_new' => 'Add New Album',
            'add_new_item' => 'Add New Album',
            'edit_item' => 'Edit Album',
            'new_item' => 'New Album',
            'view_item' => 'View Album',
            'search_items' => 'Search Albums',
            'not_found' => 'No Albums Found',
'not_found_in_trash' => 'No Albums Found In Trash'
),
);
/* Register the music album post type. */
register_post_type( 'music_album', $album_args );
}
?>Code snippet boj-music-collection-post-types.php
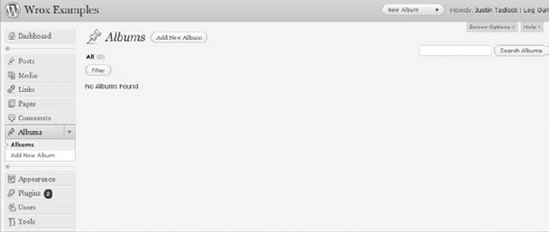
This creates a new top-level menu item in the WordPress admin called Albums, as shown in Figure 11-1. The new menu item also has two submenu items: Albums and Add New Album. The former links to a page that lists the albums (after they're created) in the order that they've been published. The latter adds a new page for publishing new albums.
Warning
The function your plugin uses to create post types must be added to the init action hook. Otherwise, your post type won't be properly registered.
In the WordPress admin, several text strings are shown for the post type. Each piece of text typically represents a link, button, or extra information about the post. By default, hierarchical post types have the term "page" in these strings, and nonhierarchical post types have the term "post" in them.
These strings are placeholders for your plugin to change depending on the post type it creates. For example, you wouldn't want to show View Post when you intend to display View Album. By setting these strings, you can create a much nicer experience for your plugin users.
When you set up your initial music album post type, you set the labels array for the $args parameter with multiple values as shown in this excerpt from the code in the previous section:
<?php

'labels' => array(
    'name' => 'Albums',
    'singular_name' => 'Album',
    'add_new' => 'Add New Album',
    'add_new_item' => 'Add New Album',
    'edit_item' => 'Edit Album',
    'new_item' => 'New Album',
    'view_item' => 'View Album',
    'search_items' => 'Search Albums',
    'not_found' => 'No Albums Found',
    'not_found_in_trash' => 'No Albums Found In Trash'
),

?>
Each of these labels is shown in some way within the admin to make for a better user experience:
name— The plural name of the post type, which is sometimes used in the WordPress admin and by other plugins and themes.singular_name— The singular version of the name of the post type. It is also sometimes used in the WordPress admin and by other plugins and themes.add_new— The label used for the add new submenu item. The text defaults to Add New.add_new_item— Used as the button text on the main post listing page to add a new post. By default, the text is Add New Post/Page.edit_item— Used as the text for editing an individual post. Defaults to Edit Post/Page.new_item— Text for creating a new post. By default, it is set to New Post/Page.view_item— The text for viewing an individual post. It defaults to View Post/Page.search_items— Text displayed for searching the posts of this type. It defaults to Search Posts/Pages.not_found— The text shown when no posts were found in a search. By default, it displays No Posts/Pages Found.not_found_in_trash— The text shown when no posts are in the trash. Defaults to No Posts/Pages Found in Trash.parent_item_colon— Text shown when displaying a post's parent. This text is used only with hierarchical post types and displays Parent Page: by default.
On some WordPress installations, there are several users, each with their own tasks to perform on the site. You need to keep this in mind when developing custom post types because site administrators often assign different user roles to editing and publishing content to specific sections of the site. Chapter 8, "Users," covers how to manipulate roles and capabilities. However, when registering custom post types, you'll likely want to set up custom capabilities for handling content.
The capability_type and capabilities arguments for the $args array in the register_post_type() function enable you to control this. capability_type gives you global control over the capabilities. The capabilities argument is an array that gives you specific control over individual capabilities.
Suppose you want to create custom capabilities for permission to these types of posts. The first option is to simply define the capability_type argument, which can automatically set each option in the capabilities array.
<?php

'capability_type' => 'album',

?>
This can create several default capabilities for editing, reading, deleting, and publishing posts of this type:
edit_albumedit_albumsedit_others_albumspublish_albumsread_albumread_private_albumsdelete_album
If you want full control over how each of these capabilities is named, you would use the capabilities argument instead of the capability_type argument as shown in the following code.
<?php

'capabilities' => array(
    'edit_post' => 'edit_album',
    'edit_posts' => 'edit_albums',
    'edit_others_posts' => 'edit_others_albums',
    'publish_posts' => 'publish_albums',
    'read_post' => 'read_album',
    'read_private_posts' => 'read_private_albums',
    'delete_post' => 'delete_album',
),

?>
Each capability grants permission for a specific task in the content publishing process for posts of this type:
edit_post— The meta capability used to determine if a user can edit a specific post.edit_posts— A capability that grants access to creating and editing posts but does not enable publishing.edit_others_posts— Gives permission to edit posts created by other users.publish_posts— Grants publishing rights to the user to publish any posts of this type.read_post— The meta capability that determines if a user can read a specific post.read_private_posts— Enables the user to read privately published posts.delete_post— The meta capability used to determine if a user can delete a specific post.
You don't have to stick to a specific formula with custom post types though. Your plugin can mix these up. It can set the same capability for multiple capability options. Or it can set the same capability for each option. For example, you can set each of these capabilities to manage_music_collection if you know only certain users will have permission to manage all music album posts.
Another capability you can set is do_not_allow if you don't want to allow access to a specific task. Generally, you wouldn't use this, but some situations may call for it, such as setting edit_others_posts to do_not_allow so that no user can edit posts created by other users.
If your post type can make use of existing taxonomies, you can easily set this in the taxonomies argument within the $args array of register_post_type(). For example, WordPress has two general taxonomies that work great for other post types: category and post_tag. However, you're not limited to taxonomies created by WordPress. Your post type can use taxonomies created by other plugins and themes as well.
Imagine you wanted to add post tags to your music album post type. You would set this as shown in the following code:
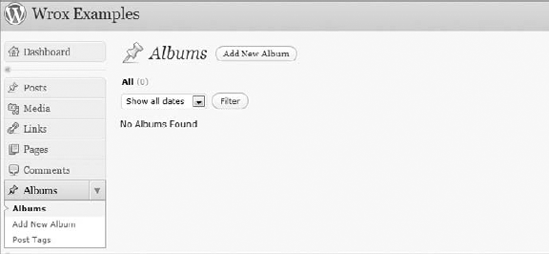
<?php

'taxonomies' => array( 'post_tag' ),

?>
By adding this to your $args array for register_post_type(), a new Post Tags submenu item will be added below your Albums menu item in the admin, as shown in Figure 11-2.
Now that you've learned how to create custom post types, you need to use them. How they'll be used will be highly dependent on what functionality your custom post type should serve, but getting the content created by posts of this type will nearly always rely on WordPress' post-related functions.
To find functions for getting post information, you can look in one of two files within the WordPress install.
wp-includes/post.php— Post functions and post utility functionswp-includes/post-template.php— Template functions for displaying post content
Each function serves a specific task within WordPress. By studying and using the functions within these files, you can start grasping how the post functions work.
Generally, it's the job of a WordPress theme to display posts on the frontend of the site. However, not all custom post types need to be displayed in the same manner. It depends on what functionality the custom post type is used for. To use custom post types, you need to learn a few functions typically considered theme territory.
When you want to grab the content of a post or multiple posts, you can query these posts from the database by initializing a new WP_Query object and looping through each of the posts retrieved. Within this loop, you would use post template functions for outputting specific parts of the individual post objects.
Suppose you want to create a list of all album titles in alphabetical order with links to the individual albums for your music collection plugin. You're creating something called The Loop, where you use a PHP while loop to iterate through each post.
The following code is an example of how to display The Loop using a shortcode that users can place within a shortcode-aware area, such as the page editor (see Chapter 10, "The Shortcode API"). The user only needs to place [music_albums] within this area. You can add the following code to your "Music Collection Post Types" plugin from earlier in this chapter to provide this functionality.
<?php

add_action( 'init', 'boj_music_album_register_shortcodes' );

function boj_music_album_register_shortcodes() {

    /* Register the [music_albums] shortcode. */
    add_shortcode( 'music_albums', 'boj_music_albums_shortcode' );
}

function boj_music_albums_shortcode() {

    /* Query albums from the database. */
    $loop = new WP_Query(
        array(
            'post_type' => 'music_album',
            'orderby' => 'title',
            'order' => 'ASC',
            'posts_per_page' => −1,
        )
    );

    /* Check if any albums were returned. */
    if ( $loop->have_posts() ) {

        /* Open an unordered list. */
        $output = '<ul class="music-collection">';

        /* Loop through the albums (The Loop). */
        while ( $loop->have_posts() ) {

            $loop->the_post();

            /* Display the album title. */
            $output .= the_title(
                '<li><a href="' . get_permalink() . '">',
                '</a></li>',
                false
            );

        }

        /* Close the unordered list. */
        $output .= '</ul>';
    }

    /* If no albums were found. */
else {
$output = '<p>No albums have been published.';
}
/* Return the music albums list. */
return $output;
}
?>Code snippet boj-post-type-loop.php
This custom loop can output a list of items similar to the list shown in Figure 11-3 if any new albums have been published.
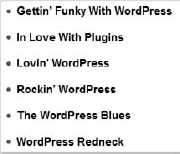
The most important part of the previous code is the post_type argument in the array passed to WP_Query. It must be set to the name of your post type. In this case, you used music_album for this value because it is your post type's name.
The only limit to how you can display posts of custom post types is your PHP development skills. You can use The Loop to display posts in any manner you want. You can display them in widgets (refer to Chapter 4) or create a shortcode as you did in the previous code (see Chapter 10, "The Shortcode API"). It's entirely dependent on what you want your plugin to do.
WordPress has several functions for retrieving content of posts. This section focuses on the most common functions for retrieving post data; however, other functions exist for getting other data about the post. You should always use these functions within The Loop, which is what you created in the previous section. Typically, WordPress themes use these functions to display content on the frontend of the site; however, your plugin may need them to display posts.
This function displays the title of the post. It displays something only if a title is given for the post. For example, if your plugin doesn't set title in the supports argument for register_post_type(), you wouldn't use this function to display a title. It accepts three parameters.
<?php
the_title( $before, $after, $echo );
?>
$before— Content to display before the post title. This defaults to an empty string.$after— Content to display after the post title. This defaults to an empty string.$echo— Whether to print the title to the screen or return it for use in PHP code. By default, it is set totrue.
This function enables you to display the content written in the post editor by the user. For it to display any content, post content must be written. Also, the editor value needs to be added to the supports array for $args in register_post_type() for users to add content. If this is not set, you probably won't need this function.
<?php
the_content( $more_link_text, $stripteaser );
?>
$more_link_text— Text to show a continue reading link if a user sets the<!--more-->quick tag in the post editor.$stripteaser— Whether to display the content written before the<!--more-->quick tag is used. By default, this is set tofalse.
This function shows an excerpt of the post content. If your post type sets excerpt in the supports argument for the $args parameter in register_post_type(), it can create an excerpt box that users can use to write custom excerpts. If this is not set or the user doesn't write a custom excerpt, one will be auto-created from the post content.
<?php
the_excerpt();
?>
There may be some scenarios in which you need to check if a post type exists before running any particular code. For example, you may want to check if the music_album post type exists before registering your own music_album post type. Or you may want to offer integration with other plugins' post types with your plugin.
The post_type_exists() function checks whether the post type has been registered with WordPress. It accepts a single parameter of $post_type, which should be a string representing the post type name. It returns true if the post type exists or false if it doesn't exist.
<?php
post_type_exists( $post_type );
?>
Suppose you wanted to display a message depending on whether the music_album post type has been registered. Using the following code, you can perform this task.
<?php

/* If music_album post type is registered. */
if ( post_type_exists( 'music_album' ) ) {

    echo 'The music_album post type has been registered.';
}

/* If the music_album post type is not registered. */
else {

    echo 'The music_album post type has not been registered.';
}

?>In WordPress, posts can have additional information attached to them. This information is called post metadata and is saved in the $wpdb->postmeta table in the database.
Post metadata is often referred to as Custom Fields in WordPress terminology. This is more of a term used for an easier user experience so that users are not scared off by developer terms such as metadata. By default, WordPress adds a meta box on the post/page editor screens for adding custom fields, as shown in Figure 11-4.
For custom post types to use this feature on the post-editing screen, the custom-fields value must be set for the supports argument when using register_post_type() as described in the "Registering a Post Type" section.
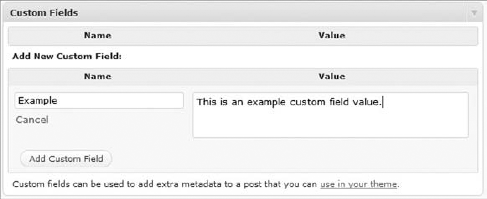
The true power of post metadata isn't in enabling users to manually create and input keys and values in the Custom Fields section on the post editor screen. Plugins can create, update, and delete these values without the user ever knowing that they're manipulating metadata.
To hide this knowledge from the end user, you would create custom meta boxes for the post screen. (For more information on creating custom meta boxes, refer to Chapter 4.) This chapter focuses on the functions you would use to manipulate metadata.
Throughout this section on post metadata, you create, retrieve, update, and delete a user's favorite song(s) from a music album (your custom post type created in the post type section).
WordPress provides a simple function for adding new post metadata. Use this to update a user's favorite song. When adding new metadata, it appears in the Custom Fields select box, as shown in Figure 11-4.
You use the add_post_meta() function to add new post metadata to a specific post, which accepts four parameters.
<?php
add_post_meta( $post_id, $meta_key, $meta_value, $unique );
?>
$post_id— The ID of the post to add metadata to.$meta_key— The metadata key (name) to add meta value(s) to.$meta_value— The value attributed to the meta key. Multiple meta values may be added to a single key.$unique— Whether the meta value provided should be the only meta value. Iftrue, there will be only a single meta value. Iffalse, multiple meta values can be added. By default, this parameter is set tofalse.
Now that you know how the parameters work for add_post_meta(), you can insert some metadata to a specific post. Suppose you have a post (album) with the ID of 100 and the user's favorite song from the album is "If Code Could Talk." You would use the following code to update this value.
<?php

add_post_meta( 100, 'favorite_song', 'If Code Could Talk', true );

?>
Setting the $unique parameter to true allows for a single value. If you want to allow for multiple values for the favorite_song meta key, you can set it to false. Suppose you want to add another song called "WordPress Makes Me Happy." You can set both values using two instances of add_post_meta().
<?php

add_post_meta( 100, 'favorite_song', 'If Code Could Talk', false );
add_post_meta( 100, 'favorite_song', 'WordPress Makes Me Happy', false );

?>
Note
To hide meta keys from appearing in the Custom Fields select box on the post-editing screen, prefix the meta key with an underscore like _favorite_song. This makes sure users never see it and is common practice when creating custom meta boxes.
WordPress makes it easy to get post metadata for display or to use in other PHP functions. A good place to use this functionality is within The Loop, which you learned how to use in the "Using Custom Post Types" section.
The get_post_meta() function retrieves metadata for a specific post and accepts three parameters.
<?php
get_post_meta( $post_id, $meta_key, $single );
?>
$post_id— The ID of the post to get the metadata for.$meta_key— The meta key name to retrieve meta value(s) for.$single— Whether to return a single meta value (true) or return an array of values (false). By default, this parameter is set tofalse.
Suppose you want to get a single meta value for the favorite_song meta key. You can use the following code to display the message "Favorite song from this album: If Code Could Talk."
<?php

/* Get a single favorite song by the favorite_song meta key. */
$favorite_song = get_post_meta( 100, 'favorite_song', true );

/* Display the meta value. */
echo 'Favorite song from this album: ' . $favorite_song;

?>
You could also display each of the meta values for the favorite_song meta key. Imagine that you want to create a list of all the favorite songs.
<?php

/* Get all meta values for the favorite_song meta key. */
$favorite_songs = get_post_meta( 100, 'favorite_song', false );

/* Open an unordered list. */
echo '<ul class="favorite-songs">';

/* Loop through each meta value. */
foreach ( $favorite_songs as $song ) {

    /* Display the individual meta value. */
    echo '<li>' . $song . '</li>';
}

/* Close the unordered list. */
echo '</ul>';

?>WordPress provides the ability to update post metadata as well. You can use this functionality when you need to update a preexisting meta value or completely overwrite all meta values for a given meta key. You can also use it to add a meta key and values if none are present.
The update_post_meta() function exists to update previous metadata for a specific post or to add new metadata if it is not already set. This function accepts four parameters.
<?php
update_post_meta( $post_id, $meta_key, $meta_value, $prev_value );
?>
$post_id— The post ID to update meta value(s) for.$meta_key— The meta key to update meta value(s) for.$meta_value— The new meta value to add to the meta key.$prev_value— The previous meta value to overwrite. If this parameter is not set, all meta values will be overwritten in favor of the$meta_valueparameter.
If you want to update an existing meta value, use the update_post_meta() function. For example, if you want to change the favorite_song value of "If Code Could Talk" to a new value, "WP Blues," you can use the following code to do this.
<?php

update_post_meta( 100, 'favorite_song', 'WP Blues', 'If Code Could Talk' );

?>
Alternatively, you can overwrite all meta values for the favorite_song meta key by not adding the $prev_value parameter. In the next example, you overwrite all previous values with the value of WP Blues.
<?php

update_post_meta( 100, 'favorite_song', 'WP Blues' );

?>
There will be scenarios in which you need to delete post metadata completely or to delete a single meta value from a given meta key. WordPress makes this process simple for developers.
The delete_post_meta() function enables you to delete metadata for a specific post, and it accepts three parameters.
<?php
delete_post_meta( $post_id, $meta_key, $meta_value );
?>
$post_id— The post ID to delete metadata for.$meta_key— The meta key to delete or the meta key to delete a meta value for.$meta_value— The meta value to delete for the given meta key. If this parameter is not set, all meta values for the meta key will be deleted.
If you wanted to delete a single value for the favorite_song meta key, you need to make sure the $meta_value parameter is set. In this case, you delete the "If Code Could Talk" meta value by setting it as the $meta_value parameter.
<?php

delete_post_meta( 100, 'favorite_song', 'If Code Could Talk' );

?>
The preceding usage of delete_post_meta() deletes a single meta value. If you want to delete all the meta values for the favorite_song meta key for this post, leave the $meta_value parameter empty.
<?php

delete_post_meta( 100, 'favorite_song' );

?>
Taxonomies are a way to group or categorize objects in WordPress, such as posts, links, and users. For the purposes of this chapter, focus on creating taxonomies for posts.
WordPress ships with several taxonomies by default:
The greatest power of custom taxonomies is creating them for custom post types. Creating a custom post type almost makes it necessary to include additional organizational methods for the individual posts of that type.
To understand how taxonomies work, you must understand that an individual taxonomy is a group of terms. Each term of the taxonomy would define how posts fit into that taxonomy.
The post types section covered how to create a new post type: music album. Users would use this post type to organize their collection of music albums. Each post would be an album. Users might want a way to further organize their music collection by grouping similar albums within given taxonomies. Some possible taxonomies for music albums follow:
Artist (WP Hot Boys, Code Rockstars)
Genre (Rock, Blues, R&B)
Format (CD, vinyl, cassette)
Studio (WP Productions, Code Is Music)
Each of these taxonomies would enable users to label their music albums with information that further defines the content. Essentially, taxonomies provide clearer organization and definition for content.
This section focuses on creating the Artist and Genre taxonomies for the music album post type you created within the post types section.
Note
This chapter focuses solely on creating taxonomies for post types because this will be the scenario they'll be used for in most cases. However, you can add taxonomies to any object type in WordPress, such as links and users.
Registering a taxonomy requires the use of only a single function provided by WordPress: register_taxonomy(). This function enables you to register a new taxonomy and set it up by using custom arguments to define how the taxonomy should be handled within WordPress.
In your plugin file, you use the register_taxonomy() function to create a new taxonomy. It accepts three parameters.
<?php
register_taxonomy( $taxonomy, $object_type, $args );
?>
$taxonomy— The name of your plugin's taxonomy. This should contain only alphanumeric characters and underscores.$object_type— A single object or an array of objects to add the taxonomy to.$args— An array of arguments that defines how WordPress should handle your taxonomy.
The $args parameter is what enables you to customize your taxonomies. The following descriptions of each argument can give you an understanding of how you can set up taxonomies to your needs.
The public argument determines whether the taxonomy should be publicly queryable from the frontend of the site. By default, this argument is set to true.
This argument decides if a WordPress-generated user interface should be added in the admin for managing the taxonomy. This argument is set to the value of the public argument by default.
The hierarchical argument determines if the taxonomy's terms should be in a hierarchical or nonhierarchical (flat) format. If this argument is set to true, terms may have parent terms within the taxonomy. By default, the argument is set to false.
This argument is the name of the query variable for terms of this taxonomy. For example, you would use this when querying posts for a specific term of this taxonomy from the database. You can set it to a custom string, true, or false. Set it to true to use the taxonomy name as the argument, or set it to false to prevent queries. By default, this argument is set to the taxonomy name.
The rewrite argument creates permalinks (URLs) for the term archive pages for the taxonomy. It accepts one of three values: true, false, or an array. If set to true, it creates permalinks from the taxonomy name and the individual term slug. If set to false, no permalink structure will be created.
If your plugin uses an array, you can set a few arguments:
with_front— Whether to prefix permalinks with the permalink front base. By default, this is set totrue.slug— Unique string to use before the term slug in the permalink. This is set to the taxonomy name by default.hierarchical— Whether terms with parents should show the parent terms in their permalink structure. The taxonomy must be hierarchical for this to work. By default, this is set tofalse.
You may set a custom function for this argument to be called when the term count is updated, which generally happens when a post is saved.
This argument determines whether the taxonomy can be used in the WordPress tag cloud widget. If set to true, the taxonomy's terms can be shown with the widget. If set to false, the terms cannot be shown. The argument defaults to the value of the show_ui argument.
The show_in_nav_menus argument decides whether the terms of the taxonomy can be added to user-created nav menus in the admin. By default, this argument is set to the value of the public argument.
When creating your taxonomy, you need to provide the best user experience possible. The labels argument enables you to set text strings that are generally used in the admin to provide information about the taxonomy or its terms. If you do not set these labels, WordPress automatically creates labels with the term Tags for nonhierarchical taxonomies and the term Categories for hierarchical taxonomies.
The labels argument is an array of text strings. Following is a description of each key in the array.
name— The plural name of the taxonomy.singular_name— The singular name of the taxonomy.search_items— The text shown for searching for terms within the taxonomy.popular_items— Text displayed when showing a tag cloud of popular terms of the taxonomy. This text isn't used for hierarchical taxonomies.all_items— Text shown for a link to view all terms of the taxonomy.parent_item— Text used to show a parent term. This isn't used for nonhierarchical taxonomies.parent_item_colon— Text displayed when showing a parent term, followed by a colon at the end of the text. This label isn't used for nonhierarchical taxonomies.edit_item— Text shown when editing a term.update_item— Text shown to update a term.add_new_item— Text displayed to create a new term.new_item_name— Text shown to create a new term name.separate_items_with_commas— A sentence letting users to know to separate individual terms with commas. This label isn't used with hierarchical taxonomies.add_or_remove_items— A sentence telling users to add or remove terms when JavaScript in their browser is disabled. This text isn't used with hierarchical taxonomies.choose_from_the_most_used— A sentence enabling users to choose from the most-used terms of a taxonomy. This label isn't used with hierarchical taxonomies.
When developing your custom taxonomy, you need to keep in mind what users should have permission to manage, edit, delete, and assign terms of the taxonomy. The capabilities argument is an array of capabilities that you set to control this. Chapter 8 covers capabilities in detail.
manage_terms— Grants users the ability to manage terms of the taxonomy. This enables them to use the category-to-tag converter and to view the taxonomy's terms in the taxonomy page in the admin. Defaults tomanage_categories.edit_terms— Gives users the ability to edit terms of the taxonomy. Defaults tomanage_categories.delete_terms— Permission to delete terms from the taxonomy. Defaults tomanage_categories.assign_terms— Grants the ability to assign terms from the taxonomy to a post. Defaults toedit_posts.
Now that you've reviewed the register_taxonomy() parameters and arguments in detail, it's time to use that knowledge to create new taxonomies.
In the next example, you create two new taxonomies, album_artist and album_genre, for the "music album" post type that you created in the first part of this chapter. The artist taxonomy is nonhierarchical and the genre taxonomy is hierarchical.
<?php

/* Set up the taxonomies. */
add_action( 'init', 'boj_music_collection_register_taxonomies' );

/* Registers taxonomies. */
function boj_music_collection_register_taxonomies() {

    /* Set up the artist taxonomy arguments. */
    $artist_args = array(
'hierarchical' => false,
'query_var' => 'album_artist',
'show_tagcloud' => true,
'rewrite' => array(
'slug' => 'music/artists',
'with_front' => false
),
'labels' => array(
'name' => 'Artists',
'singular_name' => 'Artist',
'edit_item' => 'Edit Artist',
'update_item' => 'Update Artist',
'add_new_item' => 'Add New Artist',
'new_item_name' => 'New Artist Name',
'all_items' => 'All Artists',
'search_items' => 'Search Artists',
'popular_items' => 'Popular Artists',
'separate_items_with_commas' => 'Separate artists with commas',
'add_or_remove_items' => 'Add or remove artists',
'choose_from_most_used' => 'Choose from the most popular artists',
),
);
/* Set up the genre taxonomy arguments. */
$genre_args = array(
'hierarchical' => true,
'query_var' => 'album_genre',
'show_tagcloud' => true,
'rewrite' => array(
'slug' => 'music/genres',
'with_front' => false
),
'labels' => array(
'name' => 'Genres',
'singular_name' => 'Genre',
'edit_item' => 'Edit Genre',
'update_item' => 'Update Genre',
'add_new_item' => 'Add New Genre',
'new_item_name' => 'New Genre Name',
'all_items' => 'All Genres',
'search_items' => 'Search Genres',
'parent_item' => 'Parent Genre',
'parent_item_colon' => 'Parent Genre:',
),
);
/* Register the album artist taxonomy. */
register_taxonomy( 'album_artist', array( 'music_album' ), $artist_args );
/* Register the album genre taxonomy. */
register_taxonomy( 'album_genre', array( 'music_album' ), $genre_args );
}
?>Code snippet boj-music-collection-taxonomies.php
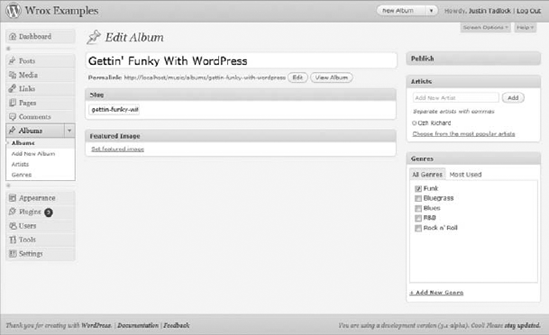
After you add the preceding code, you'll be presented with two new submenu items under the Albums menu item in the admin, labeled Artists and Genres. You also have two new meta boxes for assigning artists and genres to individual albums, as shown in Figure 11-5.
Warning
Your function for registering new taxonomies must be added to the init action hook for the taxonomies to be properly registered.
Sometimes, you may need to assign taxonomy to a post type when your plugin does not create the taxonomy or the post type. If your plugin creates the taxonomy, you would do this with the register_taxonomy() function, or if your plugin needs to add a preexisting taxonomy, it would set this in the register_post_type() function as you've seen earlier. However, you may not always have the benefit of using those functions when you need to assign taxonomy to a post type.
This function enables you to set taxonomy to any object type, which will typically be a specific post type. It accepts two parameters and returns true if successful and false if not.
<?php
register_taxonomy_for_object_type( $taxonomy, $object_type );
?>
$taxonomy— The name of the taxonomy your plugin will add to the post type.$object_type— The name of the object type to add the taxonomy to. Most of the time, this will be a post type. This value can be a single object type or an array of object types.
One example of setting a specific taxonomy to a post type is giving the "page" post type the "post tag" taxonomy, which is usually used for the "post" post type. Using the following code, you can add this taxonomy to it.
<?php

/* Adds the post_tag taxonomy to the page post type. */
register_taxonomy_for_object_type( 'post_tag', 'page' );

?>
As with custom post types, taxonomies are most often used within WordPress theme template files. However, there are scenarios where your plugin needs to use taxonomy functions for displaying information.
In some cases, you may need to get a taxonomy object to retrieve information about a registered taxonomy. The taxonomy object is a PHP object created for registered taxonomies using the arguments supplied for the $args array in register_taxonomy().
The get_taxonomy() function accepts a single parameter of $taxonomy, which should be the name of the taxonomy. It returns the taxonomy object.
<?php
get_taxonomy( $taxonomy );
?>
Suppose you need to display the singular_name label of the album_genre taxonomy that you registered. You'd use the following code to get the taxonomy object and display this label.
<?php

/* Get the genre taxonomy object. */
$genre = get_taxonomy( 'album_genre' );

/* Display the singular name of the genre taxonomy. */
echo $genre->labels->singular_name;

?>
When using taxonomy with posts, you'll generally be listing the taxonomy terms for the given post alongside some or all the content of the post. This would allow viewers to note there is a taxonomy for the post and allow them to find related posts by a given taxonomy term.
The the_terms() function returns a formatted list of terms for a given taxonomy of a specific post. It accepts five parameters.
<?php
the_terms( $id, $taxonomy, $before, $sep, $after );
?>
$id— The ID of the post to list the taxonomy's terms for.$taxonomy— The name of the taxonomy to list terms for.$before— Content to display before the list of terms.$sep— Any string of text or HTML to separate individual terms in the list. This defaults to a comma.$after— Content to display after the list of terms.
The the_terms() function is a wrapper function for get_the_term_list(). The former function displays the list of terms for the taxonomy, and the latter returns them for use in PHP.
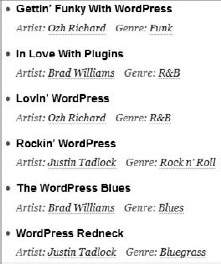
Now revisit the custom shortcode you created in the section on custom post types in which you listed posts of the music album post type. This time, use the get_the_term_list() function to add each album's artist(s) and genre(s) to the list.
You can add the following two lines of code to your shortcode function for displaying the album artist(s) and genre(s):
$output .= get_the_term_list( get_the_ID(), 'album_artist', 'Artist: ', ', ', ' ' );

$output .= get_the_term_list( get_the_ID(), 'album_genre', 'Genre: ', ', ', ' ' );
The following is what the code should now look like to display the album_artist and album_genre taxonomy terms:
<?php

add_action( 'init', 'boj_music_album_register_shortcodes' );

function boj_music_album_register_shortcodes() {

    /* Register the [music_albums] shortcode. */
add_shortcode( 'music_albums', 'boj_music_albums_shortcode' );
}
function boj_music_albums_shortcode() {
/* Query albums from the database. */
$loop = new WP_Query(
array(
'post_type' => 'music_album',
'orderby' => 'title',
'order' => 'ASC',
'posts_per_page' => −1,
)
);
/* Check if any albums were returned. */
if ( $loop->have_posts() ) {
/* Open an unordered list. */
$output = '<ul class="music-collection">';
/* Loop through the albums (The Loop). */
while ( $loop->have_posts() ) {
$loop->the_post();
/* Display the album title. */
$output .= the_title(
'<li><a href="' . get_permalink() . '">',
'</a></li>',
false
);
/* Insert a line break. */
$output .= '<br />';
/* Show the album artist. */
$output .= get_the_term_list( get_the_ID(), 'album_artist',
'Artist: ', ', ', ' ' );
/* Show the album genre. */
$output .= get_the_term_list( get_the_ID(), 'album_genre',
'Genre: ', ', ', ' ' );
}
/* Close the unordered list. */
$output .= '</ul>';
}
/* If no albums were found. */
else {
$output = '<p>No albums have been published.';
}
/* Return the music albums list. */return $output; } ?>
Code snippet boj-post-type-taxonomy-loop.php
This code can give you a list of items similar to the list shown in Figure 11-6.
WordPress has a few conditional tags for taxonomies. Conditional tags check a specific condition and return true if the condition is met or false if the condition is not met.
The taxonomy_exists() function checks if a taxonomy has been registered with WordPress. It accepts a single parameter of $taxonomy, which should be the name of the taxonomy you're checking.
<?php
taxonomy_exists( $taxonomy );
?>
Suppose you wanted to check if the artist taxonomy you created earlier exists. Using the following code, you can display a custom message based on the return value of the taxonomy_exists() function.
<?php

/* If the album artist taxonomy exists. */
if ( taxonomy_exists( 'album_artist' ) ) {

    echo 'The "artist" taxonomy is registered.';
}

/* If the album artist taxonomy doesn't exist. */
else {

    echo 'The "artist" taxonomy is not registered.';
}

?>The is_taxonomy_hierarchical() function determines if a given taxonomy is hierarchical. It accepts a single parameter of $taxonomy, which should be the name of the taxonomy.
<?php
is_taxonomy_hierarchical( $taxonomy );
?>
The album genre taxonomy you created is hierarchical, but the album artist taxonomy is not hierarchical. Now create an array of taxonomy names and loop through each, creating a list of messages to determine whether each is hierarchical.
<?php

/* Create an array of custom taxonomies. */
$taxonomies = array(
    'album_artist',
    'album_genre'
);

/* Open an unordered list. */
echo '<ul>';

/* Loop through the array of taxonomies. */
foreach ( $taxonomies as $tax ) {

    /* If the taxonomy is hierarchical. */
    if ( is_taxonomy_hierarchical( $tax ) ) {
        echo '<li>The ' . $tax . ' taxonomy is hierarchical.</li>';
    }

    /* If the taxonomy is non-hierarchical. */
    else {
        echo '<li>The ' . $tax . ' taxonomy is non-hierarchical.</li>';
    }
}

/* Close the unordered list. */
echo '</ul>';

?>The is_tax() function determines if a site visitor is on a term archive page on the frontend of the site. When using no parameters, it simply checks if the visitor is on any taxonomy archive. However, you may optionally set either parameter for a more specific check.
<?php
is_tax( $taxonomy, $term );
?>
$taxonomy— The name of the taxonomy to check for. Defaults to an empty string.$term— The name of the term from the taxonomy to check for. Defaults to an empty string.
With the next snippet of code, you display up to three different messages depending on which conditions are true. You first check to see if a visitor is on a taxonomy term archive. You then check for a specific taxonomy: genre. Then, you check if the archive page is in the blues genre.
<?php

/* If on a taxonomy term archive page. */
if ( is_tax() ) {
    echo 'You are viewing a term archive.';
}

/* If viewing a term archive for the album genre taxonomy. */
if ( is_tax( 'album_genre' ) ) {
    echo 'You are viewing a term archive for the genre taxonomy.';
}

/* If viewing the blues archive for the album genre taxonomy. */
if ( is_tax( 'album_genre', 'blues' ) ) {
    echo 'You are viewing the blues archive for the genre taxonomy.';
}

?>Now that you covered how to use post types and taxonomies, you can put both techniques together to make a plugin based on this knowledge. The name of your plugin is Music Collection. It enables users to create new music albums and organize the albums by genre and artist. What you're doing here is putting together code you've already covered throughout this chapter.
The first step you'll take is creating a new file in your plugins directory named boj-music-collection.php and adding your plugin header at the top of this file.
<?php
/*
Plugin Name: Music Collection
Plugin URI: http://example.com
Description: Keeps track of a music collection by album, artist, and genre.
Version: 0.1
Author: WROX
Author URI: http://wrox.com
*/
Code snippet boj-music-collection.php
The next step is to create the music_album post type, which was outlined in the "Registering a Post Type" section.
/* Set up the post types. */
add_action( 'init', 'boj_music_collection_register_post_types' );

/* Registers post types. */
function boj_music_collection_register_post_types() {

    /* Set up the arguments for the 'music_album' post type. */
    $album_args = array(
        'public' => true,
        'query_var' => 'music_album',
        'rewrite' => array(
            'slug' => 'music/albums',
            'with_front' => false,
        ),
        'supports' => array(
            'title',
            'thumbnail'
        ),
        'labels' => array(
            'name' => 'Albums',
            'singular_name' => 'Album',
            'add_new' => 'Add New Album',
            'add_new_item' => 'Add New Album',
            'edit_item' => 'Edit Album',
            'new_item' => 'New Album',
            'view_item' => 'View Album',
            'search_items' => 'Search Albums',
            'not_found' => 'No Albums Found',
            'not_found_in_trash' => 'No Albums Found In Trash'
        ),
    );

    /* Register the music album post type. */
    register_post_type( 'music_album', $album_args );
}
Code snippet boj-music-collection.php
The final step of the process is creating the taxonomies for the music_album post type: album_artist and album_genre. How to register a taxonomy was covered in the "Registering a Custom Taxonomy" section.
/* Set up the taxonomies. */
add_action( 'init', 'boj_music_collection_register_taxonomies' );

/* Registers taxonomies. */
function boj_music_collection_register_taxonomies() {

    /* Set up the artist taxonomy arguments. */
    $artist_args = array(
        'hierarchical' => false,
        'query_var' => 'album_artist',
        'show_tagcloud' => true,
'rewrite' => array(
'slug' => 'music/artists',
'with_front' => false
),
'labels' => array(
'name' => 'Artists',
'singular_name' => 'Artist',
'edit_item' => 'Edit Artist',
'update_item' => 'Update Artist',
'add_new_item' => 'Add New Artist',
'new_item_name' => 'New Artist Name',
'all_items' => 'All Artists',
'search_items' => 'Search Artists',
'popular_items' => 'Popular Artists',
'separate_items_with_commas' => 'Separate artists with commas',
'add_or_remove_items' => 'Add or remove artists',
'choose_from_most_used' => 'Choose from the most popular artists',
),
);
/* Set up the genre taxonomy arguments. */
$genre_args = array(
'hierarchical' => true,
'query_var' => 'album_genre',
'show_tagcloud' => true,
'rewrite' => array(
'slug' => 'music/genres',
'with_front' => false
),
'labels' => array(
'name' => 'Genres',
'singular_name' => 'Genre',
'edit_item' => 'Edit Genre',
'update_item' => 'Update Genre',
'add_new_item' => 'Add New Genre',
'new_item_name' => 'New Genre Name',
'all_items' => 'All Genres',
'search_items' => 'Search Genres',
'parent_item' => 'Parent Genre',
'parent_item_colon' => 'Parent Genre:',
),
);
/* Register the album artist taxonomy. */
register_taxonomy( 'album_artist', array( 'music_album' ), $artist_args );
/* Register the album genre taxonomy. */
register_taxonomy( 'album_genre', array( 'music_album' ), $genre_args );
}
?>Code snippet boj-music-collection.php
At this point, you have created an entire plugin with minimal code that creates and organizes a new type of content within WordPress. All that's left is learning other techniques presented throughout this book to make your plugin even stronger, such as adding widgets (refer to Chapter 4) and creating shortcodes (refer to Chapter 10) for your post types and taxonomies.
This chapter represents a small sampling of what's possible with custom post types, post metadata, and taxonomies. The biggest lesson you should take away is that you can literally use WordPress to create and manage any type of content you can imagine. The platform isn't simply limited to blog posts and pages.
The information presented in this chapter reveals many possibilities for plugin developers. You can make plugins for public use to give thousands of people new ways to manage content. Or you can use these tools for custom client web sites that have unique content needs.