Table of Contents for
Professional WordPress® Plugin Development
 Professional WordPress® Plugin Development
Published by
Wrox, 2011
Professional WordPress® Plugin Development
Published by
Wrox, 2011
- Copyright
- CREDITS
- ABOUT THE AUTHORS
- ACKNOWLEDGMENTS
- FOREWORD
- INTRODUCTION
- 1. An Introduction to Plugins
- 2. Plugin Foundation
- 3. Hooks
- 4. Integrating in WordPress
- 5. Internationalization
- 6. Plugin Security
- 7. Plugin Settings
- 8. Users
- 9. HTTP API
- 10. The Shortcode API
- 11. Extending Posts: Metadata, Custom Post Types, and Taxonomies
- 12. JavaScript and Ajax in WordPress
- 13. Cron
- 14. The Rewrite API
- 15. Multisite
- 16. Debugging and Optimizing
- 17. Marketing Your Plugin
- 18. The Developer Toolbox
Shortcodes are WordPress-specific code that enables you to do nifty things with little effort, such as embed content or create objects that would normally require lots of complicated, ugly code.
In this chapter, you learn how to allow users of your plugins to enhance their posts with advanced customizable content using just a few characters.
This section teaches you what a shortcode is and how to create new shortcodes, from simple string replacements to advanced functions with parameters.
The Shortcode API enables creating simple macro codes, sometimes also referred to as bbcodes for their similarity with a popular syntax in various forums and bulletin boards.
In a nutshell, a shortcode is a simple tag syntax between square brackets, such as [something], used in posts. At render time when the post is displayed, the shortcode is dynamically replaced with a more complex and user-defined content. See Figure 10-1 for a simple example of a shortcode plugin that would substitute [date] with the current date and time.

WordPress out-of-the-box registers shortcodes you can use: When you upload multiple images attached to a given post, you can simply insert [gallery] in your post, and this shortcode will be replaced with a nicely formatted gallery of your images.
Technically, a shortcode can be any string that would fit as an array key. For instance, you could register the following different shortcodes:
[foo][Foo][123][l33t][Hello My Name Is Inigo Montoya]
In practice, for simplicity, and to avoid potential conflicts between different shortcodes, you register only short, lowercase, simple strings.
You now learn how to register your own shortcodes, with practical usages, from a simple tag replacement to more complex and parameterized output.
The following shortcode plugins use boj_scX as a prefix, where X will be a number.
The simplest usage of shortcodes is to quicken your typing and replace often-used sentences with something shorter to type or easier to remember.
For instance, if you frequently mention a book you want to promote on Amazon, instead of typing "<a href="http://www.amazon.com/dp/0470560541">book</a>" each time, wouldn't it be faster to just write [book]?
The function you use is add_shortcode(), which needs two parameters:
The tag pattern (without the surrounding square brackets)
A callback function used to replace the tag
<?php
/*
Plugin Name: Shortcode Example 1
Plugin URI: http://example.com/
Description: Replace [book] with a long Amazon link
Version: 1.0
Author: Ozh
Author URI: http://wrox.com/
*/

// Register a new shortcode: [book]
add_shortcode( 'book', 'boj_sc1_book' );

// The callback function that will replace [book]
function boj_sc1_book() {
    return '<a href="http://www.amazon.com/dp/0470560541">book</a>';
}


?>
Code snippet plugin_boj_sc1.php
What just happened?
With
add_shortcode(), you have registered[book]as a new shortcode, stating that it will be replaced with the output of the functionboj_sc1_book()The shortcode callback function, here
boj_sc1_book(), needs toreturna value in the end. A frequent beginner error is to have itechoa value instead of returning it, which will make the shortcode fail.
Activate the plugin, and from now on, write "Buy my [book]" in a post or a page, and it will be replaced with the Amazon link.
Note that WordPress is rather flexible on the shortcode syntax: You can more or less mimic XHTML tags and either type [book], [book ], [book/] or [book /]. The only requirement is that there is no space between the opening square bracket and the tag.
What if you have more than one book to promote?
The first option would be to create several simple shortcodes as previously done, one per book (for instance [book1], [book2], [book3], and so on). A more elegant option you can use is to introduce an attribute to the shortcode, so it enables a smarter syntax such as [book title="prowp"] and [book title="xkcd"].
You can use the same function add_shortcode() again but now with a new parameter $attr that receives an array of attribute => value pairs.
<?php
/*
Plugin Name: Shortcode Example 2
Plugin URI: http://example.com/
Description: Replace [books title="xxx"] with different Amazon links
Version: 1.0
Author: Ozh
Author URI: http://wrox.com/
*/

// Register a new shortcode: [books title="xxx"]
add_shortcode( 'books', 'boj_sc2_multiple_books' );

// The callback function that will replace [books]
function boj_sc2_multiple_books( $attr ) {

    switch( $attr['title'] ) {
        case 'xkcd':
            $asin = '0615314465';
            $title = 'XKCD Volume 0';
            break;

        default:
        case 'prowp':
            $asin = '0470560541';
            $title = 'Professional WordPress';
            break;
    }

    return "<a href='http://www.amazon.com/dp/$asin'>$title</a>";
}
?>
Code snippet plugin_boj_sc2.php
What just happened?
You have registered a new shortcode,
[books].Your callback function
boj_sc2_multiple_books()expects a parameter:$attrwill be an array of attribute => value pair used in the shortcode. For instance, write[books title="prowp"]and the callback function will receivearray( 'title' => 'prowp' )as its parameter.Your callback function can now return different values depending on the attribute used.
If you write
[books]with no attribute, the callback function receives an empty string. You have coded it to return a default value in such a case.
You can continue to push the plugin forward with a new improvement: The anchor text in the Amazon link will now be parameterized.
The function used will still be the same add_shortcode(), this time with a second parameter $content, which will receive any enclosed text as a string:
<?php
/*
Plugin Name: Shortcode Example 3
Plugin URI: http://example.com/
Description: Replace [amazon isbn="xxx"]book title[/amazon]
Version: 1.0
Author: Ozh
Author URI: http://wrox.com/
*/

// Register a new shortcode: [amazon isbn="123"]link title[/amazon]
add_shortcode( 'amazon', 'boj_sc3_amazon' );

// Callback function for the [amazon] shortcode
function boj_sc3_amazon( $attr, $content ) {

    // Get ASIN (Amazon Standard Identification Number)
    if( isset( $attr['asin'] ) ) {
        $asin = preg_replace( '/[^\d]/', '', $attr['asin'] );
    } else {
        $asin = '0470560541';
    }

    // Sanitize content, or set default
    if( !empty( $content ) ) {
        $content = esc_html( $content );
    } else {
        if( $asin == '0470560541' ) {
            $content = 'Professional WordPress';
} else {
$content = 'this book';
}
}
return "<a href='http://www.amazon.com/dp/$asin'>$content</a>";
}
?>Code snippet plugin_boj_sc3.php
What just happened?
You have registered another shortcode, using the tag
[amazon].Your callback function,
boj_sc3_amazon(), now expects two optional parameters: an array of attribute => value pairs, and a text string enclosed between the opening and the closing shortcodes.The callback function can deal with all the combinations of missing ASIN attribute (Amazon Standard Identification Number) and/or book title:
[amazon], [amazon asin="123"], and[amazon]awesome book[/amazon]would flawlessly work.Your shortcode can return arbitrary content, so remember to apply techniques you have learned in Chapter 6, "Plugin Security": Sanitize the ASIN to be only digits and make sure the book title can be safely displayed and your blog and won't break the
<a>tag in which it is enclosed.
When you register a new shortcode, the two parameters define the square bracket tag pattern and the callback function:
<?php

add_shortcode( 'boj', 'boj_my_shortcode' );

?>
The callback function receives two parameters, empty if omitted: an array of attribute => value pairs, and a string of content enclosed within the opening and closing shortcode. Just as in HTML, the attributes are case-insensitive.
You can define default values just as in any other PHP function, and in the end the function must return something.
<?php

function boj_my_shortcode( $attr = array( 'var' => 'val' ), $content = 'book' ) {
    // $attr is an associate array
// $content is a string
return $something;
}
?>The shortcode attributes are case-insensitive, can have arbitrary or no value, and support quotes or lack thereof. The following examples show the values of the array $attr in the callback function, depending on how the shortcode is used:
[boj]:$attrwill be an empty string.[boj hello]:$attrwill bearray( 'hello' ).[boj name=ozh skillz='1337' MAP="q3dm6"]:$attrwill bearray ( 'name' => 'ozh', 'skillz' => '1337', 'map' => 'q3dm6' ).
Shortcodes are a great way to spice up post contents with complex and dynamic content. To guarantee the best end user experience, as a plugin author you should keep in mind two principles:
Make things simple and fool proof.
Remember it's dynamic.
As a plugin user, it's great to add new features to one's blog and being allowed to write a simple shortcode that can display much more complex content. But it's cumbersome to remember the shortcode parameter syntax: you end up with the impression that you have to learn a new markup language.
Back to your plugin with the [amazon] shortcode: You can now code a companion plugin that will add the shortcode [amazonimage] to display product images from Amazon. You can specify the ASIN number, the image type (books or CD covers), and its size.
When functional, the plugin permit shortcodes such as [amazonimage asin='123456' type='CD' imagesize='small'].
When users have this plugin installed for a long time, they might have forgotten about the attribute names and syntax. Is it [amazonimage] or [amazonimg]? As for the attributes, is it isbn or asin? And imagesize='large' or 'big'? type='CD' or type='disk'?
Allowing lots of options is neat, but you don't want your users having to check the plugin documentation and give them a bad experience. Instead, make things simple and foolproof so that users can use your plugin instinctively.
Now to the plugin:
<?php
/*
Plugin Name: Shortcode Example 4
Plugin URI: http://example.com/
Description: Replace [amazonimage] with images from Amazon
Version: 1.0
Author: Ozh
Author URI: http://wrox.com/
*/

// Register two shortcodes [amazonimage] and [amazonimg]
add_shortcode( 'amazonimage', 'boj_sc4_amazonimage' );
add_shortcode( 'amazonimg',   'boj_sc4_amazonimage' );

// Callback function for the shortcode
function boj_sc4_amazonimage( $attr, $content ) {

    // Get ASIN or set default
    $possible = array( 'asin', 'isbn' );
    $asin = boj_sc4_find( $possible, $attr, '0470560541' );

    // Get affiliate ID or set default
    $possible = array( 'aff', 'affiliate' );
    $aff = boj_sc4_find( $possible, $attr, 'aff_id' );

    // Get image size if specified
    $possible = array( 'size', 'image', 'imagesize' );
    $size = boj_sc4_find( $possible, $attr, '' );

    // Get type if specified
    if( isset( $attr['type'] ) ) {
        $type = strtolower( $attr['type'] );
        $type = ( $type == 'cd' || $type == 'disc' ) ? 'cd' : '';
    }

    // Now build the Amazon image URL
    $img = 'http://images.amazon.com/images/P/';
    $img .= $asin;
    // Image option: size
    if( $size ) {
        switch( $size ) {
            case 'small':
                $size = '_AA100';
                break;
            default:
            case 'medium':
                $size = '_AA175';
                break;
            case 'big':
            case 'large':
                $size = '_SCLZZZZZZZ';
break; // Good practice: don't forget the last break
}
}
// Image option: type
if( $type == 'cd' ) {
$type = '_PF';
}
// Append options to image URL, if any
if( $type or $size ) {
$img .= '.01.' . $type . $size;
}
// Finish building the image URL
$img .= '.jpg';
// Now return the image
return "<a href='http://www.amazon.com/dp/$asin'><img src='$img' /></a>";
}
// Helper function:
// Search $find_keys in array $in_array, return $default if not found
function boj_sc4_find( $find_keys, $in_array, $default ) {
foreach( $find_keys as $key ) {
if( isset( $in_array[$key] ) )
return $in_array[$key];
}
return $default;
}
?>Code snippet plugin_boj_sc4.php
The first thing you'll notice is that you have registered two shortcodes with the same callback function: This way, the user can either use [amazonimage] or [amazonimg].
Then look at how the plugin considers multiple attributes as synonyms: Using the helper function named boj_sc4_find(), the main callback function checks the value of $attr['asin'] or $attr['isbn'], and if omitted, sets a default value.
As non-WordPress information, it's also worth mentioning that the fun part in this plugin is to leverage the way Amazon crafts image URLs. The base URL is http://images.amazon.com/images/P/, to which you append the following:
The ASIN number, such as '
B002OEBMN4'.If you want to add options, append '
.01.'A first possible option used here is the size: Append for instance '
_AA100' for 100 pixels wide, or '_SCLZZZZZZZ' for a large image.Another possible option used is to add a CD image beneath the cover: Append '
_PF' to the image URL.Finally, make the image URL end with '
.jpg'.
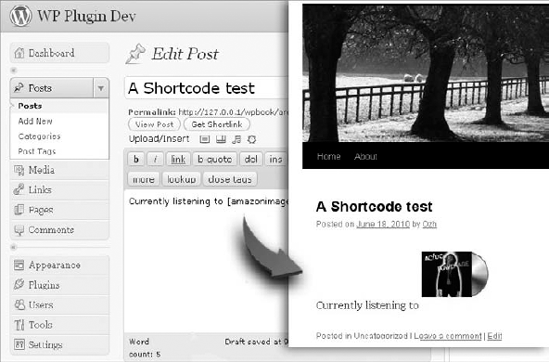
Activate the plugin, write a post with "Currently listening to [amazonimage asin= "B00008WT5E" type="cd" size="small"]" and see the result that should look like Figure 10-2.
Shortcode outputs are dynamically generated: Every time WordPress displays a page (a single post, an archive), the post content is parsed, and shortcodes are replaced with the returned result of their callback function.
Replacements such as the one you coded in this chapter so far are lightning fast, and you don't have to worry about WordPress' performance when you register new shortcodes.
However, performance will be a matter of importance if your shortcodes either pull information from the database or from remote web sites:
In the first case, your code will issue extra SQL queries, which can hinder performance on slow web hosts.
In the second case, your shortcode will perform external HTTP requests that could slow down the whole page rendering, while WordPress is awaiting the remote server response to parse.
In such cases, you should consider caching the result of your shortcode, for instance in the post metadata. In the next plugin, you implement such a caching technique.
Besides using add_shortcode() to register new ones, here are other interesting functions or facts to know about the Shortcode API and then a fun plugin to make use of them.
All registered shortcodes are stored in the global array $shortcode_tags, in 'shortcode' => 'callback' pairs:
<?php

global $shortcode_tags;
var_dump( $shortcode_tags );

/* Result:
array (
    'wp_caption'  => 'img_caption_shortcode',
    'caption'     => 'img_caption_shortcode',
    'gallery'     => 'gallery_shortcode',
    'embed'       => '__return_false',
    'amazonimage' => 'boj_sc4_amazonimage',
    'amazonimg'   => 'boj_sc4_amazonimage',
)
*/

?>You can dynamically unregister a shortcode using the function remove_shortcode().
Example: remove_shortcode( 'amazonimg' );
Similarly, you can dynamically unregister all the shortcodes, using the function remove_all_shortcodes() with no argument. Technically, this function simply resets the global $shortcode_tags to an empty array.
The function strip_shortcodes() strips registered shortcodes from string content, as in the following example:
<?php

$content = <<<S
Some existing shortcodes: [amazonimage] [gallery]
These don't exist: [bleh] [123]
S;
echo strip_shortcodes( $content );

/* Result:
Some existing shortcodes:
These don't exist: [bleh] [123]
*/
?>
This function can be used to compare user attributes against a list of supported attributes and fill in defaults when needed.
For instance, look at how the built-in shortcode [gallery] works. Its callback function is gallery_shortcode(), which processes the shortcode attributes like so:
<?php

function gallery_shortcode( $attr ){

    // Define supported attributes and their default values
    $defaults = array(
        'order'      => 'ASC',
        'orderby'    => 'menu_order ID',
        'id'         => $post->ID,
        'itemtag'    => 'dl',
        'icontag'    => 'dt',
        'captiontag' => 'dd',
        'columns'    => 3,
        'size'       => 'thumbnail',
        'include'    => '',
        'exclude'    => ''
    );

    // Filter user entered attributes and set default if omitted
    $options = shortcode_atts( $defaults, $attr );

    //   [.. code continues ..]
    //   File: wp-includes/media.php

}
?>
After the exhaustive list of supported attributes and their default values is set in array $defaults, it is combined with the user input attributes in array $attr, and any unknown attribute is ignored.
The function do_shortcode() searches the string content passed as its parameter for shortcodes, and processes them. When WordPress initializes, it hooks the filter 'the_content' to this function, so that post contents are taken care of:
<?php

// In wp-includes/shortcodes.php
add_filter( 'the_content', 'do_shortcode', 11 );
?>
It can happen that the content enclosed in a shortcode may contain other shortcodes. For instance, you can register [b] and [i] to display bold and italic text, and it should work with a nested structure such as "[b]some [i]text[/i] here[/b]".
This is no problem because the callback function of a shortcode can recursively call do_shortcode():
<?php
// add shortcodes [b] and [i]
add_shortcode( 'i', 'boj_sc5_italic' );
add_shortcode( 'b', 'boj_sc5_bold' );

// callback function: return bold text
function boj_sc5_bold( $attr, $content ) {
    return '<strong>' . do_shortcode( $content ) . '</strong>';
}

// callback function: return italic text
function boj_sc5_italic( $attr, $content ) {
    return '<em>' . do_shortcode( $content ) . '</em>';
}

?>
Code snippet plugin_boj_sc5.php
Each callback function applies shortcodes to its enclosed text to make sure each shortcode is processed.
You can now code a new plugin to enable BB-like tags in comments: Instead of using regular HTML tags such as <a> or <b>, commenters need to use [url] and [b] like in most forums.
The plugin will also have the following traits:
It should not change how authors write their posts (with HTML tags as usual).
It should not apply to comments shortcodes otherwise registered for posts, such as
[amazonimage]in your previous plugin or[gallery].
The plugin follows:
<?php
/*
Plugin Name: Shortcode Example 6
Plugin URI: http://example.com/
Description: Enables [url] and [b] shortcodes in comments
Version: 1.0
Author: Ozh
Author URI: http://wrox.com/
*/

// Hook into 'comment_text' to process comment content
add_filter( 'comment_text', 'boj_sc6_comments' );

// This function processes comment content
function boj_sc6_comments( $comment ) {

    // Save registered shortcodes:
    global $shortcode_tags;
    $original = $shortcode_tags;

    // Unregister all shortcodes:
    remove_all_shortcodes();

    // Register new shortcodes:
    add_shortcode( 'url', 'boj_sc6_comments_url' );
    add_shortcode( 'b', 'boj_sc6_comments_bold' );
    add_shortcode( 'strong', 'boj_sc6_comments_bold' );

    // Strip all HTML tags from comments:
    $comment = wp_strip_all_tags( $comment );

    // Process comment content with these shortcodes:
    $comment = do_shortcode( $comment );

    // Unregister comment shortcodes, restore normal shortcodes
    $shortcode_tags = $original;

    // Return comment:
    return $comment;
}

// the [b] or [strong] to <strong> callback
function boj_sc6_comments_bold( $attr, $text ) {
    return '<strong>' . do_shortcode( $text ) . '</strong>';
}

// the [url] to <a> callback
function boj_sc6_comments_url( $attr, $text ) {
    $text = esc_url( $text );
return "<a href=\"$text\">$text</a>"; } ?>
Code snippet plugin_boj_sc6.php
What just happened?
As you can see, your plugin does not register new shortcodes
[url]and[b]directly from the start; otherwise, they would interfere with the post contents. Instead, the plugin starts with capturing each comment's contents.The comment processing function,
boj_sc5_comments(), first unregisters all shortcodes after making a copy of them.New shortcodes are then registered:
[url]and[b]. ([strong]will be equivalent to[b], for user's simplicity.)The comment content, kept in the variable
$comment, is expurgated from regular HTML tags and then applied to the newly registered shortcodes.Notice how the shortcode callback function for bold text recursively calls
do_shortcode(), enabling for nested structures.Original shortcodes are restored; the comment shortcodes
[url]and[b]are unregistered by the way.The formatted comment content is returned for display.
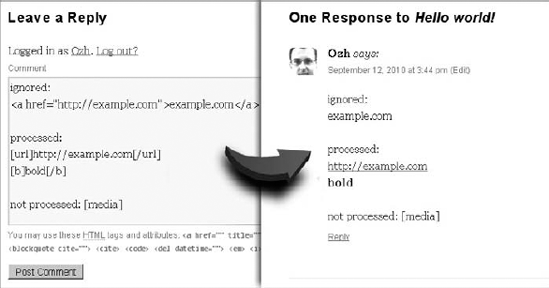
Activate the plugin and type in a new comment: See in Figure 10-3 how HTML tags are ignored; [b] and [url] shortcodes are processed but regular shortcodes such as [gallery], which would otherwise apply to posts, are not.
As you have read previously, WordPress can handle nested shortcode structures, provided their callback functions recursively call do_shortcode(). However, this handling has limitations and can sometimes fail, as you will see now.
The following structure is fine because nested shortcodes are different, and each one is correctly enclosed:
Works:
[foo]
    [bar]
        [baz]
    [/bar]
[/foo]
The parser will fail if you enclose a shortcode within the same shortcode:
Fails:
[foo]
    [foo]
    [/foo]
[/foo]
Also, remember that shortcodes can be self-closing (a standalone [foo] or [foo/]) or enclose content ([foo]content[/foo]), which can also make some structures impossible to parse correctly:
Fails:
[foo]
[foo]
    content
[/foo]As a complete and more complex example using shortcodes, you now make a plugin that can integrate Google Maps into your WordPress-powered web site.
Google offers many different APIs for accessing its services and in particular the mapping service, which uses two related services: a geocoding API and the map API.
Note
Google provides extensive documentation on the Google Maps API. You can find more information at http://code.google.com/apis/maps/documentation/javascript/.
In this section, you code a plugin to convert a plain text address (such as "111 River Street Hoboken, NJ 07030") into a dynamically generated interactive Google map.
The first step to convert an address into a map is to "geocode" this address. Geocoding is defined as the process of converting a standard address (like "108 Ocean Ave. Amityville, NY 11701") to geographic longitude and latitude coordinates ("40.6665060, −73.4147750"). These coordinates are used by the Google Maps API to locate specific positions on a map and to plot markers on a map based on the coordinates specified.
Currently the Google Geocoding API can return results in two formats: JSON or XML. In this example you use the JSON format and work with the techniques discussed in Chapter 9, "HTTP API," about HTTP requests.
Google has made the process of interacting with its API simple. To retrieve coordinates you can request the following URL: http://maps.google.com/maps/api/geocode/$output?$parameters where $output will be the format output (for instance 'json') and $parameter will be a query string of additional parameters to geocode.
You need to pass only two required parameters to this API: address or latlng and sensor:
Because you don't know the latitude and longitude coordinates, you use the
addressparameter. This parameter is the full, plain text address you want to geocode, in its URL encoded form.The sensor parameter indicates whether the request comes from a device with a location sensor (such as a smartphone). You set this variable to
false.
You can easily test this by loading the geocoding API URL in any browser and populating the required parameters: http://maps.google.com/maps/api/geocode/json?address=1600+Pennsylvania+Ave,+Washington,+DC&sensor=false.
As you can see, the JSON results returned contain the longitude and latitude coordinates of the address and additional data such as the ZIP code (which we didn't send in the request).
Now write the function boj_gmap_geocode() that will geocode an address:
<?php

// Geocode an address: return array of latitude & longitude
function boj_gmap_geocode( $address ) {
    // Make Google Geocoding API URL
    $map_url = 'http://maps.google.com/maps/api/geocode/json?address=';
    $map_url .= urlencode( $address ).'&sensor=false';

    // Send GET request
    $request = wp_remote_get( $map_url );

    // Get the JSON object
    $json = wp_remote_retrieve_body( $request );
// Make sure the request was successful or return false
if( empty( $json ) )
return false;
// Decode the JSON object
$json = json_decode( $json );
// Get coordinates
$lat = $json->results[0]->geometry->location->lat; //latitude
$long = $json->results[0]->geometry->location->lng; //longitude
// Return array of latitude & longitude
return compact( 'lat', 'long' );
}
?>This function sends a request to the Google Maps Geocoding API, and receives a JSON response which, when decoded, contains latitude and longitude. Test it to check the return value format:
<?php

$coords = boj_gmap_geocode( '108 Ocean Ave. Amityville, NY' );

var_dump( $coords );

/* Result:
array(2) {
  ["lat"]=> float(40.666506)
  ["long"]=> float(-73.414775)
}
*/
?>
For more details and explanation on the functions used in this function, refer to Chapter 9.
One important aspect of shortcodes is that they generate content dynamically each time. But that would not be efficient to issue an HTTP request to the Google Maps Geolocation API each time a post is displayed because it would slow down each page load.
As an alternative, when an address has been geolocated, you can store its coordinates in metadata attached to the post. This way, next time the same post displays, the latitude and longitude will be automatically fetched from the database with all other post metadata, thus saving one HTTP request.
Note
Post metadata, accessible in the WordPress write interface as "Custom Post Fields," is fetched at the same time as the post data itself, so reading information stored there does not issue an extra SQL query. You learn more about post metadata in Chapter 11, "Extending Posts."
Instead of getting coordinates from Google's API using the function boj_gmap_geocode(), you can use the proxy function boj_gmap_get_coords() that first checks for the information in the post metadata. If the information is missing, it will be fetched fresh from Google and then stored in the metadata for faster later reuse.
Following is your proxy function:
<?php

// Convert a plain text address into latitude & longitude coordinates
// Retrieved from meta data if possible, or get fresh then cached otherwise
function boj_gmap_get_coords( $address = '111 River Street Hoboken, NJ' ) {

    // Current post id
    global $id;

    // Check if we already have this coordinates in the database
    $saved = get_post_meta( $id, 'boj_gmap_addresses' );
    foreach( (array)$saved as $_saved ) {
        if( isset( $_saved['address'] ) && $_saved['address'] == $address ) {
            extract( $_saved );
            return compact( 'lat', 'long' );
        }
    }

    // Coordinates not cached: let's fetch them from Google
    $coords = boj_gmap_geocode( $address );
    if( !$coords )
        return false;

    // Cache result in a post meta data
    add_post_meta( $id, 'boj_gmap_addresses', array(
        'address' => $address,
        'lat' => $coords['lat'],
        'long' => $coords['long']
        )
    );

    extract( $coords );
    return compact( 'lat', 'long' );
}

?>
Each time an address is geolocated for the first time, the add_post_meta() call inserts into the post metadata named 'boj_gmap_addresses' an array like the following:
array(
    "address" => "108 Ocean Ave. Amityville, NY ",
    "lat"     => "40.666506",
    "long"    => "-73.414775"
)
On the next page load, the coordinates should be found and retrieved from the post metadata.
Now that you know how to convert an address into longitude and latitude coordinates using the Google Geocoding API, you can plot those coordinates on a Google Map using the Google Maps API.
Interactive Google Maps are created using JavaScript that must be inserted in the page where you want the map to display. Before integrating it straight into your plugin, you learn how to embed such a map in an HTML page:
First, you need to insert the main script:
<script type="text/javascript"
    src="http://maps.google.com/maps/api/js?sensor=false">
Then, insert the map-specific JavaScript part, enclosed in its own function:
function initialize_map() {An object holds a new instance of a Google Map, with specific latitude and longitude parameters:
var myLatlng = new google.maps.LatLng(45.124099,-123.113634);
Another object can define the map options: its zoom level, where it should be centered, and the map type (terrain, road, satellite, or hybrid):
var myOptions = {
        zoom: 4,
        center: myLatlng,
        mapTypeId: google.maps.MapTypeId.SATELLITE
    }
Now, you attach the map to an HTML object such as a <div>; here with attribute id "map_canvas":
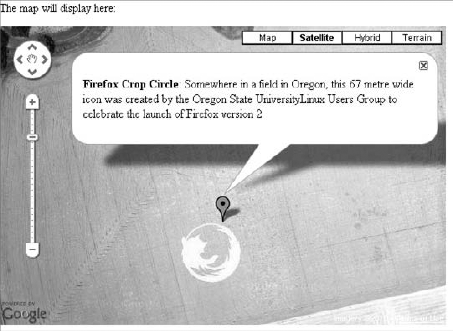
var map = new google.maps.Map( document.getElementById("map_canvas"), myOptions );The following string holds a custom text that displays in the information window showing when clicking the marker on the map:
var contentString = '<div id="content">'+
        '<p><b>Firefox Crop Circle</b>: Somewhere in a field in Oregon'+
        ', this 67 metre wide icon was created by the Oregon State University'+
        'Linux Users Group to celebrate the launch of Firefox version 2</p>'+
        '</div>'+
        '</div>';
This string is now attached to a new instance of the InfoWindow object:
var infowindow = new google.maps.InfoWindow({
        content: contentString
    });
Now, place a marker on your map:
var marker = new google.maps.Marker({
        position: myLatlng,
        map: map,
        title: 'Firefox Crop Circle'
    });
And finally add behavior so that the information window pops up when the marker is clicked:
google.maps.event.addListener(marker, 'click', function() {
        infowindow.open(map,marker);
    });
}
Almost done! Now create the empty HTML object that will receive the map, and call the JavaScript function that will display it:
<p>The map will display here:</p>
    <div id="map_canvas" style="width:600px;height:600px"></div>
    <script type="text/javascript">initialize_map()</script>
Code snippet google_map_api_example.html
This file outlines the concept of the Google Maps API and displays a map, as shown in Figure 10-4.
You are now ready to implement dynamic Google Maps in your plugin.
Now you code the central piece of the plugin: the function to register the shortcode [googlemap] and display the Google Map. The shortcode will be used like so:
[googlemap width=500 height=300 zoom=12]Elm Street, Springwood, Ohio[/googlemap]
First, register the shortcode itself. You could elect to also register various similar shortcodes pointing to the same callback, such as [googlemaps], [google_map], and [google_maps].
<?php

//add the [googlemap] shortcode support
add_shortcode( 'googlemap', 'boj_gmap_generate_map' );
Now start to define the callback function that can parse and process the shortcode attributes and its content:
// The shortcode callback
function boj_gmap_generate_map( $attr, $address ) {

    // Set map default
    $defaults = array(
        'width'  => '500',
        'height' => '500',
        'zoom'   => 12,
    );

    // Get map attributes (set to defaults if omitted)
    extract( shortcode_atts( $defaults, $attr ) );
This first part sets an array of default values, merged with the actual attributes using the function shortcode_atts() that returns an array. The extract() call then imports variables from the array so that for instance array( 'size' => 300 ) becomes $size = 300.
// get coordinates
    $coord = boj_gmap_get_coords( $address );

    // Make sure we have coordinates, otherwise return empty string
    if( !$coord )
        return '';
What you've done here is geocode the address (either from fresh API data or the post metadata) and, in case the geocoding fails (temporary connection problem between your server and Google's, for instance), return an empty string.
// Output for the shortcode
    $output = '';

    // populate $lat and $long variables
    extract( $coord );
Now that you have all the needed variables, you sanitize them for output. Some are to be included in JavaScript strings and others used as HTML attributes, so you can use the appropriate escaping function as described in Chapter 6:
// Sanitize variables depending on the context they will be printed in
    $lat     = esc_js( $lat );
    $long    = esc_js( $long );
    $address = esc_js( $address );
    $zoom    = esc_js( $zoom );
    $width   = esc_attr( $width );
    $height  = esc_attr( $height );
Now you insert the JavaScript parts.
Usually, you would insert the main script in the <head> of the document, but in this case this would be counter-performant because the script would be inserted even if no post on the page requires it.
Instead, you insert it inline, as part as the shortcode return, while making sure it's echoed only once per page:
// generate a unique map ID so we can have different maps on the same page
    $map_id = 'boj_map_'.md5( $address );

    // Add the Google Maps main javascript only once per page
    static $script_added = false;
    if( $script_added == false ) {
        $output .= '<script type="text/javascript"
        src="http://maps.google.com/maps/api/js?sensor=false"></script>';
        $script_added = true;
    }
Now you can insert the map-specific JavaScript. Each function and each map placeholder will be uniquely named, using the $map_id variable previously generated, so you can have several maps on the same page:
// Add the map specific code
    $output .= <<<CODE
    <div id="$map_id"></div>

    <script type="text/javascript">
    function generate_$map_id() {
        var latlng = new google.maps.LatLng( $lat, $long );
        var options = {
            zoom: $zoom,
            center: latlng,
            mapTypeId: google.maps.MapTypeId.ROADMAP
        }

        var map = new google.maps.Map(
            document.getElementById("$map_id"),
options
);
var legend = '<div class="map_legend"><p> $address </p></div>';
var infowindow = new google.maps.InfoWindow({
content: legend,
});
var marker = new google.maps.Marker({
position: latlng,
map: map,
});
google.maps.event.addListener(marker, 'click', function() {
infowindow.open(map,marker);
});
}
generate_$map_id();
</script>Append to the output some simple styling as per user-defined attributes:
<style type"text/css">
    .map_legend{
        width:200px;
        max-height:200px;
        min-height:100px;
    }
    #$map_id {
        width: {$width}px;
        height: {$height}px;
    }
    </style>

CODE;
And, of course, don't forget to return the content of the shortcode replacement:
return $output;
}

?>
Code snippet plugin_boj_sc7.php
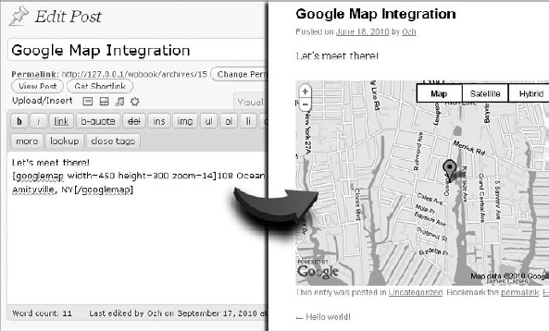
Now your plugin is ready to go! Create a new post and, for instance, write the following shortcode: [googlemap width=450 height=300 zoom=14]108 Ocean Ave. Amityville, NY[/googlemap]. Your post will look like Figure 10-5.
Shortcodes can easily add interesting and practical functions, and again, your imagination will be the limit. You can for instance register shortcodes to display member-only content, display time-limited content, obfuscate email addresses, and more. In the following sections, you'll look at a few of the options.
The first quick shortcode you will implement now is a neat way to display content to logged in users only. For instance, its usage in posts would be as following:
Today's Jedi pro-tip is:
[members]Use the force[/members]
The code and function for such a shortcode is the following simple snippet:
<?php

add_shortcode( 'members', 'boj_sc8_loggedin' );

function boj_sc8_loggedin( $attr, $content ) {
    if( is_user_logged_in() ) {
        return $content;
    } else {
return "<p>Members Eyes Only</p>";
}
}
?>Code snippet plugin_boj_sc8.php
The result is that you enclose content between a [members] shortcode, and only readers who are logged in can see it. For a more elaborated example on the same concept, refer back to Chapter 8, "Users."
Another simple yet valuable shortcode you will code will allow displaying time-limited content, such as a promotional link that is valid only for 24 hours:
This promo link valid for 24 hours only:
[24hours] http://example.com/promo/ [/24hours]
To implement this shortcode, you need the following snippet that will simply check the current time against the time the post was published:
<?php

add_shortcode( '24hours', 'boj_sc8_24hours' );

function boj_sc8_24hours( $attr, $content ) {
    $now = time();
    $post_time = get_the_date( 'U' );
    if( ( $now - $post_time ) > 86400 ) {
        return 'Offer has expired!';
    } else {
        return $content;
    }
}
?>
Code snippet plugin_boj_sc8.php
If the current post has been published more than 86400 seconds (that is, 24 hours) ago, the text enclosed in [24hours] tags won't show.
The next quick shortcode idea you will code is a practical way to convert a plain text email address into a mailto: link that will be obfuscated (that is, less readable) to spam robots. In a post, you would simply type:
Email me at [email]ozh@ozh.org[/email]
The shortcode function will make use of WordPress' function antispambot(), which converts characters into HTML entities that spambots and email harvesters cannot easily read:
<?php

add_shortcode( 'email', 'boj_sc8_email' );

function boj_sc8_email( $attr, $content ) {
    if( is_email( $content ) ) {
        $content = antispambot( $content );
        return sprintf( '<a href="mailto:%s">%s</a>', $content, $content );    } else {
        return '';
    }
}
?>
Code snippet plugin_boj_sc8.php
The result is that you enclose email addresses between [email][/email] tags, and the shortcode will obfuscate them. For instance, actual return for 'ozh@ozh.org' is 'ozh@& #111;zh.org'.
Shortcodes open the door to advanced, customizable, and dynamic content for end users who may have no knowledge or will to write complicated HTML, JavaScript, CSS, or PHP.
Using shortcodes, you can propose advanced macros to your clients, adding much value to your work at little cost for development.