Table of Contents for
Professional WordPress® Plugin Development
 Professional WordPress® Plugin Development
Published by
Wrox, 2011
Professional WordPress® Plugin Development
Published by
Wrox, 2011
- Copyright
- CREDITS
- ABOUT THE AUTHORS
- ACKNOWLEDGMENTS
- FOREWORD
- INTRODUCTION
- 1. An Introduction to Plugins
- 2. Plugin Foundation
- 3. Hooks
- 4. Integrating in WordPress
- 5. Internationalization
- 6. Plugin Security
- 7. Plugin Settings
- 8. Users
- 9. HTTP API
- 10. The Shortcode API
- 11. Extending Posts: Metadata, Custom Post Types, and Taxonomies
- 12. JavaScript and Ajax in WordPress
- 13. Cron
- 14. The Rewrite API
- 15. Multisite
- 16. Debugging and Optimizing
- 17. Marketing Your Plugin
- 18. The Developer Toolbox
WHAT'S IN THIS CHAPTER?
Working with users and user functions
Adding, updating, and retrieving user data
Developing for roles and capabilities
Limiting access with user permissions
Customizing user roles
Just a couple of years ago, a chapter on users would probably not have been too exciting to potential plugin developers. At the time, WordPress was largely used as a pure blogging system with one or a few bloggers writing posts. Developing plugins to integrate with the users system most likely wouldn't have earned you a lot of popularity within the plugin community.
Today, WordPress powers many large sites with thousands and even hundreds of thousands of users. Knowing how WordPress handles users is now an important tool in any plugin developer's toolbox. You'll deal with various user scenarios in many of your plugins.
Perhaps, more important, understanding the roles and capabilities system is paramount to developing a solid and secure plugin. Roles and capabilities define what users can do within individual sites created with WordPress.
People use WordPress for private membership sites, social networks, online newspapers, medical databases, centers for education, and much more. All these might require plugins to handle users and permissions. When creating plugins for these types of sites, it's often important to make sure you use the correct WordPress functions so that private information is not shown to users without permission to see it.
This chapter gives you the tools to work within the WordPress users, roles, and capabilities systems and show you how each interact with each other within the WordPress environment.
In WordPress, users are people who have registered a unique username for the site. The user has an account within that installation of WordPress. The term "user" shouldn't be confused with "visitor." A visitor is someone reading the site without an account. This chapter's main focus is on registered users.
All WordPress installations have at minimum one user. This is the person that installed WordPress and initially set it up. This account has been traditionally known as the "admin" user because older versions of WordPress automatically created an account with the "admin" username. Today, WordPress allows a different username upon registration.
Warning
Some older plugins relied on there being a user account called "admin," which was wrong in the past and is wrong now. Never assume that a specific username is in use, and never assume that if the username is in use that the user has particular permissions.
WordPress has many functions for working with users. In this section, you learn how to use some of these basic functions.
Warning
Many user functions aren't loaded until after plugins are loaded and the current user isn't authenticated until the init action hook (see Chapter 3, "Hooks"). Using a user function before init in the WordPress flow will most likely cause a fatal error.
The is_user_logged_in() function is a conditional tag that enables you to check if a user is logged into the site. It returns either true or false based on whether the current user has an ID. It is also pluggable, so you can create a custom is_user_logged_in() function to overwrite its functionality completely. People logged in are users, and people who are not logged in are visitors.
In the following example, you display a message for users based on the return value of this function in the footer of the site. Logged-in users will get one message and users not logged in will get a different message.
<?php

add_action( 'wp_footer', 'boj_footer_user_logged_in' );

function boj_footer_user_logged_in() {

    if ( is_user_logged_in() )
echo 'You are currently logged into this site.';
else
echo 'You are not logged into the site.';
}
?>This function is important because it enables you to run specific code only when needed. Although it is useful, you'll likely rely more on capabilities for more specific checks within your plugins (see the "Roles and Capabilities" section of this chapter).
The get_users() function enables you to query users from the database based on the arguments passed into the function through the $args parameter. The $args parameter is an array of arguments that you can define to limit the users returned by the function.
<?php
get_users( $args );
?>
After you query a set of users, you receive an array that you can use to perform some specific functionality based on the results. For example, you could display a list of users based on the date they registered for the site.
The $args parameter gives you many options for limiting which users are returned in the query. The parameter is optional and returns all users if you do not define any arguments.
blog_id— Get users registered for a specific blog within the network. This is only useful for multisite installs (Chapter 15, "Multisite"). It defaults to the current blog ID.role— The name of a user role. This defaults to an empty string and uses all roles.meta_key— A meta key from the$wpdb->usermetatable.meta_value— A meta value from the$wpdb->usermetatable.meta_compare— A conditional operator to compare themeta_valueargument against. Some values are=, !=, >, >=, <, and<=.include— An array of user IDs to specifically include in the query.exclude— An array of user IDs that should be excluded from the query.search— A string used to search for users. The search will be on theuser_login, user_nicename, user_email, user_url, anddisplay_namefields from the$wpdb->userstable.orderby— The field in which to order the users by. By default, this islogin. You can also order byemail, url, registered, name, user_login, andpost_count.order— Whether to order the users in ascending (ASC) or descending (DESC) order. It defaults toASC.offset— Number of users to skip over in the query before getting the users from the database.number— An integer that limits the user query to a set number of users. By default, all users that match the given arguments will be returned.
It's time to put the get_users() function to some good use. In this section, you build a small plugin that displays the avatar (photo of the user) of all users based on a given role. This plugin will be a simple function that enables the plugin user to input the role they want to show the user avatars for.
<?php
/*
Plugin Name: User Avatars
Plugin URI: http://example.com
Description: Displays user avatars based on role.
Author: WROX
Author URI: http://wrox.com
*/

function boj_user_avatars( $role = 'subscriber' ) {

    /* Get the users based on role. */
    $users = get_users(
        array(
            'role' => $role
        )
    );

    /* Check if any users were returned. */
    if ( is_array( $users ) ) {

        /* Loop through each user. */
        foreach ( $users as $user ) {

            /* Display the user's avatar. */
            echo get_avatar( $user );
        }
    }
}

?>
Code snippet boj-user-avatars.php
To use this plugin on a live site, the plugin user needs to use the following code and input a role name. This example uses the editor as the role.
<?php
boj_user_avatars( 'editor' );
?>
If you need to get all the users of the blog, you don't have to use the get_users() function from the previous section. The get_users_of_blog() function returns an array of all user IDs registered for the current blog being viewed.
<?php
get_users_of_blog( $id );
?>
The function takes in a single parameter: $id. This parameter is only useful in multisite setups where $id would be a specific site ID.
In the next example, you create a function that lists of all the users for the blog. This list displays the user's name and links to the user's archive page.
<?php

function boj_list_users_of_blog() {

    /* Get the users of the current blog. */
    $users = get_users_of_blog();

    /* Check if users are returned. */
    if ( !empty( $users ) ) {

        /* Open the users list. */
        echo '<ul class="users-list">';

        /* Loop through each user returned. */
        foreach ( $users as $user ) {

            /* Create a list item linking to the user archive page. */
            echo '<li><a href="' . get_author_posts_url( $user->ID ) . '">';
            echo get_the_author_meta( 'display_name', $user->ID );
            echo '</a></li>';
        }

        /* Close the users list. */
        echo '</ul>';
    }
}

?>
You now have a function for creating a nice list of all the users for a blog. You can build this functionality into a shortcode (see Chapter 10, "The Shortcode API") or a widget (refer to Chapter 4) by calling the boj_list_users_of_blog() function. You can also have plugin users input the following code where they want the users list to appear within their theme.
<?php boj_list_users_of_blog(); ?>
The count_users() function enables you to count users of the site. It keeps track of the count of all users and the number of users for each role. It takes in a single parameter called $strategy, which determines how the users are counted and can be one of two values.
time— This value is CPU-intensive and is the default.memory— This value is memory-intensive.
With the next code example, you get the user count for the site. You then list the total number of users for the site, followed by the user count for each role.
<?php

/* Get the user counts. */
$user_count = count_users();

/* Open an unordered list. */
echo '<ul class="user-counts">';

/* List the total number of users. */
echo '<li>Total users: ' . $user_count['total_users'] . '</li>';

/* Loop through each of the roles. */
foreach ( $user_count['avail_roles'] as $role => $count ) {

    /* List the role and its number of users. */
    echo '<li>' . $role . ': ' . $count . '</li>';
}

/* Close the unordered list. */
echo '</ul>';

?>WordPress has a built-in user interface for creating, updating, and deleting users that most people will use. However, you may find yourself in a situation where you would need to create a plugin that handles these things outside of the normal WordPress interface.
Following are some examples of reasons why you need to code a plugin to handle this:
A client needs to import thousands of users from a different system into WordPress, and creating these users individually would be out of the question.
You're building a social networking plugin that needs a front-end interface for registering user accounts.
A plugin that enables administrators to bulk edit/update various forms of user data in a quick and efficient manner.
You need to create a sidebar widget for use in multiple WordPress themes to handle user registration.
As you should see by now, there can be many reasons for stepping outside of the standard WordPress interface for handling users. Although you won't be using the standard interface, you will be using standard functions that WordPress has conveniently provided for doing these types of things.
The wp_insert_user() function inserts new users into the database. It also handles the update of currently registered user accounts if a user ID is passed into the function.
The function has a single parameter: $userdata. This is an array of arguments for inputting data into the $wpdb->users and $wpdb->usermeta tables for the specific user.
<?php
wp_insert_user( $userdata );
?>
ID— A current user's ID. You should use this only if you're updating a user. WordPress automatically creates new user IDs.user_pass— A password for the new user account.user_login— This is the "username" for the user. This is a required argument and returns an error if not unique.user_nicename— An alternative name to use in things such as permalinks to user archives. This defaults to theuser_loginargument.user_url— A link to the user's personal web site.user_email— The email address of the user. This is a required argument and returns an error if not given or if the email address is already in use.display_name— The name to display for the user. This defaults to theuser_loginargument.nickname— A nickname for the user. This defaults to theuser_loginargument.first_name— The first name of the user.last_name— The last name (surname) of the user.description— A biographical information argument that describes the user.rich_editing— Whether to use the visual editor when writing posts. This is set totrueby default.user_registered— The date and time of the user registration. WordPress automatically sets this to the current date and time if no argument is given.role— The role the user should have. This defaults to the default role the site administrator has set in the WordPress options.admin_color— The color scheme for the WordPress administration area.comment_shortcuts— Whether the user should use keyboard shortcuts when moderating comments. This defaults tofalse.
Now, you can take these arguments and create a new user with the wp_insert_user() function. You can mix and match the preceding arguments but make sure you use the required arguments (user_login, user_pass, and user_email). The user you create next has the "editor" role and is named Wrox. You also make sure the user was created by displaying a WordPress-generated error message in the instance that something went wrong.
Create a new plugin file named boj-insert-user.php and use the following code to create a plugin that will insert a new user into your database using the wp_insert_user() function.
<?php
/*
Plugin Name: Insert User
Plugin URI: http://example.com
Description: Plugin that inserts a user.
Version: 0.1
Author: WROX
Author URI: http://wrox.com
*/

/* Insert the new user on the 'init' hook. */
add_action( 'init', 'boj_insert_user' );

/* Inserts a new user. */
function boj_insert_user() {

    /* Do nothing if the 'wrox' username exists. */
    if ( username_exists( 'wrox' ) )
        return;

    /* Set up the user data. */
    $userdata = array(
        'user_login' => 'wrox',
        'user_email' => 'wrox@example.com',
        'user_pass' => '123456789',
        'user_url' => 'http://example.com',
        'display_name' => 'Wrox',
        'description' => 'Loves to publish awesome books on WordPress!',
        'role' => 'editor'
    );

    /* Create the user. */
    $user = wp_insert_user( $userdata );

    /* If the user wasn't created, display the error message. */
    if ( is_wp_error( $user ) )
        echo $result->get_error_message();
}

?>
Code snippet boj-insert-user.php
You may be wondering why there's a function named wp_create_user() when the wp_insert_user() can get the job done. This function can actually be a useful alternative that enables you to quickly create new users and not worry about dealing with all the arguments from wp_insert_user().
<?php
wp_create_user( $username, $password, $email );
?>
This function enables you to insert the minimum arguments for creating a user, which simplifies creating users greatly. It's especially useful if you don't have any other data you want to input.
$username— A unique login name for the user.$password— A password the user will use to log into the site.$email— A unique email address for the user account.
With the next code, you create a new user called wrox2. This user is given the default user role set by the site administrator. Create a new plugin file named boj-create-user.php and use the following code to create a new user with the wp_create_user() function.
<?php
/*
Plugin Name: Create User
Plugin URI: http://example.com
Description: Plugin that creates a user.
Version: 0.1
Author: WROX
Author URI: http://wrox.com
*/

/* Create the new user on the 'init' hook. */
add_action( 'init', 'boj_create_user' );

/* Creates a new user. */
function boj_create_user() {

    /* Do nothing if the 'wrox2' username exists. */
    if ( username_exists( 'wrox2' ) )
        return;

    /* Create the 'wrox2' user. */
    wp_create_user(
        'wrox2',
        '123456789',
        'wrox2@example.com'
    );
}

?>
Code snippet boj-create-user.php
This is another function that can be done with wp_insert_user(). This function is a wrapper function for it with one important difference: If the user password (user_pass argument) is updated, the function automatically resets the cookies for the user's browser.
<?php
wp_update_user( $userdata );
?>
This function takes in a single parameter called $userdata, which accepts all the same arguments covered in the section on wp_insert_user(). However, the ID argument is required for updating the user. If the ID argument isn't present, a new user will be created.
In the next example, you use the wp_update_user() function to force the currently logged-in user to use the "fresh" color scheme in the admin. This can be useful for making sure all users have a consistent experience in the admin. Create a new file called boj-force-admin-color.php and use the following code to update the user.
<?php
/*
Plugin Name: Force Admin Color
Plugin URI: http://example.com
Description: Forces the 'fresh' admin color scheme.
Version: 0.1
Author: WROX
Author URI: http://wrox.com
*/

/* Only load change the color scheme in the admin. */
add_action( 'admin_init', 'boj_force_admin_color' );

/* Forces the current user to use the 'fresh' admin color. */
function boj_force_admin_color() {

    /* Get the current user object. */
    $user = wp_get_current_user();

    /* If the $user variable is not empty, continue. */
    if ( !empty( $user ) ) {

        /* Get the user's admin color scheme. */
        $admin_color = get_user_meta( $user->ID, 'admin_color', true );

        /* If the admin color is not 'fresh', change it. */
        if ( $admin_color !== 'fresh' ) {

            /* Set up the user data. */
            $userdata = array(
                'ID' => $user->ID,
                'admin_color' => 'fresh'
            );

            /* Update the user. */
wp_update_user( $userdata );
}
}
}
?>Code snippet boj-force-admin-color.php
The wp_delete_user() function is a little different than the previous user functions because it exists only in the WordPress admin. Therefore, you should call the function only while in the admin. Otherwise, you get a PHP error.
<?php
wp_delete_user( $user_id, $reassign );
?>
The function is used for deleting individual users and reassigning their posts and links to an alternative user. It takes in two parameters.
$id— The ID of the user to delete.$reassign— The ID of the user to set as the author of posts and links in which the user you're deleting has published. If this parameter is not set, the posts and links will be deleted from the database.
In this next example, you delete a user with the ID of 100 and reassign the user's posts and links to a user with the ID of 1.
<?php

/* Delete user 100 and assign posts to user 1. */
wp_delete_user( 100, 1 );

?>
User data in WordPress is saved in two different tables in the database: $wpdb->users and $wpdb->usermeta. The users table saves information about the user that WordPress needs to function. The usermeta table is for storing additional metadata about users. You sometimes need to load, create, update, and delete this data within your plugins.
When working with user data from the users table, you work with a few different values set for every user on the site.
ID— The ID of the registered user.user_login— The login name (username).user_pass— The user's password. Note that you should never display this publicly.user_nicename— A "pretty" version of the user login that works in URLs.user_url— The web site address of the user.user_email— The email address of the user. You should never display this publicly without the user's permission.user_registered— The date the user registered for the site.display_name— The name the user would like displayed.
The get_userdata() function is for getting a user's data from the users table. It also returns data from the usermeta table, but WordPress has other functions that will be covered for getting this information. It takes in a single parameter of $user_id, which is the ID of a registered user for the site. It returns an object of user data if a user were found or false if no user were found.
Remember, this function can also return metadata, but you shouldn't worry about using this function for displaying metadata with it. This is covered later in the chapter.
Suppose you needed a function to quickly display a specific user's name and web site address. Use the following code to create a function to display this data.
<?php
function boj_display_user_website( $user_id ) {

    /* Get the user data. */
    $data = get_userdata( $user_id );

    /* Check if data was returned. */
    if ( !empty( $data ) ) {

        /* Check if a URL has been given. */
        if ( !empty( $data->user_url ) ) {

            /* Display the user display name and URL. */
            echo $data->display_name . ': ' . $data->user_url;
        }
}

?>
Now you can use the boj_display_user_website() function to display any user's name and site address by inputting the user ID as the $user_id parameter. For example, you could use the following code to display this information for a user with the ID of 100.
<?php
boj_display_user_website( 100 );
?>
The wp_get_current_user() function gets the user data from the users table for the currently logged-in user. It can be useful for displaying information when a specific user is logged into the site. The function takes in no parameters and returns an object of the user data.
In the next example, you display a welcome message based on the user's display name in the WordPress admin footer.
<?php

/* Display user welcome message in the admin footer. */
add_action( 'in_admin_footer', 'boj_user_welcome_message' );

function boj_user_welcome_message() {

    /* Get the current user's data. */
    $data = wp_get_current_user();

    /* Display a message for the user. */
    echo "Hello, {$data->display_name}.<br />";
}

?>The get_currentuserinfo() function is similar to the function from the previous section. wp_get_current_user() actually calls it to get the user's information. The big difference between the two functions is that get_currentuserinfo() doesn't return a variable. It sets a global variable of $current_user instead.
In most scenarios, the wp_get_current_user() function is preferable. However, both functions are pluggable (you can create your own versions of the functions), so this needs to be taken into consideration when building plugins that do overwrite the functions.
Following is the code you can use to display the current user's registration date. Create a new plugin file named boj-user-registration-date.php and use the code to display the user's registration date for the site in the admin footer.
<?php
/*
Plugin Name: User Registration Date
Plugin URI: http://example.com
Description: Displays user's registration date in admin footer.
Version: 0.1
Author: WROX
Author URI: http://wrox.com
*/

/* Display user registration date in the admin footer. */
add_action( 'in_admin_footer', 'boj_display_user_registration_date' );

function boj_display_user_registration_date() {

    /* Globalize the $current_user variable. */
    global $current_user;

    /* Call the current user function. */
    get_currentuserinfo();

    /* Format user registration date. */
    $date = mysql2date( 'F j, Y', $current_user->user_registered );

    /* Display the user's registration date. */
    echo "You registered on {$date}.<br />";
}

?>
Code snippet boj-user-registration-date.php
If you need to count the number of posts a user has written, use the count_user_posts() function. This function counts only the number of posts of the "post" post type. For example, it doesn't count the number of pages or entries of custom post types. It takes in a single parameter of $user_id, which is the ID of the user you'd like to count the posts of.
Suppose you have a rating system for users depending on the number of posts each user has written. You want to give a user a "silver" rating for writing 25 posts or a "gold" rating for writing 50 posts. To do this, you only need to execute the code when a post is saved. Create a new plugin file called boj-user-ratings.php and use the following code to update the logged-in user's rating. Remember, the user's rating is saved as user meta only when a post is saved. (See the section on user metadata for details on how to handle metadata.)
<?php
/*
Plugin Name: User Ratings
Plugin URI: http://example.com
Description: Updates user rating based on number of posts.
Version: 0.1
Author: WROX
Author URI: http://wrox.com
*/

/* Only update the user rating when a post is saved. */
add_action( 'save_post', 'boj_add_user_rating' );

function boj_add_user_rating() {

    /* Get the current user. */
$user = wp_get_current_user();
/* Get the current user rating. */
$rating = get_user_meta( $user->ID, 'user_rating', true );
/* If user already has 'gold' rating, do nothing. */
if ( 'gold' == $rating )
return;
/* Get the user's post count. */
$posts = count_user_posts( $user->ID );
/* Check if the number of posts is equal to or greater than 50. */
if ( 50 <= $posts ) {
/* Give the user a 'gold' rating. */
update_user_meta( $user->ID, 'user_rating', 'gold' );
}
/* Check if the number of posts is equal to or greater than 25. */
elseif ( 25 <= $posts ) {
/* Give the user a 'silver' rating. */
update_user_meta( $user->ID, 'user_rating', 'silver' );
}
}
?>Code snippet boj-user-ratings.php
Sometimes you may want to count the number of posts for multiple users rather than a single user. Any time you need post counts from multiple users, you should use this function instead of using the count_user_posts() function multiple times so that you're not querying the database multiple times.
The count_many_users_posts() function accepts a single parameter of $users, which should be an array of user IDs. It returns an array with the user IDs as the array keys and the post counts as the array values.
In this next example, you create a function that accepts an array of user IDs and lists the number of posts each user has written.
<?php

function boj_list_users_posts_counts( $user_ids = array() ) {

    /* Make sure user IDs were given. */
    if ( empty( $user_ids ) )
return '';
/* Get the post counts for the users. */
$users_counts = count_many_users_posts( $user_ids );
/* Open an unordered list. */
echo '<ul class="users-posts-counts">';
/* Loop through each of the user counts. */
foreach ( $users_counts as $user => $count ) {
/* Display a message with user ID and post count. */
echo "<li>The user with an ID of {$user} has {$count} posts.</li>";
}
/* Close the unordered list. */
echo '</ul>';
}
?>A plugin user can use this code to display a formatted list of post counts for the users of their choosing. Suppose the plugin user wanted to list the post counts for users with the IDs of 100, 200, and 300. They'd need to only input those user IDs into the function call as shown in the following code.
<?php boj_list_users_posts_counts( array( 100, 200, 300 ) ); ?>
User metadata is data about the user that is saved in the $wpdb->usermeta table in the database. This is additional data that plugins can add about the user outside of the predefined WordPress fields in the $wpdb->users table.
This type of data can be anything you need to develop user-based settings for your plugin. This data is saved in key/value pairs; however, a single key may have multiple values. Meta keys are a way to represent the information provided by the meta values. Think of them as a human-readable ID that represents the information you're working with. Meta values are the pieces of data you retrieved based on the given meta key.
Metadata can literally be any type of data you want to save for the user. Some examples include the following:
Twitter or Facebook account
Location (country, city, state)
Phone number
Favorite book
Personal settings for the site
Private membership information
Warning
Keep in mind that when saving sensitive information about users, you should make sure this data is not publicly displayed by your plugin.
This section focuses on adding, displaying, updating, and deleting specific data for a user. This can enable you to see how the user meta functions work when manipulating data.
You work with a user ID of 100 and a meta key of favorite_books. This meta key saves the values of the user's three favorite books.
To add new user metadata, use the add_user_meta() function. This function returns true when the data is successfully entered into the database and false when it fails.
<?php
add_user_meta( $user_id, $meta_key, $meta_value, $unique );
?>
$user_id— The ID of the user to add metadata to.$meta_key— The metadata key in the database.$meta_value— A single value to add to pair with$meta_key.$unique— Whether the function should force a single row (true) in theusermetatable or create multiple rows for multiple meta values (false). This defaults tofalse.
Now, you give three favorite books to a user with the ID of 100. These book titles are WordPress Dev Champ, WordPress Lazy Coder, and WordPress The Hard Way.
<?php

add_user_meta( 100, 'favorite_books', 'WordPress Dev Champ', false );
add_user_meta( 100, 'favorite_books', 'WordPress Lazy Coder', false );
add_user_meta( 100, 'favorite_books', 'WordPress The Hard Way', false );

?>
The $unique parameter is set to false. This must be false to set multiple values for the same meta key, favorite_books. You would set this to true if the meta value should be a single value.
Now that you've learned how to add custom user metadata, you might want to display it. The get_user_meta() function pulls the meta from the database based on the user ID and meta key.
<?php
get_user_meta( $user_id, $meta_key, $single );
?>
$user_id— The ID of the user to get the metadata for.$meta_key— The metadata key to get the metadata value(s) for.$single— Whether to return an array of meta values (false) or a single value (true). This defaults tofalse.
To display a list of the user's favorite books that you added with the add_user_meta() function, use the following code.
<?php

/* Get the user's favorite books. */
$favorite_books = get_user_meta( 100, 'favorite_books', false );

/* Check if there are any favorite books. */
if ( !empty( $favorite_books ) ) {

    /* Open an unordered list. */
    echo '<ul class="favorite-books">';

    /* Loop through each of the books. */
    foreach ( $favorite_books as $book ) {

        /* Display the book name. */
        echo '<li>' . $book . '</li>';
    }
}

?>
If the favorite_books meta key had only a single meta value instead of multiple values, you wouldn't need to loop through an array. You could simply print the return value to the screen.
<?php

/* Get the user's favorite book (single book). */
$favorite_book = get_user_meta( 100, 'favorite_books', true );

/* Display the favorite book. */
echo $favorite_book;

?>
The update_user_meta() enables you to update a single meta value whether there is a single or multiple values. You can also completely overwrite all of the meta values if the meta key has multiple values. This function can also be used to insert new metadata if it doesn't already exist for the user.
<?php
update_user_meta( $user_id, $meta_key, $meta_value, $prev_value );
?>
$user_id— The ID of the user you want to get metadata for.$meta_key— The metadata key to update meta values for.$meta_value— The new value for the meta key.$prev_value— The previous meta value to overwrite. If this is not set, all meta values will be overwritten with the single, new$meta_valueparameter.
Suppose you want to change one of the user's favorite books, WordPress Dev Champ, to a new book, WordPress Design Champ. You need to set the $meta_value parameter to the new book name and the $prev_value parameter to the old book name.
<?php

update_user_meta(
    100,
    'favorite_books',
    'WordPress Design Champ',
    'WordPress Dev Champ'
);

?>
If you want to overwrite all the favorite books with a single book, you can pass the $meta_value parameter and leave the $prev_value parameter empty.
<?php

update_user_meta( 100, 'favorite_books', 'WordPress Design Champ' );

?>
The delete_user_meta() function enables you to delete all the meta values and meta key or a single meta value for a given meta key.
<?php
delete_user_meta( $user_id, $meta_key, $meta_value = '' );
?>
$user_id— The ID of the user to delete metadata for.$meta_key— The meta key to delete or the meta key to delete meta value(s) for.$meta_value— The specific meta value to delete. If this is left empty, all meta values and the meta key will be deleted for the user.
If you want to delete a single book from the user's list of favorite books, you need to set the $meta_value parameter to the name of the book. With the following code, you delete the WordPress Lazy Coder book from the user's favorite books.
<?php

delete_user_meta( 100, 'favorite_books', 'WordPress Lazy Coder' );

?>
If you want to delete all the user's favorite books, leave the $meta_value parameter empty.
<?php

delete_user_meta( 100, 'favorite_books' );

?>
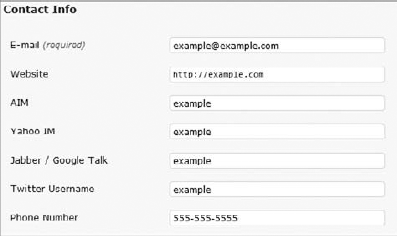
user_contactmethods is a hook (Chapter 3, "Hooks"), not a function like what this chapter has focused on. It is important because it's a quick method for adding user metadata for alternative contact methods such as a Twitter username, Facebook profile, or phone numbers.
It enables you to create additional fields on the user edit screen with a few lines of code. By default, WordPress adds five methods. The last three are metadata as covered in this section of the chapter:
Email
Website
AIM
Yahoo IM
Jabber/Google Talk
The user_contactmethods filter hook returns an array of meta keys and labels for these label keys. To add new meta keys, you need to add new values to the array, as shown in the next code.
<?php
/*
Plugin Name: User Contact Methods
Plugin URI: http://example.com
Description: Additional user contact methods.
Author: WROX
Author URI: http://wrox.com
*/

/* Add a filter to the hook. */
add_filter( 'user_contactmethods', 'boj_user_contactmethods' );

/* Function for adding new contact methods. */
function boj_user_contactmethods( $user_contactmethods ) {

    /* Add the Twitter contact method. */
    $user_contactmethods['twitter'] = 'Twitter Username';

    /* Add the phone number contact method. */
$user_contactmethods['phone'] = 'Phone Number';
/* Return the array with the new values added. */
return $user_contactmethods;
}
?>Code snippet boj-user-contact-methods.php
This adds the extra fields to the contact info section of the user profile screen, as shown in Figure 8-1.
WordPress handles all the heavy lifting of adding, updating, and deleting the metadata in the admin. To retrieve these values, use the get_user_meta() function covered earlier in this section.
Now that you've learned how to manipulate user metadata, it's time to use that knowledge for a practical test. In many cases, custom user metadata your plugin might use needs to be set by the user from the user's profile page.
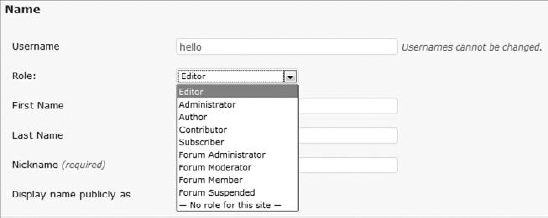
What you will do is build a plugin that adds an extra section to the user edit screen in the WordPress admin. This form will have a select box of the site's blog posts. The users can select one of these posts as their favorite.
The first step would be to create a new file in your plugin directory with a filename boj-user-favorite-post.php. You would then need to create the plugin header and add the form to the user edit page.
<?php
/*
Plugin Name: User Favorite Post
Plugin URI: http://example.com
Description: Allows users to select their favorite post from the site.
Version: 0.1
Author: WROX
Author URI: http://wrox.com
*/

/* Add the post form to the user/profile edit page in the admin. */
add_action( 'show_user_profile', 'boj_user_favorite_post_form' );
add_action( 'edit_user_profile', 'boj_user_favorite_post_form' );

/* Function for displaying an extra form on the user edit page. */
function boj_user_favorite_post_form( $user ) {

    /* Get the current user's favorite post. */
    $favorite_post = get_user_meta( $user->ID, 'favorite_post', true );

    /* Get a list of all the posts. */
    $posts = get_posts( array( 'numberposts' => −1 ) );
    ?>

    <h3>Favorites</h3>

    <table class="form-table">

        <tr>
            <th><label for="favorite_post">Favorite Post</label></th>

            <td>
                <select name="favorite_post" id="favorite_post">
                    <option value=""></option>

                <?php foreach ( $posts as $post ) { ?>
                    <option value="<?php echo esc_attr( $post->ID ); ?>"
                    <?php selected( $favorite_post, $post->ID ); ?>>
                        <?php echo esc_html( $post->post_title ); ?>
                    </option>
                <?php } ?>

                </select>
                <br />
                <span class="description">Select your favorite post.</span>
            </td>
        </tr>

    </table>
<?php }
Code snippet boj-user-favorite-post.php
This gives you an extra section on the user edit page, as shown in Figure 8-2.

The form is only displayed at this point. The next step would be to save the user's favorite post as metadata.
/* Add the update function to the user update hooks. */
add_action( 'personal_options_update', 'boj_user_favorite_post_update' );
add_action( 'edit_user_profile_update', 'boj_user_favorite_post_update' );

/* Function for updating the user's favorite post. */
function boj_user_favorite_post_update( $user_id ) {

    /* Check if the current user has permission to edit the user. */
    if ( !current_user_can( 'edit_user', $user_id ) )
        return false;

    /* Only accept numbers 0-9 since it's a post ID. */
    $favorite_post = preg_replace( "/[^0-9]/", '', $_POST['favorite_post'] );

    /* Update the user's favorite post. */
    update_user_meta( $user_id, 'favorite_post', $favorite_post );
}

?>
Code snippet boj-user-favorite-post.php
The plugin is complete at this point. However, this information is saved only in the database and shown on the user's profile screen in the admin. If you want to show the user's favorite post, you need to use the get_user_meta() function to pull the information from the database.
With the following code, you get the favorite post selected by a user with the ID of 100 and display its title. Because the post ID is the saved meta value, you need to use the get_post() function to retrieve additional information about the post, such as the post title.
<?php

/* Get the user's favorite post (ID). */
$favorite_post = get_user_meta( 100, 'favorite_post', true );

/* Check if the favorite post is set. */
if ( !empty( $favorite_post ) ) {

    /* Get the post object based on the post ID. */
    $post = get_post( $favorite_post );

    /* Display the post title. */
    echo $post->post_title;
}

?>WordPress provides a flexible user system as you've seen in the previous half of this chapter. However, this system represents data about individual users. Alone, it doesn't define what a user can do within the site. For that, WordPress has a roles and capabilities system, which enables complete control over what permissions users have.
Roles are what define users in the WordPress system. More precisely, they grant users a set of permissions called capabilities.
Roles are what users are grouped by in WordPress. They're a way of giving a label to various sets of users. One of the most important things to note is that roles are not hierarchical. For example, an administrator is not necessarily "higher" than an editor. Roles are merely defined by what the role can and can't do. It's a permissions system.
Capabilities are that permissions system. Roles are assigned capabilities that define what that role can or can't do. These can be set up with the WordPress defaults or be completely custom, depending on the site. As a plugin developer, you can't make too many assumptions about what certain roles have permission to do.
Imagine having to define what individual users could do on a site with thousands of users, each user having a custom set of permissions. It'd be nearly impossible to maintain. Roles enable you to group users into distinguishable sets, each group with its own permissions.
Understanding how users, roles, and capabilities work and their relationship to one another is an important aspect of plugin development.
Users are registered accounts on a site. Each user's role determines what the user can do on a site.
Roles are sets of capabilities assigned to users. Multiple roles may be given to users, although this is not evident in the WordPress interface.
Capabilities are the permissions for roles, which are extended to the users of that role.
In general, most plugins won't need to know what roles users have. Most plugins work directly with capabilities because they are what define whether a user has permission to perform a task within the site.
Warning
A common mistake many plugin authors make is to check a user's role before executing code. There is rarely a good reason to do this. Your plugin should check for a capability because capabilities determine a user's permission to do something on the site.
WordPress ships with five default roles, which work well for most installs. Although roles are not hierarchical, the default roles do set up what appears to be a hierarchical system.
Administrator — Has control over everything on the site
Editor — Has publishing permission and editing access over everyone's posts
Author — Has publishing access and can edit its own posts but doesn't have control over others' content
Contributor — Can submit posts but not publish them
Subscriber — Enables access to edit its user profile and the WordPress dashboard
This list is a general overview of the default roles. Even though these are the defaults, plugin users can install role management plugins that enable them to change what each role can do.
Note
You should note the context in which the term "author" is used because it might refer to either the default author role or a post author. It's usually not an issue, but it is one those WordPress quirks you have to learn to live with.
WordPress allows custom roles, which can be created by plugins and themes. There is no user interface in WordPress for creating custom roles; however, several role management plugins exist that enable users to create new roles for their site.
Therefore, as a plugin developer, you can never know exactly what roles exist or might exist for a site unless you have direct access to the install, such as when doing client work. Keep this in mind when developing your plugins.
You may be faced with the task of creating custom roles in your plugins as well. Imagine that you were creating a plugin that implemented a forum within a WordPress install. Because WordPress wouldn't know how to manage a forum, you would have to define these custom roles within your plugin. Some example roles for a forum might include the following:
Forum Administrator
Forum Moderator
Forum Member
Forum Suspended
See the "Customizing Roles" section later in this chapter for more details on creating custom roles.
"Limiting access" is a way to describe the process of working with WordPress capabilities to see if a user has permission to access something or perform a specific task within a WordPress install.
By default, most access in WordPress is restricted within the admin. The admin can expose potentially vital information about a site, so making sure only users with the correct permissions have access to particular parts of it is important. WordPress can handle this when it needs to. Security issues arise when your plugin doesn't take into account a user's capabilities.
WordPress has two types of capabilities:
Role capabilities — Added to individual roles, which are extended to the role's users
Meta capabilities — Based on a specific object (user, post, link, and so on)
A good way to differentiate between the two is to consider this example. User A has the edit_posts capability (given to his role). This capability enables the user to edit posts. However, this user shouldn't be able to edit User B's posts based on that capability. That's where meta capabilities come into play. If User A is trying to edit User B's post, the edit_post meta capability is called, but it's not the actual capability checked for. The map_meta_cap() function in WordPress decides whether the user can edit the post by returning an array of role capabilities to check against based on the user and post.
When adding settings pages for your plugin, you input a capability. However, WordPress handles the capability checks for you, so you don't need to worry about limiting access to those pages with custom code. See Chapter 7, "Plugin Settings," for more information on adding settings pages.
This chapter reviews only a few of the possible capabilities. For an in-depth list of the available capabilities, reference the Roles and Capabilities page on the WordPress Codex: http://codex.wordpress.org/Roles_and_Capabilities.
When you check a user's permissions, you're checking if a user's role has been granted a specific capability or if the user is given a meta capability for a specific object. Plugins won't need to deal with meta capabilities in most cases, but there are instances in which meta capabilities are needed.
The current_user_can() function enables you to check if the currently logged-in user has permission to perform a given capability. If the user has permission, the function returns true. If the user is not logged in or doesn't have permission, it returns false.
<?php
current_user_can( $capability, $args );
?>
$capability— A single capability to check against a user's role.$args— Extra argument that's usually an object ID (like a post ID) when checking if the user has a meta capability.
You will most likely use this function when checking for permissions within your plugin. You can use it to check for default WordPress capabilities or custom capabilities implemented by your plugin.
Suppose you wanted to check if a user has permission to edit posts before creating a link to the posts page in the admin on the front end of the site. You would use the current_user_can() function and the edit_posts capability.
<?php

/* Check if the current user can edit posts. */
if ( current_user_can( 'edit_posts' ) ) {

    /* Link to the edit posts page in the admin. */
    echo '<a href="' . admin_url( 'edit.php' ) . '">Edit Posts</a>';
}

?>
If you want to check for a meta capability, you would use the same technique. However, you need to insert the second parameter of the object ID into the current_user_can() function. For example, suppose you want to save some post metadata for a post with the ID of 100 but need to check if the user can edit the post before updating the metadata (see Chapter 11, "Extending Posts").
<?php

/* Check if the current user can edit the specific post. */
if ( current_user_can( 'edit_post', 100 ) {

    /* Update the post meta. */
    update_post_meta( 100, 'boj_example_meta', 'Example' );
}

?>
Warning
Your plugin shouldn't check for permissions based on role. Remember, roles are not hierarchical, so you cannot assume a role has permission to perform a specific task. Always check for permission by capability.
This function is specifically for use with multisite installations. It works almost exactly the same as current_user_can() with the added expectation of the blog ID parameter.
<?php
current_user_can_for_blog( $blog_id, $capability );
?>
$blog_id— The ID of the blog in the multisite install to check the capability against$capability— The capability to check if the user has, for the given blog ID
You can learn more about working within a multisite environment in Chapter 15, "Multisite."
The author_can() function works similarly to current_user_can() function. It enables you to check if a post author (not the author role) can perform a specific task based on the capability for a given post. This function checks for the author of the post. It does not extend to other users.
<?php
author_can( $post, $capability );
?>
$post— A post object or the ID of a post$capability— The capability to check against the author of the post
In most scenarios, you would use the current_user_can() function. However, this function has its place and should be used when you want to specifically check if the post author has permission to perform a specific task.
With this next code, you can check if the author of a post with the ID of 100 has permission to publish posts and display a message depending on the result.
<?php

/* Check if the post author can publish posts. */
if ( author_can( 100, 'publish_posts' ) ) {

    /* Display a message. */
    echo 'The author of this post has publishing access.';
}

/* If the author can't publish posts. */
else {

    /* Display a message. */
    echo 'The author of this post cannot publish this post.';
}

?>
This can be a useful function if you want to build a notification system for editors or administrators of the site to let them know when a post has been written but not published. That way, users with the publish_posts capability could come in and press the Publish button.
The user_can() function works similarly to the previous functions. The difference is that you can check if any user on the WordPress install has a specific capability.
<?php
user_can( $user, $capability );
?>
$user_id— A user ID or object to check the capability for$capability— A capability to check against the given user
You use this function when you only need to check for a capability against a specific user rather than the currently logged-in user or the author of a post. It returns true if the user has the capability and false if not.
The map_meta_cap filter hook is applied to the return value of the map_meta_cap() function, which is a function that maps role capabilities to the meta capability of a given object. For example, it's called when current_user_can() is used to check a meta capability. The function returns an array of role capabilities the user's role must have based on the meta capability and object.
To simplify that description, imagine that you're checking if a specific user can edit a specific post. The map_meta_cap() function determines this for you. However, plugins have the option of overwriting this using the map_meta_cap filter hook.
<?php
apply_filters( 'map_meta_cap', $caps, $cap, $user_id, $args );
?>
$caps— Array of capabilities the user must have. The user must have each of the capabilities in the array for thecurrent_user_can()function to returntrue.$cap— The meta capability to check if the user can perform the given check.$user_id— The user's ID to check the capabilities against.$args— Array of additional arguments passed to themap_meta_cap()function. Generally, the object ID will be the first argument in the array.
Imagine you want to create a plugin that restricted other users from editing or deleting an admin's blog posts. Remember, because roles are not hierarchical, any user with the edit_others_posts capability can edit the admin's posts, or any user with the delete_others_posts capability can delete them.
You're going to create a plugin that limits the editing of admin posts to only users that are admins by checking for an admin-related capability: delete_users. Therefore, a user with the edit_others_posts capability cannot edit admin posts, and a user with the delete_others_posts cannot delete admin posts.
You're overwriting the default WordPress functionality to present more of a hierarchical-type role system by doing this.
<?php
/*
Plugin Name: Restrict Admin Post Editing
Plugin URI: http://example.com
Description: Only admins can edit posts made by admins.
Version: 0.1
Author: WROX
Author URI: http://wrox.com
*/

/* Filter the 'map_meta_cap' hook. */
add_filter( 'map_meta_cap', 'boj_restrict_admin_post_editing', 10, 4 );

/* Function for restricting users from editing admin posts. */
function boj_restrict_admin_post_editing( $caps, $cap, $user_id, $args ) {

    /* If user is trying to edit or delete a post. */
    if ( 'edit_post' == $cap || 'delete_post' == $cap ) {

        /* Get the post object. */
        $post = get_post( $args[0] );

        /* If an admin is the post author. */
        if ( author_can( $post, 'delete_users' ) ) {

            /* Add a capability that only admins might have to the caps array. */
            $caps[] = 'delete_users';
        }
    }

    /* Return the array of capabilities. */
    return $caps;
}

?>
Code snippet boj-restrict-admin-post-editing.php
Ideally, if you were creating a plugin that made a hierarchical system like this, you'd create custom capabilities and check for those. Custom capabilities are outlined later in this chapter.
Sometimes, your plugin might need to check if a user is an admin on the site. This can be confusing as a plugin developer because roles are not hierarchical. Remember, users with the "administrator" role are not always in full control of the site. However, they will be in most cases.
Generally, you wouldn't check whether a user is an admin. It's nearly always better to check for a capability based on the specific task the user might be performing.
Determining admin status can be dangerous territory without understanding how roles and capabilities work because there is no single capability that defines a user as an admin. WordPress does provide a function for checking if a user is an admin, but it should be used only if a specific capability isn't evident.
The is_super_admin() function was added as part of the multisite package of features, but it works great for single-site installs of WordPress as well. It gives an accurate view of who is an admin on the site.
The function accepts a single parameter of $user_id, which is the ID of the user you want to check admin status for. It returns true if the user is an admin or false if the user is not an admin.
is_super_admin() works a bit differently for multisite installs and single-site installs. A super admin in a multisite setup has full control over the site. You can read more about how super admins work within a multisite environment in Chapter 15.
On single-site installations, the is_super_admin() function checks if the current user has the delete_users capability because it's a capability that would essentially give the user the most power on the site. This could just as easily be done with the current_user_can() function. It almost seems silly to check if someone is an admin by checking if they have the delete_users capability, especially if the task to be performed has nothing to do with deleting users.
Suppose your plugin needed to check if a user with the ID of 100 was an admin before performing a specific task. You would use the following code to handle that check.
<?php

/* Check if the user is an admin. */
if ( is_super_admin( 100 ) ) {

    /* Display a message. */
    echo 'User 100 is an admin. */
}

?>
Warning
Keep in mind that being an admin and having the administrator role is not the same thing in some custom setups.
WordPress ships with many default capabilities that extend all the control average users will ever need. Most plugins will never need custom capabilities. However, some plugins may want to use custom capabilities to control permissions related to their functionality.
Suppose you want to create a plugin that allows users to create private sections of content within their posts with a simple shortcode (see Chapter 10, "The Shortcode API"). You would need to create a custom capability to control who could see that particular content and use the current_user_can() function to check for that capability.
<?php
/*
Plugin Name: Private Content
Plugin URI: http://example.com
Description: Shortcode for hiding private content.
Version: 0.1
Author: WROX
Author URI: http://wrox.com
*/

/* Register shortcodes in 'init'. */
add_action( 'init', 'boj_private_content_register_shortcodes' );

/* Function for registering the shortcode. */
function boj_private_content_register_shortcodes() {

    /* Adds the [boj-private] shortcode. */
    add_shortcode( 'boj-private', 'boj_private_content_shortcode' );
}

/* Function for handling shortcode output. */
function boj_private_content_shortcode( $attr, $content = null ) {

    /* If there is no content, return. */
    if ( is_null( $content ) )
        return $content;

    /* Check if the current user has the 'read_private_content' capability. */
    if ( current_user_can( 'read_private_content' ) ) {

        /* Return the private content. */
        return $content;
    }


    /* Return an empty string as a fallback. */
    return '';
}

?>
Code snippet boj-private-content.php
Post authors can then hide content using the [boj-private] shortcode within the post editor. For example, a post author might hide content as shown here.
[boj-private]
You can only see this content if you have permission to see it.
[/boj-private]
When creating this plugin, you may have noticed that no user has permission to read the content. This is because no roles have been assigned the capability of read_private_content. To assign this capability to a role, a user would need to install a role management plugin, or your plugin would need to assign the capability upon activation.
See the later section, "Adding Capabilities to a Role," for information on how to assign capabilities to roles.
WordPress roles are flexible, and plugins can bend them in any way that suits their purposes. This section covers customizing roles, creating new roles, and adding capabilities to new or existing roles.
You need to know that any changes you make to roles are saved in the database. If your plugin makes a change, this change won't undo itself when it's deactivated. Your plugin should remove custom capabilities that it has added and remove any roles it adds if no users are assigned to that role.
WordPress enables the creation of custom roles by plugins. The best time to create a new role for your plugin is on the activation hook for your plugin (see Chapter 2, "Plugin Foundation"). Role creation needs to be done only once, so this is a good hook to use because it's fired only when your plugin is activated.
The add_role() function enables plugin developers to easily add new roles. The function returns a role object if a new role was successfully added and null if the role already exists.
<?php
add_role( $role, $display_name, $capabilities );
?>
$role— The name of the role to add. This should act as a key and contain only alphanumeric characters or underscores.$display_name— The label for the role. This is the name used for the role in public-facing areas.$capabilities— An array of capabilities to assign to the role. Capabilities can also be added or removed later.
Now go back to the previous forum example from the "Custom Roles" section. The section outlined four roles that a forum plugin might define.
Forum Administrator
Forum Moderator
Forum Member
Forum Suspended
In the next code, you create these roles and give each a basic capability of read, which enables the user to see only their profile and the dashboard in the admin.
<?php

/* Create the forum administrator role. */
add_role( 'forum_administrator', 'Forum Administrator', array( 'read' ) );

/* Create the forum moderator role. */
add_role( 'forum_moderator', 'Forum Moderator', array( 'read' ) );

/* Create the forum member role. */
add_role( 'forum_member', 'Forum Member', array( 'read' ) );

/* Create the forum suspended role. */
add_role( 'forum_suspended', 'Forum Suspended', array( 'read' ) );

?>
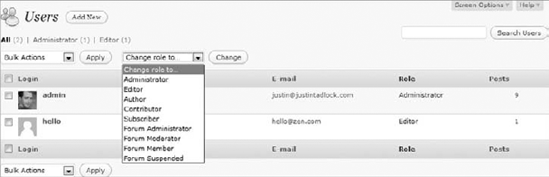
Adding a new role can make it appear in the role selection box on the user profile page, as shown in Figure 8-3, and on the Users screen in the admin.
Deleting a role is as simple as adding a new role by using the correct WordPress function. However, if your plugin needs to delete a role, it should check that no users on the site have the given role before deleting it. Otherwise, you might potentially break the plugin user's custom setup.
The best time to delete a role is on the activation or deactivation hook for your plugin (see Chapter 2, "Plugin Foundation"). You need to delete a role only once, so these are good hooks to use because they're fired only when your plugin is activated or deactivated.
The remove_role() function can remove a role from the list of saved roles in the database. It accepts a single parameter of $role, which is the name of the role (not the label or display name).
Suppose you wanted to delete the Forum Moderator role you created in the previous section. You need to set the $role parameter to forum_moderator.
<?php

/* Remove the forum moderator role. */
remove_role( 'forum_moderator' );

?>
If you want to check if a user has the role before deleting it, you need to use the get_users() function outlined earlier. If the function doesn't return any users, delete the role. If it does, simply skip the role deletion.
<?php

add_action( 'admin_init', 'boj_remove_forum_moderator' );

function boj_remove_forum_moderator() {

    /* Get at least one user with the forum moderator role. */
    $users = get_users( array( 'role' => 'forum_moderator', 'number' => 1 ) );

    /* Check if there are no forum moderators. */
    if ( empty( $users ) ) {

        /* Remove the forum moderator role. */
        remove_role( 'forum_moderator' );
    }
}

?>
For the purposes of this example, your code is executing on the admin_init hook, which WordPress executes on every admin page. In real-world use, it should be executing only once, most likely on a plugin deactivation hook. This is the hook you will use when creating your plugin in the "A Custom Role and Capability Plugin" section later.
Like creating custom roles, you can create custom capabilities. You can also add WordPress capabilities to new or existing roles. A capability doesn't technically exist if it's not given to a role. Your plugin should add capabilities to a role only once. Most likely, it will run this code on the plugin activation hook (see Chapter 2, "Plugin Foundation").
To add a capability to a role, you must first get the role object, which requires the get_role() function. This function accepts a single parameter of $role, which is the name of the role. After you get the role object, you would use the add_cap() method to grant a capability to the role.
Suppose you want to grant the default WordPress Contributor role the ability to publish posts. Using this code, you can make the change.
<?php

/* Get the contributor role. */
$role =& get_role( 'contributor' );

/* Check if the role exists. */
if ( !empty( $role ) ) {

    /* Add the 'publish_posts' capability to the role. */
    $role->add_cap( 'publish_posts' );
}

?>
Going back to the idea of a forum plugin and the custom roles you added in the previous section, you can easily use this method for adding extra capabilities to those roles. Suppose you want to give two custom capabilities to the forum administrator role called publish_forum_topics and delete_forum_topics.
<?php

/* Get the forum administrator role. */
$role =& get_role( 'forum_administrator' );

/* Check if the role exists. */
if ( !empty( $role ) ) {

    /* Add the 'publish_forum_topics' capability to the role. */
    $role->add_cap( 'publish_forum_topics' );

    /* Add the 'delete_forum_topics' capability to the role. */
    $role->add_cap( 'delete_forum_topics' );
}

?>WordPress has you covered when it comes to deleting capabilities from a role. Any time you create a plugin that assigns custom capabilities for use with just your plugin, your plugin needs to clean up after itself and remove the capabilities it added. Your plugin should remove capabilities from a role only once instead of on every page load. Most likely, it will run this code on the plugin activation or deactivation hook (see Chapter 2, "Plugin Foundation").
Like with adding capabilities, you must first get the role you want to remove capabilities from using the get_role() function. The difference is that you would use the remove_cap() method for removing the capability from the role.
In the previous section, you added the publish_posts capability to the contributor role. In your plugin's uninstall method or on its deactivation hook (See Chapter 2, "Plugin Foundation"), you would remove this capability.
<?php

/* Get the contributor role. */
$role =& get_role( 'contributor' );

/* Check if the role exists. */
if ( !empty( $role ) ) {

    /* Remove the 'publish_posts' capability to the role. */
    $role->remove_cap( 'publish_posts' );
}

?>Now that you've learned how to create custom roles and capabilities, it's time to put this knowledge to the test. In this section, you create a plugin that puts it all together.
The forum plugin you've been keeping in mind throughout the roles section of this chapter will be your starting point. Before starting with code, you need to outline what capabilities each role should have. Because capabilities handle permissions, you need to define what each capability should do. Let's outline four fictional capabilities a forum plugin might have. (A real forum plugin would likely have many more.)
publish_forum_topics— Permission to publish new forum topicsedit_others_forum_topics— Permission to edit other users' forum topicsdelete_forum_topics— Permission to delete forum topicsread_forum_topics— Permission to read forum topics
After you outline your capabilities, focus on which roles should have each capability. Use the four custom roles outlined earlier and the default WordPress administrator role.
Administrator — Default WordPress administrator role should have all the capabilities for the forum.
Forum Administrator — Should have all the capabilities and full control over the forum.
Forum Moderator — Should have the
publish_forum_topics, edit_others_forum_topics, andread_forum_topicscapabilities.Forum Member — Should have the
publish_forum_topicsandread_forum_topicscapabilities.Forum Suspended — Because these users are suspended, they should have only the
read_forum_topicscapability.
You create a forum administrator role because the plugin users might want to assign forum administrators outside of their normal administrator role and not grant full access to the site to those users.
Now that you've outlined the roles and capabilities needed for your plugin, you can start building it.
<?php
/*
Plugin Name: Forum Roles
Plugin URI: http://example.com
Description: Creates custom roles and capabilities for a fictional forum plugin.
Version: 0.1
Author: WROX
Author URI: http://wrox.com
*/

/* Custom forum roles and capabilities class. */
class BOJ_Forum_Roles {

    /* PHP4 Constructor method. */
    function BOJ_Forum_Roles() {

        /* Register plugin activation hook. */
        register_activation_hook( __FILE__, array( &$this, 'activation' ) );

        /* Register plugin deactivation hook. */
        register_deactivation_hook( __FILE__, array( &$this, 'deactivation' ) );
    }

    /* Plugin activation method. */
    function activation() {

        /* Get the default administrator role. */
        $role =& get_role( 'administrator' );

        /* Add forum capabilities to the administrator role. */
        if ( !empty( $role ) ) {
            $role->add_cap( 'publish_forum_topics' );
            $role->add_cap( 'edit_others_forum_topics' );
            $role->add_cap( 'delete_forum_topics' );
            $role->add_cap( 'read_forum_topics' );
        }

        /* Create the forum administrator role. */
        add_role(
            'forum_administrator',
            'Forum Administrator',
            array(
                'publish_forum_topics',
                'edit_others_forum_topics',
                'delete_forum_topics',
                'read_forum_topics'
            )
        );

        /* Create the forum moderator role. */
add_role(
'forum_moderator',
'Forum Moderator',
array(
'publish_forum_topics',
'edit_others_forum_topics',
'read_forum_topics'
)
);
/* Create the forum member role. */
add_role(
'forum_member',
'Forum Member',
array(
'publish_forum_topics',
'read_forum_topics'
)
);
/* Create the forum suspended role. */
add_role(
'forum_suspended',
'Forum Suspended',
array( 'read_forum_topics' )
);
}
/* Plugin deactivation method. */
function deactivation() {
/* Get the default administrator role. */
$role =& get_role( 'administrator' );
/* Remove forum capabilities to the administrator role. */
if ( !empty( $role ) ) {
$role->remove_cap( 'publish_forum_topics' );
$role->remove_cap( 'edit_others_forum_topics' );
$role->remove_cap( 'delete_forum_topics' );
$role->remove_cap( 'read_forum_topics' );
}
/* Set up an array of roles to delete. */
$roles_to_delete = array(
'forum_administrator',
'forum_moderator',
'forum_member',
'forum_suspended'
);
/* Loop through each role, deleting the role if necessary. */
foreach ( $roles_to_delete as $role ) {
/* Get the users of the role. */$users = get_users( array( 'role' => $role ) );
/* Check if there are no users for the role. */
if ( count( $users ) <= 0 ) {
/* Remove the role from the site. */
remove_role( $role );
}
}
}
}
$forum_roles = new BOJ_Forum_Roles();
?>Code snippet boj-forum-roles.php
This plugin can make the four extra roles you created available on the Users screen in the admin, as shown in Figure 8-4. Your plugin users could add the users they want to these forum-type roles.
The user, role, and capability systems in WordPress are powerful and flexible, enabling you to build any type of plugin to manipulate how these systems work. Each section in this chapter has briefly touched on possibilities. The best thing you can do as a plugin developer is set up a test install and create several fictional test users. Then, take what you've learned throughout this chapter and start coding.
If you take away anything from this chapter, you need to remember how the relationship of users, roles, and capabilities works. Capabilities control permissions. Roles are given capabilities. Users are assigned roles, and each role's capabilities are extended to its users. Keeping this in mind when developing your plugins can make the development process much smoother.