Table of Contents for
Professional WordPress® Plugin Development
 Professional WordPress® Plugin Development
Published by
Wrox, 2011
Professional WordPress® Plugin Development
Published by
Wrox, 2011
- Copyright
- CREDITS
- ABOUT THE AUTHORS
- ACKNOWLEDGMENTS
- FOREWORD
- INTRODUCTION
- 1. An Introduction to Plugins
- 2. Plugin Foundation
- 3. Hooks
- 4. Integrating in WordPress
- 5. Internationalization
- 6. Plugin Security
- 7. Plugin Settings
- 8. Users
- 9. HTTP API
- 10. The Shortcode API
- 11. Extending Posts: Metadata, Custom Post Types, and Taxonomies
- 12. JavaScript and Ajax in WordPress
- 13. Cron
- 14. The Rewrite API
- 15. Multisite
- 16. Debugging and Optimizing
- 17. Marketing Your Plugin
- 18. The Developer Toolbox
WHAT'S IN THIS CHAPTER?
In computer language, "security" often refers to scary buzzwords such as Cross Site Scripting (XSS), Cross Site Request Forgery (CSRF), SQL Injection, Privilege Escalation, Vulnerabilities, and Holes.
Are you frightened yet?
You should be scared because these are real threats and, as you will read, trivial to execute against shabby code. But then, you should not be scared because, fortunately, WordPress comes with all the tools you need to make your code safe and secure.
Weak code may be subject to abuse and eventually compromise your server security, or retrieve otherwise hidden data about you or your users. This is the worst-case scenario.
But before letting Internet pirates wander in your files and directories, feeble code will simply fail at making sure that data entered by an honest user is valid and sanitary. As you can see in this chapter, a poorly coded form can, for instance, truncate user input and as a result process partial content.
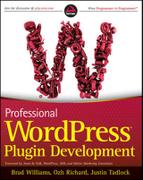
You probably have already noticed it: When you try to access an admin page of a WordPress blog while being logged in as a user that is not an administrator, you may be shown a message stating that you don't have sufficient privileges, as shown in Figure 6-1.
To guarantee that specific actions (such as managing plugins or changing the site options) are restricted to a population with specific rights, in other words to block privilege escalation attacks, WordPress makes extensive use of a function named current_user_can(). You too, of course, can and should use this function in your plugins.
The usage of current_user_can() is straightforward: You either check if a user has a capability or a role before proceeding to a sensitive action, or die with a meaningful message. For example:
<?php

// Capability:
if ( !current_user_can('install_plugins') )
    wp_die( 'Insufficient permissions' );

// Role:
if( !current_user_can('editor') )
    wp_die( 'You cannot edit this setting' );
?>
You can either use default roles and capabilities or create custom ones. You learn how to do this in Chapter 8, which is devoted to user management.
The function current_user_can() depends on get_currentuserinfo(), which has a particularity: It is a pluggable function. Pluggable functions can be replaced by plugins: They can be found in file wp-includes/pluggable.php, which is loaded after active plugins.
Because of this particularity you cannot check user permissions at plugin loading and instead will need to wait until WordPress has fully started and instantiated (for instance, after the action 'init').
For example, picture a plugin that outputs debug information when you append ?debug=1 to any URL of the blog, but only if the user is an administrator.
The debug output function here prints out all SQL queries that WordPress ran, provided that the constant SAVEQUERIES is set to true:
<?php
// Print debug information
function boj_debug_output() {
    global $wpdb;
    echo "<pre>";
    print_r($wpdb->queries);
    echo "</pre>";
}
?>
Now how can you make this function dependant on the query parameter debug=1?
The worst way to do so would be the following:
<?php
if( isset( $_GET['debug'] ) )
    boj_debug_output();
?>
This is bad practice because debug information can potentially reveal sensitive information such as physical paths or table names, and with such a conditional test, anyone would see them by simply adding ?debug=1 to any URL of the site.
Because you want to restrict the debug data to the administrator of the blog, you need to code a more evolved condition:
<?php
if( isset( $_GET['debug'] ) && current_user_can( 'manage_options' ) )
    boj_debug_output();
?>
But this won't work: Remember, when the plugin is loaded and the server parses and compiles its code, pluggable functions are not in memory yet. What you need to do is to hook this check to an action that occurs only when everything is loaded.
Following is the complete plugin:
<?php
/*
Plugin Name: Simple Debug
Plugin URI: http://example.com/
Description: Append ?debug=1 to display debug info if you are an admin
Author: WROX
Author URI: http://wrox.com
*/

add_action( 'init', 'boj_debug_check' );

function boj_debug_check() {
    if( isset( $_GET['debug'] ) && current_user_can( 'manage_options' ) ) {
        if( !defined( 'SAVEQUERIES' ) )
            define( 'SAVEQUERIES', true );
        add_action( 'wp_footer', 'boj_debug_output' );
    }
}

// Print debug information
function boj_debug_output() {
    global $wpdb;
    echo "<pre>";
    print_r($wpdb->queries);
    echo "</pre>";
}
?>
Code snippet plugin-simple-debug.php
Note
In your plugins, always hook function calls to an appropriate action, such as 'init' or 'plugins_loaded'. This way you can ensure that all WordPress functions have been declared and your function won't be triggered too soon.
In the previous section about user permissions, you learned how to check that people have authority before they can perform an operation, and doing so, you protect their blog against nonprivileged users. But you also need to protect users from... themselves.
When you are logged into your WordPress install, you can click links that perform various actions, such as delete a post, update plugin settings, or create a category. Before proceeding, all these operations should verify that you are actually logged in and have sufficient permission, using the function current_user_can(). They verify that you have authority.
Now imagine people maliciously crafting a link that would delete a post on your blog. They could not use it themselves, of course, because they have no admin account on your blog and thus, no authority. But what if they trick you into clicking on this link? Because you are logged in, the action would occur, and the post would be deleted. You had authority but no intention. The malicious users just completed a Cross Site Request Forgery, or CSRF.
Note
To trick people into clicking a link on their own site is trivial. For instance, hide the link with a URL shortener such as bit.ly and share it via instant messaging with a compelling message such as "Look at this pic, very funny!" In the age of Twitter and Facebook, CSRF attacks are flourishing.
Of course, WordPress has a built-in solution to prevent these attacks.
In computer language, a nonce, or cryptographic nonce, is the abbreviation of "number used once." In WordPress, it is a short and apparently random string such as a password, which is specific to the following:
One WordPress user
One action (delete, update, save, and such)
One object (a post, a link, a plugin setting, and such)
One time frame of 24 hours
For example, the link to delete the post #43 in your WordPress blog could be something such as http://example.com/wp-admin/post.php?post=43&action=trash&_wpnonce=83a08fcbc2. The nonce, here 83a08fcbc2, is valid for only 24 hours, only if used by you and only to delete post #43. When you click that link, WordPress verifies that this nonce meets all these specifications before actually deleting the link.
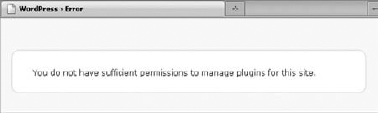
More important, a nonce cannot be guessed by a malicious user, and loading a link without the correct nonce goes nowhere, as shown in Figure 6-2, which shows the result of trying to activate a plugin without knowing the valid nonce.
WordPress employs two different functions to create nonces in forms, as hidden fields, or in URLs, as a GET parameter.
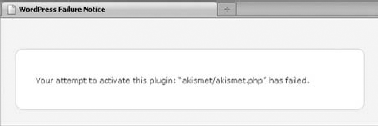
To become acquainted with nonces, you can code a useful plugin to enhance WordPress native tag management features. This plugin identifies post tags not used in any post and enables you to either rename or delete them. Call this plugin Unused Tags and use the prefix boj_utags.
To create and add a nonce to a URL, just like in the previous example with links deleting a post, use function wp_nonce_url() as follows:
<?php
$url = wp_nonce_url( $url, $action );
?>
The first parameter $url is a string of the URL address to which you want to append a nonce in the query string. The links in the Unused Tags plugin to delete a link will be of the form http://example.com/wp-admin/edit.php?page=boj_utags&boj_action=delete&id=6; in this URL notice the parameter boj_action and the tag ID.
The second parameter $action is the string with which you make the nonce specific to one action and one object. The link you want to protect with a nonce here is tied to the action "delete" and the tag id 6, so the $action parameter could be 'boj_utags-delete_tag6'.
Note
The nonce action can be any string, but to make it unique to your plugin and one action over one object (besides the current user and the 24-hour window), it is good practice to adhere to the plugin-action_object model.
To sum it up, in your plugin, given a tag ID $id, the code to generate a nonce protected URL to delete this tag will be the following:
<?php

$delete_url = add_query_arg( array('boj_action'=>'delete','id'=>$id) );
$nonced_url = wp_nonce_url( $delete_url, 'boj_utags-delete_tag'.$id );
?>
<a href="<?php echo $nonced_url; ?>">delete</a> this tag
To craft the delete link, you have used the handy function add_query_arg(), which adds to the current URL the query parameters defined in its array parameter. In other words, it adds ?boj_action=delete&id=6, or &boj_action=delete&id=6 if the current URL already has a query string.
Nonces also protect forms, with function wp_nonce_field(). This function needs a single string parameter, the nonce action plugin-action_object.
Given the $name and $id of a post tag, the proper form to allow renaming it follows:
<form action="" method="post">
    <?php wp_nonce_field( 'boj_utags-rename_tag'.$id ); ?>
    <input type="hidden" name="boj_action" value="rename" />
    <input type="hidden" name="id" value="<?php echo $id; ?>" />
    <input type="text" name="name" value="<?php echo esc_attr($name); ?>" />
    <input type="submit" value="Rename" />
</form>
Notice how you used a new function named esc_attr() here: It is to ensure that, should $name contain quotes, it will not break the display and the form. You learn all about this in the next section about data sanitization.
Adding nonces to URLs or forms is only the first part of the job: On the other end, the function that executes the expected operation needs to verify before that the nonce is valid and tied to that operation.
The function you use is named check_admin_referer(): It authenticates the nonce, silently does nothing if valid, or dies with an "Are you sure" error screen, as shown in Figure 6-2. This function must be called before any output is sent to the screen.
In your plugin, parameters such as the action or the tag ID are either passed via GET (the URL query string) or POST (the submitted form): Instead of checking both arrays $_GET and $_POST, you simply examine $_REQUEST to get the parameter values.
The complete code block to check nonces and then rename or delete a post tag follows:
<?php

if( !current_user_can( 'manage_options' ) )
    wp_die( 'Insufficient privileges!' );

$id     = $_REQUEST['id'];
$action = $_REQUEST['boj_action'];

check_admin_referer( 'boj_utags-'.$action.'_tag'.$id );

switch( $action ) {
    case 'rename':
        $newtag = array( 'name' => $_POST['name'], 'slug' => $_POST['name'] );
        wp_update_term( $id, 'post_tag', $newtag );
        break;
    case 'delete':
        wp_delete_term( $id, 'post_tag' );
        break;
}
?>
Notice how you first check user permissions: Nonces check a user's intention, but you still need to validate their authority.
To be fully operational, your plugin now needs a proper plugin header, a complete administration page with a new entry in the menu, and of course the function that lists the unused tags.
<?php
/*
Plugin Name: Unused Tags
Plugin URI: http://example.com/
Description: Find unused tags and rename or delete them
Author: WROX
Author URI: http://wrox.com
*/

// Add an entry for our option page to the Posts menu
add_action('admin_menu', 'boj_utags_add_page');
function boj_utags_add_page() {
    add_posts_page( 'Unused Tags', 'Unused Tags', 'manage_options',
        'boj_utags', 'boj_utags_option_page' );
}

// Catch any boj_action parameter in query string
add_action( 'admin_init', 'boj_utags_do_action' );

// Proceed to requested boj_action if applicable
function boj_utags_do_action() {
    if( !isset( $_REQUEST['boj_action'] ) )
        return;

    if( !current_user_can( 'manage_options' ) )
        wp_die( 'Insufficient privileges!' );

    $id     = $_REQUEST['id'];
    $action = $_REQUEST['boj_action'];

    if( $action == 'done' ) {
        add_action( 'admin_notices', 'boj_utags_message' );
        return;
    }

    check_admin_referer( 'boj_utags-'.$action.'_tag'.$id );

    switch( $action ) {
        case 'rename':
            $newtag = array( 'name' => $_POST['name'], 'slug' => $_POST['name'] );
            wp_update_term( $id, 'post_tag', $newtag );
            break;
        case 'delete':
            wp_delete_term( $id, 'post_tag' );
break;
}
wp_redirect( add_query_arg( array( 'boj_action' => 'done' ) ) );
}
// Admin notice
function boj_utags_message() {
echo "<div class='updated'><p>Action completed</p></div>";
}
// Draw the tag management page
function boj_utags_option_page() {
?>
<div class="wrap">
<?php screen_icon(); ?>
<h2>Unused Tags</h2>
<?php
if( $tags = boj_utags_find_orphans() ):
echo '<p>You currently have '.count( $tags ). ' unused tags:</p>';
echo '<ol>';
foreach( $tags as $tag ) {
$id = $tag->term_id;
$name = esc_attr( $tag->name );
$delete_url= add_query_arg( array('boj_action'=>'delete','id'=>$id) );
$nonced_url= wp_nonce_url( $delete_url, 'boj_utags-delete_tag'.$id );
?>
<li>
<form action="" method="post">
<?php wp_nonce_field( 'boj_utags-rename_tag'.$id ); ?>
<input type="hidden" name="boj_action" value="rename" />
<input type="hidden" name="id" value="<?php echo $id; ?>" />
<input type="text" name="name" value="<?php echo $name; ?>" />
<input type="submit" value="Rename" /> or
<a href="<?php echo $nonced_url; ?>">delete</a> this tag
</form>
</li>
<?php }
else: ?>
<p>You have no unused tags.</p>
<?php endif; ?>
</ol>
</div><?php
}
// Find unused tags, return them in an array
function boj_utags_find_orphans() {
global $wpdb;
$sql = "SELECT terms.term_id, terms.name FROM {$wpdb->terms} terms
INNER JOIN {$wpdb->term_taxonomy} taxo
ON terms.term_id=taxo.term_id
WHERE taxo.taxonomy = 'post_tag'
AND taxo.count=0";
return $wpdb->get_results( $sql );
}
?>Code snippet plugin-unused-tags.php
Copy or download this plugin, activate it, and you can access a new page under the Posts menu that resembles Figure 6-3:
Spot a few more good practices in this plugin:
Function
boj_utags_do_action(), which checks for the presence of aboj_actionparameter in the query string or the POST data, is hooked to actionadmin_init. This way, the plugin actually does something only when the user is in the admin area. When viewing the public part (the blog itself), no event is triggered. The gain here is negligible because the plugin is simple, but this technique applied to complex plugins does speed up execution.When a tag has been deleted or renamed, the plugin redirects the user to the current page with the additional query parameter
'boj_action=done'. Doing so, you prevent any unwanted repeated action if the user accidentally reloads the page and resubmits data. The function hooks into'admin_notices'to display an informational message.
Ajax scripts are particular types of JavaScripts that enable updating a part of the browser's screen without reloading the entire page. Ajax scripts can consist of forms or links and as such need to be protected with nonces as well.
You learn how to add such nonces in Chapter 12, "JavaScript and Ajax," which is entirely about JavaScript and Ajax.
As you read in the introduction of this chapter, the golden rule in data filtering is to consider all data invalid unless it can be proven valid. Otherwise stated, now is a good time for some healthy suspicion and a little bit of welcome paranoia.
In this practical section, you now learn why data filtering is important, how to validate and sanitize the various types of data your WordPress plugins process (raw text strings, emails, integers, and so on), and what WordPress built-in function can help you do this.
Consider a few lines of simple and innocent looking HTML and PHP code:
<?php $name = $_POST['fullname']; ?>

<form action="" method="POST">
    Full name:
    <input type="text" name="fullname" value="<?php echo $name; ?>" />
    <input type="submit" value="Save" />
</form>
Code snippet bad_form.php
This minimal form has just one field, named fullname, which is prepopulated with any previously entered value. For future reference, name this form Bad Form.
For instance, if you enter Ozh RICHARD as a full name and press Save, everything seems fine with this form (see Figure 6-4).
So, what could possibly go wrong with such a simple form?
The potential problem here is that inputs are not validated, and outputs are not sanitized. In other words, consider the following:
The script does not make sure that the string entered actually looks like a full name.
The script does not make sure that the string entered can be printed out without breaking the form.
To illustrate this trivial lack in security, input the following full names and see the results (see Figure 6-5):
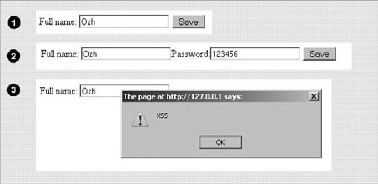
Nonmalicious input:
Ozh "Funny Guy" RICHARDMalicious input:
Ozh"/>Password:<input name="password" value="123456"Malicious input:
Ozh"<script>alert('XSS');</script>
What just happened?
Case 1 is an example of a legit, nonmalicious, yet form-breaking example: Although the data entered is a valid full name, the lack of sanitization at output breaks the input field because of the quotation marks. A correct way to render the form in that case would have been to convert these quotation marks into HTML entities.
In case 2, the user has joined the Dark Side and deliberately tries to exploit the form. Again, the quotation mark breaks the input field, so the output shows another field that would be actually submitted if the user pressed Save again. Not only is the output not sanitized (by encoding quotation marks before printing the value of the field) but the input is also questionable and should have been validated first, for instance by removing all nonalphanumeric characters and stripping HTML tags.
Case 3 is a variation on the same principle: Instead of adding arbitrary content to the form, the user here injects JavaScript that could, for instance, fetch a session cookie value from your site and send it to another one.
The third case is an example of Cross Site Scripting, or XSS: a vulnerability in web applications that enables malicious attackers to inject client-side script into web pages viewed by other users. Via XSS, an attacker can gain elevated access privileges to sensitive page content, session cookies, and a variety of other information maintained by the browser on behalf of the user.
These examples demonstrate how the lack of data validation measures can, at best, corrupt data or, at worst, exploit security holes in your web applications.
Note
At output, you must sanitize content before sending it to the user's browser screen. At input, you must validate data (make sure it is valid) or sanitize data (fix it to make it valid).
Imagine you are coding a plugin with an interface asking users to enter their age and to pick a color between red, green, or blue.
Consider the following code fragment:
<?php

$clean = array();

// Age: positive integer only
$clean['age'] = absint( $_POST['age'] );

// Color: red, green or blue only
switch( $_POST['color'] ) {
    case 'red':
    case 'green':
    case 'blue':
        $clean['color'] = $_POST['color'];
        break;
}

?>
Notice how this validating snippet makes use of an array named $clean. This illustrates a good practice that can help developers identify whether data is potentially unsanitary or can be considered safe. Because you cannot be sure of what the submitted array $_POST contains, don't validate it. Instead, select the expected part of it.
This snippet also introduces a WordPress function that is a convenient wrapper for PHP functions intval() and abs(), used to return a positive integer.
Note
You should never validate data and leave it in $_POST, $_GET or $_REQUEST because it is important for developers to always be suspicious of data within these superglobal arrays.
Initializing variables, such as $clean at the beginning of the snippet here, is another good practice because you make sure the result of your validating procedure contains only what you expect.
Using PHP's error_reporting and setting WordPress constant WP_DEBUG to true can help to enforce the initialization of variables because a reference to an undefined variable generates a notice on the screen. For more details about debugging, see Chapter 16.
The previous snippet validated only data: User input is accepted if it is valid and ignored otherwise. It does not sanitize, or "fix," the input: If incorrect data is submitted (such as the user entering a string instead of their age), the resulting array $clean simply ignores the item.
You can write a similar code block to sanitize data instead of simply validating it:
<?php

$clean = array();

// Age: positive integer only
$clean['age'] = absint( $_POST['age'] );

// Color: red, green or blue only. Default is blue.
switch( $_POST['color'] ) {
    case 'red':
    case 'green':
        $clean['color'] = $_POST['color'];
        break;
    case 'blue':
        default:
        $clean['color'] = 'blue';
        break;
}

?>
Now, if users enter an invalid age, such as abc, the result will be 0. If they enter an invalid color (for instance purple), the result will be blue because of the default statement.
The validation philosophy applied here is called white listing: You accept data only from a finite list of known and trusted values. The opposite, reject data from a finite list of untrusted values, is called black listing, which is rarely a good idea. White listing is not always possible, but whenever you can enforce this policy, you should.
Whether you want to validate or sanitize user input is a design decision and depends mostly on the kind of data expected. Imagine a form containing a field to receive an integer (age for instance), an email address, and a longer paragraph for raw text with no HTML tags (such as a short bio).
Before you decide that you will just validate or also sanitize data, the first thing to consider is the potential inconvenience of simply validating and rejecting invalid data submitted:
In the age field, the user has to re-enter a simple integer. No big deal and quickly done.
In the bio field, if the entire text is ignored because the user has used an HTML tag, this may be a lot more annoying to start over and rewrite it. Here, sanitizing the input (stripping HTML tags out) would probably make more sense.
A second decisive factor to consider is your ability to interpret and guess what a sanitized value would be:
If the user enters ABC in the age field, does that mean anything? You cannot sanitize here because it's impossible to deduce from invalid information what valid data could be. Your only option is to validate and ignore unacceptable data.
On the contrary, if the user enters unauthorized HTML tags in the bio field, you can strip out HTML tags and propose valid sanitized data that will be close to what the user wanted to input.
A third characteristic to reflect on is what you will do right away with the input data if you sanitize, hence possibly modify it:
If a slightly weird looking or badly formatted bio is published on a profile page, this may not be a severe incident (assuming the user can later edit and amend it, obviously).
If the user enters an invalid email such as joe@joe,co.uk and you send a confirmation email to the sanitized but invalid joe@joeco.uk, the user will never get it. It would be a better choice to validate only the email field, thus rejecting invalid data and asking the user to re-input it.
You now learn how to validate and sanitize various types of data, and what WordPress functions exist to do so.
Most of the time, PHP functions such as intval() or is_int() can do the job:
<?php
$data = 43;

// validate integers
return( intval( $data ) == $data );

// sanitize integers
return( intval( $data ) );
?>
WordPress's function absint() is also applicable whenever you want a positive integer, such as an age.
The possible problem you may run into is when dealing with large numbers: 32-bit systems have a maximum signed integer range of −2147483648 to 2147483647. So for example on such a system, intval('1000000000000') will return 2147483647. On the same principle, the maximum signed integer value for 64-bit systems is 9223372036854775807.
If you have to deal with large numbers, your best bet is to consider the data a string instead of an integer, and make sure it consists only of digits:
<?php
$num = '100000000000000000';

// Validate large integers
return( ctype_digit( $num ) );
?>
Note that the ctype library may not be available on all servers. Before using it for a particular client, check that their server supports it.
You often need to validate text strings of arbitrary length, such as a username or a country of birth. PHP functions of the ctype_ family are fine for validating them. They return Boolean true or false.
If you are expecting only letters:
<?php
// Validate alphabetic strings
return( ctype_alpha( $num ) );
?>
If you are expecting alphanumeric strings, such as for a nickname (for example, "Bob43"):
<?php
// Validate alphanumeric strings
return( ctype_alnum( $num ) );
?>
Note
In version 5.2 and newer, PHP includes filter functions to validate various types of data: integers, Booleans, emails, strings, and so on. You can learn more about them at http://php.net/filter. WordPress does not use them though, as they are still in development.
Text strings can also consist of special characters such as punctuation. WordPress offers a function that is handy to sanitize general text strings from user input: sanitize_text_field(). This function removes invalid UTF-8 characters, converts single < into HTML entities, and removes all HTML tags, line breaks, and extra white space.
<?php

var_dump( sanitize_text_field( "I am nice.\n Very <em>nice</em>!  " ) );

// result:
// string(21) "I am nice. Very nice!"

?>
In a less destructive manner, you may want to simply strip HTML tags but keep other formatting such as line breaks. WordPress provides wp_strip_all_tags() because PHP's built-in strip_tags() does not properly filter out complex markup such as <script></script> as you can see in the following example:
<?php

$test = '<a href="xx">site</a> <b>bold<b> <script>alert("fail")</script>';

// PHP's strip_tags()
var_dump( htmlentities( strip_tags( $test ) ) );
// result: string(33) "site bold alert("fail")"

// WordPress' wp_strip_all_tags()
var_dump( htmlentities( wp_strip_all_tags( $test ) ) );
// result: string(9) "site bold"
?>WordPress comes with a function named sanitize_key() used to sanitize internal identifiers, such as option names, which accepts lowercase characters, dashes, and underscores.
<?php
$data = 'option_43;';

// Validate:
return( preg_match('/^[a-z0-9-_]+$/', $data ) );

// Sanitize:
return( sanitize_key( $data ) );
?>
The validating line introduces a powerful tool: regular expression pattern matching. Basically, this line says "return true if $data matches the pattern". This seemingly cryptic pattern is constructed as shown in Figure 6-6:
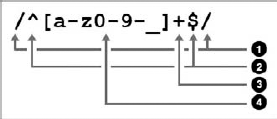
The four parts of this regular expression follow:
The pattern delimiters. It can be any character and is usually a forward slash
/.When used as the first character after the opening pattern delimiter, the caret
∧identifies the beginning of the string. Similarly, when used as the last character before the closing delimiter, a dollar sign$means "end of the string."The plus sign
+means "one or more of the preceding pattern."And finally the pattern itself, between square brackets: any character from lowercase a to lowercase z, from 0 to 9, or a dash -, or an underscore _.
You will use more complex regular expressions in the following examples.
Occasionally you need to validate or sanitize text strings that adhere to a predefined and known pattern, such as dates of birth, credit card numbers, ZIP codes, or telephone numbers.
For example, you can now write a function to validate telephone numbers of the following form: 123-456-7890 (3 digits, dash, 3 digits, dash, and four digits).
In regular expressions, \d means a digit (this is equivalent to [0-9] but shorter). If you expect exactly three digits, you can use: \d{3}.
Knowing this, you can now define and test the following function:
<?php
// Validate phone numbers like 123-456-7890
function boj_validate_phone( $num ) {
    return preg_match( '/^\d{3}-\d{3}-\d{4}$/', $num );
}

// Test your function:

var_dump( boj_validate_phone( '132-456-7890' ) );
// echoes: int(1)

var_dump( boj_validate_phone( '555-8882' ) );
// echoes: int(0)
?>Now if you want to validate a product serial number such as A145-B3D5-KK43, what pattern can you use?
<?php

// Validate product serial number like A145-B3D5-KK43
function boj_validate_serial( $string ) {
    return preg_match( '/^[A-Z0-9]{4}-[A-Z0-9]{4}-[A-Z0-9]{4}$/', $string );
}
?>In this third example, you can write a function to validate a date for an upcoming event. This one is slightly trickier: The data must comply to the pattern mm/dd/yyyy but also be a real and future date. (30/30/2010 cannot be accepted, for instance.)
The pattern used to match the input will be \d{2}/\d{2}/\d{4}. Because this pattern contains forward slashes, the regular expression delimiters will need to be another character, for instance the exclamation mark ! (You can also escape the slashes in the pattern with backslashes, but it makes the pattern even less readable: \d{2}\/\d{2}\/\d{4}.)
To check if the date exists, use the PHP function strtotime(), which converts textual dates into a UNIX timestamp if valid and into −1 or false otherwise.
The complete validating function would be the following:
<?php

// Validate future dates like mm/dd/yyyy.
// Returns true or an error message
function boj_validate_date( $date ) {
    // first test: pattern matching
    if( !preg_match( '!\d{2}/\d{2}/\d{4}!', $date ) )
        return 'wrong pattern';

    // second test: is date valid?
    $timestamp = strtotime( $date );
    if( !$ timestamp )
        return 'date invalid';

    // third test: is the date from the past?
    if( $timestamp <= time() )
        return 'past date';

    // So far, so good
    return true;
}

// Test it:

var_dump( boj_validate_date( '12/12/99' ) );
// string(12) "wrong pattern"

var_dump( boj_validate_date( '35/30/1980' ) );
// string(12) "date invalid"

var_dump( boj_validate_date( '03/30/1980' ) );
// string(9) "past date"

var_dump( boj_validate_date( '03/30/2020' ) );
// bool(true)

?>
Code snippet validate_date.php
Because this function returns either the Boolean true for success, or an error message for any further diagnosis, to validate a date you need to strictly compare the validated date with true, using the triple equal sign:
<?php

$date = '30/30/3030';

if( boj_validate_date( $date ) === true ) {
// date is valid
} else {
// date is invalid
}
?>Regular expressions are an extremely powerful tool designed to match any structured pattern. You can find more about this subject at http://php.net/pcre.
Emails are a type of pattern text string that is easy to validate or sanitize within WordPress, thanks to functions is_email() and sanitize_email():
<?php

$email = 'wrox@example.com';

// Validate:
return( is_email( $email ) );

// Sanitize:
return( sanitize_email( $email ) );
?>
Function is_email() returns either false or the email address if valid. Consider the following examples:
<?php

var_dump( is_email( 'wrox@example' ) );
// bool(false)

var_dump( is_email( 'wrox@example.com' ) );
// string(11) "wrox@example.com"
?>
To use this function, you need to strictly compare an email and the result of is_email():
<?php

if( is_email( $email ) === email ) {
    // email seems valid
} else {
    // email is invalid
}
?>
Be aware that in a LAN environment and some corporate networks, possibly functional email addresses such as admin@localhost or webmaster@server will not be considered valid. In such a case, you can simply check for the presence of the @ character, or maybe if possible test against a finite list of valid email addresses.
Function sanitize_email() either returns an empty string or a sanitized email address, depending on how malformed the input was. Consider the following sample outputs:
<?php

var_dump( sanitize_email( 'ozh@ozh' ) );
// string(0) ""

var_dump( sanitize_email( 'ozh@ozh..org' ) );
// string(0) ""

var_dump( sanitize_email( '(ozh)@(ozh).org' ) );
// string(11) "ozh@ozh.org"

var_dump( sanitize_email( 'ozh@ozh.org' ) );
// string(11) "ozh@ozh.org"
?>
In any case, you should compare the sanitized emails with the original input, and if different ask the users to confirm their address.
Note that these functions do not check whether the email is actually an existing address, but only whether the pattern looks correct: one or more allowed characters, an at sign @, more characters, a dot, and again a few characters for the top-level domain. A blatantly fake email address such as kk@kk.kk will pass the test.
Note
The only way to test the existence of an email address is to send a mail to that address and ask the recipients to confirm they have received it by completing an action (usually clicking on a link that contains a unique identifier).
HTML in this section can either be a full HTML fragment (a comment on a blog post, for instance), or single nodes, that is, an HTML element with text and attributes.
HTML fragments can be sanitized at input with WordPress function force_balance_tags(), although this cannot be considered as an HTML validator but more a helper function to achieve validity. This function finds incorrectly nested or missing closing tags and fixes the markup:
<?php

// 1. Fixing missing closing tags:

$html = '<p>Please close my <strong>tags!';
var_dump( force_balance_tags( $html ) );
// string(45) "<p>Please close my <strong>tags!</strong></p>"

// 2. Fixing incorrectly nested tags:

$html = '<p>Please <strong><em>fix</strong></em> nesting!</p>';
var_dump( force_balance_tags( $html ) );
// string(52) "<p>Please <strong><em>fix</em></strong> nesting!</p>"

?>
WordPress ships with a script named KSES (a recursive acronym: KSES Strips Evil Scripts) that should process and sanitize all untrusted HTML, both at input and output. The wrapper function, wp_kses() enables advanced filtering of HTML snippets, for instance with a custom set of authorized tags.
You can now write a function to strip all HTML tags except <strong> and <a href='' title=''>. All other tags (<em>, <b>...) or attributes (class='', style='',...) need to be taken out.
First, define an array of allowed tags and attributes:
<?php

$allowed = array(
    'strong' => array(),
    'a'      => array(
        'href'  => array(),
        'title' => array()
    )
);
?>
You are now ready to filter and sanitize HTML fragments:
<?php

$html = '<a href="#" class="external">site</a>
         <b>bold?</b> <strong>bold!</strong>';

var_dump( wp_kses( $html, $allowed ) );
// string(58) "<a href="#">site</a> bold? <strong>bold!</strong>"
?>
Notice how selective this function is in removing tags and attributes as you have defined them. This function is used for instance to filter comments and enable only a minimal common set of HTML tags.
Note that the KSES library in WordPress defines default sets of HTML tags and attributes, as you can see at the beginning of the file wp-includes/kses.php. The global variable $allowedtags contains a rather restrictive set of tags that are typically what you will want to accept in comments or user input.
Using the function wp_kses_data() and passing as a single argument the chunk of HTML you want to sanitize, you will make use of this default list:
<?php

$html = '<a href="http://site.com">site</a>
    <script src="script.js"></script>
    <img src="image.png" />
    <junk>random</junk>';

var_dump( wp_kses_data( $html ) );
// string(41) "<a href="http://site.com">site</a> random"
?>A node is a part of an HTML (or, again, XML) document. It consists of three parts, as shown in Figure 6-7.
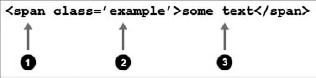
The element node (
span, h1, em... or any custom XML element)The attribute node (
class, style, title, alt...)The text node (any text found outside attributes and elements)
What you need to sanitize are the attribute and the text nodes at output to make sure they are valid and cannot break the display.
Consider the following code block, and try to spot its weaknesses before you read more:
<h1><?php echo $page_title; ?></h1>
<a href="#anchor" title="<?php echo $link_title; ?>" >link</a>
In a similar manner to how the previous example Bad Form was breakable, the problem here is that the text node $page_title and the attribute node $link_title are not sanitized for display, which can produce unexpected and potentially dreadful results with values such as the following:
<?php

$page_title = 'break</h1><h1>the tag';
$link_title = '" onmouseover="alert(\'XSS\');';

?>
WordPress contains two functions specifically designed to sanitize HTML attributes and text nodes, escape illegal characters, and convert to HTML entities when needed: esc_attr() and esc_html(). The same code block, now bullet proof, would be the following:
<h1><?php echo esc_html( $page_title; ) ?></h1>
<a href="#anchor" title="<?php echo esc_attr( $link_title; ) ?>" >link</a>
In a localized environment, functions esc_html() and esc_attr() have variations that can translate and escape at the same time (such as esc_html_e() for example). Chapter 5, "Internationalization," has a detailed description of these functions.
Whether they are used as output in an HTML attribute node (<a href="">) or as standalone information (for example a field asking for a site URL in a form), URLs should be sanitized for input and output using WordPress' function esc_url(). This function checks and cleans a URL by removing unacceptable characters and optionally filtering protocols.
For output, use the function as following:
<?php
// dangerous URL
$url = 'javascript:alert("XSS");';
?>

<a href="<?php echo esc_url( $url ); ?> ">Link Text</a>
In this example, the link would be safely displayed with an empty href attribute. For input, pass either one parameter (the URL) or two parameters (the URL and an array of allowed protocols) to sanitize data before storing or returning it.
In the following example, see how various URLs are sanitized:
<?php
$url1 = 'http://example.com/"<script>alert(\'XSS\')</script>';
var_dump( esc_url( $url1 ) );
// string(54) "http://example.com/scriptalert('XSS')/script"
$url2 = 'http://example.com/"<script>alert(\'XSS\')</script>';
var_dump( esc_url( $url2 ) );
// string(90) "http://example.com/<script>alert('XSS')</script>"
$url3 = 'onmouseover="alert(\'XSS\')';
var_dump( esc_url( $url3 ) );
// string(41) "http://onmouseover=alert('XSS')"
$url4 = 'c:\dir\dir\dir\dir';
var_dump( esc_url( $url4 ) );
// string(0) ""
$url5 = 'http://ex[]amp[]le.co[]m/';
var_dump( esc_url( $url5 ) );
// string(19) "http://example.com/"
?>As you can see, the purpose of function esc_url() is not to make sure a URL is valid (for instance, http://onmouseover=alert('XSS') does not look like one) but to sanitize it drastically so that it is harmless when used.
With a second array parameter, this function is also great at limiting the protocols you want to authorize:
<?php

$allowed = array( 'http', 'https', 'ftp' );

$url1 = 'https://example.com';
var_dump( esc_url( $url1, $allowed ) );
// string(19) "https://example.com"

$url2 = 'irc://example.com';
var_dump( esc_url( $url2, $allowed ) );
// string(0) ""

$url3 = 'xyz123://example.com';
var_dump( esc_url( $url3, $allowed ) );
// string(0) ""
?>
Function esc_url() converts ampersands and single quotes into HTML entities to make sure displaying the URL will not break any output. To sanitize a URL for database usage, prefer esc_url_raw(), which sanitizes without entity translation:
<?php $url = "http://ex[a]mple.com/?q=1&s=2'"; var_dump( esc_url( $url ) ); // string(38) "http://example.com/?q=1&s=2'" var_dump( esc_url_raw( $url ) ); // string(28) "http://example.com/?q=1&s=2'" ?>
You may have to redirect users to a page where the location depends on a user generated value, such as "http://example.com/profile.php?user=$user". The wrong way to do it in a WordPress environment would be to simply use header redirection:
<?php
header( "Location: http://example.com/profile.php?user=$user" );
?>
Omitting to sanitize variable $user could allow unwanted redirection on some server setups (depending on the version of PHP installed), with values such as "Joe\nLocation: http://evilsite/".
The correct way to handle redirections within WordPress is to use its function wp_redirect(), which first sanitizes the redirection location:
<?php
wp_redirect( "http://example.com/profile.php?user=$user" );
?>
Inline JavaScript (such as onclick="doSomething();" for example) is another type of HTML node attribute that gets particular treatment and its own sanitization function: esc_js().
You can use this function to ensure that JavaScript snippets using dynamic variables from PHP will not break, as in the following example:
<?php
$user = 'Joe';
?>

<script type="text/javascript">
var user = '<?php echo esc_js( $user ); ?>';

function confirm_delete() {
    return confirm('Really delete user '+user+'?');
}
</script>

<a href="<?php echo esc_url( "delete.php?user=$user" ); ?>"
   onclick="javascript:return( confirm_delete() )"
   title="Delete">Delete user <?php echo esc_html( $user ) ?></a>
Notice how this neat example uses different esc_ functions to sanitize the various parts of the "delete" link.
The superglobal array $_SERVER, as its name may not imply, contains information received by the server from the client, that is, a user's browser. As such, consider its values unsafe. Depending on what server variable you need, be sure to always sanitize it with the appropriate functions.
For instance, if you want to display on a page the referring URL that presumably sent a visitor to your site, don't use the following:
<?php if( isset( $_SERVER['HTTP_REFERER'] ) ) { ?>
Welcome visitor from <?php echo $_SERVER['HTTP_REFERER']; ?> !
<?php } ?>
Because the referrer URL is extremely easy to spoof and may contain anything a malicious user can imagine, let esc_url() handle it for you:
<?php if( isset( $_SERVER['HTTP_REFERER'] ) ) { ?>
Welcome visitor from <?php echo esc_url( $_SERVER['HTTP_REFERER'] ); ?> !
<?php } ?>
In the same way, don't trust the user-agent signature stored in $_SERVER['HTTP_USER_AGENT']. If you want to display this data, you should treat it as unsafe HTML and sanitize it with wp_kses() first.
Other often-used server variables are $_SERVER['REQUEST_URI'] or $_SERVER['PHP_SELF'], containing the location of the currently loaded page or executed script. When not sanitized, these server variables are easily exploitable. For example, craft the following form that will point to itself in its action parameter:
<form action="<?php echo $_SERVER['PHP_SELF']; ?>" method="post" >
<input type="text" name="fullname" />
<input type="submit" value="Save" />
</form>
Save this form as self_form.php, and then point your browser to http://localhost/self_form.php/"><script>alert(1337)</script> and see what happens in Figure 6-8.
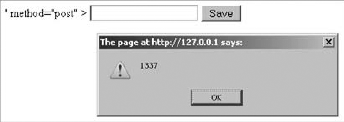
The best option is to always hardcode form action parameters, or to leave the form action empty (<form action="" method="post">) to send data back to the same place. If you need to make it dynamic and use a server variable, sanitize it with esc_url().
Just as you must not trust $_GET or $_POST, be suspicious toward the $_COOKIE array. Indeed, cookies are simple text files stored on the client's computer and as such easy to edit with tools such as Firebug for Firefox. Give cookies the same treatment as data from a submitted form: Validate and sanitize values.
Note
In PHP, $_REQUEST usually contains $_GET, $_POST, and $_COOKIE. Note that upon start, WordPress removes the $_COOKIE array from $_REQUEST. Thus, if you need to check the value of a cookie, do not rely on $_REQUEST in a WordPress environment, but check $_COOKIE directly.
You can easily validate or sanitize an array of similar data using PHP's function array_map().
Imagine for instance a form where a user has to enter several positive integers (age, number of children, and household income). To sanitize this information, you need absint(). You can process each data one by one, or use this more compact and efficient code:
<?php

// sanitize the whole $_POST array
$_POST = array_map( 'absint', $_POST );

// extract only expected values
$clean = array();
$clean['age'] = $_POST['age'];
$clean['numchild'] = $_POST['numchild'];
$clean['income'] = $_POST['income'];
?>
This technique is particularly useful when you don't know how many values you need to sanitize. Picture a form textarea field in which you would ask users to enter a list of URLs, such as their favorite sites, one per line.
To sanitize such a list, you can split it into individual URLs and pass the resulting array to esc_url() all at once:
<?php

$clean_urls = array();

// Split the textarea value into an array of URLs
$urls = split( "\n", $_POST['urls'] );

// Sanitize the whole array
$clean_urls = array_map( 'esc_url', $urls );
?>
Even when your form seems to lock down the number of possible values of a given field, such as a radio button being only Yes or No, always validate the submitted value. Indeed, it's trivial to post arbitrary data to any form, as the following example demonstrates.
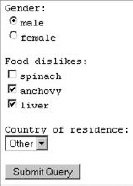
First, create a script showing a simple form with radio buttons, check boxes, and a drop-down, similar to Figure 6-9. To mimic storing information, the script can also save any submitted information to a local text file.
<?php

if( $_POST ) {
    $post = print_r( $_POST, true );
    error_log( $post, 3, dirname( __FILE__ ).'/post.log' );
}

?>

<form action="" method="post">

    Gender:
    <input type="radio" name="gender" value="male" />male
    <input type="radio" name="gender" value="female" />female

    Food dislikes:
    <input type="checkbox" name="food[]" value="spinach"/>spinach
    <input type="checkbox" name="food[]" value="anchovy"/>anchovy
    <input type="checkbox" name="food[]" value="liver"/>liver

    Country of residence:
    <select name="country">
        <option value="usa">USA</option>
        <option value="canada">Canada</option>
        <option value="uk">United Kingdom</option>
        <option value="other">Other</option>
    </select>

    <input type="submit" />

</form>
Code snippet locked_form.php
At the beginning of the script, if array $_POST is defined, its content is sent to a file named 'log.txt' in the same directory. You can learn more about error and message logging in Chapter 16, which is about debugging and code optimization.
This form looks pretty much locked down: Every field value belongs to a limited set, and at first you would probably confidently think that the submitted data will always be along the lines of the following array as read in log.txt:
Array
(
    [gender] => male
    [food] => Array
        (
            [0] => anchovy
            [1] => liver
        )
    [country] => usa
)
Just because the input fields seem to enforce values does not mean you cannot post anything to the form. You can now take the role of a malicious user and try to abuse this seemingly locked-down form with a script that posts random data to it:
<form action="locked_form.php" method="post">
    <input name="gender" value="hello" />
    <input name="food[]" value="<script>alert('hello');</script>" />
    <input name="country" value="bleh" />
    <input name="random" value="1337" />
    <input type="submit" />
</form>
Code snippet locked_form_abuse.php
Notice how values passed to the script referenced in the action attribute contain totally random values that could not be generated by the legitimate form.
Note
All it takes is a plain HTML file, hosted anywhere including a desktop computer with no web server, to submit any information to a script. Never take for granted that all users will always post only what you expect.
Back to the first form, locked_form.php: You can now make it secure and sanitize submitted values before storing them. Because you know the different values every field can take, you can code efficient and straightforward filters, using a white list principle. The storing code block will now be the following:
<?php

if( $_POST ) {

    $clean = array();

    // Gender: 2 possible values, default to 'male'
    $clean['gender'] = ( $_POST['gender'] == 'female' ? 'female' : 'male' );

    // Food: arbitrary number of possible values, no default
    $foods = array( 'spinach', 'anchovy', 'liver' );
    if( in_array( $_POST['food'], $foods ) )
        $clean['food'] = $_POST['food'];

    // Country: arbitrary number of possible values, default to 'other'
    switch( $_POST['country'] ) {
        case 'canada':
        case 'uk':
        case 'usa':
            $clean['country'] = $_POST['country'];
            break;
default:
$clean['country'] = 'other';
}
$post = print_r( $clean, true );
error_log( $post, 3, dirname( __FILE__ ).'/post.log' );
}
?>Code snippet locked_form_secure.php
Notice how different test syntaxes are involved. The first comparison and sanitization, for gender, uses PHP's ternary operator. This compact line means, Is $_POST['gender'] female? Then $clean['gender'] equals female, otherwise it will equal male.
Database queries are obviously crucial strings regarding security. Consider for instance a web application in which the following query would authenticate users after they submit their login and password:
<?php
$sql = "SELECT * FROM users
        WHERE ''user_login' = '$login' AND 'user_pass'= '$password'";
?>
Because that SQL statement is not escaped and not sanitized, a malicious user could log in with the following credentials:
<?php
$login = 'anything';
$password = "123456' OR 1='1";
?>
Indeed, setting these variables, the SQL statement becomes a simple 1=1 condition, which is obviously always true:
SELECT * FROM users
WHERE 'user_login' = 'adminzzz'
AND 'user_pass'= '123456'
OR 1='1'
This would be a successful SQL injection attack: A user manipulates the statement performed on the database, as humorously depicted in Figure 6-10, a strip by Randall Munroe, titled "Exploits of a Mom" and reproduced here with permission (original URL: http://xkcd.com/327/).

Opportunely, WordPress comes with functions to help you sanitize your queries properly.
Function esc_sql() escapes content for inclusion into the database, which means it adds backslashes before characters that need to be quoted in queries (quotes and backslashes). The particularity of esc_sql() is that it can process indifferently a query string or an array of query strings.
<?php

$login = 'back\slash';
$sql = 'SELECT * FROM 'users' WHERE 'login' = "'. esc_sql( $login ) .'"';
var_dump( $sql );
// string(55) "SELECT * FROM 'users' WHERE 'login' = "back\\slash""
?>
Function like_escape() takes care of escaping text used in LIKE clauses, where special characters percent % and ampersand _ are used:
<?php

$pattern = 'joe';

$like = like_escape( 'LIKE "%'.$pattern.'%"' );

$sql = 'SELECT * FROM 'users' WHERE 'username' '.$like;

var_dump( $sql );
// string(53) "SELECT * FROM 'users' WHERE 'username' LIKE "\%joe\%""
?>
Function sanitize_sql_orderby() sanitizes ORDER BY clauses before they are included into an SQL string:
<?php

$order_by   = 'last_name';
$order_sort = 'DESC';
$order = sanitize_sql_orderby( "$order_by $order_sort" );

$sql = 'SELECT * FROM 'users' ORDER BY '. $order;

var_dump( $sql );
// string(45) "SELECT * FROM 'users' ORDER BY last_name DESC"
?>
WordPress provides much more than simple escaping functions to sanitize queries: It has a complete set of functions designed to help you securely format your SQL statements.
WordPress offers numerous functions you learn to use throughout this section to access information from the database.
All database interactions within WordPress can be done through a class called wpdb, which (if you have some PHP background) you will see derives from the popular ezSQL class.
You should not run SQL queries using PHP's functions such as mysql_query() or mysql_fetch_array() for two reasons:
Methods from this class, which you learn to use in this section, should not be called directly: Instead, always use the $wpdb object WordPress instantiates on every page load.
Note
Don't forget to "globalize" $wpdb (that is, adding line global $wpdb;) before using it within your functions.
The $wpdb object can be used to access data from any table in the database used by WordPress: All the standard tables created upon installation or upgrade of your blog, but also any custom table created by a plugin, for example. In Chapter 7, "Plugin Settings," you learn when and how to create such a custom table.
The $wpdb object contains several methods you can use to read, insert, update, or delete information from tables. The following examples would produce the same results, but notice how readable and foolproof it gets:
<?php

// Example 1
mysql_connect( DB_HOST, DB_USER, DB_PASSWORD ) or
   die("Could not connect: " . mysql_error());
mysql_select_db( DB_NAME );
mysql_query( "UPDATE wp_posts SET post_title= '$newtitle' WHERE ID= $id" );

// Example 2
$newtitle = esc_sql( $newtitle );
$my_id = absint( $my_id );
$wpdb->query( "UPDATE $wpdb->posts SET post_title='$newtitle' WHERE ID=$id");

// Example 3
$new_values = array( 'post_title' => $newtitle );
$where = array( 'ID' => $my_id );
$wpdb->update( $wpdb->posts, $new_values, $where );
?>
What do these three examples tell you?
Example 1, the old manual way, is cumbersome: Establish a connection to the database and run the query. The query itself is questionable: The table name is hardcoded even though a blog owner can change the table prefix; variables
$newtitleand$idare not sanitized.Example 2 is good: Variables are sanitized with functions you've just learned to use, the table name complies with the local table prefix, and the query is run through the
$wpdbobject with theupdate()method.Example 3 is just as good but even easier: Define an array of values to update in column => value pairs, define an array of
WHEREclause with the same structure, and let the method handle sanitization and query for you. You don't need to remember the exact SQL syntax; you don't need to make mental notes about data sanitization; and you completely rely on the WordPress API.
Note
Always use the $wpdb methods: These functions can make your code easier to read, faster to maintain, and safer to execute.
As in the previous example #3, all-in-one methods are foolproof functions that exempt you from memorizing the boring parts (SQL syntax, sanitization functions) and manage everything for you. Count on update() and insert().
This method needs three parameters:
A table name. (Remember to use
$wpdb->prefix.)An array of data to update, in column => value pairs, unescaped.
An array of
WHEREclauses, in unescaped column => value pairs. If there are several clauses, they will be joined with anAND.
You can optionally pass two other parameters:
An array of formats to be mapped to each of the data to update (or a string instead of an array if the same format is to be used for all the values). A format can be
'%d'for decimal,'%s'for string, or'%f'for float. If omitted, all values will be treated as strings, unless otherwise specified in WordPress standard table definitions.An array of formats (or a string if one format applies) to be mapped to each of the values in the WHERE clause. If omitted, they get a string treatment.
To exemplify the usage of this function, imagine a table named wp_custom with a simple structure, as in Table 6-1:
Table 6.1. table wp_custom Structure
COL_ID | COL_STRING | COL_INTEGER |
|---|---|---|
int(11) NOT NULL AUTO_INCREMENT | varchar(100) NOT NULL | int(11) |
You can now update a row of table wp_custom, where the ID is 1, the value in the second column is a string, and the value in the third column is an integer:
<?php


$values = array(
    'column1' => 'some string',
    'column2' => 43
);

$where = array(
'ID' => 1 ); $formats_values = array( '%s', '%d' ); $formats_where = array( '%d' ); $wpdb->update( $wpdb->custom, $values, $where, $formats_values, $formats_where ); ?>
As you can see, this method grants a structured way to declare the SQL query, in particular the format of the data to sanitize. The method returns either false on error, or an integer with the number of rows affected by the update.
Note
Do not hardcode the WordPress database table prefix (usually "wp_") into your plugins. Be sure to use the $wpdb->prefix variable instead. Not only will it use the proper prefix, but it will also include the proper blog ID in a multisite environment.
You can use this method to insert data in a similar operation, with three parameters:
A table name
An array of data to insert, in unescaped column => value pairs
An optional array of formats to be mapped to these values, otherwise treated and sanitized as strings
Use this method to insert in a row in the same $wpdb->custom table, the first field being a string and the second one being an integer:
<?php

$values = array(
    'column1' => 'new string',
    'column2' => 44
);

$formats_values = array( '%s', '%d' );

$wpdb->insert( $wpdb->custom, $values, $formats_values );
?>
Similarly to the update() method, this function also returns false on error or an integer for the number of rows inserted.
Not all the queries you'll run will be simple UPDATE or INSERT, so the wpdb class provides numerous other methods you'll peruse now, for instance to fetch a single value or an entire row, or perform custom complex statements.
The get_var() method returns a single variable from WordPress' database (or NULL if no value is found).
For instance, to fetch the number of posts you have published on your blog, you can use the following query:
<?php

$sql = "SELECT COUNT(ID) FROM {$wpdb->posts}
        WHERE post_status = 'publish' AND post_type = 'post'";

$num_of_posts = $wpdb->get_var( $sql );
?>To fetch an entire row (or parts of a row), use method get_row(), which can return results as an object, an associative array, or a numerically indexed array. The syntax of this method follows:
<?php
$wpdb->get_row( $sql, $output_type, $row_offset );
?>
This methods requires the following parameters:
$sql— The SQL query$output_type— Optionally, one of the three predefined constantsOBJECT(return result as an object),ARRAY_A(return as an associative array), orARRAY_N(numerically indexed array). If omitted, the default isOBJECT.$row_offset— Optionally, the desired row, default value being 0.
For example, fetch from the users table the email and URL of user 'admin' and compare different output types. The SQL statement for such a query follows:
<?php
$sql = "SELECT 'user_email', 'user_url'
        FROM $wpdb->users
        WHERE user_login = 'admin'";

$object  = $wpdb->get_row( $sql, OBJECT );
$array_a = $wpdb->get_row( $sql, ARRAY_A );
$array_n = $wpdb->get_row( $sql, ARRAY_N );
?>
Examine now with var_dump() the nature of each result, depending on the output type selected:
<?php

var_dump( $object );
/*
object(stdClass)#824 (2) {
  ["user_email"] => string(17) "ozh@ozh.org"
  ["user_url"] => string(21) "http://ozh.org/"
}
*/

var_dump( $array_a );
/*
array(2) {
  ["user_email"] => string(17) "ozh@ozh.org"
  ["user_url"] => string(21) "http://ozh.org/"
}
*/

var_dump( $array_n );
/*
array(2) {
  [0] => string(17) "ozh@ozh.org"
  [1] => string(21) "http://ozh.org/"
}
*/
?>
The nature of the result can affect how you now access individual records. For instance, to get the email address of the selected user, you can use one of the three following syntax constructions:
<?php
$email = $object->user_email;

$email = $array_a['user_email'];

$email = $array_n[0];
?>
Notice how the first two syntaxes refer to 'user_email', which is the name of the column in the database.
Note
When fetching values from a database, prefer results returned as an object or an associative array. These two output formats can retain the database column names for better clarity.
This method can select an entire column, or part of a column, and return a dimensional array. It needs a query as first parameter and an optional column offset as second parameter, used if more than one column is returned. (The default value is zero.)
Imagine you want to send an email to all registered users of your WordPress setup, telling them the site will go temporarily offline for maintenance.
First, query the $wpdb->users table and get column 'user_email':
<?php

$sql = "SELECT 'user_email' FROM $wpdb->users";

$emails = $wpdb->get_col( $sql );
?>
Now, send the short email notice to each of these registered users:
<?php

$subject = 'Blog maintenance';
$message = 'Dear user, the blog will be offline for 15 minutes.';

foreach( $emails as $email ) {
    wp_mail( $email, $subject, $message );
}
?>If you need to fetch generic multiple row results, you can use method get_results(). This function needs a SQL statement parameter of course, and like get_row() an optional output format between OBJECT, ARRAY_N or ARRAY_A (as discussed earlier in the "Select a Row" section).
As an example of a more complex query, use this method to get the number of posts you have published each year on your blog:
<?php

$sql = "SELECT YEAR(post_date) AS 'year', count(ID) as posts
        FROM $wpdb->posts
        WHERE post_type = 'post' AND post_status = 'publish'
        GROUP BY YEAR(post_date)
        ORDER BY post_date DESC";

$results = $wpdb->get_results( $sql, ARRAY_A );
?>
If you use print_r( $results ), the resulting associative array will be something like the following:
Array (
    [0] => Array (
            [year] => 2010
            [posts] => 13
        )
    [1] => Array (
            [year] => 2009
            [posts] => 37
        )
    [2] => Array (
            [year] => 2008
            [posts] => 9
        )
)
To display a human readable summary of your yearly activity, you can loop over each subarray of $results, like the following:
<?php

foreach( $results as $sum ) {
    $year  = $sum['year'];
    $count = $sum['posts'];
    echo "<p>Posts published in $year: $count</p>";
}
?>
Note
A good habit is to SELECT only what you need and avoid the lazy "SELECT * FROM". Trimming your selection only to fields you need helps to reduce the database's load and memory usage.
This is especially crucial in shared host environments, where hundreds of other processes may be polling data from or writing to the database at the same time. Learning how to minimize hits against the database will ensure that your plugin will not be the one blamed for abuse of resources.
Of course, common methods of the $wpdb object are not limited to SELECT statements. Any query can be processed by method query(), which returns an integer corresponding to the number of rows affected or selected, or false if an error occurred.
For illustration, you can delete all comments from your blog if they point to an unwanted website:
<?php

$sql = "DELETE from wp_comments
        WHERE comment_author_url
        LIKE '%evil.example.com%'";

$deleted = $wpdb->query( $sql );
?>
Now the variable $deleted is either false if there were an error (for instance if the table prefix is not 'wp_' and thus table 'wp_comments' does not exist) or an integer of the number of records deleted.
You can also use the query() method in place of any other method when you need more flexibility in the syntax and parameters. In this practical example, you can disable comments on all posts older than 90 days:
<?php

$sql = "UPDATE $wpdb->posts
        SET comment_status = 'closed'
        WHERE post_date < DATE_SUB( NOW(), INTERVAL 90 DAY )
        AND post_status = 'publish'";

$wpdb->query( $sql );
?>
As a last example, imagine a friend of yours who is also a frequent commentator on your site just moved his personal blog to another URL. You can hopefully update all comment author URLs with a single query:
<?php

$sql = "UPDATE $wpdb->comments
        SET comment_author_url =
        REPLACE( comment_author_url, 'http://oldsite/', 'http://newsite/' )";

$wpdb->query( $sql );
?>You may have noticed that the previous queries are not sanitized. This was indeed not needed because they are completely hardcoded and do not contain any dynamic and potentially unsanitary or malformed data.
If you need to create a dynamic custom query where you cannot hardcode every component, you already know that you need to sanitize and escape it with function esc_sql() before your run it. This preparation step can be handily done with the prepare() method, which enables the same kind of format strict validation as insert() or update().
The process becomes twofold:
Prepare the SQL query with
prepare(), which returns a sanitized and escaped statement.Run the query with this statement, using any of the previously mentioned common methods.
For instance, how can you fetch the titles of all posts written by an author with a given user ID during a particular month? The SQL query for such a request is similar to the following:
SELECT 'post_title'
    FROM $wpdb->posts
    WHERE 'post_author' = 1
    AND post_status = 'publish'
    AND post_type = 'post'
    AND DATE_FORMAT( 'post_date', '%Y-%m' ) = '2010-11'
From this example, define a generic SQL query with format placeholders:
<?php
$sql = "SELECT 'post_title'
        FROM $wpdb->posts
        WHERE 'post_author' = %d
        AND post_status = 'publish'
        AND post_type = 'post'
        AND DATE_FORMAT( 'post_date', '%%Y-%%m') = %s ";

?>
Think of it as a template query, where %d will be an integer and %s a string. Notice how percent signs % are double-escaped as %% and how you don't need quotes around these placeholders.
Now you can "prepare" the query and then process it. Get all posts titles from author ID 1 from the month of November 2010:
<?php

$id = 1;
$month = '2010-11'

$safe_sql = $wpdb->prepare( $sql, $id, $month );

$posts = $wpdb->get_results( $safe_sql );
?>
The prepare() method takes an arbitrary number of parameters: first the SQL template with its placeholders and then as many values as there are placeholders, either one by one or grouped in an array. What is important here is to pass these values in the same order as their placeholders in the query, much like you would use PHP's function printf().
If you var_dump() the resulting $posts variable, you get something like the following:
array(3) {
  [0]=>
  object(stdClass)#251 (1) {
["post_title"] => string(30) "Halloween over, Christmas soon"
}
[1]=>
object(stdClass)#250 (1) {
["post_title"] => string(25) "Happy Birthday Mike Muir"
}
[2]=>
object(stdClass)#249 (1) {
["post_title"] => string(27) "Ditched My Mac, Bought a PC"
}The $wpdb object contains a few methods and properties you might use, particularly for debugging purposes.
You can turn error echoing on and off:
<?php

// On:
$wpdb->show_errors();

// Off:
$wpdb->hide_errors();
?>
You can also echo the error (if any occurred) generated by the most recent query using either the print_error() method or the last_error property:
<?php
echo $wpdb->last_error;

$wpdb->print_error();
?>
Refer to Chapter 16, which is about debugging, for more tips.
The wpdb class variable num_queries keeps record of the number of queries issued. You can also more simply use function get_num_queries(). Again, you learn more about this in Chapter 16, which is about debugging and optimizing.
Table 6-2 shows a list of other noteworthy class variables and what they contain:
Security is a subtle cocktail involving design, reflection, and general common sense. Everything you have read in this chapter can aid you and provide the right tools, but you also need to develop a few good habits.
Always try to break your plugins: Think about illegitimate, evil, and malicious ways to exploit your code, but also consider just plain stupid use. Some users don't always read the documentation, just as some plugin authors may be poor at writing clear documentation. Don't assume users will do what you expect them to do.
Make security a part of your reflection from the start of the project: If you do not design your plugin with security in mind, you are doomed to be sooner or later addressing security issues or vulnerabilities.
WordPress developers take security seriously. When vulnerability is reported and confirmed, a new version of WordPress with a fix is made available, generally under a few hours. But these developers do not maintain older versions: As a result, make sure you code with the latest, therefore most secure, existing version. Coding plugins using deprecated functions or API could expose your work to security holes.
WordPress developers take security seriously because they know WordPress is not perfect: If you happen to discover a new security hole while playing with WordPress code, make sure you play your role in WordPress's improvement. Do so in a "white hat" (ethical) approach: Don't make your findings public; instead alert security@wordpress.org.
Some of the functions described in this chapter are relatively recent: If you started coding plugins several years ago and did not stay up to par with WordPress code improvements, now is a good time to get back to your plugins and improve the code.
Document your code. Your future self will thank you when working back on a plugin coded several months ago; this can make maintenance much easier, and you can quickly spot security weaknesses.
Be open to your user community and responsive: You are bound to be addressing security issues one day, and receiving an alarming security report about one product is not something a coder should be ashamed of. But pride yourself in fixing your code quickly, and publicly disclose that you're releasing a security upgrade: This can encourage users to upgrade.
Above all, be distrustful and consider all dynamic data to be unclean.
Note
The golden rule in security, as per Mark Jaquith's words (lead developer of WordPress and security expert) can be summed up as this: Anything that isn't hardcoded is suspect.
Although there is no official WordPress plugin security audit team that can help you improve or validate your plugin, this does not mean you're on your own. Publicly releasing a plugin and getting involved in the WordPress community will connect you not only with users but also with seasoned developers and WordPress contributors. It's a common practice in the WordPress community to suggest patches to other plugin authors. You will learn more about getting involved in Chapter 17.
One thing you should retain from this chapter is that security is not difficult to implement in WordPress plugins, thanks to convenient functions designed to address the various aspects of security.
The most important rule to remember is to always check both entrance and exit "gateways": places where users can send data to your server (URLs, form fields, cookies, and so on) and places where you send data back to the user (data outputs on the browser screen). Any interaction between a user and a web site is both dangerous by nature and easy to secure.