Table of Contents for
Professional WordPress® Plugin Development
 Professional WordPress® Plugin Development
Published by
Wrox, 2011
Professional WordPress® Plugin Development
Published by
Wrox, 2011
- Copyright
- CREDITS
- ABOUT THE AUTHORS
- ACKNOWLEDGMENTS
- FOREWORD
- INTRODUCTION
- 1. An Introduction to Plugins
- 2. Plugin Foundation
- 3. Hooks
- 4. Integrating in WordPress
- 5. Internationalization
- 6. Plugin Security
- 7. Plugin Settings
- 8. Users
- 9. HTTP API
- 10. The Shortcode API
- 11. Extending Posts: Metadata, Custom Post Types, and Taxonomies
- 12. JavaScript and Ajax in WordPress
- 13. Cron
- 14. The Rewrite API
- 15. Multisite
- 16. Debugging and Optimizing
- 17. Marketing Your Plugin
- 18. The Developer Toolbox
WHAT'S IN THIS CHAPTER?
JavaScript is principally a language used to code plain text script executed on the client side, that is, the browser. In this chapter, occurrences of the term "script" refer to JavaScript script.
This chapter offers a concise introduction to jQuery, a JavaScript library used by WordPress, and to Ajax. Then it focuses on the WordPress specifics, introducing the functions and concepts you need to know, and eventually you author plugins using JavaScript and Ajax.
jQuery is a popular JavaScript framework: It is used by more than 40% of the top million sites followed by Quantcast (source: http://trends.builtwith.com/javascript) and, more specific to this book's subject, is used by WordPress. jQuery on its own deserves more than an entire book, so this will be only a short preamble.
What makes jQuery such a great library and the reasons why it comes with WordPress are among the following:
It is light: The minified and gzipped library is only 24kb.
It uses a quick and terse syntax for faster developing (the write-less-do-more library).
It is completely a cross browser: What you develop works the same in IE 6+, Firefox 2+, Safari 3+, Chrome, and Opera 9+.
It is CSS3-compliant: It supports CSS 1-3 selectors (select document elements such as
div p.asidesortr:nth-child(odd) td).It makes things easier to work on: Events, DOM object manipulation and traversing, effects, common utilities, and so on.
It makes Ajax much simpler and easily reads JSON and XML.
It has a great documentation, available at
http://docs.jquery.com/.
It's of course possible to use any other library such as PrototypeJS, Mootools, or YUI with WordPress, but because WordPress uses jQuery for its internal need, you also have lots of great code to dissect and study when you want to understand the innards of a particular behavior.
The scope of this section is not to teach you how to master this powerful JavaScript library in a few minutes but to give you some basis to read on without being completely lost, and WordPress specific information.
In old school JavaScript, you may have written code like
document.getElementById('container').getElementsByTagName('a')to select elements that your CSS would simply call #container a. With jQuery, you can now simply write the following:
$('#container a')JQuery methods can be chained together, which will return the jQuery object, as you will see in the following short practical example.
Create a minimalist HTML content that includes the latest jQuery script from the official website:
<html>
<head>
<script src='http://code.jquery.com/jquery.js'></script>
<title>Quick jQuery example</title>
</head>
<body>
<p class="target">click on me!</p>
<p class="target">click on me!</p>
<p class="target">click on me!</p>
</body>
</html>
Now, right before the closing </body> tag, insert a jQuery snippet to add a background and a border to each paragraph, and which, when clicked, changes the background color while shrinking it for 2 seconds before making it disappear:
<script type="text/javascript">
$('p.target')
    .css( { background:'#eef', border: '1px solid red' } )
    .click(function(){
    $(this)
        .css('background','#aaf')
        .animate(
            { width:'300px', borderWidth:'30px', marginLeft:'100px'},
            2000,
            function(){
                $(this).fadeOut();
            }
        );
    });
</script>
Code snippet jquery-example.html
If you dissect this compact snippet, you can see the main structure:
$('p.target').css( ).click( function(){ } );This applies some styling to the selected paragraph and then defines the behavior when the event 'click' occurs on this element. Chaining enables a method to return an object itself as a result, reducing usage of temporary variables and enabling a compact syntax.
Similarly, within the function defining the click behavior, you can see several methods applied to the $(this) object, referencing the current jQuery object instantiated by the initial $('p.target').
What you have now is three independently animated paragraph blocks, as shown in Figure 12-1.

jQuery is not the only JavaScript library to use the $ sign. For example, PrototypeJS uses $ as a simple shortcut to the longer function document.getElementById().
To enable coexistence with other libraries, jQuery has a no-conflict mode, activated by default within WordPress, which gives back $ to other libraries. The result of this is that if you port existing jQuery code to a WordPress environment, you need to use one of these solutions:
Write
jQuery( )instead of each$( ).Use a jQuery wrapper.
To illustrate this, consider the initial jQuery code you would need to port into a WordPress no-conflict environment:
$('.something').each( function(){
    $(this).addClass( 'stuff' );
});
$.data( document.body, 'foo', 1337 );
Option one would give the following result:
jQuery('.something').each( function(){
    jQuery(this).addClass( 'stuff' );
});
jQuery.data( document.body, 'foo', 1337 );
Option two would give the following result:
// jQuery noConflict wrapper:
(function($) {
    // $() will work here
    $('.something').each( function(){
        $(this).addClass( 'stuff' );
    });
    $.data( document.body, 'foo', 1337 );
})(jQuery);
Both solutions are programmatically equal, but using a no-conflict wrapper will enable you to more conveniently and easily use existing code without having to replace each $ with a longer jQuery.
A frequent requirement in JavaScript is to make sure that elements in a page load before you can do something with them. Here is a snippet you may have used before:
window.onload = function(){
    /* do something */
}
This ancient technique has two weaknesses:
With jQuery you get a much better solution:
$(document).ready( function(){
    /* do something */
});
Now, as soon as the DOM hierarchy has been fully constructed, the document "ready" event triggers: This happens before images load, before ads are shown, so the user experience is much smoother and faster.
You can combine the document-ready function with a jQuery noConflict() wrapper, like the following:
jQuery(document).ready(function($) {

    // $() will work as an alias for jQuery() inside of this function

});
Using this technique, you can use the $( ) syntax and be sure that you do not reference a DOM element that has not been rendered by the browser yet.
In the WordPress interface when you write a new post, you can add or remove tags and categories without refreshing the whole page: This is Ajax.
Ajax is a web development technique that enables a page to retrieve data asynchronously, in the background, and to update parts of the page without reloading it. The word originally stands as an acronym for Asynchronous JavaScript And XML, but despite its name the use of XML is not actually mandatory. You can sometimes read it as AJAX, but the form Ajax is more widely adopted.
Ajax is not a technology or a programming language but a group of technologies: It involves client-side scripts such as JavaScript and server-side script such as PHP that outputs content in HTML, CSS, XML, and JSON — or actually mostly anything.
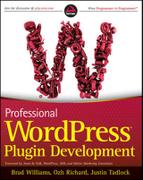
You can now code a simple yet illustrative example of what Ajax is. The page you write can asynchronously fetch from Twitter the latest tweets of a given user.
First, start with a basic HTML page structure.
<html>
<head>
    <title>Ajax Example</title>
    <script src='http://code.jquery.com/jquery.js'></script>
</head>
<body>
    <h1>Ajax example, reading JSON response</h1>
    <p>View <a id="load" href="http://twitter.com/ozh">Ozh' latest tweets</a></p>
    <div id="tweets"></div></body>
</html>
The two things you notice in this HTML document follow:
The page includes the jQuery script.
There is an empty placeholder:
<div id="tweets"></div>.
Now onto the Ajax bits: When clicking the link to Twitter, it should display the latest tweets in the page rather than redirecting to Twitter. The link click behavior can be overtaken:
<script type="text/javascript">

// When the DOM is ready, add behavior to the link
$(document).ready(function(){

    $('#load').click(function(){
        load_tweets();
        // Skip default behavior (ie redirecting to the link href)
        return false;
    });

});

</script>
You now need to define the function that fetches and displays the latest tweets:
<script type="text/javascript">
// Main function: load tweets in JSON
function load_tweets() {

    // Activity indicator:
    $('#tweets').html('loading tweets...');

    // Ajax JSON request
    $.getJSON(
        // Use a JSONP (with callback) URL
'http://twitter.com/status/user_timeline/ozh.json?count=5&callback=?',
// Function that will handle the JSON response
function(data) {
// Put empty <ul> in the placeholder
$('#tweets').html('<ul></ul>');
// Read each object in the JSON response
$(data).each(function(i, tweet) {
$('#tweets ul').append('<li>'+tweet.text+'</li>');
});
}
);
}
</script>What just happened?
When called by a click on the link, the function load_tweets() adds some feedback so that the user knows that something is happening in the background ("loading...") and then send a JSON request to Twitter, which if successful will be handled by the callback function that goes through each JSON item and adds its text element to the placeholder. These events happen on the same page without reloading the page, as shown in Figure 12-2.
Note
An important limitation of Ajax to understand is the Same Origin Policy: Due to browser security restrictions, most Ajax requests cannot successfully retrieve data from a different domain, subdomain, or even protocol. JSONP requests (as used here) are not subject to the same origin policy restrictions.
You have coded a page with a client script that can update a part of the HTML document (the empty <div> placeholder) with data asynchronously fetched: This is a typical Ajax example.
Review the entire page with both the HTML and the JavaScript:
<html>
<head>
    <title>Ajax Example</title>
    <script src='http://code.jquery.com/jquery-1.4.2.js'></script>
</head>

<body>
    <h1>Ajax example, reading JSON response</h1>
    <p>View <a id="load" href="http://twitter.com/ozh">Ozh' latest tweets</a></p>
    <div id="tweets"></div>

<script type="text/javascript">

// When the DOM is ready, add behavior to the link
$(document).ready(function(){

    $('#load').click(function(){
        load_tweets();
        // Skip default behavior (ie sending to the link href)
        return false;
    });

});

// Main function: load tweets in JSON
function load_tweets() {

    // Activity indicator:
    $('#tweets').html('loading tweets...');

    // Ajax JSON request
    $.getJSON(
        'http://twitter.com/status/user_timeline/ozh.json?count=5&callback=?',

        // Callback function with JSON response
        function(data) {
            // Put empty <ul> in the placeholder
            $('#tweets').html('<ul></ul>');
            // Read each object in the JSON response and add text to the <ul>
            $(data).each(function(i, tweet) {
                $('#tweets ul').append('<li>'+tweet.text+'</li>');
            });
        }
    );
}
</script>
</body>
</html>
Code snippet ajax-example-twitter.html
This simple page is also a neat example of a few JavaScript and Ajax good practices:
Unobtrusive JavaScript — No inelegant
onlick="doSomething()"bits added to HTML elements; the behavior is added via JavaScript, and the content is separated from the function. First write content; then add functions.Accessible content — A direct consequence of unobtrusive JavaScript is that, on a browser with no JavaScript such as screen readers that sight-impaired people use, the page makes sense with a proper link to Twitter.
Activity indicator — When the user clicks the View Tweets links, there is immediate feedback ("loading..."). This is important to let the user know that something is happening in the background.
User feedback — When a part of the page updates successfully, it should be obvious to the user. (A counter example would be, for instance, a login box at the top of a page that would add content to the bottom of the page.) In more complex applications, it's also important to deal with errors and let the user know when something unexpectedly failed.
Note
Ajax popularized the usage of tiny animated images, called throbbers, to indicate background activity. Sites such as http://ajaxload.info/ enable you to create your own images that match your design.
Back to your favorite topic: WordPress! You now learn how to use JavaScript in WordPress: first the important techniques, and then full-fledged plugins illustrating them.
The main skill to master is how to add JavaScript into pages that WordPress generates. As trivial as it may sound at first, it can quickly become a source of conflicts between plugins or with the core if incorrectly done.
The main function you use to insert JavaScript into a WordPress page is wp_enqueue_script(), which as it name suggests adds a script to a queue of required scripts.
The goal of wp_enqueue_script() is to register a script and tell WordPress to properly inject it in the page. The function syntax and its five arguments follow:
<?php
// Add a script to the insert queue
wp_enqueue_script( $handle, $src, $dependencies, $ver, $in_footer );
?>
$handle— The only mandatory argument of the function, this represents the name of the script in the form of a lowercase string. The name of the script is either provided by WordPress or is a custom name registered by your plugin. In such a case, you should of course make it unique.$src— If provided, this is the URL of the script. WordPress needs this parameter only if it does not know this script yet. If the script is already known, this parameter will be simply ignored.$dependencies— An optional array of handles the script you want to add depends on and as such that must be loaded before. This parameter is needed only if WordPress does not know about this script.$ver— An optional version number, in the liberal form of a string such as 1.0 or 3.0.1-RC1. This makes sure the browser fetches the correct version of a script, regardless of its caching settings.$in_footer— An optional Boolean you set totrueif instead of having your script injected into the<head>of the document, you want it placed at the bottom of the page near the closing</body>tag.
Using WordPress' queue system to add scripts has four virtues:
No matter how many plugins require the same script, it will be added only once into the page.
You can precisely select on what page you want to add your script. You learn how to do this a little bit later.
Specifying dependencies as described next, you can expressly set the order in which several scripts will be included in the page, no matter the sequence of
wp_enqueue_script()function calls.Scripts are added in compliance to the
FORCE_SSL_ADMINconstant value. (That is, if the user uses WordPress over https in the admin area, scripts will be added over https, too.)
Typically, you will use wp_enqueue_script() hooked to an early action that occurs before any content is sent to the browser, such as 'init' or 'template_redirect', and the function call will output a proper <script> tag in the resulting HTML document, as in the following snippet:
<?php
add_action( 'init', 'boj_js_add_script' );

function boj_js_add_script() {
    wp_enqueue_script( $handle, $src, $dependencies, $ver, $in_footer );
}
?>
You will use the various parameters of wp_enqueue_script() depending on the scenario, as you will now read in concrete examples of different usages.
You can easily use wp_enqueue_script() to add a core script to your PHP code, for instance the Prototype JavaScript library.
<?php

// Example 1: Add prototype.js which is bundled with WordPress
function boj_js_add_script1() {
    wp_enqueue_script( 'prototype' );
}
?>
In this first example, no script source is provided: WordPress ships with a version of the JavaScript framework PrototypeJS and thus knows where to find it.
This is equivalent to adding the following line to the document <head>:
<script type="text/javascript"
    src="http://example.com/wp-includes/js/prototype.js?ver=1.6.1"></script>
Notice the query string appended to the script URL: WordPress affixes the known version number to known scripts.
To add a custom script to your code with wp_enqueue_script() you need to specify its source as well as its handle.
<?php

// Example 2: Add a custom script
function boj_js_add_script2() {
    wp_enqueue_script( 'boj1', 'http://example.com/script1.js' );
}
?>
In this example, you need to specify the full location of the script because it's not a core script.
This is equivalent to the following:
<script type="text/javascript"
    src="http://example.com/script1.js?ver=3.1"></script>
Notice again the version number in the script URL. Because the version number is omitted in the wp_enqueue_script() call, WordPress appends its own version number to it.
Now you will look at how you can clarify that your script has dependencies on other scripts.
<?php

// Example 3: Add a custom script that relies on jQuery components
function boj_js_add_script3() {
    wp_enqueue_script(
        'boj2',
'http://example.com/script2.js',
array( 'jquery-ui-tabs', 'jquery-ui-draggable' )
);
}
?>Here you have specified that the script depends on other scripts, which therefore need to be loaded before. These scripts are included in WordPress, so their handle is enough information. This single line outputs in the HTML document the following set of script includes:
<script type='text/javascript'
 src='http://example.com/wp-includes/js/jquery/jquery.js?ver=1.4.2'></script>
<script type='text/javascript'
 src='http://example.com/wp-includes/js/jquery/ui.core.js?ver=1.7.3'></script>
<script type='text/javascript'
 src='http://example.com/wp-includes/js/jquery/ui.tabs.js?ver=1.7.3'></script>
<script type='text/javascript'
 src='http://example.com/wp-includes/js/jquery/ui.draggable.js?ver=1.7.3'></script>
<script type='text/javascript'
 src='http://example.com/script2.js?ver=3.1'></script>
Including version numbers with your scripts is often practical, and it is easy to accomplish.
<?php

// Example 4: Add a custom script with version number
function boj_js_add_script4() {
    wp_enqueue_script( 'boj3', 'http://example.com/script3.js', '', '1.3.3.7' );
}
?>
This inserts the following bits to the document <head>:
<script type='text/javascript'
    src='http://example.com/script3.js?ver=1.3.3.7'></script>
If you maintain a plugin and update its JavaScript, keeping track of the version included is a good idea to avoid browser caching issues. Typically, you would, for instance, define a constant that holds the current plugin version and use this constant anywhere needed in your plugin.
By default, wp_enqueue_script() will output the corresponding <script> tag within the <head> of the resulting HTML document. Instead, you can elect to add it near the end of document with passing true as a last parameter:
<?php

// Example 5: Add a custom script in the footer
function boj_js_add_script5() {
wp_enqueue_script( 'boj4', 'http://example.com/script4.js', '', '', true ); } ?>
Example 5 adds the script near the closing </body> tag. The potential interest of adding a script to the page footer is discussed later in this chapter, in the section titled "Where To Include Scripts."
Warning
Injecting a script in the footer is possible if WordPress knows that it is currently rendering the footer. In the admin area, this always works, but for the blog part it requires the theme to use the wp_footer() function in its footer. Any good theme should do this, but be warned that bad themes exist!
As a wrap-up, you will now review a call to the function wp_enqueue_script() with all parameters used at once.
<?php

// Example 6: All parameters specified
function boj_js_add_script6() {
    wp_enqueue_script(
        'boj5',
        'http://example.com/script5.js',
        array( 'boj1' ),
        '6.6.6',
        true
    );
}
?>
This function call includes the script with version 6.6.6 in the footer. Notice how you have declared a dependency to script boj1, which is feasible because the script is now known by WordPress since example 2. Stating dependency to an unknown script would result in nothing being eventually included in the page.
As you've read in this chapter and may already know, WordPress comes with numerous core scripts. You will find these scripts in the following:
/wp-includes/jsand subdirectories for scripts either used on the public part (the site itself) or the admin backend/wp-admin/jsand subdirectories for scripts WordPress uses in the admin area
All these core scripts exist in two versions: a minified .js file and a readable (commented and indented) .dev.js version. By default, the minified files are included to save bandwidth, but you can toggle this behavior for debugging purpose by adding the following line to your wp-config.php:
<?php
define( 'SCRIPT_DEBUG', true );
?>
Handles for all the core scripts are defined in the function wp_default_scripts() to be found in wp-includes/script-loader.php. Refer to this function source if you need to include a core script and need to know its handle. The most frequently used in plugins follow:
'jquery'for the jQuery frameworkjQuery components such as
'jquery-ui-core', 'jquery-ui-tabs', 'jquery-ui-sortable'or'jquery-ui-draggable''thickbox'for the floating iframe (such as the one popping over when you want to upload an image in a post for instance), also known as a "thickbox"
If you want to prevent a script from loading, you can use function wp_dequeue_script() to remove it from the queue as follows:
<?php
add_action( 'init', 'boj_js_remove_queued' );

function boj_js_remove_queued() {
    // Don't include PrototypeJS
    wp_dequeue_script( 'prototype' );

    // Don't include a script added by another plugin
    wp_dequeue_script( 'some_script' );
}
?>
You can also use function wp_script_is( $handle ) to check if a script is registered and enqueued. This trick can be useful in the following, and unfortunately not hypothetical, scenario:
Imagine you've authored a new plugin with a neat settings page that makes good use of JavaScript and Ajax. Quickly, you start to receive support requests about JavaScript functionalities broken when another particular plugin is activated.
Indeed, it is not uncommon that plugin authors incorrectly add their scripts to all admin pages when it's actually needed only on their plugin settings page. (You'll see later in this chapter in the section "Adding Script Only When Needed" how to add scripts to selected particular pages.) Doing so, they can involuntarily break other plugins' settings pages.
At this point, you have two options to make your plugin compatible with the culprit:
Either contact the other plugin authors and tell them to correctly insert their script only where needed; if you're lucky, they will update it.
Or on your own plugin settings page, dequeue the conflicting script.
WordPress comes with its own scripts, but that does not mean you cannot replace them. For instance, instead of using the built-in jQuery framework, you can tell your sites to load it from Google's Content Delivery Network (CDN). By doing so the end user will download the framework from a highly reliable server that is possibly geographically closer than your own server thanks to Google's data centers. You will also increase the chances that the user already has the file in their cache and thus save bandwidth on your own server.
To do this, simply cut and paste the following snippet into all your plugins:
<?php

// Replace in-house jQuery with Google's one
add_action( 'init', 'boj_jquery_from_cdn' );
if( !function_exists( 'boj_jquery_from_cdn' ) ) {
    function boj_jquery_from_cdn() {
        wp_deregister_script( 'jquery' );
        wp_register_script(
            'jquery',
            'http://ajax.googleapis.com/ajax/libs/jquery/1.4.3/jquery.min.js'
        );
    }
}
?>
Code snippet boj_jquery_cdn.php
This snippet does the following:
Early in the WordPress instantiation process (on action
'init'), the functionboj_jquery_from_cdn()is called.This function (defined only if it does not already exist because you may have pasted this snippet in several plugins) deregisters jQuery as known by WordPress and then registers it again, this time with another script location.
The function wp_register_script() does not enqueue the script for inclusion in the page; it just "introduces" it to WordPress for later use if required.
If you need to enqueue the same script several times in a plugin, you can use the shorthand function wp_register_script() introduced in the previous paragraph.
First, define your script, using the same parameters as with function wp_enqueue_script():
<?php
wp_register_script( $handle, $src, $deps, $ver, $in_footer );
?>
Now you can enqueue it anytime needed:
<?php
wp_enqueue_script( $handle );
?>
This is outside the scope of this chapter but simply too similar not to be mentioned: You can add, register, and enqueue style sheets (that is, CSS files) the same way you add scripts, with similar functions accepting the same parameters:
Core styles are defined in
wp_default_styles()in filewp-includes/script-loader.php.Add styles with
wp_enqueue_style().
You now know that using wp_enqueue_script() you can elect to insert your script in the document header or at the end of the document body. How does this matter?
You've also read that it is important to insert your scripts only when needed, for instance on your plugin's settings page. How can you do this?
The function wp_enqueue_script() can insert scripts in the <head> or near the closing </body> tag. But you can also insert them manually, echoing <script src="http://example.com/script.js"></script> in your code. Finally, you can also insert your script inline in your document.
Each situation has its preferred method:
The typical script inclusion adds a JavaScript library in the document <head>, as wp_enqueue_script() does by default:
<head>
    <script type="text/javascript" src="/js/library.js"></script>
</head>
Doing so, the page elements may not be available to the script because they are not loaded yet. You can typically include here libraries and function definitions that can then be used later in the page.
The opposite alternative is to add the <script> tag near the end of the HTML document, hence usually in the footer of the page:
<script type="text/javascript" src="/js/script.js"></script>
</body>
</html>
This technique has been widely advocated by Yahoo! in its "Best Practices for Speeding Up Your Web Site" (see http://developer.yahoo.com/performance/rules.html). This rule can be effective if you need to include a third-party script that can potentially slow down or halt the rendering of your page while it loads and executes, for instance a widget hosted on another site. By adding it late in the page, the reader has a chance to actually view some page content before the widget halts the page rendering, making the overall experience less clunky.
Another way to add JavaScript in the page is to insert its <script> tag in an arbitrary location within the page:
</p>
</div>
<div>
    <script type="text/javascript" src="/js/script.js"></script>
There are situations when you won't want to always load a script in the head or the footer. Back to Chapter 10, "The Shortcode API," for a moment: In this chapter you've created a plugin that adds a Google map script only if the post contains the appropriate shortcode. Doing this, you load the script only if a post in the page needs it, instead of systematically loading it with wp_enqueue_script().
The last option to add JavaScript is to add it inline in the document, instead of specifying the src attribute of the <script> tag:
</p>
</div>
<div>
    <script type="text/javascript">
    var something = 123;
    do_something();
    </script>
You can also add small chunks of JavaScript inline, typically when it won't clutter the page with too much inline content and does not justify making an external JavaScript file.
If you want to pay attention to HTML or XHTML code validation, remember to use the following syntax:
<script type="text/javascript">
/* <![CDATA[ */
// content of your Javascript goes here
/* ]]> */
</script>
The preferred JavaScript library to develop with WordPress is jQuery, which has a convenient method to state that a script should start executing only when the DOM (that is, the page elements) is ready. If you use jQuery's document ready method, it becomes rather unimportant if the script is loaded in the header, the footer, or anywhere in the page.
For scripts that you did not author and do not rely on such a DOM ready technique, it is still relevant to consider the best spot to load them.
More important than where in the page to load a script is to load it only when needed. Doing so, you not only reduce site load, page rendering time, and bandwidth usage, but you also decrease the chances of having your scripts conflict with another script they don't relate with.
You can now code a plugin that performs this important task of adding a given script where needed and only where needed. Because the objective of this section is to learn how to target in WordPress specific pages for JavaScript inclusion, the scripts are simple alert() boxes to instantly identify which script has loaded.
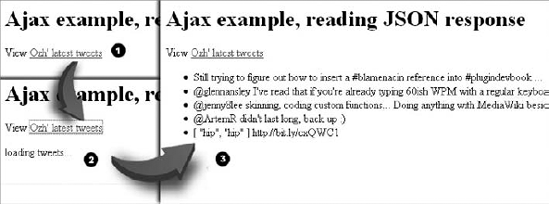
Your plugin has to guess its own URL on the user install before it can add to pages the JavaScript it ships with. In Chapter 2, "Plugin Foundation," you learned about an appropriate plugin folder structure, with a subdirectory for each type of file, as shown in Figure 12-3.
Assuming you follow this sane advice, the following snippet includes a file named script.js located within the /js subdirectory of your plugin directory:
<?php

// guess current plugin directory URL
$plugin_url = plugin_dir_url( __FILE__);

// Enqueue script
wp_enqueue_script( 'boj_script', $plugin_url.'js/script.js' );
?>
This is a great snippet to reuse: It does not hardcode anything related to the user install specifics (location of the wp-content directory, for instance). The function plugin_dir_url() returns the URL directory path (with a trailing slash) for the plugin file passed as a parameter. (It will, for instance, return http://example.com/wp-content/plugins/bj_insertjs/).
Note
Never hardcode the path or URL of your plugin: You cannot assume where the wp-content folder will be on a user's install because it does not necessarily exist within the main WordPress directory. Instead, opt for this always safe snippet to guess your plugin's location, which works even if the user renames your plugin folder.
For this plugin you can use boj_insertjs as a prefix, and the plugin starts with defining its own script location:
<?php
/*
Plugin Name: Add JavaScript
Plugin URI: http://example.com/
Description: Demonstrates how to properly insert JS into different pages
Author: Ozh
Author URI: http://wrox.com
*/

// URL to the /js directory of the plugin
define( 'BOJ_INSERTJS', plugin_dir_url( __FILE__).'js' );
Code snippet boj_insertjs/plugin.php
The general rule is that wp_enqueue_script() needs to be called early and before any content has been printed to the page. The hook and technique to use depends on where exactly you need the script.
The plugin can add a different script on various pages:
Because the script you want to add here concerns only the admin area, you can rely on a hook that occurs only in this context. Since you add a few pages in the admin menu, the hook admin_menu is a perfect candidate:
// Add new admin pages
add_action('admin_menu', 'boj_insertjs_add_page');

// Add new admin pages
function boj_insertjs_add_page() {
Within this function you will now sequentially add the four scripts, as detailed in the following snippets:
// 1. Add JS to all the admin pages
    wp_enqueue_script( 'boj_insertjs_1', BOJ_INSERTJS.'/admin.js' );
You enqueued a script that can load in all pages of the admin area, either built-in such as the dashboard or created by plugins:
// 2. Add a page under Settings
    $settings = add_options_page( 'Insert JS', 'Insert JS', 'manage_options',
        'boj_insertjs_settings', 'boj_insertjs_options_page'
    );
Now you added a menu entry using add_options_page(). Using the return value of this function call, you can hook into an interesting hook that is "load-$pagename" where the page name is a variable part:
// Add JS to the plugin setting page only
    add_action( 'load-'.$settings, 'boj_insertjs_add_settings_script' );
This action fires only when loading the plugin settings page. Now create another plugin page, and use a different hook to also fire an action only on that page:
// 3. Add a page under Users
    $users = add_users_page( 'Insert JS', 'Insert JS', 'manage_options',
        'boj_insertjs_users', 'boj_insertjs_users_page'
    );

    // 4. Add JS to the users page, with a different hook
    add_action( 'admin_print_scripts-'.$users, 'boj_insertjs_add_users_script' );

} // end of function boj_insertjs_add_page()
These two admin page specific actions now need to be defined: They will be regular wp_enqueue_script() calls:
// Add JS to the plugin's settings page
function boj_insertjs_add_settings_script() {
    wp_enqueue_script( 'boj_insertjs_2', BOJ_INSERTJS.'/settings.js' );
}

// Add JS to the plugin's users page, in the page footer for a change
function boj_insertjs_add_users_script() {
    wp_enqueue_script( 'boj_insertjs_3', BOJ_INSERTJS.'/users.js',
        '', '', true
    );
}
You can now load another script into a specific and core admin page, for instance the Comments page. Again, the load-$pagename hook can prove useful:
// Add JS to the Comments page
add_action( 'load-edit-comments.php', 'boj_insertjs_on_comments' );
function boj_insertjs_on_comments() {
    wp_enqueue_script( 'boj_insertjs_4', BOJ_INSERTJS.'/comments.js' );
}
Code snippet boj_insertjs/plugin.php
Using wp_enqueue_script() attached to specific admin hooks, you have made sure that given scripts load only where needed in the admin area.
Note
This cannot be emphasized enough: Always be selective regarding where to add JavaScript, and target precisely pages where your scripts will be needed. Most of the time you need to add a custom script to your plugin settings page only: Use the above trick.
To add scripts to the public area, the principle is similar: Rely on a hook that will be triggered only when the blog part is viewed, for instance 'template_redirect', which is triggered when WordPress is about to load the required theme.
// Add JS to pages of the blog
add_action( 'template_redirect', 'boj_insertjs_add_scripts_blog' );
function boj_insertjs_add_scripts_blog() {

    // To all pages of the blog
    wp_enqueue_script( 'boj_insertjs_5', BOJ_INSERTJS.'/blog.js' );

    // To single post pages
    if( is_single() ) {
wp_enqueue_script( 'boj_insertjs_6', BOJ_INSERTJS.'/single.js' );
}
// To the "About" page
if( is_page('About') ) {
wp_enqueue_script( 'boj_insertjs_7', BOJ_INSERTJS.'/about.js' );
}
}Code snippet boj_insertjs/plugin.php
What you have done here is hook into an action that occurs only on the public part, and then using conditional tags such as is_single(), you have targeted specific pages. You can learn more about these conditional tags at http://codex.wordpress.org/Conditional_Tags.
Of course, you can select on which page to add JavaScript using other conditions than just the page type. Following are examples on how to add a script if a user is not logged in or add another script only if the single post being viewed has comments:
// Add script if user is not logged
add_action( 'template_redirect', 'boj_insertjs_notlogged' );
function boj_insertjs_notlogged() {
    if( !is_user_logged_in() )
        wp_enqueue_script( 'boj_insertjs_8', BOJ_INSERTJS.'/notlogged.js' );
}

// Add script on single post & pages with comments only
add_action( 'template_redirect', 'boj_insertjs_add_ifcomments' );
function boj_insertjs_add_ifcomments() {
    if( is_single() ) {
        global $post;
        if( $post->comment_count )
            wp_enqueue_script( 'boj_insertjs_9', BOJ_INSERTJS.'/hascomments.js' );
    }
}JavaScript files are usually static .js files, but you sometimes need your script to be aware of data coming from WordPress, such as an option value or a plugin path.
An obvious way to make your script dynamic would be to serve a dynamic script.js.php file instead of a static one so that PHP generates the JavaScript on-the-fly.
To make such a script aware of WordPress data, a common way adopted by a lot of coders is something along the lines of this:
In WordPress, enqueue the dynamic script as usual:
<?php

wp_enqueue_script( 'dyn', $path.'/script.js.php' );
?>
In the
script.js.phpfile, start the file with the following:<?php header('Content-type: application/javascript'); include( '../../../wp-load.php' ); ?> /* javascript (and PHP) code here */
This (albeit frequent) solution has several critical flaws:
Finding
wp-load.phporwp-config.phpcan be difficult: The wholewp-contentdirectory could be placed somewhere nonstandard and not necessarily as a subdirectory of the folder wherewp-load.phpis. Failing to properly include this file can result in a fatal error when the script tries to access a WordPress function.Requiring
wp-load.phpin an embedded file wholly instantiates WordPress again, which means that for every page request the load on the web server will be doubled: two WordPress init, both reading all options from memory, each loading plugins, and so on.Depending on the configuration, browsers may not cache
.js.phpfiles, which may cause server and bandwidth issues on active web sites.
The preceding solution is tempting because the .js.php file enables flexible code, for instance having the file to output totally different JavaScript code depending on variable values.
If you must use such a file, a better solution is to pass the needed variable as query arguments to the .js.php file and make this one completely independent from WordPress (in other words, not loading wp-load.php).
In WordPress, get the needed information and then enqueue the dynamic script with query arguments:
<?php

// Get info the script needs
$var1 = get_option( 'myplugin_var1' );
$var2 = get_home_url();

// Craft dynamic script query
$script = 'script.js.php?var1=' . $var1 . '&var2=' . $var2 ;
wp_enqueue_script( 'dyn', $path.'/'.$script );
?>
Now your
script.js.phpfile would look like this:<?php header('Content-type: application/javascript'); // Get variable $var = isset( $_GET['var1'] ? $_GET['var1'] : '' ); $home = isset( $_GET['var2'] ? $_GET['var2'] : '' ); ?> /* javascript (and PHP) code here using $var and $home */
This solution is arguably better because you don't instantiate WordPress another time in the script file, which is now completely independent from WordPress and the folders' location.
There is still a potential problem to address regarding caching because browsers may or may not cache the script.js.php?args file. Although this won't be a big deal if the script is to be used in the admin area only, it can be problematic on the public side of the site where page hits are much more frequent and from many more different users.
A more robust solution is to output dynamic variables inline in the WordPress page that needs JavaScript and enqueue a totally static cacheable file. For instance, in the next section of this chapter titled "Ajax in WordPress," you code an Ajax plugin in which you need to know the URL of the file that handles Ajax requests in WordPress, for example, http://example.com/wp-admin/admin-ajax.php, and you use the technique explained here.
First, you enqueue a truly static script, the usual way:
<?php

// Enqueue the script
wp_enqueue_script( 'boj_myplugin', plugin_dir_url( __FILE__ ).'js/script.js', );
?>
Then, collect in an array all the WordPress data your script needs:
<?php

$params = array(
    'option1' => get_option( 'boj_myplugin_option' ),
    'home'    => get_home_url();
);

?>
Now, finally tell WordPress that wherever it includes your static script, it should output inline variables right before it:
<?php

wp_localize_script( 'boj_myplugin', 'boj_myplugin_params', $params );

?>
The function wp_localize_script() needs three arguments: the script handle, registered by the preceding wp_enqueue_script() call; a unique name for the options; and an array of strings that will be converted into a properly escaped and quoted javascript string.
Now review the full snippet and its actual result in the page:
<?php

// Enqueue the script
wp_enqueue_script( 'boj_myplugin', plugin_dir_url( __FILE__ ).'js/script.js', );

$params = array(
    'option1' => get_option( 'boj_myplugin_option' ),
    'home'    => get_home_url();
);

wp_localize_script( 'boj_myplugin', 'boj_myplugin_params', $params );

?>
This snippet outputs HTML similar to the following:
<script type='text/javascript'>
/* <![CDATA[ */
var boj_myplugin_params = {
    option1: "it\'s an option value",
    home: "http://example.com/"
};
/* ]]> */
</script>
<script
   type='text/javascript'
   src='http://example.com/wp-content/plugins/boj_myplugin/js/script.js?ver=3.1'>
</script>
The JavaScript functions located in script.js can now easily access the dynamic variables, which will be respectively here boj_myplugin_params.option1 and boj_myplugin_params.home.
Using the function wp_localize_script() (introduced in Chapter 5, "Internationalization") may seem a bit unexpected at first because you're not localizing here, but it does have several benefits:
You can use a completely static script, hence fully cacheable by browsers and not needing any processing by the server.
The inline JavaScript is bound to the main script defined in
wp_enqueue_script(): You precisely target pages, and if you need to dequeue the main script, there will be no unnecessary inline JavaScript left.The inline JavaScript is always properly escaped and quoted.
The function takes care of the required CDATA tags not to break XHTML validation.
So far, you now know how to flawlessly include JavaScript in pages that WordPress generates. Now it's time to learn how to handle and process Ajax requests and then get your hands greasy with coding.
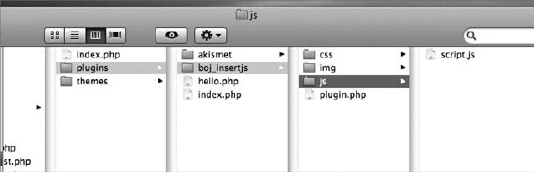
As explained in the introductory section about Ajax, you can break down the Ajax flow of events, as shown in Figure 12-4.
Implementing Ajax in WordPress is a streamlined process: Using jQuery makes it simple to both send and receive Ajax data, while a dedicated action in WordPress handles all the server-side parts.
When the client-side event occurs (element clicked, timer completed, form submitted and such), you process and collect the data that will be sent in the Ajax request:
var data = {
    action:    'boj_myplugin_do_ajax_request',
    some_var:  'some value',
    other_var: 'other value'
};
Note the 'action' parameter; it will be used later.
Using jQuery, sending the Ajax request (here via POST) and waiting for the server response is done in one function call to which you pass the admin-ajax.php URL the data to post and a callback:
jQuery.post( 'http://example.com/wp-admin/admin-ajax.php', data, function( resp ) {
    /*
    1. process response object 'resp'
    2. update part of page
    */
});
All Ajax requests are sent to admin-ajax.php, located in the wp-admin directory. Despite its name and location, this file can indeed handle and process Ajax requests sent both from the admin area and the public side of the site, from both logged in known users and anonymous users.
Note
Head to http://api.jquery.com/category/ajax/ to learn more about the syntax of Ajax requests in jQuerytype="note".
In the client-side part, the JavaScript posts data to admin-ajax.php, including a parameter named 'action' with a value of 'boj_myplugin_do_ajax_request'. You guessed it already: This value must be unique, and prefixing it as usual is a good practice.
The 'action' parameter is how you connect a function defined in WordPress and an Ajax request, using the two wp_ajax_ actions:
wp_ajax_$actionhooks functions if the user is logged in.wp_ajax_nopriv_$actionhooks functions if the user is not logged in and has no privilege.
For instance, in your plugin you would define the following action hook:
<?php
add_action( 'wp_ajax_boj_myplugin_do_ajax_request', 'boj_myplugin_process_ajax' );
?>
Now define the function that will process the request and return data:
<?php
// process Ajax data and send response
function boj_myplugin_process_ajax() {

    // check authority and permissions: current_user_can()

    // check intention: wp_verify_nonce()

    // process data sent by the Ajax request

    // echo data response that the Ajax function callback will process

    die();
}

?>
Depending on the situation, you need to pay attention to user permissions and intention, as explained in Chapter 6, "Plugin Security."
After security checks conclude, your function can process data in the $_POST array, echoing a result that is understandable by the client-side Ajax callback function and die().
Note
All Ajax requests, both from the front side and the admin side, are handled by admin-ajax.php. If this directory is protected at a lower level than WordPress (like with a .htaccess password), this file will not be accessible to anonymous readers, and Ajax requests will fail.
As a practical application of this implementation process and the techniques to insert JavaScript, you can now code a neat plugin.
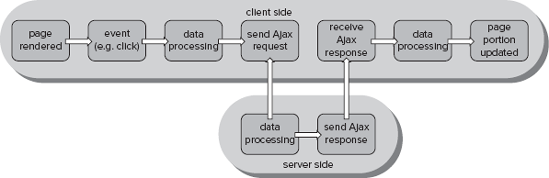
As you may know, you can break posts in WordPress using the <!--more--> tag. You can now make a sexy plugin that will enable a reader to read the rest of a story without being redirected to a new page: A click on the Read More link can display inline the second part of a post, as shown in Figure 12-5.
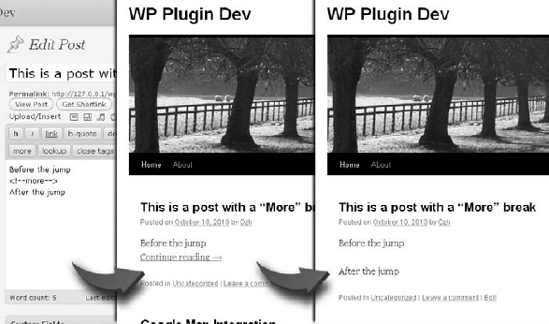
Your Ajax Read More plugin can use boj_arm_ as a prefix. The plugin needs to do the following tasks:
Insert a script that monitors clicks on Read More links.
Insert the script only if there is a Read More link on the page.
Get the second part of a post after the Read More break.
By the time WordPress prints the <head> of a page, you cannot know if the page contains a Read More link. You can then use a smarter technique:
Enqueue the JavaScript for inclusion in the footer.
As every post is displayed, check for the presence of a Read More link.
Right before it's actually added to the footer, check if it's actually needed and remove it otherwise.
The first step is to enqueue the JavaScript in the footer.
<?php

// Plugin version, bump it up if you update the plugin
define( 'BOJ_ARM_VERSION', '1.0' );

// Enqueue the script, in the footer
add_action( 'template_redirect', 'boj_arm_add_js' );
function boj_arm_add_js() {

    // Enqueue the script
    wp_enqueue_script( 'boj_arm',
        plugin_dir_url( __FILE__ ).'js/script.js',
        array('jquery'), BOJ_ARM_VERSION, true
    );

    // Get current page protocol
    $protocol = isset( $_SERVER["HTTPS"] ) ? 'https://' : 'http://';

    // Output admin-ajax.php URL with same protocol as current page
    $params = array(
      'ajaxurl' => admin_url( 'admin-ajax.php', $protocol )
    );
    wp_localize_script( 'boj_arm', 'boj_arm', $params );
}

?>
As explained before, Ajax actions are handled by admin-ajax.php, located in the wp-admin folder, and which location is guessed using the function admin_url(). But remember an important limitation of Ajax described in the preparatory section: because of the same origin policy, Ajax requests and responses must be processed on the same domain, including same protocol (http or https).
In WordPress you can enforce the https protocol in the admin area even if the public part is on http (defining constant 'FORCE_SSL_ADMIN' to true), but you cannot view a page on http://example.com/ that sends Ajax requests to https://example.com/wp-admin/admin-ajax.php.
That's why you're calling here admin_url() with a second parameter that will enforce the current protocol used in the public part in the location of admin-ajax.php. In other words, even if the admin area has an obligatory https://preference, viewing the public pages under http:// will return http://example.com/wp-admin/admin-ajax.php.
Note
Remember: to succeed, Ajax requests must be performed on the same domain, subdomain (http://example.com/ and http://www.example.com/ are different) and protocol (http versus https).
For the second step, as explained, you now check, as each post is displayed, if there is a Read More link that can justify the inclusion of the JavaScript in the footer.
<?php

// Flag to state if the script is needed
global $boj_arm_needjs;
$boj_arm_needjs = false;

// Inspect each post to check if there's a "read more" tag
add_action( 'the_post', 'boj_arm_check_readmore' );
function boj_arm_check_readmore( $post ) {
    if ( preg_match('/<!--more(.*?)?-->/', $post->post_content )
    && !is_single() ) {
        global $boj_arm_needjs;
        $boj_arm_needjs = true;
    }
}

?>
Here, during the loop on each unprocessed and unformatted post, you're checking if $post->post_content contains the <!--more--> tag, and if that's not a single page where the post will be displayed entirely, flag a Boolean to true, stating that the page will need the JavaScript.
For the third and final step in JavaScript inclusion, in the footer right before WordPress adds the script, check if it's needed and remove it if not.
<?php

// Don't add the script if actually not needed
add_action( 'wp_print_footer_scripts', 'boj_arm_footer_maybe_remove', 1 );
function boj_arm_footer_maybe_remove() {
global $boj_arm_needjs;
if( !$boj_arm_needjs ) {
wp_deregister_script( 'boj_arm' );
}
}
?>WordPress adds scripts in the footer when the action 'wp_print_footer_scripts' is fired: Hooked into it and if the Boolean flag is false, simply deregister the JavaScript file. Because you've also used wp_localize_script() to add the inline bits, it will also be removed if the script is dequeued, leaving no superfluous bits on the page.
Now that you know that the script will be included only if needed, you can start writing that script. The script will loop over each link that has class="more-link" and add to them the following behavior when clicked:
Guess the post ID, from the Read More link anchor that will have a fragment such as
#more-45.Change the link text to "Loading..." so that the reader knows that something is happening in the background.
Send an Ajax request to
admin-ajax.phpwith the post ID, requesting the second part of the post.Receive the second part of the post from
admin-ajax.php, and display it inline in place of the Read More link.
Following is the complete script:
(function($) {
    $('a.more-link').click(function(){

        // copy the this object for future reference
        var link = this;

        // change link text
        $(link).html('loading...');

        // get post id from its href
        var post_id = $(link).attr('href').replace(/^.*#more-/, '');

        // Prepare Ajax data: action and post id
        var data = {
            action: 'boj_arm_ajax',
            post_id: post_id
        };

        // Send Ajax request with data
        $.get(boj_arm.ajaxurl, data, function(data){
// add content after link and remove link
$(link).after(data).remove();
});
// prevent default behavior of the link that was clicked
return false;
});
})(jQuery);Notice how your script uses the URL of admin-ajax.php, contained in boj_arm.ajaxurl and as printed by the call to wp_localize_script().
The last part of this plugin is now the server-side processing: Admin-ajax.php will receive a post ID, which you use to fetch the second part of the post corresponding to this ID.
First, define the Ajax action and its associated function:
<?php

// Ajax handler
add_action('wp_ajax_nopriv_boj_arm_ajax', 'boj_arm_ajax');
add_action('wp_ajax_boj_arm_ajax', 'boj_arm_ajax');

function boj_arm_ajax() {
    // Modify the way WP gets post content
    add_filter( 'the_content', 'boj_arm_get_2nd_half' );

    // setup the main Query again
    query_posts( 'p='.absint( $_REQUEST['post_id'] ) );

    // "The Loop"
    if ( have_posts() ) : while ( have_posts() ) : the_post();
        the_content();
    endwhile; else:
        echo "post not found :/";
    endif;

    // reset Query
    wp_reset_query();

    // Always die() in functions echoing content for Ajax requests
    die();
}

?>
Because the reader can either be anonymous random users or users with privileges, you have used both the wp_ajax_ and the wp_ajax_nopriv_ hooks, pointing to the same function boj_arm_ajax().
The Ajax handler function boj_arm_ajax() is mainly a custom loop that just has the one occurring on the blog page to display posts, except that it is limited to one post of a given ID. It has no security measure implemented apart from validating the post ID as an absolute integer: It's used to display post content, just as anyone on the front page can do, so there is no permission to check.
You're almost there: As-is, the function would return the entire post, but you want only the second half of it. The filter introduced in this function will do the trick:
<?php

// Get second part of a post after the "more" jump
function boj_arm_get_2nd_half( $content ) {
    $id = absint( $_REQUEST['post_id'] );
    $content = preg_replace( "!^.*<span id=\"more-$id\"></span>!s", '', $content );
    return $content;
}

?>
Hooked into filter 'the_content', this function receives the formatted post content and returns it after removing everything until the <span> element that WordPress inserts in place of the Read More link.
All done! Review the whole plugin Ajax Read More and its JavaScript component:
<?php
/*
Plugin Name: Ajax Read More
Plugin URI: http://example.com/
Description: Ajaxify the "Read more" links
Version: 1.0
Author: Ozh
Author URI: http://wrox.com
*/

// Flag to state if the script is needed
global $boj_arm_needjs;
$boj_arm_needjs = false;

// Plugin version, bump it up if you update the plugin
define( 'BOJ_ARM_VERSION', '1.0' );

// Enqueue the script, in the footer
add_action( 'template_redirect', 'boj_arm_add_js' );
function boj_arm_add_js() {

    // Enqueue the script
    wp_enqueue_script( 'boj_arm',
        plugin_dir_url( __FILE__ ).'js/script.js',
        array('jquery'), BOJ_ARM_VERSION, true
    );
// Get current page protocol
$protocol = isset( $_SERVER["HTTPS"]) ? 'https://' : 'http://';
// Output admin-ajax.php URL with same protocol as current page
$params = array(
'ajaxurl' => admin_url( 'admin-ajax.php', $protocol )
);
wp_localize_script( 'boj_arm', 'boj_arm', $params );
}
// Don't add the script if actually not needed
add_action( 'wp_print_footer_scripts', 'boj_arm_footer_maybe_remove', 1 );
function boj_arm_footer_maybe_remove() {
global $boj_arm_needjs;
if( !$boj_arm_needjs ) {
wp_deregister_script( 'boj_arm' );
}
}
// Inspect each post to check if there's a "read more" tag
add_action( 'the_post', 'boj_arm_check_readmore' );
function boj_arm_check_readmore( $post ) {
if ( preg_match('/<!--more(.*?)?-->/', $post->post_content )
&& !is_single() ) {
global $boj_arm_needjs;
$boj_arm_needjs = true;
}
}
// Ajax handler
add_action('wp_ajax_nopriv_boj_arm_ajax', 'boj_arm_ajax');
add_action('wp_ajax_boj_arm_ajax', 'boj_arm_ajax');
function boj_arm_ajax() {
// Modify the way WP gets post content
add_filter( 'the_content', 'boj_arm_get_2nd_half' );
// setup Query
query_posts( 'p='.absint( $_REQUEST['post_id'] ) );
// "The Loop"
if ( have_posts() ) : while ( have_posts() ) : the_post();
the_content();
endwhile; else:
echo "post not found :/";
endif;
// reset Query
wp_reset_query();
die();
}
// Get second part of a post after the "more" jump
function boj_arm_get_2nd_half( $content ) {$id = absint( $_REQUEST['post_id'] );
$content = preg_replace( "!^.*<span id=\"more-$id\"></span>!s", '', $content );
return $content;
}Code snippet boj_readmore/plugin.php
(function($) {
    $('.more-link').click(function(){
        var link = this;
        $(link).html('loading...');
        var post_id = $(link).attr('href').replace(/^.*#more-/, '');
        var data = {
            action: 'boj_arm_ajax',
            post_id: post_id
        };
        $.get(boj_arm.ajaxurl, data, function(data){
            $(link).after(data).remove();
        });
        return false;
    });
})(jQuery);
Code snippet boj_readmore/js/script.js
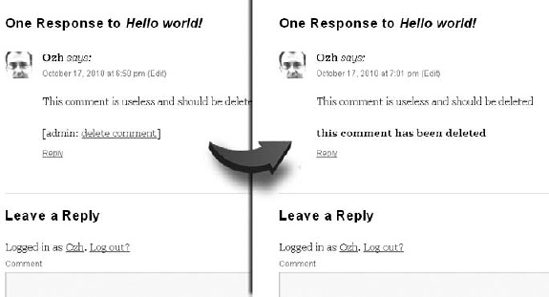
You are now going to make another plugin that can enable a user with sufficient privileges to instantly delete comments from the frontend, on the post page without waiting for the page to refresh, as shown in Figure 12-6.
You can code the plugin Instant Delete Comment to point out three aspects of Ajax programming in WordPress:
How to implement security in Ajax
The
Wp_Ajax_Responseclass and its XML responseHow to read an XML response in JavaScript
Start the plugin with inserting the JavaScript if needed and adding the Delete Comment link after each comment. Use boj_idc_ as a prefix.
<?php

/*
Plugin Name: Instant Delete Comment
Plugin URI: http://example.com/
Description: Add a quick link to instantly delete comments
Author: Ozh
Version: 1.0
Author URI: http://wrox.com/
*/

// Add script on single post & pages with comments only, if user has edit rights
add_action( 'template_redirect', 'boj_idc_addjs_ifcomments' );
function boj_idc_addjs_ifcomments() {
    if( is_single() && current_user_can( 'moderate_comments' ) ) {
        global $post;
        if( $post->comment_count ) {
            $path = plugin_dir_url( __FILE__ );

            wp_enqueue_script( 'boj_idc', $path.'js/script.js' );
            $protocol = isset( $_SERVER["HTTPS"]) ? 'https://' : 'http://';
            $params = array(
              'ajaxurl' => admin_url( 'admin-ajax.php', $protocol )
            );
            wp_localize_script( 'boj_idc', 'boj_idc', $params );
        }
    }
}

// Add an admin link to each comment
add_filter( 'comment_text', 'boj_idc_add_link' );
function boj_idc_add_link( $text ) {
    // Get current comment ID
    global $comment;
    $comment_id = $comment->comment_ID;

    // Get link to admin page to trash comment, and add nonces to it
    $link = admin_url( 'comment.php?action=trash&c='.$comment_id );
    $link = wp_nonce_url( $link, 'boj_idc-delete-'.$comment_id );
    $link = "<a href='$link' class='boj_idc_link'>delete comment</a>";
// Append link to comment text
return $text."<p>[admin: $link]</p>";
}
?>Code snippet boj_deletecomment/plugin.php
The function boj_idc_addjs_ifcomments() is self-explanatory. In the function boj_idc_add_link() that modifies the comment text, however, you can notice the use of wp_nonce_url() (refer to Chapter 6 for details on this function).
The link added to each comment has the class attribute boj_idc_link and the following location pattern: http://example.com/wp-admin/comment.php?action=trash&c=11&_wpnonce=551e407bc1. When clicked, this link posts via Ajax the parameter c (the comment ID) and the nonce value.
The server-side Ajax handler will be the following function:
<?php

// Ajax handler
add_action( 'wp_ajax_boj_idc_ajax_delete', 'boj_idc_ajax_delete' );
function boj_idc_ajax_delete() {
    $cid = absint( $_POST['cid'] );

    $response = new WP_Ajax_Response;

    if(
        current_user_can( 'moderate_comments' ) &&
        check_ajax_referer( 'boj_idc-delete-'.$cid, 'nonce', false ) &&
        wp_delete_comment( $cid  )
    ) {
        // Request successful
        $response->add( array(
            'data' => 'success',
            'supplemental' => array(
                'cid'     => $cid,
                'message' => 'this comment has been deleted'
            ),
        ) );
    } else {
        // Request failed
        $response->add( array(
            'data' => 'error',
            'supplemental' => array(
                'cid'     => $cid,
                'message' => 'an error occurred'
            ),
        ) );
    }
$response->send();
exit();
}
?>Code snippet boj_deletecomment/plugin.php
First, notice the security measures and then the use of a new class: WP_Ajax_Response.
Similarly to what you have practiced in the Chapter 6, before executing any request here, you first verify the user's permission and intention.
The function check_ajax_referer() is similar to check_admin_referer() and takes up to three parameters:
$action— A string corresponding to the unique action used to compute the nonce string, here'boj_idc-delete-'.$comment_id.$query_arg— The name of the parameter passed to the Ajax request and containing the nonce string. If this parameter is omitted, the function will look in$_REQUESTfor_ajax_nonceor_wpnonce. In this case, you are looking for the nonce string in the parameternonce.$die— A Boolean with a default value of true telling WordPress to die with message −1, which can then be interpreted as a failure by the client-side JavaScript. In this plugin you handle the error checking yourself; therefore, the value offalsepassed.
Notice how the function boj_idc_ajax_delete() uses an instance of this new class:
<?php

// New class instance
$response = new WP_Ajax_Response;

// Add data to the response
$response->add( array(
    'data' => 'success',
    'supplemental' => array(
        'cid'     => $cid,
        'message' => 'this comment has been deleted'
    ),
) );

// Output the response
$response->send();

?>
The purpose of this class is to output a well-formed XML response that will be then easy to parse with jQuery. Its method add() appends the argument to the XML response. It expects a string into its element data and an arbitrary array passed to supplemental. You can for instance here easily return translated strings to the static JavaScript in the frontend.
Its method send() prints the data as an XML document and then dies to prevent any further output. For instance, the result of the previous snippet will be the following XML:
<?xml version='1.0' standalone='yes'?>
<wp_ajax>
    <response action="boj_idc_ajax_delete_0">
        <object id="0" position="1">
            <response_data>success</response_data>
            <supplemental>
                <cid>12</cid>
                <message>this comment has been deleted</message>
            </supplemental>
        </object>
    </response>
</wp_ajax>
Now write the client-side JavaScript to see how you will parse this XML response.
jQuery(document).ready(function($) {

    $('.boj_idc_link').click(function(){
        var link = this;
        // get comment id and nonce
        var href = $(link).attr( 'href' );
        var id =    href.replace(/^.*c=(\d+).*$/, '$1');
        var nonce = href.replace(/^.*_wpnonce=([a-z0-9]+).*$/, '$1');

        var data = {
            action: 'boj_idc_ajax_delete',
            cid: id,
            nonce: nonce
        }

        $.post( boj_idc.ajaxurl, data, function(data){
            var status  = $(data).find('response_data').text();
            var message = $(data).find('supplemental message').text();
            if( status == 'success' ) {
                $(link).parent().after( '<p><b>'+message+'</b></p>' ).remove();
            } else {
                alert( message );
            }
        });
return false;
});
});Code snippet boj_deletecomment/js/script.js
As in the previous plugin, this function modifies the click behavior and parses the link href attribute to get the comment ID and the nonce value that are then posted in the Ajax request.
The callback of the Ajax function shows how easy it is with jQuery to parse an XML response, using $.find() to literally find an element into the document tree, just as you would select an element into an HTML page.
When you write PHP code, you instantly notice if your code has an error: The server prints an error in bold, and you can use functions such as var_dump() to check what variables or objects contain. The difficulty with Ajax is that everything happens in the background, so if your script fails on the client side or server side, it can be more difficult to diagnose.
The browser Firefox has an invaluable and free addon called Firebug that can prove indispensable to inspect an Ajax request. You can, for instance, check the parameters passed and the XML response, as shown in Figure 12-7.
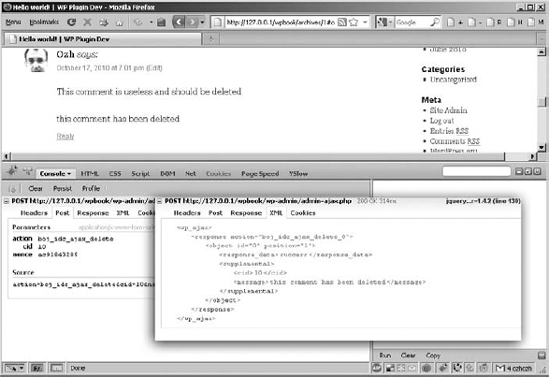
You can download Firebug for Firefox at http://getfirebug.com/. The browser Chrome has a built-in inspector tool that provides the same kind of functionalities.
Firefox with Firebug and Chrome can also let you easily check the JavaScript variables, array, or object as you would do it in PHP with var_dump(), using the function console.log():
if( typeof(console) == 'object' ) {
    console.log( 'script loaded' );
    console.log( an_array, an_object, some_string );
}If you were to memorize just one thing from this chapter, it should be that when adding JavaScript to your WordPress pages, you should always target where you will need the script, using a proper wp_enqueue_script() call.
The other thing that this chapter should have shown is that adding Ajax to WordPress is fairly easy because of the dedicated actions wp_ajax_ and wp_ajax_nopriv_. The only difficulty here will be mastering JavaScript and the awesome jQuery library.