Table of Contents for
Professional WordPress® Plugin Development
 Professional WordPress® Plugin Development
Published by
Wrox, 2011
Professional WordPress® Plugin Development
Published by
Wrox, 2011
- Copyright
- CREDITS
- ABOUT THE AUTHORS
- ACKNOWLEDGMENTS
- FOREWORD
- INTRODUCTION
- 1. An Introduction to Plugins
- 2. Plugin Foundation
- 3. Hooks
- 4. Integrating in WordPress
- 5. Internationalization
- 6. Plugin Security
- 7. Plugin Settings
- 8. Users
- 9. HTTP API
- 10. The Shortcode API
- 11. Extending Posts: Metadata, Custom Post Types, and Taxonomies
- 12. JavaScript and Ajax in WordPress
- 13. Cron
- 14. The Rewrite API
- 15. Multisite
- 16. Debugging and Optimizing
- 17. Marketing Your Plugin
- 18. The Developer Toolbox
WHAT'S IN THIS CHAPTER?
Understanding cron
Managing schedule and single events
Unscheduling cron events
Viewing all scheduled cron jobs
Creating custom intervals in cron
Creating practical use examples
The execution of certain functions on a schedule is a key feature of the WordPress API. In this chapter you learn how to schedule events in cron, unschedule events, and set custom cron schedule intervals. You also create more advanced, practical-use example plugins using cron.
Cron is how WordPress handles scheduled events. The term cron comes from the time-based job scheduler in UNIX. WordPress uses cron for various core functionality. These scheduled jobs include checking for new versions of WordPress, checking for plugin and theme updates, and publishing scheduled posts.
One of the common misconceptions about cron in WordPress is that cron is always running, looking for tasks to execute. This actually isn't true. Cron is run when a frontend or admin page is loaded on your web site. Every time a page is requested, WordPress checks if there are any cron jobs to run. Any visit to your Web site can trigger cron, whether from a visitor or a search engine bot.
This is also one of the caveats of cron. Because cron runs on page load, it is not 100% precise. If you have a scheduled cron job to run at midnight, but your Web site lacks adequate traffic, the scheduled job may not run until 12:30 a.m. or later because no one is on your Web site that late.
Two types of cron events can be scheduled in WordPress: single and recurring. A recurring event is a cron job that runs on a schedule and has a set recurring time in which it will run again. A single event runs once and never runs again until it is rescheduled.
When scheduling an event to execute using cron, you actually start by creating a custom action hook. That hook will be registered with the cron scheduler to execute at the scheduled time. When the action hook runs, it will trigger the custom function you set in your hook and process any code in that function.
To schedule an event in WordPress, use the wp_schedule_event() function.
<?php wp_schedule_event( timestamp, recurrence, hook, args ); ?>
The function accepts the following parameters:
timestamp— The time you want the event to occurrecurrence— How often the event should reoccurhook— The action hook name to executeargs— Arguments to pass to the hook's callback function
Now build a simple example plugin to demonstrate the power of a cron scheduled task. As with most plugins, you create a settings menu option and page.
<?php
add_action( 'admin_menu', 'boj_cron_menu' );

function boj_cron_menu() {

    //create cron example settings page
    add_options_page( 'Cron Example Settings', 'Cron Settings',
'manage_options', 'boj-cron', 'boj_cron_settings' );

}
?>
In this example, you schedule the cron event when the user visits your settings page for the first time. You can schedule your cron event in many different ways, for example, on plugin activation or when the user enables a specific option value, but for this example the settings page will work just fine.
Next you create a custom action hook and function to execute when the cron runs the scheduled task.
<?php
add_action('boj_cron_hook', 'boj_cron_email_reminder');

function boj_cron_email_reminder() {

    //send scheduled email
    wp_mail( 'you@example.com', 'Elm St. Reminder',
        'Don\'t fall asleep!' );

}
?>
As you can see, you first create a custom action hook named boj_cron_hook. When that hook is called, it executes your custom boj_email_reminder() function. This is the function that runs when the cron scheduled job runs. This example uses the wp_mail() function to send an email to make sure you stay awake!
Now create the custom boj_cron_settings() function to display your settings page and schedule the cron job.
<?php
function boj_cron_settings() {

    //verify event has not been scheduled
    if ( !wp_next_scheduled( 'boj_cron_hook' ) ) {

        //schedule the event to run hourly
        wp_schedule_event( time(), 'hourly', 'boj_cron_hook' );

    }

}
?>
First, use the wp_next_scheduled() function to verify your cron job hasn't been scheduled already. This function returns the timestamp for the cron event, and if that event doesn't exist it will return false.
After you have verified the cron job hasn't been scheduled, it's time to schedule it! You do this using the wp_schedule_event() function. The first parameter set is the current time. The second parameter is the recurrence in which this task should run. By default WordPress has three recurrence settings: hourly, daily, and twicedaily. In this example you set the task to run hourly. The final parameter you send is the name of the action hook to execute when the cron job runs. This is set to the custom action hook you created earlier: boj_cron_hook.
You have successfully created a scheduled cron job in WordPress! Every hour WordPress will automatically send an email reminding you to stay awake.
Now review the full plugin source code:
<?php
/*
Plugin Name: Cron Example Plugin
Plugin URI: http://example.com/wordpress-plugins/my-plugin
Description: A plugin demonstrating Cron in WordPress
Version: 1.0
Author: Brad Williams
Author URI: http://wrox.com
License: GPLv2
*/

add_action( 'admin_menu', 'boj_cron_menu' );

function boj_cron_menu() {

    //create cron example settings page
    add_options_page( 'Cron Example Settings', 'Cron Settings',
        'manage_options', 'boj-cron', 'boj_cron_settings' );

}

add_action('boj_cron_hook', 'boj_cron_email_reminder');

function boj_cron_email_reminder() {

    //send scheduled email
    wp_mail( 'you@example.com', 'Elm St. Reminder',
        'Don\'t fall asleep!' );

}

function boj_cron_settings() {

    //verify event has not been scheduled
    if ( !wp_next_scheduled( 'boj_cron_hook' ) ) {

        //schedule the event to run hourly
        wp_schedule_event( time(), 'hourly', 'boj_cron_hook' );

    }

}
?>
Code snippet boj-cron.php
Typically events scheduled in cron are recurring, but there may be an occasion when you want to schedule a single event in cron. This means the event would run once and not be scheduled to run again. To schedule a single event use the wp_schedule_single_event() function:
<?php wp_schedule_single_event( timestamp, hook, args ); ?>
The function accepts the following parameters:
timestamp— The time you want the event to runhook— The action hook name to executeargs— Arguments to pass to the hook's callback function
Now look at a working example. Just as before start by adding a menu item that links to your settings page.
<?php
//create the plugin menu
add_action( 'admin_menu', 'boj_cron_single_menu' );

function boj_cron_single_menu() {

    //create cron example settings page
    add_options_page( 'Cron Example Settings', 'Cron Settings',
        'manage_options', 'boj-single-cron', 'boj_cron_single_settings' );

}
?>
Next create the settings page that will schedule the single event to run.
<?php
function boj_cron_single_settings() {

    //verify event has not been scheduled
    if ( !wp_next_scheduled( 'boj_single_cron_hook' ) ) {

        //schedule the event to in one hour
        wp_schedule_single_event( time()+3600,
            'boj_single_cron_hook' );

    }

}
?>
Using the wp_schedule_single_event() function, you set the execution time to time()+3600, which is exactly one hour from the time the cron event is scheduled. The second parameter, boj_single_cron_hook, is the custom hook the cron job will execute. Now create the hook.
<?php
//create the custom hook for cron scheduling
add_action( 'boj_single_cron_hook',
    'boj_cron_single_email_reminder' );

function boj_cron_single_email_reminder () {

    //send scheduled email
    wp_mail( 'you@example.com', 'Reminder', 'You have a meeting' );

}
?>
Now look at the full plugin source code.
<?php
/*
Plugin Name: Schedule Single Event Cron
Plugin URI: http://example.com/wordpress-plugins/my-plugin
Description: schedules a single event to run in cron
Version: 1.0
Author: Brad Williams
Author URI: http://wrox.com
License: GPLv2
*/

//create the plugin menu
add_action( 'admin_menu', 'boj_cron_single_menu' );

function boj_cron_single_menu() {

    //create cron example settings page
    add_options_page( 'Cron Example Settings', 'Cron Settings',
        'manage_options', 'boj-single-cron', 'boj_cron_single_settings' );

}

//create the custom hook for cron scheduling
add_action( 'boj_single_cron_hook',
    'boj_cron_single_email_reminder' );

function boj_cron_single_email_reminder () {

    //send scheduled email
    wp_mail( 'you@example.com', 'Reminder', 'You have a meeting' );

}

function boj_cron_single_settings() {

    //verify event has not been scheduled
    if ( !wp_next_scheduled( 'boj_single_cron_hook' ) ) {

        //schedule the event to in one hour
wp_schedule_single_event( time()+3600,
'boj_single_cron_hook' );
}
}
?>Code snippet boj-single-event.php
Note
When scheduling a single cron event, you do not need to unschedule it. The cron event runs once and unschedules itself when complete.
When a cron job is scheduled in WordPress, it is stored in the wp_options table. This means the scheduled job will not be removed, or unscheduled, by simply deactivating the plugin that scheduled it. If the plugin is deactivated without properly unscheduling the cron job. WordPress can't execute the scheduled job because the plugin code will no longer be available. However, the cron job scheduled will still be stored and WordPress will try to execute it on the schedule set.
To properly unschedule a cron event, use the wp_unschedule_event() function.
<?php wp_unschedule_event( timestamp, hook, args ); ?>
The function accepts the following parameters:
timestamp— Time of the next occurrence to runhook— The action hook to unscheduleargs— Arguments to pass to the hook's callback function
Now unschedule the cron job you scheduled earlier.
<?php
//get time of next scheduled run
$timestamp = wp_next_scheduled( 'boj_cron_hook' );

//unschedule custom action hook
wp_unschedule_event( $timestamp, 'boj_cron_hook' );
?>
First, use the wp_next_scheduled() function to determine the exact time of the next occurrence for your scheduled hook. After the next scheduled time has been determined, unschedule the cron job using wp_unschedule_event(). The only two parameters required are the time and custom hook associated with the scheduled job. After this function has been executed, the cron scheduled job will be unscheduled in WordPress and will no longer execute.
As discussed, WordPress has three recurrence values by default: Hourly, Twice Daily, and Daily. WordPress makes it easy to create a custom recurrence setting to use when scheduling cron jobs. To create a custom recurrence, use the cron_schedules filter hook. Now create a recurrence option for a weekly scheduled job.
<?php
add_filter( 'cron_schedules', 'boj_cron_add_weekly' );

function boj_cron_add_weekly( $schedules ) {

    //create a 'weekly' recurrence schedule option
    $schedules['weekly'] = array(
        'interval' => 604800,
        'display' => 'Once Weekly'
    );

    return $schedules;
}
?>
The first step is to call the add_filter() function to execute the cron_schedules filter hook. The filter executes your custom function boj_cron_add_weekly(). Notice how the variable $schedules is passed as a parameter to your custom function. This variable stores all recurrence schedules as an array in WordPress. To create your new schedule, you add a value to this array.
You first define the name of your recurrence to weekly by setting $schedules['weekly'] 5 array(). Next, set the two values for your new schedule: interval and display. The interval value is the number of seconds when the cron job should run. In this example, use 604800, which is how many seconds exist in a week. The display value is the friendly display name of the new recurrence.
The final step to your custom schedule is to return the $schedules value from the function. Now you have a custom recurrence value defined in cron. You can easily use this new recurrence value when scheduling a cron event:
<?php wp_schedule_event( time(), 'weekly', 'boj_cron_hook' ); ?>
When working with cron jobs, it can be useful to see exactly what jobs are scheduled in WordPress. There is no built-in way to view these events, so create a plugin to view all cron jobs scheduled in WordPress.
First, create a new menu for your plugin page.
<?php
add_action( 'admin_menu', 'boj_view_cron_menu' );

function boj_view_cron_menu() {

    //create view cron jobs settings page
add_options_page( 'View Cron Jobs', 'View Cron Jobs',
'manage_options', 'boj-view-cron', 'boj_view_cron_settings' );
}
?>Next, create the boj_view_cron_settings() function to display the cron jobs scheduled:
<?php
function boj_view_cron_settings() {

    $cron = _get_cron_array();
    $schedules = wp_get_schedules();
    $date_format = 'M j, Y @ G:i';
First, set the variable $cron to the value of _get_cron_array(). This function stores all scheduled cron jobs in an array. Next, set $schedules to the value of the wp_get_schedules() function. This function stores all registered cron recurrence options available. The final variable set is the $date_format, which you use to format the cron run date and time later.
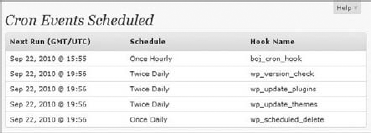
Now it's time to create the table to display the cron jobs scheduled in a nice, familiar format.
<div class="wrap" id="cron-gui">
    <h2>Cron Events Scheduled</h2>

    <table class="widefat fixed">
        <thead>
        <tr>
            <th scope="col">Next Run (GMT/UTC)</th>
            <th scope="col">Schedule</th>
            <th scope="col">Hook Name</th>
        </tr>
        </thead>
        <tbody>
The table features three columns of data: Next Run, Schedule, and the Hook Name. Now for the fun part: it's time to loop through the scheduled cron jobs and display them in your table.
<?php foreach ( $cron as $timestamp => $cronhooks ) { ?>
            <?php foreach ( (array) $cronhooks as $hook => $events )
                { ?>
                <?php foreach ( (array) $events as $event ) { ?>
                <tr>
                    <td>
                        <?php echo date_i18n( $date_format,
                            wp_next_scheduled( $hook ) ); ?>
                    </td>
                    <td>
                    <?php
                    if ( $event[ 'schedule' ] ) {
                        echo $schedules[ $event[ 'schedule' ] ]
                            [ 'display' ];
                    } else {
                        ?>One-time<?php
}
?>
</td>
<td><?php echo $hook; ?></td>
</tr>
<?php } ?>
<?php } ?>
<?php } ?>
</tbody>
</table>
</div>
<?
}
?>This can look a little overwhelming, but it's actually quite straightforward. The code loops through the $cron variable, which stores the array value from _get_cron_array(), extracting the data needed from each array element.
To display the next scheduled run time, use the WordPress function date_i18n(). This function converts a date into a localized format based on the timestamp set. The timestamp in this example was set in the $date_format set earlier to display the date in a format such as Month Day, Year @ Time. To get the time that you want to format, use the wp_next_scheduled() function.
Next, the schedule is displayed from the $schedules variable. If the event is recurring, the recurrence value is displayed. If the event does not have a recurrence set, then "One-time" is displayed. The final piece of information displayed is the hook name scheduled to execute.
Now when viewing your plugin settings page, all scheduled cron jobs in WordPress will be displayed with their next scheduled run time, recurrence, and hook being executed, as shown in Figure 13-1.
Now look at the full plugin source code:
<?php
/*
Plugin Name: View Cron Jobs Plugin
Plugin URI: http://example.com/wordpress-plugins/my-plugin
Description: A plugin demonstrating Cron in WordPress
Version: 1.0
Author: Brad Williams
Author URI: http://wrox.com
License: GPLv2
*/
add_action( 'admin_menu', 'boj_view_cron_menu' );
function boj_view_cron_menu() {
//create view cron jobs settings pageadd_options_page( 'View Cron Jobs', 'View Cron Jobs',
'manage_options', 'boj-view-cron', 'boj_view_cron_settings' );
}
function boj_view_cron_settings() {
$cron = _get_cron_array();
$schedules = wp_get_schedules();
$date_format = 'M j, Y @ G:i';
?>
<div class="wrap" id="cron-gui">
<h2>Cron Events Scheduled</h2>
<table class="widefat fixed">
<thead>
<tr>
<th scope="col">Next Run (GMT/UTC)</th>
<th scope="col">Schedule</th>
<th scope="col">Hook Name</th>
</tr>
</thead>
<tbody>
<?php foreach ( $cron as $timestamp => $cronhooks ) { ?>
<?php foreach ( (array) $cronhooks as
$hook => $events ) { ?>
<?php foreach ( (array) $events as $event ) { ?>
<tr>
<td>
<?php echo date_i18n( $date_format,
wp_next_scheduled( $hook ) ); ?>
</td>
<td>
<?php
if ( $event[ 'schedule' ] ) {
echo $schedules[
$event[ 'schedule' ] ][ 'display' ];
} else {
?>One-time<?php
}
                    ?>
                    </td>
                    <td><?php echo $hook; ?></td>
                </tr>
                <?php } ?>
            <?php } ?>
        <?php } ?>
        </tbody>
    </table>
    </div>
<?
}
?>Code snippet boj-view-cron-jobs.php
As mentioned earlier, a WordPress cron is not a "true" cron, in that it runs based on page requests and not a true timed interval. However, you can set up a true cron and disable the WordPress page request cron.
The first step to set up a true cron is to disable cron in WordPress by adding the following line of code to your wp-config.php file.
define('DISABLE_WP_CRON', true);This disables WordPress from loading wp-cron.php to look for cron jobs to execute. Now that you've disabled cron in WordPress, you need to set up some other method to execute cron.
A common method is using wget to load wp-cron.php on a schedule. If your server is Linux-based, cron will already exist and can be scheduled using the crontab command. If your server is Windows-based, you can install wget and create a scheduled task to execute it. The wget command would work like this:
wget http://www.example.com/wp-cron.php
When wget requests wp-cron.php WordPress looks for all scheduled cron jobs and executes as needed. Setting up true cron on your server will guarantee your cron jobs will run perfectly on schedule without missing a beat.
Now that you understand how cron works, look at some more advanced cron example plugins.
A post revision is saved in the database each time you save a post or page. This can grow the size of your database quickly, and it should be purged on occasion. In this example, you create a plugin that schedules a weekly cron job to delete all post revisions from the database that are older than 30 days.
First, create the custom action hook that the cron job will run every week.
<?php
//create the custom hook for cron scheduling
add_action( 'boj_del_rev_cron_hook', 'boj_cron_rev_delete' );

function boj_cron_rev_delete() {
    global $wpdb;

    $sql = " DELETE a,b,c
        FROM $wpdb->posts a
        LEFT JOIN $wpdb->term_relationships b ON (a.ID = b.object_id)
        LEFT JOIN $wpdb->postmeta c ON (a.ID = c.post_id)
        WHERE a.post_type = 'revision'
AND DATEDIFF( now(), a.post_modified ) > 30 ";
//execute query to delete all post revisions and meta data
$wpdb->query( $wpdb->prepare( $sql ) );
}
?>The action hook boj_del_rev_cron_hook triggers the custom function boj_cron_rev_delete(). First, you must define $wpdb as a global variable, so the wpdb class will be available for use in interacting with the WordPress database. Next, generate the query to delete post revisions older than 30 days.
The $sql variable stores the query to execute. As you can see, the query joins the posts table with the term_relationships and postmeta tables. This ensures that not only is the post revision deleted but also any post meta data stored for that revision.
Finally, execute the query using the wpdb query() and prepare() functions. The prepare function is one of the most important functions in the wpdb class. This function is used for escaping variables passed to your SQL queries. Even though the query in this plugin has no user defined variables, it's a best practice to always use the prepare() function when running database queries.
Now that the delete post revision function has been constructed, it's time to add a setting to enable the scheduled job. This plugin will use the Settings API, as covered in Chapter 7, "Plugin Settings," to add a single check box option to the General settings page in WordPress.
<?php
add_action( 'admin_init', 'boj_cron_rev_admin_init' );

function boj_cron_rev_admin_init(){

    //register the options in the Settings API
    register_setting(
        'general',
        'boj_cron_rev_options'
    );

    //register the field in the Settings API
    add_settings_field(
        'boj_cron_rev_field',
        'Delete post revisions weekly?',
        'boj_cron_rev_setting_input',
        'general',
        'default'
    );

    //load the option value
    $options = get_option( 'boj_cron_rev_options' );
    $boj_del_rev = $options['boj_del_rev'];

    // if the option is enabled and not already
    // scheduled lets schedule it
    if ( $boj_del_rev == 'on' &&
!wp_next_scheduled( 'boj_del_rev_cron_hook' ) ) {
//schedule the event to run hourly
wp_schedule_event( time(), 'weekly',
'boj_del_rev_cron_hook' );
// if the option is NOT enabled and scheduled lets unschedule it
} elseif ( $boj_del_rev != 'on' &&
wp_next_scheduled( 'boj_del_rev_cron_hook' ) ) {
//get time of next scheduled run
$timestamp = wp_next_scheduled( 'boj_del_rev_cron_hook' );
//unschedule custom action hook
wp_unschedule_event( $timestamp, 'boj_del_rev_cron_hook' );
}
}
?>Use the admin_init action hook to execute the custom boj_cron_rev_admin_init() function. To register the plugin option, use the register_setting() and add_settings_field() Settings API functions. The code registers a boj_cron_rev_options option. This option is where the plugin will store its only option value, whether the scheduled job is enabled. The callback function is set to boj_cron_rev_setting_input() when adding the settings field.
The second part of the code determines whether the option is enabled for the plugin. The option value is loaded using get_option() and stored in the $boj_del_rev variable. If the option is enabled, it checks if the job has been scheduled, and if not schedules it. If the option is disabled, it checks if the job has been unscheduled, and if not unschedules it.
Next, create the boj_cron_rev_setting_input() function to display the option check box.
<?php
function boj_cron_rev_setting_input() {

    // load the 'boj_del_rev' option from the database
    $options = get_option( 'boj_cron_rev_options' );
    $boj_del_rev = $options['boj_del_rev'];

    //display the option checkbox
    echo "<input id='boj_del_rev'
        name='boj_cron_rev_options[boj_del_rev]'
type='checkbox' ". checked( $boj_del_rev, 'on', false ). " />";

}
?>
As before, you load the option value using get_option(). This will be used to determine if the check box is checked. The HTML check box field is then displayed. Use the checked function to compare the $boj_del_dev variable and 'on'. If they match, the option is enabled and should be checked. The check box option will now be displayed on the General settings page, as shown in Figure 13-2.

The final piece to the plugin is to create a weekly recurrence filter for cron. This enables the plugin to delete post revisions once a week.
<?php
//register a weekly recurrence
add_filter( 'cron_schedules', 'boj_cron_add_weekly' );

function boj_cron_add_weekly( $schedules ) {

    //create a 'weekly' recurrence schedule
    $schedules['weekly'] = array(
        'interval' => 604800,
        'display' => 'Once Weekly'
    );

    return $schedules;
}
?>
Your cron job can use weekly as the recurrence setting. That's it! You now have a fully functional plugin that can automatically delete all post revisions older than 30 days once a week. Now review the full plugin code:
<?php
/*
Plugin Name: Delete Post Revisions Weekly
Plugin URI: http://example.com/wordpress-plugins/my-plugin
Description: Deletes post revisions older than 30 days once a week
Version: 1.0
Author: Brad Williams
Author URI: http://wrox.com
License: GPLv2
*/

//create the custom hook for cron scheduling
add_action( 'boj_del_rev_cron_hook', 'boj_cron_rev_delete' );

function boj_cron_rev_delete() {
    global $wpdb;

        $sql = " DELETE a,b,c
            FROM $wpdb->posts a
            LEFT JOIN $wpdb->term_relationships b
                ON (a.ID = b.object_id)
            LEFT JOIN $wpdb->postmeta c
                ON (a.ID = c.post_id)
            WHERE a.post_type = 'revision'
AND DATEDIFF( now(), a.post_modified ) > 30 ";
//execute query to delete all post revisions and meta data
$wpdb->query( $wpdb->prepare( $sql ) );
}
add_action( 'admin_init', 'boj_cron_rev_admin_init' );
function boj_cron_rev_admin_init(){
//register the options in the Settings API
register_setting(
'general',
'boj_cron_rev_options'
);
//register the field in the Settings API
add_settings_field(
'boj_cron_rev_field',
'Delete post revisions weekly?',
'boj_cron_rev_setting_input',
'general',
'default'
);
//load the option value
$options = get_option( 'boj_cron_rev_options' );
$boj_del_rev = $options['boj_del_rev'];
// if the option is enabled and
// not already scheduled lets schedule it
if ( $boj_del_rev == 'on' &&
!wp_next_scheduled( 'boj_del_rev_cron_hook' ) ) {
//schedule the event to run hourly
wp_schedule_event( time(), 'weekly',
'boj_del_rev_cron_hook' );
// if the option is NOT enabled and scheduled lets unschedule it
} elseif ( $boj_del_rev != 'on' &&
wp_next_scheduled( 'boj_del_rev_cron_hook' ) ) {
//get time of next scheduled run
$timestamp = wp_next_scheduled( 'boj_del_rev_cron_hook' );
//unschedule custom action hook
wp_unschedule_event( $timestamp, 'boj_del_rev_cron_hook' );
}
}
function boj_cron_rev_setting_input() {
// load the 'boj_del_rev' option from the database$options = get_option( 'boj_cron_rev_options' );
$boj_del_rev = $options['boj_del_rev'];
//display the option checkbox
echo "<input id='boj_del_rev'
name='boj_cron_rev_options[boj_del_rev]'
type='checkbox' ". checked( $boj_del_rev, 'on', false ). " />";
}
//register a weekly recurrence
add_filter( 'cron_schedules', 'boj_cron_add_weekly' );
function boj_cron_add_weekly( $schedules ) {
//create a 'weekly' recurrence schedule
$schedules['weekly'] = array(
'interval' => 604800,
'display' => 'Once Weekly'
);
return $schedules;
}
?>Code snippet boj-delete-rev-cron.php
Now create a plugin to send an email automatically when no new posts have been published in the last three days. This can be a handy reminder to create a new post.
First, start by creating the custom action hook and function:
<?php
//create the custom hook for cron scheduling
add_action( 'boj_pester_cron_hook', 'boj_cron_pester_check' );

function boj_cron_pester_check() {
    global $wpdb;

    //retrieve latest published post date
    $sql = " SELECT post_date FROM $wpdb->posts
        WHERE post_status = 'publish' AND post_type = 'post'
        ORDER BY post_date DESC LIMIT 1 ";
    $latest_post_date = $wpdb->get_var( $wpdb->prepare( $sql ) );

    if ( strtotime( $latest_post_date ) <= strtotime('-3 day') ) {
        //post is older than 3 days

        //populate email values
        $email_to = 'you@example.com';
$email_subject = 'Blog Reminder';
$email_msg = 'Water your blog!
Its been three days or more since your last post';
//send scheduled email
wp_mail( $email_to, $email_subject, $email_msg );
}
}
?>The boj_cron_pester_check() function is executed by cron and can check when the last post was published. Use the get_var() and prepare() functions of the wpdb class to execute the custom query and return the single value of the last published post date.
To compare the dates, use the PHP strtotime() function. This function takes a date, or any English textual date time, and returns a UNIX timestamp. This makes it easy to compare two dates because they are now in the same format. In the previous code, you are comparing the variable $latest_post_date to the UNIX timestamp for 3 days ago, or '-3 day' in this case. If the latest post date is less than or equal to the value of '-3 day' then the post is older than 3 days. The final step is to populate the email variables and use wp_mail() to send the reminder email.
Now create the admin_init function to register the plugin option and schedule the cron job.
<?php
add_action( 'admin_init', 'boj_cron_pester_init' );

function boj_cron_pester_init(){

    //register the options in the Settings API
    register_setting(
        'writing',
        'boj_cron_pester_options'
    );

    //register the field in the Settings API
    add_settings_field(
        'boj_cron_pester_field',
        'Enable Blog Pester?',
        'boj_cron_pester_setting',
        'writing',
        'default'
    );

    //load the option value
    $options = get_option( 'boj_cron_pester_options' );
    $boj_pester = $options['boj_pester'];

    // if the option is enabled and
    // not already scheduled lets schedule it
if ( $boj_pester == 'on' &&
!wp_next_scheduled( 'boj_pester_cron_hook' ) ) {
//schedule the event to run hourly
wp_schedule_event( time(), 'daily', 'boj_pester_cron_hook' );
// if the option is NOT enabled and scheduled lets unschedule it
} elseif ( $boj_pester != 'on' &&
wp_next_scheduled( 'boj_pester_cron_hook' ) ) {
//get time of next scheduled run
$timestamp = wp_next_scheduled( 'boj_pester_cron_hook' );
//unschedule custom action hook
wp_unschedule_event( $timestamp, 'boj_pester_cron_hook' );
}
}
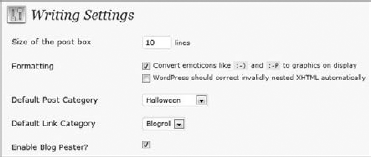
?>The plugin adds an option to the Writing Settings page using the Settings API, as shown in Figure 13-3. Enabling the blog pester option schedules the cron job to run daily. This means if no new blog post has been published in the last 3 days, an email will be sent once a day until a new blog post is published.
The final step to the plugin is creating the check box form field to enable or disable the pester email.
<?php
function boj_cron_pester_setting() {

    // load the 'boj_pester' option from the database
    $options = get_option( 'boj_cron_pester_options' );
    $boj_pester = $options['boj_pester'];

    //display the option checkbox
    echo "<input id='boj_pester'
        name='boj_cron_pester_options[boj_pester]'
        type='checkbox' ". checked( $boj_pester, 'on', false ). " />";

}
?>
As before use the get_option() function to retrieve the pester setting value. Also use the checked function to determine if the option is enabled.
Now review the full blog pester plugin source.
<?php
/*
Plugin Name: Blog Pester Plugin
Plugin URI: http://example.com/wordpress-plugins/my-plugin
Description: Sends an email after 3 days with no new posts
Version: 1.0
Author: Brad Williams
Author URI: http://wrox.com
License: GPLv2
*/

//create the custom hook for cron scheduling
add_action( 'boj_pester_cron_hook', 'boj_cron_pester_check' );

function boj_cron_pester_check() {
    global $wpdb;

    //retrieve latest published post date
    $sql = " SELECT post_date FROM $wpdb->posts
        WHERE post_status = 'publish' AND post_type = 'post'
        ORDER BY post_date DESC LIMIT 1 ";
    $latest_post_date = $wpdb->get_var( $wpdb->prepare( $sql ) );

    if ( strtotime( $latest_post_date ) <= strtotime('-3 day') ) {
        //post is older than 3 days

        //populate email values
        $email_to = 'you@example.com';
        $email_subject = 'Blog Reminder';
        $email_msg = 'Water your blog!
            Its been three days or more since your last post';

        //send scheduled email
        wp_mail( $email_to, $email_subject, $email_msg );

    }

}

add_action( 'admin_init', 'boj_cron_pester_init' );

function boj_cron_pester_init(){

    //register the options in the Settings API
    register_setting(
        'writing',
        'boj_cron_pester_options'
    );

    //register the field in the Settings API
    add_settings_field(
        'boj_cron_pester_field',
        'Enable Blog Pester?',
        'boj_cron_pester_setting',
'writing',
'default'
);
//load the option value
$options = get_option( 'boj_cron_pester_options' );
$boj_pester = $options['boj_pester'];
// if the option is enabled and
// not already scheduled lets schedule it
if ( $boj_pester == 'on' &&
!wp_next_scheduled( 'boj_pester_cron_hook' ) ) {
//schedule the event to run hourly
wp_schedule_event( time(), 'daily', 'boj_pester_cron_hook' );
// if the option is NOT enabled and scheduled lets unschedule it
} elseif ( $boj_pester != 'on' &&
wp_next_scheduled( 'boj_pester_cron_hook' ) ) {
//get time of next scheduled run
$timestamp = wp_next_scheduled( 'boj_pester_cron_hook' );
//unschedule custom action hook
wp_unschedule_event( $timestamp, 'boj_pester_cron_hook' );
}
}
function boj_cron_pester_setting() {
// load the 'boj_pester' option from the database
$options = get_option( 'boj_cron_pester_options' );
$boj_pester = $options['boj_pester'];
//display the option checkbox
echo "<input id='boj_pester'
name='boj_cron_pester_options[boj_pester]'
type='checkbox' ". checked( $boj_pester, 'on', false ). " />";
}
?>Code snippet boj-blog-pester.php
As a final example, create a cron plugin with multiple options. This plugin can delete spam and moderated comments older than the number of days set. For example, you can delete all spam comments older than 15 days.
To start, create the admin_init function to register your plugin settings and schedule the cron job.
<?php
add_action( 'admin_init', 'boj_cron_comment_init' );

function boj_cron_comment_init(){

    //register the options in the Settings API
    register_setting(
        'discussion',
        'boj_cron_comment_options'
    );

    //register the select field in the Settings API
    add_settings_field(
        'boj_cron_comment_type_field',
        'Select Comments to Delete',
        'boj_cron_comment_type',
        'discussion',
        'default'
    );

    //register the text field in the Settings API
    add_settings_field(
        'boj_cron_days_old_field',
        'Delete Comments Older Than',
        'boj_cron_days_old',
        'discussion',
        'default'
    );

    //load the option value
    $options = get_option( 'boj_cron_comment_options' );
    $boj_comments = $options['boj_comments'];

    // if the option is enabled and
    // not already scheduled lets schedule it
    if ( $boj_comments &&
        !wp_next_scheduled( 'boj_comment_cron_hook' ) ) {

        //schedule the event to run daily
        wp_schedule_event( time(), 'daily',
            'boj_comment_cron_hook' );

    // if the option is NOT enabled and scheduled lets unschedule it
    } elseif ( !$boj_comments &&
        wp_next_scheduled( 'boj_comment_cron_hook' ) ) {

        //get time of next scheduled run
        $timestamp = wp_next_scheduled( 'boj_comment_cron_hook' );

        //unschedule custom action hook
wp_unschedule_event( $timestamp, 'boj_comment_cron_hook' );
}
}
?>This plugin adds two setting fields to the Discussion settings page in WordPress, as shown in Figure 13-4. One field is a select form field to set what type of comments to delete. The second field is a text form field to set how old a comment should be before it is deleted.

Now create the two form fields you registered in the previous function.
<?php
function boj_cron_comment_type() {

    // load the 'boj_comments' option from the database
    $options = get_option( 'boj_cron_comment_options' );
    $boj_comments = $options['boj_comments'];

    //display the option select field
    echo '<select name="boj_cron_comment_options[boj_comments]">';
        echo '<option value="" '.
            selected( $boj_comments, '', false ) .'>None</option>';
        echo '<option value="spam" '.
            selected( $boj_comments, 'spam', false ) .
            '>Spam Comments</option>';
        echo '<option value="moderated" '.
            selected( $boj_comments, 'moderated', false ) .
            '>Moderated Comments</option>';
        echo '<option value="both" '.
            selected( $boj_comments, 'both', false ) .'>Both</option>';
    echo '</select>';

}
?>
The first form field is a select field. Use the selected() function to compare the option value saved in WordPress to the option value, and if identical, set the option value to selected. The next field is the text form field.
<?php
function boj_cron_days_old() {

    // load the 'boj_days_old' option from the database
    $options = get_option( 'boj_cron_comment_options' );
    $boj_days_old = ( $options['boj_days_old'] ) ?
        absint( $options['boj_days_old'] ) : 30;

    //display the option text field
echo '<input type="text"
name="boj_cron_comment_options[boj_days_old]"
value="' .esc_attr( $boj_days_old ). '" size="3" /> Days';
}
?>To set the $boj_days_old variable, use a PHP ternary operator. If the value exists, it will be used, and if no value exists (that is, the plugin was just installed) the default value of 30 will be used.
Now that the setting fields are in place, you need to create the custom action hook and function to delete the comments.
<?php
//create the custom hook for cron scheduling
add_action( 'boj_comment_cron_hook', 'boj_cron_delete_comments' );
function boj_cron_delete_comments() {
global $wpdb;
$options = get_option( 'boj_cron_comment_options' );
$boj_comments = $options['boj_comments'];
$boj_days_old = ( $options['boj_days_old'] ) ?
$options['boj_days_old'] : 30;
//verify option is enabled
if ( $boj_comments ) {
if ( $boj_comments == "spam" ) {
$boj_comment_status = 'spam';
} elseif ( $boj_comments == "moderated" ) {
$boj_comment_status = '0';
}
$sql = " DELETE FROM $wpdb->comments
WHERE ( comment_approved = '$boj_comment_status' )
AND DATEDIFF( now(), comment_date ) > %d";
if ( $boj_comments == "both" ) {
$sql = " DELETE FROM $wpdb->comments
WHERE ( comment_approved = 'spam'
OR comment_approved = '0' )
AND DATEDIFF( now(), comment_date ) > %d";
}
$wpdb->query( $wpdb->prepare( $sql, $boj_days_old ) );
}
}
?>First, the plugin loads both option values into the two variables: $boj_comments and $boj_days_old. If the variable $boj_comments has a value, you know the plugin settings have been enabled by the user. Next, you need to build the query that will delete the comments based on the settings saved the by user. The query also uses the DATEDIFF MySQL function to verify the comment is older than the number of days set by the user. After the query has been generated, it is executed using the query() and prepare() functions of the wpdb class.
When configured you can easily set which comments to delete and how old they must be before they are deleted. The cron job is scheduled to run daily to check for comments to delete.
Now review the full plugin code.
<?php
/*
Plugin Name: Delete Comments on a Schedule
Plugin URI: http://example.com/wordpress-plugins/my-plugin
Description: Deletes spam and moderated comments older than days set
Version: 1.0
Author: Brad Williams
Author URI: http://wrox.com
License: GPLv2
*/
//create the custom hook for cron scheduling
add_action( 'boj_comment_cron_hook', 'boj_cron_delete_comments' );
function boj_cron_delete_comments() {
global $wpdb;
$options = get_option( 'boj_cron_comment_options' );
$boj_comments = $options['boj_comments'];
$boj_days_old = ( $options['boj_days_old'] ) ?
absint( $options['boj_days_old'] ) : 30;
//verify option is enabled
if ( $boj_comments ) {
if ( $boj_comments == "spam" ) {
$boj_comment_status = 'spam';
} elseif ( $boj_comments == "moderated" ) {
$boj_comment_status = '0';
}
$sql = " DELETE FROM $wpdb->comments
WHERE ( comment_approved = '$boj_comment_status' )
AND DATEDIFF( now(), comment_date ) > %d ";
if ( $boj_comments == "both" ) {
$sql = " DELETE FROM $wpdb->comments
WHERE ( comment_approved = 'spam'
OR comment_approved = '0' )
AND DATEDIFF( now(), comment_date ) > %d ";}
$wpdb->query( $wpdb->prepare( $sql, $boj_days_old ) );
}
}
add_action( 'admin_init', 'boj_cron_comment_init' );
function boj_cron_comment_init(){
//register the options in the Settings API
register_setting(
'discussion',
'boj_cron_comment_options'
);
//register the select field in the Settings API
add_settings_field(
'boj_cron_comment_type_field',
'Select Comments to Delete',
'boj_cron_comment_type',
'discussion',
'default'
);
//register the text field in the Settings API
add_settings_field(
'boj_cron_days_old_field',
'Delete Comments Older Than',
'boj_cron_days_old',
'discussion',
'default'
);
//load the option value
$options = get_option( 'boj_cron_comment_options' );
$boj_comments = $options['boj_comments'];
// if the option is enabled and
// not already scheduled lets schedule it
if ( $boj_comments &&
!wp_next_scheduled( 'boj_comment_cron_hook' ) ) {
//schedule the event to run daily
wp_schedule_event( time(), 'daily', 'boj_comment_cron_hook' );
// if the option is NOT enabled and scheduled lets unschedule it
} elseif ( !$boj_comments &&
wp_next_scheduled( 'boj_comment_cron_hook' ) ) {
//get time of next scheduled run
$timestamp = wp_next_scheduled( 'boj_comment_cron_hook' );
//unschedule custom action hookwp_unschedule_event( $timestamp, 'boj_comment_cron_hook' );
}
}
function boj_cron_comment_type() {
// load the 'boj_comments' option from the database
$options = get_option( 'boj_cron_comment_options' );
$boj_comments = $options['boj_comments'];
//display the option select field
echo '<select name="boj_cron_comment_options[boj_comments]">';
echo '<option value="" '.
selected( $boj_comments, '', false ) .'>None</option>';
echo '<option value="spam" '.
selected( $boj_comments, 'spam', false ) .
'>Spam Comments</option>';
echo '<option value="moderated" '.
selected( $boj_comments, 'moderated', false ) .
'>Moderated Comments</option>';
echo '<option value="both" '.
selected( $boj_comments, 'both', false ) .'>Both</option>';
echo '</select>';
}
function boj_cron_days_old() {
// load the 'boj_days_old' option from the database
$options = get_option( 'boj_cron_comment_options' );
$boj_days_old = ( $options['boj_days_old'] ) ?
absint( $options['boj_days_old'] ) : 30;
//display the option text field
echo '<input type="text"
        name="boj_cron_comment_options[boj_days_old]"
        value="' .esc_attr( $boj_days_old ). '" size="3" /> Days';

}
?>Code snippet boj-delete-comments.php