Table of Contents for
Learning Linux Binary Analysis
 Learning Linux Binary Analysis
Published by
Packt Publishing, 2016
Learning Linux Binary Analysis
Published by
Packt Publishing, 2016
- Cover
- Table of Contents
- Learning Linux Binary Analysis
- Learning Linux Binary Analysis
- Credits
- About the Author
- Acknowledgments
- About the Reviewers
- www.PacktPub.com
- Preface
- What you need for this book
- Who this book is for
- Conventions
- Reader feedback
- Customer support
- 1. The Linux Environment and Its Tools
- Useful devices and files
- Linker-related environment points
- Summary
- 2. The ELF Binary Format
- ELF program headers
- ELF section headers
- ELF symbols
- ELF relocations
- ELF dynamic linking
- Coding an ELF Parser
- Summary
- 3. Linux Process Tracing
- ptrace requests
- The process register state and flags
- A simple ptrace-based debugger
- A simple ptrace debugger with process attach capabilities
- Advanced function-tracing software
- ptrace and forensic analysis
- Process image reconstruction – from the memory to the executable
- Code injection with ptrace
- Simple examples aren't always so trivial
- Demonstrating the code_inject tool
- A ptrace anti-debugging trick
- Summary
- 4. ELF Virus Technology �� Linux/Unix Viruses
- ELF virus engineering challenges
- ELF virus parasite infection methods
- The PT_NOTE to PT_LOAD conversion infection method
- Infecting control flow
- Process memory viruses and rootkits – remote code injection techniques
- ELF anti-debugging and packing techniques
- ELF virus detection and disinfection
- Summary
- 5. Linux Binary Protection
- Stub mechanics and the userland exec
- Other jobs performed by protector stubs
- Existing ELF binary protectors
- Downloading Maya-protected binaries
- Anti-debugging for binary protection
- Resistance to emulation
- Obfuscation methods
- Protecting control flow integrity
- Other resources
- Summary
- 6. ELF Binary Forensics in Linux
- Detecting other forms of control flow hijacking
- Identifying parasite code characteristics
- Checking the dynamic segment for DLL injection traces
- Identifying reverse text padding infections
- Identifying text segment padding infections
- Identifying protected binaries
- IDA Pro
- Summary
- 7. Process Memory Forensics
- Process memory infection
- Detecting the ET_DYN injection
- Linux ELF core files
- Summary
- 8. ECFS – Extended Core File Snapshot Technology
- The ECFS philosophy
- Getting started with ECFS
- libecfs – a library for parsing ECFS files
- readecfs
- Examining an infected process using ECFS
- The ECFS reference guide
- Process necromancy with ECFS
- Learning more about ECFS
- Summary
- 9. Linux /proc/kcore Analysis
- stock vmlinux has no symbols
- /proc/kcore and GDB exploration
- Direct sys_call_table modifications
- Kprobe rootkits
- Debug register rootkits – DRR
- VFS layer rootkits
- Other kernel infection techniques
- vmlinux and .altinstructions patching
- Using taskverse to see hidden processes
- Infected LKMs – kernel drivers
- Notes on /dev/kmem and /dev/mem
- /dev/mem
- K-ecfs – kernel ECFS
- Kernel hacking goodies
- Summary
- Index
One neat exercise to test our abilities with both the ELF format and ptrace is to design software that can reconstruct a process image back into a working executable. This is especially useful for the type of forensic work where we find a suspicious program running on the system. Extended core file snapshot (ECFS) technology is capable of this and extends the functionality into an innovative forensics and debugging format that is backward compatible with the traditional Linux core files' format. This is available at https://github.com/elfmaster/ecfs and is further documented in Chapter 8, ECFS – Extended Core File Snapshot Technology, in this book. Quenya also has this feature and is available for download at http://www.bitlackeys.org/projects/quenya_32bit.tgz.
In order to reconstruct a process back into an executable we must first consider the challenges involved, as there are a myriad things to consider. There is one particular type of variables over which we have no control, and these are the global variables in the initialized data. They will have possibly changed at runtime to variables dictated by the code, and we will have no way of knowing what they are supposed to be initialized to before runtime. We may not even be able to find this out by static code analysis.
The following are the goals for executable reconstruction:
Full executable reconstruction is possible, but it comes with some challenges, especially when reconstructing a dynamically linked executable. Here, we will go over what the primary challenges are and what the general solution is for each one.
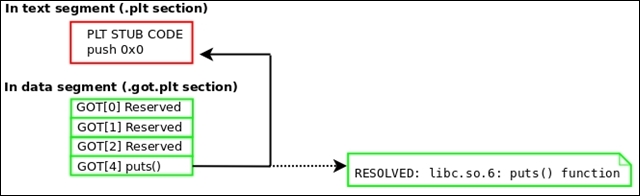
The global offset table will be filled in with the resolved values of the corresponding shared library functions. This was, of course, done by the dynamic linker, and so we must replace these addresses with the original PLT stub addresses. We do this so that when the shared library functions are called for the first time, they trigger the dynamic linker properly through the PLT instruction that pushes the GOT offset onto the stack. Refer to the ELF and dynamic linking section of Chapter 2, The ELF Binary Format.
The following diagram demonstrates how GOT entries must be restored:
Remember that a program's section header table is not loaded into the memory at runtime. This is because it is not needed. When reconstructing a process image back into an executable, it would be desirable (although not necessary) to add a section header table. It is perfectly possible to add every section header entry that was on the original executable, but a good ELF hacker can generate at least the basics.
So try to create a section header for the following sections: .interp, .note, .text, .dynamic, .got.plt, .data, .bss, .shstrtab, .dynsym, and .dynstr.
Let's look at executable reconstruction:
- Locate the base address of the executable (text segment). This can be done by parsing
/proc/<pid>/maps:[First line of output from /proc/<pid>/maps file for program 'evil'] 00400000-401000 r-xp /home/ryan/evil
Tip
Use the
PTRACE_PEEKTEXTrequest withptraceto read in the entire text segment. You can see in a line from the preceding maps output that the address range for the text segment (markedr-xp) is0x400000to0x401000, which is 4096 bytes. So, this is how large your buffer should be for the text segment. Since we have not covered how to usePTRACE_PEEKTEXTto read more than a long-sized word at a time, I have written a function calledpid_read()that demonstrates a good way to do this.[Source code for pid_read() function] int pid_read(int pid, void *dst, const void *src, size_t len) { int sz = len / sizeof(void *); unsigned char *s = (unsigned char *)src; unsigned char *d = (unsigned char *)dst; unsigned long word; while (sz!=0) { word = ptrace(PTRACE_PEEKTEXT, pid, (long *)s, NULL); if (word == 1) return 1; *(long *)d = word; s += sizeof(long); d += sizeof(long); } return 0; } - Parse the
ELFfile header (for example,Elf64_Ehdr) to locate the program header table:/* Where buffer is the buffer holding the text segment */ Elf64_Ehdr *ehdr = (Elf64_Ehdr *)buffer; Elf64_Phdr *phdr = (Elf64_Phdr *)&buffer[ehdr->e_phoff];
- Then parse the program header table to find the data segment:
for (c = 0; c < ehdr>e_phnum; c++) if (phdr[c].p_type == PT_LOAD && phdr[c].p_offset) { dataVaddr = phdr[c].p_vaddr; dataSize = phdr[c].p_memsz; break; } pid_read(pid, databuff, dataVaddr, dataSize); - Read the data segment into a buffer, and locate the dynamic segment within it and then the GOT. Use
d_tagfrom the dynamic segment to locate the GOT:Note
We discussed the dynamic segment and its tag values in the Dynamic linking section of Chapter 2, The ELF Binary Format.
Elf64_Dyn *dyn; for (c = 0; c < ehdr->e_phnum; c++) { if (phdr[c].p_type == PT_DYNAMIC) { dyn = (Elf64_Dyn *)&databuff[phdr[c].p_vaddr – dataAddr]; break; } if (dyn) { for (c = 0; dyn[c].d_tag != DT_NULL; c++) { switch(dyn[c].d_tag) { case DT_PLTGOT: gotAddr = dyn[i].d_un.d_ptr; break; case DT_STRTAB: /* Get .dynstr info */ break; case DT_SYMTAB: /* Get .dynsym info */ break; } } } - Once the GOT has been located, it must be restored to its state prior to runtime. The part that matters the most is restoring the original PLT stub addresses in each GOT entry so that lazy linking works at program runtime. See the ELF dynamic linking section of Chapter 2, The ELF Binary Format:
00000000004003e0 <puts@plt>:
4003e0: ff 25 32 0c 20 00 jmpq *0x200c32(%rip) # 601018
4003e6: 68 00 00 00 00 pushq $0x0
4003eb: e9 e0 ff ff ff jmpq 4003d0 <_init+0x28>
- The GOT entry that is reserved for
puts()should be patched to point back to the PLT stub code that pushes the GOT offset onto the stack for that entry. The address for this,0x4003e6, is given in the preceding command. The method for determining the GOT-to-PLT entry relationship is left as an exercise for the reader. - Optionally reconstruct a section header table. Then write the text and data segment (and the section header table) to the disk.
A 32-bit ELF executable named dumpme simply prints the You can Dump my segments! string and then pauses, giving us time to reconstruct it.
Now, the following code demonstrates Quenya reconstructing a process image into an executable:
[Quenya v0.1@ELFWorkshop]
rebuild 2497 dumpme.out
[+] Beginning analysis for executable reconstruction of process image (pid: 2497)
[+] Getting Loadable segment info...
[+] Found loadable segments: text segment, data segment
Located PLT GOT Vaddr 0x804a000
Relevant GOT entries begin at 0x804a00c
[+] Resolved PLT: 0x8048336
PLT Entries: 5
Patch #1 [
0xb75f7040] changed to [0x8048346]
Patch #2 [
0xb75a7190] changed to [0x8048356]
Patch #3 [
0x8048366] changed to [0x8048366]
Patch #4 [
0xb755a990] changed to [0x8048376]
[+] Patched GOT with PLT stubs
Successfully rebuilt ELF object from memory
Output executable location: dumpme.out
[Quenya v0.1@ELFWorkshop]
quit
Here, we are demonstrating that the output executable runs correctly:
hacker@ELFWorkshop:~/
workshop/labs/exercise_9$ ./dumpme.out
You can Dump my segments!
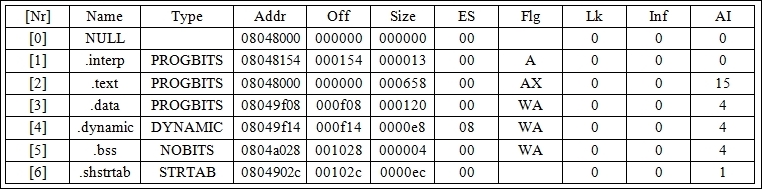
Quenya has created a minimal section header table for the executable as well:
hacker@ELFWorkshop:~/
workshop/labs/exercise_9$ readelf -S
dumpme.out
There are seven section headers, starting at the offset 0x1118, as shown here:
The source code for process reconstruction in Quenya is located primarily in rebuild.c, and Quenya may be downloaded from my site at http://www.bitlackeys.org/.