© Szymon Rozga 2018
Szymon RozgaPractical Bot Developmenthttps://doi.org/10.1007/978-1-4842-3540-9_7

7. Building an Integrated Bot Experience

Szymon Rozga1 
(1)
Port Washington, New York, USA
 

So far, we have built a pretty good LUIS application that has been evolving over time. We also utilized the Bot Builder dialog engine that employs our natural language models, extracts the relevant intents and entities from user utterances, and contains conditional logic around many of the different permutations of inputs coming into the bot. But our code does not really do anything. How do we make it do something useful and real? Throughout the book, we’ve been exploring the idea of a calendar bot. This means we need to integrate with some kind of calendar API. For the purposes of this book, we’re going to integrate with Google’s Calendar API. After that is set up, we will explore how to integrate those calls into the bot flow. In this day and age of OAuth, we are not going to spend time collecting a user’s name and password in our chat window. That would not be secure. Instead, we will implement a three-legged OAuth flow using the Google OAuth libraries. We’ll then go ahead and make the changes in our code to support communication with the Google Calendar API. At the end of the chapter, we’ll end up with a bot that we can use to create appointments and view entries in our calendar!

Note, the code for this chapter is available as part of the code repository. Throughout the bot code and the code in this book, you’ll find use of many libraries. One of the more used ones is Underscore. Underscore is a nifty library that provides a series of useful utility functions, especially around collections.

A Word on OAuth 2.0

This isn’t a book about security, but understanding basic authentication and authorization mechanisms is essential to be a developer. OAuth 2.0 is a standard authorization protocol. The three-legged OAuth 2.0 flow allows third-party applications to access services on behalf of another entity. In our case, we will be accessing a user’s Google Calendar data on behalf of that user. At the end of the three-legged OAuth flow, we end up with two tokens: an access token and a refresh token. The access token is included in requests to an API in the authorization HTTP header and provides data to the API declaring which user we are requesting data. Access tokens are typically short-lived to reduce the window during which a compromised access token can be utilized. When an access token expires, we can use the refresh token to receive a new access token.

To initiate the flow, we first redirect the user to a service that they can authenticate against, say, Google. Google presents an OAuth 2.0 login page where it authenticates the user and asks the user for their consent so that the bot can access the user’s data from Google on their behalf. When authentication and consent are successful, Google sends an authorization code back into the bot’s API, via what’s known as the redirect URI. Finally, our bot requests the access and refresh tokens by presenting the authorization code to Google’s token endpoint. Google’s OAuth libraries will help us implement the three-legged flow in our calendar bot.

Setting Up Google APIs

Before we jump into it, we should set ourselves up to be able to use the Google APIs. Luckily, Google makes this quite easy via the Google Cloud Platform API console. Google Cloud Platform is Google’s Azure or AWS; it is Google’s one-stop shop for provisioning and managing different cloud services. To get started, we navigate to https://console.cloud.google.com . If this is our first time visiting the site, we will be asked to accept the terms of service. After that, we will be placed in the dashboard (Figure 7-1).
../images/455925_1_En_7_Chapter/455925_1_En_7_Fig1_HTML.jpg
Figure 7-1

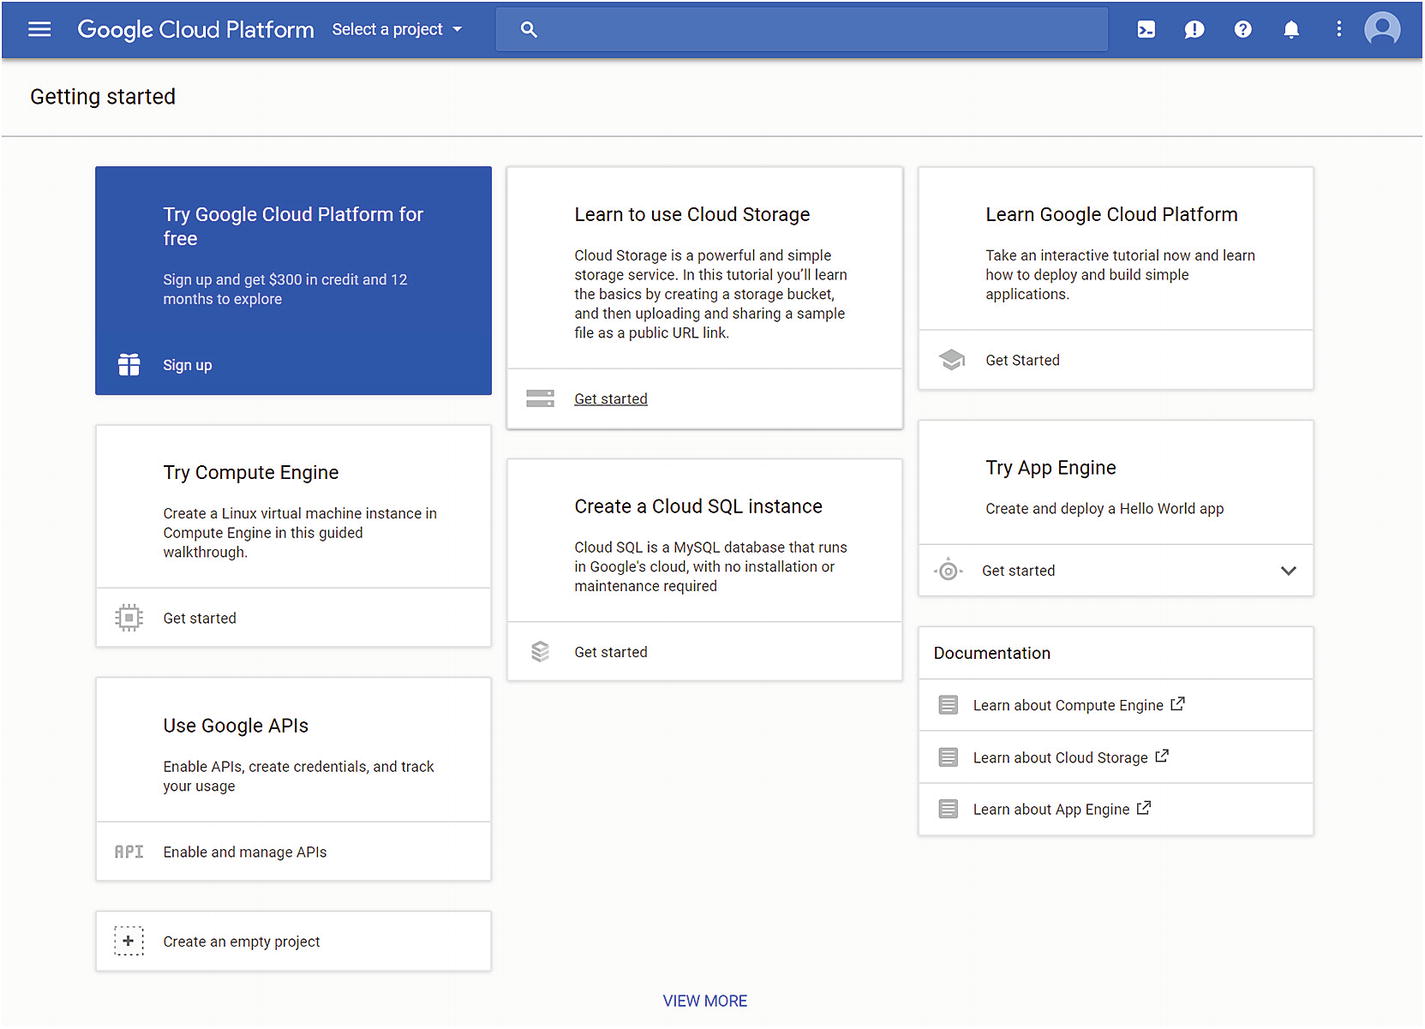
Google Cloud Platform dashboard

Our next steps are as follows. We will create a new project. Within that project, we will ask for access to the Calendar API. We will also give our project the ability to log in on behalf of users using OAuth2. Once done, we will receive a client ID and secret. Those two pieces of data, plus our redirect URI, are sufficient for us to use the Google API libraries within our bot.

Click the Select a Project drop-down. You’ll be met with a pop-up that, if you have not used this console before, should be empty (Figure 7-2).
../images/455925_1_En_7_Chapter/455925_1_En_7_Fig2_HTML.jpg
Figure 7-2

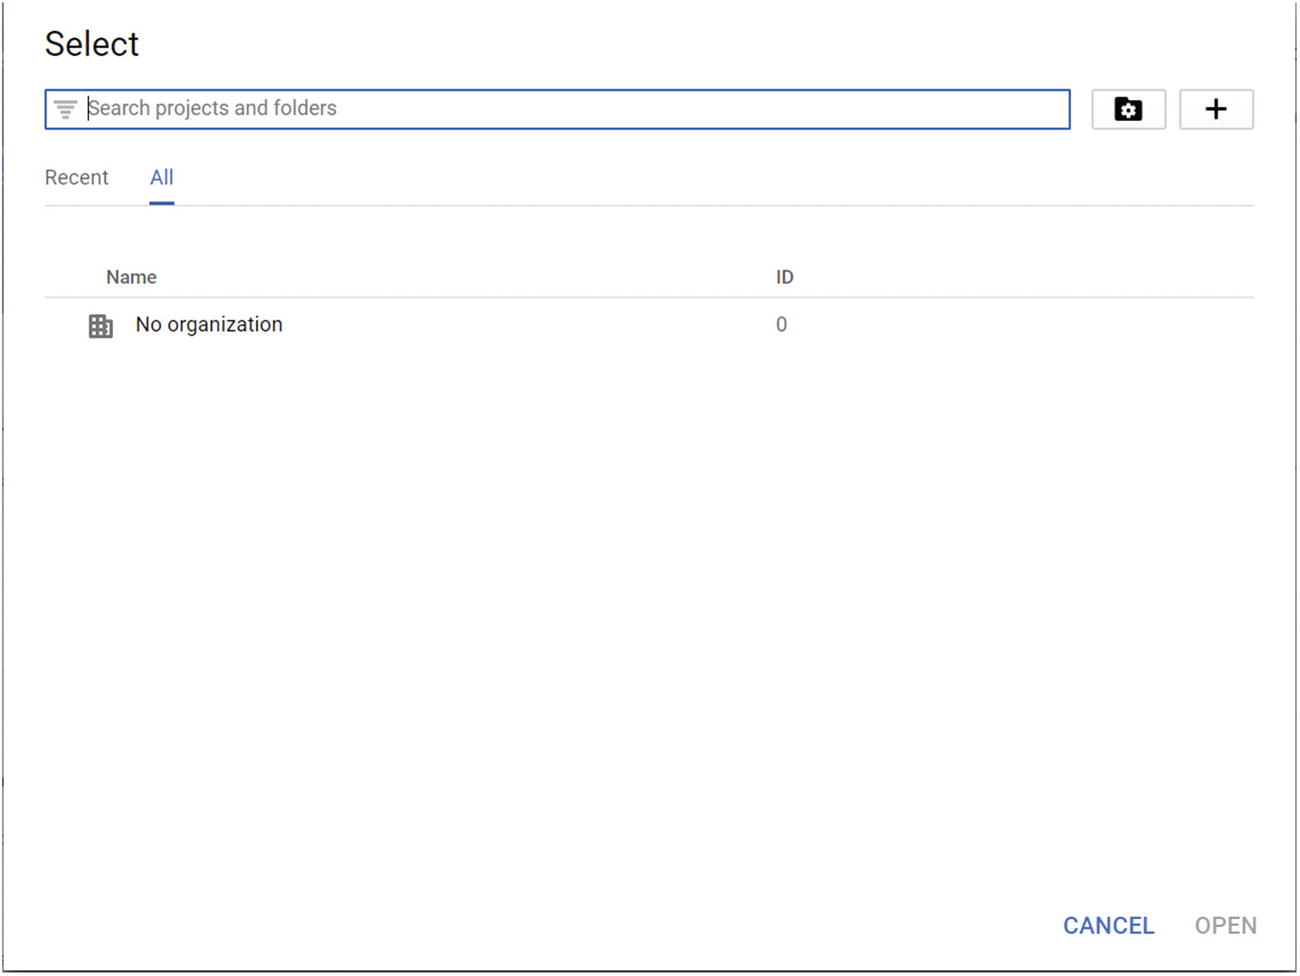
Google Cloud Platform Dashboard projects

Click the + button to add a new project. Give the project a name. Once the project is created, we will be able to navigate to it through the Select a Project functionality (Figure 7-3). The project is also assigned an ID, prefixed by the project name.
../images/455925_1_En_7_Chapter/455925_1_En_7_Fig3_HTML.jpg
Figure 7-3

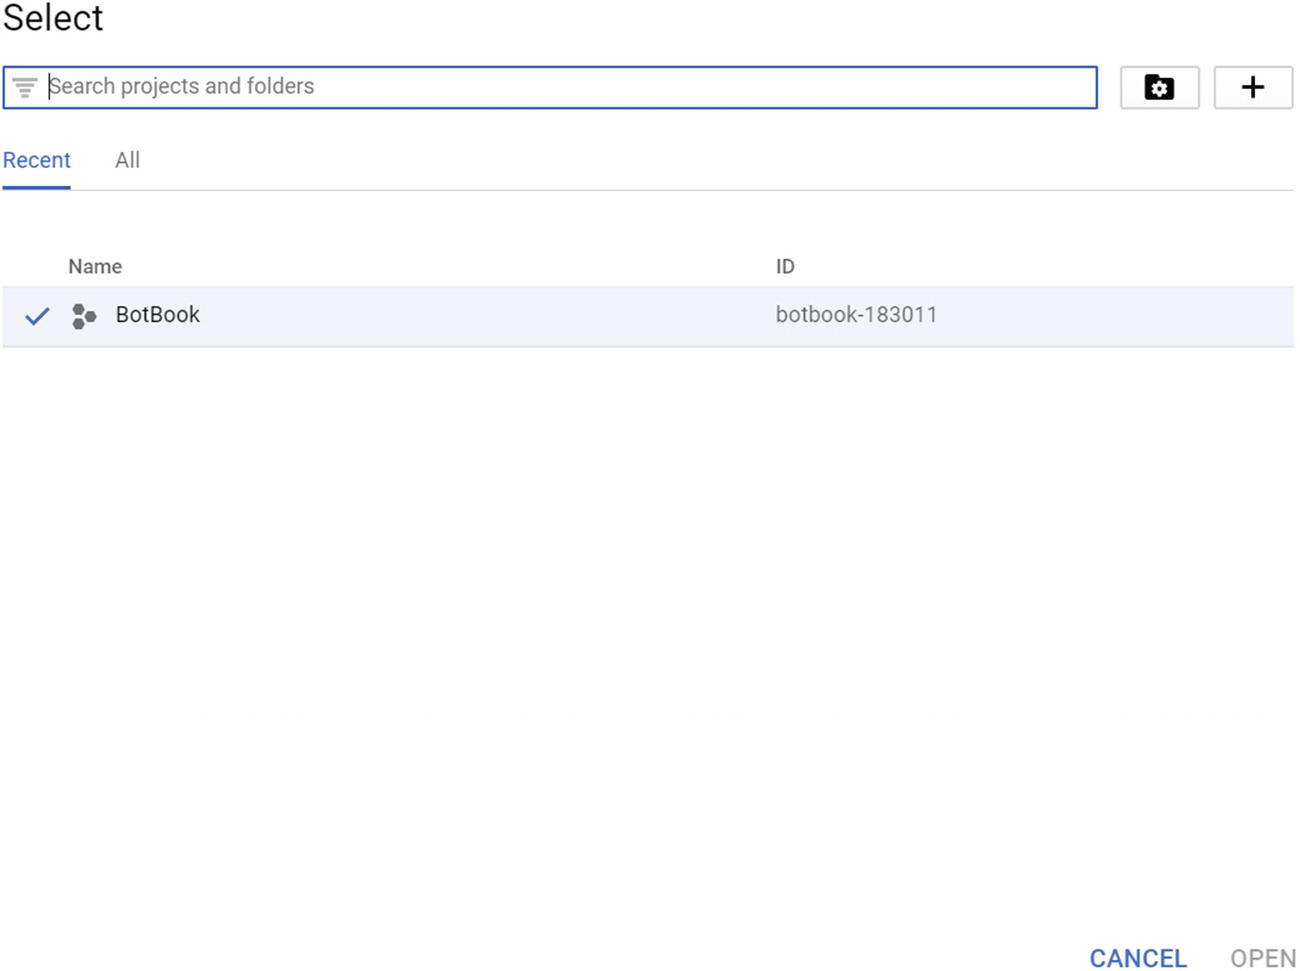
Our project is created!

When the open the project, we see the project dashboard, which initially looks intimidating (Figure 7-4). There are many things we can do here.
../images/455925_1_En_7_Chapter/455925_1_En_7_Fig4_HTML.jpg
Figure 7-4

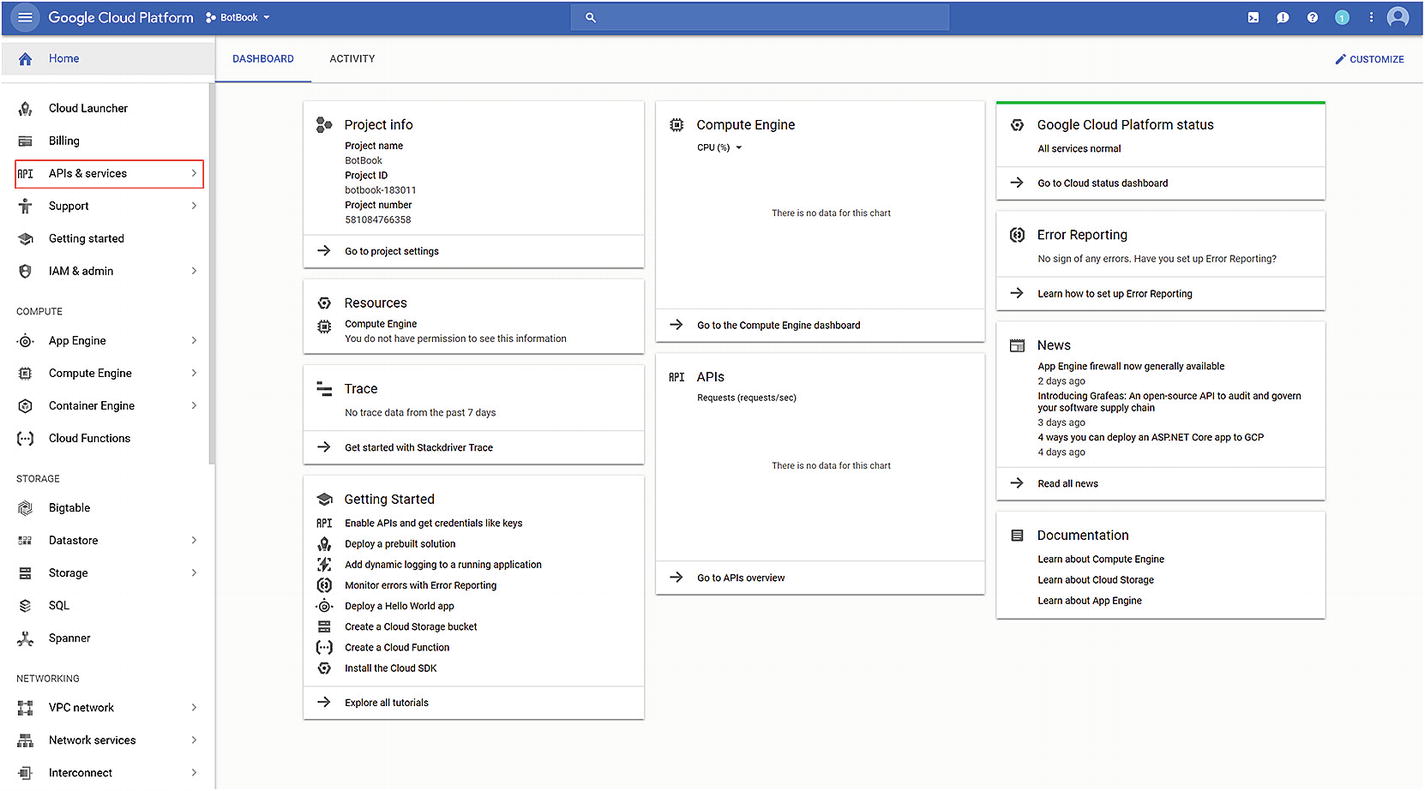
There are many things to do with a project

Let’s begin by getting access to the Google Calendar API. We first click APIs & Services. We can find this link in the first few items on the left navigation pane. The page already has quite a few things populated. These are the default Google Cloud Platform services. Since we’re not using them, we can disable each one. Once ready, we can click the Enable APIs and Services button. We search for Calendar and click Google Calendar API. Finally, we click the Enable button to add it to our project (Figure 7-5). We will receive a warning indicating that we may need credentials to use the API. No problem, we will do this next.
../images/455925_1_En_7_Chapter/455925_1_En_7_Fig5_HTML.jpg
Figure 7-5

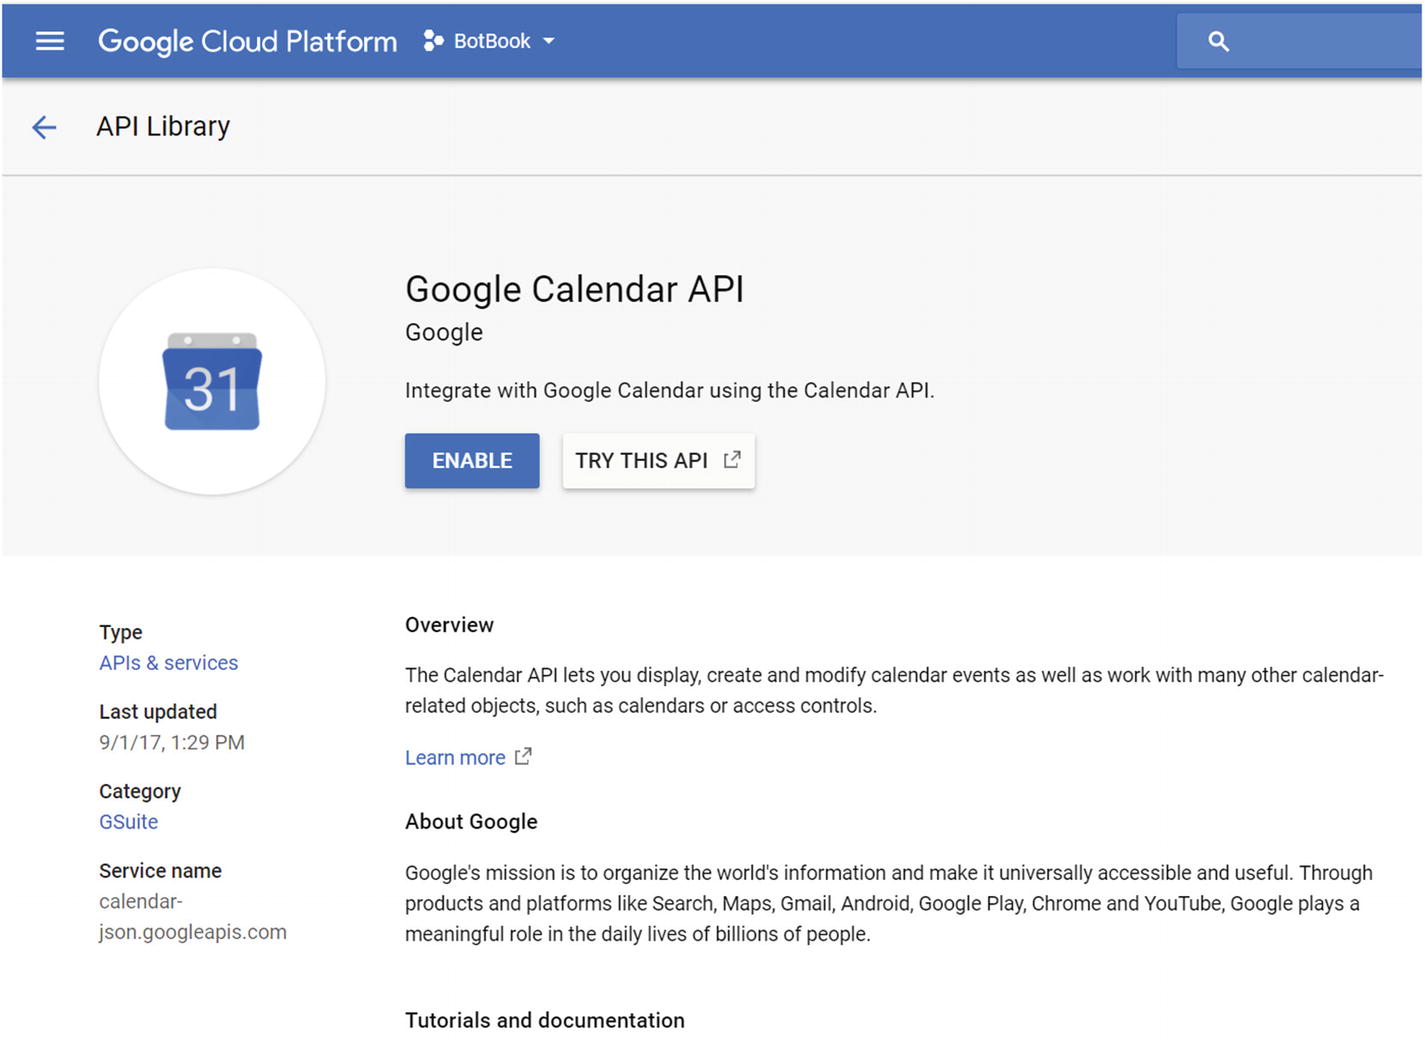
Enabling the Calendar API for our project

To set up authorization, we click the Credentials link on the left pane. We will be met with a prompt to create credentials. For our use case, in which we will be accessing the user’s calendar, we need an OAuth Client ID1 (Figure 7-6).
../images/455925_1_En_7_Chapter/455925_1_En_7_Fig6_HTML.jpg
Figure 7-6

Setting up our client credentials

We will first be asked to set up the consent screen (Figure 7-7). This is the screen that the user will be shown when authenticating against Google. Most of us have probably encountered these types of screens across different web applications. For example, whenever we log into an app via Facebook, we will be presented with a page telling us that the app needs permission to read all your contact information and photos and even deepest secrets. This is Google’s way of setting up a similar page. It asks for data such as the product name, logos, terms of service, privacy policy URLs, and so on. To test the functionality we minimally need a product name.
../images/455925_1_En_7_Chapter/455925_1_En_7_Fig7_HTML.jpg
Figure 7-7

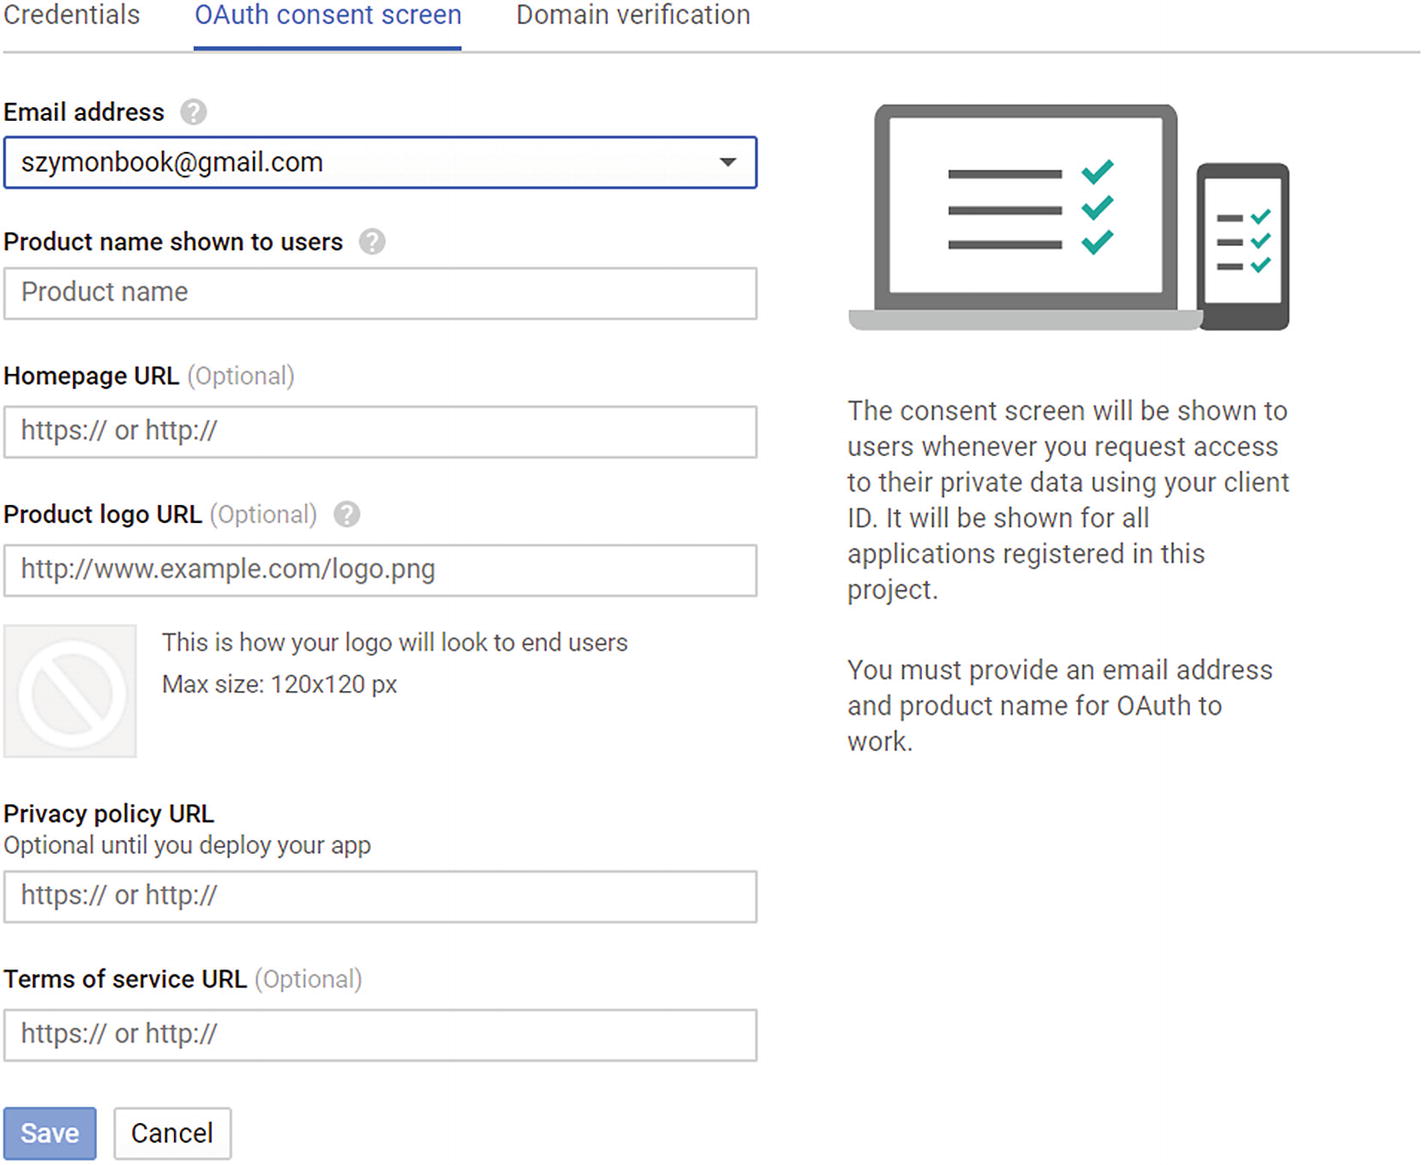
OAuth consent configuration

At this point, we will be taken back to the Create Client ID function. As the Application Type setting, we should select Web Application and give our client a name and a redirect URI (Figure 7-8). We utilize our ngrok proxy URI (see Chapter 5 for more on ngrok). For local testing, we are free to enter a localhost address. For example, you can enter http://localhost:3978.
../images/455925_1_En_7_Chapter/455925_1_En_7_Fig8_HTML.jpg
Figure 7-8

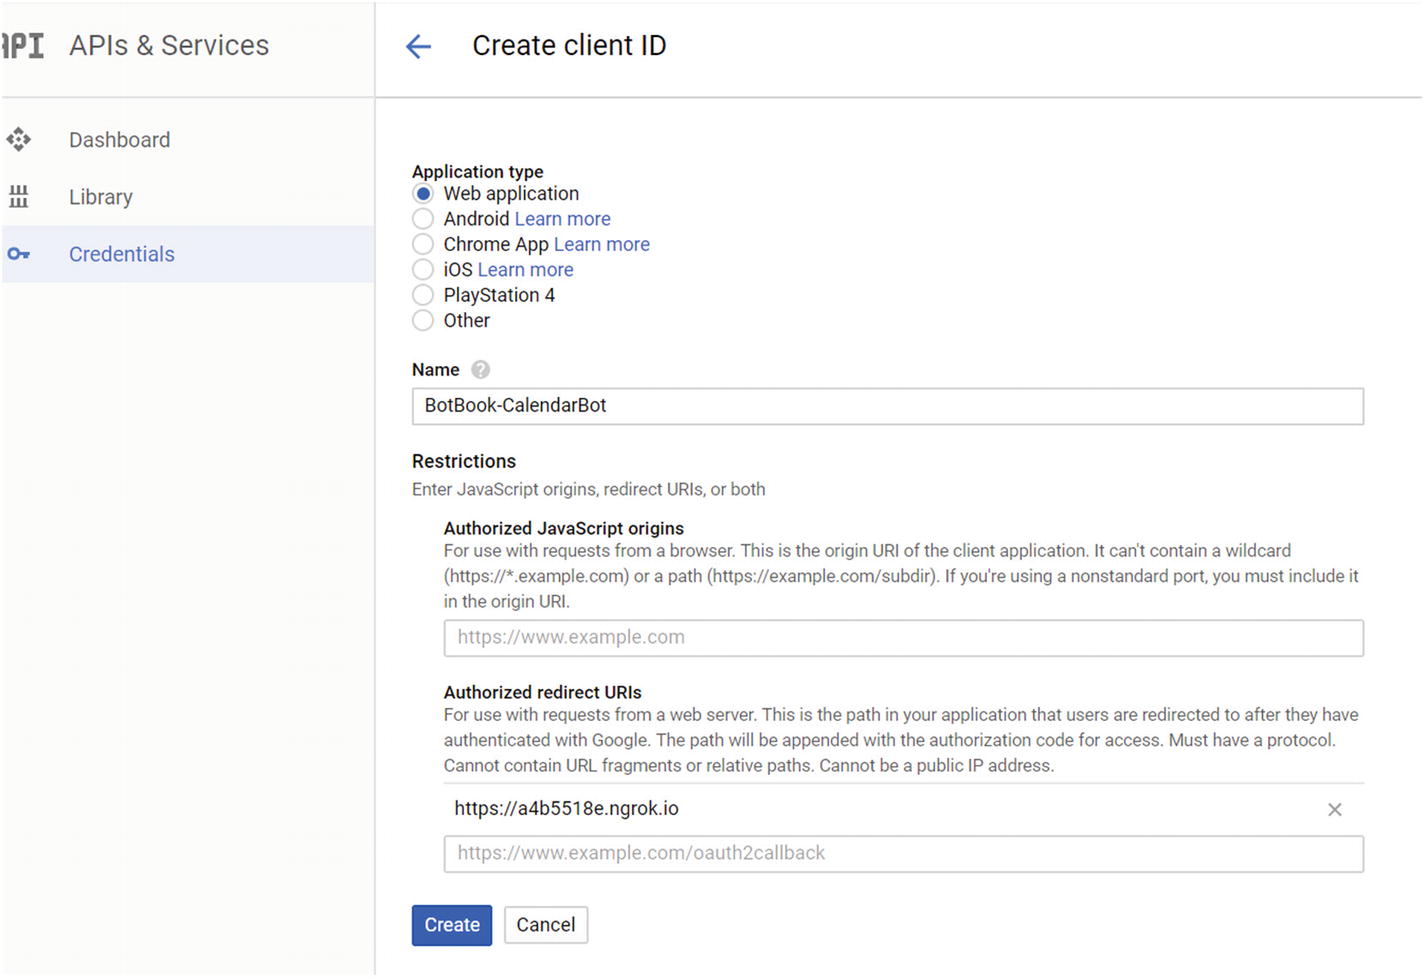
Creating a new OAuth 2.0 Client ID and providing a redirect URI

Once we click the Create button , we will receive a pop-up with the client ID and client secret (Figure 7-9). Copy them because we will need the values in our bot. If we lose the client ID and secret, we can always access them by navigating to the Credentials page for the project and selecting the entry we created in the OAuth 2.0 Client IDs.
../images/455925_1_En_7_Chapter/455925_1_En_7_Fig9_HTML.jpg
Figure 7-9

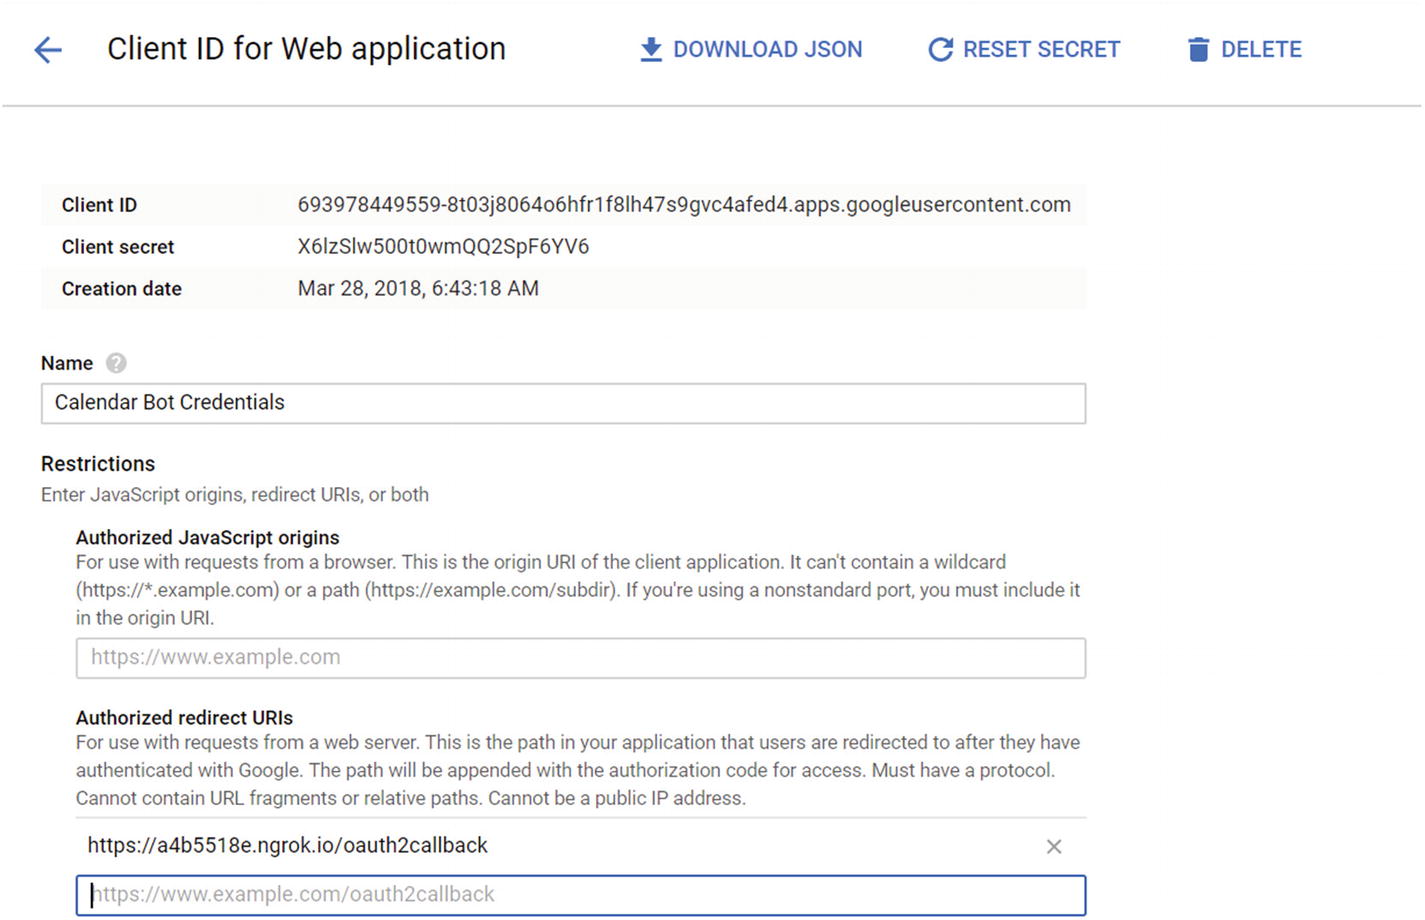
We can always find a missing ID and secret

At this point we are ready to hook our bot up to the Google OAuth2 provider.

Integrating Authentication with Bot Builder

We will need to install the googleapis node package as well as crypto-js, a library that lets us encrypt data. When we send the user to the OAuth login page, we also include a state in the URL. A state is simply a payload that our application can use to identify a user and their conversation. When Google sends back an authorization code as part of the OAuth 2.0 three-legged flow, it will also send back the state. The state parameter should be something recognizable to our API but very hard for a malicious actor to guess, such as a session hash or some other information we are interested in. Once we receive it from Google’s auth page, we can continue the user’s conversation using the data in the state parameter.

To mask the data from bad actors, we will encode this object as a Base64 string. Base64 is an ASCII representation of binary data.2 Since a malicious actor could easily compromise this information by simply decoding from Base64, we will use crypto-js to encrypt the state string.

First, let’s install the two packages.

npm install googleapis crypto-js --save

Second, let’s add three variables to our .env file representing the client ID, secret, and redirect URI. We use the redirect URI we provided in Figure 7-8 and the client ID and secret we received in Figure 7-9.

GOOGLE_OAUTH_CLIENT_ID=693978449559-8t03j8064o6hfr1f8lh47s9gvc4afed4.apps.googleusercontent.com
GOOGLE_OAUTH_CLIENT_SECRET=X6lzSlw500t0wmQQ2SpF6YV6
GOOGLE_OAUTH_REDIRECT_URI=https://a4b5518e.ngrok.io

Third, we need to generate the URL to the login page and send a button that can open this URL. The Google Auth APIs can do a lot of this for us. We will do a few things in our code. First, we import the crypto-js and googleapis packages. Next, we create an OAuth2 client instance including our client data. The state that we will send as part of the login URL contains the user’s address. As shown in the previous chapter, an address is sufficient to uniquely identify a user’s conversation, and Bot Builder contains the facilities to help us send messages to that user by simply presenting the conversation address. We use crypto-js to encrypt the state, using the ASE algorithm.3 AES is a symmetric-key algorithm, which means that the data is encrypted and decrypted using the same key or passphrase. We add the passphrase into our .env file with the name AES_PASSPHRASE.

GOOGLE_OAUTH_CLIENT_ID=693978449559-8t03j8064o6hfr1f8lh47s9gvc4afed4.apps.googleusercontent.com
GOOGLE_OAUTH_CLIENT_SECRET=X6lzSlw500t0wmQQ2SpF6YV6
GOOGLE_OAUTH_REDIRECT_URI=https://a4b5518e.ngrok.io/oauth2callback
AES_PASSPHRASE=BotsBotsBots!!!

Another thing to note is the scopes array. When requesting authorization to the Google APIs, we specify to Google which APIs we are looking for access to using scopes. We can think of each item in the scopes array as a piece of data we want to access about the user from Google’s APIs. Of course, this array needs to be a subset of the APIs our Google project may access to begin with. If we added a scope we did not enable for our project earlier, the authorization process would fail.

const google = require('googleapis');
const OAuth2 = google.auth.OAuth2;
const CryptoJS = require('crypto-js');
const oauth2Client = getAuthClient();
const state = {
    address: session.message.address
};
const googleApiScopes = [
    'https://www.googleapis.com/auth/calendar'
];
const encryptedState = CryptoJS.AES.encrypt(JSON.stringify(state), process.env.AES_PASSPHRASE).toString();
const authUrl = oauth2Client.generateAuthUrl({
    access_type: 'offline',
    scope: googleApiScopes,
    state: encryptedState
});

We also need to be able to send a button for the user to utilize to authorize the bot. We utilize the built-in SigninCard for this purpose.

const card = new builder.SigninCard(session).button('Login to Google', authUrl).text('Need to get your credentials. Please login here.');
const loginReply = new builder.Message(session)
    .attachmentLayout(builder.AttachmentLayout.carousel)
    .attachments([card]);
The emulator renders the SigninCard as per Figure 7-10.
../images/455925_1_En_7_Chapter/455925_1_En_7_Fig10_HTML.jpg
Figure 7-10

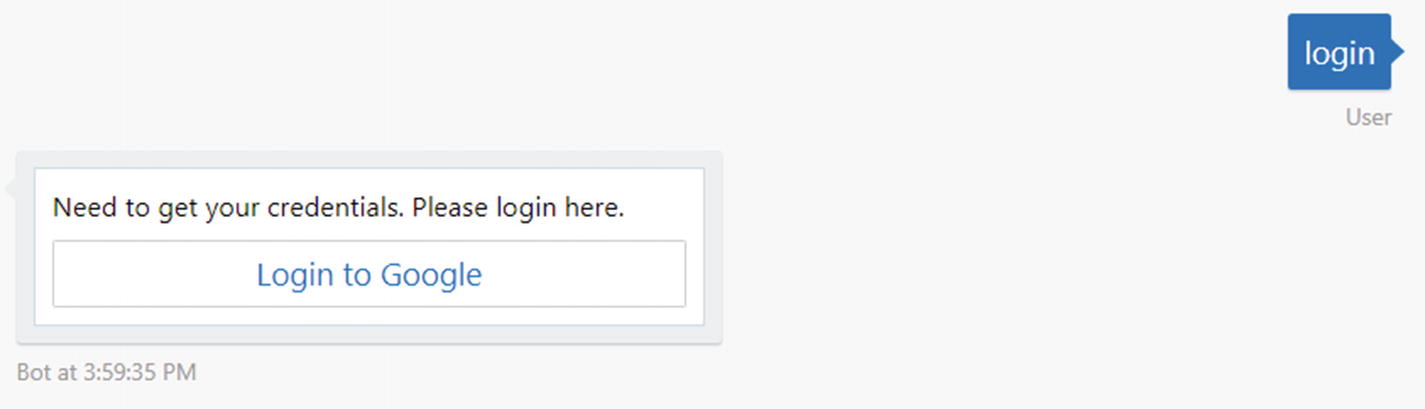
A SigninCard rendered in the Bot Framework emulator

At this point we can click the Login button to log into Google and authorize our bot to access our data, but it would fail because we have not yet provided the code to handle the message from the return URI. We use the same approach to install a handler for the https://a4b5518e.ngrok.io/oauth2callback endpoint as we did to install the API messages endpoint. We also enable restify.queryParser, which will expose each parameter in the query string as a field in the req.query object. For example, a callback in the form redirectUri?state=state&code=code will result in a query object with two properties, state and code.

const server = restify.createServer();
server.use(restify.queryParser());
server.listen(process.env.port || process.env.PORT || 3978, function () {
    console.log('%s listening to %s', server.name, server.url);
});
server.get('/oauth2callback', function (req, res, next) {
    const code = req.query.code;
    const encryptedState = req.query.state;
    ...
});

We read the authorization code from the callback and use the Google OAuth2 client to get the tokens from the token endpoint. The tokens JSON will look like the following data. Note that expiry_date is the datetime in milliseconds since the epoch.4

{
    "access_token": "ya29.GluMBfdm6hPy9QpmimJ5qjJpJXThL1y    GcKHrOI7JCXQ46XdQaCDBcJzgp1gWcWFQNPTXjbBYoBp43BkEAyLi3    ZPsR6wKCGlOYNCQIkeLEMdRTntTKIf5CE3wkolU",
    "refresh_token": "1/GClsgQh4BvHTxPdbQgwXtLW2hBza6FPLXDC9zBJsKf4NK_N7AfItv073kssh5VHq",
    "token_type": "Bearer",
    "expiry_date": 1522261726664
}

Once we receive the tokens, we call setCredentials on the OAuth2 object, and it can now be used to access the Google Calendar API!

server.get('/oauth2callback', function (req, res, next) {
    const code = req.query.code;
    const encryptedState = req.query.state;
    const oauth2Client = new OAuth2(
        process.env.GOOGLE_OAUTH_CLIENT_ID,
        process.env.GOOGLE_OAUTH_CLIENT_SECRET,
        process.env.GOOGLE_OAUTH_REDIRECT_URI
    );
    res.contentType = 'json';
    oauth2Client.getToken(code, function (error, tokens) {
        if (!error) {
            oauth2Client.setCredentials(tokens);
            // We can now use the oauth2Client to call the calendar API
            next();
        } else {
            res.send(500, {
                status: 'error',
                error: error
            });
            next();
        }
    });
});

In the code location where we have access to the Calendar API, we can write code that gets a list of calendars that we own and prints out their names. Note that calapi in the following code is a helper object that wraps the Google Calendar API in JavaScript promises. The code is available in the chapter’s code library.

calapi.listCalendars(oauth2Client).then(function (data) {
    const myCalendars = _.filter(data, p => p.accessRole === 'owner');
    console.log(_.map(myCalendars, p => p.summary));
});

This code results in the following console output, which is an unfortunate reminder of the rather lonely workout schedule that has not seen much action since I became a dad.

Array(5) ["BotCalendar", "Szymon Rozga", "Work", "Szymon WFH Schedule", "Workout schedule"]

Fatherhood weight gain aside, this is great! We do have a few challenges. We need to store the users’ OAuth tokens so we can access them any time the users message us. Where do we store them? This one is easy: private conversation data. How do we get access to that data dictionary in this context? We do this by passing the user’s address to the bot.loadSession method.

Recall that we stored in the user’s address into the encrypted state variable. We can decrypt that object by using the same passphrase we used to encrypt the data.

const state = JSON.parse(CryptoJS.AES.decrypt(encryptedState, process.env.AES_PASSPHRASE).toString(CryptoJS.enc.Utf8));

After we receive the token, we can load the bot session from the address. At that point, we have a session object that has all the dialog methods such as beginDialog for us to use.

oauth2Client.getToken(code, function (error, tokens) {
    bot.loadSession(state.address, (sessionLoadError, session) => {
        if (!error && !sessionLoadError) {
            oauth2Client.setCredentials(tokens);
            calapi.listCalendars(oauth2Client).then(function (data) {
                const myCalendars = _.filter(data, p => p.accessRole === 'owner');
                session.beginDialog('processUserCalendars', { tokens: tokens, calendars: myCalendars });
                res.send(200, {
                    status: 'success'
                });
                next();
            });
            // We can now use the oauth2Client to call the calendar API
        } else {
            res.send(500, {
                status: 'error',
                error: error
            });
            next();
        }
    });
});

The processUserCalendars dialog could look something like this. It sets the tokens into the private conversation data, lets the user know they are logged in, and displays the names of all of the client’s calendars.

bot.dialog('processUserCalendars', (session, args) => {
    session.privateConversationData.userTokens = args.tokens;
    session.send('You are now logged in!');
    session.send('You own the following calendars. ' + _.map(args.calendars, p => p.summary).join(', '));
    session.endDialog();
});
The interaction would look like Figure 7-11.
../images/455925_1_En_7_Chapter/455925_1_En_7_Fig11_HTML.jpg
Figure 7-11

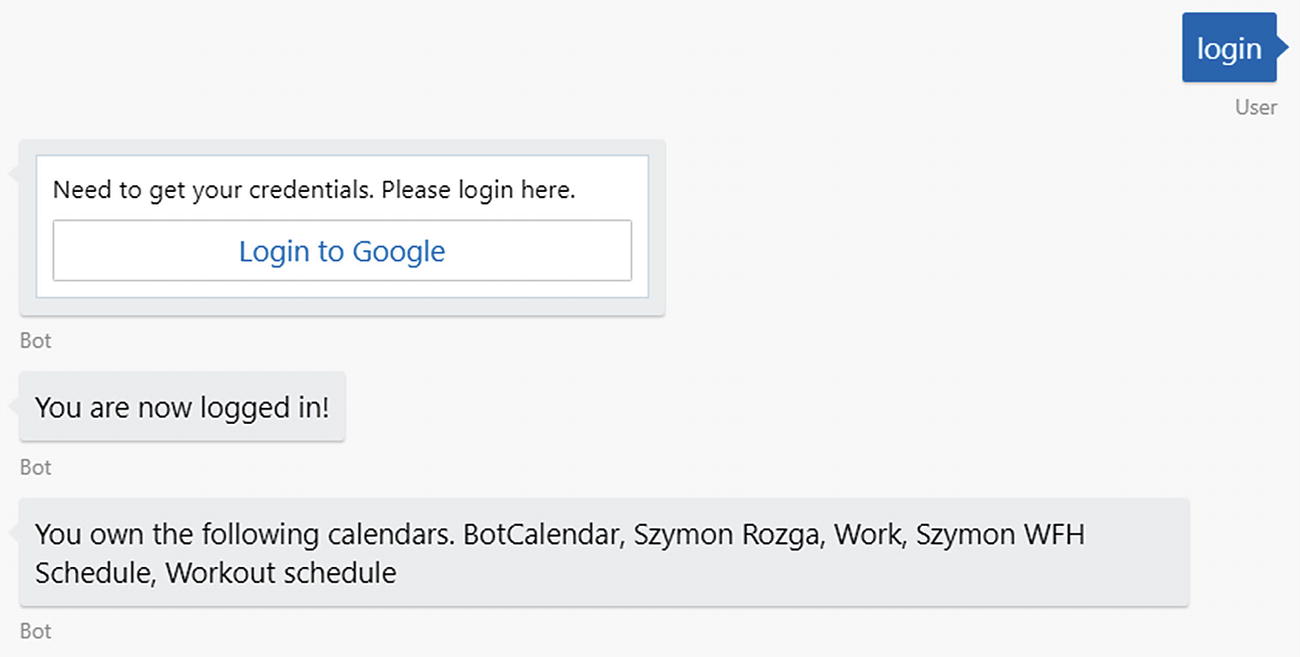
Login flow integrated with a dialog

Seamless Login Flow

We have successfully logged in and stored the access token, but we have not yet demonstrated a seamless mechanism to redirect to a login flow when a dialog requires our users to be logged in. More specifically, if in the context of the calendar bot a user is not logged in and asks the bot to add a new calendar entry, the bot should show the login button and then continue with the Add Entry dialog once login is successful.

There are a few requirements to integrating with the existing dialog flow, listed here:
  1. 1.

    We want to allow users to message the bot with the text login or logout at any time and have the bot do the correct thing.

     
  2. 2.

    When a dialog that requires authorization begins, it needs to validate that the user authorization exists. If the auth does not exist, the login button should show up and block the user from continuing with said dialog until the user is authorized.

     
  3. 3.

    If the user says logout, the tokens should be cleared from the private conversation data and revoked with Google.

     
  4. 4.

    If the user says login, the bot needs to render the login button. This button will point the user to the authorization URL. This is the same as described earlier. We must, however, ensure that clicking the button twice does not confuse the bot and its understanding of the user’s state.


We will naturally implement a Login dialog and a Logout dialog. Logout simply checks the existence of tokens in the conversation state. If we do not have the tokens, we are already logged out. If we do, we use Google’s library to revoke the user’s credentials.5 The tokens are no longer valid.

function getAuthClientFromSession(session) {
    const auth = getAuthClient(session.privateConversationData.tokens);
    return auth;
};
function getAuthClient(tokens) {
    const auth = new OAuth2(
        process.env.GOOGLE_OAUTH_CLIENT_ID,
        process.env.GOOGLE_OAUTH_CLIENT_SECRET,
        process.env.GOOGLE_OAUTH_REDIRECT_URI
    );
    if (tokens) {
        auth.setCredentials(tokens);
    }
    return auth;
}
bot.dialog('LogoutDialog', [(session, args) => {
    if (!session.privateConversationData.tokens) {
        session.endDialog('You are already logged out!');
    } else {
        const client = getAuthClientFromSession(session);
        client.revokeCredentials();
        delete session.privateConversationData['tokens'];
        session.endDialog('You are now logged out!');
    }
}]).triggerAction({
    matches: /^logout$/i
});

Login is a waterfall dialog that begins an EnsureCredentials dialog before it gets to the next step. In the second step, it verifies whether it is logged in. See the following code. It does this by verifying that it receives the authenticated flag from the EnsureCredentials dialog. If yes, it simply lets the user know that she is logged in. Otherwise, an error is shown to the user.

Notice what we did here. We outsourced the logic of figuring out if we are logged in, logging in, and then sending the result back to a different dialog. As long as that dialog returns with an object with fields authenticated and, optionally, error, this just works. We will use the same technique to inject an authorization flow into any other dialog that requires it.

bot.dialog('LoginDialog', [(session, args) => {
    session.beginDialog(constants.dialogNames.Auth.EnsureCredentials);
}, (session, args) => {
    if (args.response.authenticated) {
        session.send('You are now logged in!');
    } else {
        session.endDialog('Failed with error: ' + args.response.error)
    }
}]).triggerAction({
    matches: /^login$/i
});
So, the most important question becomes, what does EnsureCredentials do? There are four cases that this code needs to handle. The first two are simple.
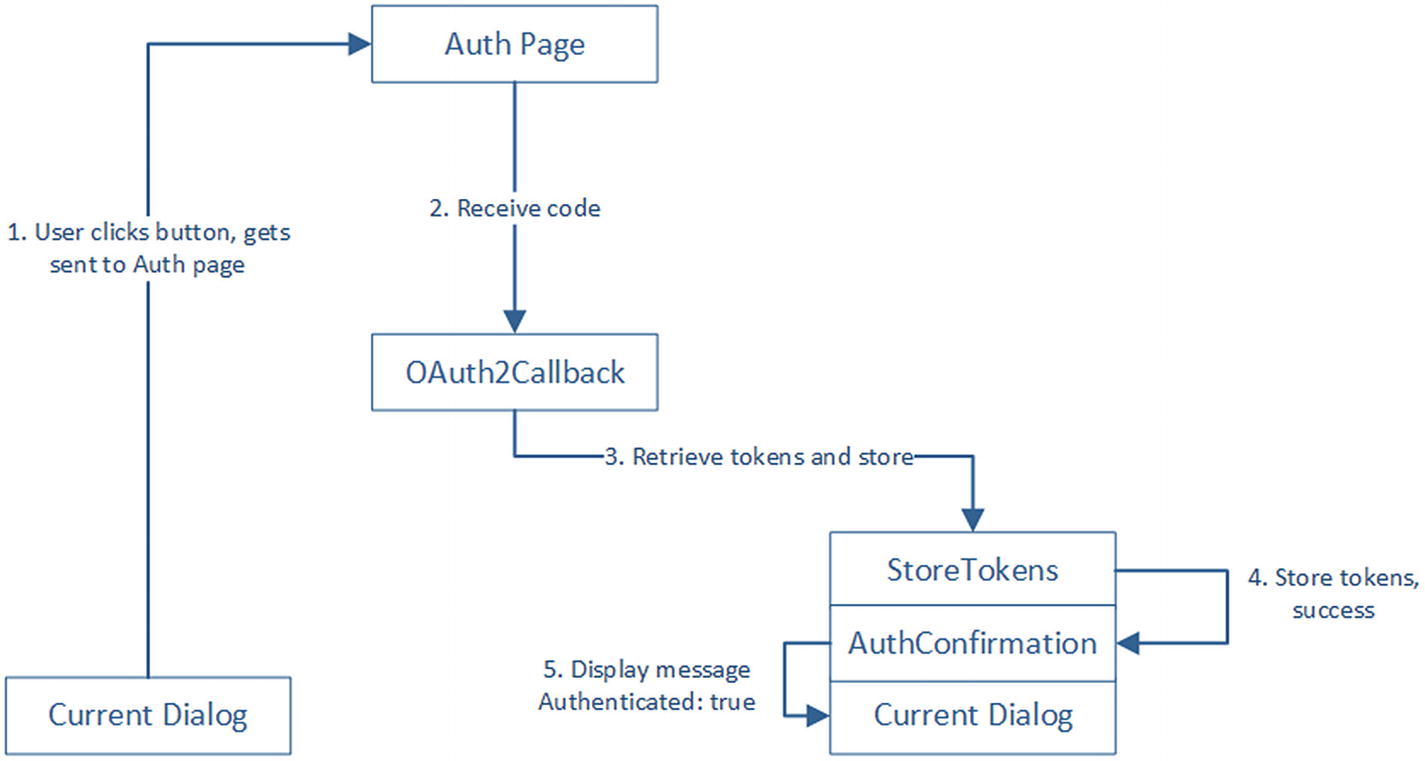
  • What happens if a dialog requires credentials and the authorization is successful?

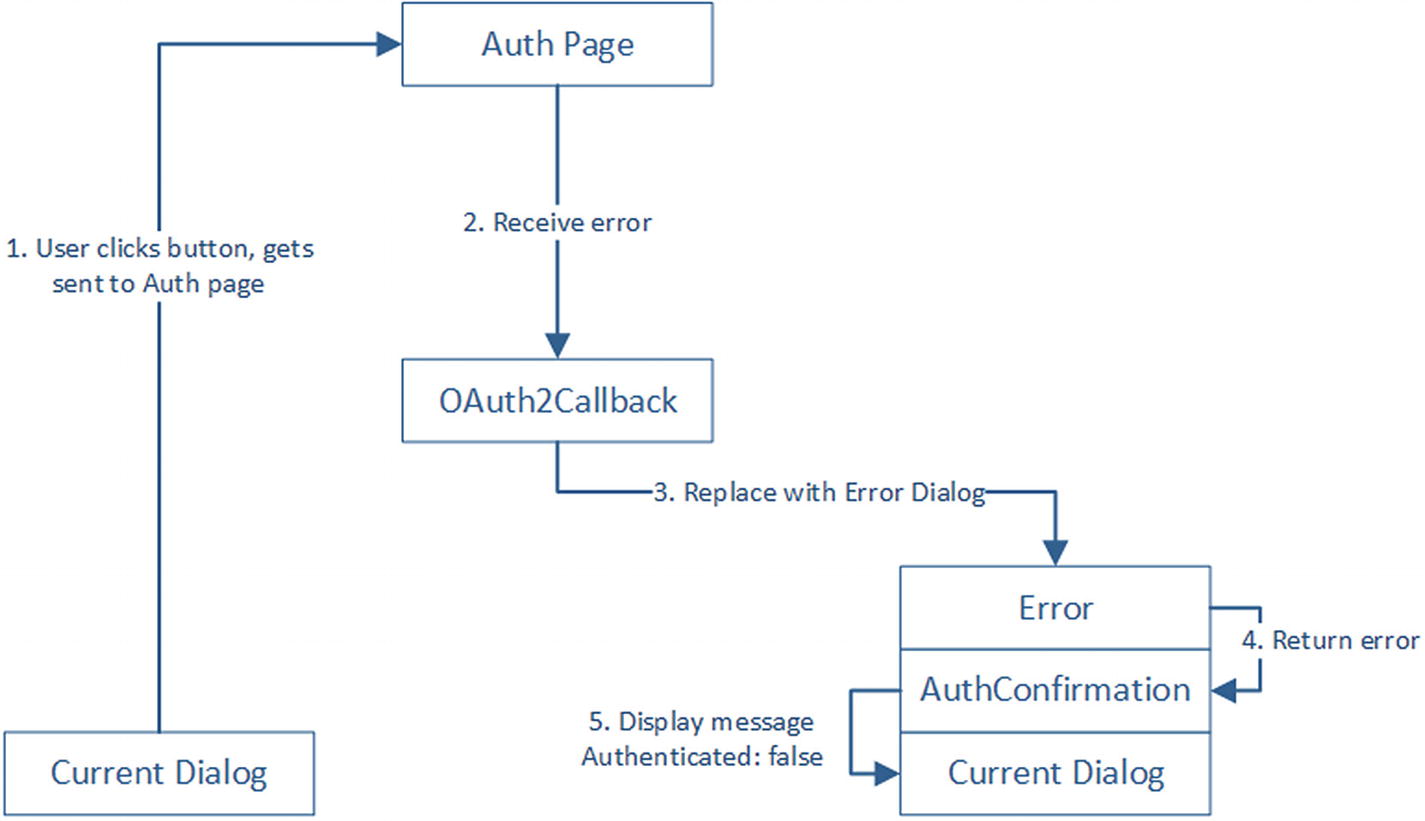
  • What happens if a dialog requires credentials and the authorization fails?

    The second two are a bit more nuanced. Our question is specifically around what the bot should do if a dialog is not awaiting authorization but it comes in anyway. Or said differently, what happens if EnsureCredentials is not on top of the stack?

  • What happens if the user clicks the login button outside the scope of a dialog that needs it and the authorization is successful?

  • What happens if the user clicks the login button outside the scope of a dialog that needs it and the authorization fails?

We illustrate the flow for the first case in Figure 7-12. A dialog requests that we have the user’s authorizations before continuing, like the Login dialog did in the previous code. The user is sent to the auth page. Once the auth page returns a successful authorization code, it sends a callback to our oauth2callback. Once we get the tokens, we call a StoreTokens dialog to store the tokens into the conversation data. That dialog will return a success message to EnsureCredentials . In turn, this returns a successful authentication message to the calling dialog.
../images/455925_1_En_7_Chapter/455925_1_En_7_Fig12_HTML.jpg
Figure 7-12

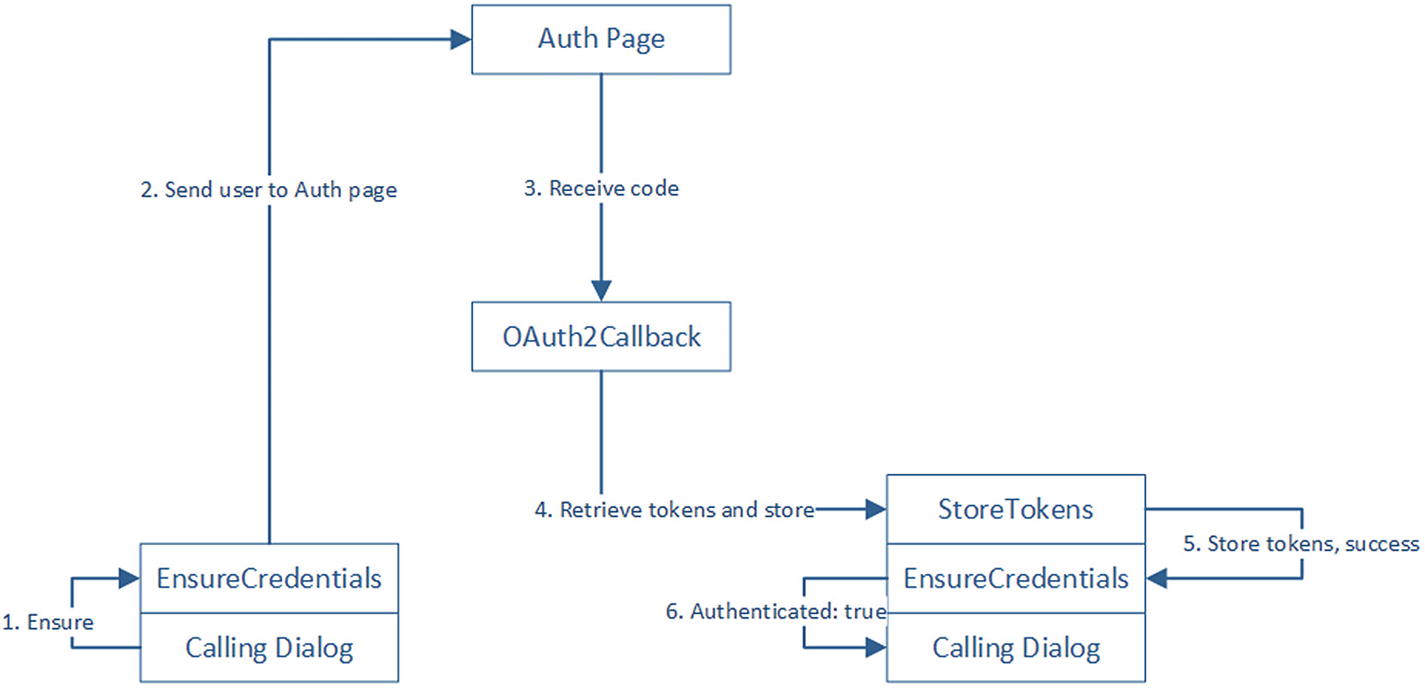
Dialog requires authorization, successful authorization

If an error occurs, the flow is similar except that we replace the EnsureCredentials dialog with the Error dialog. The Error dialog will then return a failed authenticate message to the calling dialog, which can handle the error as it best sees fit (Figure 7-13). Recall, as we noted in Chapter 5, replaceDialog is a call that replaces the current dialog on top of the stack with an instance of another dialog. The calling dialog does not know, nor care, about this implementation detail.
../images/455925_1_En_7_Chapter/455925_1_En_7_Fig13_HTML.jpg
Figure 7-13

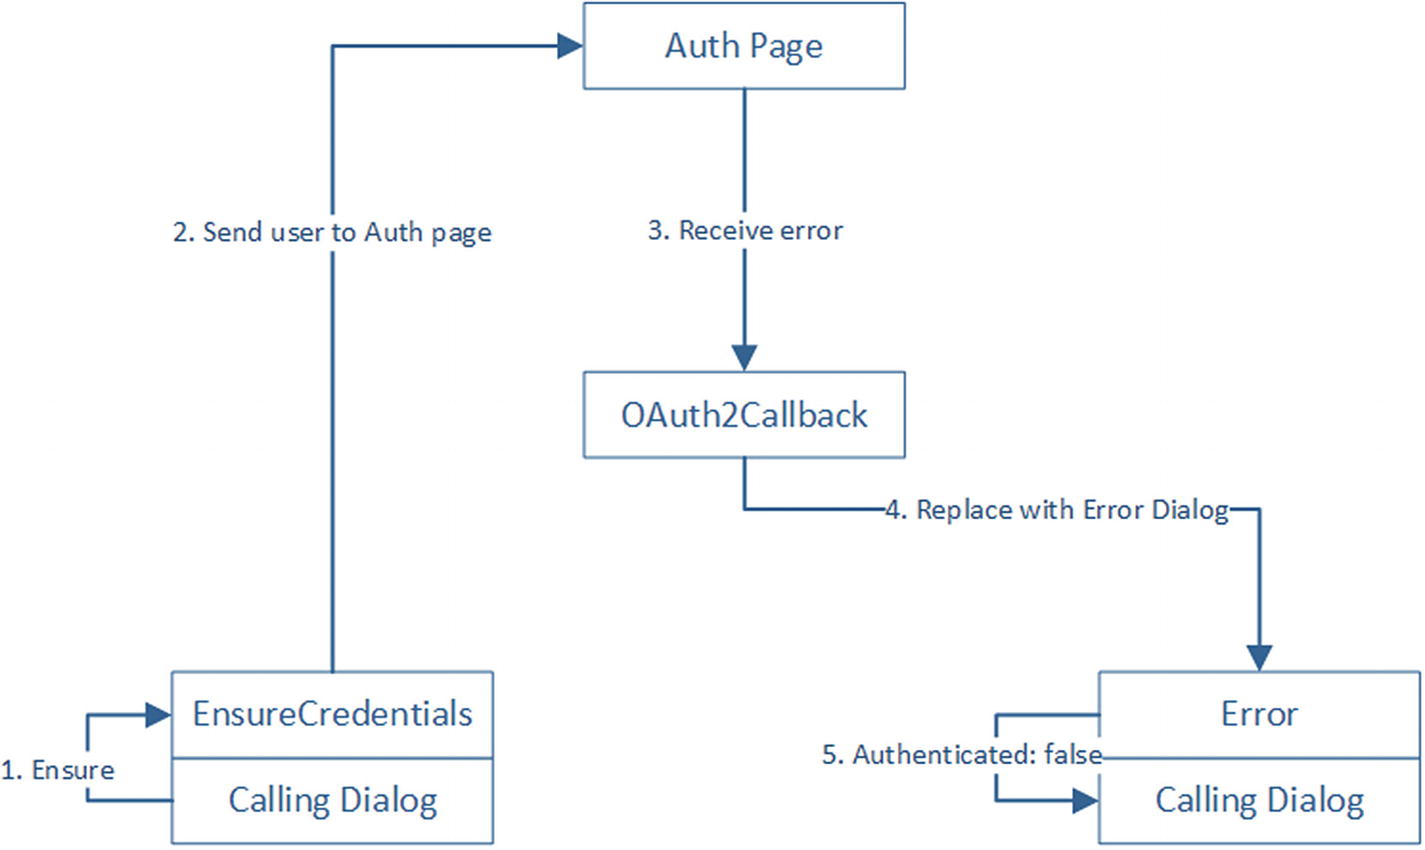
Dialog requires authorization, failed authorization

In the case that the user clicks the login button when a dialog is not expecting a reply and EnsureCredentials is not on top of the stack, the flow is slightly different. We want to display a success or failure message to the user if the authorization succeeds or fails. To achieve this, we will put a confirmation dialog, AuthConfirmation, on the stack before invoking the StoreTokens dialog (Figure 7-14).
../images/455925_1_En_7_Chapter/455925_1_En_7_Fig14_HTML.jpg
Figure 7-14

User says login, successful authorization

Likewise, in the case we receive an authorization error, we push the AuthConfirmation dialog on top of the stack, before pushing the Error dialog (Figure 7-15). This will ensure that the confirmation dialog displays the right type of message to the user.
../images/455925_1_En_7_Chapter/455925_1_En_7_Fig15_HTML.jpg
Figure 7-15

User says login, failed authorization

Let’s see what the code for this looks like. The Login and Logout dialogs are done, but let’s look at EnsureCredentials, StoreTokens, and Error.

EnsureCredentials is composed of two steps. First, if the user has a set of tokens defined, the dialog finishes passing a result indicating that the user is good to go. Otherwise, we create the auth URL and send a SigninCard to the user, just like we did in the previous section. The second step also executes in case 1. It simply tells the calling dialog that the user is authorized.

bot.dialog('EnsureCredentials', [(session, args) => {
    if(session.privateConversationData.tokens) {
        // if we have the tokens... we're good. if we have the tokens for too long and the tokens expired
        // we'd need to somehow handle it here.
        session.endDialogWithResult({ response: { authenticated: true } });
        return;
    }
    const oauth2Client = getAuthClient();
    const state = {
        address: session.message.address
    };
    const encryptedState = CryptoJS.AES.encrypt(JSON.stringify(state), process.env.AES_PASSPHRASE).toString();
    const authUrl = oauth2Client.generateAuthUrl({
        access_type: 'offline',
        scope: googleApiScopes,
        state: encryptedState
    });
    const card = new builder.HeroCard(session)
        .title('Login to Google')
        .text("Need to get your credentials. Please login here.")
        .buttons([
            builder.CardAction.openUrl(session, authUrl, 'Login')
        ]);
    const loginReply = new builder.Message(session)
        .attachmentLayout(builder.AttachmentLayout.carousel)
        .attachments([card]);
    session.send(loginReply);
}, (session, args) => {
    session.endDialogWithResult({ response: { authenticated: true } });
}]);

StoreTokens and Error are similar. Both essentially return an authorization result to its parent dialog. In the case of StoreTokens , we also store the tokens into the conversation data.

bot.dialog('Error', [(session, args) => {
    session.endDialogWithResult({ response: { authenticated: false, error: args.error } });
}]);
bot.dialog('StoreTokens', function (session, args) {
    session.privateConversationData.tokens = args.tokens;
    session.privateConversationData.calendarId = args.calendarId;
    session.endDialogWithResult({ response: { authenticated: true }});
});

Note that EnsureCredentials is going to consume the result of either of these two and simply pass it down to the calling dialog. It is up to the calling dialog to display a success or error message. There may not even be a success message; the calling dialog may just jump into its own steps.

That covers cases 1 and 2. To ensure cases 3 and 4 are covered, we need to implement this AuthConfirmation dialog. The role of this dialog is to display either a success or failure message. Recall that we place either an Error (case 3) or StoreTokens (case 4) dialog on top of AuthConfirmation. The idea is that AuthConfirmation will receive the name of the dialog to place on top of itself and then send the appropriate message to the user when it receives a result.

bod.dialog('AuthConfirmation', [
    (session, args) => {
        session.beginDialog(args.dialogName, args);
    },
    (session, args) => {
        if (args.response.authenticated) {
            session.endDialog('You are now logged in.')
        }
        else {
            session.endDialog('Error occurred while logging in. ' + args.response.error);
        }
    }
]);

Lastly, how do we change our endpoint callback code? Before we get there, we write a few helpers to invoke the different dialogs. We expose a function called isInEnsure that verifies whether we are getting into this piece of code from the EnsureCredentials dialog. This will dictate whether we need the AuthConfirmation. beginErrorDialog and beginStoreTokensAndResume both utilize this approach. Finally, ensureLoggedIn is the function that each dialog that requires authorization must call to kick off the flow.

function isInEnsure(session) {
    return _.find(session.dialogStack(), function (p) { return p.id.indexOf('EnsureCredentials') >= 0; }) != null;
}
const beginErrorDialog = (session, args) => {
    if (isInEnsure(session)) {
        session.replaceDialog('Error', args);
    }
    else {
        args.dialogName = 'Error';
        session.beginDialog('AuthConfirmation', args);
    }
};
const beginStoreTokensAndResume = (session, args) => {
    if (isInEnsure(session)) {
        session.beginDialog('StoreTokens', args);
    } else {
        args.dialogName = 'StoreTokens';
        session.beginDialog('AuthConfirmation', args);
    }
};
const ensureLoggedIn = (session) => {
    session.beginDialog('EnsureCredentials');
};

Finally, let’s look at the callback. The code looks similar to our callback in the previous section, except we need to add the logic to begin the right dialogs. If we encounter any errors while loading our session object or we get an OAuth error, such as the user declining access to our bot, we redirect the user to the Error dialog. Otherwise, we use the authorization code from Google to get the tokens, set the credentials in the OAuth client, and call into the StoreTokens or AuthConfirmation dialog. The following code covers the four cases highlighted at the beginning of this section:

exports.oAuth2Callback = function (bot, req, res, next) {
    const code = req.query.code;
    const encryptedState = req.query.state;
    const oauthError = req.query.error;
    const state = JSON.parse(CryptoJS.AES.decrypt(encryptedState, process.env.AES_PASSPHRASE).toString(CryptoJS.enc.Utf8));
    const oauth2Client = getAuthClient();
    res.contentType = 'json';
    bot.loadSession(state.address, (sessionLoadError, session) => {
        if (sessionLoadError) {
            console.log('SessionLoadError:' + sessionLoadError);
            beginErrorDialog(session, { error: 'unable to load session' });
            res.send(401, {
                status: 'Unauthorized'
            });
        } else if (oauthError) {
            console.log('OAuthError:' + oauthError);
            beginErrorDialog(session, { error: 'Access Denied' });
            res.send(401, {
                status: 'Unauthorized'
            });
        } else {
            oauth2Client.getToken(code, (error, tokens) => {
                if (!error) {
                    oauth2Client.setCredentials(tokens);
                    res.send(200, {
                        status: 'success'
                    });
                    beginStoreTokensAndResume(session, {
                        tokens: tokens
                    });
                } else {
                    beginErrorDialog(session, {
                        error: error
                    });
                    res.send(500, {
                        status: 'error'
                    });
                }
            });
        }
        next();
    });
};

Exercise 7-1

Setting Up Google Auth with Gmail Access

The goal of this exercise to create a bot that allows a user to authorize against the Gmail API . Your goal is to follow these steps:
  1. 1.

    Set up a Google project and enable access to the Google Gmail API.

     
  2. 2.

    Create an OAuth client ID and secret.

     
  3. 3.

    Create a basic workflow in your bot that allows users to log into Google with the Gmail scope and store the tokens in the user’s private conversation data.


At the end of this exercise, you will have created a bot that is ready to access the Gmail API on behalf of the bot user.

Integrating with the Google Calendar API

We are now ready to integrate with the Google Calendar API. There are a few things we should address first. Google Calendar allows users to have access to multiple calendars and, further, to have a different permission level for each calendar. In our bot, we assume that at any point we are querying or adding events into only one calendar, as flawed as that may seem. We could extend the LUIS application and bot to include the ability to specify a calendar for each utterance.

To handle this, we create a PrimaryCalendar dialog that allows users to set, reset, and retrieve their primary calendar. Similar to the EnsureCredentials dialog being called at the beginning of each dialog that requires authentication, we create a similar mechanism to guarantee that a calendar is set as primary.

Before we get there, let’s talk about connecting to the Google Calendar API. The googleapis node package includes the Calendar APIs, among others. The API utilizes the following format:

API.Resource.Method(args, function (error, response) {
});

A calendar call would look as follows:

calendar.events.get({
    auth: auth,
    calendarId: calendarId,
    eventId: eventId
}, function (err, response) {
    // do stuff with the error and/or response
});

First, we will adapt this to the JavaScript Promise6 pattern. Promises make it easy to work with asynchronous calls. A promise in JavaScript represents an eventual completion or failure of an operation, as well as its return value. It supports a then method that allows us to perform an action on the result and a catch method that allows us to perform an action on the error object. Promises can be chained: the result of a promise can be passed to another promise that produces a result that can get passed into another promise and so forth, resulting in code that look as follows:

promise1()
    .then(r1 => promise2(r2))
    .then(r2 => promise3(r2))
    .catch(err => console.log('Error in promise chain. ' + err));

Our modified Google Calendar Promise API will look as follows:

gcalapi.getCalendar(auth, temp)
    .then(function (result) {
        // do something with result
    }).catch(function (err) {
        // do something with err
    });

We wrap all the necessary functions in a module called calendar-api. Some of the code is presented here:

const google = require('googleapis');
const calendar = google.calendar('v3');
function listEvents (auth, calendarId, start, end, subject) {
    const p = new Promise(function (resolve, reject) {
        calendar.events.list({
            auth: auth,
            calendarId: calendarId,
            timeMin: start.toISOString(),
            timeMax: end.toISOString(),
            q: subject
        }, function (err, response) {
            if (err) reject(err);
            resolve(response.items);
        });
    });
    return p;
}
function listCalendars (auth) {
    const p = new Promise(function (resolve, reject) {
        calendar.calendarList.list({
            auth: auth
        }, function (err, response) {
            if (err) reject(err);
            else resolve(response.items);
        });
    });
    return p;
};
With the API working, we now turn our focus to the PrimaryCalendar dialog. This dialog must handle several scenarios.
  • What happens if a user sends utterances such as “get primary calendar” or “set primary calendar”? The former should return a card representation of the calendar, and the latter should allow the user to select a calendar card.

  • What happens if a user logs in and a primary calendar isn’t set? At that point, we automatically try to get the user to select a calendar.

  • What happens if the user selects a calendar via the action button on the calendar card?

  • What happens if the user selects a calendar by typing the calendar’s name?

  • What happens if the user tries to perform an action that requires a calendar to be set (such as adding a new appointment)?

The PrimaryCalendar dialog is a waterfall dialog with three steps. Step 1 ensures that the user is logged in by calling EnsureCredentials. Step 2 expects to receive a command from a user. We can either get our current primary calendar, set a calendar, or reset our calendar; thus, the three commands are get, set, or reset. Set calendar takes an optional calendar ID. If a calendar ID is not passed, the set command is treated equivalently to reset. Reset simply sends the user a list of all available calendars to which a user has write access to (another simplifying assumption).

The get case is handled by this code:

let temp = null;
if (calendarId) { temp = calendarId.entity; }
if (!temp) {
    temp = session.privateConversationData.calendarId;
}
gcalapi.getCalendar(auth, temp).then(result => {
    const msg = new builder.Message(session)
        .attachmentLayout(builder.AttachmentLayout.carousel)
        .attachments([utils.createCalendarCard(session, result)]);
    session.send(msg);
}).catch(err => {
    console.log(err);
    session.endDialog('No calendar found.');
});

The reset case sends the user a carousel of calendar cards. If the user enters a text input, the third step of the waterfall assumes that the input is a calendar name and sets the right calendar. If the input isn’t recognized, an error message is sent.

handleReset(session, auth);
function handleReset (session, auth) {
    gcalapi.listCalendars(auth).then(result => {
        const myCalendars = _.filter(result, p => { return p.accessRole !== 'reader'; });
        const msg = new builder.Message(session)
            .attachmentLayout(builder.AttachmentLayout.carousel)
            .attachments(_.map(myCalendars, item => { return utils.createCalendarCard(session, item); }));
        builder.Prompts.text(session, msg);
    }).catch(err => {
        console.log(err);
        session.endDialog('No calendar found.');
    });
}

The createCalendarCard method simply sends a card with a title, subtitle, and a button that sends the set calendar command. The button posts back this value: Set primary calendar to {calendarId}.

function createCalendarCard (session, calendar) {
    const isPrimary = session.privateConversationData.calendarId === calendar.id;
    let subtitle = 'Your role: ' + calendar.accessRole;
    if (isPrimary) {
        subtitle = 'Primary\r\n' + subtitle;
    }
    let buttons = [];
    if (!isPrimary) {
        let btnval = 'Set primary calendar to ' + calendar.id;
        buttons = [builder.CardAction.postBack(session, btnval, 'Set as primary')];
    }
    const heroCard = new builder.HeroCard(session)
        .title(calendar.summary)
        .subtitle(subtitle)
        .buttons(buttons);
    return heroCard;
};

This presents an interesting challenge. If a calendar card is sent in any context other than the PrimaryCalendar dialog, we need a full utterance like to resolve to a global action, which then invokes the PrimaryCalendar dialog. However, if we serve a card like this in the context of the primary calendar dialog, the button will still trigger the global action, therefore resetting our entire stack. We don’t want to set different text based on which dialog created the card because these buttons remain in the chat history and can be clicked any time.

In addition, if the PrimaryCalendar dialog is invoked, we would like to ensure that it does not get rid of the current dialog. For example, if I am in the middle of adding an appointment, I should be able to switch calendars and come back to the right step in the process afterward.

We override the triggerAction and selectAction methods to ensure the right behavior. If another instance of the PrimaryCalendar dialog is on the stack, we replace it. Otherwise, we push the PrimaryCalendar dialog to the top of the stack.

.triggerAction({
    matches: constants.intentNames.PrimaryCalendar,
    onSelectAction: (session, args, next) => {
        if (_.find(session.dialogStack(), function (p) { return p.id.indexOf(constants.dialogNames.PrimaryCalendar) >= 0; }) != null) {
            session.replaceDialog(args.action, args);
        } else {
            session.beginDialog(args.action, args);
        }
    }
});

If a PrimaryCalendar dialog is invoked while the user is within another instance of the PrimaryCalendar dialog, we replace the top dialog with another instance of the PrimaryCalendar dialog. In reality, and bear with me here, this will occur only in the reset command, and it will actually replace the builder.Prompts.text dialog that we invoke in handleReset.

So, in essence we end up with a PrimaryCalendar dialog waiting for a response object that can now come from another PrimaryCalendar dialog. We can have the topmost instance return a flag when it is done so that the other instance simply exits when the third step resumes. Here is the final waterfall step to illustrate this logic:

function (session, args) {
    // if we have a response from another primary calendar dialog, we simply finish up!
    if (args.response.calendarSet) {
        session.endDialog({ response: { calendarSet: true } });
        return;
    }
    // else we try to match the user text input to a calendar name
    var name = session.message.text;
    var auth = authModule.getAuthClientFromSession(session);
    // we try to find the calendar with a summary that matches the user's input.
    gcalapi.listCalendars(auth).then(function (result) {
        var myCalendars = _.filter(result, function (p) { return p.accessRole != 'reader'; });
        var calendar = _.find(myCalendars, function (item) { return item.summary.toUpperCase() === name.toUpperCase(); });
        if (calendar == null) {
            session.send('No such calendar found.');
            session.replaceDialog(constants.dialogNames.PrimaryCalendar);
        }
        else {
            session.privateConversationData.calendarId = result.id;
            var card = utils.createCalendarCard(session, result);
            var msg = new builder.Message(session)
                .attachmentLayout(builder.AttachmentLayout.carousel)
                .attachments([card])
                .text('Primary calendar set!');
            session.send(msg);
            session.endDialog({ response: { calendarSet: true } });
        }
    }).catch(function (err) {
        console.log(err);
        session.endDialog('No calendar found.');
    });
}

The set action is less complex. If we receive a calendar ID along with the user message, we simply set that message and send back a card of the calendar. If we do not receive a calendar ID, we assume the same behavior as reset.

let temp = null;
if (calendarId) { temp = calendarId.entity; }
if (!temp) {
    handleReset(session, auth);
} else {
    gcalapi.getCalendar(auth, temp).then(result => {
        session.privateConversationData.calendarId = result.id;
        const card = utils.createCalendarCard(session, result);
        const msg = new builder.Message(session)
            .attachmentLayout(builder.AttachmentLayout.carousel)
            .attachments([card])
            .text('Primary calendar set!');
        session.send(msg);
        session.endDialog({ response: { calendarSet: true } });
    }).catch(err => {
        console.log(err);
        session.endDialog('this calendar does not exist');
        // this calendar id doesn't exist...
    });
}

That was a lot to process, but it is a good illustration of some the dialog gymnastics that need to occur to ensure a consistent and comprehensive conversational experience. In the following section, we will integrate the authentication and primary calendar flows into the dialogs we developed in Chapter 6 and connect the logic to calls into the Google Calendar API.

Implementing the Bot Functionality

At this point, we are ready to connect our bot code to the Google Calendar API. Our code doesn’t change too much from its Chapter 5 state. These are the main changes to our dialogs:
  • We must ensure that the user is logged in.

  • We must ensure a primary calendar is set.

  • Utilize the Google Calendar APIs to finally make things happen!

Let’s start with the first two items. We have created the EnsureCredentials and PrimaryCalendar dialogs for this very purpose. In the provided code, our authModule and primaryCalendarModule modules contain a couple of helpers to call the EnsureCredentials and PrimaryCalendar dialogs. Each of our functions can utilize the helpers to ensure that the credentials and the primary calendar are set.

This is too much responsibility for those dialogs. We would have to add two steps into every single dialog. Instead, let’s create a dialog that can evaluate all the prechecks in the correct order and simply pass one result to the calling dialog. Here’s how we would achieve this. We create a dialog called PreCheck . This dialog will make the necessary checks and return a response object with an error set if there is an error as well as a flag indicating which check failed.

bot.dialog('PreCheck', [
    function (session, args) {
        authModule.ensureLoggedIn(session);
    },
    function (session, args) {
        if (!args.response.authenticated) {
            session.endDialogWithResult({ response: { error: 'You must authenticate to continue.', error_auth: true } });
        } else {
            primaryCalendarModule.ensurePrimaryCalendar(session);
        }
    },
    function (session, args, next) {
        if (session.privateConversationData.calendarId) session.endDialogWithResult({ response: { } });
        else session.endDialogWithResult({ response: { error: 'You must set a primary calendar to continue.', error_calendar: true } });
    }
]);

Any dialog that needs auth and a primary calendar to be set only needs to invoke the PreCheck dialog and ensure there was no error. Here is an example from the ShowCalendarSummary dialog in the sample code. Note that the first step in the waterfall calls PreCheck, and the second step ensures all prechecks successfully passed.

lib.dialog(constants.dialogNames.ShowCalendarSummary, [
    function (session, args) {
        g = args.intent;
        prechecksModule.ensurePrechecks(session);
    },
    function (session, args, next) {
        if (args.response.error) {
            session.endDialog(args.response.error);
            return;
        }
        next();
    },
    function (session, args, next) {
        // do stuff
    }
]).triggerAction({ matches: constants.intentNames.ShowCalendarSummary });

So that’s it for the first two items. At this point, all that is left is the third one; we need to implement the actual integration with the Google Calendar API. The following is the example of what the third step of the ShowCalendarSummary dialog looks like. Notice that we gather the datetimeV2 entities to figure out what time period we need to retrieve events for, we optionally use the Subject entity to filter out calendar items, and we build a carousel of event cards, ordered by date. The createEventCard method creates a HeroCard object for every Google Calendar API event object.

The implementation of the remaining dialogs is available in the calendar-bot-buildup repository included with the book.

    function (session, args, next) {
        var auth = authModule.getAuthClientFromSession(session);
        var entry = new et.EntityTranslator();
        et.EntityTranslatorUtils.attachSummaryEntities(entry, session.dialogData.intent.entities);
        var start = null;
        var end = null;
        if (entry.hasRange) {
            if (entry.isDateTimeEntityDateBased) {
                start = moment(entry.range.start).startOf('day');
                end = moment(entry.range.end).endOf('day');
            } else {
                start = moment(entry.range.start);
                end = moment(entry.range.end);
            }
        } else if (entry.hasDateTime) {
            if (entry.isDateTimeEntityDateBased) {
                start = moment(entry.dateTime).startOf('day');
                end = moment(entry.dateTime).endOf('day');
            } else {
                start = moment(entry.dateTime).add(-1, 'h');
                end = moment(entry.dateTime).add(1, 'h');
            }
        }
        else {
            session.endDialog("Sorry I don't know what you mean");
            return;
        }
        var p = gcalapi.listEvents(auth, session.privateConversationData.calendarId, start, end);
        p.then(function (events) {
            var evs = _.sortBy(events, function (p) {
                if (p.start.date) {
                    return moment(p.start.date).add(-1, 's').valueOf();
                } else if (p.start.dateTime) {
                    return moment(p.start.dateTime).valueOf();
                }
            });
            // should also potentially filter by subject
            evs = _.filter(evs, function(p) {
                if(!entry.hasSubject) return true;
                var containsSubject = entry.subject.toLowerCase().indexOf(entry.subject.toLowerCase()) >= 0;
                return containsSubject;
            });
            var eventmsg = new builder.Message(session);
            if (evs.length > 1) {
                eventmsg.text('Here is what I found...');
            } else if (evs.length == 1) {
                eventmsg.text('Here is the event I found.');
            } else {
                eventmsg.text('Seems you have nothing going on then. What a sad existence you lead.');
            }
            if (evs.length >= 1) {
                var cards = _.map(evs, function (p) {
                    return utils.createEventCard(session, p);
                });
                                     eventmsg.attachmentLayout(builder.AttachmentLayout.carousel);
                eventmsg.attachments(cards);
            }
            session.send(eventmsg);
            session.endDialog();
        });
    }
function createEventCard(session, event) {
    var start, end, subtitle;
    if (!event.start.date) {
        start = moment(event.start.dateTime);
        end = moment(event.end.dateTime);
        var diffInMinutes = end.diff(start, "m");
        var diffInHours = end.diff(start, "h");
        var duration = diffInMinutes + ' minutes';
        if (diffInHours >= 1) {
            var hrs = Math.floor(diffInHours);
            var mins = diffInMinutes - (hrs * 60);
            if (mins == 0) {
                duration = hrs + 'hrs';
            } else {
                duration = hrs + (hrs > 1 ? 'hrs ' : 'hr ') + (mins < 10 ? ('0' + mins) : mins) + 'mins';
            }
        }
        subtitle = 'At ' + start.format('L LT') + ' for ' + duration;
    } else {
        start = moment(event.start.date);
        end = moment(event.end.date);
        var diffInDays = end.diff(start, 'd');
        subtitle = 'All Day ' + start.format('L') + (diffInDays > 1 ? end.format('L') : '');
    }
    var heroCard = new builder.HeroCard(session)
        .title(event.summary)
        .subtitle(subtitle)
        .buttons([
            builder.CardAction.openUrl(session, event.htmlLink, 'Open Google Calendar'),
            builder.CardAction.postBack(session, 'Delete event with id ' + event.id, 'Delete')
        ]);
    return heroCard;
};

Exercise 7-2

Integrating with the Gmail API

Although you are welcome to follow the code in the previous section and then use the code provided with the book to put together a calendar bot, the goal of this exercise is to create a bot that can send emails from the user’s Gmail account. This way, you can exercise your authentication logic from Exercise 7-1 and integrate with a client API you have not seen before.
  1. 1.

    Taking your code from Exercise 7-1 as a starting point, create a bot that contain two dialogs, one for sending mail and one for viewing unread messages. There is no need to create a LUIS application (though you are certainly free to work on that). Use keywords like send and list to invoke the dialogs.

     
  2. 2.

    For the send operation, create a dialog called SendMail. This dialog should collect an email address, a title, and message body text. Ensure the dialog is integrated with an auth flow.

     
  3. 3.

    Integrate with the Gmail client library to send an email using the user’s access tokens collected during the auth flow. Use the documentation here for the messages.send API call: https://developers.google.com/gmail/api/v1/reference/users/messages/send .

     
  4. 4.

    For the list operation, create a dialog called ListMail. This dialog should get all unread mail from the user’s inbox using the user’s access tokens collected during the auth flow. Use the documentation here for the messages.list API call: https://developers.google.com/gmail/api/v1/reference/users/messages/list .

     
  5. 5.

    Render the list of unread messages as a carousel. Display the title, date received, and a button to open the email message in a web browser. You can find the reference for the messages object here: https://developers.google.com/gmail/api/v1/reference/users/messages#resource . The URL for a message is https://mail.google.com/mail/#inbox/{MESSAGE_ID }.


If you succeeded in creating this bot, congratulations! This is not the easiest of exercises, but the results is well worth it. You now have the skills to create a bot, integrate it with an OAuth flow, use a third-party API to make your bot functional, and render items as cards. Great work!

Conclusion

Building bots is both easy and challenging. It is easy to set up a basic bot with some simple commands. It is easy to get user utterances and execute code based on them. It is, however, quite challenging to get the user experience just right. As we have observed, the challenges in developing bots are twofold.

First, we need to make sense of the many permutations of natural language utterances. Our users can say the same things in numerous ways with nuanced variations. The LUIS application we’ve built for this book are a good start, but there are many other ways of expressing the same ideas. We’ll need to exercise judgment on when we say that a LUIS application is good enough. Bot testing is where a lot of this kind of evaluation occurs. Once we unleash a set of users on your bot, we will see how users end up using your bot and what type of inputs and behaviors they expect to be handled. This is the data we need to improve our natural language understanding and decide what features to build next. We will cover analytics tools that help with this task in Chapter 13.

Second, it is important to spend time on the overall conversations experience. Although this is not the focus of this book, a proper experience is key to our bots’ success. We did spend some time thinking around how to ensure that the user is logged in before we proceed into dialogs with any actions against the Calendar API. This is an example of the type of behaviors and flows that need to be thought through as we develop a bot. A more naïve bot may simply send the user an error saying they need to log in first, after which the user would have to repeat their input. A better implementation is the redirection through dialogs that we created in this chapter. Lucky for us, the Bot Builder SDK and its dialog model help us describe these complex flows in code.

We now have the skills and experience to develop complex and amazing bot experiences, with all types of API integrations. This is the real combined power of LUIS and the Microsoft Bot Framework!