© Szymon Rozga 2018
Szymon RozgaPractical Bot Developmenthttps://doi.org/10.1007/978-1-4842-3540-9_11

11. Adaptive Cards and Custom Graphics

Szymon Rozga1 
(1)
Port Washington, New York, USA
 

Throughout the book we have discussed the different ways in which bots can communicate to users. Bots can use text, voice, images, buttons, or carousels. These combined with the right tone and data become a powerful interface for users to quickly and efficiently accomplish their goals. We can easily build text with correct data, but text may not always be the most effective mechanism to communicate certain ideas. Let’s take the example of a stock quote. What kind of data are users looking for when they ask for a quote for, say, Twitter?

Are they looking for the last price? Are they looking for volume? Are they looking for the bid/ask? Maybe they are looking to see what the 52-week high and low prices are. The truth is, each user may be looking for something slightly different. A text description of the stock may make sense to be read by a voice assistant. We would expect Alexa to say, “Twitter, symbol TWTR, is trading at $24.47 with a volume of 8.1 million. The 52-week range is $14.12 to $25.56. The current bid is $24.46, and the current ask is $24.47.” Could you imagine receiving this data in a bot? Parsing through the text is, quite frankly, painful.

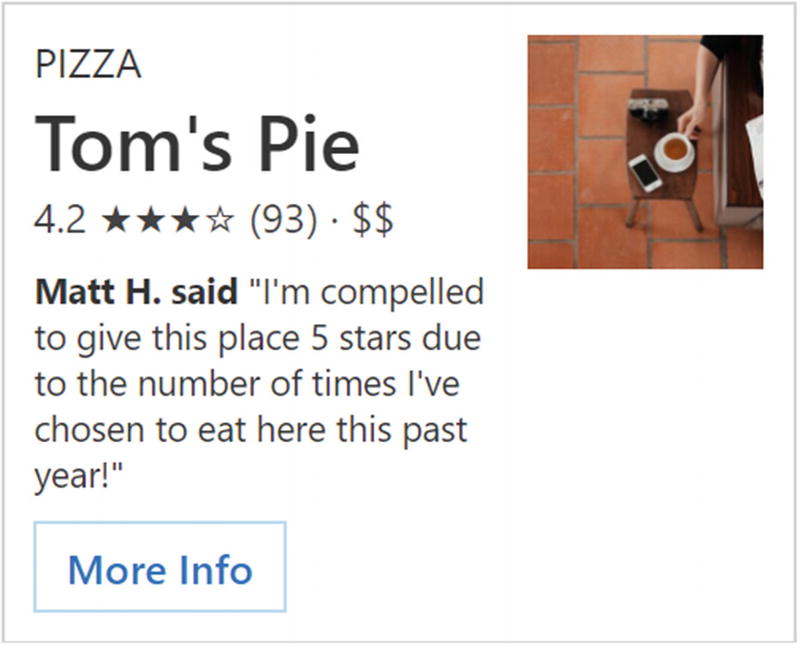
An appealing option is to lay out content inside a card, as in Figure 11-1. This sample comes from the TD Ameritrade Messenger bot. A lot of the same data that is included in the text message is communicated via the figure, yet this format is much easier for a human to consume.
../images/455925_1_En_11_Chapter/455925_1_En_11_Fig1_HTML.jpg
Figure 11-1

A stock quote card

A common hero card does not leave much room to create an interface like this. The title, subtitle, and buttons are easy, but the image is not. How do we include such visuals in our bot? In this chapter, we will explore two approaches: custom image rendering using headless browsers and Adaptive Cards, a format that Microsoft’s connectors can render in a channel-specific manner. We will delve into Adaptive Cards first.

Adaptive Cards

When the Bot Framework was first released, Microsoft created hero cards. The hero card, as we explored in Chapters 4 and 5, is a great abstraction over the distinct ways in which different messaging platforms render images with text and buttons. However, it became evident that hero cards are a bit limiting since they are only composed of an image, title, subtitle, and optional buttons.

To provide more flexible user interfaces, Microsoft created Adaptive Cards. The Adaptive Card object model describes a much richer set of user interfaces within a messaging application. It is the channel connector’s responsibility to render an Adaptive Card definition into whatever form is supported by the channel. Basically, it’s a much richer version of the hero card.

Adaptive Cards were announced at the Build 2017 conference. As chat bot developers, we now have one format to describe a rich user interface. The format itself is a mix of a XAML-like layout engine with HTML-like concepts in a JSON format.

Here is an example of a restaurant card and its rendering in Figure 11-2:

{
    "$schema": "http://adaptivecards.io/schemas/adaptive-card.json",
    "type": "AdaptiveCard",
    "version": "1.0",
    "body": [
        {
            "speak": "Tom's Pie is a Pizza restaurant which is rated 9.3 by customers.",
            "type": "ColumnSet",
            "columns": [
                {
                    "type": "Column",
                    "width": 2,
                    "items": [
                        {
                            "type": "TextBlock",
                            "text": "PIZZA"
                        },
                        {
                            "type": "TextBlock",
                            "text": "Tom's Pie",
                            "weight": "bolder",
                            "size": "extraLarge",
                            "spacing": "none"
                        },
                        {
                            "type": "TextBlock",
                            "text": "4.2 ★★★☆ (93) · $$",
                            "isSubtle": true,
                            "spacing": "none"
                        },
                        {
                            "type": "TextBlock",
                            "text": "**Matt H. said** \"I'm compelled to give this place 5 stars due to the number of times I've chosen to eat here this past year!\"",
                            "size": "small",
                            "wrap": true
                        }
                    ]
                },
                {
                    "type": "Column",
                    "width": 1,
                    "items": [
                        {
                            "type": "Image",
                            "url": "https://picsum.photos/300?image=882",
                            "size": "auto"
                        }
                    ]
                }
            ]
        }
    ],
    "actions": [
        {
            "type": "Action.OpenUrl",
            "title": "More Info",
            "url": "https://www.youtube.com/watch?v=dQw4w9WgXcQ"
        }
    ]
}
../images/455925_1_En_11_Chapter/455925_1_En_11_Fig2_HTML.jpg
Figure 11-2

A restaurant card rendering

In an Adaptive Card, almost everything is a container that can include other containers or UI elements. The result is a UI object tree, just like any other standard UI platform. In this example we have a container with two columns. The first column is double the width of the second column and contains four TextBlock elements. The second column simply contains an image. Lastly, the card includes one action that opens a web URL. Here is another example and its rendering (Figure 11-3):

{
  "$schema": "http://adaptivecards.io/schemas/adaptive-card.json",
  "type": "AdaptiveCard",
  "version": "1.0",
  "body": [
    {
      "type": "ColumnSet",
      "columns": [
        {
          "type": "Column",
          "width": 2,
          "items": [
            {
              "type": "TextBlock",
              "text": "Tell us about yourself",
              "weight": "bolder",
              "size": "medium"
            },
            {
              "type": "TextBlock",
              "text": "We just need a few more details to get you booked for the trip of a lifetime!",
              "isSubtle": true,
              "wrap": true
            },
            {
              "type": "TextBlock",
              "text": "Don't worry, we'll never share or sell your information.",
              "isSubtle": true,
              "wrap": true,
              "size": "small"
            },
            {
              "type": "TextBlock",
              "text": "Your name",
              "wrap": true
            },
            {
              "type": "Input.Text",
              "id": "myName",
              "placeholder": "Last, First"
            },
            {
              "type": "TextBlock",
              "text": "Your email",
              "wrap": true
            },
            {
              "type": "Input.Text",
              "id": "myEmail",
              "placeholder": "youremail@example.com",
              "style": "email"
            },
            {
              "type": "TextBlock",
              "text": "Phone Number"
            },
            {
              "type": "Input.Text",
              "id": "myTel",
              "placeholder": "xxx.xxx.xxxx",
              "style": "tel"
            }
          ]
        },
        {
          "type": "Column",
          "width": 1,
          "items": [
            {
              "type": "Image",
              "url": "https://upload.wikimedia.org/wikipedia/commons/b/b2/Diver_Silhouette%2C_Great_Barrier_Reef.jpg",
              "size": "auto"
            }
          ]
        }
      ]
    }
  ],
  "actions": [
    {
      "type": "Action.Submit",
      "title": "Submit"
    }
  ]
}
../images/455925_1_En_11_Chapter/455925_1_En_11_Fig3_HTML.jpg
Figure 11-3

A data-gathering template

This has a similar overall layout with two columns that have a 2:1 width ratio. The first column contains text of varying sizes as well as three input fields. The second column contains an image.

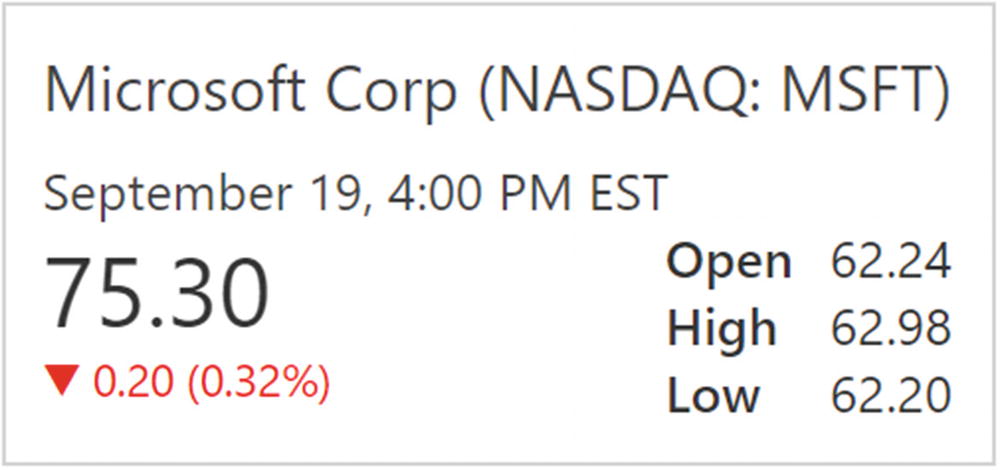
We present one more example in Figure 11-4, recalling our stock ticker card discussion.

{
    "$schema": "http://adaptivecards.io/schemas/adaptive-card.json",
    "type": "AdaptiveCard",
    "version": "1.0",
    "speak": "Microsoft stock is trading at $62.30 a share, which is down .32%",
    "body": [
        {
            "type": "Container",
            "items": [
                {
                    "type": "TextBlock",
                    "text": "Microsoft Corp (NASDAQ: MSFT)",
                    "size": "medium",
                    "isSubtle": true
                },
                {
                    "type": "TextBlock",
                    "text": "September 19, 4:00 PM EST",
                    "isSubtle": true
                }
            ]
        },
        {
            "type": "Container",
            "spacing": "none",
            "items": [
                {
                    "type": "ColumnSet",
                    "columns": [
                        {
                            "type": "Column",
                            "width": "stretch",
                            "items": [
                                {
                                    "type": "TextBlock",
                                    "text": "75.30",
                                    "size": "extraLarge"
                                },
                                {
                                    "type": "TextBlock",
                                    "text": "▼ 0.20 (0.32%)",
                                    "size": "small",
                                    "color": "attention",
                                    "spacing": "none"
                                }
                            ]
                        },
                        {
                            "type": "Column",
                            "width": "auto",
                            "items": [
                                {
                                    "type": "FactSet",
                                    "facts": [
                                        {
                                            "title": "Open",
                                            "value": "62.24"
                                        },
                                        {
                                            "title": "High",
                                            "value": "62.98"
                                        },
                                        {
                                            "title": "Low",
                                            "value": "62.20"
                                        }
                                    ]
                                }
                            ]
                        }
                    ]
                }
            ]
        }
    ]
}
../images/455925_1_En_11_Chapter/455925_1_En_11_Fig4_HTML.jpg
Figure 11-4

A stock quote rendering

This template introduces a few more concepts. First, the card has two containers instead of columns. The first container simply displays the two TextBlocks with the data around the company name/ticker and the quote date. The second container contains two columns. One has the last price and change data, and the other has the Open/High/Low data. The latter data is stored in an object of type FactSet, a collection of name-value pairs that are rendered as a tightly spaced group.

The Adaptive Cards website provide a variety of rich samples.1 On the same site, the Visualizer2 makes it clear that Bot Framework chat bots are only a small part of Adaptive Cards. The individual Bot Framework channels are supported with varying degrees of fidelity. The emulator renders the cards faithfully, but many other channels like Facebook Messenger result in images (Figure 11-5).
../images/455925_1_En_11_Chapter/455925_1_En_11_Fig5_HTML.jpg
Figure 11-5

Messenger renders the Adaptive Cards as images

To be fair, Microsoft’s Facebook connector returns a Bad Request (400) status code to any Adaptive Card with unsupported features. This truly captures the dilemma here. Having a common rich card format is a positive development, but only if it is widely supported. Lacking support in a platform like Facebook is detrimental. It is worth noting that the host app allowed in the Visualizer tells a broader adaptive cards story (Figure 11-6).
../images/455925_1_En_11_Chapter/455925_1_En_11_Fig6_HTML.jpg
Figure 11-6

Possible rendering options in the Adaptive Card Visualizer

Note the first seven items (WebChat, Cortana Skills, Windows Timeline, Skype, Outlook Actionable Messages, Microsoft Team, and Windows Notifications) are all systems within Microsoft’s control. Microsoft is building a common format to render cards across its numerous properties.

In short, if your application is targeting many of the Microsoft systems like Windows 10, Teams, and Skype, investing in reusable and consistent cross-platform Adaptive Cards is a good idea.

Microsoft also provides several SDKs to help your custom app render Adaptive Cards. For instance, there is an iOS SDK, a client-side JavaScript SDK, and a Windows SDK; each can take adaptive card JSON and render a native UI from it.
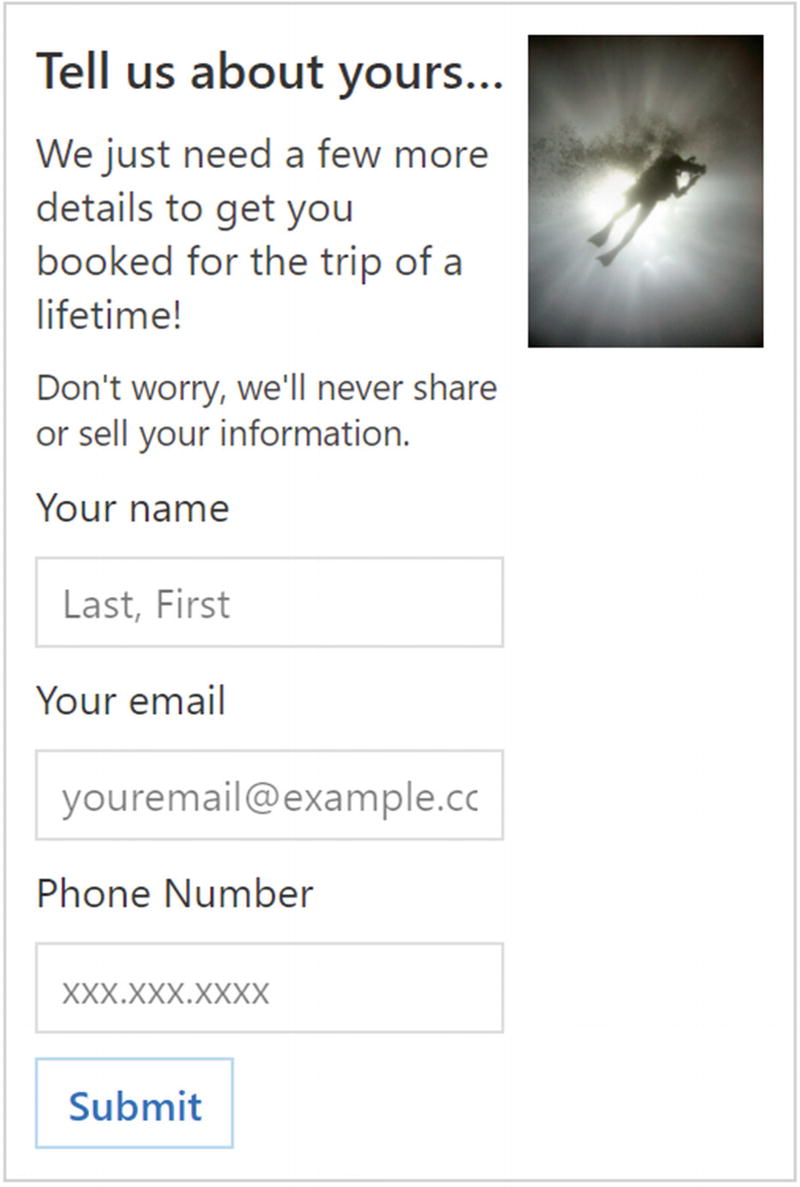
A Working Example

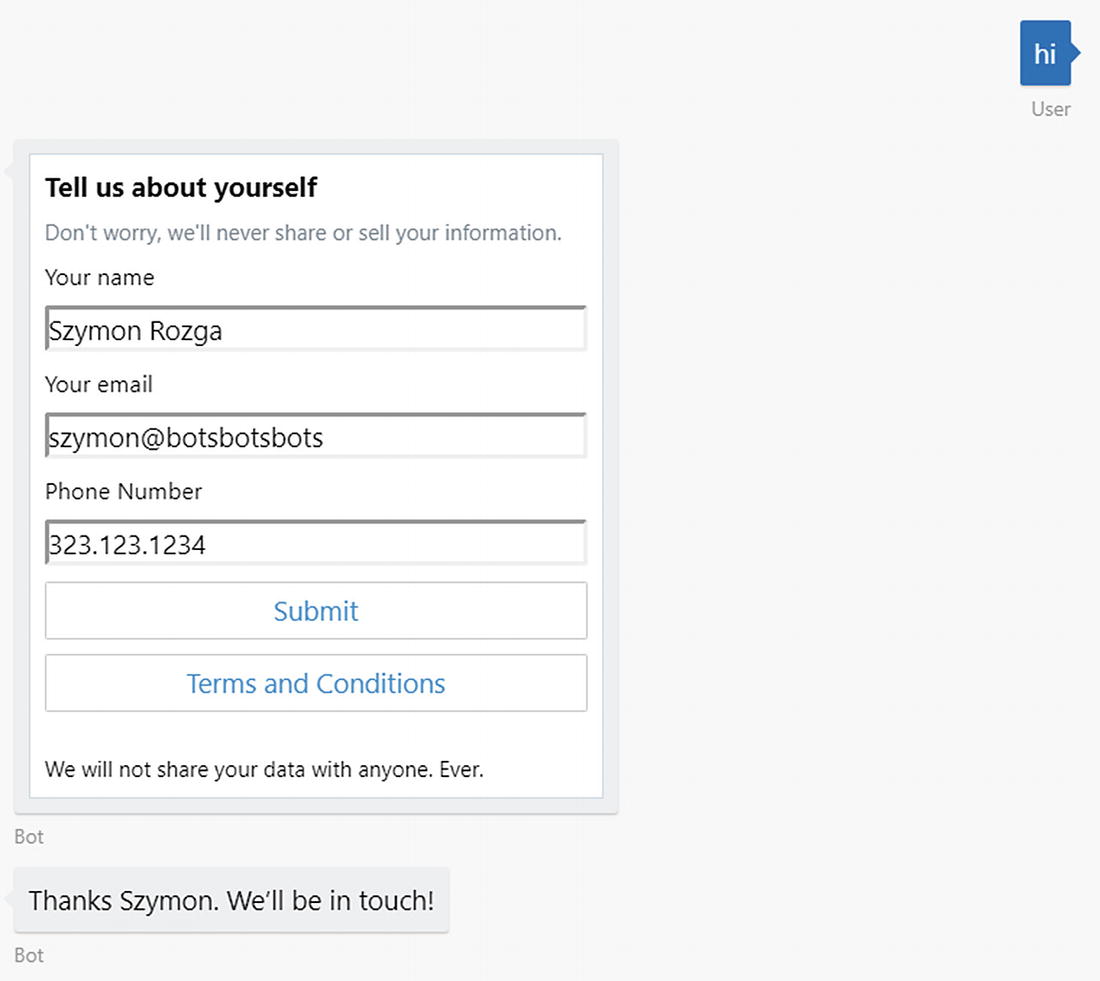
We will now look at a sample to get a better idea of how Adaptive Cards render and how they send input form messages back to the bot. We will use the Emulator as our channel since it implements all the important features. We will use a slightly modified card from a previous example to collect a user’s name, phone number, and e-mail address.

{
        "$schema": "http://adaptivecards.io/schemas/adaptive-card.json",
        "type": "AdaptiveCard",
        "version": "1.0",
        "body": [
            {
                "type": "TextBlock",
                "text": "Tell us about yourself",
                "weight": "bolder",
                "size": "medium"
            },
            {
                "type": "TextBlock",
                "text": "Don't worry, we'll never share or sell your information.",
                "isSubtle": true,
                "wrap": true,
                "size": "small"
            },
            {
                "type": "TextBlock",
                "text": "Your name",
                "wrap": true
            },
            {
                "type": "Input.Text",
                "id": "name",
                "placeholder": "First Last"
            },
            {
                "type": "TextBlock",
                "text": "Your email",
                "wrap": true
            },
            {
                "type": "Input.Text",
                "id": "email",
                "placeholder": "youremail@example.com",
                "style": "email"
            },
            {
                "type": "TextBlock",
                "text": "Phone Number"
            },
            {
                "type": "Input.Text",
                "id": "tel",
                "placeholder": "xxx.xxx.xxxx",
                "style": "tel"
            }
        ],
        "actions": [
            {
                "type": "Action.Submit",
                "title": "Submit"
            },
            {
                "type": "Action.ShowCard",
                "title": "Terms and Conditions",
                "card": {
                    "type": "AdaptiveCard",
                    "body": [
                        {
                            "type": "TextBlock",
                            "text": "We will not share your data with anyone. Ever.",
                            "size": "small",
                        }
                    ]
                }
            }
        ]
    }

We will also allow the user to click any of two items: a Submit button to send the data and a Terms and Conditions button that displays some extra information when clicked. When a user clicks Submit, the data from the fields is gathered and sent to the bot as an object exposed via the message’s value property. The object sent by the Adaptive Card defined in the previous JSON will have three properties: name, email, and tel. The property names correspond to the field id.

It follows that the code that gets the values is straightforward. It could be as basic as simply checking whether the value exists and executing logic based on it. If we send multiple cards, since they stay in the user’s chat history, it is again critical to ensure a consistent conversational experience.

const bot = new builder.UniversalBot(connector, [
    (session) => {
        let incoming = session.message;
        if (incoming.value) {
            // this means we are getting data from an adaptive card
            let o = incoming.value;
            session.send('Thanks ' + o.name.split(' ')[0] + ". We'll be in touch!");
        } else {
            let msg = new builder.Message(session);
            msg.addAttachment({
                contentType: 'application/vnd.microsoft.card.adaptive',
                content: adaptiveCardJson
            });
            session.send(msg);
        }
    }
]);
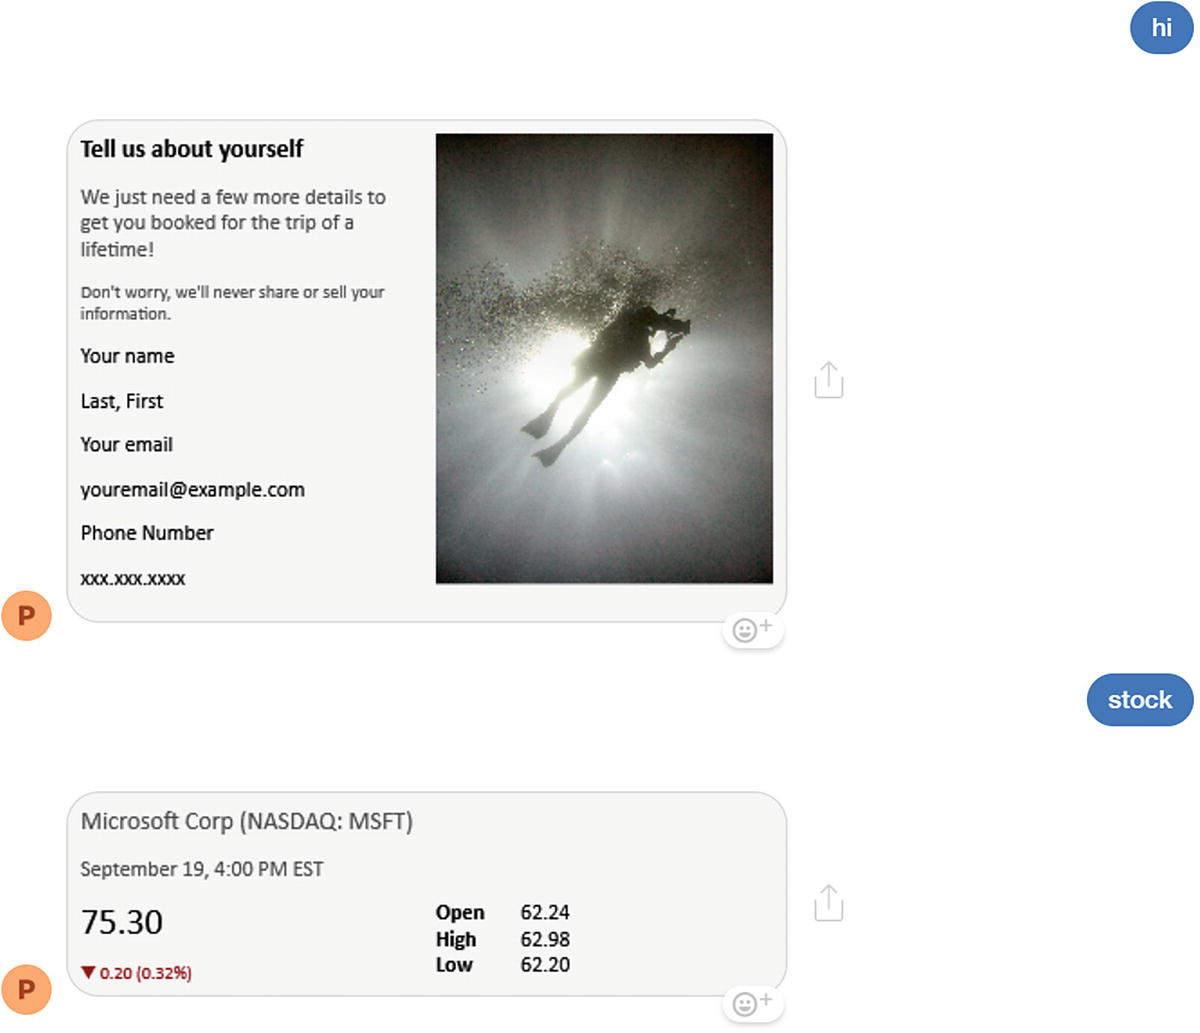
Figure 11-7 illustrates how this conversation can develop. Note that there is no actual logic within the cards themselves, save for some minor validation. There may be an ability to do so in the future, but for now all such logic must occur in the bot code.
../images/455925_1_En_11_Chapter/455925_1_En_11_Fig7_HTML.jpg
Figure 11-7

An input form Adaptive Card after expanding the Terms and Conditions and clicking Submit

Exercise 11-1

Creating a Custom Adaptive Card
  1. 1.

    The goal of this exercise is to create a functioning weather update Adaptive Card. You will integrate with a Weather API to provide live weather to your chat bot’s users. Create a bot that collects a user’s location, perhaps simply a ZIP code, and returns a text message echoing the location.

     
  2. 2.

    Write the code necessary to integrate with the Yahoo Weather API. You can find information about using it at https://developer.yahoo.com/weather/ .

     
  3. 3.

    Create an Adaptive Card that includes the various data points that the service provides. The Adaptive Cards website provides two weather samples; you can use one of these if you would prefer. Once done, switch some of the UI elements around in the adaptive card JSON. How easy is it to do so?

     
  4. 4.

    Add graphic image elements. For example, display a different graphic to represent sunny versus overcast weather. You may find some assets using an image search online or host some images locally. If you host them locally, make sure you are set up to serve static content.


Well done! You are now able to enrich your bot’s conversational experience with Adaptive Cards.

Rendering Custom Graphics

Adaptive Cards simplify some types of layouts and allow us to declaratively define custom layouts that can be rendered into images. We do not, however, have control over how the image is utilized; as we saw on Messenger, the image is sent as a stand-alone image, devoid of any contextual buttons or text in card format. Among other minor limitations around sizing, margins, and layout control, we do not have a way to generate graphics. Say we wanted to generate a chart to represent a stock price over time. There is no way to do this using Adaptive Cards. What if we had an alternate way of doing this?

The best way to create custom graphics is to utilize technologies we are already familiar with, such as HTML, JavaScript, and CSS! If we could use HTML and CSS directly, we could create custom, branded, beautiful layouts to represent the various concepts in our conversational experience. Using SVG and JavaScript, we would enable us to create stunning data-driven graphics that bring our bot’s content to life.

OK, we are sold. But how do we do this? We’ll take a slight detour into a mechanism we can use to render these artifacts: headless browsers.

A standard run-of-the-mill browser like Firefox or Chrome has many components: the network layer; standards-compliant HTML engines such as Gecko, WebKit, or Chromium; and lastly the UI that allows you to view the actual content. A headless browser is a browser without the UI components. Typically, these browsers are controlled using either the command line or a scripting language. The original and most important use cases that headless browsers address are tasks such as functional tests in an environment where JavaScript and AJAX are enabled. Search engines, for example, can use headless browsers to index dynamic web page content. Phantom3 is an example of a WebKit-based headless browser that was used heavily during the early AngularJS days. Firefox4 and Chrome5 have recently added support for headless modes in both of their browsers. One of the uses that is becoming more common in this space is image rendering. All headless browsers implement a screenshot functionality that we can leverage for image rendering needs.

We will continue with our stock quote example and build something that can return a quote as text. The full working code sample can be found under the chapter11-image-rendering-bot folder in the book’s GitHub repo. To do so, we need access to a financial data provider. One easy-to-use provider is called Intrinio , which provides free accounts to start using their API. Go to http://intrinio.com and click the Start for Free button to create an account to use their APIs. Once we have completed the account creation process, we can access our access keys, which must be passed to the API via Basic HTTP authentication. Using a URL like https://api.intrinio.com/data_point?ticker=AAPL&item=last_price,volume , we receive the last price and volume for AAPL. The resulting data JSON is shown here:

{
    "data": [
        {
            "identifier": "AAPL",
            "item": "last_price",
            "value": 174.32
        },
        {
            "identifier": "AAPL",
            "item": "volume",
            "value": 20179172
        }
    ],
    "result_count": 2,
    "api_call_credits": 2
}

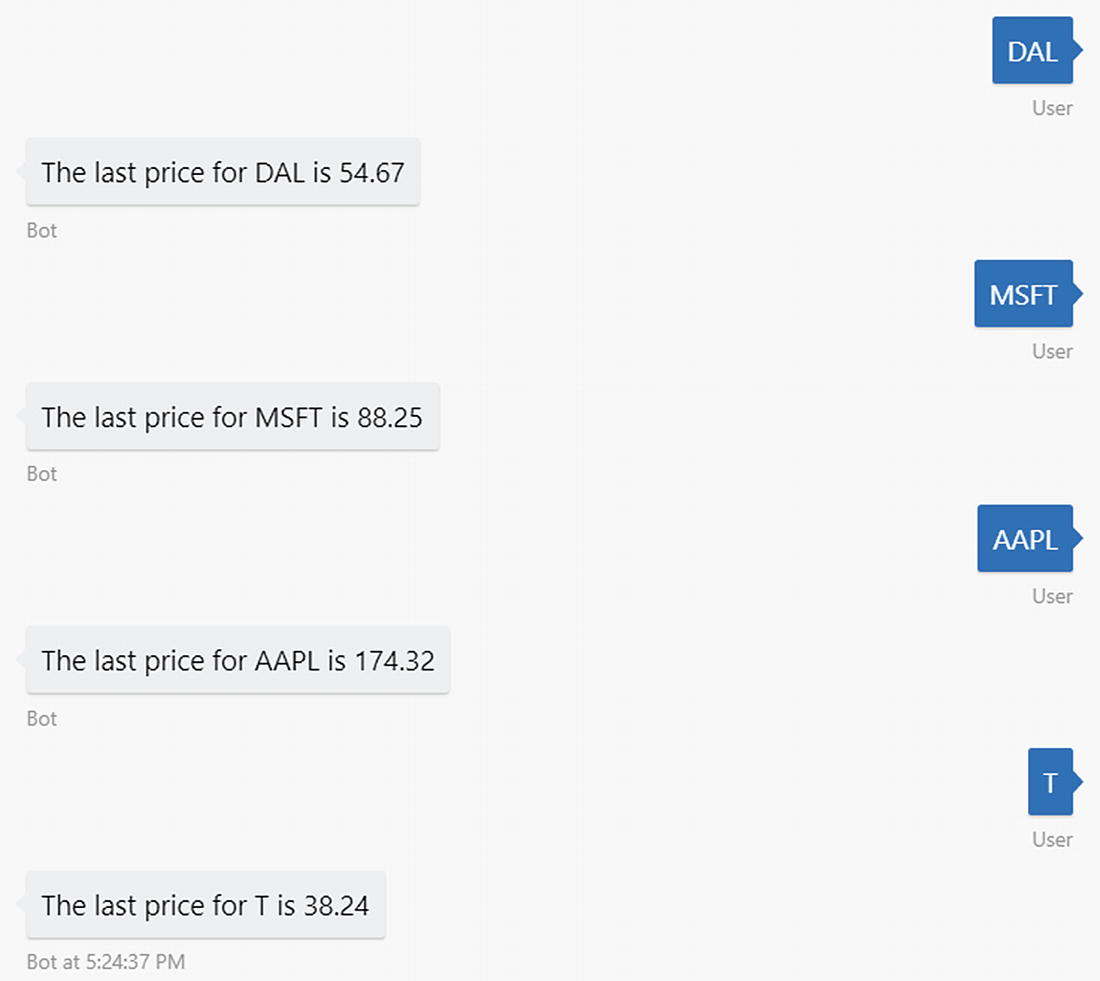
Creating a bot to use this API can be done by using the following code, resulting in the conversation in Figure 11-8:

require('dotenv-extended').load();
const builder = require('botbuilder');
const restify = require('restify');
const request = require('request');
const moment = require('moment');
const _ = require('underscore');
const puppeteer = require('puppeteer');
const vsprintf = require('sprintf').vsprintf;
// declare all of the data points we will be interested in
const datapoints = {
    last_price: 'last_price',
    last_year_low: '52_week_low',
    last_year_high: '52_week_high',
    ask_price: 'ask_price',
    ask_size: 'ask_size',
    bid_price: 'bid_price',
    bid_size: 'bid_size',
    volume: 'volume',
    name: 'name',
    change: 'change',
    percent_change: 'percent_change',
    last_timestamp: 'last_timestamp'
};
const url = "https://api.intrinio.com/data_point?ticker=%s&item=" + _.map(Object.keys(datapoints), p => datapoints[p]).join(',');
// Setup Restify Server
const server = restify.createServer();
server.listen(process.env.port || process.env.PORT || 3978, () => {
    console.log('%s listening to %s', server.name, server.url);
});
// Create chat bot and listen to messages
const connector = new builder.ChatConnector({
    appId: process.env.MICROSOFT_APP_ID,
    appPassword: process.env.MICROSOFT_APP_PASSWORD
});
server.post('/api/messages', connector.listen());
const bot = new builder.UniversalBot(connector, [
    session => {
        // get ticker and create request URL
        const ticker = session.message.text.toUpperCase();
        const tickerUrl = vsprintf(url, [ticker]);
        // make request to get the ticker data
        request.get(tickerUrl, {
            auth:
                {
                    user: process.env.INTRINIO_USER,
                    pass: process.env.INTRINIO_PASS
                }
        }, (err, response, body) => {
            if (err) {
                console.log('error while fetching data:\n' + err);
                session.endConversation('Error while fetching data. Please try again later.');
                return;
            }
            // parse JSON response and extract the last price
            const results = JSON.parse(body).data;
            const lastPrice = getval(results, ticker, datapoints.last_price).value;
            // send the last price as a response
            session.endConversation(vsprintf('The last price for %s is %.2f', [ ticker, lastPrice]));
        });
    }
]);
const getval = function(arr, ticker, data_point) {
    const r =  _.find(arr, p => p.identifier === ticker && p.item === data_point);
    return r;
}
const inMemoryStorage = new builder.MemoryBotStorage();
bot.set('storage', inMemoryStorage);
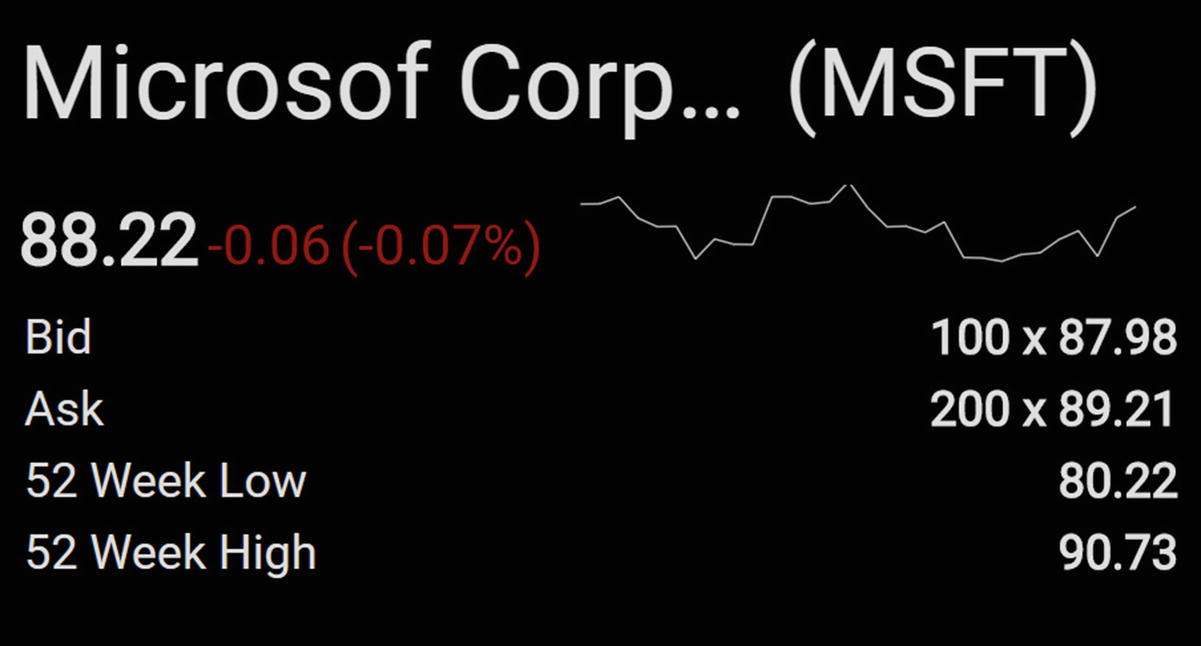
../images/455925_1_En_11_Chapter/455925_1_En_11_Fig8_HTML.jpg
Figure 11-8

Text stock quotes

Great. We will now create an adaptive card and see how we can utilize what we just covered with headless browsers to render a richer graphic.

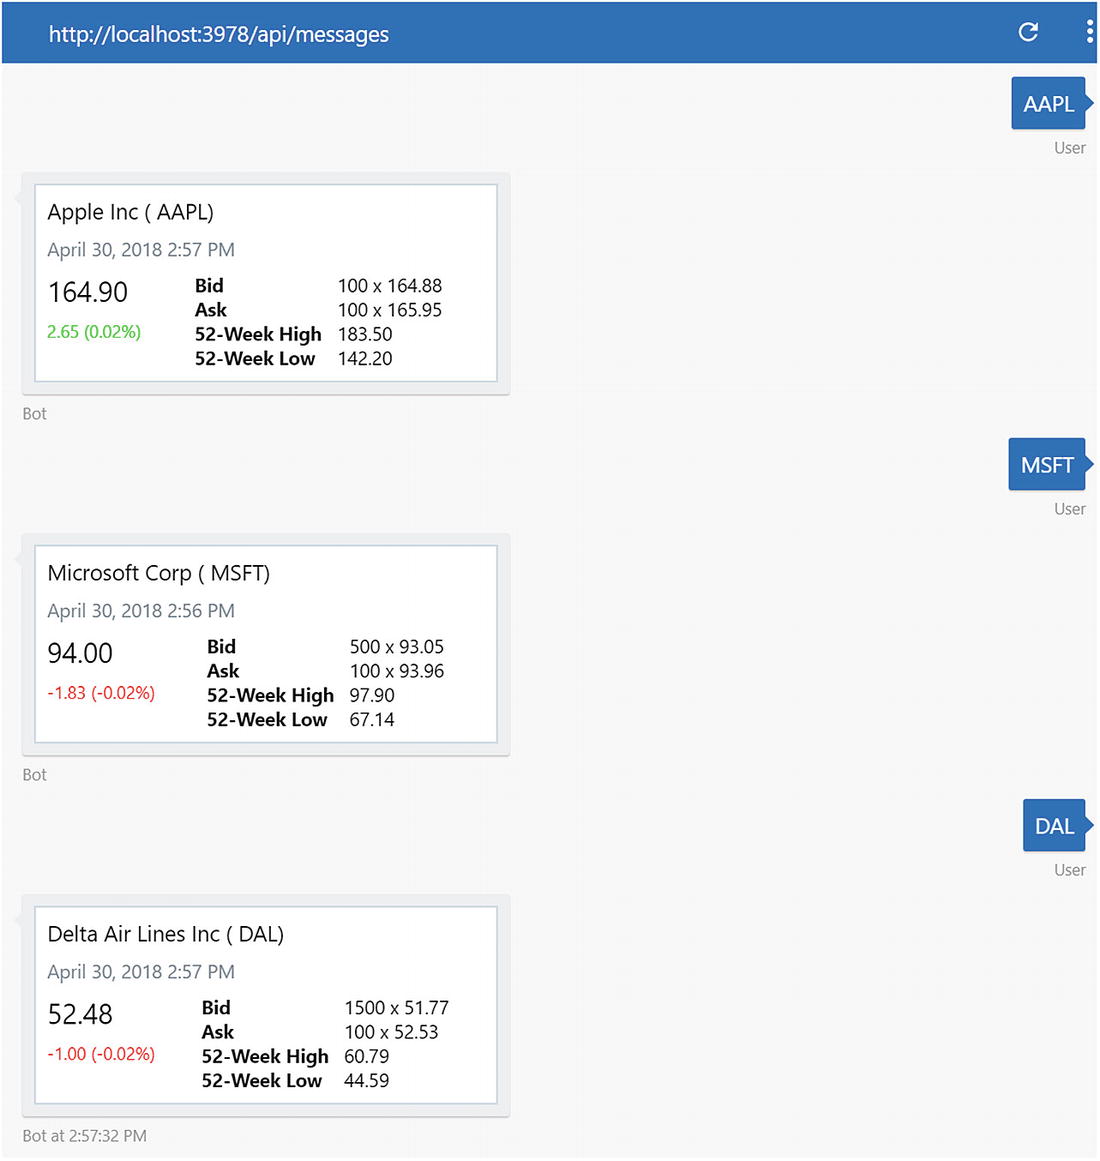
For the adaptive card, we will use a template modified from the previous stock update scenario. Instead of sending a string in the endConversation call, we send back a stock card. The renderStockCard function takes the data returned from the API and renders the adaptive card JSON.

const cardData = renderStockCard(results, ticker);
const msg = new builder.Message(session);
msg.addAttachment({
    contentType: 'application/vnd.microsoft.card.adaptive',
    content: cardData
});
session.endConversation(msg);
function renderStockCard(data, ticker) {
    const last_price = getval(data, ticker, datapoints.last_price).value;
    const change = getval(data, ticker, datapoints.change).value;
    const percent_change = getval(data, ticker, datapoints.percent_change).value;
    const name = getval(data, ticker, datapoints.name).value;
    const last_timestamp = getval(data, ticker, datapoints.last_timestamp).value;
    const open_price = getval(data, ticker, datapoints.open_price).value;
    const low_price = getval(data, ticker, datapoints.low_price).value;
    const high_price = getval(data, ticker, datapoints.high_price).value;
    const yearhigh = getval(data, ticker, datapoints.last_year_high).value;
    const yearlow = getval(data, ticker, datapoints.last_year_low).value;
    const bidsize = getval(data, ticker, datapoints.bid_size).value;
    const bidprice = getval(data, ticker, datapoints.bid_price).value;
    const asksize = getval(data, ticker, datapoints.ask_size).value;
    const askprice = getval(data, ticker, datapoints.ask_price).value;
    let color = 'default';
    if (change > 0) color = 'good';
    else if (change < 0) color = 'warning';
    let facts = [
        { title: 'Bid', value: vsprintf('%d x %.2f', [bidsize, bidprice]) },
        { title: 'Ask', value: vsprintf('%d x %.2f', [asksize, askprice]) },
        { title: '52-Week High', value: vsprintf('%.2f', [yearhigh]) },
        { title: '52-Week Low', value: vsprintf('%.2f', [yearlow]) }
    ];
    let card = {
        "$schema": "http://adaptivecards.io/schemas/adaptive-card.json",
        "type": "AdaptiveCard",
        "version": "1.0",
        "speak": vsprintf("%s stock is trading at $%.2f a share, which is down %.2f%%", [name, last_price, percent_change]),
        "body": [
            {
                "type": "Container",
                "items": [
                    {
                        "type": "TextBlock",
                        "text": vsprintf("%s ( %s)", [name, ticker]),
                        "size": "medium",
                        "isSubtle": false
                    },
                    {
                        "type": "TextBlock",
                        "text": moment(last_timestamp).format('LLL'),
                        "isSubtle": true
                    }
                ]
            },
            {
                "type": "Container",
                "spacing": "none",
                "items": [
                    {
                        "type": "ColumnSet",
                        "columns": [
                            {
                                "type": "Column",
                                "width": "stretch",
                                "items": [
                                    {
                                        "type": "TextBlock",
                                        "text": vsprintf("%.2f", [last_price]),
                                        "size": "extraLarge"
                                    },
                                    {
                                        "type": "TextBlock",
                                        "text": vsprintf("%.2f (%.2f%%)", [change, percent_change]),
                                        "size": "small",
                                        "color": color,
                                        "spacing": "none"
                                    }
                                ]
                            },
                            {
                                "type": "Column",
                                "width": "auto",
                                "items": [
                                    {
                                        "type": "FactSet",
                                        "facts": facts
                                    }
                                ]
                            }
                        ]
                    }
                ]
            }
        ]
    }
    return card;
}
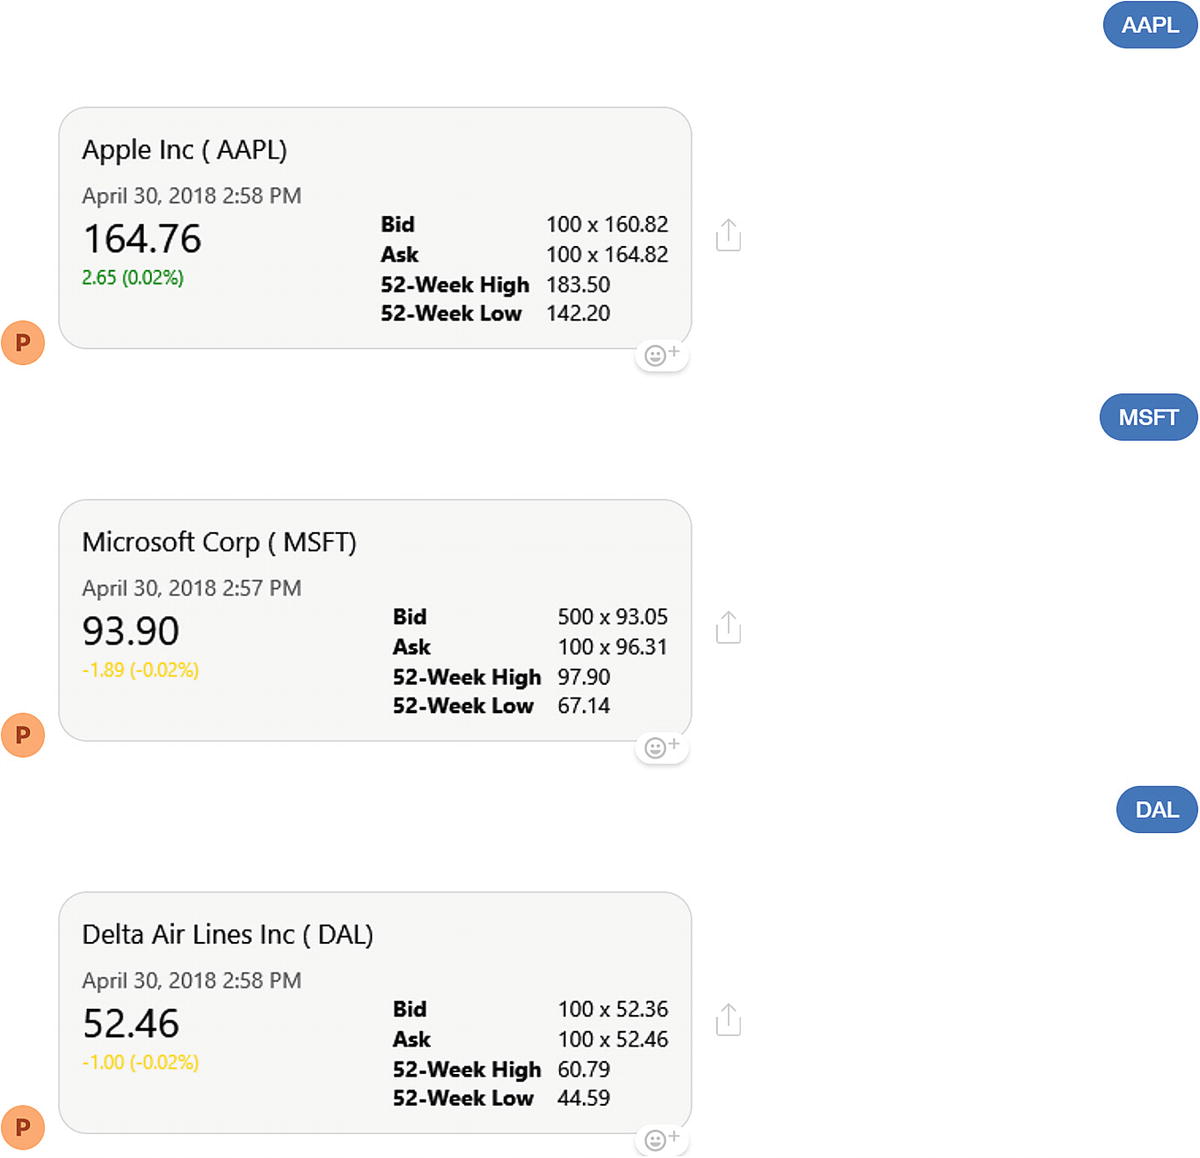
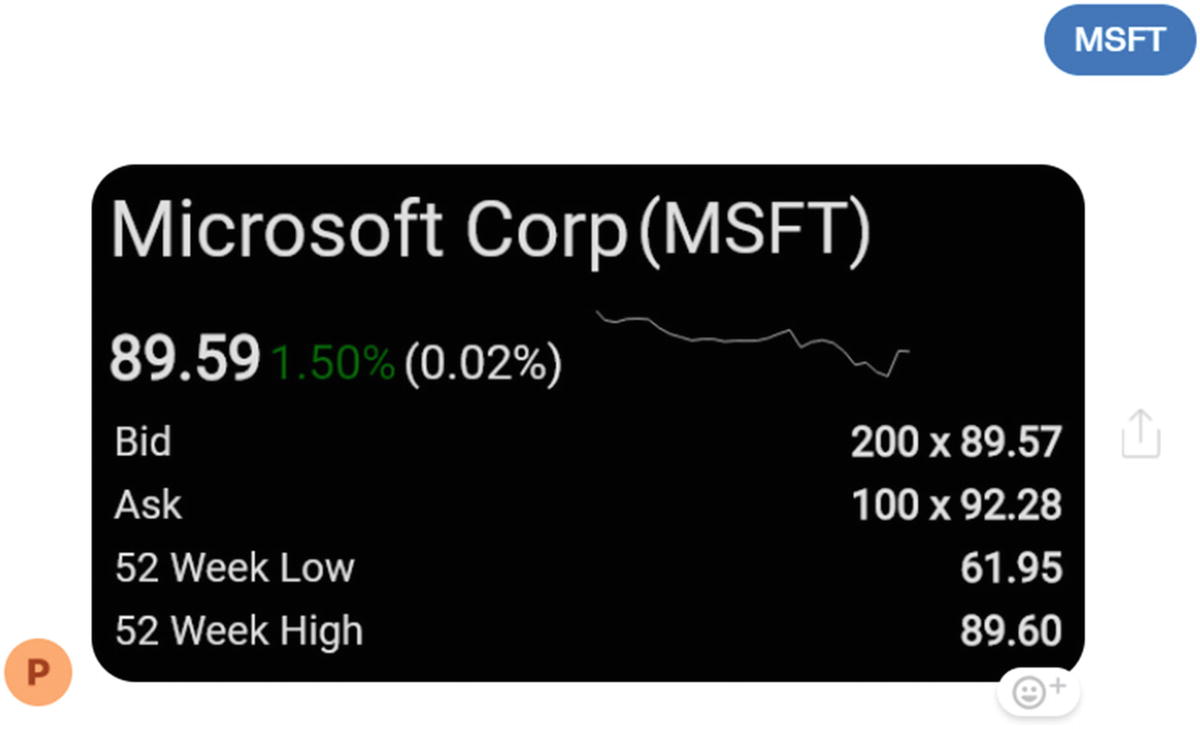
Now, if we send a ticker symbol to the bot, we will get a resulting adaptive card. The rendering on the emulator looks good (Figure 11-9). The Messenger rendering is a bit choppy and pixelated (Figure 11-10). We have also uncovered an inconsistency in how the two channels render the “warning” color. We can certainly do better.
../images/455925_1_En_11_Chapter/455925_1_En_11_Fig9_HTML.jpg
Figure 11-9

Emulator rendering of the stock update card

../images/455925_1_En_11_Chapter/455925_1_En_11_Fig10_HTML.jpg
Figure 11-10

Messenger rendering of the stock u-update card

We will now create our own custom HTML template. Now, by trade, as an engineer, I do not do design, but Figure 11-11 is the card that I came up with. We display all the same pieces of data as earlier, but we also add a sparkline for the last 30 days of data.
../images/455925_1_En_11_Chapter/455925_1_En_11_Fig11_HTML.jpg
Figure 11-11

The custom quote card we would like to support

The HTML and CSS for the earlier template is presented here:

<html>
<head>
    <style>
        body {
            background-color: white;
            font-family: 'Roboto', sans-serif;
            margin: 0;
            padding: 0;
        }
        .card {
            color: #dddddd;
            background-color: black;
            width: 564px;
            height: 284px;
            padding: 10px;
        }
        .card .symbol {
            font-size: 48px;
            vertical-align: middle;
        }
        .card .companyname {
            font-size: 52px;
            display: inline-block;
            vertical-align: middle;
            overflow-x: hidden;
            white-space: nowrap;
            text-overflow: ellipsis;
            max-width: 380px;
        }
        .card .symbol::before {
            content: '(';
        }
        .card .symbol::after {
            content: ')';
        }
        .card .priceline {
            margin-top: 20px;
        }
        .card .price {
            font-size: 36px;
            font-weight: bold;
        }
        .card .change {
            font-size: 28px;
        }
        .card .changePct {
            font-size: 28px;
        }
        .card .positive {
            color: darkgreen;
        }
        .card .negative {
            color: darkred;
        }
        .card .changePct::before {
            content: '(';
        }
        .card .changePct::after {
            content: ')';
        }
        .card .factTable {
            margin-top: 10px;
            color: #dddddd;
            width: 100%;
        }
        .card .factTable .factTitle {
            width: 50%;
            font-size: 24px;
            padding-bottom: 5px;
        }
        .card .factTable .factValue {
            width: 50%;
            text-align: right;
            font-size: 24px;
            font-weight: bold;
            padding-bottom: 5px;
        }
        .sparkline {
            padding-left: 10px;
        }
        .sparkline embed {
            width: 300px;
            height: 40px;
        }
    </style>
    <link href="https://fonts.googleapis.com/css?family=Roboto" rel="stylesheet">
</head>
<body>
    <div class="card">
        <div class="header">
                <span class="companyname">Microsoft</span>
                <span class="symbol">MSFT</span>
        </div>
        <div class="priceline">
            <span class="price">88.22</span>
            <span class="change negative">-0.06</span>
            <span class="changePct negative">-0.07%</span>
            <span class="sparkline">
                <embed src="http://sparksvg.me/line.svg?174.33,174.35,175,173.03,172.23,172.26,169.23,171.08,170.6,170.57,175.01,175.01,174.35,174.54,176.42,173.97,172.22,172.27,171.7,172.67,169.37,169.32,169.01,169.64,169.8,171.05,171.85,169.48,173.07,174.09&rgba:255,255,255,0.7"
                    type="image/svg+xml">
            </span>
        </div>
        <table class="factTable">
            <tr>
                <td class="factTitle">Bid</td>
                <td class="factValue">100 x 87.98</td>
            </tr>
            <tr>
                <td class="factTitle">Ask</td>
                <td class="factValue">200 x 89.21</td>
            </tr>
            <tr>
                <td class="factTitle">52 Week Low</td>
                <td class="factValue">80.22</td>
            </tr>
            <tr>
                <td class="factTitle">52 Week High</td>
                <td class="factValue">90.73</td>
            </tr>
        </table>
    </div>
</body>
</html>

Note that we are doing three things that are not obviously possible with adaptive cards: the fine granular control over styling that CSS allows, custom web fonts (in this case, Google’s Roboto font), and an SVG object to draw the sparkline. At this point, all we really must do is modify the appropriate data in the HTML template and render it. How do we do this?

From the different options we mentioned earlier, one of the better options today is Chrome. The easiest way to integrate with headless Chrome is to use the Node.js package called Puppeteer.6 This library can be used for many tasks such as automating Chrome, taking screenshots, gathering timeline data for websites, and running automated test suites. We’ll use the basic API to take a screenshot of a page.

Puppeteer samples use the async/await7 features introduced in Node version 7.6. The syntax waits for a Promise value to return in one line, instead of writing chains of then method calls. The code for rendering an HTML snippet will look as follows:

async function renderHtml(html, width, height) {
    var browser = await puppeteer.launch();
    const page = await browser.newPage();
    await page.setViewport({ width: width, height: height });
    await page.goto(`data:text/html,${html}`, { waitUntil: 'load' });
    const pageResultBuffer = await page.screenshot({ omitBackground: true });
    await page.close();
    browser.disconnect();
    return pageResultBuffer;
}

We launch a new instance of headless chrome, open a new page, set the size of the viewport, load the HTML, and then take a screenshot. The omitBackground option allows us to have transparent backgrounds in the HTML, which result in transparent screenshot backgrounds.

The resulting object is a Node.js buffer. A buffer is simply a collection of binary data, and Node.js provides numerous functions to consume this data. We can call our renderHtml method and convert the buffer into a base64 string. Once we have this, we can simply send the base64 image as part of a Bot Builder attachment.

renderHtml(html, 600, 312).then(cardData => {
    const base64image = cardData.toString('base64');
    const contentType = 'image/png';
    const attachment = {
        contentUrl: util.format('data:%s;base64,%s', contentType, base64image),
        contentType: contentType,
        name: ticker + '.png'
    }
    const msg = new builder.Message(session);
    msg.addAttachment(attachment);
    session.endConversation(msg);    
});

Constructing the HTML is string manipulation to ensure that the proper values are populated. We add some placeholders into the HTML to make it easy to do string replace calls to place the data into the appropriate locations. A snippet of this is shown here:

<div class="priceline">
    <span class="price">${last_price}</span>
    <span class="change ${changeClass}">${change}</span>
    <span class="changePct ${changeClass}">${percent_change}</span>
    <span class="sparkline">
        <embed src="http://sparksvg.me/line.svg?${sparklinedata}&rgba:255,255,255,0.7" type="image/svg+xml">
    </span>
</div>

The following is the full code to fetch the data from the Intrinio endpoints, read the card template HTML, substitute the right values, render the HTML, and send it as an attachment. Some sample results are illustrated in Figure 11-12.

        request.get(tickerUrl, opts, (quote_error, quote_response, quote_body) => {
            request.get(pricesTickerUrl, opts, (prices_error, prices_response, prices_body) => {
                if (quote_error) {
                    console.log('error while fetching data:\n' + quote_error);
                    session.endConversation('Error while fetching data. Please try again later.');
                    return;
                } else if (prices_error) {
                    console.log('error while fetching data:\n' + prices_error);
                    session.endConversation('Error while fetching data. Please try again later.');
                    return;
                }
                const quoteResults = JSON.parse(quote_body).data;
                const priceResults = JSON.parse(prices_body).data;
                const prices = _.map(priceResults, p => p.close);
                const sparklinedata = prices.join(',');
                fs.readFile("cardTemplate.html", "utf8", function (err, data) {
                    const last_price = getval(quoteResults, ticker, datapoints.last_price).value;
                    const change = getval(quoteResults, ticker, datapoints.change).value;
                    const percent_change = getval(quoteResults, ticker, datapoints.percent_change).value;
                    const name = getval(quoteResults, ticker, datapoints.name).value;
                    const last_timestamp = getval(quoteResults, ticker, datapoints.last_timestamp).value;
                    const yearhigh = getval(quoteResults, ticker, datapoints.last_year_high).value;
                    const yearlow = getval(quoteResults, ticker, datapoints.last_year_low).value;
                    const bidsize = getval(quoteResults, ticker, datapoints.bid_size).value;
                    const bidprice = getval(quoteResults, ticker, datapoints.bid_price).value;
                    const asksize = getval(quoteResults, ticker, datapoints.ask_size).value;
                    const askprice = getval(quoteResults, ticker, datapoints.ask_price).value;
                    data = data.replace('${bid}', vsprintf('%d x %.2f', [bidsize, bidprice]));
                    data = data.replace('${ask}', vsprintf('%d x %.2f', [asksize, askprice]));
                    data = data.replace('${52weekhigh}', vsprintf('%.2f', [yearhigh]));
                    data = data.replace('${52weeklow}', vsprintf('%.2f', [yearlow]));
                    data = data.replace('${ticker}', ticker);
                    data = data.replace('${companyName}', name);
                    data = data.replace('${last_price}', last_price);
                    let changeClass = '';
                    if(change > 0) changeClass = 'positive';
                    else if(change < 0) changeClass = 'negative';
                    data = data.replace('${changeClass}', changeClass);
                    data = data.replace('${change}', vsprintf('%.2f%%', [change]));
                    data = data.replace('${percent_change}', vsprintf('%.2f%%', [percent_change]));
                    data = data.replace('${last_timestamp}', moment(last_timestamp).format('LLL'));
                    data = data.replace('${sparklinedata}', sparklinedata);
                    renderHtml(data, 584, 304).then(cardData => {
                        const base64image = cardData.toString('base64');
                        const contentType = 'image/png';
                        const attachment = {
                            contentUrl: util.format('data:%s;base64,%s', contentType, base64image),
                            contentType: contentType,
                            name: ticker + '.png'
                        }
                        const msg = new builder.Message(session);
                        msg.addAttachment(attachment);
                        session.endConversation(msg);
                    });
                });
            });
        });
../images/455925_1_En_11_Chapter/455925_1_En_11_Fig12_HTML.jpg
Figure 11-12

Different renderings of the custom HTML images

These are really good results considering the short amount of time we spent on this! The image renders great on Messenger as well (Figure 11-13).
../images/455925_1_En_11_Chapter/455925_1_En_11_Fig13_HTML.jpg
Figure 11-13

Image rendering in Messenger

However, we had set a goal of creating custom cards. OK, so we change the code to the following:

const card = new builder.HeroCard(session)
    .buttons([
        builder.CardAction.postBack(session, ticker, 'Quote Again')])
    .images([
        builder.CardImage.create(session, imageUri)
    ])
    .title(ticker + ' Quote')
    .subtitle('Last Updated: ' + moment(last_timestamp).format('LLL'));
const msg = new builder.Message(session);msg.addAttachment(card.toAttachment());
session.send(msg);

This renders perfectly fine in the emulator, but we get no result in Messenger. If we look at the Node output, we will quickly notice that Facebook returns an HTTP 400 (BadRequest) response. What’s happening? Although Facebook supports data URIs with an embedded Base64 image, it does not support this format for card images. We can go through the effort of creating an endpoint in our bot that returns the image, but Facebook has yet another limitation: a webhook and the URI for the card image cannot have the same hostname.

The solution is for our bot to host the resulting images elsewhere. A great place to start is a cloud-based Blob store like Amazon’s S3 or Microsoft’s Azure Storage. Since we are focusing on Microsoft’s stack, we’ll go ahead and use Azure’s Blob Storage. We will use the relevant Node.js package.

npm install azure-storage --save
const blob = azureStorage.createBlobService(process.env.IMAGE_STORAGE_CONNECTION_STRING);

IMAGE_STORAGE_CONNECTION_STRING is an environment variable that stores the Azure Storage connection string, which can be found in the Azure Portal after creating a storage account resource. After we generate the image into a local file, our code must ensure a blob container exists and create the blob from our image. We then use the new blob’s URL as the source of our image.

renderHtml(data, 584, 304).then(cardData => {
    const uniqueId = uuid();
    const name = uniqueId + '.png';
    const pathToFile = 'images/' + name;
    fs.writeFileSync(pathToFile, cardData);
    const containerName = 'image-rendering-bot';
    blob.createContainerIfNotExists(containerName, {
        publicAccessLevel: 'blob'
    }, function (error, result, response) {
        if (!error) {
            blob.createBlockBlobFromLocalFile(containerName, name, pathToFile, function (error, result, response) {
                if (!error) {
                    fs.unlinkSync(pathToFile);
                    const imageUri = blob.getUrl(containerName, name);
                    const card = new builder.HeroCard(session)
                        .buttons([
                            builder.CardAction.postBack(session, ticker, 'Quote Again')])
                        .images([
                            builder.CardImage.create(session, base64Uri)
                        ])
                        .title(ticker + ' Quote')
                        .subtitle('Last Updated: ' + moment(last_timestamp).format('LLL'));
                    const msg = new builder.Message(session);
                    msg.addAttachment(card.toAttachment());
                    session.send(msg);
                } else {
                    console.error(error);
                }
            });
        } else {
            console.error(error);
        }
    });
});
The card is now rendering as expected, as per Figure 11-14.
../images/455925_1_En_11_Chapter/455925_1_En_11_Fig14_HTML.jpg
Figure 11-14

The card now renders!

Exercise 11-2

Rendering Your Graphic Using Headless Chrome

In this exercise, you will take the code from your weather bot from Exercise 11-1 and add custom HTML rendering.
  1. 1.

    In your adaptive card, add a placeholder that can contain an image to represent the temperature forecast in a chart.

     
  2. 2.

    Render an image using headless chrome that shows the forecast using a line chart. You can utilize the same sparkline approach as earlier.

     
  3. 3.

    Store the resulting image in blob storage.

     
  4. 4.

    Ensure the adaptive card includes the custom rendered image in the designated spot and that it can render in the emulator and Facebook Messenger.


You have now mixed a custom HTML rendering with an adaptive card. No one said we couldn’t do that, right?

Conclusion

In this chapter, we explored two approaches to communicating complex ideas and our chat bot’s brand via rich graphics. Adaptive Cards are a quick way to get started and allow for deeper integration with platforms that support the format natively. Custom HTML-based image rendering allows for much more customization and control over the resulting graphic and is especially valuable where there is no native Adaptive Card support. Both are great choices for highly engaging chat bot experiences.