One of book’s goals is to emphasize that the ideas, techniques, and skills introduced throughout apply to many types of applications. In this chapter, by creating a simple Alexa skill, we demonstrate how we can apply our knowledge of intent classification, entity extraction, and dialog construction to create a natural language voice experience. We begin by creating an Alexa skill in the simplest way possible, by using the Alexa Skills Kit SDK for Node.js. Since we already have a bot service back end, you may inevitably ask whether we can integrate Alexa with this back end. The answer is a resounding yes. Once we have our Alexa skill basics down, we will show how to power an Alexa skill via Direct Line and a Bot Framework bot.
Introduction
Alexa is Amazon’s intelligent personal assistant. The first Alexa-enabled devices were the Echo and Echo Dot followed by the screen-enabled Echo Show and Spot. Amazon is also exploring a chat bot platform called Lex. Alexa skills are developed by declaring a set of intents and slots (another name for entities) and writing a webhook to handle incoming Alexa messages. A message from Alexa will include the resolved intent and slot data. Our webhook responds with data that includes speech and user interface elements. In the first iteration of the Echo and Echo Dot, there was no physical screen, so the only user interface was the Alexa app on the user’s phone. The main user interface element on the app is a card, not much different from the hero cards we encountered in the Bot Builder SDK. For instance, a message from Alexa to our webhook will look as follows. Note that the message formats presented in this section are pseudocode because the actual messages are significantly more verbose.
The response would look like this:
We may want to allow additional functionality such as playing audio files. In keeping with the financial scenario, maybe we have audio briefing content that we would like to play for our users. A message to accomplish this task would look something like this:
In addition, the system may want to provide an indication of whether the user cancelled audio playback or listened to the entire clip. More generically, the system may need a way to send events to our webhook. In those cases, an incoming message may look like this:
If we gain use of a screen like the Echo Show device provides, the potential for more actions and behaviors grows. For example, we can now play videos. Or we can present a user interface with images and buttons to our users. If we display a list of items, perhaps we want the device to send an event when an item is tapped. We will then create a user interface render directive, so perhaps our earlier response for a quote will now include a user interface element as follows:
The great thing about directives is that they are declarative; it is up to the device to determine what to do with them. The Echo Show and Echo Spot devices, for example, may render templates in a slightly different but consistent manner. The Echo and Echo Dot might ignore or raise an error in the case that they receive an unsupported directive, such as playing a video.
Creating a New Skill

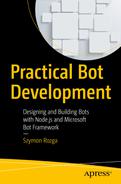
Not much on this dashboard
New custom skill dashboard
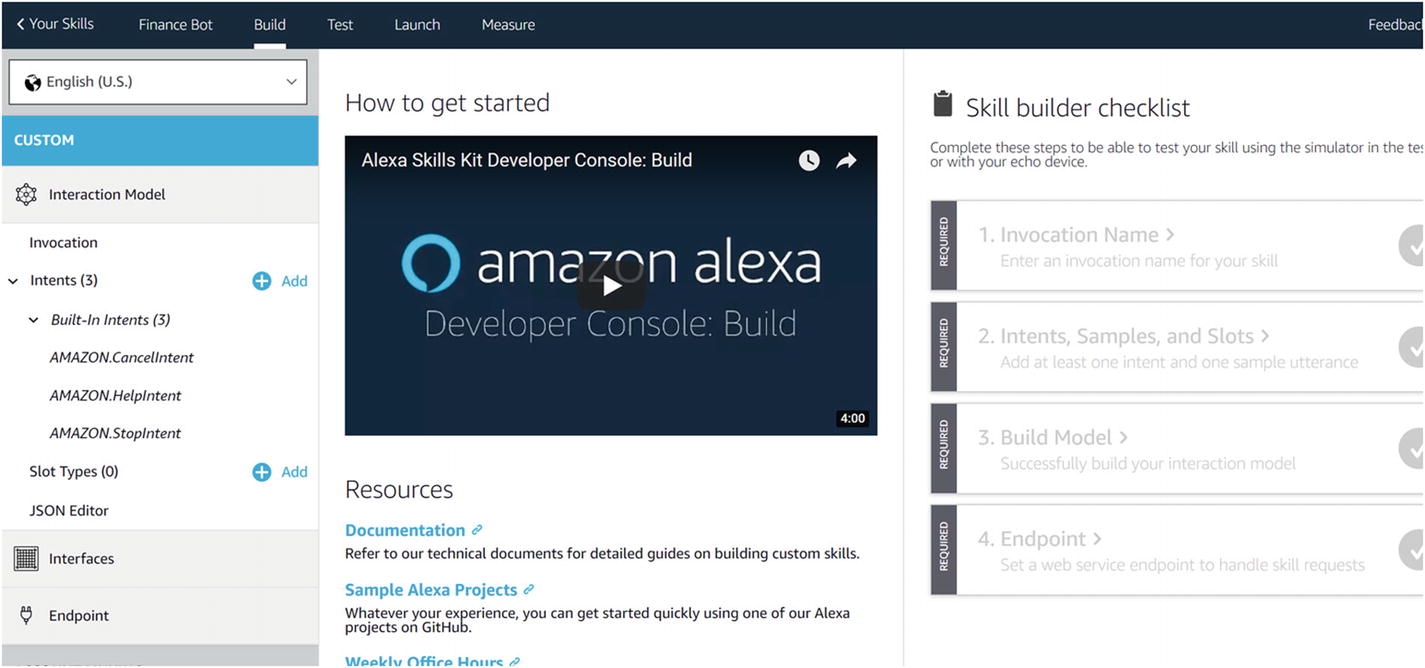
Setting up a skill invocation name
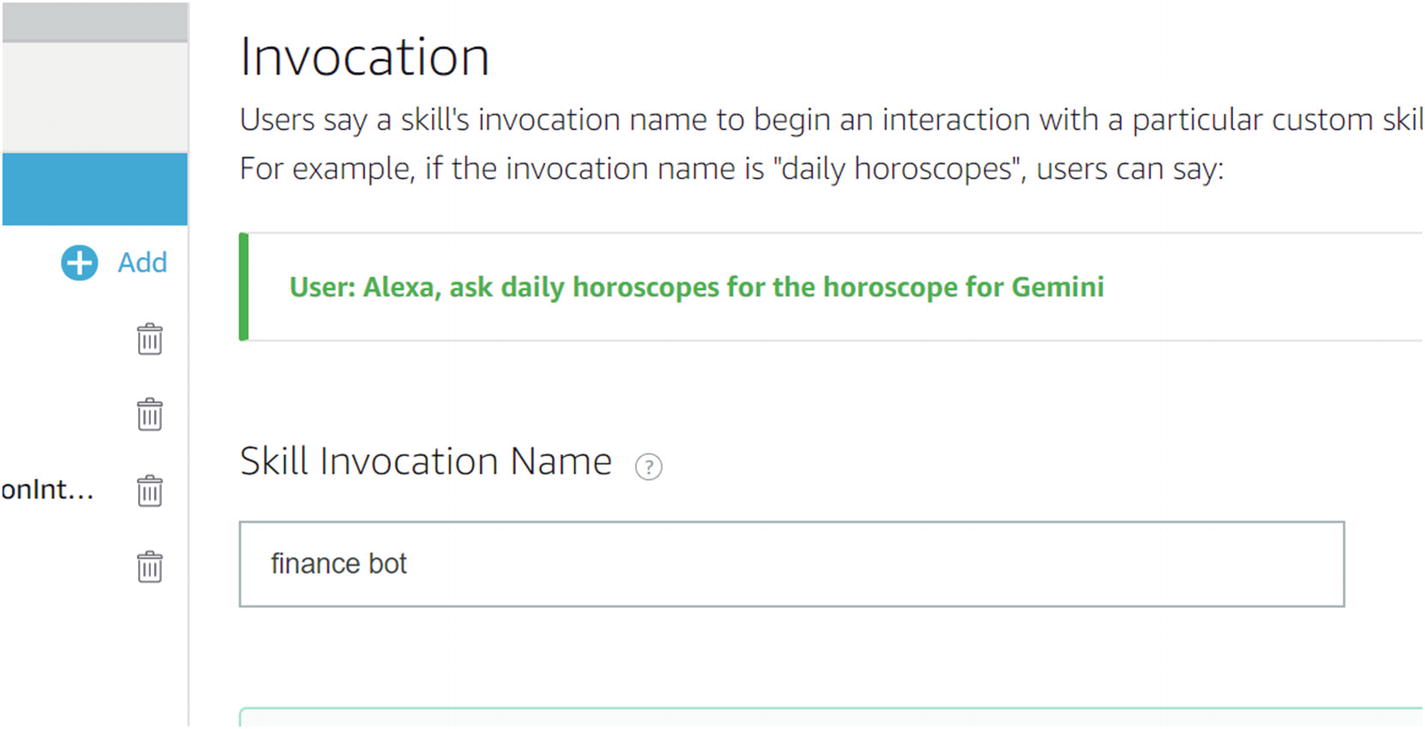
Enabling Alexa interfaces
We are now ready to work on the Alexa interaction model.
Alexa NLU and Automatic Speech Recognition
You may have noticed that when we first created the skill, we had three built-in intents in our skill’s model. These are displayed on the left-side pane. After enabling the various interfaces, we now have about 16 intents. As the Alexa system adds more features, more and more intents will be added to all the skills.
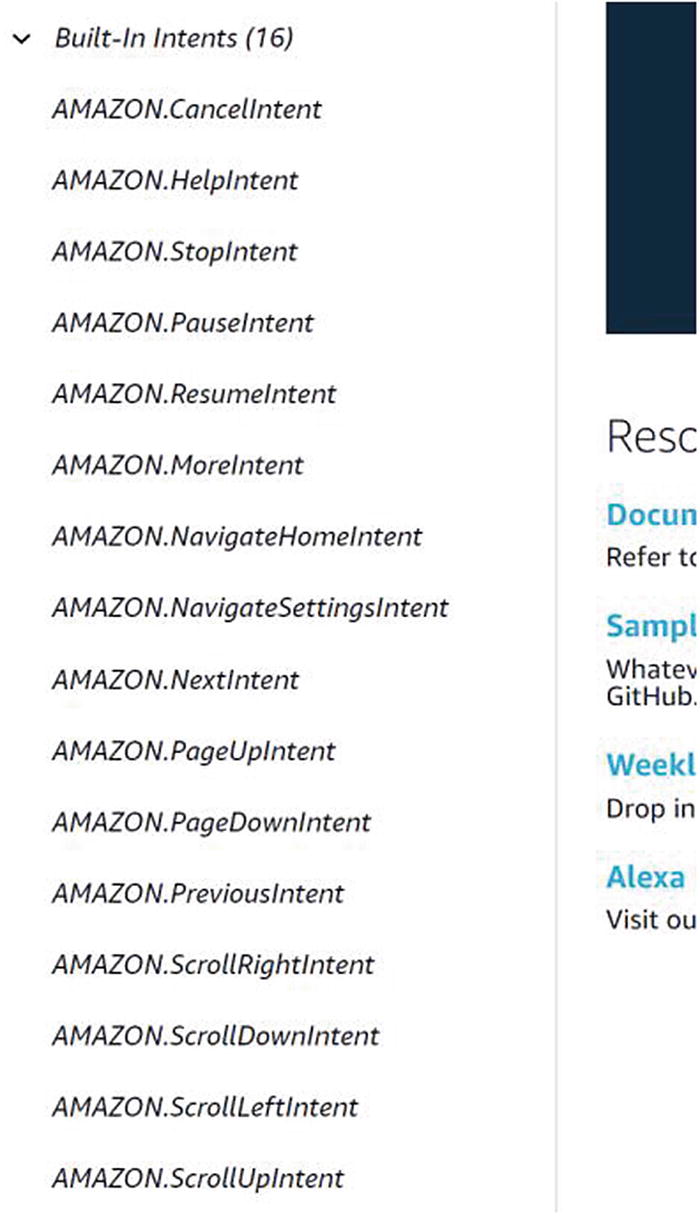
Built-in Alexa intents
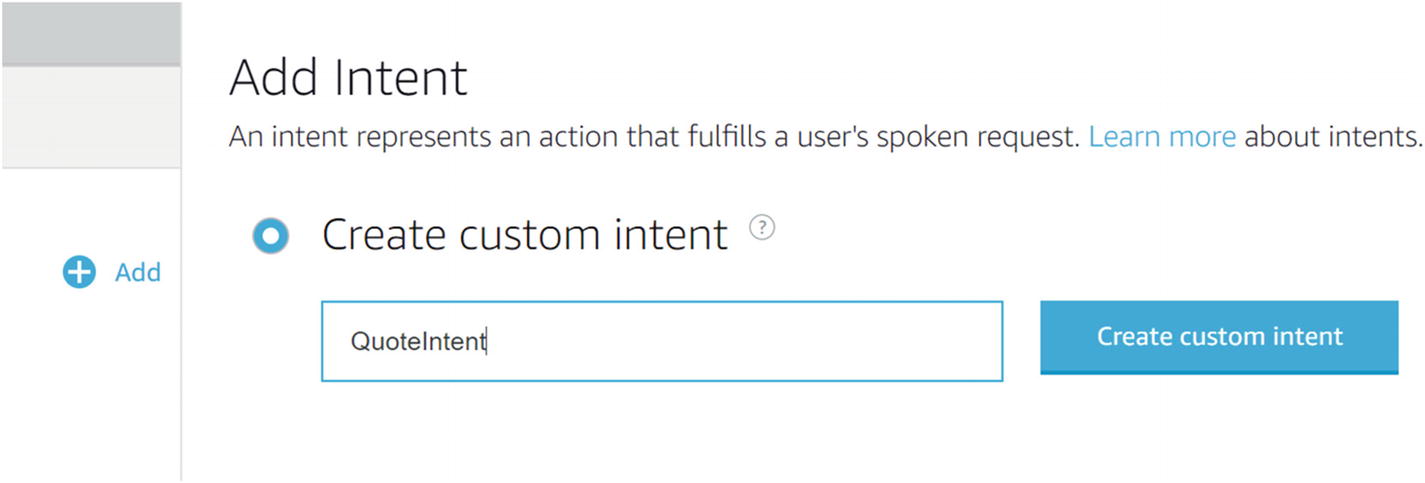
Adding the QuoteIntent custom intent
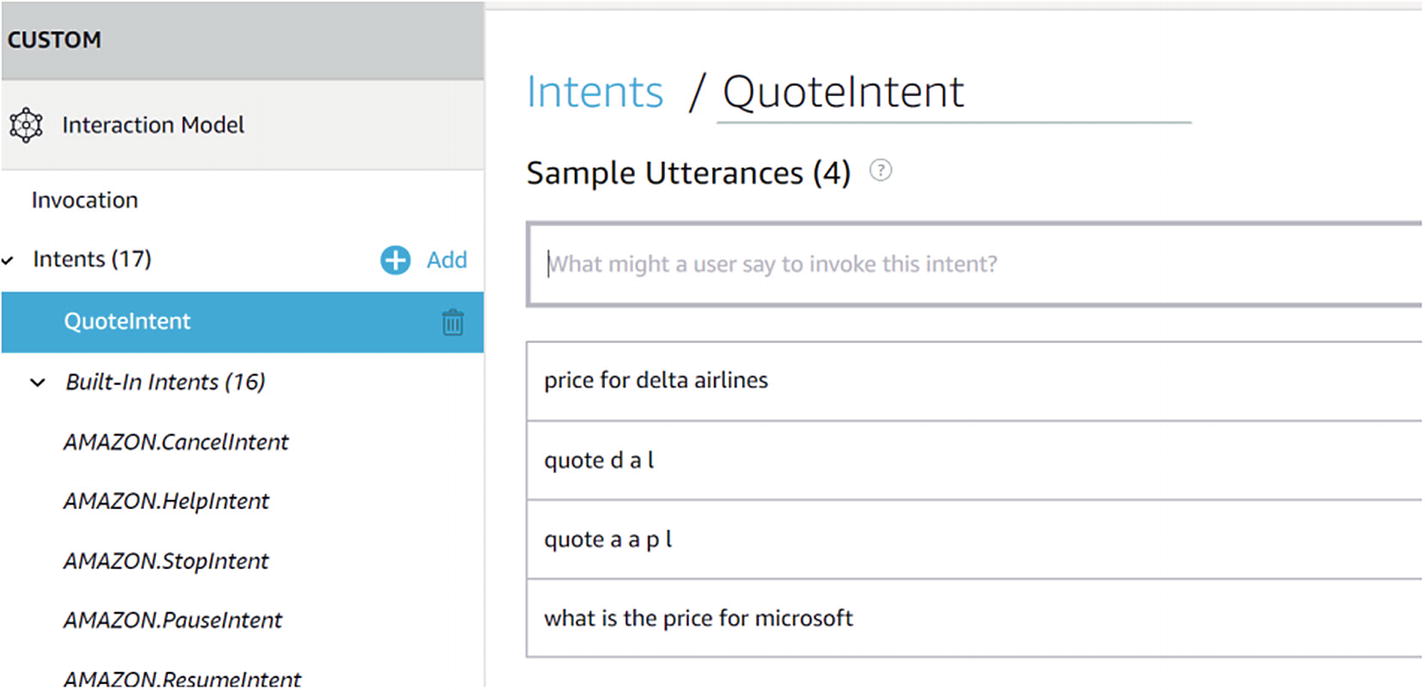
Populating sample utterance for QuoteIntent
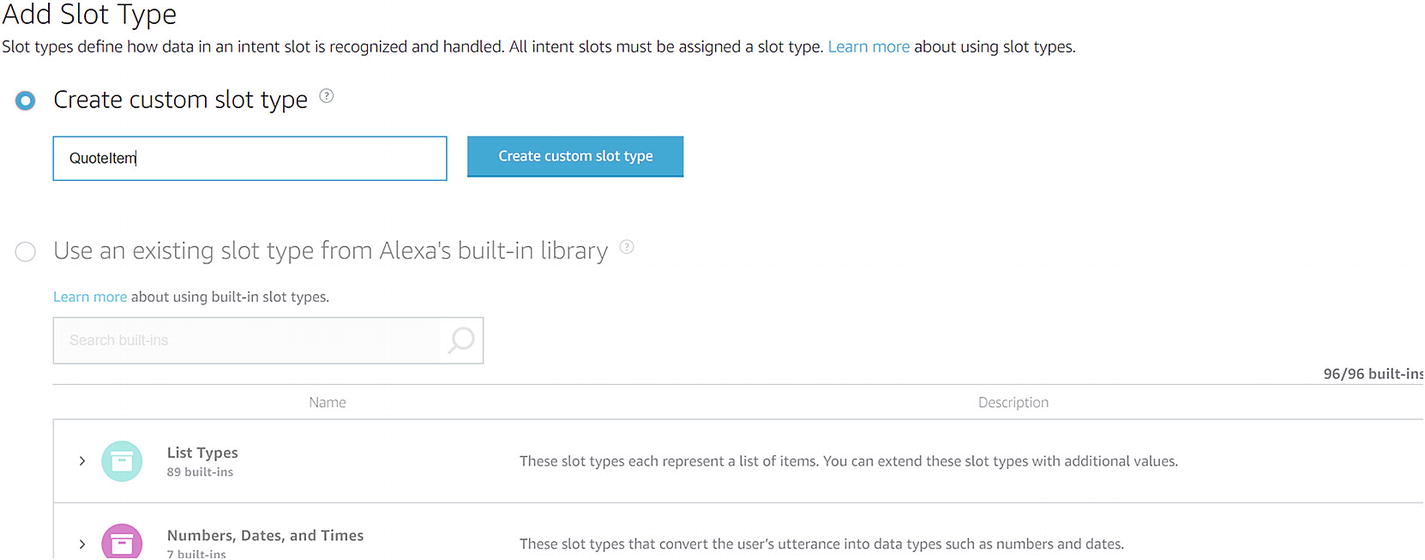
Adding a new slot type
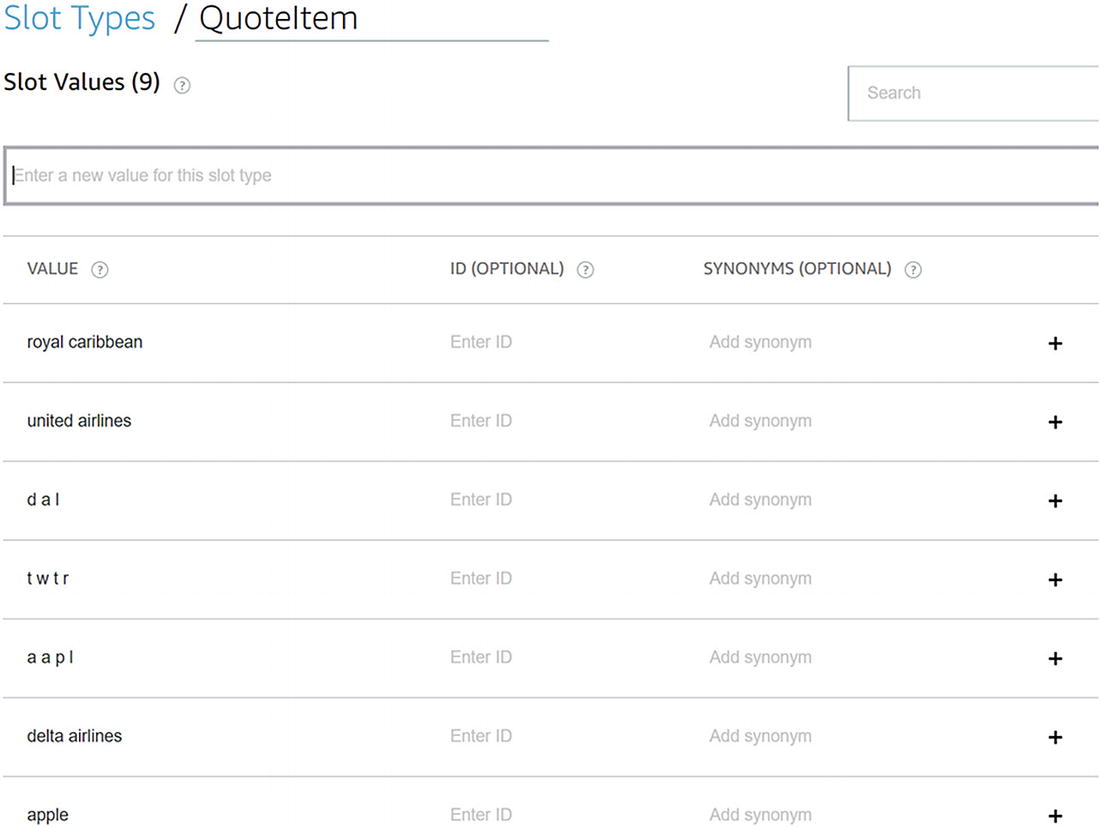
Adding new values to a custom slot type
This is a limited set, of course, but it will do for now. The universe of company names and ticker symbols is quite large, and we are not expecting to enter all of them in the sample slot values. However, the more examples we provide, the better the NLU engine will be at correctly identifying QuoteItems, and the better the Automatic Speech Recognition (ASR) engine will be. The reason for this latter point is that speech recognition systems such as Alexa, Google Home, and Microsoft’s Cortana can all be primed with different utterances. Priming is an important step in the ASR process as it gives clear hints to the engine about the skill’s vocabulary. This allows the ASR system to understand context and better transcribe users’ utterances.

Adding the QuoteItem slot type to QuoteIntent
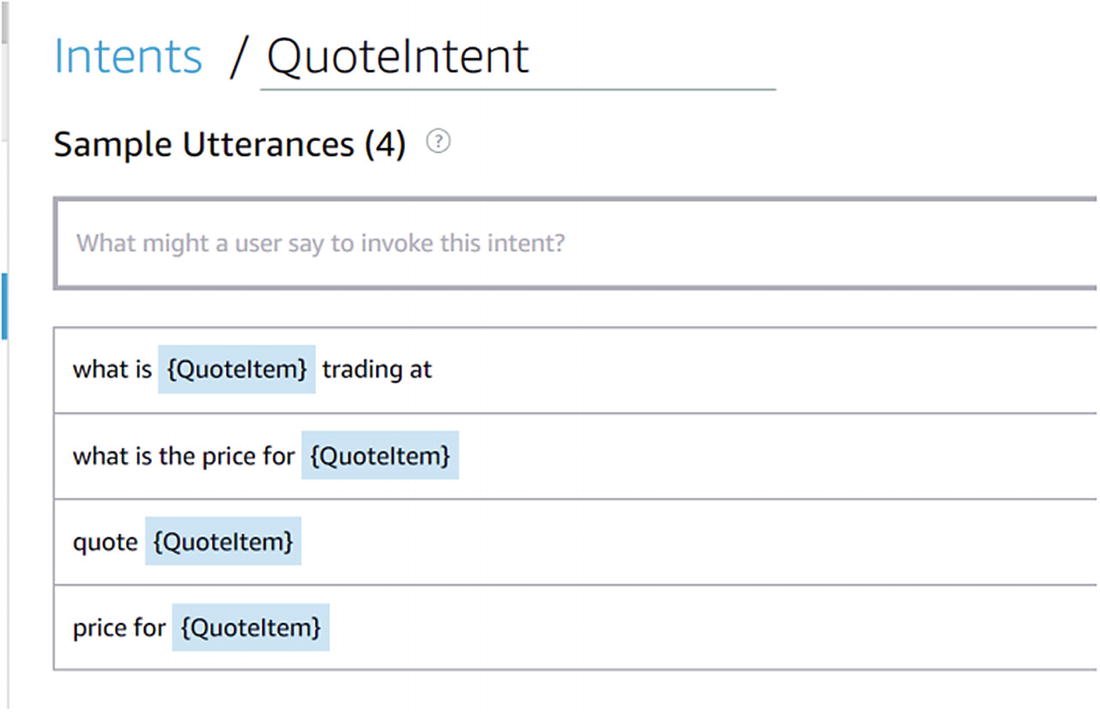
The QuoteIntent is now ready
We will add one more intent. We want the ability to ask for information about specific account types using utterances like “get information for 401k account” or “what is a roth ira?” Let’s call this intent GetAccountTypeInfoIntent. Before we create the intent, let’s create the supporting slot type. In the same way that we added the QuoteItem slot type, let’s add an AccountType custom slot type.
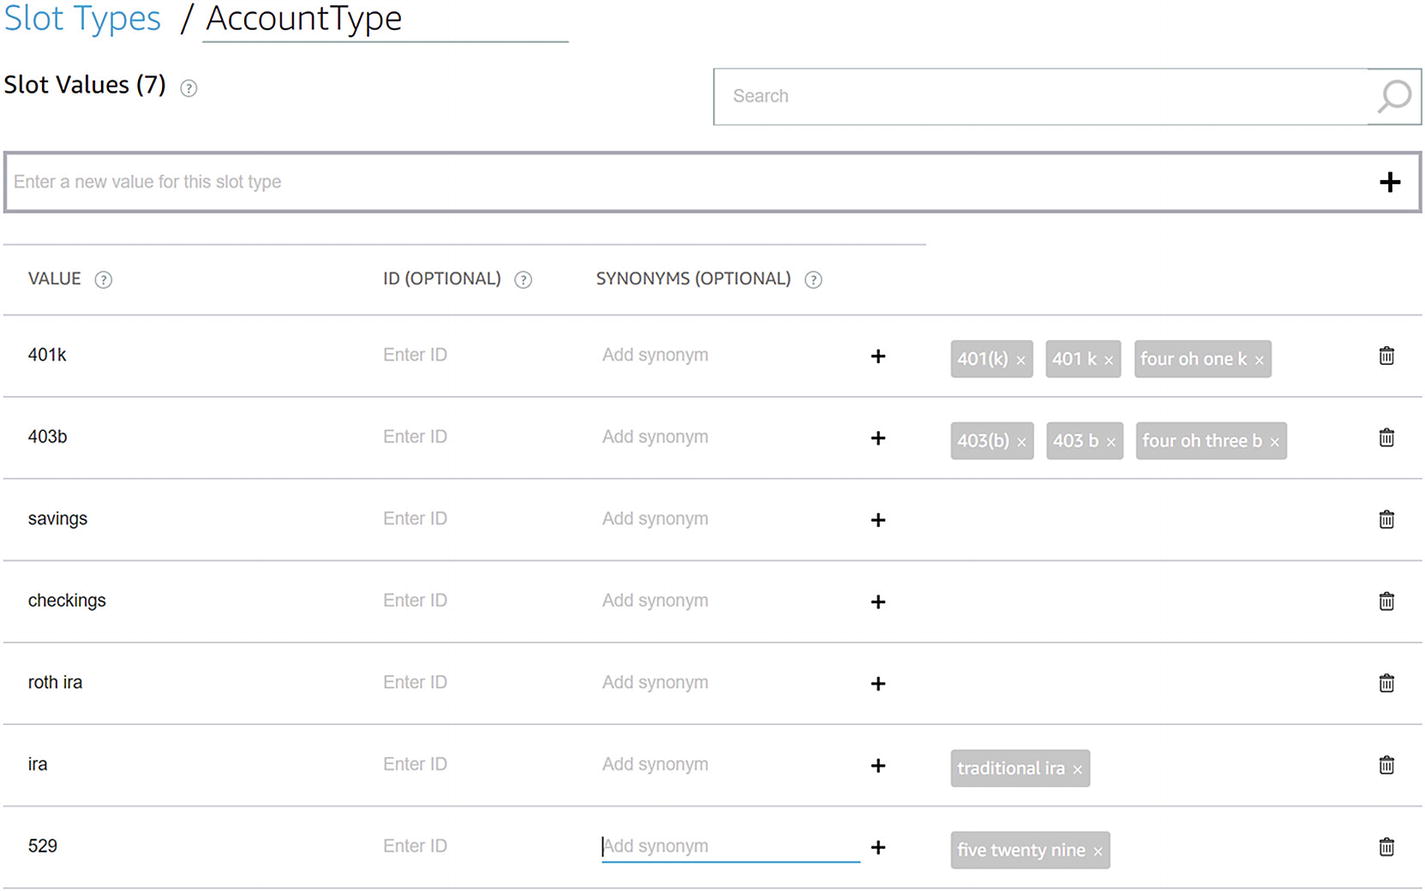
Creating a custom slot type with synonyms
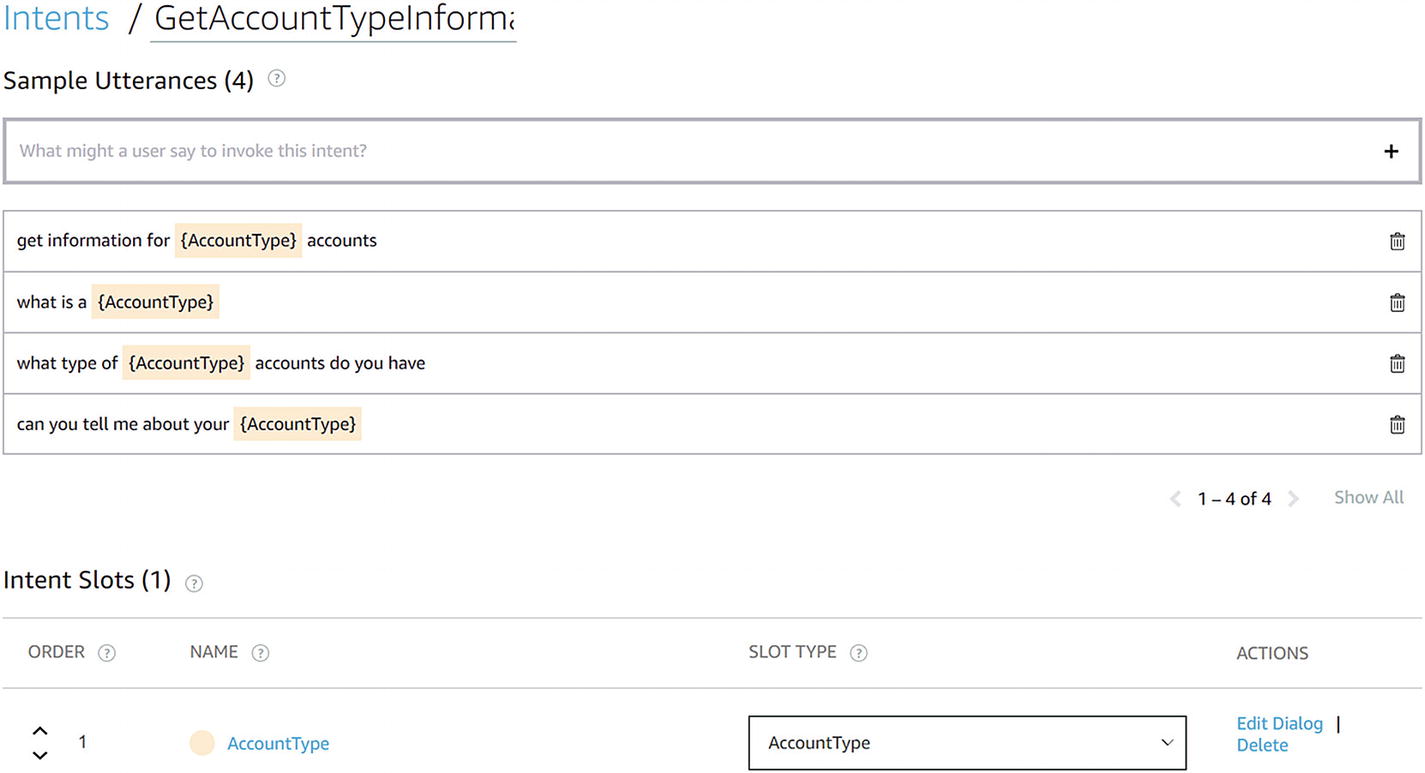
Finalized GetAccountTypeInformationIntent
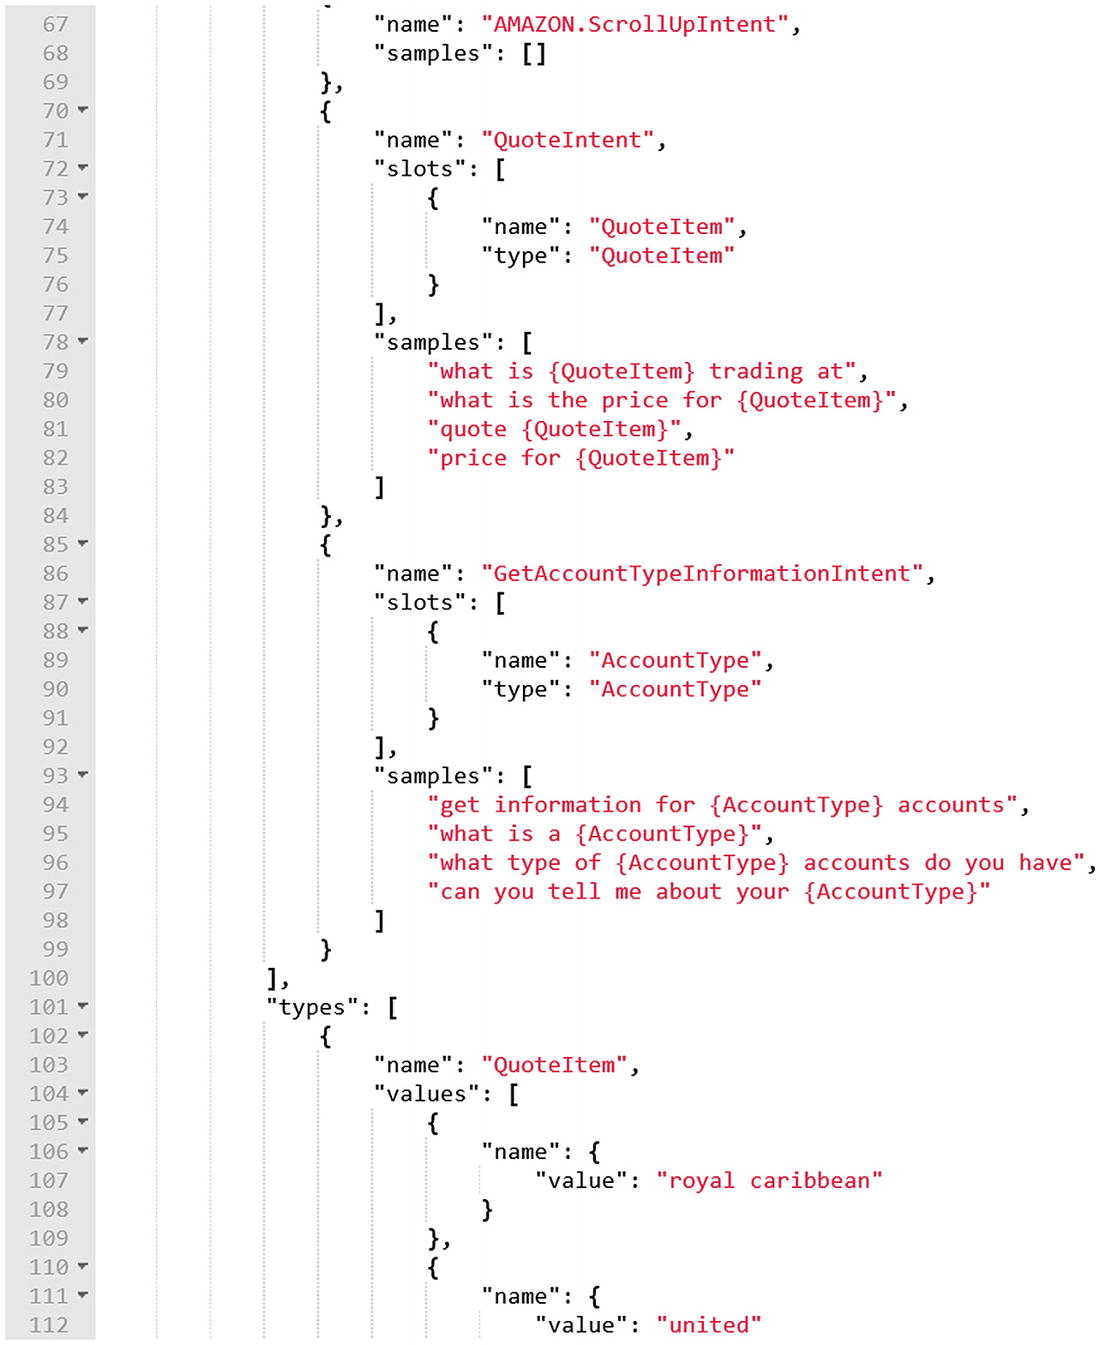
An excerpt of the Alexa interaction model we just created
For the purposes of this chapter, this is all we will cover about Alexa’s NLU. To be clear, we did not do it justice. The system is rich and worth learning about.
Diving Into Alexa Skills Kit for Node
Back in the dashboard, the last step in the Skill builder checklist is to set up the endpoint. The endpoint is the code that will receive the incoming messages from Amazon and respond with speech, cards, and directives.
There are two approaches we can take here. First, we can host an endpoint ourselves, give Amazon the URL, parse each request, and respond accordingly. Using this approach, we gain control but must implement the verification and parsing logic ourselves. We would also own the deployment tasks.
The second alternative, which is quite common these days, is to use serverless computing.2 This gives us the ability to create bits of code in the cloud that run and scale according to demand. On AWS, this is Lambda. In Azure, the equivalent would be Functions. Amazon provides the Amazon Alexa Skills Kit SDK for Node.js for this very purpose ( https://github.com/alexa/alexa-skills-kit-sdk-for-nodejs ). In this section, we dive into running Alexa Skills on AWS Lambda.
The structure of a skill built using the Alexa Skills Kit SDK is shown next. We register all the intents we want to handle in the code. The emit function sends responses to Alexa. There are many different overloads of emit documented on the SDK’s GitHub site.3
Finally, we register the skill and handlers with the Alexa SDK.
This code is sufficient to run a basic skill that responds with “hello world” when launched or when the HelloWorldIntent intent is matched. Conceptually, we will follow the same approach when creating the code for our financial skill. Before we continue, though, how do we connect our skill to an AWS Lambda?
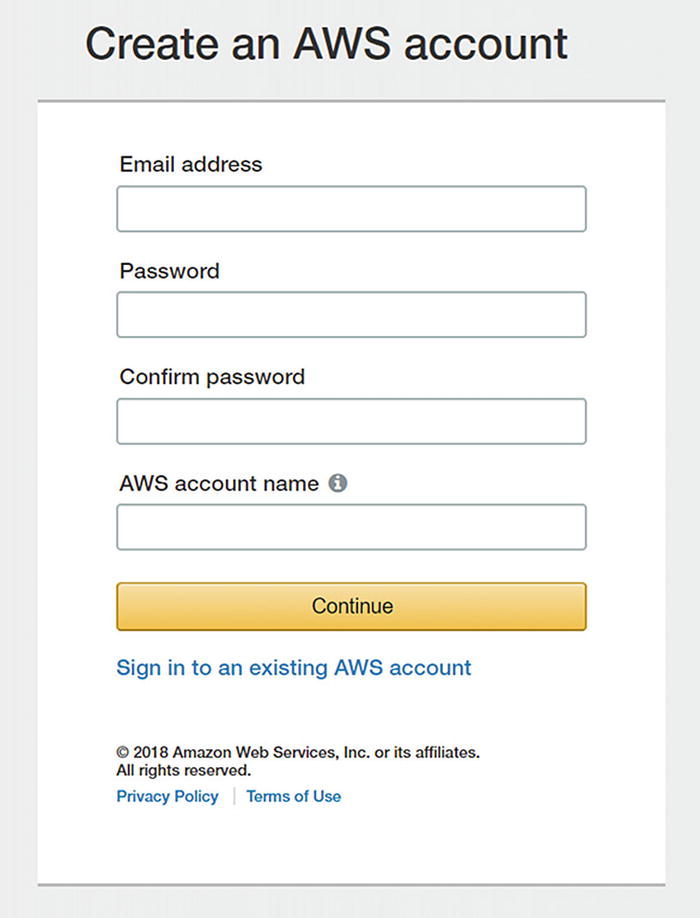
Creating a new AWS account
Next, we will enter our personal contact information. We will need to enter our payment information for identity verification purposes (you will not be charged while in the free tier) and verify our phone number. Once completed, we will be taken to the AWS Management Console. At this point, we can find Lambda in the “All services” list and navigate to it.
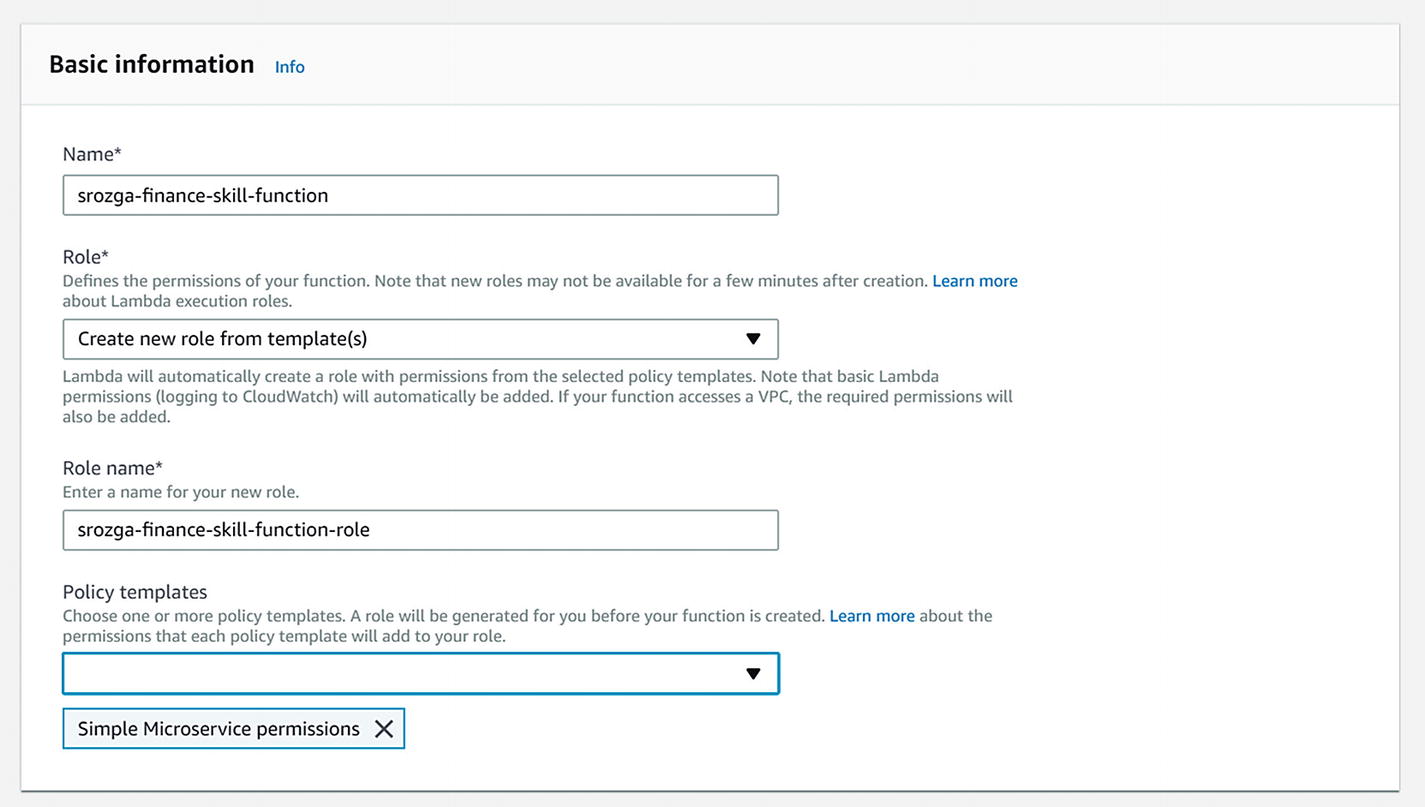
Creating a new Lambda function
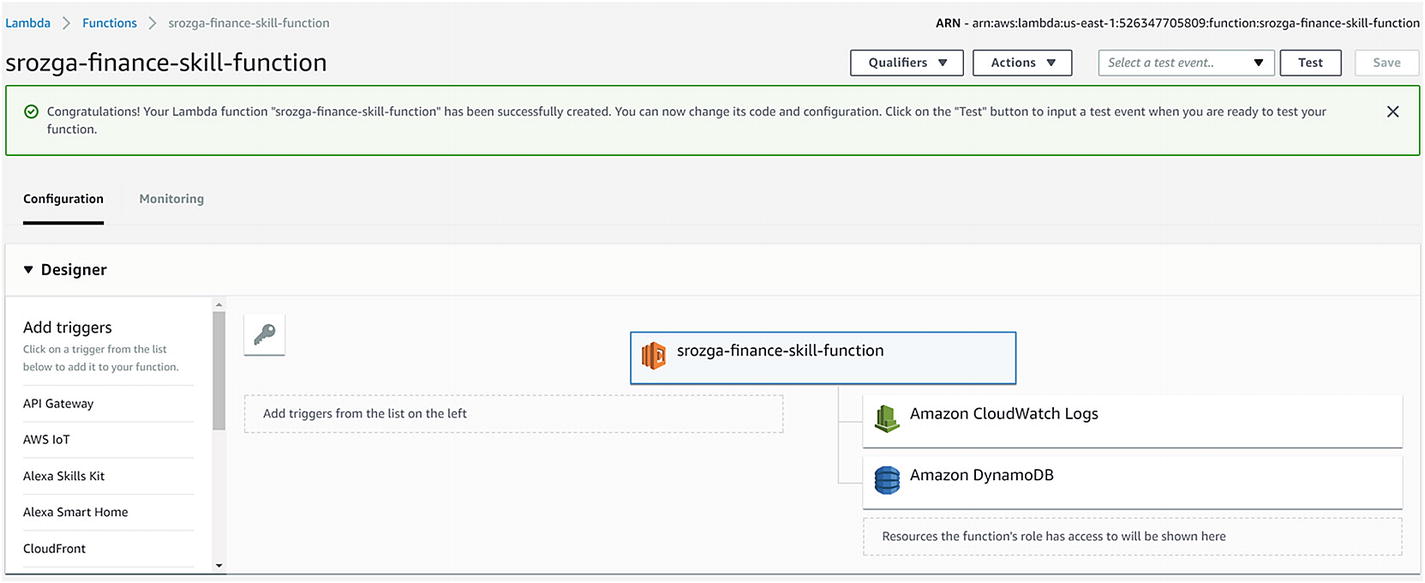
Function configuration screen
There are many actions we can perform on this screen. First, the top right shows the Lambda identifier. We will need to present this to the Alexa skill momentarily. We also see that the function has access to CloudWatch logs (all Lambda logs are sent to CloudWatch) and DynamoDB, Amazon’s managed cloud NoSQL database. Alexa skills can use DynamoDB to store skill state.
In the Designer section, we need to set a trigger that can invoke our new function. For our purposes, find and click the Alexa Skills Kit trigger. Once you do so, a Configure Triggers section will appear below. Enter the skill ID from the Alexa Skill dashboard. It should look like amzn1.ask.skill.5d364108-7906-4612-a465-9f560b0bc16f. Once you have entered the ID, click Add for the trigger and then save the function configuration. At this point, the Lambda function is ready to be called from our skill.
Before we do so, we select the function in the Designer (in this case, srozga-finance-skill-function as per Figure 14-17); we will be greeted with the code editor. We have a few different options of how code is loaded into Lambda. One option is to write the code manually in the editor; another option is to upload a zip with all the code. Doing this manual labor in a real application gets tiring very quickly; you can utilize the AWS4 and ASK CLI5 to deploy a skill from the command line. For now, we will simply use the editor. Replace the code in the editor with the following:
Before we leave, copy the Lambda function’s Amazon Resource Name (ARN) from the top-right area of the screen. The identifier looks like this: arn:aws:lambda:us-east-1:526347705809:function:srozga-finance-skill-function.
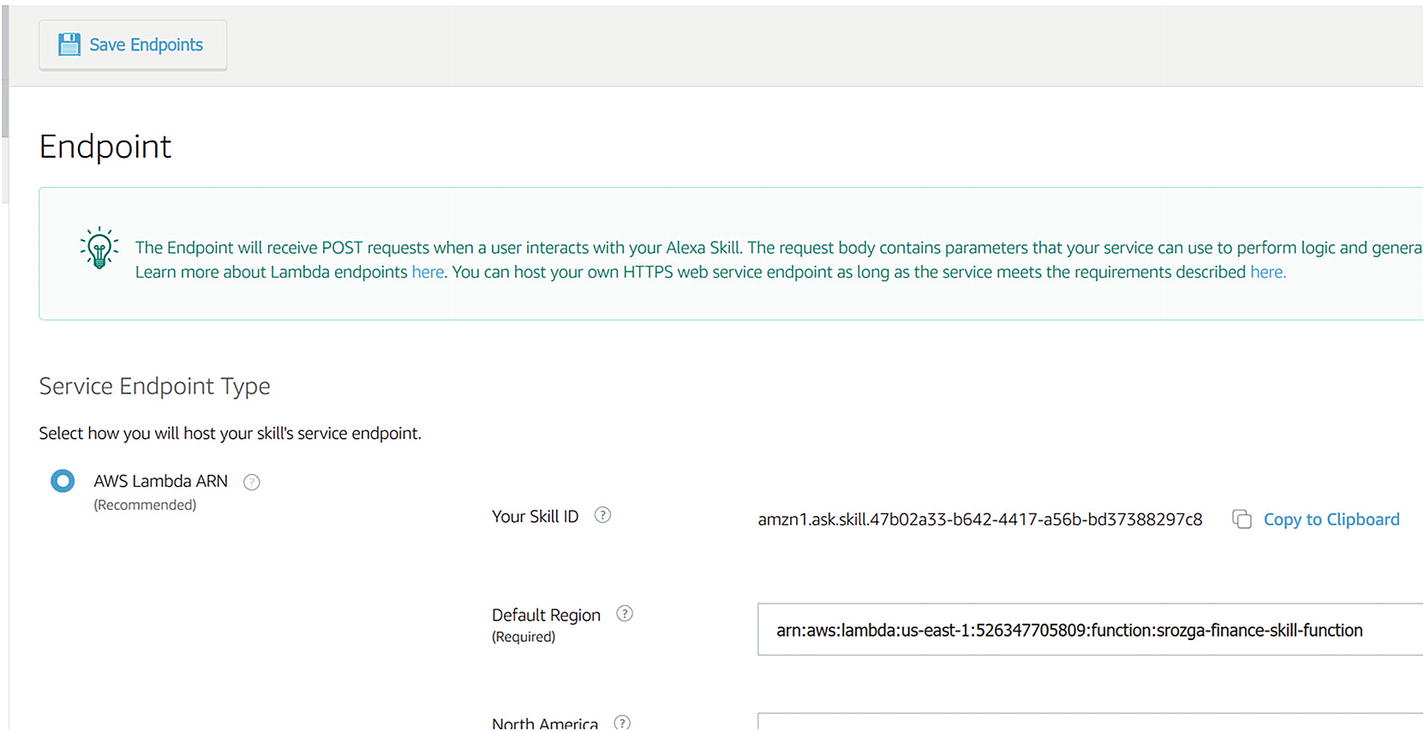
Alexa skill Lambda ARN endpoint configuration
Click the Save Endpoints button. If there are issues here, you may not have correctly added the Alexa Skills Kit trigger for the Lambda function.
At this point we can navigate into the Test section, using the top navigation panel. By default, the skill is not enabled for test. Toggle the checkbox. Now, we can test the skill from the Alexa test interface, any Echo device connected to the developer account, or third-party tools such as EchoSim.6 You may be prompted to allow microphone access if you want to speak to the test application.
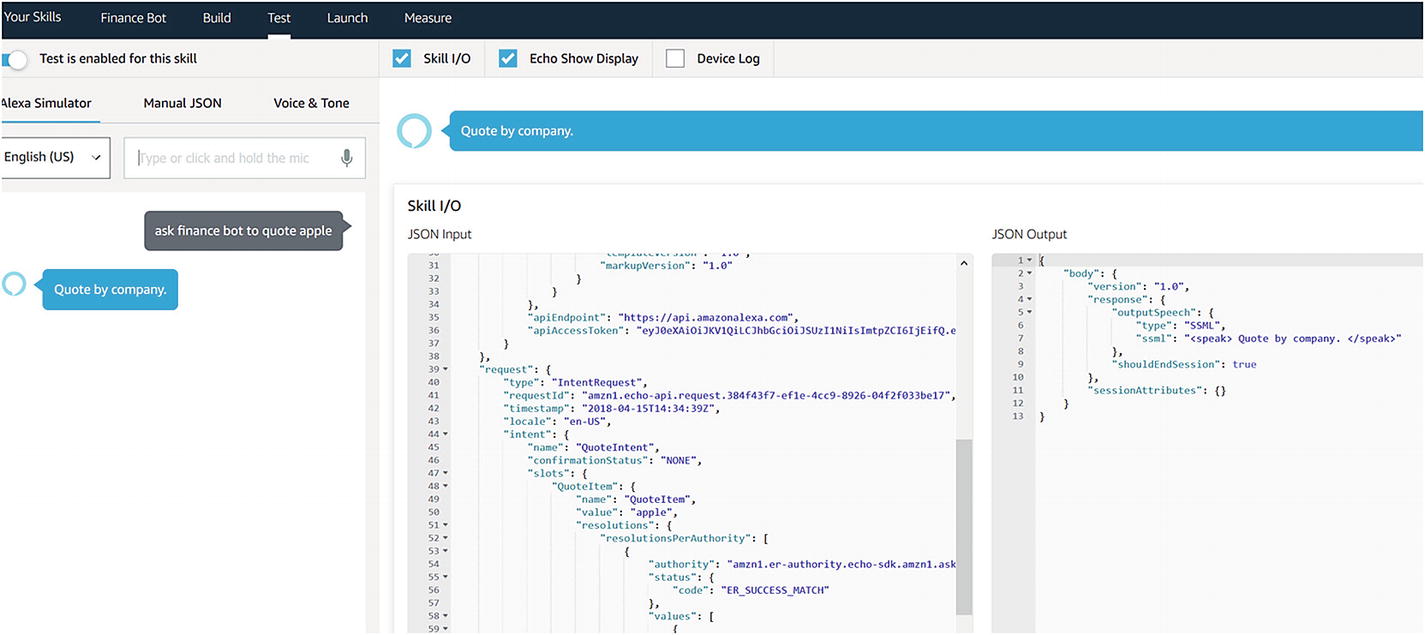
Success!
Now that we see the incoming JSON and the slot format, we can extend the code to extract the slot values. In the context of an intent handler, the this.event.request object contains the resolved intent and slot values. From there, it’s simply a matter of extracting the values and doing something with them. The following code extracts the slot values and includes them in the Alexa voice response:
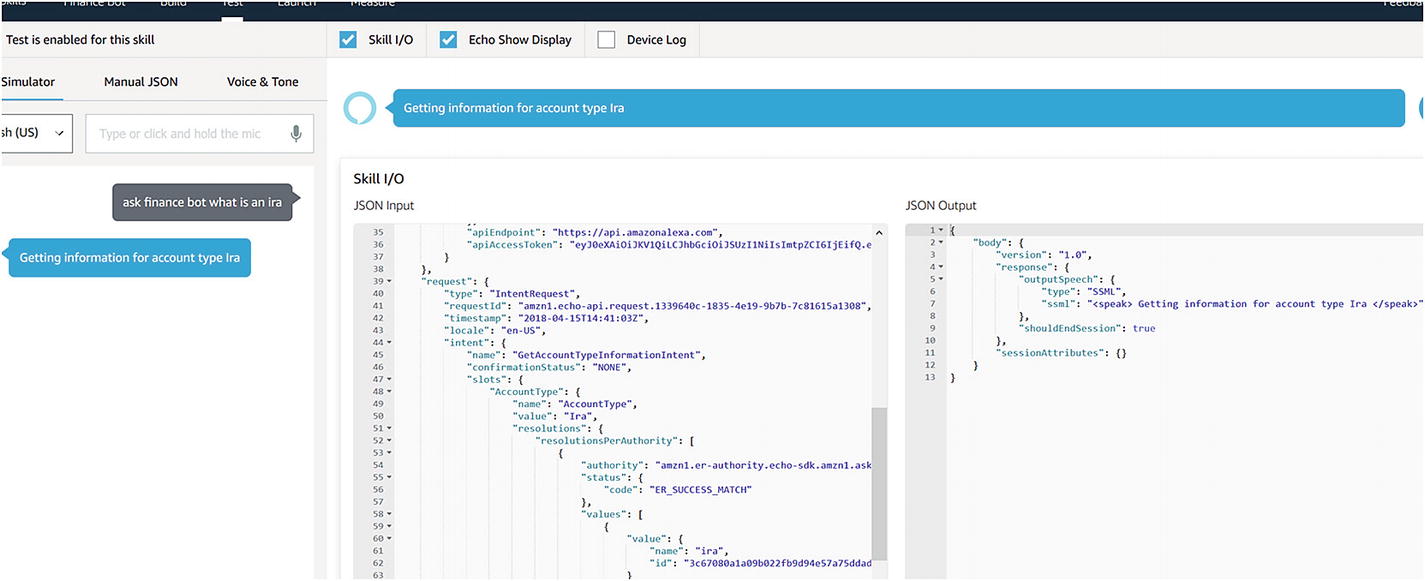
Successfully extracting AccountType slot values from Alexa request
Note that if we send the skill something that the built-in Amazon intents should handle, as perhaps “cancel,” the skill might return an error. The reason for this is that we do not yet handle some of those built-in intents. In addition, we do not include unhandled intent logic. We can easily handle both cases by adding the following handlers:
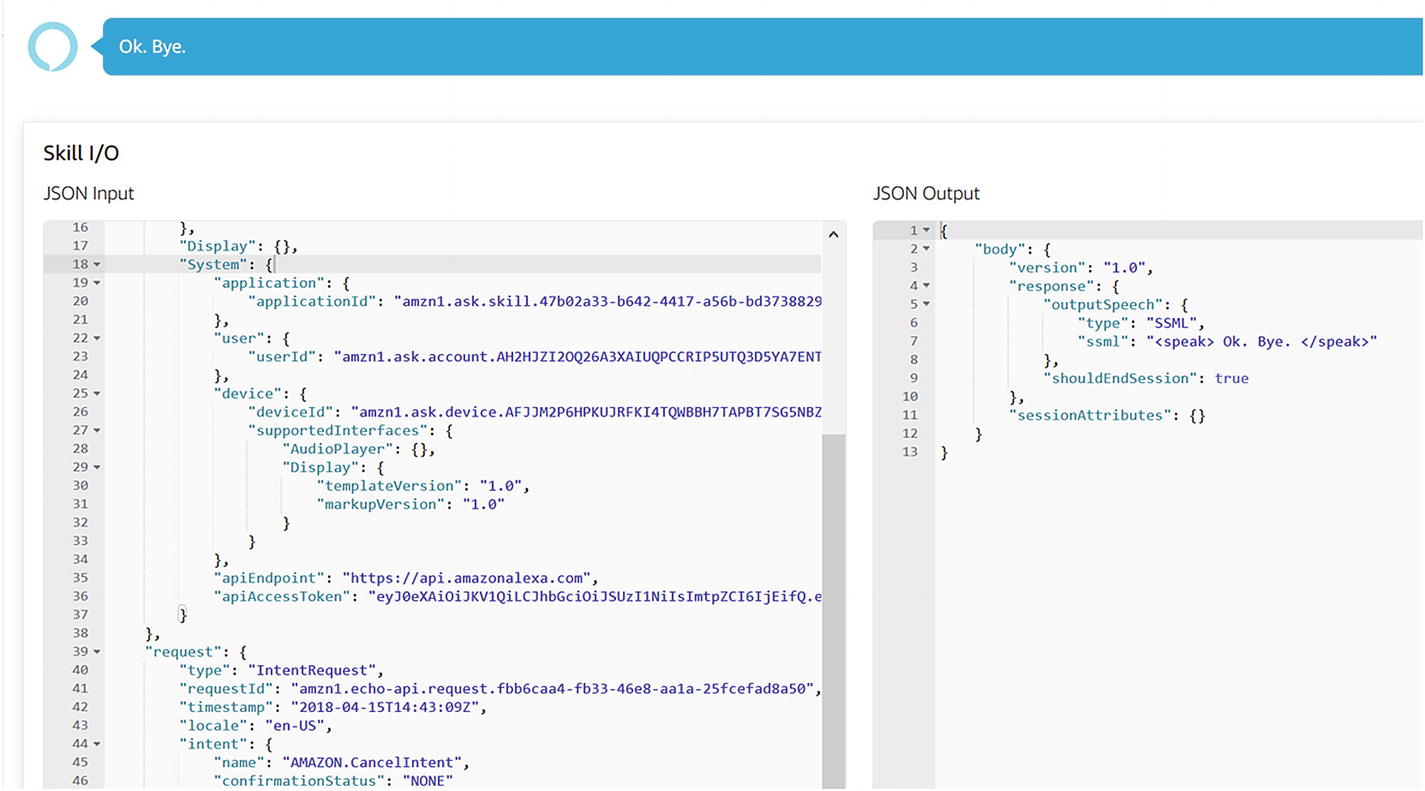
The sassy message we promised when asking the skill to cancel
Great. This works well, but how do we model a dialog into an Alexa Skill? The SDK for Node.js includes the concept of state. Think of it as the user’s current dialog. For each state, we provide a set of handlers for each intent supported by that state. Essentially, we are encoding a dialog graph by using a set of state names and handlers. The code for this skill follows:
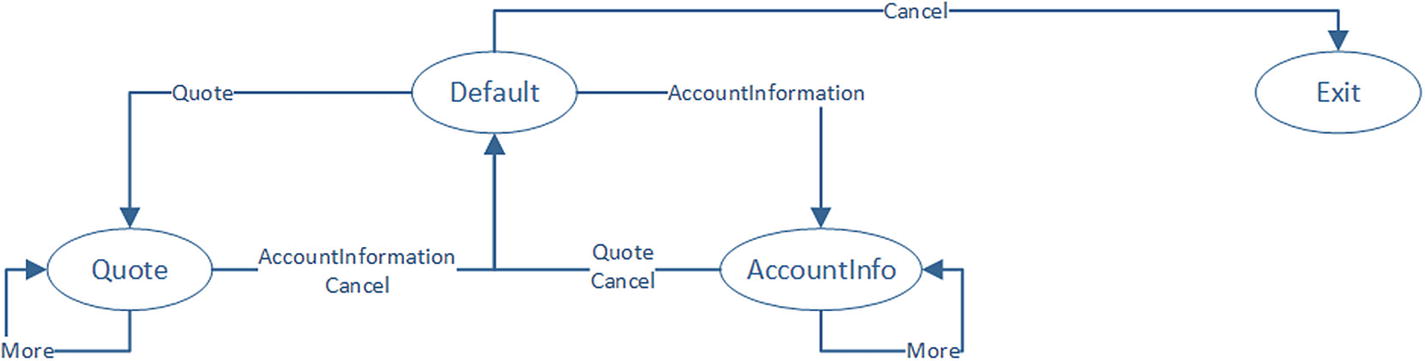
An illustration of the dialogs and transitions in our skill
Go ahead and run this sample to gain familiarity with the ideas behind the flow. Of importance is that we take advantage of two fields for state storage: this.handler.state for the name of the current state and this.attributes, which acts as a user conversation data store. Think of this.attributes as the privateConversationData dictionary in Bot Builder. These values are not persisted when a session ends by default, but the Alexa Skills Kit for Node.js supports DynamoDB integration for state storage. This would enable our skill to continue an interaction with a user whenever they invoke the skill again.
Other Options
We conveniently ignored a few other options along the way. The skill developer console for our skill contains the Account Linking and Permissions links. Account linking is the process of redirecting the user to an authorization experience via an OAuth flow managed by Alexa. Alexa stores the tokens and sends them to our endpoint as part of each request. Part of the reason this is managed in this manner is that the original Echo did not have a screen. As an affordance, authorization is conducted through the Alexa mobile app, so the Alexa servers need to own the entire OAuth flow.
The Permissions screen lets us request access to certain data on the user’s device such as the device address or Alexa shopping lists (Figure 14-23).
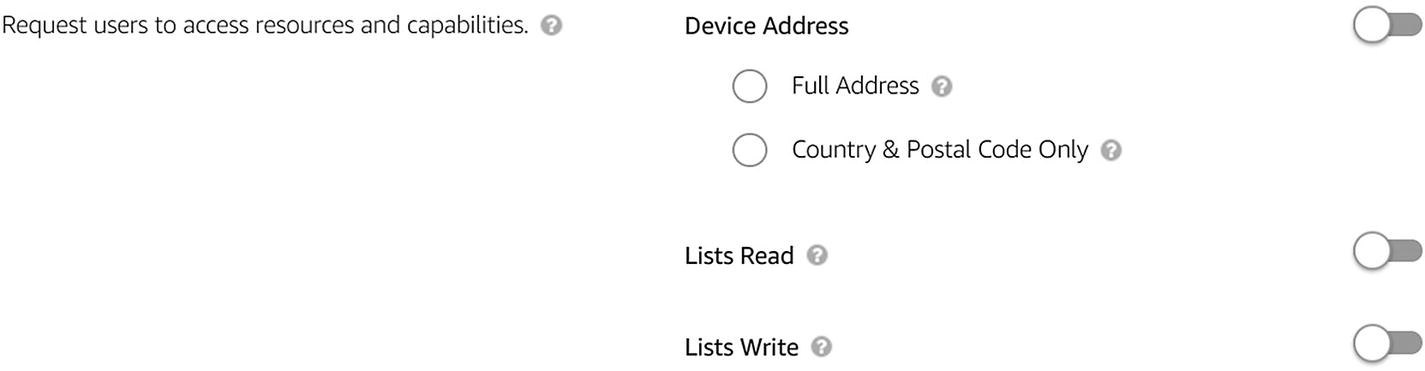
The Alexa Permissions screen
Exercise 14-1
Connecting to Real Data and Rendering Imagery
- 1.
Use the code in the previous section as a starting point. Revisit the code from Chapter 11 and ensure that your quote state QuoteIntent handler retrieves quote data from Intrinio and responds with the latest price in voice.
- 2.
Integrate Chapter 11’s HTML-to-image generation code into your Alexa skill. Remember to add the necessary packages into the package.json file in the Lambda function.
- 3.
Visit https://developer.amazon.com/docs/custom-skills/display-interface-reference.html to get familiar with how to render display templates. Specifically, you will be using BodyTemplate7 to render the image generated in the previous step.
- 4.
To render the template using the Node.js SDK for Alexa Skills Kit you will need to utilize the response builder ( https://github.com/alexa/alexa-skills-kit-sdk-fornodejs#response-vs-responsebuilder ). The SDK has helpers to generate the template JSON ( https://github.com/alexa/alexa-skills-kit-sdk-fornodejs#display-interface ).
- 5.
Test the functionality in the Alexa Test utility, EchoSim, and, if available, real Echo devices. What is the behavior of the code in a device without a display?
Your skill should now be rendering your financial quote image on display-enabled Echo devices, and you should have gained hands-on experience testing an Alexa skill using several methods.
Connecting to Bot Framework
The features we have presented thus far are just a fraction of the Alexa Skills Kit capabilities but are sufficient to gain an appreciation for applying this book’s concepts to emerging voice platforms. The process of connecting an Alexa skill to a Bot Framework bot follows a recipe similar to our voice bot implementation for Twilio in Chapter 8. We will show code on how to accomplish this connection given our existing Alexa Skills Kit interaction model. Before we dive into the code, we will discuss several implementation decisions for our solution.
Implementation Decisions Around Bot Framework and Alexa Skills Kit Integration
Typically, we do not suggest that a stand-alone Alexa skill be implemented by using the Bot Framework. If the requirements truly suggest a single platform, staying within the confines of an Alexa interaction model and the Alexa Skills Kit SDK for Node.js running on an AWS Lambda function is sufficient. In the case that our product should support multiple natural language text and voice interfaces, we may want to consider one platform to run our business logic, and the Bot Framework lends itself well to this approach. Once we start down the path of connecting an Alexa skill to the Bot Framework, several important implementation decisions follow. These apply to all types of systems, not just Alexa.
Natural Language Understanding
In the context of our current effort, which NLU platform should we utilize: LUIS or Alexa’s interaction model? If we were to use Alexa’s interaction model, we would have to pass the Alexa intent and slot objects through Direct Line calls into our bot implementation. We could then build a custom recognizer that detects this object’s existence and translates it to the correct intent and entity response object in the Bot Builder SDK. To make it very clear, this is where the utility of recognizers shines: the bot doesn’t care where the intent data comes from.
On the other hand, if we choose to utilize LUIS, we must find a way to pass raw input from Alexa into the bot. The way to achieve this is to mark the entire user input as an AMAZON.LITERAL slot type.9 This allows developers to pass the raw user input into the skill code. This does not mean our skill interaction model becomes nonexistent. Remember, Alexa uses the interaction model for its ASR, so we want to give as many examples of utterances and input types that we expect in our skill’s vocabulary. We would need to include all our LUIS utterances in the Alexa interaction model.
In general, since the bot may support more channels than Alexa, maintaining one NLU system, such as LUIS, is be a more maintainable approach. There is no way to break away completely. We still need to ensure our bot correctly handles the built-in intents, such as Stop and Cancel. In the following code sample, in the interest of expediency, we will assume the entire NLU model lives in Alexa and demonstrate a custom recognizer approach.
Channel-Agnostic vs. Channel-Specific Dialogs
When we develop one bot that handles multiple channels, we must decide whether the one dialog implementation can handle all channels or whether each channel should have its own dialog implementation. There are arguments to be made for each, although if you think in terms of the Model View Controller (MVC) pattern,10 we can come up with an elegant solution. If we consider a dialog to be the controller and the APIs we talk to the model, then we are left with the question of what takes on the role of the view.
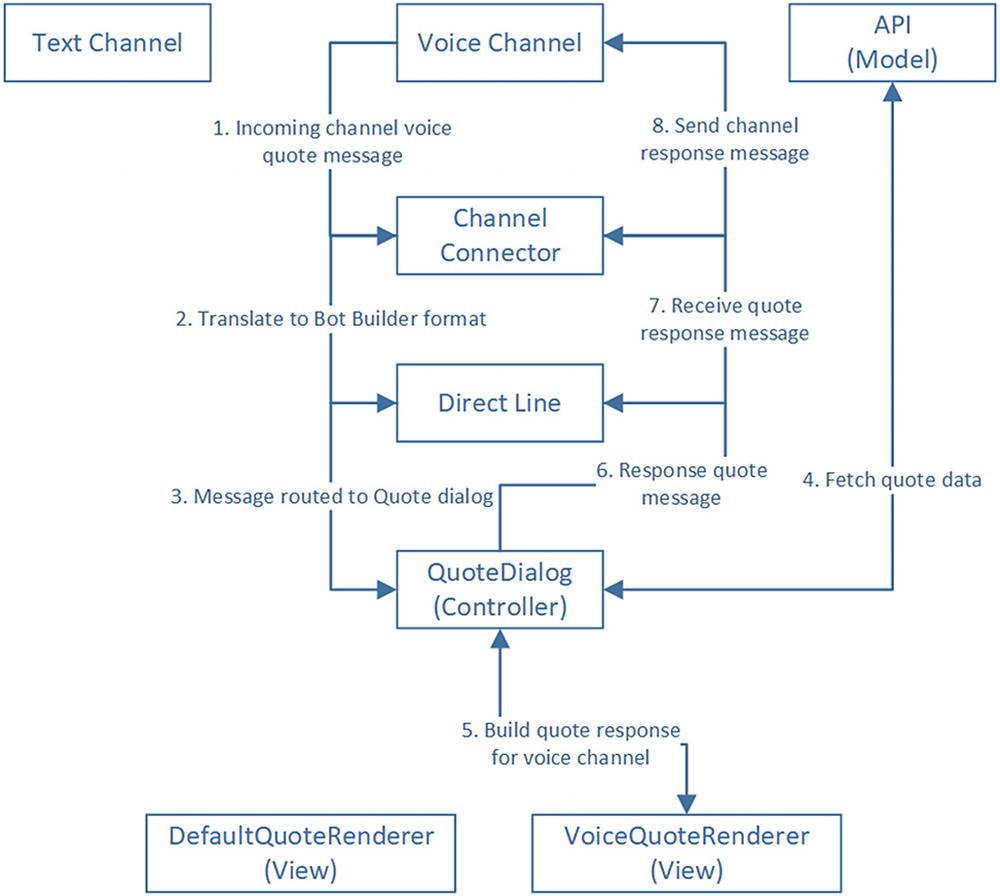
A sample flow of a message incoming from a voice channel such as Alexa and its flow through our system all the way to the view renderers
Alexa Constructs
The Bot Builder SDK abstracts the concept of a text conversation well, but mapping the concepts directly to Alexa is nontrivial. A couple of examples come to mind.
First, when a speech utterance is sent to the Alexa service, it may include an initial speech string plus a re-prompt speech string. The re-prompt is spoken to the user if Alexa poses a question, and the user does not respond in time. Bot Builder activities contain a property for speech but not for re-prompt. In our sample code, we leverage the custom Channel Data field to send this information.
A second example is the Alexa render templates. Although we are not covering them here, Alexa supports a number (seven by the latest count) of templates to display content on display-enabled Echo devices. Each template is a different JSON structure representing a user interface. Although we could try to come up with a way to utilize the hero card objects to communicate these templates to a connector, it is simpler to generate the JSON in a renderer and send in the channel data. Instructing the Echo device to play a video presents a similar dilemma.
A solution to all these problems is to try to render as much as possible using the Bot Builder SDK objects and drop to channel data only when necessary. As illustrated in Figure 14-24, we could even utilize the Bot Builder SDK objects and translate them to channel-specific constructs on the connector layer. In general, though, is it easier to generate the Alexa channel data for each response in an Alexa renderer.
Callback Support
Most channels can send events that have nothing to do with user messages. For example, Facebook sends events about referrals, app handover, checkouts, and payments among others. These are channel-specific messages that need to be handled in the bot, sometimes outside the structure of a dialog. Alexa is no stranger to such events. When a video or audio file is playing on an Echo device, various events about progress, interruptions, and errors are sent to the skill. It is up to our bot code to interpret those events correctly.
A good approach to this interaction is to create custom recognizers that can identify the different types of messages and then direct these messages to the right dialogs. For events that require a JSON response, the dialogs should send a payload using the channel data.
Sample Integration
Let’s dig into what a sample integration would look like. We split the implementation into three components: the connector, the recognizer, and the bot. The full sample code can be found under the chapter14-alexa-skill-connector-bot folder in the book’s GitHub repo.
The connector consists of an HTTP handler that Alexa will send messages to. The goal of the handler is to resolve the conversation, call the bot, wait for a response from the bot, and send the message back to Alexa. There is a bit of code here, so let’s walk through it step-by-step.
The message comes into the handler. We extract the request body and the user ID. We then create an MD5 hash of the user ID. The reason for doing this is that Alexa user IDs are longer than the Bot Framework supports. A hash helps us keep the length manageable.
We next either retrieve a cached conversation for that user or create a new one. Note, we store the conversations in memory, so every server restart will create new Direct Line conversations. In production, we would use a persistent store using a service such as Cosmos DB or Azure Table Storage. Alexa also includes a flag that informs us whether a session has just started. In the case that we do not have a cached conversation or the session is new, we create a new Direct Line conversation and cache it.
After we retrieve the conversation, we post an activity to the bot. Note that since we decided to pass the resolved Alexa interaction model intents and slots, we simply pass the Alexa message through the channel data in the sourceEvent property.
If Alexa sent a SessionEndedRequst, we automatically respond with an HTTP 200 status code.
Otherwise, we use the Direct Line polling mechanism to try to get the activity response from the bot. We time out after six seconds. Once a response activity has been identified, we extract some Alexa-specific information from the activity and build a response to Alexa. If the message had timed out, we send back an HTTP 504 status code.
That’s it! The code to build the response messages follows.
The Direct Line functions are the same as those we showed in Chapter 9.
What happens with the message on the bot side of things? First it will hit our custom recognizer. The recognizer first ensures we are getting an Alexa message and that it is either an IntentRequest, LaunchRequest, or SessionEndedRequest request. If it is an IntentRequest, we resolve the Alexa intent and slots as the intent and entities for LUIS. As the comments note, the format of the slots object is different from the LUIS entities object. If we were to mix both NLU systems in one bot to use the same dialogs, we would have to ensure that the format is normalized. If the request is LaunchRequest or SessionEndedRequest, we simply pass through those strings as bot intents.
Let’s come back to the bot code. We first register our custom Alexa HTTP handler, custom recognizer, and the default response. Note our use of the custom Direct Line data. If we ask the skill something it doesn’t support, the session is terminated.
It reads the quote item from the entities as our Alexa skill code did.
It sends a response via the speak property but also includes a reprompt in the custom Direct Line channel data.
Within the context of this dialog, if the bot detects the AMAZON.MoreIntent, the MoreQuoteDialog dialog is invoked.
After the MoreQuoteDialog dialog executes, it yields control back to QuoteDialog.
The same pattern is repeated for the GetAccountTypeInformationIntent intent. Lastly, we add some handlers to support things such as canceling the skill and handling the LaunchRequest and SessionEndedRequest events.
That completes our integration with Alexa. If we run the code, we will see similar behavior to the Lambda skill we had developed earlier. There are many unhandled intents and contingencies in both the bot code and the connector code, but we are well on our way to integrating the Alexa Skills Kit with Microsoft’s Bot Framework.
Exercise 14-2
Integrate Data and Quote Imagery into Bot Builder Code
- 1.
Utilize the previous section’s code as a starting point.
- 2.
Extract the appropriate image generation code from the Lambda function and add it to your bot. Make sure you install the necessary Node.js packages.
- 3.
Generate the display template within the dialog and add it into your custom channel data. You can include the Alexa Skills Kit SDK for Node.js as a dependency to use the template builder types.
- 4.
Ensure the connector is translating the channel data template correctly into a final response back to Alexa.
- 5.
Run your integrated Alexa skill and Bot Framework bot and test it using the same methods you used in Exercise 14-2.
- 6.
What does it take to modify the bot code so that you can utilize your bot through the Bot Framework emulator? After all the knowledge you have gained in this book, you should be able to create a LUIS application to complete the experience.
What a great feeling getting this one working! It can be quite fun and interesting to develop voice chat bots, especially on a rich ecosystem like Alexa.
Conclusion
This chapter has enabled us to coalesce the learnings of this book to leverage Amazon’s Alexa platform and, additionally, integrate it with the Bot Builder SDK. A modern conversational interface can be reduced to NLU intents and entities plus a dialog engine to drive the conversation. Whether it is Alexa or other channels like Google Assistant, all these systems share common core concepts. There are those who will draw a strong enough distinction between voice and text communications to argue for a need for distinct ways of handling both interactions. Although it is true that the voice and text communications are distinct enough to warrant different front-end experiences, the ability to handle the generic idea of a conversation is well developed in the Bot Builder SDK. The idea that we can connect different NLU systems to pass their own intents into our Bot Framework bot is powerful. It means that a message into our bot can be much more than just text. It can be any kind of complex object only limited by our imagination. Granted, there is always some level of overhead to run a generic system connected to many specific interfaces, but, as we hope to have demonstrated in this chapter, the extra effort required to build the connecting layer is well within our grasp.