Microsoft’s Bot Builder SDK comes in two flavors: C# and Node.js. As mentioned in Chapter 1, for the purposes of this book, we are going with the Node.js version. Node.js is a cross-platform JavaScript runtime; the fact that it is cross platform and based on a low barrier of entry language such as JavaScript means we can more easily show how easy it is to build bots using the technology. We stay within the confines of EcmaScript6; however, Bot Framework bots can be built using just about any flavor of JavaScript. The Bot Builder framework itself is written in TypeScript, a superset of JavaScript that includes optional static typing and can be compiled into JavaScript.
For this chapter, we should have an introductory-level knowledge of Node.js and npm (the node package manager). Code provided throughout the book will include the npm package definition, so we will need to run only two commands.
Our aim in this chapter is to write a basic echo bot and deploy it to Facebook Messenger using Microsoft’s channel connectors. Once we have the basic bot set up, we’ll dive into the different concepts in the Bot Builder SDK that really allow us to write killer bots: waterfalls, dialogs, recognizers, sessions, cards, and much more. Let’s go!
Microsoft Bot Builder SDK Basics
The core library we will be using to write the bot is called the Bot Builder SDK ( https://github.com/Microsoft/BotBuilder ). To get started, you will need to create a new node package and install the botbuilder, dotenv-extended, and restify packages. You can do so by creating a new directory and typing these commands:
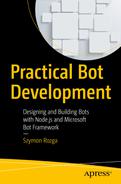
Typical high-level bot architecture
As an alternative to creating the package.json file manually, we can bootstrap this exercise using the echo-bot code provided with the book. The package.json for the echo-bot looks like this. Note that the eslint dependencies are purely for our development environment, so we can run a JavaScript linter1 to check for stylistic and potential programmatic errors.
The bot itself is defined in the app.js file. Note that the start script in the package definition specifies app.js as the entry point of our bot.
Let’s walk thought this code. We use a library called dotenv to load environment variables.
The environment variables are loaded from a file called .env into the process.env JavaScript object. The .env.defaults file includes default environment variables and can be used to specify the values our Node.js requires. In this case, the file looks like this:
We require the botbuilder and restify libraries. Botbuilder is self-explanatory. Restify is used to run a web server endpoint for us.
Now we set up our web server to listen for messages on port 3978.
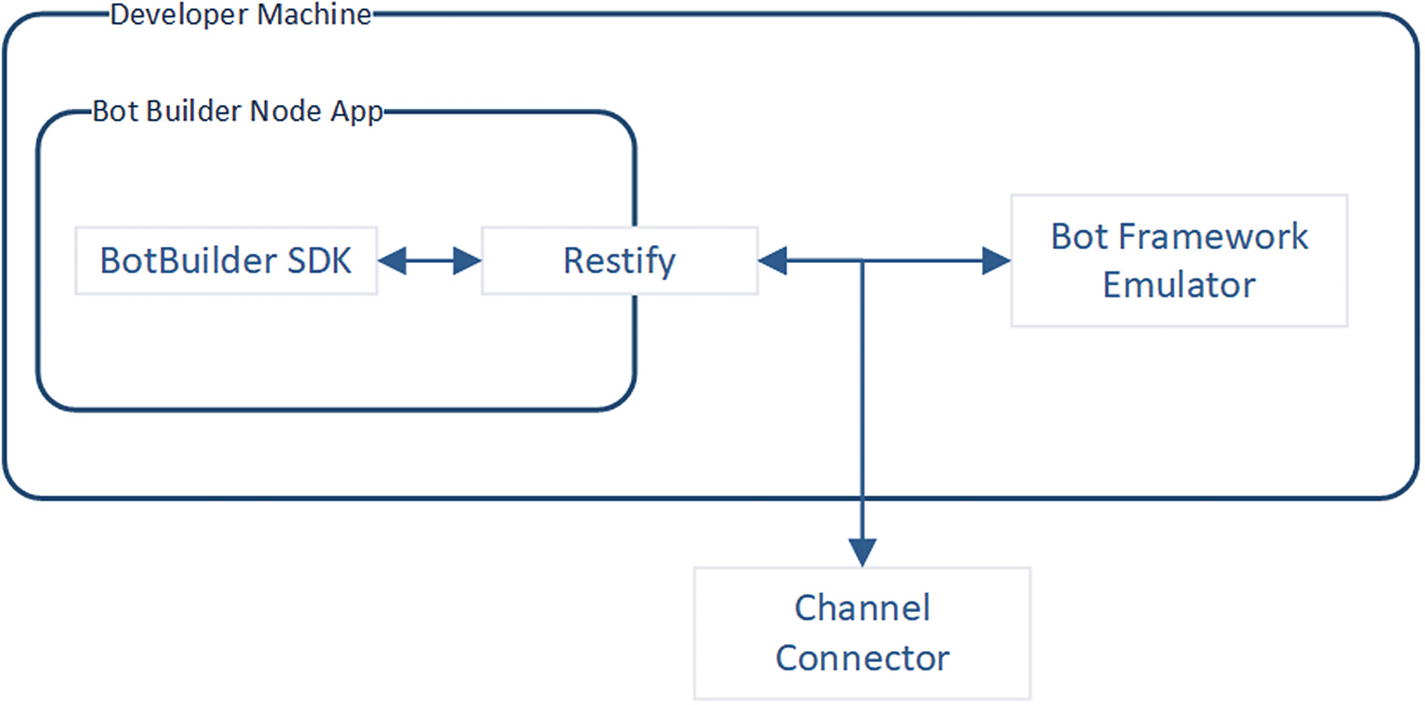
Microsoft Bot Framework connectors
The environment variables MICROSOFT_APP_ID and MICROSOFT_APP_PASSWORD are our bot’s credentials. We will set them up in the Bot Framework at a later point when we create the Azure Bot Service registration with Azure. For now, we can leave those values blank because we don’t care to secure our bot quite yet.
Next we tell restify that any requests into the /api/messages endpoint, or, more specifically, http://localhost:3978/api/messages, should be handled by the function returned by connector.listen(). That is, we are allowing the Bot Framework to handle all incoming messages into that endpoint .
Lastly, we create the universal bot. It is called a universal bot because it is not tied to any specific platform. It uses the connector for receiving and sending data. Any message that comes into the bot will be sent to the array of functions. For now, we have only one function. The function takes in a session object. This object contains data such as the message but also data about the user and conversation. The bot responds to the user by calling the session.send function.
Notice that the Bot Builder SDK takes care of providing the right HTTP response to the incoming HTTP request. In practice, the internals will return an HTTP Accepted (202) if Bot Builder processes the code without a problem and will return an HTTP Internal Server Error (500) otherwise.
The content of our response is asynchronous, meaning that the response to the original request our bot receives does not contain any content. An incoming request, as we will see in the following chapter, includes a channel ID, the name of the connector such as slack or facebook, and a response URL where our bot sends messages. The URL typically looks like https://facebook.botframework.com . Session.send will send an HTTP POST request to the response URL.
We can run this bot by simply executing the following:
We will see some Node.js output in our console. There should be a server running on port 3978, on the path /api/messages. Depending on our local Node.js setup and the preexisting software on our machine, we may need to update to the latest version of the node-gyp package, a tool for compiling native addon tools.
How do we actually converse with the bot? We could try sending messages by using a command-line HTTP tool like curl, but we would have to host a response URL to see any responses. Additionally, we would need to add logic to obtain an access token to pass any security checks. Seems like too much work to simply test the bot.
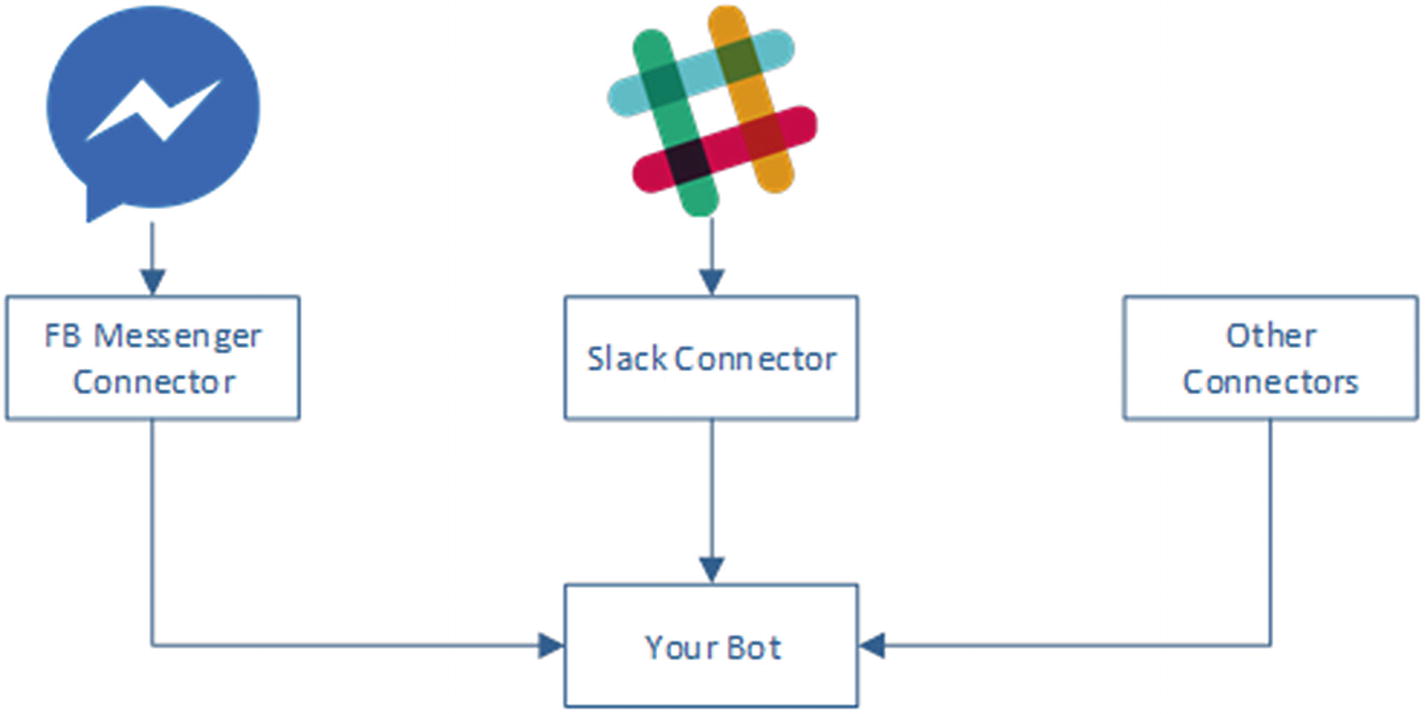
Bot Framework Emulator
We can input our bot URL (/api/messages) into the address bar. The emulator also allows us to deal with bot security and specify the app ID/password. We’ll get into that later.
The log section shows us all the messages sent between the bot and emulator. We can see that the emulator opened a port to host a response URL. In this example, it is port 58462.
The emulator log indicates when there is an update, so we are always running the latest and greatest version.
There is some verbiage about ngrok. Ngrok is a reverse proxy that lets us tunnel requests from a public HTTPS endpoint into a local web server. It is incredibly useful when testing bot connectivity from remote computers, for example, if we want to run a local bot on Facebook Messenger. We can also use the emulator to send messages to remote bots.
The details section shows the JSON for each message sent between the bot and the emulator.
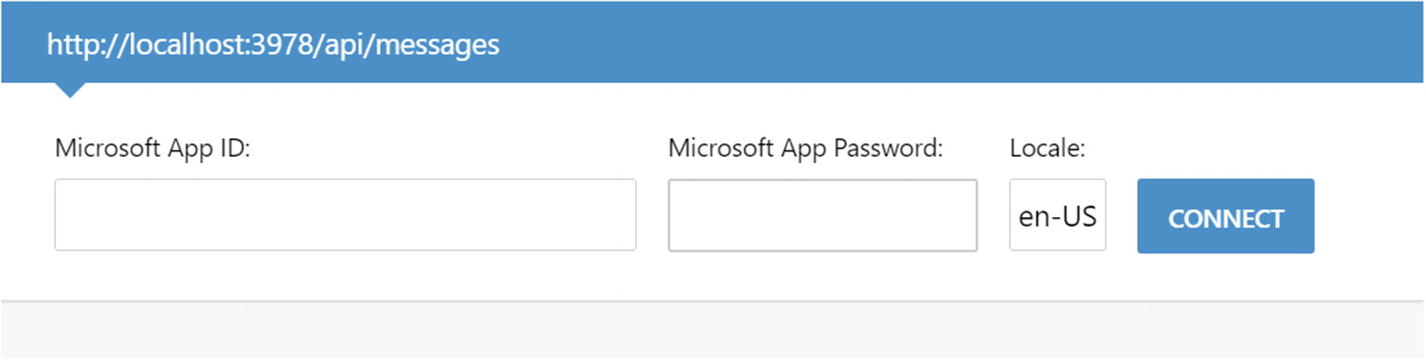
Emulator connection UI
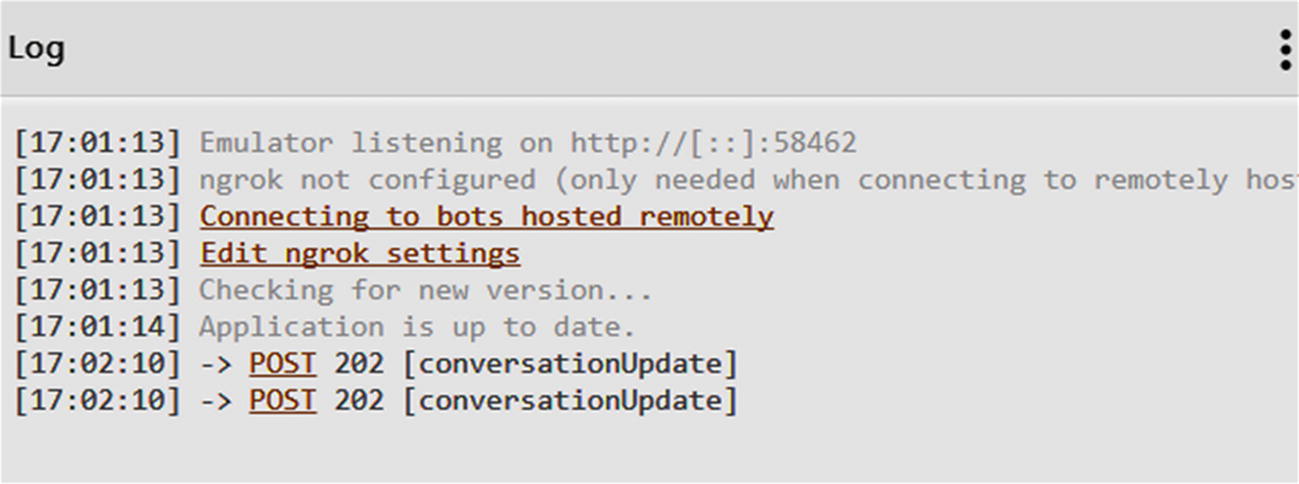
conversationUpdate messages when establishing a connection from the emulator to our bot
What does this mean? Each message between the bot and consuming connector (Emulator in this case) is called an activity, and each activity has a type. There are types like message or typing. If the activity is of type message, then it is literally a message between the bot and the user. A typing activity tells the connector to display a typing indicator. Previously, we saw the conversationUpdate type. This type indicates there is a change in the conversation; most commonly, users have joined or left the conversation. In a 1:1 conversation between a user and a bot, the user and bot will be the two members of a conversation. In a group chat scenario, the bot plus all the users would be part of the conversation. The message metadata will include information about which users joined or left the conversation. In fact, if we click the POST link for the two conversationUpdate activities, we find the JSON in the Details section. Here is the content for both messages:
Now, let’s send a message to the bot with the text “echo!” and look at the Emulator logs (Figure 5-6). Note that if we do not set up an explicit bot storage implementation, we might get a warning like this: “Warning: The Bot Framework State API is not recommended for production environments, and may be deprecated in a future release.” We will dive into this in the next chapter. Suffice it to say, it is strongly suggested that we use do not use the default bot storage. We can use the following code to replace it for now:
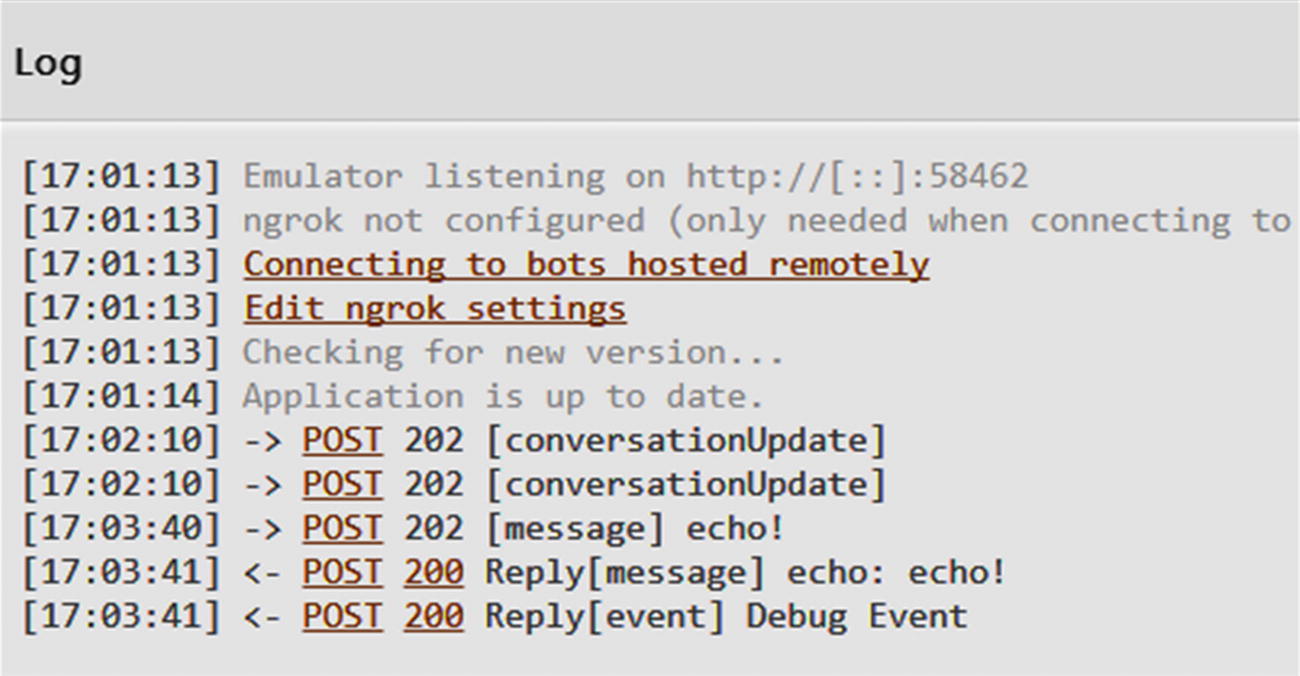
It’s alive!
Sender info (id/name): The channel-specific identifier and username for the sender. If the message is from the user to bot, this is the user. In the reverse direction, the sender is the bot. The Bot Builder SDK takes care of populating this data. In our JSON, this is the from field.
Recipient info (id/name): The inverse of the sender info. This is the recipient field.
Timestamp: The date and time when the message was sent. Typically, timestamp will be in UTC, and localTimestamp will be in the local time zone, though confusingly enough, the bot response’s localTimestamp is a UTC timestamp.
ID: Unique activity identifier. This typically maps to the channel-specific message ID. The IDs are assigned by the channel. In the Emulator, the incoming message will have an ID assigned. The outgoing message will not.
ReplyToId: The identifier of the activity for which the current message is a response. This is used to thread conversations in messaging clients.
Conversation: The conversation identifier on the platform.
Type: The type of the activity. Possible values are message, conversationUpdate, contactRelationUpdate, typing, ping, deleteUserData, endOfConversation, event, and invoke.
Text: The message’s text.
TextFormat: Text field format. Possible values are plain, markdown, and xml.
Attachments: This is the structure through which the Bot Framework sends media attachments such as video, images, audio, or other types like hero cards. We can utilize this field for any kind of custom attachment type as well.
Text Local: The user’s language.
ChannelData: Channel-specific data. For incoming messages, this may include the raw native message from a channel, for instance the native Facebook Messenger SendAPI. For outgoing messages, this would be a raw native message we want to pass through to the channel. This is typically used when the Microsoft channel connectors don’t implement a specific type of message against a channel. We will explore some examples in Chapters 8 and 9.
ChannelId: The messaging platform channel identifier.
ServiceUrl: The endpoint to which the bot sends messages.
Entities: A collection of data objects passed between the user and bot.
Let’s examine the messages exchanged in more detail. The incoming message from the emulator looks as follows:
There should be no surprises here. The response looks similar though a lot less verbose. This is typical. The incoming message will be populated by the channel connector with as much supporting data as possible. The response does not need to have all of this. One item of note is the fact that ID is not populated; the channel connector will typically take care of this for us.
We also note the existence of the inputHint field, which is mostly relevant to a voice assistant system and is an indication to the messaging platform on the suggested state for the microphone. For example, acceptingInput would indicate the user may respond to a bot message, and expectingInput would indicate that a user response is expected right now.
Lastly, the Debug Event provides data on how the bot executed the request.
Note, these are the same values as are printed in the bot console output. Again, if we did not override the default bot state, we would see more data here related to the deprecated code. The console output is shown here:
This output tracks how the user’s request is executed and how it traverses the conversation dialogs. We will address this further in this chapter.
If we were to send more messages using the emulator, we would see the same type of output since this bot is very simple. As we gain more experience with features such as cards, we will benefit from using the Emulator and examining the JSON messages further. The protocol is a huge part of the Bot Framework’s power: we should be as familiar with it as we can.
Exercise 5-1
Connecting to the Emulator
- 1.
Examine the request/response messages carefully.
- 2.
Observe the behavior between the emulator and the bot.
- 3.
Explore the emulator. Use the Settings menu to create new conversations or send system activity messages to the bot. How does it react? Can you write some code to handle any of these messages?
At the end of this exercise you should be familiar with running an unauthenticated local bot and connecting to it via the emulator.
Bot Framework End-to-End Setup
We now have a bot. How do we connect it to all these different channels? The Bot Framework makes this simple. Our goal here will be to register our bot and its endpoint with the Bot Framework through the Azure Portal and subscribe the bot to the Facebook Messenger channel.
There are a few things we will have to do. First, we have to create an Azure Bot service registration on the Azure Portal. We may need to create our first Azure Subscription. Part of this setup is using ngrok to allow the bot to be accessible from the Internet, so we should make sure that we have ngrok installed from here: https://ngrok.com/ . Lastly, we will deploy the bot to Facebook Messenger. This means we need to create a Facebook page, a Facebook app, and Messenger and Webhook integrations, and connect all that back to the Bot Framework. There are quite a few steps, but once we become familiar with Azure and Facebook terminology, it is not that cumbersome. We will first quickly walk through the directions and then go back and explain what was done at each step.
Step 1: Connecting to Azure
Our first step is to log into the Azure Portal. If you have an Azure account, excellent. Skip ahead to step 2 if you have an Azure subscription already. If you do not, you are able to create a free developer account with a $200 30-day credit by going to https://azure.microsoft.com/en-us/free/ .
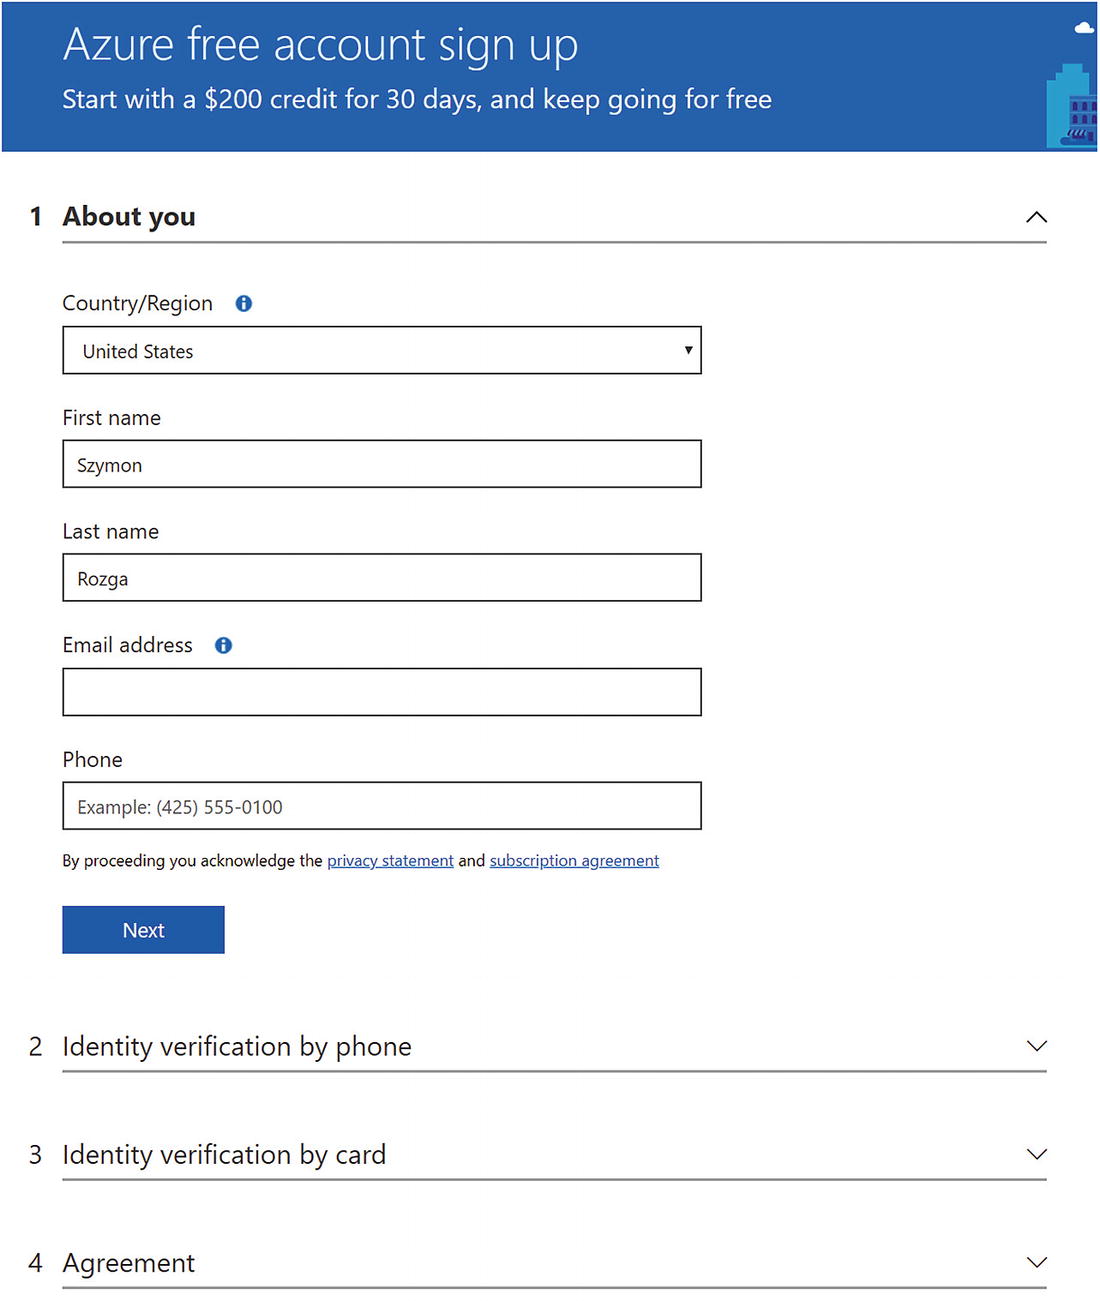
Azure sign-up page
Once the process is done, you will be able to go into the Azure Portal at https://portal.azure.com . It looks something like Figure 5-8. On the top right, you will see the email address you signed up with and your directory name. For example, if my email were szymon.rozga@aol.com (it’s not), then my directory name would be SZYMONROZGAAOL. If you were added into other directories, that menu would be a drop-down for you to select to which directory you are navigating.
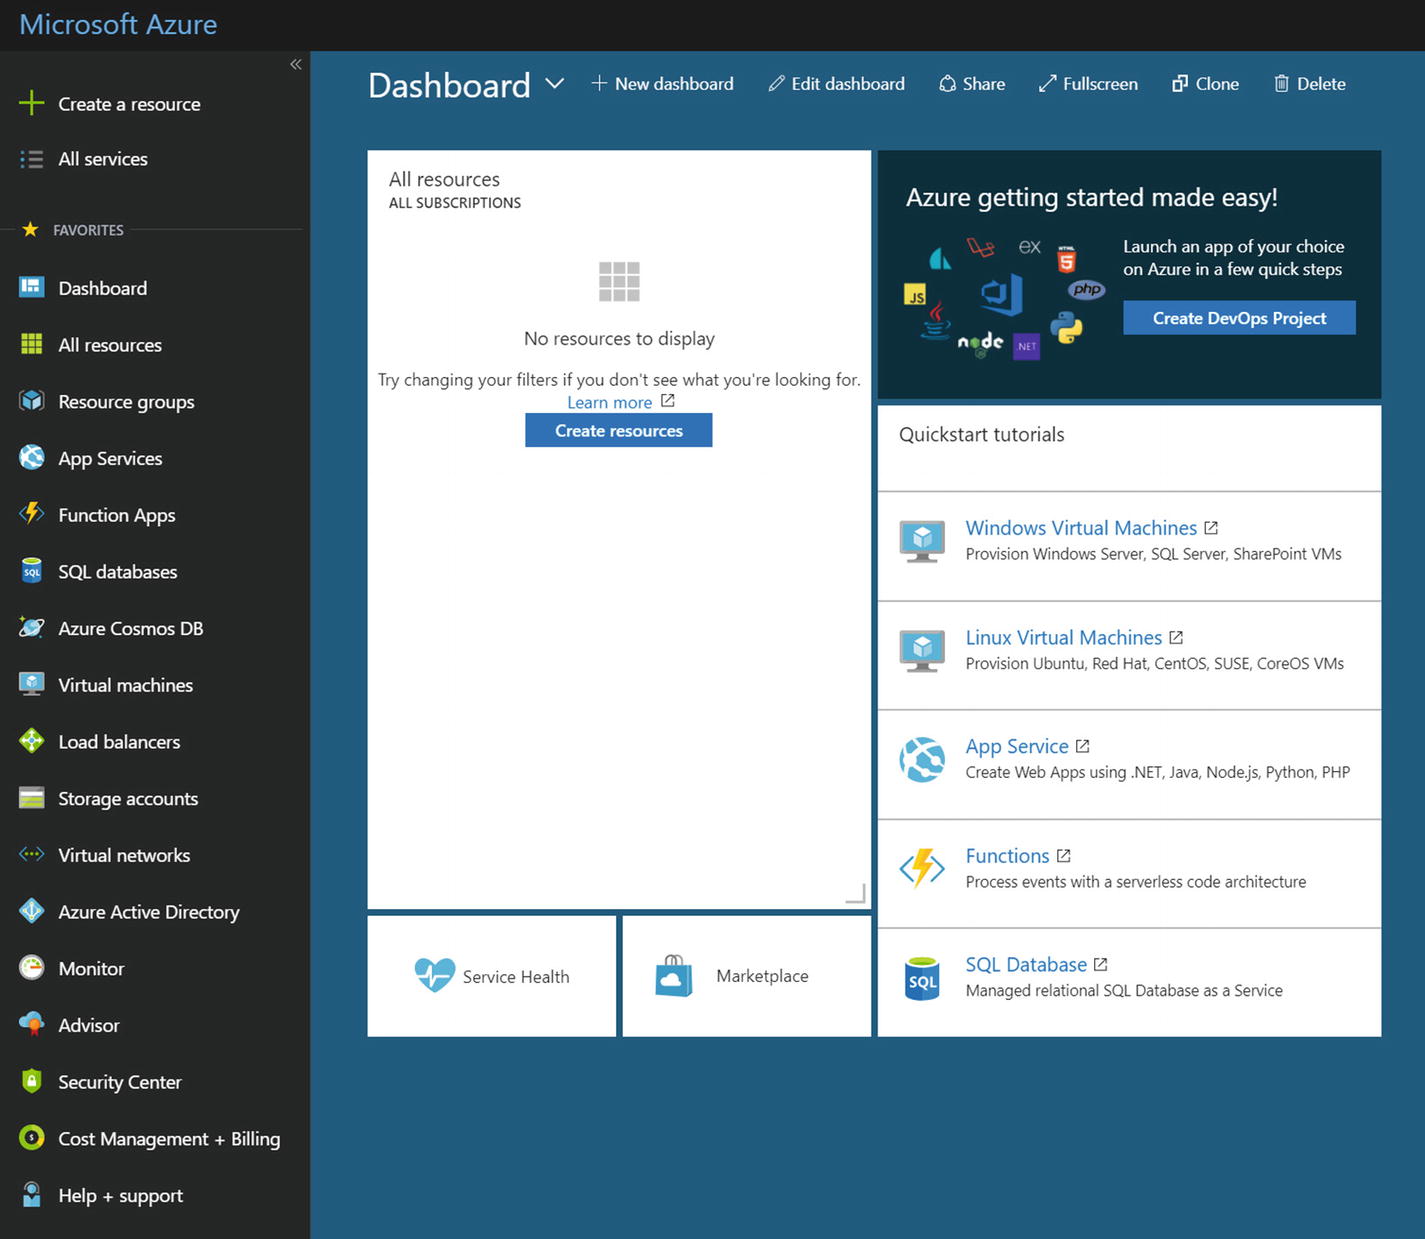
Empty Azure Portal
Step 2: Creating the Bot Registration
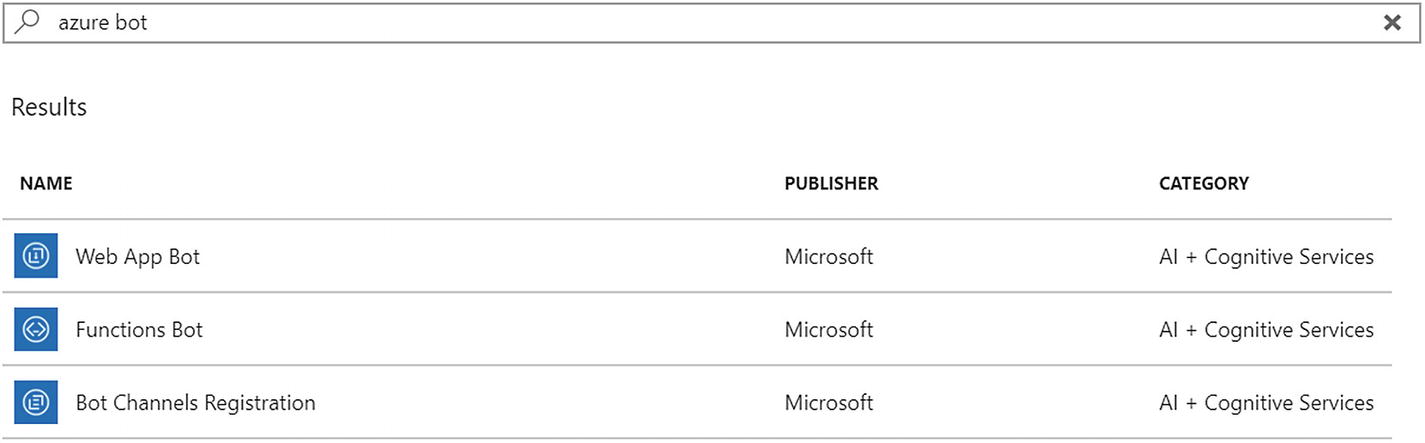
Azure bot resources
Web App Bot: A bot registration pointing to a web app deployed on Azure
Functions Bot: A bot registration pointing to a bot running as an Azure function, one of Azure’s serverless computing options
Bot Channels Registration: A bot registration with no cloud-based back end
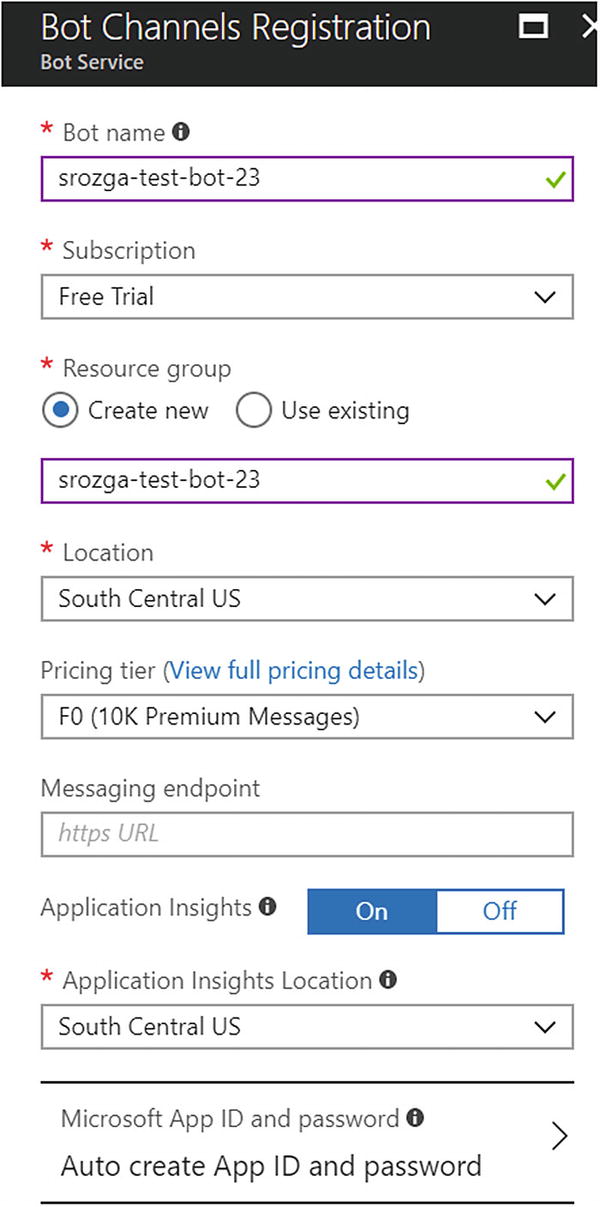
Creating a new bot channel registration

The resources in our resource group
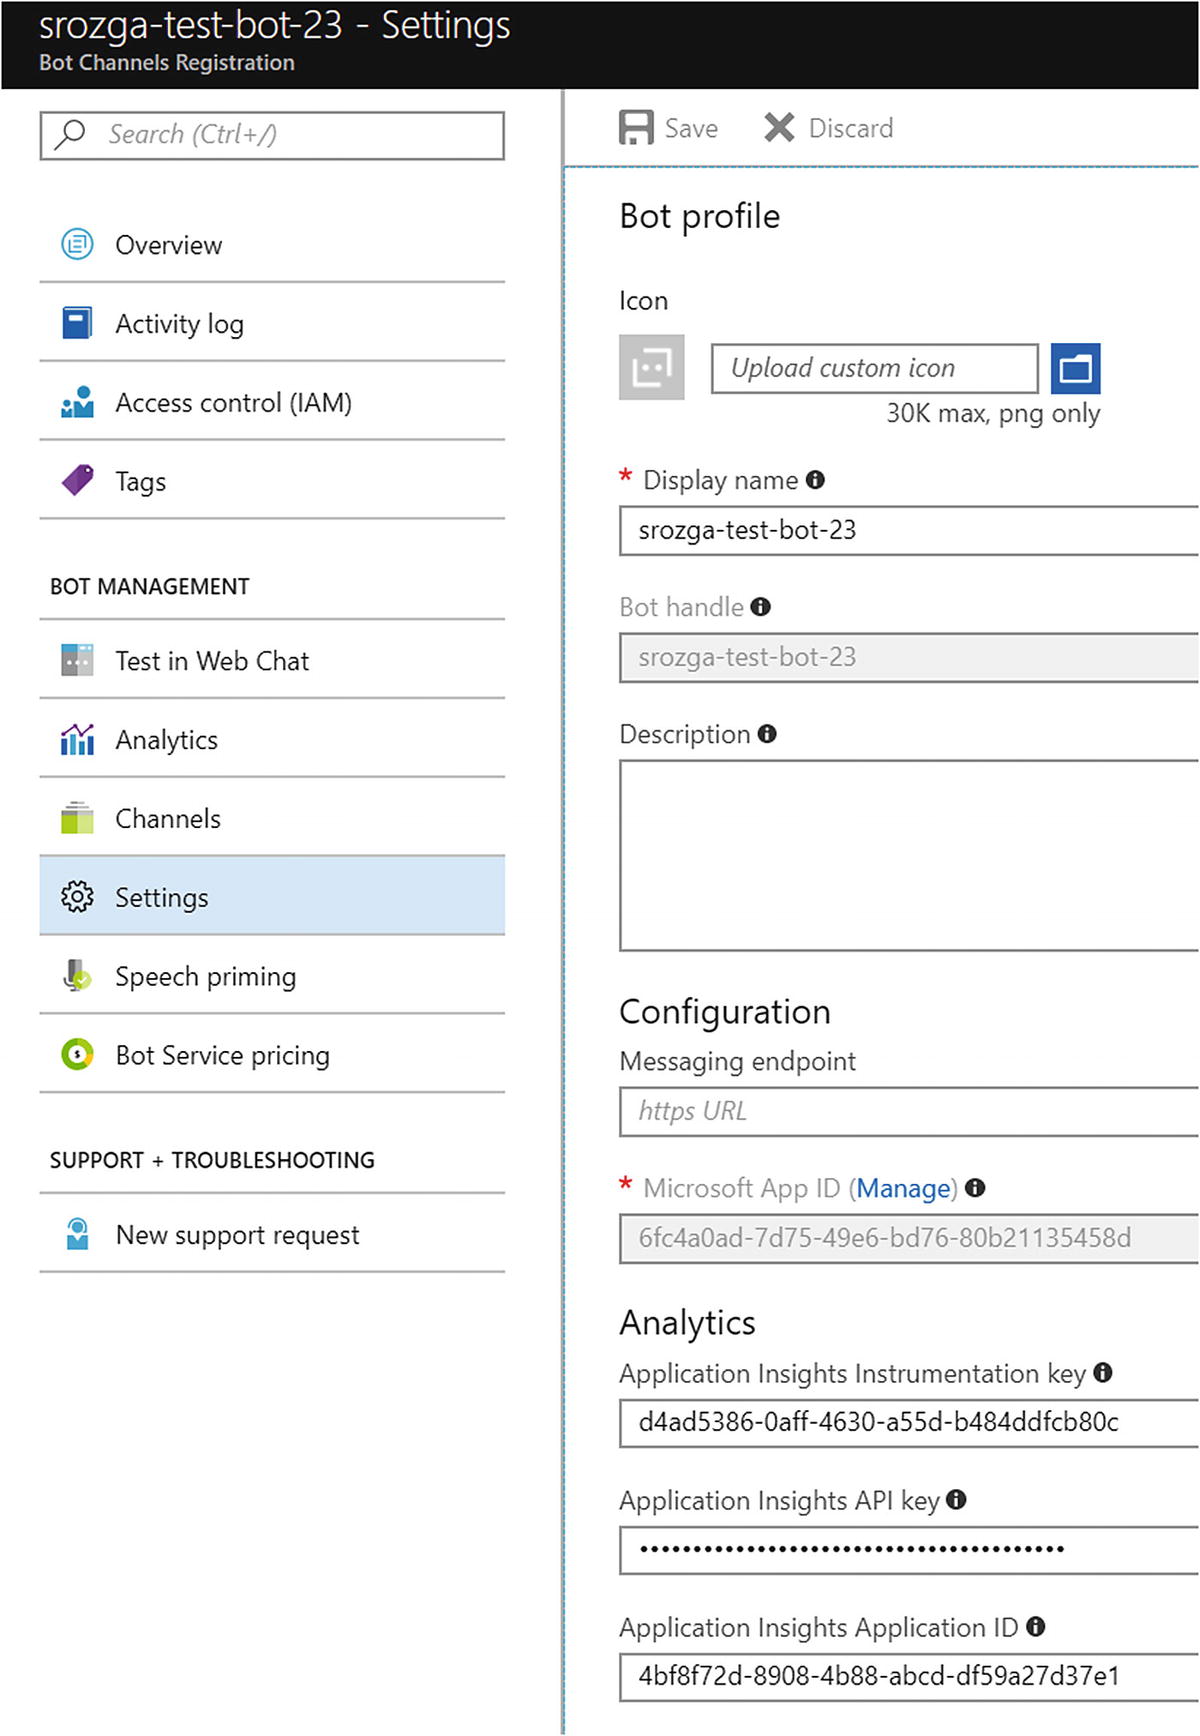
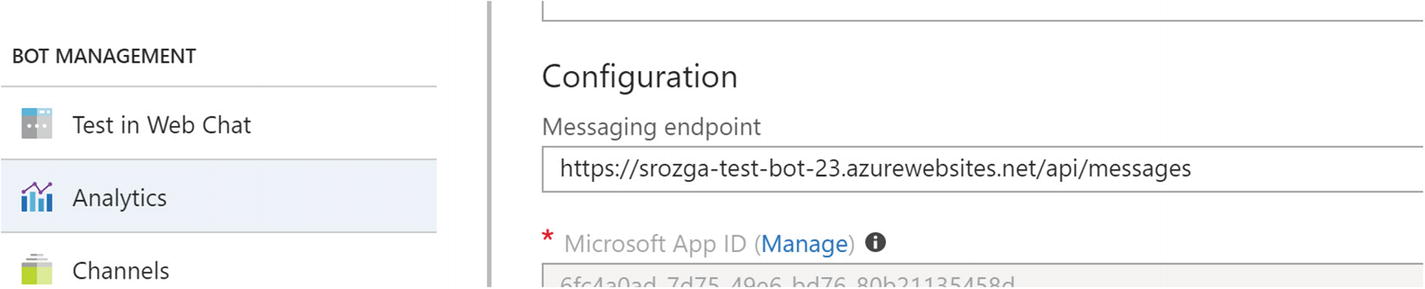
The Bot Channels Registration Settings blade
We will also be shown the Microsoft App ID. Take note of this value. Click the Manage link directly above it to navigate to the Microsoft Application Portal. This may ask for our login information once again because it is a separate site from Azure. Once we locate the newly created bot in the list of applications, click Generate New Password (in the Application Secrets section) and save the value; you will see it once only! Recall that we were seeing warnings that our bot was not secure in the bot console output? We will now fix that.
Step 3: Securing Our Bot
In the directory containing the echo bot code, create a file called .env and provide the Microsoft App ID and the password:
Shut down and restart the bot (npm start).
If we try to connect from the emulator now, the emulator will show the following log messages:
The bot console output will contain the following message:
It seems a bit more secure now, right? We must enter the same app ID and password on the emulator side. Click the “Edit our bot’s MSA (Microsoft Account) info” link, and enter the data into the emulator. If we try to connect using the emulator now, it will work fine. Send a message to the bot to confirm before continuing.
Step 4: Setting Up Remote Access
We could deploy the bot to Azure, connect the Facebook connector to that endpoint, and call it a day. But how do we develop or debug Facebook-specific features? The Bot Framework way is to run a local instance of the bot and connect a test Facebook page to the local bot for development.
To achieve this, run ngrok from the command line.
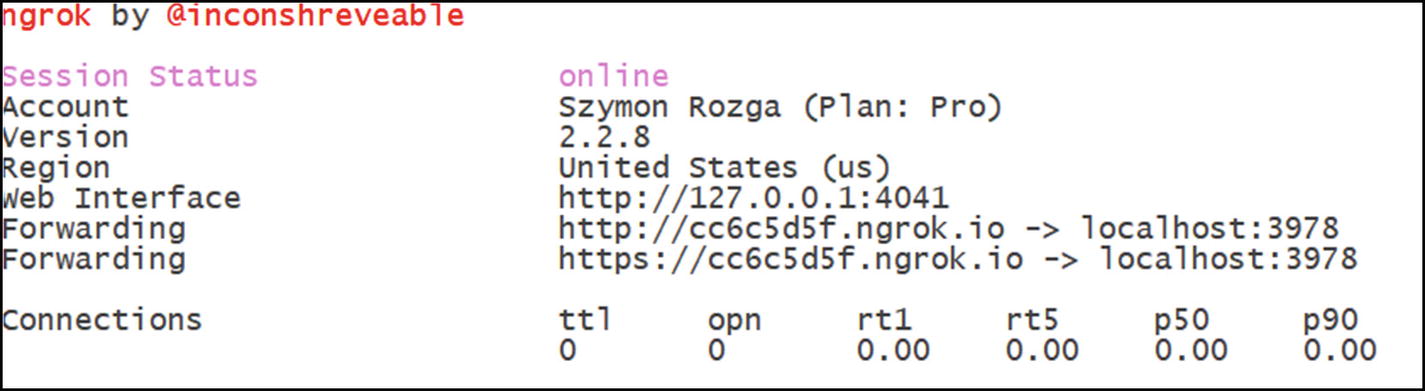
Ngrok forwarding HTTP/HTTPS requests to our local bot
Let’s see if this works. In the emulator, enter the ngrok URL followed by /api/messages. For instance, for the previous URL, the correct messaging endpoint is https://cc6c5d5f.ngrok.io/api/messages . Add the app ID and app password information into the emulator. Once you click Connect, the emulator should successfully connect to and chat with the bot.
It works! Our bot is connected to our first channel!
Step 5: Connecting to Facebook Messenger
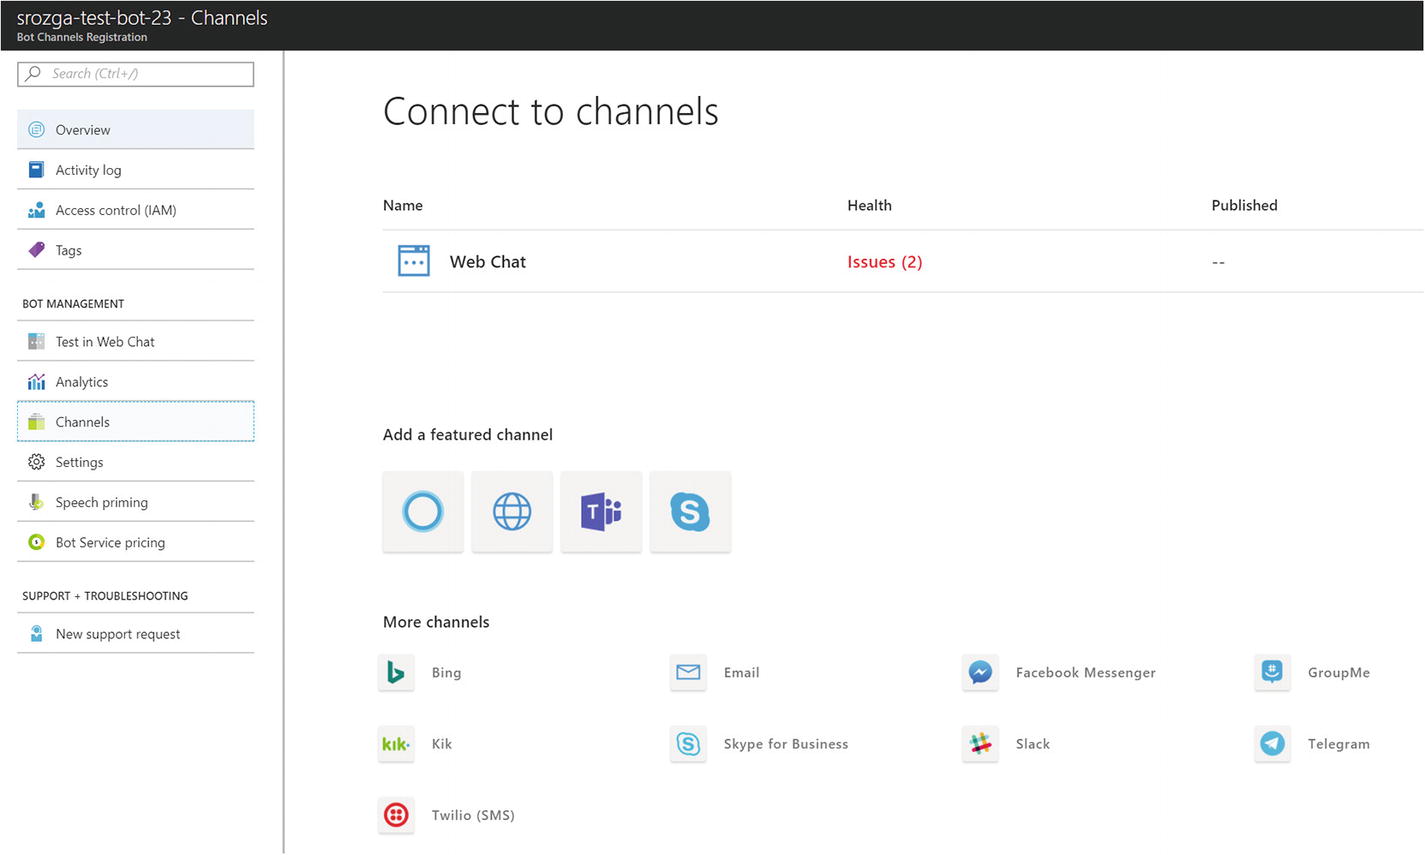
Channel dashboard
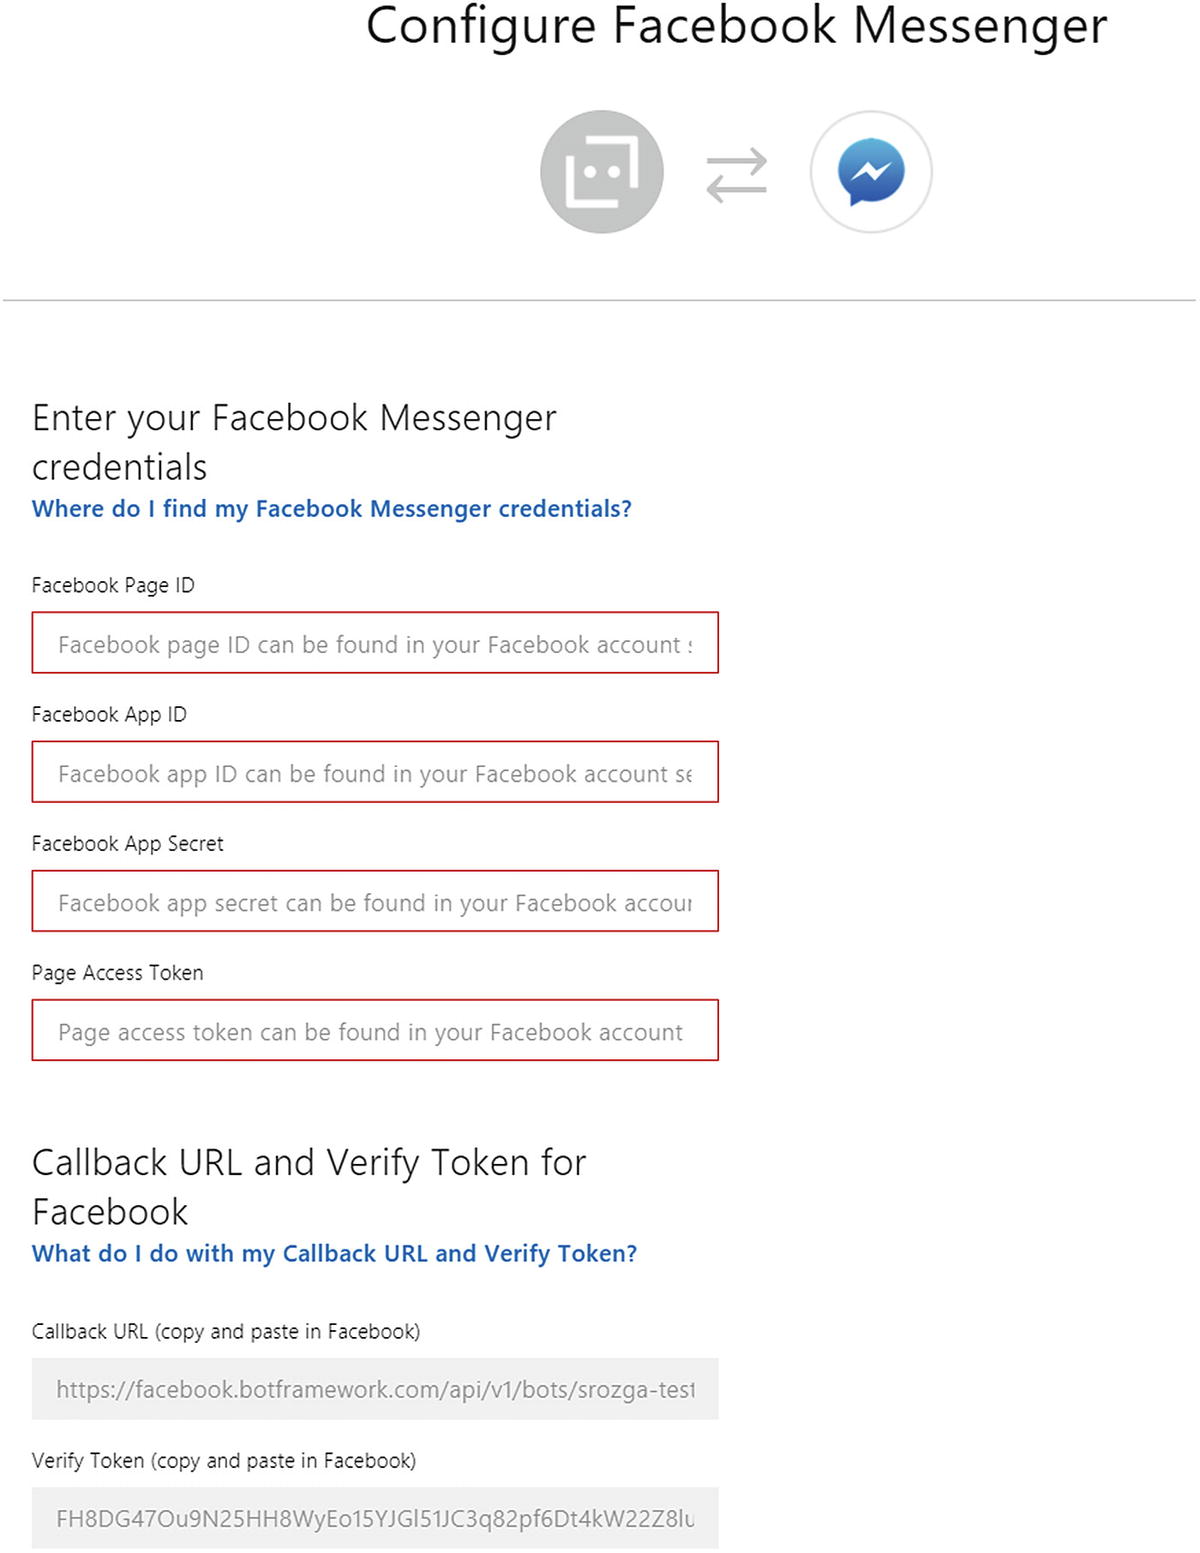
Facebook Messenger Bot Framework connector settings
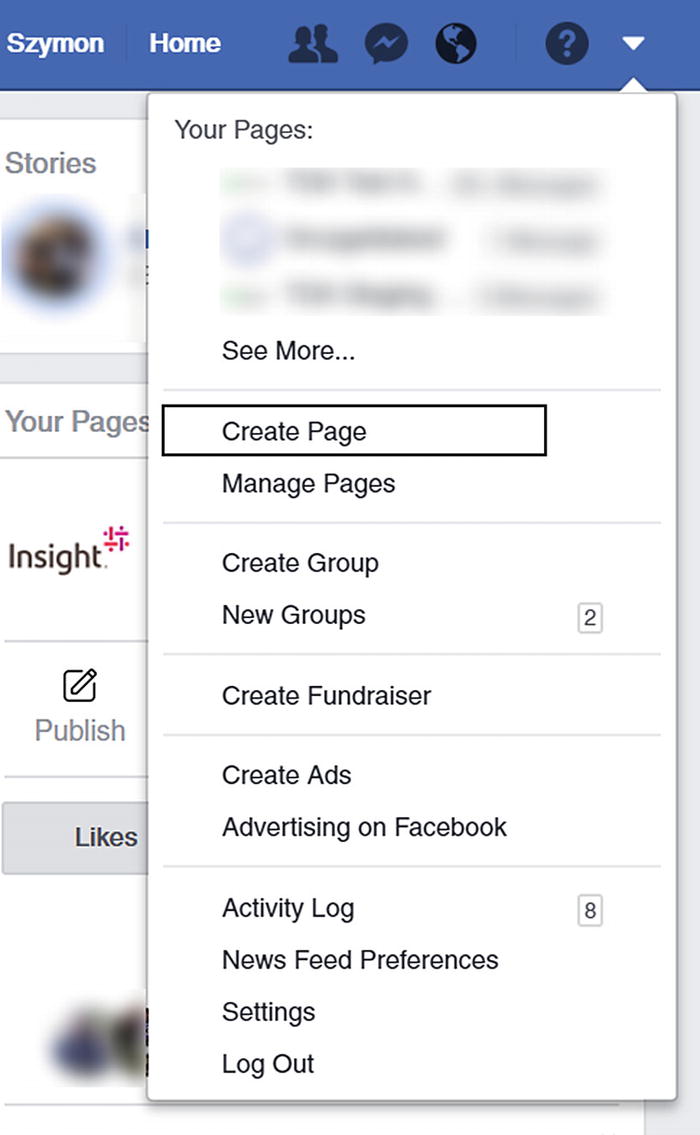
Creating a new Facebook page
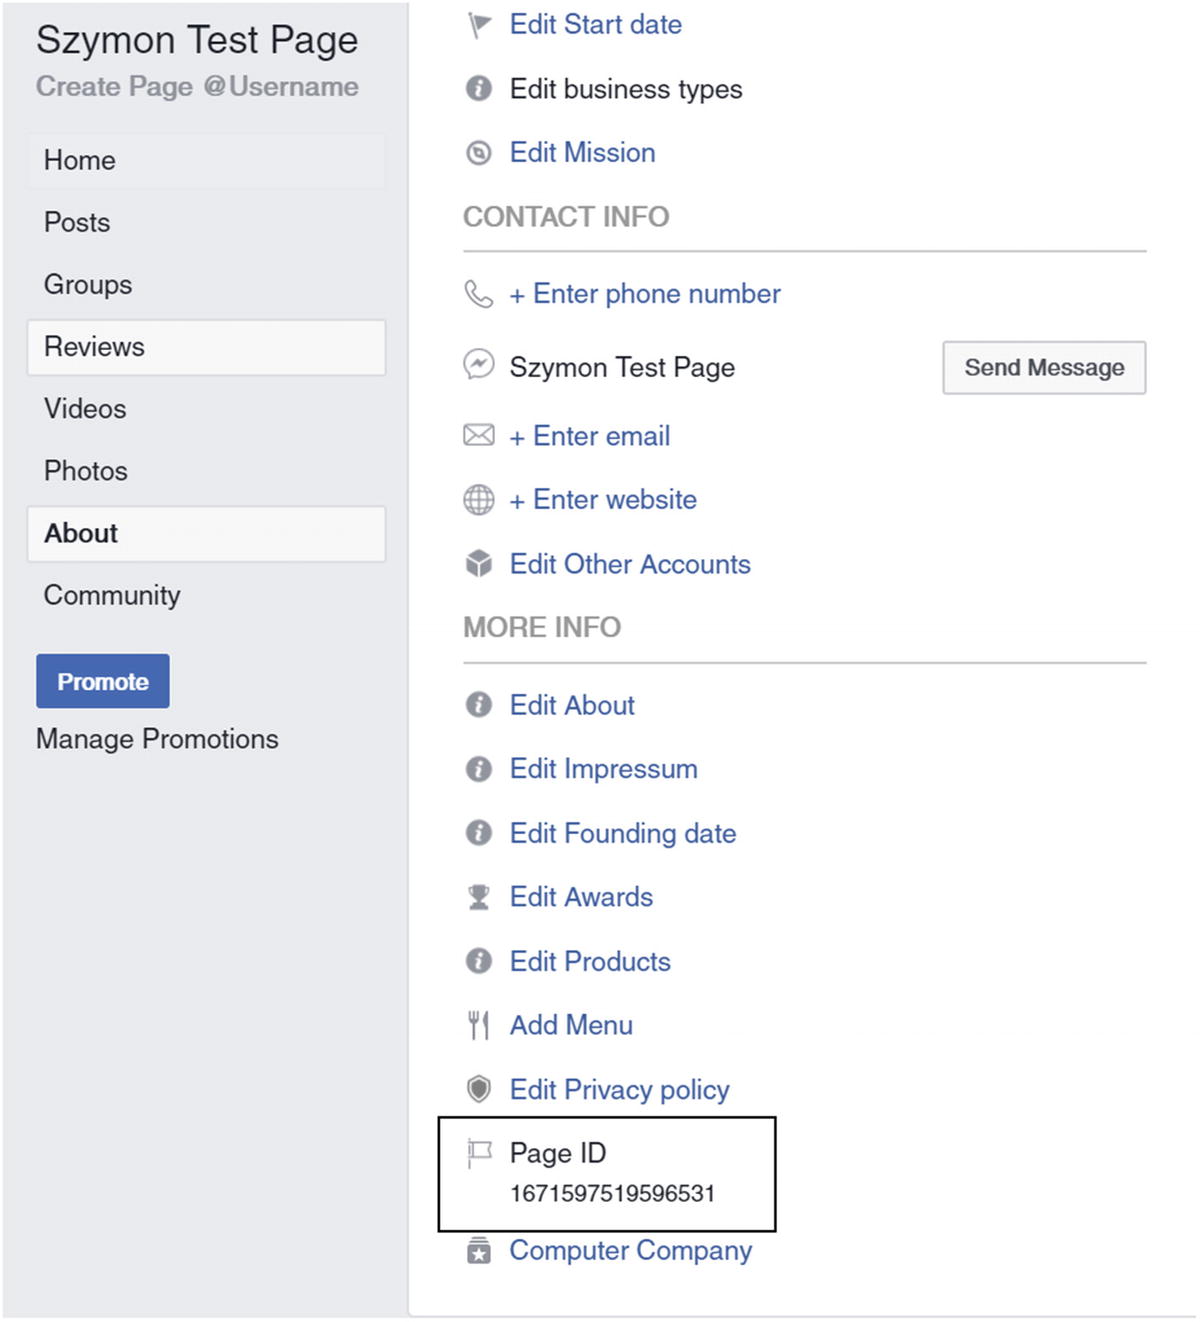
Facebook Page About page, including the page ID
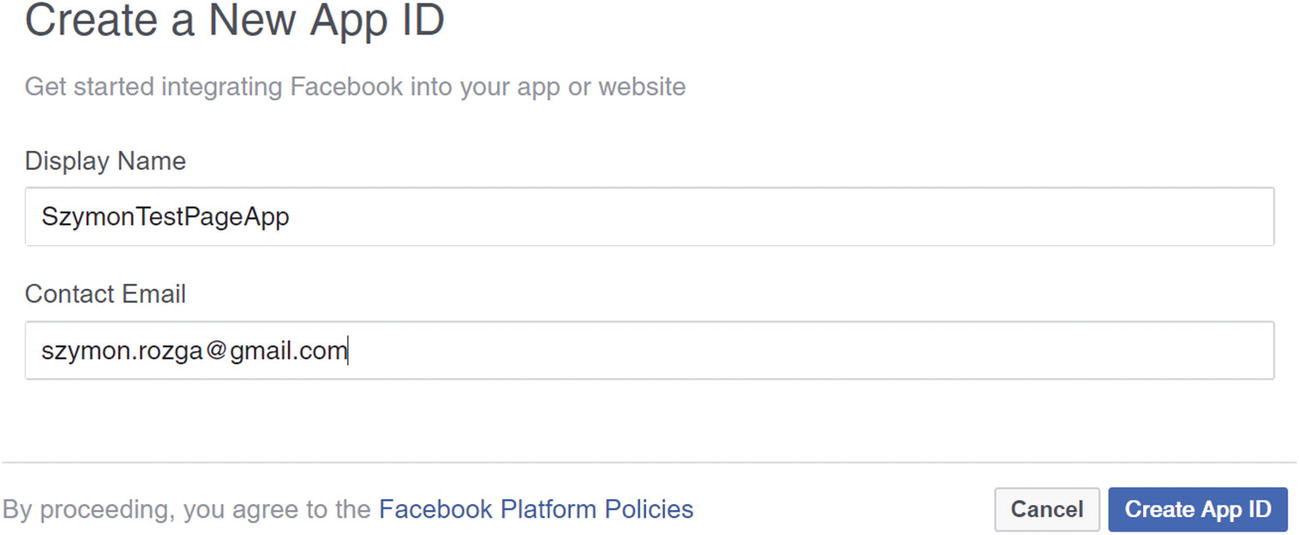
Creating a new Facebook app
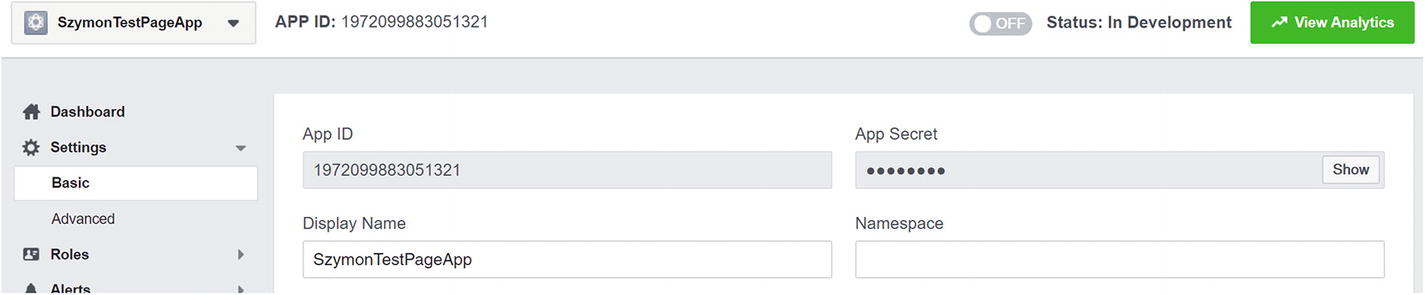
App ID and app secret
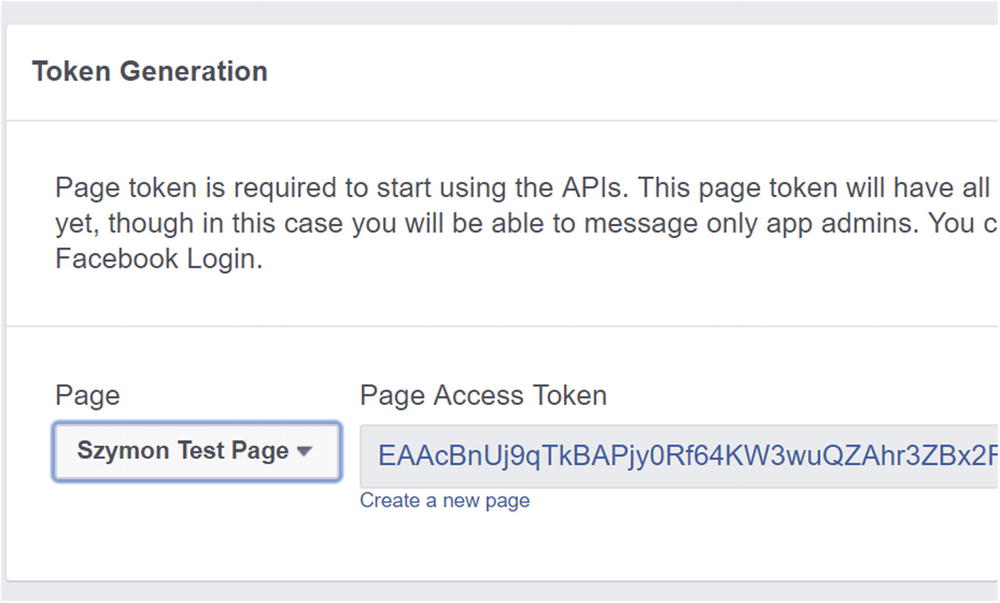
Generating the page access token
Next, scroll to the Webhooks section (just below the Token Generation section of the Facebook App Dashboard) and click Setup Webhooks. You will see a pop-up that asks you for a callback URL and the verify token. Copy and paste both of those from the Configure Facebook Messenger form in the Azure Portal.
messages
message_deliveries
message_reads
messaging_postbacks
messaging_optins
message_echoes
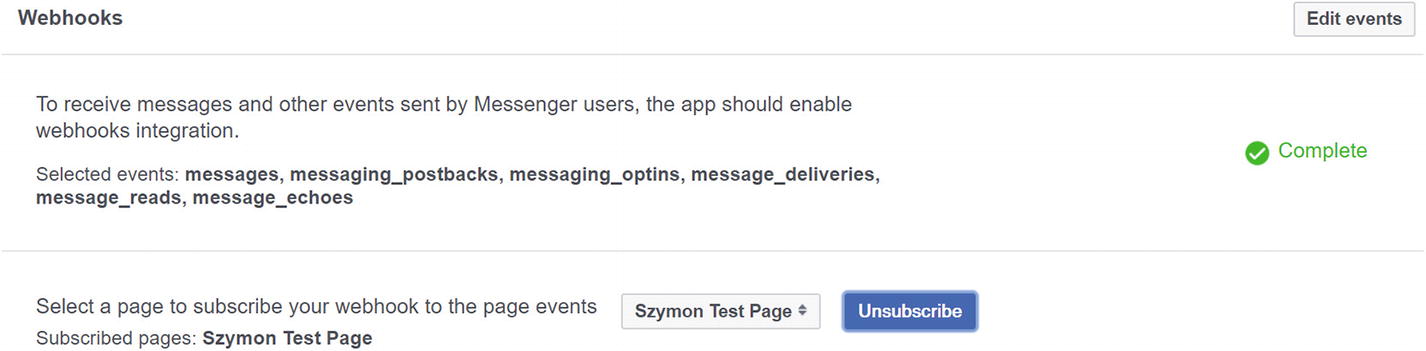
Subscribing to messages on our test page
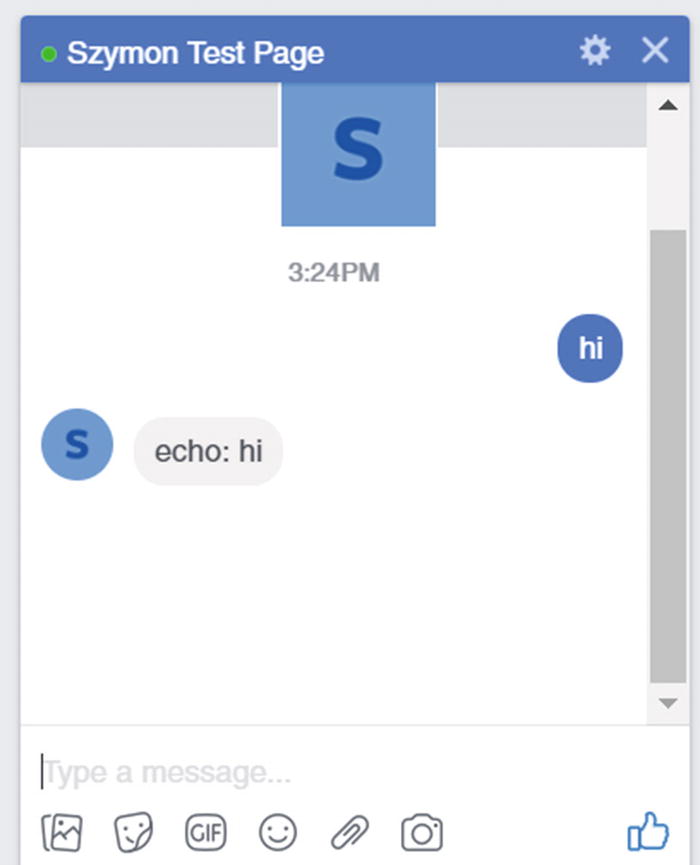
Echo bot working in Messenger
Step 6: Deploying to Azure
It would not be a complete tutorial if we did not deploy the code into the cloud. We will create a web app and deploy our Node.js app using Kudu ZipDeploy. Lastly, we will point the bot channel registration to the web app.
Go into your Azure resource group that we created in step 2 and create a new resource. Search for web app. Select Web App and not Web App Bot. The Web App Bot is a combination of a bot channel registration and an app service. We have no need for this combination since we have already created a bot channel registration.

Creating a new app service and app service plan
Before we deploy our echo bot, we need to add two things. First, we add a response to the base URL endpoint to validate our bot was deployed. Add this code to the end of the app.js file:
Second, for a Windows-based Azure setup, we also need to include a custom web.config file to tell Internet Information Services (IIS)2 how to run a Node app.3
Next, we visit our bot web app via the browser. In my case, I navigate to https://srozga-test-bot-23.azurewebsites.net . There will be a default “Your App Service app is up and running” page. Before we deploy, we must zip the echo bot for transfer to Azure. We zip all the application files, including the node-modules directory. We can use the following commands:
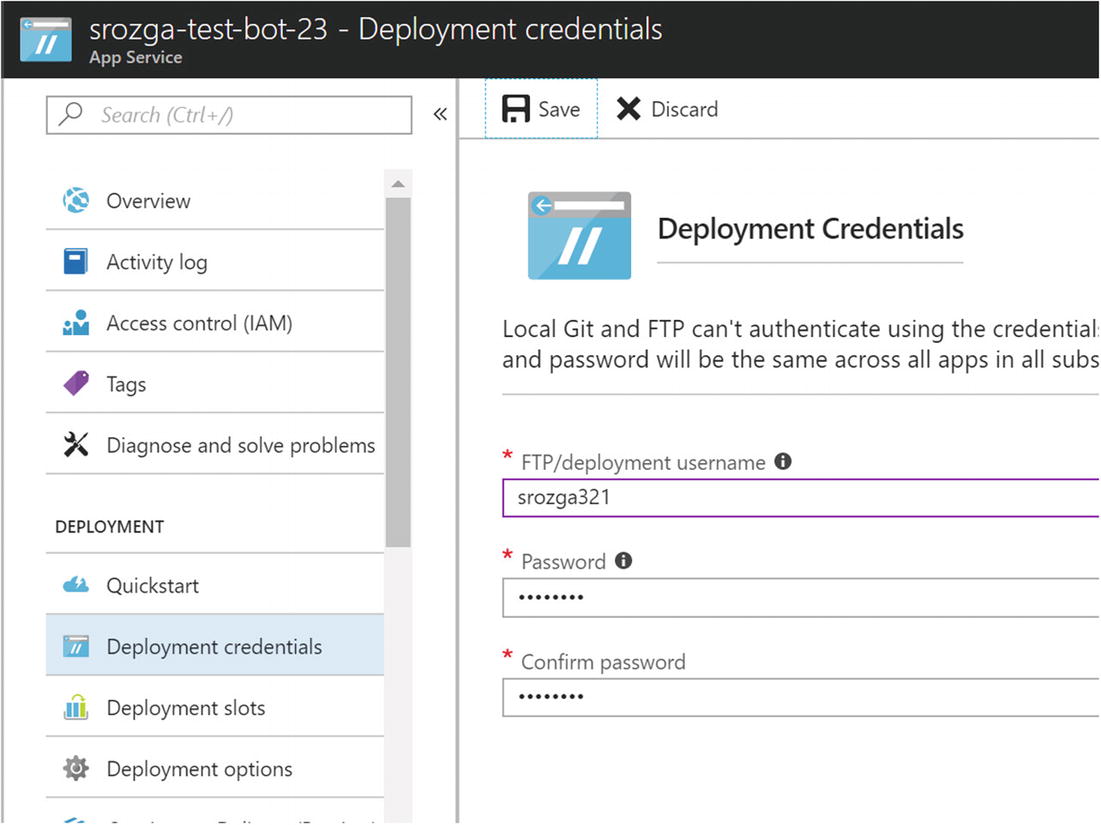
Setting up deployment credentials
Once done, we are ready to roll. Running the following curl command will kick off the deployment process:
Once you run this, curl will ask for the password that was provided in Figure 5-25. It will upload the zip and set up the app on the app service. Once done, make a request to your app’s base URL, and you should see a 200 response with success set to true.

Kudu ZipDeploy user interface
Final update to the messaging endpoint
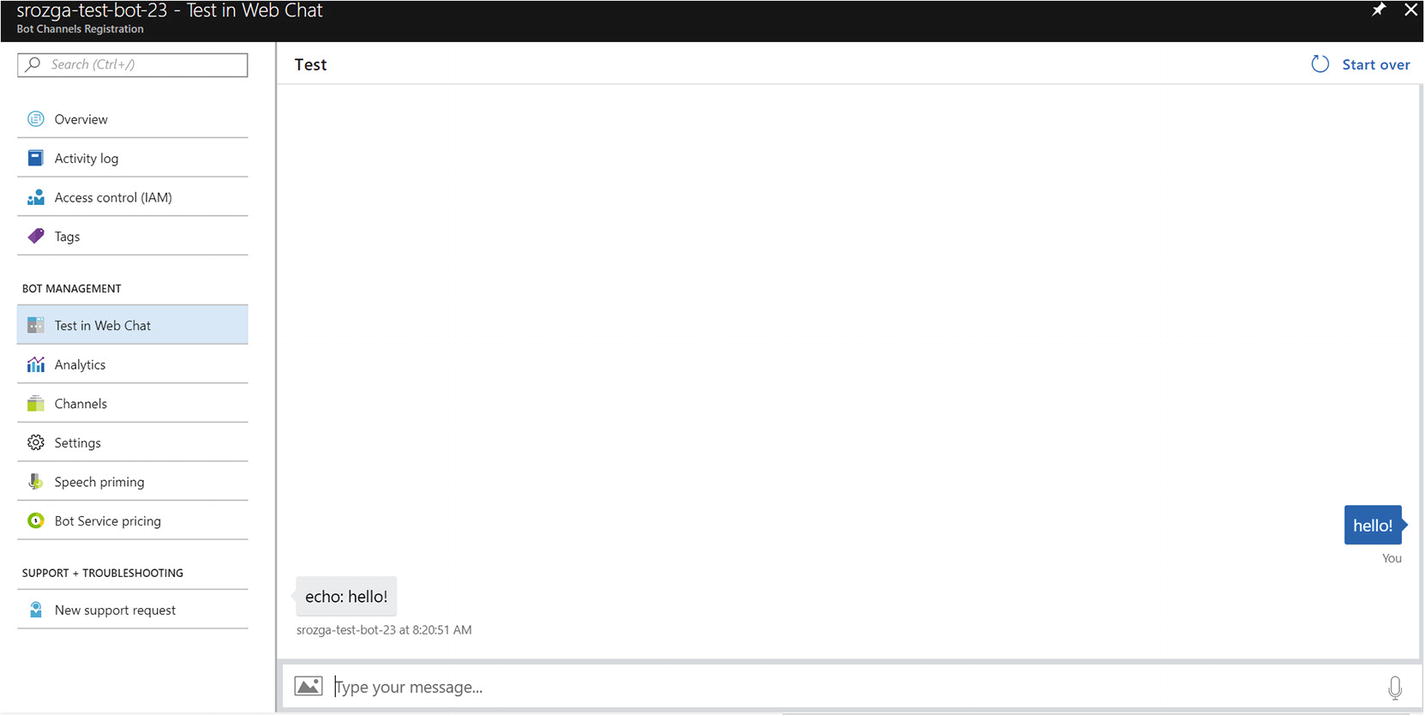
Save and test on Web Chat and Messenger to your heart’s content. Congratulations! We accomplished a lot! We now have a bot running on Azure using Node.js and the Microsoft Bot Framework talking to Web Chat and Facebook Messenger. Up next, we will dive into a description of what we just accomplished.
What Did We Just Do?
We went through quite a lot in the previous section. There are many moving parts in terms of registering and creating a bot, establishing connectivity to Facebook and deploying to Azure. Many of these action only need to be performed once, but as a bot developer you should have a solid understanding of the different systems, how they connect to each other and how they can be set up.
Microsoft Azure
Microsoft Azure is Microsoft’s cloud platform. There are many types of resources ranging from infrastructure-as-a-service to platform-as-a-service and even software-as-a-service. We can provision new virtual machines as easily as creating new application services. We can create, modify, and edit resources using Azure PowerShell, Azure CLI (or the Cloud Shell), the Azure Portal (as we did in the example), or the Azure Resource Manager. The details of these are outside the scope of this book, and we refer you to the Microsoft online documentation for more information.
Bot Channels Registration Entry
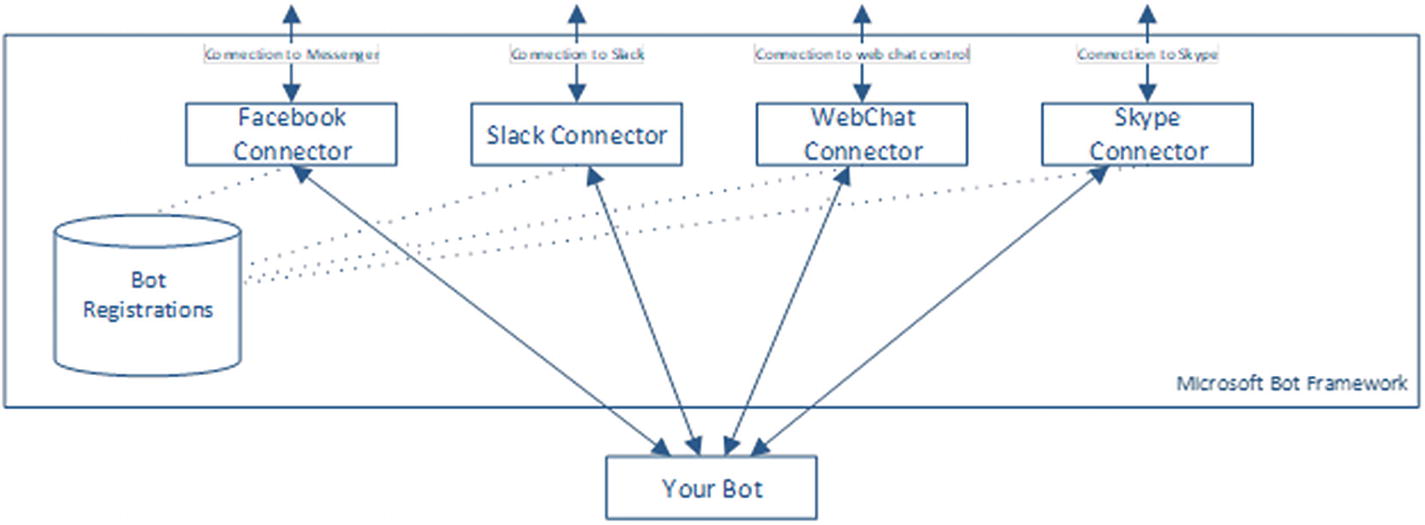
Conceptual Bot Framework architecture
We skipped the other two types of bot resources in Azure: Web App Bot and Functions Bot. A Web App Bot is exactly what we just set up; we provision a server to run bot app. Azure Functions is one of Azure’s approaches to serverless computing. It allows us to host different code, or functions, in a cloud environment to be run on demand. We pay only for the resources we use. Azure scales the infrastructure dynamically based on load. Functions is a perfectly valid approach to bot development. For more complex scenarios, we need to be careful about architecting the function code for scale-out and multiserver deployment. For the purposes of this book, we do not utilize Functions Bots. However, we suggest you experiment with the topic as serverless computing is becoming more and more prominent.
Authentication
How do we ensure that only authorized channel connectors or applications can communicate with our bot? That’s where the Microsoft app ID and app password come in. When a connector sends a message to our bot, it will include a token in the HTTP authorization header. Our bot must validate this token. When our bot sends outgoing messages to the connector, our bot must retrieve a valid token from Azure or the connector will reject the message.
The Bot Builder SDK provides all the code so that this process is transparent to the developer. The Bot Framework documentation describes the steps in both flows in detail: https://docs.microsoft.com/en-us/bot-framework/rest-api/bot-framework-rest-connector-authentication .
Connectivity and Ngrok
Although ngrok is not part of the Bot Framework, it is an indispensable part of our toolset. Ngrok is a reverse proxy that tunnels all requests through an externally accessible subdomain on ngrok.io to a port on our computer. The free version creates a new random subdomain each time we run it; the pro version allows us to have a static subdomain. Ngrok also exposes an HTTPS endpoint, which makes local development setup a breeze.
Typically, we will not typically experience any problems with Ngrok. If our ngrok is correctly configured, any issues could be narrowed down to either an external service or our bot.
Deploying to Facebook Messenger
Every platform is different, but we learned a bit about the intricacies of bots on Facebook. First, Facebook users interact with brands and companies using Facebook Pages. User requests on a page are typically responded to by a human who has enough access to the page to view and respond via the page’s inbox. There are many enterprise live chat systems that connect to Facebook Pages and allow a team of customer service representatives to respond to users’ queries in real time. With the Bot Framework’s Facebook Messenger connector, we can now have a bot respond to those queries. We will discuss the idea of a bot handing a conversation over to an agent, known as human handover, in Chapter 13.
A bot on Facebook is a Facebook app that subscribes to messages coming into a Facebook page via web hooks. We registered the Bot Framework web hook endpoint that is called by Facebook when a message comes into our Facebook page. The bot channels registration page also provided the verify token that Facebook uses to make sure it is connecting to the right web hook. Azure’s Bot Connectors need to know the Facebook app ID and app secret to verify the signature of each incoming message. We need the page access token to send a message back to a user in a chat with a page. We can find more details about Facebook’s SendAPI and Messenger Webhooks in Facebook’s documentation pages: https://developers.facebook.com/docs/messenger-platform/reference/send-api/ and https://developers.facebook.com/docs/messenger-platform/webhook/ .
Once all these things are in place, messages easily flow between Facebook and our bot. Although Facebook has some unique concepts like the page access tokens and specific names for webhook types, the overall idea behind what we did is similar to other channels. Generally, we will be creating an app on the platform and establishing a tie between that app and the Bot Framework endpoints. It is the Bot Framework’s role to forward the messages to us.
Deploying to Azure
There are many approaches to deploying code to Azure. Kudu, the tool we used, allows us to deploy via a REST API. Kudu can also be configured to deploy from a git repo or other locations. There are also other tools that make deployment easier. If we were to write a bot using Microsoft’s Visual Studio or Visual Studio Code, there are extensions that allow us to easily deploy our code into Azure. Again, this is a topic beyond the scope of this book. For our purposes of running a Node.js bot on a Linux app service, using the ZipDeploy REST API is sufficient.
Because we can develop our bot locally by use of the emulator and test a local bot on various channels by running ngrok, we do not deploy to Azure anymore throughout the rest of this book. If necessary, take down the web app instance so the subscription is not charged. Make sure to delete the app service plan; simply stopping the web app will not work.
Key Bot Builder SDK Concepts
It feels good to have worked through the details of getting a bot running via the emulator and Facebook Messenger, but the bot doesn’t do anything useful! In this section, we will delve into the Bot Builder SDK for Node.js library. This is the focus for the rest of this chapter and the following chapter. For now, we will go over four foundational concepts of the Bot Builder SDK. Afterward, we show the skeleton code for a calendar bot conversation, based on the NLU work on LUIS from Chapter 3. This bot will know how to talk to users about many calendar tasks but will not integrate with any APIs quite yet. This is a common approach to demonstrate the conversation flow and how it may work without going through the entire back-end integration effort. Let’s dive in.
Sessions and Messages
Session is an object that represents the current conversation and the operations that can be invoked on it. At the most basic level, we can use the Session object to send messages.
Messages can include images, videos, files, and custom attachment types. Figure 5-29 shows the resulting message.
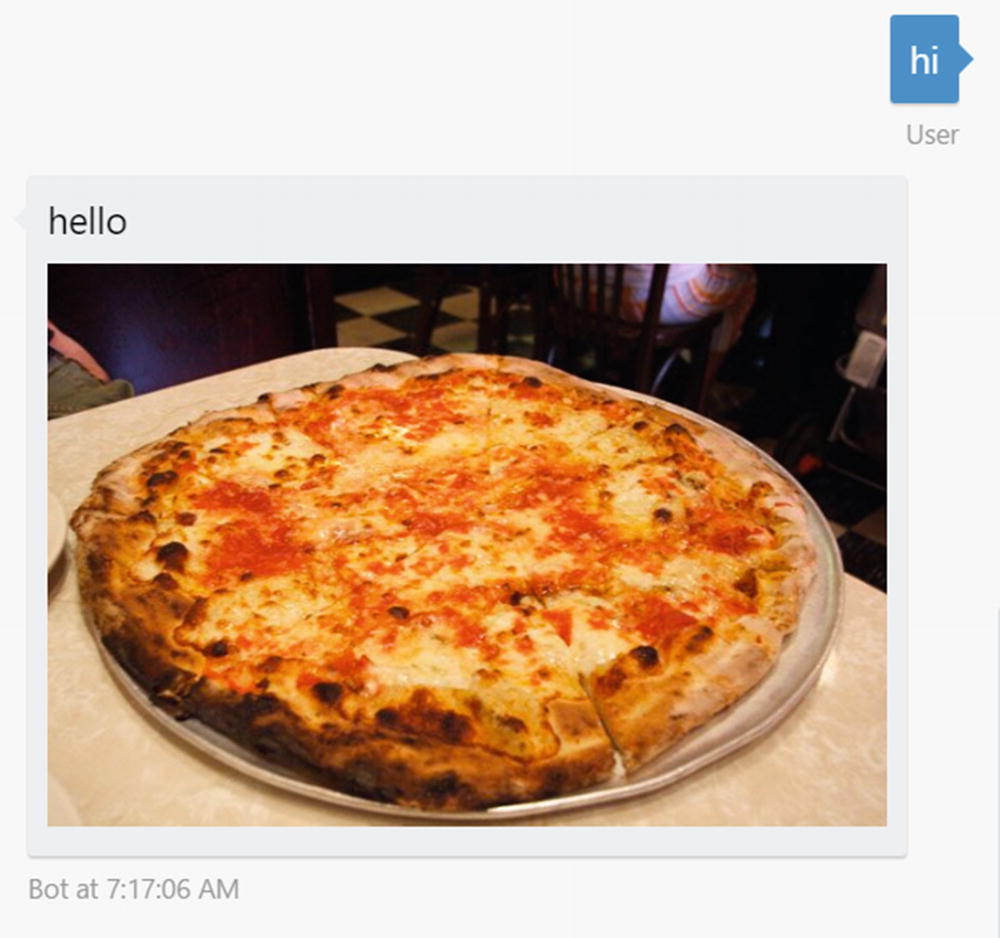
Sending an image
We also can send a hero card. Hero cards are stand-alone containers that include an image, title, subtitle, and text plus an optional list of buttons. Figure 5-30 shows the resulting exchange.
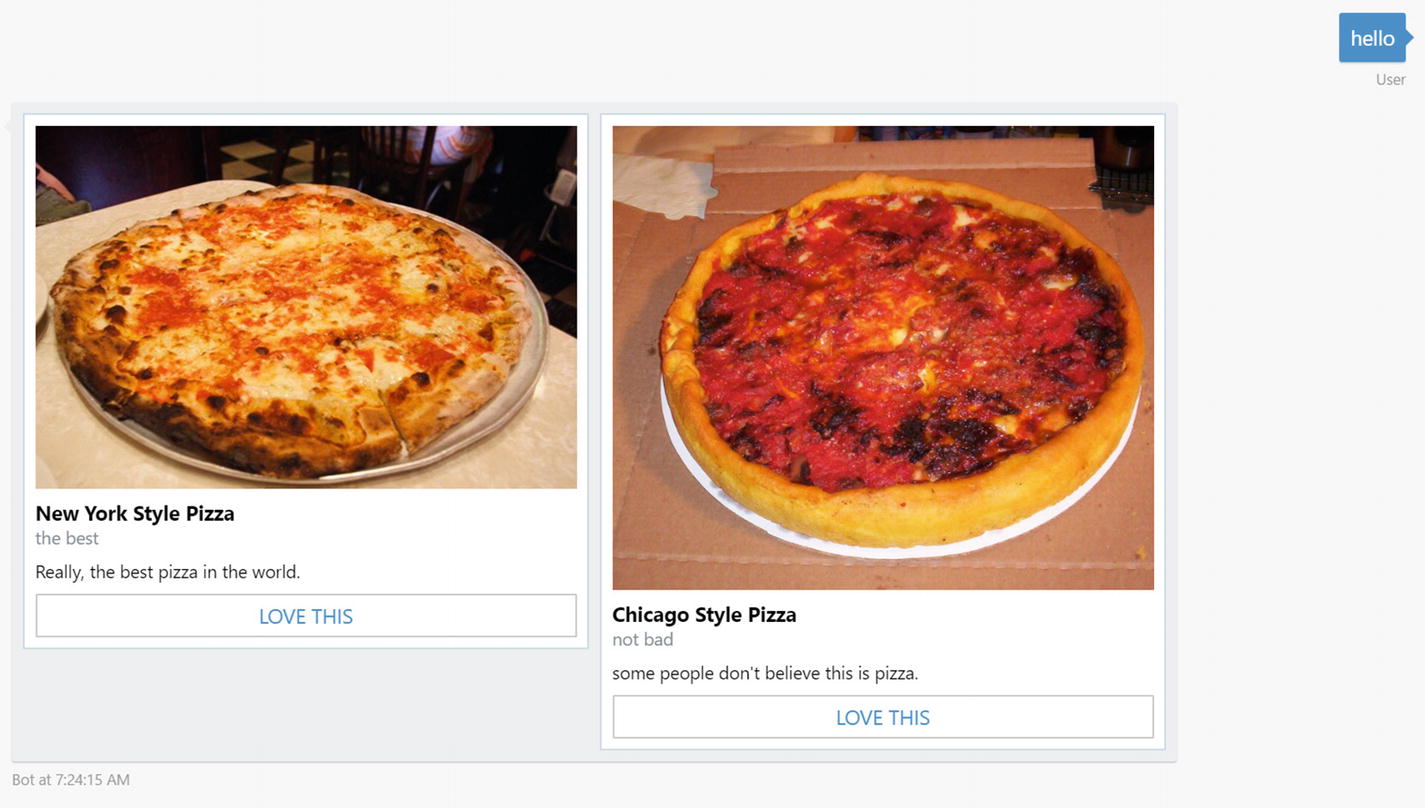
A sample pizza carousel
Adaptive card : A flexible card with a combination of items including containers, buttons, input fields, speech, text, and images; not supported by all channels. We dive into adaptive cards in Chapter 11.
Animation card : A card that supports animated GIFs or short videos.
Audio card: A card to play audio.
Thumbnail card: Similar to a hero card but with a smaller image size.
Receipt card : Renders a receipt including common line items such as description, tax, totals, etc.
Sign in card: A card to initiate a sign-in flow.
Video card: A card to play videos.
Another interesting point is the attachment layout. By default, attachments are sent in a vertical list. We chose to use the carousel, a scrollable horizontal list, to provide a better experience for the user.
postBack: Same as IM back, but the user doesn’t see the message.
openUrl: Opens a URL in a browser. This can be the default browser on the desktop or an in-app web view.
call: Calls a phone number.
downloadFile: Downloads a file to the user’s device.
playAudio: Plays an audio file.
playVideo: Plays a video file.
showImage: Shows an image in an image viewer.
We can also use the Session object to send speech consent in channels that support both written and spoken responses. We can either build a message object like we did in the carousel hero card sample or use a convenience method on the session. The input hint in the following code snippet tells the user interface whether the bot is expecting a response, accepting input, or not accepting input at all. For developers who have a background in voice assistant skill development, like for Amazon’s Alexa, this should be a familiar concept.
Session is also the object that helps us access relevant user conversation data. For example, we can store the last message the user sent to the bot inside the session’s privateConversationData and utilize it later in the conversation as shown in the following sample (Figure 5-31):
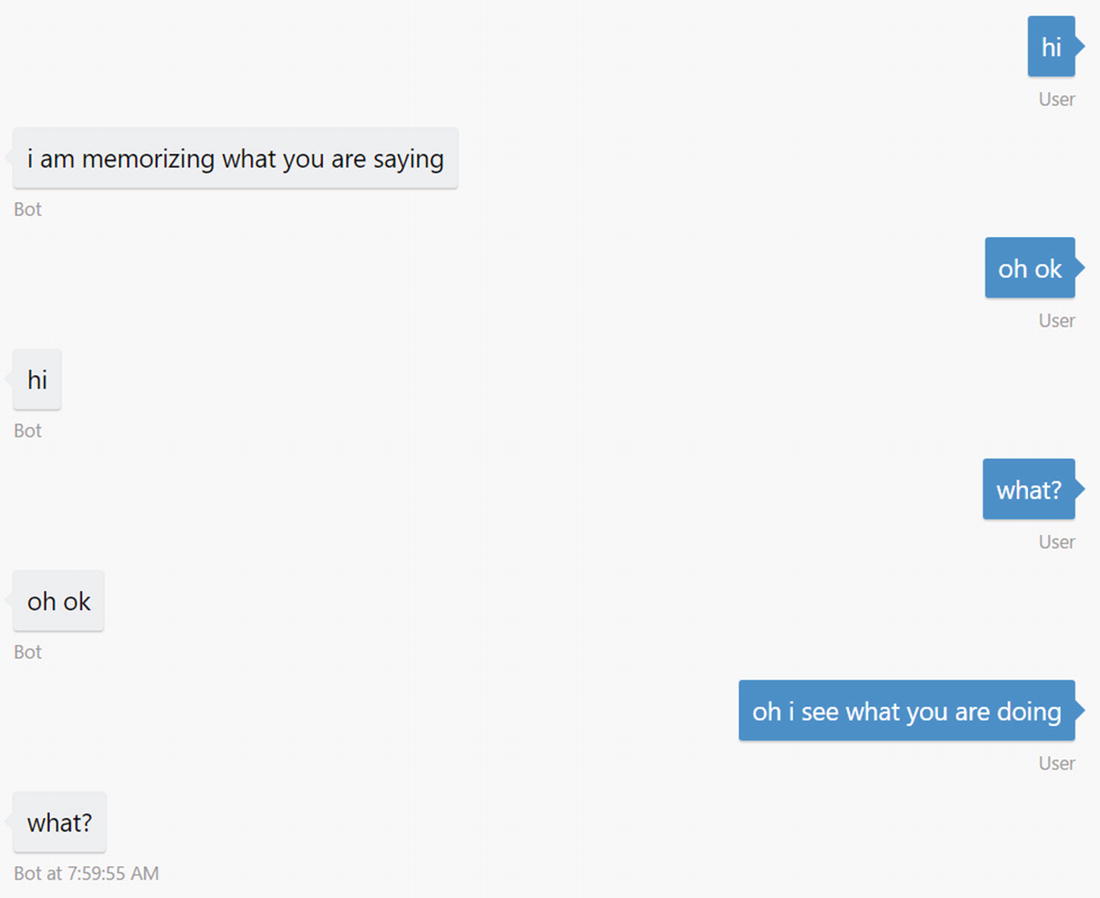
Storing session data between messages
privateConversationData: Private user data scoped to a conversation
conversationData: Data for a conversation, shared between all users who are part of the conversation
userData: Data for a user across all conversations on one channel
By default, these objects are all stored in memory, but we can easily provide an alternate storage service implementation. We will see an example in Chapter 6.
Waterfalls and Prompts
A waterfall is a sequence of functions that process incoming messages on a bot. The Universal Bot constructor takes an array of functions as a parameter. This is the waterfall. The Bot Builder SDK calls each function in succession, passing the result of the previous step into the current step. The most common use of this approach is to query the user for more information using a prompt. In the following code, we use a text prompt, but the Bot Builder SDK supports inputs such as numbers, dates, or multiple choice (Figure 5-32).
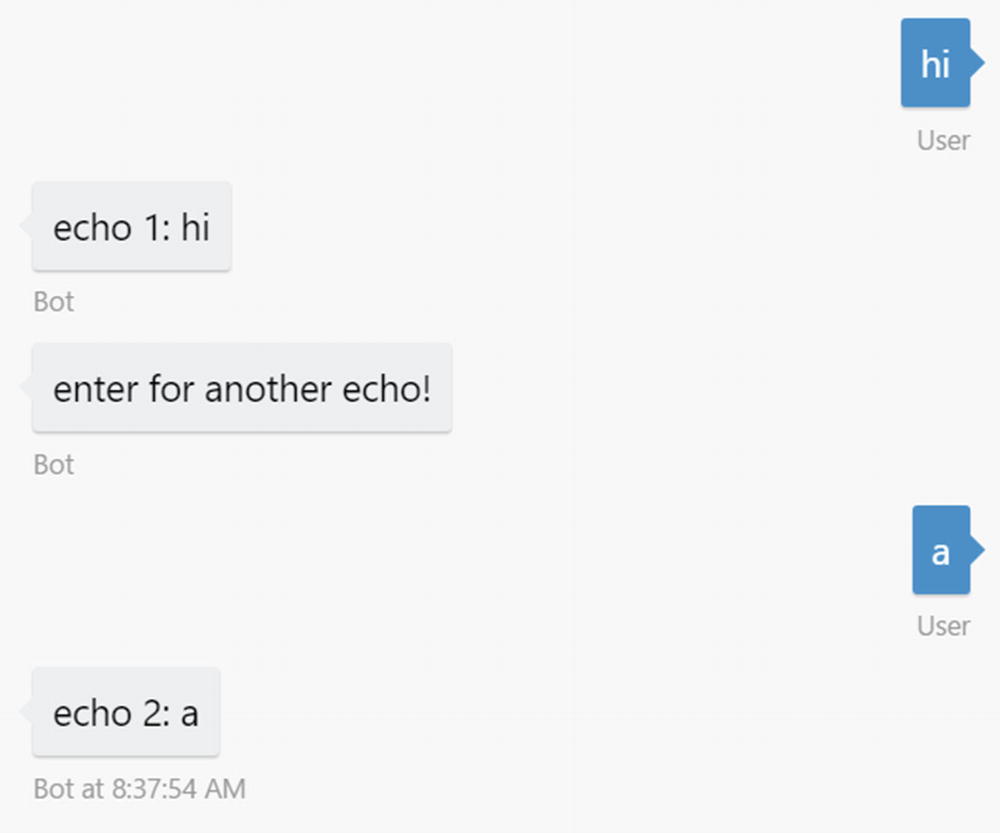
Basic waterfall sample
We can also advance the waterfall manually, using the next function, in which case the bot would not wait for additional input (Figure 5-33). This is useful in cases where the first step may conditionally ask for additional input. We will use this in our calendar bot code.
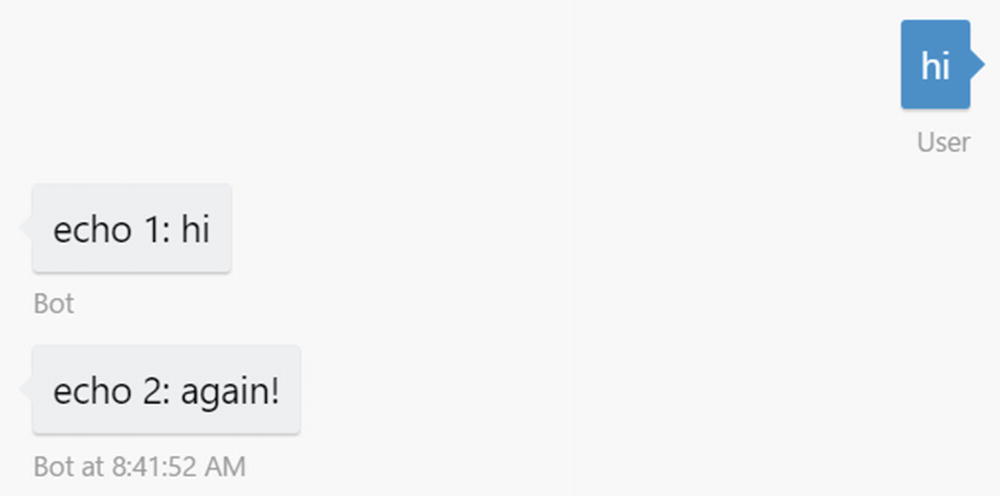
Programmatic waterfall progression
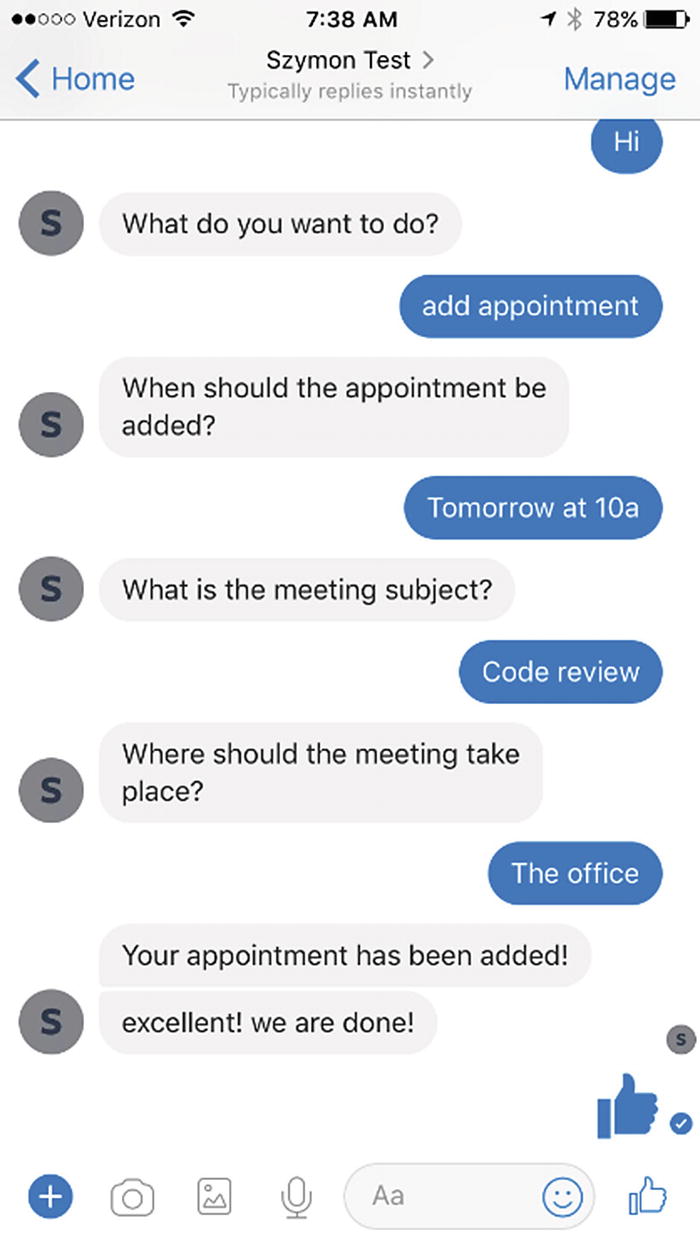
The following is an even more complex data-gathering waterfall:
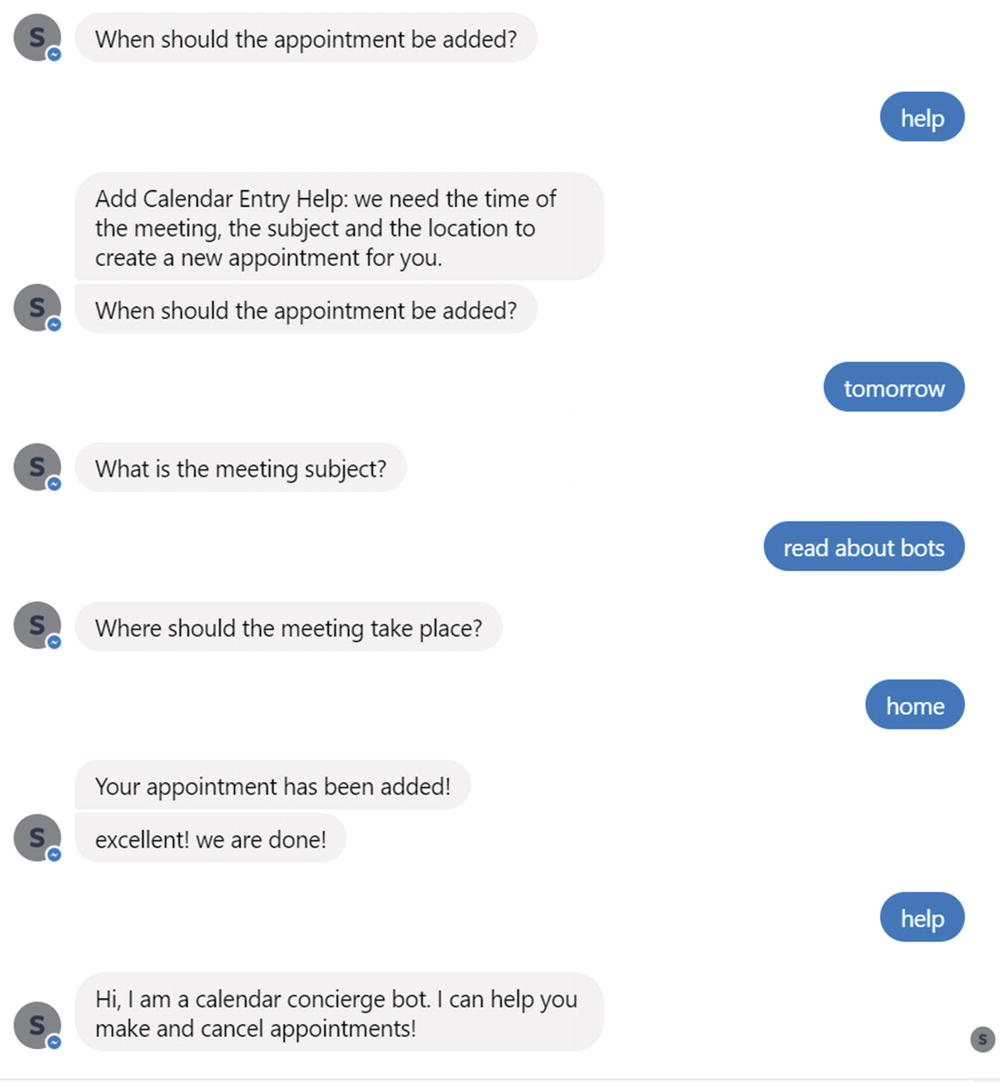
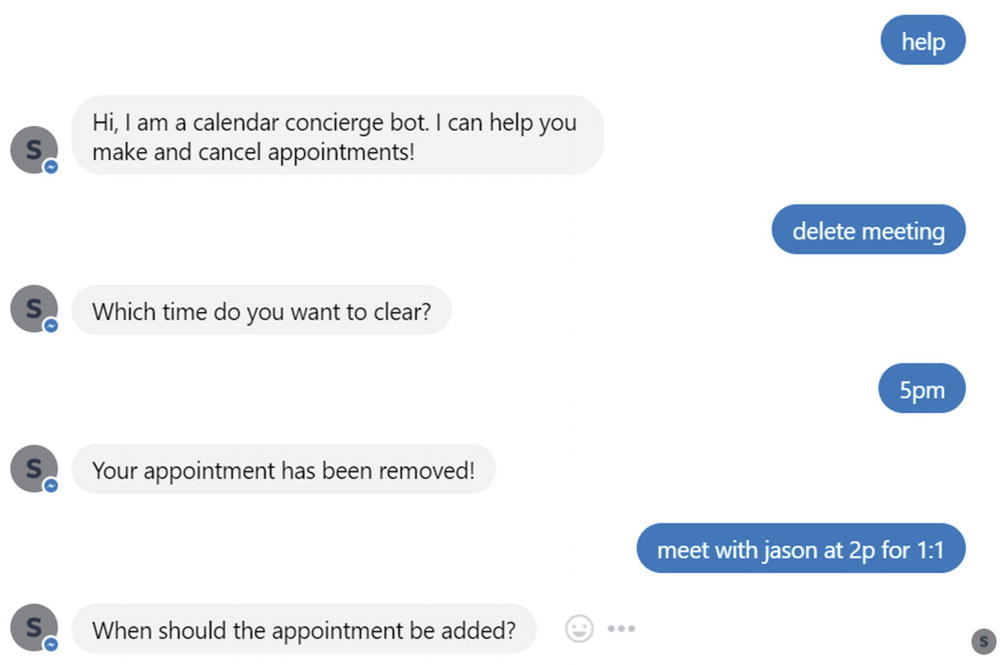
In this sample, we use a couple more types of prompts: Choice and Time. The Choice prompt asks the user to select an option. The prompt can render the choice using inline text (relevant in SMS scenarios for example) or buttons. The Time prompt uses the chronos Node.js library to parse a string representation of a datetime into a datetime object. An input like “tomorrow at 5pm” can resolve to a value that a computer can use.
Note that we use logic to skip certain waterfall steps. Specifically, if we are in the delete appointment branch, we do not need the event location. As such, we do not even ask for it. We take advantage of the privateConversationData object to the store action object, which represents the operation we will want to invoke against an API. Lastly, we use the session.endConversation method to finalize the conversation. This method will clear the user’s state so that the next time the user interacts with the bot, it is as if the bot is seeing a new user.
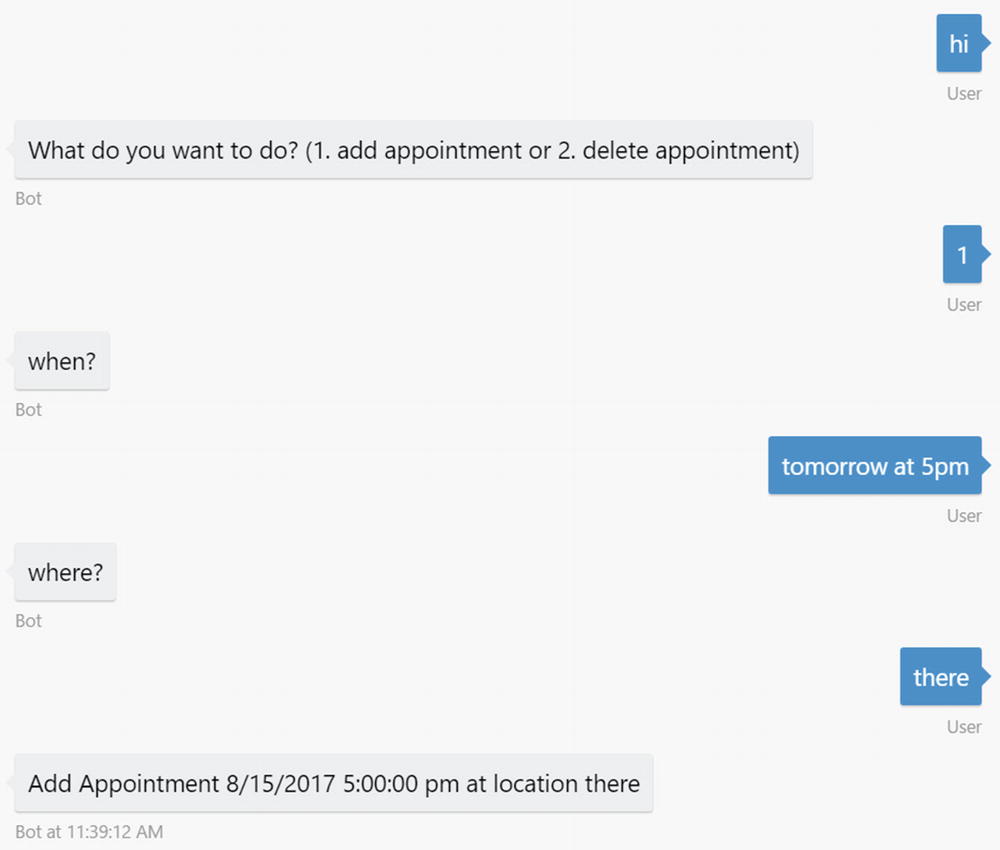
Data gathering waterfall
Dialogs
Let’s bring this full circle with conversational design. In Chapter 4, we discussed how we can model a conversation using a graph of nodes we called dialogs. So far in this chapter, we have learned about waterfalls and how we can model a conversation in code.
We have also learned how we can utilize prompts to gather data from the user. Recall that prompts are simple mechanisms to collect data from users.
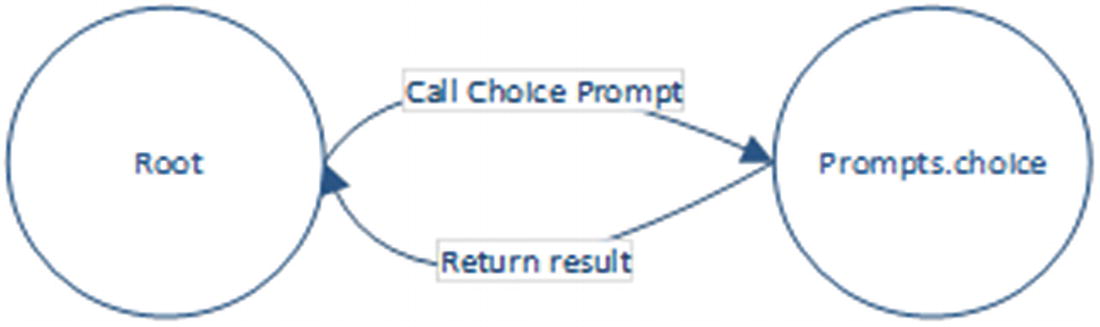
Conceptual transfer of control between dialogs
This interaction is the same model as a programming function call. The way a function call is typically implemented is using a stack. Examine Figure 5-36 and the following code:
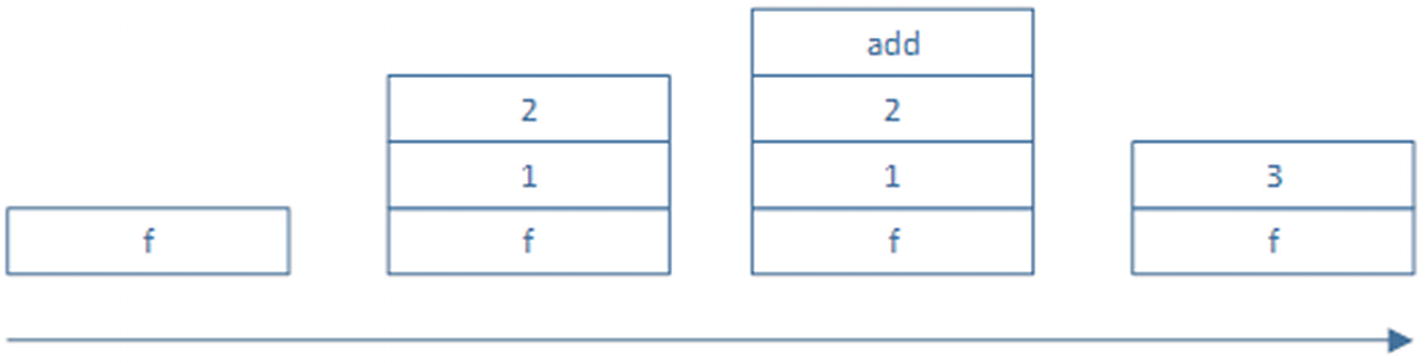
Function calls on a stack
This is the way prompts work in a conversation. The generic concept in the Bot Builder SDK is a dialog. A prompt is a type of dialog. A dialog is nothing more than an encapsulation of conversation logic and is analogous to a function call. A dialog is initialized with some parameters. It receives input from the user, executing its own code or calling into other dialogs along the way, and can send responses back to the user. Once the dialog’s purpose is accomplished, it returns a value to the calling dialog. In short, a calling dialog pushes a child dialog to the top of the stack. When the child dialog is done, it pops itself from the stack.

Dialogs on the dialog stack over time

A more complex dialog stack, illustrated over time
Waterfalls and dialogs are the workhorses that translate a conversation design into actual working code. There are, of course, more details around them, and we’ll get into those during the next chapters, but this is the magic behind the Bot Builder SDK. Its key value is an engine that can drive a conversation using the dialog abstractions. At each point during the conversation, the dialog stack and the supporting user and conversation data are stored. This means that depending on the conversation’s storage implementation, the user may stop talking to the bot for days, come back, and the bot can pick up from where the user left off.
How do we apply some of these concepts? Revisiting the add and remove appointment waterfall sample, we can create a bot that, based on a Choice prompt, starts one of two dialogs: one to add a calendar entry or another to remove it. The dialogs have all the necessary logic to figure out which appointment to add or remove, resolve conflicts, prompt for user confirmation, and so forth.
We start a new dialog by calling the session.beginDialog method and pass in the dialog name. We may also pass an optional argument object, which would be accessible via the args parameter in the called dialog. We use the session.dialogData object to store dialog state. We’ve run into userData, privateConversationData, and conversationData before. Those are scoped to the entire conversation. DialogData, however, is scoped only to the lifetime of the current dialog instance. To end a dialog, we call session.endDialog. This returns control to the next step in the root waterfall. There is a method called session.endDialogWithResult that allows us to pass data back to the calling dialog.
A demonstration of an AddCalendarEntry dialog implementation
This code has a few shortcomings. First, if we want to cancel either adding or deleting an appointment, there’s no way to do that. Second, if we are the middle of adding an appointment and decide we want to delete an appointment, we cannot easily switch to the remove appointment dialog. We must finish the current dialog and then switch over. Third, but not essential, it would be nice to connect the bot to our LUIS model so users can interact with the bot using natural language. We’ll address the first two points next and then follow with connecting to our LUIS models to really build some intelligence into the bot.
Invoking Dialogs
Let’s continue with the following exercise. Say we want to allow the user to ask for help at any point in the conversation; this is a typical scenario. Sometimes the help will be contextual to the dialog. At other times, the help will be a global action, a bot behavior that can be accessed from anywhere within the conversation. The Bot Builder SDK allows us to insert both types of behaviors into our dialogs.
We introduce a simple help dialog.
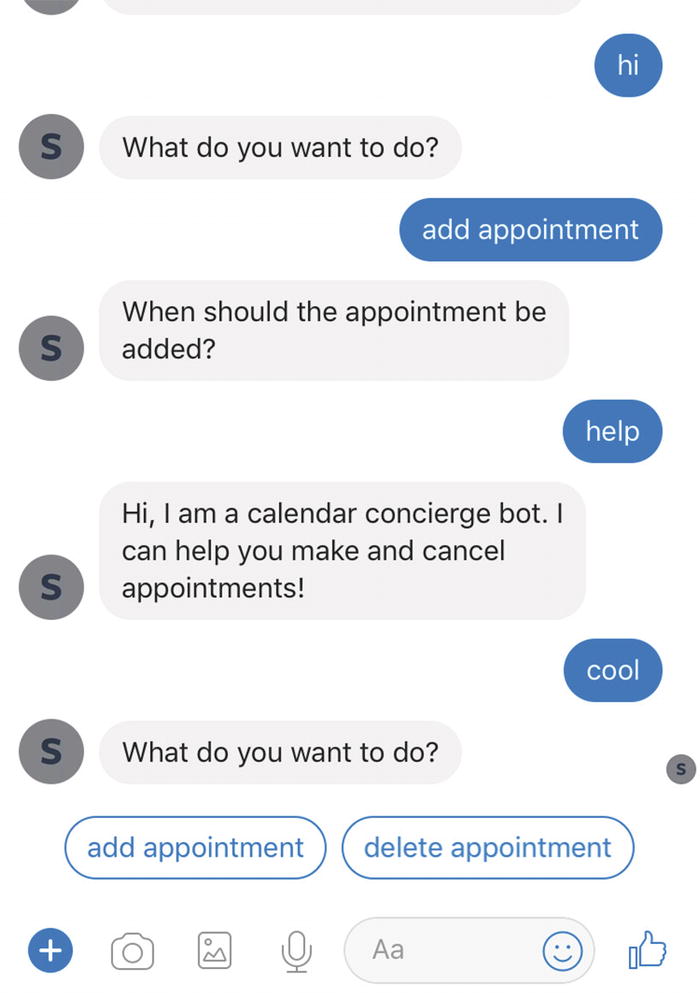
Help cancels the previous dialog. Not good.
We can override this behavior by implementing the onSelectAction callback.
This brings up an interesting question: how can we affect the dialog stack? When we are working on a dialog flow and want to transition control over to another dialog, we can use either beginDialog or replaceDialog. replaceDialog replaces the dialog on top of the stack, and beginDialog pushes a dialog to the top of the stack. The session also has a method called reset, which resets the entire dialog stack. The default behavior is to reset the stack and push the new dialog on top.
What if we wanted to include contextual help? Let’s create a new dialog to handle help for the add calendar entry dialog. We can use the beginDialogAction method on a dialog to define triggers that start new dialogs on top of the AddCalendarEntry dialog.
Properly handling contextual actions
We will dive deeper into actions and their behavior in the following chapter.
Recognizers
Recall we defined that the help dialog will be triggered via a regular expression. How does the Bot Builder SDK implement this? This is where recognizers come in. A recognizer is a piece of code that accepts incoming messages and determines what the user’s intent was. A recognizer returns an intent name and a score. The intent and score can come from an NLU service like LUIS, but they do not have to.
By default, as seen in the previous examples, the only recognizer in our bot is a regular expression or plain-text matcher. It takes in a regular expression or a hard-coded string and matches it to the incoming message’s text. We could utilize an explicit version of this recognizer by adding a RegExpRecognizer to our bot’s list of recognizers. The following implementation states that if the user’s input matches the provided regular expression, an intent called HelpIntent is resolved with a score of 1.0. Otherwise, the score is 0.0.
Another thing that the recognizer model allows us to do is to create a custom recognizer that executes any code we want and resolves an intent with a score. Here’s an example:
Now this is quite a simple example, but our minds should be racing with the possibilities. For example, if the user’s input is nontext media such as an image or video, we can write a custom recognizer that validates the media and responds accordingly.
The Bot Builder SDK allows us to register multiple recognizers to our bot. Whenever a message comes into the bot, each recognizer is invoked, and the recognizer with the highest score is deemed the winner. If two or more recognizers result in the same score, the recognizer that was registered first wins.
Lastly, this same mechanism can be used to connect our bot to LUIS, and in fact the Bot Builder SDK includes a recognizer for this very case. To do this, we take the endpoint URL for our LUIS application (perhaps the one we created in Chapter 3) and use it as a parameter to the LuisRecognizer.
Once we set this up, we add a triggerAction call for each intent we would like to handle globally, as we did with the help dialog. The strings passed as the “matches” member must correspond to our LUIS intent names.
Finally powered by our LUIS models!
Exercise 5-2
Connecting Your Bot to LUIS
- 1.
Create an empty bot and create a dialog to handle each type of intent created in Chapter 3. For each dialog, simply send a message with the dialog name.
- 2.
Register the LUIS recognizer with your bot and confirm that it works.
- 3.
The first method of every dialog waterfall is passed the session object and an args object. Use a debugger to explore the objects.5 What is the structure of data from LUIS? Alternatively, send the JSON string representing the args object to the user.
Recognizers are a powerful feature in the Bot Builder SDK , allowing us to equip our bots with a variety of behaviors based on incoming messages.
Building a Simple Calendar Bot
Ideally the patterns around how we structure a conversation are becoming clear. The git repos provided with the book include a Calendar Concierge Bot that we build on throughout the remaining chapters in the book. Every chapter that makes changes to the bot has its own folder in the repo. The Chapter 5 folder includes the skeleton code that integrates with LUIS and sends back a message saying what the bot understood. Auth and API integration will be covered in Chapter 7. We add basic multilanguage support in Chapter 10, human handover in Chapter 12, and analytics integration in Chapter 13.
In the context of Node, how do we structure a bot and its component dialogs?
What is the general pattern of the code that interprets the data passed into dialogs?
Although it is possible to create end-to-end tests with the Bot Builder SDK, in its current form, unit testing dialog logic is not the most straightforward task. How do we structure our code so that it can be unit tested as best as possible?
As the code is being built and tested, we will find that there are gaps in our LUIS applications. During the construction of this code, my model has changed a bit from what was produced in Chapter 3. These are not breaking changes but rather new utterances and entities. The code samples include this version of the model.
We need to define the scope of each dialog. For example, the edit calendar entry dialog was repurposed to focus on moving appointments.
We have created some helper classes that contain some of the trickiest logic, which is reading each type of entity from the LUIS results and translating them to objects that can be used in the dialogs. For example, many of our dialogs perform actions on the calendar based on datetimes or ranges and subject or invitee.
Constants and helpers
Code that translates LUIS intents and entities into application objects
Dialogs to support adding, moving, and removing an appointment; checking availability; and getting an agenda for the day
Lastly, an app.js entry point that ties it all together
Conclusion
This was quite an introduction into the Bot Framework and Bot Builder SDK. We are now equipped to build basic bot experiences. The core concepts of creating bot channel registrations, connecting our bots to channel connectors, debugging using the Bot Framework Emulator and ngrok, and building bots using the Bot Builder SDK are the key pieces we need to understand to be productive. The Bot Builder SDK is a powerful library to assist us in the process. We introduced the core concepts from the SDK. Without getting too deep into the details of the SDK, we developed a chat bot that can interpret a large variety of natural language inputs that execute the use cases we aimed to support from Chapter 3. The only thing left to do is to pull in a calendar API and translate the LUIS intent and entity combinations into the right API calls.
Before we jump into this, we will dive deeper into the Bot Builder SDK to make sure we are selecting the correct approach in our final implementation.