In the previous chapter, we spent time connecting our chat bot’s Speech Synthesis Markup Language (SSML) output into a cloud-based text-to-speech engine to give our chat bot as human a voice as possible. The Bing Speech API that we utilized is an example of what is collectively being called cognitive services . These are typically services that enable more natural human-like interactions with applications. Originally, Microsoft referred to these as Project Oxford.1 These days, the suite of APIs is now branded as Azure Cognitive Services.
At a more technical level, these are services that allow easy access to machine learning (ML) algorithms that perform cognitive-type tasks, for example, speech recognition, speech synthesis, spell-checking, auto-correction, recommendation engines, decision engines, and visual object recognition. LUIS, which we explored in depth in Chapter 3, is another example of an Azure Cognitive Service. Microsoft is obviously not the only player in this space. IBM has many similar services under its Watson umbrella. Google’s Cloud Platform includes similar services on the Google stack.
This ML-as-a-service approach is extremely convenient for many tasks. Although it may not be appropriate from a latency and cost perspective for all workloads, for many it just makes sense to use for prototyping, pilot and production deployments. In this chapter, we will explore a few of Microsoft's Azure Cognitive Services at our disposal. This is not meant to be an exhaustive treatment of the subject but rather an introduction to the type of services that may be of interest to chat bot developers.
In either case, it is worth exploring these services to understand what is being offered, to learn what types of technologies can be applied to our business problems applications, and, most importantly, to engender our chat bots with some relevant intelligence.
Adding the Bing Spell Check v7 API in Azure
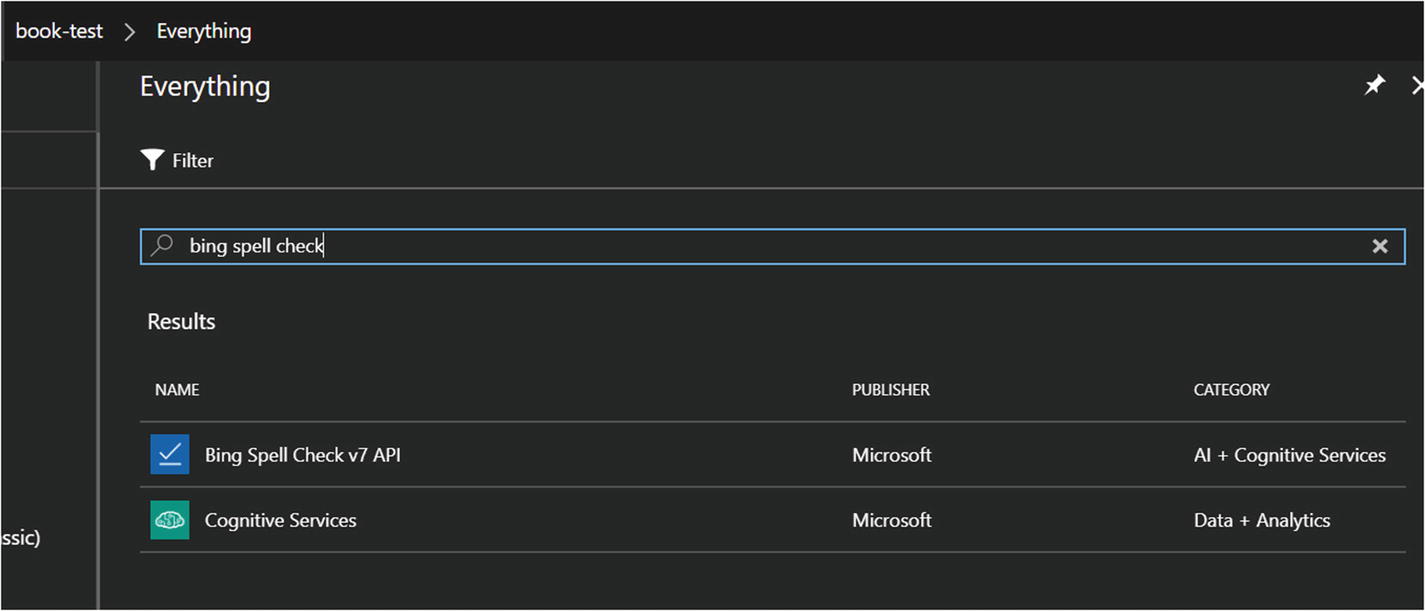
Creating the Bing Spell Check v7 API resource
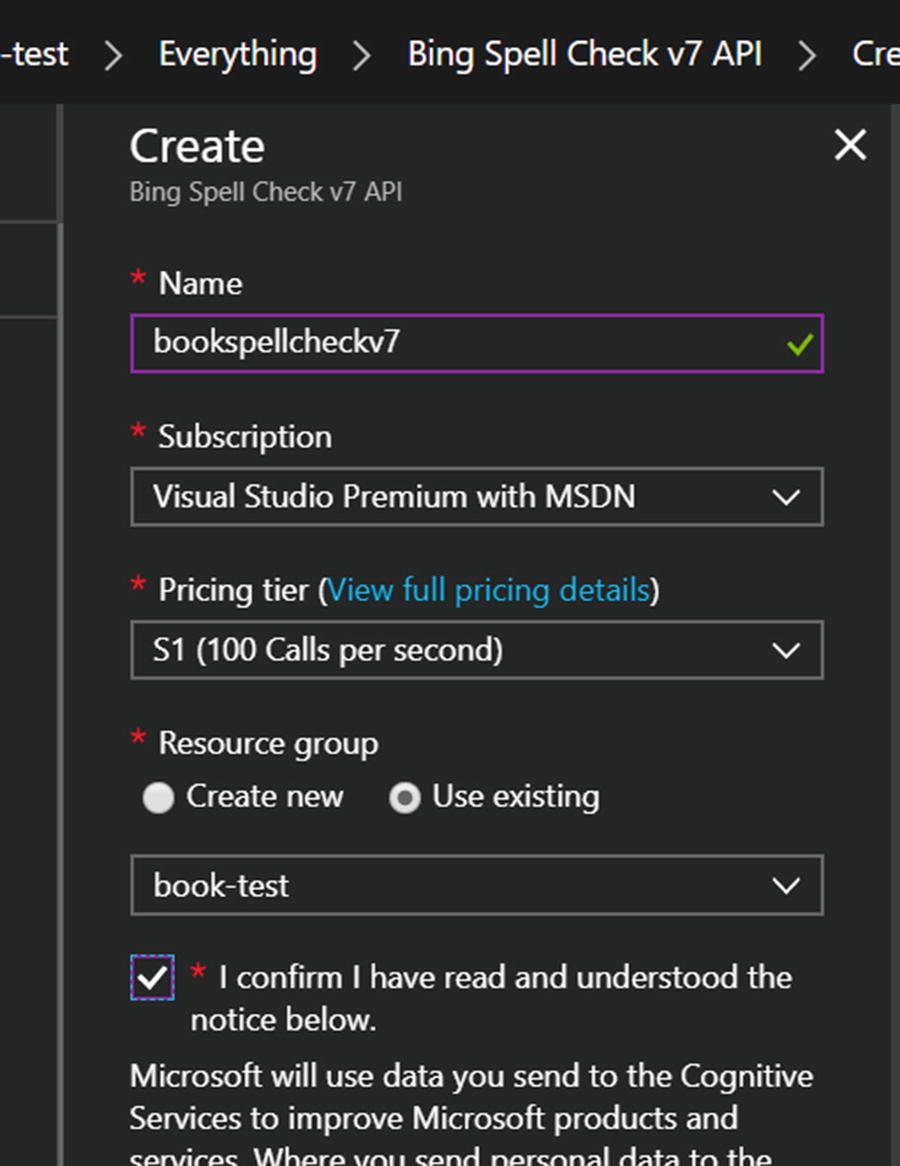
Finding the access keys for the Bing Spell Check v7 API resource
This process works similarly for the rest of the services; no advanced level of knowledge of the portal is needed to get started.
When the services were first being developed in public preview, most were offered free. As the services moved from preview into general availability, tiered pricing models were established. Lucky for us, most of the services still have a free tier that permits a substantial amount of usage. For example, LUIS allows us to call the endpoint 10,000 times per month for free. We can use the Translator Text API to translate 2,000,000 characters per month free. You can find more pricing details for all the services at https://azure.microsoft.com/en-us/pricing/details/cognitive-services/ .
Spell-Checking
One feature for any application that deals with user-generated text input is spell-checking. We would like an engine that is flexible and can handle common spelling issues such as dealing with slang, handling proper name errors within a context, figuring out word breaks, and spotting errors with homophones. Additionally, the engine should be continually updated with new entities such as brands and popular cultural expressions. That is no small feat, yet Microsoft offers its Spell Check API that does just that.
Microsoft’s Bing Spell Check API provides two spell-checker modes: Proof and Spell. Proof is designed for document spell-checking including capitalization and punctuation suggestions to help with document authoring (the type of spell checking you may find in Microsoft Word). Spell is designed for correcting the spelling in web searches. Microsoft claims the Spell mode to be more aggressive as it is designed to optimize for search results.2 The context of chat bots is closer to a web search than drafting long documents, so Spell is probably the better choice.
We will begin with the basics, passing the mode, the culture for which we want to spell check (referred to as the market), and the text itself. We also have the option of adding the context before and after the input text. In many scenarios, context can be important and relevant for the spell checker. You can find more details in the API reference documentation.3
To demonstrate the APIs usage, we will create a basic chat bot that simply passes the user input through the spell-checker and responds by modifying the user’s input with suggested improvements that have a score higher than 0.5. The bot will first prompt for the user to select the spell-check mode. At that point, any input will be sent to the Spell Check API using the selected mode. Finally, we can send the message “exit” at any time to return to the main menu and select the mode again. This is basic, but it will illustrate interacting with the API. You can find the code for this bot under the chapter10-spell-check-bot folder in the book’s GitHub repo.
We first create the Bing Spell Check v7 API resource in Azure, so we can get a key. Although we could write our own client library to use with the service, we will use a Node.js package called cognitive-services 4 that includes client implementations for most of Microsoft’s cognitive services.
We set up our UniversalBot as usual. We add the Spell Check API key into our .env file and call the field SC_KEY.
Next, we create a dialog called spell-check-dialog . In this code we send a request to the Spell Check API any time a new message is sent by the user. When we receive the result, we replace the segments flagged as problematic with a suggested correction that has a score greater or equal to 0.5. Why 0.5? It is a bit of an arbitrary decision, and it is suggested to modify the score threshold and input option to find the best values for your application.
We define the spellCheck function to call the Bing Spell Check API and replace misspelled words with the suggested correction.
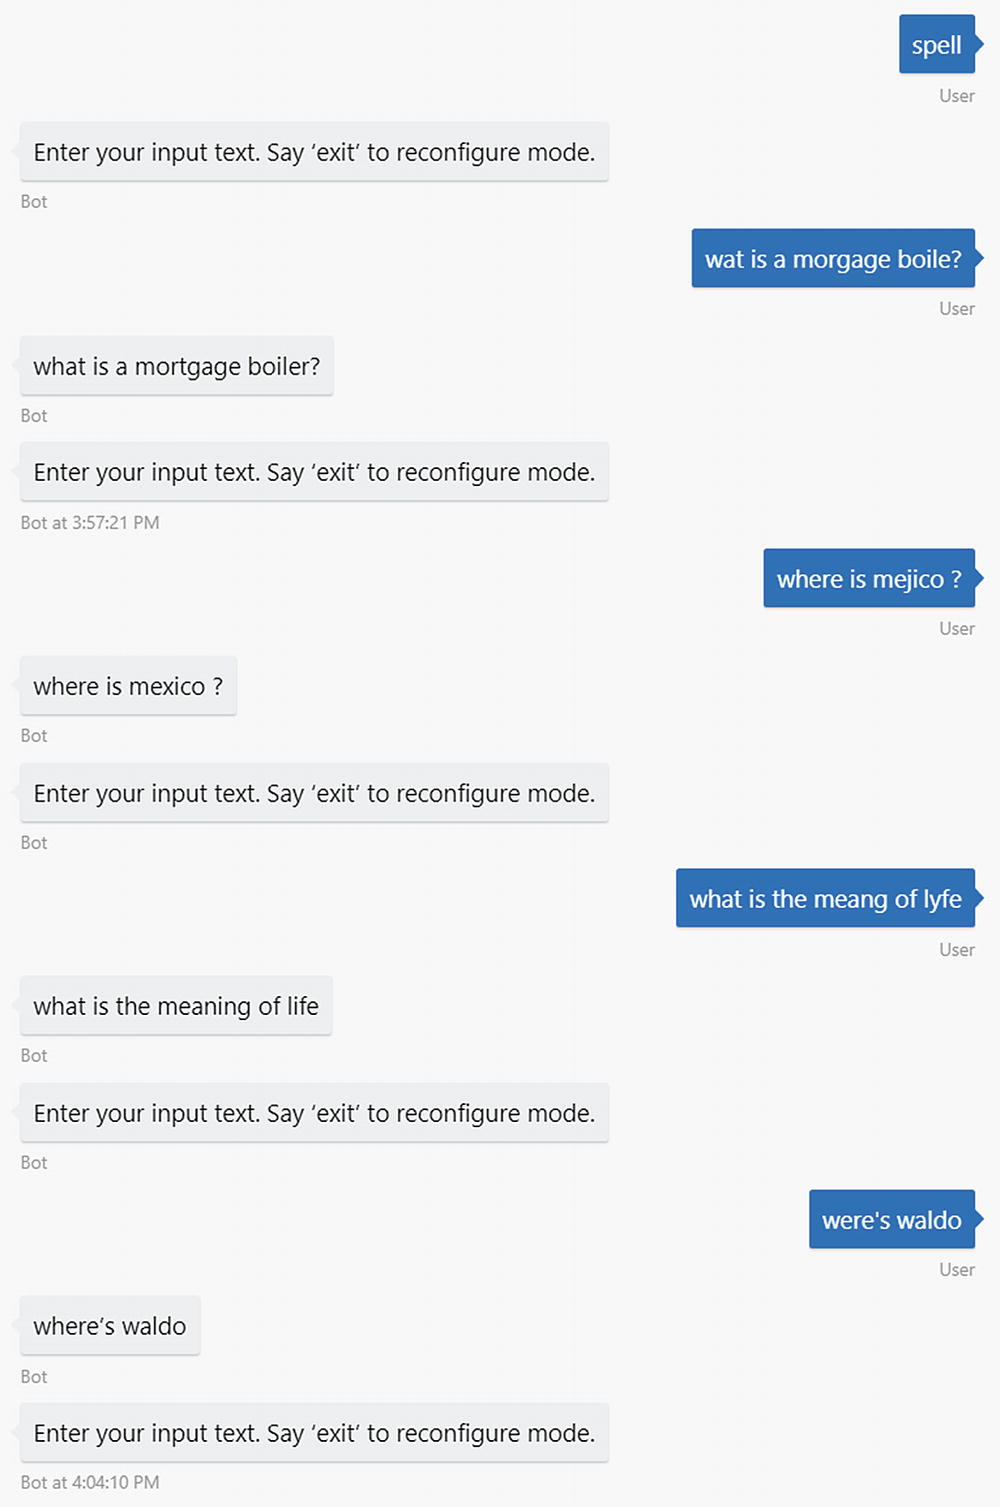
Spell-checker bot in action
It works well! Another approach is to always run input through the spell-checker before it even reaches the dialog stack. We can do this by installing custom middleware in the bot. The idea behind middleware is to be able to add logic into the pipeline that the Bot Builder uses to process every incoming and outgoing message. The structure of a middleware object is as follows. The method bot.use adds the middleware object to Bot Builder’s pipeline.
We could create the following middleware using our previously defined code. We spell-check incoming input, overwriting the input with the autocorrected text. We do not define any logic on outgoing messages.
That’s it! Now our dialog can be so much simpler!
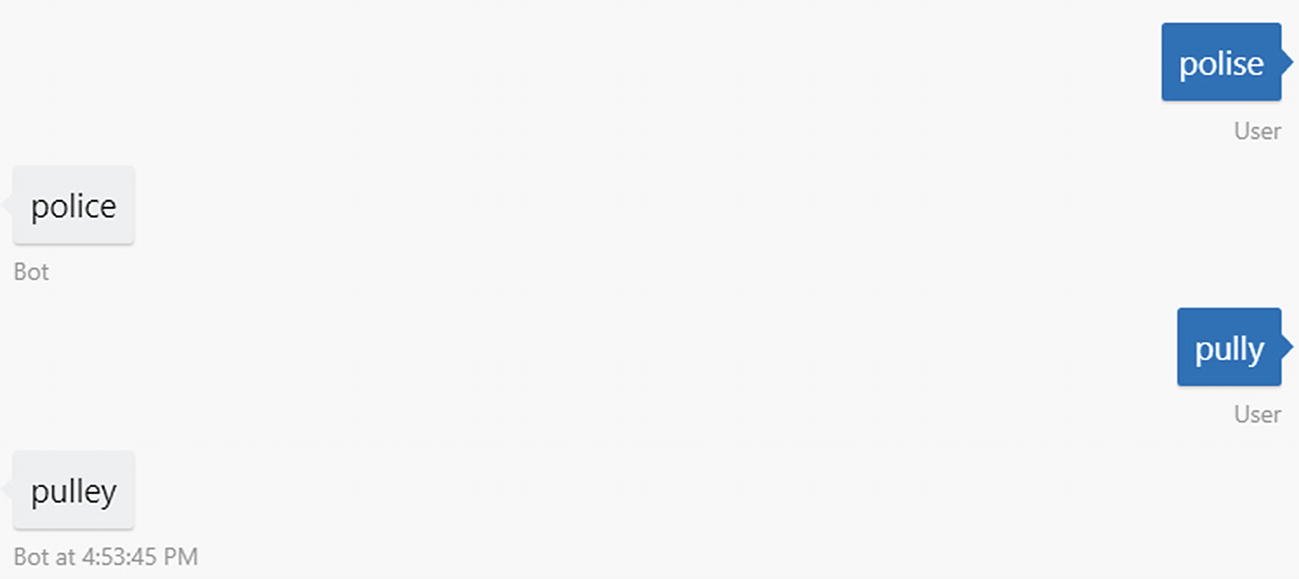
Spell-checking using the middleware approach
In Chapter 3 we explored the options the Language Understanding Intelligence Service (LUIS) offers when it comes to spell-checking. As mentioned previously, LUIS is another one of Microsoft’s cognitive services; it is an NLU system that allows us to classify intents and extract named entities. One of the tasks it can accomplish is to integrate with the Bing Spell Check API and run the spell-checked query (versus the raw input) through the NLU models. The benefit to this approach is that our LUIS app does not need to be trained with misspelled words. The disadvantage is that our scenario may include domain-specific language that the spell-checker does not recognize but our LUIS model does.
The approach of using middleware to completely change the user’s input so that the bot never sees the raw input is not something we recommend. Minimally, we should be logging the raw input and raw output. If enabling spell-checking on LUIS itself yields problematic behaviors in our model, we could move some of that logic into our bot. One option would be to wrap the LUIS recognizer around a custom spell-check LUIS recognizer. In this custom recognizer, you would have logic to ensure that spell-checker never modifies a certain vocabulary subset. In effect, we would be performing a partial spell-check.
Sentiment
A bot that can respond to sentiment
Obviously, this approach has limitations such as not considering the word’s context. If we were to develop our own lookups, we would need to make sure the list keeps up-to-date as cultural norms change. More advanced approaches use machine learning classification techniques to create a sentiment function to score an utterance’s sentiment. Microsoft offers an ML algorithm based on a large corpus of text prelabeled with sentiment.
Microsoft’s sentiment analysis is part of its Text Analytics API. The service offers three main functions: sentiment analysis, key phrase extraction, and language detection. We will first focus on sentiment analysis.
The API allows us to send one or more text strings and receive a response with one or more numeric scores between 0 and 1, where 0 is negative sentiment and 1 is positive. Here is an example (and you can tell my son woke me up way too early with this one):
Here is the result:
Sentiment analysis has some interesting applications in the chat bot space. We can utilize the data after the fact in analytics reports to see which features challenge users the most. Or, we can utilize the live sentiment score to automatically transfer the conversation to a human agent to immediately address a user’s concern or frustration.
Supporting Multiple Languages
Anytime a user sends a message to the bot, our chat bot will use the Text Analytics API to identify the user’s language.
If the language is English, continue as normal. If not, translate the utterance into English.
Run the English phrase through LUIS.
On the way out, if the user’s language was English, continue as normal. Otherwise, translate the bot’s response into the user’s language before sending to user.
In essence, we are using English as an intermediary language to provide LUIS support. This approach isn’t foolproof. There are reasons LUIS supports multiple cultures, like the many nuances and cultural variations in language. A direct literal translation without extra context may not make sense. And in fact, we may want to support completely different ways of saying things in one language than in English. A correct approach to the problem is to develop detailed LUIS applications for each culture for which we want to provide first-class support, use those applications based on language detection, and use the Translator API and intermediary English only when we don’t have LUIS support for a language. Or maybe we even avoid the Translator API altogether because of the possible issues with translation.
Although we do not use this approach in the following example, since we can control the bot’s text output, we could provide those static strings localized across all languages we want to support (instead of using translation services). We could fall back on automatic translation for anything not explicitly scripted.
Before we begin, make sure you have created a Text Analytics API and Translator Text API resource in the Azure Portal, in the same way we created the Bing Spell Check v7 API resource. Both APIs have a free pricing tier, so make sure to select that. Note that the Text Analytics API requires that we select a region. All the cognitive services unrelated to Bing require this to be set. This obviously has availability and latency implications that are outside the scope of this book. Once created, we must save the keys into the .env file. Name the Text Analytics key as TA_KEY and the Translator key as TRANSLATOR_KEY. In addition, the cognitive-services package requires the endpoint to be specified. The endpoint maps to the region, so if we selected West US as the Text Analytics service region, the endpoint value is westus.api.cognitive.microsoft.com.5 Set this to the TA_ENDPOINT key in the .env file.
We will use the cognitive-services Node.js package to interact with the Text Analytics API; however, the Translator API is one of the services not supported by this package. We can install the mstranslator Node.js package.
Next, we can create a middleware module that contains the translation logic so that we can easily apply this functionality to any bot.
The middleware code itself will depend on using the Text Analytics and Translator APIs.
After that, we create a class TranslatorMiddleware with a map that tells us which users are using which language. This is needed to store a user’s incoming language for the outgoing logic to be able to translate from English back into it.
The receive logic skips anything that is not a message. If we have a message, the user’s language is detected. If the language is English, we continue; otherwise, we translate the message into English, reset the message text to the English version (thereby losing the original language input), and continue. If there is an error while we translate the incoming message, we simply assume English.
On the way out, we simply figure out the user’s language and translate the outgoing message into that language. If the user’s language is English, we skip the translation step.
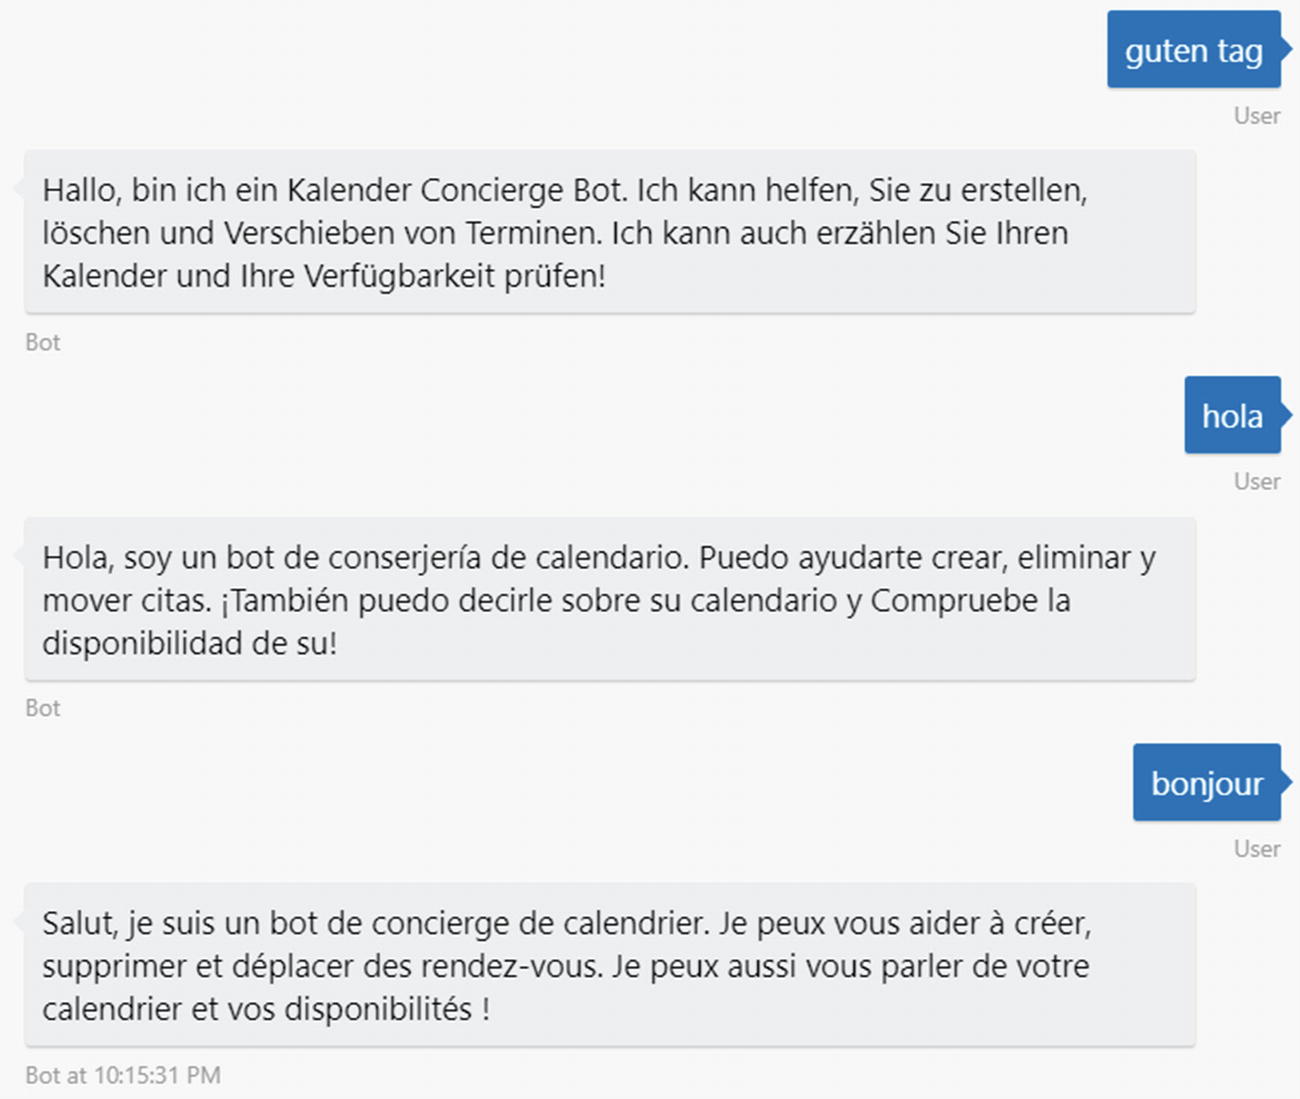
Bot responding in different languages
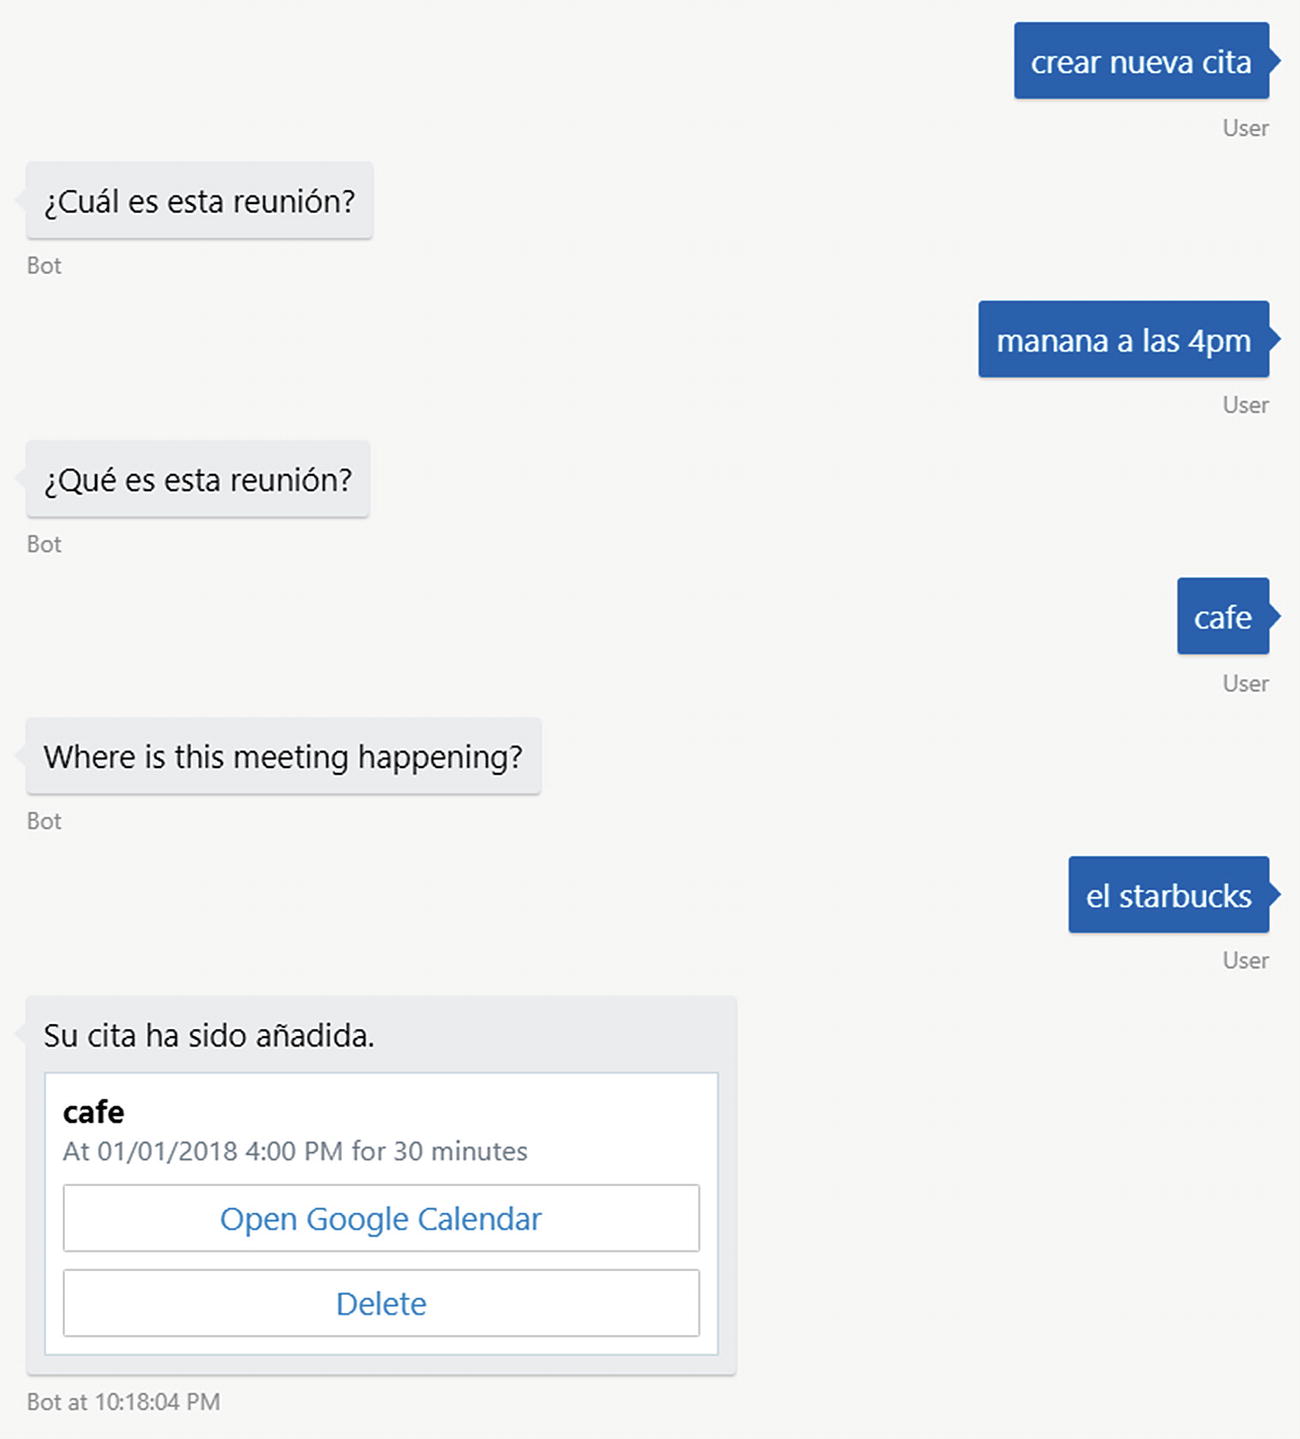
Create appointment flow in Spanish, with a blip
The problem is that the word café is valid in both English and Spanish. This perhaps calls for some sort of language lock-in during dialogs. The translation of “when is the meeting?” does not sound right either. The word cuál translates to which, not when. We could solve this by providing static localized output strings.
There is much more to implementing a production-grade multilanguage bot, but this is a good proof-of-concept to show how we can detect and translate languages using Azure Cognitive Services.
QnA Maker
A common use case for bots is to provide an FAQ for users to get information about a topic, brand, or product. Usually, this is similar to a web FAQ but geared more to a conversational interaction. A typical approach is to create a database of question-and-answer pairs and provide some sort of fuzzy matching algorithm to search over the data set given a user input.
One implementation approach would be to load all the question-and-answer data into a search engine such as Lucene and use its fuzzy search algorithm to search for the right pair. In Microsoft Azure, the equivalent would be to load the data into a repository such as Cosmos DB and use Azure Search to create a search index over the data.
For our purposes, we will use a simpler option called QnA Maker, another one of the cognitive services at our disposal. QnA Maker ( https://qnamaker.ai/ ) went into general availability in May 2018. The system is straightforward: we enter a set of question-and-answer pairs into a knowledge base, train the system and publish it as an API. Fuzzy logic matching is then made available via an API that we host in an Azure App Service Plan, so we can tune its performance as necessary.
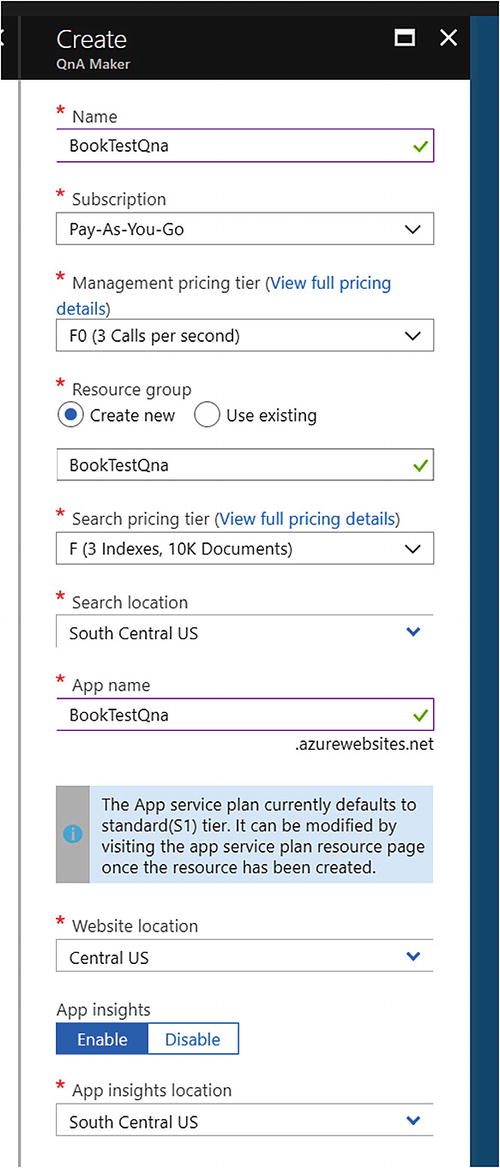
Creating a new QnA Maker service
After the Azure Portal does its thing, we end up with several resources. The search service hosts the search index, the app service hosts the API we will call, and Application Insights provides analytics around our service usage. Make sure to change the app service plan pricing tier to free!
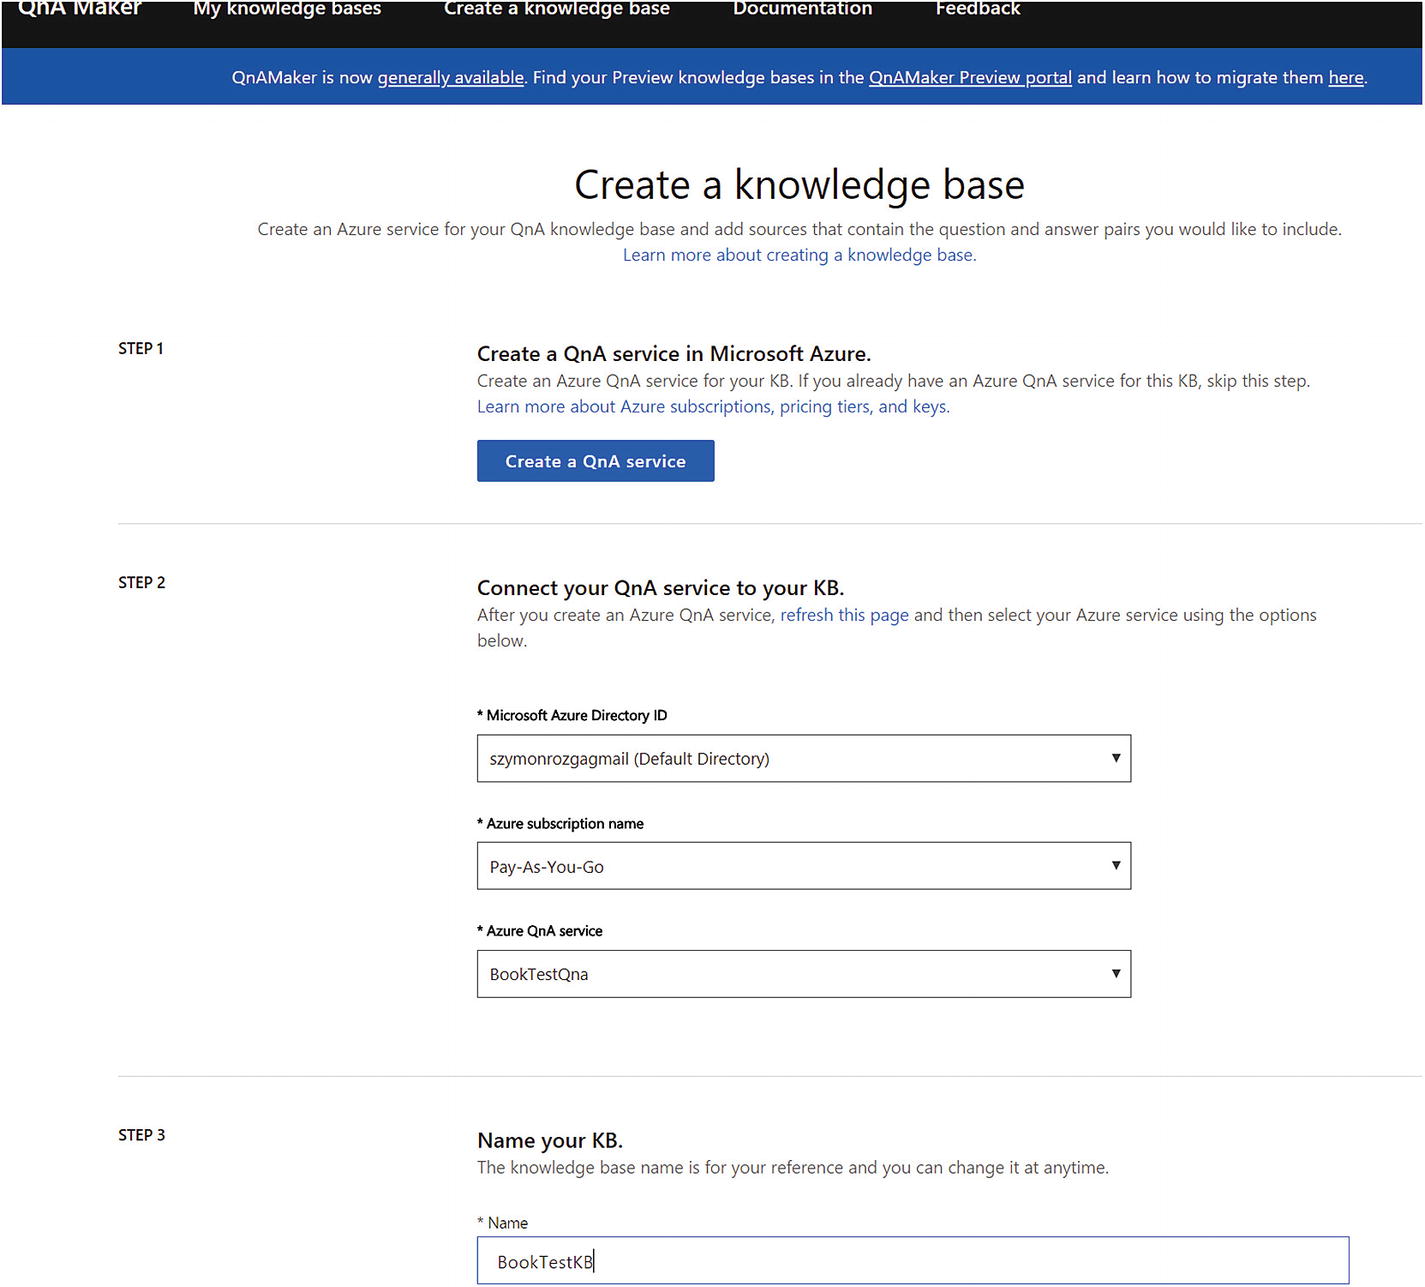
Creating a new QnA knowledge base
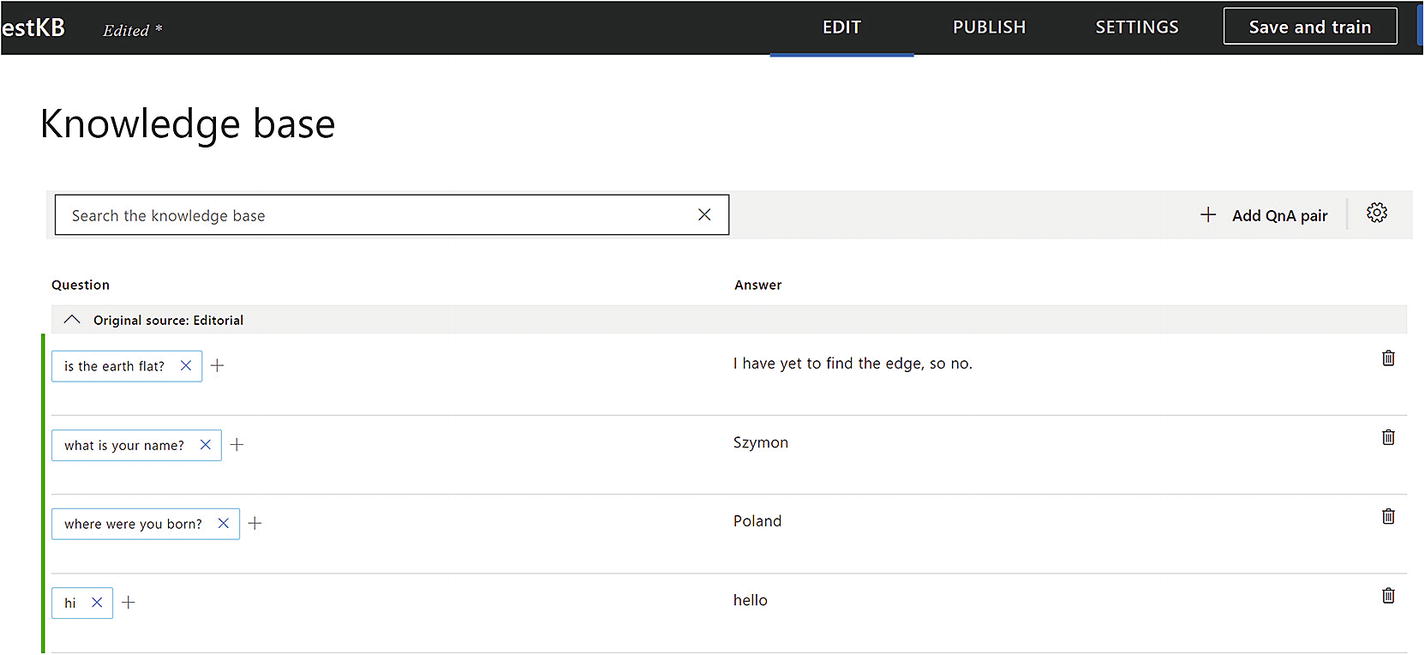
Adding more QnA pairs to our knowledge base
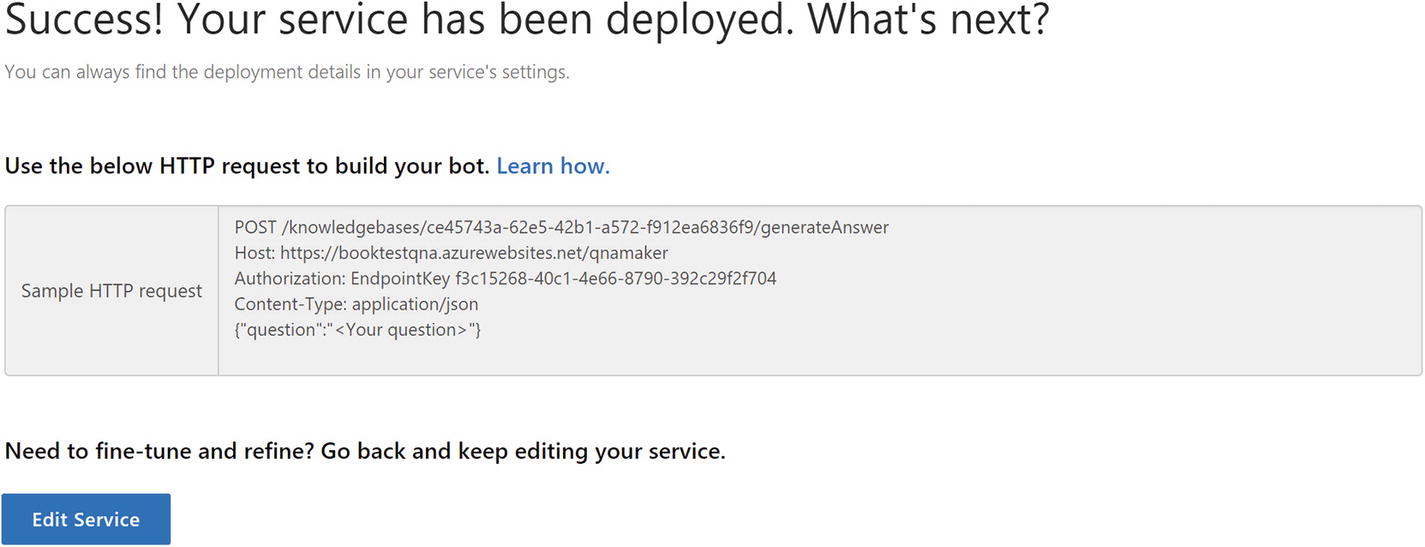
We published a QnA Maker KB!
Let’s use curl to see the API in action. We’ll try something we have not explicitly trained it with like “whats your name.” Note that we can include the top parameter to indicate to QnA Maker how many results we are willing to process. If QnA Maker finds multiple possible candidate answers with a close enough score, it will return up to the value of top options.
The response is as follows:
The response looks good. If we ask a question we have not trained, we get a “No good match found in the KB” response.
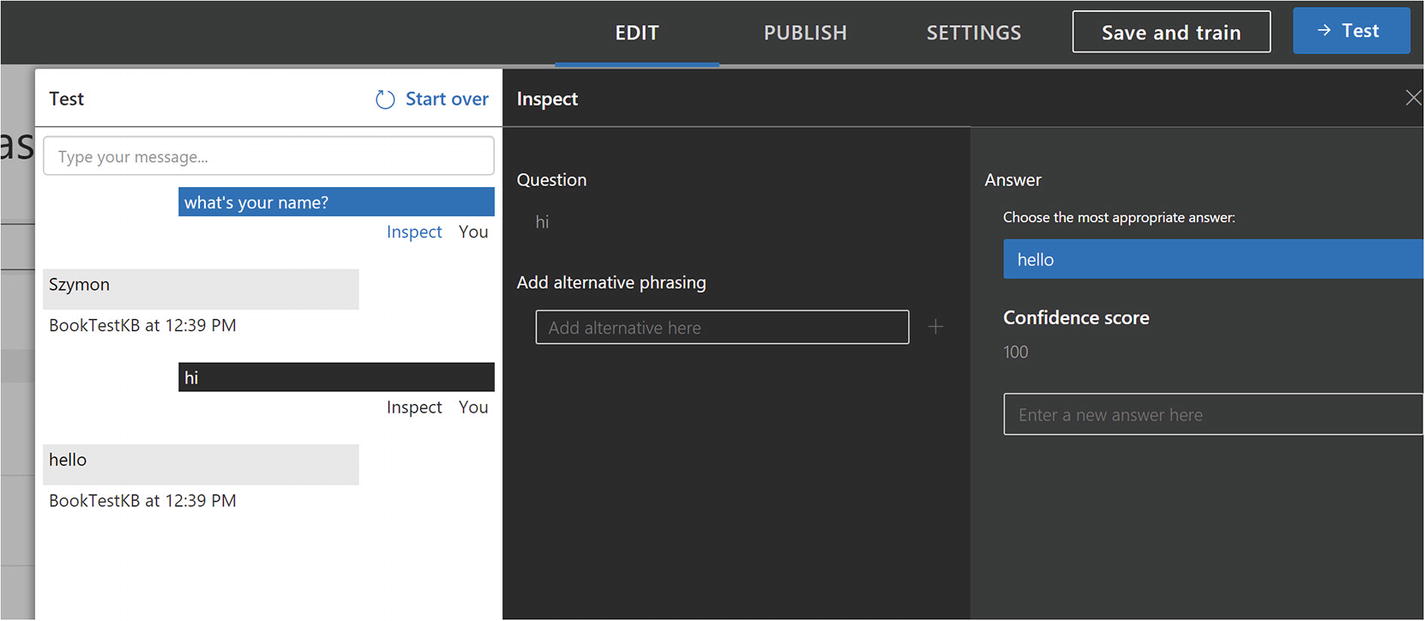
QnA Maker test interface, a powerful way to add new question phrasings and add new pairs
Microsoft provides a QnA Maker recognizer and dialog as part of its BotBuilder-CognitiveServices 6 Node.js package. If we would like our chat bot to utilize both QnA Maker and LUIS, we could use a custom recognizer that queries both services and picks the right course of action depending on the results from both services.
Exercise 10-1
Integrating with QnA Maker
- 1.
Create a simple QnA Maker knowledge base that has answers to some questions about yourself. Name, date of birth, and number of siblings are some possibilities.
- 2.
Create a chat that utilizes the BotBuilder-CognitiveServices Node.js package to connect to your QnA Maker service.
- 3.
Integrate your QnA Maker dialog and recognizer into a bot that also connects to LUIS. You can use Chapter 7’s calendar bot as an example. Is the framework good at distinguishing between LUIS queries and QnA queries?
- 4.
Try to train QnA Maker with utterances that are like those with which you trained your LUIS model. How does the bot behave? Does the behavior change if we change the order of recognizer registrations?
In this exercise you explored integrating QnA Maker into a chat bot. You also explored mixing the QnA Maker and LUIS recognizers, a good exercise in both Bot Builder mechanics and possible ordering pitfalls.
Computer Vision
Until now, all the cognitive services we have explored had some form of obvious application to chat bots. Spell-checking, sentiment analysis, translation and language detection, and fuzzy input matching are all clearly applicable to our everyday bot interactions. On the other hand, there are many machine learning tasks whose applicability to bots is not as clear. Computer Vision is one such example.
Microsoft’s Azure Cognitive Services includes the Computer Vision family of services that provide several functions. For example, there is a service to detect and analyze faces and another one to analyze people’s emotions. There is a content moderations service and a service that allows you to customize existing computer vision models to fit our use case (imagine trying to get an algorithm to become good at recognizing different types of trees). There is also a more general-purpose service called Computer Vision that returns a set of tags for the image with a confidence score. It can also create a text summary of the image and determine whether an image is racy or contains adult content, among other tasks.
Because of my unending amusement with mobile apps whose only task is to determine whether a photo is a hot dog or not, we will look at code for a bot that can tell whether the image sent by the user is a hot dog or not. The code can be found under the chapter10-hot-dog-or-not-hot-dog-bot folder of the book’s GitHub repo.
Principally, we will exercise this bot using the emulator to ensure we can develop locally. When a user sends an image via any channel, the bot usually receives a URL for the image. We could send that URL to the service, but since the emulator sends a localhost address, this won’t work. What our code will need to do is to download said image to a temporary directory and then upload it to the Computer Vision API. We will download the image using this code and using the request Node.js package.
We then create a simple dialog that takes any input and runs it through the service to figure out whether a hot dog was identified.

A plain old hot dog
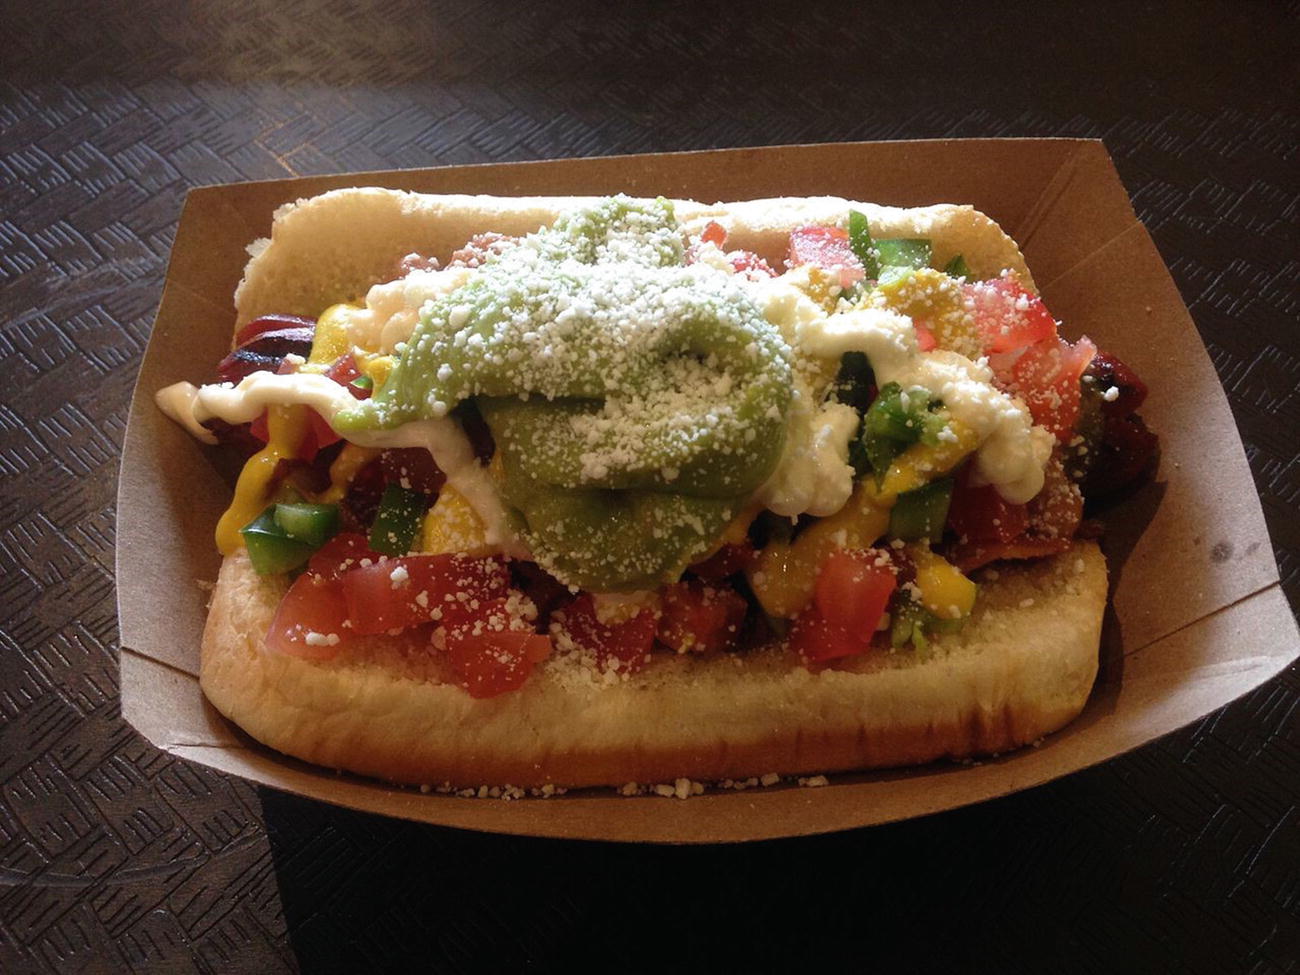
Another type of hot dog?
I don’t know what a Sonoran hot dog is, but after reading about it, it sounds really tasty. I am slightly amused that the service could correctly determine it is a hotdog. I’m further amused that it also tagged the image with the tags pizza and different. It would be a fun exercise to see how crazy a hot dog one needs to completely trick this model.
There are a lot of fun things we can do with image detection and analysis, and although hot dog or not hot dog is a silly example, it should be clear how powerful this kind of general image description generation can be. Of course, more specific application requirements might mean that the general models provided by Microsoft or other providers are insufficient, and a custom model is more appropriate. The Custom Vision Service7 has you covered for those use cases. In either case, the ability to quickly prototype these functions using an easy-to-use REST API cannot be understated.
Exercise 10-2
Exploring Computer Vision
- 1.
Get an access key for the Computer Vision API by using the Azure Portal. The process is the same as any other cognitive service.
- 2.
Create a chat bot that accepts photos and extracts the text information from the photos. Handle image upload similarly as we did in the hot dog chat bot.
- 3.
Try writing some text on a piece of paper and running it through your chat bot. Can it properly recognize your writing?
- 4.
How bad can the contrast be in the image, or how bad can your writing get before the OCR struggles to recognize the text?
You have now exercised the Computer Vision API and tested its OCR algorithm’s performance in an ad hoc manner.
Conclusion
The world is making much progress in the accuracy of machine learning algorithms, enough so that much of this functionality has been exposed to developers via REST APIs. The ability to access some of these algorithms through a simple REST endpoint, without the need to learn new environments and languages (like Anaconda, Python, and scikit-learn), has spurred a rush of developers to try new ideas and include AI functionality in their applications. Some services provided by big tech companies may not be as performant, cost effective, or accurate as custom-developed and curated models would be, but their ease of use and increasing accuracy and cost effectiveness over time is a catalyst for consideration in production scenarios.
As professionals in the chat bot space, we should have an idea of the type of cognitive offerings that can assist in our chat bot’s development. Using all these great features can improve the conversational experience by leaps and bounds.