In the previous chapter, we built a simple bot that can utilize an existing LUIS application and the Bot Builder SDK to enable a conversational flow for a calendar bot. As it stands, the bot is useless. It responds with text describing what it understood from user input, but it does not accomplish anything of substance. We’re building up to connecting our bot to the Google Calendar API, but in the meantime, we need to figure out what tools the Bot Builder SDK provides at our disposal to create meaningful conversational experiences.
In this chapter, we will elaborate on some of the techniques we used in our Chapter 5 code and more thoroughly explore some of the Bot Builder SDK features. We will figure out how the SDK stores state, builds messages with rich content, builds actions and cards, and allows the framework to customize channel behavior, dialog behavior, and user action handling. Lastly, we will look at how we best group bot functionality into reusable components.
Conversation State
As mentioned throughout the previous chapters, a good conversational engine will store each user and conversation’s state so that whenever a user communicates with the bot, the right state of the conversation flow is retrieved, and there is a coherent experience for the user. In the Bot Builder SDK, this state is, by default, stored in memory via the aptly named MemoryBotStorage. Historically, state was stored in a cloud endpoint; however, this has been deprecated. Every so often, we may run into a reference to the state service in some older documentation, so be aware that it no longer exists.
userData: Data for a user across all conversations in a channel
privateConversationData: Private user data scoped to a conversation
conversationData: Data for a conversation, shared for any users who are part of the conversation
In addition, as a dialog is executing, we have access to its state object referred to as dialogData . Any time a message is received from a user, the Bot Builder SDK will retrieve the user’s state from the state storage, populate the three data objects plus dialogData on the session object, and execute the logic for the current step in the conversation. Once all responses are sent out, the framework will save the state back into the state storage.
In some of the code from the previous chapter, there were instances where we had to re-create a custom object from dialogData and then store the object into the dialogData. The reason for this is that saving an object into the dialogData (or any of the other state containers) will turn the object into a vanilla JavaScript object, like using JSON.stringify would. Trying to invoke any method on session.dialogData.addEntry in the previous code, before resetting to a new object, would cause an error.
The storage mechanism is implemented by an interface called IBotStorage.
The ChatConnector class that we instantiate when building a new instance of a bot installs the default MemoryBotStorage instance, which is a great option for development. The SDK allows us to provide our own implementation to replace the default functionality, something you will most likely want to do in a production deployment as this ensures that states are stored instead of being erased any time your instances restarts. For instance, Microsoft provides two additional implementations of the interface, a NoSQL implementation for Azure Cosmos DB1 and an implementation for Azure Table Storage.2 Both are Azure services available through the Azure Portal. You can find the two storage implementations in the botbuilder-azure node package, documented at https://github.com/Microsoft/BotBuilder-Azure . You are also able to write your own IBotStorage implementation and to register it with the SDK. Writing your own implementation is a matter of following the simple IBotStorage interface.
Messages
In the previous chapter, our bot communicated to the user by sending text messages using either the session.send or session.endDialog method. This is fine, but it limits our bot a fair amount. A message between a bot and a user is composed of a variety of pieces of data that we ran into in the “Bot Builder SDK Basics” section in the previous chapter.
The Bot Builder IMessage interface defines what a message is really composed of.
For this chapter, we will be most interested in the text, attachments, suggestedActions, and attachmentLayout as they form the basis of a good conversational UX.
To create a message object in code, we create a builder.Message object. At that point, you can assign the properties as per the following example. A message can then be passed into the session.send method.
Likewise, when a message comes into your bot, the session object contains a message object. Same interface. Same type of data. But, this time, it is coming in from the channel rather than from the bot.
Note that IMessage inherits from IEvent, which means it has a type field. This field is set to message for an IMessage, but there are other events that may come from either the framework or a custom app.
conversationUpdate : Raised when a user has been added or removed from a conversation or some metadata about the conversation has changed; used for group chat management.
contactRelationUpdate : Raised when the bot was either added or removed from a user’s contact list.
typing : Raised when a user is typing a message; not supported by all channels.
ping : Raised to figure out if the bot endpoint is available.
deleteUserData : Raised when the user requests to have their user data deleted.
endOfConversation : Raised when a conversation has ended.
invoke : Raised when a request is sent for the bot to perform some custom logic. For example, some channels may need to invoke a function on the bot and expect a response. The Bot Framework would send this request as an invoke request, expecting a synchronous HTTP reply. This is not a common scenario.
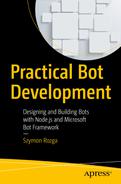
We can register a handler for each event type by using the on method on the UniversalBot. The resulting conversation with a bot that handles events can provide for more immersive conversational experiences for your users (Figure 6-1).
A bot responding to typing and conversationUpdate events
Addresses and Proactive Messages
In the message interface, the address property uniquely represents a user in a conversation. It looks like this:
The importance behind an address is that we can use it to send a message proactively outside the scope of a dialog. For example, we could create a process that sends a message to a random address every five seconds. This message has zero effect on the user’s dialog stack.
If we did want to modify the dialog stack, perhaps by calling into a complex dialog operation, we can utilize the beginDialog method on the UniversalBot object.
The significance of these concepts that we can have external events in disparate systems begin affecting the state of a user’s conversation within the bot. We will see this applied in the context of OAuth web hooks in the next chapter.
Rich Content
Rich content can be sent to the user using the attachments functionality in the BotBuilder IMessage interface. In the Bot Builder SDK, an attachment is simply a name, content URL, and a MIME type.3 A message in the Bot Builder SDK accepts zero or more attachments. It is up to the bot connectors to translate that message into something that the channel will understand. All types of messages and attachments are not supported by every channel. Be careful when creating attachments of various MIME types.
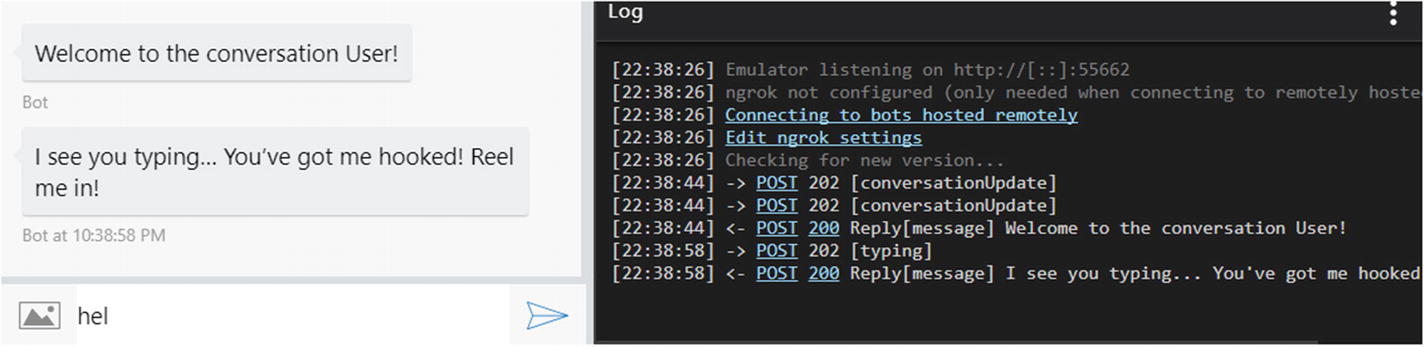
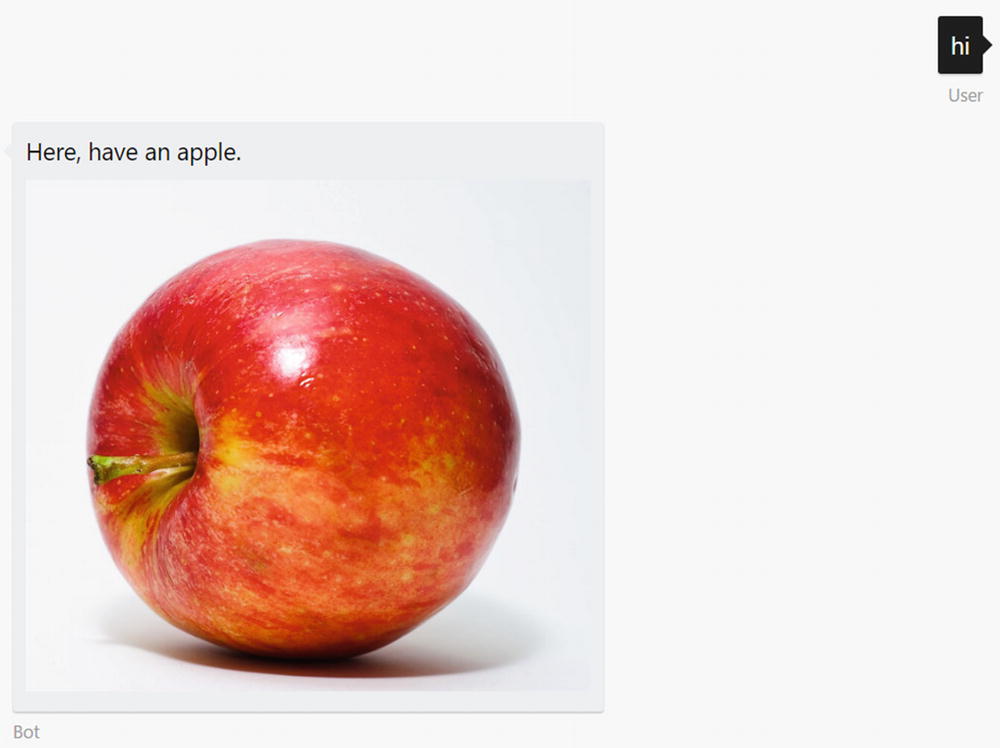
For example, to share an image, we can use the following code:
Emulator image attachment
Facebook Messenger image attachment
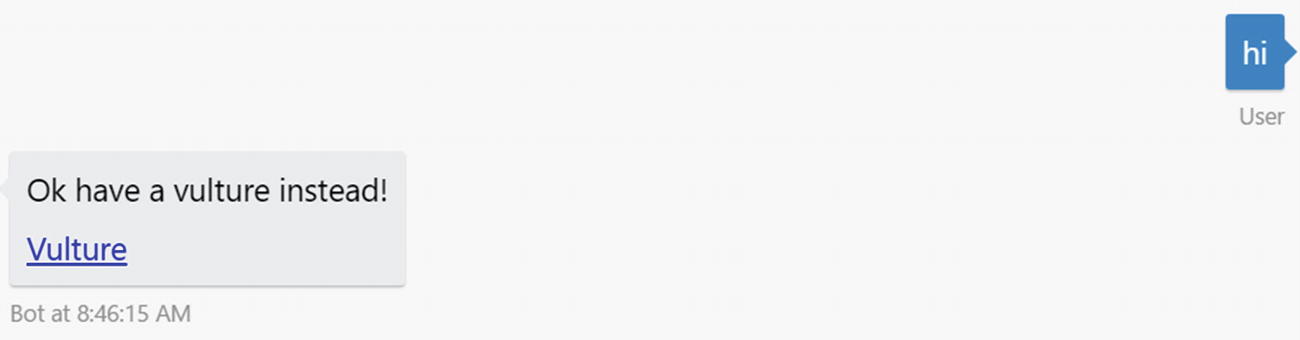
This code will send audio file attachments, which can be played right from within the messaging channel.
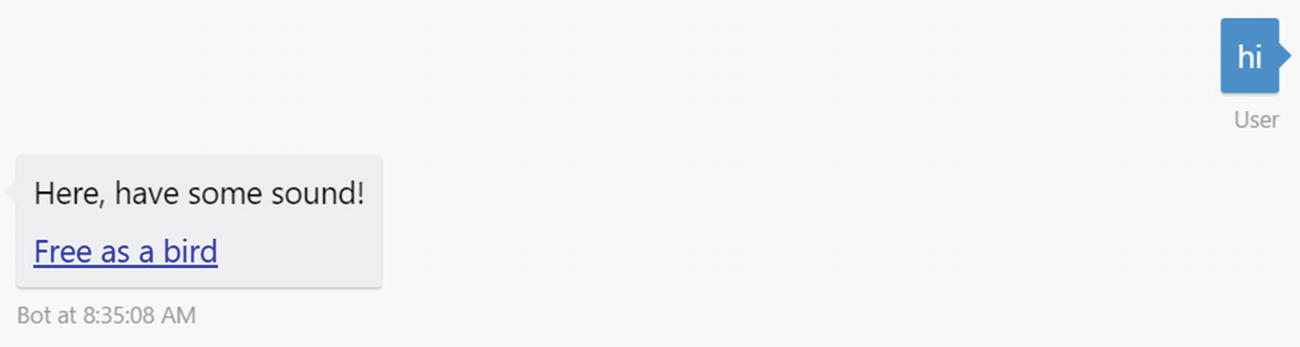
An OGG sound file attachment in the Emulator

An OGG sound file attachment in Facebook Messenger
Whoops! It seems like OGG4 files are not supported. This is a good example of Bot Framework behavior when our bot sends an invalid message to Facebook or any other channel. We will investigate this further in the “Channel Errors” section later in this chapter. My console error log has this message:

Bot Framework error for an OGG sound file on Messenger
OK, so they make it somewhat easy to diagnose the problem. We know we must provide a different file format. Let’s try an MP3.
Emulator MP3 file attachment
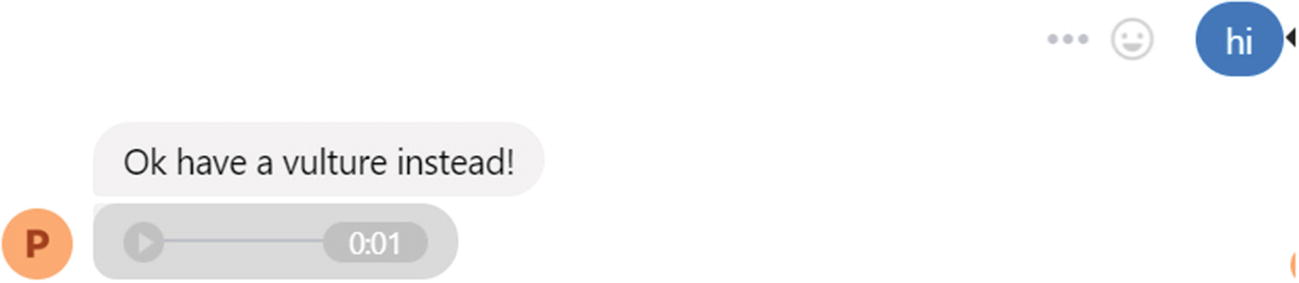
Facebook Messenger MP3 file attachment
The Emulator still produces a link, but Messenger has a built-in audio player you can utilize! The experience uploading a video is similar. Messenger will provide a built-in video player right within the conversation.
Exercise 6-1
Experimenting with Attachments
- 1.
Create a basic bot using the echo bot as a starting point.
- 2.
From the bot function, send different types of attachments in your message such as JSON, XML, or file. Experiment with some types of rich media such as video. How does the emulator render these types of attachments? How about Messenger?
- 3.
Try sending an image to the bot from the emulator. What data does the incoming message contain? Is this any different from when you send an image via Messenger?
Attachments are an easy way to share all kinds of rich content with your users. Use them wisely to create colorful and engaging conversational experiences.
Buttons
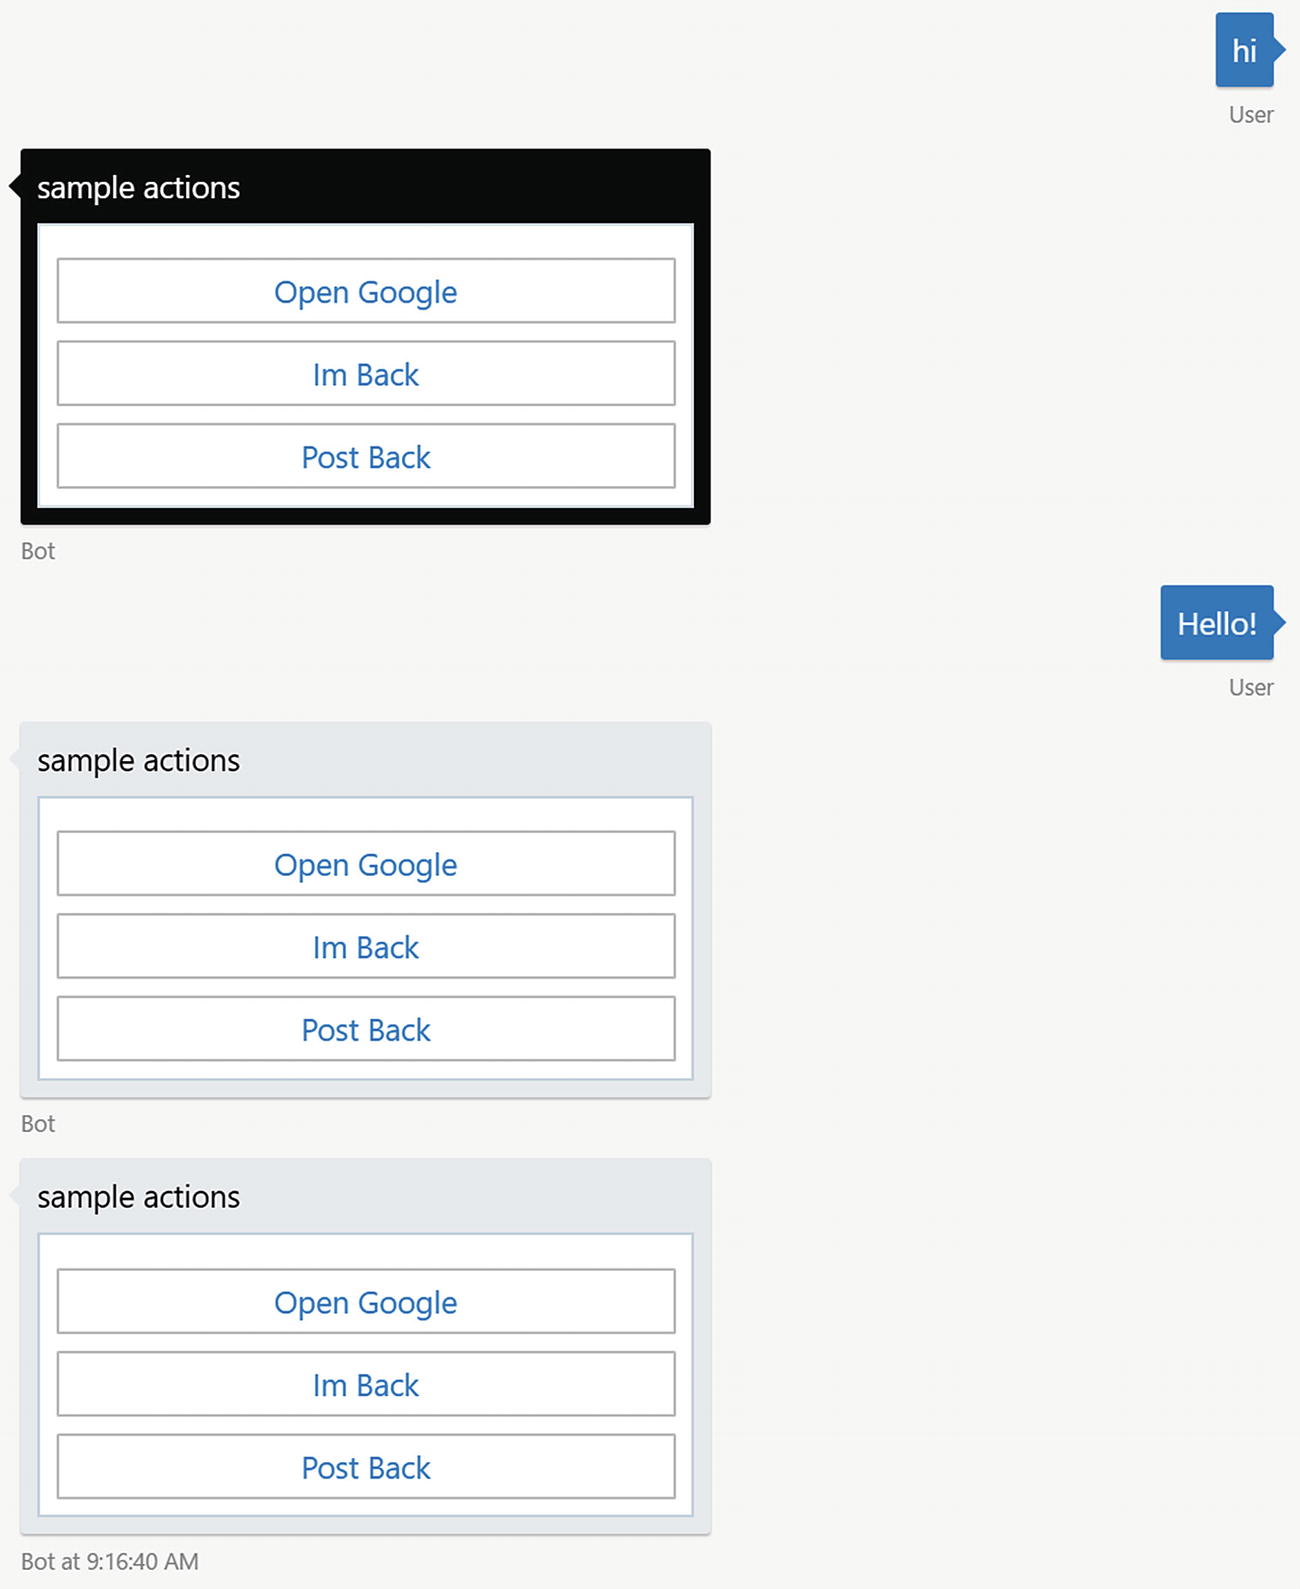
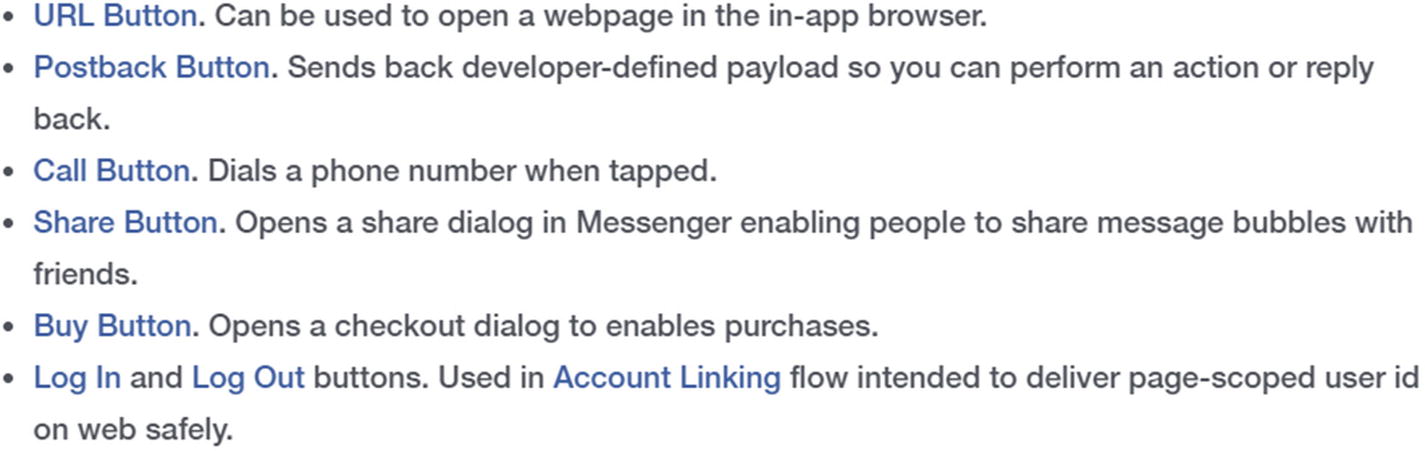
Bots can also send buttons to users. A button is a distinct call to action for a user to perform a task. Each button has a label associated with it, as well as a value. A button also has an action type, which will determine what the button does with the value when the button is clicked. The three most common types of actions are open URL, post back, and IM back. Open URL typically opens a web view within the messaging app or a new browser window in a desktop setting. Both post back and IM back send the value of the button as a message to the bot. The difference between the two is that clicking the post back should not display a message from the user in the chat history, whereas the IM back should. Not all channels implement both types of buttons.
Note that in the previous code we used a CardAction object. A CardAction is an encapsulation of the data we discussed earlier: a type of action, a title, and value. The channel connectors will usually render a CardAction into a button on the individual platforms.
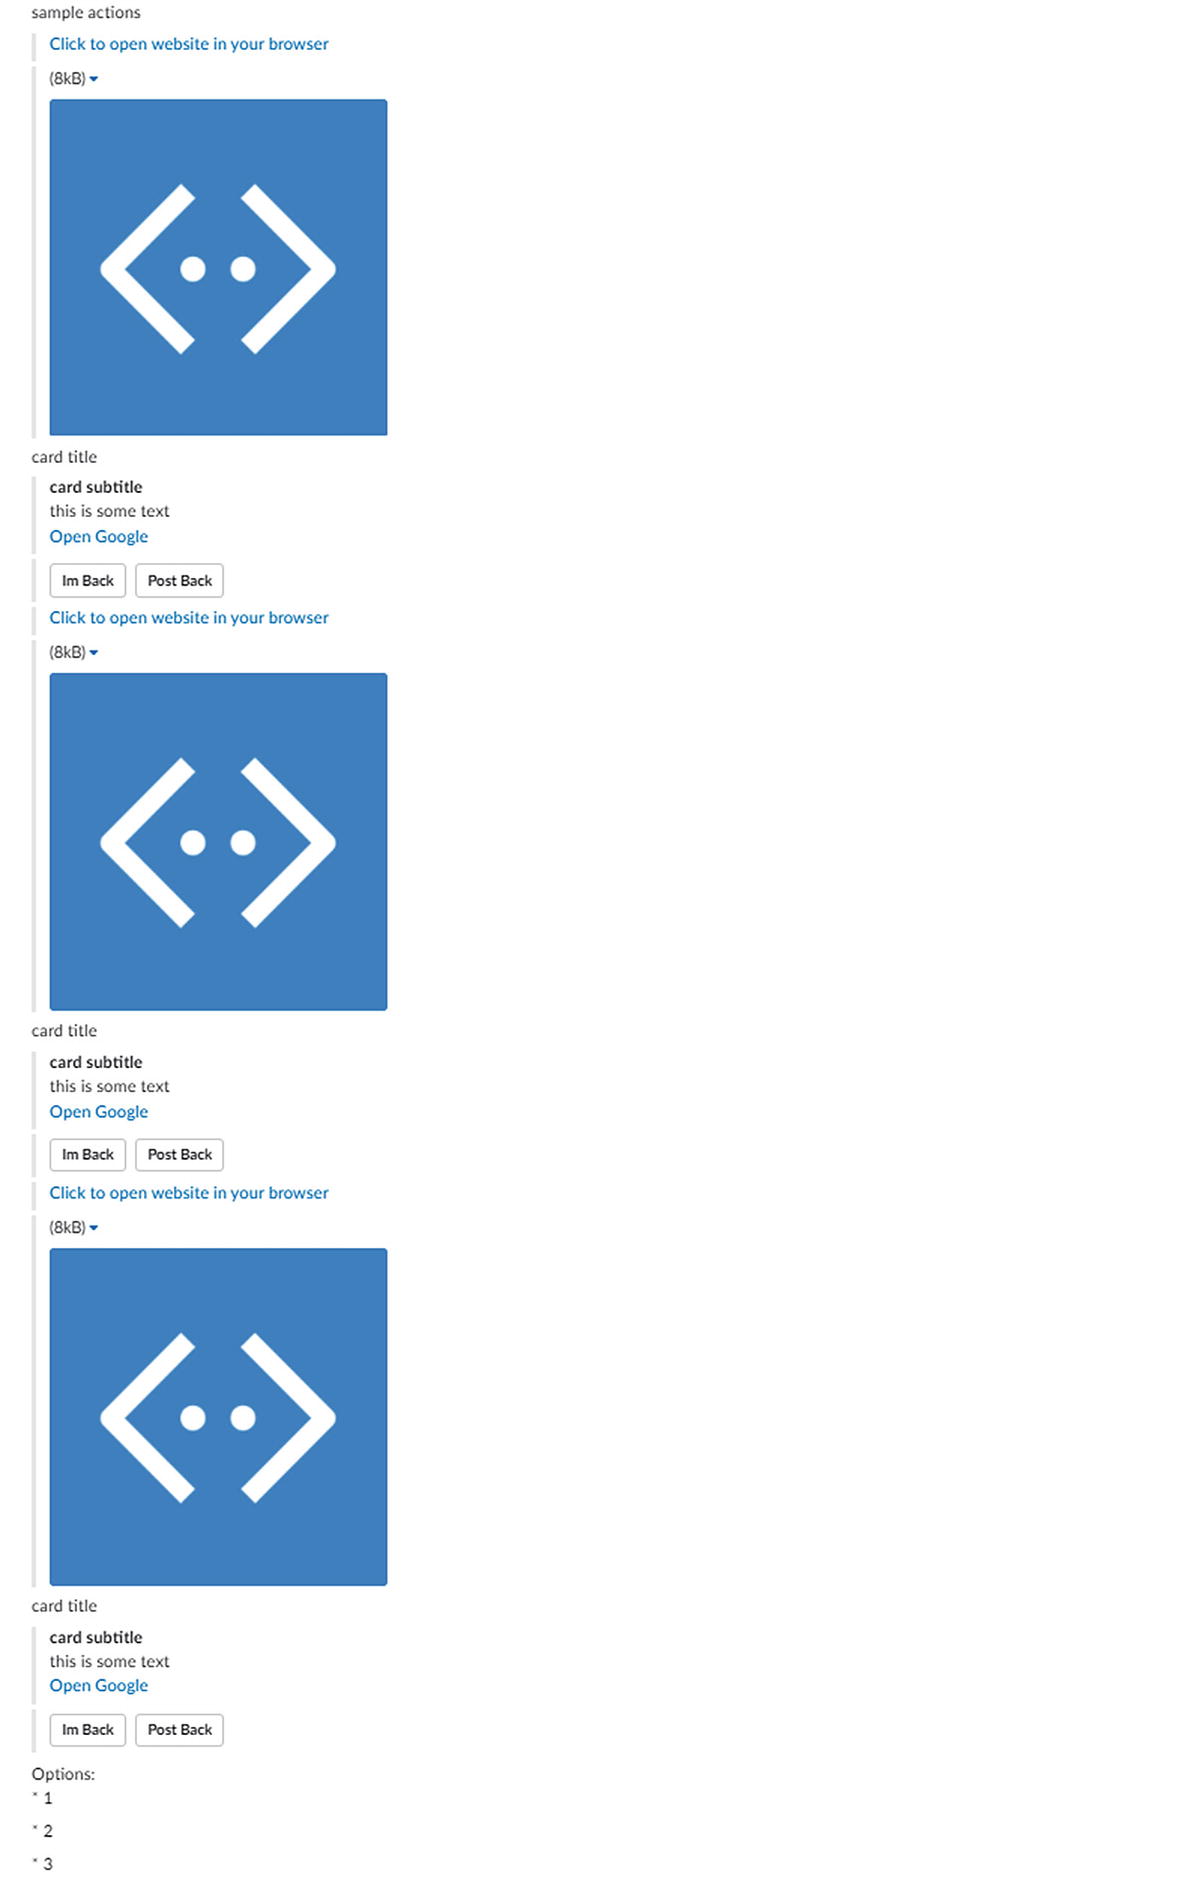
A sampling of Bot Builder button behaviors in the emulator
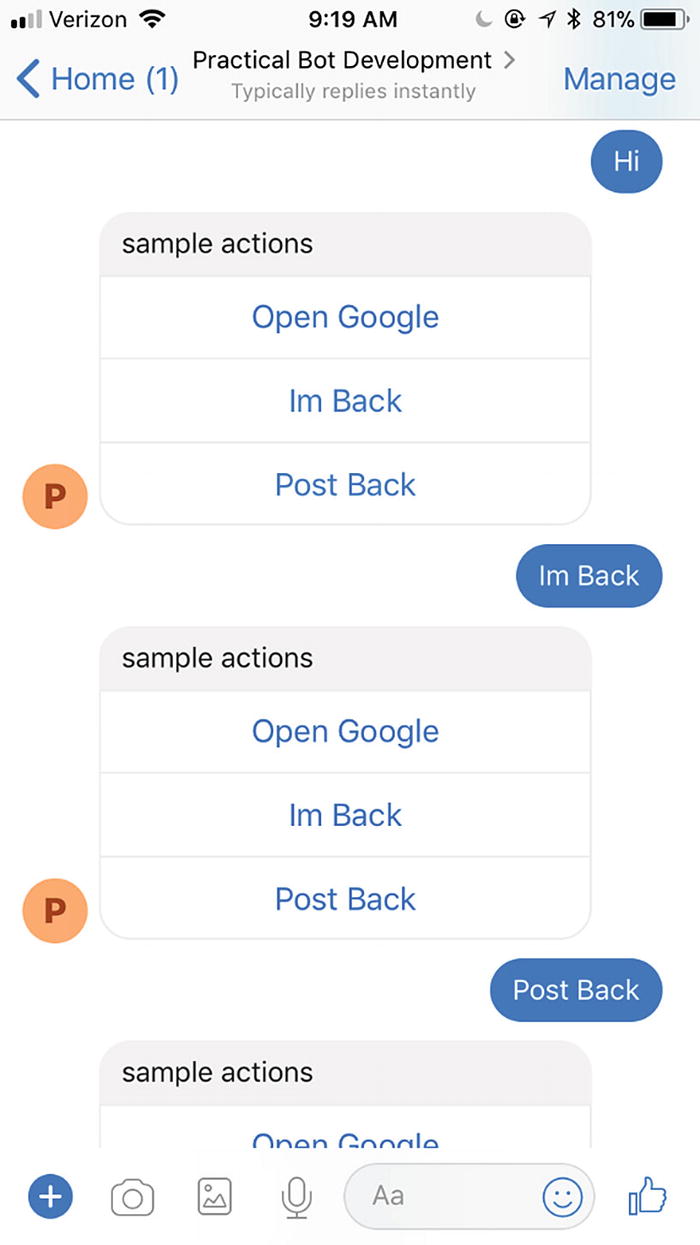
Sampling of button behaviors in Facebook Messenger
openUrl: Opens a URL in a browser
imBack: Sends a message to the bot from the user, which is visible to all conversation participants
postBack: Sends a message to the bot from the user, which may not be visible to all conversation participants
call: Places a call
playAudio: Plays an audio file within the bot interface
playVideo: Plays a video file within the bot interface
showImage: Shows an image within the bot interface
downloadFile: Downloads a file to the device
signin: Kicks off an OAuth flow
Messenger button template types
In the Bot Builder SDK, every card action can be created by using the static factory methods in the CardAction class. Here is the relevant code from the Bot Builder source:
Cards
Another type of Bot Builder attachment is the hero card. In our previous example with button actions, we conveniently ignored the fact that button actions need to be part of a hero card object, but what is that?
The term hero card originates from the racing world. The cards themselves are usually bigger than baseball cards and are designed to promote a race team, specifically the driver and sponsors. It would include photos, information about the driver and sponsors, contact information, and so on. But really the concept is reminiscent of typical baseball or Pokémon cards.
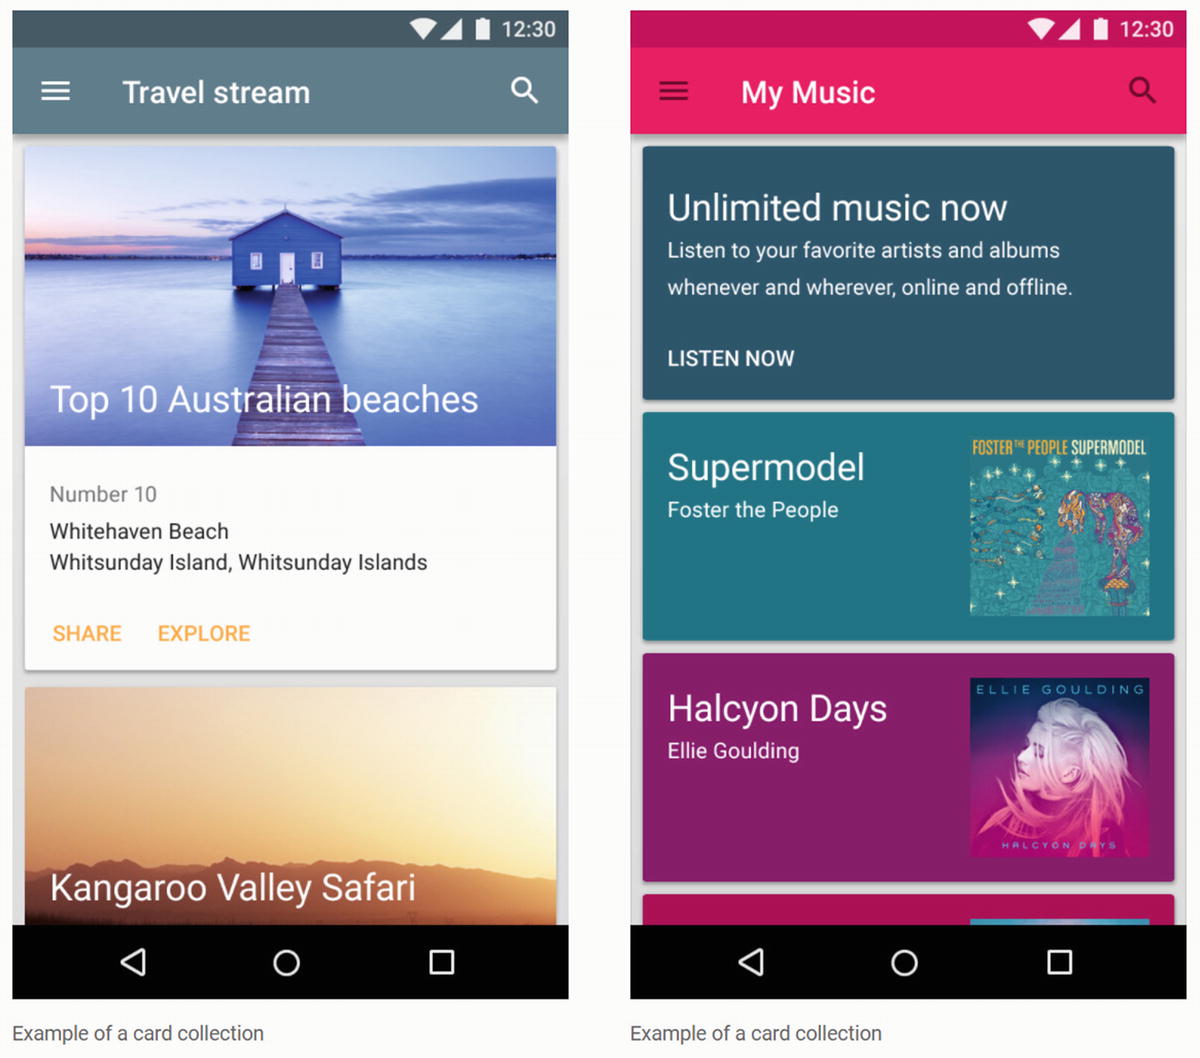
Google’s Material Design card samples
In the context of bots, the term hero card refers to a grouping of an image with text, buttons for actions, and an optional default tap behavior. Different channels will call cards different things. Facebook loosely refers to them as templates . Other platforms just refer to the idea as attaching content to a message. At the end of the day, the UX concepts are the same.
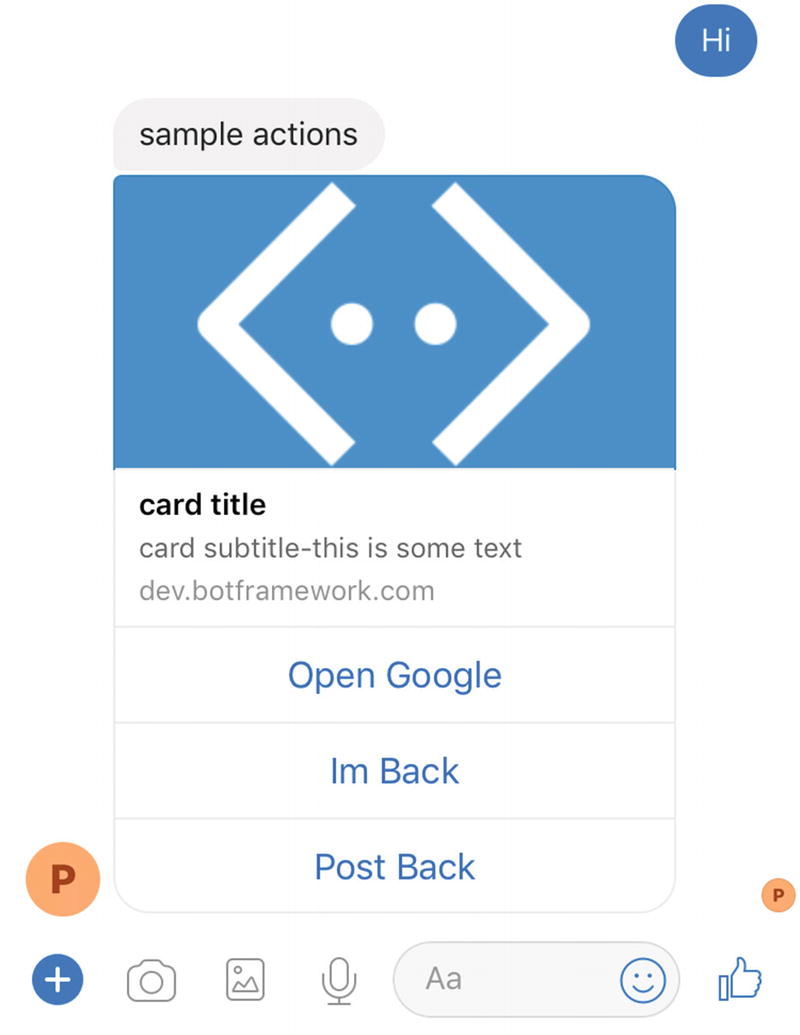
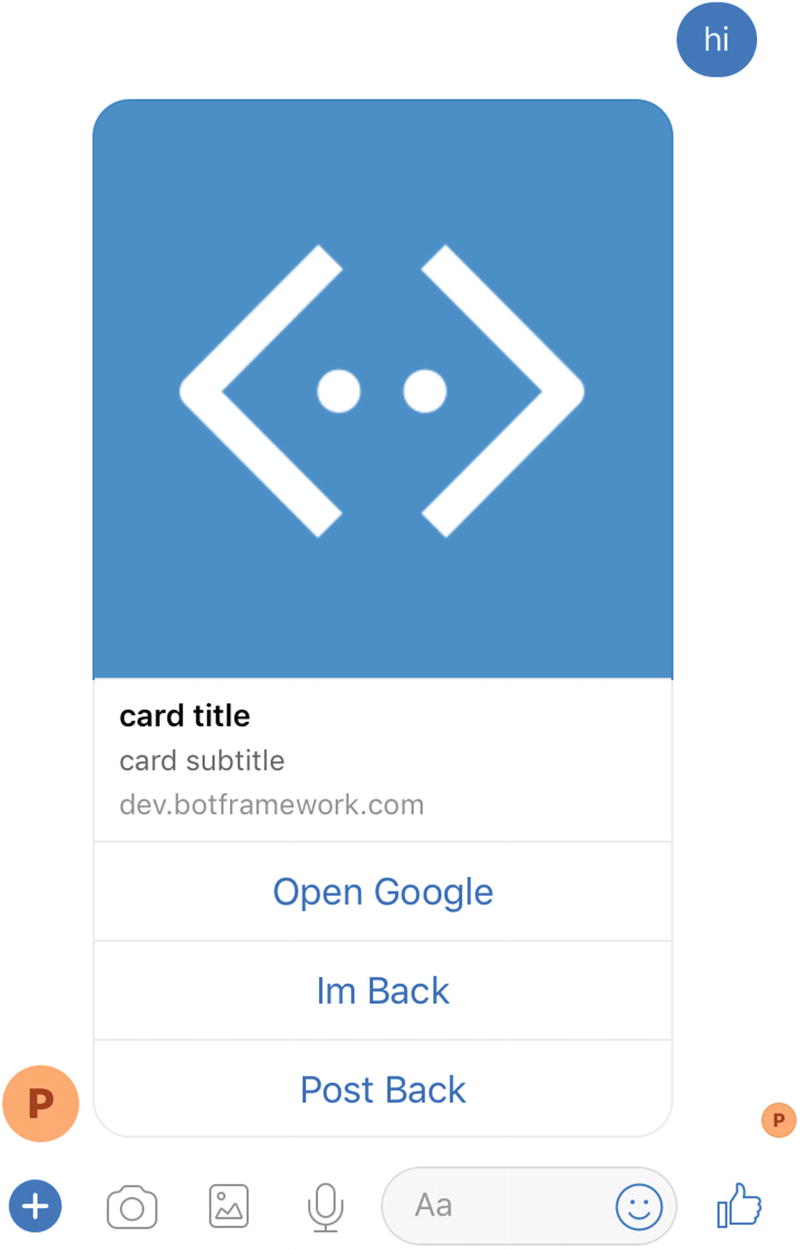
In the Bot Builder SDK, we can create a card using the following code. We also show how this card renders in the emulator (Figure 6-13) and on Facebook Messenger (Figure 6-14).

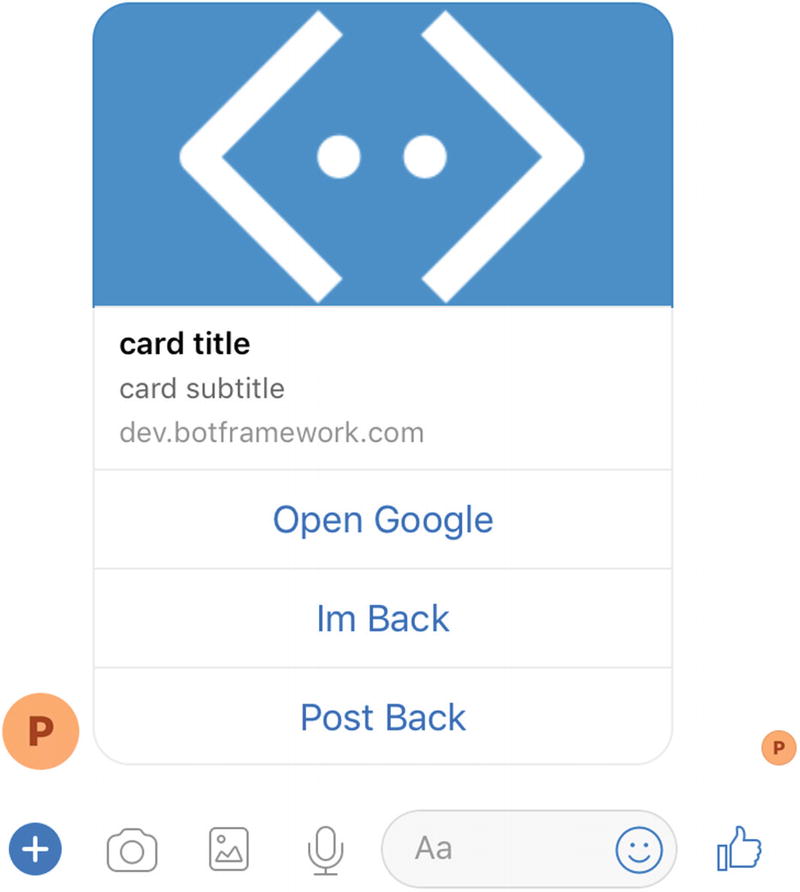
A hero card as rendered by the emulator
Same hero card in Facebook Messenger
Cards are a great way to communicate the results of a bot action invoked by the user. If you would like to display some data with an image and follow-up actions, there is no better way to do so than using cards. The fact that you get only a few different text fields, with limited formatting abilities, means that the UX resulting in this approach can be a bit limited. That is by design. For more complex visualizations and scenarios, you can either utilize adaptive cards or render custom graphics. We will explore both topics in Chapter 11.
The next question is, can we display cards side by side in a carousel style? Of course, we can. A message in the Bot Builder SDK has a property called attachmentLayout . We set this to carousel, add more cards, and we’re done! The emulator (Figure 6-15) and Facebook Messenger (Figure 6-16) take care of laying the cards out in a friendly carousel format. The default attachmentLayout is a list. Using this layout, the cards would appear one below the other. It is not the most user-friendly approach.
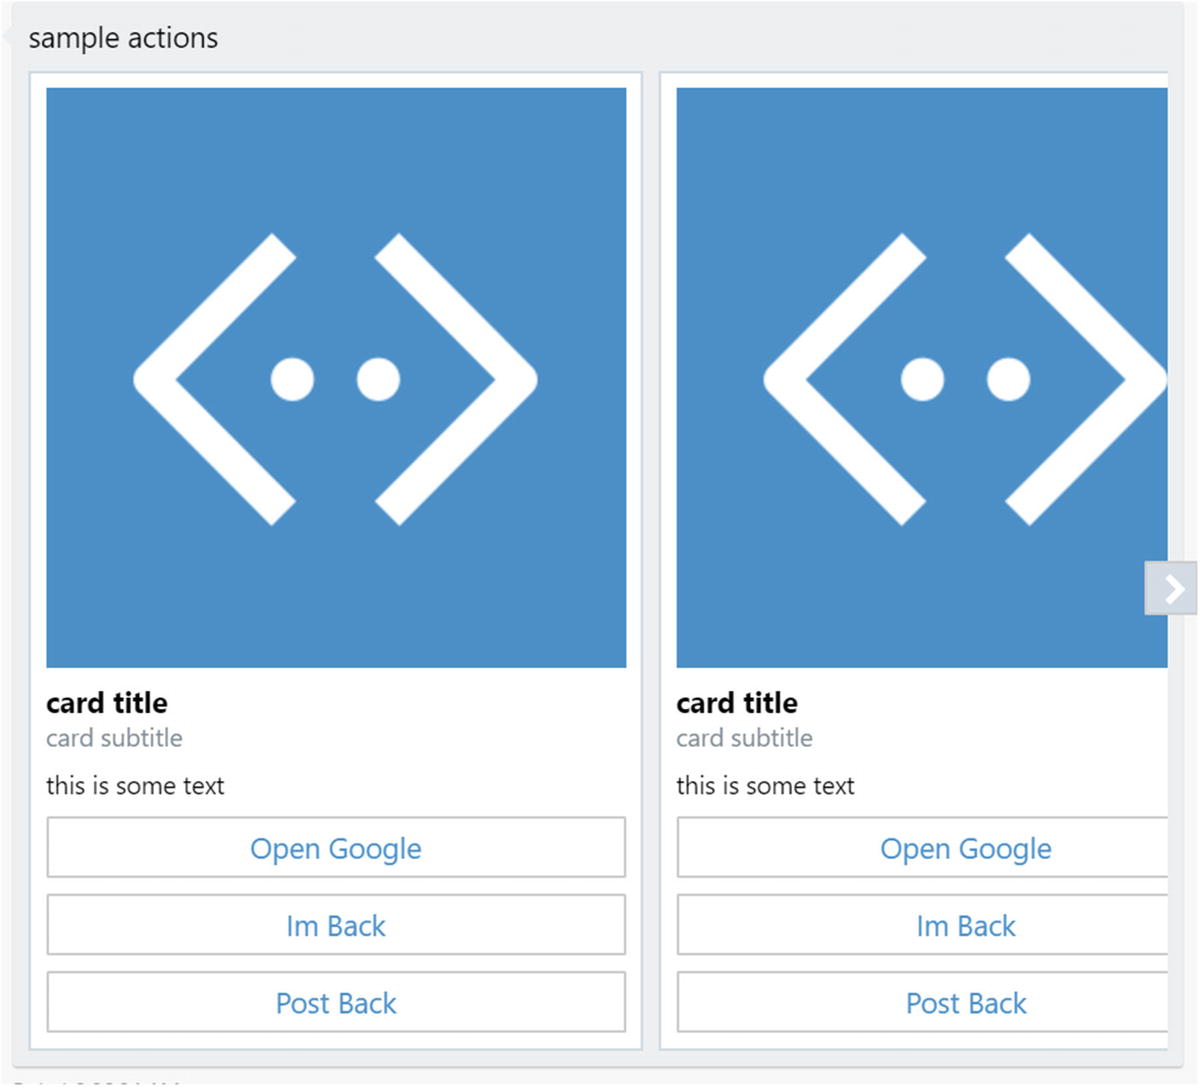
A hero card carousel in the emulator
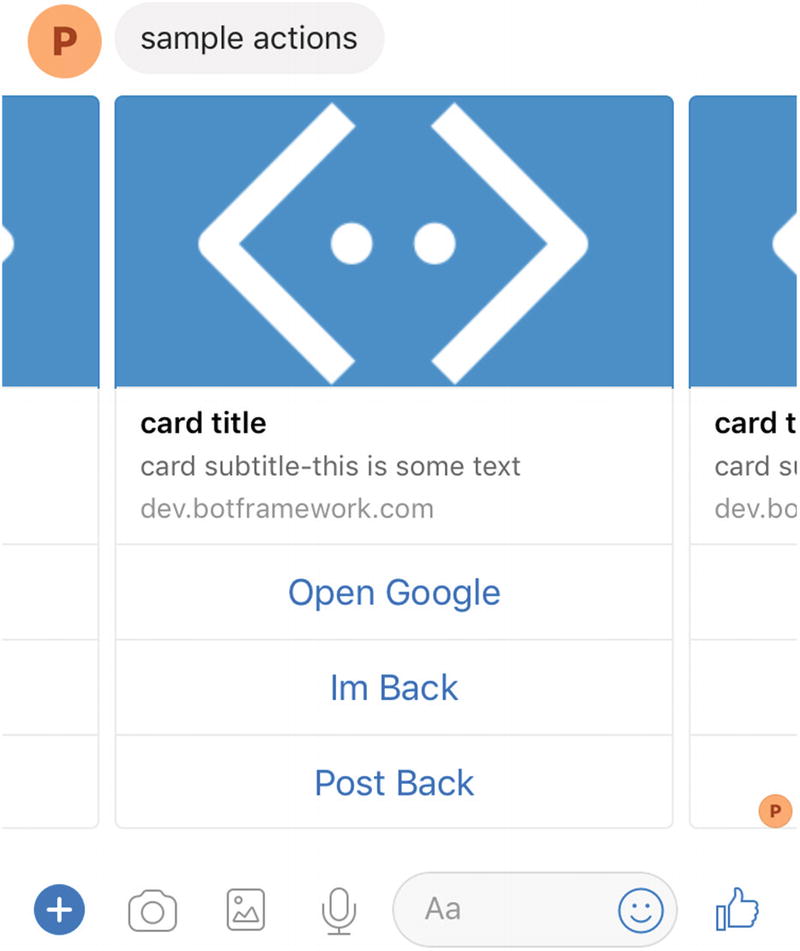
Same hero card carousel on Messenger
Cards can be a bit tricky because there are many ways of laying out buttons and images. Each platform has ever so slightly different rules. On some platforms, openUrl buttons (but not others) must point to an HTTPS address. There may also be rules that limit the number of buttons per card, number of cards in a carousel and image aspect ratios. Microsoft’s Bot Framework will handle all this in the best way it can, but being aware of these limitations will help us debug our bots.
Suggested Actions
We’ve discussed suggested actions in the context of conversational design; they are message-context-specific actions that can be performed immediately after a message is received. If another message comes in, the context is lost, and the suggested actions disappear. This is in opposition to card actions, which stay on the card in the chat history pretty much forever. The typical UX for suggested actions, also referred to as quick replies , is as a horizontally laid out list of buttons along the bottom of the screen.
The code for building suggested actions is similar to a hero card, except the only data we need is a collection of CardActions. The type of actions allowed in the suggested actions area will depend on the channel. Figure 6-17 and Figure 6-18 shows renderings on the emulator and Facebook Messenger, respectively.
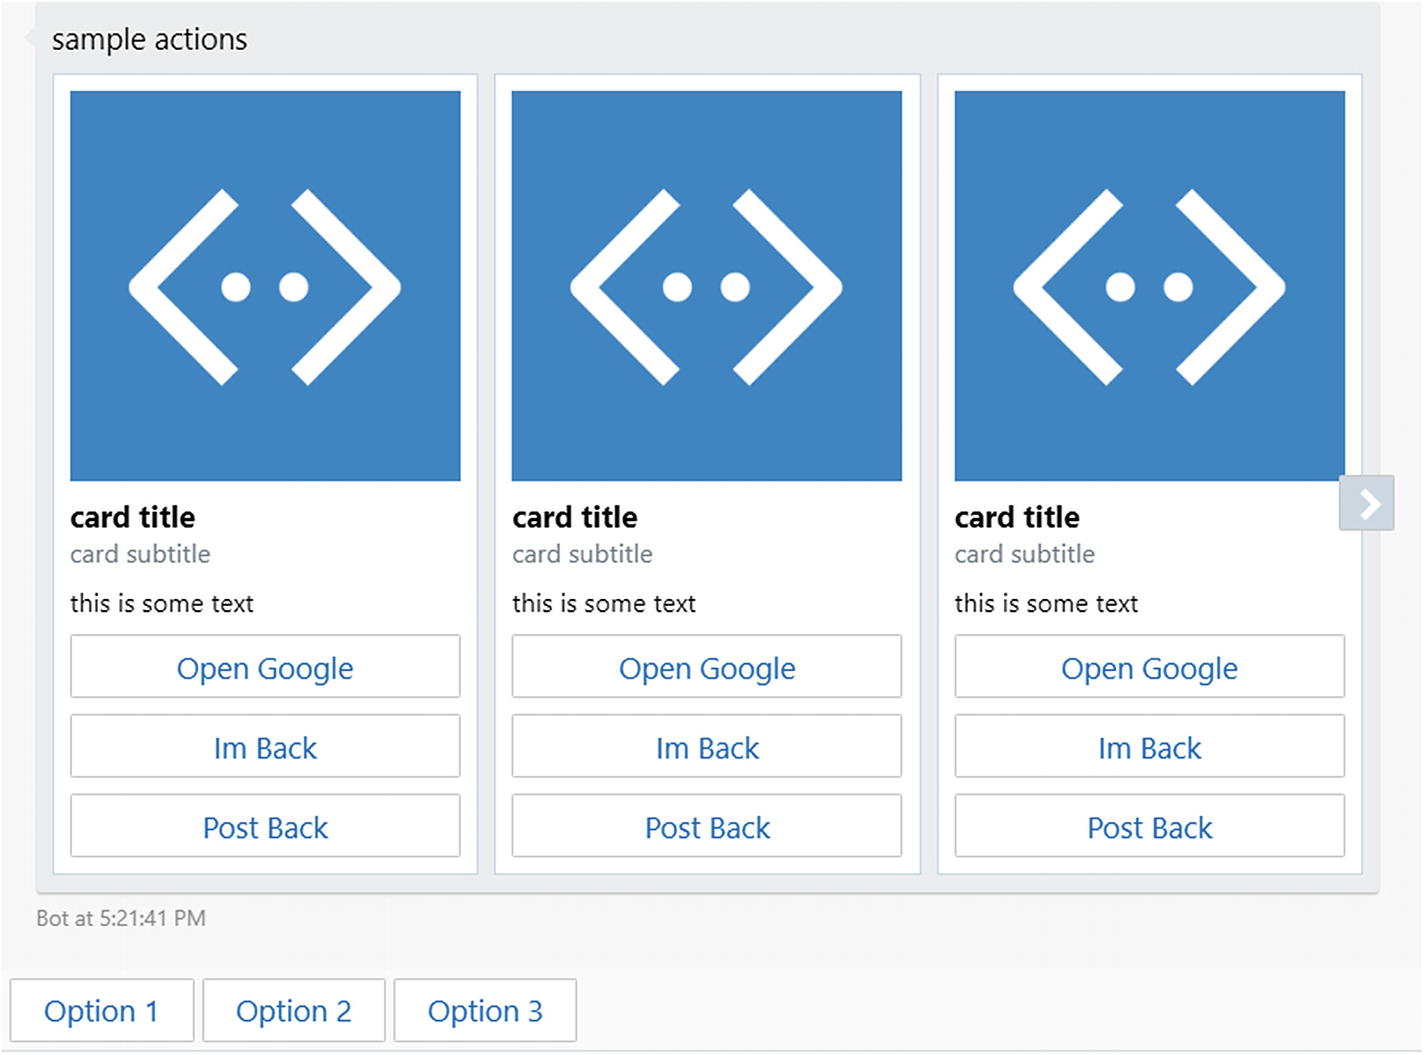
Suggested actions rendered in the emulator
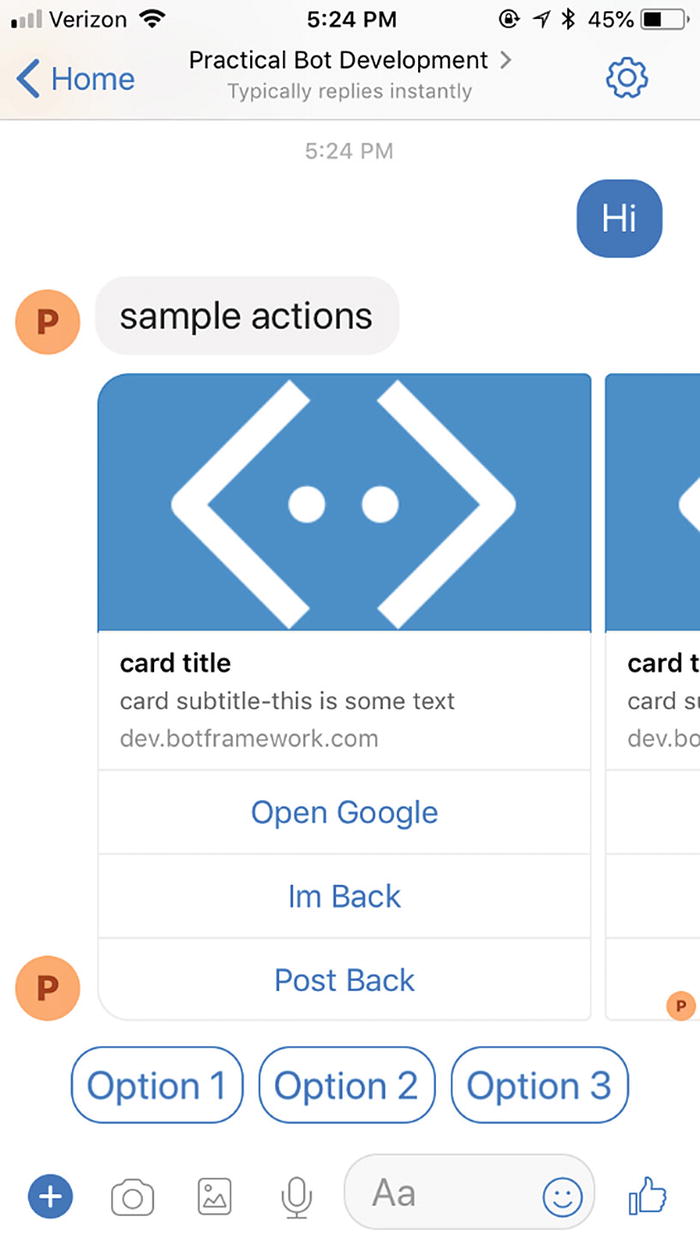
Same suggested actions in Messenger
The suggested actions buttons are great to keep the conversation with the user going without asking the user to guess what they can type into the text message field.
Exercise 6-2
Cards and Suggested Actions
- 1.
Create an account with and establish connectivity to https://dictionaryapi.com . This API will allow you to use the Dictionary and Thesaurus APIs.
- 2.
Create a bot that can look up a word based on user input using the Dictionary API and responds with a hero card that includes the word and the definition text. Include a button that opens the word’s page on the dictionary website.
- 3.
Connect to the Thesaurus API to return the first ten synonyms as suggested actions.
- 4.
As a bonus, use the Bing Image Search API to populate the image in the card. You can get an access key in Azure and use the following sample as a guide: https://docs.microsoft.com/en-us/azure/cognitive-services/bing-image-search/image-search-sdk-node-quickstart .
You now have experience connecting your bot to different APIs and translating those API responses into hero cards, buttons, and suggested actions. Well done!
Channel Errors
In the “Rich Content” section, we noted that when a bad request is sent by our bot to the Facebook Messenger connector, our bot will receive an HTTP error. This error was also printed out in the console output of the bot. It seems that the Facebook Bot connector is reporting an error from the Facebook APIs back to our bot. That is cool. The additional feature we saw was that the channel detail page in Azure also contained all those errors. Although minor, this is a powerful feature. It allows us to quickly see how many messages were rejected by the API and the error codes. The case we ran into, that a specific file type format was not supported, was just one of many possible errors. We would see errors if the message is malformed, if there are authentication issues, or if Facebook rejects the connector message for any other reason. Similar ideas apply to the other set of connectors. In general, the connectors are good at translating Bot Framework activities into something that will not be rejected by the channels, but it happens.
In general, if our bot sends a message to a Bot Framework connector and the message does not appear on the interface, chances are there was an issue with the interaction between the connector and channel, and this online error log will contain information about the failure.
Channel Data
We have mentioned several times that different channels may render messages differently or have different rules about certain items, such as the number of hero cards in a carousel or the number of buttons in a hero card. We have been showing examples of Messenger and emulator renderings, as those channels typically work well. Skype is another one that supports a lot of the Bot Builder features (which makes sense, as both are owned by Microsoft). Slack does not have as much rich support for these features, but its editable messages are a slick feature we will visit in Chapter 8.
Same Bot Builder object rendered in Slack
That’s not a carousel. There is no such concept in Slack! There are also no cards to speak of; it is just messages with attachments. The images are not clickable either; the default link is displayed above the image. Both the Im Back and Post Back buttons appear to do a post back. There is no concept of suggested actions/quick replies. You can find more information about the Slack Message format online.7
However, the team behind the Bot Builder SDK has thought of the issue where you may want to specify the exact native channel message, distinct from the default Bot Framework connector rendering for that channel. The solution is to provide a field on the Message object that contains the native channel JSON data for incoming messages and a field that may contain native channel JSON responses.
The terminology used in the Node SDK is sourceEvent (the C# version of Bot Builder refers to this concept as channelData). The sourceEvent in the Node SDK exists on the IEvent interface. Remember, this is the interface that IMessage implements as well. This means any event from a bot connector may include the raw channel JSON.
Let’s look at a feature in Facebook Messenger that is not readily supported by the Bot Framework. By default, cards in Messenger require an image with a 1.91:1 aspect ratio.8 The default conversion of a hero card by the connector utilizes this template. There is, however, the ability to utilize a 1:1 image ratio. There are other options in the documentation that are hidden by the Bot Framework. For example, Facebook has a specific flag around setting cards as sharable. Furthermore, you can control the size of the WebView invoked by an openURL button in Messenger. For now, we will stick to modifying the image aspect ratio.
For starters, let’s see the code to send the same card we have been sending using the hero card object but using Facebook’s native format:
Rendering a generic template in Messenger
We set image_aspect_ratio to square, and now Facebook renders it as a square (Figure 6-21)!
Rendering a generic template with a square image on Messenger
It’s that easy! This is just a taste. In Chapter 8, we will explore using the Bot Framework to integrate with native Slack features.
Group Chat
Some types of bots are meant to be used in a group setting. In the context of Messenger, Twitter direct messages, or similar platforms, the interaction between a user and a bot is typically one on one. However, some channels, most notably Slack, are focused on collaboration. In such a context, the ability to converse with multiple users simultaneously becomes important. Giving your bot the ability to productively participate in a group conversation as well as to handle mention tags correctly is important.
Some channels will allow the bot to view every single message that is sent between users in a channel. Other channels will only send messages to the bot if it is mentioned (for example, “hey @szymonbot, write a book on bots will ya?”).
If we are in a channel that allows our bot to see all messages in a group setting, our bot could monitor the conversation and silently execute code based on the discussion (because replying to every message on a group conversation is kind of annoying), or it could ignore everything that doesn’t have a mention of the bot. It could also implement a combination of the two behaviors, where the bot is activated by a mention with a certain command and becomes chatty.
In the “Messages” section, we showed the interface for a message. We glossed over the entities list, but it becomes relevant here. One type of entity we may receive from a connector is mentions. The object includes the name and id of the mentioned user and looks as follows:
Facebook does not support this type of entity, but Slack does. We will connect a bot to Slack in Chapter 8, but in the meantime, here is the code that could always reply in a direct messaging scenario but only reply in a group chat if it is mentioned:
Direct messaging a group chat–enabled bot in Slack

Group chat–enabled bot ignoring messages without a mention
Custom Dialogs
We have constructed our dialogs by using the bot.dialog(…) method. We also discussed the concept of a waterfall. In the calendar bot we started in the previous chapter, each of our dialogs was implemented via waterfalls: a set of steps that will execute in sequence. We can skip some steps or end the dialog before all steps are completed, but the idea of a predefined sequence is key. This logic is implemented by a class in the Bot Builder SDK called WaterfallDialog. If we look at the code behind the dialog(…) call, we will find this bit:
What if the conversation piece we would like to encode is not easily represented in a waterfall abstraction? What choices do we have? We can create a custom implementation of a dialog!
In the Bot Builder SDK, a dialog is a class that represents some interaction between the user and the bot. Dialogs can call other dialogs and accept return values from those child dialogs. They live on a dialog stack, not unlike a function call stack. Using the default waterfall helper hides some of these details; implementing a custom dialog brings us closer to the dialog stack reality. The abstract Dialog class from the Bot Builder is shown here:
Begin: Called when the dialog is first placed on the stack.
ReplyReceived: Called anytime a message arrives from a user.
DialogResumed: Called when a child dialog ends and the current dialog becomes active again. One of the parameters received by the dialogResumed method is the child dialog’s result object.
Recognize: Allows us to add custom dialog recognition logic. By default, BotBuilder provides declarative methods to set up custom global or dialog-scoped recognition. However, if we would like to add further recognition logic, we can do so using this approach. We’ll get more into this in the “Actions” section.
To illustrate the concepts, we create a BasicCustomDialog. Since Bot Builder is written in TypeScript,9 a typed superset of JavaScript, we went ahead and wrote the subclass in TypeScript, compiled into JavaScript using the TypeScript Compiler (tsc), and then used it in app.js.
Let’s look at the custom dialog’s code. This happens to be TypeScript as it has a cleaner interface when using inheritance; the compiled JavaScript is shown later. When the dialog begins, it send the “begin” text. When it receives a message, it responds with the “reply received” text. If the user sent the “prompt” text, the dialog will ask the user for some text input. It would then receive the text input in the dialogResumed method, which prints that result. If the user had entered “done,” the dialog finishes and returns to the root dialog.
We use an instance of the dialog directly in app.js. In the default waterfall, we echo any message, except the “custom” input, which begins the custom dialog.
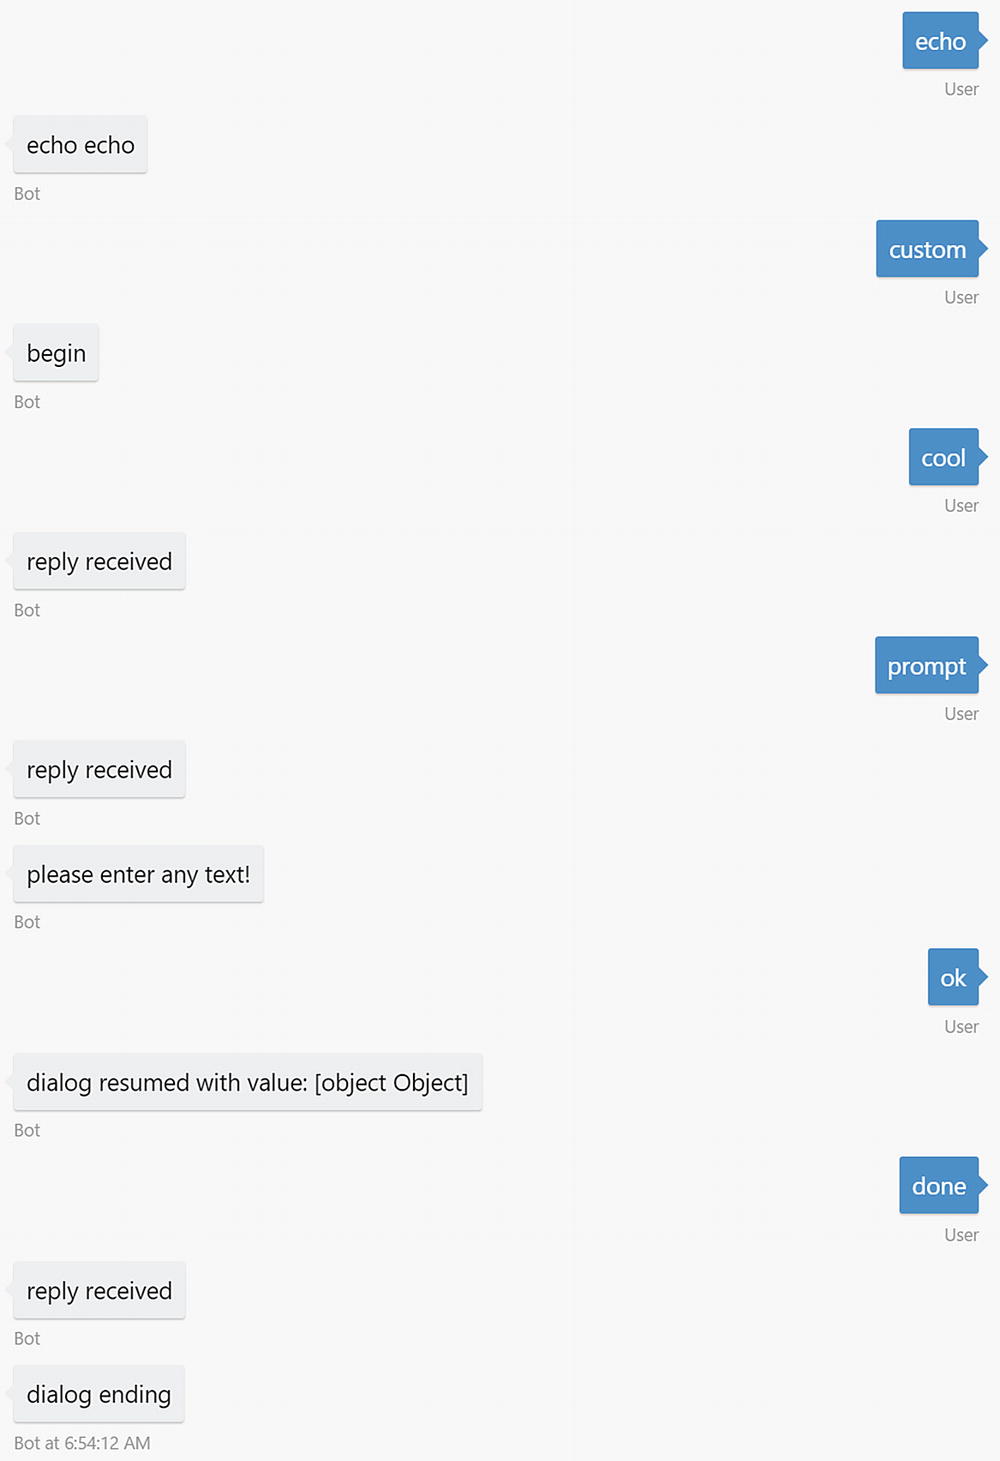
Incidentally, the Promps.text, Prompts.number, and other Prompt dialogs are all implemented as custom dialogs.
The compiled JavaScript for the custom dialog is shown next. It is a bit more challenging to reason about, but at the end of the day, it is standard ES5 JavaScript prototype inheritance.10
Exercise 6-3
Implementing a Custom Prompts.number
- 1.
Create a bot with a two-step waterfall that uses the standard Prompts.number to collect a numerical value and send the number back to the user in the second waterfall step. Note that you will be using the response field on the args parameter to the waterfall functions.
- 2.
Create a custom dialog that collects user input until it receives a number. You can use parseFloat for the purposes of the exercise. When a valid number is received, call session.endDialogWithResult with an object of the same structure as the one returned by Prompts.number. If the user’s input is invalid, return an error message and ask for a number again.
- 3.
In your waterfall, instead of calling Prompts.number, call your new custom dialog. Your waterfall should still work!
- 4.
As a bonus, add logic to your custom dialog to allow a maximum of five tries. After that, return a canceled result to your waterfall.
You now understand the building blocks of all dialogs in the Bot Builder SDK! We can use this knowledge to build just about any sort of interaction.
Actions
We now have a good idea of how powerful abstraction dialogs are and how the Bot Builder SDK manages the dialog stack. One of the key pieces of the framework that we do not have good insight into is how to link user actions to transformations of the dialog stack. At the most basic level, we can write code that simply calls beginDialog. But how do we make that determination based on user input? How can we hook that into the recognizers that we learned about in the previous chapter and specifically LUIS? That is what actions allow us to do.
The Bot Builder SDK contains six types of actions, with two being global and four scoped to a dialog. The two global actions are triggerAction and customAction. We’ve run into triggerAction before. It allows the bot to invoke a dialog when an intent is matched at any point during the conversation, assuming the intent does not match a dialog-scoped action beforehand. These are evaluated any time user input is received. The default behavior is to clear the entire dialog stack before the dialog is invoked.
Each of our main dialogs in our code in the calendar bot from the previous chapter uses the default triggerAction behavior, except for Help. The Help dialog is invoked on top of the dialog stack, so when it completes, we are back to whatever dialog the user was on to begin on. To achieve this effect, we override the onSelectAction method and specify the behavior we want.
A customAction binds directly to the bot object, instead of a dialog. It allows us to bind a function to respond to user input. We don’t get a chance to query the user for more information like a dialog implementation would. This is good for functionality that simply returns a message or performs some HTTP call based on user input. In fact, we could as far as to rewrite the Help dialog like this. The code looks straightforward, but we lose the encapsulation and extensibility of the dialog model. In other words, we no longer have the logic in its own dialog, with the ability to execute several steps, collect user input, or provide a result to the calling object.
The four types of contextual actions are beginDialogAction, reloadAction, cancelAction, and endConversationAction. Let’s examine each one.
BeginDialogAction creates an action that pushes a new dialog on the stack whenever the action is matched. Our contextual help dialogs in the calendar bot used this approach. We created two dialogs: one as the help for the AddCalendarEntry dialog and the second as a help for the RemoveCalendarEntry dialog.
Our AddCalendarEntry dialog can then bind the beginDialogAction to its appropriate help dialog.
Note that the behavior of this action is the same as calling beginDialog manually. The new dialog is placed on top of the dialog stack, and the current dialog is continued when done.
The reloadAction call performs a replaceDialog. replaceDialog is a method on the session object that ends the current dialog and replaces it with an instance of a different dialog. The parent dialog does not get a result until the new dialog finishes. In practice, we can utilize this to restart an interaction or to switch into a more appropriate dialog in the middle of a flow.
Here is the code for the conversation (see Figure 6-25):
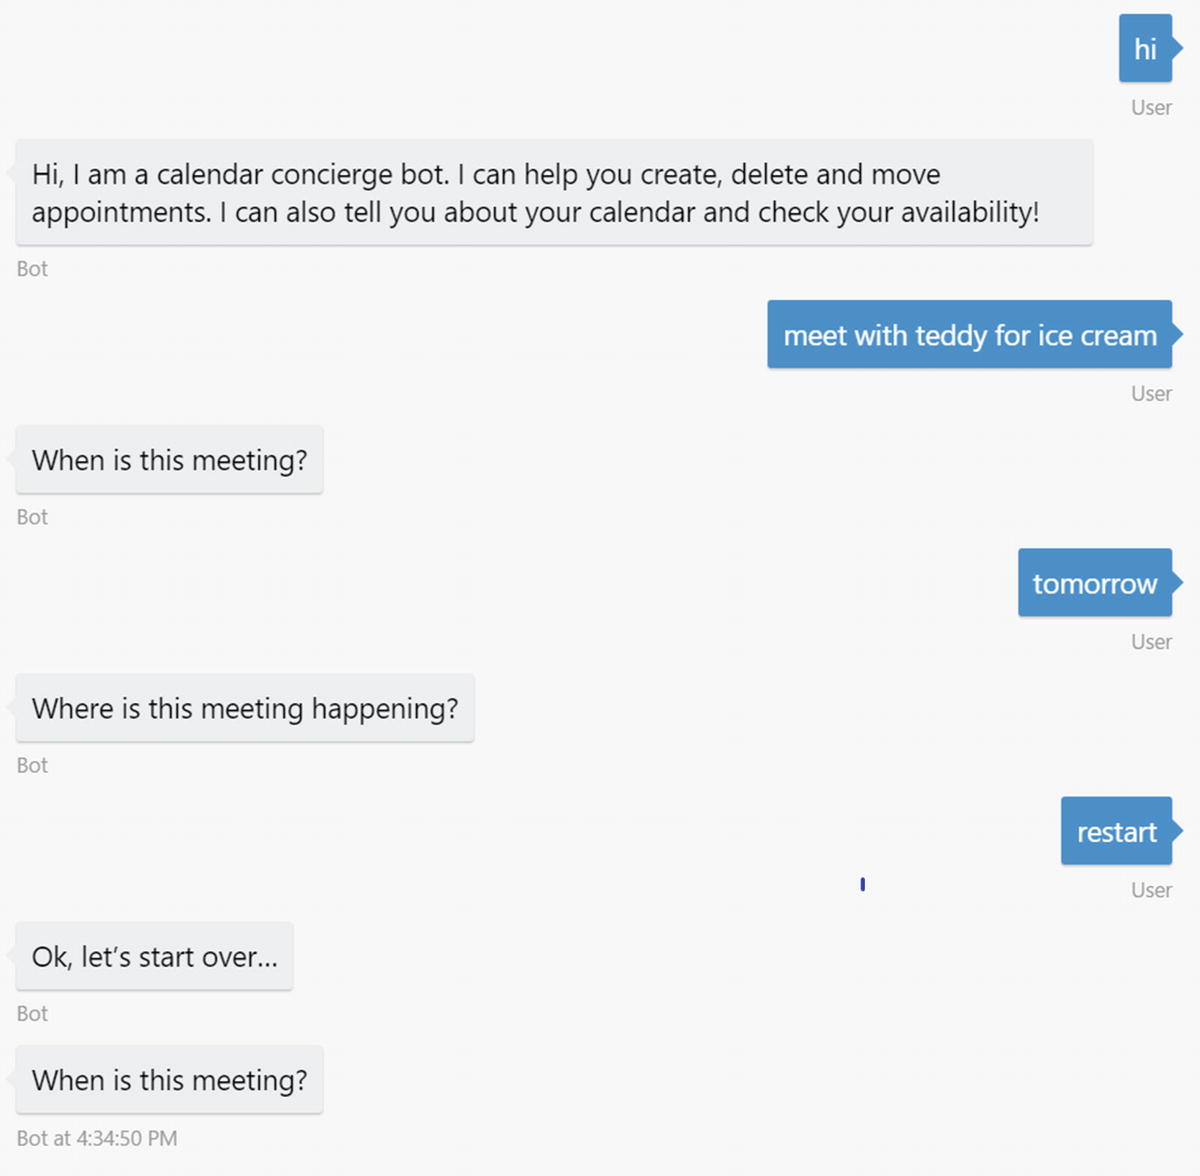
Sample conversation triggering the reloadAction
CancelAction allows us to cancel the current dialog. The parent dialog will receive a cancelled flag set to true in its resume handler. This allows the dialog to properly act on the cancellation. The code follows (the conversation visualization is shown in Figure 6-26):
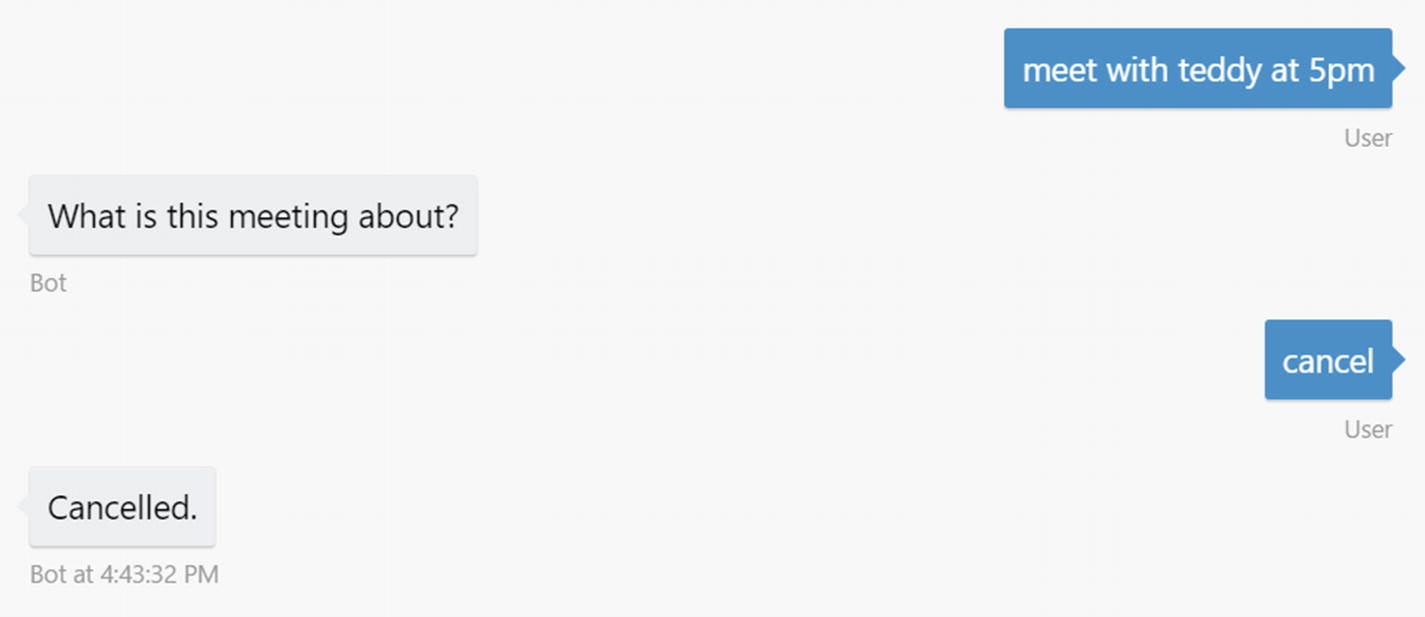
Sample conversation triggering the cancelAction
Lastly, the endConversationAction allows us to bind to the session.endConversation call. Ending a conversation implies that the entire dialog stack is cleared and that all the user and conversation data is removed from the state store. If a user starts messaging the bot again, a new conversation is created without any knowledge of the previous interactions. The code is as follows (Figure 6-27 shows the conversation visualization):
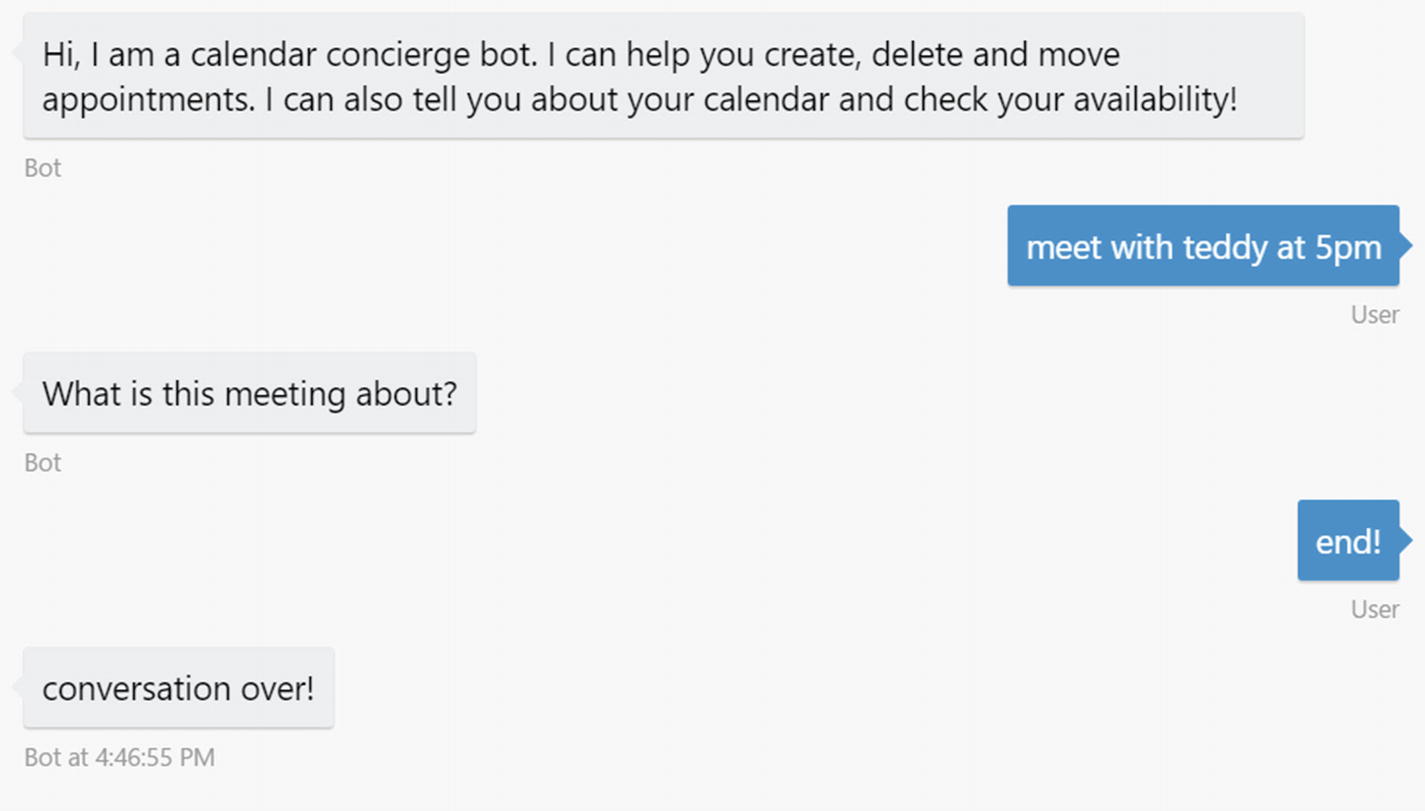
A sample conversation triggering an endConversationAction
Extra Notes on Actions
Recall from the previous chapter that each recognizer accepts a user input and returns an object with an intent text value and a score. We touched upon the fact that we can use recognizers that determine the intent from LUIS, that use regular expressions, or that implement any custom logic. The matches object in each of the actions that we have created is a way for us to specify which recognizer intent an action is interested in. The matches object implements the following interface:
Matches is the intent name or regular expression the action is looking for.
intentThreshold is the minimum score a recognizer must assign to an intent for this action to get invoked.
onFindAction allows us to invoke custom logic when an action is being checked for whether it should be triggered.
onSelectAction allows you to customize the behavior for an action. For instance, use it if you don’t want to clear the dialog stack but would rather place the dialog on top of the stack. We have seen this in action in our previous action samples.
In addition to this level of customization, the Bot Builder SDK has very specific rules around actions and their precedence. Recall that we’ve looked at global actions, dialog-scoped actions, and a possible recognize implementation on each dialog in our discussion on custom dialogs. The order of action resolution when a message arrives is as follows. First, the system tries to locate the current dialog’s implementation of the recognize function. After that, the SDK looks at the dialog stack, starting from the current dialog all the way to the root dialog. If no action matches along that path, the global actions are queried. This order makes sure that actions closest to the current user experience are processed first. Keep this in mind as you design your bot interactions.
Libraries
Libraries are a way of packaging and distributing related bot dialogs, recognizers, and other functionality. Libraries can reference other libraries, resulting in bots with highly composed pieces of functionality. From the developer perspective, a library is simply a nicely packaged collection of dialogs, recognizers, and other Bot Builder objects with a name and, commonly, a set of helper methods to aid in invoking the dialogs and other library-specific features. In our Calendar Concierge Bot in Chapter 5, each dialog was part of a library related to a high-level bot feature. The app.js code loads all the modules and then installs them into the main bot via the bot.library call.
This is library composition in action: UniversalBot is itself a subclass of Library. Our main UniversalBot library imports six other libraries. A reference to a dialog from any other context must be namespaced using the library name as a prefix. From the perspective of the root library or dialogs in the UniversalBot object, invoking any other library’s dialog must use a qualified name in the format: libName:dialogName. This fully qualified dialog name referencing process is necessary only when crossing library boundaries. Within the context of the same library, the library prefix is not necessary.
A common pattern is to expose a helper method in your module that invokes library dialog. Think of it as library encapsulation; a library should not know anything about the internals of another library. For example, our help library exposes a method to do just that.
Conclusion
Microsoft’s Bot Builder SDK is a powerful bot construction library and conversation engine that helps us develop all types of asynchronous conversational experiences from simple back and forth to complex bots with a multitude of behaviors. The dialog abstraction is a powerful way of modeling a conversation. Recognizers define the mechanisms that our bot utilizes to translate user input into machine-readable intents. Actions map those recognizer results into operations on the dialog stack. A dialog is principally concerned with three things: what happens when it begins, what happens when a user’s message is received, and what happens when a child dialog returns its result. Every dialog utilizes the bot context, called the session, to retrieve the user message and to create responses. A response may be composed of text, video, audio, or images. In addition, cards can produce richer and context-sensitive experiences. Suggested actions are responsible for keeping the user from guessing what to do next.
In the following chapter, we’ll apply these concepts to integrate our bot with the Google Calendar API, and we’ll take steps to creating a compelling first version of our calendar bot experience.