CMake Cookbook
Building, testing, and packaging modular software
with modern CMake
with modern CMake

BIRMINGHAM - MUMBAI

Copyright © 2018 Packt Publishing
All rights reserved. No part of this book may be reproduced, stored in a retrieval system, or transmitted in any form or by any means, without the prior written permission of the publisher, except in the case of brief quotations embedded in critical articles or reviews.
Every effort has been made in the preparation of this book to ensure the accuracy of the information presented. However, the information contained in this book is sold without warranty, either express or implied. Neither the authors, nor Packt Publishing or its dealers and distributors, will be held liable for any damages caused or alleged to have been caused directly or indirectly by this book.
Packt Publishing has endeavored to provide trademark information about all of the companies and products mentioned in this book by the appropriate use of capitals. However, Packt Publishing cannot guarantee the accuracy of this information.
Commissioning Editor: Smeet Thakkar
Acquisition Editor: Noyonika Das
Content Development Editor: Francis Carneiro
Technical Editor: Sachin Sunilkumar
Copy Editor: Safis Editing
Project Coordinator: Devanshi Doshi
Proofreader: Safis Editing
Indexer: Pratik Shirodkar
Graphics: Jason Monteiro
Production Coordinator: Aparna Bhagat
First published: September 2018
Production reference: 1240918
Published by Packt Publishing Ltd.
Livery Place
35 Livery Street
Birmingham
B3 2PB, UK.
ISBN 978-1-78847-071-1

Mapt is an online digital library that gives you full access to over 5,000 books and videos, as well as industry leading tools to help you plan your personal development and advance your career. For more information, please visit our website mapt.io.
Spend less time learning and more time coding with practical eBooks and Videos from over 4,000 industry professionals
Improve your learning with Skill Plans built especially for you
Get a free eBook or video every month
Mapt is fully searchable
Copy and paste, print, and bookmark content
Did you know that Packt offers eBook versions of every book published, with PDF and ePub files available? You can upgrade to the eBook version at www.PacktPub.com and as a print book customer, you are entitled to a discount on the eBook copy. Get in touch with us at service@packtpub.com for more details.
At www.PacktPub.com, you can also read a collection of free technical articles, sign up for a range of free newsletters, and receive exclusive discounts and offers on Packt books and eBooks.
Radovan Bast works at the High Performance Computing Group at UiT - The Arctic University of Norway in Tromsø and leads the CodeRefinery project. He has a PhD in theoretical chemistry and contributes to a number of quantum chemistry programs as a code developer. He enjoys learning new programming languages and techniques, and teaching programming to students and researchers. He got in touch with CMake in 2008 and has ported a number of research codes and migrated a number of communities to CMake since then.
Roberto Di Remigio is a postdoctoral fellow in theoretical chemistry at UiT - The Arctic University of Norway in Tromsø, Norway and Virginia Tech, USA. He is currently working on stochastic methods and solvation models. He is a developer of the PCMSolver library and the Psi4 open source quantum chemistry program. He contributes or has contributed to the development of popular quantum chemistry codes and libraries: DIRAC, MRCPP, DALTON, LSDALTON, XCFun, and ReSpect. He usually programs in C++ and Fortran.
Holding an engineering degree from ENSEEIHT and a PhD in computer science from UVSQ in France, Eric Noulard has been writing and compiling source code in a variety of languages for 20 years. A user of CMake since 2006, he has also been an active contributor to the project for several years. During his career, Eric has worked for private companies and government agencies. He is now employed by Antidot, a software vendor developing and marketing high-end information retrieval technology and solutions.
Shlomi Fish is an Israeli software developer and writer. He has been contributing to various open source and open culture projects since at least 2000. Among other endeavors, he has initiated some solvers for games, which led to him maintaining the PySol FC suite of solitaire games, adopting fortune-mod, solving over 290 Project Euler problems, and writing several stories, essays, aphorisms, and other documents.
If you're interested in becoming an author for Packt, please visit authors.packtpub.com and apply today. We have worked with thousands of developers and tech professionals, just like you, to help them share their insight with the global tech community. You can make a general application, apply for a specific hot topic that we are recruiting an author for, or submit your own idea.
Computer software is present in almost every aspect of our daily lives: it triggers our alarm clocks, fuels our communication, banking, weather forecasts, bus schedules, calendars, meetings, travel, photo albums, television, music streaming, social media, dinner and movie reservations, from dawn till dusk.
The software that surrounds us contains many layers: apps are built on top of frameworks, frameworks on top of libraries, libraries use smaller libraries and executables, all the way down to smaller and smaller software components. Libraries and executables in turn need to be built from source code. Often we only see the outermost layer, but all these layers need to be carefully organized and built. This book is about how to build libraries and executables from sources using CMake.
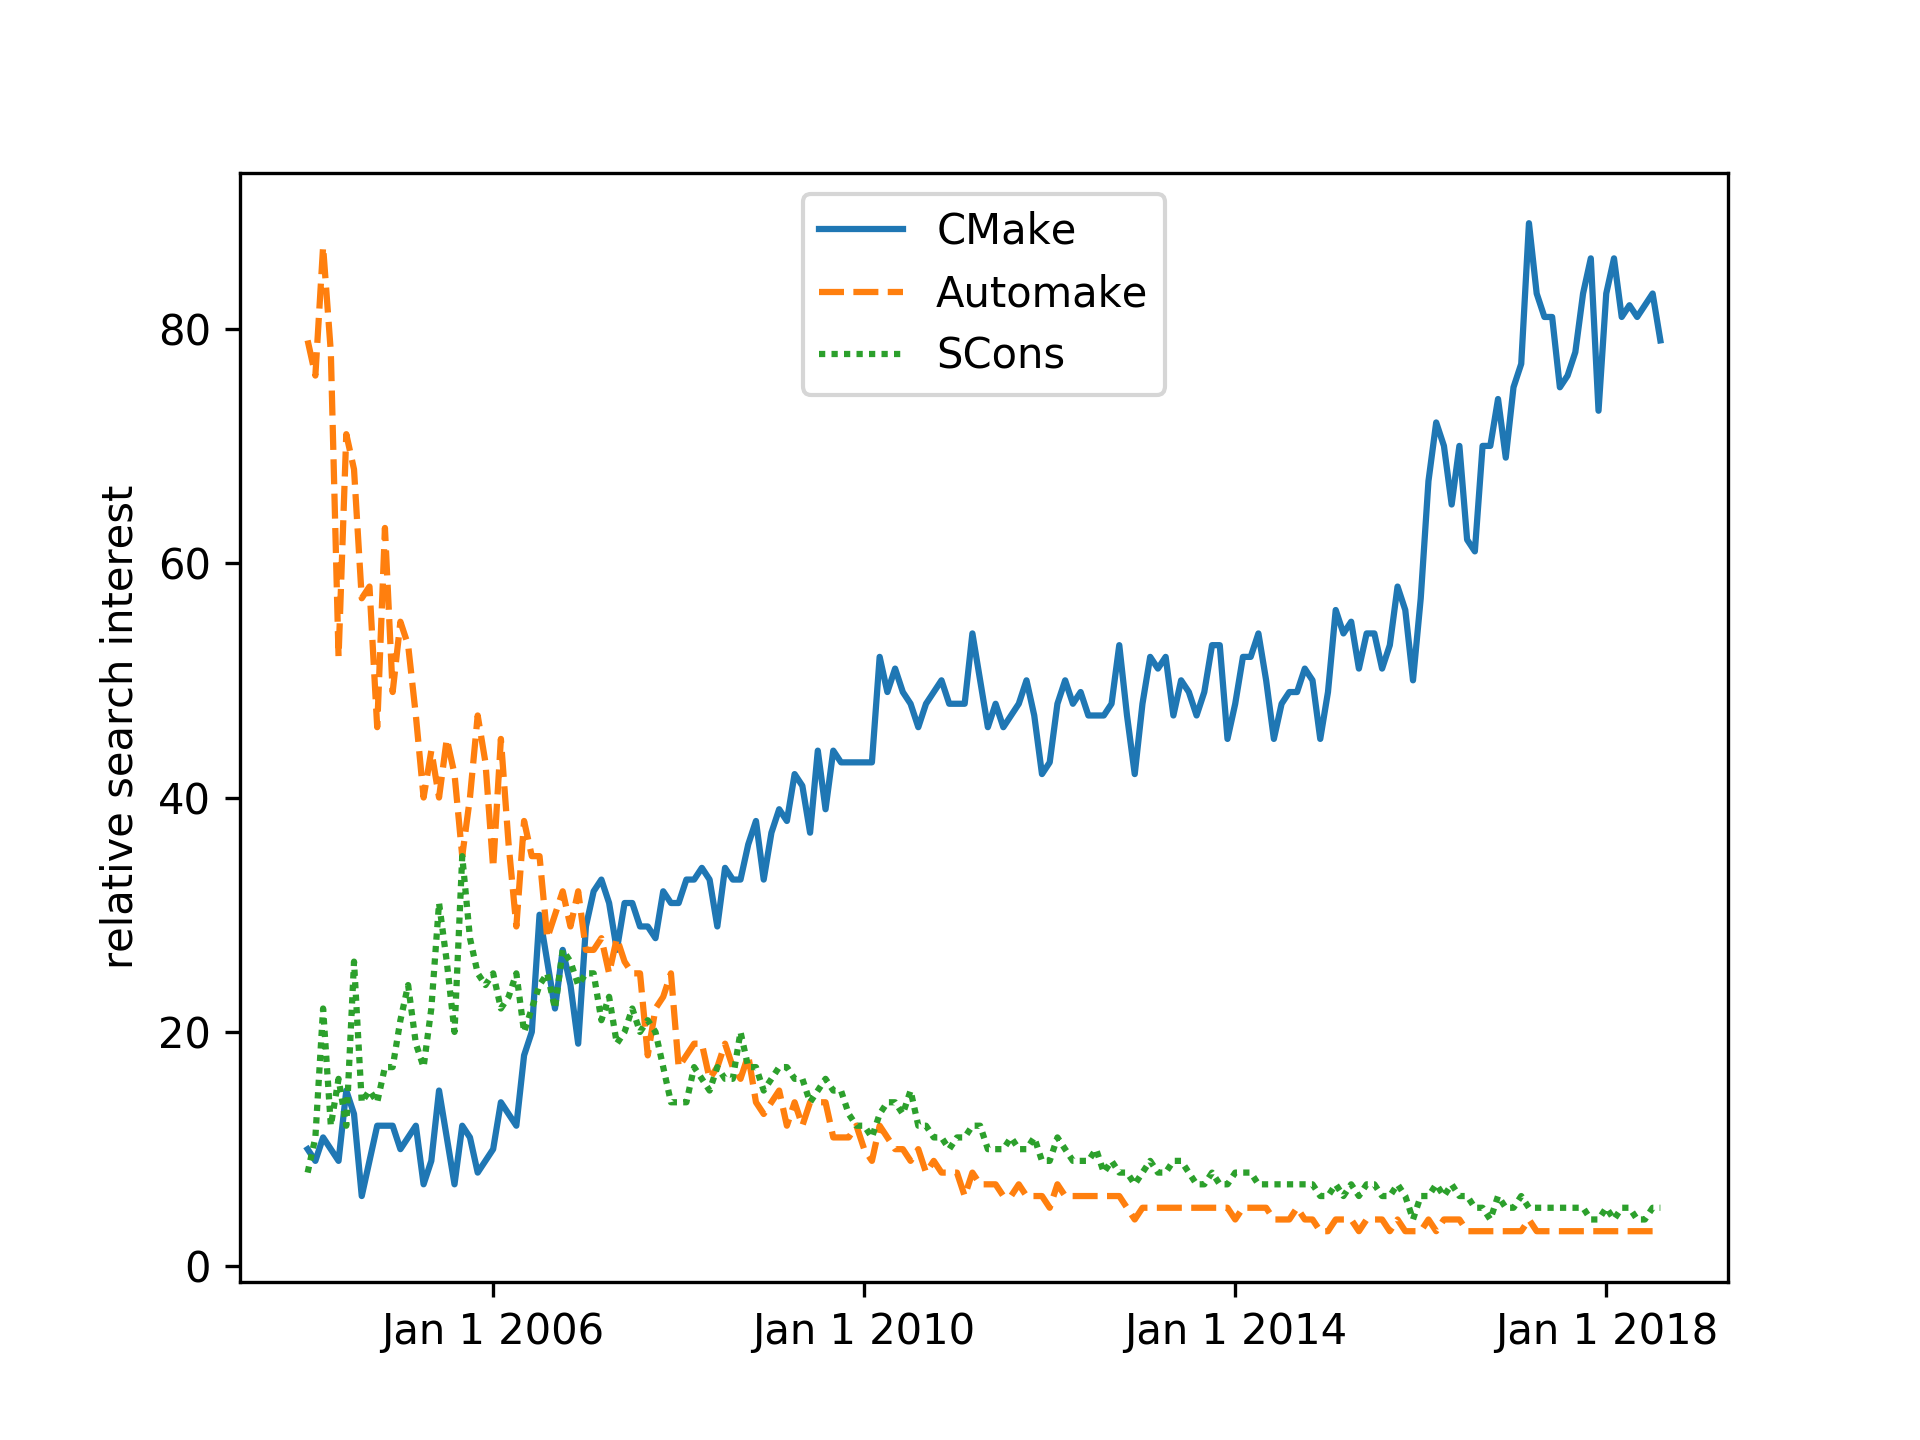
CMake and its siblings, CTest, CPack, and CDash, have emerged as the leading toolset for building software from sources, surpassing in usage and popularity many other similar tools, such as the venerated GNU Autotools and the more recent, Python-based, SCons build system.
The history of the CMake project started in 1999, when Kitware, the company behind its development, was commissioned to design a new set of tools to simplify the day-to-day software work of researchers. The goal was clear: provide a set of tools that would make it easier to configure, build, test, and deploy the same project across different platforms. A fascinating account of the ensuing design choices in the CMake project can be found at https://www.aosabook.org/en/cmake.html.
CMake is a build-system generator, offering a powerful domain-specific language (DSL) to describe what the build system should achieve. In our opinion, this is one of the main strengths of CMake, because it allows the generation of platform-native build systems with the same set of CMake scripts. The CMake software toolset gives developers full control over the whole life cycle of a given project:
An old adage goes that the deeper you dig, the more stones you will find. For the preparation of this book we have carefully been digging deeper through many software layers, with CMake being our quarry. The number of stones and artifacts that we have hit when building various software components and libraries on various platforms, each with their own quirks, has felt disheartening at times. But we believe we have cleared the ground of many stones and we are happy to share our findings and recipes with you, our readers. There will always be stones left but each stone will bring new insight and we encourage you to share this insight with the community.
Writing software that can run natively, reliably, and efficiently on many different platforms is of paramount importance for all sectors of industry and society. Software build systems take center stage in this task. They are a crucial part in the management of the software development life cycle: from incubation and prototype development to testing and all the way till packaging, deployment, and distribution. CMake is designed to help you manage these operations: if you are a software developer who wishes to manage the build system using CMake or who would like to be able to understand and modify CMake code written by others, this book is for you.
We have written this book as a progressive sequence of tasks and recipes. At each point, we introduce enough information about CMake to show how to achieve our goals, without overwhelming you with details. By the end of the book, you will be able to tackle increasingly complex operations and leverage the contents of the recipes in your own real-world projects with confidence.
We will cover these topics:
The workflow of a project managed by CMake happens in a number of stages, which we refer to as times. These can be summarized neatly in the following figure:

This book is organized as follows:
Chapter 1, From a Simple Executable to Libraries, shows how to get started configuring and building simple executables and libraries with CMake.
Chapter 2, Detecting the Environment, explains how to interact with the operating system and processor architecture using simple CMake commands.
Chapter 3, Detecting External Libraries and Programs, shows how CMake can simplify the detection of dependencies for your project.
Chapter 4, Creating and Running Tests, explains how to harness the power of CMake and CTest to define and run tests.
Chapter 5, Configure-time and Build-time Operations, shows how to perform custom operations at different stages of the build process with cross-platform CMake commands.
Chapter 6, Generating Source Code, discusses CMake commands to automatically generate source code.
Chapter 7, Structuring Projects, shows powerful CMake syntax for organizing your projects to make them more maintainable.
Chapter 8, The Superbuild Pattern, explains the powerful CMake superbuild pattern for managing critical project dependencies with control over side effects.
Chapter 9, Mixed-language Projects, shows how to build projects mixing different programming languages with the help of CMake.
Chapter 10, Writing an Installer, takes care of the installation of projects with the cross-platform power of CMake.
Chapter 11, Packaging Projects, shows how to use CPack to produce source and platform-native source archives and how to build Python and Conda packages for distribution.
Chapter 12, Building Documentation, shows how to use CMake to also build the documentation for your code.
Chapter 13, Alternative Generators and Cross-compilation, shows how to use CMake to cross-compile projects between platforms.
Chapter 14, Testing Dashboards, shows how to report the results of tests to an online dashboard.
Chapter 15, Porting a Project to CMake, shows best practices, tips, and tricks that will help you port a project to a CMake-based build system.
This is a book written by programmers, for programmers. We have assumed basic knowledge and familiarity with the following:
You can download the example code examples for this book from https://github.com/dev-cafe/cmake-cookbook. For more details please see the Setting up Your System section.
We also provide a PDF file that has color images of the screenshots/diagrams used in this book. You can download it here: http://www.packtpub.com/sites/default/files/downloads/CMakeCookbook_ColorImages.pdf.
There are a number of text conventions used throughout this book.
CodeInText: Indicates code commands in text, folder names, filenames, module names, and target names.
A block of code is set as follows:
cmake_minimum_required(VERSION 3.5 FATAL_ERROR)

project(recipe-01 LANGUAGES CXX)

add_executable(hello-world hello-world.cpp)
Any command-line input is written in bold and contains a $ prompt in front of the command to type:
$ mkdir -p build
$ cd build
$ cmake ..
To distinguish command-line input and output, we keep output non-bold:
$ ./hello-world

Hello World!
The documentation for CMake available online is comprehensive and we will refer to it throughout the book: https://cmake.org/documentation/
In preparing this book we have been inspired also by other resources:
We can also recommend to browse the curated list of CMake resources, scripts, modules, and examples collected by Viktor Kirilov: https://github.com/onqtam/awesome-cmake.
It is also worth noting that our book is not the only one out there covering CMake:
Feedback from our readers is always welcome.
Source code improvements and issues: Please direct pull requests towards https://github.com/dev-cafe/cmake-cookbook and report specific issues with recipes via https://github.com/dev-cafe/cmake-cookbook/issues.
General feedback: Email feedback@packtpub.com and mention the book title in the subject of your message. If you have questions about any aspect of this book, please email us at questions@packtpub.com.
Errata: Although we have taken every care to ensure the accuracy of our content, mistakes do happen. If you have found a mistake in this book, we would be grateful if you would report this to us. Please visit www.packtpub.com/submit-errata, selecting your book, clicking on the Errata Submission Form link, and entering the details.
Piracy: If you come across any illegal copies of our works in any form on the Internet, we would be grateful if you would provide us with the location address or website name. Please contact us at copyright@packtpub.com with a link to the material.
If you are interested in becoming an author: If there is a topic that you have expertise in and you are interested in either writing or contributing to a book, please visit authors.packtpub.com.
Please leave a review. Once you have read and used this book, why not leave a review on the site that you purchased it from? Potential readers can then see and use your unbiased opinion to make purchase decisions, we at Packt can understand what you think about our products, and our authors can see your feedback on their book. Thank you!
For more information about Packt, please visit packtpub.com.
Before diving into CMake and the recipes in this book, you will need to set your system up to successfully run all of the examples. In this section, we will discuss the following topics:
We have strived to make our discussions of the topics in this book as accessible to novices as possible. However, this book does not start from absolute scratch. We assume that you have basic knowledge of the native tools for building software that are available on your platform of choice. It is also helpful (but not required) to have basic experience with version control using Git, to interact with the repository holding the recipe sources.
The source code for the recipes in this book is available on GitHub, at https://github.com/dev-cafe/cmake-cookbook. The code is licensed under the standard open source MIT license: this is a permissive software license, and you can reuse and remix the code in whatever way you see fit, as long as the original copyright and license notice are included in any copies of the software/source. The full text of the license is available at https://opensource.org/licenses/MIT.
In order to test the recipes by yourself, you will need a working installation of Git, obtained as follows:
Alternatively, you can access the examples with the GitHub desktop client at https://desktop.github.com.
Yet another alternative is to download and extract the ZIP file from https://github.com/dev-cafe/cmake-cookbook.
Once you have Git installed, you can clone the repository to your local machine, as follows:
$ git clone https://github.com/dev-cafe/cmake-cookbook.git
This will create a folder named cmake-cookbook. The book and the repository are organized in chapters and recipes. The numbering of chapters and the order of recipes in the repository reflect the order in the text. Each recipe is further organized into example folders. Some of the recipes have more than one example, usually when similar CMake concepts are illustrated in different programming languages.
The recipes are tested on GNU/Linux, macOS, and Windows, using state-of-the-art continuous integration services. We will discuss the testing set up shortly.
We have tagged the precise versions that correspond to the examples printed in this book with the tag v1.0. For maximum overlap with the book text, you can fetch this particular version as follows:
$ git clone --single-branch -b v1.0 https://github.com/dev-cafe/cmake-cookbook.git
We expect to receive bug fixes and the GitHub repository to evolve. To get the latest updates, you may prefer to follow the master branch of the repository, instead.
You will likely find that the easiest approach to testing the book's recipes in a software environment (which contains all of the dependencies preinstalled) is to use a Docker image that we have set up, based on Ubuntu 18.04. You can install Docker on your favorite operating system, following the official documentation at https://docs.docker.com.
Once Docker is installed, you can run our image and test the recipes with the full software environment in place, as follows:
$ docker run -it devcafe/cmake-cookbook_ubuntu-18.04
$ git clone https://github.com/dev-cafe/cmake-cookbook.git
$ cd cmake-cookbook
$ pipenv install --three
$ pipenv run python testing/collect_tests.py 'chapter-*/recipe-*'
An alternative to running the book recipes in a container is to install the dependencies directly on the host operating system. For this, we have assembled a minimal toolstack that can be used as a basic starting point for all of our recipes. You will have to install the following:
We will also detail how to install the additional dependencies required by some of the recipes.
CMake 3.5 is the minimum required version of CMake for this book. Only a few, specific recipes and examples that demonstrate useful features that were introduced after version 3.5 will require a more recent version of CMake. The introduction to every recipe features an info box, pointing out where the code is available, which examples are given, and the minimum version of CMake required. The info boxes will look like the following box:
Some, if not most, of the recipes will still be valid with older versions of CMake. However, we have made no attempts to test this assumption, since we consider CMake 3.5 to be the default on most systems and distributions. We also consider upgrading to later versions of CMake to be a straightforward step.
CMake can be installed in a number of different ways. Downloading and extracting the binary distribution maintained by Kitware will work across all platforms. The download page is at https://cmake.org/download/.
Most GNU/Linux distributions have CMake available in their package managers. However, on some distributions, the packaged version can be rather old, so downloading the binary maintained by Kitware is still the preferred option. The following commands will download and install CMake 3.5.2 under $HOME/Deps/cmake (adjust this path to your preference), from the version packaged by CMake:
$ cmake_version="3.5.2"
$ target_path=$HOME/Deps/cmake/${cmake_version}
$ cmake_url="https://cmake.org/files/v${cmake_version%.*}/cmake-${cmake_version}-Linux-x86_64.tar.gz"
$ mkdir -p "${target_path}"
$ curl -Ls "${cmake_url}" | tar -xz -C "${target_path}" --strip-components=1
$ export PATH=$HOME/Deps/cmake/${cmake_version}/bin${PATH:+:$PATH}
$ cmake --version
Homebrew for macOS reliably ships the latest version of CMake:
$ brew upgrade cmake
On Windows, you can use Visual Studio 2017, which provides CMake support. The installation of Visual Studio 2017 is documented in Chapter 13, Alternative Generators and Cross-compilation, Recipe 1, Building a CMake project using Visual Studio 2017.
Alternatively, you can download the MSYS2 installer from https://www.msys2.org , follow the instructions given therein to update the list of packages, and then install CMake using the package manager, pacman. The following code assumes that we are building the 64-bit version:
$ pacman -S mingw64/mingw-w64-x86_64-cmake
For the 32-bit version, use the following (though we will only refer to 64-bit versions in future, for the sake of brevity):
$ pacman -S mingw64/mingw-w64-i686-cmake
Another nice feature of MSYS2 is that it provides a terminal on Windows that feels and behaves like a terminal on a Unix-like operating system, providing a useful development environment.
We will need compilers for C++, C, and Fortran. These should be fairly recent, as we require support for recent language standards in most of the recipes. CMake offers very good support for many compilers, from both commercial and non-commercial vendors. To keep the recipes consistently cross-platform and as operating system independent as possible, we have worked with open source compilers:
$ sudo apt-get install g++ gcc gfortran
$ sudo apt-get install clang clang++ gfortran
$ brew install gcc
$ pacman -S mingw64/mingw-w64-x86_64-toolchain
These build-automation tools will provide the infrastructure for building and linking the projects presented in the recipes. What you will end up installing and using strongly depends on your operating system and your taste:
For maximum portability, we have made the recipes as agnostic about these system-dependent details as possible. A clear advantage of this approach is that configuring, building, and linking are native to each platform and each set of compilers.
The Ninja program is a different build-automation tool that works on GNU/Linux, macOS, and Windows. Ninja is a new build tool, with a focus on speed, especially for incremental rebuilds. Prepackaged binaries for GNU/Linux, macOS, and Windows can be found on the project's GitHub repository at https://github.com/ninja-build/ninja/releases.
Using CMake and Ninja with Fortran projects requires some care. CMake 3.7.2 or later is required, along with the version of Ninja maintained by Kitware, available at https://github.com/Kitware/ninja/releases.
On GNU/Linux, you can install Ninja with the following series of commands:
$ mkdir -p ninja
$ ninja_url="https://github.com/Kitware/ninja/releases/download/v1.8.2.g3bbbe.kitware.dyndep-1.jobserver-1/ninja-1.8.2.g3bbbe.kitware.dyndep-1.jobserver-1_x86_64-linux-gnu.tar.gz"
$ curl -Ls ${ninja_url} | tar -xz -C ninja --strip-components=1
$ export PATH=$HOME/Deps/ninja${PATH:+:$PATH}
On Windows, using the MSYS2 environment (assuming the 64-bit version), executing the command:
$ pacman -S mingw64/mingw-w64-x86_64-ninja
This book is about CMake, but some of the recipes, along with the whole infrastructure powering testing, need Python. Thus, first and foremost, you will need a working installation of Python: the interpreter, header files, and libraries. The end of life for Python 2.7 was announced for 2020, and we will thus use Python 3.5.
On Ubuntu 14.04 LTS (this is the environment used by Travis CI which we will discuss later on), Python 3.5 can be installed as follows:
$ sudo apt-get install python3.5-dev
On Windows, using the MSYS2 environment, the Python environment can be installed as follows (assuming the 64-bit version):
$ pacman -S mingw64/mingw-w64-x86_64-python3
$ pacman -S mingw64/mingw-w64-x86_64-python3-pip
$ python3 -m pip install pipenv
Specific Python modules are also required, in order to run the testing machinery that we have put in place. These can be installed system-wide by using your favorite package manager, or in an isolated environment. The latter approach is highly recommended, as it offers the following advantages:
We have prepared a Pipfile for this purpose. In combination with its Pipfile.lock, you can use Pipenv (http://pipenv.readthedocs.io) to generate an isolated environment, with all packages installed. To create this environment for the recipe example repository, run the following commands in the top-level directory of the repository:
$ pip install --user pip pipenv --upgrade
$ pipenv install --python python3.5
The pipenv shell command will drop you into a command-line environment with the specific version of Python and all of the packages available. Executing exit will bring you back to a clean environment. You can also use pipenv run to directly execute a command within the isolated environment.
Alternatively, the requirements.txt file in the repository can be used, in combination with Virtualenv (http://docs.python-guide.org/en/latest/dev/virtualenvs/) and pip, to achieve the same effect:
$ virtualenv --python=python3.5 venv
$ source venv/bin/activate
$ pip install -r requirements.txt
The virtual environment can be exited by using the deactivate command.
Yet another alternative is to use Conda environments. To do so, we suggest installing Miniconda. The following instructions will install the latest Miniconda to the directory $HOME/Deps/conda, for GNU/Linux (download from https://repo.continuum.io/miniconda/Miniconda3-latest-Linux-x86_64.sh) or macOS (download from https://repo.continuum.io/miniconda/Miniconda3-latest-MacOSX-x86_64.sh):
$ curl -Ls https://repo.continuum.io/miniconda/Miniconda3-latest-Linux-x86_64.sh > miniconda.sh
$ bash miniconda.sh -b -p "$HOME"/Deps/conda &> /dev/null
$ touch "$HOME"/Deps/conda/conda-meta/pinned
$ export PATH=$HOME/Deps/conda/bin${PATH:+:$PATH}
$ conda config --set show_channel_urls True
$ conda config --set changeps1 no
$ conda update --all
$ conda clean -tipy
On Windows, you can download the latest Miniconda from https://repo.continuum.io/miniconda/Miniconda3-latest-Windows-x86_64.exe. The package can be installed using PowerShell, as follows:
$basedir = $pwd.Path + "\"
$filepath = $basedir + "Miniconda3-latest-Windows-x86_64.exe"
$Anaconda_loc = "C:\Deps\conda"
$args = "/InstallationType=JustMe /AddToPath=0 /RegisterPython=0 /S /D=$Anaconda_loc"
Start-Process -FilePath $filepath -ArgumentList $args -Wait -Passthru

$conda_path = $Anaconda_loc + "\Scripts\conda.exe"
$args = "config --set show_channel_urls True"
Start-Process -FilePath "$conda_path" -ArgumentList $args -Wait -Passthru
$args = "config --set changeps1 no"
Start-Process -FilePath "$conda_path" -ArgumentList $args -Wait -Passthru
$args = "update --all"
Start-Process -FilePath "$conda_path" -ArgumentList $args -Wait -Passthru
$args = "clean -tipy"
Start-Process -FilePath "$conda_path" -ArgumentList $args -Wait -Passthru
Once Conda is installed, the Python modules can be installed as follows:
$ conda create -n cmake-cookbook python=3.5
$ conda activate cmake-cookbook
$ conda install --file requirements.txt
Executing conda deactivate will drop you outside of the isolated environment.
Some recipes will require additional software, which will be covered in the following sections.
Most Linux distributions provide packages for BLAS and LAPACK. For example, on Ubuntu 14.04 LTS, you can run the following:
$ sudo apt-get install libatlas-dev liblapack-dev liblapacke-dev
On macOS, the Accelerate libraries, shipped with XCode, are enough for our purposes.
On Windows, using the MSYS2 environment, these libraries can be installed as follows (assuming the 64-bit version):
$ pacman -S mingw64/mingw-w64-x86_64-openblas
Alternatively, you can download the reference implementation of BLAS and LAPACK from GitHub (https://github.com/Reference-LAPACK/lapack) and compile the libraries from sources. Commercial vendors might offer packages for their own implementations of the BLAS and LAPACK APIs, available as installers for your platform.
There are many commercial and non-commercial implementations of MPI. For our introductory purposes, it is enough to install any of the freely available non-commercial implementations. On Ubuntu 14.04 LTS, we recommend OpenMPI. It can be installed with the following command:
$ sudo apt-get install openmpi-bin libopenmpi-dev
For macOS, Homebrew distributes MPICH:
$ brew install mpich
It is also possible to compile OpenMPI from the sources publicly available at https://www.open-mpi.org/software/.
For Windows, the Microsoft MPI implementation can be installed via https://msdn.microsoft.com/en-us/library/bb524831(v=vs.85).aspx.
Some recipes will need the Eigen linear algebra template library, version 3.3 or later. If your package manager does not provide Eigen, you can install it from the online source archive (http://eigen.tuxfamily.org). For example, on GNU/Linux and macOS, you can install Eigen to the directory $HOME/Deps/eigen, as follows:
$ eigen_version="3.3.4"
$ mkdir -p eigen
$ curl -Ls http://bitbucket.org/eigen/eigen/get/${eigen_version}.tar.gz | tar -xz -C eigen --strip-components=1
$ cd eigen
$ cmake -H. -Bbuild_eigen -DCMAKE_INSTALL_PREFIX="$HOME/Deps/eigen" &> /dev/null
$ cmake --build build_eigen -- install &> /dev/null
Boost packages are available for every operating system; most Linux distributions have packages available through their package managers. On Ubuntu 14.04 LTS, for instance, the Boost Filesystem, Boost Python, and Boost Test libraries can be installed with the following command:
$ sudo apt-get install libboost-filesystem-dev libboost-python-dev libboost-test-dev
For macOS, both MacPorts and Homebrew provide packages for recent versions of Boost. Our testing setup on macOS installs Boost as follows:
$ brew cask uninstall --force oclint
$ brew uninstall --force --ignore-dependencies boost
$ brew install boost
$ brew install boost-python3
Prebuilt binary distributions for Windows are also available for download from the Boost website at http://www.boost.org. Alternatively, you can download the sources from https://www.boost.org and compile the libraries yourself.
On Debian/Ubuntu-like systems, cross-compilers can be installed with the following command:
$ sudo apt-get install gcc-mingw-w64 g++-mingw-w64 gfortran-mingw-w64
On macOS, using Brew, the cross-compilers can be installed as follows:
$ brew install mingw-w64
Other package managers offer corresponding packages.
An alternative to using packaged cross-compilers is to build them from sources, using the M cross environment (https://mxe.cc).
On Ubuntu 14.04 LTS, these packages can be installed as follows:
$ sudo apt-get install pkg-config libzmq3-dev doxygen graphviz-dev uuid-dev
On macOS, we recommend installing with Brew:
$ brew install ossp-uuid pkg-config zeromq doxygen
The pkg-config program and UUID library are only available on Unix-like systems.
On Windows, using the MSYS2 environment, these dependencies can be installed as follows (assuming the 64-bit version):
$ pacman -S mingw64/mingw-w64-x86_64-zeromq
$ pacman -S mingw64/mingw-w64-x86_64-pkg-config
$ pacman -S mingw64/mingw-w64-x86_64-doxygen
$ pacman -S mingw64/mingw-w64-x86_64-graphviz
The recipes exploring packaging with Conda will need Miniconda and the Conda build and deployment tools installed on the system. The instructions for the installation of Miniconda were given previously. To install Conda build and deployment tools on GNU/Linux and macOS, run the following commands:
$ conda install --yes --quiet conda-build anaconda-client jinja2 setuptools
$ conda clean -tipsy
$ conda info -a
These tools can be installed on Windows as follows:
$conda_path = "C:\Deps\conda\Scripts\conda.exe"

$args = "install --yes --quiet conda-build anaconda-client jinja2 setuptools"
Start-Process -FilePath "$conda_path" -ArgumentList $args -Wait -Passthru

$args = "clean -tipsy"
Start-Process -FilePath "$conda_path" -ArgumentList $args -Wait -Passthru

$args = "info -a"
Start-Process -FilePath "$conda_path" -ArgumentList $args -Wait -Passthru
The recipes are tested on state-of-the-art continuous integration (CI) services: Travis (https://travis-ci.org) for GNU/Linux and macOS, Appveyor (https://www.appveyor.com) for Windows, and CircleCI (https://circleci.com) for additional GNU/Linux testing with commercial compilers. The configuration files for the CI services can be found in the repository (https://github.com/dev-cafe/cmake-cookbook/): .travis.yml for Travis, .appveyor.yml for Appveyor, and .circleci/config.yml for CircleCI. Additional installation scripts for Travis and Appveyor can be found in the folder testing/dependencies.
The testing machinery is a set of Python scripts that are also contained in the testing folder. The script collect_tests.py will run tests and report their statuses. Recipes can be tested in isolation, or in batches; collect_tests.py accepts a regular expression as command-line input, for example:
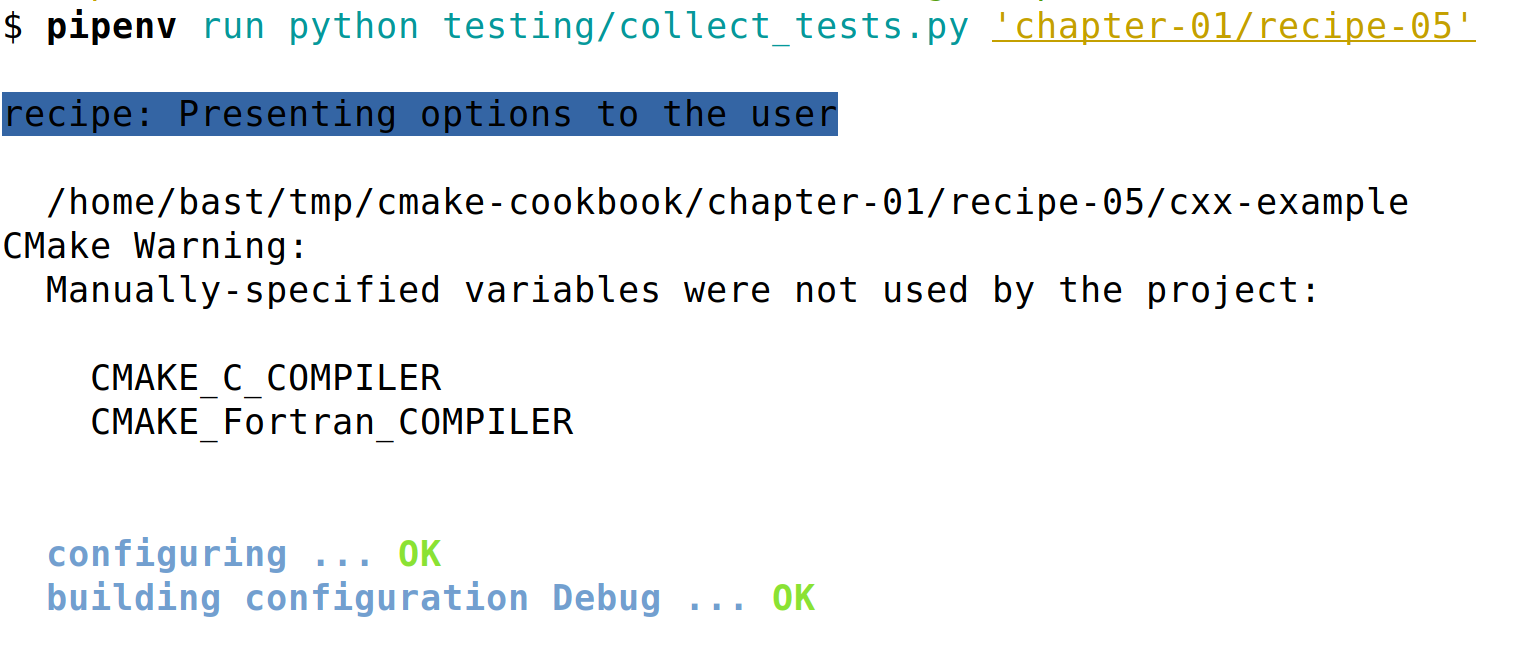
$ pipenv run python testing/collect_tests.py 'chapter-0[1,7]/recipe-0[1,2,5]'
This command will run tests for Recipes 1, 2, and 5, in Chapters 1 and 7. A sample of the output looks as follows:
To get more verbose output, set VERBOSE_OUTPUT=ON:
$ env VERBOSE_OUTPUT=ON pipenv run python testing/collect_tests.py 'chapter-*/recipe-*'
Please report issues at https://github.com/dev-cafe/cmake-cookbook/issues.
To contribute changes,we recommend forking the repository https://github.com/dev-cafe/cmake-cookbook and submitting changes using pull requests, following https://help.github.com/articles/creating-a-pull-request-from-a-fork/.
For non-trivial changes, we recommend to first describe and discuss the proposed change by opening an issue on https://github.com/dev-cafe/cmake-cookbook/issues before sending a pull request.
In this chapter, we will cover the following recipes:
The recipes in this chapter will walk you through fairly basic tasks needed to build your code: compiling an executable, compiling a library, performing build actions based on user input, and so forth. CMake is a build system generator particularly suited to being platform- and compiler-independent. We have striven to show this aspect in this chapter. Unless stated otherwise, all recipes are independent of the operating system; they can be run without modifications on GNU/Linux, macOS, and Windows.
The recipes in this book are mainly designed for C++ projects and demonstrated using C++ examples, but CMake can be used for projects in other languages, including C and Fortran. For any given recipe and whenever it makes sense, we have tried to include examples in C++, C, and Fortran. In this way, you will be able to choose the recipe in your favorite flavor. Some recipes are tailor-made to highlight challenges to overcome when a specific language is chosen.
In this recipe, we will demonstrate how to run CMake to configure and build a simple project. The project consists of a single source file for a single executable. We will discuss the project in C++, but examples for C and Fortran are available in the GitHub repository.
We wish to compile the following source code into a single executable:
#include <cstdlib>
#include <iostream>
#include <string>

std::string say_hello() { return std::string("Hello, CMake world!"); }

int main() {
  std::cout << say_hello() << std::endl;
  return EXIT_SUCCESS;
}
Alongside the source file, we need to provide CMake with a description of the operations to perform to configure the project for the build tools. The description is done in the CMake language, whose comprehensive documentation can be found online at https://cmake.org/cmake/help/latest/. We will place the CMake instructions into a file called CMakeLists.txt.
In detail, these are the steps to follow:
cmake_minimum_required(VERSION 3.5 FATAL_ERROR)
project(recipe-01 LANGUAGES CXX)
add_executable(hello-world hello-world.cpp)
$ mkdir -p build
$ cd build
$ cmake ..

-- The CXX compiler identification is GNU 8.1.0
-- Check for working CXX compiler: /usr/bin/c++
-- Check for working CXX compiler: /usr/bin/c++ -- works
-- Detecting CXX compiler ABI info
-- Detecting CXX compiler ABI info - done
-- Detecting CXX compile features
-- Detecting CXX compile features - done
-- Configuring done
-- Generating done
-- Build files have been written to: /home/user/cmake-cookbook/chapter-01/recipe-01/cxx-example/build
$ cmake --build .

Scanning dependencies of target hello-world
[ 50%] Building CXX object CMakeFiles/hello-world.dir/hello-world.cpp.o
[100%] Linking CXX executable hello-world
[100%] Built target hello-world
In this recipe, we have used a simple CMakeLists.txt to build a "Hello world" executable:
cmake_minimum_required(VERSION 3.5 FATAL_ERROR)

project(recipe-01 LANGUAGES CXX)

add_executable(hello-world hello-world.cpp)
To configure the project and generate its build system, we have to run CMake through its command-line interface (CLI). The CMake CLI offers a number of switches, cmake --help will output to screen the full help menu listing all of the available switches. We will learn more about them throughout the book. As you will notice from the output of cmake --help, most of them will let you access the CMake manual. The typical series of commands issued for generating the build system is the following:
$ mkdir -p build
$ cd build
$ cmake ..
Here, we created a directory, build, where the build system will be generated, we entered the build directory, and invoked CMake by pointing it to the location of CMakeLists.txt (in this case located in the parent directory). It is possible to use the following invocation to achieve the same effect:
$ cmake -H. -Bbuild
This invocation is cross-platform and introduces the -H and -B CLI switches. With -H. we are instructing CMake to search for the root CMakeLists.txt file in the current directory. -Bbuild tells CMake to generate all of its files in a directory called build.
Running the cmake command outputs a series of status messages to inform you of the configuration:
$ cmake ..

-- The CXX compiler identification is GNU 8.1.0
-- Check for working CXX compiler: /usr/bin/c++
-- Check for working CXX compiler: /usr/bin/c++ -- works
-- Detecting CXX compiler ABI info
-- Detecting CXX compiler ABI info - done
-- Detecting CXX compile features
-- Detecting CXX compile features - done
-- Configuring done
-- Generating done
-- Build files have been written to: /home/user/cmake-cookbook/chapter-01/recipe-01/cxx-example/build
CMake is a build system generator. You describe what type of operations the build system, such as Unix Makefiles, Ninja, Visual Studio, and so on, will have to run to get your code compiled. In turn, CMake generates the corresponding instructions for the chosen build system. By default, on GNU/Linux and macOS systems, CMake employs the Unix Makefiles generator. On Windows, Visual Studio is the default generator. We will take a closer look at generators in the next recipe and also revisit generators in Chapter 13, Alternative Generators and Cross-compilation.
On GNU/Linux, CMake will by default generate Unix Makefiles to build the project:
To build the example project, we ran this command:
$ cmake --build .
This command is a generic, cross-platform wrapper to the native build command for the chosen generator, make in this case. We should not forget to test our example executable:
$ ./hello-world

Hello, CMake world!
Finally, we should point out that CMake does not enforce a specific name or a specific location for the build directory. We could have placed it completely outside the project path. This would have worked equally well:
$ mkdir -p /tmp/someplace
$ cd /tmp/someplace
$ cmake /path/to/source
$ cmake --build .
The official documentation at https://cmake.org/runningcmake/ gives a concise overview on running CMake. The build system generated by CMake, the Makefile in the example given above, will contain targets and rules to build object files, executables, and libraries for the given project. The hello-world executable was our only target in the current example, but running the command:
$ cmake --build . --target help

The following are some of the valid targets for this Makefile:
... all (the default if no target is provided)
... clean
... depend
... rebuild_cache
... hello-world
... edit_cache
... hello-world.o
... hello-world.i
... hello-world.s
reveals that CMake generates more targets than those strictly needed for building the executable itself. These targets can be chosen with the cmake --build . --target <target-name> syntax and achieve the following:
For more complex projects, with a test stage and installation rules, CMake will generate additional convenience targets:
CMake is a build system generator and a single CMakeLists.txt can be used to configure projects for different toolstacks on different platforms. You describe in CMakeLists.txt the operations the build system will have to run to get your code configured and compiled. Based on these instructions, CMake will generate the corresponding instructions for the chosen build system (Unix Makefiles, Ninja, Visual Studio, and so on). We will revisit generators in Chapter 13, Alternative Generators and Cross-compilation.
CMake supports an extensive list of native build tools for different platforms. Both command-line tools, such as Unix Makefiles and Ninja, and integrated development environment (IDE) tools are supported. You can find an up-to-date list of the generators available on your platform and for your installed version of CMake by running the following:
$ cmake --help
The output of this command will list all options to the CMake command-line interface. At the bottom, you will find the list of available generators. For example, this is the output on a GNU/Linux machine with CMake 3.11.2 installed:
Generators

The following generators are available on this platform:
  Unix Makefiles = Generates standard UNIX makefiles.
  Ninja = Generates build.ninja files.
  Watcom WMake = Generates Watcom WMake makefiles.
  CodeBlocks - Ninja = Generates CodeBlocks project files.
  CodeBlocks - Unix Makefiles = Generates CodeBlocks project files.
  CodeLite - Ninja = Generates CodeLite project files.
  CodeLite - Unix Makefiles = Generates CodeLite project files.
  Sublime Text 2 - Ninja = Generates Sublime Text 2 project files.
  Sublime Text 2 - Unix Makefiles = Generates Sublime Text 2 project files.
  Kate - Ninja = Generates Kate project files.
  Kate - Unix Makefiles = Generates Kate project files.
  Eclipse CDT4 - Ninja = Generates Eclipse CDT 4.0 project files.
  Eclipse CDT4 - Unix Makefiles= Generates Eclipse CDT 4.0 project files.
With this recipe, we will show how easy it is to switch generators for the same project.
We will reuse hello-world.cpp and CMakeLists.txt from the previous recipe. The only difference is in the invocation of CMake, since we will now have to pass the generator explicitly with the -G CLI switch.
$ mkdir -p build
$ cd build
$ cmake -G Ninja ..

-- The CXX compiler identification is GNU 8.1.0
-- Check for working CXX compiler: /usr/bin/c++
-- Check for working CXX compiler: /usr/bin/c++ -- works
-- Detecting CXX compiler ABI info
-- Detecting CXX compiler ABI info - done
-- Detecting CXX compile features
-- Detecting CXX compile features - done
-- Configuring done
-- Generating done
-- Build files have been written to: /home/user/cmake-cookbook/chapter-01/recipe-02/cxx-example/build
$ cmake --build .

[2/2] Linking CXX executable hello-world
We have seen that the output of the configuration step was unchanged compared to the previous recipe. The output of the compilation step and the contents of the build directory will however be different, as every generator has its own specific set of files:
Note how cmake --build . wrapped the ninja command in a unified, cross-platform interface.
We will discuss alternative generators and cross-compilation in Chapter 13, Alternative Generators and Cross-compilation.
The CMake documentation is a good starting point to learn more about generators: https://cmake.org/cmake/help/latest/manual/cmake-generators.7.html.
A project almost always consists of more than a single executable built from a single source file. Projects are split across multiple source files, often spread across different subdirectories in the source tree. This practice not only helps in keeping source code organized within a project, but greatly favors modularity, code reuse, and separation of concerns, since common tasks can be grouped into libraries. This separation also simplifies and speeds up recompilation of a project during development. In this recipe, we will show how to group sources into libraries and how to link targets against these libraries.
Let us go back to our very first example. However, instead of having one single source file for the executable, we will now introduce a class to wrap the message to be printed out to screen. This is our updated hello-world.cpp:
#include "Message.hpp"

#include <cstdlib>
#include <iostream>

int main() {
  Message say_hello("Hello, CMake World!");

  std::cout << say_hello << std::endl;

  Message say_goodbye("Goodbye, CMake World");

  std::cout << say_goodbye << std::endl;

  return EXIT_SUCCESS;
}
The Message class wraps a string, provides an overload for the << operator, and consists of two source files: the Message.hpp header file and the corresponding Message.cpp source file. The Message.hpp interface file contains the following:
#pragma once

#include <iosfwd>
#include <string>

class Message {
public:
  Message(const std::string &m) : message_(m) {}

  friend std::ostream &operator<<(std::ostream &os, Message &obj) {
    return obj.printObject(os);
  }

private:
  std::string message_;
  std::ostream &printObject(std::ostream &os);
};
The corresponding implementation is contained in Message.cpp:
#include "Message.hpp"

#include <iostream>
#include <string>

std::ostream &Message::printObject(std::ostream &os) {
  os << "This is my very nice message: " << std::endl;
  os << message_;

  return os;
}
These two new files will also have to be compiled and we have to modify CMakeLists.txt accordingly. However, in this example we want to compile them first into a library, and not directly into the executable:
add_library(message
  STATIC
    Message.hpp
    Message.cpp
  )
add_executable(hello-world hello-world.cpp)
target_link_libraries(hello-world message)
$ mkdir -p build
$ cd build
$ cmake ..
$ cmake --build .

Scanning dependencies of target message
[ 25%] Building CXX object CMakeFiles/message.dir/Message.cpp.o
[ 50%] Linking CXX static library libmessage.a
[ 50%] Built target message
Scanning dependencies of target hello-world
[ 75%] Building CXX object CMakeFiles/hello-world.dir/hello-world.cpp.o
[100%] Linking CXX executable hello-world
[100%] Built target hello-world

$ ./hello-world

This is my very nice message:
Hello, CMake World!
This is my very nice message:
Goodbye, CMake World
The previous example introduced two new commands:
After successful compilation, the build directory will contain the libmessage.a static library (on GNU/Linux) and the hello-world executable.
CMake accepts other values as valid for the second argument to add_library and we will encounter all of them in the rest of the book:
CMake is also able to generate special types of libraries. These produce no output in the build system but are extremely helpful in organizing dependencies and build requirements between targets:
In this example, we have collected the sources directly using add_library. In later chapters, we demonstrate the use of the target_sources CMake command to collect sources, in particular in Chapter 7, Structuring Projects. See also this wonderful blog post by Craig Scott: https://crascit.com/2016/01/31/enhanced-source-file-handling-with-target_sources/ which further motivates the use of the target_sources command.
Let us now show the use of the object library functionality made available in CMake. We will use the same source files, but modify CMakeLists.txt:
cmake_minimum_required(VERSION 3.5 FATAL_ERROR)

project(recipe-03 LANGUAGES CXX)

add_library(message-objs
  OBJECT
    Message.hpp
    Message.cpp
  )

# this is only needed for older compilers
# but doesn't hurt either to have it
set_target_properties(message-objs
  PROPERTIES
    POSITION_INDEPENDENT_CODE 1
  )

add_library(message-shared
  SHARED
    $<TARGET_OBJECTS:message-objs>
  )

add_library(message-static
  STATIC
    $<TARGET_OBJECTS:message-objs>
  )

add_executable(hello-world hello-world.cpp)

target_link_libraries(hello-world message-static)
First, notice that the add_library command changed to add_library(message-objs OBJECT Message.hpp Message.cpp). Additionally, we have to make sure that the compilation to object files generates position-independent code. This is done by setting the corresponding property of the message-objs target, with the set_target_properties command.
This object library can now be used to obtain both the static library, called message-static, and the shared library, called message-shared. It is important to note the generator expression syntax used to refer to the object library: $<TARGET_OBJECTS:message-objs>. Generator expressions are constructs that CMake evaluates at generation time, right after configuration time, to produce configuration-specific build output. See also: https://cmake.org/cmake/help/latest/manual/cmake-generator-expressions.7.html. We will delve into generator expressions later in Chapter 5, Configure-time and Build-time Operations. Finally, the hello-world executable is linked with the static version of the message library.
Is it possible to have CMake generate the two libraries with the same name? In other words, can both of them be called message instead of message-static and message-shared? We will need to modify the properties of these two targets:
add_library(message-shared
  SHARED
    $<TARGET_OBJECTS:message-objs>
  )
set_target_properties(message-shared
  PROPERTIES
    OUTPUT_NAME "message"
  )

add_library(message-static
  STATIC
    $<TARGET_OBJECTS:message-objs>
  )
set_target_properties(message-static
  PROPERTIES
    OUTPUT_NAME "message"
  )
Can we link against the DSO? It depends on the operating system and compiler:
Why? Generating good DSOs requires the programmer to limit symbol visibility. This is achieved with the help of the compiler, but conventions are different on different operating systems and compilers. CMake has a powerful mechanism for taking care of this and we will explain how it works in Chapter 10, Writing an Installer.
So far, we have looked at fairly simple projects, where the execution flow for CMake was linear: from a set of source files to a single executable, possibly via static or shared libraries. To ensure complete control over the execution flow of all the steps involved in building a project, configuration, compilation, and linkage, CMake offers its own language. In this recipe, we will explore the use of the conditional construct if-elseif-else-endif.
Let us start with the same source code as for the previous recipe. We want to be able to toggle between two behaviors:
Let us construct CMakeLists.txt to achieve this:
cmake_minimum_required(VERSION 3.5 FATAL_ERROR)

project(recipe-04 LANGUAGES CXX)
set(USE_LIBRARY OFF)

message(STATUS "Compile sources into a library? ${USE_LIBRARY}")
set(BUILD_SHARED_LIBS OFF)
list(APPEND _sources Message.hpp Message.cpp)
if(USE_LIBRARY)
  # add_library will create a static library
  # since BUILD_SHARED_LIBS is OFF
  add_library(message ${_sources})

  add_executable(hello-world hello-world.cpp)

  target_link_libraries(hello-world message)
else()
  add_executable(hello-world hello-world.cpp ${_sources})
endif()
We have introduced two variables: USE_LIBRARY and BUILD_SHARED_LIBS. Both of them have been set to OFF. As detailed in the CMake language documentation, true or false values can be expressed in a number of ways:
The USE_LIBRARY variable will toggle between the first and the second behavior. BUILD_SHARED_LIBS is a global flag offered by CMake. Remember that the add_library command can be invoked without passing the STATIC/SHARED/OBJECT argument. This is because, internally, the BUILD_SHARED_LIBS global variable is looked up; if false or undefined, a static library will be generated.
This example shows that it is possible to introduce conditionals to control the execution flow in CMake. However, the current setup does not allow the toggles to be set from outside, that is, without modifying CMakeLists.txt by hand. In principle, we want to be able to expose all toggles to the user, so that configuration can be tweaked without modifying the code for the build system. We will show how to do that in a moment.
In the previous recipe, we introduced conditionals in a rather rigid fashion: by introducing variables with a given truth value hardcoded. This can be useful sometimes, but it prevents users of your code from easily toggling these variables. Another disadvantage of the rigid approach is that the CMake code does not communicate to the reader that this is a value that is expected to be modified from outside. The recommended way to toggle behavior in the build system generation for your project is to present logical switches as options in your CMakeLists.txt using the option() command. This recipe will show you how to use this command.
Let us have a look at our static/shared library example from the previous recipe. Instead of hardcoding USE_LIBRARY to ON or OFF, we will now prefer to expose it as an option with a default value that can be changed from the outside:
option(USE_LIBRARY "Compile sources into a library" OFF)
$ mkdir -p build
$ cd build
$ cmake -D USE_LIBRARY=ON ..

-- ...
-- Compile sources into a library? ON
-- ...

$ cmake --build .

Scanning dependencies of target message
[ 25%] Building CXX object CMakeFiles/message.dir/Message.cpp.o
[ 50%] Linking CXX static library libmessage.a
[ 50%] Built target message
Scanning dependencies of target hello-world
[ 75%] Building CXX object CMakeFiles/hello-world.dir/hello-world.cpp.o
[100%] Linking CXX executable hello-world
[100%] Built target hello-world
The -D switch is used to set any type of variable for CMake: logicals, paths, and so forth.
The option command accepts three arguments:
option(<option_variable> "help string" [initial value])
Sometimes there is the need to introduce options that are dependent on the value of other options. In our example, we might wish to offer the option to either produce a static or a shared library. However, this option would have no meaning if the USE_LIBRARY logical was not set to ON. CMake offers the cmake_dependent_option() command to define options that depend on other options:
include(CMakeDependentOption)

# second option depends on the value of the first
cmake_dependent_option(
  MAKE_STATIC_LIBRARY "Compile sources into a static library" OFF
  "USE_LIBRARY" ON
  )

# third option depends on the value of the first
cmake_dependent_option(
  MAKE_SHARED_LIBRARY "Compile sources into a shared library" ON
  "USE_LIBRARY" ON
  )
If USE_LIBRARY is ON, MAKE_STATIC_LIBRARY defaults to OFF, while MAKE_SHARED_LIBRARY defaults to ON. So we can run this:
$ cmake -D USE_LIBRARY=OFF -D MAKE_SHARED_LIBRARY=ON ..
This will still not build a library, since USE_LIBRARY is still set to OFF.
As mentioned earlier, CMake has mechanisms in place to extend its syntax and capabilities through the inclusion of modules, either shipped with CMake itself or custom ones. In this case, we have included a module called CMakeDependentOption. Without the include statement, the cmake_dependent_option() command would not be available for use. See also https://cmake.org/cmake/help/latest/module/CMakeDependentOption.html.
One aspect that we have not given much thought to so far is the selection of compilers. CMake is sophisticated enough to select the most appropriate compiler given the platform and the generator. CMake is also able to set compiler flags to a sane set of defaults. However, often we wish to control the choice of the compiler, and in this recipe we will show how this can be done. In later recipes, we will also consider the choice of build type and show how to control compiler flags.
How can we select a specific compiler? For example, what if we want to use the Intel or Portland Group compilers? CMake stores compilers for each language in the CMAKE_<LANG>_COMPILER variable, where <LANG> is any of the supported languages, for our purposes CXX, C, or Fortran. The user can set this variable in one of two ways:
$ cmake -D CMAKE_CXX_COMPILER=clang++ ..
$ env CXX=clang++ cmake ..
Any of the recipes discussed so far can be configured for use with any other compiler by passing the appropriate option.
We have here assumed that the additional compilers are available in the standard paths where CMake does its lookups. If that is not the case, the user will need to pass the full path to the compiler executable or wrapper.
At configure time, CMake performs a series of platform tests to determine which compilers are available and if they are suitable for the project at hand. A suitable compiler is not only determined by the platform we are working on, but also by the generator we want to use. The first test CMake performs is based on the name of the compiler for the project language. For example, if cc is a working C compiler, then that is what will be used as the default compiler for a C project. On GNU/Linux, using Unix Makefiles or Ninja, the compilers in the GCC family will be most likely chosen by default for C++, C, and Fortran. On Microsoft Windows, the C++ and C compilers in Visual Studio will be selected, provided Visual Studio is the generator. MinGW compilers are the default if MinGW or MSYS Makefiles were chosen as generators.
Where can we find which default compilers and compiler flags will be picked up by CMake for our platform? CMake offers the --system-information flag, which will dump all information about your system to the screen or a file. To see this, try the following:
$ cmake --system-information information.txt
Searching through the file (in this case, information.txt), you will find the default values for the CMAKE_CXX_COMPILER, CMAKE_C_COMPILER, and CMAKE_Fortran_COMPILER options, together with their default flags. We will have a look at the flags in the next recipe.
CMake provides additional variables to interact with compilers:
We can try to configure the following example CMakeLists.txt with different compilers. In this example, we will use CMake variables to probe what compiler we are using and what version:
cmake_minimum_required(VERSION 3.5 FATAL_ERROR)

project(recipe-06 LANGUAGES C CXX)

message(STATUS "Is the C++ compiler loaded? ${CMAKE_CXX_COMPILER_LOADED}")
if(CMAKE_CXX_COMPILER_LOADED)
  message(STATUS "The C++ compiler ID is: ${CMAKE_CXX_COMPILER_ID}")
  message(STATUS "Is the C++ from GNU? ${CMAKE_COMPILER_IS_GNUCXX}")
  message(STATUS "The C++ compiler version is: ${CMAKE_CXX_COMPILER_VERSION}")
endif()

message(STATUS "Is the C compiler loaded? ${CMAKE_C_COMPILER_LOADED}")
if(CMAKE_C_COMPILER_LOADED)
  message(STATUS "The C compiler ID is: ${CMAKE_C_COMPILER_ID}")
  message(STATUS "Is the C from GNU? ${CMAKE_COMPILER_IS_GNUCC}")
  message(STATUS "The C compiler version is: ${CMAKE_C_COMPILER_VERSION}")
endif()
Observe that this example does not contain any targets, so there is nothing to build and we will only focus on the configuration step:
$ mkdir -p build
$ cd build
$ cmake ..

...
-- Is the C++ compiler loaded? 1
-- The C++ compiler ID is: GNU
-- Is the C++ from GNU? 1
-- The C++ compiler version is: 8.1.0
-- Is the C compiler loaded? 1
-- The C compiler ID is: GNU
-- Is the C from GNU? 1
-- The C compiler version is: 8.1.0
...
The output will of course depend on the available and chosen compilers and compiler versions.
CMake has the notion of build types or configurations, such as Debug, Release, and so forth. Within one configuration, one can collect related options or properties, such as compiler and linker flags, for a Debug or Release build. The variable governing the configuration to be used when generating the build system is CMAKE_BUILD_TYPE. This variable is empty by default, and the values recognized by CMake are:
In this recipe, we will show how the build type can be set for an example project:
cmake_minimum_required(VERSION 3.5 FATAL_ERROR)

project(recipe-07 LANGUAGES C CXX)
if(NOT CMAKE_BUILD_TYPE)
  set(CMAKE_BUILD_TYPE Release CACHE STRING "Build type" FORCE)
endif()

message(STATUS "Build type: ${CMAKE_BUILD_TYPE}")
message(STATUS "C flags, Debug configuration: ${CMAKE_C_FLAGS_DEBUG}")
message(STATUS "C flags, Release configuration: ${CMAKE_C_FLAGS_RELEASE}")
message(STATUS "C flags, Release configuration with Debug info: ${CMAKE_C_FLAGS_RELWITHDEBINFO}")
message(STATUS "C flags, minimal Release configuration: ${CMAKE_C_FLAGS_MINSIZEREL}")

message(STATUS "C++ flags, Debug configuration: ${CMAKE_CXX_FLAGS_DEBUG}")
message(STATUS "C++ flags, Release configuration: ${CMAKE_CXX_FLAGS_RELEASE}")
message(STATUS "C++ flags, Release configuration with Debug info: ${CMAKE_CXX_FLAGS_RELWITHDEBINFO}")
message(STATUS "C++ flags, minimal Release configuration: ${CMAKE_CXX_FLAGS_MINSIZEREL}")
$ mkdir -p build
$ cd build
$ cmake ..

...
-- Build type: Release
-- C flags, Debug configuration: -g
-- C flags, Release configuration: -O3 -DNDEBUG
-- C flags, Release configuration with Debug info: -O2 -g -DNDEBUG
-- C flags, minimal Release configuration: -Os -DNDEBUG
-- C++ flags, Debug configuration: -g
-- C++ flags, Release configuration: -O3 -DNDEBUG
-- C++ flags, Release configuration with Debug info: -O2 -g -DNDEBUG
-- C++ flags, minimal Release configuration: -Os -DNDEBUG
$ cmake -D CMAKE_BUILD_TYPE=Debug ..

-- Build type: Debug
-- C flags, Debug configuration: -g
-- C flags, Release configuration: -O3 -DNDEBUG
-- C flags, Release configuration with Debug info: -O2 -g -DNDEBUG
-- C flags, minimal Release configuration: -Os -DNDEBUG
-- C++ flags, Debug configuration: -g
-- C++ flags, Release configuration: -O3 -DNDEBUG
-- C++ flags, Release configuration with Debug info: -O2 -g -DNDEBUG
-- C++ flags, minimal Release configuration: -Os -DNDEBUG
We have demonstrated how to set a default build type and how to override it from the command line. With this, we can control whether a project is built with optimization flags or with all optimizations turned off, and instead debugging information on. We have also seen what kind of flags are used for the various available configurations, as this depends on the compiler of choice. Instead of printing the flags explicitly during a run of CMake, one can also peruse the output of running cmake --system-information to find out what the presets are for the current combination of platform, default compiler, and language. In the next recipe, we will discuss how to extend or adjust compiler flags for different compilers and different build types.
We have shown how the variable CMAKE_BUILD_TYPE (documented at this link: https://cmake.org/cmake/help/v3.5/variable/CMAKE_BUILD_TYPE.html) defines the configuration of the generated build system. It is often helpful to build a project both in Release and Debug configurations, for example when assessing the effect of compiler optimization levels. For single-configuration generators, such as Unix Makefiles, MSYS Makefiles or Ninja, this requires running CMake twice, that is a full reconfiguration of the project. CMake however also supports multiple-configuration generators. These are usually project files offered by integrated-development environments, most notably Visual Studio and Xcode which can handle more than one configuration simultaneously. The available configuration types for these generators can be tweaked with the CMAKE_CONFIGURATION_TYPES variable which will accept a list of values (documentation available at this link: https://cmake.org/cmake/help/v3.5/variable/CMAKE_CONFIGURATION_TYPES.html).
The following CMake invocation with the Visual Studio:
$ mkdir -p build
$ cd build
$ cmake .. -G"Visual Studio 12 2017 Win64" -D CMAKE_CONFIGURATION_TYPES="Release;Debug"
will generate a build tree for both the Release and Debug configuration. You can then decide which of the two to build by using the --config flag:
$ cmake --build . --config Release
The previous recipes showed how to probe CMake for information on the compilers and how to tune compiler optimizations for all targets in your project. The latter task is a subset of the general need to control which compiler flags are used in your project. CMake offers a lot of flexibility for adjusting or extending compiler flags and you can choose between two main approaches:
In this recipe, we will show both approaches.
We will compile an example program to calculate the area of different geometric shapes. The code has a main function in a file called compute-areas.cpp:
#include "geometry_circle.hpp"
#include "geometry_polygon.hpp"
#include "geometry_rhombus.hpp"
#include "geometry_square.hpp"

#include <cstdlib>
#include <iostream>

int main() {
  using namespace geometry;

  double radius = 2.5293;
  double A_circle = area::circle(radius);
  std::cout << "A circle of radius " << radius << " has an area of " << A_circle
            << std::endl;

  int nSides = 19;
  double side = 1.29312;
  double A_polygon = area::polygon(nSides, side);
  std::cout << "A regular polygon of " << nSides << " sides of length " << side
            << " has an area of " << A_polygon << std::endl;

  double d1 = 5.0;
  double d2 = 7.8912;
  double A_rhombus = area::rhombus(d1, d2);
  std::cout << "A rhombus of major diagonal " << d1 << " and minor diagonal " << d2
            << " has an area of " << A_rhombus << std::endl;

  double l = 10.0;
  double A_square = area::square(l);
  std::cout << "A square of side " << l << " has an area of " << A_square
            << std::endl;

  return EXIT_SUCCESS;
}
The implementations of the various functions are contained in other files: each geometric shape has a header file and a corresponding source file. In total, we have four header files and five source files to compile:
.
├── CMakeLists.txt
├── compute-areas.cpp
├── geometry_circle.cpp
├── geometry_circle.hpp
├── geometry_polygon.cpp
├── geometry_polygon.hpp
├── geometry_rhombus.cpp
├── geometry_rhombus.hpp
├── geometry_square.cpp
└── geometry_square.hpp
We will not provide listings for all these files but rather refer the reader to https://github.com/dev-cafe/cmake-cookbook/tree/v1.0/chapter-01/recipe-08.
Now that we have the sources in place, our goal will be to configure the project and experiment with compiler flags:
cmake_minimum_required(VERSION 3.5 FATAL_ERROR)
project(recipe-08 LANGUAGES CXX)
message("C++ compiler flags: ${CMAKE_CXX_FLAGS}")
list(APPEND flags "-fPIC" "-Wall")
if(NOT WIN32)
  list(APPEND flags "-Wextra" "-Wpedantic")
endif()
add_library(geometry
  STATIC
    geometry_circle.cpp
    geometry_circle.hpp
    geometry_polygon.cpp
    geometry_polygon.hpp
    geometry_rhombus.cpp
    geometry_rhombus.hpp
    geometry_square.cpp
    geometry_square.hpp
  )
target_compile_options(geometry
  PRIVATE
    ${flags}
  )
add_executable(compute-areas compute-areas.cpp)
target_compile_options(compute-areas
  PRIVATE
    "-fPIC"
  )
target_link_libraries(compute-areas geometry)
In this example, the warning flags -Wall, -Wextra, and -Wpedantic will be added to the compile options for the geometry target; both the compute-areas and geometry targets will use the -fPIC flag. Compile options can be added with three levels of visibility: INTERFACE, PUBLIC, and PRIVATE.
The visibility levels have the following meaning:
The visibility levels of target properties are at the core of a modern usage of CMake and we will revisit this topic often and extensively throughout the book. Adding compile options in this way does not pollute the CMAKE_<LANG>_FLAGS_<CONFIG> global CMake variables and gives you granular control over what options are used on which targets.
How can we verify whether the flags are correctly used as we intended to? Or in other words, how can you discover which compile flags are actually used by a CMake project? One approach is the following and it uses CMake to pass additional arguments, in this case the environment variable VERBOSE=1, to the native build tool:
$ mkdir -p build
$ cd build
$ cmake ..
$ cmake --build . -- VERBOSE=1

... lots of output ...

[ 14%] Building CXX object CMakeFiles/geometry.dir/geometry_circle.cpp.o
/usr/bin/c++ -fPIC -Wall -Wextra -Wpedantic -o CMakeFiles/geometry.dir/geometry_circle.cpp.o -c /home/bast/tmp/cmake-cookbook/chapter-01/recipe-08/cxx-example/geometry_circle.cpp
[ 28%] Building CXX object CMakeFiles/geometry.dir/geometry_polygon.cpp.o
/usr/bin/c++ -fPIC -Wall -Wextra -Wpedantic -o CMakeFiles/geometry.dir/geometry_polygon.cpp.o -c /home/bast/tmp/cmake-cookbook/chapter-01/recipe-08/cxx-example/geometry_polygon.cpp
[ 42%] Building CXX object CMakeFiles/geometry.dir/geometry_rhombus.cpp.o
/usr/bin/c++ -fPIC -Wall -Wextra -Wpedantic -o CMakeFiles/geometry.dir/geometry_rhombus.cpp.o -c /home/bast/tmp/cmake-cookbook/chapter-01/recipe-08/cxx-example/geometry_rhombus.cpp
[ 57%] Building CXX object CMakeFiles/geometry.dir/geometry_square.cpp.o
/usr/bin/c++ -fPIC -Wall -Wextra -Wpedantic -o CMakeFiles/geometry.dir/geometry_square.cpp.o -c /home/bast/tmp/cmake-cookbook/chapter-01/recipe-08/cxx-example/geometry_square.cpp

... more output ...

[ 85%] Building CXX object CMakeFiles/compute-areas.dir/compute-areas.cpp.o
/usr/bin/c++ -fPIC -o CMakeFiles/compute-areas.dir/compute-areas.cpp.o -c /home/bast/tmp/cmake-cookbook/chapter-01/recipe-08/cxx-example/compute-areas.cpp

... more output ...
The preceding output confirms that the compile flags were correctly set according to our instructions.
The second approach to controlling compiler flags involves no modifications to CMakeLists.txt. If one wants to modify compiler options for the geometry and compute-areas targets in this project, it is as easy as invoking CMake with an additional argument:
$ cmake -D CMAKE_CXX_FLAGS="-fno-exceptions -fno-rtti" ..
As you might have guessed, this command will compile the project, deactivating exceptions and runtime type identification (RTTI).
The two approaches can also be coupled. One can use a basic set of flags globally, while keeping control of what happens on a per target basis. We can use CMakeLists.txt and running this command:
$ cmake -D CMAKE_CXX_FLAGS="-fno-exceptions -fno-rtti" ..
This will configure the geometry target with -fno-exceptions -fno-rtti -fPIC -Wall -Wextra -Wpedantic, while configuring compute-areas with -fno-exceptions -fno-rtti -fPIC.
Most of the time, flags are compiler-specific. Our current example will only work with GCC and Clang; compilers from other vendors will not understand many, if not all, of those flags. Clearly, if a project aims at being truly cross-platform, this problem has to be solved. There are three approaches to this.
The most typical approach will append a list of desired compiler flags to each configuration type CMake variable, that is, to CMAKE_<LANG>_FLAGS_<CONFIG>. These flags are set to what is known to work for the given compiler vendor, and will thus be enclosed in
if-endif clauses that check the CMAKE_<LANG>_COMPILER_ID variable, for example:
if(CMAKE_CXX_COMPILER_ID MATCHES GNU)
  list(APPEND CMAKE_CXX_FLAGS "-fno-rtti" "-fno-exceptions")
  list(APPEND CMAKE_CXX_FLAGS_DEBUG "-Wsuggest-final-types" "-Wsuggest-final-methods" "-Wsuggest-override")
  list(APPEND CMAKE_CXX_FLAGS_RELEASE "-O3" "-Wno-unused")
endif()

if(CMAKE_CXX_COMPILER_ID MATCHES Clang)
  list(APPEND CMAKE_CXX_FLAGS "-fno-rtti" "-fno-exceptions" "-Qunused-arguments" "-fcolor-diagnostics")
  list(APPEND CMAKE_CXX_FLAGS_DEBUG "-Wdocumentation")
  list(APPEND CMAKE_CXX_FLAGS_RELEASE "-O3" "-Wno-unused")
endif()
A more refined approach does not tamper with the CMAKE_<LANG>_FLAGS_<CONFIG> variables at all and rather defines project-specific lists of flags:
set(COMPILER_FLAGS)
set(COMPILER_FLAGS_DEBUG)
set(COMPILER_FLAGS_RELEASE)

if(CMAKE_CXX_COMPILER_ID MATCHES GNU)
  list(APPEND CXX_FLAGS "-fno-rtti" "-fno-exceptions")
  list(APPEND CXX_FLAGS_DEBUG "-Wsuggest-final-types" "-Wsuggest-final-methods" "-Wsuggest-override")
  list(APPEND CXX_FLAGS_RELEASE "-O3" "-Wno-unused")
endif()

if(CMAKE_CXX_COMPILER_ID MATCHES Clang)
  list(APPEND CXX_FLAGS "-fno-rtti" "-fno-exceptions" "-Qunused-arguments" "-fcolor-diagnostics")
  list(APPEND CXX_FLAGS_DEBUG "-Wdocumentation")
  list(APPEND CXX_FLAGS_RELEASE "-O3" "-Wno-unused")
endif()
Later on, it uses generator expressions to set compiler flags on a per-configuration and per-target basis:
target_compile_option(compute-areas
  PRIVATE
    ${CXX_FLAGS}
    "$<$<CONFIG:Debug>:${CXX_FLAGS_DEBUG}>"
    "$<$<CONFIG:Release>:${CXX_FLAGS_RELEASE}>"
  )
We have shown both approaches in the current recipe and have clearly recommended the latter (project-specific variables and target_compile_options) over the former (CMake variables).
Both approaches work and are widely used in many projects. However, they have shortcomings. As we have already mentioned, CMAKE_<LANG>_COMPILER_ID is not guaranteed to be defined for all compiler vendors. In addition, some flags might become deprecated or might have been introduced in a later version of the compiler. Similarly to CMAKE_<LANG>_COMPILER_ID, the CMAKE_<LANG>_COMPILER_VERSION variable is not guaranteed to be defined for all languages and vendors. Although checking on these variables is quite popular, we think that a more robust alternative would be to check whether a desired set of flags works with the given compiler, so that only effectively working flags are actually used in the project. Combined with the use of project-specific variables, target_compile_options, and generator expressions, this approach is quite powerful. We will show how to use this check-and-set pattern in Recipe 3, Writing a function to test and set compiler flags, in Chapter 7, Structuring Projects.
Programming languages have different standards available, that is, different versions that offer new and improved language constructs. Enabling new standards is accomplished by setting the appropriate compiler flag. We have shown in the previous recipe how this can be done, either on a per-target basis or globally. With its 3.1 version, CMake introduced a platform- and compiler-independent mechanism for setting the language standard for C++ and C: setting the <LANG>_STANDARD property for targets.
For the following example, we will require a C++ compiler compliant with the C++14 standard or later. The code for this recipe defines a polymorphic hierarchy of animals. We use std::unique_ptr for the base class in the hierarchy:
std::unique_ptr<Animal> cat = Cat("Simon");
std::unique_ptr<Animal> dog = Dog("Marlowe);
Instead of explicitly using constructors for the various subtypes, we use an implementation of the factory method. The factory is implemented using C++11 variadic templates. It holds a map of creation functions for each object in the inheritance hierarchy:
typedef std::function<std::unique_ptr<Animal>(const std::string &)> CreateAnimal;
It dispatches them based on a preassigned tag, so that creation of objects will look like the following:
std::unique_ptr<Animal> simon = farm.create("CAT", "Simon");
std::unique_ptr<Animal> marlowe = farm.create("DOG", "Marlowe");
The tags and creation functions are registered to the factory prior to its use:
Factory<CreateAnimal> farm;
farm.subscribe("CAT", [](const std::string & n) { return std::make_unique<Cat>(n); });
farm.subscribe("DOG", [](const std::string & n) { return std::make_unique<Dog>(n); });
We are defining the creation functions using C++11 lambda functions. Notice the use of std::make_unique to avoid introducing the naked new operator. This helper was introduced in C++14.
We will construct the CMakeLists.txt step by step and show how to require a certain standard (in this case C++14):
cmake_minimum_required(VERSION 3.5 FATAL_ERROR)

project(recipe-09 LANGUAGES CXX)
set(CMAKE_WINDOWS_EXPORT_ALL_SYMBOLS ON)
add_library(animals
  SHARED
    Animal.cpp
    Animal.hpp
    Cat.cpp
    Cat.hpp
    Dog.cpp
    Dog.hpp
    Factory.hpp
  )
set_target_properties(animals
  PROPERTIES
    CXX_STANDARD 14
    CXX_EXTENSIONS OFF
    CXX_STANDARD_REQUIRED ON
    POSITION_INDEPENDENT_CODE 1
  )
add_executable(animal-farm animal-farm.cpp)

set_target_properties(animal-farm
  PROPERTIES
    CXX_STANDARD 14
    CXX_EXTENSIONS OFF
    CXX_STANDARD_REQUIRED ON
  )
target_link_libraries(animal-farm animals)
$ mkdir -p build
$ cd build
$ cmake ..
$ cmake --build .
$ ./animal-farm

I'm Simon the cat!
I'm Marlowe the dog!
In steps 4 and 5, we set a number of properties for the animals and animal-farm targets:
CMake offers an even finer level of control over the language standard by introducing the concept of compile features. These are features introduced by the language standard, such as variadic templates and lambdas in C++11, and automatic return type deduction in C++14. You can ask for certain features to be available for specific targets with the target_compile_features() command and CMake will automatically set the correct compiler flag for the standard. It is also possible to have CMake generate compatibility headers for optional compiler features.
We have used if-elseif-endif constructs in previous recipes of this chapter. CMake also offers language facilities for creating loops: foreach-endforeach and while-endwhile. Both can be combined with break for breaking from the enclosing loop early. This recipe will show you how to use foreach to loop over a list of source files. We will apply such a loop to lower the compiler optimization for a set of source files without introducing a new target.
We will reuse the geometry example introduced in Recipe 8, Controlling compiler flags. Our goal will be to fine-tune the compiler optimization for some of the sources by collecting them into a list.
These are the detailed steps to follow in CMakeLists.txt:
cmake_minimum_required(VERSION 3.5 FATAL_ERROR)

project(recipe-10 LANGUAGES CXX)

add_library(geometry
  STATIC
    geometry_circle.cpp
    geometry_circle.hpp
    geometry_polygon.cpp
    geometry_polygon.hpp
    geometry_rhombus.cpp
    geometry_rhombus.hpp
    geometry_square.cpp
    geometry_square.hpp
  )
target_compile_options(geometry
  PRIVATE
    -O3
  )
list(
  APPEND sources_with_lower_optimization
    geometry_circle.cpp
    geometry_rhombus.cpp
  )
message(STATUS "Setting source properties using IN LISTS syntax:")
foreach(_source IN LISTS sources_with_lower_optimization)
  set_source_files_properties(${_source} PROPERTIES COMPILE_FLAGS -O2)
  message(STATUS "Appending -O2 flag for ${_source}")
endforeach()
message(STATUS "Querying sources properties using plain syntax:")
foreach(_source ${sources_with_lower_optimization})
  get_source_file_property(_flags ${_source} COMPILE_FLAGS)
  message(STATUS "Source ${_source} has the following extra COMPILE_FLAGS: ${_flags}")
endforeach()
add_executable(compute-areas compute-areas.cpp)

target_link_libraries(compute-areas geometry)
$ mkdir -p build
$ cd build
$ cmake ..

...
-- Setting source properties using IN LISTS syntax:
-- Appending -O2 flag for geometry_circle.cpp
-- Appending -O2 flag for geometry_rhombus.cpp
-- Querying sources properties using plain syntax:
-- Source geometry_circle.cpp has the following extra COMPILE_FLAGS: -O2
-- Source geometry_rhombus.cpp has the following extra COMPILE_FLAGS: -O2
$ cmake --build . -- VERBOSE=1
The foreach-endforeach syntax can be used to express the repetition of certain tasks over a list of variables. In our case, we used it to manipulate, set, and get the compiler flags of specific files in the project. This CMake snippet introduced two additional new commands:
The foreach() construct can be used in four different ways:
In this chapter, we will cover the following recipes:
Although CMake is cross-platform and in our projects we strive for the source code to be portable across platforms, operating systems, and compilers, sometimes the source code is not fully portable; for example, when using vendor-dependent extensions, we may find it necessary to configure and/or build code slightly differently depending on the platform. This is particularly relevant for legacy code or when cross-compiling, a topic we will return to in Chapter 13, Alternative Generators and Cross-compilation. It can also be advantageous to know the processor instruction set to optimize performance for a specific target platform. This chapter presents recipes to detect such environments and provides recommendations for how to implement such solutions.
CMake is a set of cross-platform tools. Nevertheless, it can be very useful to know on which operating system (OS) the configuration or build step is executed. Such OS discovery can be used either to tweak CMake code for a particular OS, to enable conditional compilation depending on the OS, or to use compiler-specific extensions if available or necessary. In this recipe, we will demonstrate how to use CMake to detect the OS with an example that does not require compilation of any source code. For simplicity, we will only consider the configuration step.
We will demonstrate OS discovery with a very simple CMakeLists.txt:
cmake_minimum_required(VERSION 3.5 FATAL_ERROR)

project(recipe-01 LANGUAGES NONE)
if(CMAKE_SYSTEM_NAME STREQUAL "Linux")
  message(STATUS "Configuring on/for Linux")
elseif(CMAKE_SYSTEM_NAME STREQUAL "Darwin")
  message(STATUS "Configuring on/for macOS")
elseif(CMAKE_SYSTEM_NAME STREQUAL "Windows")
  message(STATUS "Configuring on/for Windows")
elseif(CMAKE_SYSTEM_NAME STREQUAL "AIX")
  message(STATUS "Configuring on/for IBM AIX")
else()
  message(STATUS "Configuring on/for ${CMAKE_SYSTEM_NAME}")
endif()
Before testing it out, first examine the preceding code block and consider what behavior you expect on your system.
$ mkdir -p build
$ cd build
$ cmake ..
-- Configuring on/for Linux
CMake correctly defines CMAKE_SYSTEM_NAME for the target OS and therefore there is typically no need to use custom commands, tools, or scripts to query this information. The value of this variable can then be used to implement OS-specific conditionals and workarounds. On systems that have the uname command, this variable is set to the output of uname -s. The variable is set to "Darwin" on macOS. On Linux and Windows, it evaluates to "Linux" and "Windows", respectively. We now know how to execute a specific CMake code on a certain OS if we need to. Of course, we should try to minimize such customization in order to simplify migration to new platforms.
Ideally, we should avoid platform-dependent source code, but sometimes we have no choice – particularly when we are given code to configure and compile that we have not written ourselves. In this recipe, we will demonstrate how to use CMake to conditionally compile source code depending on the OS.
For this example, we will modify the hello-world.cpp example code from Chapter 1, From a Simple Executable to Libraries, Recipe 1, Compiling a single source file into an executable:
#include <cstdlib>
#include <iostream>
#include <string>

std::string say_hello() {
#ifdef IS_WINDOWS
  return std::string("Hello from Windows!");
#elif IS_LINUX
  return std::string("Hello from Linux!");
#elif IS_MACOS
  return std::string("Hello from macOS!");
#else
  return std::string("Hello from an unknown system!");
#endif
}

int main() {
  std::cout << say_hello() << std::endl;
  return EXIT_SUCCESS;
}
Let us build a corresponding CMakeLists.txt instance, which will enable us to conditionally compile the source code based on the target OS:
cmake_minimum_required(VERSION 3.5 FATAL_ERROR)

project(recipe-02 LANGUAGES CXX)
add_executable(hello-world hello-world.cpp)
if(CMAKE_SYSTEM_NAME STREQUAL "Linux")
  target_compile_definitions(hello-world PUBLIC "IS_LINUX")
endif()
if(CMAKE_SYSTEM_NAME STREQUAL "Darwin")
  target_compile_definitions(hello-world PUBLIC "IS_MACOS")
endif()
if(CMAKE_SYSTEM_NAME STREQUAL "Windows")
  target_compile_definitions(hello-world PUBLIC "IS_WINDOWS")
endif()
Before continuing, first examine the preceding expressions and consider what behavior you expect on your system.
Now we are ready to test it out and to configure the project:
$ mkdir -p build
$ cd build
$ cmake ..
$ cmake --build .
$ ./hello-world

Hello from Linux!
On a Windows system, you will see Hello from Windows!; other operating systems will yield different outputs.
The interesting part in the hello-world.cpp example is the conditional compilation based on the preprocessor definitions IS_WINDOWS, IS_LINUX, or IS_MACOS:
std::string say_hello() {
#ifdef IS_WINDOWS
  return std::string("Hello from Windows!");
#elif IS_LINUX
  return std::string("Hello from Linux!");
#elif IS_MACOS
  return std::string("Hello from macOS!");
#else
  return std::string("Hello from an unknown system!");
#endif
}
These definitions are defined at configure time by CMake in CMakeLists.txt by using target_compile_definitions before being passed on to the preprocessor. We could have achieved a more compact expression without repeating if-endif statements and we will demonstrate this refactoring in the next recipe. We could also have joined the if-endif statements into one if-elseif-elseif-endif statement.
At this stage, we should point out that we could have set the definitions using add_definitions(-DIS_LINUX) (of course, adjusting the definition according to the platform in question) instead of using target_compile_definitions. The disadvantage of using add_definitions is that it modifies compile definitions for the entire project, whereas target_compile_definitions gives us the possibility to restrict both the scope of the definitions to a specific target, as well as to restrict visibility of these definitions by using the PRIVATE, PUBLIC, or INTERFACE qualifiers. These qualifiers have the same meaning they had for compiler flags, as we have seen already in Chapter 1, From a Simple Executable to Libraries, Recipe 8, Controlling compiler flags:
This recipe is similar to the previous one in the sense that we will use CMake to accommodate the compilation of conditional source code that is dependent on the environment: in this case, it will be dependent on the chosen compiler. Again, for the sake of portability, this is a situation that we try to avoid when writing new code, but it is also a situation that we are almost guaranteed to meet sooner or later, especially when using legacy code or when dealing with compiler-dependent tooling, such as sanitizers. From the recipes of this and the previous chapter, we have all the ingredients to achieve this. Nevertheless, it will be useful to discuss the problem of dealing with compiler-dependent source code since we will have the chance to introduce some new aspects of CMake.
In this recipe, we will start out with an example in C++, and later we will demonstrate a Fortran example and attempt to refactor and simplify the CMake code.
Let us consider the following hello-world.cpp source code:
#include <cstdlib>
#include <iostream>
#include <string>

std::string say_hello() {
#ifdef IS_INTEL_CXX_COMPILER
  // only compiled when Intel compiler is selected
  // such compiler will not compile the other branches
  return std::string("Hello Intel compiler!");
#elif IS_GNU_CXX_COMPILER
  // only compiled when GNU compiler is selected
  // such compiler will not compile the other branches
  return std::string("Hello GNU compiler!");
#elif IS_PGI_CXX_COMPILER
  // etc.
  return std::string("Hello PGI compiler!");
#elif IS_XL_CXX_COMPILER
  return std::string("Hello XL compiler!");
#else
  return std::string("Hello unknown compiler - have we met before?");
#endif
}

int main() {
  std::cout << say_hello() << std::endl;
  std::cout << "compiler name is " COMPILER_NAME << std::endl;
  return EXIT_SUCCESS;
}
We will also use a corresponding Fortran example (hello-world.F90):
program hello

  implicit none

#ifdef IS_Intel_FORTRAN_COMPILER
  print *, 'Hello Intel compiler!'
#elif IS_GNU_FORTRAN_COMPILER
  print *, 'Hello GNU compiler!'
#elif IS_PGI_FORTRAN_COMPILER
  print *, 'Hello PGI compiler!'
#elif IS_XL_FORTRAN_COMPILER
  print *, 'Hello XL compiler!'
#else
  print *, 'Hello unknown compiler - have we met before?'
#endif

end program
We shall start out with the C++ example before moving on to the Fortran example:
cmake_minimum_required(VERSION 3.5 FATAL_ERROR)

project(recipe-03 LANGUAGES CXX)
add_executable(hello-world hello-world.cpp)
target_compile_definitions(hello-world PUBLIC "COMPILER_NAME=\"${CMAKE_CXX_COMPILER_ID}\"")

if(CMAKE_CXX_COMPILER_ID MATCHES Intel)
    target_compile_definitions(hello-world PUBLIC "IS_INTEL_CXX_COMPILER")
endif()
if(CMAKE_CXX_COMPILER_ID MATCHES GNU)
    target_compile_definitions(hello-world PUBLIC "IS_GNU_CXX_COMPILER")
endif()
if(CMAKE_CXX_COMPILER_ID MATCHES PGI)
    target_compile_definitions(hello-world PUBLIC "IS_PGI_CXX_COMPILER")
endif()
if(CMAKE_CXX_COMPILER_ID MATCHES XL)
    target_compile_definitions(hello-world PUBLIC "IS_XL_CXX_COMPILER")
endif()
The previous recipes have trained our eyes and now we can already anticipate the result:
$ mkdir -p build
$ cd build
$ cmake ..
$ cmake --build .
$ ./hello-world

Hello GNU compiler!
If you use a different compiler vendor, then this example code will provide a different greeting.
The if statements in the CMakeLists.txt file in the preceding example and the previous recipe seem repetitive, and as programmers, we do not like to repeat ourselves. Can we express this more compactly? Indeed we can! For this, let us turn to the Fortran example.
In the CMakeLists.txt file of the Fortran example, we need to do the following:
project(recipe-03 LANGUAGES Fortran)
add_executable(hello-world hello-world.F90)
target_compile_definitions(hello-world
  PUBLIC "IS_${CMAKE_Fortran_COMPILER_ID}_FORTRAN_COMPILER"
)
The remaining behavior of the Fortran example is the same as in the C++ example.
The preprocessor definitions are defined at configure time by CMake in CMakeLists.txt and are passed on to the preprocessor. The Fortran example contains a very compact expression where we use the CMAKE_Fortran_COMPILER_ID variable to construct the preprocessor definition using target_compile_definitions. To accommodate this, we had to change the case of "Intel" from IS_INTEL_CXX_COMPILER to IS_Intel_FORTRAN_COMPILER. We could achieve the same for C or C++ by using the corresponding CMAKE_C_COMPILER_ID and CMAKE_CXX_COMPILER_ID variables. Please do note, however, that CMAKE_<LANG>_COMPILER_ID is not guaranteed to be defined for all compilers or languages.
The advent of 64-bit integer arithmetic in 1970s supercomputing and 64-bit addressing in the early 2000s for personal computers has widened the memory-addressing range, and significant resources have been invested into porting code that was hardcoded for 32-bit architectures to enable 64-bit addressing. A number of blog posts, such as https://www.viva64.com/en/a/0004/, are devoted to discussing typical issues and solutions in porting C++ code to 64-bit platforms. It is very much advisable to program in a way that avoids explicitly hardcoded limits, but you may be in a situation where you need to accommodate hardcoded limits in a code configured with CMake, and in this recipe, we wish to discuss options for detecting the host processor architecture.
We will use the following arch-dependent.cpp example source:
#include <cstdlib>
#include <iostream>
#include <string>

#define STRINGIFY(x) #x
#define TOSTRING(x) STRINGIFY(x)

std::string say_hello() {
  std::string arch_info(TOSTRING(ARCHITECTURE));
  arch_info += std::string(" architecture. ");
#ifdef IS_32_BIT_ARCH
  return arch_info + std::string("Compiled on a 32 bit host processor.");
#elif IS_64_BIT_ARCH
  return arch_info + std::string("Compiled on a 64 bit host processor.");
#else
  return arch_info + std::string("Neither 32 nor 64 bit, puzzling ...");
#endif
}
int main() {
  std::cout << say_hello() << std::endl;
  return EXIT_SUCCESS;
}
Now let us turn to the CMake side. In the CMakeLists.txt file, we need to apply the following:
cmake_minimum_required(VERSION 3.5 FATAL_ERROR)

project(recipe-04 LANGUAGES CXX)

add_executable(arch-dependent arch-dependent.cpp)
if(CMAKE_SIZEOF_VOID_P EQUAL 8)
  target_compile_definitions(arch-dependent PUBLIC "IS_64_BIT_ARCH")
  message(STATUS "Target is 64 bits")
else()
  target_compile_definitions(arch-dependent PUBLIC "IS_32_BIT_ARCH")
  message(STATUS "Target is 32 bits")
endif()
if(CMAKE_HOST_SYSTEM_PROCESSOR MATCHES "i386")
  message(STATUS "i386 architecture detected")
elseif(CMAKE_HOST_SYSTEM_PROCESSOR MATCHES "i686")
  message(STATUS "i686 architecture detected")
elseif(CMAKE_HOST_SYSTEM_PROCESSOR MATCHES "x86_64")
  message(STATUS "x86_64 architecture detected")
else()
  message(STATUS "host processor architecture is unknown")
endif()

target_compile_definitions(arch-dependent
  PUBLIC "ARCHITECTURE=${CMAKE_HOST_SYSTEM_PROCESSOR}"
  )
$ mkdir -p build
$ cd build
$ cmake ..

...
-- Target is 64 bits
-- x86_64 architecture detected
...
$ cmake --build .
$ ./arch-dependent

x86_64 architecture. Compiled on a 64 bit host processor.
CMake defines the CMAKE_HOST_SYSTEM_PROCESSOR variable to contain the name of the processor it is currently running on. This can be set to "i386", "i686", "x86_64", "AMD64", and such like, depending, of course, on the CPU at hand. CMAKE_SIZEOF_VOID_P is defined to hold the size of a pointer to the void type. We can query both at the CMake level in order to modify targets or target compile definitions. Using preprocessor definitions, we can branch source code compilation based on the detected host processor architecture. As discussed in previous recipes, such customization should be avoided when writing new code, but sometimes it is useful when working with legacy code or when cross-compiling, which is the subject of Chapter 13, Alternative Generators and Cross-compilation.
In addition to CMAKE_HOST_SYSTEM_PROCESSOR, CMake also defines the CMAKE_SYSTEM_PROCESSOR variable. Whereas the former contains the name of the CPU CMake is currently running on, the latter will contain the name of the CPU we are currently building for. This is a subtle difference that plays a very fundamental role when cross-compiling. We will see more about cross-compilation in Chapter 13, Alternative Generators and Cross-compilation.
An alternative to letting CMake detect the host processor architecture is to use symbols defined within C or C++ and use CMake's try_run function to build and attempt to execute the source code (see Chapter 5, Configure-time and Build-time Operations, Recipe 8, Probing execution) that is branched by the preprocessor symbols. This returns well-defined errors that can be caught on the CMake side (this strategy is inspired by https://github.com/axr/solar-cmake/blob/master/TargetArch.cmake):
#if defined(__i386) || defined(__i386__) || defined(_M_IX86)
    #error cmake_arch i386
#elif defined(__x86_64) || defined(__x86_64__) || defined(__amd64) || defined(_M_X64)
    #error cmake_arch x86_64
#endif
This strategy is also the recommended one for detecting the target processor architecture, where CMake does not seem to offer a portable intrinsic solution.
Yet another alternative exists. It will only use CMake, doing away entirely with the preprocessor, at the expense of having a different source file for each case, which would then be set as the source file for the executable target arch-dependent using the target_sources CMake command:
add_executable(arch-dependent "")

if(CMAKE_HOST_SYSTEM_PROCESSOR MATCHES "i386")
  message(STATUS "i386 architecture detected")
  target_sources(arch-dependent
    PRIVATE
      arch-dependent-i386.cpp
    )
elseif(CMAKE_HOST_SYSTEM_PROCESSOR MATCHES "i686")
  message(STATUS "i686 architecture detected")
  target_sources(arch-dependent
    PRIVATE
      arch-dependent-i686.cpp
    )
elseif(CMAKE_HOST_SYSTEM_PROCESSOR MATCHES "x86_64")
  message(STATUS "x86_64 architecture detected")
  target_sources(arch-dependent
    PRIVATE
      arch-dependent-x86_64.cpp
    )
else()
  message(STATUS "host processor architecture is unknown")
endif()
This approach will clearly require more work for an existing project, since the source files will need to be separated. Moreover, code duplication between the different source files might certainly become a problem.
In this recipe, we will discuss how to discover the host processor instruction set with the help of CMake. This functionality has been added to CMake relatively recently and requires CMake 3.10 or later. The detected host system information can be used to either set corresponding compiler flags or to implement optional compilation of sources or source code generation depending on the host system. In this recipe, our goal will be to detect the host system information, pass it to the C++ source code using preprocessor definitions, and print the information to the output.
Our example C++ source file (processor-info.cpp) consists of the following:
#include "config.h"

#include <cstdlib>
#include <iostream>

int main() {
  std::cout << "Number of logical cores: "
            << NUMBER_OF_LOGICAL_CORES << std::endl;
  std::cout << "Number of physical cores: "
            << NUMBER_OF_PHYSICAL_CORES << std::endl;

  std::cout << "Total virtual memory in megabytes: "
            << TOTAL_VIRTUAL_MEMORY << std::endl;
  std::cout << "Available virtual memory in megabytes: "
            << AVAILABLE_VIRTUAL_MEMORY << std::endl;
  std::cout << "Total physical memory in megabytes: "
            << TOTAL_PHYSICAL_MEMORY << std::endl;
  std::cout << "Available physical memory in megabytes: "
            << AVAILABLE_PHYSICAL_MEMORY << std::endl;

  std::cout << "Processor is 64Bit: "
            << IS_64BIT << std::endl;
  std::cout << "Processor has floating point unit: "
            << HAS_FPU << std::endl;
  std::cout << "Processor supports MMX instructions: "
            << HAS_MMX << std::endl;
  std::cout << "Processor supports Ext. MMX instructions: "
            << HAS_MMX_PLUS << std::endl;
  std::cout << "Processor supports SSE instructions: "
            << HAS_SSE << std::endl;
  std::cout << "Processor supports SSE2 instructions: "
            << HAS_SSE2 << std::endl;
  std::cout << "Processor supports SSE FP instructions: "
            << HAS_SSE_FP << std::endl;
  std::cout << "Processor supports SSE MMX instructions: "
            << HAS_SSE_MMX << std::endl;
  std::cout << "Processor supports 3DNow instructions: "
            << HAS_AMD_3DNOW << std::endl;
  std::cout << "Processor supports 3DNow+ instructions: "
            << HAS_AMD_3DNOW_PLUS << std::endl;
  std::cout << "IA64 processor emulating x86 : "
            << HAS_IA64 << std::endl;

  std::cout << "OS name: "
            << OS_NAME << std::endl;
  std::cout << "OS sub-type: "
            << OS_RELEASE << std::endl;
  std::cout << "OS build ID: "
            << OS_VERSION << std::endl;
  std::cout << "OS platform: "
            << OS_PLATFORM << std::endl;

  return EXIT_SUCCESS;
}
This file includes config.h, which we will generate from config.h.in, given here:
#pragma once

#define NUMBER_OF_LOGICAL_CORES @_NUMBER_OF_LOGICAL_CORES@
#define NUMBER_OF_PHYSICAL_CORES @_NUMBER_OF_PHYSICAL_CORES@
#define TOTAL_VIRTUAL_MEMORY @_TOTAL_VIRTUAL_MEMORY@
#define AVAILABLE_VIRTUAL_MEMORY @_AVAILABLE_VIRTUAL_MEMORY@
#define TOTAL_PHYSICAL_MEMORY @_TOTAL_PHYSICAL_MEMORY@
#define AVAILABLE_PHYSICAL_MEMORY @_AVAILABLE_PHYSICAL_MEMORY@
#define IS_64BIT @_IS_64BIT@
#define HAS_FPU @_HAS_FPU@
#define HAS_MMX @_HAS_MMX@
#define HAS_MMX_PLUS @_HAS_MMX_PLUS@
#define HAS_SSE @_HAS_SSE@
#define HAS_SSE2 @_HAS_SSE2@
#define HAS_SSE_FP @_HAS_SSE_FP@
#define HAS_SSE_MMX @_HAS_SSE_MMX@
#define HAS_AMD_3DNOW @_HAS_AMD_3DNOW@
#define HAS_AMD_3DNOW_PLUS @_HAS_AMD_3DNOW_PLUS@
#define HAS_IA64 @_HAS_IA64@
#define OS_NAME "@_OS_NAME@"
#define OS_RELEASE "@_OS_RELEASE@"
#define OS_VERSION "@_OS_VERSION@"
#define OS_PLATFORM "@_OS_PLATFORM@"
We will use CMake to fill the definitions in config.h with sensible values for our platform and to compile our sample source file into an executable:
cmake_minimum_required(VERSION 3.10 FATAL_ERROR)

project(recipe-05 CXX)
add_executable(processor-info "")

target_sources(processor-info
  PRIVATE
    processor-info.cpp
  )

target_include_directories(processor-info
  PRIVATE
    ${PROJECT_BINARY_DIR}
  )
foreach(key
  IN ITEMS
    NUMBER_OF_LOGICAL_CORES
    NUMBER_OF_PHYSICAL_CORES
    TOTAL_VIRTUAL_MEMORY
    AVAILABLE_VIRTUAL_MEMORY
    TOTAL_PHYSICAL_MEMORY
    AVAILABLE_PHYSICAL_MEMORY
    IS_64BIT
    HAS_FPU
    HAS_MMX
    HAS_MMX_PLUS
    HAS_SSE
    HAS_SSE2
    HAS_SSE_FP
    HAS_SSE_MMX
    HAS_AMD_3DNOW
    HAS_AMD_3DNOW_PLUS
    HAS_IA64
    OS_NAME
    OS_RELEASE
    OS_VERSION
    OS_PLATFORM
  )
  cmake_host_system_information(RESULT _${key} QUERY ${key})
endforeach()
configure_file(config.h.in config.h @ONLY)
$ mkdir -p build
$ cd build
$ cmake ..
$ cmake --build .
$ ./processor-info

Number of logical cores: 4
Number of physical cores: 2
Total virtual memory in megabytes: 15258
Available virtual memory in megabytes: 14678
Total physical memory in megabytes: 7858
Available physical memory in megabytes: 4072
Processor is 64Bit: 1
Processor has floating point unit: 1
Processor supports MMX instructions: 1
Processor supports Ext. MMX instructions: 0
Processor supports SSE instructions: 1
Processor supports SSE2 instructions: 1
Processor supports SSE FP instructions: 0
Processor supports SSE MMX instructions: 0
Processor supports 3DNow instructions: 0
Processor supports 3DNow+ instructions: 0
IA64 processor emulating x86 : 0
OS name: Linux
OS sub-type: 4.16.7-1-ARCH
OS build ID: #1 SMP PREEMPT Wed May 2 21:12:36 UTC 2018
OS platform: x86_64
The foreach loop in CMakeLists.txt queries values for a number of keys and defines corresponding variables. The core function of this recipe is cmake_host_system_information, which queries system information of the host system on which CMake runs. This function can be invoked with multiple keys in one function call, but in this case, we have used one function call per key. We then use these variables to configure the placeholders in config.h.in and generate config.h . This configuration is done with the configure_file command. Finally, config.h is included in processor-info.cpp, and once compiled, it will print the values to the screen. We will revisit this approach in Chapter 5, Configure-time and Build-time Operations, and Chapter 6, Generating Source Code.
For a more fine-grained processor instruction set detection, consider this module: https://github.com/VcDevel/Vc/blob/master/cmake/OptimizeForArchitecture.cmake. We would also like to note that, sometimes, the host building the code may not be the same as the host running the code. This is often the case on compute clusters where the login node architecture may differ from the architecture found on compute nodes. One way to solve this is to submit the configuration and compilation as a computation step and deploy it to the compute nodes.
The vector capabilities of modern processor architectures can dramatically enhance the performance of your code. This is particularly the case for certain classes of operations, and linear algebra is foremost among these. This recipe will show how to enable vectorization to speed up a simple executable using the Eigen C++ library for linear algebra.
We will use the Eigen C++ template library for linear algebra and show how to set up compiler flags to enable vectorization. The source code for this recipe the linear-algebra.cpp file:
#include <chrono>
#include <iostream>

#include <Eigen/Dense>

EIGEN_DONT_INLINE
double simple_function(Eigen::VectorXd &va, Eigen::VectorXd &vb) {
  // this simple function computes the dot product of two vectors
  // of course it could be expressed more compactly
  double d = va.dot(vb);
  return d;
}

int main() {
  int len = 1000000;
  int num_repetitions = 100;

  // generate two random vectors
  Eigen::VectorXd va = Eigen::VectorXd::Random(len);
  Eigen::VectorXd vb = Eigen::VectorXd::Random(len);

  double result;
  auto start = std::chrono::system_clock::now();
  for (auto i = 0; i < num_repetitions; i++) {
    result = simple_function(va, vb);
  }
  auto end = std::chrono::system_clock::now();
  auto elapsed_seconds = end - start;

  std::cout << "result: " << result << std::endl;
  std::cout << "elapsed seconds: " << elapsed_seconds.count() << std::endl;
}
We expect vectorization to speed up the execution of the dot product operation in simple_function.
According to the documentation of the Eigen library, it is sufficient to set the appropriate compiler flag to enable the generation of vectorized code. Let us look at CMakeLists.txt:
cmake_minimum_required(VERSION 3.5 FATAL_ERROR)

project(recipe-06 LANGUAGES CXX)

set(CMAKE_CXX_STANDARD 11)
set(CMAKE_CXX_EXTENSIONS OFF)
set(CMAKE_CXX_STANDARD_REQUIRED ON)
find_package(Eigen3 3.3 REQUIRED CONFIG)
include(CheckCXXCompilerFlag)
check_cxx_compiler_flag("-march=native" _march_native_works)
check_cxx_compiler_flag("-xHost" _xhost_works)
set(_CXX_FLAGS)
if(_march_native_works)
  message(STATUS "Using processor's vector instructions (-march=native compiler flag set)")
  set(_CXX_FLAGS "-march=native")
elseif(_xhost_works)
  message(STATUS "Using processor's vector instructions (-xHost compiler flag set)")
  set(_CXX_FLAGS "-xHost")
else()
  message(STATUS "No suitable compiler flag found for vectorization")
endif()
add_executable(linear-algebra-unoptimized linear-algebra.cpp)

target_link_libraries(linear-algebra-unoptimized
  PRIVATE
    Eigen3::Eigen
  )
add_executable(linear-algebra linear-algebra.cpp)

target_compile_options(linear-algebra
  PRIVATE
    ${_CXX_FLAGS}
  )

target_link_libraries(linear-algebra
  PRIVATE
    Eigen3::Eigen
  )
$ mkdir -p build
$ cd build
$ cmake ..

...
-- Performing Test _march_native_works
-- Performing Test _march_native_works - Success
-- Performing Test _xhost_works
-- Performing Test _xhost_works - Failed
-- Using processor's vector instructions (-march=native compiler flag set)
...
$ cmake --build .

$ ./linear-algebra-unoptimized

result: -261.505
elapsed seconds: 1.97964

$ ./linear-algebra

result: -261.505
elapsed seconds: 1.05048
Most modern processors provide vector instruction sets. Carefully crafted code can exploit these and achieve enhanced performance with respect to non-vectorized code. The Eigen library has been written with vectorization explicitly in mind since linear algebra operations can greatly benefit from it. All we need to do is instruct the compiler to inspect the processor for us and generate the native set of instructions for the current architecture. Different compiler vendors use different flags to achieve this: the GNU compiler implements this by means of the -march=native flag, whereas the Intel compiler uses the -xHost flag. We then use the check_cxx_compiler_flag function offered by the CheckCXXCompilerFlag.cmake module:
check_cxx_compiler_flag("-march=native" _march_native_works)
This function accepts two arguments: the first one is the compiler flag to check, the second is a variable for storing the result, true or false, of the check. If the check is positive, we add the working flag to the _CXX_FLAGS variable, which will then be used to set the compiler flags for our executable target.
This recipe could be combined with the previous recipe; processor capabilities could be queried using cmake_host_system_information.
In this chapter, we will cover the following recipes:
Projects often depend on other projects and libraries. This chapter demonstrates how to detect external libraries, frameworks, and projects and how to link to these. CMake has a rather extensive set of prepackaged modules to detect the most commonly used libraries and programs, such as Python and Boost, for example. You can get a list of existing modules using cmake --help-module-list. However, not all libraries and programs are covered and from time to time you will have to provide your own detection scripts. In this chapter, we will discuss the necessary tools and discover the find family of CMake commands:
Python is a very popular dynamic language. Many projects package tools written in Python together with their main programs and libraries, or use Python scripts in the configuration or build process. In such cases, it is important to ensure that the runtime dependency on the Python interpreter is also satisfied. This recipe will show how to detect and use the Python interpreter at the configuration step. We will introduce the find_package command, which will be used throughout this chapter.
We will build up the CMakeLists.txt file step by step:
cmake_minimum_required(VERSION 3.5 FATAL_ERROR)

project(recipe-01 LANGUAGES NONE)
find_package(PythonInterp REQUIRED)
execute_process(
  COMMAND
    ${PYTHON_EXECUTABLE} "-c" "print('Hello, world!')"
  RESULT_VARIABLE _status
  OUTPUT_VARIABLE _hello_world
  ERROR_QUIET
  OUTPUT_STRIP_TRAILING_WHITESPACE
  )
message(STATUS "RESULT_VARIABLE is: ${_status}")
message(STATUS "OUTPUT_VARIABLE is: ${_hello_world}")
$ mkdir -p build
$ cd build
$ cmake ..

-- Found PythonInterp: /usr/bin/python (found version "3.6.5")
-- RESULT_VARIABLE is: 0
-- OUTPUT_VARIABLE is: Hello, world!
-- Configuring done
-- Generating done
-- Build files have been written to: /home/user/cmake-cookbook/chapter-03/recipe-01/example/build
find_package is a wrapper command for CMake modules written for discovering and setting up packages. These modules contain CMake commands to identify packages in standard locations on the system. The files for the CMake modules are called Find<name>.cmake and the commands they contain will be run internally when a call to find_package(<name>) is issued.
In addition to actually discovering the requested package on your system, find modules also set up a handful of useful variables, reflecting what was actually found, which you can use in your own CMakeLists.txt. In the case of the Python interpreter, the relevant module is FindPythonInterp.cmake, which is shipped with CMake, and sets the following variables:
It is possible to force CMake to look for specific versions of a package. For example, use this to request any version of the Python interpreter greater or equal to 2.7:
find_package(PythonInterp 2.7)
It is also possible to enforce that dependencies are satisfied:
find_package(PythonInterp REQUIRED)
In this case, CMake will abort configuration if no suitable executable for the Python interpreter is found in the usual lookup locations.
Sometimes, packages are not installed in standard locations and CMake might fail to locate them correctly. It is possible to tell CMake to look into certain specific locations to find certain software using the CLI switch -D to pass the appropriate option. In the case of the Python interpreter, you may configure with the following:
$ cmake -D PYTHON_EXECUTABLE=/custom/location/python ..
This will correctly identify the Python executable in the non-standard /custom/location/python installation directory.
Independently of detecting packages, we would like to mention a handy helper module for printing variables. In this recipe, we have used the following:
message(STATUS "RESULT_VARIABLE is: ${_status}")
message(STATUS "OUTPUT_VARIABLE is: ${_hello_world}")
A handy alternative for debugging is to use the following:
include(CMakePrintHelpers)
cmake_print_variables(_status _hello_world)
This produces the following output:
-- _status="0" ; _hello_world="Hello, world!"
For more documentation on convenience macros for printing properties and variables, see https://cmake.org/cmake/help/v3.5/module/CMakePrintHelpers.html.
The use of Python tools to analyze and manipulate output from compiled programs is nowadays widespread. However, there are also other, more powerful ways of combining an interpreted language such as Python with compiled languages such as C or C++. One way is to extend Python by providing new types and new functionalities on these types via C or C++ modules, compiled into shared libraries. This will be the topic of recipes in Chapter 9, Mixed-language Projects. Another approach is to embed the Python interpreter into a C or C++ program. Both approaches require the following:
All three components have to be pinned to the exact same version. We have demonstrated how to find the Python interpreter; in this recipe, we will show how to find the two missing ingredients for a successful embedding.
We will use a simple example of Python embedding into a C program that can be found on the Python documentation pages. The source file is called hello-embedded-python.c:
#include <Python.h>

int main(int argc, char *argv[]) {
  Py_SetProgramName(argv[0]); /* optional but recommended */
  Py_Initialize();
  PyRun_SimpleString("from time import time,ctime\n"
                     "print 'Today is',ctime(time())\n");
  Py_Finalize();
  return 0;
}
This code samples will initialize an instance of the Python interpreter within the program and print the date using the time Python module.
These are the steps to follow in our CMakeLists.txt:
cmake_minimum_required(VERSION 3.5 FATAL_ERROR)

project(recipe-02 LANGUAGES C)
set(CMAKE_C_STANDARD 99)
set(CMAKE_C_EXTENSIONS OFF)
set(CMAKE_C_STANDARD_REQUIRED ON)
find_package(PythonInterp REQUIRED)
find_package(PythonLibs ${PYTHON_VERSION_MAJOR}.${PYTHON_VERSION_MINOR} EXACT REQUIRED)
add_executable(hello-embedded-python hello-embedded-python.c)
target_include_directories(hello-embedded-python
  PRIVATE
    ${PYTHON_INCLUDE_DIRS}
  )
target_link_libraries(hello-embedded-python
  PRIVATE
    ${PYTHON_LIBRARIES}
  )
$ mkdir -p build
$ cd build
$ cmake ..

...
-- Found PythonInterp: /usr/bin/python (found version "3.6.5")
-- Found PythonLibs: /usr/lib/libpython3.6m.so (found suitable exact version "3.6.5")
$ cmake --build .
$ ./hello-embedded-python

Today is Thu Jun 7 22:26:02 2018
The FindPythonLibs.cmake module will look in standard locations for the Python header and library. Since these are required dependencies of our project, configuration will stop with an error if these are not found.
Notice that we explicitly asked CMake to detect the installation of the Python executable. This is to ensure that executable, header, and library all have a matching version. This is paramount to ensure that there are no mismatches between versions that could cause crashes at runtime. We have achieved this by using PYTHON_VERSION_MAJOR and PYTHON_VERSION_MINOR, defined in FindPythonInterp.cmake:
find_package(PythonInterp REQUIRED)
find_package(PythonLibs ${PYTHON_VERSION_MAJOR}.${PYTHON_VERSION_MINOR} EXACT REQUIRED)
Using the EXACT keyword, we have constrained CMake to detect a particular, and in this case matching, version of the Python include files and libraries. For an even closer match, we could have used the precise PYTHON_VERSION_STRING:
find_package(PythonInterp REQUIRED)
find_package(PythonLibs ${PYTHON_VERSION_STRING} EXACT REQUIRED)
How do we make sure that the Python header and libraries are correctly located even when they are not in a standard installation directory? For the Python interpreter, it is possible to force CMake to look in specific directories by passing the PYTHON_LIBRARY and PYTHON_INCLUDE_DIR options via the -D option to the CLI. These options specify the following:
This ensures that the desired version of Python will be picked up.
It might be very difficult to exactly pin the Python interpreter and its development components to be of the exact same version. This is especially true for those cases where they are installed in non-standard locations or there is more than one version of each installed on your system. New Python detection modules have been added to CMake in its version 3.12 that are aimed at solving this vexing problem. The detection portion of our CMakeLists.txt would also be greatly simplified to:
find_package(Python COMPONENTS Interpreter Development REQUIRED)
We encourage you to read the documentation for the new module at: https://cmake.org/cmake/help/v3.12/module/FindPython.html
In the previous recipe, we showed how to detect the Python interpreter and how to compile a simple C program, embedding the Python interpreter. Both are fundamental tasks to get you off the ground when combining Python and a compiled language. Often, your code will depend on specific Python modules, be they Python tools, compiled programs embedding Python, or libraries extending it. For example, NumPy has become very popular in the scientific community for problems involving matrix algebra. In projects that depend on Python modules or packages, it is important to make sure that the dependency on these Python modules is satisfied. This recipe will show how to probe the user's environment to find specific Python modules and packages.
We will try a slightly more involved embedding example in a C++ program. The example is again taken from the Python online documentation (https://docs.python.org/3.5/extending/embedding.html#pure-embedding) and shows how to execute functions from a user-defined Python module by calling the compiled C++ executable.
The Python 3 example code (Py3-pure-embedding.cpp) contains the following source code (see https://docs.python.org/2/extending/embedding.html#pure-embedding for the corresponding Python 2 equivalent):
#include <Python.h>

int main(int argc, char *argv[]) {
  PyObject *pName, *pModule, *pDict, *pFunc;
  PyObject *pArgs, *pValue;
  int i;

  if (argc < 3) {
    fprintf(stderr, "Usage: pure-embedding pythonfile funcname [args]\n");
    return 1;
  }

  Py_Initialize();

  PyRun_SimpleString("import sys");
  PyRun_SimpleString("sys.path.append(\".\")");

  pName = PyUnicode_DecodeFSDefault(argv[1]);
  /* Error checking of pName left out */

  pModule = PyImport_Import(pName);
  Py_DECREF(pName);

  if (pModule != NULL) {
    pFunc = PyObject_GetAttrString(pModule, argv[2]);
    /* pFunc is a new reference */

    if (pFunc && PyCallable_Check(pFunc)) {
      pArgs = PyTuple_New(argc - 3);
      for (i = 0; i < argc - 3; ++i) {
        pValue = PyLong_FromLong(atoi(argv[i + 3]));
        if (!pValue) {
          Py_DECREF(pArgs);
          Py_DECREF(pModule);
          fprintf(stderr, "Cannot convert argument\n");
          return 1;
        }
        /* pValue reference stolen here: */
        PyTuple_SetItem(pArgs, i, pValue);
      }
      pValue = PyObject_CallObject(pFunc, pArgs);
      Py_DECREF(pArgs);
      if (pValue != NULL) {
        printf("Result of call: %ld\n", PyLong_AsLong(pValue));
        Py_DECREF(pValue);
      } else {
        Py_DECREF(pFunc);
        Py_DECREF(pModule);
        PyErr_Print();
        fprintf(stderr, "Call failed\n");
        return 1;
      }
    } else {
      if (PyErr_Occurred())
        PyErr_Print();
      fprintf(stderr, "Cannot find function \"%s\"\n", argv[2]);
    }
    Py_XDECREF(pFunc);
    Py_DECREF(pModule);
  } else {
    PyErr_Print();
    fprintf(stderr, "Failed to load \"%s\"\n", argv[1]);
    return 1;
  }
  Py_Finalize();
  return 0;
}
The Python code that we wish to embed (use_numpy.py) uses NumPy to set up a matrix with all matrix elements set to 1.0:
import numpy as np


def print_ones(rows, cols):

    A = np.ones(shape=(rows, cols), dtype=float)
    print(A)

    # we return the number of elements to verify
    # that the C++ code is able to receive return values
    num_elements = rows*cols
    return(num_elements)
In the following code, we wish to be able to check whether NumPy is available using CMake. We will first need to make sure that the Python interpreter, headers, and libraries are all available on our system. We will then move on to make sure that NumPy is available:
cmake_minimum_required(VERSION 3.5 FATAL_ERROR)

project(recipe-03 LANGUAGES CXX)

set(CMAKE_CXX_STANDARD 11)
set(CMAKE_CXX_EXTENSIONS OFF)
set(CMAKE_CXX_STANDARD_REQUIRED ON)
find_package(PythonInterp REQUIRED)
find_package(PythonLibs ${PYTHON_VERSION_MAJOR}.${PYTHON_VERSION_MINOR} EXACT REQUIRED)
execute_process(
  COMMAND
    ${PYTHON_EXECUTABLE} "-c" "import re, numpy; print(re.compile('/__init__.py.*').sub('',numpy.__file__))"
  RESULT_VARIABLE _numpy_status
  OUTPUT_VARIABLE _numpy_location
  ERROR_QUIET
  OUTPUT_STRIP_TRAILING_WHITESPACE
  )
if(NOT _numpy_status)
  set(NumPy ${_numpy_location} CACHE STRING "Location of NumPy")
endif()
execute_process(
  COMMAND
    ${PYTHON_EXECUTABLE} "-c" "import numpy; print(numpy.__version__)"
  OUTPUT_VARIABLE _numpy_version
  ERROR_QUIET
  OUTPUT_STRIP_TRAILING_WHITESPACE
  )
include(FindPackageHandleStandardArgs)
find_package_handle_standard_args(NumPy
  FOUND_VAR NumPy_FOUND
  REQUIRED_VARS NumPy
  VERSION_VAR _numpy_version
  )
add_executable(pure-embedding "")

target_sources(pure-embedding
  PRIVATE
    Py${PYTHON_VERSION_MAJOR}-pure-embedding.cpp
  )

target_include_directories(pure-embedding
  PRIVATE
    ${PYTHON_INCLUDE_DIRS}
  )

target_link_libraries(pure-embedding
  PRIVATE
    ${PYTHON_LIBRARIES}
  )
add_custom_command(
  OUTPUT
    ${CMAKE_CURRENT_BINARY_DIR}/use_numpy.py
  COMMAND
    ${CMAKE_COMMAND} -E copy_if_different ${CMAKE_CURRENT_SOURCE_DIR}/use_numpy.py
                                          ${CMAKE_CURRENT_BINARY_DIR}/use_numpy.py
  DEPENDS
    ${CMAKE_CURRENT_SOURCE_DIR}/use_numpy.py
  )

# make sure building pure-embedding triggers the above custom command
target_sources(pure-embedding
  PRIVATE
    ${CMAKE_CURRENT_BINARY_DIR}/use_numpy.py
  )
$ mkdir -p build
$ cd build
$ cmake ..

-- ...
-- Found PythonInterp: /usr/bin/python (found version "3.6.5")
-- Found PythonLibs: /usr/lib/libpython3.6m.so (found suitable exact version "3.6.5")
-- Found NumPy: /usr/lib/python3.6/site-packages/numpy (found version "1.14.3")

$ cmake --build .
$ ./pure-embedding use_numpy print_ones 2 3

[[1. 1. 1.]
 [1. 1. 1.]]
Result of call: 6
There are three new CMake commands in this recipe: execute_process and add_custom_command, which are always available, and find_package_handle_standard_args, which requires include(FindPackageHandleStandardArgs).
The execute_process command will execute one or more commands as child processes to the currently issued CMake command. The return value for the last child process will be saved into the variable passed as an argument to RESULT_VARIABLE, while the contents of the standard output and standard error pipes will be saved into the variables passed as arguments to OUTPUT_VARIABLE and ERROR_VARIABLE. execute_process allows us to execute arbitrary commands and use their results to infer the configuration of our system. In our case, we first use it to make sure that NumPy is available and then to obtain the version of the module.
The find_package_handle_standard_args command provides the standard tool for handling common operations related to finding programs and libraries installed on a given system. The version-related options, REQUIRED and EXACT, are all correctly handled without further CMake code when referring to this command. The additional options QUIET and COMPONENTS, which we will meet shortly, are also handled under the hood by this CMake command. In this recipe, we have used the following:
include(FindPackageHandleStandardArgs)
find_package_handle_standard_args(NumPy
  FOUND_VAR NumPy_FOUND
  REQUIRED_VARS NumPy
  VERSION_VAR _numpy_version
  )
The command will set the variable to signal that the module was found (NumPy_FOUND) when all required variables are set to valid file paths (NumPy). It will also set the version to the passed version variable ( _numpy_version) and print out status messages for the user:
-- Found NumPy: /usr/lib/python3.6/site-packages/numpy (found version "1.14.3")
In the present recipe, we have not used these variables further. What we could have done is to stop the configuration if NumPy_FOUND was returned as FALSE.
Finally, we should comment on the section of the code that copies use_numpy.py to the build directory:
add_custom_command(
  OUTPUT
    ${CMAKE_CURRENT_BINARY_DIR}/use_numpy.py
  COMMAND
    ${CMAKE_COMMAND} -E copy_if_different ${CMAKE_CURRENT_SOURCE_DIR}/use_numpy.py
                                          ${CMAKE_CURRENT_BINARY_DIR}/use_numpy.py
  DEPENDS
    ${CMAKE_CURRENT_SOURCE_DIR}/use_numpy.py
  )

target_sources(pure-embedding
  PRIVATE
    ${CMAKE_CURRENT_BINARY_DIR}/use_numpy.py
  )
We could have achieved the copying with a file(COPY ...) command. Here, we opted to use add_custom_command to make sure that the file gets copied every time it changes, not only the first time we run the configuration. We will return to add_custom_command in more detail in Chapter 5, Configure-time and Build-time Operations. Note also the target_sources command, which adds the dependency to ${CMAKE_CURRENT_BINARY_DIR}/use_numpy.py; this was done to make sure that building the pure-embedding target triggers the preceding custom command.
Many numerical codes rely heavily on matrix and vector operations. Think for example of matrix-vector and matrix-matrix products, the solution of linear system of equations, the calculation of eigenvalues and eigenvectors or singular-value decompositions. These operations might be so ubiquitous in the code base or might have to be run on such large data sets that the availability of efficient implementations becomes an absolute necessity in your code. Fortunately, there are libraries just for that: the basic linear algebra subprograms (BLAS) and the linear algebra package (LAPACK) offer standard APIs for many tasks involving linear algebraic manipulations. Different vendors provide different implementations, but all of them share the same API. While the actual programming languages for the underlying implementation of the math libraries varied over time (Fortran, C, Assembly), the remaining historical trace is the Fortran calling convention. Our task in this recipe will be to link against these libraries and show how to seamlessly work with a library written in a different language, considering the above-mentioned calling convention.
To demonstrate the detection and linking of math libraries, we wish to compile a C++ program that takes the dimension of a matrix as command-line input, generates a random square matrix A, a random vector b and solves the ensuing linear systems of equations: Ax = b. In addition, we will scale the random vector b by a random factor. The subroutines we need to use are DSCAL from BLAS, to perform the scaling and DGESV from LAPACK to find the solution of the linear system of equations. The listing for the example C++ code contains (linear-algebra.cpp):
#include "CxxBLAS.hpp"
#include "CxxLAPACK.hpp"

#include <iostream>
#include <random>
#include <vector>

int main(int argc, char **argv) {
  if (argc != 2) {
    std::cout << "Usage: ./linear-algebra dim" << std::endl;
    return EXIT_FAILURE;
  }

  // Generate a uniform distribution of real number between -1.0 and 1.0
  std::random_device rd;
  std::mt19937 mt(rd());
  std::uniform_real_distribution<double> dist(-1.0, 1.0);

  // Allocate matrices and right-hand side vector
  int dim = std::atoi(argv[1]);
  std::vector<double> A(dim * dim);
  std::vector<double> b(dim);
  std::vector<int> ipiv(dim);
  // Fill matrix and RHS with random numbers between -1.0 and 1.0
  for (int r = 0; r < dim; r++) {
    for (int c = 0; c < dim; c++) {
      A[r + c * dim] = dist(mt);
    }
    b[r] = dist(mt);
  }

  // Scale RHS vector by a random number between -1.0 and 1.0
  C_DSCAL(dim, dist(mt), b.data(), 1);
  std::cout << "C_DSCAL done" << std::endl;

  // Save matrix and RHS
  std::vector<double> A1(A);
  std::vector<double> b1(b);

  int info;
  info = C_DGESV(dim, 1, A.data(), dim, ipiv.data(), b.data(), dim);
  std::cout << "C_DGESV done" << std::endl;
  std::cout << "info is " << info << std::endl;

  double eps = 0.0;
  for (int i = 0; i < dim; ++i) {
    double sum = 0.0;
    for (int j = 0; j < dim; ++j)
      sum += A1[i + j * dim] * b[j];
    eps += std::abs(b1[i] - sum);
  }
  std::cout << "check is " << eps << std::endl;

  return 0;
}
We are using the random library, introduced in C++11, to generate a random distribution between -1.0 and 1.0. C_DSCAL and C_DGESV are interfaces to the BLAS and LAPACK libraries, respectively, taking care of the name mangling in order to call these functions from a different programming language. This is done in the following interface files in combination with a CMake module which we will discuss further below.
The file CxxBLAS.hpp wraps the BLAS routine with extern "C" linkage:
#pragma once

#include "fc_mangle.h"

#include <cstddef>

#ifdef __cplusplus
extern "C" {
#endif

extern void DSCAL(int *n, double *alpha, double *vec, int *inc);

#ifdef __cplusplus
}
#endif

void C_DSCAL(size_t length, double alpha, double *vec, int inc);
The corresponding implementation file CxxBLAS.cpp contains:
#include "CxxBLAS.hpp"

#include <climits>

// see http://www.netlib.no/netlib/blas/dscal.f
void C_DSCAL(size_t length, double alpha, double *vec, int inc) {
  int big_blocks = (int)(length / INT_MAX);
  int small_size = (int)(length % INT_MAX);
  for (int block = 0; block <= big_blocks; block++) {
    double *vec_s = &vec[block * inc * (size_t)INT_MAX];
    signed int length_s = (block == big_blocks) ? small_size : INT_MAX;
    ::DSCAL(&length_s, &alpha, vec_s, &inc);
  }
}
The files CxxLAPACK.hpp and CxxLAPACK.cpp perform corresponding translations for the LAPACK calls.
The corresponding CMakeLists.txt contains the following building blocks:
cmake_minimum_required(VERSION 3.5 FATAL_ERROR)

project(recipe-04 LANGUAGES CXX C Fortran)
set(CMAKE_CXX_STANDARD 11)
set(CMAKE_CXX_EXTENSIONS OFF)
set(CMAKE_CXX_STANDARD_REQUIRED ON)
include(FortranCInterface)

FortranCInterface_VERIFY(CXX)

FortranCInterface_HEADER(
 fc_mangle.h
 MACRO_NAMESPACE "FC_"
 SYMBOLS DSCAL DGESV
 )
find_package(BLAS REQUIRED)
find_package(LAPACK REQUIRED)
add_library(math "")

target_sources(math
  PRIVATE
    CxxBLAS.cpp
    CxxLAPACK.cpp
  )

target_include_directories(math
  PUBLIC
    ${CMAKE_CURRENT_SOURCE_DIR}
    ${CMAKE_CURRENT_BINARY_DIR}
  )

target_link_libraries(math
  PUBLIC
    ${LAPACK_LIBRARIES}
  )
add_executable(linear-algebra "")

target_sources(linear-algebra
  PRIVATE
    linear-algebra.cpp
  )

target_link_libraries(linear-algebra
  PRIVATE
    math
  )
$ mkdir -p build
$ cd build
$ cmake ..

...
-- Detecting Fortran/C Interface
-- Detecting Fortran/C Interface - Found GLOBAL and MODULE mangling
-- Verifying Fortran/C Compiler Compatibility
-- Verifying Fortran/C Compiler Compatibility - Success
...
-- Found BLAS: /usr/lib/libblas.so
...
-- A library with LAPACK API found.
...
$ cmake --build .
$ ./linear-algebra 1000

C_DSCAL done
C_DGESV done
info is 0
check is 1.54284e-10
FindBLAS.cmake and FindLAPACK.cmake will look in standard locations for libraries offering the standard BLAS and LAPACK APIs. For the former, the module will look for the Fortran implementation of the SGEMM function, for single-precision matrix-matrix products for general matrices. For the latter, the module searches for the Fortran implementation of the CHEEV function, for the calculation of eigenvalues and eigenvectors of complex, Hermitian matrices. These lookups are carried out internally by compiling a small program calling these functions and trying to link against the candidate libraries. If that fails, it signals that a compliant library is not available on the system.
Every compiler performs name-mangling of symbols when generating machine code and unfortunately conventions for this operation are not universal, but compiler-dependent. To overcome this difficulty, we have used the FortranCInterface module (https://cmake.org/cmake/help/v3.5/module/FortranCInterface.html) to both verify that the Fortran and C/C++ compilers work together and to generate a Fortran-C interface header fc_mangle.h which is compatible with the compiler in question. The generated fc_mangle.h must then be included in the interface header files CxxBLAS.hpp and CxxLAPACK.hpp. We had to add C and Fortran support to the list of LANGUAGES in order to use FortranCInterface. Of course we could have defined own preprocessor definitions instead, however at the price of limited portability.
We will discuss the interoperability of Fortran and C more closely in Chapter 9, Mixed-language Projects.
Many numerical codes rely heavily on matrix algebra operations and it is important to correctly link against high-performance implementations of the BLAS and LAPACK APIs. There is a large variability in the way vendors package their libraries for different architectures and parallel environments. FindBLAS.cmake and FindLAPACK.cmake will most likely not be able to locate an existing library in all possible cases. If that happens, you can explicitly set the libraries from the CLI via the -D option.
Today, basically any computer on the market is a multi-core machine and for programs focusing on performance, we may have to focus on these multi-core CPUs and use concurrency in our programming models. OpenMP is the standard for shared-memory parallelism on multi-core CPUs. Existing programs often do not need to be radically modified or rewritten in order to benefit from OpenMP parallelization. Once the performance-critical sections in the code are identified, for example using a profiling tool, the programmer can add preprocessor directives that will instruct the compiler to generate parallel code for those regions.
In this recipe, we will show how to compile a program containing OpenMP directives, provided we use an OpenMP-aware compiler. Many Fortran, C, and C++ compilers exist that can take advantage of OpenMP parallelism. CMake provides very good support for OpenMP in combination with C, C++, or Fortran for relatively recent versions of CMake. This recipe will show you how to detect and link to OpenMP using imported targets for simple C++ and Fortran programs when using CMake 3.9 or above.
C and C++ programs can access OpenMP functionality by including the omp.h header file and by linking to the correct library. The compiler will generate parallel code according to preprocessor directives preceding the performance-critical sections. In this recipe, we will build the following example source code (example.cpp). This code sums integers from 1 to N, where N is given as a command-line argument:
#include <iostream>
#include <omp.h>
#include <string>

int main(int argc, char *argv[]) {
  std::cout << "number of available processors: " << omp_get_num_procs()
            << std::endl;
  std::cout << "number of threads: " << omp_get_max_threads() << std::endl;

  auto n = std::stol(argv[1]);
  std::cout << "we will form sum of numbers from 1 to " << n << std::endl;

  // start timer
  auto t0 = omp_get_wtime();

  auto s = 0LL;
#pragma omp parallel for reduction(+ : s)
  for (auto i = 1; i <= n; i++) {
    s += i;
  }

  // stop timer
  auto t1 = omp_get_wtime();

  std::cout << "sum: " << s << std::endl;
  std::cout << "elapsed wall clock time: " << t1 - t0 << " seconds" << std::endl;

  return 0;
}
In Fortran, one needs to use the omp_lib module and link to the correct library. Use of parallel directives is once again possible in code comments preceding the performance-critical sections. The corresponding example.F90 contains the following:
program example

  use omp_lib

  implicit none

  integer(8) :: i, n, s
  character(len=32) :: arg
  real(8) :: t0, t1

  print *, "number of available processors:", omp_get_num_procs()
  print *, "number of threads:", omp_get_max_threads()

  call get_command_argument(1, arg)
  read(arg , *) n

  print *, "we will form sum of numbers from 1 to", n

  ! start timer
  t0 = omp_get_wtime()

  s = 0
!$omp parallel do reduction(+:s)
  do i = 1, n
    s = s + i
  end do

  ! stop timer
  t1 = omp_get_wtime()

  print *, "sum:", s
  print *, "elapsed wall clock time (seconds):", t1 - t0

end program
Our CMakeLists.txt for the C++ and Fortran examples will follow a template that is largely similar between the two languages:
cmake_minimum_required(VERSION 3.9 FATAL_ERROR)

project(recipe-05 LANGUAGES CXX)
set(CMAKE_CXX_STANDARD 11)
set(CMAKE_CXX_EXTENSIONS OFF)
set(CMAKE_CXX_STANDARD_REQUIRED ON)
find_package(OpenMP REQUIRED)
add_executable(example example.cpp)

target_link_libraries(example
  PUBLIC
    OpenMP::OpenMP_CXX
  )
$ mkdir -p build
$ cd build
$ cmake ..
$ cmake --build .
$ ./example 1000000000

number of available processors: 4
number of threads: 4
we will form sum of numbers from 1 to 1000000000
sum: 500000000500000000
elapsed wall clock time: 1.08343 seconds
$ env OMP_NUM_THREADS=1 ./example 1000000000

number of available processors: 4
number of threads: 1
we will form sum of numbers from 1 to 1000000000
sum: 500000000500000000
elapsed wall clock time: 2.96427 seconds
Our simple example seems to work: the code compiled and linked, and we observe a speed-up when running on multiple cores. The fact that the speed-up is not a perfect multiple of OMP_NUM_THREADS is not our concern in this recipe, since we focus on the CMake aspect of a project which requires OpenMP. We have found linking to OpenMP to be extremely compact thanks to imported targets provided by a reasonably modern FindOpenMP module:
target_link_libraries(example
  PUBLIC
    OpenMP::OpenMP_CXX
  )
We did not have to worry about compile flags or about include directories - these settings and dependencies are encoded in the definition of the library OpenMP::OpenMP_CXX which is of the IMPORTED type. As we mentioned in Recipe 3, Building and linking static and shared libraries, in Chapter 1, From a Simple Executable to Libraries, IMPORTED libraries are pseudo-targets that fully encode usage requirements for dependencies outside our own project. To use OpenMP one needs to set compiler flags, include directories, and link libraries. All of these are set as properties on the OpenMP::OpenMP_CXX target and transitively applied to our example target simply by using the target_link_libraries command. This makes using libraries within our CMake scripts exceedingly easy. We can print the properties of interface with the cmake_print_properties command, offered by the CMakePrintHelpers.cmake standard module:
include(CMakePrintHelpers)
cmake_print_properties(
  TARGETS
    OpenMP::OpenMP_CXX
  PROPERTIES
    INTERFACE_COMPILE_OPTIONS
    INTERFACE_INCLUDE_DIRECTORIES
    INTERFACE_LINK_LIBRARIES
  )
Note that all properties of interest have the prefix INTERFACE_, because these properties usage requirements for any target wanting to interface and use the OpenMP target.
For CMake versions below 3.9, we would have to do a bit more work:
add_executable(example example.cpp)

target_compile_options(example
  PUBLIC
    ${OpenMP_CXX_FLAGS}
  )

set_target_properties(example
  PROPERTIES
    LINK_FLAGS ${OpenMP_CXX_FLAGS}
  )
For CMake versions below 3.5, we might need to explicitly define compile flags for a Fortran project.
In this recipe, we have discussed C++ and Fortran, but the arguments and approach are valid also for a C project.
An alternative and often complementary approach to OpenMP shared-memory parallelism is the Message Passing Interface (MPI), which has become the de facto standard for modeling a program executing in parallel on a distributed memory system. Although modern MPI implementations allow shared-memory parallelism as well, a typical approach in high-performance computing is to use OpenMP within a compute node combined with MPI across compute nodes. The implementation of the MPI standard consists of the following:
This recipe will show how to find a suitable MPI implementation on your system in order to compile a simple MPI "Hello, World" program.
The example code (hello-mpi.cpp, downloaded from http://www.mpitutorial.com), which we will compile in this recipe, will initialize the MPI library, have every process print its name, and eventually finalize the library:
#include <iostream>

#include <mpi.h>

int main(int argc, char **argv) {
  // Initialize the MPI environment. The two arguments to MPI Init are not
  // currently used by MPI implementations, but are there in case future
  // implementations might need the arguments.
  MPI_Init(NULL, NULL);

  // Get the number of processes
  int world_size;
  MPI_Comm_size(MPI_COMM_WORLD, &world_size);

  // Get the rank of the process
  int world_rank;
  MPI_Comm_rank(MPI_COMM_WORLD, &world_rank);

  // Get the name of the processor
  char processor_name[MPI_MAX_PROCESSOR_NAME];
  int name_len;
  MPI_Get_processor_name(processor_name, &name_len);

  // Print off a hello world message
  std::cout << "Hello world from processor " << processor_name << ", rank "
            << world_rank << " out of " << world_size << " processors" << std::endl;

  // Finalize the MPI environment. No more MPI calls can be made after this
  MPI_Finalize();
}
In this recipe, we set out to find the MPI implementation: library, header files, compiler wrappers, and launcher. To do so, we will leverage the FindMPI.cmake standard CMake module:
cmake_minimum_required(VERSION 3.9 FATAL_ERROR)

project(recipe-06 LANGUAGES CXX)

set(CMAKE_CXX_STANDARD 11)
set(CMAKE_CXX_EXTENSIONS OFF)
set(CMAKE_CXX_STANDARD_REQUIRED ON)
find_package(MPI REQUIRED)
add_executable(hello-mpi hello-mpi.cpp)

target_link_libraries(hello-mpi
  PUBLIC
    MPI::MPI_CXX
  )
$ mkdir -p build
$ cd build
$ cmake -D CMAKE_CXX_COMPILER=mpicxx ..

-- ...
-- Found MPI_CXX: /usr/lib/openmpi/libmpi_cxx.so (found version "3.1")
-- Found MPI: TRUE (found version "3.1")
-- ...

$ cmake --build .
$ mpirun -np 2 ./hello-mpi

Hello world from processor larry, rank 1 out of 2 processors
Hello world from processor larry, rank 0 out of 2 processors
Remember that the compiler wrapper is a thin layer around the compiler used to build the MPI library. Under the hood, it will call the same compiler and augment it with additional arguments, such as include paths and libraries, needed to successfully build a parallel program.
Which flags does the wrapper actually apply when compiling and linking a source file? We can probe this using the --showme option to the compiler wrapper. To find out the compiler flags we can use:
$ mpicxx --showme:compile

-pthread
Whereas to find out the linker flags we use the following:
$ mpicxx --showme:link

-pthread -Wl,-rpath -Wl,/usr/lib/openmpi -Wl,--enable-new-dtags -L/usr/lib/openmpi -lmpi_cxx -lmpi
Similarly to the previous OpenMP recipe, we have found the linking to MPI to be extremely compact thanks to the imported targets provided by a reasonably modern FindMPI module:
target_link_libraries(hello-mpi
  PUBLIC
    MPI::MPI_CXX
 )
We did not have to worry about compile flags or about include directories - these settings and dependencies are already encoded as INTERFACE-type properties in the IMPORTED target provided by CMake.
And as discussed in the previous recipe, for CMake versions below 3.9, we would have to do a bit more work:
add_executable(hello-mpi hello-mpi.c)

target_compile_options(hello-mpi
  PUBLIC
    ${MPI_CXX_COMPILE_FLAGS}
  )

target_include_directories(hello-mpi
  PUBLIC
    ${MPI_CXX_INCLUDE_PATH}
  )

target_link_libraries(hello-mpi
  PUBLIC
    ${MPI_CXX_LIBRARIES}
  )
In this recipe, we have discussed C++, but the arguments and approach are equally valid for a C or Fortran project.
The BLAS library offers a standardized interface for common operations involving matrices and vectors. This interface was however standardized with the Fortran language in mind. While we have shown how these libraries can be used more or less directly from C++, it may be desirable to have a higher-level interface in modern C++ programs.
The header-only Eigen library uses template programming to offer such an interface. Its matrix and vector types are intuitive to use and even provide type checking at compile time, to ensure that incompatible matrix dimensions are not mixed. Dense and sparse matrix operations, such as matrix-matrix products, solvers for linear systems, and eigenvalue problems, are also implemented using expression templates for efficiency. From version 3.3, Eigen can be linked to the BLAS and LAPACK libraries, which provides the flexibility to offload certain operations to the implementation given in these libraries for additional performance.
This recipe will show how to find the Eigen library and to instruct it to use OpenMP parallelization and offload some of the work to the BLAS library.
In this example, we will compile a program that allocates a random square matrix and vector of dimension passed from the command line. We will then solve the linear system Ax=b using LU decomposition. We will use the following source code (linear-algebra.cpp):
#include <chrono>
#include <cmath>
#include <cstdlib>
#include <iomanip>
#include <iostream>
#include <vector>

#include <Eigen/Dense>

int main(int argc, char **argv) {
  if (argc != 2) {
    std::cout << "Usage: ./linear-algebra dim" << std::endl;
    return EXIT_FAILURE;
  }

  std::chrono::time_point<std::chrono::system_clock> start, end;
  std::chrono::duration<double> elapsed_seconds;
  std::time_t end_time;

  std::cout << "Number of threads used by Eigen: " << Eigen::nbThreads()
            << std::endl;

  // Allocate matrices and right-hand side vector
  start = std::chrono::system_clock::now();
  int dim = std::atoi(argv[1]);
  Eigen::MatrixXd A = Eigen::MatrixXd::Random(dim, dim);
  Eigen::VectorXd b = Eigen::VectorXd::Random(dim);
  end = std::chrono::system_clock::now();

  // Report times
  elapsed_seconds = end - start;
  end_time = std::chrono::system_clock::to_time_t(end);
  std::cout << "matrices allocated and initialized "
            << std::put_time(std::localtime(&end_time), "%a %b %d %Y
%r\n")
            << "elapsed time: " << elapsed_seconds.count() << "s\n";

  start = std::chrono::system_clock::now();
  // Save matrix and RHS
  Eigen::MatrixXd A1 = A;
  Eigen::VectorXd b1 = b;
  end = std::chrono::system_clock::now();
  end_time = std::chrono::system_clock::to_time_t(end);
  std::cout << "Scaling done, A and b saved "
            << std::put_time(std::localtime(&end_time), "%a %b %d %Y %r\n")
            << "elapsed time: " << elapsed_seconds.count() << "s\n";

  start = std::chrono::system_clock::now();
  Eigen::VectorXd x = A.lu().solve(b);
  end = std::chrono::system_clock::now();

  // Report times
  elapsed_seconds = end - start;
  end_time = std::chrono::system_clock::to_time_t(end);

  double relative_error = (A * x - b).norm() / b.norm();

  std::cout << "Linear system solver done "
            << std::put_time(std::localtime(&end_time), "%a %b %d %Y %r\n")
            << "elapsed time: " << elapsed_seconds.count() << "s\n";
  std::cout << "relative error is " << relative_error << std::endl;

  return 0;
}
Matrix-vector multiplications and LU decompositions are implemented in Eigen, but can optionally be offloaded to the BLAS and LAPACK libraries. In this recipe, we only consider offloading to the BLAS library.
In this project, we will find the Eigen and BLAS libraries, as well as OpenMP, and instruct Eigen to use OpenMP parallelization and to offload part of the linear algebra work to the BLAS library:
cmake_minimum_required(VERSION 3.9 FATAL_ERROR)

project(recipe-07 LANGUAGES CXX)

set(CMAKE_CXX_STANDARD 11)
set(CMAKE_CXX_EXTENSIONS OFF)
set(CMAKE_CXX_STANDARD_REQUIRED ON)
find_package(OpenMP REQUIRED)
find_package(Eigen3 3.3 REQUIRED CONFIG)
if(TARGET Eigen3::Eigen)
  message(STATUS "Eigen3 v${EIGEN3_VERSION_STRING} found in ${EIGEN3_INCLUDE_DIR}")
endif()
add_executable(linear-algebra linear-algebra.cpp)
find_package(BLAS)
if(BLAS_FOUND)
  message(STATUS "Eigen will use some subroutines from BLAS.")
  message(STATUS "See: http://eigen.tuxfamily.org/dox-devel/TopicUsingBlasLapack.html")
  target_compile_definitions(linear-algebra
    PRIVATE
      EIGEN_USE_BLAS
    )
  target_link_libraries(linear-algebra
    PUBLIC
      ${BLAS_LIBRARIES}
    )
else()
  message(STATUS "BLAS not found. Using Eigen own functions")
endif()
target_link_libraries(linear-algebra
  PUBLIC
    Eigen3::Eigen
    OpenMP::OpenMP_CXX
  )
$ mkdir -p build
$ cd build
$ cmake ..

-- ...
-- Found OpenMP_CXX: -fopenmp (found version "4.5")
-- Found OpenMP: TRUE (found version "4.5")
-- Eigen3 v3.3.4 found in /usr/include/eigen3
-- ...
-- Found BLAS: /usr/lib/libblas.so
-- Eigen will use some subroutines from BLAS.
-- See: http://eigen.tuxfamily.org/dox-devel/TopicUsingBlasLapack.html
$ cmake --build .
$ ./linear-algebra 1000

Number of threads used by Eigen: 4
matrices allocated and initialized Sun Jun 17 2018 11:04:20 AM
elapsed time: 0.0492328s
Scaling done, A and b saved Sun Jun 17 2018 11:04:20 AM
elapsed time: 0.0492328s
Linear system solver done Sun Jun 17 2018 11:04:20 AM
elapsed time: 0.483142s
relative error is 4.21946e-13
Eigen provides native CMake support, which makes it easy to set up a C++ project using it. Starting from version 3.3, Eigen ships CMake modules that export the appropriate target, Eigen3::Eigen, which we have used here.
You will have noticed the CONFIG option to the find_package command. This signals to CMake that the package search will not proceed through a FindEigen3.cmake module, but rather through the Eigen3Config.cmake, Eigen3ConfigVersion.cmake, and Eigen3Targets.cmake files provided by the Eigen3 package in the standard location, <installation-prefix>/share/eigen3/cmake. This package location mode is called "Config" mode and is more versatile than the Find<package>.cmake approach we have been using so far. For more information about "Module" mode versus "Config" mode, please consult the official documentation at https://cmake.org/cmake/help/v3.5/command/find_package.html.
Also note that while the Eigen3, BLAS, and OpenMP dependencies were declared as PUBLIC dependencies, the EIGEN_USE_BLAS compile definition was declared as PRIVATE. Instead of linking the executable directly, we could collect the library dependencies in a separate library target. Using the PUBLIC/PRIVATE keywords, we can then adjust the visibility of the corresponding flags and definitions to dependents of the library target.
CMake will look for config modules in a predefined hierarchy of locations. First off is CMAKE_PREFIX_PATH, while <package>_DIR is the next search path. Thus, if Eigen3 was installed in a non-standard location, we can use two alternatives to tell CMake where to look for it:
$ cmake -D CMAKE_PREFIX_PATH=<installation-prefix> ..
$ cmake -D Eigen3_DIR=<installation-prefix>/share/eigen3/cmake/
The Boost libraries are a collection of general-purpose C++ libraries. These libraries provide a lot of functionality that may be indispensable in a modern C++ project, but which is not yet available through the C++ standard. For example, Boost provides components for metaprogramming, handling optional arguments, and filesystem manipulations, among others. Many of these libraries have later been adopted by the C++11, C++14, and C++17 standards, but many Boost components are still the libraries of choice for code bases that have to keep compatibility with older compilers.
This recipe will show you how to detect and link against some components of the Boost libraries.
The source code we will compile is one of the examples for the filesystem library provided by Boost to interact with the filesystem. This library is conveniently cross-platform and abstracts the differences between operating systems and filesystems into a coherent, high-level API. The following example code (path-info.cpp) will accept a path as an argument and print a report about its components to the screen:
#include <iostream>

#include <boost/filesystem.hpp>

using namespace std;
using namespace boost::filesystem;

const char *say_what(bool b) { return b ? "true" : "false"; }

int main(int argc, char *argv[]) {
  if (argc < 2) {
    cout
        << "Usage: path_info path-element [path-element...]\n"
           "Composes a path via operator/= from one or more path-element arguments\n"
           "Example: path_info foo/bar baz\n"
#ifdef BOOST_POSIX_API
           " would report info about the composed path foo/bar/baz\n";
#else // BOOST_WINDOWS_API
           " would report info about the composed path foo/bar\\baz\n";
#endif
    return 1;
  }

  path p;
  for (; argc > 1; --argc, ++argv)
    p /= argv[1]; // compose path p from the command line arguments

  cout << "\ncomposed path:\n";
  cout << " operator<<()---------: " << p << "\n";
  cout << " make_preferred()-----: " << p.make_preferred() << "\n";

  cout << "\nelements:\n";
  for (auto element : p)
    cout << " " << element << '\n';

  cout << "\nobservers, native format:" << endl;
#ifdef BOOST_POSIX_API
  cout << " native()-------------: " << p.native() << endl;
  cout << " c_str()--------------: " << p.c_str() << endl;
#else // BOOST_WINDOWS_API
  wcout << L" native()-------------: " << p.native() << endl;
  wcout << L" c_str()--------------: " << p.c_str() << endl;
#endif
  cout << " string()-------------: " << p.string() << endl;
  wcout << L" wstring()------------: " << p.wstring() << endl;

  cout << "\nobservers, generic format:\n";
  cout << " generic_string()-----: " << p.generic_string() << endl;
  wcout << L" generic_wstring()----: " << p.generic_wstring() << endl;

  cout << "\ndecomposition:\n";
  cout << " root_name()----------: " << p.root_name() << '\n';
  cout << " root_directory()-----: " << p.root_directory() << '\n';
  cout << " root_path()----------: " << p.root_path() << '\n';
  cout << " relative_path()------: " << p.relative_path() << '\n';
  cout << " parent_path()--------: " << p.parent_path() << '\n';
  cout << " filename()-----------: " << p.filename() << '\n';
  cout << " stem()---------------: " << p.stem() << '\n';
  cout << " extension()----------: " << p.extension() << '\n';

  cout << "\nquery:\n";
  cout << " empty()--------------: " << say_what(p.empty()) << '\n';
  cout << " is_absolute()--------: " << say_what(p.is_absolute()) <<
  '\n';
  cout << " has_root_name()------: " << say_what(p.has_root_name()) <<
  '\n';
  cout << " has_root_directory()-: " << say_what(p.has_root_directory()) << '\n';
  cout << " has_root_path()------: " << say_what(p.has_root_path()) <<
  '\n';
  cout << " has_relative_path()--: " << say_what(p.has_relative_path()) << '\n';
  cout << " has_parent_path()----: " << say_what(p.has_parent_path()) << '\n';
  cout << " has_filename()-------: " << say_what(p.has_filename()) <<
  '\n';
  cout << " has_stem()-----------: " << say_what(p.has_stem()) << '\n';
  cout << " has_extension()------: " << say_what(p.has_extension()) <<
  '\n';

  return 0;
}
Boost consists of many different libraries and these can be used almost independently from each other. Internally, CMake represents this library collection as a collection of components. The FindBoost.cmake module can search not only for the full installation of the library collection but also for particular components and their dependencies within the collection, if any. We will build up the corresponding CMakeLists.txt step by step:
cmake_minimum_required(VERSION 3.5 FATAL_ERROR)

project(recipe-08 LANGUAGES CXX)

set(CMAKE_CXX_STANDARD 11)
set(CMAKE_CXX_EXTENSIONS OFF)
set(CMAKE_CXX_STANDARD_REQUIRED ON)
find_package(Boost 1.54 REQUIRED COMPONENTS filesystem)
add_executable(path-info path-info.cpp)
target_link_libraries(path-info
  PUBLIC
    Boost::filesystem
  )
The FindBoost.cmake module, which is used in this recipe, will try to locate the Boost libraries in standard system installation directories. Since we link to the imported Boost::filesystem target, CMake will automatically set the include directories and adjust the compile and link flags. In case the Boost libraries are installed in a non-standard location, one can pass the root of the Boost installation at configuration time using the BOOST_ROOT variable in order to point CMake to also search the non-standard path:
$ cmake -D BOOST_ROOT=/custom/boost/
Alternatively, one can pass both the BOOST_INCLUDEDIR and BOOST_LIBRARYDIR variables for the directories containing headers and libraries:
$ cmake -D BOOST_INCLUDEDIR=/custom/boost/include -D BOOST_LIBRARYDIR=/custom/boost/lib
We have so far discussed two ways of detecting external dependencies:
What if a certain dependency provides neither a find-module nor vendor-packaged CMake files? In this case, we are left with two options:
In this recipe, we will show how to leverage pkg-config from within CMake to locate the ZeroMQ messaging library. The next recipe, Detecting external libraries: II. Writing a find-module, will show how to write your own basic find-module for ZeroMQ.
The code we will build is an example from the ZeroMQ manual at http://zguide.zeromq.org/page:all. It consists of two source files, hwserver.c, and hwclient.c, which will be built into two separate executables. When executed, they will print the familiar "Hello, World" message.
This is a C project and we will use the C99 standard. We will build the CMakeLists.txt file step by step:
cmake_minimum_required(VERSION 3.6 FATAL_ERROR)

project(recipe-09 LANGUAGES C)

set(CMAKE_C_STANDARD 99)
set(CMAKE_C_EXTENSIONS OFF)
set(CMAKE_C_STANDARD_REQUIRED ON)
find_package(PkgConfig REQUIRED QUIET)
pkg_search_module(
  ZeroMQ
  REQUIRED
    libzeromq libzmq lib0mq
  IMPORTED_TARGET
  )
if(TARGET PkgConfig::ZeroMQ)
  message(STATUS "Found ZeroMQ")
endif()
add_executable(hwserver hwserver.c)

target_link_libraries(hwserver PkgConfig::ZeroMQ)

add_executable(hwclient hwclient.c)

target_link_libraries(hwclient PkgConfig::ZeroMQ)
$ mkdir -p build
$ cd build
$ cmake ..
$ cmake --build .
Current 0MQ version is 4.2.2
Connecting to hello world server…
Sending Hello 0…
Received World 0
Sending Hello 1…
Received World 1
Sending Hello 2…
...
Once pkg-config is found, CMake will provide two functions to wrap the functionality offered by this program:
These functions accept the REQUIRED and QUIET arguments, as find_package does. In more detail, our call to pkg_search_module is the following:
pkg_search_module(
  ZeroMQ
  REQUIRED
    libzeromq libzmq lib0mq
  IMPORTED_TARGET
  )
Here, the first argument is the prefix that will be used to name the target that is storing the result of the search for the ZeroMQ library: PkgConfig::ZeroMQ. Notice that we need to pass different options for the names of the library on the system: libzeromq, libzmq, and lib0mq. This is due to the fact that different operating systems and package managers can choose different names for the same package.
This recipe complements the previous recipe, Detecting external libraries: I. Using pkg-config. We will show how to write a basic find-module to locate the ZeroMQ messaging library on your system so that the detection of the library can be made to work on non-Unix operating systems. We will reuse the same server-client sample code.
This is a C project and we will use the C99 standard. We will build the CMakeLists.txt file step by step:
cmake_minimum_required(VERSION 3.5 FATAL_ERROR)

project(recipe-10 LANGUAGES C)

set(CMAKE_C_STANDARD 99)
set(CMAKE_C_EXTENSIONS OFF)
set(CMAKE_C_STANDARD_REQUIRED ON)
list(APPEND CMAKE_MODULE_PATH ${CMAKE_CURRENT_SOURCE_DIR})
find_package(ZeroMQ REQUIRED)
add_executable(hwserver hwserver.c)

target_include_directories(hwserver
  PRIVATE
    ${ZeroMQ_INCLUDE_DIRS}
  )

target_link_libraries(hwserver
  PRIVATE
    ${ZeroMQ_LIBRARIES}
  )
add_executable(hwclient hwclient.c)

target_include_directories(hwclient
  PRIVATE
    ${ZeroMQ_INCLUDE_DIRS}
  )

target_link_libraries(hwclient
  PRIVATE
    ${ZeroMQ_LIBRARIES}
  )
The main CMakeLists.txt for this recipe differs from the one used in the previous recipe in the use of the FindZeroMQ.cmake module. This module searches for the ZeroMQ header files and libraries using the find_path and find_library CMake built-in commands and sets relevant variables using the find_package_handle_standard_args, as we did in Recipe 3, Detecting Python modules and packages.
if(NOT ZeroMQ_ROOT)
  set(ZeroMQ_ROOT "$ENV{ZeroMQ_ROOT}")
endif()
if(NOT ZeroMQ_ROOT)
  find_path(_ZeroMQ_ROOT NAMES include/zmq.h)
else()
  set(_ZeroMQ_ROOT "${ZeroMQ_ROOT}")
endif()

find_path(ZeroMQ_INCLUDE_DIRS NAMES zmq.h HINTS ${_ZeroMQ_ROOT}/include)
set(_ZeroMQ_H ${ZeroMQ_INCLUDE_DIRS}/zmq.h)

function(_zmqver_EXTRACT _ZeroMQ_VER_COMPONENT _ZeroMQ_VER_OUTPUT)
  set(CMAKE_MATCH_1 "0")
  set(_ZeroMQ_expr "^[ \\t]*#define[ \\t]+${_ZeroMQ_VER_COMPONENT}[ \\t]+([0-9]+)$")
  file(STRINGS "${_ZeroMQ_H}" _ZeroMQ_ver REGEX "${_ZeroMQ_expr}")
  string(REGEX MATCH "${_ZeroMQ_expr}" ZeroMQ_ver "${_ZeroMQ_ver}")
  set(${_ZeroMQ_VER_OUTPUT} "${CMAKE_MATCH_1}" PARENT_SCOPE)
endfunction()

_zmqver_EXTRACT("ZMQ_VERSION_MAJOR" ZeroMQ_VERSION_MAJOR)
_zmqver_EXTRACT("ZMQ_VERSION_MINOR" ZeroMQ_VERSION_MINOR)
_zmqver_EXTRACT("ZMQ_VERSION_PATCH" ZeroMQ_VERSION_PATCH)
if(ZeroMQ_FIND_VERSION_COUNT GREATER 2)
  set(ZeroMQ_VERSION "${ZeroMQ_VERSION_MAJOR}.${ZeroMQ_VERSION_MINOR}.${ZeroMQ_VERSION_PATCH}")
else()
  set(ZeroMQ_VERSION "${ZeroMQ_VERSION_MAJOR}.${ZeroMQ_VERSION_MINOR}")
endif()
if(NOT ${CMAKE_C_PLATFORM_ID} STREQUAL "Windows")
find_library(ZeroMQ_LIBRARIES
NAMES
zmq
HINTS
${_ZeroMQ_ROOT}/lib
${_ZeroMQ_ROOT}/lib/x86_64-linux-gnu
)
else()
find_library(ZeroMQ_LIBRARIES
NAMES
libzmq
"libzmq-mt-${ZeroMQ_VERSION_MAJOR}_${ZeroMQ_VERSION_MINOR}_${ZeroMQ_VERSION_PATCH}"
"libzmq-${CMAKE_VS_PLATFORM_TOOLSET}-mt-${ZeroMQ_VERSION_MAJOR}_${ZeroMQ_VERSION_MINOR}_${ZeroMQ_VERSION_PATCH}"
libzmq_d
"libzmq-mt-gd-${ZeroMQ_VERSION_MAJOR}_${ZeroMQ_VERSION_MINOR}_${ZeroMQ_VERSION_PATCH}"
"libzmq-${CMAKE_VS_PLATFORM_TOOLSET}-mt-gd-${ZeroMQ_VERSION_MAJOR}_${ZeroMQ_VERSION_MINOR}_${ZeroMQ_VERSION_PATCH}"
HINTS
${_ZeroMQ_ROOT}/lib
)
endif()
include(FindPackageHandleStandardArgs)
find_package_handle_standard_args(ZeroMQ
FOUND_VAR
ZeroMQ_FOUND
REQUIRED_VARS
ZeroMQ_INCLUDE_DIRS
ZeroMQ_LIBRARIES
VERSION_VAR
ZeroMQ_VERSION
)
Find-modules typically follow a specific pattern:
find_path(<VAR> NAMES name PATHS paths)
To summarize, when discovering packages there are four available routes:
The four alternative routes have been ranked by relevance, but each approach has its challenges.
Not all package vendors provide CMake discovery files, but it is becoming more common. This is due to the fact that exporting CMake targets makes it very easy for third-party code to consume additional dependencies imposed by libraries and/or programs that it depends on.
Find-modules have been the workhorse of dependency location in CMake since the very beginning. However, most of them still rely on setting variables consumed by the dependent, such as Boost_INCLUDE_DIRS, PYTHON_INTERPRETER, and so forth. This approach makes it difficult to redistribute your own package for third-parties and ensure that your dependencies are consistently met.
The approach using pkg-config can work very well since it has become a de facto standard for Unix-based systems. For this reason, however, it is not a fully cross-platform approach. Moreover, as the CMake documentation states, in some cases, the user can accidentally override package detection and lead pkg-config to supply incorrect information.
The very last resort is then to write your own find-module CMake script, as we have done in this recipe. This is doable and relies on the FindPackageHandleStandardArgs.cmake module we briefly discussed. However, writing a fully comprehensive find-module is far from trivial; there are many corner cases that are hard to discover, and we have shown an example of that when looking for the ZeroMQ library files on Unix and Windows platforms.
These concerns and difficulties are very well-known to all software developers, as witnessed by the lively discussions on the CMake mailing list: https://cmake.org/pipermail/cmake/2018-May/067556.html. pkg-config is accepted among Unix package developers, but it cannot be easily ported to not-Unix platforms. CMake configuration files are powerful, but not all software developers are familiar with the CMake syntax. The Common Package Specification project is a very recent attempt at unifying the pkg-config and CMake configuration files approaches for package discovery. You can find more information on the project's website: https://mwoehlke.github.io/cps/
In Chapter 10, Writing an Installer, we will discuss how to make your own package discoverable to third-party applications by using the first route outlined in the previous discussion: providing your own CMake discovery files alongside your project.
In this chapter, we will cover the following recipes:
Testing is a core component of the code development toolbox. Performing automated testing by using unit and integration tests not only helps the developer to detect functionality regressions early, but can also serve as a starting point for developers joining the project. It can help new developers to submit changes to the code project, with assurance that the expected functionality is preserved. For users of the code, automated tests can be essential when verifying that the installation preserves the functionality of the code. A nice byproduct of employing tests for units, modules, or libraries right from the start is that it can guide the programmer towards more modular and less complex code structures, using a pure, functional style, that minimizes and localizes global variables and the global state.
In this chapter, we will demonstrate how to integrate testing into the CMake build structure, using popular testing libraries and frameworks, with the following goals in mind:
In this recipe, we will introduce unit tests using CTest, the testing tool distributed as a part of CMake. In order to keep the focus on the CMake/CTest aspect and to minimize the cognitive load, we wish to keep the code that is to be tested as simple as possible. Our plan is to write and test code that can sum up integers, and nothing more. Just like in primary school, when we learned multiplication and division after learning how to add, at this point, our example code will only add and will only understand integers; it will not need to deal with floating point numbers. And, just as the young Carl Friedrich Gauss was tested by his teacher to sum all natural numbers from 1 to 100, we will ask our code to do the same-albeit without using the clever grouping trick employed by Gauss. To show that CMake does not impose any restrictions on the language to implement the actual tests, we will test our code using not only a C++ executable, but also using a Python script and a shell script. For simplicity, we will do this without using any testing libraries, but we will introduce C++ testing frameworks in later recipes in this chapter.
Our code example consists of three files. The implementation source file, sum_integers.cpp, does the work of summing up over a vector of integers, and returns the sum:
#include "sum_integers.hpp"
#include <vector>
int sum_integers(const std::vector<int> integers) {
auto sum = 0;
for (auto i : integers) {
sum += i;
}
return sum;
}
For this example, it does not matter whether this is the most elegant implementation of a sum over a vector. The interface is exported to our example library in sum_integers.hpp, as follows:
#pragma once
#include <vector>
int sum_integers(const std::vector<int> integers);
Finally, the main function is defined in main.cpp, which collects the command-line arguments from argv[], converts them into a vector of integers, calls the sum_integers function, and prints the result to the output:
#include "sum_integers.hpp"
#include <iostream>
#include <string>
#include <vector>
// we assume all arguments are integers and we sum them up
// for simplicity we do not verify the type of arguments
int main(int argc, char *argv[]) {
std::vector<int> integers;
for (auto i = 1; i < argc; i++) {
integers.push_back(std::stoi(argv[i]));
}
auto sum = sum_integers(integers);
std::cout << sum << std::endl;
}
Our goal is to test this code using a C++ executable (test.cpp), a Bash shell script (test.sh), and a Python script (test.py), to demonstrate that CMake does not really mind which programming or scripting language we prefer, as long as the implementation can return a zero or non-zero value that CMake can interpret as a success or failure, respectively.
In the C++ example (test.cpp), we verify that 1 + 2 + 3 + 4 + 5 equals 15, by calling sum_integers:
#include "sum_integers.hpp"
#include <vector>
int main() {
auto integers = {1, 2, 3, 4, 5};
if (sum_integers(integers) == 15) {
return 0;
} else {
return 1;
}
}
The Bash shell script test example calls the executable, which is received as a positional argument:
#!/usr/bin/env bash
EXECUTABLE=$1
OUTPUT=$($EXECUTABLE 1 2 3 4)
if [ "$OUTPUT" = "10" ]
then
exit 0
else
exit 1
fi
Also, the Python test script calls the executable (passed using the --executable command-line argument) directly, and allows it to be executed with the --short command-line argument:
import subprocess
import argparse
# test script expects the executable as argument
parser = argparse.ArgumentParser()
parser.add_argument('--executable',
help='full path to executable')
parser.add_argument('--short',
default=False,
action='store_true',
help='run a shorter test')
args = parser.parse_args()
def execute_cpp_code(integers):
result = subprocess.check_output([args.executable] + integers)
return int(result)
if args.short:
# we collect [1, 2, ..., 100] as a list of strings
result = execute_cpp_code([str(i) for i in range(1, 101)])
assert result == 5050, 'summing up to 100 failed'
else:
# we collect [1, 2, ..., 1000] as a list of strings
result = execute_cpp_code([str(i) for i in range(1, 1001)])
assert result == 500500, 'summing up to 1000 failed'
We will now describe, step by step, how to set up testing for our project, as follows:
cmake_minimum_required(VERSION 3.5 FATAL_ERROR)
project(recipe-01 LANGUAGES CXX)
set(CMAKE_CXX_STANDARD 11)
set(CMAKE_CXX_EXTENSIONS OFF)
set(CMAKE_CXX_STANDARD_REQUIRED ON)
find_package(PythonInterp REQUIRED)
find_program(BASH_EXECUTABLE NAMES bash REQUIRED)
# example library
add_library(sum_integers sum_integers.cpp)
# main code
add_executable(sum_up main.cpp)
target_link_libraries(sum_up sum_integers)
# testing binary
add_executable(cpp_test test.cpp)
target_link_libraries(cpp_test sum_integers)
enable_testing()
add_test(
NAME bash_test
COMMAND ${BASH_EXECUTABLE} ${CMAKE_CURRENT_SOURCE_DIR}/test.sh $<TARGET_FILE:sum_up>
)
add_test(
NAME cpp_test
COMMAND $<TARGET_FILE:cpp_test>
)
add_test(
NAME python_test_long
COMMAND ${PYTHON_EXECUTABLE} ${CMAKE_CURRENT_SOURCE_DIR}/test.py --executable $<TARGET_FILE:sum_up>
)
add_test(
NAME python_test_short
COMMAND ${PYTHON_EXECUTABLE} ${CMAKE_CURRENT_SOURCE_DIR}/test.py --short --executable $<TARGET_FILE:sum_up>
)
$ mkdir -p build
$ cd build
$ cmake ..
$ cmake --build .
$ ./sum_up 1 2 3 4 5
15
$ ctest
Test project /home/user/cmake-recipes/chapter-04/recipe-01/cxx-example/build
Start 1: bash_test
1/4 Test #1: bash_test ........................ Passed 0.01 sec
Start 2: cpp_test
2/4 Test #2: cpp_test ......................... Passed 0.00 sec
Start 3: python_test_long
3/4 Test #3: python_test_long ................. Passed 0.06 sec
Start 4: python_test_short
4/4 Test #4: python_test_short ................ Passed 0.05 sec
100% tests passed, 0 tests failed out of 4
Total Test time (real) = 0.12 sec
The two key commands here are enable_testing(), which enables testing for this directory and all subfolders within it (in this case, the entire project, since we place it in the main CMakeLists.txt), and add_test(), which defines a new test and sets the test name and the command to run; an example is as follows:
add_test(
NAME cpp_test
COMMAND $<TARGET_FILE:cpp_test>
)
In the preceding example, we employed a generator expression: $<TARGET_FILE:cpp_test>. Generator expressions are expressions that are evaluated at build system generation time. We will return to generator expressions in more detail in Chapter 5, Configure-time and Build-time Operations, Recipe 9, Fine-tuning configuration and compilation with generator expressions. At this point, we can state that $<TARGET_FILE:cpp_test> will be replaced by the full path to the cpp_test executable target.
Generator expressions are extremely convenient in the context of defining tests, because we do not have to explicitly hardcode the locations and names of the executables into the test definitions. It would be very tedious to achieve this in a portable way, since both the location of the executable and the executable suffix (for example, the .exe suffix on Windows) can vary between operating systems, build types, and generators. Using the generator expression, we do not have to explicitly know the location and name.
It is also possible to pass arguments to the test command to run; for example:
add_test(
NAME python_test_short
COMMAND ${PYTHON_EXECUTABLE} ${CMAKE_CURRENT_SOURCE_DIR}/test.py --short --executable $<TARGET_FILE:sum_up>
)
In this example, we run the tests sequentially (Recipe 8, Running tests in parallel, will show you how to shorten the total test time by executing tests in parallel), and the tests are executed in the same order that they are defined (Recipe 9, Running a subset of tests, will show you how to change the order or run a subset of tests). It is up to the programmer to define the actual test command, which can be programmed in any language supported by the operating system environment running the test set. The only thing that CTest cares about, in order to decide whether a test has passed or failed, is the return code of the test command. CTest follows the standard convention that a zero return code means success, and a non-zero return code means failure. Any script that can return zero or non-zero can be used to implement a test case.
Now that we know how to define and execute tests, it is also important that we know how to diagnose test failures. For this, we can introduce a bug into our code and let all of the tests fail:
Start 1: bash_test
1/4 Test #1: bash_test ........................***Failed 0.01 sec
Start 2: cpp_test
2/4 Test #2: cpp_test .........................***Failed 0.00 sec
Start 3: python_test_long
3/4 Test #3: python_test_long .................***Failed 0.06 sec
Start 4: python_test_short
4/4 Test #4: python_test_short ................***Failed 0.06 sec
0% tests passed, 4 tests failed out of 4
Total Test time (real) = 0.13 sec
The following tests FAILED:
1 - bash_test (Failed)
2 - cpp_test (Failed)
3 - python_test_long (Failed)
4 - python_test_short (Failed)
Errors while running CTest
If we then wish to learn more, we can inspect the file Testing/Temporary/LastTestsFailed.log. This file contains the full output of the test commands, and is the first place to look during a postmortem analysis. It is possible to obtain more verbose test output from CTest by using the following CLI switches:
CTest offers a very handy shortcut to rerun only the tests that have previously failed; the CLI switch to use is --rerun-failed, and it proves extremely useful during debugging.
Consider the following definition:
add_test(
NAME python_test_long
COMMAND ${PYTHON_EXECUTABLE} ${CMAKE_CURRENT_SOURCE_DIR}/test.py --executable $<TARGET_FILE:sum_up>
)
The preceding definition can be re-expressed by explicitly specifying the WORKING_DIRECTORY in which the script will be run, as follows:
add_test(
NAME python_test_long
COMMAND ${PYTHON_EXECUTABLE} test.py --executable $<TARGET_FILE:sum_up>
WORKING_DIRECTORY ${CMAKE_CURRENT_SOURCE_DIR}
)
We will also mention that test names can contain the / character, which may be useful when organizing related tests by name; for example:
add_test(
NAME python/long
COMMAND ${PYTHON_EXECUTABLE} test.py --executable $<TARGET_FILE:sum_up>
WORKING_DIRECTORY ${CMAKE_CURRENT_SOURCE_DIR}
)
Sometimes, we need to set environment variables for a test script. This can be achieved with set_tests_properties:
set_tests_properties(python_test
PROPERTIES
ENVIRONMENT
ACCOUNT_MODULE_PATH=${CMAKE_CURRENT_SOURCE_DIR}
ACCOUNT_HEADER_FILE=${CMAKE_CURRENT_SOURCE_DIR}/account/account.h
ACCOUNT_LIBRARY_FILE=$<TARGET_FILE:account>
)
This approach might not always be robust across different platforms, but CMake offers a way around this potential lack of robustness. The following snippet is equivalent to the one given above and invokes CMake, via CMAKE_COMMAND, to prepend environment variables before executing the actual Python test script:
add_test(
NAME
python_test
COMMAND
${CMAKE_COMMAND} -E env ACCOUNT_MODULE_PATH=${CMAKE_CURRENT_SOURCE_DIR}
ACCOUNT_HEADER_FILE=${CMAKE_CURRENT_SOURCE_DIR}/account/account.h
ACCOUNT_LIBRARY_FILE=$<TARGET_FILE:account>
${PYTHON_EXECUTABLE} ${CMAKE_CURRENT_SOURCE_DIR}/account/test.py
)
Once again, note the use of the generator expression $<TARGET_FILE:account> to pass the location of the library file without explicitly hardcoding paths.
We have executed the test set using the ctest command, but CMake will also create targets for the generator in question (make test for Unix Makefile generators, ninja test for the Ninja tool, or RUN_TESTS for Visual Studio). This means that there is yet another (almost) portable way to run the test step:
$ cmake --build . --target test
Unfortunately, this fails when using the Visual Studio generator where we have to use RUN_TESTS instead:
$ cmake --build . --target RUN_TESTS
In the previous recipe, we used an integer return code to signal success or failure in test.cpp. This is fine for simple tests, but typically, we would like to use a testing framework that offers an infrastructure to run more sophisticated tests with fixtures, comparisons with numerical tolerance, and better error reporting if a test fails. A modern and popular test library is Catch2 (https://github.com/catchorg/Catch2). One nice feature of this test framework is the fact that it can be included in your project as a single-header library, which makes compilation and updating the framework particularly easy. In this recipe, we will use CMake in combination with Catch2, to test the summation code introduced in the previous recipe.
We will keep the main.cpp, sum_integers.cpp, and sum_integers.hpp unchanged from the previous recipe, but will update the test.cpp:
#include "sum_integers.hpp"
// this tells catch to provide a main()
// only do this in one cpp file
#define CATCH_CONFIG_MAIN
#include "catch.hpp"
#include <vector>
TEST_CASE("Sum of integers for a short vector", "[short]") {
auto integers = {1, 2, 3, 4, 5};
REQUIRE(sum_integers(integers) == 15);
}
TEST_CASE("Sum of integers for a longer vector", "[long]") {
std::vector<int> integers;
for (int i = 1; i < 1001; ++i) {
integers.push_back(i);
}
REQUIRE(sum_integers(integers) == 500500);
}
We also need the catch.hpp header, which we can download from https://github.com/catchorg/Catch2 (we have used version 2.0.1) and place in the root of our project, alongside test.cpp.
To use the Catch2 library, we will modify CMakeLists.txt from the previous recipe, to perform the following steps:
# set minimum cmake version
cmake_minimum_required(VERSION 3.5 FATAL_ERROR)
# project name and language
project(recipe-02 LANGUAGES CXX)
# require C++11
set(CMAKE_CXX_STANDARD 11)
set(CMAKE_CXX_EXTENSIONS OFF)
set(CMAKE_CXX_STANDARD_REQUIRED ON)
# example library
add_library(sum_integers sum_integers.cpp)
# main code
add_executable(sum_up main.cpp)
target_link_libraries(sum_up sum_integers)
# testing binary
add_executable(cpp_test test.cpp)
target_link_libraries(cpp_test sum_integers)
enable_testing()
add_test(
NAME catch_test
COMMAND $<TARGET_FILE:cpp_test> --success
)
$ mkdir -p build
$ cd build
$ cmake ..
$ cmake --build .
$ ctest -V
UpdateCTestConfiguration from :/home/user/cmake-cookbook/chapter-04/recipe-02/cxx-example/build/DartConfiguration.tcl
UpdateCTestConfiguration from :/home/user/cmake-cookbook/chapter-04/recipe-02/cxx-example/build/DartConfiguration.tcl
Test project /home/user/cmake-cookbook/chapter-04/recipe-02/cxx-example/build
Constructing a list of tests
Done constructing a list of tests
Updating test list for fixtures
Added 0 tests to meet fixture requirements
Checking test dependency graph...
Checking test dependency graph end
test 1
Start 1: catch_test
1: Test command: /home/user/cmake-cookbook/chapter-04/recipe-02/cxx-example/build/cpp_test "--success"
1: Test timeout computed to be: 10000000
1:
1: ~~~~~~~~~~~~~~~~~~~~~~~~~~~~~~~~~~~~~~~~~~~~~~~~~~~~~~~~~~~~~~~~~~~
1: cpp_test is a Catch v2.0.1 host application.
1: Run with -? for options
1:
1: ----------------------------------------------------------------
1: Sum of integers for a short vector
1: ----------------------------------------------------------------
1: /home/user/cmake-cookbook/chapter-04/recipe-02/cxx-example/test.cpp:10
1: ...................................................................
1:
1: /home/user/cmake-cookbook/chapter-04/recipe-02/cxx-example/test.cpp:12:
1: PASSED:
1: REQUIRE( sum_integers(integers) == 15 )
1: with expansion:
1: 15 == 15
1:
1: ----------------------------------------------------------------
1: Sum of integers for a longer vector
1: ----------------------------------------------------------------
1: /home/user/cmake-cookbook/chapter-04/recipe-02/cxx-example/test.cpp:15
1: ...................................................................
1:
1: /home/user/cmake-cookbook/chapter-04/recipe-02/cxx-example/test.cpp:20:
1: PASSED:
1: REQUIRE( sum_integers(integers) == 500500 )
1: with expansion:
1: 500500 (0x7a314) == 500500 (0x7a314)
1:
1: ===================================================================
1: All tests passed (2 assertions in 2 test cases)
1:
1/1 Test #1: catch_test ....................... Passed 0.00 s
100% tests passed, 0 tests failed out of 1
Total Test time (real) = 0.00 sec
$ ./cpp_test --success
~~~~~~~~~~~~~~~~~~~~~~~~~~~~~~~~~~~~~~~~~~~~~~~~~~~~~~~~~~~~~~~~~~~
cpp_test is a Catch v2.0.1 host application.
Run with -? for options
-------------------------------------------------------------------
Sum of integers for a short vector
-------------------------------------------------------------------
/home/user/cmake-cookbook/chapter-04/recipe-02/cxx-example/test.cpp:10
...................................................................
/home/user/cmake-cookbook/chapter-04/recipe-02/cxx-example/test.cpp:12:
PASSED:
REQUIRE( sum_integers(integers) == 15 )
with expansion:
15 == 15
-------------------------------------------------------------------
Sum of integers for a longer vector
-------------------------------------------------------------------
/home/user/cmake-cookbook/chapter-04/recipe-02/cxx-example/test.cpp:15
...................................................................
/home/user/cmake-cookbook/chapter-04/recipe-02/cxx-example/test.cpp:20:
PASSED:
REQUIRE( sum_integers(integers) == 500500 )
with expansion:
500500 (0x7a314) == 500500 (0x7a314)
===================================================================
All tests passed (2 assertions in 2 test cases)
$ ./cpp_test --help
Since Catch2 is a single-header framework, no additional targets have to be defined and built. We only have to make sure that CMake can find catch.hpp, to build test.cpp. For convenience, we placed it in the same directory as test.cpp, but we could have chosen a different location and indicated that location by using target_include_directories. Yet another approach would be to wrap the header into an INTERFACE library. This can be done as illustrated in the Catch2 documentation (https://github.com/catchorg/Catch2/blob/master/docs/build-systems.md#cmake):
# Prepare "Catch" library for other executables set(CATCH_INCLUDE_DIR ${CMAKE_CURRENT_SOURCE_DIR}/catch) add_library(Catch INTERFACE) target_include_directories(Catch INTERFACE ${CATCH_INCLUDE_DIR})
We would have then linked against the library as follows:
target_link_libraries(cpp_test Catch)
We recall from the discussion in Recipe 3, Building and linking static and shared libraries, in Chapter 1, From a Simple Executable to Libraries that INTERFACE libraries are pseudo-targets offered by CMake that are useful to specify usage requirements for targets outside our project.
This was a simple example, with a focus on CMake. Catch2 offers much more, of course. For a full documentation of the Catch2 framework, visit https://github.com/catchorg/Catch2.
The Catch2 code repository contains a contributed CMake function to parse Catch tests and automatically create CMake tests, without explicitly typing add_test() functions; see https://github.com/catchorg/Catch2/blob/master/contrib/ParseAndAddCatchTests.cmake.
In this recipe, we will demonstrate how to implement unit testing using the Google Test framework, with the help of CMake. In contrast to the previous recipe, the Google Test framework is more than a header file; it is a library containing a couple of files that need to be built and linked against. We could place these alongside our code project, but to make the code project more lightweight, we will choose to download a well-defined version of the Google Test sources at configure time, and then build the framework and link against it. We will use the relatively new FetchContent module (available since CMake version 3.11). We will revisit FetchContent in Chapter 8, The Superbuild Pattern, where we will discuss how the module works under the hood, and where we will also illustrate how to emulate it by using ExternalProject_Add. This recipe is inspired by (and adapted from) the example at https://cmake.org/cmake/help/v3.11/module/FetchContent.html.
We will keep main.cpp, sum_integers.cpp, and sum_integers.hpp unchanged from the previous recipes, but will update the test.cpp source code, as follows:
#include "sum_integers.hpp"
#include "gtest/gtest.h"
#include <vector>
int main(int argc, char **argv) {
::testing::InitGoogleTest(&argc, argv);
return RUN_ALL_TESTS();
}
TEST(example, sum_zero) {
auto integers = {1, -1, 2, -2, 3, -3};
auto result = sum_integers(integers);
ASSERT_EQ(result, 0);
}
TEST(example, sum_five) {
auto integers = {1, 2, 3, 4, 5};
auto result = sum_integers(integers);
ASSERT_EQ(result, 15);
}
As indicated in the preceding code, we chose to explicitly place neither gtest.h nor other Google Test sources in our code project repository, but will download them at configure time by using the FetchContent module.
The following steps describe how you can set up a CMakeLists.txt step by step, to compile the executable and its corresponding test using GTest:
# set minimum cmake version
cmake_minimum_required(VERSION 3.11 FATAL_ERROR)
# project name and language
project(recipe-03 LANGUAGES CXX)
# require C++11
set(CMAKE_CXX_STANDARD 11)
set(CMAKE_CXX_EXTENSIONS OFF)
set(CMAKE_CXX_STANDARD_REQUIRED ON)
set(CMAKE_WINDOWS_EXPORT_ALL_SYMBOLS ON)
# example library
add_library(sum_integers sum_integers.cpp)
# main code
add_executable(sum_up main.cpp)
target_link_libraries(sum_up sum_integers)
option(ENABLE_UNIT_TESTS "Enable unit tests" ON)
message(STATUS "Enable testing: ${ENABLE_UNIT_TESTS}")
if(ENABLE_UNIT_TESTS)
# all the remaining CMake code will be placed here
endif()
include(FetchContent)
FetchContent_Declare(
googletest
GIT_REPOSITORY https://github.com/google/googletest.git
GIT_TAG release-1.8.0
)
FetchContent_GetProperties(googletest)
if(NOT googletest_POPULATED)
FetchContent_Populate(googletest)
# Prevent GoogleTest from overriding our compiler/linker options
# when building with Visual Studio
set(gtest_force_shared_crt ON CACHE BOOL "" FORCE)
# Prevent GoogleTest from using PThreads
set(gtest_disable_pthreads ON CACHE BOOL "" FORCE)
# adds the targers: gtest, gtest_main, gmock, gmock_main
add_subdirectory(
${googletest_SOURCE_DIR}
${googletest_BINARY_DIR}
)
# Silence std::tr1 warning on MSVC
if(MSVC)
foreach(_tgt gtest gtest_main gmock gmock_main)
target_compile_definitions(${_tgt}
PRIVATE
"_SILENCE_TR1_NAMESPACE_DEPRECATION_WARNING"
)
endforeach()
endif()
endif()
add_executable(cpp_test "")
target_sources(cpp_test
PRIVATE
test.cpp
)
target_link_libraries(cpp_test
PRIVATE
sum_integers
gtest_main
)
enable_testing()
add_test(
NAME google_test
COMMAND $<TARGET_FILE:cpp_test>
)
$ mkdir -p build
$ cd build
$ cmake ..
$ cmake --build .
$ ctest
Test project /home/user/cmake-cookbook/chapter-04/recipe-03/cxx-example/build
Start 1: google_test
1/1 Test #1: google_test ...................... Passed 0.00 sec
100% tests passed, 0 tests failed out of 1
Total Test time (real) = 0.00 sec
$ ./cpp_test
[==========] Running 2 tests from 1 test case.
[----------] Global test environment set-up.
[----------] 2 tests from example
[ RUN ] example.sum_zero
[ OK ] example.sum_zero (0 ms)
[ RUN ] example.sum_five
[ OK ] example.sum_five (0 ms)
[----------] 2 tests from example (0 ms total)
[----------] Global test environment tear-down
[==========] 2 tests from 1 test case ran. (0 ms total)
[ PASSED ] 2 tests.
The FetchContent module enables populating content at configure time, via any method supported by the ExternalProject module, and has become a standard part of CMake in its 3.11 version. Whereas ExternalProject_Add() downloads at build time (as seen in Chapter 8, The Superbuild Pattern), the FetchContent module makes content available immediately, such that the main project and the fetched external project (in this case, the Google Test) can be processed when CMake is first invoked, and can be nested using add_subdirectory.
To fetch Google Test sources, we have first declared the external content:
include(FetchContent)
FetchContent_Declare(
googletest
GIT_REPOSITORY https://github.com/google/googletest.git
GIT_TAG release-1.8.0
)
In this case, we fetched a Git repository with a specific tag (release-1.8.0), but we could also fetch an external project from a Subversion, Mercurial, or HTTP(S) source. For available options, consult the options of the corresponding ExternalProject_Add command at https://cmake.org/cmake/help/v3.11/module/ExternalProject.html.
We checked whether content population was already processed with the FetchContent_GetProperties() command, before calling FetchContent_Populate(); otherwise, FetchContent_Populate() would have thrown an error if it was called more than once.
The command FetchContent_Populate(googletest) populates the sources and defines googletest_SOURCE_DIR and googletest_BINARY_DIR, which we can use to process the Google Test project (using add_subdirectory(), since it happens to be a CMake project, as well):
add_subdirectory(
${googletest_SOURCE_DIR}
${googletest_BINARY_DIR}
)
The preceding defines the following targets: gtest, gtest_main, gmock, and gmock_main. In this recipe, we were only interested in the gtest_main target, as a library dependency for the unit test example:
target_link_libraries(cpp_test
PRIVATE
sum_integers
gtest_main
)
When building our code, we can see how it correctly triggers the configure and build steps for Google Test. One day, we will wish to upgrade to a later Google Test release, and the only line that we will probably need to change is the one detailing the GIT_TAG.
We have scraped the surface of FetchContent and its build-time cousin, ExternalProject_Add, and we will revisit these commands in Chapter 8, The Superbuild Pattern. For a detailed discussion of the available options, please consult https://cmake.org/cmake/help/v3.11/module/FetchContent.html.
In this recipe, we fetched the sources at configure time, but we could have also installed them on the system environment and used the FindGTest module to detect the library and header files (https://cmake.org/cmake/help/v3.5/module/FindGTest.html). From version 3.9, CMake also offers a GoogleTest module (https://cmake.org/cmake/help/v3.9/module/GoogleTest.html), which provides a gtest_add_tests function. This function can be used to automatically add tests, by scanning the source code for Google Test macros.
Obviously, Google Test has a myriad of features that are outside the scope of this recipe, as listed at https://github.com/google/googletest.
Boost test is another very popular unit testing framework in the C++ community, and in this example, we will demonstrate how to unit test our familiar summing example code using Boost test.
We will keep the main.cpp, sum_integers.cpp, and sum_integers.hpp unchanged from the previous recipes, but we will update test.cpp as a minimal example of a unit test using the Boost test library:
#include "sum_integers.hpp"
#include <vector>
#define BOOST_TEST_MODULE example_test_suite
#include <boost/test/unit_test.hpp>
BOOST_AUTO_TEST_CASE(add_example) {
auto integers = {1, 2, 3, 4, 5};
auto result = sum_integers(integers);
BOOST_REQUIRE(result == 15);
}
These are the steps to follow to build our project using Boost test:
# set minimum cmake version
cmake_minimum_required(VERSION 3.5 FATAL_ERROR)
# project name and language
project(recipe-04 LANGUAGES CXX)
# require C++11
set(CMAKE_CXX_STANDARD 11)
set(CMAKE_CXX_EXTENSIONS OFF)
set(CMAKE_CXX_STANDARD_REQUIRED ON)
# example library
add_library(sum_integers sum_integers.cpp)
# main code
add_executable(sum_up main.cpp)
target_link_libraries(sum_up sum_integers)
find_package(Boost 1.54 REQUIRED COMPONENTS unit_test_framework)
add_executable(cpp_test test.cpp)
target_link_libraries(cpp_test
PRIVATE
sum_integers
Boost::unit_test_framework
)
# avoid undefined reference to "main" in test.cpp
target_compile_definitions(cpp_test
PRIVATE
BOOST_TEST_DYN_LINK
)
enable_testing()
add_test(
NAME boost_test
COMMAND $<TARGET_FILE:cpp_test>
)
$ mkdir -p build
$ cd build
$ cmake ..
$ cmake --build .
$ ctest
Test project /home/user/cmake-recipes/chapter-04/recipe-04/cxx-example/build
Start 1: boost_test
1/1 Test #1: boost_test ....................... Passed 0.01 sec
100% tests passed, 0 tests failed out of 1
Total Test time (real) = 0.01 sec
$ ./cpp_test
Running 1 test case...
*** No errors detected
We have used find_package to detect the unit_test_framework component of Boost (see Chapter 3, Detecting External Libraries and Programs, Recipe 8, Detecting the Boost libraries). We have insisted that this component is REQUIRED, and the configuration will stop if it cannot be found in the system environment. The cpp_test target needs to know where to find Boost header files, and needs to be linked against the corresponding libraries; these are both provided by the IMPORTED library target, Boost::unit_test_framework, set by a successful call to find_package. We recall from the discussion in Recipe 3, Building and linking static and shared libraries, in Chapter 1, From a Simple Executable to Libraries that IMPORTED libraries are pseudo-targets offered by CMake to represent pre-existing dependencies and their usage requirements.
In this recipe, we assumed that Boost was installed on the system. Alternatively, we could have fetched and built the Boost dependency at compile-time (see Chapter 8, The Superbuild Pattern, Recipe 2, Managing dependencies with a superbuild: I. The Boost libraries). However, Boost is not a lightweight dependency. In our example code, we used only the most basic infrastructure, but Boost offers a wealth of features and options, and we will refer the interested reader to http://www.boost.org/doc/libs/1_65_1/libs/test/doc/html/index.html.
Memory defects, such as writing to or reading from memory beyond allocated bounds, or memory leaks (memory that is allocated, but never released), can create nasty bugs that are difficult to track down, and it is useful to detect them early. Valgrind (http://valgrind.org) is a popular and versatile tool to detect memory defects and memory leaks, and in this recipe, we will use Valgrind to alert us about memory problems when running tests using CMake/CTest (see Chapter 14, Testing Dashboards, for a discussion of the related AddressSanitizer and ThreadSanitizer).
For this recipe, we require three files. The first is the implementation that we wish to test (we can call the file leaky_implementation.cpp):
#include "leaky_implementation.hpp"
int do_some_work() {
// we allocate an array
double *my_array = new double[1000];
// do some work
// ...
// we forget to deallocate it
// delete[] my_array;
return 0;
}
We also need the corresponding header file (leaky_implementation.hpp):
#pragma once
int do_some_work();
And, we need the test file (test.cpp):
#include "leaky_implementation.hpp"
int main() {
int return_code = do_some_work();
return return_code;
}
We expect the test to pass, since the return_code is hardcoded to 0. However, we also hope to detect a memory leak, since we forgot to de-allocate my_array.
The following shows how to set up CMakeLists.txt to perform the dynamic analysis of the code:
cmake_minimum_required(VERSION 3.5 FATAL_ERROR)
project(recipe-05 LANGUAGES CXX)
set(CMAKE_CXX_STANDARD 11)
set(CMAKE_CXX_EXTENSIONS OFF)
set(CMAKE_CXX_STANDARD_REQUIRED ON)
add_library(example_library leaky_implementation.cpp)
add_executable(cpp_test test.cpp)
target_link_libraries(cpp_test example_library)
find_program(MEMORYCHECK_COMMAND NAMES valgrind)
set(MEMORYCHECK_COMMAND_OPTIONS "--trace-children=yes --leak-check=full")
# add memcheck test action
include(CTest)
enable_testing()
add_test(
NAME cpp_test
COMMAND $<TARGET_FILE:cpp_test>
)
$ ctest
Test project /home/user/cmake-recipes/chapter-04/recipe-05/cxx-example/build
Start 1: cpp_test
1/1 Test #1: cpp_test ......................... Passed 0.00 sec
100% tests passed, 0 tests failed out of 1
Total Test time (real) = 0.00 sec
$ ctest -T memcheck
Site: myhost
Build name: Linux-c++
Create new tag: 20171127-1717 - Experimental
Memory check project /home/user/cmake-recipes/chapter-04/recipe-05/cxx-example/build
Start 1: cpp_test
1/1 MemCheck #1: cpp_test ......................... Passed 0.40 sec
100% tests passed, 0 tests failed out of 1
Total Test time (real) = 0.40 sec
-- Processing memory checking output:
1/1 MemCheck: #1: cpp_test ......................... Defects: 1
MemCheck log files can be found here: ( * corresponds to test number)
/home/user/cmake-recipes/chapter-04/recipe-05/cxx-example/build/Testing/Temporary/MemoryChecker.*.log
Memory checking results:
Memory Leak - 1
We used find_program(MEMORYCHECK_COMMAND NAMES valgrind) to find Valgrind and set MEMORYCHECK_COMMAND to its full path. We also needed to explicitly include the CTest module to enable the memcheck test action, which we can employ by using ctest -T memcheck. Also, observe that we were able to pass options to Valgrind using set(MEMORYCHECK_COMMAND_OPTIONS "--trace-children=yes --leak-check=full"). The memory checking step creates a log file, which can be used to inspect the memory defect in detail.
This recipe can be used to report memory defects to a nightly testing dashboard, but we demonstrated here that this functionality can also be used independent of a testing dashboard. We will revisit discuss usage in conjunction with CDash in Chapter 14, Testing Dashboards.
For documentation on Valgrind and its features and options, see http://valgrind.org.
Ideally, we want all of our tests to always pass on every platform. However, we may want to test whether an expected failure or exception will occur in a controlled setting, and in that case, we would define the expected failure as a successful outcome. We believe that typically, this is a task that should be given to the test framework (such as Catch2 or Google Test), which should check for the expected failure and report successes to CMake. But, there may be situations where you wish to define a non-zero return code from a test as success; in other words, you may want to invert the definitions of success and failure. In this recipe, we will demonstrate such a situation.
The ingredient for this recipe will be a tiny Python script (test.py) that always returns 1, which CMake interprets as a failure:
import sys
# simulate a failing test
sys.exit(1)
Step by step, this is how to write CMakeLists.txt to accomplish our task:
cmake_minimum_required(VERSION 3.5 FATAL_ERROR)
project(recipe-06 LANGUAGES NONE)
find_package(PythonInterp REQUIRED)
enable_testing()
add_test(example ${PYTHON_EXECUTABLE} ${CMAKE_CURRENT_SOURCE_DIR}/test.py)
set_tests_properties(example PROPERTIES WILL_FAIL true)
$ mkdir -p build
$ cd build
$ cmake ..
$ cmake --build .
$ ctest
Test project /home/user/cmake-recipes/chapter-04/recipe-06/example/build
Start 1: example
1/1 Test #1: example .......................... Passed 0.00 sec
100% tests passed, 0 tests failed out of 1
Total Test time (real) = 0.01 sec
Using set_tests_properties(example PROPERTIES WILL_FAIL true), we set the property WILL_FAIL to true, which inverts success/failure. However, this feature should not be used to temporarily fix broken tests.
If you need more flexibility, you can use the test properties PASS_REGULAR_EXPRESSION and FAIL_REGULAR_EXPRESSION in combination with set_tests_properties. If these are set, the test output will be checked against a list of regular expressions given as arguments, and, if at least one of the regular expressions matches, the test either passes or fails, respectively. Many other properties can be set on tests. A full list of available properties can be found at https://cmake.org/cmake/help/v3.5/manual/cmake-properties.7.html#properties-on-tests.
Ideally, the test set should take only a short time, in order to motivate developers to run the test set often, and to make it possible (or easier) to test every commit (changeset). However, some tests might take longer or get stuck (for instance, due to a high file I/O load), and we may need to implement timeouts to terminate tests that go overtime, before they pile up and delay the entire test and deploy pipeline. In this recipe, we will demonstrate one way of implementing timeouts, which can be adjusted separately for each test.
The ingredient for this recipe will be a tiny Python script (test.py) that always returns 0. To keep it super simple and to maintain focus on the CMake aspect, the test script does nothing other than wait for two seconds; but, we can imagine that in real life, this test script would perform more meaningful work:
import sys
import time
# wait for 2 seconds
time.sleep(2)
# report success
sys.exit(0)
We need to inform CTest that tests need to be terminated if they go into overtime, as follows:
# set minimum cmake version
cmake_minimum_required(VERSION 3.5 FATAL_ERROR)
# project name
project(recipe-07 LANGUAGES NONE)
# detect python
find_package(PythonInterp REQUIRED)
# define tests
enable_testing()
# we expect this test to run for 2 seconds
add_test(example ${PYTHON_EXECUTABLE} ${CMAKE_CURRENT_SOURCE_DIR}/test.py)
set_tests_properties(example PROPERTIES TIMEOUT 10)
$ ctest
Test project /home/user/cmake-recipes/chapter-04/recipe-07/example/build
Start 1: example
1/1 Test #1: example .......................... Passed 2.01 sec
100% tests passed, 0 tests failed out of 1
Total Test time (real) = 2.01 sec
$ ctest
Test project /home/user/cmake-recipes/chapter-04/recipe-07/example/build
Start 1: example
1/1 Test #1: example ..........................***Timeout 10.01 sec
0% tests passed, 1 tests failed out of 1
Total Test time (real) = 10.01 sec
The following tests FAILED:
1 - example (Timeout)
Errors while running CTest
TIMEOUT is a handy property that can be used to specify a timeout for individual tests, by using set_tests_properties. If the test goes past that time, for whatever reason (the test has stalled or the machine is too slow), the test is terminated and marked as failed.
Most modern computers have four or more CPU cores. One fantastic feature of CTest is its ability to run tests in parallel, if you have more than one core available. This can significantly reduce the total time to test, and reducing the total test time is what really counts, to motivate developers to test frequently. In this recipe, we will demonstrate this feature and discuss how you can optimize the definition of your tests for maximum performance.
Let us assume that our test set contains tests labeled a, b, ..., j, each with a specific time duration:
| Tests | Duration (in time units) |
| a, b, c, d | 0.5 |
| e, f, g | 1.5 |
| h | 2.5 |
| i | 3.5 |
| j | 4.5 |
The time units can be minutes, but to keep it simple and short, we will use seconds. For simplicity, we can represent test a, which consumes 0.5 time units, with a Python script:
import sys
import time
# wait for 0.5 seconds
time.sleep(0.5)
# finally report success
sys.exit(0)
The other tests can be represented accordingly. We will place these scripts one directory below CMakeLists.txt, in a directory called test.
For this recipe, we need to declare a list of tests, as follows:
# set minimum cmake version
cmake_minimum_required(VERSION 3.5 FATAL_ERROR)
# project name
project(recipe-08 LANGUAGES NONE)
# detect python
find_package(PythonInterp REQUIRED)
# define tests
enable_testing()
add_test(a ${PYTHON_EXECUTABLE} ${CMAKE_CURRENT_SOURCE_DIR}/test/a.py)
add_test(b ${PYTHON_EXECUTABLE} ${CMAKE_CURRENT_SOURCE_DIR}/test/b.py)
add_test(c ${PYTHON_EXECUTABLE} ${CMAKE_CURRENT_SOURCE_DIR}/test/c.py)
add_test(d ${PYTHON_EXECUTABLE} ${CMAKE_CURRENT_SOURCE_DIR}/test/d.py)
add_test(e ${PYTHON_EXECUTABLE} ${CMAKE_CURRENT_SOURCE_DIR}/test/e.py)
add_test(f ${PYTHON_EXECUTABLE} ${CMAKE_CURRENT_SOURCE_DIR}/test/f.py)
add_test(g ${PYTHON_EXECUTABLE} ${CMAKE_CURRENT_SOURCE_DIR}/test/g.py)
add_test(h ${PYTHON_EXECUTABLE} ${CMAKE_CURRENT_SOURCE_DIR}/test/h.py)
add_test(i ${PYTHON_EXECUTABLE} ${CMAKE_CURRENT_SOURCE_DIR}/test/i.py)
add_test(j ${PYTHON_EXECUTABLE} ${CMAKE_CURRENT_SOURCE_DIR}/test/j.py)
$ mkdir -p build
$ cd build
$ cmake ..
$ ctest
Start 1: a
1/10 Test #1: a ................................ Passed 0.51 sec
Start 2: b
2/10 Test #2: b ................................ Passed 0.51 sec
Start 3: c
3/10 Test #3: c ................................ Passed 0.51 sec
Start 4: d
4/10 Test #4: d ................................ Passed 0.51 sec
Start 5: e
5/10 Test #5: e ................................ Passed 1.51 sec
Start 6: f
6/10 Test #6: f ................................ Passed 1.51 sec
Start 7: g
7/10 Test #7: g ................................ Passed 1.51 sec
Start 8: h
8/10 Test #8: h ................................ Passed 2.51 sec
Start 9: i
9/10 Test #9: i ................................ Passed 3.51 sec
Start 10: j
10/10 Test #10: j ................................ Passed 4.51 sec
100% tests passed, 0 tests failed out of 10
Total Test time (real) = 17.11 sec
$ ctest --parallel 4
Start 10: j
Start 9: i
Start 8: h
Start 5: e
1/10 Test #5: e ................................ Passed 1.51 sec
Start 7: g
2/10 Test #8: h ................................ Passed 2.51 sec
Start 6: f
3/10 Test #7: g ................................ Passed 1.51 sec
Start 3: c
4/10 Test #9: i ................................ Passed 3.63 sec
5/10 Test #3: c ................................ Passed 0.60 sec
Start 2: b
Start 4: d
6/10 Test #6: f ................................ Passed 1.51 sec
7/10 Test #4: d ................................ Passed 0.59 sec
8/10 Test #2: b ................................ Passed 0.59 sec
Start 1: a
9/10 Test #10: j ................................ Passed 4.51 sec
10/10 Test #1: a ................................ Passed 0.51 sec
100% tests passed, 0 tests failed out of 10
Total Test time (real) = 4.74 sec
We can see that in the parallel case, tests j, i, h, and e started at the same time. The reduction in total test time when running in parallel can be significant. Looking at the output from ctest --parallel 4, we can see that the parallel test run started with the longest tests, and ran the shortest tests at the end. Starting with the longest tests is a very good strategy. It is like packing moving boxes: we start with larger items, and fill in the gaps with smaller items. Comparing the stacking of the a-j tests on four cores, when starting with the longest, looks as follows:
--> time
core 1: jjjjjjjjj
core 2: iiiiiiibd
core 3: hhhhhggg
core 4: eeefffac
Running tests in the order in which they are defined looks as follows:
--> time
core 1: aeeeiiiiiii
core 2: bfffjjjjjjjjj
core 3: cggg
core 4: dhhhhh
Running the tests in the order in which they are defined takes more time overall, since it leaves two cores idle for most of the time (here, cores 3 and 4). How did CMake know which tests would take the longest? CMake knew the time cost for each test because we ran the test sequentially first, and this recorded the cost data for each test in the file Testing/Temporary/CTestCostData.txt, which looks as follows:
a 1 0.506776
b 1 0.507882
c 1 0.508175
d 1 0.504618
e 1 1.51006
f 1 1.50975
g 1 1.50648
h 1 2.51032
i 1 3.50475
j 1 4.51111
If we had started with the parallel test right after configuring the project, it would run the tests in the order in which they were defined, and on four cores, the total test time would be noticeably longer. What does this mean for us? Does it mean that we should order tests according to decreasing time costs? This is an option, but it turns out that there is another way; we can indicate the time cost for each test by ourselves:
add_test(a ${PYTHON_EXECUTABLE} ${CMAKE_CURRENT_SOURCE_DIR}/test/a.py)
add_test(b ${PYTHON_EXECUTABLE} ${CMAKE_CURRENT_SOURCE_DIR}/test/b.py)
add_test(c ${PYTHON_EXECUTABLE} ${CMAKE_CURRENT_SOURCE_DIR}/test/c.py)
add_test(d ${PYTHON_EXECUTABLE} ${CMAKE_CURRENT_SOURCE_DIR}/test/d.py)
set_tests_properties(a b c d PROPERTIES COST 0.5)
add_test(e ${PYTHON_EXECUTABLE} ${CMAKE_CURRENT_SOURCE_DIR}/test/e.py)
add_test(f ${PYTHON_EXECUTABLE} ${CMAKE_CURRENT_SOURCE_DIR}/test/f.py)
add_test(g ${PYTHON_EXECUTABLE} ${CMAKE_CURRENT_SOURCE_DIR}/test/g.py)
set_tests_properties(e f g PROPERTIES COST 1.5)
add_test(h ${PYTHON_EXECUTABLE} ${CMAKE_CURRENT_SOURCE_DIR}/test/h.py)
set_tests_properties(h PROPERTIES COST 2.5)
add_test(i ${PYTHON_EXECUTABLE} ${CMAKE_CURRENT_SOURCE_DIR}/test/i.py)
set_tests_properties(i PROPERTIES COST 3.5)
add_test(j ${PYTHON_EXECUTABLE} ${CMAKE_CURRENT_SOURCE_DIR}/test/j.py)
set_tests_properties(j PROPERTIES COST 4.5)
The COST parameter can be either an estimate or extracted from Testing/Temporary/CTestCostData.txt.
Instead of using ctest --parallel N, you can also use the environment variable CTEST_PARALLEL_LEVEL, and set it to the desired level.
In the previous recipe, we learned how to run tests in parallel with the help of CMake, and we discussed that it is advantageous to start with the longest tests. While this strategy minimizes the total test time, during the code development of a particular feature, or during debugging, we may not wish to run the entire test set. We may prefer to start with the longest tests, especially while debugging functionality that is exercised by a short test. For debugging and code development, we need the ability to only run a selected subset of tests. In this recipe, we will present strategies to accomplish that.
In this example, we assume that we have six tests in total; the first three tests are shorter, and have the names feature-a, feature-b, and feature-c. We also have three longer tests, with the names feature-d, benchmark-a, and benchmark-b. In this recipe, we can represent these tests with Python scripts, where we can adjust the sleep time:
import sys
import time
# wait for 0.1 seconds
time.sleep(0.1)
# finally report success
sys.exit(0)
The following is a detailed breakdown of the contents of our CMakeLists.txt:
cmake_minimum_required(VERSION 3.5 FATAL_ERROR)
# project name
project(recipe-09 LANGUAGES NONE)
# detect python
find_package(PythonInterp REQUIRED)
# define tests
enable_testing()
add_test(
NAME feature-a
COMMAND ${PYTHON_EXECUTABLE} ${CMAKE_CURRENT_SOURCE_DIR}/test/feature-a.py
)
add_test(
NAME feature-b
COMMAND ${PYTHON_EXECUTABLE} ${CMAKE_CURRENT_SOURCE_DIR}/test/feature-b.py
)
add_test(
NAME feature-c
COMMAND ${PYTHON_EXECUTABLE} ${CMAKE_CURRENT_SOURCE_DIR}/test/feature-c.py
)
add_test(
NAME feature-d
COMMAND ${PYTHON_EXECUTABLE} ${CMAKE_CURRENT_SOURCE_DIR}/test/feature-d.py
)
add_test(
NAME benchmark-a
COMMAND ${PYTHON_EXECUTABLE} ${CMAKE_CURRENT_SOURCE_DIR}/test/benchmark-a.py
)
add_test(
NAME benchmark-b
COMMAND ${PYTHON_EXECUTABLE} ${CMAKE_CURRENT_SOURCE_DIR}/test/benchmark-b.py
)
set_tests_properties(
feature-a
feature-b
feature-c
PROPERTIES
LABELS "quick"
)
set_tests_properties(
feature-d
benchmark-a
benchmark-b
PROPERTIES
LABELS "long"
)
$ mkdir -p build
$ cd build
$ cmake ..
$ ctest
Start 1: feature-a
1/6 Test #1: feature-a ........................ Passed 0.11 sec
Start 2: feature-b
2/6 Test #2: feature-b ........................ Passed 0.11 sec
Start 3: feature-c
3/6 Test #3: feature-c ........................ Passed 0.11 sec
Start 4: feature-d
4/6 Test #4: feature-d ........................ Passed 0.51 sec
Start 5: benchmark-a
5/6 Test #5: benchmark-a ...................... Passed 0.51 sec
Start 6: benchmark-b
6/6 Test #6: benchmark-b ...................... Passed 0.51 sec
100% tests passed, 0 tests failed out of 6
Label Time Summary:
long = 1.54 sec*proc (3 tests)
quick = 0.33 sec*proc (3 tests)
Total Test time (real) = 1.87 sec
Each test now has a name and a label. In CMake, all tests are numbered, so they also carry a unique number. Having defined the test label, we can now either run the entire set or run tests by their names (using regular expressions), their labels, or their numbers.
Running tests by their names (here, we run all tests with names matching feature) looks as follows:
$ ctest -R feature
Start 1: feature-a
1/4 Test #1: feature-a ........................ Passed 0.11 sec
Start 2: feature-b
2/4 Test #2: feature-b ........................ Passed 0.11 sec
Start 3: feature-c
3/4 Test #3: feature-c ........................ Passed 0.11 sec
Start 4: feature-d
4/4 Test #4: feature-d ........................ Passed 0.51 sec
100% tests passed, 0 tests failed out of 4
Running tests by their labels (here, we run all long tests) produces:
$ ctest -L long
Start 4: feature-d
1/3 Test #4: feature-d ........................ Passed 0.51 sec
Start 5: benchmark-a
2/3 Test #5: benchmark-a ...................... Passed 0.51 sec
Start 6: benchmark-b
3/3 Test #6: benchmark-b ...................... Passed 0.51 sec
100% tests passed, 0 tests failed out of 3
Running tests by their numbers (here, we run tests 2 to 4) yields:
$ ctest -I 2,4
Start 2: feature-b
1/3 Test #2: feature-b ........................ Passed 0.11 sec
Start 3: feature-c
2/3 Test #3: feature-c ........................ Passed 0.11 sec
Start 4: feature-d
3/3 Test #4: feature-d ........................ Passed 0.51 sec
100% tests passed, 0 tests failed out of 3
Try using $ ctest --help, and you will see a wealth of options to choose from to customize your testing.
This recipe was inspired by the work of Craig Scott, and we recommend the reader to also consult the corresponding blog post for more background, at https://crascit.com/2016/10/18/test-fixtures-with-cmake-ctest/. The motivation for this recipe was to demonstrate how to employ test fixtures. These are useful for more sophisticated tests that require setup actions before the test is run, and cleanup actions after it has completed (such as creating an example database, setting up a connection, disconnecting, cleaning up the test database, and so on). We want to make sure that running a test that requires a setup or cleanup action automatically triggers these steps in a predictable and robust way, without introducing code repetition. These setup and cleanup steps can be delegated to the testing framework, such as Google Test or Catch2, but here, we demonstrate how to implement test fixtures at the CMake level.
We will prepare four tiny Python scripts, and place them under the test directory: setup.py, feature-a.py, feature-b.py, and cleanup.py.
We start with a familiar CMakeLists.txt structure, with some additional steps, as follows:
# set minimum cmake version
cmake_minimum_required(VERSION 3.5 FATAL_ERROR)
# project name
project(recipe-10 LANGUAGES NONE)
# detect python
find_package(PythonInterp REQUIRED)
# define tests
enable_testing()
add_test(
NAME setup
COMMAND ${PYTHON_EXECUTABLE} ${CMAKE_CURRENT_SOURCE_DIR}/test/setup.py
)
set_tests_properties(
setup
PROPERTIES
FIXTURES_SETUP my-fixture
)
add_test(
NAME feature-a
COMMAND ${PYTHON_EXECUTABLE} ${CMAKE_CURRENT_SOURCE_DIR}/test/feature-a.py
)
add_test(
NAME feature-b
COMMAND ${PYTHON_EXECUTABLE} ${CMAKE_CURRENT_SOURCE_DIR}/test/feature-b.py
)
set_tests_properties(
feature-a
feature-b
PROPERTIES
FIXTURES_REQUIRED my-fixture
)
add_test(
NAME cleanup
COMMAND ${PYTHON_EXECUTABLE} ${CMAKE_CURRENT_SOURCE_DIR}/test/cleanup.py
)
set_tests_properties(
cleanup
PROPERTIES
FIXTURES_CLEANUP my-fixture
)
$ mkdir -p build
$ cd build
$ cmake ..
$ ctest
Start 1: setup
1/4 Test #1: setup ............................ Passed 0.01 sec
Start 2: feature-a
2/4 Test #2: feature-a ........................ Passed 0.01 sec
Start 3: feature-b
3/4 Test #3: feature-b ........................ Passed 0.00 sec
Start 4: cleanup
4/4 Test #4: cleanup .......................... Passed 0.01 sec
100% tests passed, 0 tests failed out of 4
$ ctest -R feature-a
Start 1: setup
1/3 Test #1: setup ............................ Passed 0.01 sec
Start 2: feature-a
2/3 Test #2: feature-a ........................ Passed 0.00 sec
Start 4: cleanup
3/3 Test #4: cleanup .......................... Passed 0.01 sec
100% tests passed, 0 tests failed out of 3
In this example, we defined a text fixture and called it my-fixture. We gave the setup test the FIXTURES_SETUP property and the cleanup test the FIXTURES_CLEANUP property, and, using FIXTURES_REQUIRED, we made sure that the tests feature-a and feature-b both required the setup and cleanup steps in order to be run. Binding these together ensures that we always enter and leave steps in a well-defined state.
For more background and an excellent motivation for using this technique for fixtures see https://crascit.com/2016/10/18/test-fixtures-with-cmake-ctest/.
In this chapter, we will cover the following recipes:
In this chapter, we will learn how to perform custom operations at configure time and build time. Let us briefly recall the notion of times as related to the workflow of a project managed by CMake:
The complete workflow and the corresponding times are depicted in the following figure:
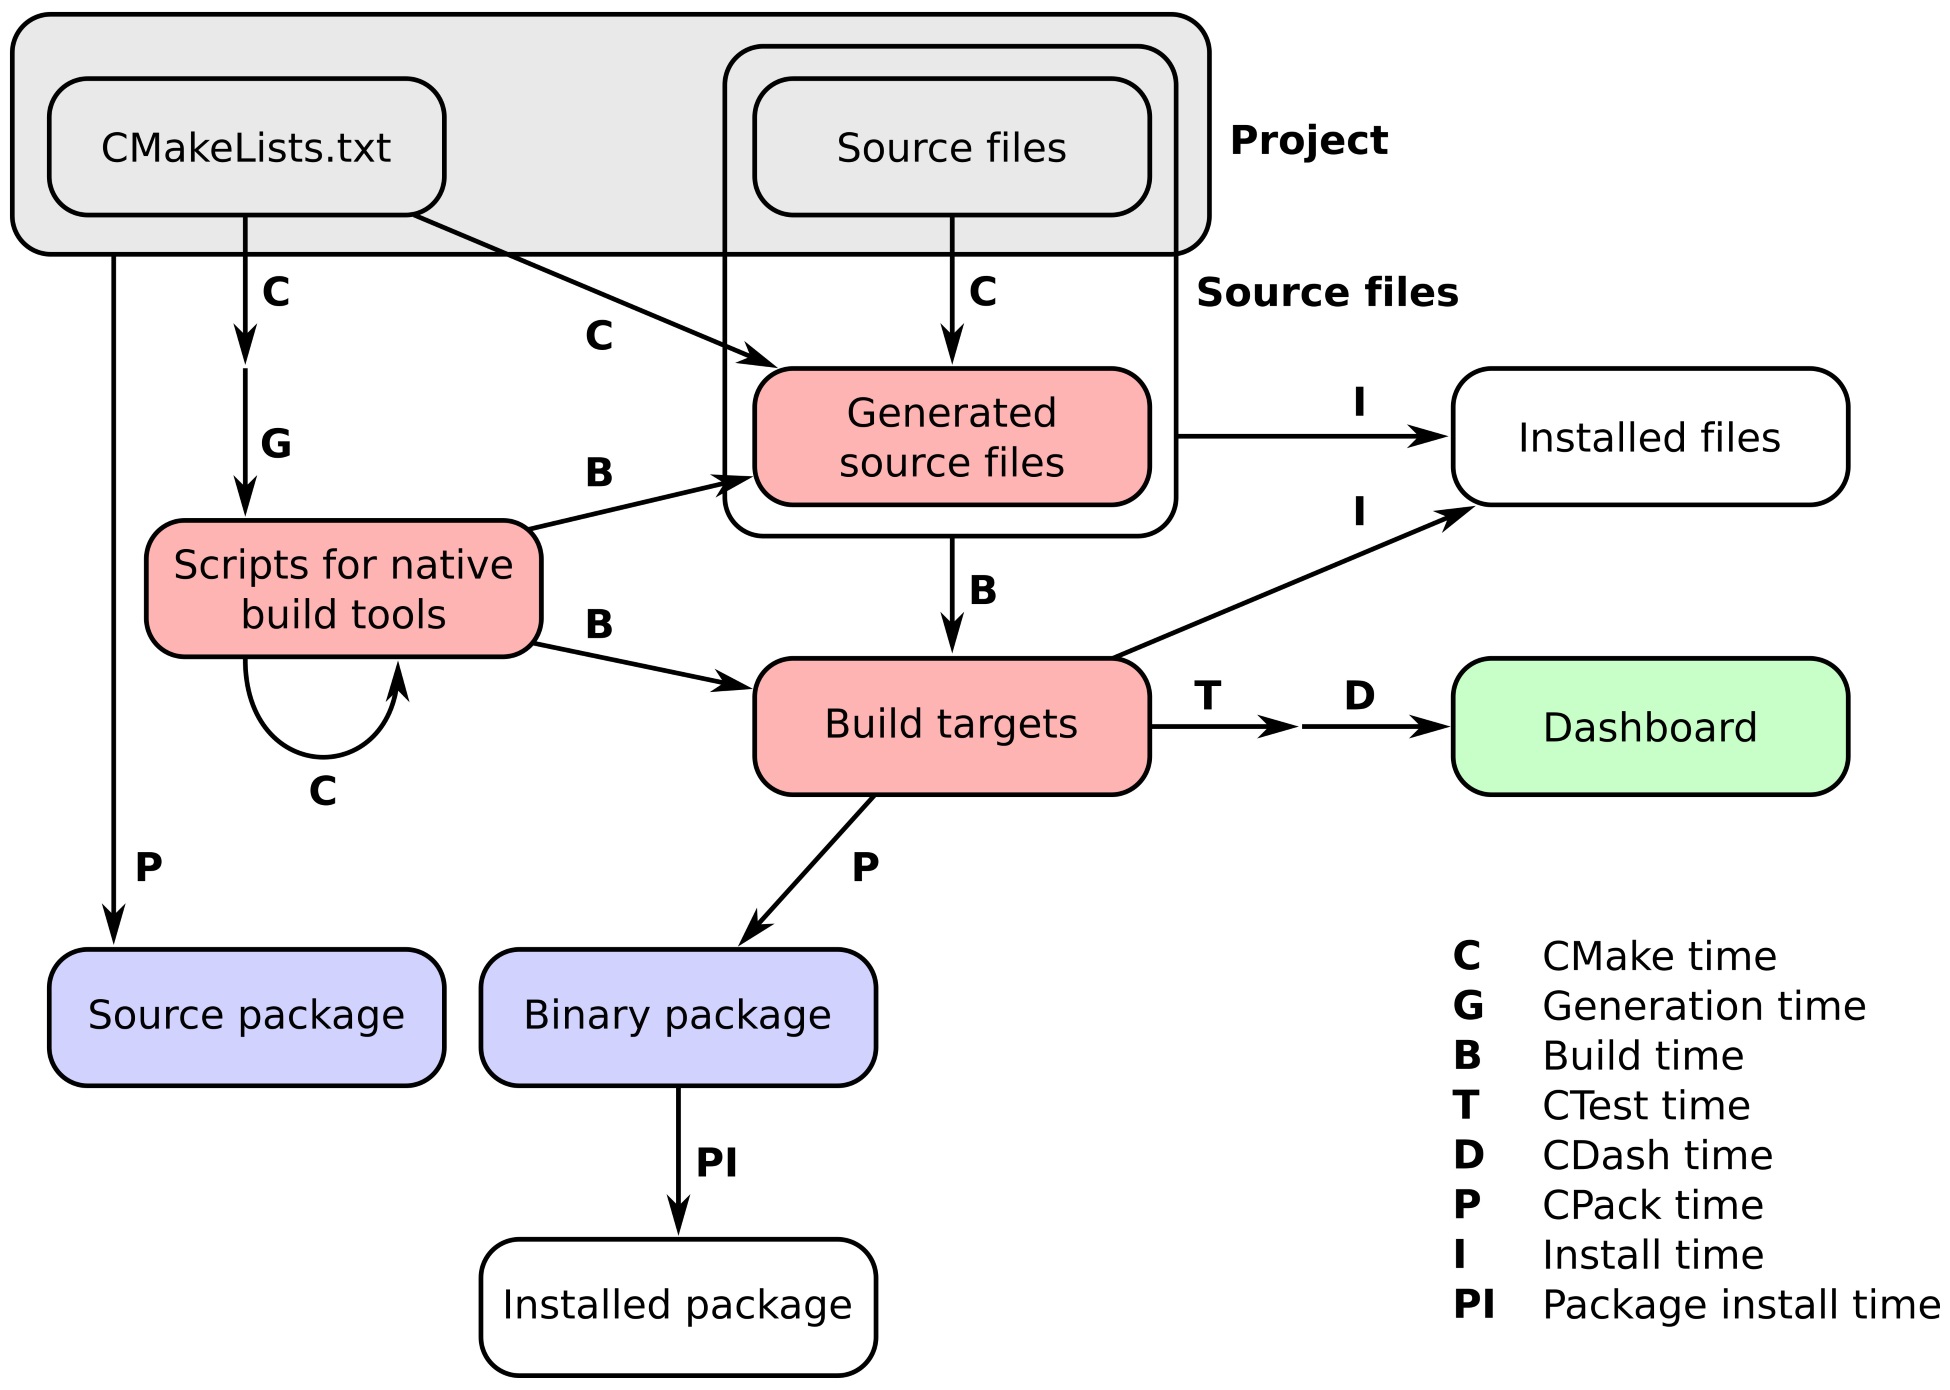
This chapter is concerned with customizing the behavior at configure time and build time. We will learn how to use these commands:
When building some projects, we may need to interact with the host platform filesystem. The interaction with the files might be simply checking whether a file exists, creating a new file to store temporary information, creating or extracting an archive, and so forth. With CMake, we are not only able to generate the build system on different platforms, we are also able to perform these operations without complicated logic to abstract away the different operating systems. This recipe will show how to extract a previously downloaded archive in a portable way.
We will show how to extract the archive bundling the Eigen library and use the extracted source files to compile our project. In this recipe, we will reuse the linear algebra example linear-algebra.cpp from Chapter 3, . The recipe also assumes that the archive containing the source code for Eigen has been downloaded in the same directory as the project itself.
The project needs to unpack the Eigen archive and set the include directories for the target accordingly:
cmake_minimum_required(VERSION 3.5 FATAL_ERROR)
project(recipe-01 LANGUAGES CXX)
set(CMAKE_CXX_STANDARD 11)
set(CMAKE_CXX_EXTENSIONS OFF)
set(CMAKE_CXX_STANDARD_REQUIRED ON)
add_custom_target(unpack-eigen
ALL
COMMAND
${CMAKE_COMMAND} -E tar xzf ${CMAKE_CURRENT_SOURCE_DIR}/eigen-eigen-5a0156e40feb.tar.gz
COMMAND
${CMAKE_COMMAND} -E rename eigen-eigen-5a0156e40feb eigen-3.3.4
WORKING_DIRECTORY
${CMAKE_CURRENT_BINARY_DIR}
COMMENT
"Unpacking Eigen3 in ${CMAKE_CURRENT_BINARY_DIR}/eigen-3.3.4"
)
add_executable(linear-algebra linear-algebra.cpp)
add_dependencies(linear-algebra unpack-eigen)
target_include_directories(linear-algebra
PRIVATE
${CMAKE_CURRENT_BINARY_DIR}/eigen-3.3.4
)
Let us take a closer look at the invocation of add_custom_target:
add_custom_target(unpack-eigen
ALL
COMMAND
${CMAKE_COMMAND} -E tar xzf ${CMAKE_CURRENT_SOURCE_DIR}/eigen-eigen-5a0156e40feb.tar.gz
COMMAND
${CMAKE_COMMAND} -E rename eigen-eigen-5a0156e40feb eigen-3.3.4
WORKING_DIRECTORY
${CMAKE_CURRENT_BINARY_DIR}
COMMENT
"Unpacking Eigen3 in ${CMAKE_CURRENT_BINARY_DIR}/eigen-3.3.4"
)
We are introducing a target called unpack-eigen into our build system. The target will always be executed since we passed the ALL argument. The COMMAND argument lets you specify what commands to execute. In this example, we wish to extract the archive and rename the extracted directory to eigen-3.3.4. This is achieved with these two commands:
Notice how we are calling the CMake command itself, with the -E flag, to execute the actual work. For many common operations, CMake implements an interface common to all the operating systems it runs on. This allows the build system generation to be largely independent of the specific platform. The next argument in the add_custom_target command is the working directory, which in our example corresponds to the build directory: CMAKE_CURRENT_BINARY_DIR. The last argument, COMMENT, is used to specify what message CMake should print out when executing the custom target.
The command add_custom_target can be used whenever a series of custom commands with no output has to be executed during the build. As we have shown in this recipe, the custom target can be specified as a dependency of other targets in the project. Moreover, custom targets can also depend on other targets, thus offering the possibility to set up the order of execution in our build.
Using the -E flag to CMake, we can run many common operations in an operating system-agnostic fashion. The full list on the specific operating system can be obtained by running cmake -E or cmake -E help. For example, this is the summary of commands on a Linux system:
Usage: cmake -E <command> [arguments...]
Available commands:
capabilities - Report capabilities built into cmake in JSON format
chdir dir cmd [args...] - run command in a given directory
compare_files file1 file2 - check if file1 is same as file2
copy <file>... destination - copy files to destination (either file or directory)
copy_directory <dir>... destination - copy content of <dir>... directories to 'destination' directory
copy_if_different <file>... destination - copy files if it has changed
echo [<string>...] - displays arguments as text
echo_append [<string>...] - displays arguments as text but no new line
env [--unset=NAME]... [NAME=VALUE]... COMMAND [ARG]...
- run command in a modified environment
environment - display the current environment
make_directory <dir>... - create parent and <dir> directories
md5sum <file>... - create MD5 checksum of files
remove [-f] <file>... - remove the file(s), use -f to force it
remove_directory dir - remove a directory and its contents
rename oldname newname - rename a file or directory (on one volume)
server - start cmake in server mode
sleep <number>... - sleep for given number of seconds
tar [cxt][vf][zjJ] file.tar [file/dir1 file/dir2 ...]
- create or extract a tar or zip archive
time command [args...] - run command and return elapsed time
touch file - touch a file.
touch_nocreate file - touch a file but do not create it.
Available on UNIX only:
create_symlink old new - create a symbolic link new -> old
Running CMake generates the build system, thus specifying what commands the native build tools will have to execute to get your project built, and in which order. We have already seen how CMake runs many subtasks at configure time in order to find out the working compiler and necessary dependencies. In this recipe, we will discuss how to run custom commands at configure time by using the execute_process command.
We have already shown the use of execute_process when trying to find the NumPy Python module in Chapter 3, Detecting External Libraries and Programs, Recipe 3, Detecting Python modules and packages. In this example, we will use the execute_process command to find out whether a particular Python module (in this case, Python CFFI) is present, and if it is, we will discover its version:
cmake_minimum_required(VERSION 3.5 FATAL_ERROR)
project(recipe-02 LANGUAGES NONE)
find_package(PythonInterp REQUIRED)
# this is set as variable to prepare
# for abstraction using loops or functions
set(_module_name "cffi")
execute_process(
COMMAND
${PYTHON_EXECUTABLE} "-c" "import ${_module_name}; print(${_module_name}.__version__)"
OUTPUT_VARIABLE _stdout
ERROR_VARIABLE _stderr
OUTPUT_STRIP_TRAILING_WHITESPACE
ERROR_STRIP_TRAILING_WHITESPACE
)
if(_stderr MATCHES "ModuleNotFoundError")
message(STATUS "Module ${_module_name} not found")
else()
message(STATUS "Found module ${_module_name} v${_stdout}")
endif()
$ mkdir -p build
$ cd build
$ cmake ..
-- Found PythonInterp: /home/user/cmake-cookbook/chapter-05/recipe-02/example/venv/bin/python (found version "3.6.5")
-- Found module cffi v1.11.5
The execute_process command will spawn one or more child processes from within the currently executing CMake process, thus providing a powerful and convenient way of running arbitrary commands when configuring your project. It is possible to execute more than one command within one invocation of execute_process. Notice, however, that the output of each command will be piped into the next. The command accepts a number of arguments:
With these explanations, we can return to our example:
set(_module_name "cffi")
execute_process(
COMMAND
${PYTHON_EXECUTABLE} "-c" "import ${_module_name}; print(${_module_name}.__version__)"
OUTPUT_VARIABLE _stdout
ERROR_VARIABLE _stderr
OUTPUT_STRIP_TRAILING_WHITESPACE
ERROR_STRIP_TRAILING_WHITESPACE
)
if(_stderr MATCHES "ModuleNotFoundError")
message(STATUS "Module ${_module_name} not found")
else()
message(STATUS "Found module ${_module_name} v${_stdout}")
endif()
The command checks the output of python -c "import cffi; print(cffi.__version__)". If the module is not found, _stderr will contain ModuleNotFoundError, which we check for in the if-statement, and in this case we would print Module cffi not found. If the import is successful, the Python code will print the version of the module, which is piped into _stdout so that we can print the following:
message(STATUS "Found module ${_module_name} v${_stdout}")
In this example, we have only printed the result, but in a real project we could warn, abort the configuration, or set variables that could be queried to toggle certain configuration options.
It would be an interesting exercise to extend the code example to multiple Python modules, such as Cython, avoiding code repetition. One option could be to loop over the module names using foreach; another approach could be to abstract the code into a function or macro. We will discuss such abstractions in Chapter 7, Structuring Projects.
In Chapter 9, Mixed-language Projects, we will use Python CFFI and Cython, and the present recipe can serve as a useful and reusable code snippet to detect whether these packages are present.
Build targets for your projects might depend on the results of commands that can only be executed at build time, after the build system generation has been completed. CMake offers three options to execute custom commands at build time:
These three options enforce specific semantics and are not interchangeable. The next three recipes will clarify their use cases.
We will reuse the C++ example from Chapter 3, Detecting External Libraries and Programs, Recipe 4, Detecting the BLAS and LAPACK math libraries, to illustrate the use of the first variant of add_custom_command. In that code sample, we probed for existing BLAS and LAPACK libraries and compiled a tiny C++ wrapper library to call the Fortran implementation of the linear algebra routines we needed.
We will split the code into two portions. The source file for linear-algebra.cpp is unchanged compared to Chapter 3, Detecting External Libraries and Programs, Recipe 4, Detecting the BLAS and LAPACK math libraries, and will include headers from the linear algebra wrappers library and link against the compiled library. The sources of the library will, however, be packaged into a zipped tar archive shipped alongside the example project. The archive will be extracted at build time and the linear algebra wrapper library compiled before the executable.
Our CMakeLists.txt will have to contain a custom command to extract the sources for the linear algebra wrapper library. Let us look at it in detail:
cmake_minimum_required(VERSION 3.5 FATAL_ERROR)
project(recipe-03 LANGUAGES CXX Fortran)
set(CMAKE_CXX_STANDARD 11)
set(CMAKE_CXX_EXTENSIONS OFF)
set(CMAKE_CXX_STANDARD_REQUIRED ON)
find_package(BLAS REQUIRED)
find_package(LAPACK REQUIRED)
set(wrap_BLAS_LAPACK_sources
${CMAKE_CURRENT_BINARY_DIR}/wrap_BLAS_LAPACK/CxxBLAS.hpp
${CMAKE_CURRENT_BINARY_DIR}/wrap_BLAS_LAPACK/CxxBLAS.cpp
${CMAKE_CURRENT_BINARY_DIR}/wrap_BLAS_LAPACK/CxxLAPACK.hpp
${CMAKE_CURRENT_BINARY_DIR}/wrap_BLAS_LAPACK/CxxLAPACK.cpp
)
add_custom_command(
OUTPUT
${wrap_BLAS_LAPACK_sources}
COMMAND
${CMAKE_COMMAND} -E tar xzf ${CMAKE_CURRENT_SOURCE_DIR}/wrap_BLAS_LAPACK.tar.gz
COMMAND
${CMAKE_COMMAND} -E touch ${wrap_BLAS_LAPACK_sources}
WORKING_DIRECTORY
${CMAKE_CURRENT_BINARY_DIR}
DEPENDS
${CMAKE_CURRENT_SOURCE_DIR}/wrap_BLAS_LAPACK.tar.gz
COMMENT
"Unpacking C++ wrappers for BLAS/LAPACK"
VERBATIM
)
add_library(math "")
target_sources(math
PRIVATE
${CMAKE_CURRENT_BINARY_DIR}/wrap_BLAS_LAPACK/CxxBLAS.cpp
${CMAKE_CURRENT_BINARY_DIR}/wrap_BLAS_LAPACK/CxxLAPACK.cpp
PUBLIC
${CMAKE_CURRENT_BINARY_DIR}/wrap_BLAS_LAPACK/CxxBLAS.hpp
${CMAKE_CURRENT_BINARY_DIR}/wrap_BLAS_LAPACK/CxxLAPACK.hpp
)
target_include_directories(math
INTERFACE
${CMAKE_CURRENT_BINARY_DIR}/wrap_BLAS_LAPACK
)
target_link_libraries(math
PUBLIC
${LAPACK_LIBRARIES}
)
add_executable(linear-algebra linear-algebra.cpp)
target_link_libraries(linear-algebra
PRIVATE
math
)
$ mkdir -p build
$ cd build
$ cmake ..
$ cmake --build .
$ ./linear-algebra 1000
C_DSCAL done
C_DGESV done
info is 0
check is 4.35597e-10
Let us have a closer look at the invocation of add_custom_command:
add_custom_command(
OUTPUT
${wrap_BLAS_LAPACK_sources}
COMMAND
${CMAKE_COMMAND} -E tar xzf ${CMAKE_CURRENT_SOURCE_DIR}/wrap_BLAS_LAPACK.tar.gz
COMMAND
${CMAKE_COMMAND} -E touch ${wrap_BLAS_LAPACK_sources}
WORKING_DIRECTORY
${CMAKE_CURRENT_BINARY_DIR}
DEPENDS
${CMAKE_CURRENT_SOURCE_DIR}/wrap_BLAS_LAPACK.tar.gz
COMMENT
"Unpacking C++ wrappers for BLAS/LAPACK"
VERBATIM
)
add_custom_command adds rules to targets so that they know how to generate the output by executing the commands. Any target declared within the same directory of add_custom_command, that is, in the same CMakeLists.txt, and that uses any file in the output as its source file, will be given a rule to generate those files at build time. Dependencies between targets and custom commands are thus automatically handled at build system generation, while the actual generation of source files happens at build time.
In our specific case, the outputs are the sources contained in the zipped tar archive. To retrieve and use those files, the archive will have to be extracted at build time. This is achieved by using the CMake command itself with the -E flag, to achieve platform independence. The next command updates the timestamps of the extracted files. We do this to make sure we are not dealing with stale source files. WORKING_DIRECTORY specifies where to execute the commands. In our case, this is CMAKE_CURRENT_BINARY_DIR, which is the build directory currently being processed. The argument to the DEPENDS keyword lists dependencies to the custom command. In our case, the zipped tar archive is a dependency. The COMMENT field will be used by CMake to print status messages at build time. Finally, VERBATIM tells CMake to generate the right command for the specific generator and platform, thus ensuring full platform independence.
Let us also have a closer look at the way the library with the wrappers is created:
add_library(math "")
target_sources(math
PRIVATE
${CMAKE_CURRENT_BINARY_DIR}/wrap_BLAS_LAPACK/CxxBLAS.cpp
${CMAKE_CURRENT_BINARY_DIR}/wrap_BLAS_LAPACK/CxxLAPACK.cpp
PUBLIC
${CMAKE_CURRENT_BINARY_DIR}/wrap_BLAS_LAPACK/CxxBLAS.hpp
${CMAKE_CURRENT_BINARY_DIR}/wrap_BLAS_LAPACK/CxxLAPACK.hpp
)
target_include_directories(math
INTERFACE
${CMAKE_CURRENT_BINARY_DIR}/wrap_BLAS_LAPACK
)
target_link_libraries(math
PUBLIC
${LAPACK_LIBRARIES}
)
We declare a library target with no sources. This is because we then use target_sources to populate the sources of the target. This achieves the very important task of letting dependents on this target know what include directories and header files they need, in order to successfully use the library. The C++ source files are PRIVATE to the target, and hence only used in building the library. The header files are PUBLIC because both the target and its dependents will need to use them to successfully compile. The include directories are specified using target_include_directories with wrap_BLAS_LAPACK declared as INTERFACE, since only dependents on the math target will need it.
This form of the add_custom_command has two limitations:
The second limitation can be avoided by carefully introducing dependencies with add_dependencies, but the proper approach to circumvent both would be to use the add_custom_target command, as we will detail in the next recipe.
As we discussed in the previous recipe, add_custom_command has some limitations that can be circumvented by using add_custom_target. This CMake command will introduce new targets in the build system. These targets, in turn, execute commands that do not return an output, in contrast to add_custom_command. The commands add_custom_target and add_custom_command can be combined. With this, the custom target can be specified in a directory different than the one where its dependents are, and this can be very helpful when designing a modular CMake infrastructure for your project.
For this recipe, we will reuse the source code sample from the previous recipe. We will, however, modify the layout of the sources slightly. In particular, instead of storing the zipped tar archive in the top-level directory, we will place it inside a subdirectory called deps. This subdirectory contains its own CMakeLists.txt, which will be included by the main CMakeLists.txt.
We will start with the main CMakeLists.txt and later move to deps/CMakeLists.txt:
cmake_minimum_required(VERSION 3.5 FATAL_ERROR)
project(recipe-04 LANGUAGES CXX Fortran)
set(CMAKE_CXX_STANDARD 11)
set(CMAKE_CXX_EXTENSIONS OFF)
set(CMAKE_CXX_STANDARD_REQUIRED ON)
add_subdirectory(deps)
find_package(BLAS REQUIRED)
find_package(LAPACK REQUIRED)
set(MATH_SRCS
${CMAKE_CURRENT_BINARY_DIR}/wrap_BLAS_LAPACK/CxxBLAS.cpp
${CMAKE_CURRENT_BINARY_DIR}/wrap_BLAS_LAPACK/CxxLAPACK.cpp
${CMAKE_CURRENT_BINARY_DIR}/wrap_BLAS_LAPACK/CxxBLAS.hpp
${CMAKE_CURRENT_BINARY_DIR}/wrap_BLAS_LAPACK/CxxLAPACK.hpp
)
add_custom_target(BLAS_LAPACK_wrappers
WORKING_DIRECTORY
${CMAKE_CURRENT_BINARY_DIR}
DEPENDS
${MATH_SRCS}
COMMENT
"Intermediate BLAS_LAPACK_wrappers target"
VERBATIM
)
add_custom_command(
OUTPUT
${MATH_SRCS}
COMMAND
${CMAKE_COMMAND} -E tar xzf ${CMAKE_CURRENT_SOURCE_DIR}/wrap_BLAS_LAPACK.tar.gz
WORKING_DIRECTORY
${CMAKE_CURRENT_BINARY_DIR}
DEPENDS
${CMAKE_CURRENT_SOURCE_DIR}/wrap_BLAS_LAPACK.tar.gz
COMMENT
"Unpacking C++ wrappers for BLAS/LAPACK"
)
add_library(math "")
target_sources(math
PRIVATE
${MATH_SRCS}
)
target_include_directories(math
INTERFACE
${CMAKE_CURRENT_BINARY_DIR}/wrap_BLAS_LAPACK
)
# BLAS_LIBRARIES are included in LAPACK_LIBRARIES
target_link_libraries(math
PUBLIC
${LAPACK_LIBRARIES}
)
add_executable(linear-algebra linear-algebra.cpp)
target_link_libraries(linear-algebra
PRIVATE
math
)
With add_custom_target, users can execute custom commands within targets. This is subtly different from the add_custom_command recipe we have discussed previously. The target added by add_custom_target has no output and is thus always executed. It is thus possible to introduce a custom target in subdirectories, and still be able to refer to it in the top-level CMakeLists.txt.
In this example, we have extracted an archive of source files using a combination of add_custom_target and add_custom_command. These source files were later used to compile a library that we managed to link against in a different (parent) directory scope. In the construction of the CMakeLists.txt files, we briefly commented that the tarball is extracted under deps, one subdirectory below the build directory of the project. This is because in CMake, the structure of the build tree mimics the hierarchy of the source tree.
A remarkable detail in this recipe, which we should discuss, is the curious fact that we have marked the math library sources as PRIVATE:
set(MATH_SRCS
${CMAKE_CURRENT_BINARY_DIR}/wrap_BLAS_LAPACK/CxxBLAS.cpp
${CMAKE_CURRENT_BINARY_DIR}/wrap_BLAS_LAPACK/CxxLAPACK.cpp
${CMAKE_CURRENT_BINARY_DIR}/wrap_BLAS_LAPACK/CxxBLAS.hpp
${CMAKE_CURRENT_BINARY_DIR}/wrap_BLAS_LAPACK/CxxLAPACK.hpp
)
# ...
add_library(math "")
target_sources(math
PRIVATE
${MATH_SRCS}
)
# ...
Although these sources are PRIVATE, we compiled linear-algebra.cpp in the parent scope and this source code includes CxxBLAS.hpp and CxxLAPACK.hpp. Why is PRIVATE used here, and how was it possible to compile linear-algebra.cpp and build the executable? Had we marked the header files as PUBLIC, CMake would have stopped at CMake time with an error, "Cannot find source file", since the to-be-generated (extracted) source files do not exist in the file tree yet.
This is a known limitation (see https://gitlab.kitware.com/cmake/cmake/issues/14633, as well as a related blog post: https://samthursfield.wordpress.com/2015/11/21/cmake-dependencies-between-targets-and-files-and-custom-commands). We have worked around this limitation by declaring the sources PRIVATE. By doing this, we did not get any file dependencies on non-existent sources at CMake time. However, the CMake built-in C/C++ file dependency scanner picked them up at build time and the sources compiled and linked.
This recipe will show how to use the second signature of add_custom_command to perform custom operations without output. This is useful to perform certain operations right before or right after a specific target is built or linked. Since the custom commands are only executed if the target itself has to be built, we achieve target-level control over their execution. We will demonstrate this with an example where we print the link line of a target right before it is built, and then we measure the static size allocation of the compiled executable right after it has been compiled.
In this recipe, we will work with the following example Fortran code (example.f90):
program example
implicit none
real(8) :: array(20000000)
real(8) :: r
integer :: i
do i = 1, size(array)
call random_number(r)
array(i) = r
end do
print *, sum(array)
end program
The fact that this is Fortran code does not matter much for the discussion that will follow, but we have chosen Fortran since there is a lot of legacy Fortran code out there where static size allocations are an issue.
In this code, we define an array holding 20,000,000 double precision floats, and we expect this array to occupy 160 MB of memory. What we have done here is not recommended programming practice, since in general this memory will be consumed independently of whether it is used in the code. A much better approach would have been to allocate the array dynamically only when it is needed and deallocate it right afterwards.
The example code fills the array with random numbers and computes their sum - this was done to make sure that the array is really used and the compiler does not optimize the allocation away. We will measure the size of static allocation of the example binary with a Python script (static-size.py) wrapping around the size command:
import subprocess
import sys
# for simplicity we do not check number of
# arguments and whether the file really exists
file_path = sys.argv[-1]
try:
output = subprocess.check_output(['size', file_path]).decode('utf-8')
except FileNotFoundError:
print('command "size" is not available on this platform')
sys.exit(0)
size = 0.0
for line in output.split('\n'):
if file_path in line:
# we are interested in the 4th number on this line
size = int(line.split()[3])
print('{0:.3f} MB'.format(size/1.0e6))
To print the link line, we will use a second Python helper script (echo-file.py) to print the contents of a file:
import sys
# for simplicity we do not verify the number and
# type of arguments
file_path = sys.argv[-1]
try:
with open(file_path, 'r') as f:
print(f.read())
except FileNotFoundError:
print('ERROR: file {0} not found'.format(file_path))
Let us have a look at our CMakeLists.txt:
cmake_minimum_required(VERSION 3.5 FATAL_ERROR)
project(recipe-05 LANGUAGES Fortran)
find_package(PythonInterp REQUIRED)
if(NOT CMAKE_BUILD_TYPE)
set(CMAKE_BUILD_TYPE Release CACHE STRING "Build type" FORCE)
endif()
add_executable(example "")
target_sources(example
PRIVATE
example.f90
)
add_custom_command(
TARGET
example
PRE_LINK
COMMAND
${PYTHON_EXECUTABLE}
${CMAKE_CURRENT_SOURCE_DIR}/echo-file.py
${CMAKE_CURRENT_BINARY_DIR}/CMakeFiles/example.dir/link.txt
COMMENT
"link line:"
VERBATIM
)
add_custom_command(
TARGET
example
POST_BUILD
COMMAND
${PYTHON_EXECUTABLE}
${CMAKE_CURRENT_SOURCE_DIR}/static-size.py
$<TARGET_FILE:example>
COMMENT
"static size of executable:"
VERBATIM
)
$ mkdir -p build
$ cd build
$ cmake ..
$ cmake --build .
Scanning dependencies of target example
[ 50%] Building Fortran object CMakeFiles/example.dir/example.f90.o
[100%] Linking Fortran executable example
link line:
/usr/bin/f95 -O3 -DNDEBUG -O3 CMakeFiles/example.dir/example.f90.o -o example
static size of executable:
160.003 MB
[100%] Built target example
Once a library or executable target has been declared, one can latch additional commands onto the target by using add_custom_command. As we have seen, these commands will be executed at specific times, contextually to the execution of the target they are attached to. CMake understands the following options for the execution order of custom commands:
In this example, we have bolted on two custom commands to the executable target. The PRE_LINK command prints the content of ${CMAKE_CURRENT_BINARY_DIR}/CMakeFiles/example.dir/link.txt to the screen. This file contains the link command and in our example, the link line turned out to be this:
link line:
/usr/bin/f95 -O3 -DNDEBUG -O3 CMakeFiles/example.dir/example.f90.o -o example
We have used a Python wrapper for this to not depend on shell commands, which might not be portable.
In the second step, the POST_BUILD custom command called the Python helper script static-size.py with the generator expression $<TARGET_FILE:example> as argument. CMake will expand the generator expression to the target file path at generation time, that is, when the build system is generated. The Python script static-size.py in turn uses the size command to obtain the size of static allocation of the executable file, converts it to MB, and prints the result. In our case, we obtained the expected 160 MB:
static size of executable:
160.003 MB
One of the most common operations during build system generation is to assess what kind of system we are trying to build our project on. That means trying to find out which functionality works and which does not, and adapting the compilation of our project accordingly, either by signaling that dependencies are unmet or by enabling proper workarounds in our codebase. The next few recipes will show how to perform these operations with CMake. In particular, we will consider the following:
This recipe will show how to use the check_<lang>_source_compiles function from the corresponding Check<LANG>SourceCompiles.cmake standard module, in order to assess whether the given compiler can compile a predefined code snippet into an executable. The command can help you ascertain whether:
In this recipe, we will show how to detect the task loop feature of the OpenMP 4.5 standard for its use in a C++ executable. We will use a sample C++ source file to probe whether the compiler supports such a feature. CMake offers an additional command, try_compile, to probe compilation. This recipe will show how to use both approaches.
We will use both try_compile and check_cxx_source_compiles and compare how the two commands work:
cmake_minimum_required(VERSION 3.9 FATAL_ERROR)
project(recipe-06 LANGUAGES CXX)
set(CMAKE_CXX_STANDARD 11)
set(CMAKE_CXX_EXTENSIONS OFF)
set(CMAKE_CXX_STANDARD_REQUIRED ON)
find_package(OpenMP)
if(OpenMP_FOUND)
# ... <- the steps below will be placed here
else()
message(STATUS "OpenMP not found: no test for taskloop is run")
endif()
set(_scratch_dir ${CMAKE_CURRENT_BINARY_DIR}/omp_try_compile)
try_compile(
omp_taskloop_test_1
${_scratch_dir}
SOURCES
${CMAKE_CURRENT_SOURCE_DIR}/taskloop.cpp
LINK_LIBRARIES
OpenMP::OpenMP_CXX
)
message(STATUS "Result of try_compile: ${omp_taskloop_test_1}")
include(CheckCXXSourceCompiles)
file(READ ${CMAKE_CURRENT_SOURCE_DIR}/taskloop.cpp _snippet)
set(CMAKE_REQUIRED_LIBRARIES OpenMP::OpenMP_CXX)
check_cxx_source_compiles("${_snippet}" omp_taskloop_test_2)
unset(CMAKE_REQUIRED_LIBRARIES)
message(STATUS "Result of check_cxx_source_compiles: ${omp_taskloop_test_2}"
$ mkdir -p build
$ cd build
$ cmake ..
-- ...
-- Found OpenMP_CXX: -fopenmp (found version "4.5")
-- Found OpenMP: TRUE (found version "4.5")
-- Result of try_compile: TRUE
-- Performing Test omp_taskloop_test_2
-- Performing Test omp_taskloop_test_2 - Success
-- Result of check_cxx_source_compiles: 1
Both try_compile and check_cxx_source_compiles will compile and link a source file into an executable. If those operations succeed, then the output variable, omp_task_loop_test_1 for the former and omp_task_loop_test_2 for the latter, will be set to TRUE. The way this task is achieved is slightly different between the two commands, however. The check_<lang>_source_compiles family of commands is a simplified wrapper to the try_compile command. As such, it offers a minimal interface:
This minimal interface reflects the fact that the test compilation is carried out by generating and executing build and link commands directly within the CMake invocation.
The command try_compile offers a more complete interface and two different modes of operation:
try_compile is thus based on invoking CMake on a project, either one where the CMakeLists.txt is already existing (in the first mode of operation) or one where the file is generated on the fly based on the arguments passed to the try_compile.
Checks of the type outlined in this recipe are not always bulletproof and can generate both false positives and false negatives. As an example, you can try to comment out the lines containing CMAKE_REQUIRED_LIBRARIES and the example will still report "Success". The reason for this is that OpenMP pragmas will then be ignored by the compiler.
What should you do when you suspect that a wrong result is being returned? The CMakeOutput.log and CMakeError.log files in the CMakeFiles subdirectory of the build directory offer clues as to what went wrong. They report the standard output and standard error for operations run by CMake. If you suspect false positives, you should check the former, by searching for the variable set to hold the result of the compilation check. If you suspect false negatives, you should check the latter.
Debugging try_compile will require some care. CMake erases all files generated by that command, even if the check was unsuccessful. Fortunately, --debug-trycompile will prevent CMake from cleaning up. If there are multiple calls to try_compile in your code, you will only be able to debug them one at a time:
$ cmake -U <variable-name>
Setting compiler flags is critical to make sure that your code is compiled correctly. Different compiler vendors implement different flags for similar tasks. Even different compiler versions from the same vendor might present slight differences in the available flags. Sometimes, new flags are introduced that are extremely convenient to use for debugging or optimization purposes. In this recipe, we will show how to check that certain flags are available for the selected compiler.
Sanitizers (refer to https://github.com/google/sanitizers) have become incredibly useful tools for static and dynamic code analysis. By simply recompiling your code with the appropriate flags and linking against the necessary libraries, you can investigate and debug problems related to memory errors (address sanitizer), uninitialized reads (memory sanitizer), thread safety (thread sanitizer), and undefined behavior (undefined behavior sanitizer). Compared to similar analysis tools, sanitizers typically introduce a much smaller performance penalty and tend to give more detailed information on the problems detected. The drawback is that your code, and possibly parts of your toolchain, need to be recompiled with the additional flags.
In this recipe, we will set up a project to compile code with the different sanitizers activated and show how to check that the correct compiler flags are available.
Sanitizers have been available for a while with the Clang compiler and were later also introduced into the GCC toolset. They were designed for use with C and C++ programs, but recent versions of Fortran will understand the same flags and produce correctly instrumented libraries and executables. This recipe will however focus on a C++ example.
cmake_minimum_required(VERSION 3.5 FATAL_ERROR)
project(recipe-07 LANGUAGES CXX)
set(CMAKE_CXX_STANDARD 11)
set(CMAKE_CXX_EXTENSIONS OFF)
set(CMAKE_CXX_STANDARD_REQUIRED ON)
list(APPEND CXX_BASIC_FLAGS "-g3" "-O1")
include(CheckCXXCompilerFlag)
set(ASAN_FLAGS "-fsanitize=address -fno-omit-frame-pointer")
set(CMAKE_REQUIRED_FLAGS ${ASAN_FLAGS})
check_cxx_compiler_flag(${ASAN_FLAGS} asan_works)
unset(CMAKE_REQUIRED_FLAGS)
if(asan_works)
string(REPLACE " " ";" _asan_flags ${ASAN_FLAGS})
add_executable(asan-example asan-example.cpp)
target_compile_options(asan-example
PUBLIC
${CXX_BASIC_FLAGS}
${_asan_flags}
)
target_link_libraries(asan-example PUBLIC ${_asan_flags})
endif()
The full recipe source code also shows how to compile and link sample executables for the thread, memory, and undefined behavior sanitizers. These are not discussed in detail here, since we use the same pattern for the compiler flag checking.
The check_<lang>_compiler_flag functions are simply wrappers around the check_<lang>_source_compiles function, which we discussed in the previous recipe. These wrappers provide a shortcut for the common use case where it is not important to check whether a specific code snippet compiles, but whether the compiler understands a set of flags.
Compiler flags for sanitizers are a special case, in that they also need to be passed on to the linker. To achieve this with the check_<lang>_compiler_flag functions, we need to set the CMAKE_REQUIRED_FLAGS variable prior to the call. The flags passed as the first argument would otherwise only be used in the call to the compiler, resulting in a false negative.
One more point to notice in the current recipe is the use of string variables and lists to set compiler flags. Using string variables with the target_compile_options and target_link_libraries functions will result in a compiler and/or linker error. CMake will pass these options quoted, resulting in parsing errors. This justifies the need to express these options in terms of lists and the ensuing string manipulations, to replace spaces in string variables with semicolons. We recall, in fact, that lists in CMake are semicolon-separated strings.
We will revisit and generalize the pattern for testing and setting compiler flags in Chapter 7, Structuring Projects, Recipe 3, Writing a function to test and set compiler flags.
We have so far shown how to check that a given source snippet can be compiled by the chosen compiler and how to make sure that the desired compiler and linker flags are available. This recipe will show how to check whether a code snippet can be compiled, linked, and run on the current system.
The code sample for this recipe is a slight variation of Chapter 3, Detecting External Libraries and Programs, Recipe 9, Detecting external libraries: I. Using pkg-config. There, we showed how to find the ZeroMQ library on your system and link it into a C program. In this recipe, we will check that a small C program using the system UUID library on GNU/Linux can actually run, before generating the actual C++ program.
We wish to check whether the UUID system library on GNU/Linux can be linked against, before embarking on building our own C++ project. This can be achieved with the following series of steps:
cmake_minimum_required(VERSION 3.6 FATAL_ERROR)
project(recipe-08 LANGUAGES CXX C)
set(CMAKE_CXX_STANDARD 11)
set(CMAKE_CXX_EXTENSIONS OFF)
set(CMAKE_CXX_STANDARD_REQUIRED ON)
find_package(PkgConfig REQUIRED QUIET)
pkg_search_module(UUID REQUIRED uuid IMPORTED_TARGET)
if(TARGET PkgConfig::UUID)
message(STATUS "Found libuuid")
endif()
include(CheckCSourceRuns)
set(_test_uuid
"
#include <uuid/uuid.h>
int main(int argc, char * argv[]) {
uuid_t uuid;
uuid_generate(uuid);
return 0;
}
")
set(CMAKE_REQUIRED_LIBRARIES PkgConfig::UUID)
check_c_source_runs("${_test_uuid}" _runs)
unset(CMAKE_REQUIRED_LIBRARIES)
if(NOT _runs)
message(FATAL_ERROR "Cannot run a simple C executable using libuuid!")
endif()
add_executable(use-uuid use-uuid.cpp)
target_link_libraries(use-uuid
PUBLIC
PkgConfig::UUID
)
The check_<lang>_source_runs functions for C and C++ operate with the same general principles as check_<lang>_source_compiles, but add an extra step where the produced executable is actually run. As for check_<lang>_source_compiles, the execution of check_<lang>_source_runs can be directed by the following variables:
Since we used the imported target as produced by pkg_search_module, it was only necessary to set CMAKE_REQUIRES_LIBRARIES to PkgConfig::UUID, to also get the include directories correctly set.
Just as check_<lang>_source_compiles is a wrapper to try_compile, check_<lang>_source_runs is a wrapper to another, more powerful command in CMake: try_run. It is thus possible to write a CheckFortranSourceRuns.cmake module that offers the same functionality as the C and C++ modules by appropriately wrapping try_run.
CMake offers a domain-specific language to describe how to configure and build a project. It is natural that variables describing particular conditions are introduced and conditional statements based on this are included in CMakeLists.txt.
In this recipe, we will revisit generator expressions, which we used throughout Chapter 4, Creating and Running Tests, to compactly refer to explicit test executable paths. Generator expressions offer a powerful and compact pattern for logical and informational expressions that are evaluated during build system generation and produce information specific to each build configuration. In other words, generator expressions are useful to refer to information that is only known at generation time, but not known or difficult to know at configure time; this is particularly the case for filenames, file locations, and library file suffixes.
In this example, we will employ generator expressions to conditionally set a preprocessor definition and conditionally link to a message passing interface (MPI) library and allow us to build the same source code either sequentially or using MPI parallelism.
We will compile the following example source code (example.cpp):
#include <iostream>
#ifdef HAVE_MPI
#include <mpi.h>
#endif
int main() {
#ifdef HAVE_MPI
// initialize MPI
MPI_Init(NULL, NULL);
// query and print the rank
int rank;
MPI_Comm_rank(MPI_COMM_WORLD, &rank);
std::cout << "hello from rank " << rank << std::endl;
// initialize MPI
MPI_Finalize();
#else
std::cout << "hello from a sequential binary" << std::endl;
#endif /* HAVE_MPI */
}
The code contains preprocessor statements (#ifdef HAVE_MPI ... #else ... #endif) so that we can compile either a sequential or a parallel executable with the same source code.
When composing the CMakeLists.txt file, we will reuse some of the building blocks we encountered in Chapter 3, Detecting External Libraries and Programs, Recipe 6, Detecting the MPI parallel environment:
cmake_minimum_required(VERSION 3.9 FATAL_ERROR)
project(recipe-09 LANGUAGES CXX)
set(CMAKE_CXX_STANDARD 11)
set(CMAKE_CXX_EXTENSIONS OFF)
set(CMAKE_CXX_STANDARD_REQUIRED ON)
option(USE_MPI "Use MPI parallelization" ON)
if(USE_MPI)
find_package(MPI REQUIRED)
endif()
add_executable(example example.cpp)
target_link_libraries(example
PUBLIC
$<$<BOOL:${MPI_FOUND}>:MPI::MPI_CXX>
)
target_compile_definitions(example
PRIVATE
$<$<BOOL:${MPI_FOUND}>:HAVE_MPI>
)
if(MPI_FOUND)
include(CMakePrintHelpers)
cmake_print_properties(
TARGETS MPI::MPI_CXX
PROPERTIES INTERFACE_LINK_LIBRARIES
)
endif()
$ mkdir -p build_mpi
$ cd build_mpi
$ cmake ..
-- ...
--
Properties for TARGET MPI::MPI_CXX:
MPI::MPI_CXX.INTERFACE_LINK_LIBRARIES = "-Wl,-rpath -Wl,/usr/lib/openmpi -Wl,--enable-new-dtags -pthread;/usr/lib/openmpi/libmpi_cxx.so;/usr/lib/openmpi/libmpi.so"
$ cmake --build .
$ mpirun -np 2 ./example
hello from rank 0
hello from rank 1
$ mkdir -p build_seq
$ cd build_seq
$ cmake -D USE_MPI=OFF ..
$ cmake --build .
$ ./example
hello from a sequential binary
The build system for a project is generated by CMake in two phases: a configuration phase, where CMakeLists.txt is parsed, and a generation phase, where the build environment is actually generated. Generator expressions are evaluated in this second phase and can be used to tweak the build system with information that can only be known at generation time. Generator expressions are thus particularly useful when cross-compiling, where some of the information is only available after the CMakeLists.txt has been parsed, or in multi-configuration projects, where the build system is generated at once for all the different configurations the project can have, such as Debug and Release.
In our case, we will use generator expressions to conditionally set a link dependency and compile definition. For this, we can focus on these two expressions:
target_link_libraries(example
PUBLIC
$<$<BOOL:${MPI_FOUND}>:MPI::MPI_CXX>
)
target_compile_definitions(example
PRIVATE
$<$<BOOL:${MPI_FOUND}>:HAVE_MPI>
)
If MPI_FOUND is true, then $<BOOL:${MPI_FOUND}> will evaluate to 1. In this case, $<$<BOOL:${MPI_FOUND}>:MPI::MPI_CXX> will evaluate to MPI::MPI_CXX and the second generator expression will evaluate to HAVE_MPI. If we set USE_MPI to OFF, MPI_FOUND is false and both generator expressions evaluate to empty strings, and thus no link dependency is introduced and no preprocessor definition is set.
We could have achieved the same effect by introducing an if-statement:
if(MPI_FOUND)
target_link_libraries(example
PUBLIC
MPI::MPI_CXX
)
target_compile_definitions(example
PRIVATE
HAVE_MPI
)
endif()
This solution is a bit less compact but possibly a bit more readable. We can often re-express if-statements using generator expressions and the choice is often a matter of taste. However, generator expressions particularly shine when we need to access or manipulate explicit file paths, since these can be difficult to construct using variables and if-clauses, and in this case we clearly favor generator expressions for readability. This was the case in Chapter 4, Creating and Running Tests, where we used generator expressions to resolve the file path of a particular target. We will also appreciate generator expressions in Chapter 11, Packaging Projects.
CMake offers three types of generator expression:
For a full list of generator expressions, please consult https://cmake.org/cmake/help/latest/manual/cmake-generator-expressions.7.html.
In this chapter, we will cover the following recipes:
For most projects, the source code is tracked using a version control system; it typically serves as input for the build system, which transforms it into objects, libraries, and executables. In certain cases, we use the build system to generate source code during the configuration or build steps. This can be useful to fine-tune the source code based on information gathered in the configuration step, or to automatize an otherwise error-prone mechanical generation of repetitive code. Another frequent use case for generating source code is to record information about the configuration or compilation for reproducibility. In this chapter, we will illustrate various strategies to generate source code, using the powerful tools provided by CMake.
The most straightforward code generation happens at configure time. For example, CMake can detect the operating system and available libraries; based on that information, we can tailor what sources are built, to offer maximum performance to the end user of our library or program. In this and some of the following recipes, we will illustrate how to generate a simple source file that defines a function to report the build system configuration.
The code sample for this recipe is in Fortran and C, setting the stage for Chapter 9, Mixed-language Projects, where mixed-language programming will be discussed. The main program is a simple Fortran executable that calls a C function, print_info(), which will print the configuration information. It is worth noting that with Fortran 2003, the compiler will take care of name mangling (given a proper interface declaration of the C function), as seen in the simple example.f90 source file that we will use:
program hello_world
implicit none
interface
subroutine print_info() bind(c, name="print_info")
end subroutine
end interface
call print_info()
end program
The print_info() C function is defined in the template file, print_info.c.in. The variables starting and ending with @ will be substituted for their actual values at configure time:
#include <stdio.h>
#include <unistd.h>
void print_info(void) {
printf("\n");
printf("Configuration and build information\n");
printf("-----------------------------------\n");
printf("\n");
printf("Who compiled | %s\n", "@_user_name@");
printf("Compilation hostname | %s\n", "@_host_name@");
printf("Fully qualified domain name | %s\n", "@_fqdn@");
printf("Operating system | %s\n",
"@_os_name@, @_os_release@, @_os_version@");
printf("Platform | %s\n", "@_os_platform@");
printf("Processor info | %s\n",
"@_processor_name@, @_processor_description@");
printf("CMake version | %s\n", "@CMAKE_VERSION@");
printf("CMake generator | %s\n", "@CMAKE_GENERATOR@");
printf("Configuration time | %s\n", "@_configuration_time@");
printf("Fortran compiler | %s\n", "@CMAKE_Fortran_COMPILER@");
printf("C compiler | %s\n", "@CMAKE_C_COMPILER@");
printf("\n");
fflush(stdout);
}
In our CMakeLists.txt, we first have to collect the configuration options, and can then substitute their values for the corresponding placeholders in print_info.c.in; we compile both the Fortran and C sources into one executable:
cmake_minimum_required(VERSION 3.10 FATAL_ERROR)
project(recipe-01 LANGUAGES Fortran C)
execute_process(
COMMAND
whoami
TIMEOUT
1
OUTPUT_VARIABLE
_user_name
OUTPUT_STRIP_TRAILING_WHITESPACE
)
# host name information
cmake_host_system_information(RESULT _host_name QUERY HOSTNAME)
cmake_host_system_information(RESULT _fqdn QUERY FQDN)
# processor information
cmake_host_system_information(RESULT _processor_name QUERY PROCESSOR_NAME)
cmake_host_system_information(RESULT _processor_description QUERY PROCESSOR_DESCRIPTION)
# os information
cmake_host_system_information(RESULT _os_name QUERY OS_NAME)
cmake_host_system_information(RESULT _os_release QUERY OS_RELEASE)
cmake_host_system_information(RESULT _os_version QUERY OS_VERSION)
cmake_host_system_information(RESULT _os_platform QUERY OS_PLATFORM)
string(TIMESTAMP _configuration_time "%Y-%m-%d %H:%M:%S [UTC]" UTC)
configure_file(print_info.c.in print_info.c @ONLY)
add_executable(example "")
target_sources(example
PRIVATE
example.f90
${CMAKE_CURRENT_BINARY_DIR}/print_info.c
)
$ mkdir -p build
$ cd build
$ cmake ..
$ cmake --build .
$ ./example
Configuration and build information
-----------------------------------
Who compiled | somebody
Compilation hostname | laptop
Fully qualified domain name | laptop
Operating system | Linux, 4.16.13-1-ARCH, #1 SMP PREEMPT Thu May 31 23:29:29 UTC 2018
Platform | x86_64
Processor info | Unknown P6 family, 2 core Intel(R) Core(TM) i5-5200U CPU @ 2.20GHz
CMake version | 3.11.3
CMake generator | Unix Makefiles
Configuration time | 2018-06-25 15:38:03 [UTC]
Fortran compiler | /usr/bin/f95
C compiler | /usr/bin/cc
The command configure_file can copy files and replace their contents with variable values. In our example, we used configure_file to both modify the contents of our template file and copy it to a location where it could then be compiled into our executable. Let us look at our invocation of configure_file:
configure_file(print_info.c.in print_info.c @ONLY)
The first argument is the name of the scaffold: print_info.c.in. CMake assumes that the input file is located relative to the root directory of the project; that is, in ${CMAKE_CURRENT_SOURCE_DIR}/print_info.c.in. The second argument is the name of the configured file, which we chose to be print_info.c. The output file is assumed to be located relative to the project build directory; that is, in ${CMAKE_CURRENT_BINARY_DIR}/print_info.c.
When limiting the invocation to just two arguments, the input and output files, CMake will not only configure variables of the form @VAR@, but also those of the form ${VAR}. This can be inconvenient when ${VAR} is part of the syntax and should not be touched (such as in shell scripts). To instruct CMake in this regard, the option @ONLY should be passed to the invocation of configure_file, as we illustrated previously.
Note that the substitution of placeholders with values expects the variable names in CMake to be exactly the same as those used in the to-be configured file, and placed in between @-markers. Any CMake variable defined at the point where configure_file is invoked can be used. This includes all built-in CMake variables, such as CMAKE_VERSION or CMAKE_GENERATOR, in our example. Moreover, whenever the template file is modified, rebuilding the code will trigger a regeneration of the build system. In this way, the configured file will always be up to date.
In this recipe, we will revisit the previous example, and will again generate print_info.c from the template print_info.c.in. However, this time, we will imagine that the CMake function configure_file() has not been invented yet, and will emulate it with a Python script. The goal of this recipe is to learn how we can generate source code at configure time by using a now familiar example. Of course, we will probably favor configure_file() for a real project, but when faced with the challenge of generating sources using Python at configure time, we will know how to do it.
We should point out that this recipe has a serious limitation and cannot emulate configure_file() fully. The approach that we will present here cannot generate an automatic dependency which would regenerate print_info.c at build time. In other words, if you remove the generated print_info.c after the configure step, this file will not be regenerated and the build step will fail. To properly mimic the behavior of configure_file() we would require add_custom_command() and add_custom_target(), which we will use in the subsequent Recipe 3, Generating source code at build time using Python, where we will overcome this limitation.
In this recipe, we will use a relatively simple Python script which we will detail below. This script will read in print_info.c.in and replace the placeholders in the file with parameters passed to the Python script from CMake. For more sophisticated templating, we recommend external tools, such as Jinja (see http://jinja.pocoo.org).
The files print_info.c.in and example.f90 are unchanged with respect to the previous recipe. In addition, we will use a Python script, configurator.py, which provides one function:
def configure_file(input_file, output_file, vars_dict):
with input_file.open('r') as f:
template = f.read()
for var in vars_dict:
template = template.replace('@' + var + '@', vars_dict[var])
with output_file.open('w') as f:
f.write(template)
This function reads an input file, goes over all of the keys of a vars_dict dictionary, replaces the pattern @key@ with its corresponding value, and writes the results to an output file. The key-value pairs will be provided by CMake.
Similar to the previous recipe, we need to configure a template file, but this time, we will emulate the configure_file() function with a Python script. We keep the CMakeLists.txt largely unchanged, but we replace configure_file(print_info.c.in print_info.c @ONLY) with a set of commands, which we will introduce step by step:
set(_config_script
"
from pathlib import Path
source_dir = Path('${CMAKE_CURRENT_SOURCE_DIR}')
binary_dir = Path('${CMAKE_CURRENT_BINARY_DIR}')
input_file = source_dir / 'print_info.c.in'
output_file = binary_dir / 'print_info.c'
import sys
sys.path.insert(0, str(source_dir))
from configurator import configure_file
vars_dict = {
'_user_name': '${_user_name}',
'_host_name': '${_host_name}',
'_fqdn': '${_fqdn}',
'_processor_name': '${_processor_name}',
'_processor_description': '${_processor_description}',
'_os_name': '${_os_name}',
'_os_release': '${_os_release}',
'_os_version': '${_os_version}',
'_os_platform': '${_os_platform}',
'_configuration_time': '${_configuration_time}',
'CMAKE_VERSION': '${CMAKE_VERSION}',
'CMAKE_GENERATOR': '${CMAKE_GENERATOR}',
'CMAKE_Fortran_COMPILER': '${CMAKE_Fortran_COMPILER}',
'CMAKE_C_COMPILER': '${CMAKE_C_COMPILER}',
}
configure_file(input_file, output_file, vars_dict)
")
find_package(PythonInterp QUIET REQUIRED)
execute_process(
COMMAND
${PYTHON_EXECUTABLE} "-c" ${_config_script}
)
Let us examine the changes that we applied to CMakeLists.txt, by discussing them backwards.
We executed a Python script that generates print_info.c. To run the Python script, we first had to detect Python and construct the Python script. The Python script imports the configure_file function, which we defined in configurator.py. It requires that we provide it with file locations for reading and writing, as well as a dictionary holding CMake variables and their values as key-value pairs.
This recipe has shown an alternative way of generating a configuration report that can be compiled into an executable, or even a library target, by delegating the generation of sources to an external script. The first approach that we discussed in the previous recipe was cleaner and simpler, but with the approach that we have presented in this recipe, we have the flexibility to implement, in principle, any configure-time step that Python (or another language) allows. Using the present approach, we can perform actions that go beyond what cmake_host_system_information() currently provides.
However, we need to remember the limitation of this approach which cannot generate an automatic dependency which would regenerate print_info.c at build time. In the next recipe we will overcome this limitation.
It is possible to express this recipe more compactly. Instead of explicitly constructing vars_dict, which felt a bit repetitive, we could have used get_cmake_property(_vars VARIABLES) to obtain a list of all variables defined at this particular time, and could have looped over all elements of _vars to access their values:
get_cmake_property(_vars VARIABLES)
foreach(_var IN ITEMS ${_vars})
message("variable ${_var} has the value ${${_var}}")
endforeach()
Using this approach, it is possible to build vars_dict implicitly. However, care has to be taken to escape values that contain characters such as ";", which Python interprets as terminating an instruction.
Being able to generate source code at build time is a powerful feature in the toolbox of the pragmatic developer who wishes to generate possibly lengthy and repetitive code based on some rules, while at the same time avoiding tracking the generated code explicitly in the source code repository. We can, for instance, imagine generating different source code, based on the detected platform or architecture. Or, we can use the simplicity of Python to generate explicit and efficient C++ code at build time, based on the input that we gathered during the configuration step. Other relevant examples are parser generators, such as Flex (https://github.com/westes/flex) and Bison (https://www.gnu.org/software/bison/), meta-object compilers, such as Qt moc (http://doc.qt.io/qt-5/moc.html), and serialization frameworks, such as Google protobuf (https://developers.google.com/protocol-buffers/).
To provide a concrete example, we imagine that we need to write a code to verify whether a number is prime. Many algorithms exist, and we can, for instance, use the sieve of Eratosthenes to separate prime numbers from non-primes. If we have to verify many numbers, we will not want to run the sieve of Eratosthenes algorithm for every single one of them. What we would like to do instead is tabulate all prime numbers once, up to a certain limit, and use a table lookup to verify a large set of numbers.
In this example, we will generate the C++ code for the lookup table (a vector of prime numbers) by using Python at compile time. Of course, to solve this particular programming problem, we could also generate the lookup table using C++, and we could do it at runtime instead.
Let us start out with the following Python script, called generate.py. This script takes two command-line arguments - an integer that will limit the search, and an output filename:
"""
Generates C++ vector of prime numbers up to max_number
using sieve of Eratosthenes.
"""
import pathlib
import sys
# for simplicity we do not verify argument list
max_number = int(sys.argv[-2])
output_file_name = pathlib.Path(sys.argv[-1])
numbers = range(2, max_number + 1)
is_prime = {number: True for number in numbers}
for number in numbers:
current_position = number
if is_prime[current_position]:
while current_position <= max_number:
current_position += number
is_prime[current_position] = False
primes = (number for number in numbers if is_prime[number])
code = """#pragma once
#include <vector>
const std::size_t max_number = {max_number};
std::vector<int> & primes() {{
static std::vector<int> primes;
{push_back}
return primes;
}}
"""
push_back = '\n'.join([' primes.push_back({:d});'.format(x) for x in primes])
output_file_name.write_text(
code.format(max_number=max_number, push_back=push_back))
Our goal is to generate a header file, primes.hpp, at compile time, and include it in the following example code:
#include "primes.hpp"
#include <iostream>
#include <vector>
int main() {
std::cout << "all prime numbers up to " << max_number << ":";
for (auto prime : primes())
std::cout << " " << prime;
std::cout << std::endl;
return 0;
}
The following is a breakdown of the commands in CMakeLists.txt:
cmake_minimum_required(VERSION 3.5 FATAL_ERROR)
project(recipe-03 LANGUAGES CXX)
set(CMAKE_CXX_STANDARD 11)
set(CMAKE_CXX_EXTENSIONS OFF)
set(CMAKE_CXX_STANDARD_REQUIRED ON)
find_package(PythonInterp QUIET REQUIRED)
file(MAKE_DIRECTORY ${CMAKE_CURRENT_BINARY_DIR}/generated)
set(MAX_NUMBER "100" CACHE STRING "Upper bound for primes")
add_custom_command(
OUTPUT
${CMAKE_CURRENT_BINARY_DIR}/generated/primes.hpp
COMMAND
${PYTHON_EXECUTABLE} generate.py ${MAX_NUMBER} ${CMAKE_CURRENT_BINARY_DIR}/generated/primes.hpp
WORKING_DIRECTORY
${CMAKE_CURRENT_SOURCE_DIR}
DEPENDS
generate.py
)
add_executable(example "")
target_sources(example
PRIVATE
example.cpp
${CMAKE_CURRENT_BINARY_DIR}/generated/primes.hpp
)
target_include_directories(example
PRIVATE
${CMAKE_CURRENT_BINARY_DIR}/generated
)
$ mkdir -p build
$ cd build
$ cmake ..
$ cmake --build .
$ ./example
all prime numbers up to 100: 2 3 5 7 11 13 17 19 23 29 31 37 41 43 47 53 59 61 67 71 73 79 83 89 97
To generate the header file, we defined a custom command that executes the generate.py script and takes ${MAX_NUMBER} and the file path (${CMAKE_CURRENT_BINARY_DIR}/generated/primes.hpp) as arguments:
add_custom_command(
OUTPUT
${CMAKE_CURRENT_BINARY_DIR}/generated/primes.hpp
COMMAND
${PYTHON_EXECUTABLE} generate.py ${MAX_NUMBER} ${CMAKE_CURRENT_BINARY_DIR}/generated/primes.hpp
WORKING_DIRECTORY
${CMAKE_CURRENT_SOURCE_DIR}
DEPENDS
generate.py
)
In order to trigger the source code generation, we need to add it as a source code dependency in the definition of the executable, a task easily achieved with target_sources:
target_sources(example
PRIVATE
example.cpp
${CMAKE_CURRENT_BINARY_DIR}/generated/primes.hpp
)
In the preceding code, we do not have to define a new custom target. The header file will be generated as a dependency of example, and will be rebuilt every time the generate.py script changes. If the code generation script produces several source files, it is important that all generated files are listed as dependencies of some target.
We mentioned that all generated files should be listed as dependencies of some target. However, we might be in a situation where we do not know this list of files, since it is determined by the scripts generating the files, depending on input that we provide to the configuration. In this case, we might be tempted to use file(GLOB ...) to collect generated files into a list (see https://cmake.org/cmake/help/v3.5/command/file.html).
However, remember that file(GLOB ...) is executed at configure time, whereas code generation happens at build time. Therefore, we may need an additional level of indirection, where we place the file(GLOB ...) command in a separate CMake script which we execute at using ${CMAKE_COMMAND} -P, in order to get the list of generated files at build time.
Code versions matter, not only for reproducibility but also to document API capabilities or simplify support requests and bug reporting. The source code is typically under some version control, and additional semantic version numbers (see e.g. https://semver.org) can be attached using Git tags, for example. However, not only does the source code need to be versioned, but the executable needs to record the project version so that it can be printed to the code output or user interface.
In this example, we will define the version number inside of the CMake sources. Our goal is to record the program version to a header file at the moment when we configure the project. The generated header file can then be included in the code at the right place and time, to print the code version to the output file(s) or screen.
We will use the following C file (example.c) to print the version information:
#include "version.h"
#include <stdio.h>
int main() {
printf("This is output from code %s\n", PROJECT_VERSION);
printf("Major version number: %i\n", PROJECT_VERSION_MAJOR);
printf("Minor version number: %i\n", PROJECT_VERSION_MINOR);
printf("Hello CMake world!\n");
}
Here, we assume that PROJECT_VERSION_MAJOR, PROJECT_VERSION_MINOR, and PROJECT_VERSION are defined in version.h. Our goal is to generate version.h from the following scaffold, version.h.in:
#pragma once
#define PROJECT_VERSION_MAJOR @PROJECT_VERSION_MAJOR@
#define PROJECT_VERSION_MINOR @PROJECT_VERSION_MINOR@
#define PROJECT_VERSION_PATCH @PROJECT_VERSION_PATCH@
#define PROJECT_VERSION "v@PROJECT_VERSION@"
We will use preprocessor definitions, but we could also employ string or integer constants for more type safety (and we will demonstrate that later). From the CMake perspective, the approach is the same.
We will follow these steps to register the version in our template header file:
cmake_minimum_required(VERSION 3.5 FATAL_ERROR)
project(recipe-04 VERSION 2.0.1 LANGUAGES C)
configure_file(
version.h.in
generated/version.h
@ONLY
)
Finally, we define the executable and provide the target include path:
add_executable(example example.c)
target_include_directories(example
PRIVATE
${CMAKE_CURRENT_BINARY_DIR}/generated
)
When invoking the CMake project command with a VERSION argument, CMake will set the PROJECT_VERSION_MAJOR, PROJECT_VERSION_MINOR, and PROJECT_VERSION_PATCH for our project. The key command in this recipe is configure_file, which takes an input file (in this case, version.h.in) and generates an output file (in this case, generated/version.h) by expanding all placeholders between @ to their corresponding CMake variables. It replaces @PROJECT_VERSION_MAJOR@ with 2, and so on. With the keyword @ONLY, we limit configure_file to only expand @variables@, but to not touch ${variables}. The latter form is not used in version.h.in, but they frequently appear when configuring a shell script using CMake.
The generated header file can be included in our example code, and the version information is available to be printed:
$ mkdir -p build
$ cd build
$ cmake ..
$ cmake --build .
$ ./example
This is output from code v2.0.1
Major version number: 2
Minor version number: 0
Hello CMake world!
To make sure that the preprocessor variables are only defined if the CMake variable is considered a true constant, one can employ #cmakedefine instead of #define in the header files that are about to be configured, by using configure_file.
Depending on whether the CMake variable is defined and evaluates to a true constant, #cmakedefine YOUR_VARIABLE will then be replaced with either #define YOUR_VARIABLE ... or /* #undef YOUR_VARIABLE */. There is also #cmakedefine01, which will set a variable to either 0 or 1, depending on whether the variable is defined.
The goal of this recipe is similar to the previous one, but the starting point is different; our plan is to read the version information from a file, rather than setting it inside of CMakeLists.txt. The motivation for keeping the version in a separate file, outside of CMake sources, is to allow other build frameworks or development tools to use the information, independent of CMake, without duplicating the information in several files. One example of a build framework that you might like to employ in parallel to CMake is the Sphinx documentation framework, generating documentation and deploying it to the Read the Docs service to serve your code documentation online.
We will start with a file called VERSION, containing the following:
2.0.1-rc-2
This time, we will choose to go for more type safety, and will define PROGRAM_VERSION as a string constant in version.hpp.in:
#pragma once
#include <string>
const std::string PROGRAM_VERSION = "@PROGRAM_VERSION@";
We will include the generated version.hpp in the following example source code (example.cpp):
// provides PROGRAM_VERSION
#include "version.hpp"
#include <iostream>
int main() {
std::cout << "This is output from code v" << PROGRAM_VERSION
<< std::endl;
std::cout << "Hello CMake world!" << std::endl;
}
The following shows how to accomplish our task, step by step:
cmake_minimum_required(VERSION 3.5 FATAL_ERROR)
project(recipe-05 LANGUAGES CXX)
set(CMAKE_CXX_STANDARD 11)
set(CMAKE_CXX_EXTENSIONS OFF)
set(CMAKE_CXX_STANDARD_REQUIRED ON)
if(EXISTS "${CMAKE_CURRENT_SOURCE_DIR}/VERSION")
file(READ "${CMAKE_CURRENT_SOURCE_DIR}/VERSION" PROGRAM_VERSION)
string(STRIP "${PROGRAM_VERSION}" PROGRAM_VERSION)
else()
message(FATAL_ERROR "File ${CMAKE_CURRENT_SOURCE_DIR}/VERSION not found")
endif()
configure_file(
version.hpp.in
generated/version.hpp
@ONLY
)
add_executable(example example.cpp)
target_include_directories(example
PRIVATE
${CMAKE_CURRENT_BINARY_DIR}/generated
)
$ mkdir -p build
$ cd build
$ cmake ..
$ cmake --build .
$ ./example
This is output from code v2.0.1-rc-2
Hello CMake world!
We used the following construct to read the version string from a file called VERSION:
if(EXISTS "${CMAKE_CURRENT_SOURCE_DIR}/VERSION")
file(READ "${CMAKE_CURRENT_SOURCE_DIR}/VERSION" PROGRAM_VERSION)
string(STRIP "${PROGRAM_VERSION}" PROGRAM_VERSION)
else()
message(FATAL_ERROR "File ${CMAKE_CURRENT_SOURCE_DIR}/VERSION not found")
endif()
Here, we first check that this file exists, and issue an error message if it does not. If it exists, we read its contents into a variable called PROGRAM_VERSION, which we strip of any trailing whitespace. Once the variable PROGRAM_VERSION is set, it can be used to configure version.hpp.in to generate generated/version.hpp, as follows:
configure_file(
version.hpp.in
generated/version.hpp
@ONLY
)
Most modern source code repositories are tracked using Git as version control system, a fact that can be attributed to the huge popularity of the repository hosting platform GitHub. We will, therefore, use Git in this recipe; the motivation and implementation will, however, translate to other version control systems. If we look at Git as an example, the Git hash of a commit uniquely determines the state of the source code. Therefore, to uniquely brand the executable, we will try to burn the Git hash into the executable by recording the hash string in a header file that can be included and used at the right place in the code.
We will need two source files, both very similar to the previous recipe. One will be configured with the recorded hash (version.hpp.in), as follows:
#pragma once
#include <string>
const std::string GIT_HASH = "@GIT_HASH@";
We will also need an example source file (example.cpp), which will print the hash to the screen:
#include "version.hpp"
#include <iostream>
int main() {
std::cout << "This code has been configured from version " << GIT_HASH
<< std::endl;
}
This recipe also assumes that we are in a Git repository with at least one commit. So, initialize this example with git init, and create commits with git add <filename>, followed by git commit, in order to get a meaningful example.
The following illustrates the steps to record versioning information from Git:
cmake_minimum_required(VERSION 3.5 FATAL_ERROR)
project(recipe-06 LANGUAGES CXX)
set(CMAKE_CXX_STANDARD 11)
set(CMAKE_CXX_EXTENSIONS OFF)
set(CMAKE_CXX_STANDARD_REQUIRED ON)
# in case Git is not available, we default to "unknown"
set(GIT_HASH "unknown")
# find Git and if available set GIT_HASH variable
find_package(Git QUIET)
if(GIT_FOUND)
execute_process(
COMMAND ${GIT_EXECUTABLE} log -1 --pretty=format:%h
OUTPUT_VARIABLE GIT_HASH
OUTPUT_STRIP_TRAILING_WHITESPACE
ERROR_QUIET
WORKING_DIRECTORY
${CMAKE_CURRENT_SOURCE_DIR}
)
endif()
message(STATUS "Git hash is ${GIT_HASH}")
# generate file version.hpp based on version.hpp.in
configure_file(
version.hpp.in
generated/version.hpp
@ONLY
)
# example code
add_executable(example example.cpp)
# needs to find the generated header file
target_include_directories(example
PRIVATE
${CMAKE_CURRENT_BINARY_DIR}/generated
)
$ mkdir -p build
$ cd build
$ cmake ..
$ cmake --build .
$ ./example
This code has been configured from version d58c64f
We use find_package(Git QUIET) to detect whether Git is available on the system. If it is (if GIT_FOUND is true), we run a Git command: ${GIT_EXECUTABLE} log -1 --pretty=format:%h. This command gives us the short version of the current commit hash. Of course, we have full flexibility to run another Git command, instead. We ask the execute_process command to place the result of the command into a variable called GIT_HASH, which we subsequently strip of any trailing whitespace. With ERROR_QUIET, we ask the command to not stop the configuration if the Git command fails for some reason.
Since the Git command might fail (the source code might have been distributed outside of the Git repository) or Git might not even be available on the system, we wish to set a default for the variable, as follows:
set(GIT_HASH "unknown")
One problem with this recipe is that the Git hash is recorded at configure time, not at build time. In the next recipe, we will demonstrate how to implement the latter approach.
In the previous recipe, we recorded the state of the code repository (Git hash) at configure time, and it is very useful to have the state of the repository recorded in the executable. However, one unsatisfactory aspect of the previous approach is that if we changed branches or committed changes after having configured the code, the version record included in our source code could point to the wrong Git hash. In this recipe, we wish to go a step further and demonstrate how to record the Git hash (or, generally, perform other actions) at build time, to make sure that these actions are run every time we build the code, since we may configure only once but build several times.
We will use the same version.hpp.in as in the previous recipe, and will modify the example.cpp file only minimally, to make it clear that it prints a build-time Git hash:
#include "version.hpp"
#include <iostream>
int main() {
std::cout << "This code has been built from version " << GIT_HASH << std::endl;
}
Saving the Git information to the version.hpp header file at build time will require the following operations:
# in case Git is not available, we default to "unknown"
set(GIT_HASH "unknown")
# find Git and if available set GIT_HASH variable
find_package(Git QUIET)
if(GIT_FOUND)
execute_process(
COMMAND ${GIT_EXECUTABLE} log -1 --pretty=format:%h
OUTPUT_VARIABLE GIT_HASH
OUTPUT_STRIP_TRAILING_WHITESPACE
ERROR_QUIET
)
endif()
message(STATUS "Git hash is ${GIT_HASH}")
# generate file version.hpp based on version.hpp.in
configure_file(
${CMAKE_CURRENT_LIST_DIR}/version.hpp.in
${TARGET_DIR}/generated/version.hpp
@ONLY
)
# set minimum cmake version
cmake_minimum_required(VERSION 3.5 FATAL_ERROR)
# project name and language
project(recipe-07 LANGUAGES CXX)
# require C++11
set(CMAKE_CXX_STANDARD 11)
set(CMAKE_CXX_EXTENSIONS OFF)
set(CMAKE_CXX_STANDARD_REQUIRED ON)
# example code
add_executable(example example.cpp)
# needs to find the generated header file
target_include_directories(example
PRIVATE
${CMAKE_CURRENT_BINARY_DIR}/generated
)
add_custom_command(
OUTPUT
${CMAKE_CURRENT_BINARY_DIR}/generated/version.hpp
ALL
COMMAND
${CMAKE_COMMAND} -D TARGET_DIR=${CMAKE_CURRENT_BINARY_DIR} -P ${CMAKE_CURRENT_SOURCE_DIR}/git-hash.cmake
WORKING_DIRECTORY
${CMAKE_CURRENT_SOURCE_DIR}
)
# rebuild version.hpp every time
add_custom_target(
get_git_hash
ALL
DEPENDS
${CMAKE_CURRENT_BINARY_DIR}/generated/version.hpp
)
# version.hpp has to be generated
# before we start building example
add_dependencies(example get_git_hash)
In this recipe, we achieved the execution of CMake code at build time. For this, we defined a custom command:
add_custom_command(
OUTPUT
${CMAKE_CURRENT_BINARY_DIR}/generated/version.hpp
ALL
COMMAND
${CMAKE_COMMAND} -D TARGET_DIR=${CMAKE_CURRENT_BINARY_DIR} -P ${CMAKE_CURRENT_SOURCE_DIR}/git-hash.cmake
WORKING_DIRECTORY
${CMAKE_CURRENT_SOURCE_DIR}
)
We also defined a custom target, as follows:
add_custom_target(
get_git_hash
ALL
DEPENDS
${CMAKE_CURRENT_BINARY_DIR}/generated/version.hpp
)
The custom command invokes CMake to execute the git-hash.cmake CMake script. This is achieved by using the -P CLI switch, to pass the location of the script. Notice that we can pass options with the -D CLI switch, as we usually would. The git-hash.cmake script generates ${TARGET_DIR}/generated/version.hpp. The custom target is added to the ALL target, and depends on the output of the custom command. In other words, when we build the default target, we make sure that the custom command is run. Also, observe that the custom command has the ALL target as output. With that, we make sure that version.hpp is generated every time.
We could enhance the recipe in order to include extra information in addition to the recorded Git hash. It is not unusual to detect whether the build environment is "dirty", that is, whether it contains uncommitted changes and untracked files, or "clean". This information could be detected using git describe --abbrev=7 --long --always --dirty --tags. Depending on the ambition for reproducibility one could even record the full output of git status into a header file but we leave these enhancements as an exercise.
In this chapter, we will cover the following recipes:
In the previous chapters, we have discovered a number of building blocks to create projects configured and built using CMake. In this chapter, we will discuss how to combine these building blocks and introduce abstractions to avoid huge CMakeLists.txt files and minimize code repetition, global variables, global state, and explicit ordering. Our goal will be to present patterns for a modular CMake code structure and for limiting the scope of variables. We will discuss strategies that will also help us control CMake code complexity for medium to large code projects.
In any programming language, functions allow us to abstract (hide) details and avoid code repetition, and CMake is no exception. In this recipe, we will discuss macros and functions as an example, and we will introduce a macro to make it more convenient for us to define tests and set the ordering of tests. Instead of calling add_test and set_tests_properties to define each set and to set the expected COST of each test (Chapter 4, Creating and Running Tests, Recipe 8, Running tests in parallel), our goal is to define a macro that will be able to take care of both in one go.
We will start with the example presented in Chapter 4, Creating and Running Tests, Recipe 2, Defining a unit test using the Catch2 library. The main.cpp, sum_integers.cpp, and sum_integers.hpp files are unchanged and can be used to compute the sum of integers provided as command line arguments. The source code for the unit tests (test.cpp) is used unchanged, as well. We also require the Catch2 header file, catch.hpp. In contrast to Chapter 4, Creating and Running Tests, Recipe 2, Defining a unit test using the Catch2 library, we will structure the source files into subdirectories and form the following file tree (we will discuss the CMake code later):
.
├── CMakeLists.txt
├── src
│ ├── CMakeLists.txt
│ ├── main.cpp
│ ├── sum_integers.cpp
│ └── sum_integers.hpp
└── tests
├── catch.hpp
├── CMakeLists.txt
└── test.cpp
Let us follow the required steps:
cmake_minimum_required(VERSION 3.5 FATAL_ERROR)
project(recipe-01 LANGUAGES CXX)
set(CMAKE_CXX_STANDARD 11)
set(CMAKE_CXX_EXTENSIONS OFF)
set(CMAKE_CXX_STANDARD_REQUIRED ON)
include(GNUInstallDirs)
set(CMAKE_ARCHIVE_OUTPUT_DIRECTORY
${CMAKE_BINARY_DIR}/${CMAKE_INSTALL_LIBDIR})
set(CMAKE_LIBRARY_OUTPUT_DIRECTORY
${CMAKE_BINARY_DIR}/${CMAKE_INSTALL_LIBDIR})
set(CMAKE_RUNTIME_OUTPUT_DIRECTORY
${CMAKE_BINARY_DIR}/${CMAKE_INSTALL_BINDIR})
add_subdirectory(src)
enable_testing()
add_subdirectory(tests)
set(CMAKE_INCLUDE_CURRENT_DIR_IN_INTERFACE ON)
add_library(sum_integers sum_integers.cpp)
add_executable(sum_up main.cpp)
target_link_libraries(sum_up sum_integers)
add_executable(cpp_test test.cpp)
target_link_libraries(cpp_test sum_integers)
macro(add_catch_test _name _cost)
math(EXPR num_macro_calls "${num_macro_calls} + 1")
message(STATUS "add_catch_test called with ${ARGC} arguments: ${ARGV}")
set(_argn "${ARGN}")
if(_argn)
message(STATUS "oops - macro received argument(s) we did not expect: ${ARGN}")
endif()
add_test(
NAME
${_name}
COMMAND
$<TARGET_FILE:cpp_test>
[${_name}] --success --out
${PROJECT_BINARY_DIR}/tests/${_name}.log --durations yes
WORKING_DIRECTORY
${CMAKE_CURRENT_BINARY_DIR}
)
set_tests_properties(
${_name}
PROPERTIES
COST ${_cost}
)
endmacro()
set(num_macro_calls 0)
add_catch_test(short 1.5)
add_catch_test(long 2.5 extra_argument)
message(STATUS "in total there were ${num_macro_calls} calls to add_catch_test")
$ mkdir -p build
$ cd build
$ cmake ..
-- ...
-- add_catch_test called with 2 arguments: short;1.5
-- add_catch_test called with 3 arguments: long;2.5;extra_argument
-- oops - macro received argument(s) we did not expect: extra_argument
-- in total there were 2 calls to add_catch_test
-- ...
$ cmake --build .
$ ctest
Start 2: long
1/2 Test #2: long ............................. Passed 0.00 sec
Start 1: short
2/2 Test #1: short ............................ Passed 0.00 sec
100% tests passed, 0 tests failed out of 2
The new feature in this recipe is the add_catch_test macro. The macro expects two arguments, _name and _cost, and we can use these arguments inside the macro to call add_test and set_tests_properties. The leading underscores are our choice, but with this we indicate to the reader that these arguments have local scope and can only be accessed within the macro. Also, note that the macro automatically populates ${ARGC} (number of arguments) and ${ARGV} (list of arguments), and we verified this in the output:
-- add_catch_test called with 2 arguments: short;1.5
-- add_catch_test called with 3 arguments: long;2.5;extra_argument
The macro also defines ${ARGN}, which holds the list of arguments past the last expected argument. In addition, we can also address arguments with ${ARGV0}, ${ARGV1}, and so on. Observe how we caught the unexpected argument (extra_argument) in this call:
add_catch_test(long 2.5 extra_argument)
We have done that using the following:
set(_argn "${ARGN}")
if(_argn)
message(STATUS "oops - macro received argument(s) we did not expect: ${ARGN}")
endif()
In this if-check, we had to introduce a new variable and could not query ARGN directly since it is not a variable in the usual CMake sense. With this macro, we were not only able to define tests by their name and command but also indicate the expected cost, which led to the "long" test being started before the "short" test thanks to the COST property.
We could have implemented this using a function instead of a macro with the same syntax:
function(add_catch_test _name _cost)
...
endfunction()
The difference between macros and functions is their variable scope. Macros are executed in the scope of the caller whereas functions have own variable scope. In other words, if we need to set or modify variables that should be available to the caller, we typically use a macro. If no output variables are set or modified, we preferably use a function. We remark that it is possible to modify parent scope variables also in a function, but this has to be explicitly indicated using PARENT_SCOPE:
set(variable_visible_outside "some value" PARENT_SCOPE)
To demonstrate the scope, we have written the following call after the definition of the macro:
set(num_macro_calls 0)
add_catch_test(short 1.5)
add_catch_test(long 2.5 extra_argument)
message(STATUS "in total there were ${num_macro_calls} calls to add_catch_test")
Inside the macro, we increase num_macro_calls by 1:
math(EXPR num_macro_calls "${num_macro_calls} + 1")
And this is the output produced:
-- in total there were 2 calls to add_catch_test
If we changed the macro to a function, the tests would still work but num_macro_calls would remain 0 throughout the calls in the parent scope. It is useful to imagine CMake macros as being like functions, which are substituted directly into the place where they are called (inlined in the C language sense). It is useful to imagine CMake functions as black boxes where nothing comes back unless you explicitly define it as PARENT_SCOPE. Functions in CMake do not have return values.
It is possible to nest function calls in macros and macro calls in functions, but we need to carefully consider the scope of the variables. If a feature can be implemented using a function, then this is probably preferable to a macro since it gives more default control over the parent scope state.
We should also mention the use of CMAKE_INCLUDE_CURRENT_DIR_IN_INTERFACE in src/CMakeLists.txt:
set(CMAKE_INCLUDE_CURRENT_DIR_IN_INTERFACE ON)
This command adds the current directory to the INTERFACE_INCLUDE_DIRECTORIES property for all targets defined in this CMakeLists.txt file. In other words, we did not have to use target_include_directories to indicate the header file location for cpp_test.
Projects typically start with a single CMakeLists.txt file, but over time this file grows and in this recipe we will demonstrate one mechanism for splitting CMakeLists.txt up into smaller units. There are several motivations for splitting up CMakeLists.txt into modules that can be included in the main CMakeLists.txt or other modules:
In this recipe, we will demonstrate how to define and include a macro that allows us to get colored CMake output (for important status messages or warnings).
In this example, we will use two files, the main CMakeLists.txt and cmake/colors.cmake:
.
├── cmake
│ └── colors.cmake
└── CMakeLists.txt
The cmake/colors.cmake file contains definitions for colored output:
# colorize CMake output
# code adapted from stackoverflow: http://stackoverflow.com/a/19578320
# from post authored by https://stackoverflow.com/users/2556117/fraser
macro(define_colors)
if(WIN32)
# has no effect on WIN32
set(ColourReset "")
set(ColourBold "")
set(Red "")
set(Green "")
set(Yellow "")
set(Blue "")
set(Magenta "")
set(Cyan "")
set(White "")
set(BoldRed "")
set(BoldGreen "")
set(BoldYellow "")
set(BoldBlue "")
set(BoldMagenta "")
set(BoldCyan "")
set(BoldWhite "")
else()
string(ASCII 27 Esc)
set(ColourReset "${Esc}[m")
set(ColourBold "${Esc}[1m")
set(Red "${Esc}[31m")
set(Green "${Esc}[32m")
set(Yellow "${Esc}[33m")
set(Blue "${Esc}[34m")
set(Magenta "${Esc}[35m")
set(Cyan "${Esc}[36m")
set(White "${Esc}[37m")
set(BoldRed "${Esc}[1;31m")
set(BoldGreen "${Esc}[1;32m")
set(BoldYellow "${Esc}[1;33m")
set(BoldBlue "${Esc}[1;34m")
set(BoldMagenta "${Esc}[1;35m")
set(BoldCyan "${Esc}[1;36m")
set(BoldWhite "${Esc}[1;37m")
endif()
endmacro()
This is how we can use the color definitions to generate colored status messages:
cmake_minimum_required(VERSION 3.5 FATAL_ERROR)
project(recipe-02 LANGUAGES NONE)
list(APPEND CMAKE_MODULE_PATH "${CMAKE_CURRENT_SOURCE_DIR}/cmake")
include(colors)
define_colors()
message(STATUS "This is a normal message")
message(STATUS "${Red}This is a red${ColourReset}")
message(STATUS "${BoldRed}This is a bold red${ColourReset}")
message(STATUS "${Green}This is a green${ColourReset}")
message(STATUS "${BoldMagenta}This is bold${ColourReset}")

This is an example where no code is compiled and no language support is required, and we have indicated this by LANGUAGES NONE:
project(recipe-02 LANGUAGES NONE)
We defined the define_colors macro and placed it in cmake/colors.cmake. We chose to use a macro and not a function since we also wish to use the variables defined inside the macro in the scope of the call to change colors in the messages. We have included the macro and called define_colors using the following lines:
include(colors)
define_colors()
However, we also need to tell CMake where to look for the macro:
list(APPEND CMAKE_MODULE_PATH "${CMAKE_CURRENT_SOURCE_DIR}/cmake")
The include(colors) command instructs CMake to search ${CMAKE_MODULE_PATH} for a module with the name colors.cmake.
Instead of writing the following:
list(APPEND CMAKE_MODULE_PATH "${CMAKE_CURRENT_SOURCE_DIR}/cmake")
include(colors)
We could have used an explicit include as follows:
include(cmake/colors.cmake)
The recommended practice is to define macros or functions in modules and then call the macro or function. It is not good practice to use module includes as function calls. Including a module should not do more than defining functions and macros and discovering programs, libraries, and paths. The actual include command should not define or modify variables and the reason for this is that a repeated include, which may be accidental, should not introduce any unwanted side effects. In Recipe 5, Redefining functions and macros, we will create a guard against accidental includes.
In the previous two recipes, we used macros; in this recipe, we will use a function to abstract away details and avoid code repetition. In the example, we will implement a function that accepts a list of compiler flags. The function will try to compile a test code with these flags, one by one, and return the first flag that was understood by the compiler. By doing so, we will learn a couple of new features: functions, list manipulations, string manipulations, and checking whether compiler flags are supported by the compiler.
Following the recommended practice of the previous recipe, we will define the function in a module (set_compiler_flag.cmake), include the module, and then call the function. The module contains the following code, which we will discuss later:
include(CheckCCompilerFlag)
include(CheckCXXCompilerFlag)
include(CheckFortranCompilerFlag)
function(set_compiler_flag _result _lang)
# build a list of flags from the arguments
set(_list_of_flags)
# also figure out whether the function
# is required to find a flag
set(_flag_is_required FALSE)
foreach(_arg IN ITEMS ${ARGN})
string(TOUPPER "${_arg}" _arg_uppercase)
if(_arg_uppercase STREQUAL "REQUIRED")
set(_flag_is_required TRUE)
else()
list(APPEND _list_of_flags "${_arg}")
endif()
endforeach()
set(_flag_found FALSE)
# loop over all flags, try to find the first which works
foreach(flag IN ITEMS ${_list_of_flags})
unset(_flag_works CACHE)
if(_lang STREQUAL "C")
check_c_compiler_flag("${flag}" _flag_works)
elseif(_lang STREQUAL "CXX")
check_cxx_compiler_flag("${flag}" _flag_works)
elseif(_lang STREQUAL "Fortran")
check_Fortran_compiler_flag("${flag}" _flag_works)
else()
message(FATAL_ERROR "Unknown language in set_compiler_flag: ${_lang}")
endif()
# if the flag works, use it, and exit
# otherwise try next flag
if(_flag_works)
set(${_result} "${flag}" PARENT_SCOPE)
set(_flag_found TRUE)
break()
endif()
endforeach()
# raise an error if no flag was found
if(_flag_is_required AND NOT _flag_found)
message(FATAL_ERROR "None of the required flags were supported")
endif()
endfunction()
This is how we can use the set_compiler_flag function in our CMakeLists.txt:
cmake_minimum_required(VERSION 3.5 FATAL_ERROR)
project(recipe-03 LANGUAGES C CXX)
include(set_compiler_flag.cmake)
set_compiler_flag(
working_compile_flag C REQUIRED
"-foo" # this should fail
"-wrong" # this should fail
"-wrong" # this should fail
"-Wall" # this should work with GNU
"-warn all" # this should work with Intel
"-Minform=inform" # this should work with PGI
"-nope" # this should fail
)
message(STATUS "working C compile flag: ${working_compile_flag}")
set_compiler_flag(
working_compile_flag CXX REQUIRED
"-foo" # this should fail
"-g" # this should work with GNU, Intel, PGI
"/RTCcsu" # this should work with MSVC
)
message(STATUS "working CXX compile flag: ${working_compile_flag}")
$ mkdir -p build
$ cd build
$ cmake ..
-- ...
-- Performing Test _flag_works
-- Performing Test _flag_works - Failed
-- Performing Test _flag_works
-- Performing Test _flag_works - Failed
-- Performing Test _flag_works
-- Performing Test _flag_works - Failed
-- Performing Test _flag_works
-- Performing Test _flag_works - Success
-- working C compile flag: -Wall
-- Performing Test _flag_works
-- Performing Test _flag_works - Failed
-- Performing Test _flag_works
-- Performing Test _flag_works - Success
-- working CXX compile flag: -g
-- ...
The pattern that we have used here is:
From the output, we can see that the code checks each flag in the list and as soon as the check is successful, it prints the successful compile flag. Let us look inside the set_compiler_flag.cmake module. This module, in turn, includes three modules:
include(CheckCCompilerFlag)
include(CheckCXXCompilerFlag)
include(CheckFortranCompilerFlag)
These are standard CMake modules and CMake will locate them in ${CMAKE_MODULE_PATH}. These modules provide the check_c_compiler_flag, check_cxx_compiler_flag, and check_fortran_compiler_flag macros, respectively. Then comes the function definition:
function(set_compiler_flag _result _lang)
...
endfunction()
The set_compiler_flag function expects two arguments and we call them _result (this will hold the successful compile flag or the empty string "") and _lang (which specifies the language: C, C++, or Fortran).
We would like to be able to call the function like this:
set_compiler_flag(working_compile_flag C REQUIRED "-Wall" "-warn all")
This call has five arguments, but the function header only expects two. This means that REQUIRED, "-Wall", and "-warn all" will be placed in ${ARGN}. From ${ARGN}, we first build a list of flags using foreach. At the same time, we filter out REQUIRED from the list of flags and use it to set _flag_is_required:
# build a list of flags from the arguments
set(_list_of_flags)
# also figure out whether the function
# is required to find a flag
set(_flag_is_required FALSE)
foreach(_arg IN ITEMS ${ARGN})
string(TOUPPER "${_arg}" _arg_uppercase)
if(_arg_uppercase STREQUAL "REQUIRED")
set(_flag_is_required TRUE)
else()
list(APPEND _list_of_flags "${_arg}")
endif()
endforeach()
Now, we will loop over ${_list_of_flags}, try each flag, and if _flag_works is set to TRUE, we set _flag_found to TRUE and abort a further search:
set(_flag_found FALSE)
# loop over all flags, try to find the first which works
foreach(flag IN ITEMS ${_list_of_flags})
unset(_flag_works CACHE)
if(_lang STREQUAL "C")
check_c_compiler_flag("${flag}" _flag_works)
elseif(_lang STREQUAL "CXX")
check_cxx_compiler_flag("${flag}" _flag_works)
elseif(_lang STREQUAL "Fortran")
check_Fortran_compiler_flag("${flag}" _flag_works)
else()
message(FATAL_ERROR "Unknown language in set_compiler_flag: ${_lang}")
endif()
# if the flag works, use it, and exit
# otherwise try next flag
if(_flag_works)
set(${_result} "${flag}" PARENT_SCOPE)
set(_flag_found TRUE)
break()
endif()
endforeach()
The unset(_flag_works CACHE) line is there to make sure that the result of check_*_compiler_flag is not cached between calls using the same _flag_works result variable.
If a flag is found and _flag_works set to TRUE, we define the variable mapped to by _result:
set(${_result} "${flag}" PARENT_SCOPE)
This needs to be done with PARENT_SCOPE since we are modifying a variable that we wish to print and use outside the function body. Note, in addition, how we dereferenced the variable _result passed from parent scope using the ${_result} syntax. This is necessary to ensure that the working flag is set as value of the variable passed from parent scope when invoking the function, regardless of its name. If no flag is found and the REQUIRED keyword was provided, we stop the configuration with an error message:
# raise an error if no flag was found
if(_flag_is_required AND NOT _flag_found)
message(FATAL_ERROR "None of the required flags were supported")
endif()
We could have achieved this task with a macro, but with a function, we have more control over the scope. We know that the only variable that can be modified by the function is the result variable.
Also, note that some flags need to be set both at compile and link time by setting CMAKE_REQUIRED_FLAGS for the check_<LANG>_compiler_flag function to report success correctly. This was the case for the sanitizers, as we discussed in Chapter 5, Configure-time and Build-time Operations, Recipe 7, Probing compiler flags.
In the previous recipes, we explored functions and macros and used positional arguments. In this recipe, we will define a function with named arguments. We will enhance the example from Recipe 1, Code reuse with functions and macros and instead of defining tests using the following:
add_catch_test(short 1.5)
We will be able to call the following:
add_catch_test(
NAME
short
LABELS
short
cpp_test
COST
1.5
)
We will use the example from Recipe 1, Code reuse with functions and macros and keep the C++ sources unchanged and the file tree essentially the same:
.
├── cmake
│ └── testing.cmake
├── CMakeLists.txt
├── src
│ ├── CMakeLists.txt
│ ├── main.cpp
│ ├── sum_integers.cpp
│ └── sum_integers.hpp
└── tests
├── catch.hpp
├── CMakeLists.txt
└── test.cpp
We will introduce small modifications in the CMake code, as shown here:
list(APPEND CMAKE_MODULE_PATH "${CMAKE_CURRENT_SOURCE_DIR}/cmake")
add_executable(cpp_test test.cpp)
target_link_libraries(cpp_test sum_integers)
include(testing)
add_catch_test(
NAME
short
LABELS
short
cpp_test
COST
1.5
)
add_catch_test(
NAME
long
LABELS
long
cpp_test
COST
2.5
)
function(add_catch_test)
set(options)
set(oneValueArgs NAME COST)
set(multiValueArgs LABELS DEPENDS REFERENCE_FILES)
cmake_parse_arguments(add_catch_test
"${options}"
"${oneValueArgs}"
"${multiValueArgs}"
${ARGN}
)
message(STATUS "defining a test ...")
message(STATUS " NAME: ${add_catch_test_NAME}")
message(STATUS " LABELS: ${add_catch_test_LABELS}")
message(STATUS " COST: ${add_catch_test_COST}")
message(STATUS " REFERENCE_FILES: ${add_catch_test_REFERENCE_FILES}")
add_test(
NAME
${add_catch_test_NAME}
COMMAND
$<TARGET_FILE:cpp_test>
[${add_catch_test_NAME}] --success --out
${PROJECT_BINARY_DIR}/tests/${add_catch_test_NAME}.log --durations yes
WORKING_DIRECTORY
${CMAKE_CURRENT_BINARY_DIR}
)
set_tests_properties(${add_catch_test_NAME}
PROPERTIES
LABELS "${add_catch_test_LABELS}"
)
if(add_catch_test_COST)
set_tests_properties(${add_catch_test_NAME}
PROPERTIES
COST ${add_catch_test_COST}
)
endif()
if(add_catch_test_DEPENDS)
set_tests_properties(${add_catch_test_NAME}
PROPERTIES
DEPENDS ${add_catch_test_DEPENDS}
)
endif()
if(add_catch_test_REFERENCE_FILES)
file(
COPY
${add_catch_test_REFERENCE_FILES}
DESTINATION
${CMAKE_CURRENT_BINARY_DIR}
)
endif()
endfunction()
$ mkdir -p build
$ cd build
$ cmake ..
-- ...
-- defining a test ...
-- NAME: short
-- LABELS: short;cpp_test
-- COST: 1.5
-- REFERENCE_FILES:
-- defining a test ...
-- NAME: long
-- LABELS: long;cpp_test
-- COST: 2.5
-- REFERENCE_FILES:
-- ...
$ cmake --build .
$ ctest
The new aspects in this recipe are the named arguments so we can focus on the cmake/testing.cmake module. CMake provides the cmake_parse_arguments command, which we call with the function name (add_catch_test) options (in our case, none), one-value arguments (here, NAME and COST), and multi-value arguments (here, LABELS, DEPENDS, and REFERENCE_FILES):
function(add_catch_test)
set(options)
set(oneValueArgs NAME COST)
set(multiValueArgs LABELS DEPENDS REFERENCE_FILES)
cmake_parse_arguments(add_catch_test
"${options}"
"${oneValueArgs}"
"${multiValueArgs}"
${ARGN}
)
...
endfunction()
The cmake_parse_arguments command parses options and arguments, and defines the following in our case:
We can then query and use these variables inside our function. This approach gives us the chance to implement functions and macros with more robust interfaces and more readable function/macro calls.
Option keywords (which we have not used in this example) are defined by cmake_parse_arguments to either TRUE or FALSE. A further enhancement of the add_catch_test function could be to also provide the test command as a named argument, which we have omitted for the benefit of a more concise example.
We have mentioned that module includes should not be used as function calls since modules could be (accidentally) included multiple times. In this recipe, we will program our own simple include guard, which will warn us if we try to include a module multiple times. The built-in include_guard command is available in CMake since version 3.10 and behaves like #pragma once for C/C++ header files. For this version of CMake, we will discuss and demonstrate how functions and macros can be redefined. We will show how we can check the CMake version and for versions below 3.10, we will use our custom include guard.
In this example, we will use three files:
.
├── cmake
│ ├── custom.cmake
│ └── include_guard.cmake
└── CMakeLists.txt
The custom custom.cmake module contains the following code:
include_guard(GLOBAL)
message(STATUS "custom.cmake is included and processed")
We will discuss cmake/include_guard.cmake and CMakeLists.txt later.
This is a step-by-step breakdown of our three CMake files:
cmake_minimum_required(VERSION 3.5 FATAL_ERROR)
project(recipe-05 LANGUAGES NONE)
# (re)defines include_guard
include(cmake/include_guard.cmake)
macro(include_guard)
if (CMAKE_VERSION VERSION_LESS "3.10")
# for CMake below 3.10 we define our
# own include_guard(GLOBAL)
message(STATUS "calling our custom include_guard")
# if this macro is called the first time
# we start with an empty list
if(NOT DEFINED included_modules)
set(included_modules)
endif()
if ("${CMAKE_CURRENT_LIST_FILE}" IN_LIST included_modules)
message(WARNING "module ${CMAKE_CURRENT_LIST_FILE} processed more than once")
endif()
list(APPEND included_modules ${CMAKE_CURRENT_LIST_FILE})
else()
# for CMake 3.10 or higher we augment
# the built-in include_guard
message(STATUS "calling the built-in include_guard")
_include_guard(${ARGV})
endif()
endmacro()
include(cmake/custom.cmake)
include(cmake/custom.cmake)
$ mkdir -p build
$ cd build
$ cmake ..
-- calling the built-in include_guard
-- custom.cmake is included and processed
-- calling the built-in include_guard
-- calling our custom include_guard
-- custom.cmake is included and processed
-- calling our custom include_guard
CMake Warning at cmake/include_guard.cmake:7 (message):
module
/home/user/example/cmake/custom.cmake
processed more than once
Call Stack (most recent call first):
cmake/custom.cmake:1 (include_guard)
CMakeLists.txt:12 (include)
Our include_guard macro contains two branches, one for CMake below 3.10 and one for CMake 3.10 and higher:
macro(include_guard)
if (CMAKE_VERSION VERSION_LESS "3.10")
# ...
else()
# ...
endif()
endmacro()
If CMake version is below 3.10, we enter the first branch and an intrinsic include_guard is not available, so we define our own:
message(STATUS "calling our custom include_guard")
# if this macro is called the first time
# we start with an empty list
if(NOT DEFINED included_modules)
set(included_modules)
endif()
if ("${CMAKE_CURRENT_LIST_FILE}" IN_LIST included_modules)
message(WARNING "module ${CMAKE_CURRENT_LIST_FILE} processed more than once")
endif()
list(APPEND included_modules ${CMAKE_CURRENT_LIST_FILE})
If the macro is called the first time, then the included_modules variable is not defined so we set it to an empty list. We then check whether ${CMAKE_CURRENT_LIST_FILE} is an element of the included_modules list. If yes, we issue a warning. If no, we append ${CMAKE_CURRENT_LIST_FILE} to this list. In the CMake output, we can verify that a second include of the custom module indeed leads to the warning.
The situation is different for CMake 3.10 and higher; in this case, an intrinsic include_guard exists and we call it with the arguments received by our own macro:
macro(include_guard)
if (CMAKE_VERSION VERSION_LESS "3.10")
# ...
else()
message(STATUS "calling the built-in include_guard")
_include_guard(${ARGV})
endif()
endmacro()
Here, _include_guard(${ARGV}) points to the built-in include_guard. In this case, we have augmented the built-in command with a custom message ("calling the built-in include_guard"). This pattern provides us with a mechanism to redefine own or built-in functions and macros. This can be useful for debugging or logging purposes.
Deprecation is an important mechanism in the development of an evolving project to signal to developers that a function or macro or a variable will be removed or replaced at some point in the future. For a certain period, the function, macro, or variable will continue being accessible but signal a warning, which eventually can be elevated to an error.
We will start out with the following CMake project:
cmake_minimum_required(VERSION 3.5 FATAL_ERROR)
project(recipe-06 LANGUAGES NONE)
macro(custom_include_guard)
if(NOT DEFINED included_modules)
set(included_modules)
endif()
if ("${CMAKE_CURRENT_LIST_FILE}" IN_LIST included_modules)
message(WARNING "module ${CMAKE_CURRENT_LIST_FILE} processed more than once")
endif()
list(APPEND included_modules ${CMAKE_CURRENT_LIST_FILE})
endmacro()
include(cmake/custom.cmake)
message(STATUS "list of all included modules: ${included_modules}")
This code defines a custom include guard, includes a custom module (the same module as in the previous recipe), and prints the list of all included modules. For CMake 3.10 and higher, we now know from the previous recipe that there is a built-in include_guard. But instead of simply removing custom_include_guard and ${included_modules}, we will deprecate the macro and the variable with a deprecation warning, which at some point we can flip into a FATAL_ERROR to make the code stop and force the developers to switch to the built-in command.
Deprecating functions, macros, and variables can be done as follows:
function(deprecate_variable _variable _access)
if(_access STREQUAL "READ_ACCESS")
message(DEPRECATION "variable ${_variable} is deprecated")
endif()
endfunction()
if (CMAKE_VERSION VERSION_GREATER "3.9")
# deprecate custom_include_guard
macro(custom_include_guard)
message(DEPRECATION "custom_include_guard is deprecated - use built-in include_guard instead")
_custom_include_guard(${ARGV})
endmacro()
# deprecate variable included_modules
variable_watch(included_modules deprecate_variable)
endif()
$ mkdir -p build
$ cd build
$ cmake ..
-- custom.cmake is included and processed
-- list of all included modules: /home/user/example/cmake/custom.cmake
CMake Deprecation Warning at CMakeLists.txt:26 (message):
custom_include_guard is deprecated - use built-in include_guard instead
Call Stack (most recent call first):
cmake/custom.cmake:1 (custom_include_guard)
CMakeLists.txt:34 (include)
-- custom.cmake is included and processed
CMake Deprecation Warning at CMakeLists.txt:19 (message):
variable included_modules is deprecated
Call Stack (most recent call first):
CMakeLists.txt:9999 (deprecate_variable)
CMakeLists.txt:36 (message)
-- list of all included modules: /home/user/example/cmake/custom.cmake
Deprecating a function or a macro is equivalent to redefining it, as demonstrated in the previous recipe, and printing a message with DEPRECATION:
macro(somemacro)
message(DEPRECATION "somemacro is deprecated")
_somemacro(${ARGV})
endmacro()
Deprecating a variable can be achieved by first defining the following:
function(deprecate_variable _variable _access)
if(_access STREQUAL "READ_ACCESS")
message(DEPRECATION "variable ${_variable} is deprecated")
endif()
endfunction()
This function is then attached to the variable that is about to be deprecated:
variable_watch(somevariable deprecate_variable)
If in this case ${included_modules} is read (READ_ACCESS), then the deprecate_variable function issues the message with DEPRECATION.
In the remaining recipes of this chapter, we will discuss strategies to structure projects and limit the scope of variables and side effects with the goal to lower code complexity and simplify the maintenance of the project. In this recipe, we will split a project into several CMakeLists.txt files with limited scope, which will be processed using the add_subdirectory command.
Since we wish to show and discuss how to structure a non-trivial project, we need an example that is more than a "hello world" project. We will develop a relatively simple code that can compute and print elementary cellular automata:
Our code will be able to compute any of the 256 elementary cellular automata, for instance rule 90 (Wolfram code):
$ ./bin/automata 40 15 90
length: 40
number of steps: 15
rule: 90
*
* *
* *
* * * *
* *
* * * *
* * * *
* * * * * * * *
* *
* * * *
* * * *
* * * * * * * *
* * * *
* * * * * * * *
* * * * * * * *
* * * * * * * * * * * * * * * *
The structure of our example code project is as follows:
.
├── CMakeLists.txt
├── external
│ ├── CMakeLists.txt
│ ├── conversion.cpp
│ ├── conversion.hpp
│ └── README.md
├── src
│ ├── CMakeLists.txt
│ ├── evolution
│ │ ├── CMakeLists.txt
│ │ ├── evolution.cpp
│ │ └── evolution.hpp
│ ├── initial
│ │ ├── CMakeLists.txt
│ │ ├── initial.cpp
│ │ └── initial.hpp
│ ├── io
│ │ ├── CMakeLists.txt
│ │ ├── io.cpp
│ │ └── io.hpp
│ ├── main.cpp
│ └── parser
│ ├── CMakeLists.txt
│ ├── parser.cpp
│ └── parser.hpp
└── tests
├── catch.hpp
├── CMakeLists.txt
└── test.cpp
Here, we have split the code into many libraries to simulate a real-world medium to large project, where sources can be organized into libraries that are then linked into an executable.
The main function is in src/main.cpp:
#include "conversion.hpp"
#include "evolution.hpp"
#include "initial.hpp"
#include "io.hpp"
#include "parser.hpp"
#include <iostream>
int main(int argc, char *argv[]) {
// parse arguments
int length, num_steps, rule_decimal;
std::tie(length, num_steps, rule_decimal) = parse_arguments(argc, argv);
// print information about parameters
std::cout << "length: " << length << std::endl;
std::cout << "number of steps: " << num_steps << std::endl;
std::cout << "rule: " << rule_decimal << std::endl;
// obtain binary representation for the rule
std::string rule_binary = binary_representation(rule_decimal);
// create initial distribution
std::vector<int> row = initial_distribution(length);
// print initial configuration
print_row(row);
// the system evolves, print each step
for (int step = 0; step < num_steps; step++) {
row = evolve(row, rule_binary);
print_row(row);
}
}
The external/conversion.cpp file contains code to convert from decimal to binary. We simulate here that this code is provided by an "external" library outside of src:
#include "conversion.hpp"
#include <bitset>
#include <string>
std::string binary_representation(const int decimal) {
return std::bitset<8>(decimal).to_string();
}
The src/evolution/evolution.cpp file propagates the system in a time step:
#include "evolution.hpp"
#include <string>
#include <vector>
std::vector<int> evolve(const std::vector<int> row, const std::string rule_binary) {
std::vector<int> result;
for (auto i = 0; i < row.size(); ++i) {
auto left = (i == 0 ? row.size() : i) - 1;
auto center = i;
auto right = (i + 1) % row.size();
auto ancestors = 4 * row[left] + 2 * row[center] + 1 * row[right];
ancestors = 7 - ancestors;
auto new_state = std::stoi(rule_binary.substr(ancestors, 1));
result.push_back(new_state);
}
return result;
}
The src/initial/initial.cpp file produces the initial state:
#include "initial.hpp"
#include <vector>
std::vector<int> initial_distribution(const int length) {
// we start with a vector which is zeroed out
std::vector<int> result(length, 0);
// more or less in the middle we place a living cell
result[length / 2] = 1;
return result;
}
The src/io/io.cpp file contains a function to print a row:
#include "io.hpp"
#include <algorithm>
#include <iostream>
#include <vector>
void print_row(const std::vector<int> row) {
std::for_each(row.begin(), row.end(), [](int const &value) {
std::cout << (value == 1 ? '*' : ' ');
});
std::cout << std::endl;
}
The src/parser/parser.cpp file parses the command-line input:
#include "parser.hpp"
#include <cassert>
#include <string>
#include <tuple>
std::tuple<int, int, int> parse_arguments(int argc, char *argv[]) {
assert(argc == 4 && "program called with wrong number of arguments");
auto length = std::stoi(argv[1]);
auto num_steps = std::stoi(argv[2]);
auto rule_decimal = std::stoi(argv[3]);
return std::make_tuple(length, num_steps, rule_decimal);
}
And finally, tests/test.cpp contains two unit tests using the Catch2 library:
#include "evolution.hpp"
// this tells catch to provide a main()
// only do this in one cpp file
#define CATCH_CONFIG_MAIN
#include "catch.hpp"
#include <string>
#include <vector>
TEST_CASE("Apply rule 90", "[rule-90]") {
std::vector<int> row = {0, 1, 0, 1, 0, 1, 0, 1, 0};
std::string rule = "01011010";
std::vector<int> expected_result = {1, 0, 0, 0, 0, 0, 0, 0, 1};
REQUIRE(evolve(row, rule) == expected_result);
}
TEST_CASE("Apply rule 222", "[rule-222]") {
std::vector<int> row = {0, 0, 0, 0, 1, 0, 0, 0, 0};
std::string rule = "11011110";
std::vector<int> expected_result = {0, 0, 0, 1, 1, 1, 0, 0, 0};
REQUIRE(evolve(row, rule) == expected_result);
}
The corresponding header files contain the function signatures. One could argue that the project contains too many subdirectories for this little code example, but please remember that this is only a simplified example of a project typically containing many source files for each library, ideally organized into separate directories like here.
Let us dive into a detailed explanation of the CMake infrastructure needed:
cmake_minimum_required(VERSION 3.5 FATAL_ERROR)
project(recipe-07 LANGUAGES CXX)
set(CMAKE_CXX_STANDARD 11)
set(CMAKE_CXX_EXTENSIONS OFF)
set(CMAKE_CXX_STANDARD_REQUIRED ON)
include(GNUInstallDirs)
set(CMAKE_ARCHIVE_OUTPUT_DIRECTORY
${CMAKE_BINARY_DIR}/${CMAKE_INSTALL_LIBDIR})
set(CMAKE_LIBRARY_OUTPUT_DIRECTORY
${CMAKE_BINARY_DIR}/${CMAKE_INSTALL_LIBDIR})
set(CMAKE_RUNTIME_OUTPUT_DIRECTORY
${CMAKE_BINARY_DIR}/${CMAKE_INSTALL_BINDIR})
# defines targets and sources
add_subdirectory(src)
# contains an "external" library we will link to
add_subdirectory(external)
# enable testing and define tests
enable_testing()
add_subdirectory(tests)
add_executable(automata main.cpp)
add_subdirectory(evolution)
add_subdirectory(initial)
add_subdirectory(io)
add_subdirectory(parser)
target_link_libraries(automata
PRIVATE
conversion
evolution
initial
io
parser
)
add_library(conversion "")
target_sources(conversion
PRIVATE
${CMAKE_CURRENT_LIST_DIR}/conversion.cpp
PUBLIC
${CMAKE_CURRENT_LIST_DIR}/conversion.hpp
)
target_include_directories(conversion
PUBLIC
${CMAKE_CURRENT_LIST_DIR}
)
add_library(evolution "")
target_sources(evolution
PRIVATE
evolution.cpp
PUBLIC
${CMAKE_CURRENT_LIST_DIR}/evolution.hpp
)
target_include_directories(evolution
PUBLIC
${CMAKE_CURRENT_LIST_DIR}
)
add_executable(cpp_test test.cpp)
target_link_libraries(cpp_test evolution)
add_test(
NAME
test_evolution
COMMAND
$<TARGET_FILE:cpp_test>
)
$ mkdir -p build
$ cd build
$ cmake ..
$ cmake --build .
Scanning dependencies of target conversion
[ 7%] Building CXX object external/CMakeFiles/conversion.dir/conversion.cpp.o
[ 14%] Linking CXX static library ../lib64/libconversion.a
[ 14%] Built target conversion
Scanning dependencies of target evolution
[ 21%] Building CXX object src/evolution/CMakeFiles/evolution.dir/evolution.cpp.o
[ 28%] Linking CXX static library ../../lib64/libevolution.a
[ 28%] Built target evolution
Scanning dependencies of target initial
[ 35%] Building CXX object src/initial/CMakeFiles/initial.dir/initial.cpp.o
[ 42%] Linking CXX static library ../../lib64/libinitial.a
[ 42%] Built target initial
Scanning dependencies of target io
[ 50%] Building CXX object src/io/CMakeFiles/io.dir/io.cpp.o
[ 57%] Linking CXX static library ../../lib64/libio.a
[ 57%] Built target io
Scanning dependencies of target parser
[ 64%] Building CXX object src/parser/CMakeFiles/parser.dir/parser.cpp.o
[ 71%] Linking CXX static library ../../lib64/libparser.a
[ 71%] Built target parser
Scanning dependencies of target automata
[ 78%] Building CXX object src/CMakeFiles/automata.dir/main.cpp.o
[ 85%] Linking CXX executable ../bin/automata
[ 85%] Built target automata
Scanning dependencies of target cpp_test
[ 92%] Building CXX object tests/CMakeFiles/cpp_test.dir/test.cpp.o
[100%] Linking CXX executable ../bin/cpp_test
[100%] Built target cpp_test
$ ctest
Running tests...
Start 1: test_evolution
1/1 Test #1: test_evolution ................... Passed 0.00 sec
100% tests passed, 0 tests failed out of 1
We could have put all the code into one source file. This would be impractical; every edit would require a full recompilation. Splitting source files into smaller, more manageable units makes sense. We could have equally well compiled all sources into a single library or executable, but in practice, projects prefer to split the compilation of sources into smaller, well-defined libraries. This is done both to localize scope and simplify dependency scanning, but also to simplify code maintenance. This means that building a project out of many libraries as we have done here is a typical situation.
To discuss the CMake structure we can proceed bottom-up from the individual CMakeLists.txt files defining each library, such as src/evolution/CMakeLists.txt:
add_library(evolution "")
target_sources(evolution
PRIVATE
evolution.cpp
PUBLIC
${CMAKE_CURRENT_LIST_DIR}/evolution.hpp
)
target_include_directories(evolution
PUBLIC
${CMAKE_CURRENT_LIST_DIR}
)
These individual CMakeLists.txt files define libraries as close as possible to the sources. In this example, we first define the library name with add_library and then define its sources and include directories, as well as their target visibility: the implementation files (here evolution.cpp) are PRIVATE, whereas the interface header file evolution.hpp is defined as PUBLIC since we will access it in main.cpp and test.cpp. The advantage of defining targets as close as possible to the code is that code developers with knowledge of this library and possibly limited knowledge of the CMake framework only need to edit files in this directory; in other words, the library dependencies are encapsulated.
Moving one level up, the libraries are assembled in src/CMakeLists.txt:
add_executable(automata main.cpp)
add_subdirectory(evolution)
add_subdirectory(initial)
add_subdirectory(io)
add_subdirectory(parser)
target_link_libraries(automata
PRIVATE
conversion
evolution
initial
io
parser
)
This file, in turn, is referenced in the top-level CMakeLists.txt. This means that we have built our project from a tree of libraries using a tree of CMakeLists.txt files. This approach is typical for many projects and it scales to large projects without the need to carry lists of source files in global variables across directories. An added bonus of the add_subdirectory approach is that it isolates scopes since variables defined in a subdirectory are not automatically accessible in the parent scope.
One limitation of building a project using a tree of add_subdirectory calls is that CMake does not allow us to use target_link_libraries with targets that are defined outside of the current directory scope. This was not a problem for the example shown in this recipe. In the next recipe, we will demonstrate an alternative approach where we assemble the different CMakeLists.txt files not using add_subdirectory, but using module includes, which allows us to link to targets defined outside the current directory.
CMake can use the Graphviz graph visualization software (http://www.graphviz.org) to generate the dependency graph of a project:
$ cd build
$ cmake --graphviz=example.dot ..
$ dot -T png example.dot -o example.png
The generated diagram will show dependencies between targets in different directories:
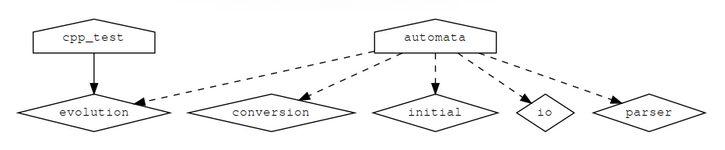
Throughout the book, we have been building the code out-of-source to keep the source tree and build tree separate. This is the recommended practice to allow us to configure different builds (sequential or parallel, Debug or Release) with the same source code, without duplicating the source code and without spilling generated and object files across the source tree. With the following snippet, you can protect your project against in-source builds:
if(${PROJECT_SOURCE_DIR} STREQUAL ${PROJECT_BINARY_DIR})
message(FATAL_ERROR "In-source builds not allowed. Please make a new directory (called a build directory) and run CMake from there.")
endif()
It is useful to recognize that the structure of the build tree mimics the structure of the source tree. In our example here, it is rather instructive to insert the following message printout into src/CMakeLists.txt:
message("current binary dir is ${CMAKE_CURRENT_BINARY_DIR}")
When configuring the project to build, we will see that the printout refers to build/src.
We note that, as of version 3.12 of CMake, OBJECT libraries are another viable approach to organizing large projects. The only modification to our example would be in the CMakeLists.txt for the libraries. The sources would be compiled into object files: neither archived into a static archive, nor linked into a shared library. For example:
add_library(io OBJECT "")
target_sources(io
PRIVATE
io.cpp
PUBLIC
${CMAKE_CURRENT_LIST_DIR}/io.hpp
)
target_include_directories(io
PUBLIC
${CMAKE_CURRENT_LIST_DIR}
)
The top-level CMakeLists.txt remains unchanged: the automata executable target links these object files into the final executable. Usage requirements, such as include directories, compile flags, and link libraries set on the OBJECT libraries will correctly be inherited. For more details on this new feature of OBJECT libraries introduced in CMake 3.12 refer to the official documentation: https://cmake.org/cmake/help/v3.12/manual/cmake-buildsystem.7.html#object-libraries
In this recipe, we will discuss an alternative approach to the previous recipe and assemble the different CMakeLists.txt files without using add_subdirectory, but using module includes. This approach is inspired by https://crascit.com/2016/01/31/enhanced-source-file-handling-with-target_sources/ and allows us to use target_link_libraries to link to targets defined outside of the current directory.
We will use the same source code as in the previous recipe. The only changes will be in CMakeLists.txt files and we will discuss these changes in the following sections.
Let us look in detail at the various files needed by CMake:
cmake_minimum_required(VERSION 3.5 FATAL_ERROR)
project(recipe-08 LANGUAGES CXX)
set(CMAKE_CXX_STANDARD 11)
set(CMAKE_CXX_EXTENSIONS OFF)
set(CMAKE_CXX_STANDARD_REQUIRED ON)
include(GNUInstallDirs)
set(CMAKE_ARCHIVE_OUTPUT_DIRECTORY
${CMAKE_BINARY_DIR}/${CMAKE_INSTALL_LIBDIR})
set(CMAKE_LIBRARY_OUTPUT_DIRECTORY
${CMAKE_BINARY_DIR}/${CMAKE_INSTALL_LIBDIR})
set(CMAKE_RUNTIME_OUTPUT_DIRECTORY
${CMAKE_BINARY_DIR}/${CMAKE_INSTALL_BINDIR})
# defines targets and sources
include(src/CMakeLists.txt)
include(external/CMakeLists.txt)
enable_testing()
add_subdirectory(tests)
add_library(automaton "")
add_library(evolution "")
include(${CMAKE_CURRENT_LIST_DIR}/evolution/CMakeLists.txt)
include(${CMAKE_CURRENT_LIST_DIR}/initial/CMakeLists.txt)
include(${CMAKE_CURRENT_LIST_DIR}/io/CMakeLists.txt)
include(${CMAKE_CURRENT_LIST_DIR}/parser/CMakeLists.txt)
add_executable(automata "")
target_sources(automata
PRIVATE
${CMAKE_CURRENT_LIST_DIR}/main.cpp
)
target_link_libraries(automata
PRIVATE
automaton
conversion
)
target_sources(automaton
PRIVATE
${CMAKE_CURRENT_LIST_DIR}/evolution.cpp
PUBLIC
${CMAKE_CURRENT_LIST_DIR}/evolution.hpp
)
target_include_directories(automaton
PUBLIC
${CMAKE_CURRENT_LIST_DIR}
)
target_sources(evolution
PRIVATE
${CMAKE_CURRENT_LIST_DIR}/evolution.cpp
PUBLIC
${CMAKE_CURRENT_LIST_DIR}/evolution.hpp
)
target_include_directories(evolution
PUBLIC
${CMAKE_CURRENT_LIST_DIR}
)
target_sources(automaton
PRIVATE
${CMAKE_CURRENT_LIST_DIR}/initial.cpp
PUBLIC
${CMAKE_CURRENT_LIST_DIR}/initial.hpp
)
target_include_directories(automaton
PUBLIC
${CMAKE_CURRENT_LIST_DIR}
)
$ mkdir -p build
$ cd build
$ cmake ..
$ cmake --build build
$ ctest
Running tests...
Start 1: test_evolution
1/1 Test #1: test_evolution ................... Passed 0.00 sec
100% tests passed, 0 tests failed out of 1
In contrast to the previous recipe, we have defined three libraries:
In this example, we keep all targets available in the parent scope by referencing CMakeLists.txt files using include():
include(src/CMakeLists.txt)
include(external/CMakeLists.txt)
We can build a tree of includes, remembering that when stepping into subdirectories (src/CMakeLists.txt), we need to use paths relative to the parent scope:
include(${CMAKE_CURRENT_LIST_DIR}/evolution/CMakeLists.txt)
include(${CMAKE_CURRENT_LIST_DIR}/initial/CMakeLists.txt)
include(${CMAKE_CURRENT_LIST_DIR}/io/CMakeLists.txt)
include(${CMAKE_CURRENT_LIST_DIR}/parser/CMakeLists.txt)
With this, we can define and link to the targets anywhere within the file tree accessed via include() statements. However, we should choose to define them at a place that is most intuitive for maintainers and code contributors.
We can once again use CMake and Graphviz (http://www.graphviz.org/) to generate the dependency graph of this project:
$ cd build
$ cmake --graphviz=example.dot ..
$ dot -T png example.dot -o example.png
For the current setup, we obtain the following dependency graph:
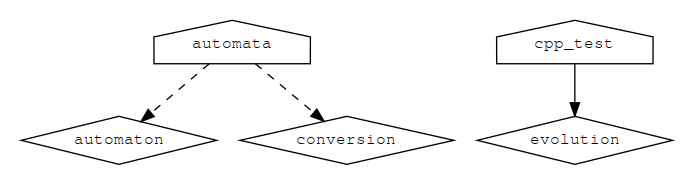
We devote one recipe to the discussion of how to structure and organize Fortran projects for two reasons:
As we will see in this recipe, modern CMake allows us to express the configuration and build process in a very compact and modular way. As an example, we will use the elementary cellular automata from the previous two recipes, now ported to Fortran.
The file tree structure is very similar to the previous two recipes. We have replaced C++ with Fortran sources and in this case, we have no header files:
.
├── CMakeLists.txt
├── external
│ ├── CMakeLists.txt
│ ├── conversion.f90
│ └── README.md
├── src
│ ├── CMakeLists.txt
│ ├── evolution
│ │ ├── ancestors.f90
│ │ ├── CMakeLists.txt
│ │ ├── empty.f90
│ │ └── evolution.f90
│ ├── initial
│ │ ├── CMakeLists.txt
│ │ └── initial.f90
│ ├── io
│ │ ├── CMakeLists.txt
│ │ └── io.f90
│ ├── main.f90
│ └── parser
│ ├── CMakeLists.txt
│ └── parser.f90
└── tests
├── CMakeLists.txt
└── test.f90
The main program is in src/main.f90:
program example
use parser, only: get_arg_as_int
use conversion, only: binary_representation
use initial, only: initial_distribution
use io, only: print_row
use evolution, only: evolve
implicit none
integer :: num_steps
integer :: length
integer :: rule_decimal
integer :: rule_binary(8)
integer, allocatable :: row(:)
integer :: step
! parse arguments
num_steps = get_arg_as_int(1)
length = get_arg_as_int(2)
rule_decimal = get_arg_as_int(3)
! print information about parameters
print *, "number of steps: ", num_steps
print *, "length: ", length
print *, "rule: ", rule_decimal
! obtain binary representation for the rule
rule_binary = binary_representation(rule_decimal)
! create initial distribution
allocate(row(length))
call initial_distribution(row)
! print initial configuration
call print_row(row)
! the system evolves, print each step
do step = 1, num_steps
call evolve(row, rule_binary)
call print_row(row)
end do
deallocate(row)
end program
As in the previous recipe, we have placed the conversion module in external/conversion.f90:
module conversion
implicit none
public binary_representation
private
contains
pure function binary_representation(n_decimal)
integer, intent(in) :: n_decimal
integer :: binary_representation(8)
integer :: pos
integer :: n
binary_representation = 0
pos = 8
n = n_decimal
do while (n > 0)
binary_representation(pos) = mod(n, 2)
n = (n - binary_representation(pos))/2
pos = pos - 1
end do
end function
end module
The evolution library, which implements the time step, is artificially split into three files. The bulk is collected in src/evolution/evolution.f90:
module evolution
implicit none
public evolve
private
contains
subroutine not_visible()
! no-op call to demonstrate private/public visibility
call empty_subroutine_no_interface()
end subroutine
pure subroutine evolve(row, rule_binary)
use ancestors, only: compute_ancestors
integer, intent(inout) :: row(:)
integer, intent(in) :: rule_binary(8)
integer :: i
integer :: left, center, right
integer :: ancestry
integer, allocatable :: new_row(:)
allocate(new_row(size(row)))
do i = 1, size(row)
left = i - 1
center = i
right = i + 1
if (left < 1) left = left + size(row)
if (right > size(row)) right = right - size(row)
ancestry = compute_ancestors(row, left, center, right)
new_row(i) = rule_binary(ancestry)
end do
row = new_row
deallocate(new_row)
end subroutine
end module
The computation of ancestors is performed in src/evolution/ancestors.f90:
module ancestors
implicit none
public compute_ancestors
private
contains
pure integer function compute_ancestors(row, left, center, right) result(i)
integer, intent(in) :: row(:)
integer, intent(in) :: left, center, right
i = 4*row(left) + 2*row(center) + 1*row(right)
i = 8 - i
end function
end module
We also have an "empty" module in src/evolution/empty.f90:
module empty
implicit none
public empty_subroutine
private
contains
subroutine empty_subroutine()
end subroutine
end module
subroutine empty_subroutine_no_interface()
use empty, only: empty_subroutine
call empty_subroutine()
end subroutine
We will explain these choices in the next section.
The code for the starting condition is located in src/initial/initial.f90:
module initial
implicit none
public initial_distribution
private
contains
pure subroutine initial_distribution(row)
integer, intent(out) :: row(:)
row = 0
row(size(row)/2) = 1
end subroutine
end module
The src/io/io.f90 file contains a function to print a row:
module io
implicit none
public print_row
private
contains
subroutine print_row(row)
integer, intent(in) :: row(:)
character(size(row)) :: line
integer :: i
do i = 1, size(row)
if (row(i) == 1) then
line(i:i) = '*'
else
line(i:i) = ' '
end if
end do
print *, line
end subroutine
end module
The src/parser/parser.f90 file parses the command-line arguments:
module parser
implicit none
public get_arg_as_int
private
contains
integer function get_arg_as_int(n) result(i)
integer, intent(in) :: n
character(len=32) :: arg
call get_command_argument(n, arg)
read(arg , *) i
end function
end module
Finally, we have the test sources in tests/test.f90:
program test
use evolution, only: evolve
implicit none
integer :: row(9)
integer :: expected_result(9)
integer :: rule_binary(8)
integer :: i
! test rule 90
row = (/0, 1, 0, 1, 0, 1, 0, 1, 0/)
rule_binary = (/0, 1, 0, 1, 1, 0, 1, 0/)
call evolve(row, rule_binary)
expected_result = (/1, 0, 0, 0, 0, 0, 0, 0, 1/)
do i = 1, 9
if (row(i) /= expected_result(i)) then
print *, 'ERROR: test for rule 90 failed'
call exit(1)
end if
end do
! test rule 222
row = (/0, 0, 0, 0, 1, 0, 0, 0, 0/)
rule_binary = (/1, 1, 0, 1, 1, 1, 1, 0/)
call evolve(row, rule_binary)
expected_result = (/0, 0, 0, 1, 1, 1, 0, 0, 0/)
do i = 1, 9
if (row(i) /= expected_result(i)) then
print *, 'ERROR: test for rule 222 failed'
call exit(1)
end if
end do
end program
We will now discuss the corresponding CMake structure:
cmake_minimum_required(VERSION 3.5 FATAL_ERROR)
project(recipe-09 LANGUAGES Fortran)
include(GNUInstallDirs)
set(CMAKE_ARCHIVE_OUTPUT_DIRECTORY
${CMAKE_BINARY_DIR}/${CMAKE_INSTALL_LIBDIR})
set(CMAKE_LIBRARY_OUTPUT_DIRECTORY
${CMAKE_BINARY_DIR}/${CMAKE_INSTALL_LIBDIR})
set(CMAKE_RUNTIME_OUTPUT_DIRECTORY
${CMAKE_BINARY_DIR}/${CMAKE_INSTALL_BINDIR})
# defines targets and sources
add_subdirectory(src)
# contains an "external" library we will link to
add_subdirectory(external)
# enable testing and define tests
enable_testing()
add_subdirectory(tests)
add_executable(automata main.f90)
add_subdirectory(evolution)
add_subdirectory(initial)
add_subdirectory(io)
add_subdirectory(parser)
target_link_libraries(automata
PRIVATE
conversion
evolution
initial
io
parser
)
add_library(conversion "")
target_sources(conversion
PUBLIC
${CMAKE_CURRENT_LIST_DIR}/conversion.f90
)
add_library(initial "")
target_sources(initial
PUBLIC
${CMAKE_CURRENT_LIST_DIR}/initial.f90
)
add_library(evolution "")
target_sources(evolution
PRIVATE
empty.f90
PUBLIC
${CMAKE_CURRENT_LIST_DIR}/ancestors.f90
${CMAKE_CURRENT_LIST_DIR}/evolution.f90
)
add_executable(fortran_test test.f90)
target_link_libraries(fortran_test evolution)
add_test(
NAME
test_evolution
COMMAND
$<TARGET_FILE:fortran_test>
)
$ mkdir -p build
$ cd build
$ cmake ..
$ cmake --build .
Scanning dependencies of target conversion
[ 4%] Building Fortran object external/CMakeFiles/conversion.dir/conversion.f90.o
[ 8%] Linking Fortran static library ../lib64/libconversion.a
[ 8%] Built target conversion
Scanning dependencies of target evolution
[ 12%] Building Fortran object src/evolution/CMakeFiles/evolution.dir/ancestors.f90.o
[ 16%] Building Fortran object src/evolution/CMakeFiles/evolution.dir/empty.f90.o
[ 20%] Building Fortran object src/evolution/CMakeFiles/evolution.dir/evolution.f90.o
[ 25%] Linking Fortran static library ../../lib64/libevolution.a
[ 25%] Built target evolution
Scanning dependencies of target initial
[ 29%] Building Fortran object src/initial/CMakeFiles/initial.dir/initial.f90.o
[ 33%] Linking Fortran static library ../../lib64/libinitial.a
[ 33%] Built target initial
Scanning dependencies of target io
[ 37%] Building Fortran object src/io/CMakeFiles/io.dir/io.f90.o
[ 41%] Linking Fortran static library ../../lib64/libio.a
[ 41%] Built target io
Scanning dependencies of target parser
[ 45%] Building Fortran object src/parser/CMakeFiles/parser.dir/parser.f90.o
[ 50%] Linking Fortran static library ../../lib64/libparser.a
[ 50%] Built target parser
Scanning dependencies of target example
[ 54%] Building Fortran object src/CMakeFiles/example.dir/__/external/conversion.f90.o
[ 58%] Building Fortran object src/CMakeFiles/example.dir/evolution/ancestors.f90.o
[ 62%] Building Fortran object src/CMakeFiles/example.dir/evolution/evolution.f90.o
[ 66%] Building Fortran object src/CMakeFiles/example.dir/initial/initial.f90.o
[ 70%] Building Fortran object src/CMakeFiles/example.dir/io/io.f90.o
[ 75%] Building Fortran object src/CMakeFiles/example.dir/parser/parser.f90.o
[ 79%] Building Fortran object src/CMakeFiles/example.dir/main.f90.o
[ 83%] Linking Fortran executable ../bin/example
[ 83%] Built target example
Scanning dependencies of target fortran_test
[ 87%] Building Fortran object tests/CMakeFiles/fortran_test.dir/__/src/evolution/ancestors.f90.o
[ 91%] Building Fortran object tests/CMakeFiles/fortran_test.dir/__/src/evolution/evolution.f90.o
[ 95%] Building Fortran object tests/CMakeFiles/fortran_test.dir/test.f90.o
[100%] Linking Fortran executable
$ ctest
Running tests...
Start 1: test_evolution
1/1 Test #1: test_evolution ................... Passed 0.00 sec
100% tests passed, 0 tests failed out of 1
Following Recipe 7, Limiting scope with add_subdirectory, we will discuss the CMake structure from the bottom up, from the individual CMakeLists.txt files defining each library, such as src/evolution/CMakeLists.txt:
add_library(evolution "")
target_sources(evolution
PRIVATE
empty.f90
PUBLIC
${CMAKE_CURRENT_LIST_DIR}/ancestors.f90
${CMAKE_CURRENT_LIST_DIR}/evolution.f90
)
These individual CMakeLists.txt files define libraries as close as possible to the sources, following the same reasoning as in previous two recipes: code developers with knowledge of this library and possibly limited knowledge of the CMake framework only need to edit files in this directory: divide and conquer.
We first define the library name with add_library and then define its sources and include directories, as well as their target visibility. In this case, both ancestors.f90 and evolution.f90 are PUBLIC since their module interfaces are accessed outside the library, whereas the module interface of empty.f90 is not accessed outside the file and therefore we mark this source as PRIVATE.
Moving one level up, the libraries are assembled in src/CMakeLists.txt:
add_executable(automata main.f90)
add_subdirectory(evolution)
add_subdirectory(initial)
add_subdirectory(io)
add_subdirectory(parser)
target_link_libraries(automata
PRIVATE
conversion
evolution
initial
io
parser
)
This file, in turn, is referenced in the top-level CMakeLists.txt. This means that we have built our project from a tree of libraries using a tree of CMakeLists.txt files, added using add_subdirectory. As discussed in Recipe 7, Limiting scope with add_subdirectory, this approach scales to large projects without the need to carry lists of source files in global variables across directories, with the added bonus of isolating scopes and namespaces.
Comparing this Fortran example with the C++ version (Recipe 7), we can note that we had to do less CMake work in the Fortran case; we do not have to use target_include_directories since there are no header files and interfaces are communicated via the generated Fortran module files. Also, observe that we neither have to worry about the order of source files listed in target_sources, nor do we have to impose any explicit dependencies between libraries! CMake is able to infer Fortran module dependencies from the source file dependencies. Using target_sources in combination with PRIVATE and PUBLIC allows us to express interfaces in a compact and robust fashion.
In this recipe, we have not specified a directory where Fortran module files should be placed and we have kept this transparent. The location for module files can be specified by setting the CMAKE_Fortran_MODULE_DIRECTORY CMake variable. Note that it is also possible to set this as a target property, Fortran_MODULE_DIRECTORY, thus achieving a finer level of control. See https://cmake.org/cmake/help/v3.5/prop_tgt/Fortran_MODULE_DIRECTORY.html.
In this chapter, we will cover the following recipes:
Every project has to deal with dependencies and CMake makes it relatively easy to find out whether these dependencies are present on the system where we configure our project. Chapter 3, Detecting External Libraries and Programs, showed how to find dependencies installed on the system and we have used that same pattern so far. However, if dependencies are not satisfied, the most we can achieve is fail the configuration and alert the user of the reasons for such a failure. However, with CMake it is possible to organize our projects such that dependencies can be automatically fetched and built if they are not found on the system. This chapter will present and analyze the ExternalProject.cmake and FetchContent.cmake standard modules and their use in the superbuild pattern. The former allows us to retrieve the dependencies of our project at build time and has been a part of CMake for a long time. The latter module was added in version 3.11 of CMake and allows us to retrieve dependencies at configure time. With the superbuild pattern, we can effectively leverage CMake as an advanced package manager: within your project you will handle dependencies in the same manner, whether already available on the system or whether they need to be built from scratch. The next five recipes will walk you through the pattern and show how it can be used to fetch and build virtually any dependency.
This recipe will introduce the superbuild pattern with a very simple example. We will show how to use the ExternalProject_Add command to build a simple "Hello, World" program.
This recipe will build the "Hello, World" executable from the following source code (hello-world.cpp):
#include <cstdlib>
#include <iostream>
#include <string>
std::string say_hello() { return std::string("Hello, CMake superbuild world!"); }
int main() {
std::cout << say_hello() << std::endl;
return EXIT_SUCCESS;
}
The project is structured as follows, with a root CMakeLists.txt, and a src/CMakeLists.txt file:
.
├── CMakeLists.txt
└── src
├── CMakeLists.txt
└── hello-world.cpp
Let us first look at CMakeLists.txt in the root folder:
cmake_minimum_required(VERSION 3.5 FATAL_ERROR)
project(recipe-01 LANGUAGES CXX)
set(CMAKE_CXX_STANDARD 11)
set(CMAKE_CXX_EXTENSIONS OFF)
set(CMAKE_CXX_STANDARD_REQUIRED ON)
set_property(DIRECTORY PROPERTY EP_BASE ${CMAKE_BINARY_DIR}/subprojects)
include(ExternalProject)
ExternalProject_Add(${PROJECT_NAME}_core
SOURCE_DIR
${CMAKE_CURRENT_LIST_DIR}/src
CMAKE_ARGS
-DCMAKE_CXX_COMPILER=${CMAKE_CXX_COMPILER}
-DCMAKE_CXX_STANDARD=${CMAKE_CXX_STANDARD}
-DCMAKE_CXX_EXTENSIONS=${CMAKE_CXX_EXTENSIONS}
-DCMAKE_CXX_STANDARD_REQUIRED=${CMAKE_CXX_STANDARD_REQUIRED}
CMAKE_CACHE_ARGS
-DCMAKE_CXX_FLAGS:STRING=${CMAKE_CXX_FLAGS}
BUILD_ALWAYS
1
INSTALL_COMMAND
""
)
Let us now move on to src/CMakeLists.txt. Since we are adding our "Hello, World" sources as an external project, this is a full-fledged CMakeLists.txt file for a standalone project:
cmake_minimum_required(VERSION 3.5 FATAL_ERROR)
project(recipe-01_core LANGUAGES CXX)
add_executable(hello-world hello-world.cpp)
Configuring and building our project is done as usual:
$ mkdir -p build
$ cmake ..
$ cmake --build .
The structure of the build directory is now slightly more complex. In particular, we notice the subprojects folder with the following contents:
build/subprojects/
├── Build
│ └── recipe-01_core
│ ├── CMakeCache.txt
│ ├── CMakeFiles
│ ├── cmake_install.cmake
│ ├── hello-world
│ └── Makefile
├── Download
│ └── recipe-01_core
├── Install
│ └── recipe-01_core
├── Stamp
│ └── recipe-01_core
│ ├── recipe-01_core-configure
│ ├── recipe-01_core-done
│ ├── recipe-01_core-download
│ ├── recipe-01_core-install
│ ├── recipe-01_core-mkdir
│ ├── recipe-01_core-patch
│ └── recipe-01_core-update
└── tmp
└── recipe-01_core
├── recipe-01_core-cache-.cmake
├── recipe-01_core-cfgcmd.txt
└── recipe-01_core-cfgcmd.txt.in
recipe-01_core has been built into a subdirectory of build/subprojects, called Build/recipe-01_core, which is the EP_BASE we have set.
The hello-world executable has been created under Build/recipe-01_core. The additional subfolders tmp/recipe-01_core and Stamp/recipe-01_core contain temporary files, such as the CMake cache script recipe-01_core-cache-.cmake, and the stamp files for the various steps CMake has performed to build the external project.
The ExternalProject_Add command can be used to add sources from third parties. Our first example, however, shows how to manage our own project as an assembly of different CMake projects. In this example, both the root and the leaf CMakeLists.txt declared a CMake project, that is, both of them used the project command.
ExternalProject_Add has many options that can be used to fine-tune all aspects of the configuration and compilation of external projects. These options can be classified into the following:
TMP_DIR = <EP_BASE>/tmp/<name> STAMP_DIR = <EP_BASE>/Stamp/<name> DOWNLOAD_DIR = <EP_BASE>/Download/<name> SOURCE_DIR = <EP_BASE>/Source/<name> BINARY_DIR = <EP_BASE>/Build/<name> INSTALL_DIR = <EP_BASE>/Install/<name>
$ cmake -DCMAKE_CXX_COMPILER=g++ -DCMAKE_CXX_STANDARD=11
-DCMAKE_CXX_EXTENSIONS=OFF -DCMAKE_CXX_STANDARD_REQUIRED=ON
-C/home/roberto/Workspace/robertodr/cmake-cookbook/chapter-08/recipe-01/cxx-example/build/subprojects/tmp/recipe-01_core/recipe-01_core-cache-.cmake "-GUnix Makefiles" /home/roberto/Workspace/robertodr/cmake-cookbook/chapter-08/recipe-01/cxx-example/src
ExternalProject.cmake defines the command ExternalProject_Get_Property which, as the name suggests, is useful to retrieve properties of external projects. The properties on external projects are set when first invoking the ExternalProject_Add command. For example, retrieving the arguments to be passed to CMake when configuring recipe-01_core can be achieved with:
ExternalProject_Get_Property(${PROJECT_NAME}_core CMAKE_ARGS)
message(STATUS "CMAKE_ARGS of ${PROJECT_NAME}_core ${CMAKE_ARGS}")
We will explore in detail the flexibility of the ExternalProject_Add command in the following recipes. Sometimes, however, the external project we want to use might require additional, non-standard steps to be performed. For this reason, the ExternalProject.cmake module defines the following additional commands:
The Boost libraries provide a rich C++ programming infrastructure and are popular among C++ developers. We have already shown how to find the Boost libraries on our system in Chapter 3, Detecting External Libraries and Programs. Sometimes, however, the version of Boost required by your project might not be available on the system. This recipe will show how to leverage the superbuild pattern to ship your code with the confidence that a missing dependency will not stop the configuration. We will reuse the code example from Recipe 8, Detecting the Boost libraries, in Chapter 3, Detecting External Libraries and Programs, but reorganize it in the form of a superbuild. This will be the layout of the project:
.
├── CMakeLists.txt
├── external
│ └── upstream
│ ├── boost
│ │ └── CMakeLists.txt
│ └── CMakeLists.txt
└── src
├── CMakeLists.txt
└── path-info.cpp
You will notice that there are four CMakeLists.txt files in the project source tree. The following section will walk you through these.
We will begin with the root CMakeLists.txt:
cmake_minimum_required(VERSION 3.5 FATAL_ERROR)
project(recipe-02 LANGUAGES CXX)
set(CMAKE_CXX_STANDARD 11)
set(CMAKE_CXX_EXTENSIONS OFF)
set(CMAKE_CXX_STANDARD_REQUIRED ON)
set_property(DIRECTORY PROPERTY EP_BASE ${CMAKE_BINARY_DIR}/subprojects)
set(STAGED_INSTALL_PREFIX ${CMAKE_BINARY_DIR}/stage)
message(STATUS "${PROJECT_NAME} staged install: ${STAGED_INSTALL_PREFIX}")
list(APPEND BOOST_COMPONENTS_REQUIRED filesystem system)
set(Boost_MINIMUM_REQUIRED 1.61)
add_subdirectory(external/upstream)
include(ExternalProject)
ExternalProject_Add(${PROJECT_NAME}_core
DEPENDS
boost_external
SOURCE_DIR
${CMAKE_CURRENT_LIST_DIR}/src
CMAKE_ARGS
-DCMAKE_CXX_COMPILER=${CMAKE_CXX_COMPILER}
-DCMAKE_CXX_STANDARD=${CMAKE_CXX_STANDARD}
-DCMAKE_CXX_EXTENSIONS=${CMAKE_CXX_EXTENSIONS}
-DCMAKE_CXX_STANDARD_REQUIRED=${CMAKE_CXX_STANDARD_REQUIRED}
CMAKE_CACHE_ARGS
-DCMAKE_CXX_FLAGS:STRING=${CMAKE_CXX_FLAGS}
-DCMAKE_INCLUDE_PATH:PATH=${BOOST_INCLUDEDIR}
-DCMAKE_LIBRARY_PATH:PATH=${BOOST_LIBRARYDIR}
BUILD_ALWAYS
1
INSTALL_COMMAND
""
)
Let us now look at the CMakeLists.txt in external/upstream. This file simply adds the boost folder as an additional directory:
add_subdirectory(boost)
The CMakeLists.txt in external/upstream/boost describes the operations needed to satisfy the dependency on Boost. Our goal is simple, if the desired version is not installed, download the source archive and build it:
find_package(Boost ${Boost_MINIMUM_REQUIRED} QUIET COMPONENTS "${BOOST_COMPONENTS_REQUIRED}")
if(Boost_FOUND)
message(STATUS "Found Boost version ${Boost_MAJOR_VERSION}.${Boost_MINOR_VERSION}.${Boost_SUBMINOR_VERSION}")
add_library(boost_external INTERFACE)
else()
# ... discussed below
endif()
else()
message(STATUS "Boost ${Boost_MINIMUM_REQUIRED} could not be located, Building Boost 1.61.0 instead.")
if(CMAKE_CXX_COMPILER_ID MATCHES "GNU")
if(APPLE)
set(_toolset "darwin")
else()
set(_toolset "gcc")
endif()
elseif(CMAKE_CXX_COMPILER_ID MATCHES ".*Clang")
set(_toolset "clang")
elseif(CMAKE_CXX_COMPILER_ID MATCHES "Intel")
if(APPLE)
set(_toolset "intel-darwin")
else()
set(_toolset "intel-linux")
endif()
endif()
if(NOT "${BOOST_COMPONENTS_REQUIRED}" STREQUAL "")
# Replace unit_test_framework (used by CMake's find_package) with test (understood by Boost build toolchain)
string(REPLACE "unit_test_framework" "test" _b2_needed_components "${BOOST_COMPONENTS_REQUIRED}")
# Generate argument for BUILD_BYPRODUCTS
set(_build_byproducts)
set(_b2_select_libraries)
foreach(_lib IN LISTS _b2_needed_components)
list(APPEND _build_byproducts ${STAGED_INSTALL_PREFIX}/boost/lib/libboost_${_lib}${CMAKE_SHARED_LIBRARY_SUFFIX})
list(APPEND _b2_select_libraries --with-${_lib})
endforeach()
# Transform the ;-separated list to a ,-separated list (digested by the Boost build toolchain!)
string(REPLACE ";" "," _b2_needed_components "${_b2_needed_components}")
set(_bootstrap_select_libraries "--with-libraries=${_b2_needed_components}")
string(REPLACE ";" ", " printout "${BOOST_COMPONENTS_REQUIRED}")
message(STATUS " Libraries to be built: ${printout}")
endif()
include(ExternalProject)
ExternalProject_Add(boost_external
URL
https://sourceforge.net/projects/boost/files/boost/1.61.0/boost_1_61_0.zip
URL_HASH
SHA256=02d420e6908016d4ac74dfc712eec7d9616a7fc0da78b0a1b5b937536b2e01e8
DOWNLOAD_NO_PROGRESS
1
UPDATE_COMMAND
""
CONFIGURE_COMMAND
<SOURCE_DIR>/bootstrap.sh
--with-toolset=${_toolset}
--prefix=${STAGED_INSTALL_PREFIX}/boost
${_bootstrap_select_libraries}
BUILD_COMMAND
<SOURCE_DIR>/b2 -q
link=shared
threading=multi
variant=release
toolset=${_toolset}
${_b2_select_libraries}
LOG_BUILD
1
BUILD_IN_SOURCE
1
INSTALL_COMMAND
<SOURCE_DIR>/b2 -q install
link=shared
threading=multi
variant=release
toolset=${_toolset}
${_b2_select_libraries}
LOG_INSTALL
1
BUILD_BYPRODUCTS
"${_build_byproducts}"
)
set(
BOOST_ROOT ${STAGED_INSTALL_PREFIX}/boost
CACHE PATH "Path to internally built Boost installation root"
FORCE
)
set(
BOOST_INCLUDEDIR ${BOOST_ROOT}/include
CACHE PATH "Path to internally built Boost include directories"
FORCE
)
set(
BOOST_LIBRARYDIR ${BOOST_ROOT}/lib
CACHE PATH "Path to internally built Boost library directories"
FORCE
)
unset(_toolset)
unset(_b2_needed_components)
unset(_build_byproducts)
unset(_b2_select_libraries)
unset(_boostrap_select_libraries)
Finally, let us look at src/CMakeLists.txt. This file describes a standalone project:
cmake_minimum_required(VERSION 3.5 FATAL_ERROR)
project(recipe-02_core LANGUAGES CXX)
find_package(Boost 1.61 REQUIRED COMPONENTS filesystem)
add_executable(path-info path-info.cpp)
target_link_libraries(path-info
PUBLIC
Boost::filesystem
)
This recipe shows how the superbuild pattern can be harnessed to muster the dependencies of your project. Let us take another look at the layout of the project:
.
├── CMakeLists.txt
├── external
│ └── upstream
│ ├── boost
│ │ └── CMakeLists.txt
│ └── CMakeLists.txt
└── src
├── CMakeLists.txt
└── path-info.cpp
We have introduced four CMakeLists.txt files in the project source tree:
Let us start start the discussion with the external/upstream/boost/CMakeLists.txt file. Boost uses its own build system and hence we need to be slightly more verbose in our ExternalProject_Add to get everything set up correctly:
CONFIGURE_COMMAND
<SOURCE_DIR>/bootstrap.sh
--with-toolset=${_toolset}
--prefix=${STAGED_INSTALL_PREFIX}/boost
${_bootstrap_select_libraries}
Once Boost has been built, the ${STAGED_INSTALL_PREFIX}/boost folder in the build directory will contain our desired libraries. We need to pass this information down to our project, whose build system is generated in src/CMakeLists.txt. To achieve this goal, we pass two additional CMAKE_CACHE_ARGS in the ExternalProject_Add in the root CMakeLists.txt:
By setting these variables to our freshly built installation of Boost, we ensure that the dependency will be properly picked up.
The superbuild pattern can be used to manage fairly complex dependencies, for projects in all the languages supported by CMake. As demonstrated in the previous recipe, it is not necessary for the various subprojects to managed by CMake as well. In contrast to the previous recipe, the external subproject in this recipe will be a CMake project and will show how to download, build, and install the FFTW library using a superbuild. FFTW is a Fast Fourier Transform library, freely available at http://www.fftw.org.
The directory layout for this recipe shows the now familiar structure for a superbuild:
.
├── CMakeLists.txt
├── external
│ └── upstream
│ ├── CMakeLists.txt
│ └── fftw3
│ └── CMakeLists.txt
└── src
├── CMakeLists.txt
└── fftw_example.c
The code for our project, fftw_example.c, is located in the src subdirectory and will calculate the Fourier transform of a function defined in the source code.
Let us start from the root CMakeLists.txt. This file puts together the whole superbuild process:
cmake_minimum_required(VERSION 3.5 FATAL_ERROR)
project(recipe-03 LANGUAGES C)
set(CMAKE_C_STANDARD 99)
set(CMAKE_C_EXTENSIONS OFF)
set(CMAKE_C_STANDARD_REQUIRED ON)
set_property(DIRECTORY PROPERTY EP_BASE ${CMAKE_BINARY_DIR}/subprojects)
set(STAGED_INSTALL_PREFIX ${CMAKE_BINARY_DIR}/stage)
message(STATUS "${PROJECT_NAME} staged install: ${STAGED_INSTALL_PREFIX}")
add_subdirectory(external/upstream)
include(ExternalProject)
ExternalProject_Add(${PROJECT_NAME}_core
DEPENDS
fftw3_external
SOURCE_DIR
${CMAKE_CURRENT_LIST_DIR}/src
CMAKE_ARGS
-DFFTW3_DIR=${FFTW3_DIR}
-DCMAKE_C_STANDARD=${CMAKE_C_STANDARD}
-DCMAKE_C_EXTENSIONS=${CMAKE_C_EXTENSIONS}
-DCMAKE_C_STANDARD_REQUIRED=${CMAKE_C_STANDARD_REQUIRED}
CMAKE_CACHE_ARGS
-DCMAKE_C_FLAGS:STRING=${CMAKE_C_FLAGS}
-DCMAKE_PREFIX_PATH:PATH=${CMAKE_PREFIX_PATH}
BUILD_ALWAYS
1
INSTALL_COMMAND
""
)
The external/upstream subdirectory also contains a CMakeLists.txt:
add_subdirectory(fftw3)
The CMakeLists.txt in external/upstream/fftw3 takes care of our dependencies:
find_package(FFTW3 CONFIG QUIET)
find_package(FFTW3 CONFIG QUIET)
if(FFTW3_FOUND)
get_property(_loc TARGET FFTW3::fftw3 PROPERTY LOCATION)
message(STATUS "Found FFTW3: ${_loc} (found version ${FFTW3_VERSION})")
add_library(fftw3_external INTERFACE) # dummy
else()
# this branch will be discussed below
endif()
message(STATUS "Suitable FFTW3 could not be located. Downloading and building!")
include(ExternalProject)
ExternalProject_Add(fftw3_external
URL
http://www.fftw.org/fftw-3.3.8.tar.gz
URL_HASH
MD5=8aac833c943d8e90d51b697b27d4384d
DOWNLOAD_NO_PROGRESS
1
UPDATE_COMMAND
""
LOG_CONFIGURE
1
LOG_BUILD
1
LOG_INSTALL
1
CMAKE_ARGS
-DCMAKE_INSTALL_PREFIX=${STAGED_INSTALL_PREFIX}
-DBUILD_TESTS=OFF
CMAKE_CACHE_ARGS
-DCMAKE_C_FLAGS:STRING=$<$<BOOL:WIN32>:-DWITH_OUR_MALLOC>
)
include(GNUInstallDirs)
set(
FFTW3_DIR ${STAGED_INSTALL_PREFIX}/${CMAKE_INSTALL_LIBDIR}/cmake/fftw3
CACHE PATH "Path to internally built FFTW3Config.cmake"
FORCE
)
The CMakeLists.txt in the src folder is fairly compact:
cmake_minimum_required(VERSION 3.5 FATAL_ERROR)
project(recipe-03_core LANGUAGES C)
find_package(FFTW3 CONFIG REQUIRED)
get_property(_loc TARGET FFTW3::fftw3 PROPERTY LOCATION)
message(STATUS "Found FFTW3: ${_loc} (found version ${FFTW3_VERSION})")
add_executable(fftw_example fftw_example.c)
target_link_libraries(fftw_example
PRIVATE
FFTW3::fftw3
)
This recipe demonstrated how to download, build, and install an external project whose build system is managed by CMake. In contrast to the previous recipe, where a custom build system had to be used, this superbuild setup is rather compact. It is important to note the use of the CONFIG option to the find_package command; this tells CMake to first look for a FFTW3Config.cmake file in order to locate the FFTW3 library. Such a file exports the library as a target to be picked up by third-party projects. The target contains the version, configuration, and location of the library, that is, complete information on how the target was configured and built. In case the library is not installed on the system, we need to tell CMake where the FFTW3Config.cmake file is located. This can be done by setting the FFTW3_DIR variable. This was the very last step in the external/upstream/fftw3/CMakeLists.txt file, where, by using the GNUInstallDirs.cmake module, we set FFTW3_DIR as a cache variable to be picked up later on in the superbuild.
In Chapter 4, Creating and Running Tests, Recipe 3, Defining a unit test and linking against Google Test, we implemented unit testing using the Google Test framework and fetched the Google Test sources at configure time using the relatively new FetchContent module (available since CMake 3.11). In this chapter, we will revisit this recipe, focus less on the testing aspect, and dive a bit deeper into FetchContent, which provides a compact and versatile module to assemble project dependencies at configure time. For additional insight and for CMake below 3.11, we will also discuss how to emulate FetchContent using ExternalProject_Add at configure time.
In this recipe, we will build and test the same source files, main.cpp, sum_integers.cpp, sum_integers.hpp, and test.cpp, as in Chapter 4, Creating and Running Tests, Recipe 3, Defining a unit test and linking against Google Test. We will download all required Google Test sources at configure time using FetchContent or ExternalProject_Add and in this recipe only focus on the fetching of dependencies at configure time, not so much on the actual source code and its unit tests.
In this recipe, we will only focus on how to fetch the Google Test sources to build the gtest_main target. For a discussion on how this target is used to test the example sources, we refer the reader to Chapter 4, Creating and Running Tests, Recipe 3, Defining a unit test and linking against Google Test:
include(FetchContent)
FetchContent_Declare(
googletest
GIT_REPOSITORY https://github.com/google/googletest.git
GIT_TAG release-1.8.0
)
FetchContent_GetProperties(googletest)
if(NOT googletest_POPULATED)
FetchContent_Populate(googletest)
# ...
# adds the targets: gtest, gtest_main, gmock, gmock_main
add_subdirectory(
${googletest_SOURCE_DIR}
${googletest_BINARY_DIR}
)
# ...
endif()
$ mkdir -p build
$ cd build
$ cmake ..
build/
├── ...
├── _deps
│ ├── googletest-build
│ │ ├── ...
│ │ └── ...
│ ├── googletest-src
│ │ ├── ...
│ │ └── ...
│ └── googletest-subbuild
│ ├── ...
│ └── ...
└── ...
The FetchContent module enables populating content at configure time. In our case, we have fetched a Git repository with a well defined Git tag:
FetchContent_Declare(
googletest
GIT_REPOSITORY https://github.com/google/googletest.git
GIT_TAG release-1.8.0
)
The FetchContent module supports fetching content via any method supported by the ExternalProject module - in other words, via Subversion, Mercurial, CVS, or HTTP(S). The content name "googletest" was our choice and with this we will be able to reference the content when querying its properties, when populating directories, and later also when configuring the subproject. Before populating the project, we checked whether the content was already fetched, otherwise FetchContent_Populate() would have thrown an error if it was called more than once:
if(NOT googletest_POPULATED)
FetchContent_Populate(googletest)
# ...
endif()
Only then did we configure the subdirectory, which we can reference with the googletest_SOURCE_DIR and googletest_BINARY_DIR variables. They were set by FetchContent_Populate(googletest) and constructed based on the project name we gave when declaring the content:
add_subdirectory(
${googletest_SOURCE_DIR}
${googletest_BINARY_DIR}
)
The FetchContent module has a number of options (see https://cmake.org/cmake/help/v3.11/module/FetchContent.html) and here we can show one: how to change the default path into which the external project will be placed. Previously, we saw that by default the content is saved to ${CMAKE_BINARY_DIR}/_deps. We can change this location by setting FETCHCONTENT_BASE_DIR:
set(FETCHCONTENT_BASE_DIR ${CMAKE_BINARY_DIR}/custom)
FetchContent_Declare(
googletest
GIT_REPOSITORY https://github.com/google/googletest.git
GIT_TAG release-1.8.0
)
FetchContent has become a standard part of CMake in its 3.11 version. In the following code, we will try to emulate FetchContent using ExternalProject_Add at configure time. This will not only be practical for older CMake versions, it will hopefully also give us more insight into what is happening underneath the FetchContent layer and provide an interesting alternative to the typical build-time fetching of projects included using ExternalProject_Add. Our goal will be to write a fetch_git_repo macro and place it in fetch_git_repo.cmake so that we can fetch the content like this:
include(fetch_git_repo.cmake)
fetch_git_repo(
googletest
${CMAKE_BINARY_DIR}/_deps
https://github.com/google/googletest.git
release-1.8.0
)
# ...
# adds the targets: gtest, gtest_main, gmock, gmock_main
add_subdirectory(
${googletest_SOURCE_DIR}
${googletest_BINARY_DIR}
)
# ...
This feels similar to the use of FetchContent. Under the hood, we will use ExternalProject_Add. Let us now lift the hood and inspect the definition of fetch_git_repo in fetch_git_repo.cmake:
macro(fetch_git_repo _project_name _download_root _git_url _git_tag)
set(${_project_name}_SOURCE_DIR ${_download_root}/${_project_name}-src)
set(${_project_name}_BINARY_DIR ${_download_root}/${_project_name}-build)
# variables used configuring fetch_git_repo_sub.cmake
set(FETCH_PROJECT_NAME ${_project_name})
set(FETCH_SOURCE_DIR ${${_project_name}_SOURCE_DIR})
set(FETCH_BINARY_DIR ${${_project_name}_BINARY_DIR})
set(FETCH_GIT_REPOSITORY ${_git_url})
set(FETCH_GIT_TAG ${_git_tag})
configure_file(
${CMAKE_CURRENT_LIST_DIR}/fetch_at_configure_step.in
${_download_root}/CMakeLists.txt
@ONLY
)
# undefine them again
unset(FETCH_PROJECT_NAME)
unset(FETCH_SOURCE_DIR)
unset(FETCH_BINARY_DIR)
unset(FETCH_GIT_REPOSITORY)
unset(FETCH_GIT_TAG)
# configure sub-project
execute_process(
COMMAND
"${CMAKE_COMMAND}" -G "${CMAKE_GENERATOR}" .
WORKING_DIRECTORY
${_download_root}
)
# build sub-project which triggers ExternalProject_Add
execute_process(
COMMAND
"${CMAKE_COMMAND}" --build .
WORKING_DIRECTORY
${_download_root}
)
endmacro()
The macro receives the project name, download root, Git repository URL, and a Git tag. The macro defines ${_project_name}_SOURCE_DIR and ${_project_name}_BINARY_DIR, and we use a macro instead of a function since ${_project_name}_SOURCE_DIR and ${_project_name}_BINARY_DIR need to survive the scope of fetch_git_repo because we use them later in the main scope to configure the subdirectory:
add_subdirectory(
${googletest_SOURCE_DIR}
${googletest_BINARY_DIR}
)
Inside the fetch_git_repo macro, we wish to use ExternalProject_Add to fetch the external project at configure time and we achieve this with a trick in three steps:
cmake_minimum_required(VERSION 3.5 FATAL_ERROR)
project(fetch_git_repo_sub LANGUAGES NONE)
include(ExternalProject)
ExternalProject_Add(
@FETCH_PROJECT_NAME@
SOURCE_DIR "@FETCH_SOURCE_DIR@"
BINARY_DIR "@FETCH_BINARY_DIR@"
GIT_REPOSITORY
@FETCH_GIT_REPOSITORY@
GIT_TAG
@FETCH_GIT_TAG@
CONFIGURE_COMMAND ""
BUILD_COMMAND ""
INSTALL_COMMAND ""
TEST_COMMAND ""
)
Using configure_file, we generate a CMakeLists.txt file in which the previous placeholders are replaced by values defined in fetch_git_repo.cmake. Note that the previous ExternalProject_Add command is constructed to only fetch, not to configure, build, install, or test.
# configure sub-project
execute_process(
COMMAND
"${CMAKE_COMMAND}" -G "${CMAKE_GENERATOR}" .
WORKING_DIRECTORY
${_download_root}
)
# build sub-project which triggers ExternalProject_Add
execute_process(
COMMAND
"${CMAKE_COMMAND}" --build .
WORKING_DIRECTORY
${_download_root}
)
One nice aspect of this solution is that since the external dependency is not configured by ExternalProject_Add, we do not need to channel any configuration settings to the project via the ExternalProject_Add call. We can configure and build the module using add_subdirectory as if the external dependency was part of our project source tree. Brilliant disguise!
For a detailed discussion of the available FetchContent options, please consult https://cmake.org/cmake/help/v3.11/module/FetchContent.html.
The configure time ExternalProject_Add solution is inspired by the work and blog post of Craig Scott: https://crascit.com/2015/07/25/cmake-gtest/.
ExternalProject and FetchContent are two very powerful tools in your CMake arsenal. The previous recipes should have convinced you how versatile the superbuild approach is in managing projects with complex dependencies. We have so far shown how to use ExternalProject to handle the following:
The previous recipe showed how to use FetchContent to handle dependencies available from open source Git repositories. This recipe will show how to use ExternalProject to the same effect. This last recipe will introduce an example that will be reused in Recipe 4, Installing a superbuild, in Chapter 10, Writing an Installer.
The source tree for this superbuild should now feel familiar:
.
├── CMakeLists.txt
├── external
│ └── upstream
│ ├── CMakeLists.txt
│ └── message
│ └── CMakeLists.txt
└── src
├── CMakeLists.txt
└── use_message.cpp
The root directory has a CMakeLists.txt, which we already know will orchestrate the superbuild. The leaf directories src and external host our own source code and the CMake directives needed to satisfy the dependency on the message library, which we will build in this example.
The process of setting up a superbuild should by now feel familiar. Let us once again look at the necessary steps, starting with the root CMakeLists.txt:
cmake_minimum_required(VERSION 3.6 FATAL_ERROR)
project(recipe-05 LANGUAGES CXX)
set(CMAKE_CXX_STANDARD 11)
set(CMAKE_CXX_EXTENSIONS OFF)
set(CMAKE_CXX_STANDARD_REQUIRED ON)
if(NOT DEFINED CMAKE_BUILD_TYPE OR "${CMAKE_BUILD_TYPE}" STREQUAL "")
set(CMAKE_BUILD_TYPE Release CACHE STRING "Build type" FORCE)
endif()
message(STATUS "Build type set to ${CMAKE_BUILD_TYPE}")
set_property(DIRECTORY PROPERTY EP_BASE ${CMAKE_BINARY_DIR}/subprojects)
set(STAGED_INSTALL_PREFIX ${CMAKE_BINARY_DIR}/stage)
message(STATUS "${PROJECT_NAME} staged install: ${STAGED_INSTALL_PREFIX}")
add_subdirectory(external/upstream)
include(ExternalProject)
ExternalProject_Add(${PROJECT_NAME}_core
DEPENDS
message_external
SOURCE_DIR
${CMAKE_CURRENT_SOURCE_DIR}/src
CMAKE_ARGS
-DCMAKE_BUILD_TYPE=${CMAKE_BUILD_TYPE}
-DCMAKE_CXX_COMPILER=${CMAKE_CXX_COMPILER}
-DCMAKE_CXX_STANDARD=${CMAKE_CXX_STANDARD}
-DCMAKE_CXX_EXTENSIONS=${CMAKE_CXX_EXTENSIONS}
-DCMAKE_CXX_STANDARD_REQUIRED=${CMAKE_CXX_STANDARD_REQUIRED}
-Dmessage_DIR=${message_DIR}
CMAKE_CACHE_ARGS
-DCMAKE_CXX_FLAGS:STRING=${CMAKE_CXX_FLAGS}
-DCMAKE_PREFIX_PATH:PATH=${CMAKE_PREFIX_PATH}
BUILD_ALWAYS
1
INSTALL_COMMAND
""
)
The CMakeLists.txt in external/upstream only contains one command:
add_subdirectory(message)
Jumping into the message folder, we again see the usual commands for managing our dependency on the message library:
find_package(message 1 CONFIG QUIET)
get_property(_loc TARGET message::message-shared PROPERTY LOCATION)
message(STATUS "Found message: ${_loc} (found version ${message_VERSION})")
add_library(message_external INTERFACE) # dummy
message(STATUS "Suitable message could not be located, Building message instead.")
include(ExternalProject)
ExternalProject_Add(message_external
GIT_REPOSITORY
https://github.com/dev-cafe/message.git
GIT_TAG
master
UPDATE_COMMAND
""
CMAKE_ARGS
-DCMAKE_INSTALL_PREFIX=${STAGED_INSTALL_PREFIX}
-DCMAKE_BUILD_TYPE=${CMAKE_BUILD_TYPE}
-DCMAKE_CXX_COMPILER=${CMAKE_CXX_COMPILER}
-DCMAKE_CXX_STANDARD=${CMAKE_CXX_STANDARD}
-DCMAKE_CXX_EXTENSIONS=${CMAKE_CXX_EXTENSIONS}
-DCMAKE_CXX_STANDARD_REQUIRED=${CMAKE_CXX_STANDARD_REQUIRED}
CMAKE_CACHE_ARGS
-DCMAKE_CXX_FLAGS:STRING=${CMAKE_CXX_FLAGS}
TEST_AFTER_INSTALL
1
DOWNLOAD_NO_PROGRESS
1
LOG_CONFIGURE
1
LOG_BUILD
1
LOG_INSTALL
1
)
if(WIN32 AND NOT CYGWIN)
set(DEF_message_DIR ${STAGED_INSTALL_PREFIX}/CMake)
else()
set(DEF_message_DIR ${STAGED_INSTALL_PREFIX}/share/cmake/message)
endif()
file(TO_NATIVE_PATH "${DEF_message_DIR}" DEF_message_DIR)
set(message_DIR ${DEF_message_DIR}
CACHE PATH "Path to internally built messageConfig.cmake" FORCE)
Finally, let us look at the CMakeLists.txt in the src folder:
cmake_minimum_required(VERSION 3.6 FATAL_ERROR)
project(recipe-05_core
LANGUAGES CXX
)
set(CMAKE_CXX_STANDARD 11)
set(CMAKE_CXX_EXTENSIONS OFF)
set(CMAKE_CXX_STANDARD_REQUIRED ON)
find_package(message 1 CONFIG REQUIRED)
get_property(_loc TARGET message::message-shared PROPERTY LOCATION)
message(STATUS "Found message: ${_loc} (found version ${message_VERSION})")
add_executable(use_message use_message.cpp)
target_link_libraries(use_message
PUBLIC
message::message-shared
)
This recipe highlighted some new options to the ExternalProject_Add command:
The additional Test options understood by ExternalProject_Add are as follows:
These options assume that the external project manages testing using CTest. If the external project does not use CTest to manage testing, we can set the TEST_COMMAND option to execute tests.
Introducing the superbuild pattern even for modules that are part of your own project comes at the cost of introducing an additional layer, re-declaring small CMake projects, and passing configuration settings explicitly through ExternalProject_Add. The benefit of introducing this additional layer is a clear separation of variable and target scopes, which can help to manage complexity, dependencies, and namespaces in projects consisting of several components, where these components can be internal or external, and composed together by CMake.
In this chapter, we will cover the following recipes:
There are plenty of existing libraries that excel at very specific tasks. It's generally a very good idea to reuse such libraries in our own codebases, because we can rely on years of experience from other groups of experts. As computer architectures and compilers evolve, so do programming languages. Whereas years ago most scientific software was written in Fortran, nowadays C, C++, and interpreted languages – first and foremost Python – are taking the center stage. It is indeed more and more common to integrate code written in a compiled language with bindings to an interpreted language, since it affords the following benefits:
As we have consistently shown throughout the previous recipes, the project command can be used to set the languages used in the project via the LANGUAGES keyword. CMake has support for many – but not all – compiled programming languages. As of CMake 3.5, various flavors of assembly (such as ASM-ATT, ASM, ASM-MASM, and ASM-NASM), C, C++, Fortran, Java, RC (Windows Resource Compiler), and Swift are valid choices. CMake 3.8 added support for two more languages: C# and CUDA (see the release notes here: https://cmake.org/cmake/help/v3.8/release/3.8.html#languages).
In this chapter, we will show how to integrate codes written in different compiled (C, C++, and Fortran) and interpreted (Python) languages in a way that is portable and cross-platform. We will show how to leverage CMake and tools intrinsic to the different programming languages we aim to integrate.
Fortran has a venerated history as the language of high-performance computing. Many numerical linear algebra libraries are still written primarily in Fortran, as are many big number-crunching packages that need to preserve compatibility with legacy code amassed in the past decades. Whereas Fortran presents a very natural syntax for handling numerical arrays, it is lacking when it comes to interaction with the operating system, primarily because an interoperability layer with C, the de facto lingua franca of computer programming, was not mandated until the release of the Fortran 2003 standard. This recipe will show how to interface a Fortran code with both C system libraries and custom C code.
As shown in Chapter 7, Structuring Projects, we will structure our project as a tree. Each subdirectory has a CMakeLists.txt file with instructions pertaining to that directory. This allows us to confine as much information as possible within the leaf directories as in this example:
.
├── CMakeLists.txt
└── src
├── bt-randomgen-example.f90
├── CMakeLists.txt
├── interfaces
│ ├── CMakeLists.txt
│ ├── interface_backtrace.f90
│ ├── interface_randomgen.f90
│ └── randomgen.c
└── utils
├── CMakeLists.txt
└── util_strings.f90
In our case, we have a src subdirectory containing the sources, including bt-randomgen-example.f90, our executable. Two further subdirectories, interfaces and utils, contain more source code that will be compiled into libraries.
The source code in the interfaces subdirectory shows how to wrap the backtrace C system library. For example, the interface_backtrace.f90 contains:
module interface_backtrace
implicit none
interface
function backtrace(buffer, size) result(bt) bind(C, name="backtrace")
use, intrinsic :: iso_c_binding, only: c_int, c_ptr
type(c_ptr) :: buffer
integer(c_int), value :: size
integer(c_int) :: bt
end function
subroutine backtrace_symbols_fd(buffer, size, fd) bind(C, name="backtrace_symbols_fd")
use, intrinsic :: iso_c_binding, only: c_int, c_ptr
type(c_ptr) :: buffer
integer(c_int), value :: size, fd
end subroutine
end interface
end module
The above example shows the use of the following:
This subdirectory contains two more source files:
We have four CMakeLists.txt instances to look at: one root and tree leaves. Let us start with the root CMakeLists.txt:
cmake_minimum_required(VERSION 3.5 FATAL_ERROR)
project(recipe-01 LANGUAGES Fortran C)
set(CMAKE_ARCHIVE_OUTPUT_DIRECTORY ${CMAKE_CURRENT_BINARY_DIR}/lib)
set(CMAKE_LIBRARY_OUTPUT_DIRECTORY ${CMAKE_CURRENT_BINARY_DIR}/lib)
set(CMAKE_RUNTIME_OUTPUT_DIRECTORY ${CMAKE_CURRENT_BINARY_DIR}/bin)
set(CMAKE_Fortran_MODULE_DIRECTORY
${CMAKE_CURRENT_BINARY_DIR}/modules)
add_subdirectory(src)
add_subdirectory(interfaces)
add_subdirectory(utils)
In the interfaces subdirectory, we do the following:
include(FortranCInterface)
FortranCInterface_VERIFY()
find_package(Backtrace REQUIRED)
add_library(bt-randomgen-wrap SHARED "")
target_sources(bt-randomgen-wrap
PRIVATE
interface_backtrace.f90
interface_randomgen.f90
randomgen.c
)
target_link_libraries(bt-randomgen-wrap
PUBLIC
${Backtrace_LIBRARIES}
)
In the utils subdirectory, we have one more CMakeLists.txt. This is a one-liner: we create a new library target into which the source file in this subdirectory will be compiled. There are no dependencies for this target:
add_library(utils SHARED util_strings.f90)
Let us return to src/CMakeLists.txt:
add_executable(bt-randomgen-example bt-randomgen-example.f90)
target_link_libraries(bt-randomgen-example
PRIVATE
bt-randomgen-wrap
utils
)
Having identified the correct libraries to link to, we need to make sure that our program can correctly call the functions they define. Every compiler performs name mangling when generating machine code and, unfortunately, conventions for this operation are not universal, but compiler-dependent. FortranCInterface, which we have already encountered in Chapter 3, Detecting External Libraries and Programs, Recipe 4, Detecting the BLAS and LAPACK math libraries, checks the compatibility of the selected C compiler with the Fortran compiler. For our current purposes, name mangling is not really an issue. The Fortran 2003 standard defines a bind attribute for functions and subroutines that accepts an optional name argument. If this argument is provided, the compiler will generate symbols for those subroutines and functions using the name fixed by the programmers. For example, the backtrace function can be exposed to Fortran from C, preserving the name, as follows:
function backtrace(buffer, size) result(bt) bind(C, name="backtrace")
The CMake code in interfaces/CMakeLists.txt also showed that it is possible to create a library from source files in different languages. CMake is evidently able to do the following:
How does CMake determine which compiler to use? Specifying the LANGUAGES option to the project command will let CMake check for working compilers for the given languages on your system. When a target is added with lists of source files, CMake will appropriately determine the compiler based on the file extension. Hence, files terminating with .c will be compiled to object files using the C compiler already determined, whereas files terminating with .f90 (or .F90 if they need preprocessing) will be compiled using the working Fortran compiler. Similarly for C++, the .cpp or .cxx extensions will trigger usage of the C++ compiler. We have only listed some of the possible, valid file extensions for the C, C++, and Fortran languages, but CMake can recognize many more. What if the file extensions in your project are, for any reason, not among the ones that are recognized? The LANGUAGE source file property can be used to tell CMake which compiler to use on specific source files, like so:
set_source_files_properties(my_source_file.axx
PROPERTIES
LANGUAGE CXX
)
Finally, what about the linker? How does CMake determine the linker language for targets? For targets that do not mix programming languages, the choice is straightforward: invoke the linker via the compiler command that was used to generate the object files. If the targets do mix programming languages, as in our example, the linker language is chosen based on that whose preference value is highest among the ones available in the language mix. With our example mixing Fortran and C, the Fortran language has higher preference than the C language and is hence used as linker language. When mixing Fortran and C++, it is the latter to have higher preference and is hence used as the linker language. Much as with the compiler language, we can force CMake to use a specific linker language for our target via the corresponding LINKER_LANGUAGE property on targets:
set_target_properties(my_target
PROPERTIES
LINKER_LANGUAGE Fortran
)
Recipe 4, Detecting the BLAS and LAPACK math libraries, in Chapter 3, Detecting External Libraries and Programs, showed how to detect BLAS and LAPACK linear algebra libraries, written in Fortran, and how to use them in C++ code. Here we will revisit this recipe, but this time from a different angle: focusing less on detecting the external libraries but rather discussing the aspect of mixing C++ and Fortran and the name mangling in more depth.
In this recipe, we will reuse the sources from Chapter 3, Detecting External Libraries and Programs, Recipe 4, Detecting the BLAS and LAPACK math libraries. Although we will not modify the actual implementation sources or header files, we will modify the project tree structure following the recommendations discussed in Chapter 7, Structuring Projects, and arrive at the following source code structure:
.
├── CMakeLists.txt
├── README.md
└── src
├── CMakeLists.txt
├── linear-algebra.cpp
└── math
├── CMakeLists.txt
├── CxxBLAS.cpp
├── CxxBLAS.hpp
├── CxxLAPACK.cpp
└── CxxLAPACK.hpp
Here we have collected all the wrappers to BLAS and LAPACK, which provide the math library under src/math. The main program is linear-algebra.cpp. All sources are thus organized under the src subdirectory. To localize the scope, we have also split the CMake code over three CMakeLists.txt files, which we will discuss now.
This project mixes C++, which is the language of the main program, Fortran, because this is the language the libraries are written in, and C, which is needed to wrap the Fortran subroutines. In the root CMakeLists.txt file, we need to do the following:
cmake_minimum_required(VERSION 3.5 FATAL_ERROR)
project(recipe-02 LANGUAGES CXX C Fortran)
set(CMAKE_CXX_STANDARD 11)
set(CMAKE_CXX_EXTENSIONS OFF)
set(CMAKE_CXX_STANDARD_REQUIRED ON)
include(GNUInstallDirs)
set(CMAKE_ARCHIVE_OUTPUT_DIRECTORY
${CMAKE_BINARY_DIR}/${CMAKE_INSTALL_LIBDIR})
set(CMAKE_LIBRARY_OUTPUT_DIRECTORY
${CMAKE_BINARY_DIR}/${CMAKE_INSTALL_LIBDIR})
set(CMAKE_RUNTIME_OUTPUT_DIRECTORY
${CMAKE_BINARY_DIR}/${CMAKE_INSTALL_BINDIR})
set(CMAKE_Fortran_MODULE_DIRECTORY ${PROJECT_BINARY_DIR}/modules)
add_subdirectory(src)
The leaf file src/CMakeLists.txt adds yet another subdirectory, math, which contains the linear algebra wrappers. In src/math/CMakeLists.txt, we need to do the following:
find_package(BLAS REQUIRED)
find_package(LAPACK REQUIRED)
include(FortranCInterface)
FortranCInterface_VERIFY(CXX)
FortranCInterface_HEADER(
fc_mangle.h
MACRO_NAMESPACE "FC_"
SYMBOLS DSCAL DGESV
)
add_library(math "")
target_sources(math
PRIVATE
CxxBLAS.cpp
CxxLAPACK.cpp
)
target_include_directories(math
PUBLIC
${CMAKE_CURRENT_SOURCE_DIR}
${CMAKE_CURRENT_BINARY_DIR}
)
target_link_libraries(math
PUBLIC
${LAPACK_LIBRARIES}
)
Stepping back to src/CMakeLists.txt, we finally add an executable target and link it to our math library of BLAS/LAPACK wrappers:
add_executable(linear-algebra "")
target_sources(linear-algebra
PRIVATE
linear-algebra.cpp
)
target_link_libraries(linear-algebra
PRIVATE
math
)
Using find_package, we have identified the correct libraries to link to. As in the previous recipe, we need to make sure that our program can correctly call the functions they define. As in Chapter 3, Detecting External Libraries and Programs, Recipe 4, Detecting the BLAS and LAPACK math libraries, we face the problem of compiler-dependent name mangling of symbols. We use the FortranCInterface CMake module to check the compatibility of the selected C and C++ compilers with the Fortran compiler. We also use the FortranCInterface_HEADER function to generate a header file with macros to take care of name mangling of Fortran subroutines. This was achieved with the following code:
FortranCInterface_HEADER(
fc_mangle.h
MACRO_NAMESPACE "FC_"
SYMBOLS DSCAL DGESV
)
This command will generate the fc_mangle.h header file with name-mangling macros, as inferred from the Fortran compiler, and save it into the current binary directory, CMAKE_CURRENT_BINARY_DIR. We were careful to set CMAKE_CURRENT_BINARY_DIR as an include path for our math target. Consider the following generated fc_mangle.h:
#ifndef FC_HEADER_INCLUDED
#define FC_HEADER_INCLUDED
/* Mangling for Fortran global symbols without underscores. */
#define FC_GLOBAL(name,NAME) name##_
/* Mangling for Fortran global symbols with underscores. */
#define FC_GLOBAL_(name,NAME) name##_
/* Mangling for Fortran module symbols without underscores. */
#define FC_MODULE(mod_name,name, mod_NAME,NAME) __##mod_name##_MOD_##name
/* Mangling for Fortran module symbols with underscores. */
#define FC_MODULE_(mod_name,name, mod_NAME,NAME) __##mod_name##_MOD_##name
/* Mangle some symbols automatically. */
#define DSCAL FC_GLOBAL(dscal, DSCAL)
#define DGESV FC_GLOBAL(dgesv, DGESV)
#endif
The compiler in this example uses underscores for mangling. Since Fortran is case-insensitive, the subroutine might appear in either lowercase or uppercase, justifying the need to pass both cases to the macro. Notice that CMake will also generate macros for mangling symbols hidden behind Fortran modules.
Since we have carefully organized the sources into a library target and an executable target, we should comment on the use of the PUBLIC, INTERFACE, and PRIVATE visibility attributes for the targets. These are essential for a clean CMake project structure. As with sources, include directories, compile definitions, and options, the meaning of these attributes remains the same when used in conjunction with target_link_libraries:
Cython is an optimizing static compiler that allows to write C extensions for Python. Cython is a very powerful tool and uses the extended Cython programming language (based on Pyrex). A typical use case for Cython is speeding up Python code, but it can also be used to interface C/C++ with Python via a Cython layer. In this recipe, we will focus on the latter use case and demonstrate how to interface C/C++ and Python using Cython with the help of CMake.
As an example, we will use the following C++ code (account.cpp):
#include "account.hpp"
Account::Account() : balance(0.0) {}
Account::~Account() {}
void Account::deposit(const double amount) { balance += amount; }
void Account::withdraw(const double amount) { balance -= amount; }
double Account::get_balance() const { return balance; }
This code provides the following interface (account.hpp):
#pragma once
class Account {
public:
Account();
~Account();
void deposit(const double amount);
void withdraw(const double amount);
double get_balance() const;
private:
double balance;
};
Using this example code, we can create bank accounts that start with a balance of zero. We can deposit to and withdraw from an account and also query the account balance using get_balance(). The balance itself is a private member of the Account class.
Our goal is to be able to interact with this C++ class directly from Python – in other words, on the Python side, we wish to be able to do this:
account = Account()
account.deposit(100.0)
account.withdraw(50.0)
balance = account.get_balance()
To achieve this, we will need a Cython interface file (we will call this file account.pyx):
# describe the c++ interface
cdef extern from "account.hpp":
cdef cppclass Account:
Account() except +
void deposit(double)
void withdraw(double)
double get_balance()
# describe the python interface
cdef class pyAccount:
cdef Account *thisptr
def __cinit__(self):
self.thisptr = new Account()
def __dealloc__(self):
del self.thisptr
def deposit(self, amount):
self.thisptr.deposit(amount)
def withdraw(self, amount):
self.thisptr.withdraw(amount)
def get_balance(self):
return self.thisptr.get_balance()
Let us look at how to generate the Python interface:
# define minimum cmake version
cmake_minimum_required(VERSION 3.5 FATAL_ERROR)
# project name and supported language
project(recipe-03 LANGUAGES CXX)
# require C++11
set(CMAKE_CXX_STANDARD 11)
set(CMAKE_CXX_EXTENSIONS OFF)
set(CMAKE_CXX_STANDARD_REQUIRED ON)
if(NOT CMAKE_BUILD_TYPE)
set(CMAKE_BUILD_TYPE Release CACHE STRING "Build type" FORCE)
endif()
find_package(PythonInterp REQUIRED)
# directory cointaining UseCython.cmake and FindCython.cmake
list(APPEND CMAKE_MODULE_PATH ${CMAKE_CURRENT_SOURCE_DIR}/cmake-cython)
# this defines cython_add_module
include(UseCython)
# tells UseCython to compile this file as a c++ file
set_source_files_properties(account.pyx PROPERTIES CYTHON_IS_CXX TRUE)
# create python module
cython_add_module(account account.pyx account.cpp)
# location of account.hpp
target_include_directories(account
PRIVATE
${CMAKE_CURRENT_SOURCE_DIR}
)
# turn on testing
enable_testing()
# define test
add_test(
NAME
python_test
COMMAND
${CMAKE_COMMAND} -E env ACCOUNT_MODULE_PATH=$<TARGET_FILE_DIR:account>
${PYTHON_EXECUTABLE} ${CMAKE_CURRENT_SOURCE_DIR}/test.py
)
import os
import sys
sys.path.append(os.getenv('ACCOUNT_MODULE_PATH'))
from account import pyAccount as Account
account1 = Account()
account1.deposit(100.0)
account1.deposit(100.0)
account2 = Account()
account2.deposit(200.0)
account2.deposit(200.0)
account1.withdraw(50.0)
assert account1.get_balance() == 150.0
assert account2.get_balance() == 400.0
$ mkdir -p build
$ cd build
$ cmake ..
$ cmake --build .
$ ctest
Start 1: python_test
1/1 Test #1: python_test ...................... Passed 0.03 sec
100% tests passed, 0 tests failed out of 1
Total Test time (real) = 0.03 sec
In this recipe, we have interfaced Python and C++ using a relatively compact CMakeLists.txt file, but we have achieved this by using the FindCython.cmake and UseCython.cmake modules, which have been placed under cmake-cython. These modules are included using the following code:
# directory contains UseCython.cmake and FindCython.cmake
list(APPEND CMAKE_MODULE_PATH ${CMAKE_CURRENT_SOURCE_DIR}/cmake-cython)
# this defines cython_add_module
include(UseCython)
FindCython.cmake is included in UseCython.cmake and locates and defines ${CYTHON_EXECUTABLE}. The latter module defines the cython_add_module and cython_add_standalone_executable functions, which can be used to create Python modules and standalone executables, respectively. Both modules have been downloaded from https://github.com/thewtex/cython-cmake-example/tree/master/cmake.
In this recipe, we use cython_add_module to create a Python module library. Note how we set the non-standard CYTHON_IS_CXX source file property to TRUE, so that the cython_add_module function will know to compile pyx as a C++ file:
# tells UseCython to compile this file as a c++ file
set_source_files_properties(account.pyx PROPERTIES CYTHON_IS_CXX TRUE)
# create python module
cython_add_module(account account.pyx account.cpp)
The Python module is created inside ${CMAKE_CURRENT_BINARY_DIR}, and in order for the Python test.py script to locate it, we pass the relevant path with a custom environment variable, which is used inside test.py to set the PATH variable. Note how the COMMAND is set to call the CMake executable itself to set the local environment right before executing the Python script. This affords us platform-independence and avoids polluting the environment with spurious variables:
add_test(
NAME
python_test
COMMAND
${CMAKE_COMMAND} -E env ACCOUNT_MODULE_PATH=$<TARGET_FILE_DIR:account>
${PYTHON_EXECUTABLE} ${CMAKE_CURRENT_SOURCE_DIR}/test.py
)
We should also take a look at the account.pyx file, which is the interface file between Python and C++ and describes the C++ interface:
# describe the c++ interface
cdef extern from "account.hpp":
cdef cppclass Account:
Account() except +
void deposit(double)
void withdraw(double)
double get_balance()
You can see except + in the Account class constructor. This directive allows Cython to handle exceptions raised by the C++ code.
The account.pyx interface file also describes the Python interface:
# describe the python interface
cdef class pyAccount:
cdef Account *thisptr
def __cinit__(self):
self.thisptr = new Account()
def __dealloc__(self):
del self.thisptr
def deposit(self, amount):
self.thisptr.deposit(amount)
def withdraw(self, amount):
self.thisptr.withdraw(amount)
def get_balance(self):
return self.thisptr.get_balance()
We can see how the cinit constructor, the __dealloc__ destructor, and the deposit and withdraw methods, are matched with the corresponding C++ implementation counterparts.
To summarize, we have found a mechanism to couple Python and C++ by introducing a dependency on the Cython module. This module can preferably be installed by pip into a virtual environment or Pipenv, or by using Anaconda.
C could be coupled analogously. If we wish to take advantage of constructors and destructors, we could write a thin C++ layer around the C interface.
Typed Memoryviews offer the interesting functionality to map and access memory buffers allocated by C/C++ directly in Python, without creating any overhead: http://cython.readthedocs.io/en/latest/src/userguide/memoryviews.html. They make it possible to map NumPy arrays directly to C++ arrays.
The Boost libraries offer another popular alternative to interface C++ code with Python. This recipe will show how to use CMake for C++ projects that rely on Boost.Python to expose their functionality as a Python module. We will reuse the example from the previous recipe and attempt to interact with the same C++ implementation (account.cpp) as in the Cython example.
While we keep account.cpp unchanged, we modify the interface file from the previous recipe (account.hpp):
#pragma once
#define BOOST_PYTHON_STATIC_LIB
#include <boost/python.hpp>
class Account {
public:
Account();
~Account();
void deposit(const double amount);
void withdraw(const double amount);
double get_balance() const;
private:
double balance;
};
namespace py = boost::python;
BOOST_PYTHON_MODULE(account) {
py::class_<Account>("Account")
.def("deposit", &Account::deposit)
.def("withdraw", &Account::withdraw)
.def("get_balance", &Account::get_balance);
}
These are the required steps to use Boost.Python with your C++ project:
# define minimum cmake version
cmake_minimum_required(VERSION 3.5 FATAL_ERROR)
# project name and supported language
project(recipe-04 LANGUAGES CXX)
# require C++11
set(CMAKE_CXX_STANDARD 11)
set(CMAKE_CXX_EXTENSIONS OFF)
set(CMAKE_CXX_STANDARD_REQUIRED ON)
# we default to Release build type
if(NOT CMAKE_BUILD_TYPE)
set(CMAKE_BUILD_TYPE Release CACHE STRING "Build type" FORCE)
endif()
# for testing we will need the python interpreter
find_package(PythonInterp REQUIRED)
# we require python development headers
find_package(PythonLibs ${PYTHON_VERSION_MAJOR}.${PYTHON_VERSION_MINOR} EXACT REQUIRED)
# now search for the boost component
# depending on the boost version it is called either python,
# python2, python27, python3, python36, python37, ...
list(
APPEND _components
python${PYTHON_VERSION_MAJOR}${PYTHON_VERSION_MINOR}
python${PYTHON_VERSION_MAJOR}
python
)
set(_boost_component_found "")
foreach(_component IN ITEMS ${_components})
find_package(Boost COMPONENTS ${_component})
if(Boost_FOUND)
set(_boost_component_found ${_component})
break()
endif()
endforeach()
if(_boost_component_found STREQUAL "")
message(FATAL_ERROR "No matching Boost.Python component found")
endif()
# create python module
add_library(account
MODULE
account.cpp
)
target_link_libraries(account
PUBLIC
Boost::${_boost_component_found}
${PYTHON_LIBRARIES}
)
target_include_directories(account
PRIVATE
${PYTHON_INCLUDE_DIRS}
)
# prevent cmake from creating a "lib" prefix
set_target_properties(account
PROPERTIES
PREFIX ""
)
if(WIN32)
# python will not import dll but expects pyd
set_target_properties(account
PROPERTIES
SUFFIX ".pyd"
)
endif()
# turn on testing
enable_testing()
# define test
add_test(
NAME
python_test
COMMAND
${CMAKE_COMMAND} -E env ACCOUNT_MODULE_PATH=$<TARGET_FILE_DIR:account>
${PYTHON_EXECUTABLE} ${CMAKE_CURRENT_SOURCE_DIR}/test.py
)
$ mkdir -p build
$ cd build
$ cmake ..
$ cmake --build .
$ ctest
Start 1: python_test
1/1 Test #1: python_test ...................... Passed 0.10 sec
100% tests passed, 0 tests failed out of 1
Total Test time (real) = 0.11 sec
Instead of depending on the Cython module, this recipe now depends on locating the Boost libraries on the system, in combination with the Python development headers and library.
The Python development headers and library are searched for with the following:
find_package(PythonInterp REQUIRED)
find_package(PythonLibs ${PYTHON_VERSION_MAJOR}.${PYTHON_VERSION_MINOR} EXACT REQUIRED)
Note how we first searched for the interpreter and then for the development headers and libraries. Moreover, the search for PythonLibs asks for the exact same major and minor versions for the development headers and libraries as were found for the interpreter. This is necessary for ensuring that consistent versions of interpreter and libraries are used throughout the project. However, this command combination will not guarantee that an exactly matching version of the two will be found.
When locating the Boost.Python component, we have met the difficulty that the name of the component that we try to locate depends both on the Boost version and our Python environment. Depending on the Boost version, the component can be called python, python2, python3, python27, python36, python37, and so on. We have solved this problem by searching from specific to more generic names and only failing if no match can be located:
list(
APPEND _components
python${PYTHON_VERSION_MAJOR}${PYTHON_VERSION_MINOR}
python${PYTHON_VERSION_MAJOR}
python
)
set(_boost_component_found "")
foreach(_component IN ITEMS ${_components})
find_package(Boost COMPONENTS ${_component})
if(Boost_FOUND)
set(_boost_component_found ${_component})
break()
endif()
endforeach()
if(_boost_component_found STREQUAL "")
message(FATAL_ERROR "No matching Boost.Python component found")
endif()
Discovery and usage of the Boost libraries can be tweaked by setting additional CMake variables. For example, CMake offers the following options:
Another new aspect introduced by this recipe is the use of the MODULE option to the add_library command. We already know from Recipe 3, Building and linking shared and static libraries, in Chapter 1, From a Simple Executable to Libraries, that CMake accepts the following options as valid second argument to add_library:
The MODULE option introduced here will generate a plugin library; that is, a Dynamic Shared Object (DSO) that is not linked dynamically into any executable, but can still be loaded at runtime. Since we are extending Python with our own functionality written in C++, the Python interpreter will need to be able to load our library at runtime. This can be achieved by using the MODULE option to add_library and by preventing the addition of any prefix (for example, lib on Unix systems) to the name of our library target. The latter operation is carried out by setting the appropriate target property, like so:
set_target_properties(account
PROPERTIES
PREFIX ""
)
One aspect of all recipes that demonstrate the interfacing of Python and C++ is that we need to describe to the Python code how to hook up to the C++ layer and to list the symbols which should be visible to Python. We also have the possibility to (re)name these symbols. In the previous recipe, we did this in a separate account.pyx file. When using Boost.Python, we describe the interface directly in the C++ code, ideally close to the definition of the class or function we wish to interface:
BOOST_PYTHON_MODULE(account) {
py::class_<Account>("Account")
.def("deposit", &Account::deposit)
.def("withdraw", &Account::withdraw)
.def("get_balance", &Account::get_balance);
}
The BOOST_PYTHON_MODULE template is included from <boost/python.hpp> and is responsible for creating the Python interface. The module will expose an Account Python class that maps to the C++ class. In this case, we do not have to explicitly declare a constructor and destructor – these are created for us and called automatically when the Python object is created:
myaccount = Account()
The destructor is called when the object goes out of scope and is collected by the Python garbage collection. Also, observe how BOOST_PYTHON_MODULE exposes the deposit, withdraw, and get_balance functions, and maps them to the corresponding C++ class methods.
This way, the compiled module can be found by Python when placed in PYTHONPATH. In this recipe, we have achieved a relatively clean separation between the Python and C++ layers. The Python code is not restricted in functionality, does not require type annotation or rewriting of names, and remains pythonic:
from account import Account
account1 = Account()
account1.deposit(100.0)
account1.deposit(100.0)
account2 = Account()
account2.deposit(200.0)
account2.deposit(200.0)
account1.withdraw(50.0)
assert account1.get_balance() == 150.0
assert account2.get_balance() == 400.0
In this recipe, we rely on Boost being installed on the system and so the CMake code tries to detect the corresponding library. Alternatively, we could have shipped the Boost sources together with our project and build this dependency as part of the project. Boost is a portable way to interface Python with C(++). The portability with respect to compiler support and C++ standard however comes at a price: Boost.Python is not a lightweight dependency. In the following recipe, we will discuss a lightweight alternative to Boost.Python.
In the previous recipe, we have used Boost.Python to interface Python with C(++). In this recipe, we will try to interface Python with C++ using pybind11 as a lightweight alternative that makes use of C++11 features and therefore requires a compiler with C++11 support. As an additional variation to the previous recipe we will demonstrate how to fetch the pybind11 dependency at configure time and build our project including a Python interface using the FetchContent approach, which we met in Chapter 4, Creating and Running Tests, Recipe 3, Define a unit test and linking against Google Test, and discussed in Chapter 8, The Superbuild Pattern, Recipe 4, Managing dependencies with a superbuild: III. The Google Test framework. In Chapter 11, Packaging Projects, Recipe 2, Distributing a C++/Python project built with CMake/pybind11 via PyPI, we will revisit this example and show how to package it and make it installable with pip.
We will keep account.cpp unchanged with respect to the previous two recipes and only modify account.hpp:
#pragma once
#include <pybind11/pybind11.h>
class Account {
public:
Account();
~Account();
void deposit(const double amount);
void withdraw(const double amount);
double get_balance() const;
private:
double balance;
};
namespace py = pybind11;
PYBIND11_MODULE(account, m) {
py::class_<Account>(m, "Account")
.def(py::init())
.def("deposit", &Account::deposit)
.def("withdraw", &Account::withdraw)
.def("get_balance", &Account::get_balance);
}
We will follow the pybind11 documentation "Building with CMake" (https://pybind11.readthedocs.io/en/stable/compiling.html#building-with-cmake) and introduce the pybind11 CMake code using add_subdirectory. However, we will not place the pybind11 source code explicitly into our project directory, but rather demonstrate how to fetch pybind11 sources at configure time using FetchContent (https://cmake.org/cmake/help/v3.11/module/FetchContent.html).
For better code reuse in the next recipe, we will also place all sources into a subdirectory and use the following project layout:
.
├── account
│ ├── account.cpp
│ ├── account.hpp
│ ├── CMakeLists.txt
│ └── test.py
└── CMakeLists.txt
Let us analyze in detail the contents of the various CMakeLists.txt files in this project:
# define minimum cmake version
cmake_minimum_required(VERSION 3.11 FATAL_ERROR)
# project name and supported language
project(recipe-05 LANGUAGES CXX)
# require C++11
set(CMAKE_CXX_STANDARD 11)
set(CMAKE_CXX_EXTENSIONS OFF)
set(CMAKE_CXX_STANDARD_REQUIRED ON)
find_package(PythonInterp REQUIRED)
add_subdirectory(account)
# turn on testing
enable_testing()
# define test
add_test(
NAME
python_test
COMMAND
${CMAKE_COMMAND} -E env ACCOUNT_MODULE_PATH=$<TARGET_FILE_DIR:account>
${PYTHON_EXECUTABLE} ${CMAKE_CURRENT_SOURCE_DIR}/account/test.py
)
include(FetchContent)
FetchContent_Declare(
pybind11_sources
GIT_REPOSITORY https://github.com/pybind/pybind11.git
GIT_TAG v2.2
)
FetchContent_GetProperties(pybind11_sources)
if(NOT pybind11_sources_POPULATED)
FetchContent_Populate(pybind11_sources)
add_subdirectory(
${pybind11_sources_SOURCE_DIR}
${pybind11_sources_BINARY_DIR}
)
endif()
add_library(account
MODULE
account.cpp
)
target_link_libraries(account
PUBLIC
pybind11::module
)
set_target_properties(account
PROPERTIES
PREFIX "${PYTHON_MODULE_PREFIX}"
SUFFIX "${PYTHON_MODULE_EXTENSION}"
)
$ mkdir -p build
$ cd build
$ cmake ..
$ cmake --build .
$ ctest
Start 1: python_test
1/1 Test #1: python_test ...................... Passed 0.04 sec
100% tests passed, 0 tests failed out of 1
Total Test time (real) = 0.04 sec
The functionality and use of pybind11 is very similar to Boost.Python, the bonus being that pybind11 is a more lightweight dependency – although we will require C++11 support from the compiler. The interface definition in account.hpp is rather similar to that in the previous recipe:
#include <pybind11/pybind11.h>
// ...
namespace py = pybind11;
PYBIND11_MODULE(account, m) {
py::class_<Account>(m, "Account")
.def(py::init())
.def("deposit", &Account::deposit)
.def("withdraw", &Account::withdraw)
.def("get_balance", &Account::get_balance);
}
Again, we can clearly recognize how Python methods are mapped to C++ functions. The library that interprets PYBIND11_MODULE is defined in the imported target pybind11::module, which we have included using the following:
add_subdirectory(
${pybind11_sources_SOURCE_DIR}
${pybind11_sources_BINARY_DIR}
)
There are two differences with respect to the previous recipe:
One solution for this challenge is to use the FetchContent module, which fetches the pybind11 sources and CMake infrastructure at configure time so that we can reference it using add_subdirectory. Using the FetchContent pattern, we can now assume that pybind11 is available within the build tree, which allows us to build and link the Python module:
add_library(account
MODULE
account.cpp
)
target_link_libraries(account
PUBLIC
pybind11::module
)
We use the following command to make sure that the Python module library gets a well-defined prefix and suffix, compatible with the Python environment:
set_target_properties(account
PROPERTIES
PREFIX ${PYTHON_MODULE_PREFIX}
SUFFIX ${PYTHON_MODULE_EXTENSION}
)
The rest of the top-level CMakeLists.txt file is testing (we use the same test.py as in the previous recipe).
We could have included the pybind11 sources as part of our project source code repository, which would simplify the CMake structure and remove the requirement to have network access to the pybind11 sources at compile time. Alternatively, we could have defined the pybind11 source path as a Git submodule (https://git-scm.com/book/en/v2/Git-Tools-Submodules) to simplify the updating of the pybind11 source dependency.
In our example, we have solved this using FetchContent, which provides a very compact approach to referencing a CMake subproject without explicitly tracking its sources. Also, we could have solved this recipe using the so-called superbuild approach (see Chapter 8, The Superbuild Pattern).
To see how you can expose simple functions, define docstrings, map memory buffers, and find further reading, we refer to the pybind11 documentation: https://pybind11.readthedocs.io.
In the previous three recipes, we have discussed Cython, Boost.Python, and pybind11 as tools to interface Python and C++ providing a modern and clean approach. The main interface in the previous recipes was a C++ interface. However, we may be in a situation where we do not have a C++ interface to hook on to and where we would like to interface Python with Fortran or other languages.
In this recipe, we will demonstrate an alternative approach for interfacing Python using the Python C Foreign Function Interface (CFFI; see also https://cffi.readthedocs.io). Since C is the lingua franca of programming languages and most programming languages (including Fortran) are able to talk to a C interface, Python CFFI is a tool to couple Python with a large number of languages. A very nice feature of Python CFFI is that the resulting interface is thin and non-intrusive, meaning that it neither restricts the Python layer in language features, nor does it impose any restrictions on the code below the C layer, apart from requiring a C interface.
In this recipe, we will apply Python CFFI to couple Python and C++ via a C interface using the bank account example introduced in preceding recipe. Our goal is to arrive at a context-aware interface where we can instantiate several bank accounts, each carrying its internal state. We will conclude this recipe by commenting on how to couple Python and Fortran using Python CFFI. In Chapter 11, Packaging Projects, Recipe 3, Distributing a C/Fortran/Python project built with CMake/CFFI via PyPI, we will revisit this example and show how to package it and make it installable with pip.
We will require a couple of files for this recipe. Let us start with the C++ implementation and interface. We will place these in a subdirectory called account/implementation. The implementation file (cpp_implementation.cpp) is similar to that in previous recipes but contains additional assert statements, since we will keep the state of the object in an opaque handle and we will have to make sure that the object is created before we try to access it:
#include "cpp_implementation.hpp"
#include <cassert>
Account::Account() {
balance = 0.0;
is_initialized = true;
}
Account::~Account() {
assert(is_initialized);
is_initialized = false;
}
void Account::deposit(const double amount) {
assert(is_initialized);
balance += amount;
}
void Account::withdraw(const double amount) {
assert(is_initialized);
balance -= amount;
}
double Account::get_balance() const {
assert(is_initialized);
return balance;
}
The interface file (cpp_implementation.hpp) contains the following:
#pragma once
class Account {
public:
Account();
~Account();
void deposit(const double amount);
void withdraw(const double amount);
double get_balance() const;
private:
double balance;
bool is_initialized;
};
In addition, we isolate a C—C++ interface (c_cpp_interface.cpp). This will be the interface we will try to hook into with Python CFFI:
#include "account.h"
#include "cpp_implementation.hpp"
#define AS_TYPE(Type, Obj) reinterpret_cast<Type *>(Obj)
#define AS_CTYPE(Type, Obj) reinterpret_cast<const Type *>(Obj)
account_context_t *account_new() {
return AS_TYPE(account_context_t, new Account());
}
void account_free(account_context_t *context) { delete AS_TYPE(Account, context); }
void account_deposit(account_context_t *context, const double amount) {
return AS_TYPE(Account, context)->deposit(amount);
}
void account_withdraw(account_context_t *context, const double amount) {
return AS_TYPE(Account, context)->withdraw(amount);
}
double account_get_balance(const account_context_t *context) {
return AS_CTYPE(Account, context)->get_balance();
}
One directory up, under account, we describe the C interface (account.h):
/* CFFI would issue warning with pragma once */
#ifndef ACCOUNT_H_INCLUDED
#define ACCOUNT_H_INCLUDED
#ifndef ACCOUNT_API
#include "account_export.h"
#define ACCOUNT_API ACCOUNT_EXPORT
#endif
#ifdef __cplusplus
extern "C" {
#endif
struct account_context;
typedef struct account_context account_context_t;
ACCOUNT_API
account_context_t *account_new();
ACCOUNT_API
void account_free(account_context_t *context);
ACCOUNT_API
void account_deposit(account_context_t *context, const double amount);
ACCOUNT_API
void account_withdraw(account_context_t *context, const double amount);
ACCOUNT_API
double account_get_balance(const account_context_t *context);
#ifdef __cplusplus
}
#endif
#endif /* ACCOUNT_H_INCLUDED */
We also describe the Python interface, which we will comment on below (__init__.py):
from subprocess import check_output
from cffi import FFI
import os
import sys
from configparser import ConfigParser
from pathlib import Path
def get_lib_handle(definitions, header_file, library_file):
ffi = FFI()
command = ['cc', '-E'] + definitions + [header_file]
interface = check_output(command).decode('utf-8')
# remove possible \r characters on windows which
# would confuse cdef
_interface = [l.strip('\r') for l in interface.split('\n')]
ffi.cdef('\n'.join(_interface))
lib = ffi.dlopen(library_file)
return lib
# this interface requires the header file and library file
# and these can be either provided by interface_file_names.cfg
# in the same path as this file
# or if this is not found then using environment variables
_this_path = Path(os.path.dirname(os.path.realpath(__file__)))
_cfg_file = _this_path / 'interface_file_names.cfg'
if _cfg_file.exists():
config = ConfigParser()
config.read(_cfg_file)
header_file_name = config.get('configuration', 'header_file_name')
_header_file = _this_path / 'include' / header_file_name
_header_file = str(_header_file)
library_file_name = config.get('configuration', 'library_file_name')
_library_file = _this_path / 'lib' / library_file_name
_library_file = str(_library_file)
else:
_header_file = os.getenv('ACCOUNT_HEADER_FILE')
assert _header_file is not None
_library_file = os.getenv('ACCOUNT_LIBRARY_FILE')
assert _library_file is not None
_lib = get_lib_handle(definitions=['-DACCOUNT_API=', '-DACCOUNT_NOINCLUDE'],
header_file=_header_file,
library_file=_library_file)
# we change names to obtain a more pythonic API
new = _lib.account_new
free = _lib.account_free
deposit = _lib.account_deposit
withdraw = _lib.account_withdraw
get_balance = _lib.account_get_balance
__all__ = [
'__version__',
'new',
'free',
'deposit',
'withdraw',
'get_balance',
]
This is a handful of files, but, as we will see, most of this interface work is generic and reusable and the actual interface is rather thin. To summarize, this is the layout of our project:
.
├── account
│ ├── account.h
│ ├── CMakeLists.txt
│ ├── implementation
│ │ ├── c_cpp_interface.cpp
│ │ ├── cpp_implementation.cpp
│ │ └── cpp_implementation.hpp
│ ├── __init__.py
│ └── test.py
└── CMakeLists.txt
Let us now use CMake to combine these files to form a Python module:
# define minimum cmake version
cmake_minimum_required(VERSION 3.5 FATAL_ERROR)
# project name and supported language
project(recipe-06 LANGUAGES CXX)
# require C++11
set(CMAKE_CXX_STANDARD 11)
set(CMAKE_CXX_EXTENSIONS OFF)
set(CMAKE_CXX_STANDARD_REQUIRED ON)
# specify where to place libraries
include(GNUInstallDirs)
set(CMAKE_LIBRARY_OUTPUT_DIRECTORY
${CMAKE_BINARY_DIR}/${CMAKE_INSTALL_LIBDIR})
# interface and sources
add_subdirectory(account)
# turn on testing
enable_testing()
# require python
find_package(PythonInterp REQUIRED)
# define test
add_test(
NAME
python_test
COMMAND
${CMAKE_COMMAND} -E env ACCOUNT_MODULE_PATH=${CMAKE_CURRENT_SOURCE_DIR}
ACCOUNT_HEADER_FILE=${CMAKE_CURRENT_SOURCE_DIR}/account/account.h
ACCOUNT_LIBRARY_FILE=$<TARGET_FILE:account>
${PYTHON_EXECUTABLE} ${CMAKE_CURRENT_SOURCE_DIR}/account/test.py
)
add_library(account
SHARED
implementation/c_cpp_interface.cpp
implementation/cpp_implementation.cpp
)
target_include_directories(account
PRIVATE
${CMAKE_CURRENT_SOURCE_DIR}
${CMAKE_CURRENT_BINARY_DIR}
)
include(GenerateExportHeader)
generate_export_header(account
BASE_NAME account
)
$ mkdir -p build
$ cd build
$ cmake ..
$ cmake --build .
$ ctest
Start 1: python_test
1/1 Test #1: python_test ...................... Passed 0.14 sec
100% tests passed, 0 tests failed out of 1
While the previous recipes required us to explicitly declare the Python—C interface and to map Python names to C(++) symbols, Python CFFI infers this mapping on its own from the C header file (in our case, account.h). The only thing we need to provide to our Python CFFI layer is the header file describing the C interface and a shared library containing the symbols. We have done this using environment variable set in the main CMakeLists.txt file, and these environment variables are queried in __init__.py:
# ...
def get_lib_handle(definitions, header_file, library_file):
ffi = FFI()
command = ['cc', '-E'] + definitions + [header_file]
interface = check_output(command).decode('utf-8')
# remove possible \r characters on windows which
# would confuse cdef
_interface = [l.strip('\r') for l in interface.split('\n')]
ffi.cdef('\n'.join(_interface))
lib = ffi.dlopen(library_file)
return lib
# ...
_this_path = Path(os.path.dirname(os.path.realpath(__file__)))
_cfg_file = _this_path / 'interface_file_names.cfg'
if _cfg_file.exists():
# we will discuss this section in chapter 11, recipe 3
else:
_header_file = os.getenv('ACCOUNT_HEADER_FILE')
assert _header_file is not None
_library_file = os.getenv('ACCOUNT_LIBRARY_FILE')
assert _library_file is not None
_lib = get_lib_handle(definitions=['-DACCOUNT_API=', '-DACCOUNT_NOINCLUDE'],
header_file=_header_file,
library_file=_library_file)
# ...
The get_lib_handle function opens and parses the header file (using ffi.cdef), loads the library (using ffi.dlopen), and returns the library object. The preceding file is in principle generic, and can be reused without modification for other projects interfacing Python and C or other languages using Python CFFI.
The _lib library object could be exported directly, but we do one additional step so that the Python interface feels more pythonic when used Python-side:
# we change names to obtain a more pythonic API
new = _lib.account_new
free = _lib.account_free
deposit = _lib.account_deposit
withdraw = _lib.account_withdraw
get_balance = _lib.account_get_balance
__all__ = [
'__version__',
'new',
'free',
'deposit',
'withdraw',
'get_balance',
]
With this change, we can write the following:
import account
account1 = account.new()
account.deposit(account1, 100.0)
The alternative would be less intuitive:
from account import lib
account1 = lib.account_new()
lib.account_deposit(account1, 100.0)
Note how we are able to instantiate and track isolated contexts with our context-aware API:
account1 = account.new()
account.deposit(account1, 10.0)
account2 = account.new()
account.withdraw(account1, 5.0)
account.deposit(account2, 5.0)
In order to import the account Python module, we need to provide the ACCOUNT_HEADER_FILE and ACCOUNT_LIBRARY_FILE environment variables, as we do for the test:
add_test(
NAME
python_test
COMMAND
${CMAKE_COMMAND} -E env ACCOUNT_MODULE_PATH=${CMAKE_CURRENT_SOURCE_DIR}
ACCOUNT_HEADER_FILE=${CMAKE_CURRENT_SOURCE_DIR}/account/account.h
ACCOUNT_LIBRARY_FILE=$<TARGET_FILE:account>
${PYTHON_EXECUTABLE} ${CMAKE_CURRENT_SOURCE_DIR}/account/test.py
)
In Chapter 11, Packaging Projects, we will discuss how to create a Python package that can be installed with pip where the header and library files will be installed in well-defined locations so that we do not have to define any environment variables to use the Python module.
Having discussed the Python aspect of the interface, let us now consider the C-side of the interface. The essence of account.h is this section:
struct account_context;
typedef struct account_context account_context_t;
ACCOUNT_API
account_context_t *account_new();
ACCOUNT_API
void account_free(account_context_t *context);
ACCOUNT_API
void account_deposit(account_context_t *context, const double amount);
ACCOUNT_API
void account_withdraw(account_context_t *context, const double amount);
ACCOUNT_API
double account_get_balance(const account_context_t *context);
The opaque handle, account_context, holds the state of the object. ACCOUNT_API is defined in account_export.h, which is generated by CMake in account/interface/CMakeLists.txt:
include(GenerateExportHeader)
generate_export_header(account
BASE_NAME account
)
The account_export.h export header defines the visibility of the interface functions and makes sure this is done in a portable way. We will discuss this point in further detail in Chapter 10, Writing an Installer. The actual implementation can be found in cpp_implementation.cpp. It contains the is_initialized boolean, which we can check to make sure that API functions are called in the expected order: the context should not be accessed before it is created or after it is freed.
When designing a Python—C interface, it is important to carefully consider on which side to allocate arrays: arrays can be allocated either on the Python side and passed to the C(++) implementation, or they can be allocated on the C(++) implementation that returns a pointer. The latter approach is convenient for situations where the buffer sizes are a priori not known. However, returning pointers to arrays allocated C(++)-side can be problematic since it can lead to memory leaks due to Python garbage collection, which does not "see" the allocated arrays. We recommend to design the C API such that arrays can be allocated outside and passed to the C implementation. These arrays can then be allocated within __init__.py, as in this example:
from cffi import FFI
import numpy as np
_ffi = FFI()
def return_array(context, array_len):
# create numpy array
array_np = np.zeros(array_len, dtype=np.float64)
# cast a pointer to its data
array_p = _ffi.cast("double *", array_np.ctypes.data)
# pass the pointer
_lib.mylib_myfunction(context, array_len, array_p)
# return the array as a list
return array_np.tolist()
The return_array function returns a Python list. Since we have done all the allocation work on the Python side, we do not have to worry about memory leaks and can leave the cleanup to the garbage collection.
For a Fortran example, we refer the reader to the following recipe repository: https://github.com/dev-cafe/cmake-cookbook/tree/v1.0/chapter-09/recipe-06/fortran-example. The main difference compared to the C++ implementation is that the account library is compiled from a Fortran 90 source file that we account for in account/CMakeLists.txt:
add_library(account
SHARED
implementation/fortran_implementation.f90
)
The context is kept in a user-defined type:
type :: account
private
real(c_double) :: balance
logical :: is_initialized = .false.
end type
The Fortran implementation is able to resolve symbols and methods defined in the unchanged account.h by using the iso_c_binding module:
module account_implementation
use, intrinsic :: iso_c_binding, only: c_double, c_ptr
implicit none
private
public account_new
public account_free
public account_deposit
public account_withdraw
public account_get_balance
type :: account
private
real(c_double) :: balance
logical :: is_initialized = .false.
end type
contains
type(c_ptr) function account_new() bind (c)
use, intrinsic :: iso_c_binding, only: c_loc
type(account), pointer :: f_context
type(c_ptr) :: context
allocate(f_context)
context = c_loc(f_context)
account_new = context
f_context%balance = 0.0d0
f_context%is_initialized = .true.
end function
subroutine account_free(context) bind (c)
use, intrinsic :: iso_c_binding, only: c_f_pointer
type(c_ptr), value :: context
type(account), pointer :: f_context
call c_f_pointer(context, f_context)
call check_valid_context(f_context)
f_context%balance = 0.0d0
f_context%is_initialized = .false.
deallocate(f_context)
end subroutine
subroutine check_valid_context(f_context)
type(account), pointer, intent(in) :: f_context
if (.not. associated(f_context)) then
print *, 'ERROR: context is not associated'
stop 1
end if
if (.not. f_context%is_initialized) then
print *, 'ERROR: context is not initialized'
stop 1
end if
end subroutine
subroutine account_withdraw(context, amount) bind (c)
use, intrinsic :: iso_c_binding, only: c_f_pointer
type(c_ptr), value :: context
real(c_double), value :: amount
type(account), pointer :: f_context
call c_f_pointer(context, f_context)
call check_valid_context(f_context)
f_context%balance = f_context%balance - amount
end subroutine
subroutine account_deposit(context, amount) bind (c)
use, intrinsic :: iso_c_binding, only: c_f_pointer
type(c_ptr), value :: context
real(c_double), value :: amount
type(account), pointer :: f_context
call c_f_pointer(context, f_context)
call check_valid_context(f_context)
f_context%balance = f_context%balance + amount
end subroutine
real(c_double) function account_get_balance(context) bind (c)
use, intrinsic :: iso_c_binding, only: c_f_pointer
type(c_ptr), value, intent(in) :: context
type(account), pointer :: f_context
call c_f_pointer(context, f_context)
call check_valid_context(f_context)
account_get_balance = f_context%balance
end function
end module
This recipe and solution has been inspired by Armin Ronacher's post, "Beautiful Native Libraries", http://lucumr.pocoo.org/2013/8/18/beautiful-native-libraries/.
In this chapter, we will cover the following recipes:
In previous chapters, we have shown how to configure, build, and test our projects using CMake. Installing projects is an equally important part of the developer's toolbox, and this chapter will demonstrate how to achieve that. The recipes in this chapter cover the install-time operations outlined in the following diagram:

We will walk you through the various steps to be taken in refining the installation of a simple C++ project: from making sure that important files built in your project are copied over to the right directories, to ensuring that other projects depending on your work can detect it using CMake. The four recipes in this chapter will build upon the simple example given in Chapter 1, From a Simple Executable to Libraries, Recipe 3, Building and linking shared and static libraries. There we tried to build a very simple library and link it into an executable. We also showed how to build both a static and a shared library out of the same source files. In this chapter, we will go a bit deeper and discuss and formalize what happens at install time.
In this very first recipe, we will introduce our small project and some of the basic concepts that will be used also in the subsequent recipes. Installing files, libraries, and executables is a very basic task, but it can present some pitfalls. We will walk you through these and show you how to effectively avoid many of them with CMake.
The code from Chapter 1, From a Simple Executable to Libraries, Recipe 3, Building and linking shared and static libraries, is used almost unaltered: we will only add a dependency on the UUID library. This dependency is conditional, and if the UUID library is not found, we will exclude the code using it via the preprocessor. The code is properly organized into its own src subdirectory. The layout of the project is as follows:
.
├── CMakeLists.txt
├── src
│ ├── CMakeLists.txt
│ ├── hello-world.cpp
│ ├── Message.cpp
│ └── Message.hpp
└── tests
└── CMakeLists.txt
We can already see that we have a root CMakeLists.txt with one leaf under the src subdirectory and another under the tests subdirectory.
The Message.hpp header file contains the following:
#pragma once
#include <iosfwd>
#include <string>
class Message {
public:
Message(const std::string &m) : message_(m) {}
friend std::ostream &operator<<(std::ostream &os, Message &obj) {
return obj.printObject(os);
}
private:
std::string message_;
std::ostream &printObject(std::ostream &os);
};
std::string getUUID();
This is the corresponding implementation in Message.cpp:
#include "Message.hpp"
#include <iostream>
#include <string>
#ifdef HAVE_UUID
#include <uuid/uuid.h>
#endif
std::ostream &Message::printObject(std::ostream &os) {
os << "This is my very nice message: " << std::endl;
os << message_ << std::endl;
os << "...and here is its UUID: " << getUUID();
return os;
}
#ifdef HAVE_UUID
std::string getUUID() {
uuid_t uuid;
uuid_generate(uuid);
char uuid_str[37];
uuid_unparse_lower(uuid, uuid_str);
uuid_clear(uuid);
std::string uuid_cxx(uuid_str);
return uuid_cxx;
}
#else
std::string getUUID() { return "Ooooops, no UUID for you!"; }
#endif
Finally, the sample hello-world.cpp executable is as follows:
#include <cstdlib>
#include <iostream>
#include "Message.hpp"
int main() {
Message say_hello("Hello, CMake World!");
std::cout << say_hello << std::endl;
Message say_goodbye("Goodbye, CMake World");
std::cout << say_goodbye << std::endl;
return EXIT_SUCCESS;
}
Let us first go through the root CMakeLists.txt file:
# CMake 3.6 needed for IMPORTED_TARGET option
# to pkg_search_module
cmake_minimum_required(VERSION 3.6 FATAL_ERROR)
project(recipe-01
LANGUAGES CXX
VERSION 1.0.0
)
# <<< General set up >>>
set(CMAKE_CXX_STANDARD 11)
set(CMAKE_CXX_EXTENSIONS OFF)
set(CMAKE_CXX_STANDARD_REQUIRED ON)
message(STATUS "Project will be installed to ${CMAKE_INSTALL_PREFIX}")
if(NOT CMAKE_BUILD_TYPE)
set(CMAKE_BUILD_TYPE Release CACHE STRING "Build type" FORCE)
endif()
message(STATUS "Build type set to ${CMAKE_BUILD_TYPE}")
include(GNUInstallDirs)
set(CMAKE_ARCHIVE_OUTPUT_DIRECTORY
${PROJECT_BINARY_DIR}/${CMAKE_INSTALL_LIBDIR})
set(CMAKE_LIBRARY_OUTPUT_DIRECTORY
${PROJECT_BINARY_DIR}/${CMAKE_INSTALL_LIBDIR})
set(CMAKE_RUNTIME_OUTPUT_DIRECTORY
${PROJECT_BINARY_DIR}/${CMAKE_INSTALL_BINDIR})
# Offer the user the choice of overriding the installation directories
set(INSTALL_LIBDIR ${CMAKE_INSTALL_LIBDIR} CACHE PATH "Installation directory for libraries")
set(INSTALL_BINDIR ${CMAKE_INSTALL_BINDIR} CACHE PATH "Installation directory for executables")
set(INSTALL_INCLUDEDIR ${CMAKE_INSTALL_INCLUDEDIR} CACHE PATH "Installation directory for header files")
if(WIN32 AND NOT CYGWIN)
set(DEF_INSTALL_CMAKEDIR CMake)
else()
set(DEF_INSTALL_CMAKEDIR share/cmake/${PROJECT_NAME})
endif()
set(INSTALL_CMAKEDIR ${DEF_INSTALL_CMAKEDIR} CACHE PATH "Installation directory for CMake files")
# Report to user
foreach(p LIB BIN INCLUDE CMAKE)
file(TO_NATIVE_PATH ${CMAKE_INSTALL_PREFIX}/${INSTALL_${p}DIR} _path )
message(STATUS "Installing ${p} components to ${_path}")
unset(_path)
endforeach()
add_subdirectory(src)
enable_testing()
add_subdirectory(tests)
We now move on to analyze the src/CMakeLists.txt leaf. This file defines the actual targets to build:
# Search for pkg-config and UUID
find_package(PkgConfig QUIET)
if(PKG_CONFIG_FOUND)
pkg_search_module(UUID uuid IMPORTED_TARGET)
if(TARGET PkgConfig::UUID)
message(STATUS "Found libuuid")
set(UUID_FOUND TRUE)
endif()
endif()
add_library(message-shared SHARED "")
target_sources(message-shared
PRIVATE
${CMAKE_CURRENT_LIST_DIR}/Message.cpp
)
target_compile_definitions(message-shared
PUBLIC
$<$<BOOL:${UUID_FOUND}>:HAVE_UUID>
)
target_link_libraries(message-shared
PUBLIC
$<$<BOOL:${UUID_FOUND}>:PkgConfig::UUID>
)
set_target_properties(message-shared
PROPERTIES
POSITION_INDEPENDENT_CODE 1
SOVERSION ${PROJECT_VERSION_MAJOR}
OUTPUT_NAME "message"
DEBUG_POSTFIX "_d"
PUBLIC_HEADER "Message.hpp"
MACOSX_RPATH ON
WINDOWS_EXPORT_ALL_SYMBOLS ON
)
add_executable(hello-world_wDSO hello-world.cpp)
target_link_libraries(hello-world_wDSO
PUBLIC
message-shared
)
The src/CMakeLists.txt file contains also the installation directives. Before considering these, we need to fix the RPATH for our executable:
# Prepare RPATH
file(RELATIVE_PATH _rel ${CMAKE_INSTALL_PREFIX}/${INSTALL_BINDIR} ${CMAKE_INSTALL_PREFIX})
if(APPLE)
set(_rpath "@loader_path/${_rel}")
else()
set(_rpath "\$ORIGIN/${_rel}")
endif()
file(TO_NATIVE_PATH "${_rpath}/${INSTALL_LIBDIR}" message_RPATH)
set_target_properties(hello-world_wDSO
PROPERTIES
MACOSX_RPATH ON
SKIP_BUILD_RPATH OFF
BUILD_WITH_INSTALL_RPATH OFF
INSTALL_RPATH "${message_RPATH}"
INSTALL_RPATH_USE_LINK_PATH ON
)
install(
TARGETS
message-shared
hello-world_wDSO
ARCHIVE
DESTINATION ${INSTALL_LIBDIR}
COMPONENT lib
RUNTIME
DESTINATION ${INSTALL_BINDIR}
COMPONENT bin
LIBRARY
DESTINATION ${INSTALL_LIBDIR}
COMPONENT lib
PUBLIC_HEADER
DESTINATION ${INSTALL_INCLUDEDIR}/message
COMPONENT dev
)
The CMakeLists.txt file in the tests directory contains simple directives to ensure that the "Hello, World" executable runs correctly:
add_test(
NAME test_shared
COMMAND $<TARGET_FILE:hello-world_wDSO>
)
Let us now configure, build, and install the project and look at the result. As soon as any installation directives are added, CMake generates a new target called install that will run the installation rules:
$ mkdir -p build
$ cd build
$ cmake -G"Unix Makefiles" -DCMAKE_INSTALL_PREFIX=$HOME/Software/recipe-01
$ cmake --build . --target install
The contents of the build directory on GNU/Linux will be the following:
build
├── bin
│ └── hello-world_wDSO
├── CMakeCache.txt
├── CMakeFiles
├── cmake_install.cmake
├── CTestTestfile.cmake
├── install_manifest.txt
├── lib64
│ ├── libmessage.so -> libmessage.so.1
│ └── libmessage.so.1
├── Makefile
├── src
├── Testing
└── tests
One the other hand, at the install prefix, you can find the following structure:
$HOME/Software/recipe-01/
├── bin
│ └── hello-world_wDSO
├── include
│ └── message
│ └── Message.hpp
└── lib64
├── libmessage.so -> libmessage.so.1
└── libmessage.so.1
This means that the locations given in the installation directives are relative to the CMAKE_INSTALL_PREFIX instance given by the user.
There are three salient points to this recipe that we need to discuss in more detail:
What is a good layout for the installation of your project? As long as you are the only consumer of your project, this question only has limited relevance. However, as soon as you start shipping to the outside world, it will be expected that you provide a sensible layout when installing your project. Fortunately, there are standards that we can adhere to and CMake can help us with that. Effectively, what the GNUInstallDirs.cmake module does is to define a set of variables. These variables are the names of the subdirectories where different types of files should be installed. In our example we used the following:
The user might, however, want to override these choices. We allowed for that with the following stanza in the root CMakeLists.txt file:
# Offer the user the choice of overriding the installation directories
set(INSTALL_LIBDIR ${CMAKE_INSTALL_LIBDIR} CACHE PATH "Installation directory for libraries")
set(INSTALL_BINDIR ${CMAKE_INSTALL_BINDIR} CACHE PATH "Installation directory for executables")
set(INSTALL_INCLUDEDIR ${CMAKE_INSTALL_INCLUDEDIR} CACHE PATH "Installation directory for header files")
This effectively redefines the INSTALL_BINDIR, INSTALL_LIBDIR, and INSTALL_INCLUDEDIR convenience variables to be used within our project. We also define the additional INSTALL_CMAKEDIR variable, but its role will be discussed in detail in the next few recipes.
Let us have a closer look at the properties set on the shared library target. We had to set the following:
Let us now discuss RPATH. We are linking our hello-world_wDSO executable to libmessage.so.1. This means that when the executable is called, the shared library will be loaded. Thus the information on the location of the library needs to be encoded somewhere in order for the loader to do its job successfully. There are two approaches regarding the location of the library:
The latter approach is preferable and more robust. However, which path should be chosen when setting the RPATH of the dynamic shared object? We need to make sure that running the executable always finds the correct shared library, regardless of whether it is run in the build tree or in the install tree. This is achieved by setting the RPATH related properties for the hello-world_wDSO target to look for a path relative to the location of the executable itself, either via the $ORIGIN (on GNU/Linux) or @loader_path (on macOS) variables:
# Prepare RPATH
file(RELATIVE_PATH _rel ${CMAKE_INSTALL_PREFIX}/${INSTALL_BINDIR} ${CMAKE_INSTALL_PREFIX})
if(APPLE)
set(_rpath "@loader_path/${_rel}")
else()
set(_rpath "\$ORIGIN/${_rel}")
endif()
file(TO_NATIVE_PATH "${_rpath}/${INSTALL_LIBDIR}" message_RPATH)
Once the message_RPATH variable is set, the target properties will do the rest of the job:
set_target_properties(hello-world_wDSO
PROPERTIES
MACOSX_RPATH ON
SKIP_BUILD_RPATH OFF
BUILD_WITH_INSTALL_RPATH OFF
INSTALL_RPATH "${message_RPATH}"
INSTALL_RPATH_USE_LINK_PATH ON
)
Let us examine this command in detail:
Finally, let us consider the installation directives. We need to install an executable, one library, and one header file. Executables and libraries are build targets, so we use the TARGETS option to the install command. Install rules for multiple targets can be set at once: CMake is aware of what kind of targets they are; that is, whether they are executables, shared libraries, or static libraries:
install(
TARGETS
message-shared
hello-world_wDSO
Executables will be installed in RUNTIME DESTINATION, which we set to ${INSTALL_BINDIR}. Shared libraries are installed to LIBRARY DESTINATION, which we set to ${INSTALL_LIBDIR}. Static libraries would be installed to ARCHIVE DESTINATION, which we also set to ${INSTALL_LIBDIR}:
ARCHIVE
DESTINATION ${INSTALL_LIBDIR}
COMPONENT lib
RUNTIME
DESTINATION ${INSTALL_BINDIR}
COMPONENT bin
LIBRARY
DESTINATION ${INSTALL_LIBDIR}
COMPONENT lib
Note that we not only specified DESTINATION, but also COMPONENT. When installing the project with the cmake --build . --target install command, all components were installed, as expected. However, it might be sometimes desirable to only install some of them. This is what the COMPONENT keyword can help us with. For example, to only install libraries, we can run the following:
$ cmake -D COMPONENT=lib -P cmake_install.cmake
Since the Message.hpp header file was set as a public header of the project, we can use the PUBLIC_HEADER keyword to install it along the other targets to the chosen destination: ${INSTALL_INCLUDEDIR}/message. Users of the library can now include the header with: #include <message/Message.hpp>, provided the proper location is passed to the compiler with the -I option.
The various destinations in the installation directives are interpreted as relative paths, unless an absolute path is used. But relative to what? There are different ways in which CMake can compute the absolute path, depending on what tool is triggering the installation. When using cmake --build . --target install, as we have done, paths will be computed relative to CMAKE_INSTALL_PREFIX. However, when using CPack, absolute paths will be computed relative to CPACK_PACKAGING_INSTALL_PREFIX. Usage of CPack will be shown in Chapter 11, Packaging Projects, Recipe 1, Generating source and binary packages.
Setting the RPATH correctly can be rather tricky, but it is essential for third-party users. By default, CMake sets the RPATH of executables assuming they will be run from the build tree. However, upon installation, the RPATH is cleared, leading to trouble when a user would like to run hello-world_wDSO. Using the ldd tool on Linux, we can inspect the hello-world_wDSO executable in the build tree to see where the loader will look for libmessage.so:
libmessage.so.1 => /home/user/cmake-cookbook/chapter-10/recipe-01/cxx-example/build/lib64/libmessage.so.1 (0x00007f7a92e44000)
Running ldd hello-world_wDSO in the installation prefix would result instead in the following:
libmessage.so.1 => Not found
This is clearly wrong. However, it would be equally wrong to always hardcode the RPATH to point to the build tree or to the installation prefix: any of the two locations could be erased resulting in corrupted executables. The solution presented here sets the RPATH differently for the executable in the build tree and in the installation prefix, so that it will always point to where "it makes sense"; that is, as close to the executable as possible. Running ldd in the build tree shows the same output:
libmessage.so.1 => /home/roberto/Workspace/robertodr/cmake-cookbook/chapter-10/recipe-01/cxx-example/build/lib64/libmessage.so.1 (0x00007f7a92e44000)
On the other hand, in the installation prefix, we now get the following:
libmessage.so.1 => /home/roberto/Software/ch10r01/bin/../lib64/libmessage.so.1 (0x00007fbd2a725000)
We have used the CMake install command with the TARGETS signature, since we needed to install build targets. The command has, however, four additional signatures:
Let us imagine that the small library that we have introduced has become hugely popular, with many people using it. However, some clients would also like a static library to be available with the installation. Other clients have noticed that all symbols are visible in the shared library. Best practices dictate that shared libraries only expose the minimal amount of symbols, thus limiting the visibility to the outside world of objects and functions defined in the code. We want to make sure that by default all symbols defined in our shared library are hidden from the outside world. This will force contributors to the project to clearly delimit the interface between the library and external codes, since they will have to explicit mark all symbols that also meant to be used outside of the project. As such, we wish to do the following:
Recipe 3, Building and linking static and shared libraries, in Chapter 1, From a Simple Executable to Libraries, already showed that CMake offers functionality to achieve the first point in a platform-independent way. We did not, however, address the issue of symbol visibility. We will revisit both points with the present recipe.
We will still use mostly the same code as in the previous recipe, but we will need to modify src/CMakeLists.txt and the Message.hpp header file. The latter will include the new, autogenerated header file, messageExport.h:
#pragma once
#include <iosfwd>
#include <string>
#include "messageExport.h"
class message_EXPORT Message {
public:
Message(const std::string &m) : message_(m) {}
friend std::ostream &operator<<(std::ostream &os, Message &obj) {
return obj.printObject(os);
}
private:
std::string message_;
std::ostream &printObject(std::ostream &os);
};
std::string getUUID();
The message_EXPORT preprocessor directive was introduced in the declaration of the Message class. This directive will let the compiler generate symbols that are visible to the users of the library.
Apart from the name of the project, the root CMakeLists.txt file is unchanged. Let us first look at the CMakeLists.txt file in the src subdirectory, where all the additional work actually happens. We will highlight the changes with respect to the file in the previous recipe:
add_library(message-shared SHARED "")
target_sources(message-shared
PRIVATE
${CMAKE_CURRENT_LIST_DIR}/Message.cpp
)
target_compile_definitions(message-shared
PUBLIC
$<$<BOOL:${UUID_FOUND}>:HAVE_UUID>
)
target_link_libraries(message-shared
PUBLIC
$<$<BOOL:${UUID_FOUND}>:PkgConfig::UUID>
)
set_target_properties(message-shared
PROPERTIES
POSITION_INDEPENDENT_CODE 1
CXX_VISIBILITY_PRESET hidden
VISIBILITY_INLINES_HIDDEN 1
SOVERSION ${PROJECT_VERSION_MAJOR}
OUTPUT_NAME "message"
DEBUG_POSTFIX "_d"
PUBLIC_HEADER "Message.hpp;${CMAKE_BINARY_DIR}/${INSTALL_INCLUDEDIR}/messageExport.h"
MACOSX_RPATH ON
)
include(GenerateExportHeader)
generate_export_header(message-shared
BASE_NAME "message"
EXPORT_MACRO_NAME "message_EXPORT"
EXPORT_FILE_NAME "${CMAKE_BINARY_DIR}/${INSTALL_INCLUDEDIR}/messageExport.h"
DEPRECATED_MACRO_NAME "message_DEPRECATED"
NO_EXPORT_MACRO_NAME "message_NO_EXPORT"
STATIC_DEFINE "message_STATIC_DEFINE"
NO_DEPRECATED_MACRO_NAME "message_NO_DEPRECATED"
DEFINE_NO_DEPRECATED
)
target_include_directories(message-shared
PUBLIC
${CMAKE_BINARY_DIR}/${INSTALL_INCLUDEDIR}
)
Now we can turn our attention to the generation of the static library:
add_library(message-static STATIC "")
target_sources(message-static
PRIVATE
${CMAKE_CURRENT_LIST_DIR}/Message.cpp
)
target_compile_definitions(message-static
PUBLIC
message_STATIC_DEFINE
$<$<BOOL:${UUID_FOUND}>:HAVE_UUID>
)
target_include_directories(message-static
PUBLIC
${CMAKE_BINARY_DIR}/${INSTALL_INCLUDEDIR}
)
target_link_libraries(message-static
PUBLIC
$<$<BOOL:${UUID_FOUND}>:PkgConfig::UUID>
)
set_target_properties(message-static
PROPERTIES
POSITION_INDEPENDENT_CODE 1
ARCHIVE_OUTPUT_NAME "message"
DEBUG_POSTFIX "_sd"
RELEASE_POSTFIX "_s"
PUBLIC_HEADER "Message.hpp;${CMAKE_BINARY_DIR}/${INSTALL_INCLUDEDIR}/messageExport.h"
)
add_executable(hello-world_wAR hello-world.cpp)
target_link_libraries(hello-world_wAR
PUBLIC
message-static
)
install(
TARGETS
message-shared
message-static
hello-world_wDSO
hello-world_wAR
ARCHIVE
DESTINATION ${INSTALL_LIBDIR}
COMPONENT lib
RUNTIME
DESTINATION ${INSTALL_BINDIR}
COMPONENT bin
LIBRARY
DESTINATION ${INSTALL_LIBDIR}
COMPONENT lib
PUBLIC_HEADER
DESTINATION ${INSTALL_INCLUDEDIR}/message
COMPONENT dev
)
This recipe demonstrates how to set the visibility of symbols for a shared library. The best practice is to keep all symbols hidden by default, explicitly exposing only those symbols that we want to be used by dependents on our library. This is achieved in two steps. First of all, we need to instruct the compiler to hide symbols. Of course, different compilers will have different options available, and directly setting these by hand in our CMakeLists.txt would not be cross-platform. CMake offers a robust and cross-platform way of setting symbol visibility by setting two properties on the shared library target:
On Windows, this is the default behavior. Recall, in fact, that we needed to override it in the previous recipe by setting the WINDOWS_EXPORT_ALL_SYMBOLS property to ON.
How do we mark the symbols we want to be visible? This is determined by the preprocessor, and we thus need to provide preprocessor macros that expand to visibility attributes that the given compiler on the chosen platform will understand. Once again, CMake comes to the rescue with the GenerateExportHeader.cmake module file. This module defines the generate_export_header function, which we invoked as follows:
include(GenerateExportHeader)
generate_export_header(message-shared
BASE_NAME "message"
EXPORT_MACRO_NAME "message_EXPORT"
EXPORT_FILE_NAME "${CMAKE_BINARY_DIR}/${INSTALL_INCLUDEDIR}/messageExport.h"
DEPRECATED_MACRO_NAME "message_DEPRECATED"
NO_EXPORT_MACRO_NAME "message_NO_EXPORT"
STATIC_DEFINE "message_STATIC_DEFINE"
NO_DEPRECATED_MACRO_NAME "message_NO_DEPRECATED"
DEFINE_NO_DEPRECATED
)
The function generates the messageExport.h header file, which will contain the preprocessor macros needed. The file is generated in the directory ${CMAKE_BINARY_DIR}/${INSTALL_INCLUDEDIR}, as requested via the EXPORT_FILE_NAME option. If this option is left empty, the header file would be generated in the current binary directory. The first argument to this function is an existing target, message-shared in our case. Basic invocation of the function only requires passing the name of an existing target. Optional arguments, for fine-grained control of all of the generated macros, can also be passed:
On GNU/Linux and using the GNU compiler, CMake will generate the following messageExport.h export header:
#ifndef message_EXPORT_H
#define message_EXPORT_H
#ifdef message_STATIC_DEFINE
# define message_EXPORT
# define message_NO_EXPORT
#else
# ifndef message_EXPORT
# ifdef message_shared_EXPORTS
/* We are building this library */
# define message_EXPORT __attribute__((visibility("default")))
# else
/* We are using this library */
# define message_EXPORT __attribute__((visibility("default")))
# endif
# endif
# ifndef message_NO_EXPORT
# define message_NO_EXPORT __attribute__((visibility("hidden")))
# endif
#endif
#ifndef message_DEPRECATED
# define message_DEPRECATED __attribute__ ((__deprecated__))
#endif
#ifndef message_DEPRECATED_EXPORT
# define message_DEPRECATED_EXPORT message_EXPORT message_DEPRECATED
#endif
#ifndef message_DEPRECATED_NO_EXPORT
# define message_DEPRECATED_NO_EXPORT message_NO_EXPORT message_DEPRECATED
#endif
#if 1 /* DEFINE_NO_DEPRECATED */
# ifndef message_NO_DEPRECATED
# define message_NO_DEPRECATED
# endif
#endif
#endif
We can prepend the classes and functions to be exposed to users with the message_EXPORT macro. Deprecation can be achieved by prepending with the message_DEPRECATED macro.
The static library is built out of the same sources. However, all symbols are supposed to be visible in the static archive, and as can be seen from the contents of the messageExport.h header file, the message_STATIC_DEFINE macro comes to the rescue. Once the target has been declared, we set it as a compile definition. The additional target properties on the static library are as follows:
It is good practice to hide internal symbols when building a shared library. This means that the library shrinks in size, because what you expose to the user is less than what you have in the library. This defines the Application Binary Interface (ABI), which most of the time should coincide with the Application Programming Interface (API). This is done in two stages:
Static libraries are just archives of object files. Thus one compiles sources into object files and then the archiver bundles them into an archive. There is no notion of ABI: all symbols are visible by default and the visibility flags for the compiler do not affect static archiving. However, if you are going to build a shared and static library from the same source files, you need a way to give meaning to the message_EXPORT preprocessor variable that now appears in the code in both cases. This is where the GenerateExportHeader.cmake module comes in. It will define a header with all the logic for giving the proper definition of this preprocessor variable. For shared libraries, it will be what is needed by the given combination of platform and compiler. Note that the meaning will also change based on whether we are building or using the shared library. Fortunately, CMake takes care of this for us without further intervention. For static libraries, it will expand to an empty string doing what we expect: nothing.
The attentive reader will have noticed that building the static and shared libraries as shown here will actually require to compile the sources twice. This was not an expensive operation for our simple example, but it can clearly become quite onerous, even for projects that are only slightly bigger than our example. Why did we choose this approach over the one using OBJECT libraries shown in Recipe 3, Building and linking static and shared libraries, in Chapter 1, From a Simple Executable to Libraries? OBJECT libraries take care of the first step in compiling the library: from sources to object files. In that step, the preprocessor intervenes and will evaluate message_EXPORT. Since the compilation of OBJECT libraries happens once, message_EXPORT is either evaluated to a value compatible with building the shared or the static library. Thus to avoid ambiguities, we chose the more robust approach of compiling twice, letting the preprocessor evaluate the visibility variable correctly.
We can imagine that our message library has been a huge success in the open source community. People like it a lot and use it in their own projects to print their messages to screen. Users particularly like the fact that each printed message gets a unique identifier. But users would also like the library to be more easily discoverable, once they compile and install it on their systems. This recipe will show how CMake can let us export our targets so that other projects using CMake can pick them up easily.
The source code is unchanged with respect to the previous recipe and the structure of the project is as follows:
.
├── cmake
│ └── messageConfig.cmake.in
├── CMakeLists.txt
├── src
│ ├── CMakeLists.txt
│ ├── hello-world.cpp
│ ├── Message.cpp
│ └── Message.hpp
└── tests
├── CMakeLists.txt
└── use_target
├── CMakeLists.txt
└── use_message.cpp
Notice that we have added a cmake subdirectory containing a messageConfig.cmake.in file. This file will contain our exported targets. We have also added a test to check whether the installation and export of the project work as intended.
Once again, the root CMakeLists.txt file is unchanged with respect to the previous recipe. Moving onto the leaf directory src containing our sources:
# Search for pkg-config and UUID
find_package(PkgConfig QUIET)
if(PKG_CONFIG_FOUND)
pkg_search_module(UUID uuid IMPORTED_TARGET)
if(TARGET PkgConfig::UUID)
message(STATUS "Found libuuid")
set(UUID_FOUND TRUE)
endif()
endif()
add_library(message-shared SHARED "")
include(GenerateExportHeader)
generate_export_header(message-shared
BASE_NAME "message"
EXPORT_MACRO_NAME "message_EXPORT"
EXPORT_FILE_NAME "${CMAKE_BINARY_DIR}/${INSTALL_INCLUDEDIR}/messageExport.h"
DEPRECATED_MACRO_NAME "message_DEPRECATED"
NO_EXPORT_MACRO_NAME "message_NO_EXPORT"
STATIC_DEFINE "message_STATIC_DEFINE"
NO_DEPRECATED_MACRO_NAME "message_NO_DEPRECATED"
DEFINE_NO_DEPRECATED
)
target_sources(message-shared
PRIVATE
${CMAKE_CURRENT_LIST_DIR}/Message.cpp
)
target_compile_definitions(message-shared
PUBLIC
$<$<BOOL:${UUID_FOUND}>:HAVE_UUID>
INTERFACE
$<INSTALL_INTERFACE:USING_message>
)
target_include_directories(message-shared
PUBLIC
$<BUILD_INTERFACE:${CMAKE_BINARY_DIR}/${INSTALL_INCLUDEDIR}>
$<INSTALL_INTERFACE:${INSTALL_INCLUDEDIR}>
)
target_link_libraries(message-shared
PUBLIC
$<$<BOOL:${UUID_FOUND}>:PkgConfig::UUID>
)
set_target_properties(message-shared
PROPERTIES
POSITION_INDEPENDENT_CODE 1
CXX_VISIBILITY_PRESET hidden
VISIBILITY_INLINES_HIDDEN 1
SOVERSION ${PROJECT_VERSION_MAJOR}
OUTPUT_NAME "message"
DEBUG_POSTFIX "_d"
PUBLIC_HEADER "Message.hpp;${CMAKE_BINARY_DIR}/${INSTALL_INCLUDEDIR}/messageExport.h"
MACOSX_RPATH ON
)
The same is done for the message-static library target:
add_library(message-static STATIC "")
target_sources(message-static
PRIVATE
${CMAKE_CURRENT_LIST_DIR}/Message.cpp
)
target_compile_definitions(message-static
PUBLIC
message_STATIC_DEFINE
$<$<BOOL:${UUID_FOUND}>:HAVE_UUID>
INTERFACE
$<INSTALL_INTERFACE:USING_message>
)
target_include_directories(message-static
PUBLIC
$<BUILD_INTERFACE:${CMAKE_BINARY_DIR}/${INSTALL_INCLUDEDIR}>
$<INSTALL_INTERFACE:${INSTALL_INCLUDEDIR}>
)
target_link_libraries(message-static
PUBLIC
$<$<BOOL:${UUID_FOUND}>:PkgConfig::UUID>
)
set_target_properties(message-static
PROPERTIES
POSITION_INDEPENDENT_CODE 1
ARCHIVE_OUTPUT_NAME "message"
DEBUG_POSTFIX "_sd"
RELEASE_POSTFIX "_s"
PUBLIC_HEADER "Message.hpp;${CMAKE_BINARY_DIR}/${INSTALL_INCLUDEDIR}/messageExport.h"
)
add_executable(hello-world_wDSO hello-world.cpp)
target_link_libraries(hello-world_wDSO
PUBLIC
message-shared
)
# Prepare RPATH
file(RELATIVE_PATH _rel ${CMAKE_INSTALL_PREFIX}/${INSTALL_BINDIR} ${CMAKE_INSTALL_PREFIX})
if(APPLE)
set(_rpath "@loader_path/${_rel}")
else()
set(_rpath "\$ORIGIN/${_rel}")
endif()
file(TO_NATIVE_PATH "${_rpath}/${INSTALL_LIBDIR}" message_RPATH)
set_target_properties(hello-world_wDSO
PROPERTIES
MACOSX_RPATH ON
SKIP_BUILD_RPATH OFF
BUILD_WITH_INSTALL_RPATH OFF
INSTALL_RPATH "${message_RPATH}"
INSTALL_RPATH_USE_LINK_PATH ON
)
add_executable(hello-world_wAR hello-world.cpp)
target_link_libraries(hello-world_wAR
PUBLIC
message-static
)
We are now ready to look at the installation rules:
install(
TARGETS
message-shared
message-static
hello-world_wDSO
hello-world_wAR
EXPORT
messageTargets
ARCHIVE
DESTINATION ${INSTALL_LIBDIR}
COMPONENT lib
RUNTIME
DESTINATION ${INSTALL_BINDIR}
COMPONENT bin
LIBRARY
DESTINATION ${INSTALL_LIBDIR}
COMPONENT lib
PUBLIC_HEADER
DESTINATION ${INSTALL_INCLUDEDIR}/message
COMPONENT dev
)
install(
EXPORT
messageTargets
NAMESPACE
"message::"
DESTINATION
${INSTALL_CMAKEDIR}
COMPONENT
dev
)
include(CMakePackageConfigHelpers)
write_basic_package_version_file(
${CMAKE_CURRENT_BINARY_DIR}/messageConfigVersion.cmake
VERSION ${PROJECT_VERSION}
COMPATIBILITY SameMajorVersion
)
configure_package_config_file(
${PROJECT_SOURCE_DIR}/cmake/messageConfig.cmake.in
${CMAKE_CURRENT_BINARY_DIR}/messageConfig.cmake
INSTALL_DESTINATION ${INSTALL_CMAKEDIR}
)
install(
FILES
${CMAKE_CURRENT_BINARY_DIR}/messageConfig.cmake
${CMAKE_CURRENT_BINARY_DIR}/messageConfigVersion.cmake
DESTINATION
${INSTALL_CMAKEDIR}
)
What are the contents of the cmake/messageConfig.cmake.in template file? The header of this file serves as documentation for its users. Let us look at the actual CMake commands:
@PACKAGE_INIT@
include("${CMAKE_CURRENT_LIST_DIR}/messageTargets.cmake")
check_required_components(
"message-shared"
"message-static"
"message-hello-world_wDSO"
"message-hello-world_wAR"
)
if(NOT WIN32)
if(NOT TARGET PkgConfig::UUID)
find_package(PkgConfig REQUIRED QUIET)
pkg_search_module(UUID REQUIRED uuid IMPORTED_TARGET)
endif()
endif()
Let us try this out:
$ mkdir -p build
$ cd build
$ cmake -DCMAKE_INSTALL_PREFIX=$HOME/Software/recipe-03 ..
$ cmake --build . --target install
The install tree has the following structure:
$HOME/Software/recipe-03/
├── bin
│ ├── hello-world_wAR
│ └── hello-world_wDSO
├── include
│ └── message
│ ├── messageExport.h
│ └── Message.hpp
├── lib64
│ ├── libmessage_s.a
│ ├── libmessage.so -> libmessage.so.1
│ └── libmessage.so.1
└── share
└── cmake
└── recipe-03
├── messageConfig.cmake
├── messageConfigVersion.cmake
├── messageTargets.cmake
└── messageTargets-release.cmake
You will notice that a share subdirectory has appeared and it contains all the files that we have asked CMake to autogenerate. From now on, the users of our message library will be able to locate the message library by doing this in their own CMakeLists.txt file, provided that they set the message_DIR CMake variable to point to the share/cmake/message directory in the install tree:
find_package(message 1 CONFIG REQUIRED)
This recipe has covered a lot of ground; let us make sense of it. CMake targets are a very useful abstraction for the operations that the build system will perform. Using the PRIVATE, PUBLIC, and INTERFACE keywords, we can set how targets within the same project will interact with each other. In practice, this lets us define how dependencies of target A will affect target B, which depends on A. The full power of this mechanism can be appreciated when other projects want to use a library as a dependency. If the proper CMake configuration files are made available by the library maintainers, then all dependencies can be easily resolved with very few CMake commands.
This problem can be solved by following the pattern outlined in the recipe for the message-static, message-shared, hello-world_wDSO, and hello-world_wAR targets. We will analyze the CMake commands for the message-shared target alone, but the discussion here is general:
if(WIN32 AND NOT CYGWIN)
set(DEF_INSTALL_CMAKEDIR CMake)
else()
set(DEF_INSTALL_CMAKEDIR share/cmake/${PROJECT_NAME})
endif()
set(INSTALL_CMAKEDIR ${DEF_INSTALL_CMAKEDIR} CACHE PATH "Installation directory for CMake files")
The final part of our CMakeLists.txt generates the configuration files. After including the CMakePackageConfigHelpers.cmake module, this is done in three steps:
Clients of the message library are now very happy since they can finally install the library on their system and have CMake discover it for them with minimal modifications to their own CMakeLists.txt:
find_package(message VERSION 1 REQUIRED)
Clients can now configure their project with the following:
$ cmake -Dmessage_DIR=/path/to/message/share/cmake/message ..
The tests included with our example show how to check that the installation of the targets went according to plan. Looking at the structure of the tests folder we notice the use_target subdirectory:
tests/
├── CMakeLists.txt
└── use_target
├── CMakeLists.txt
└── use_message.cpp
This directory contains a small project that uses the exported targets. The interesting part is in the CMakeLists.txt file specifying the tests:
add_test(
NAME use-target_configure
COMMAND
${CMAKE_COMMAND} -H${CMAKE_CURRENT_LIST_DIR}/use_target
-B${CMAKE_CURRENT_BINARY_DIR}/build_use-target
-G${CMAKE_GENERATOR}
-Dmessage_DIR=${CMAKE_INSTALL_PREFIX}/${
INSTALL_CMAKEDIR}
-DCMAKE_BUILD_TYPE=$<CONFIGURATION>
)
set_tests_properties(use-target_configure
PROPERTIES
FIXTURES_SETUP use-target
)
add_test(
NAME use-target_build
COMMAND
${CMAKE_COMMAND} --build ${CMAKE_CURRENT_BINARY_DIR}/build_use-target
--config $<CONFIGURATION>
)
set_tests_properties(use-target_build
PROPERTIES
FIXTURES_REQUIRED use-target
)
set(_test_target)
if(MSVC)
set(_test_target "RUN_TESTS")
else()
set(_test_target "test")
endif()
add_test(
NAME use-target_test
COMMAND
${CMAKE_COMMAND} --build ${CMAKE_CURRENT_BINARY_DIR}/build_use-target
--target ${_test_target}
--config $<CONFIGURATION>
)
set_tests_properties(use-target_test
PROPERTIES
FIXTURES_REQUIRED use-target
)
unset(_test_target)
add_test(
NAME use-target_cleanup
COMMAND
${CMAKE_COMMAND} -E remove_directory ${CMAKE_CURRENT_BINARY_DIR}/build_use-target
)
set_tests_properties(use-target_cleanup
PROPERTIES
FIXTURES_CLEANUP use-target
)
Note that these tests can only be run after the project has been installed.
Our example message library has become a huge success, and many other programmers use it and are very happy with it. You want to use it in your own project too, but are unsure how to manage the dependency properly. You could ship the source code for the message library with your own code, but what if the library is already installed on the system? Chapter 8, The Superbuild Pattern, showed that this is a typical scenario for a superbuild, but you are unsure on how to install such a project. This recipe will walk you through the details of installing a superbuild.
This recipe will build a simple executable linking against the message library. The layout of the project is as follows:
├── cmake
│ ├── install_hook.cmake.in
│ └── print_rpath.py
├── CMakeLists.txt
├── external
│ └── upstream
│ ├── CMakeLists.txt
│ └── message
│ └── CMakeLists.txt
└── src
├── CMakeLists.txt
└── use_message.cpp
The main CMakeLists.txt file coordinates the superbuild. The external subdirectory contains CMake instructions to handle the dependencies. The cmake subdirectory contains a Python script and a template CMake script. These will be used to fine-tune the installation, the CMake script being first configured and then executed to call the Python script to print the RPATH for the installed use_message executable:
import shlex
import subprocess
import sys
def main():
patcher = sys.argv[1]
elfobj = sys.argv[2]
tools = {'patchelf': '--print-rpath', 'chrpath': '--list', 'otool': '-L'}
if patcher not in tools.keys():
raise RuntimeError('Unknown tool {}'.format(patcher))
cmd = shlex.split('{:s} {:s} {:s}'.format(patcher, tools[patcher], elfobj))
rpath = subprocess.run(
cmd,
bufsize=1,
stdout=subprocess.PIPE,
stderr=subprocess.PIPE,
universal_newlines=True)
print(rpath.stdout)
if __name__ == "__main__":
main()
Printing the RPATH can easily be done with platform-native tools that we will discuss later on in this recipe.
Finally, the src subdirectory contains the CMakeLists.txt and source file for the actual project we want to compile. The use_message.cpp source file contains the following:
#include <cstdlib>
#include <iostream>
#ifdef USING_message
#include <message/Message.hpp>
void messaging() {
Message say_hello("Hello, World! From a client of yours!");
std::cout << say_hello << std::endl;
Message say_goodbye("Goodbye, World! From a client of yours!");
std::cout << say_goodbye << std::endl;
}
#else
void messaging() {
std::cout << "Hello, World! From a client of yours!" << std::endl;
std::cout << "Goodbye, World! From a client of yours!" << std::endl;
}
#endif
int main() {
messaging();
return EXIT_SUCCESS;
}
We will start by looking at the root CMakeLists.txt file, which is coordinating the superbuild:
cmake_minimum_required(VERSION 3.6 FATAL_ERROR)
project(recipe-04
LANGUAGES CXX
VERSION 1.0.0
)
# <<< General set up >>>
set(CMAKE_CXX_STANDARD 11)
set(CMAKE_CXX_EXTENSIONS OFF)
set(CMAKE_CXX_STANDARD_REQUIRED ON)
if(NOT CMAKE_BUILD_TYPE)
set(CMAKE_BUILD_TYPE Release CACHE STRING "Build type" FORCE)
endif()
message(STATUS "Build type set to ${CMAKE_BUILD_TYPE}")
message(STATUS "Project will be installed to ${CMAKE_INSTALL_PREFIX}")
include(GNUInstallDirs)
set(CMAKE_ARCHIVE_OUTPUT_DIRECTORY
${PROJECT_BINARY_DIR}/${CMAKE_INSTALL_LIBDIR})
set(CMAKE_LIBRARY_OUTPUT_DIRECTORY
${PROJECT_BINARY_DIR}/${CMAKE_INSTALL_LIBDIR})
set(CMAKE_RUNTIME_OUTPUT_DIRECTORY
${PROJECT_BINARY_DIR}/${CMAKE_INSTALL_BINDIR})
# Offer the user the choice of overriding the installation directories
set(INSTALL_LIBDIR ${CMAKE_INSTALL_LIBDIR} CACHE PATH "Installation directory for libraries")
set(INSTALL_BINDIR ${CMAKE_INSTALL_BINDIR} CACHE PATH "Installation directory for executables")
set(INSTALL_INCLUDEDIR ${CMAKE_INSTALL_INCLUDEDIR} CACHE PATH "Installation directory for header files")
if(WIN32 AND NOT CYGWIN)
set(DEF_INSTALL_CMAKEDIR CMake)
else()
set(DEF_INSTALL_CMAKEDIR share/cmake/${PROJECT_NAME})
endif()
set(INSTALL_CMAKEDIR ${DEF_INSTALL_CMAKEDIR} CACHE PATH "Installation directory for CMake files")
# Report to user
foreach(p LIB BIN INCLUDE CMAKE)
file(TO_NATIVE_PATH ${CMAKE_INSTALL_PREFIX}/${INSTALL_${p}DIR} _path )
message(STATUS "Installing ${p} components to ${_path}")
unset(_path)
endforeach()
set_property(DIRECTORY PROPERTY EP_BASE ${CMAKE_BINARY_DIR}/subprojects)
set(STAGED_INSTALL_PREFIX ${CMAKE_BINARY_DIR}/stage)
message(STATUS "${PROJECT_NAME} staged install: ${STAGED_INSTALL_PREFIX}")
add_subdirectory(external/upstream)
include(ExternalProject)
ExternalProject_Add(${PROJECT_NAME}_core
DEPENDS
message_external
SOURCE_DIR
${CMAKE_CURRENT_SOURCE_DIR}/src
CMAKE_ARGS
-DCMAKE_INSTALL_PREFIX=${STAGED_INSTALL_PREFIX}
-DCMAKE_BUILD_TYPE=${CMAKE_BUILD_TYPE}
-DCMAKE_CXX_COMPILER=${CMAKE_CXX_COMPILER}
-DCMAKE_CXX_FLAGS=${CMAKE_CXX_FLAGS}
-DCMAKE_CXX_STANDARD=${CMAKE_CXX_STANDARD}
-DCMAKE_CXX_EXTENSIONS=${CMAKE_CXX_EXTENSIONS}
-DCMAKE_CXX_STANDARD_REQUIRED=${CMAKE_CXX_STANDARD_REQUIRED}
-Dmessage_DIR=${message_DIR}
CMAKE_CACHE_ARGS
-DCMAKE_PREFIX_PATH:PATH=${CMAKE_PREFIX_PATH}
BUILD_ALWAYS
1
)
enable_testing()
add_test(
NAME
check_use_message
COMMAND
${STAGED_INSTALL_PREFIX}/${INSTALL_BINDIR}/use_message
)
install(
DIRECTORY
${STAGED_INSTALL_PREFIX}/
DESTINATION
.
USE_SOURCE_PERMISSIONS
)
if(UNIX)
set(PRINT_SCRIPT "${CMAKE_CURRENT_LIST_DIR}/cmake/print_rpath.py")
configure_file(cmake/install_hook.cmake.in install_hook.cmake @ONLY)
install(
SCRIPT
${CMAKE_CURRENT_BINARY_DIR}/install_hook.cmake
)
endif()
You will have noticed that -Dmessage_DIR=${message_DIR} has been passed as a CMake argument to our own project. This will correctly set the location of the message library dependency. The value of message_DIR is defined in the CMakeLists.txt file under the external/upstream/message directory. This file handles the dependency on the message library – let us see how:
find_package(message 1 CONFIG QUIET)
if(message_FOUND)
get_property(_loc TARGET message::message-shared PROPERTY LOCATION)
message(STATUS "Found message: ${_loc} (found version ${message_VERSION})")
add_library(message_external INTERFACE) # dummy
else()
include(ExternalProject)
message(STATUS "Suitable message could not be located, Building message instead.")
ExternalProject_Add(message_external
GIT_REPOSITORY
https://github.com/dev-cafe/message.git
GIT_TAG
master
UPDATE_COMMAND
""
CMAKE_ARGS
-DCMAKE_INSTALL_PREFIX=${STAGED_INSTALL_PREFIX}
-DCMAKE_BUILD_TYPE=${CMAKE_BUILD_TYPE}
-DCMAKE_CXX_COMPILER=${CMAKE_CXX_COMPILER}
CMAKE_CACHE_ARGS
-DCMAKE_CXX_FLAGS:STRING=${CMAKE_CXX_FLAGS}
TEST_AFTER_INSTALL
1
DOWNLOAD_NO_PROGRESS
1
LOG_CONFIGURE
1
LOG_BUILD
1
LOG_INSTALL
1
)
if(WIN32 AND NOT CYGWIN)
set(DEF_message_DIR ${STAGED_INSTALL_PREFIX}/CMake)
else()
set(DEF_message_DIR ${STAGED_INSTALL_PREFIX}/share/cmake/message)
endif()
file(TO_NATIVE_PATH "${DEF_message_DIR}" DEF_message_DIR)
set(message_DIR ${DEF_message_DIR}
CACHE PATH "Path to internally built messageConfig.cmake" FORCE)
endif()
We are finally ready to compile our own project and successfully link it against the message library, be it already available on the system or freshly built for the purpose. Since this is a superbuild, the code under the src subdirectory is a fully standalone CMake project:
cmake_minimum_required(VERSION 3.6 FATAL_ERROR)
project(recipe-04_core
LANGUAGES CXX
)
set(CMAKE_CXX_STANDARD 11)
set(CMAKE_CXX_EXTENSIONS OFF)
set(CMAKE_CXX_STANDARD_REQUIRED ON)
include(GNUInstallDirs)
set(CMAKE_ARCHIVE_OUTPUT_DIRECTORY
${CMAKE_BINARY_DIR}/${CMAKE_INSTALL_LIBDIR})
set(CMAKE_LIBRARY_OUTPUT_DIRECTORY
${CMAKE_BINARY_DIR}/${CMAKE_INSTALL_LIBDIR})
set(CMAKE_RUNTIME_OUTPUT_DIRECTORY
${CMAKE_BINARY_DIR}/${CMAKE_INSTALL_BINDIR})
find_package(message 1 CONFIG REQUIRED)
get_property(_loc TARGET message::message-shared PROPERTY LOCATION)
message(STATUS "Found message: ${_loc} (found version ${message_VERSION})")
add_executable(use_message use_message.cpp)
target_link_libraries(use_message
PUBLIC
message::message-shared
)
# Prepare RPATH
file(RELATIVE_PATH _rel ${CMAKE_INSTALL_PREFIX}/${CMAKE_INSTALL_BINDIR} ${CMAKE_INSTALL_PREFIX})
if(APPLE)
set(_rpath "@loader_path/${_rel}")
else()
set(_rpath "\$ORIGIN/${_rel}")
endif()
file(TO_NATIVE_PATH "${_rpath}/${CMAKE_INSTALL_LIBDIR}" use_message_RPATH)
set_target_properties(use_message
PROPERTIES
MACOSX_RPATH ON
SKIP_BUILD_RPATH OFF
BUILD_WITH_INSTALL_RPATH OFF
INSTALL_RPATH "${use_message_RPATH}"
INSTALL_RPATH_USE_LINK_PATH ON
)
install(
TARGETS
use_message
RUNTIME
DESTINATION ${CMAKE_INSTALL_BINDIR}
COMPONENT bin
)
Let us now look at the contents of the install_hook.cmake.in template CMake script:
set(_executable ${CMAKE_INSTALL_PREFIX}/@INSTALL_BINDIR@/use_message)
set(_patcher)
list(APPEND _patchers chrpath patchelf otool)
foreach(p IN LISTS _patchers)
find_program(${p}_FOUND
NAMES
${p}
)
if(${p}_FOUND)
set(_patcher ${p})
message(STATUS "ELF patching tool ${_patcher} FOUND")
break()
endif()
endforeach()
if(NOT _patcher)
message(FATAL_ERROR "ELF patching tool NOT FOUND!\nPlease install one of chrpath, patchelf or otool")
find_package(PythonInterp REQUIRED QUIET)
execute_process(
COMMAND
${PYTHON_EXECUTABLE} @PRINT_SCRIPT@ "${_patcher}"
"${_executable}"
RESULT_VARIABLE _res
OUTPUT_VARIABLE _out
ERROR_VARIABLE _err
OUTPUT_STRIP_TRAILING_WHITESPACE
)
if(_res EQUAL 0)
message(STATUS "RPATH for ${_executable} is ${_out}")
else()
message(STATUS "Something went wrong!")
message(STATUS "Standard output from print_rpath.py: ${_out}")
message(STATUS "Standard error from print_rpath.py: ${_err}")
message(FATAL_ERROR "${_patcher} could NOT obtain RPATH for ${_executable}")
endif()
endif()
execute_process(
COMMAND ${_executable}
RESULT_VARIABLE _res
OUTPUT_VARIABLE _out
ERROR_VARIABLE _err
OUTPUT_STRIP_TRAILING_WHITESPACE
)
if(_res EQUAL 0)
message(STATUS "Running ${_executable}:\n ${_out}")
else()
message(STATUS "Something went wrong!")
message(STATUS "Standard output from running ${_executable}:\n ${_out}")
message(STATUS "Standard error from running ${_executable}:\n ${_err}")
message(FATAL_ERROR "Something went wrong with ${_executable}")
endif()
The superbuild is a very useful pattern in our CMake toolbox. It lets us manage complex projects by separating them into smaller, more manageable subprojects. In addition, we can use CMake as a package manager for the project we are building. CMake can search for our dependencies and, in case they are not found on the system, freshly build them for us. The basic pattern requires three CMakeLists.txt files:
We will first consider the configuration of the superbuild when the dependency on the message library is not already satisfied:
$ mkdir -p build
$ cd build
$ cmake -DCMAKE_INSTALL_PREFIX=$HOME/Software/recipe-04 ..
We will let CMake find the library for us, and this is the output we obtain:
-- The CXX compiler identification is GNU 7.3.0
-- Check for working CXX compiler: /nix/store/gqg2vrcq7krqi9rrl6pphvsg81sb8pjw-gcc-wrapper-7.3.0/bin/g++
-- Check for working CXX compiler: /nix/store/gqg2vrcq7krqi9rrl6pphvsg81sb8pjw-gcc-wrapper-7.3.0/bin/g++ -- works
-- Detecting CXX compiler ABI info
-- Detecting CXX compiler ABI info - done
-- Detecting CXX compile features
-- Detecting CXX compile features - done
-- Project will be installed to /home/roberto/Software/recipe-04
-- Build type set to Release
-- Installing LIB components to /home/roberto/Software/recipe-04/lib64
-- Installing BIN components to /home/roberto/Software/recipe-04/bin
-- Installing INCLUDE components to /home/roberto/Software/recipe-04/include
-- Installing CMAKE components to /home/roberto/Software/recipe-04/share/cmake/recipe-04
-- recipe-04 staged install: /home/roberto/Workspace/robertodr/cmake-cookbook/chapter-10/recipe-04/cxx-example/build/stage
-- Suitable message could not be located, Building message instead.
-- Configuring done
-- Generating done
-- Build files have been written to: /home/roberto/Workspace/robertodr/cmake-cookbook/chapter-10/recipe-04/cxx-example/build
As instructed, CMake reports the following:
If the library is already at a known location on the system, we can pass the
-Dmessage_DIR option to CMake:
$ cmake -DCMAKE_INSTALL_PREFIX=$HOME/Software/use_message -Dmessage_DIR=$HOME/Software/message/share/cmake/message ..
And, in fact, the library was found and imported. Only build operations for our own project will be performed:
-- The CXX compiler identification is GNU 7.3.0
-- Check for working CXX compiler: /nix/store/gqg2vrcq7krqi9rrl6pphvsg81sb8pjw-gcc-wrapper-7.3.0/bin/g++
-- Check for working CXX compiler: /nix/store/gqg2vrcq7krqi9rrl6pphvsg81sb8pjw-gcc-wrapper-7.3.0/bin/g++ -- works
-- Detecting CXX compiler ABI info
-- Detecting CXX compiler ABI info - done
-- Detecting CXX compile features
-- Detecting CXX compile features - done
-- Project will be installed to /home/roberto/Software/recipe-04
-- Build type set to Release
-- Installing LIB components to /home/roberto/Software/recipe-04/lib64
-- Installing BIN components to /home/roberto/Software/recipe-04/bin
-- Installing INCLUDE components to /home/roberto/Software/recipe-04/include
-- Installing CMAKE components to /home/roberto/Software/recipe-04/share/cmake/recipe-04
-- recipe-04 staged install: /home/roberto/Workspace/robertodr/cmake-cookbook/chapter-10/recipe-04/cxx-example/build/stage
-- Checking for one of the modules 'uuid'
-- Found message: /home/roberto/Software/message/lib64/libmessage.so.1 (found version 1.0.0)
-- Configuring done
-- Generating done
-- Build files have been written to: /home/roberto/Workspace/robertodr/cmake-cookbook/chapter-10/recipe-04/cxx-example/build
The final installation rule for the project will copy the contents of the staged installation prefix to CMAKE_INSTALL_PREFIX:
install(
DIRECTORY
${STAGED_INSTALL_PREFIX}/
DESTINATION
.
USE_SOURCE_PERMISSIONS
)
Note the use of . rather than the ${CMAKE_INSTALL_PREFIX} absolute path, such that this rule can be understood properly also by the CPack tool. Usage of CPack will be shown in Chapter 11, Packaging Projects, Recipe 1, Generating source and binary packages.
The recipe-04_core project builds a simple executable target that links against the message shared library. As discussed earlier in this chapter, the RPATH needs to be set properly in order for the executable to run correctly. Recipe 1 in this chapter showed how to achieve just that with the help of CMake and the same pattern was reused here in the CMakeLists.txt handling the creation of the use_message executable:
file(RELATIVE_PATH _rel ${CMAKE_INSTALL_PREFIX}/${CMAKE_INSTALL_BINDIR} ${CMAKE_INSTALL_PREFIX})
if(APPLE)
set(_rpath "@loader_path/${_rel}")
else()
set(_rpath "\$ORIGIN/${_rel}")
endif()
file(TO_NATIVE_PATH "${_rpath}/${CMAKE_INSTALL_LIBDIR}" use_message_RPATH)
set_target_properties(use_message
PROPERTIES
MACOSX_RPATH ON
SKIP_BUILD_RPATH OFF
BUILD_WITH_INSTALL_RPATH OFF
INSTALL_RPATH "${use_message_RPATH}"
INSTALL_RPATH_USE_LINK_PATH ON
)
To check that this is indeed enough, we can use a platform-native tool to print the RPATH of the installed executable. We wrap the call to the tool into a Python script, with is further wrapped into a CMake script. Eventually, the CMake script is invoked as an installation rule with the SCRIPT keyword:
if(UNIX)
set(PRINT_SCRIPT "${CMAKE_CURRENT_LIST_DIR}/cmake/print_rpath.py")
configure_file(cmake/install_hook.cmake.in install_hook.cmake @ONLY)
install(
SCRIPT
${CMAKE_CURRENT_BINARY_DIR}/install_hook.cmake
)
endif()
This additional script is executed at the very end of the installation process:
$ cmake --build build --target install
and on a GNU/Linux system we would see the following output:
Install the project...
-- Install configuration: "Release"
-- Installing: /home/roberto/Software/recipe-04/.
-- Installing: /home/roberto/Software/recipe-04/./lib64
-- Installing: /home/roberto/Software/recipe-04/./lib64/libmessage.so
-- Installing: /home/roberto/Software/recipe-04/./lib64/libmessage_s.a
-- Installing: /home/roberto/Software/recipe-04/./lib64/libmessage.so.1
-- Installing: /home/roberto/Software/recipe-04/./include
-- Installing: /home/roberto/Software/recipe-04/./include/message
-- Installing: /home/roberto/Software/recipe-04/./include/message/Message.hpp
-- Installing: /home/roberto/Software/recipe-04/./include/message/messageExport.h
-- Installing: /home/roberto/Software/recipe-04/./share
-- Installing: /home/roberto/Software/recipe-04/./share/cmake
-- Installing: /home/roberto/Software/recipe-04/./share/cmake/message
-- Installing: /home/roberto/Software/recipe-04/./share/cmake/message/messageTargets-release.cmake
-- Installing: /home/roberto/Software/recipe-04/./share/cmake/message/messageConfigVersion.cmake
-- Installing: /home/roberto/Software/recipe-04/./share/cmake/message/messageConfig.cmake
-- Installing: /home/roberto/Software/recipe-04/./share/cmake/message/messageTargets.cmake
-- Installing: /home/roberto/Software/recipe-04/./bin
-- Installing: /home/roberto/Software/recipe-04/./bin/hello-world_wAR
-- Installing: /home/roberto/Software/recipe-04/./bin/use_message
-- Installing: /home/roberto/Software/recipe-04/./bin/hello-world_wDSO
-- ELF patching tool chrpath FOUND
-- RPATH for /home/roberto/Software/recipe-04/bin/use_message is /home/roberto/Software/recipe-04/bin/use_message: RUNPATH=$ORIGIN/../lib64:/home/roberto/Workspace/robertodr/cmake-cookbook/chapter-10/recipe-04/cxx-example/build/stage/lib64:/nix/store/di389pfcw2krnmh8nmkn55d1rnzmba37-CMake-Cookbook/lib64:/nix/store/di389pfcw2krnmh8nmkn55d1rnzmba37-CMake-Cookbook/lib:/nix/store/mjs2b8mmid86lvbzibzdlz8w5yrjgcnf-util-linux-2.31.1/lib:/nix/store/2kcrj1ksd2a14bm5sky182fv2xwfhfap-glibc-2.26-131/lib:/nix/store/4zd34747fz0ggzzasy4icgn3lmy89pra-gcc-7.3.0-lib/lib
-- Running /home/roberto/Software/recipe-04/bin/use_message:
This is my very nice message:
Hello, World! From a client of yours!
...and here is its UUID: a8014bf7-5dfa-45e2-8408-12e9a5941825
This is my very nice message:
Goodbye, World! From a client of yours!
...and here is its UUID: ac971ef4-7606-460f-9144-1ad96f713647
In this chapter, we will cover the following recipes:
Up to this point, we have compiled and installed (example) software packages "from sources" – this meant fetching the project via Git, and executing the configure, build, test, and install steps manually. However, in practice, software packages are often rather installed using package managers, such as Apt, DNF, Pacman, pip, and Conda. We need to be able to distribute our code projects in various formats: as source archives or as binary installer.
This is what we refer to as packaging time in the now familiar scheme showing the various phases of a project using CMake:
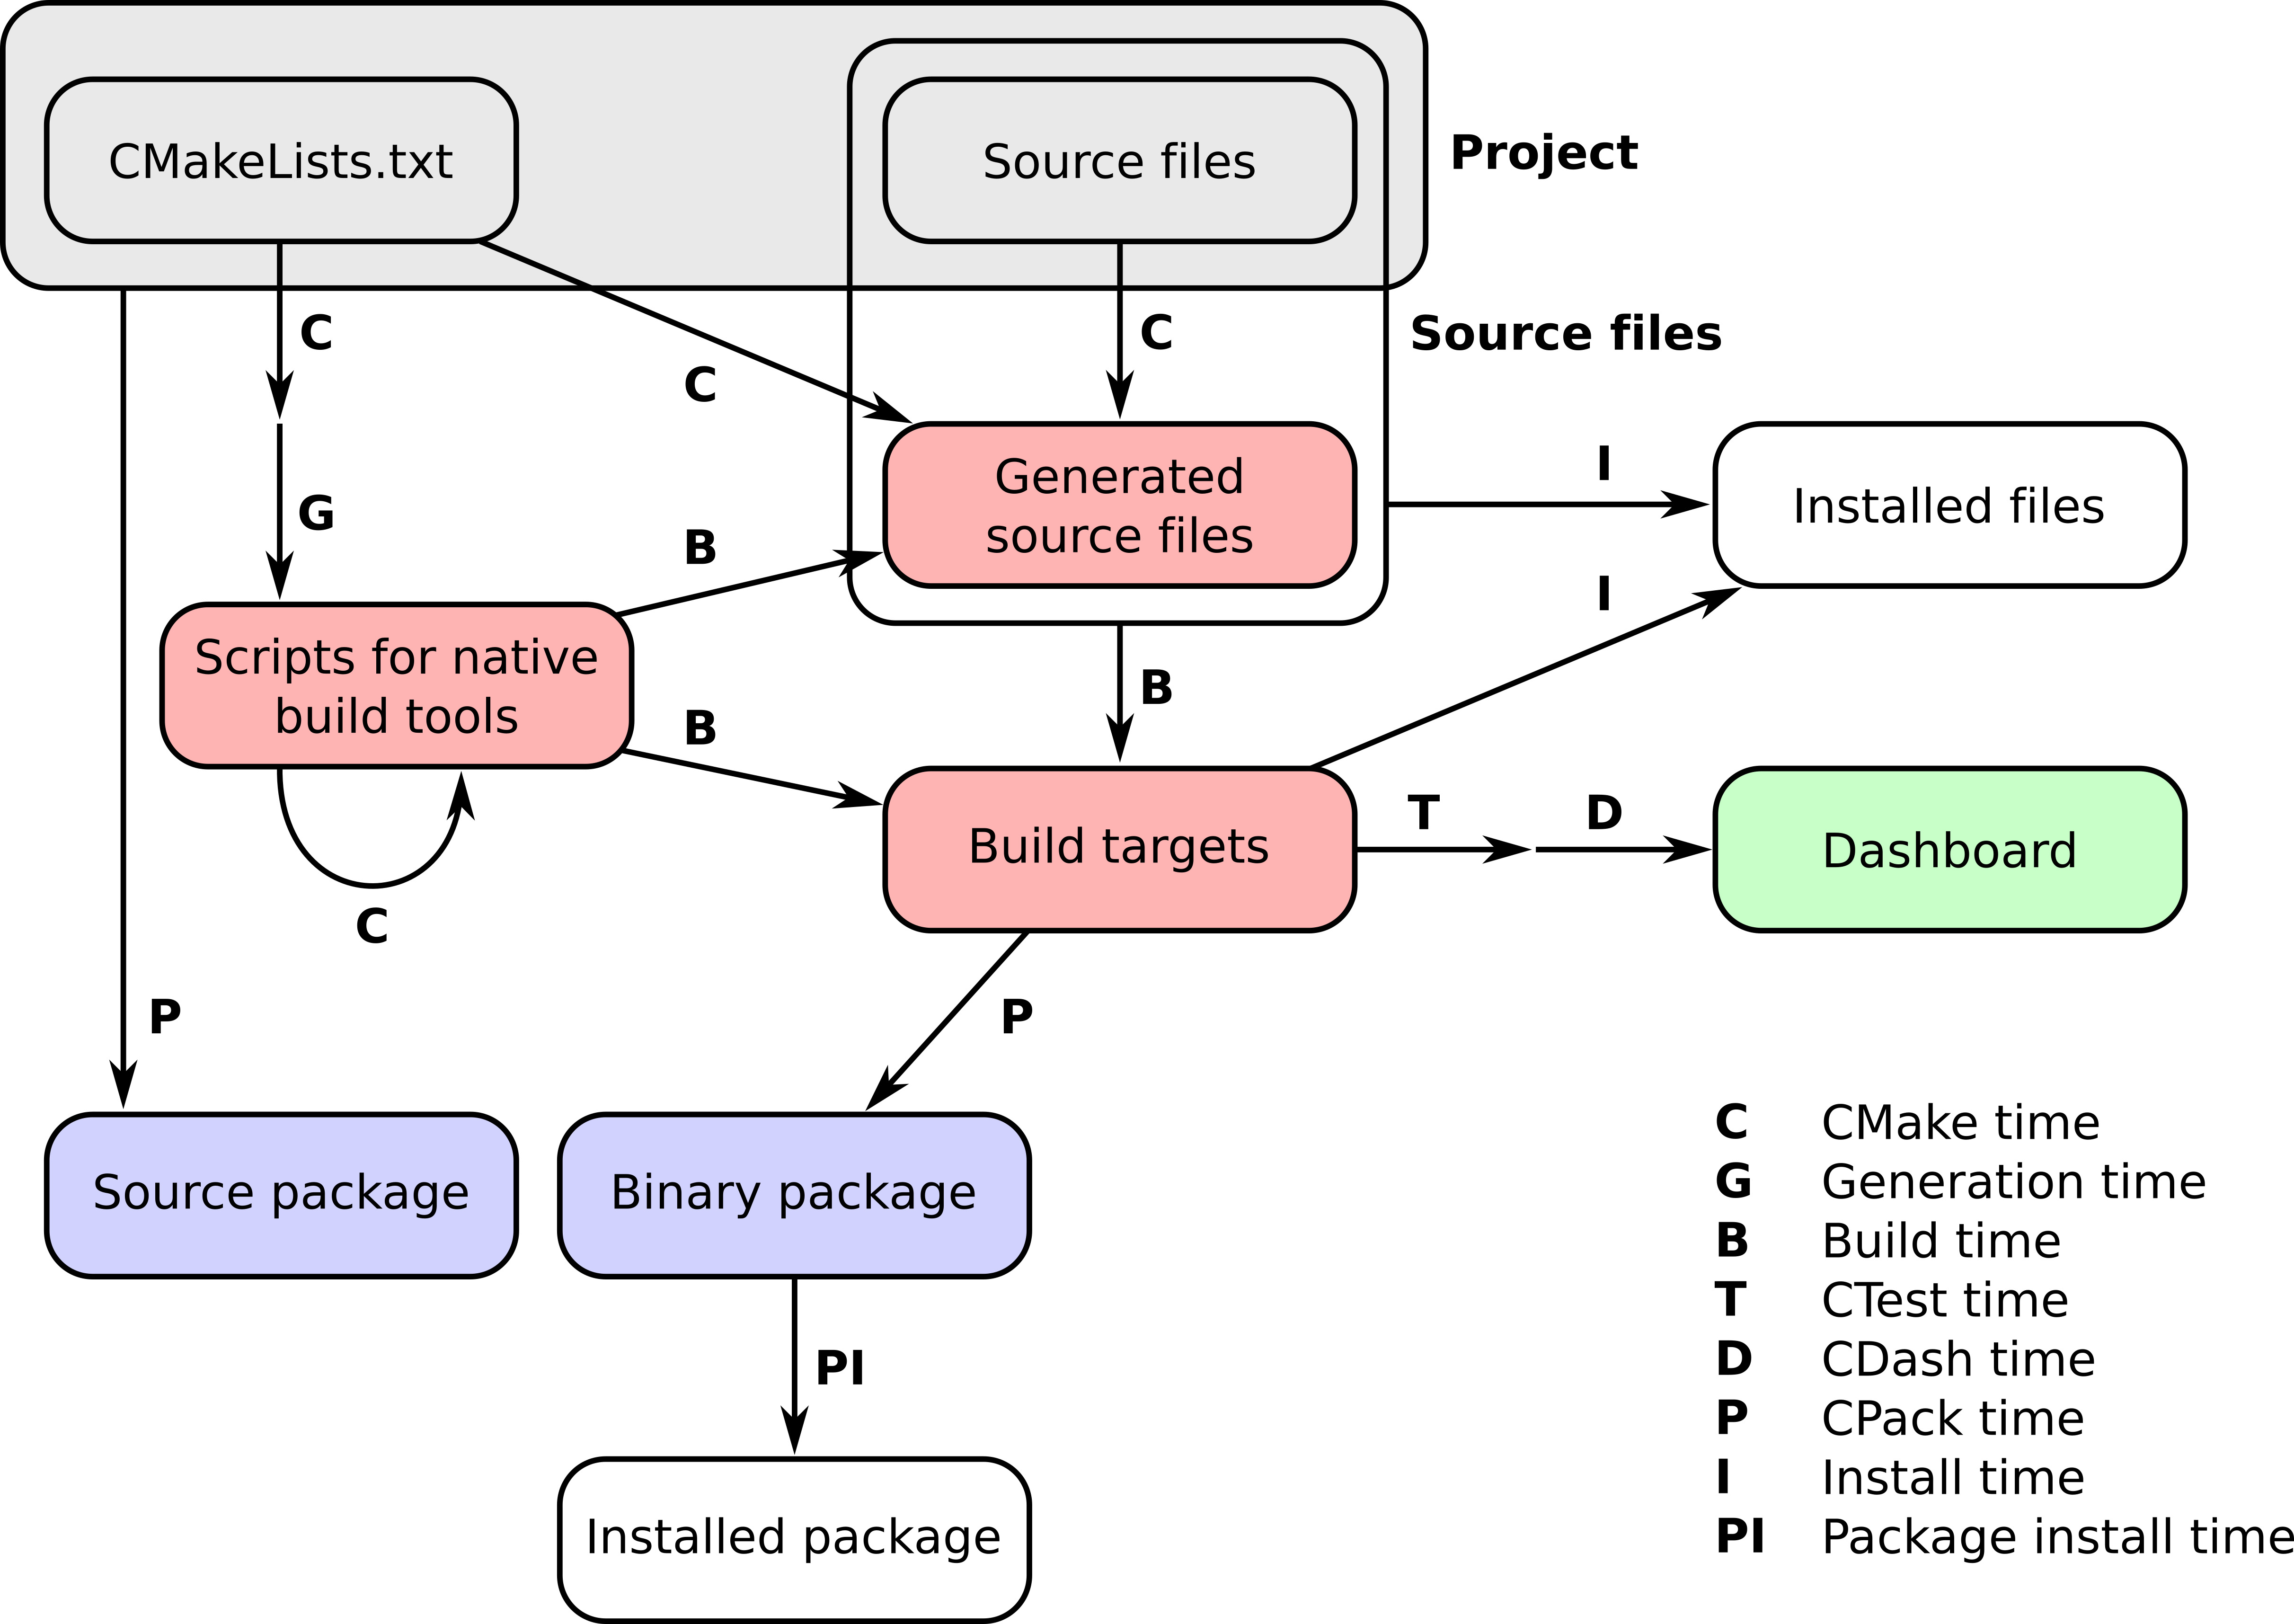
In this chapter, we will explore different packaging strategies. We will first discuss packaging using the tool CPack in the CMake family. We will also provide recipes for packaging and uploading CMake projects to the Python Package Index (PyPI, https://pypi.org) and the Anaconda Cloud (https://anaconda.org) – these are standard and popular platforms for distributing packages via the package managers pip and Conda (https://conda.io/docs/), respectively. For PyPI, we will demonstrate how to package and distribute mixed C++/Python or C/Fortran/Python projects. For Conda, we will show how to package C++ projects with dependencies on other libraries.
If your code is open source, users will expect to be able to download the sources for your project and build by themselves using your perfectly tailored CMake scripts. Of course, the packaging operation could be done with a script, but CPack offers a more compact and portable alternative. This recipe will guide you through the creation of a number of packaging alternatives:
We will use the source code for the message library presented in Chapter 10, Writing an Installer, Recipe 3, Exporting your targets. The project tree consists of the following directories and files:
.
├── cmake
│ ├── coffee.icns
│ ├── Info.plist.in
│ └── messageConfig.cmake.in
├── CMakeCPack.cmake
├── CMakeLists.txt
├── INSTALL.md
├── LICENSE
├── src
│ ├── CMakeLists.txt
│ ├── hello-world.cpp
│ ├── Message.cpp
│ └── Message.hpp
└── tests
├── CMakeLists.txt
└── use_target
├── CMakeLists.txt
└── use_message.cpp
Since the emphasis in this recipe will be on effective usage of CPack, we will not comment on the source code itself. We will only add packaging directives in CMakeCPack.cmake, which we will discuss in a moment. In addition, we have added INSTALL.md and a LICENSE file: they contain installation instructions and the license for the project and are required by the packaging directives.
Let us look at the packaging directives that need to be added to this project. We will collect them in CMakeCPack.cmake, which is included at the end of CMakeLists.txt using include(CMakeCPack.cmake):
set(CPACK_PACKAGE_NAME "${PROJECT_NAME}")
set(CPACK_PACKAGE_VENDOR "CMake Cookbook")
set(CPACK_PACKAGE_DESCRIPTION_FILE "${PROJECT_SOURCE_DIR}/INSTALL.md")
set(CPACK_PACKAGE_DESCRIPTION_SUMMARY "message: a small messaging library")
set(CPACK_RESOURCE_FILE_LICENSE "${PROJECT_SOURCE_DIR}/LICENSE")
set(CPACK_PACKAGING_INSTALL_PREFIX "/opt/${PROJECT_NAME}")
set(CPACK_PACKAGE_VERSION_MAJOR "${PROJECT_VERSION_MAJOR}")
set(CPACK_PACKAGE_VERSION_MINOR "${PROJECT_VERSION_MINOR}")
set(CPACK_PACKAGE_VERSION_PATCH "${PROJECT_VERSION_PATCH}")
set(CPACK_SOURCE_IGNORE_FILES "${PROJECT_BINARY_DIR};/.git/;.gitignore")
set(CPACK_SOURCE_GENERATOR "ZIP;TGZ")
set(CPACK_GENERATOR "ZIP;TGZ")
if(UNIX)
if(CMAKE_SYSTEM_NAME MATCHES Linux)
list(APPEND CPACK_GENERATOR "DEB")
set(CPACK_DEBIAN_PACKAGE_MAINTAINER "robertodr")
set(CPACK_DEBIAN_PACKAGE_SECTION "devel")
set(CPACK_DEBIAN_PACKAGE_DEPENDS "uuid-dev")
list(APPEND CPACK_GENERATOR "RPM")
set(CPACK_RPM_PACKAGE_RELEASE "1")
set(CPACK_RPM_PACKAGE_LICENSE "MIT")
set(CPACK_RPM_PACKAGE_REQUIRES "uuid-devel")
endif()
endif()
if(WIN32 OR MINGW)
list(APPEND CPACK_GENERATOR "NSIS")
set(CPACK_NSIS_PACKAGE_NAME "message")
set(CPACK_NSIS_CONTACT "robertdr")
set(CPACK_NSIS_ENABLE_UNINSTALL_BEFORE_INSTALL ON)
endif()
if(APPLE)
list(APPEND CPACK_GENERATOR "Bundle")
set(CPACK_BUNDLE_NAME "message")
configure_file(${PROJECT_SOURCE_DIR}/cmake/Info.plist.in Info.plist @ONLY)
set(CPACK_BUNDLE_PLIST ${CMAKE_CURRENT_BINARY_DIR}/Info.plist)
set(CPACK_BUNDLE_ICON ${PROJECT_SOURCE_DIR}/cmake/coffee.icns)
endif()
message(STATUS "CPack generators: ${CPACK_GENERATOR}")
include(CPack)
We can now configure the project as usual:
$ mkdir -p build
$ cd build
$ cmake ..
With the following command, we can list the available targets (the example output is obtained on a GNU/Linux system with Unix Makefiles as generator):
$ cmake --build . --target help
The following are some of the valid targets for this Makefile:
... all (the default if no target is provided)
... clean
... depend
... install/strip
... install
... package_source
... package
... install/local
... test
... list_install_components
... edit_cache
... rebuild_cache
... hello-world
... message
We can see that the package and package_source targets are available. The source packages can be generated with the following command:
$ cmake --build . --target package_source
Run CPack packaging tool for source...
CPack: Create package using ZIP
CPack: Install projects
CPack: - Install directory: /home/user/cmake-cookbook/chapter-11/recipe-01/cxx-example
CPack: Create package
CPack: - package: /home/user/cmake-cookbook/chapter-11/recipe-01/cxx-example/build/recipe-01-1.0.0-Source.zip generated.
CPack: Create package using TGZ
CPack: Install projects
CPack: - Install directory: /home/user/cmake-cookbook/chapter-11/recipe-01/cxx-example
CPack: Create package
CPack: - package: /home/user/cmake-cookbook/chapter-11/recipe-01/cxx-example/build/recipe-01-1.0.0-Source.tar.gz generated.
Similarly, we can build the binary packages:
$ cmake --build . --target package
And, in our case, we obtained the following list of binary packages:
message-1.0.0-Linux.deb
message-1.0.0-Linux.rpm
message-1.0.0-Linux.tar.gz
message-1.0.0-Linux.zip
CPack can be used to generate many different types of packages for distribution. When generating the build system, the CPack instructions we listed in CMakeCPack.cmake are used to generate a CPackConfig.cmake file in the build directory. When running the CMake command for the package or package_source targets, CPack is automatically invoked with the autogenerated configuration file as argument. Indeed, these two new targets are simple rules that wrap calls to CPack. Much as CMake, CPack also has a concept of generators. Whereas generators in the context of CMake are the tools that will be used to generate the native build scripts, for example, Unix Makefiles or Visual Studio project files, in the context of CPack these are the tools to be used for packaging. We listed these, exercising particular care for the different platforms, using the CPACK_SOURCE_GENERATOR and the CPACK_GENERATOR variables for the source and binary packages, respectively. Thus the Debian packaging utilities will be invoked for the DEB package generator, whereas the appropriate archiving tool on the given platform will be invoked for the TGZ generator. We can invoke CPack directly from the build directory and select which generator to use with the -G command-line option. The RPM package can be generated with the following:
$ cd build
$ cpack -G RPM
CPack: Create package using RPM
CPack: Install projects
CPack: - Run preinstall target for: recipe-01
CPack: - Install project: recipe-01
CPack: Create package
CPackRPM: Will use GENERATED spec file: /home/user/cmake-cookbook/chapter-11/recipe-01/cxx-example/build/_CPack_Packages/Linux/RPM/SPECS/recipe-01.spec
CPack: - package: /home/user/cmake-cookbook/chapter-11/recipe-01/cxx-example/build/recipe-01-1.0.0-Linux.rpm generated.
For any distribution, be it source or binary, we need to package only those contents that will be strictly necessary for the end user, hence the entire build directory and any other file related to version control will have to be excluded from the list of files to be packaged. In our example, the exclusion list was declared with the following command:
set(CPACK_SOURCE_IGNORE_FILES "${PROJECT_BINARY_DIR};/.git/;.gitignore")
We also need to specify basic information about our package, such as the name, a short description, and the version. This information is set by means of CMake variables, which are then passed on to CPack when including the corresponding module.
Let us look in detail at the instructions for the different kinds of packages we can generate for our example project.
In our example, we decided to use the TGZ and ZIP generators for the source archive. These will result in .tar.gz and .zip archives, respectively. We can inspect the contents of the generated .tar.gz file:
$ tar tzf recipe-01-1.0.0-Source.tar.gz
recipe-01-1.0.0-Source/opt/
recipe-01-1.0.0-Source/opt/recipe-01/
recipe-01-1.0.0-Source/opt/recipe-01/cmake/
recipe-01-1.0.0-Source/opt/recipe-01/cmake/coffee.icns
recipe-01-1.0.0-Source/opt/recipe-01/cmake/Info.plist.in
recipe-01-1.0.0-Source/opt/recipe-01/cmake/messageConfig.cmake.in
recipe-01-1.0.0-Source/opt/recipe-01/CMakeLists.txt
recipe-01-1.0.0-Source/opt/recipe-01/src/
recipe-01-1.0.0-Source/opt/recipe-01/src/Message.hpp
recipe-01-1.0.0-Source/opt/recipe-01/src/CMakeLists.txt
recipe-01-1.0.0-Source/opt/recipe-01/src/Message.cpp
recipe-01-1.0.0-Source/opt/recipe-01/src/hello-world.cpp
recipe-01-1.0.0-Source/opt/recipe-01/LICENSE
recipe-01-1.0.0-Source/opt/recipe-01/tests/
recipe-01-1.0.0-Source/opt/recipe-01/tests/CMakeLists.txt
recipe-01-1.0.0-Source/opt/recipe-01/tests/use_target/
recipe-01-1.0.0-Source/opt/recipe-01/tests/use_target/CMakeLists.txt
recipe-01-1.0.0-Source/opt/recipe-01/tests/use_target/use_message.cpp
recipe-01-1.0.0-Source/opt/recipe-01/INSTALL.md
As expected, only the contents of the source tree are included. Notice that the INSTALL.md and LICENSE files are also included, as specified by means of the CPACK_PACKAGE_DESCRIPTION_FILE and CPACK_RESOURCE_FILE_LICENSE variables.
When creating binary archives, CPack will package the contents of the targets described in our CMakeCPack.cmake file as described by the installation instructions. Thus in our example the hello-world executable, the message shared library, and the corresponding header files will all be packaged in the .tar.gz and .zip formats. In addition, also the CMake configuration files will be packaged. This is very useful for other projects that will need to link against our library. The installation prefix used in the package may differ from the one used when installing the project from the build tree. The CPACK_PACKAGING_INSTALL_PREFIX variable may be used to achieve this. In our example, we set it to a specific location on the system: /opt/recipe-01.
We can analyze the contents of the generated .tar.gz archive:
$ tar tzf recipe-01-1.0.0-Linux.tar.gz
recipe-01-1.0.0-Linux/opt/
recipe-01-1.0.0-Linux/opt/recipe-01/
recipe-01-1.0.0-Linux/opt/recipe-01/bin/
recipe-01-1.0.0-Linux/opt/recipe-01/bin/hello-world
recipe-01-1.0.0-Linux/opt/recipe-01/share/
recipe-01-1.0.0-Linux/opt/recipe-01/share/cmake/
recipe-01-1.0.0-Linux/opt/recipe-01/share/cmake/recipe-01/
recipe-01-1.0.0-Linux/opt/recipe-01/share/cmake/recipe-01/messageConfig.cmake
recipe-01-1.0.0-Linux/opt/recipe-01/share/cmake/recipe-01/messageTargets-hello-world.cmake
recipe-01-1.0.0-Linux/opt/recipe-01/share/cmake/recipe-01/messageConfigVersion.cmake
recipe-01-1.0.0-Linux/opt/recipe-01/share/cmake/recipe-01/messageTargets-hello-world-release.cmake
recipe-01-1.0.0-Linux/opt/recipe-01/share/cmake/recipe-01/messageTargets-release.cmake
recipe-01-1.0.0-Linux/opt/recipe-01/share/cmake/recipe-01/messageTargets.cmake
recipe-01-1.0.0-Linux/opt/recipe-01/include/
recipe-01-1.0.0-Linux/opt/recipe-01/include/message/
recipe-01-1.0.0-Linux/opt/recipe-01/include/message/Message.hpp
recipe-01-1.0.0-Linux/opt/recipe-01/include/message/messageExport.h
recipe-01-1.0.0-Linux/opt/recipe-01/lib64/
recipe-01-1.0.0-Linux/opt/recipe-01/lib64/libmessage.so
recipe-01-1.0.0-Linux/opt/recipe-01/lib64/libmessage.so.1
We expect the configuration for each platform-native binary installer to be slightly different. These differences can be managed with CPack within a single CMakeCPack.cmake, as we have done in our example.
For GNU/Linux, the stanza configures both the DEB and RPM generators:
if(UNIX)
if(CMAKE_SYSTEM_NAME MATCHES Linux)
list(APPEND CPACK_GENERATOR "DEB")
set(CPACK_DEBIAN_PACKAGE_MAINTAINER "robertodr")
set(CPACK_DEBIAN_PACKAGE_SECTION "devel")
set(CPACK_DEBIAN_PACKAGE_DEPENDS "uuid-dev")
list(APPEND CPACK_GENERATOR "RPM")
set(CPACK_RPM_PACKAGE_RELEASE "1")
set(CPACK_RPM_PACKAGE_LICENSE "MIT")
set(CPACK_RPM_PACKAGE_REQUIRES "uuid-devel")
endif()
endif()
Our example depends on the UUID library, and the CPACK_DEBIAN_PACKAGE_DEPENDS and CPACK_RPM_PACKAGE_REQUIRES options let us specify dependencies between our package and others in the database. We can use the dpkg and rpm programs to analyze the contents of the generated .deb and .rpm packages, respectively.
Note that CPACK_PACKAGING_INSTALL_PREFIX also affects these package generators: our package will be installed to /opt/recipe-01.
CMake truly provides support for cross-platform and portable build systems. The following stanza will create an installer using the Nullsoft Scriptable Install System (NSIS):
if(WIN32 OR MINGW)
list(APPEND CPACK_GENERATOR "NSIS")
set(CPACK_NSIS_PACKAGE_NAME "message")
set(CPACK_NSIS_CONTACT "robertdr")
set(CPACK_NSIS_ENABLE_UNINSTALL_BEFORE_INSTALL ON)
endif()
Finally, the following stanza will enable the Bundle packager if we are building the project on macOS:
if(APPLE)
list(APPEND CPACK_GENERATOR "Bundle")
set(CPACK_BUNDLE_NAME "message")
configure_file(${PROJECT_SOURCE_DIR}/cmake/Info.plist.in Info.plist @ONLY)
set(CPACK_BUNDLE_PLIST ${CMAKE_CURRENT_BINARY_DIR}/Info.plist)
set(CPACK_BUNDLE_ICON ${PROJECT_SOURCE_DIR}/cmake/coffee.icns)
endif()
In the macOS example, we first need to configure a property list file for the package, something achieved by the configure_file command. The location of Info.plist and the icon for the package are then set as variables for CPack.
Instead of listing the CPack configuration settings in CMakeCPack.cmake as we have done for simplicity, we could have placed the per-generator settings of CPACK_* variables in a separate file, such as CMakeCPackOptions.cmake, and included these settings into CMakeCPack.cmake using set(CPACK_PROJECT_CONFIG_FILE "${PROJECT_SOURCE_DIR}/CMakeCPackOptions.cmake"). This file can also be configured at CMake time and then included at CPack time, providing a clean way to configure multi-format package generators (see also: https://cmake.org/cmake/help/v3.6/module/CPack.html).
As with all tools in the CMake family, CPack is powerful and versatile and offers much more flexibility and options than what we have shown in this recipe. The interested reader should read the official documentation for the command-line interface to CPack (https://cmake.org/cmake/help/v3.6/manual/cpack.1.html) and the manual pages, which detail the additional generators that CPack knows how to use to package projects (https://cmake.org/cmake/help/v3.6/module/CPack.html).
In this recipe, we will take the pybind11 example from Chapter 9, Mixed-language Projects, Recipe 5, Building C++ and Python projects using pybind11, as a starting point, add relevant install targets and pip packaging information and upload the project to PyPI. Our goal will be to arrive at a project that can be installed using pip and runs CMake and fetches the pybind11 dependency under the hood.
To distribute a package via PyPI, you will need a user account at https://pypi.org, but it is possible to first exercise with installations from a local path.
Our starting point is the pybind11 example from Chapter 9, Mixed-language Projects, Recipe 5, Building C++ and Python projects using pybind11, which contains a top-level CMakeLists.txt file and an account/CMakeLists.txt file that configures the account example targets and uses the following project tree:
.
├── account
│ ├── account.cpp
│ ├── account.hpp
│ ├── CMakeLists.txt
│ └── test.py
└── CMakeLists.txt
In this recipe, we will keep account.cpp, account.hpp, and the test.py script unchanged. We will modify account/CMakeLists.txt and add a couple of files for pip to be able to build and install the package. For this, we will require three additional files in the root directory: README.rst, MANIFEST.in, and setup.py.
README.rst contains documentation about the project:
Example project
===============
Project description in here ...
MANIFEST.in lists files that should be installed along the Python modules and packages:
include README.rst CMakeLists.txt
recursive-include account *.cpp *.hpp CMakeLists.txt
And, finally, setup.py contains instructions for building and installing the project:
import distutils.command.build as _build
import os
import sys
from distutils import spawn
from distutils.sysconfig import get_python_lib
from setuptools import setup
def extend_build():
class build(_build.build):
def run(self):
cwd = os.getcwd()
if spawn.find_executable('cmake') is None:
sys.stderr.write("CMake is required to build this package.\n")
sys.exit(-1)
_source_dir = os.path.split(__file__)[0]
_build_dir = os.path.join(_source_dir, 'build_setup_py')
_prefix = get_python_lib()
try:
cmake_configure_command = [
'cmake',
'-H{0}'.format(_source_dir),
'-B{0}'.format(_build_dir),
'-DCMAKE_INSTALL_PREFIX={0}'.format(_prefix),
]
_generator = os.getenv('CMAKE_GENERATOR')
if _generator is not None:
cmake_configure_command.append('-
G{0}'.format(_generator))
spawn.spawn(cmake_configure_command)
spawn.spawn(
['cmake', '--build', _build_dir, '--target', 'install'])
os.chdir(cwd)
except spawn.DistutilsExecError:
sys.stderr.write("Error while building with CMake\n")
sys.exit(-1)
_build.build.run(self)
return build
_here = os.path.abspath(os.path.dirname(__file__))
if sys.version_info[0] < 3:
with open(os.path.join(_here, 'README.rst')) as f:
long_description = f.read()
else:
with open(os.path.join(_here, 'README.rst'), encoding='utf-8') as f:
long_description = f.read()
_this_package = 'account'
version = {}
with open(os.path.join(_here, _this_package, 'version.py')) as f:
exec(f.read(), version)
setup(
name=_this_package,
version=version['__version__'],
description='Description in here.',
long_description=long_description,
author='Bruce Wayne',
author_email='bruce.wayne@example.com',
url='http://example.com',
license='MIT',
packages=[_this_package],
include_package_data=True,
classifiers=[
'Development Status :: 3 - Alpha',
'Intended Audience :: Science/Research',
'Programming Language :: Python :: 2.7',
'Programming Language :: Python :: 3.6'
],
cmdclass={'build': extend_build()})
We will place __init__.py into the account subdirectory:
from .version import __version__
from .account import Account
__all__ = [
'__version__',
'Account',
]
We will also place version.py into the account subdirectory:
__version__ = '0.0.0'
This means that we will arrive at the following file structure for our project:
.
├── account
│ ├── account.cpp
│ ├── account.hpp
│ ├── CMakeLists.txt
│ ├── __init__.py
│ ├── test.py
│ └── version.py
├── CMakeLists.txt
├── MANIFEST.in
├── README.rst
└── setup.py
This recipe builds on top of Chapter 9, Mixed-language Projects, Recipe 5, Building C++ and Python projects using pybind11. Let us see how in detail:
First, we extend account/CMakeLists.txt. The only addition is the last directive, which specifies the install target:
install(
TARGETS
account
LIBRARY
DESTINATION account
)
And that's it! With the install target and the README.rst, MANIFEST.in, setup.py, __init__.py, and version.py files in place, we are ready to test the installation of our example code which is interfaced using pybind11:
$ pipenv install /path/to/cxx-example
$ pipenv run python
>>> from account import Account
>>> account1 = Account()
>>> account1.deposit(100.0)
>>> account1.deposit(100.0)
>>> account1.withdraw(50.0)
>>> print(account1.get_balance())
150.0
The ${CMAKE_CURRENT_BINARY_DIR} directory contains the compiled account.cpython-36m-x86_64-linux-gnu.so Python module built using pybind11, but note that its name depends on the operating system (in this case, 64-bit Linux) and the Python environment (in this case, Python 3.6). The setup.py script will run CMake under the hood and install the Python module into the correct path, depending on the selected Python environment (system Python or Pipenv or Virtual Environment). But now we have two challenges when installing the module:
We can solve this by using the following install target, where setup.py will define the install target location:
install(
TARGETS
account
LIBRARY
DESTINATION account
)
Here we instruct CMake to install the compiled Python module file into the account subdirectory relative to the install target location (Chapter 10, Writing an Installer, discusses in detail how the target location can be set). The latter will be set by setup.py by defining CMAKE_INSTALL_PREFIX to point to the right path depending on the Python environment.
Let us now inspect how we achieve this in setup.py; we will start from the bottom of the script:
setup(
name=_this_package,
version=version['__version__'],
description='Description in here.',
long_description=long_description,
author='Bruce Wayne',
author_email='bruce.wayne@example.com',
url='http://example.com',
license='MIT',
packages=[_this_package],
include_package_data=True,
classifiers=[
'Development Status :: 3 - Alpha',
'Intended Audience :: Science/Research',
'Programming Language :: Python :: 2.7',
'Programming Language :: Python :: 3.6'
],
cmdclass={'build': extend_build()})
The script contains a number of placeholders and hopefully self-explaining directives, but here we will focus on the last directive, cmdclass, where we extend the default build step by a custom function, which we call extend_build. This function subclasses the default build step:
def extend_build():
class build(_build.build):
def run(self):
cwd = os.getcwd()
if spawn.find_executable('cmake') is None:
sys.stderr.write("CMake is required to build this package.\n")
sys.exit(-1)
_source_dir = os.path.split(__file__)[0]
_build_dir = os.path.join(_source_dir, 'build_setup_py')
_prefix = get_python_lib()
try:
cmake_configure_command = [
'cmake',
'-H{0}'.format(_source_dir),
'-B{0}'.format(_build_dir),
'-DCMAKE_INSTALL_PREFIX={0}'.format(_prefix),
]
_generator = os.getenv('CMAKE_GENERATOR')
if _generator is not None:
cmake_configure_command.append('-G{0}'.format(_generator))
spawn.spawn(cmake_configure_command)
spawn.spawn(
['cmake', '--build', _build_dir, '--target', 'install'])
os.chdir(cwd)
except spawn.DistutilsExecError:
sys.stderr.write("Error while building with CMake\n")
sys.exit(-1)
_build.build.run(self)
return build
First, the function checks whether CMake is available on the system. The core of the function executes two CMake commands:
cmake_configure_command = [
'cmake',
'-H{0}'.format(_source_dir),
'-B{0}'.format(_build_dir),
'-DCMAKE_INSTALL_PREFIX={0}'.format(_prefix),
]
_generator = os.getenv('CMAKE_GENERATOR')
if _generator is not None:
cmake_configure_command.append('-G{0}'.format(_generator))
spawn.spawn(cmake_configure_command)
spawn.spawn(
['cmake', '--build', _build_dir, '--target', 'install'])
Here we have the possibility to change the default generator used by setting the CMAKE_GENERATOR environment variable. The install prefix is defined as follows:
_prefix = get_python_lib()
The get_python_lib function imported from distutils.sysconfig provides the root directory for the install prefix. The cmake --build _build_dir --target install command builds and installs our project in one step in a portable way. The reason why we use the name _build_dir instead of simply build is that your project might already contain a build directory when testing the local install, which would conflict with a fresh installation. For packages already uploaded to PyPI, the name of the build directory does not make a difference.
Now that we have the local install tested, we are ready to upload the package to PyPI. But, before we do that, make sure that the metadata in setup.py (such as the name of the project, and the contact and license information) is reasonable, and that the project name is not already taken on PyPI. It is also good practice to first test upload to and download from the PyPI test instance (https://test.pypi.org) before uploading to https://pypi.org.
Before the upload, we need to create a file called .pypirc in the home directory containing (replace yourusername and yourpassword):
[distutils]account
index-servers=
pypi
pypitest
[pypi]
username = yourusername
password = yourpassword
[pypitest]
repository = https://test.pypi.org/legacy/
username = yourusername
password = yourpassword
We will proceed in two steps. First, we create the distribution locally:
$ python setup.py sdist
In the second step, we upload the generated distribution data using Twine (we install Twine into a local Pipenv):
$ pipenv run twine upload dist/* -r pypitest
Uploading distributions to https://test.pypi.org/legacy/
Uploading yourpackage-0.0.0.tar.gz
As a next step, try to install from the test instance into an isolated environment:
$ pipenv shell
$ pip install --index-url https://test.pypi.org/simple/ yourpackage
Once this is working, we are ready to upload to production PyPI:
$ pipenv run twine upload dist/* -r pypi
This recipe is a mashup of the previous recipe and Chapter 9, Mixed-language Projects, Recipe 6, Mixing C, C++, Fortran, and Python using Python CFFI. We will reuse many building blocks from the previous recipe, but instead of using pybind11, we will use Python CFFI to provide the Python interface. In this recipe, our goal is to share a Fortran project via PyPI, but instead of Fortran, it could equally be a C or C++ project or any language exposing a C interface.
We will start out with the following file tree:
.
├── account
│ ├── account.h
│ ├── CMakeLists.txt
│ ├── implementation
│ │ └── fortran_implementation.f90
│ ├── __init__.py
│ ├── interface_file_names.cfg.in
│ ├── test.py
│ └── version.py
├── CMakeLists.txt
├── MANIFEST.in
├── README.rst
└── setup.py
The top-level CMakeLists.txt file and all sources below account, except account/CMakeLists.txt, are unchanged from how they appeared in Chapter 9, Mixed-language Projects, Recipe 6, Mixing C, C++, Fortran, and Python using Python CFFI. We will shortly discuss the small changes we need to apply to account/CMakeLists.txt. The README.rst file is identical with the previous recipe. The setup.py script contains one extra line compared to the previous recipe (the line containing install_requires=['cffi']):
# ... up to this line the script is unchanged
setup(
name=_this_package,
version=version['__version__'],
description='Description in here.',
long_description=long_description,
author='Bruce Wayne',
author_email='bruce.wayne@example.com',
url='http://example.com',
license='MIT',
packages=[_this_package],
install_requires=['cffi'],
include_package_data=True,
classifiers=[
'Development Status :: 3 - Alpha',
'Intended Audience :: Science/Research',
'Programming Language :: Python :: 2.7',
'Programming Language :: Python :: 3.6'
],
cmdclass={'build': extend_build()})
MANIFEST.in lists files that should be installed along with the Python modules and packages and contains the following:
include README.rst CMakeLists.txt
recursive-include account *.h *.f90 CMakeLists.txt
Under the account subdirectory, we see two new files. Again, there is a version.py file holding the project version for setup.py:
__version__ = '0.0.0'
The subdirectory also holds the interface_file_names.cfg.in file, which we will be discussing soon:
[configuration]
header_file_name = account.h
library_file_name = $<TARGET_FILE_NAME:account>
Let usdiscuss the steps necessary to achieve the packaging:
file(
GENERATE OUTPUT ${CMAKE_CURRENT_BINARY_DIR}/interface_file_names.cfg
INPUT ${CMAKE_CURRENT_SOURCE_DIR}/interface_file_names.cfg.in
)
set_target_properties(account
PROPERTIES
PUBLIC_HEADER "account.h;${CMAKE_CURRENT_BINARY_DIR}/account_export.h"
RESOURCE "${CMAKE_CURRENT_BINARY_DIR}/interface_file_names.cfg"
)
install(
TARGETS
account
LIBRARY
DESTINATION account/lib
RUNTIME
DESTINATION account/lib
PUBLIC_HEADER
DESTINATION account/include
RESOURCE
DESTINATION account
)
And that's it! With the install target and the additional files in place, we are ready to test the installation. For this, create a new directory somewhere on your computer and we will test the installation there.
$ pipenv install /path/to/fortran-example
$ pipenv run python
>>> import account
>>> account1 = account.new()
>>> account.deposit(account1, 100.0)
>>> account.deposit(account1, 100.0)
>>> account.withdraw(account1, 50.0)
>>> print(account.get_balance(account1))
150.0
The extension to install mixed-language projects using Python CFFI and CMake compared to Chapter 9, Mixed-language Projects, Recipe 6, Mixing C, C++, Fortran, and Python using Python CFFI consists of two additional steps:
The structure of setup.py is almost identical to the previous recipe, and we refer you to the previous recipe for a discussion of this file. The only addition was a line containing install_requires=['cffi'] to make sure that installing our example package also fetches and installs the required Python CFFI. The setup.py script will automatically install __init__.py and version.py, since these are referenced from the setup.py script. MANIFEST.in is slightly changed to package not only README.rst and CMake files, but also the header and Fortran source files:
include README.rst CMakeLists.txt
recursive-include account *.h *.f90 CMakeLists.txt
We have three challenges in this recipe to package a CMake project that uses Python CFFI with setup.py:
Let us start with the last point: we don't know the exact name, but upon build system generation CMake does and therefore we use the generator expression in interface_file_names.cfg.in to expand the placeholder:
[configuration]
header_file_name = account.h
library_file_name = $<TARGET_FILE_NAME:account>
This input file is used to generate ${CMAKE_CURRENT_BINARY_DIR}/interface_file_names.cfg:
file(
GENERATE OUTPUT ${CMAKE_CURRENT_BINARY_DIR}/interface_file_names.cfg
INPUT ${CMAKE_CURRENT_SOURCE_DIR}/interface_file_names.cfg.in
)
We then define the two header files as PUBLIC_HEADER (see also Chapter 10, Writing an Installer) and the configuration file as RESOURCE:
set_target_properties(account
PROPERTIES
PUBLIC_HEADER "account.h;${CMAKE_CURRENT_BINARY_DIR}/account_export.h"
RESOURCE "${CMAKE_CURRENT_BINARY_DIR}/interface_file_names.cfg"
)
Finally, we install the library, header files, and the configuration file to a structure relative to a path defined by setup.py:
install(
TARGETS
account
LIBRARY
DESTINATION account/lib
RUNTIME
DESTINATION account/lib
PUBLIC_HEADER
DESTINATION account/include
RESOURCE
DESTINATION account
)
Note that we set DESTINATION for both LIBRARY and RUNTIME to point to account/lib. This is important for Windows, where shared libraries have executable entry points and therefore we have to specify both.
The Python package will be able to find these files thanks to this section in account/__init__.py:
# this interface requires the header file and library file
# and these can be either provided by interface_file_names.cfg
# in the same path as this file
# or if this is not found then using environment variables
_this_path = Path(os.path.dirname(os.path.realpath(__file__)))
_cfg_file = _this_path / 'interface_file_names.cfg'
if _cfg_file.exists():
config = ConfigParser()
config.read(_cfg_file)
header_file_name = config.get('configuration', 'header_file_name')
_header_file = _this_path / 'include' / header_file_name
_header_file = str(_header_file)
library_file_name = config.get('configuration', 'library_file_name')
_library_file = _this_path / 'lib' / library_file_name
_library_file = str(_library_file)
else:
_header_file = os.getenv('ACCOUNT_HEADER_FILE')
assert _header_file is not None
_library_file = os.getenv('ACCOUNT_LIBRARY_FILE')
assert _library_file is not None
In this case, _cfg_file will be found and parsed and setup.py will find the header file under include and the library under lib and pass these on to CFFI to construct the library object. This is also the reason why we have used lib as the install target DESTINATION and not CMAKE_INSTALL_LIBDIR, which otherwise might confuse account/__init__.py.
For follow-up steps for getting the package to the PyPI test and production instances, we refer the reader to the previous recipe since these steps are analogous.
While PyPI is a standard and popular platform to distribute Python packages, Anaconda (https://anaconda.org) is more general in the sense that it allows to not only distribute Python or mixed-language projects with a Python interface but also allows packaging and dependency management for non-Python projects. In this recipe, we will prepare a Conda package for a very simple C++ example project configured and built using CMake without dependencies other than C++. In the next recipe, we will prepare and discuss a more complex Conda package.
Our goal will be to package the following simple example code (example.cpp):
#include <iostream>
int main() {
std::cout << "hello from your conda package!" << std::endl;
return 0;
}
This is how to proceed, step by step:
cmake_minimum_required(VERSION 3.5 FATAL_ERROR)
project(recipe-04 LANGUAGES CXX)
set(CMAKE_CXX_STANDARD 11)
set(CMAKE_CXX_EXTENSIONS OFF)
set(CMAKE_CXX_STANDARD_REQUIRED ON)
add_executable(hello-conda "")
target_sources(hello-conda
PRIVATE
example.cpp
)
install(
TARGETS
hello-conda
DESTINATION
bin
)
.
├── CMakeLists.txt
├── conda-recipe
│ └── meta.yaml
└── example.cpp
package:
name: conda-example-simple
version: "0.0.0"
source:
path: ../ # this can be changed to git-url
build:
number: 0
binary_relocation: true
script:
- cmake -H. -Bbuild_conda -G "${CMAKE_GENERATOR}" -DCMAKE_INSTALL_PREFIX=${PREFIX} # [not win]
- cmake -H. -Bbuild_conda -G "%CMAKE_GENERATOR%" -DCMAKE_INSTALL_PREFIX="%LIBRARY_PREFIX%" # [win]
- cmake --build build_conda --target install
requirements:
build:
- cmake >=3.5
- {{ compiler('cxx') }}
about:
home: http://www.example.com
license: MIT
summary: "Summary in here ..."
$ conda build conda-recipe
$ conda install --use-local conda-example-simple
$ hello-conda
hello from your conda package!
$ conda remove conda-example-simple
The install target in CMakeLists.txt is an essential component to this recipe:
install(
TARGETS
hello-conda
DESTINATION
bin
)
This target makes sure that the binary is installed in ${CMAKE_INSTALL_PREFIX}/bin. The prefix variable is defined by Conda in the build step of meta.yaml:
build:
number: 0
binary_relocation: true
script:
- cmake -H. -Bbuild_conda -G "${CMAKE_GENERATOR}"
-DCMAKE_INSTALL_PREFIX=${PREFIX} # [not win]
- cmake -H. -Bbuild_conda -G "%CMAKE_GENERATOR%"
-DCMAKE_INSTALL_PREFIX="%LIBRARY_PREFIX%" # [win]
- cmake --build build_conda --target install
The build step configures the project, sets the install prefix to ${PREFIX} (intrinsic variable set by Conda), builds, and installs the project. The motivation to call the build directory build_conda is similar to the previous recipes: a specific build directory name makes it easier to experiment with local installs based on directories that might already contain a directory called build.
By installing the package into the Anaconda environment, we made the executable available to the system.
The configuration file meta.yaml can be used to specify build, test, and install steps for projects of in principle any complexity. Please refer to the official documentation for an in-depth discussion: https://conda.io/docs/user-guide/tasks/build-packages/define-metadata.html.
For an upload of a Conda package to the Anaconda cloud, please follow the official Anaconda cloud documentation: https://docs.anaconda.com/anaconda-cloud/user-guide/. Also, consider Miniconda as a lightweight alternative to Anaconda: https://conda.io/miniconda.html.
In this recipe, we will build on the findings of the previous recipe and prepare a more realistic and sophisticated Conda package for an example CMake project that will depend on and utilize the implementation of the DGEMM function, for matrix-matrix multiplication, available in the Intel Math Kernel Library (MKL). Intel MKL is made available as a Conda package. This recipe will provide us with a toolset to prepare and share Conda packages with dependencies.
For this recipe, we will use the same file naming and directory structure as in the previous simple Conda recipe:
.
├── CMakeLists.txt
├── conda-recipe
│ └── meta.yaml
└── example.cpp
The example source file (example.cpp) performs a matrix-matrix multiplication and compares the result returned by the MKL library against a "noddy" implementation:
#include "mkl.h"
#include <cassert>
#include <cmath>
#include <iostream>
#include <random>
int main() {
// generate a uniform distribution of real number between -1.0 and 1.0
std::random_device rd;
std::mt19937 mt(rd());
std::uniform_real_distribution<double> dist(-1.0, 1.0);
int m = 500;
int k = 1000;
int n = 2000;
double *A = (double *)mkl_malloc(m * k * sizeof(double), 64);
double *B = (double *)mkl_malloc(k * n * sizeof(double), 64);
double *C = (double *)mkl_malloc(m * n * sizeof(double), 64);
double *D = new double[m * n];
for (int i = 0; i < (m * k); i++) {
A[i] = dist(mt);
}
for (int i = 0; i < (k * n); i++) {
B[i] = dist(mt);
}
for (int i = 0; i < (m * n); i++) {
C[i] = 0.0;
}
double alpha = 1.0;
double beta = 0.0;
cblas_dgemm(CblasRowMajor,
CblasNoTrans,
CblasNoTrans,
m,
n,
k,
alpha,
A,
k,
B,
n,
beta,
C,
n);
// D_mn = A_mk B_kn
for (int r = 0; r < m; r++) {
for (int c = 0; c < n; c++) {
D[r * n + c] = 0.0;
for (int i = 0; i < k; i++) {
D[r * n + c] += A[r * k + i] * B[i * n + c];
}
}
}
// compare the two matrices
double r = 0.0;
for (int i = 0; i < (m * n); i++) {
r += std::pow(C[i] - D[i], 2.0);
}
assert(r < 1.0e-12 && "ERROR: matrices C and D do not match");
mkl_free(A);
mkl_free(B);
mkl_free(C);
delete[] D;
std::cout << "MKL DGEMM example worked!" << std::endl;
return 0;
}
We also need a modified meta.yaml. However, the only change compared to the previous recipe is a line listing the mkl-devel dependency under requirements:
package:
name: conda-example-dgemm
version: "0.0.0"
source:
path: ../ # this can be changed to git-url
build:
number: 0
script:
- cmake -H. -Bbuild_conda -G "${CMAKE_GENERATOR}"
-DCMAKE_INSTALL_PREFIX=${PREFIX} # [not win]
- cmake -H. -Bbuild_conda -G "%CMAKE_GENERATOR%"
-DCMAKE_INSTALL_PREFIX="%LIBRARY_PREFIX%" # [win]
- cmake --build build_conda --target install
requirements:
build:
- cmake >=3.5
- {{ compiler('cxx') }}
host:
- mkl-devel 2018
about:
home: http://www.example.com
license: MIT
summary: "Summary in here ..."
These are the steps to follow to prepare our package:
cmake_minimum_required(VERSION 3.5 FATAL_ERROR)
project(recipe-05 LANGUAGES CXX)
set(CMAKE_CXX_STANDARD 11)
set(CMAKE_CXX_EXTENSIONS OFF)
set(CMAKE_CXX_STANDARD_REQUIRED ON)
add_executable(dgemm-example "")
target_sources(dgemm-example
PRIVATE
example.cpp
)
add_library(IntelMKL INTERFACE)
target_compile_options(IntelMKL
INTERFACE
$<$<OR:$<CXX_COMPILER_ID:GNU>,$<CXX_COMPILER_ID:AppleClang>>:-m64>
)
find_path(_mkl_h
NAMES
mkl.h
HINTS
${CMAKE_INSTALL_PREFIX}/include
)
target_include_directories(IntelMKL
INTERFACE
${_mkl_h}
)
message(STATUS "MKL header file FOUND: ${_mkl_h}")
find_library(_mkl_libs
NAMES
mkl_rt
HINTS
${CMAKE_INSTALL_PREFIX}/lib
)
message(STATUS "MKL single dynamic library FOUND: ${_mkl_libs}")
find_package(Threads QUIET)
target_link_libraries(IntelMKL
INTERFACE
${_mkl_libs}
$<$<OR:$<CXX_COMPILER_ID:GNU>,$<CXX_COMPILER_ID:AppleClang>>:Threads::Threads>
$<$<OR:$<CXX_COMPILER_ID:GNU>,$<CXX_COMPILER_ID:AppleClang>>:m>
)
include(CMakePrintHelpers)
cmake_print_properties(
TARGETS
IntelMKL
PROPERTIES
INTERFACE_COMPILE_OPTIONS
INTERFACE_INCLUDE_DIRECTORIES
INTERFACE_LINK_LIBRARIES
)
target_link_libraries(dgemm-example
PRIVATE
IntelMKL
)
install(
TARGETS
dgemm-example
DESTINATION
bin
)
$ conda build conda-recipe
$ conda install --use-local conda-example-dgemm
$ dgemm-example
MKL DGEMM example worked!
$ conda remove conda-example-dgemm
The only change in meta.yaml compared to the previous recipe is the mkl-devel dependency. The challenge from the CMake perspective is to locate the MKL libraries that are installed by Anaconda. Fortunately, we know that they are located in ${CMAKE_INSTALL_PREFIX}. The Intel MKL link line advisor available online (https://software.intel.com/en-us/articles/intel-mkl-link-line-advisor/) can be used to look up how to link MKL into our project depending on the platform and compiler chosen. We have decided to wrap this information into an INTERFACE library. This solution is ideal for the case of MKL: the library is not a target created by our project, or any subproject, but it still needs to be dealt with in a possibly very convoluted manner; that is: setting compiler flags, include directories, and link libraries. CMake INTERFACE libraries are targets in the build system, but do not create any build output, at least directly. However, since they are targets, we may set their properties on them. Just as "real" targets, they can also be installed, exported, and imported.
First of all, we declare a new library called IntelMKL with the INTERFACE attribute. We then need to set properties as needed and we follow the pattern of calling the appropriate CMake command on the target with the INTERFACE attribute, using the following:
The properties we have just set on the IntelMKL target can be printed out for the user by means of the cmake_print_properties command. Finally, we link against the IntelMKL target. As expected, this will set compiler flags, include directories, and link libraries as necessary to compile successfully:
target_link_libraries(dgemm-example
PRIVATE
IntelMKL
)
The Anaconda cloud contains a wealth of packages. With the preceding recipes, it is possible and relatively simple to build Conda packages for CMake projects that may depend on other Conda packages. Explore the possibility and share your software packages for others to build on your developments!
In this chapter, we will cover the following recipes:
Documentation is essential in all software projects: for users, to explain how to obtain and build the code and to illustrate how to use your code or library effectively, and also for developers, to describe the internal details of your library and to help other programmers get involved with and contribute to your project. This chapter will show how to use CMake to build code documentation, using two popular frameworks: Doxygen and Sphinx.
Doxygen (http://www.doxygen.nl) is a very popular source code documentation tool. You can add documentation tags as comments in your code. Running Doxygen will extract these comments and create the documentation in a format defined in the Doxyfile configuration file. Doxygen can output HTML, XML, and even LaTeX or PDF. This recipe will show you how to use CMake to build your Doxygen documentation.
We will use a simplified version of the message library presented in previous chapters. The source tree is organized as follows:
.
├── cmake
│ └── UseDoxygenDoc.cmake
├── CMakeLists.txt
├── docs
│ ├── Doxyfile.in
│ └── front_page.md
└── src
├── CMakeLists.txt
├── hello-world.cpp
├── Message.cpp
└── Message.hpp
We still have our sources under the src subdirectory, and we have custom CMake modules in the cmake subdirectory. Since our emphasis is on the documentation, we have removed the dependency on UUID and simplified the source code. The most significant differences are the numerous code comments in the header file:
#pragma once
#include <iosfwd>
#include <string>
/*! \file Message.hpp */
/*! \class Message
* \brief Forwards string to screen
* \author Roberto Di Remigio
* \date 2018
*/
class Message {
public:
/*! \brief Constructor from a string
* \param[in] m a message
*/
Message(const std::string &m) : message_(m) {}
/*! \brief Constructor from a character array
* \param[in] m a message
*/
Message(const char *m) : message_(std::string(m)) {}
friend std::ostream &operator<<(std::ostream &os, Message &obj) {
return obj.printObject(os);
}
private:
/*! The message to be forwarded to screen */
std::string message_;
/*! \brief Function to forward message to screen
* \param[in, out] os output stream
*/
std::ostream &printObject(std::ostream &os);
};
These comments are in the format /*! */, and include some special tags, which are understood by Doxygen (see http://www.stack.nl/~dimitri/doxygen/manual/docblocks.html).
First, let us discuss the CMakeLists.txt file in the root directory:
cmake_minimum_required(VERSION 3.5 FATAL_ERROR)
project(recipe-01 LANGUAGES CXX)
set(CMAKE_CXX_STANDARD 11)
set(CMAKE_CXX_EXTENSIONS OFF)
set(CMAKE_CXX_STANDARD_REQUIRED ON)
include(GNUInstallDirs)
set(CMAKE_ARCHIVE_OUTPUT_DIRECTORY
${CMAKE_BINARY_DIR}/${CMAKE_INSTALL_LIBDIR})
set(CMAKE_LIBRARY_OUTPUT_DIRECTORY
${CMAKE_BINARY_DIR}/${CMAKE_INSTALL_LIBDIR})
set(CMAKE_RUNTIME_OUTPUT_DIRECTORY
${CMAKE_BINARY_DIR}/${CMAKE_INSTALL_BINDIR})
list(APPEND CMAKE_MODULE_PATH "${CMAKE_SOURCE_DIR}/cmake")
include(UseDoxygenDoc)
add_subdirectory(src)
The CMakeLists.txt file in the src subdirectory contains the following building blocks:
add_library(message STATIC
Message.hpp
Message.cpp
)
add_executable(hello-world hello-world.cpp)
target_link_libraries(hello-world
PUBLIC
message
)
In the last stanza in the root CMakeLists.txt file, we call the add_doxygen_doc function. This adds a new docs target that will invoke Doxygen to build our documentation:
add_doxygen_doc(
BUILD_DIR
${CMAKE_CURRENT_BINARY_DIR}/_build
DOXY_FILE
${CMAKE_CURRENT_SOURCE_DIR}/docs/Doxyfile.in
TARGET_NAME
docs
COMMENT
"HTML documentation"
)
Finally, let us look at the UseDoxygenDoc.cmake module, where the add_doxygen_doc function is defined:
find_package(Perl REQUIRED)
find_package(Doxygen REQUIRED)
function(add_doxygen_doc)
set(options)
set(oneValueArgs BUILD_DIR DOXY_FILE TARGET_NAME COMMENT)
set(multiValueArgs)
cmake_parse_arguments(DOXY_DOC
"${options}"
"${oneValueArgs}"
"${multiValueArgs}"
${ARGN}
)
# ...
endfunction()
configure_file(
${DOXY_DOC_DOXY_FILE}
${DOXY_DOC_BUILD_DIR}/Doxyfile
@ONLY
)
add_custom_target(${DOXY_DOC_TARGET_NAME}
COMMAND
${DOXYGEN_EXECUTABLE} Doxyfile
WORKING_DIRECTORY
${DOXY_DOC_BUILD_DIR}
COMMENT
"Building ${DOXY_DOC_COMMENT} with Doxygen"
VERBATIM
)
message(STATUS "Added ${DOXY_DOC_TARGET_NAME} [Doxygen] target to build documentation")
We can configure the project as usual:
$ mkdir -p build
$ cd build
$ cmake ..
$ cmake --build .
The documentation can be built by invoking our custom docs target:
$ cmake --build . --target docs
You will notice that a _build subdirectory will have appeared in the build tree. This contains the HTML documentation that Doxygen has generated from your source files. Opening index.html with your favorite browser will show the Doxygen welcome page.
If you navigate to the class list, you can for instance browse the documentation for the Message class:
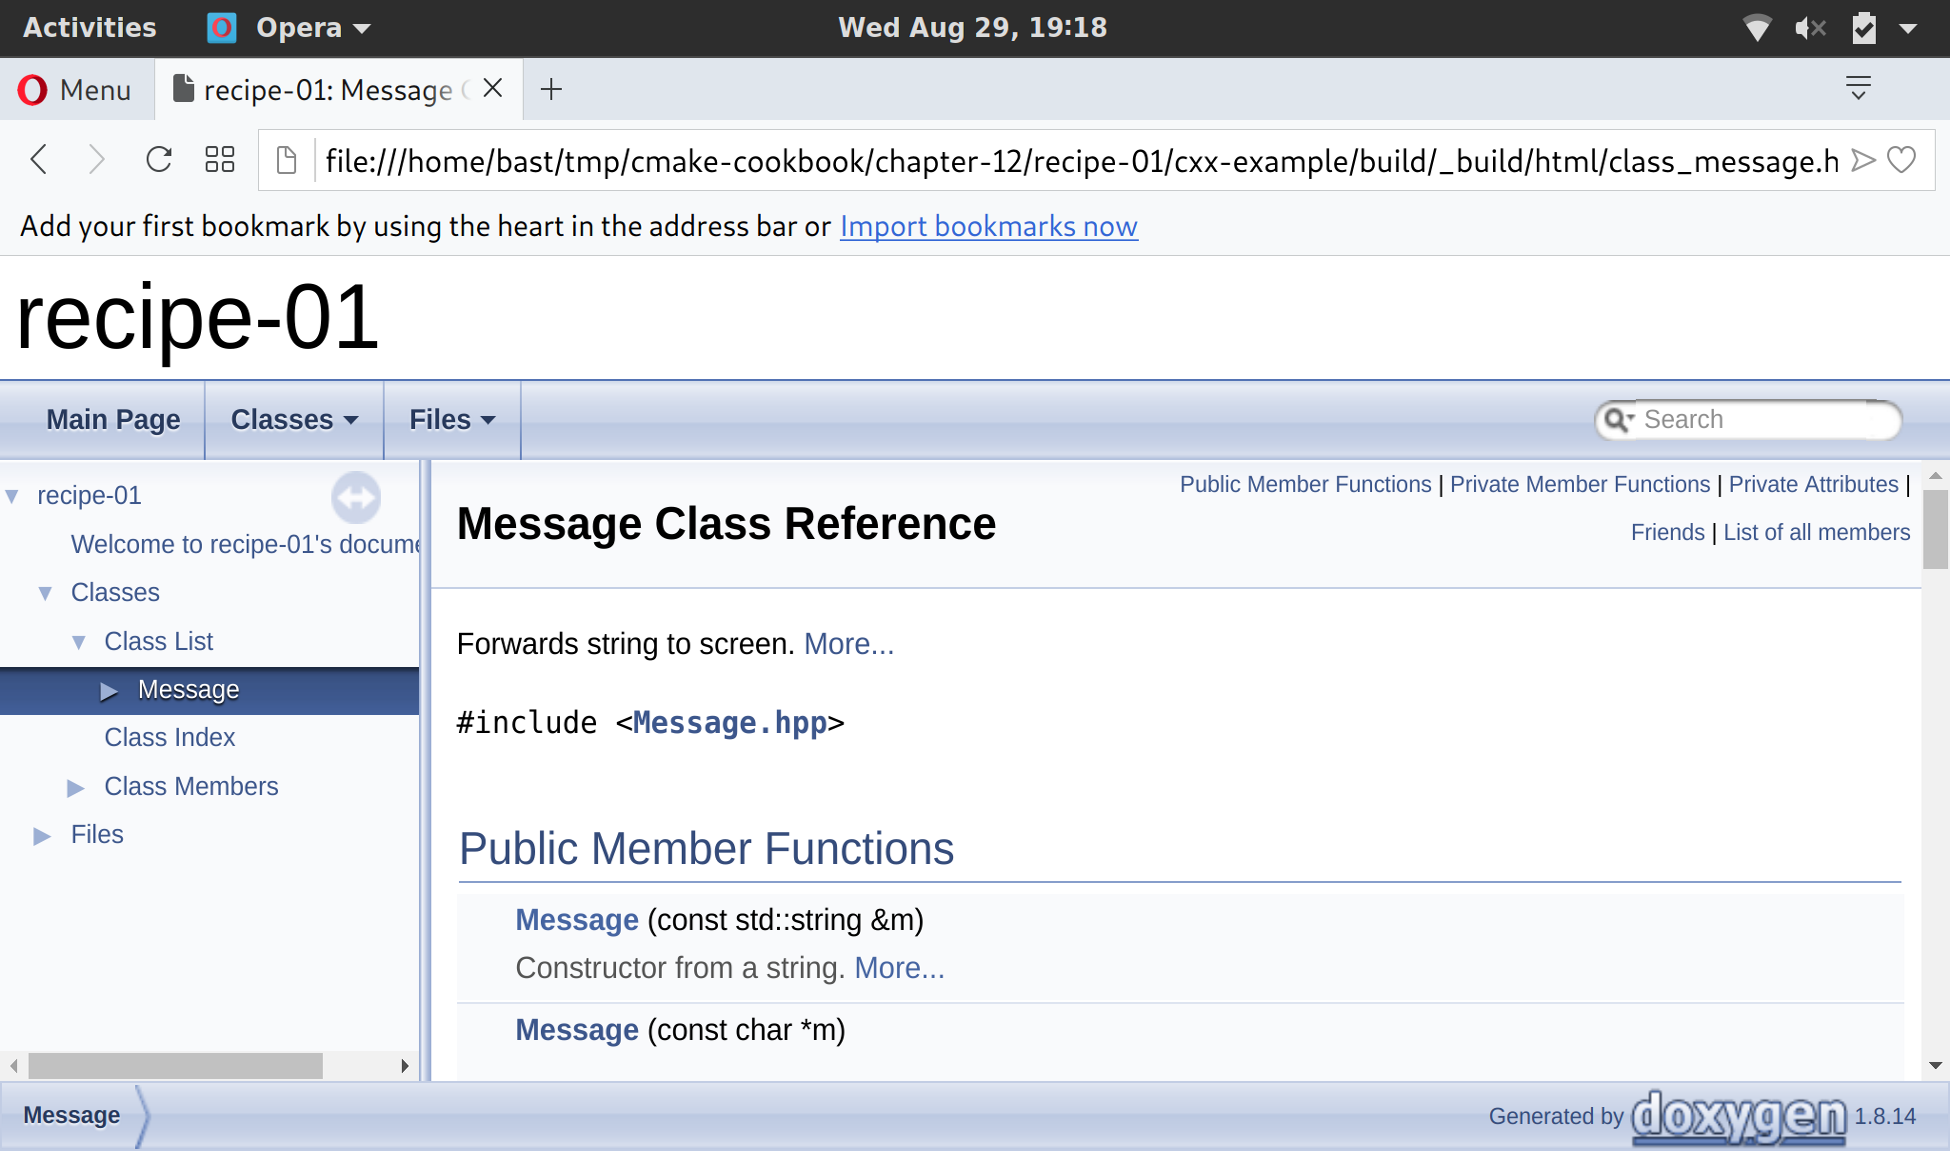
CMake does not support documentation building by default. However, we can use add_custom_target to perform arbitrary operations, and this is the mechanism that we leveraged in the present recipe. The important point to note is that we need to make sure that the tools necessary to build the documentation (Doxygen and Perl in this particular case) are available on the system.
In addition, note that the UseDoxygenDoc.cmake custom module only does the following:
The actual creation of the docs target is left to a later invocation of the add_doxygen_doc function. This is an explicit is better than implicit pattern, which we consider a good CMake practice: do not use module inclusion to perform macro-like (or function-like) actions.
We have implemented add_doxygen_doc by using a function, and not a macro, in order to limit the scope and possible side-effects of variable definitions. In this particular case, both a function and a macro would work (and would yield the same result), but we recommend preferring functions over macros unless variables in the parent scope need to be modified.
Sphinx is a Python program and a very popular documentation system (http://www.sphinx-doc.org). When used with Python projects, it can parse the source file for so-called docstrings and automatically produce documentation pages for functions and classes. However, Sphinx is not limited to Python, and can also parse reStructuredText, Markdown plain-text files, and generate HTML, ePUB, or PDF documentation. Coupled with the online Read the Docs service (https://readthedocs.org), it offers a great way to quickly get started with writing and deploying documentation. This recipe will show you how to use CMake to build documentation based on Sphinx.
We wish to build a simple website documenting our messaging library. The source tree now looks as follows:
.
├── cmake
│ ├── FindSphinx.cmake
│ └── UseSphinxDoc.cmake
├── CMakeLists.txt
├── docs
│ ├── conf.py.in
│ └── index.rst
└── src
├── CMakeLists.txt
├── hello-world.cpp
├── Message.cpp
└── Message.hpp
We have some custom modules in the cmake subdirectory, and the docs subdirectory contains the main page for our website in a plain-text reStructuredText format, index.rst, and a Python template file, conf.py.in, with settings for Sphinx. This file can be autogenerated using the sphinx-quickstart utility, which is a part of the Sphinx installation.
Compared to the previous recipe, we will modify the root CMakeLists.txt file, and will also implement a function (add_sphinx_doc):
list(APPEND CMAKE_MODULE_PATH "${CMAKE_SOURCE_DIR}/cmake")
include(UseSphinxDoc)
add_sphinx_doc(
SOURCE_DIR
${CMAKE_CURRENT_SOURCE_DIR}/docs
BUILD_DIR
${CMAKE_CURRENT_BINARY_DIR}/_build
CACHE_DIR
${CMAKE_CURRENT_BINARY_DIR}/_doctrees
HTML_DIR
${CMAKE_CURRENT_BINARY_DIR}/sphinx_html
CONF_FILE
${CMAKE_CURRENT_SOURCE_DIR}/docs/conf.py.in
TARGET_NAME
docs
COMMENT
"HTML documentation"
)
The UseSphinxDoc.cmake module follows the same explicit is better than implicit pattern that we used in the previous recipe:
find_package(PythonInterp REQUIRED)
find_package(Sphinx REQUIRED)
function(add_sphinx_doc)
set(options)
set(oneValueArgs
SOURCE_DIR
BUILD_DIR
CACHE_DIR
HTML_DIR
CONF_FILE
TARGET_NAME
COMMENT
)
set(multiValueArgs)
cmake_parse_arguments(SPHINX_DOC
"${options}"
"${oneValueArgs}"
"${multiValueArgs}"
${ARGN}
)
# ...
endfunction()
configure_file(
${SPHINX_DOC_CONF_FILE}
${SPHINX_DOC_BUILD_DIR}/conf.py
@ONLY
)
add_custom_target(${SPHINX_DOC_TARGET_NAME}
COMMAND
${SPHINX_EXECUTABLE}
-q
-b html
-c ${SPHINX_DOC_BUILD_DIR}
-d ${SPHINX_DOC_CACHE_DIR}
${SPHINX_DOC_SOURCE_DIR}
${SPHINX_DOC_HTML_DIR}
COMMENT
"Building ${SPHINX_DOC_COMMENT} with Sphinx"
VERBATIM
)
message(STATUS "Added ${SPHINX_DOC_TARGET_NAME} [Sphinx] target to build documentation")
$ mkdir -p build
$ cd build
$ cmake ..
$ cmake --build . --target docs
This will produce the HTML documentation in the SPHINX_DOC_HTML_DIR subdirectory of the build tree. Once again, you can use your favorite browser to open index.html and see the shiny (but still sparse) documentation:
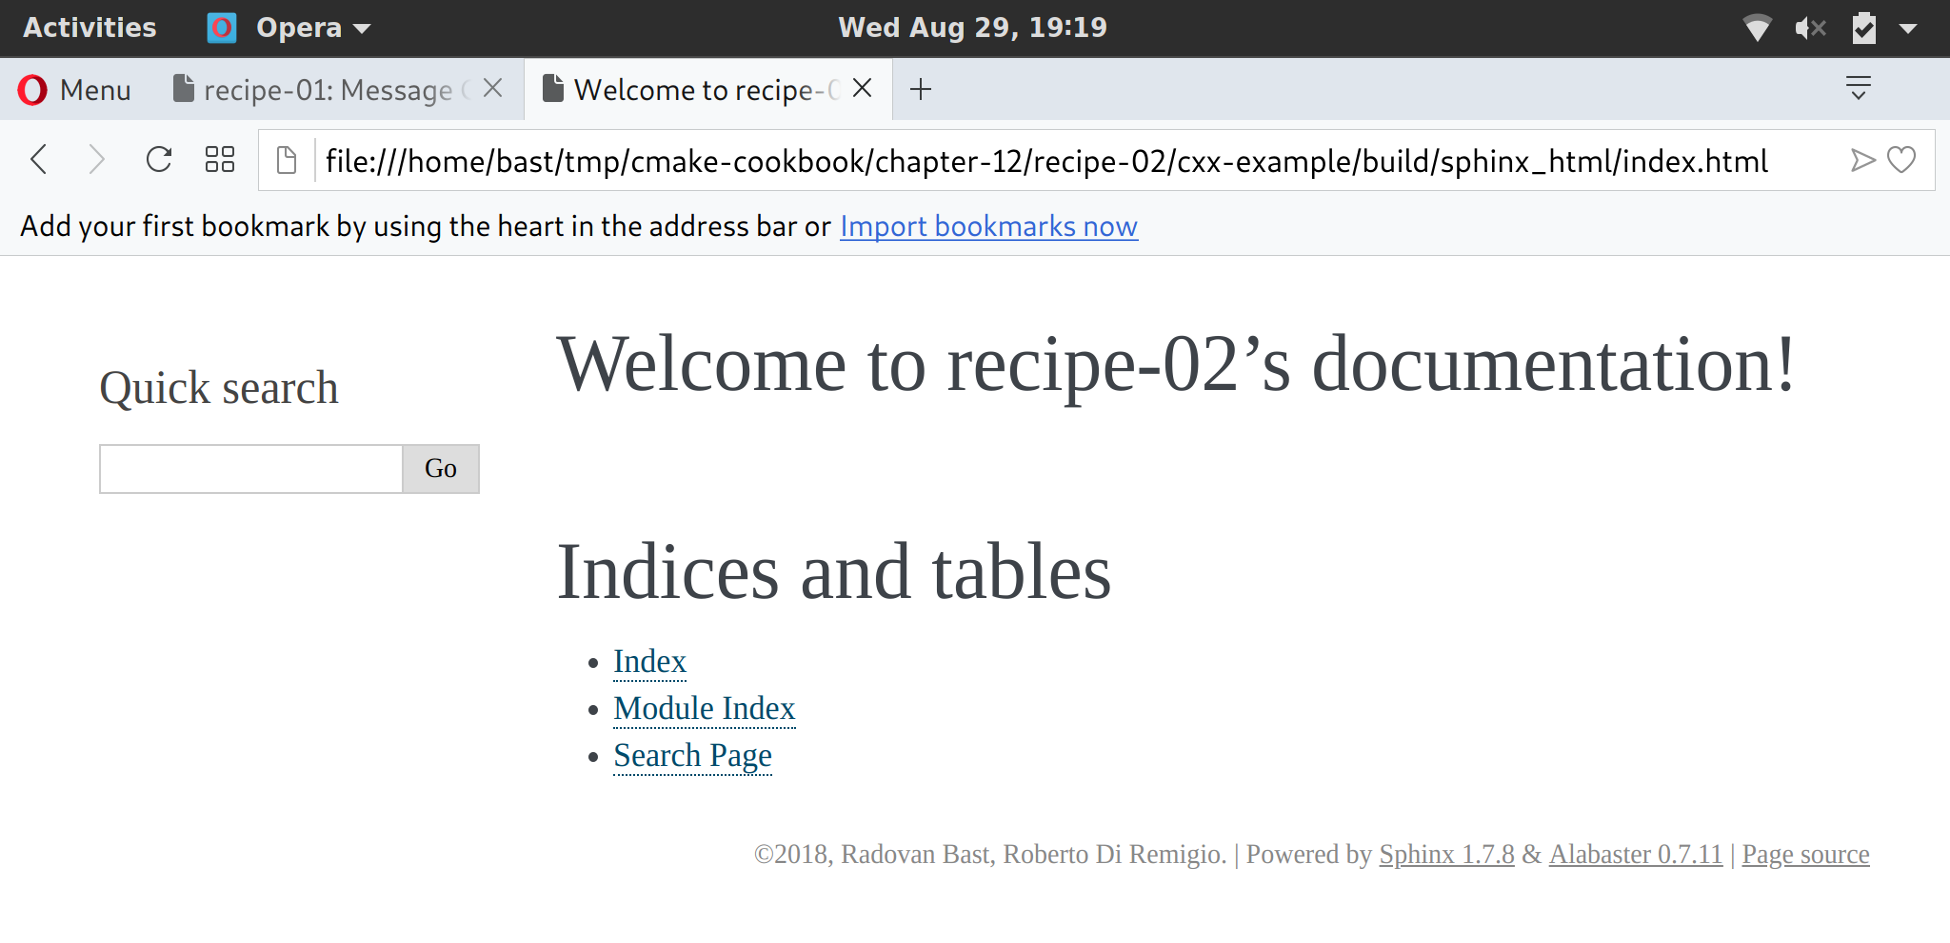
Once again, we leveraged the power of add_custom_target to add an arbitrary build target to our build system. In this case, the documentation will be built using Sphinx. Since Sphinx is a Python program that can be extended with other Python modules, the docs target will depend on the Python interpreter. We make sure that dependencies are satisfied by using find_package. Note that the FindSphinx.cmake module is not yet a standard CMake module; a copy of it is included with the project source, under the cmake subdirectory.
We have a C++ project, and thus, Doxygen is the ideal choice to generate source code documentation. However, we also wish to publish user-facing documentation, explaining, for example, our design choices. We would rather use Sphinx for that, because the generated HTML will also work on mobile devices, and because we can deploy the documentation to Read the Docs (https://readthedocs.org). This recipe will illustrate how to use the Breathe plugin (https://breathe.readthedocs.io) to bridge Doxygen and Sphinx.
The source tree for this recipe is similar to the two previous recipes:
.
├── cmake
│ ├── FindPythonModule.cmake
│ ├── FindSphinx.cmake
│ └── UseBreathe.cmake
├── CMakeLists.txt
├── docs
│ ├── code-reference
│ │ ├── classes-and-functions.rst
│ │ └── message.rst
│ ├── conf.py.in
│ ├── Doxyfile.in
│ └── index.rst
└── src
├── CMakeLists.txt
├── hello-world.cpp
├── Message.cpp
└── Message.hpp
The docs subdirectory now contains both a Doxyfile.in and a conf.py.in template file, with settings for Doxygen and Sphinx, respectively. In addition, we also have a code-reference subdirectory.
The files following code-reference contain Breathe instructions, to include Doxygen-generated documentation in Sphinx:
Messaging classes
=================
Message
-------
.. doxygenclass:: Message
:project: recipe-03
:members:
:protected-members:
:private-members:
This will output the documentation for the Message class.
The CMakeLists.txt file in the src directory is unchanged. The only changes in the root CMakeLists.txt file are as follows:
list(APPEND CMAKE_MODULE_PATH "${CMAKE_SOURCE_DIR}/cmake")
include(UseBreathe)
add_breathe_doc(
SOURCE_DIR
${CMAKE_CURRENT_SOURCE_DIR}/docs
BUILD_DIR
${CMAKE_CURRENT_BINARY_DIR}/_build
CACHE_DIR
${CMAKE_CURRENT_BINARY_DIR}/_doctrees
HTML_DIR
${CMAKE_CURRENT_BINARY_DIR}/html
DOXY_FILE
${CMAKE_CURRENT_SOURCE_DIR}/docs/Doxyfile.in
CONF_FILE
${CMAKE_CURRENT_SOURCE_DIR}/docs/conf.py.in
TARGET_NAME
docs
COMMENT
"HTML documentation"
)
Let us examine the UseBreatheDoc.cmake module. This follows the same explicit is better than implicit pattern that we described in the two previous recipes. The module is described in detail, as follows:
find_package(Doxygen REQUIRED)
find_package(Perl REQUIRED)
find_package(PythonInterp REQUIRED)
find_package(Sphinx REQUIRED)
include(FindPythonModule)
find_python_module(breathe REQUIRED)
function(add_breathe_doc)
set(options)
set(oneValueArgs
SOURCE_DIR
BUILD_DIR
CACHE_DIR
HTML_DIR
DOXY_FILE
CONF_FILE
TARGET_NAME
COMMENT
)
set(multiValueArgs)
cmake_parse_arguments(BREATHE_DOC
"${options}"
"${oneValueArgs}"
"${multiValueArgs}"
${ARGN}
)
# ...
endfunction()
configure_file(
${BREATHE_DOC_CONF_FILE}
${BREATHE_DOC_BUILD_DIR}/conf.py
@ONLY
)
configure_file(
${BREATHE_DOC_DOXY_FILE}
${BREATHE_DOC_BUILD_DIR}/Doxyfile
@ONLY
)
add_custom_target(${BREATHE_DOC_TARGET_NAME}
COMMAND
${SPHINX_EXECUTABLE}
-q
-b html
-c ${BREATHE_DOC_BUILD_DIR}
-d ${BREATHE_DOC_CACHE_DIR}
${BREATHE_DOC_SOURCE_DIR}
${BREATHE_DOC_HTML_DIR}
COMMENT
"Building ${BREATHE_DOC_TARGET_NAME} documentation with Breathe, Sphinx and Doxygen"
VERBATIM
)
message(STATUS "Added ${BREATHE_DOC_TARGET_NAME} [Breathe+Sphinx+Doxygen] target to build documentation")
$ mkdir -p build
$ cd build
$ cmake ..
$ cmake --build . --target docs
The documentation will be available in the BREATHE_DOC_HTML_DIR subdirectory of the build tree. After firing up your browser to open the index.html file, you can navigate to the documentation for the Message class:
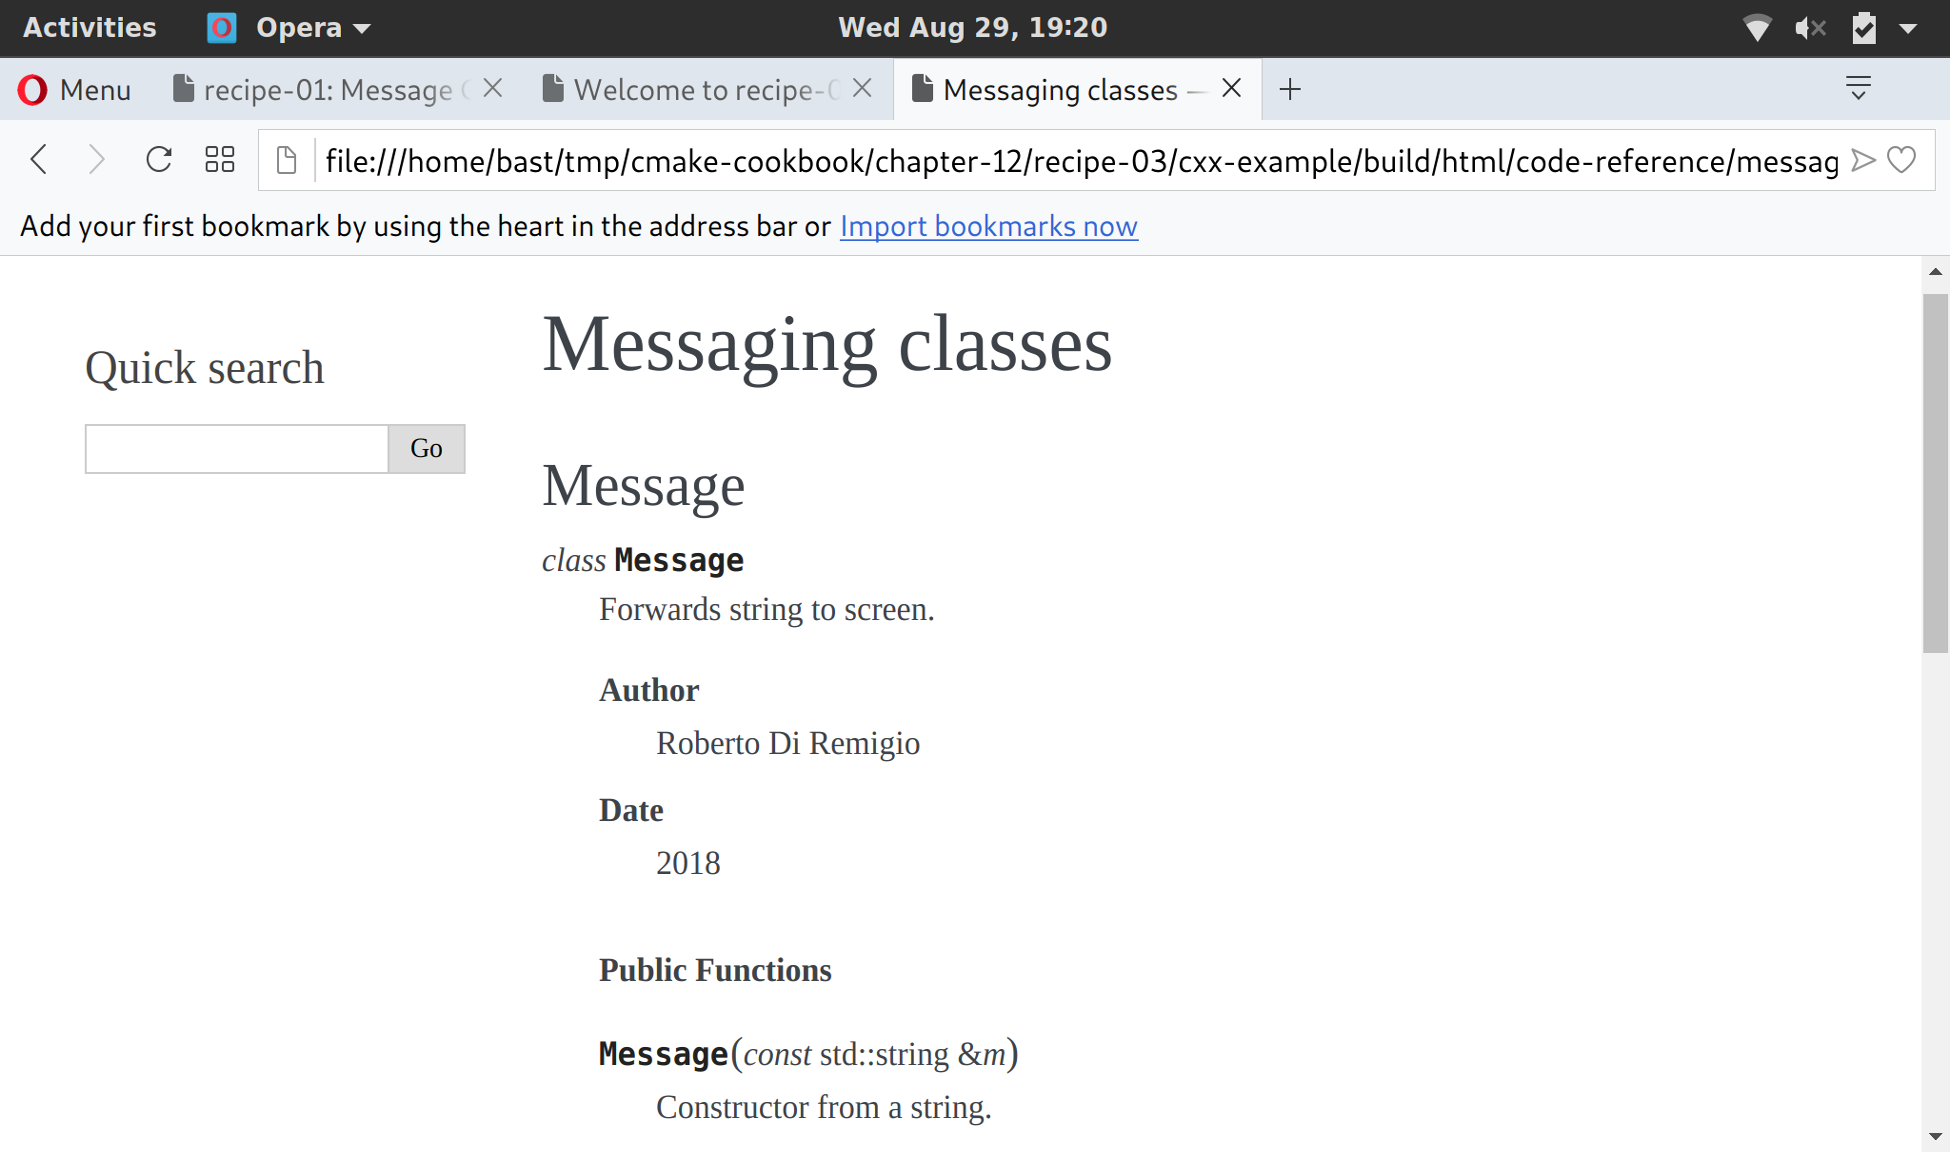
You will note that both Doxygen and Sphinx are run, despite the fact that only the invocation to Sphinx was given when declaring the custom BREATHE_DOC_TARGET_NAME target. This is thanks to the following settings, defined in the conf.py file for Sphinx:
def run_doxygen(folder):
"""Run the doxygen make command in the designated folder"""
try:
retcode = subprocess.call("cd {}; doxygen".format(folder), shell=True)
if retcode < 0:
sys.stderr.write(
"doxygen terminated by signal {}".format(-retcode))
except OSError as e:
sys.stderr.write("doxygen execution failed: {}".format(e))
def setup(app):
run_doxygen('@BREATHE_DOC_BUILD_DIR@')
Doxygen will generate XML output that the Breathe plugin will be able to render in a form consistent with the chosen Sphinx documentation style.
In this chapter, we will cover the following recipes:
CMake does not build executables and libraries on its own. Instead, CMake configures a project and generates files used by another build tool or framework to build the project. On GNU/Linux and macOS, CMake typically generates Unix Makefiles, but a number of alternatives exist. On Windows, these are typically Visual Studio project files or MinGW or MSYS Makefiles. CMake includes a wide range of generators for native command-line build tools or integrated development environments (IDEs). You can read more about them at the following link: https://cmake.org/cmake/help/latest/manual/cmake-generators.7.html.
These generators can be selected using cmake -G, for instance:
$ cmake -G "Visual Studio 15 2017"
Not all generators are available on every platform and, depending on the platform where CMake runs, typically only a subset is available. To see a list of all available generators on the current platform, type the following:
$ cmake -G
In this chapter, we will not cycle through all the available generators but we note that most recipes in this book have been tested using the Unix Makefiles, MSYS Makefiles, Ninja, and Visual Studio 15 2017 generators. In this chapter, we will focus on developing on/for the Windows platform. We will demonstrate how to build a CMake project directly using Visual Studio 15 2017, without using the command line. We will also discuss how to cross-compile a Windows executable on a Linux or macOS system.
While earlier versions of Visual Studio required developers to edit source code and run CMake commands in different windows, Visual Studio 2017 introduces built-in support for CMake projects (https://aka.ms/cmake), which allows for the entire coding, configuring, building, and testing workflow to happen within the same IDE. In this recipe, we will test this and build a simple "hello world" CMake example project directly using Visual Studio 2017, without resorting to the command line.
First, we will use the Windows platform and download and install Visual Studio Community 2017 (https://www.visualstudio.com/downloads/). At the time of writing, this version is freely available with a 30-day trial period. The steps which we will follow are also nicely explained in this video: https://www.youtube.com/watch?v=_lKxJjV8r3Y.
When running the installer, make sure to select Desktop development with C++ on the left panel and also verify that Visual C++ tools for CMake is checked on the Summary panel to the right:
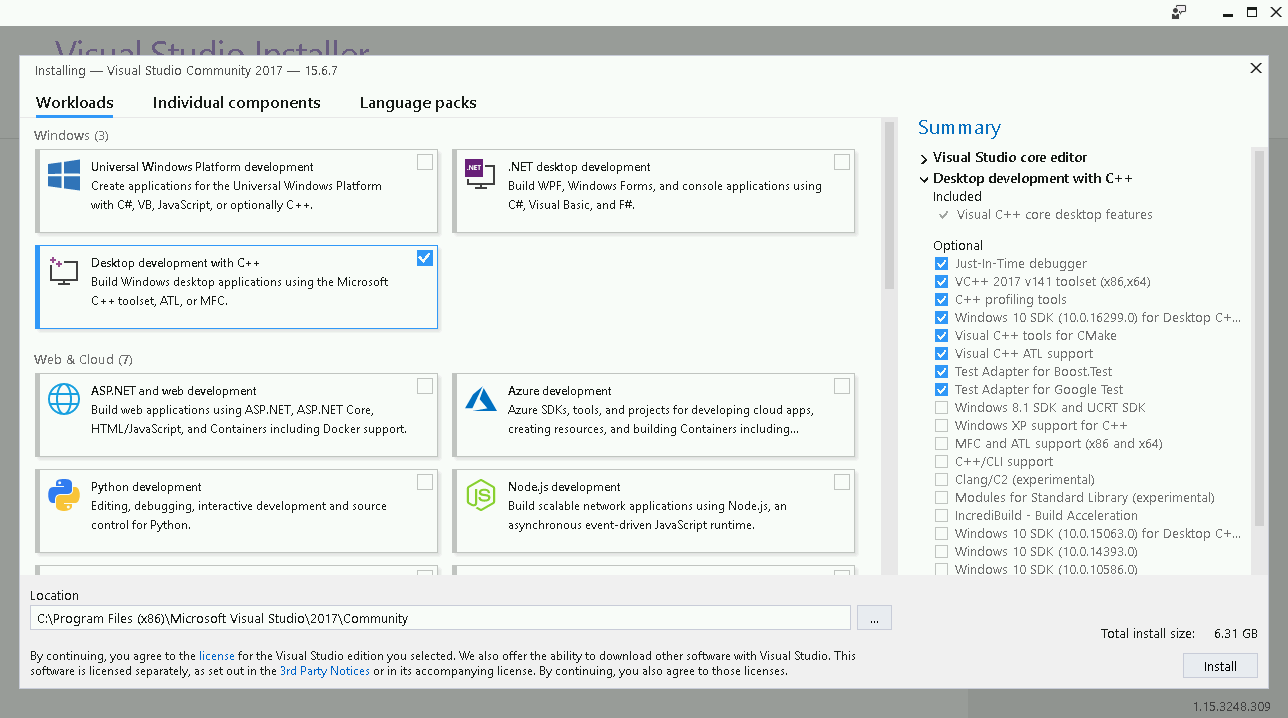
In Visual Studio 2017 15.4, you can also build code for the Linux platform. For this, select Linux development with C++ under Other Toolsets:

With this option enabled, you can target both Windows and Linux machines from within Visual Studio provided you have configured access to a Linux server. However, we will not demonstrate this approach in this chapter.
In this recipe, we will build a Windows binary on Windows, and our goal will be to configure and build the following example code (hello-world.cpp):
#include <cstdlib>
#include <iostream>
#include <string>
const std::string cmake_system_name = SYSTEM_NAME;
int main() {
std::cout << "Hello from " << cmake_system_name << std::endl;
return EXIT_SUCCESS;
}
To create the corresponding source code, please follow these steps:
# set minimum cmake version
cmake_minimum_required(VERSION 3.5 FATAL_ERROR)
# project name and language
project(recipe-01 LANGUAGES CXX)
set(CMAKE_CXX_STANDARD 11)
set(CMAKE_CXX_EXTENSIONS OFF)
set(CMAKE_CXX_STANDARD_REQUIRED ON)
include(GNUInstallDirs)
set(CMAKE_ARCHIVE_OUTPUT_DIRECTORY
${CMAKE_BINARY_DIR}/${CMAKE_INSTALL_LIBDIR})
set(CMAKE_LIBRARY_OUTPUT_DIRECTORY
${CMAKE_BINARY_DIR}/${CMAKE_INSTALL_LIBDIR})
set(CMAKE_RUNTIME_OUTPUT_DIRECTORY
${CMAKE_BINARY_DIR}/${CMAKE_INSTALL_BINDIR})
# define executable and its source file
add_executable(hello-world hello-world.cpp)
# we will print the system name in the code
target_compile_definitions(hello-world
PUBLIC
"SYSTEM_NAME=\"${CMAKE_SYSTEM_NAME}\""
)
install(
TARGETS
hello-world
DESTINATION
${CMAKE_INSTALL_BINDIR}
)
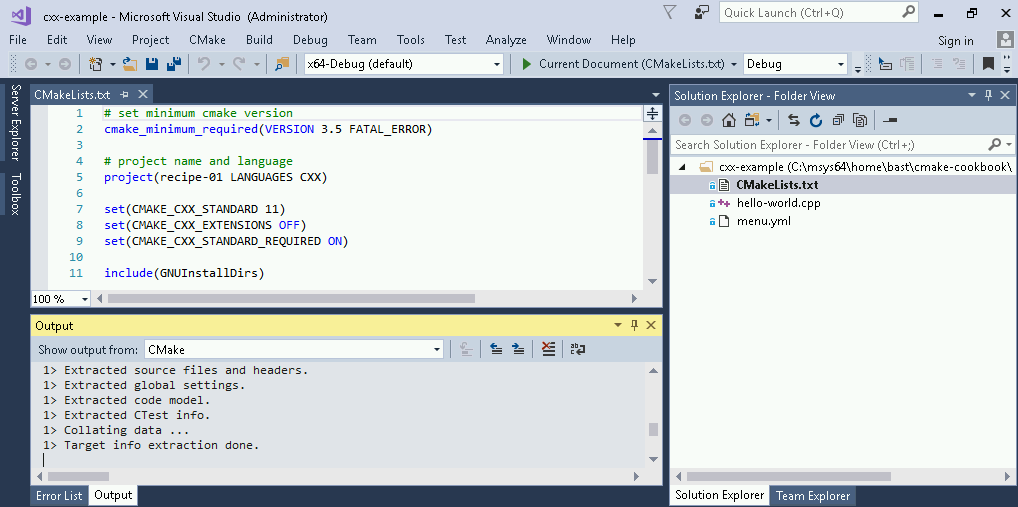
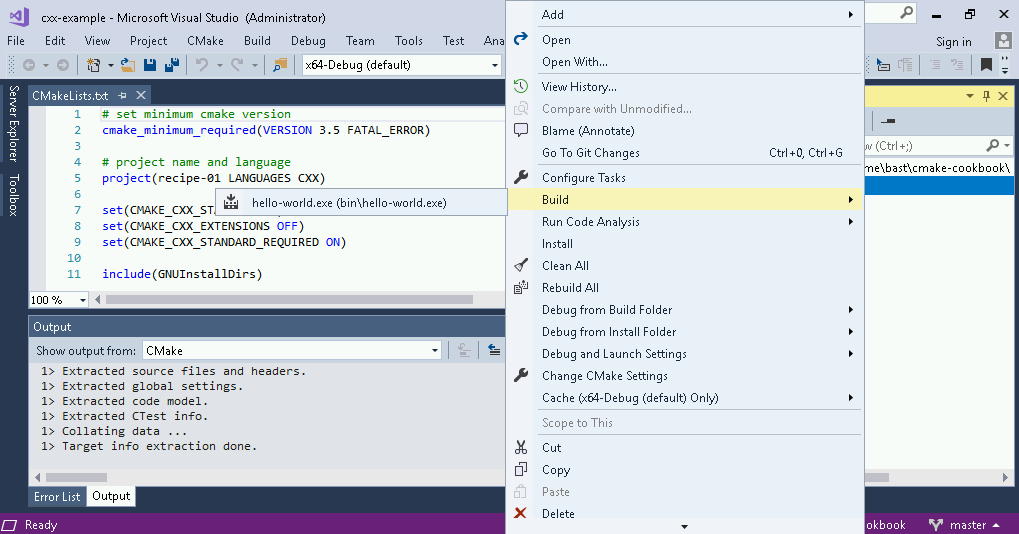
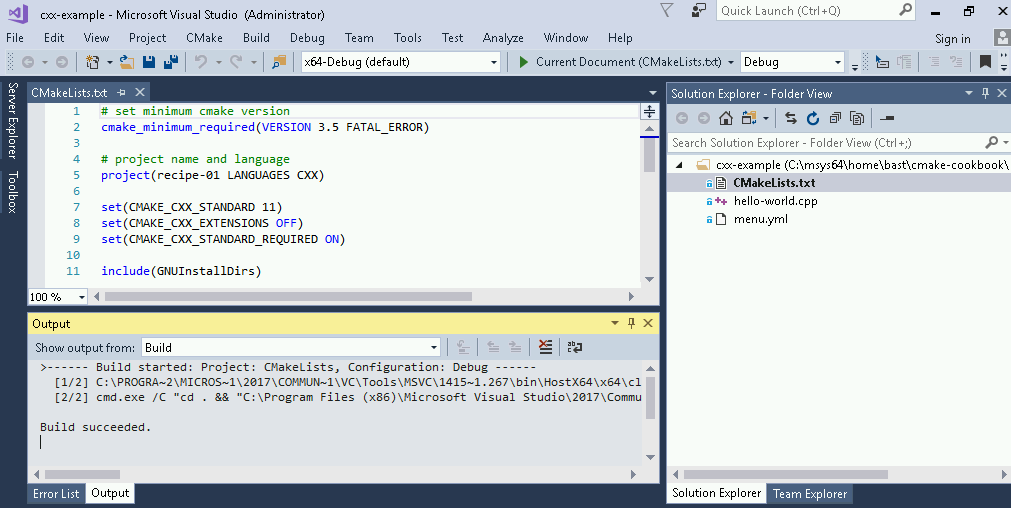
We have seen that Visual Studio 2017 nicely interfaces to CMake, and we have been able to configure and build the code from within the IDE. In addition to the build step, we could have run install or test steps. These are accessible by right-clicking on CMakeLists.txt (right panel).
However, the configuration step was run automatically and we might prefer to modify configuration options. We would also like to know the actual build and install paths so that we can test our executable. For this, we can select CMake | Change CMake Settings, and we arrive at the following screen:

In the top-left panel, we can now inspect and modify the generator (in this case, Ninja), settings, arguments, as well as paths. The build path is highlighted in the preceding screenshot. The settings are grouped into build types (x86-Debug, x86-Release, and so on) and we can toggle between these build types in the middle of the top panel bar.
Now that we know the actual build path, we can test the compiled executable:
$ ./hello-world.exe
Hello from Windows
The build and install paths can, of course, be adjusted.
In this recipe, we will reuse the "Hello World" example from the previous recipe and cross-compile the code from Linux or macOS to Windows. In other words, we will configure and compile the code on Linux or macOS and obtain an executable for the Windows platform.
We start with a simple hello world example (hello-world.cpp):
#include <cstdlib>
#include <iostream>
#include <string>
const std::string cmake_system_name = SYSTEM_NAME;
int main() {
std::cout << "Hello from " << cmake_system_name << std::endl;
return EXIT_SUCCESS;
}
We will also use the unchanged CMakeLists.txt from the previous recipe:
# set minimum cmake version
cmake_minimum_required(VERSION 3.5 FATAL_ERROR)
# project name and language
project(recipe-01 LANGUAGES CXX)
set(CMAKE_CXX_STANDARD 11)
set(CMAKE_CXX_EXTENSIONS OFF)
set(CMAKE_CXX_STANDARD_REQUIRED ON)
include(GNUInstallDirs)
set(CMAKE_ARCHIVE_OUTPUT_DIRECTORY
${CMAKE_BINARY_DIR}/${CMAKE_INSTALL_LIBDIR})
set(CMAKE_LIBRARY_OUTPUT_DIRECTORY
${CMAKE_BINARY_DIR}/${CMAKE_INSTALL_LIBDIR})
set(CMAKE_RUNTIME_OUTPUT_DIRECTORY
${CMAKE_BINARY_DIR}/${CMAKE_INSTALL_BINDIR})
# define executable and its source file
add_executable(hello-world hello-world.cpp)
# we will print the system name in the code
target_compile_definitions(hello-world
PUBLIC
"SYSTEM_NAME=\"${CMAKE_SYSTEM_NAME}\""
)
install(
TARGETS
hello-world
DESTINATION
${CMAKE_INSTALL_BINDIR}
)
To cross-compile the source code, we will need to install a cross-compiler for C++ and optionally for C and Fortran. One option is to use packaged MinGW compilers. As an alternative to packaged cross-compilers, we can also build a suite of cross-compilers from sources using MXE (the M cross environment): http://mxe.cc.
We will create three files in this cross-compilation "hello world" example following these steps:
# the name of the target operating system
set(CMAKE_SYSTEM_NAME Windows)
# which compilers to use
set(CMAKE_CXX_COMPILER i686-w64-mingw32-g++)
# adjust the default behaviour of the find commands:
# search headers and libraries in the target environment
set(CMAKE_FIND_ROOT_PATH_MODE_INCLUDE ONLY)
set(CMAKE_FIND_ROOT_PATH_MODE_LIBRARY ONLY)
# search programs in the host environment
set(CMAKE_FIND_ROOT_PATH_MODE_PROGRAM NEVER)
$ mkdir -p build
$ cd build
$ cmake -D CMAKE_TOOLCHAIN_FILE=toolchain.cmake ..
-- The CXX compiler identification is GNU 5.4.0
-- Check for working CXX compiler: /home/user/mxe/usr/bin/i686-w64-mingw32.static-g++
-- Check for working CXX compiler: /home/user/mxe/usr/bin/i686-w64-mingw32.static-g++ -- works
-- Detecting CXX compiler ABI info
-- Detecting CXX compiler ABI info - done
-- Detecting CXX compile features
-- Detecting CXX compile features - done
-- Configuring done
-- Generating done
-- Build files have been written to: /home/user/cmake-recipes/chapter-13/recipe-01/cxx-example/build
$ cmake --build .
Scanning dependencies of target hello-world
[ 50%] Building CXX object CMakeFiles/hello-world.dir/hello-world.cpp.obj
[100%] Linking CXX executable bin/hello-world.exe
[100%] Built target hello-world
Hello from Windows
Since we configure and build the code on a host environment (in this case, GNU/Linux or macOS) that is different than the target environment (Windows), we need to provide CMake with information about the target environment which we have encoded in the toolchain.cmake file (https://cmake.org/cmake/help/latest/manual/cmake-toolchains.7.html#cross-compiling).
First and foremost, we provide the name of the target operating system:
set(CMAKE_SYSTEM_NAME Windows)
Then, we specify the compiler(s), for instance:
set(CMAKE_C_COMPILER i686-w64-mingw32-gcc)
set(CMAKE_CXX_COMPILER i686-w64-mingw32-g++)
set(CMAKE_Fortran_COMPILER i686-w64-mingw32-gfortran)
In this simple example, we did not have to detect any libraries or header files but, if we had to, we would specify the root path using the following:
set(CMAKE_FIND_ROOT_PATH /path/to/target/environment)
The target environment can, for instance, be the one provided by an MXE installation.
Finally, we adjust the default behavior of the find commands. We instruct CMake to search headers and libraries in the target environment:
set(CMAKE_FIND_ROOT_PATH_MODE_INCLUDE ONLY)
set(CMAKE_FIND_ROOT_PATH_MODE_LIBRARY ONLY)
And to search programs in the host environment:
set(CMAKE_FIND_ROOT_PATH_MODE_PROGRAM NEVER)
For a more detailed discussion of the various options, see https://cmake.org/cmake/help/latest/manual/cmake-toolchains.7.html#cross-compiling.
In this recipe, we will apply what we have learned in the previous recipe, albeit to a more interesting and realistic example: we will cross-compile a Windows binary which is parallelized using OpenMP.
We will use the unmodified source code from Chapter 3, Detecting External Libraries and Programs, Recipe 5, Detecting the OpenMP parallel environment. The example code sums up all natural numbers up to N (example.cpp):
#include <iostream>
#include <omp.h>
#include <string>
int main(int argc, char *argv[]) {
std::cout << "number of available processors: " << omp_get_num_procs()
<< std::endl;
std::cout << "number of threads: " << omp_get_max_threads() << std::endl;
auto n = std::stol(argv[1]);
std::cout << "we will form sum of numbers from 1 to " << n << std::endl;
// start timer
auto t0 = omp_get_wtime();
auto s = 0LL;
#pragma omp parallel for reduction(+ : s)
for (auto i = 1; i <= n; i++) {
s += i;
}
// stop timer
auto t1 = omp_get_wtime();
std::cout << "sum: " << s << std::endl;
std::cout << "elapsed wall clock time: " << t1 - t0 << " seconds" << std::endl;
return 0;
}
The CMakeLists.txt file is largely unchanged with respect to Chapter 3, Detecting External Libraries and Programs, Recipe 5, Detecting the OpenMP parallel environment, except there is an additional install target:
# set minimum cmake version
cmake_minimum_required(VERSION 3.9 FATAL_ERROR)
# project name and language
project(recipe-02 LANGUAGES CXX)
set(CMAKE_CXX_STANDARD 11)
set(CMAKE_CXX_EXTENSIONS OFF)
set(CMAKE_CXX_STANDARD_REQUIRED ON)
include(GNUInstallDirs)
set(CMAKE_ARCHIVE_OUTPUT_DIRECTORY
${CMAKE_BINARY_DIR}/${CMAKE_INSTALL_LIBDIR})
set(CMAKE_LIBRARY_OUTPUT_DIRECTORY
${CMAKE_BINARY_DIR}/${CMAKE_INSTALL_LIBDIR})
set(CMAKE_RUNTIME_OUTPUT_DIRECTORY
${CMAKE_BINARY_DIR}/${CMAKE_INSTALL_BINDIR})
find_package(OpenMP REQUIRED)
add_executable(example example.cpp)
target_link_libraries(example
PUBLIC
OpenMP::OpenMP_CXX
)
install(
TARGETS
example
DESTINATION
${CMAKE_INSTALL_BINDIR}
)
With the following steps, we will manage to cross-compile an OpenMP-parallelized Windows executable:
# the name of the target operating system
set(CMAKE_SYSTEM_NAME Windows)
# which compilers to use
set(CMAKE_CXX_COMPILER i686-w64-mingw32-g++)
# adjust the default behaviour of the find commands:
# search headers and libraries in the target environment
set(CMAKE_FIND_ROOT_PATH_MODE_INCLUDE ONLY)
set(CMAKE_FIND_ROOT_PATH_MODE_LIBRARY ONLY)
# search programs in the host environment
set(CMAKE_FIND_ROOT_PATH_MODE_PROGRAM NEVER)
$ mkdir -p build
$ cd build
$ cmake -D CMAKE_TOOLCHAIN_FILE=toolchain.cmake ..
-- The CXX compiler identification is GNU 5.4.0
-- Check for working CXX compiler: /home/user/mxe/usr/bin/i686-w64-mingw32.static-g++
-- Check for working CXX compiler: /home/user/mxe/usr/bin/i686-w64-mingw32.static-g++ -- works
-- Detecting CXX compiler ABI info
-- Detecting CXX compiler ABI info - done
-- Detecting CXX compile features
-- Detecting CXX compile features - done
-- Found OpenMP_CXX: -fopenmp (found version "4.0")
-- Found OpenMP: TRUE (found version "4.0")
-- Configuring done
-- Generating done
-- Build files have been written to: /home/user/cmake-recipes/chapter-13/recipe-02/cxx-example/build
$ cmake --build .
Scanning dependencies of target example
[ 50%] Building CXX object CMakeFiles/example.dir/example.cpp.obj
[100%] Linking CXX executable bin/example.exe
[100%] Built target example
$ set OMP_NUM_THREADS=1
$ example.exe 1000000000
number of available processors: 2
number of threads: 1
we will form sum of numbers from 1 to 1000000000
sum: 500000000500000000
elapsed wall clock time: 2.641 seconds
$ set OMP_NUM_THREADS=2
$ example.exe 1000000000
number of available processors: 2
number of threads: 2
we will form sum of numbers from 1 to 1000000000
sum: 500000000500000000
elapsed wall clock time: 1.328 seconds
We have successfully built an executable for parallel execution on the Windows platform using cross-compilation with a simple toolchain. We were able to specify the number of OpenMP threads by setting OMP_NUM_THREADS. Going from 1 thread to 2 threads, we have observed a reduction of runtime from 2.6 to 1.3 seconds. For a discussion of the toolchain file, please see the previous recipe.
It is possible to cross-compile for a set of target platforms, for instance, Android. For examples, we refer the reader to https://cmake.org/cmake/help/latest/manual/cmake-toolchains.7.html.
In this chapter, we will cover the following recipes:
CDash is a web service used to aggregate the test results reported by CTest during a test run or nightly testing, or in a continuous integration setting. Reporting to the dashboard is what we refer to as CDash time, as illustrated by the following diagram:

In this chapter, we will demonstrate recipes to report test results to a CDash dashboard. We will discuss strategies for reporting test coverage, as well as memory defects and data races collected with tools such as the AddressSanitizer and the ThreadSanitizer, respectively.
There are two ways to report to CDash: either through the test target of a build or by using a CTest script. We will demonstrate the test target route in the first two recipes and will use the CTest script route in the last two recipes.
The installation of CDash requires a web server (Apache, NGINX, or IIS) with PHP and SSL enabled, and access to a MySQL or PostgreSQL database server. It is outside of the scope of this book to discuss the setup of a CDash web service in detail; we refer the reader to its official documentation, at https://public.kitware.com/Wiki/CDash:Installation.
Installing a CDash instance is not a requirement for producing the recipes in this chapter since Kitware offers two public dashboards (https://my.cdash.org and https://open.cdash.org). We will reference the former in the recipes.
For readers that decide to install their own CDash instance, we recommend using a MySQL backend, since this seems to be the configuration used by https://my.cdash.org and https://open.cdash.org, and also seems to be better tested by the community.
In this recipe, we will extend the test example of Recipe 1, Creating a simple unit test, from Chapter 4, Creating and Running Tests, and deploy the test result to https://my.cdash.org/index.php?project=cmake-cookbook, which we created for this book on the public dashboard (https://my.cdash.org) provided to the community by Kitware.
We will start by reusing the example source code from Recipe 1, Creating a simple unit test, in Chapter 4, Creating and Running Tests, which sums integers given as command-line arguments. The example consists of three source files: main.cpp, sum_integers.cpp, and sum_integers.hpp. These sources are unchanged. We will also reuse the file test.cpp from Chapter 4, Creating and Running Tests, but will rename it to test_short.cpp. We will extend the example with test_long.cpp, containing the following code:
#include "sum_integers.hpp"
#include <numeric>
#include <vector>
int main() {
// creates vector {1, 2, 3, ..., 999, 1000}
std::vector<int> integers(1000);
std::iota(integers.begin(), integers.end(), 1);
if (sum_integers(integers) == 500500) {
return 0;
} else {
return 1;
}
}
We will then organize these files into the following file tree:
.
├── CMakeLists.txt
├── CTestConfig.cmake
├── src
│ ├── CMakeLists.txt
│ ├── main.cpp
│ ├── sum_integers.cpp
│ └── sum_integers.hpp
└── tests
├── CMakeLists.txt
├── test_long.cpp
└── test_short.cpp
We will now describe how to configure, build, test, and finally, submit the test results for our example project to the dashboard:
# example library
add_library(sum_integers "")
target_sources(sum_integers
PRIVATE
sum_integers.cpp
PUBLIC
${CMAKE_CURRENT_LIST_DIR}/sum_integers.hpp
)
target_include_directories(sum_integers
PUBLIC
${CMAKE_CURRENT_LIST_DIR}
)
# main code
add_executable(sum_up main.cpp)
target_link_libraries(sum_up sum_integers)
add_executable(test_short test_short.cpp)
target_link_libraries(test_short sum_integers)
add_executable(test_long test_long.cpp)
target_link_libraries(test_long sum_integers)
add_test(
NAME
test_short
COMMAND
$<TARGET_FILE:test_short>
)
add_test(
NAME
test_long
COMMAND
$<TARGET_FILE:test_long>
)
# set minimum cmake version
cmake_minimum_required(VERSION 3.5 FATAL_ERROR)
# project name and language
project(recipe-01 LANGUAGES CXX)
# require C++11
set(CMAKE_CXX_STANDARD 11)
set(CMAKE_CXX_EXTENSIONS OFF)
set(CMAKE_CXX_STANDARD_REQUIRED ON)
# process src/CMakeLists.txt
add_subdirectory(src)
enable_testing()
# allow to report to a cdash dashboard
include(CTest)
# process tests/CMakeLists.txt
add_subdirectory(tests)
set(CTEST_DROP_METHOD "http")
set(CTEST_DROP_SITE "my.cdash.org")
set(CTEST_DROP_LOCATION "/submit.php?project=cmake-cookbook")
set(CTEST_DROP_SITE_CDASH TRUE)
$ mkdir -p build
$ cd build
$ cmake ..
$ cmake --build .
$ ctest --dashboard Experimental
Site: larry
Build name: Linux-c++
Create new tag: 20180408-1449 - Experimental
Configure project
Each . represents 1024 bytes of output
. Size of output: 0K
Build project
Each symbol represents 1024 bytes of output.
'!' represents an error and '*' a warning.
. Size of output: 0K
0 Compiler errors
0 Compiler warnings
Test project /home/user/cmake-recipes/chapter-15/recipe-01/cxx-example/build
Start 1: test_short
1/2 Test #1: test_short ....................... Passed 0.00 sec
Start 2: test_long
2/2 Test #2: test_long ........................ Passed 0.00 sec
100% tests passed, 0 tests failed out of 2
Total Test time (real) = 0.01 sec
Performing coverage
Cannot find any coverage files. Ignoring Coverage request.
Submit files (using http)
Using HTTP submit method
Drop site:http://my.cdash.org/submit.php?project=cmake-cookbook
Uploaded: /home/user/cmake-recipes/chapter-14/recipe-01/cxx-example/build/Testing/20180408-1449/Build.xml
Uploaded: /home/user/cmake-recipes/chapter-14/recipe-01/cxx-example/build/Testing/20180408-1449/Configure.xml
Uploaded: /home/user/cmake-recipes/chapter-14/recipe-01/cxx-example/build/Testing/20180408-1449/Test.xml
Submission successful

A high-level overview of the workflow shows that CTest runs the tests and records results locally in XML files. These XML files are then sent to the CDash server, where they can be browsed and analyzed. We can obtain more details about the passed or failed tests (in this example, there are no failed tests) by clicking on the 2 under Pass, as shown in the preceding screenshot. The details, as shown in the following screenshot, record information about the machine that ran the tests, as well as timing information. Again, the test output for individual tests can be browsed online.

CTest supports three different running submission modes: Experimental, Nightly, and Continuous. We have used ctest --dashboard Experimental, and thus, the test results appear under Experimental. The Experimental mode is useful for testing the current state of the code, for debugging a new dashboard script (see Recipes 3 and 4 in this chapter), or for debugging a CDash server or project. The Nightly mode will update (or down-date) the code to the repository snapshot closest to the latest nightly start time, which can be set in CTestConfig.cmake; it gives all nightly tests in a project that receives frequent updates a well-defined reference point. For instance, the nightly start time can be set to midnight, Coordinated Universal Time, as follows:
set(CTEST_NIGHTLY_START_TIME "00:00:00 UTC")
The Continuous mode is useful for a continuous integration workflow and will update the code to the latest version.
In this recipe, we deployed to CDash directly from the test target. It is possible to use a dedicated CTest script instead, and we will demonstrate this approach later in this chapter, in the upcoming Recipes 3 and 4.
CDash allows you to monitor not only whether tests are passing or failing, but also the test timing. You can configure margins for test timing: if a test takes more time than allotted, it will be marked as failing. This is useful for benchmark tests, to automatically detect performance degradation in test timing when refactoring code.
See the official CDash documentation for a detailed discussion of CDash definitions and configuration settings, at https://public.kitware.com/Wiki/CDash:Documentation.
In this recipe, we will measure the test coverage and report it to the CDash dashboard, where we will be able to browse the test coverage analysis line-by-line, in order to identify untested or unused code.
We will extend the source code of the previous recipe with a minor change in src/sum_integers.cpp, where we will add a function - sum_integers_unused:
#include "sum_integers.hpp"
#include <vector>
int sum_integers(const std::vector<int> integers) {
auto sum = 0;
for (auto i : integers) {
sum += i;
}
return sum;
}
int sum_integers_unused(const std::vector<int> integers) {
auto sum = 0;
for (auto i : integers) {
sum += i;
}
return sum;
}
Our goal is to detect this unused code with a test coverage analysis, by using gcov (https://gcc.gnu.org/onlinedocs/gcc/Gcov.html). Apart from the preceding modification, we will use the unmodified sources of the previous recipe.
Through the following steps, we will enable coverage analysis and upload the results to the dashboard:
option(ENABLE_COVERAGE "Enable coverage" ON)
if(ENABLE_COVERAGE)
if(CMAKE_CXX_COMPILER_ID MATCHES GNU)
message(STATUS "Coverage analysis with gcov enabled")
target_compile_options(sum_integers
PUBLIC
-fprofile-arcs -ftest-coverage -g
)
target_link_libraries(sum_integers
PUBLIC
gcov
)
else()
message(WARNING "Coverage not supported for this compiler")
endif()
endif()
$ mkdir -p build
$ cd build
$ cmake ..
$ cmake --build . --target Experimental
Performing coverage
Processing coverage (each . represents one file):
...
Accumulating results (each . represents one file):
...
Covered LOC: 14
Not covered LOC: 7
Total LOC: 21
Percentage Coverage: 66.67%
Submit files (using http)
Using HTTP submit method
Drop site:http://my.cdash.org/submit.php?project=cmake-cookbook
Uploaded: /home/user/cmake-recipes/chapter-14/recipe-02/cxx-example/build/Testing/20180408-1530/Build.xml
Uploaded: /home/user/cmake-recipes/chapter-14/recipe-02/cxx-example/build/Testing/20180408-1530/Configure.xml
Uploaded: /home/user/cmake-recipes/chapter-14/recipe-02/cxx-example/build/Testing/20180408-1530/Coverage.xml
Uploaded: /home/user/cmake-recipes/chapter-14/recipe-02/cxx-example/build/Testing/20180408-1530/CoverageLog-0.xml
Uploaded: /home/user/cmake-recipes/chapter-14/recipe-02/cxx-example/build/Testing/20180408-1530/Test.xml
Submission successful
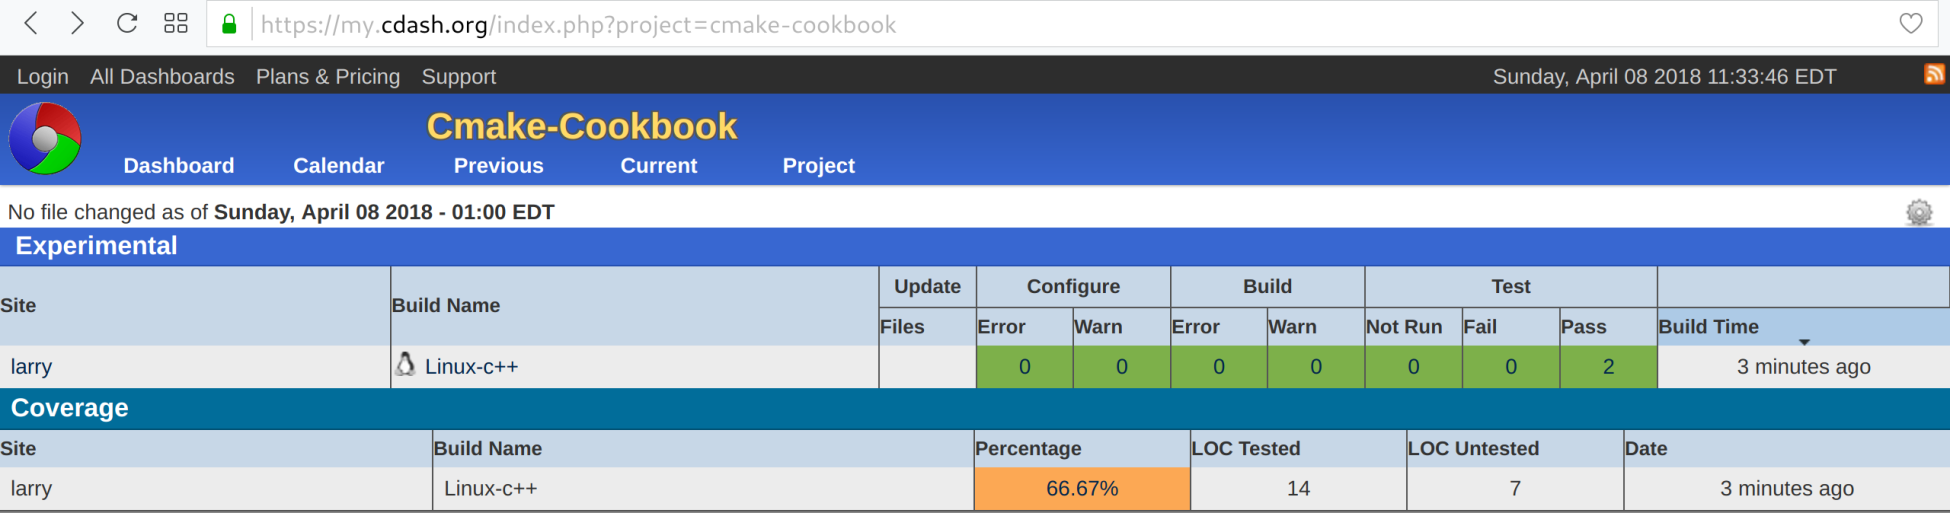
The test coverage analysis is summarized with a percentage of 66.67%. To get further insights, we can click on the percentage and obtain a coverage analysis for the two subdirectories, as follows:
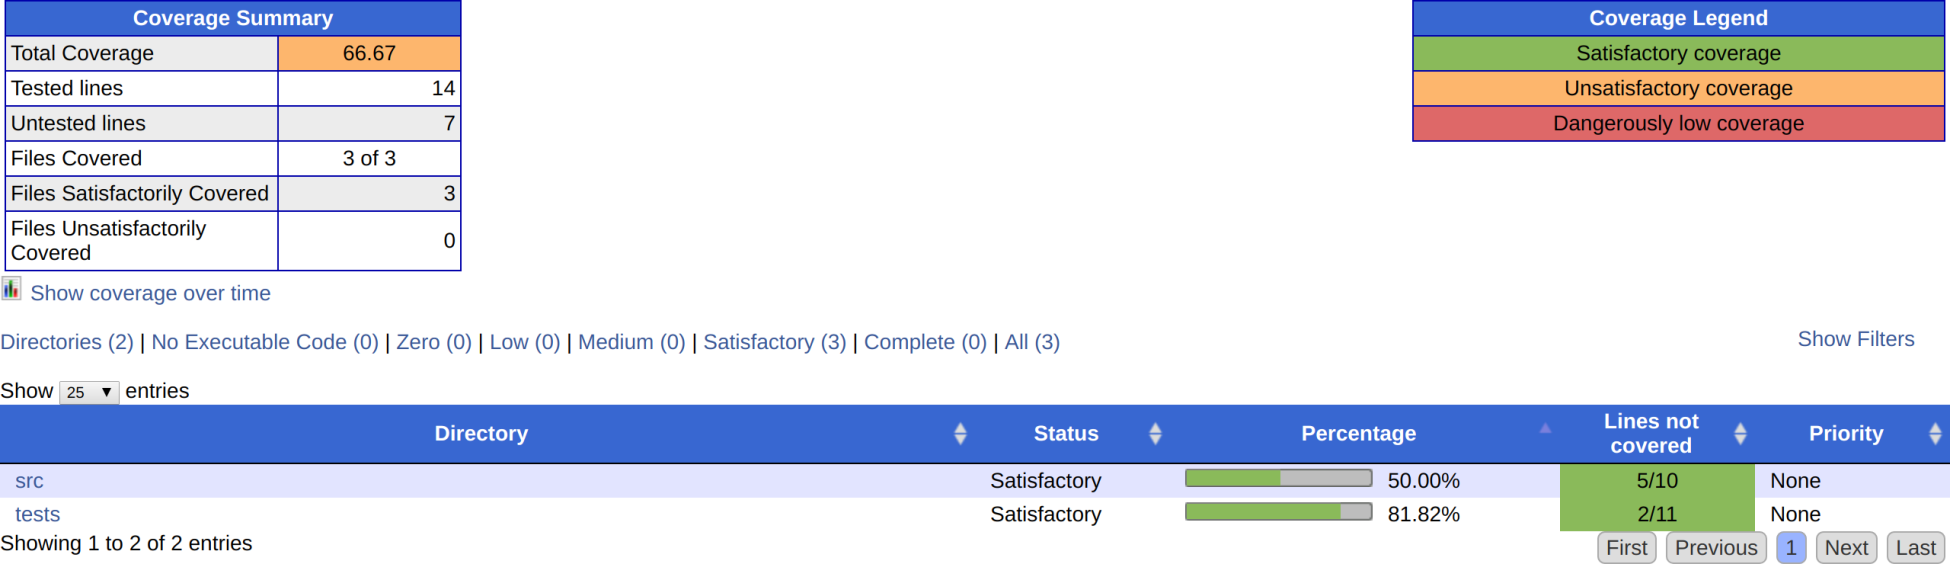
By browsing the subdirectory links, we can inspect the test coverage percentage for individual files, and can even browse a line-by-line summary (for example, src/sum_integers.cpp):
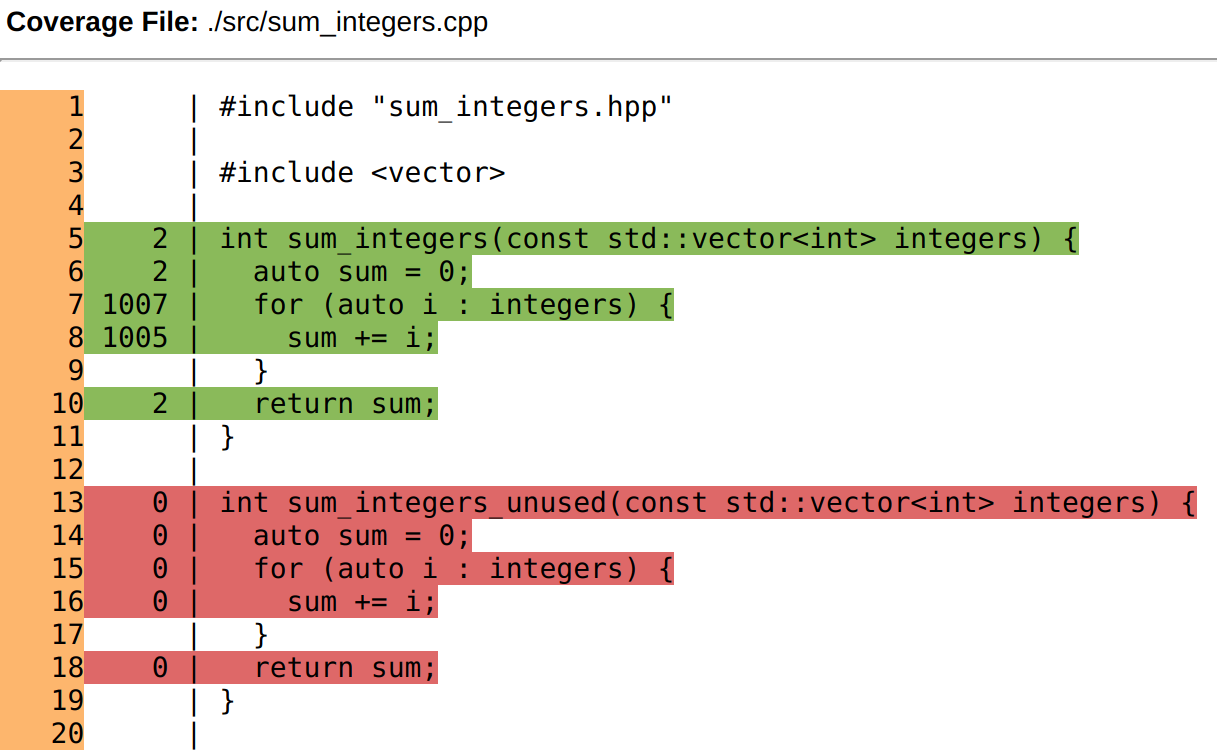
The green lines have been traversed when running the test suite, whereas the red lines have not. Through this, we can not only identify unused/untested code (with the function sum_integers_unused) but can also see how often each line has been traversed. For instance, the code line sum += i has been visited 1,005 times (5 times during test_short, and 1,000 times during test_long). Test coverage analysis is an indispensable companion to automated testing, and CDash provides us with an interface to browse and analyze the results graphically in the browser.
For further reading, we recommend the following blog post, which discusses additional coverage features in CDash: https://blog.kitware.com/additional-coverage-features-in-cdash/.
AddressSanitizer (ASan) is a memory error detector for C++, C, and Fortran. It can find memory defects, such as use after free, use after return, use after scope, buffer overflows, initialization order bugs, and memory leaks (see https://github.com/google/sanitizers/wiki/AddressSanitizer). AddressSanitizer is a part of LLVM, starting with version 3.1, and is a part of GCC, starting with version 4.8. In this recipe, we will fabricate two bugs in our code, which may go undetected in a normal test run. To detect these bugs, we will couple CTest with dynamic analysis by using AddressSanitizer, and will report the defects to CDash.
In this example, we will use two source files and two tests, as follows:
.
├── CMakeLists.txt
├── CTestConfig.cmake
├── dashboard.cmake
├── src
│ ├── buggy.cpp
│ ├── buggy.hpp
│ └── CMakeLists.txt
└── tests
├── CMakeLists.txt
├── leaky.cpp
└── use_after_free.cpp
The file buggy.cpp contains two buggy functions, as follows:
#include "buggy.hpp"
#include <iostream>
int function_leaky() {
double *my_array = new double[1000];
// do some work ...
// we forget to deallocate the array
// delete[] my_array;
return 0;
}
int function_use_after_free() {
double *another_array = new double[1000];
// do some work ...
// deallocate it, good!
delete[] another_array;
// however, we accidentally use the array
// after it has been deallocated
std::cout << "not sure what we get: " << another_array[123] << std::endl;
return 0;
}
These functions are exposed in the corresponding header file (buggy.hpp):
#pragma once
int function_leaky();
int function_use_after_free();
The test source, leaky.cpp, verifies the return code from function_leaky:
#include "buggy.hpp"
int main() {
int return_code = function_leaky();
return return_code;
}
Correspondingly, use_after_free.cpp checks the return value of function_use_after_free, as follows:
#include "buggy.hpp"
int main() {
int return_code = function_use_after_free();
return return_code;
}
We need to compile our code with particular flags to take advantage of ASan. Then, we will run tests and submit them to the dashboard. Let us take a look at how to do this:
add_library(buggy "")
target_sources(buggy
PRIVATE
buggy.cpp
PUBLIC
${CMAKE_CURRENT_LIST_DIR}/buggy.hpp
)
target_include_directories(buggy
PUBLIC
${CMAKE_CURRENT_LIST_DIR}
)
option(ENABLE_ASAN "Enable AddressSanitizer" OFF)
if(ENABLE_ASAN)
if(CMAKE_CXX_COMPILER_ID MATCHES GNU)
message(STATUS "AddressSanitizer enabled")
target_compile_options(buggy
PUBLIC
-g -O1 -fsanitize=address -fno-omit-frame-pointer
)
target_link_libraries(buggy
PUBLIC
asan
)
else()
message(WARNING "AddressSanitizer not supported for this compiler")
endif()
endif()
foreach(_test IN ITEMS leaky use_after_free)
add_executable(${_test} ${_test}.cpp)
target_link_libraries(${_test} buggy)
add_test(
NAME
${_test}
COMMAND
$<TARGET_FILE:${_test}>
)
endforeach()
# set minimum cmake version
cmake_minimum_required(VERSION 3.5 FATAL_ERROR)
# project name and language
project(recipe-03 LANGUAGES CXX)
# require C++11
set(CMAKE_CXX_STANDARD 11)
set(CMAKE_CXX_EXTENSIONS OFF)
set(CMAKE_CXX_STANDARD_REQUIRED ON)
# process src/CMakeLists.txt
add_subdirectory(src)
enable_testing()
# allow to report to a cdash dashboard
include(CTest)
# process tests/CMakeLists.txt
add_subdirectory(tests)
set(CTEST_DROP_METHOD "http")
set(CTEST_DROP_SITE "my.cdash.org")
set(CTEST_DROP_LOCATION "/submit.php?project=cmake-cookbook")
set(CTEST_DROP_SITE_CDASH TRUE)
set(CTEST_PROJECT_NAME "example")
cmake_host_system_information(RESULT _site QUERY HOSTNAME)
set(CTEST_SITE ${_site})
set(CTEST_BUILD_NAME "${CMAKE_SYSTEM_NAME}-${CMAKE_HOST_SYSTEM_PROCESSOR}")
set(CTEST_SOURCE_DIRECTORY "${CTEST_SCRIPT_DIRECTORY}")
set(CTEST_BINARY_DIRECTORY "${CTEST_SCRIPT_DIRECTORY}/build")
include(ProcessorCount)
ProcessorCount(N)
if(NOT N EQUAL 0)
set(CTEST_BUILD_FLAGS -j${N})
set(ctest_test_args ${ctest_test_args} PARALLEL_LEVEL ${N})
endif()
ctest_start(Experimental)
ctest_configure(
OPTIONS
-DENABLE_ASAN:BOOL=ON
)
ctest_build()
ctest_test()
set(CTEST_MEMORYCHECK_TYPE "AddressSanitizer")
ctest_memcheck()
ctest_submit()
$ ctest -S dashboard.cmake -D CTEST_CMAKE_GENERATOR="Unix Makefiles"
Each . represents 1024 bytes of output
. Size of output: 0K
Each symbol represents 1024 bytes of output.
'!' represents an error and '*' a warning.
. Size of output: 1K

In this recipe, we successfully reported memory bugs to the Dynamic Analysis section of the dashboard. We can gain further insights by browsing the defects (under Defect Count):
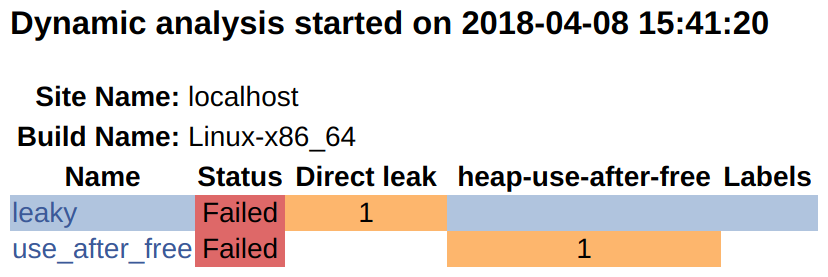
By clicking on the individual links, it is possible to browse the full output.
Note that it is also possible to generate the AddressSanitizer report locally. In this example, we need to set ENABLE_ASAN, as follows:
$ mkdir -p build
$ cd build
$ cmake -DENABLE_ASAN=ON ..
$ cmake --build .
$ cmake --build . --target test
Start 1: leaky
1/2 Test #1: leaky ............................***Failed 0.07 sec
Start 2: use_after_free
2/2 Test #2: use_after_free ...................***Failed 0.04 sec
0% tests passed, 2 tests failed out of 2
Running the leaky test executable directly produces the following:
$ ./build/tests/leaky
=================================================================
==18536==ERROR: LeakSanitizer: detected memory leaks
Direct leak of 8000 byte(s) in 1 object(s) allocated from:
#0 0x7ff984da1669 in operator new[](unsigned long) /build/gcc/src/gcc/libsanitizer/asan/asan_new_delete.cc:82
#1 0x564925c93fd2 in function_leaky() /home/user/cmake-recipes/chapter-14/recipe-03/cxx-example/src/buggy.cpp:7
#2 0x564925c93fb2 in main /home/user/cmake-recipes/chapter-14/recipe-03/cxx-example/tests/leaky.cpp:4
#3 0x7ff98403df49 in __libc_start_main (/usr/lib/libc.so.6+0x20f49)
SUMMARY: AddressSanitizer: 8000 byte(s) leaked in 1 allocation(s).
Correspondingly, we can obtain detailed output by running the use_after_free executable directly, as follows:
$ ./build/tests/use_after_free
=================================================================
==18571==ERROR: AddressSanitizer: heap-use-after-free on address 0x6250000004d8 at pc 0x557ffa8b0102 bp 0x7ffe8c560200 sp 0x7ffe8c5601f0
READ of size 8 at 0x6250000004d8 thread T0
#0 0x557ffa8b0101 in function_use_after_free() /home/user/cmake-recipes/chapter-14/recipe-03/cxx-example/src/buggy.cpp:28
#1 0x557ffa8affb2 in main /home/user/cmake-recipes/chapter-14/recipe-03/cxx-example/tests/use_after_free.cpp:4
#2 0x7ff1d6088f49 in __libc_start_main (/usr/lib/libc.so.6+0x20f49)
#3 0x557ffa8afec9 in _start (/home/user/cmake-recipes/chapter-14/recipe-03/cxx-example/build/tests/use_after_free+0xec9)
0x6250000004d8 is located 984 bytes inside of 8000-byte region [0x625000000100,0x625000002040)
freed by thread T0 here:
#0 0x7ff1d6ded5a9 in operator delete[](void*) /build/gcc/src/gcc/libsanitizer/asan/asan_new_delete.cc:128
#1 0x557ffa8afffa in function_use_after_free() /home/user/cmake-recipes/chapter-14/recipe-03/cxx-example/src/buggy.cpp:24
#2 0x557ffa8affb2 in main /home/user/cmake-recipes/chapter-14/recipe-03/cxx-example/tests/use_after_free.cpp:4
#3 0x7ff1d6088f49 in __libc_start_main (/usr/lib/libc.so.6+0x20f49)
previously allocated by thread T0 here:
#0 0x7ff1d6dec669 in operator new[](unsigned long) /build/gcc/src/gcc/libsanitizer/asan/asan_new_delete.cc:82
#1 0x557ffa8affea in function_use_after_free() /home/user/cmake-recipes/chapter-14/recipe-03/cxx-example/src/buggy.cpp:19
#2 0x557ffa8affb2 in main /home/user/cmake-recipes/chapter-14/recipe-03/cxx-example/tests/use_after_free.cpp:4
#3 0x7ff1d6088f49 in __libc_start_main (/usr/lib/libc.so.6+0x20f49)
SUMMARY: AddressSanitizer: heap-use-after-free /home/user/cmake-recipes/chapter-14/recipe-03/cxx-example/src/buggy.cpp:28 in function_use_after_free()
Shadow bytes around the buggy address:
0x0c4a7fff8040: fd fd fd fd fd fd fd fd fd fd fd fd fd fd fd fd
0x0c4a7fff8050: fd fd fd fd fd fd fd fd fd fd fd fd fd fd fd fd
0x0c4a7fff8060: fd fd fd fd fd fd fd fd fd fd fd fd fd fd fd fd
0x0c4a7fff8070: fd fd fd fd fd fd fd fd fd fd fd fd fd fd fd fd
0x0c4a7fff8080: fd fd fd fd fd fd fd fd fd fd fd fd fd fd fd fd
=>0x0c4a7fff8090: fd fd fd fd fd fd fd fd fd fd fd[fd]fd fd fd fd
0x0c4a7fff80a0: fd fd fd fd fd fd fd fd fd fd fd fd fd fd fd fd
0x0c4a7fff80b0: fd fd fd fd fd fd fd fd fd fd fd fd fd fd fd fd
0x0c4a7fff80c0: fd fd fd fd fd fd fd fd fd fd fd fd fd fd fd fd
0x0c4a7fff80d0: fd fd fd fd fd fd fd fd fd fd fd fd fd fd fd fd
0x0c4a7fff80e0: fd fd fd fd fd fd fd fd fd fd fd fd fd fd fd fd
Shadow byte legend (one shadow byte represents 8 application bytes):
Addressable: 00
Partially addressable: 01 02 03 04 05 06 07
Heap left redzone: fa
Freed heap region: fd
Stack left redzone: f1
Stack mid redzone: f2
Stack right redzone: f3
Stack after return: f5
Stack use after scope: f8
Global redzone: f9
Global init order: f6
Poisoned by user: f7
Container overflow: fc
Array cookie: ac
Intra object redzone: bb
ASan internal: fe
Left alloca redzone: ca
Right alloca redzone: cb
==18571==ABORTING
If we test without the AddressSanitizer (ENABLE_ASAN is OFF by default), no error is reported in the following example:
$ mkdir -p build_no_asan
$ cd build_no_asan
$ cmake ..
$ cmake --build .
$ cmake --build . --target test
Start 1: leaky
1/2 Test #1: leaky ............................ Passed 0.00 sec
Start 2: use_after_free
2/2 Test #2: use_after_free ................... Passed 0.00 sec
100% tests passed, 0 tests failed out of 2
Indeed, leaky will just waste memory, whereas use_after_free may result in non-deterministic failures. One way to debug these failures is to use valgrind (http://valgrind.org).
In contrast to the previous two recipes, we have used a CTest script to configure, build, and test the code, and to submit the report to the dashboard. To understand how this recipe works, take a closer look at the dashboard.cmake script. First, we define the project name and set the host reporting and the build name, as follows:
set(CTEST_PROJECT_NAME "example")
cmake_host_system_information(RESULT _site QUERY HOSTNAME)
set(CTEST_SITE ${_site})
set(CTEST_BUILD_NAME "${CMAKE_SYSTEM_NAME}-${CMAKE_HOST_SYSTEM_PROCESSOR}")
In our case, the CTEST_BUILD_NAME evaluates to Linux-x86_64. In your case, you may observe a different result, depending on your operating system.
Next, we specify paths for the source and build directories:
set(CTEST_SOURCE_DIRECTORY "${CTEST_SCRIPT_DIRECTORY}")
set(CTEST_BINARY_DIRECTORY "${CTEST_SCRIPT_DIRECTORY}/build")
We could set the generator to Unix Makefiles:
set(CTEST_CMAKE_GENERATOR "Unix Makefiles")
However, for a more portable test script, we prefer to provide the generator via the command line, as follows:
$ ctest -S dashboard.cmake -D CTEST_CMAKE_GENERATOR="Unix Makefiles"
The next code snippet in dashboard.cmake figures out the number of available cores on the machine and sets the parallel level of the test step to the number of available cores, in order to minimize the total test time:
include(ProcessorCount)
ProcessorCount(N)
if(NOT N EQUAL 0)
set(CTEST_BUILD_FLAGS -j${N})
set(ctest_test_args ${ctest_test_args} PARALLEL_LEVEL ${N})
endif()
Next, we start the testing step and configure the code, with ENABLE_ASAN set to ON:
ctest_start(Experimental)
ctest_configure(
OPTIONS
-DENABLE_ASAN:BOOL=ON
)
The remaining commands in dashboard.cmake map to the build, test, memcheck, and submit steps:
ctest_build()
ctest_test()
set(CTEST_MEMORYCHECK_TYPE "AddressSanitizer")
ctest_memcheck()
ctest_submit()
The attentive reader will have noticed that we did not search for the AddressSanitizer on our system prior to linking our target against it. A real-world, complete use case would have done that, to avoid unpleasant surprises during the linking stage. We will remind the reader that we showed a method to probe for the availability of sanitizers in Recipe 7, Probing compiler flags, in Chapter 5, Configure-time and Build-time Operations.
For more AddressSanitizer documentation and examples, see https://github.com/google/sanitizers/wiki/AddressSanitizer. AddressSanitizer is not limited to C and C++. For a Fortran example, we refer the reader to the code repository at https://github.com/dev-cafe/cmake-cookbook/tree/v1.0/chapter-14/recipe-03/fortran-example.
The following blog post discusses examples of how to add support for dynamic analysis tools, and it inspired the present recipe: https://blog.kitware.com/ctest-cdash-add-support-for-new-dynamic-analysis-tools/.
In this recipe, we will reuse the approach from the previous example, but use ThreadSanitizer, or TSan, in combination with CTest and CDash, to identify data races and report these to a CDash dashboard. The documentation for ThreadSanitizer can be found online, at https://github.com/google/sanitizers/wiki/ThreadSanitizerCppManual.
In this recipe, we will work with the following example code (example.cpp):
#include <chrono>
#include <iostream>
#include <thread>
static const int num_threads = 16;
void increase(int i, int &s) {
std::this_thread::sleep_for(std::chrono::seconds(1));
std::cout << "thread " << i << " increases " << s++ << std::endl;
}
int main() {
std::thread t[num_threads];
int s = 0;
// start threads
for (auto i = 0; i < num_threads; i++) {
t[i] = std::thread(increase, i, std::ref(s));
}
// join threads with main thread
for (auto i = 0; i < num_threads; i++) {
t[i].join();
}
std::cout << "final s: " << s << std::endl;
return 0;
}
In this example code, we start 16 threads, and each of these threads calls the increase function. The increase function sleeps for one second, then prints and increments an integer, s. We anticipate that this example code will manifest data races, because all threads read and modify the same address, without any explicit synchronization or coordination. In other words, we expect that the final s, which is printed at the end of the code, may differ from run to run. The code is buggy, and we will try to identify the data race with the help of ThreadSanitizer. Without running ThreadSanitizer, we may not see any problems with the code:
$ ./example
thread thread 0 increases 01 increases 1
thread 9 increases 2
thread 4 increases 3
thread 10 increases 4
thread 2 increases 5
thread 3 increases 6
thread 13 increases 7
thread thread 7 increases 8
thread 14 increases 9
thread 8 increases 10
thread 12 increases 11
thread 15 increases 12
thread 11 increases 13
5 increases 14
thread 6 increases 15
final s: 16
Let us go through the necessary steps in detail, as follows:
cmake_minimum_required(VERSION 3.5 FATAL_ERROR)
project(recipe-04 LANGUAGES CXX)
set(CMAKE_CXX_STANDARD 11)
set(CMAKE_CXX_EXTENSIONS OFF)
set(CMAKE_CXX_STANDARD_REQUIRED ON)
find_package(Threads REQUIRED)
add_executable(example example.cpp)
target_link_libraries(example
PUBLIC
Threads::Threads
)
option(ENABLE_TSAN "Enable ThreadSanitizer" OFF)
if(ENABLE_TSAN)
if(CMAKE_CXX_COMPILER_ID MATCHES GNU)
message(STATUS "ThreadSanitizer enabled")
target_compile_options(example
PUBLIC
-g -O1 -fsanitize=thread -fno-omit-frame-pointer -fPIC
)
target_link_libraries(example
PUBLIC
tsan
)
else()
message(WARNING "ThreadSanitizer not supported for this compiler")
endif()
endif()
enable_testing()
# allow to report to a cdash dashboard
include(CTest)
add_test(
NAME
example
COMMAND
$<TARGET_FILE:example>
)
set(CTEST_DROP_METHOD "http")
set(CTEST_DROP_SITE "my.cdash.org")
set(CTEST_DROP_LOCATION "/submit.php?project=cmake-cookbook")
set(CTEST_DROP_SITE_CDASH TRUE)
set(CTEST_PROJECT_NAME "example")
cmake_host_system_information(RESULT _site QUERY HOSTNAME)
set(CTEST_SITE ${_site})
set(CTEST_BUILD_NAME "${CMAKE_SYSTEM_NAME}-${CMAKE_HOST_SYSTEM_PROCESSOR}")
set(CTEST_SOURCE_DIRECTORY "${CTEST_SCRIPT_DIRECTORY}")
set(CTEST_BINARY_DIRECTORY "${CTEST_SCRIPT_DIRECTORY}/build")
include(ProcessorCount)
ProcessorCount(N)
if(NOT N EQUAL 0)
set(CTEST_BUILD_FLAGS -j${N})
set(ctest_test_args ${ctest_test_args} PARALLEL_LEVEL ${N})
endif()
ctest_start(Experimental)
ctest_configure(
OPTIONS
-DENABLE_TSAN:BOOL=ON
)
ctest_build()
ctest_test()
set(CTEST_MEMORYCHECK_TYPE "ThreadSanitizer")
ctest_memcheck()
ctest_submit()
$ ctest -S dashboard.cmake -D CTEST_CMAKE_GENERATOR="Unix Makefiles"
Each . represents 1024 bytes of output
. Size of output: 0K
Each symbol represents 1024 bytes of output.
'!' represents an error and '*' a warning.
. Size of output: 0K
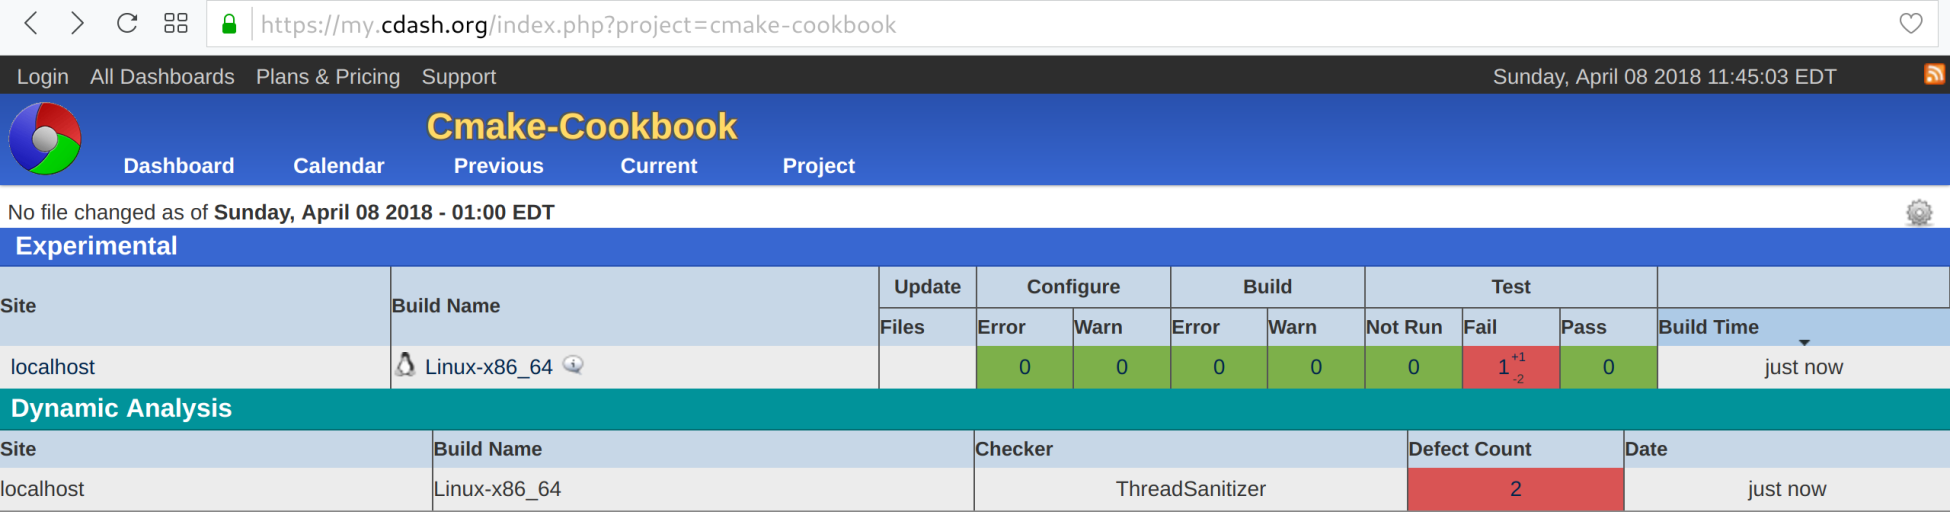

The core ingredients for this recipe are in the following section of CMakeLists.txt:
option(ENABLE_TSAN "Enable ThreadSanitizer" OFF)
if(ENABLE_TSAN)
if(CMAKE_CXX_COMPILER_ID MATCHES GNU)
message(STATUS "ThreadSanitizer enabled")
target_compile_options(example
PUBLIC
-g -O1 -fsanitize=thread -fno-omit-frame-pointer -fPIC
)
target_link_libraries(example
PUBLIC
tsan
)
else()
message(WARNING "ThreadSanitizer not supported for this compiler")
endif()
endif()
The ingredients are also in the updated steps in dashboard.cmake:
# ...
ctest_start(Experimental)
ctest_configure(
OPTIONS
-DENABLE_TSAN:BOOL=ON
)
ctest_build()
ctest_test()
set(CTEST_MEMORYCHECK_TYPE "ThreadSanitizer")
ctest_memcheck()
ctest_submit()
As in the previous recipe, we can also inspect the output from ThreadSanitizer locally:
$ mkdir -p build
$ cd build
$ cmake -DENABLE_TSAN=ON ..
$ cmake --build .
$ cmake --build . --target test
Start 1: example
1/1 Test #1: example ..........................***Failed 1.07 sec
0% tests passed, 1 tests failed out of 1
$ ./build/example
thread 0 increases 0
==================
WARNING: ThreadSanitizer: data race (pid=24563)
... lots of output ...
SUMMARY: ThreadSanitizer: data race /home/user/cmake-recipes/chapter-14/recipe-04/cxx-example/example.cpp:9 in increase(int, int&)
It would be a natural step to apply TSan on an OpenMP code, but please note that OpenMP is known to generate false positives under TSan, in some cases. For the Clang compilers, a workaround would be to recompile the compiler itself, and its libomp, with -DLIBOMP_TSAN_SUPPORT=TRUE. In general, using sanitizers in a sensible way may require a recompilation of the entire tool-stack, in order to avoid false positives. This will probably be the case for a C++ project using pybind11; we would need to recompile Python with the sanitizers enabled to get anything meaningful. Alternatively, the Python binding can be left out from the sanitizing by using sanitizer suppression, as explained at https://github.com/google/sanitizers/wiki/ThreadSanitizerSuppressions. This may not be possible if, for example, a shared library is called by both by a sanitized binary and a Python plugin.
The following blog post discusses examples of how to add support for dynamic analysis tools, and it inspired the present recipe: https://blog.kitware.com/ctest-cdash-add-support-for-new-dynamic-analysis-tools/.
In the final chapter of this book, we will combine a number of different building blocks that we have discussed in the previous chapters and apply them to a real-life project. Our goal will be to demonstrate step-by-step how to port a non-trivial project to CMake and discuss the steps involved in such a process. We will provide recommendations for porting your own projects or adding CMake support to legacy code, be it from Autotools, from hand-written configure scripts and Makefiles, or from Visual Studio project files.
To have a tangible and realistic example, we will use the source code behind the popular editor Vim (https://www.vim.org) and attempt to port the configuration and compilation from Autotools to CMake.
To keep the discussion and the examples relatively simple, we will not attempt to present a full port to CMake for the entire Vim code with all options. Instead, we will single out and discuss the most important aspects and only build a core version of Vim, without support for a graphical user interface (GUI). Nevertheless, we will arrive at a working version of Vim, configured, built, and tested with CMake and the other tools we have presented in the book.
The following topics will be covered in this chapter:
We will first show where to find our example online and then discuss the porting example step by step.
We will start from the v8.1.0290 release tag of the Vim source code repository (https://github.com/vim/vim) and base our work on the Git commit hash b476cb7. The following steps can be reproduced by cloning the source code repository of Vim and checking out that particular version of the code:
$ git clone --single-branch -b v8.1.0290 https://github.com/vim/vim.git
Alternatively, our solution can be found on the cmake-support branch at https://github.com/dev-cafe/vim and cloned to your computer using this:
$ git clone --single-branch -b cmake-support https://github.com/dev-cafe/vim
In this example, we will emulate a ./configure --enable-gui=no configuration in CMake, built with the GNU compiler collection.
For comparison with our solution later, and for additional inspiration, we encourage readers to also study the Neovim project (https://github.com/neovim/neovim), which is a fork of the traditional Vi editor and provides a CMake build system.
As a start, we create a top-level CMakeLists.txt in the root directory of the source code repository where we set the minimum CMake version, the project name, and supported languages, in this case C:
cmake_minimum_required(VERSION 3.5 FATAL_ERROR)
project(vim LANGUAGES C)
Before adding any targets or sources, we can already set the default build type. In this case, we default to the Release configuration, which will turn on certain compiler optimizations:
if(NOT CMAKE_BUILD_TYPE)
set(CMAKE_BUILD_TYPE Release CACHE STRING "Build type" FORCE)
endif()
We also use portable install directory variables, as defined for GNU software:
include(GNUInstallDirs)
set(CMAKE_ARCHIVE_OUTPUT_DIRECTORY
${CMAKE_BINARY_DIR}/${CMAKE_INSTALL_LIBDIR})
set(CMAKE_LIBRARY_OUTPUT_DIRECTORY
${CMAKE_BINARY_DIR}/${CMAKE_INSTALL_LIBDIR})
set(CMAKE_RUNTIME_OUTPUT_DIRECTORY
${CMAKE_BINARY_DIR}/${CMAKE_INSTALL_BINDIR})
As a sanity check, we can already try to configure and build the project, but so far there are no targets so the output from the build step will be empty:
$ mkdir -p build
$ cd build
$ cmake ..
$ cmake --build .
We will start adding targets in a moment to put more flesh on the bones.
A very nice feature of CMake is that we build out-of-source, the build directory can be any directory, and it does not have to be a subdirectory of the project directory. This means that we can port a project to CMake while not intruding into the previous/present configuration and build mechanism. For the migration of a non-trivial project, it is very useful that CMake files can coexist with other build frameworks to allow a gradual migration, both in terms of options, features, and portability, and to allow the developer community to adapt to the new framework. To allow both traditional and CMake configurations to coexist for a while, a typical strategy is to collect all CMake code in CMakeLists.txt files and all auxiliary CMake source files under a cmake subdirectory. In our example, we will not introduce a cmake subdirectory, but rather keep auxiliary files closer to the targets and sources requiring them, but we will take care to keep almost all files used by the traditional Autotools build unmodified, with one exception: we will apply few modifications in order to place autogenerated files under the build directory and not in the source tree.
Before we add any targets to the configuration, it is often useful to first capture a record of what the traditional build does, and save the output of the configuration and the build step into a log file. For our Vim example, this can be done using the following:
$ ./configure --enable-gui=no
... lot of output ...
$ make > build.log
In our case (the complete content of build.log is not shown here), we are able to verify which sources are compiled and which compile flags are used (-I. -Iproto
-DHAVE_CONFIG_H -g -O2 -U_FORTIFY_SOURCE -D_FORTIFY_SOURCE=1). From the log file, we can deduce the following:
When gradually moving targets and commands to the CMake side, it will be useful to print values of variables using the message command:
message(STATUS "for debugging printing the value of ${some_variable}")
By adding options, targets, sources, and dependencies while debugging using message, we will inch our way towards a working build.
Find out which options the traditional configuration offers to the users (for example, by running ./configure --help). The Vim project offers a very long list of options and flags and to keep the discussion in this chapter simple, we will implement only four of the options on the CMake side:
--disable-netbeans Disable NetBeans integration support.
--disable-channel Disable process communication support.
--enable-terminal Enable terminal emulation support.
--with-features=TYPE tiny, small, normal, big or huge (default: huge)
We will also ignore any GUI support and emulate --enable-gui=no, since it would complicate the example without significantly adding to the learning outcome.
We will place the following options and defaults in CMakeLists.txt:
option(ENABLE_NETBEANS "Enable netbeans" ON)
option(ENABLE_CHANNEL "Enable channel" ON)
option(ENABLE_TERMINAL "Enable terminal" ON)
We will emulate the --with-features flag using a variable, FEATURES, that can be defined with cmake -D FEATURES=value. We make sure that if FEATURES is not set, it defaults to "huge":
if(NOT FEATURES)
set(FEATURES "huge" CACHE STRING
"FEATURES chosen by the user at CMake configure time")
endif()
We also make sure that users provide a valid value for FEATURES:
list(APPEND _available_features "tiny" "small" "normal" "big" "huge")
if(NOT FEATURES IN_LIST _available_features)
message(FATAL_ERROR "Unknown features: \"${FEATURES}\". Allowed values are: ${_available_features}.")
endif()
set_property(CACHE FEATURES PROPERTY STRINGS ${_available_features})
The last line, containing set_property(CACHE FEATURES PROPERTY STRINGS ${_available_features}), has the nice effect that when configuring the project using cmake-gui, the user is presented with a selection field for FEATURES listing all available features that we have defined already (see also https://blog.kitware.com/constraining-values-with-comboboxes-in-cmake-cmake-gui/).
The options can either be placed in the top-level CMakeLists.txt (as we have done here) or they can be defined close to the targets that query ENABLE_NETBEANS, ENABLE_CHANNEL, ENABLE_TERMINAL, and FEATURES. The former strategy has the advantage that options are listed in one place and one does not need to traverse a tree of CMakeLists.txt files to find the definition of an option. Since we have not defined any targets yet, we can start with keeping the options in a central file, but we may later move the option definition closer to the targets to localize scope and arrive at more reusable CMake building blocks.
Let us add some sources. In the Vim example, sources are under src and to keep the main CMakeLists.txt readable and maintainable, we will create a new file, src/CMakeLists.txt, and process this file in its own directory scope by adding this to the main CMakeLists.txt:
add_subdirectory(src)
Inside src/CMakeLists.txt, we could start out defining the executable target and listing all sources that we have extracted from build.log:
add_executable(vim
arabic.c beval.c buffer.c blowfish.c crypt.c crypt_zip.c dict.c diff.c digraph.c edit.c eval.c evalfunc.c ex_cmds.c ex_cmds2.c ex_docmd.c ex_eval.c ex_getln.c farsi.c fileio.c fold.c getchar.c hardcopy.c hashtab.c if_cscope.c if_xcmdsrv.c list.c mark.c memline.c menu.c misc1.c misc2.c move.c mbyte.c normal.c ops.c option.c os_unix.c auto/pathdef.c popupmnu.c pty.c quickfix.c regexp.c screen.c search.c sha256.c spell.c spellfile.c syntax.c tag.c term.c terminal.c ui.c undo.c userfunc.c window.c libvterm/src/encoding.c libvterm/src/keyboard.c libvterm/src/mouse.c libvterm/src/parser.c libvterm/src/pen.c libvterm/src/screen.c libvterm/src/state.c libvterm/src/unicode.c libvterm/src/vterm.c netbeans.c channel.c charset.c json.c main.c memfile.c message.c version.c
)
This is a start. In this case, the code will not even configure since the list of sources contains generated files. Before we discuss generated files and link dependencies, we will split this long list up a bit to limit the scope of target dependencies and to make the project more manageable. We will also make it easier for CMake to scan source file dependencies and avoid a very long link line if we group them to targets.
For the Vim example, we can gain further insight into the grouping of sources from src/Makefile and src/configure.ac. From these files, we can deduce that most sources are basic and required. Some sources are optional (netbeans.c should only be built if ENABLE_NETBEANS is ON and channel.c should only be built when ENABLE_CHANNEL is ON). In addition, we can probably group all sources under src/libvterm/ and make their compilation optional with ENABLE_TERMINAL.
With this, we reorganize the CMake structure to the following tree structure:
.
├── CMakeLists.txt
└── src
├── CMakeLists.txt
└── libvterm
└── CMakeLists.txt
The top-level file adds src/CMakeLists.txt with add_subdirectory(src). The src/CMakeLists.txt file now contains three targets (one executable and two libraries), each carrying compile definitions and include directories. We first define the executable:
add_executable(vim
main.c
)
target_compile_definitions(vim
PRIVATE
"HAVE_CONFIG_H"
)
Then, we define the required sources:
add_library(basic_sources "")
target_sources(basic_sources
PRIVATE
arabic.c beval.c blowfish.c buffer.c charset.c
crypt.c crypt_zip.c dict.c diff.c digraph.c
edit.c eval.c evalfunc.c ex_cmds.c ex_cmds2.c
ex_docmd.c ex_eval.c ex_getln.c farsi.c fileio.c
fold.c getchar.c hardcopy.c hashtab.c if_cscope.c
if_xcmdsrv.c json.c list.c main.c mark.c
memfile.c memline.c menu.c message.c misc1.c
misc2.c move.c mbyte.c normal.c ops.c
option.c os_unix.c auto/pathdef.c popupmnu.c pty.c
quickfix.c regexp.c screen.c search.c sha256.c
spell.c spellfile.c syntax.c tag.c term.c
terminal.c ui.c undo.c userfunc.c version.c
window.c
)
target_include_directories(basic_sources
PRIVATE
${CMAKE_CURRENT_LIST_DIR}/proto
${CMAKE_CURRENT_LIST_DIR}
${CMAKE_CURRENT_BINARY_DIR}
)
target_compile_definitions(basic_sources
PRIVATE
"HAVE_CONFIG_H"
)
target_link_libraries(vim
PUBLIC
basic_sources
)
Then, we define the optional sources:
add_library(extra_sources "")
if(ENABLE_NETBEANS)
target_sources(extra_sources
PRIVATE
netbeans.c
)
endif()
if(ENABLE_CHANNEL)
target_sources(extra_sources
PRIVATE
channel.c
)
endif()
target_include_directories(extra_sources
PUBLIC
${CMAKE_CURRENT_LIST_DIR}/proto
${CMAKE_CURRENT_BINARY_DIR}
)
target_compile_definitions(extra_sources
PRIVATE
"HAVE_CONFIG_H"
)
target_link_libraries(vim
PUBLIC
extra_sources
)
The file also optionally processes and links src/libvterm/ with the following code:
if(ENABLE_TERMINAL)
add_subdirectory(libvterm)
target_link_libraries(vim
PUBLIC
libvterm
)
endif()
The corresponding src/libvterm/CMakeLists.txt contains the following:
add_library(libvterm "")
target_sources(libvterm
PRIVATE
src/encoding.c
src/keyboard.c
src/mouse.c
src/parser.c
src/pen.c
src/screen.c
src/state.c
src/unicode.c
src/vterm.c
)
target_include_directories(libvterm
PUBLIC
${CMAKE_CURRENT_LIST_DIR}/include
)
target_compile_definitions(libvterm
PRIVATE
"HAVE_CONFIG_H"
"INLINE="
"VSNPRINTF=vim_vsnprintf"
"IS_COMBINING_FUNCTION=utf_iscomposing_uint"
"WCWIDTH_FUNCTION=utf_uint2cells"
)
We have extracted the compile definitions from the recorded build.log. The advantage of the tree structure is that targets are defined close to where sources are located. If we decide to refactor the code and rename or move directories, the CMake files describing the targets have the chance to move with the sources.
Our example code still does not even configure (unless this is tried after a successful Autotools build):
$ mkdir -p build
$ cd build
$ cmake ..
-- The C compiler identification is GNU 8.2.0
-- Check for working C compiler: /usr/bin/cc
-- Check for working C compiler: /usr/bin/cc -- works
-- Detecting C compiler ABI info
-- Detecting C compiler ABI info - done
-- Detecting C compile features
-- Detecting C compile features - done
-- Configuring done
CMake Error at src/CMakeLists.txt:12 (add_library):
Cannot find source file:
auto/pathdef.c
Tried extensions .c .C .c++ .cc .cpp .cxx .cu .m .M .mm .h .hh .h++ .hm
.hpp .hxx .in .txx
We need to generate auto/pathdef.c (and other files), which we will consider in the next section.
It turns out that for the Vim code example, we need to generate three files at configure time, src/auto/pathdef.c, src/auto/config.h, and src/auto/osdef.h:
This situation is rather common. We will need to configure a file based on CMake variables, perform a number of platform checks to generate config.h, and execute a script at configure time. In particular, the platform checks are very common for projects striving for portability to accommodate the subtle differences between operating systems.
In the original layout, files are generated under the src folder. We do not like this approach and we will do it differently in our example CMake port: these files will be generated in the build directory. The reason for this is that generated files often depend on the chosen options, compiler, or build type and we wish to keep the ability to configure multiple builds with the same source. To enable generation in the build directory, we will have to apply minimal changes to the script which generates one of the files listed before.
We will collect functions that generate these files in src/autogenerate.cmake, include this module, and call these functions in src/CMakeLists.txt before defining the executable target:
# generate config.h, pathdef.c, and osdef.h
include(autogenerate.cmake)
generate_config_h()
generate_pathdef_c()
generate_osdef_h()
add_executable(vim
main.c
)
# ...
The included src/autogenerate.cmake contains other includes for functionality that we will require to probe header files, functions, and libraries, as well as the three functions:
include(CheckTypeSize)
include(CheckFunctionExists)
include(CheckIncludeFiles)
include(CheckLibraryExists)
include(CheckCSourceCompiles)
function(generate_config_h)
# ... to be written
endfunction()
function(generate_pathdef_c)
# ... to be written
endfunction()
function(generate_osdef_h)
# ... to be written
endfunction()
We choose to generate files with functions rather than in macros or "naked" CMake code. As we discussed in previous chapters, this sidesteps many pitfalls:
The config.h file is generated from src/config.h.in, which contains preprocessor flags that are configured depending on the system capabilities:
/* Define if we have EBCDIC code */
#undef EBCDIC
/* Define unless no X support found */
#undef HAVE_X11
/* Define when terminfo support found */
#undef TERMINFO
/* Define when termcap.h contains ospeed */
#undef HAVE_OSPEED
/* ... */
An example generated from src/config.h can start like this example (definitions can differ depending on the environment):
/* Define if we have EBCDIC code */
/* #undef EBCDIC */
/* Define unless no X support found */
#define HAVE_X11 1
/* Define when terminfo support found */
#define TERMINFO 1
/* Define when termcap.h contains ospeed */
/* #undef HAVE_OSPEED */
/* ... */
A great resource for platform checks is this page: https://www.vtk.org/Wiki/CMake:How_To_Write_Platform_Checks.
In src/configure.ac, we can examine which platform checks we need to perform to set corresponding preprocessor definitions.
We will make use of #cmakedefine (https://cmake.org/cmake/help/v3.5/command/configure_file.html?highlight=cmakedefine) and to make sure we do not break the existing Autotools build, we will copy config.h.in to config.h.cmake.in and change all #undef SOME_DEFINITION to #cmakedefine SOME_DEFINITION @SOME_DEFINITION@.
In the generate_config_h function, we first define a couple of variables:
set(TERMINFO 1)
set(UNIX 1)
# this is hardcoded to keep the discussion in the book chapter
# which describes the migration to CMake simpler
set(TIME_WITH_SYS_TIME 1)
set(RETSIGTYPE void)
set(SIGRETURN return)
find_package(X11)
set(HAVE_X11 ${X11_FOUND})
Then, we perform a couple of type size checks:
check_type_size("int" VIM_SIZEOF_INT)
check_type_size("long" VIM_SIZEOF_LONG)
check_type_size("time_t" SIZEOF_TIME_T)
check_type_size("off_t" SIZEOF_OFF_T)
Then, we loop over functions and check whether the system is able to resolve them:
foreach(
_function IN ITEMS
fchdir fchown fchmod fsync getcwd getpseudotty
getpwent getpwnam getpwuid getrlimit gettimeofday getwd lstat
memset mkdtemp nanosleep opendir putenv qsort readlink select setenv
getpgid setpgid setsid sigaltstack sigstack sigset sigsetjmp sigaction
sigprocmask sigvec strcasecmp strerror strftime stricmp strncasecmp
strnicmp strpbrk strtol towlower towupper iswupper
usleep utime utimes mblen ftruncate
)
string(TOUPPER "${_function}" _function_uppercase)
check_function_exists(${_function} HAVE_${_function_uppercase})
endforeach()
We verify whether a particular library contains a particular function:
check_library_exists(tinfo tgetent "" HAVE_TGETENT)
if(NOT HAVE_TGETENT)
message(FATAL_ERROR "Could not find the tgetent() function. You need to install a terminal library; for example ncurses.")
endif()
Then, we loop over header files and check whether they are available:
foreach(
_header IN ITEMS
setjmp.h dirent.h
stdint.h stdlib.h string.h
sys/select.h sys/utsname.h termcap.h fcntl.h
sgtty.h sys/ioctl.h sys/time.h sys/types.h
termio.h iconv.h inttypes.h langinfo.h math.h
unistd.h stropts.h errno.h sys/resource.h
sys/systeminfo.h locale.h sys/stream.h termios.h
libc.h sys/statfs.h poll.h sys/poll.h pwd.h
utime.h sys/param.h libintl.h libgen.h
util/debug.h util/msg18n.h frame.h sys/acl.h
sys/access.h sys/sysinfo.h wchar.h wctype.h
)
string(TOUPPER "${_header}" _header_uppercase)
string(REPLACE "/" "_" _header_normalized "${_header_uppercase}")
string(REPLACE "." "_" _header_normalized "${_header_normalized}")
check_include_files(${_header} HAVE_${_header_normalized})
endforeach()
Then, we translate CMake options from the main CMakeLists.txt to preprocessor definitions:
string(TOUPPER "${FEATURES}" _features_upper)
set(FEAT_${_features_upper} 1)
set(FEAT_NETBEANS_INTG ${ENABLE_NETBEANS})
set(FEAT_JOB_CHANNEL ${ENABLE_CHANNEL})
set(FEAT_TERMINAL ${ENABLE_TERMINAL})
And finally, we check whether we are able to compile a particular code snippet:
check_c_source_compiles(
"
#include <sys/types.h>
#include <sys/stat.h>
int
main ()
{
struct stat st;
int n;
stat(\"/\", &st);
n = (int)st.st_blksize;
;
return 0;
}
"
HAVE_ST_BLKSIZE
)
The defined variables are then used to configure src/config.h.cmake.in to config.h, which concludes the generate_config_h function:
configure_file(
${CMAKE_CURRENT_LIST_DIR}/config.h.cmake.in
${CMAKE_CURRENT_BINARY_DIR}/auto/config.h
@ONLY
)
We generate pathdef.c from src/pathdef.c.in:
#include "vim.h"
char_u *default_vim_dir = (char_u *)"@_default_vim_dir@";
char_u *default_vimruntime_dir = (char_u *)"@_default_vimruntime_dir@";
char_u *all_cflags = (char_u *)"@_all_cflags@";
char_u *all_lflags = (char_u *)"@_all_lflags@";
char_u *compiled_user = (char_u *)"@_compiled_user@";
char_u *compiled_sys = (char_u *)"@_compiled_sys@";
The generate_pathdef_c function configures src/pathdef.c.in, but we leave out link flags for simplicity:
function(generate_pathdef_c)
set(_default_vim_dir ${CMAKE_INSTALL_PREFIX})
set(_default_vimruntime_dir ${_default_vim_dir})
set(_all_cflags "${CMAKE_C_COMPILER} ${CMAKE_C_FLAGS}")
if(CMAKE_BUILD_TYPE STREQUAL "Release")
set(_all_cflags "${_all_cflags} ${CMAKE_C_FLAGS_RELEASE}")
else()
set(_all_cflags "${_all_cflags} ${CMAKE_C_FLAGS_DEBUG}")
endif()
# it would require a bit more work and execute commands at build time
# to get the link line into the binary
set(_all_lflags "undefined")
if(WIN32)
set(_compiled_user $ENV{USERNAME})
else()
set(_compiled_user $ENV{USER})
endif()
cmake_host_system_information(RESULT _compiled_sys QUERY HOSTNAME)
configure_file(
${CMAKE_CURRENT_LIST_DIR}/pathdef.c.in
${CMAKE_CURRENT_BINARY_DIR}/auto/pathdef.c
@ONLY
)
endfunction()
Finally, we generate osdef.h using the following function:
function(generate_osdef_h)
find_program(BASH_EXECUTABLE bash)
execute_process(
COMMAND
${BASH_EXECUTABLE} osdef.sh ${CMAKE_CURRENT_BINARY_DIR}
WORKING_DIRECTORY
${CMAKE_CURRENT_LIST_DIR}
)
endfunction()
In order to generate osdef.h in ${CMAKE_CURRENT_BINARY_DIR}/src/auto instead of src/auto, we had to adapt osdef.sh to accept ${CMAKE_CURRENT_BINARY_DIR} as a command line argument.
Inside osdef.sh, we check whether this argument is given:
if [ $# -eq 0 ]
then
# there are no arguments
# assume the target directory is current directory
target_directory=$PWD
else
# target directory is provided as argument
target_directory=$1
fi
And then, we generate ${target_directory}/auto/osdef.h. To do so, we also had to adjust the following compilation line inside osdef.sh:
$CC -I. -I$srcdir -I${target_directory} -E osdef0.c >osdef0.cc
We have now all generated files in place, so let us retry the build. We should be able to configure and compile the sources, but we will not be able to link:
$ mkdir -p build
$ cd build
$ cmake ..
$ cmake --build .
...
Scanning dependencies of target vim
[ 98%] Building C object src/CMakeFiles/vim.dir/main.c.o
[100%] Linking C executable ../bin/vim
../lib64/libbasic_sources.a(term.c.o): In function `set_shellsize.part.12':
term.c:(.text+0x2bd): undefined reference to `tputs'
../lib64/libbasic_sources.a(term.c.o): In function `getlinecol':
term.c:(.text+0x902): undefined reference to `tgetent'
term.c:(.text+0x915): undefined reference to `tgetent'
term.c:(.text+0x935): undefined reference to `tgetnum'
term.c:(.text+0x948): undefined reference to `tgetnum'
... many other undefined references ...
Again, we can take the log file from the Autotools compilation and, in particular, the link line as inspiration to resolve the missing dependencies by adding the following code to src/CMakeLists.txt:
# find X11 and link to it
find_package(X11 REQUIRED)
if(X11_FOUND)
target_link_libraries(vim
PUBLIC
${X11_LIBRARIES}
)
endif()
# a couple of more system libraries that the code requires
foreach(_library IN ITEMS Xt SM m tinfo acl gpm dl)
find_library(_${_library}_found ${_library} REQUIRED)
if(_${_library}_found)
target_link_libraries(vim
PUBLIC
${_library}
)
endif()
endforeach()
Observe how we can add one library dependency to the target at a time and do not have to construct and carry around a list of libraries in a variable, which would produce more brittle CMake code since the variable could get corrupted on the way, in particular for larger projects.
With this change, the code compiles and links:
$ cmake --build .
...
Scanning dependencies of target vim
[ 98%] Building C object src/CMakeFiles/vim.dir/main.c.o
[100%] Linking C executable ../bin/vim
[100%] Built target vim
We can now try to execute the compiled binary and edit some files with our newly compiled version of Vim!
Let us now try to adjust the compiler flags to mirror the reference build.
So far, we have not defined any custom compiler flags, but from the reference Autotools build, we remember that the code was compiled with -g -U_FORTIFY_SOURCE
-D_FORTIFY_SOURCE=1 -O2 using the GNU C compiler.
Our first approach could be to define the following:
if(CMAKE_C_COMPILER_ID MATCHES GNU)
set(CMAKE_C_FLAGS "${CMAKE_C_FLAGS} -g -U_FORTIFY_SOURCE -D_FORTIFY_SOURCE=1 -O2")
endif()
And, we would place this code on top of src/CMakeLists.txt, right before generating source files (since pathdef.c uses ${CMAKE_C_FLAGS}):
# <- we will define flags right here
include(autogenerate.cmake)
generate_config_h()
generate_pathdef_c()
generate_osdef_h()
A slight improvement to the compiler flag definitions would be to define -O2 as a Release configuration flag and to turn off optimization for a Debug configuration:
if(CMAKE_C_COMPILER_ID MATCHES GNU)
set(CMAKE_C_FLAGS "${CMAKE_C_FLAGS} -g -U_FORTIFY_SOURCE
-D_FORTIFY_SOURCE=1")
set(CMAKE_C_FLAGS_RELEASE "-O2")
set(CMAKE_C_FLAGS_DEBUG "-O0")
endif()
Please verify with make VERBOSE=1 that the build uses the expected flags.
In this particular example project, all source files use the same compile flags. For other projects, we may prefer to not define compile flags globally as we have done above, but to define flags individually for each target using target_compile_options. The advantage would be more flexibility and more local scope. The price to pay in our example here would probably be unnecessary code duplication.
Let us now discuss how to port tests from the reference build to our CMake build.
If the project that is being ported contains a test target or any form of automated testing or test scripts, the first step will again be to run the traditional test step and record the commands used. For the Vim project, the place to start is src/testdir/Makefile. It will probably make sense to define tests on the CMake side close to src/testdir/Makefile and the test scripts, and we will choose to define tests in src/testdir/CMakeLists.txt. To process such a file, we must reference it in src/CMakeLists.txt:
add_subdirectory(testdir)
We should also enable the test target in the top-level CMakeLists.txt, right before processing src/CMakeLists.txt:
# enable the test target
enable_testing()
# process src/CMakeLists.txt in its own scope
add_subdirectory(src)
So far, the test target is empty before we populate src/testdir/CMakeLists.txt with add_test directives. The minimum to specify in add_test is a test name and a command to run. The command can be any script written in any language. The essential part for CMake is that the script returns zero if the test is successful and non-zero if the test fails. For more details, we refer the reader to Chapter 4, Creating and Running Tests. In the case of Vim, we will need a bit more to accommodate multi-step tests, which we will discuss in the next section.
The targets in src/testdir/Makefile indicate that the Vim code runs tests as multi-step tests: first the vim executable processes a script and produces an output file, then in a second step the output file is compared with a reference file and if these files do not differ, the test is successful. Temporary files are then removed in a third step. This can probably not be fitted into a single add_test command in a portable way since add_test can only execute one command. One solution would be to define the test steps in a Python script and to execute the Python script with some arguments. The alternative we will present here, which is also cross-platform, is to define the test steps in a separate CMake script and to execute this script from add_test. We will define the test steps in src/testdir/test.cmake:
function(execute_test _vim_executable _working_dir _test_script)
# generates test.out
execute_process(
COMMAND ${_vim_executable} -f -u unix.vim -U NONE --noplugin --not-a-term -s dotest.in ${_test_script}.in
WORKING_DIRECTORY ${_working_dir}
)
# compares test*.ok and test.out
execute_process(
COMMAND ${CMAKE_COMMAND} -E compare_files ${_test_script}.ok test.out
WORKING_DIRECTORY ${_working_dir}
RESULT_VARIABLE files_differ
OUTPUT_QUIET
ERROR_QUIET
)
# removes leftovers
file(REMOVE ${_working_dir}/Xdotest)
# we let the test fail if the files differ
if(files_differ)
message(SEND_ERROR "test ${_test_script} failed")
endif()
endfunction()
execute_test(${VIM_EXECUTABLE} ${WORKING_DIR} ${TEST_SCRIPT})
Again, we choose a function over a macro to make sure variables do not escape the function scope. We will process this script, which will call the execute_test function. However, we have to make sure that ${VIM_EXECUTABLE}, ${WORKING_DIR}, and ${TEST_SCRIPT} are defined from outside. These are defined in src/testdir/CMakeLists.txt:
add_test(
NAME
test1
COMMAND
${CMAKE_COMMAND} -D VIM_EXECUTABLE=$<TARGET_FILE:vim>
-D WORKING_DIR=${CMAKE_CURRENT_LIST_DIR}
-D TEST_SCRIPT=test1
-P ${CMAKE_CURRENT_LIST_DIR}/test.cmake
WORKING_DIRECTORY
${PROJECT_BINARY_DIR}
)
The Vim project has many tests but in this example, we have ported only one (test1) as a proof of concept.
We can give at least two recommendations for porting tests. First, to make sure that the test does not always report success, verify that the test fails if you break the code or change the reference data. Second, add COST estimates to tests so that when run in parallel, longer tests are started first to minimize the total test time (see Chapter 4, Creating and Running Tests, Recipe 8, Running tests in parallel).
We can now configure, compile, link, and test the code, but we are missing the install target, which we will add in this section.
This is the Autotools approach to building and installing code:
$ ./configure --prefix=/some/install/path
$ make
$ make install
And this is the CMake way:
$ mkdir -p build
$ cd build
$ cmake -D CMAKE_INSTALL_PREFIX=/some/install/path ..
$ cmake --build .
$ cmake --build . --target install
To add an install target, we add the following snippet in src/CMakeLists.txt:
install(
TARGETS
vim
RUNTIME DESTINATION
${CMAKE_INSTALL_BINDIR}
)
In this example, we only install the executable. The Vim project installs a large number of files along with the binary (symbolic links and documentation files). To keep this section digestible, we don't install all other files in this example migration. For your own project, you should verify that the result of the install step matches the install target of the legacy build framework.
After a successful port to CMake, the next step should be to localize the scope of targets and variables even further: consider moving options, targets, and variables closer to where they are used and modified. Avoid global variables since they will enforce an order to CMake commands, and this order may not be evident and will lead to a brittle CMake code. One approach to enforcing the separation of variable scopes is to divide larger projects into CMake projects, which are composed using the superbuild pattern (see Chapter 8, The Superbuild Pattern). Consider splitting large CMakeLists.txt files into smaller modules.
The next steps can be to test the configuration and compilation on other platforms and operating systems in order to generalize and bullet-proof the CMake code and make it more portable.
Finally, when migrating projects to a new build framework, the developer community needs to adapt to it too. Help your colleagues with training, documentation, and code review. The hardest part in porting code to CMake can be to change the habits of humans.
Let us summarize what we have achieved in this chapter and what we learned.
In this chapter, we have discussed how to port a project to CMake. We have considered the Vim project as an example and added the following files:
.
├── CMakeLists.txt
└── src
├── autogenerate.cmake
├── CMakeLists.txt
├── config.h.cmake.in
├── libvterm
│ └── CMakeLists.txt
├── pathdef.c.in
└── testdir
├── CMakeLists.txt
└── test.cmake
The changes can be browsed online: https://github.com/dev-cafe/vim/compare/b476cb7...cmake-support.
This was an incomplete proof of concept port to CMake, where we left out many options and tweaks for simplicity and tried to focus on the most salient features and steps.
We would like to conclude this discussion by pointing out some common pitfalls when moving to CMake.
If you enjoyed this book, you may be interested in these other books by Packt:
Mastering Qt 5 - Second Edition
Guillaume Lazar, Robin Penea
ISBN: 978-1-78899-539-9
Learn QT 5
Nicholas Sherriff
ISBN: 978-1-78847-885-4
Please share your thoughts on this book with others by leaving a review on the site that you bought it from. If you purchased the book from Amazon, please leave us an honest review on this book's Amazon page. This is vital so that other potential readers can see and use your unbiased opinion to make purchasing decisions, we can understand what our customers think about our products, and our authors can see your feedback on the title that they have worked with Packt to create. It will only take a few minutes of your time, but is valuable to other potential customers, our authors, and Packt. Thank you!
Copyright © 2018 Packt Publishing
All rights reserved. No part of this book may be reproduced, stored in a retrieval system, or transmitted in any form or by any means, without the prior written permission of the publisher, except in the case of brief quotations embedded in critical articles or reviews.
Every effort has been made in the preparation of this book to ensure the accuracy of the information presented. However, the information contained in this book is sold without warranty, either express or implied. Neither the authors, nor Packt Publishing or its dealers and distributors, will be held liable for any damages caused or alleged to have been caused directly or indirectly by this book.
Packt Publishing has endeavored to provide trademark information about all of the companies and products mentioned in this book by the appropriate use of capitals. However, Packt Publishing cannot guarantee the accuracy of this information.
Commissioning Editor: Smeet Thakkar
Acquisition Editor: Noyonika Das
Content Development Editor: Francis Carneiro
Technical Editor: Sachin Sunilkumar
Copy Editor: Safis Editing
Project Coordinator: Devanshi Doshi
Proofreader: Safis Editing
Indexer: Pratik Shirodkar
Graphics: Jason Monteiro
Production Coordinator: Aparna Bhagat
First published: September 2018
Production reference: 1240918
Published by Packt Publishing Ltd.
Livery Place
35 Livery Street
Birmingham
B3 2PB, UK.
ISBN 978-1-78847-071-1
Mapt is an online digital library that gives you full access to over 5,000 books and videos, as well as industry leading tools to help you plan your personal development and advance your career. For more information, please visit our website mapt.io.
Spend less time learning and more time coding with practical eBooks and Videos from over 4,000 industry professionals
Improve your learning with Skill Plans built especially for you
Get a free eBook or video every month
Mapt is fully searchable
Copy and paste, print, and bookmark content
Did you know that Packt offers eBook versions of every book published, with PDF and ePub files available? You can upgrade to the eBook version at www.PacktPub.com and as a print book customer, you are entitled to a discount on the eBook copy. Get in touch with us at service@packtpub.com for more details.
At www.PacktPub.com, you can also read a collection of free technical articles, sign up for a range of free newsletters, and receive exclusive discounts and offers on Packt books and eBooks.
Radovan Bast works at the High Performance Computing Group at UiT - The Arctic University of Norway in Tromsø and leads the CodeRefinery project. He has a PhD in theoretical chemistry and contributes to a number of quantum chemistry programs as a code developer. He enjoys learning new programming languages and techniques, and teaching programming to students and researchers. He got in touch with CMake in 2008 and has ported a number of research codes and migrated a number of communities to CMake since then.
Roberto Di Remigio is a postdoctoral fellow in theoretical chemistry at UiT - The Arctic University of Norway in Tromsø, Norway and Virginia Tech, USA. He is currently working on stochastic methods and solvation models. He is a developer of the PCMSolver library and the Psi4 open source quantum chemistry program. He contributes or has contributed to the development of popular quantum chemistry codes and libraries: DIRAC, MRCPP, DALTON, LSDALTON, XCFun, and ReSpect. He usually programs in C++ and Fortran.
Holding an engineering degree from ENSEEIHT and a PhD in computer science from UVSQ in France, Eric Noulard has been writing and compiling source code in a variety of languages for 20 years. A user of CMake since 2006, he has also been an active contributor to the project for several years. During his career, Eric has worked for private companies and government agencies. He is now employed by Antidot, a software vendor developing and marketing high-end information retrieval technology and solutions.
Shlomi Fish is an Israeli software developer and writer. He has been contributing to various open source and open culture projects since at least 2000. Among other endeavors, he has initiated some solvers for games, which led to him maintaining the PySol FC suite of solitaire games, adopting fortune-mod, solving over 290 Project Euler problems, and writing several stories, essays, aphorisms, and other documents.
If you're interested in becoming an author for Packt, please visit authors.packtpub.com and apply today. We have worked with thousands of developers and tech professionals, just like you, to help them share their insight with the global tech community. You can make a general application, apply for a specific hot topic that we are recruiting an author for, or submit your own idea.
Computer software is present in almost every aspect of our daily lives: it triggers our alarm clocks, fuels our communication, banking, weather forecasts, bus schedules, calendars, meetings, travel, photo albums, television, music streaming, social media, dinner and movie reservations, from dawn till dusk.
The software that surrounds us contains many layers: apps are built on top of frameworks, frameworks on top of libraries, libraries use smaller libraries and executables, all the way down to smaller and smaller software components. Libraries and executables in turn need to be built from source code. Often we only see the outermost layer, but all these layers need to be carefully organized and built. This book is about how to build libraries and executables from sources using CMake.
CMake and its siblings, CTest, CPack, and CDash, have emerged as the leading toolset for building software from sources, surpassing in usage and popularity many other similar tools, such as the venerated GNU Autotools and the more recent, Python-based, SCons build system.
The history of the CMake project started in 1999, when Kitware, the company behind its development, was commissioned to design a new set of tools to simplify the day-to-day software work of researchers. The goal was clear: provide a set of tools that would make it easier to configure, build, test, and deploy the same project across different platforms. A fascinating account of the ensuing design choices in the CMake project can be found at https://www.aosabook.org/en/cmake.html.
CMake is a build-system generator, offering a powerful domain-specific language (DSL) to describe what the build system should achieve. In our opinion, this is one of the main strengths of CMake, because it allows the generation of platform-native build systems with the same set of CMake scripts. The CMake software toolset gives developers full control over the whole life cycle of a given project:
An old adage goes that the deeper you dig, the more stones you will find. For the preparation of this book we have carefully been digging deeper through many software layers, with CMake being our quarry. The number of stones and artifacts that we have hit when building various software components and libraries on various platforms, each with their own quirks, has felt disheartening at times. But we believe we have cleared the ground of many stones and we are happy to share our findings and recipes with you, our readers. There will always be stones left but each stone will bring new insight and we encourage you to share this insight with the community.
Writing software that can run natively, reliably, and efficiently on many different platforms is of paramount importance for all sectors of industry and society. Software build systems take center stage in this task. They are a crucial part in the management of the software development life cycle: from incubation and prototype development to testing and all the way till packaging, deployment, and distribution. CMake is designed to help you manage these operations: if you are a software developer who wishes to manage the build system using CMake or who would like to be able to understand and modify CMake code written by others, this book is for you.
We have written this book as a progressive sequence of tasks and recipes. At each point, we introduce enough information about CMake to show how to achieve our goals, without overwhelming you with details. By the end of the book, you will be able to tackle increasingly complex operations and leverage the contents of the recipes in your own real-world projects with confidence.
We will cover these topics:
The workflow of a project managed by CMake happens in a number of stages, which we refer to as times. These can be summarized neatly in the following figure:
This book is organized as follows:
Chapter 1, From a Simple Executable to Libraries, shows how to get started configuring and building simple executables and libraries with CMake.
Chapter 2, Detecting the Environment, explains how to interact with the operating system and processor architecture using simple CMake commands.
Chapter 3, Detecting External Libraries and Programs, shows how CMake can simplify the detection of dependencies for your project.
Chapter 4, Creating and Running Tests, explains how to harness the power of CMake and CTest to define and run tests.
Chapter 5, Configure-time and Build-time Operations, shows how to perform custom operations at different stages of the build process with cross-platform CMake commands.
Chapter 6, Generating Source Code, discusses CMake commands to automatically generate source code.
Chapter 7, Structuring Projects, shows powerful CMake syntax for organizing your projects to make them more maintainable.
Chapter 8, The Superbuild Pattern, explains the powerful CMake superbuild pattern for managing critical project dependencies with control over side effects.
Chapter 9, Mixed-language Projects, shows how to build projects mixing different programming languages with the help of CMake.
Chapter 10, Writing an Installer, takes care of the installation of projects with the cross-platform power of CMake.
Chapter 11, Packaging Projects, shows how to use CPack to produce source and platform-native source archives and how to build Python and Conda packages for distribution.
Chapter 12, Building Documentation, shows how to use CMake to also build the documentation for your code.
Chapter 13, Alternative Generators and Cross-compilation, shows how to use CMake to cross-compile projects between platforms.
Chapter 14, Testing Dashboards, shows how to report the results of tests to an online dashboard.
Chapter 15, Porting a Project to CMake, shows best practices, tips, and tricks that will help you port a project to a CMake-based build system.
This is a book written by programmers, for programmers. We have assumed basic knowledge and familiarity with the following:
You can download the example code examples for this book from https://github.com/dev-cafe/cmake-cookbook. For more details please see the Setting up Your System section.
We also provide a PDF file that has color images of the screenshots/diagrams used in this book. You can download it here: http://www.packtpub.com/sites/default/files/downloads/CMakeCookbook_ColorImages.pdf.
There are a number of text conventions used throughout this book.
CodeInText: Indicates code commands in text, folder names, filenames, module names, and target names.
A block of code is set as follows:
cmake_minimum_required(VERSION 3.5 FATAL_ERROR)
project(recipe-01 LANGUAGES CXX)
add_executable(hello-world hello-world.cpp)
Any command-line input is written in bold and contains a $ prompt in front of the command to type:
$ mkdir -p build
$ cd build
$ cmake ..
To distinguish command-line input and output, we keep output non-bold:
$ ./hello-world
Hello World!
The documentation for CMake available online is comprehensive and we will refer to it throughout the book: https://cmake.org/documentation/
In preparing this book we have been inspired also by other resources:
We can also recommend to browse the curated list of CMake resources, scripts, modules, and examples collected by Viktor Kirilov: https://github.com/onqtam/awesome-cmake.
It is also worth noting that our book is not the only one out there covering CMake:
Feedback from our readers is always welcome.
Source code improvements and issues: Please direct pull requests towards https://github.com/dev-cafe/cmake-cookbook and report specific issues with recipes via https://github.com/dev-cafe/cmake-cookbook/issues.
General feedback: Email feedback@packtpub.com and mention the book title in the subject of your message. If you have questions about any aspect of this book, please email us at questions@packtpub.com.
Errata: Although we have taken every care to ensure the accuracy of our content, mistakes do happen. If you have found a mistake in this book, we would be grateful if you would report this to us. Please visit www.packtpub.com/submit-errata, selecting your book, clicking on the Errata Submission Form link, and entering the details.
Piracy: If you come across any illegal copies of our works in any form on the Internet, we would be grateful if you would provide us with the location address or website name. Please contact us at copyright@packtpub.com with a link to the material.
If you are interested in becoming an author: If there is a topic that you have expertise in and you are interested in either writing or contributing to a book, please visit authors.packtpub.com.
Please leave a review. Once you have read and used this book, why not leave a review on the site that you purchased it from? Potential readers can then see and use your unbiased opinion to make purchase decisions, we at Packt can understand what you think about our products, and our authors can see your feedback on their book. Thank you!
For more information about Packt, please visit packtpub.com.
Before diving into CMake and the recipes in this book, you will need to set your system up to successfully run all of the examples. In this section, we will discuss the following topics:
We have strived to make our discussions of the topics in this book as accessible to novices as possible. However, this book does not start from absolute scratch. We assume that you have basic knowledge of the native tools for building software that are available on your platform of choice. It is also helpful (but not required) to have basic experience with version control using Git, to interact with the repository holding the recipe sources.
The source code for the recipes in this book is available on GitHub, at https://github.com/dev-cafe/cmake-cookbook. The code is licensed under the standard open source MIT license: this is a permissive software license, and you can reuse and remix the code in whatever way you see fit, as long as the original copyright and license notice are included in any copies of the software/source. The full text of the license is available at https://opensource.org/licenses/MIT.
In order to test the recipes by yourself, you will need a working installation of Git, obtained as follows:
Alternatively, you can access the examples with the GitHub desktop client at https://desktop.github.com.
Yet another alternative is to download and extract the ZIP file from https://github.com/dev-cafe/cmake-cookbook.
Once you have Git installed, you can clone the repository to your local machine, as follows:
$ git clone https://github.com/dev-cafe/cmake-cookbook.git
This will create a folder named cmake-cookbook. The book and the repository are organized in chapters and recipes. The numbering of chapters and the order of recipes in the repository reflect the order in the text. Each recipe is further organized into example folders. Some of the recipes have more than one example, usually when similar CMake concepts are illustrated in different programming languages.
The recipes are tested on GNU/Linux, macOS, and Windows, using state-of-the-art continuous integration services. We will discuss the testing set up shortly.
We have tagged the precise versions that correspond to the examples printed in this book with the tag v1.0. For maximum overlap with the book text, you can fetch this particular version as follows:
$ git clone --single-branch -b v1.0 https://github.com/dev-cafe/cmake-cookbook.git
We expect to receive bug fixes and the GitHub repository to evolve. To get the latest updates, you may prefer to follow the master branch of the repository, instead.
You will likely find that the easiest approach to testing the book's recipes in a software environment (which contains all of the dependencies preinstalled) is to use a Docker image that we have set up, based on Ubuntu 18.04. You can install Docker on your favorite operating system, following the official documentation at https://docs.docker.com.
Once Docker is installed, you can run our image and test the recipes with the full software environment in place, as follows:
$ docker run -it devcafe/cmake-cookbook_ubuntu-18.04
$ git clone https://github.com/dev-cafe/cmake-cookbook.git
$ cd cmake-cookbook
$ pipenv install --three
$ pipenv run python testing/collect_tests.py 'chapter-*/recipe-*'
An alternative to running the book recipes in a container is to install the dependencies directly on the host operating system. For this, we have assembled a minimal toolstack that can be used as a basic starting point for all of our recipes. You will have to install the following:
We will also detail how to install the additional dependencies required by some of the recipes.
CMake 3.5 is the minimum required version of CMake for this book. Only a few, specific recipes and examples that demonstrate useful features that were introduced after version 3.5 will require a more recent version of CMake. The introduction to every recipe features an info box, pointing out where the code is available, which examples are given, and the minimum version of CMake required. The info boxes will look like the following box:
Some, if not most, of the recipes will still be valid with older versions of CMake. However, we have made no attempts to test this assumption, since we consider CMake 3.5 to be the default on most systems and distributions. We also consider upgrading to later versions of CMake to be a straightforward step.
CMake can be installed in a number of different ways. Downloading and extracting the binary distribution maintained by Kitware will work across all platforms. The download page is at https://cmake.org/download/.
Most GNU/Linux distributions have CMake available in their package managers. However, on some distributions, the packaged version can be rather old, so downloading the binary maintained by Kitware is still the preferred option. The following commands will download and install CMake 3.5.2 under $HOME/Deps/cmake (adjust this path to your preference), from the version packaged by CMake:
$ cmake_version="3.5.2"
$ target_path=$HOME/Deps/cmake/${cmake_version}
$ cmake_url="https://cmake.org/files/v${cmake_version%.*}/cmake-${cmake_version}-Linux-x86_64.tar.gz"
$ mkdir -p "${target_path}"
$ curl -Ls "${cmake_url}" | tar -xz -C "${target_path}" --strip-components=1
$ export PATH=$HOME/Deps/cmake/${cmake_version}/bin${PATH:+:$PATH}
$ cmake --version
Homebrew for macOS reliably ships the latest version of CMake:
$ brew upgrade cmake
On Windows, you can use Visual Studio 2017, which provides CMake support. The installation of Visual Studio 2017 is documented in Chapter 13, Alternative Generators and Cross-compilation, Recipe 1, Building a CMake project using Visual Studio 2017.
Alternatively, you can download the MSYS2 installer from https://www.msys2.org , follow the instructions given therein to update the list of packages, and then install CMake using the package manager, pacman. The following code assumes that we are building the 64-bit version:
$ pacman -S mingw64/mingw-w64-x86_64-cmake
For the 32-bit version, use the following (though we will only refer to 64-bit versions in future, for the sake of brevity):
$ pacman -S mingw64/mingw-w64-i686-cmake
Another nice feature of MSYS2 is that it provides a terminal on Windows that feels and behaves like a terminal on a Unix-like operating system, providing a useful development environment.
We will need compilers for C++, C, and Fortran. These should be fairly recent, as we require support for recent language standards in most of the recipes. CMake offers very good support for many compilers, from both commercial and non-commercial vendors. To keep the recipes consistently cross-platform and as operating system independent as possible, we have worked with open source compilers:
$ sudo apt-get install g++ gcc gfortran
$ sudo apt-get install clang clang++ gfortran
$ brew install gcc
$ pacman -S mingw64/mingw-w64-x86_64-toolchain
These build-automation tools will provide the infrastructure for building and linking the projects presented in the recipes. What you will end up installing and using strongly depends on your operating system and your taste:
For maximum portability, we have made the recipes as agnostic about these system-dependent details as possible. A clear advantage of this approach is that configuring, building, and linking are native to each platform and each set of compilers.
The Ninja program is a different build-automation tool that works on GNU/Linux, macOS, and Windows. Ninja is a new build tool, with a focus on speed, especially for incremental rebuilds. Prepackaged binaries for GNU/Linux, macOS, and Windows can be found on the project's GitHub repository at https://github.com/ninja-build/ninja/releases.
Using CMake and Ninja with Fortran projects requires some care. CMake 3.7.2 or later is required, along with the version of Ninja maintained by Kitware, available at https://github.com/Kitware/ninja/releases.
On GNU/Linux, you can install Ninja with the following series of commands:
$ mkdir -p ninja
$ ninja_url="https://github.com/Kitware/ninja/releases/download/v1.8.2.g3bbbe.kitware.dyndep-1.jobserver-1/ninja-1.8.2.g3bbbe.kitware.dyndep-1.jobserver-1_x86_64-linux-gnu.tar.gz"
$ curl -Ls ${ninja_url} | tar -xz -C ninja --strip-components=1
$ export PATH=$HOME/Deps/ninja${PATH:+:$PATH}
On Windows, using the MSYS2 environment (assuming the 64-bit version), executing the command:
$ pacman -S mingw64/mingw-w64-x86_64-ninja
This book is about CMake, but some of the recipes, along with the whole infrastructure powering testing, need Python. Thus, first and foremost, you will need a working installation of Python: the interpreter, header files, and libraries. The end of life for Python 2.7 was announced for 2020, and we will thus use Python 3.5.
On Ubuntu 14.04 LTS (this is the environment used by Travis CI which we will discuss later on), Python 3.5 can be installed as follows:
$ sudo apt-get install python3.5-dev
On Windows, using the MSYS2 environment, the Python environment can be installed as follows (assuming the 64-bit version):
$ pacman -S mingw64/mingw-w64-x86_64-python3
$ pacman -S mingw64/mingw-w64-x86_64-python3-pip
$ python3 -m pip install pipenv
Specific Python modules are also required, in order to run the testing machinery that we have put in place. These can be installed system-wide by using your favorite package manager, or in an isolated environment. The latter approach is highly recommended, as it offers the following advantages:
We have prepared a Pipfile for this purpose. In combination with its Pipfile.lock, you can use Pipenv (http://pipenv.readthedocs.io) to generate an isolated environment, with all packages installed. To create this environment for the recipe example repository, run the following commands in the top-level directory of the repository:
$ pip install --user pip pipenv --upgrade
$ pipenv install --python python3.5
The pipenv shell command will drop you into a command-line environment with the specific version of Python and all of the packages available. Executing exit will bring you back to a clean environment. You can also use pipenv run to directly execute a command within the isolated environment.
Alternatively, the requirements.txt file in the repository can be used, in combination with Virtualenv (http://docs.python-guide.org/en/latest/dev/virtualenvs/) and pip, to achieve the same effect:
$ virtualenv --python=python3.5 venv
$ source venv/bin/activate
$ pip install -r requirements.txt
The virtual environment can be exited by using the deactivate command.
Yet another alternative is to use Conda environments. To do so, we suggest installing Miniconda. The following instructions will install the latest Miniconda to the directory $HOME/Deps/conda, for GNU/Linux (download from https://repo.continuum.io/miniconda/Miniconda3-latest-Linux-x86_64.sh) or macOS (download from https://repo.continuum.io/miniconda/Miniconda3-latest-MacOSX-x86_64.sh):
$ curl -Ls https://repo.continuum.io/miniconda/Miniconda3-latest-Linux-x86_64.sh > miniconda.sh
$ bash miniconda.sh -b -p "$HOME"/Deps/conda &> /dev/null
$ touch "$HOME"/Deps/conda/conda-meta/pinned
$ export PATH=$HOME/Deps/conda/bin${PATH:+:$PATH}
$ conda config --set show_channel_urls True
$ conda config --set changeps1 no
$ conda update --all
$ conda clean -tipy
On Windows, you can download the latest Miniconda from https://repo.continuum.io/miniconda/Miniconda3-latest-Windows-x86_64.exe. The package can be installed using PowerShell, as follows:
$basedir = $pwd.Path + "\"
$filepath = $basedir + "Miniconda3-latest-Windows-x86_64.exe"
$Anaconda_loc = "C:\Deps\conda"
$args = "/InstallationType=JustMe /AddToPath=0 /RegisterPython=0 /S /D=$Anaconda_loc"
Start-Process -FilePath $filepath -ArgumentList $args -Wait -Passthru
$conda_path = $Anaconda_loc + "\Scripts\conda.exe"
$args = "config --set show_channel_urls True"
Start-Process -FilePath "$conda_path" -ArgumentList $args -Wait -Passthru
$args = "config --set changeps1 no"
Start-Process -FilePath "$conda_path" -ArgumentList $args -Wait -Passthru
$args = "update --all"
Start-Process -FilePath "$conda_path" -ArgumentList $args -Wait -Passthru
$args = "clean -tipy"
Start-Process -FilePath "$conda_path" -ArgumentList $args -Wait -Passthru
Once Conda is installed, the Python modules can be installed as follows:
$ conda create -n cmake-cookbook python=3.5
$ conda activate cmake-cookbook
$ conda install --file requirements.txt
Executing conda deactivate will drop you outside of the isolated environment.
Some recipes will require additional software, which will be covered in the following sections.
Most Linux distributions provide packages for BLAS and LAPACK. For example, on Ubuntu 14.04 LTS, you can run the following:
$ sudo apt-get install libatlas-dev liblapack-dev liblapacke-dev
On macOS, the Accelerate libraries, shipped with XCode, are enough for our purposes.
On Windows, using the MSYS2 environment, these libraries can be installed as follows (assuming the 64-bit version):
$ pacman -S mingw64/mingw-w64-x86_64-openblas
Alternatively, you can download the reference implementation of BLAS and LAPACK from GitHub (https://github.com/Reference-LAPACK/lapack) and compile the libraries from sources. Commercial vendors might offer packages for their own implementations of the BLAS and LAPACK APIs, available as installers for your platform.
There are many commercial and non-commercial implementations of MPI. For our introductory purposes, it is enough to install any of the freely available non-commercial implementations. On Ubuntu 14.04 LTS, we recommend OpenMPI. It can be installed with the following command:
$ sudo apt-get install openmpi-bin libopenmpi-dev
For macOS, Homebrew distributes MPICH:
$ brew install mpich
It is also possible to compile OpenMPI from the sources publicly available at https://www.open-mpi.org/software/.
For Windows, the Microsoft MPI implementation can be installed via https://msdn.microsoft.com/en-us/library/bb524831(v=vs.85).aspx.
Some recipes will need the Eigen linear algebra template library, version 3.3 or later. If your package manager does not provide Eigen, you can install it from the online source archive (http://eigen.tuxfamily.org). For example, on GNU/Linux and macOS, you can install Eigen to the directory $HOME/Deps/eigen, as follows:
$ eigen_version="3.3.4"
$ mkdir -p eigen
$ curl -Ls http://bitbucket.org/eigen/eigen/get/${eigen_version}.tar.gz | tar -xz -C eigen --strip-components=1
$ cd eigen
$ cmake -H. -Bbuild_eigen -DCMAKE_INSTALL_PREFIX="$HOME/Deps/eigen" &> /dev/null
$ cmake --build build_eigen -- install &> /dev/null
Boost packages are available for every operating system; most Linux distributions have packages available through their package managers. On Ubuntu 14.04 LTS, for instance, the Boost Filesystem, Boost Python, and Boost Test libraries can be installed with the following command:
$ sudo apt-get install libboost-filesystem-dev libboost-python-dev libboost-test-dev
For macOS, both MacPorts and Homebrew provide packages for recent versions of Boost. Our testing setup on macOS installs Boost as follows:
$ brew cask uninstall --force oclint
$ brew uninstall --force --ignore-dependencies boost
$ brew install boost
$ brew install boost-python3
Prebuilt binary distributions for Windows are also available for download from the Boost website at http://www.boost.org. Alternatively, you can download the sources from https://www.boost.org and compile the libraries yourself.
On Debian/Ubuntu-like systems, cross-compilers can be installed with the following command:
$ sudo apt-get install gcc-mingw-w64 g++-mingw-w64 gfortran-mingw-w64
On macOS, using Brew, the cross-compilers can be installed as follows:
$ brew install mingw-w64
Other package managers offer corresponding packages.
An alternative to using packaged cross-compilers is to build them from sources, using the M cross environment (https://mxe.cc).
On Ubuntu 14.04 LTS, these packages can be installed as follows:
$ sudo apt-get install pkg-config libzmq3-dev doxygen graphviz-dev uuid-dev
On macOS, we recommend installing with Brew:
$ brew install ossp-uuid pkg-config zeromq doxygen
The pkg-config program and UUID library are only available on Unix-like systems.
On Windows, using the MSYS2 environment, these dependencies can be installed as follows (assuming the 64-bit version):
$ pacman -S mingw64/mingw-w64-x86_64-zeromq
$ pacman -S mingw64/mingw-w64-x86_64-pkg-config
$ pacman -S mingw64/mingw-w64-x86_64-doxygen
$ pacman -S mingw64/mingw-w64-x86_64-graphviz
The recipes exploring packaging with Conda will need Miniconda and the Conda build and deployment tools installed on the system. The instructions for the installation of Miniconda were given previously. To install Conda build and deployment tools on GNU/Linux and macOS, run the following commands:
$ conda install --yes --quiet conda-build anaconda-client jinja2 setuptools
$ conda clean -tipsy
$ conda info -a
These tools can be installed on Windows as follows:
$conda_path = "C:\Deps\conda\Scripts\conda.exe"
$args = "install --yes --quiet conda-build anaconda-client jinja2 setuptools"
Start-Process -FilePath "$conda_path" -ArgumentList $args -Wait -Passthru
$args = "clean -tipsy"
Start-Process -FilePath "$conda_path" -ArgumentList $args -Wait -Passthru
$args = "info -a"
Start-Process -FilePath "$conda_path" -ArgumentList $args -Wait -Passthru
The recipes are tested on state-of-the-art continuous integration (CI) services: Travis (https://travis-ci.org) for GNU/Linux and macOS, Appveyor (https://www.appveyor.com) for Windows, and CircleCI (https://circleci.com) for additional GNU/Linux testing with commercial compilers. The configuration files for the CI services can be found in the repository (https://github.com/dev-cafe/cmake-cookbook/): .travis.yml for Travis, .appveyor.yml for Appveyor, and .circleci/config.yml for CircleCI. Additional installation scripts for Travis and Appveyor can be found in the folder testing/dependencies.
The testing machinery is a set of Python scripts that are also contained in the testing folder. The script collect_tests.py will run tests and report their statuses. Recipes can be tested in isolation, or in batches; collect_tests.py accepts a regular expression as command-line input, for example:
$ pipenv run python testing/collect_tests.py 'chapter-0[1,7]/recipe-0[1,2,5]'
This command will run tests for Recipes 1, 2, and 5, in Chapters 1 and 7. A sample of the output looks as follows:
To get more verbose output, set VERBOSE_OUTPUT=ON:
$ env VERBOSE_OUTPUT=ON pipenv run python testing/collect_tests.py 'chapter-*/recipe-*'
Please report issues at https://github.com/dev-cafe/cmake-cookbook/issues.
To contribute changes,we recommend forking the repository https://github.com/dev-cafe/cmake-cookbook and submitting changes using pull requests, following https://help.github.com/articles/creating-a-pull-request-from-a-fork/.
For non-trivial changes, we recommend to first describe and discuss the proposed change by opening an issue on https://github.com/dev-cafe/cmake-cookbook/issues before sending a pull request.
In this chapter, we will cover the following recipes:
The recipes in this chapter will walk you through fairly basic tasks needed to build your code: compiling an executable, compiling a library, performing build actions based on user input, and so forth. CMake is a build system generator particularly suited to being platform- and compiler-independent. We have striven to show this aspect in this chapter. Unless stated otherwise, all recipes are independent of the operating system; they can be run without modifications on GNU/Linux, macOS, and Windows.
The recipes in this book are mainly designed for C++ projects and demonstrated using C++ examples, but CMake can be used for projects in other languages, including C and Fortran. For any given recipe and whenever it makes sense, we have tried to include examples in C++, C, and Fortran. In this way, you will be able to choose the recipe in your favorite flavor. Some recipes are tailor-made to highlight challenges to overcome when a specific language is chosen.
In this recipe, we will demonstrate how to run CMake to configure and build a simple project. The project consists of a single source file for a single executable. We will discuss the project in C++, but examples for C and Fortran are available in the GitHub repository.
We wish to compile the following source code into a single executable:
#include <cstdlib>
#include <iostream>
#include <string>
std::string say_hello() { return std::string("Hello, CMake world!"); }
int main() {
std::cout << say_hello() << std::endl;
return EXIT_SUCCESS;
}
Alongside the source file, we need to provide CMake with a description of the operations to perform to configure the project for the build tools. The description is done in the CMake language, whose comprehensive documentation can be found online at https://cmake.org/cmake/help/latest/. We will place the CMake instructions into a file called CMakeLists.txt.
In detail, these are the steps to follow:
cmake_minimum_required(VERSION 3.5 FATAL_ERROR)
project(recipe-01 LANGUAGES CXX)
add_executable(hello-world hello-world.cpp)
$ mkdir -p build
$ cd build
$ cmake ..
-- The CXX compiler identification is GNU 8.1.0
-- Check for working CXX compiler: /usr/bin/c++
-- Check for working CXX compiler: /usr/bin/c++ -- works
-- Detecting CXX compiler ABI info
-- Detecting CXX compiler ABI info - done
-- Detecting CXX compile features
-- Detecting CXX compile features - done
-- Configuring done
-- Generating done
-- Build files have been written to: /home/user/cmake-cookbook/chapter-01/recipe-01/cxx-example/build
$ cmake --build .
Scanning dependencies of target hello-world
[ 50%] Building CXX object CMakeFiles/hello-world.dir/hello-world.cpp.o
[100%] Linking CXX executable hello-world
[100%] Built target hello-world
In this recipe, we have used a simple CMakeLists.txt to build a "Hello world" executable:
cmake_minimum_required(VERSION 3.5 FATAL_ERROR)
project(recipe-01 LANGUAGES CXX)
add_executable(hello-world hello-world.cpp)
To configure the project and generate its build system, we have to run CMake through its command-line interface (CLI). The CMake CLI offers a number of switches, cmake --help will output to screen the full help menu listing all of the available switches. We will learn more about them throughout the book. As you will notice from the output of cmake --help, most of them will let you access the CMake manual. The typical series of commands issued for generating the build system is the following:
$ mkdir -p build
$ cd build
$ cmake ..
Here, we created a directory, build, where the build system will be generated, we entered the build directory, and invoked CMake by pointing it to the location of CMakeLists.txt (in this case located in the parent directory). It is possible to use the following invocation to achieve the same effect:
$ cmake -H. -Bbuild
This invocation is cross-platform and introduces the -H and -B CLI switches. With -H. we are instructing CMake to search for the root CMakeLists.txt file in the current directory. -Bbuild tells CMake to generate all of its files in a directory called build.
Running the cmake command outputs a series of status messages to inform you of the configuration:
$ cmake ..
-- The CXX compiler identification is GNU 8.1.0
-- Check for working CXX compiler: /usr/bin/c++
-- Check for working CXX compiler: /usr/bin/c++ -- works
-- Detecting CXX compiler ABI info
-- Detecting CXX compiler ABI info - done
-- Detecting CXX compile features
-- Detecting CXX compile features - done
-- Configuring done
-- Generating done
-- Build files have been written to: /home/user/cmake-cookbook/chapter-01/recipe-01/cxx-example/build
CMake is a build system generator. You describe what type of operations the build system, such as Unix Makefiles, Ninja, Visual Studio, and so on, will have to run to get your code compiled. In turn, CMake generates the corresponding instructions for the chosen build system. By default, on GNU/Linux and macOS systems, CMake employs the Unix Makefiles generator. On Windows, Visual Studio is the default generator. We will take a closer look at generators in the next recipe and also revisit generators in Chapter 13, Alternative Generators and Cross-compilation.
On GNU/Linux, CMake will by default generate Unix Makefiles to build the project:
To build the example project, we ran this command:
$ cmake --build .
This command is a generic, cross-platform wrapper to the native build command for the chosen generator, make in this case. We should not forget to test our example executable:
$ ./hello-world
Hello, CMake world!
Finally, we should point out that CMake does not enforce a specific name or a specific location for the build directory. We could have placed it completely outside the project path. This would have worked equally well:
$ mkdir -p /tmp/someplace
$ cd /tmp/someplace
$ cmake /path/to/source
$ cmake --build .
The official documentation at https://cmake.org/runningcmake/ gives a concise overview on running CMake. The build system generated by CMake, the Makefile in the example given above, will contain targets and rules to build object files, executables, and libraries for the given project. The hello-world executable was our only target in the current example, but running the command:
$ cmake --build . --target help
The following are some of the valid targets for this Makefile:
... all (the default if no target is provided)
... clean
... depend
... rebuild_cache
... hello-world
... edit_cache
... hello-world.o
... hello-world.i
... hello-world.s
reveals that CMake generates more targets than those strictly needed for building the executable itself. These targets can be chosen with the cmake --build . --target <target-name> syntax and achieve the following:
For more complex projects, with a test stage and installation rules, CMake will generate additional convenience targets:
CMake is a build system generator and a single CMakeLists.txt can be used to configure projects for different toolstacks on different platforms. You describe in CMakeLists.txt the operations the build system will have to run to get your code configured and compiled. Based on these instructions, CMake will generate the corresponding instructions for the chosen build system (Unix Makefiles, Ninja, Visual Studio, and so on). We will revisit generators in Chapter 13, Alternative Generators and Cross-compilation.
CMake supports an extensive list of native build tools for different platforms. Both command-line tools, such as Unix Makefiles and Ninja, and integrated development environment (IDE) tools are supported. You can find an up-to-date list of the generators available on your platform and for your installed version of CMake by running the following:
$ cmake --help
The output of this command will list all options to the CMake command-line interface. At the bottom, you will find the list of available generators. For example, this is the output on a GNU/Linux machine with CMake 3.11.2 installed:
Generators
The following generators are available on this platform:
Unix Makefiles = Generates standard UNIX makefiles.
Ninja = Generates build.ninja files.
Watcom WMake = Generates Watcom WMake makefiles.
CodeBlocks - Ninja = Generates CodeBlocks project files.
CodeBlocks - Unix Makefiles = Generates CodeBlocks project files.
CodeLite - Ninja = Generates CodeLite project files.
CodeLite - Unix Makefiles = Generates CodeLite project files.
Sublime Text 2 - Ninja = Generates Sublime Text 2 project files.
Sublime Text 2 - Unix Makefiles = Generates Sublime Text 2 project files.
Kate - Ninja = Generates Kate project files.
Kate - Unix Makefiles = Generates Kate project files.
Eclipse CDT4 - Ninja = Generates Eclipse CDT 4.0 project files.
Eclipse CDT4 - Unix Makefiles= Generates Eclipse CDT 4.0 project files.
With this recipe, we will show how easy it is to switch generators for the same project.
We will reuse hello-world.cpp and CMakeLists.txt from the previous recipe. The only difference is in the invocation of CMake, since we will now have to pass the generator explicitly with the -G CLI switch.
$ mkdir -p build
$ cd build
$ cmake -G Ninja ..
-- The CXX compiler identification is GNU 8.1.0
-- Check for working CXX compiler: /usr/bin/c++
-- Check for working CXX compiler: /usr/bin/c++ -- works
-- Detecting CXX compiler ABI info
-- Detecting CXX compiler ABI info - done
-- Detecting CXX compile features
-- Detecting CXX compile features - done
-- Configuring done
-- Generating done
-- Build files have been written to: /home/user/cmake-cookbook/chapter-01/recipe-02/cxx-example/build
$ cmake --build .
[2/2] Linking CXX executable hello-world
We have seen that the output of the configuration step was unchanged compared to the previous recipe. The output of the compilation step and the contents of the build directory will however be different, as every generator has its own specific set of files:
Note how cmake --build . wrapped the ninja command in a unified, cross-platform interface.
We will discuss alternative generators and cross-compilation in Chapter 13, Alternative Generators and Cross-compilation.
The CMake documentation is a good starting point to learn more about generators: https://cmake.org/cmake/help/latest/manual/cmake-generators.7.html.
A project almost always consists of more than a single executable built from a single source file. Projects are split across multiple source files, often spread across different subdirectories in the source tree. This practice not only helps in keeping source code organized within a project, but greatly favors modularity, code reuse, and separation of concerns, since common tasks can be grouped into libraries. This separation also simplifies and speeds up recompilation of a project during development. In this recipe, we will show how to group sources into libraries and how to link targets against these libraries.
Let us go back to our very first example. However, instead of having one single source file for the executable, we will now introduce a class to wrap the message to be printed out to screen. This is our updated hello-world.cpp:
#include "Message.hpp"
#include <cstdlib>
#include <iostream>
int main() {
Message say_hello("Hello, CMake World!");
std::cout << say_hello << std::endl;
Message say_goodbye("Goodbye, CMake World");
std::cout << say_goodbye << std::endl;
return EXIT_SUCCESS;
}
The Message class wraps a string, provides an overload for the << operator, and consists of two source files: the Message.hpp header file and the corresponding Message.cpp source file. The Message.hpp interface file contains the following:
#pragma once
#include <iosfwd>
#include <string>
class Message {
public:
Message(const std::string &m) : message_(m) {}
friend std::ostream &operator<<(std::ostream &os, Message &obj) {
return obj.printObject(os);
}
private:
std::string message_;
std::ostream &printObject(std::ostream &os);
};
The corresponding implementation is contained in Message.cpp:
#include "Message.hpp"
#include <iostream>
#include <string>
std::ostream &Message::printObject(std::ostream &os) {
os << "This is my very nice message: " << std::endl;
os << message_;
return os;
}
These two new files will also have to be compiled and we have to modify CMakeLists.txt accordingly. However, in this example we want to compile them first into a library, and not directly into the executable:
add_library(message
STATIC
Message.hpp
Message.cpp
)
add_executable(hello-world hello-world.cpp)
target_link_libraries(hello-world message)
$ mkdir -p build
$ cd build
$ cmake ..
$ cmake --build .
Scanning dependencies of target message
[ 25%] Building CXX object CMakeFiles/message.dir/Message.cpp.o
[ 50%] Linking CXX static library libmessage.a
[ 50%] Built target message
Scanning dependencies of target hello-world
[ 75%] Building CXX object CMakeFiles/hello-world.dir/hello-world.cpp.o
[100%] Linking CXX executable hello-world
[100%] Built target hello-world
$ ./hello-world
This is my very nice message:
Hello, CMake World!
This is my very nice message:
Goodbye, CMake World
The previous example introduced two new commands:
After successful compilation, the build directory will contain the libmessage.a static library (on GNU/Linux) and the hello-world executable.
CMake accepts other values as valid for the second argument to add_library and we will encounter all of them in the rest of the book:
CMake is also able to generate special types of libraries. These produce no output in the build system but are extremely helpful in organizing dependencies and build requirements between targets:
In this example, we have collected the sources directly using add_library. In later chapters, we demonstrate the use of the target_sources CMake command to collect sources, in particular in Chapter 7, Structuring Projects. See also this wonderful blog post by Craig Scott: https://crascit.com/2016/01/31/enhanced-source-file-handling-with-target_sources/ which further motivates the use of the target_sources command.
Let us now show the use of the object library functionality made available in CMake. We will use the same source files, but modify CMakeLists.txt:
cmake_minimum_required(VERSION 3.5 FATAL_ERROR)
project(recipe-03 LANGUAGES CXX)
add_library(message-objs
OBJECT
Message.hpp
Message.cpp
)
# this is only needed for older compilers
# but doesn't hurt either to have it
set_target_properties(message-objs
PROPERTIES
POSITION_INDEPENDENT_CODE 1
)
add_library(message-shared
SHARED
$<TARGET_OBJECTS:message-objs>
)
add_library(message-static
STATIC
$<TARGET_OBJECTS:message-objs>
)
add_executable(hello-world hello-world.cpp)
target_link_libraries(hello-world message-static)
First, notice that the add_library command changed to add_library(message-objs OBJECT Message.hpp Message.cpp). Additionally, we have to make sure that the compilation to object files generates position-independent code. This is done by setting the corresponding property of the message-objs target, with the set_target_properties command.
This object library can now be used to obtain both the static library, called message-static, and the shared library, called message-shared. It is important to note the generator expression syntax used to refer to the object library: $<TARGET_OBJECTS:message-objs>. Generator expressions are constructs that CMake evaluates at generation time, right after configuration time, to produce configuration-specific build output. See also: https://cmake.org/cmake/help/latest/manual/cmake-generator-expressions.7.html. We will delve into generator expressions later in Chapter 5, Configure-time and Build-time Operations. Finally, the hello-world executable is linked with the static version of the message library.
Is it possible to have CMake generate the two libraries with the same name? In other words, can both of them be called message instead of message-static and message-shared? We will need to modify the properties of these two targets:
add_library(message-shared
SHARED
$<TARGET_OBJECTS:message-objs>
)
set_target_properties(message-shared
PROPERTIES
OUTPUT_NAME "message"
)
add_library(message-static
STATIC
$<TARGET_OBJECTS:message-objs>
)
set_target_properties(message-static
PROPERTIES
OUTPUT_NAME "message"
)
Can we link against the DSO? It depends on the operating system and compiler:
Why? Generating good DSOs requires the programmer to limit symbol visibility. This is achieved with the help of the compiler, but conventions are different on different operating systems and compilers. CMake has a powerful mechanism for taking care of this and we will explain how it works in Chapter 10, Writing an Installer.
So far, we have looked at fairly simple projects, where the execution flow for CMake was linear: from a set of source files to a single executable, possibly via static or shared libraries. To ensure complete control over the execution flow of all the steps involved in building a project, configuration, compilation, and linkage, CMake offers its own language. In this recipe, we will explore the use of the conditional construct if-elseif-else-endif.
Let us start with the same source code as for the previous recipe. We want to be able to toggle between two behaviors:
Let us construct CMakeLists.txt to achieve this:
cmake_minimum_required(VERSION 3.5 FATAL_ERROR)
project(recipe-04 LANGUAGES CXX)
set(USE_LIBRARY OFF)
message(STATUS "Compile sources into a library? ${USE_LIBRARY}")
set(BUILD_SHARED_LIBS OFF)
list(APPEND _sources Message.hpp Message.cpp)
if(USE_LIBRARY)
# add_library will create a static library
# since BUILD_SHARED_LIBS is OFF
add_library(message ${_sources})
add_executable(hello-world hello-world.cpp)
target_link_libraries(hello-world message)
else()
add_executable(hello-world hello-world.cpp ${_sources})
endif()
We have introduced two variables: USE_LIBRARY and BUILD_SHARED_LIBS. Both of them have been set to OFF. As detailed in the CMake language documentation, true or false values can be expressed in a number of ways:
The USE_LIBRARY variable will toggle between the first and the second behavior. BUILD_SHARED_LIBS is a global flag offered by CMake. Remember that the add_library command can be invoked without passing the STATIC/SHARED/OBJECT argument. This is because, internally, the BUILD_SHARED_LIBS global variable is looked up; if false or undefined, a static library will be generated.
This example shows that it is possible to introduce conditionals to control the execution flow in CMake. However, the current setup does not allow the toggles to be set from outside, that is, without modifying CMakeLists.txt by hand. In principle, we want to be able to expose all toggles to the user, so that configuration can be tweaked without modifying the code for the build system. We will show how to do that in a moment.
In the previous recipe, we introduced conditionals in a rather rigid fashion: by introducing variables with a given truth value hardcoded. This can be useful sometimes, but it prevents users of your code from easily toggling these variables. Another disadvantage of the rigid approach is that the CMake code does not communicate to the reader that this is a value that is expected to be modified from outside. The recommended way to toggle behavior in the build system generation for your project is to present logical switches as options in your CMakeLists.txt using the option() command. This recipe will show you how to use this command.
Let us have a look at our static/shared library example from the previous recipe. Instead of hardcoding USE_LIBRARY to ON or OFF, we will now prefer to expose it as an option with a default value that can be changed from the outside:
option(USE_LIBRARY "Compile sources into a library" OFF)
$ mkdir -p build
$ cd build
$ cmake -D USE_LIBRARY=ON ..
-- ...
-- Compile sources into a library? ON
-- ...
$ cmake --build .
Scanning dependencies of target message
[ 25%] Building CXX object CMakeFiles/message.dir/Message.cpp.o
[ 50%] Linking CXX static library libmessage.a
[ 50%] Built target message
Scanning dependencies of target hello-world
[ 75%] Building CXX object CMakeFiles/hello-world.dir/hello-world.cpp.o
[100%] Linking CXX executable hello-world
[100%] Built target hello-world
The -D switch is used to set any type of variable for CMake: logicals, paths, and so forth.
The option command accepts three arguments:
option(<option_variable> "help string" [initial value])
Sometimes there is the need to introduce options that are dependent on the value of other options. In our example, we might wish to offer the option to either produce a static or a shared library. However, this option would have no meaning if the USE_LIBRARY logical was not set to ON. CMake offers the cmake_dependent_option() command to define options that depend on other options:
include(CMakeDependentOption)
# second option depends on the value of the first
cmake_dependent_option(
MAKE_STATIC_LIBRARY "Compile sources into a static library" OFF
"USE_LIBRARY" ON
)
# third option depends on the value of the first
cmake_dependent_option(
MAKE_SHARED_LIBRARY "Compile sources into a shared library" ON
"USE_LIBRARY" ON
)
If USE_LIBRARY is ON, MAKE_STATIC_LIBRARY defaults to OFF, while MAKE_SHARED_LIBRARY defaults to ON. So we can run this:
$ cmake -D USE_LIBRARY=OFF -D MAKE_SHARED_LIBRARY=ON ..
This will still not build a library, since USE_LIBRARY is still set to OFF.
As mentioned earlier, CMake has mechanisms in place to extend its syntax and capabilities through the inclusion of modules, either shipped with CMake itself or custom ones. In this case, we have included a module called CMakeDependentOption. Without the include statement, the cmake_dependent_option() command would not be available for use. See also https://cmake.org/cmake/help/latest/module/CMakeDependentOption.html.
One aspect that we have not given much thought to so far is the selection of compilers. CMake is sophisticated enough to select the most appropriate compiler given the platform and the generator. CMake is also able to set compiler flags to a sane set of defaults. However, often we wish to control the choice of the compiler, and in this recipe we will show how this can be done. In later recipes, we will also consider the choice of build type and show how to control compiler flags.
How can we select a specific compiler? For example, what if we want to use the Intel or Portland Group compilers? CMake stores compilers for each language in the CMAKE_<LANG>_COMPILER variable, where <LANG> is any of the supported languages, for our purposes CXX, C, or Fortran. The user can set this variable in one of two ways:
$ cmake -D CMAKE_CXX_COMPILER=clang++ ..
$ env CXX=clang++ cmake ..
Any of the recipes discussed so far can be configured for use with any other compiler by passing the appropriate option.
We have here assumed that the additional compilers are available in the standard paths where CMake does its lookups. If that is not the case, the user will need to pass the full path to the compiler executable or wrapper.
At configure time, CMake performs a series of platform tests to determine which compilers are available and if they are suitable for the project at hand. A suitable compiler is not only determined by the platform we are working on, but also by the generator we want to use. The first test CMake performs is based on the name of the compiler for the project language. For example, if cc is a working C compiler, then that is what will be used as the default compiler for a C project. On GNU/Linux, using Unix Makefiles or Ninja, the compilers in the GCC family will be most likely chosen by default for C++, C, and Fortran. On Microsoft Windows, the C++ and C compilers in Visual Studio will be selected, provided Visual Studio is the generator. MinGW compilers are the default if MinGW or MSYS Makefiles were chosen as generators.
Where can we find which default compilers and compiler flags will be picked up by CMake for our platform? CMake offers the --system-information flag, which will dump all information about your system to the screen or a file. To see this, try the following:
$ cmake --system-information information.txt
Searching through the file (in this case, information.txt), you will find the default values for the CMAKE_CXX_COMPILER, CMAKE_C_COMPILER, and CMAKE_Fortran_COMPILER options, together with their default flags. We will have a look at the flags in the next recipe.
CMake provides additional variables to interact with compilers:
We can try to configure the following example CMakeLists.txt with different compilers. In this example, we will use CMake variables to probe what compiler we are using and what version:
cmake_minimum_required(VERSION 3.5 FATAL_ERROR)
project(recipe-06 LANGUAGES C CXX)
message(STATUS "Is the C++ compiler loaded? ${CMAKE_CXX_COMPILER_LOADED}")
if(CMAKE_CXX_COMPILER_LOADED)
message(STATUS "The C++ compiler ID is: ${CMAKE_CXX_COMPILER_ID}")
message(STATUS "Is the C++ from GNU? ${CMAKE_COMPILER_IS_GNUCXX}")
message(STATUS "The C++ compiler version is: ${CMAKE_CXX_COMPILER_VERSION}")
endif()
message(STATUS "Is the C compiler loaded? ${CMAKE_C_COMPILER_LOADED}")
if(CMAKE_C_COMPILER_LOADED)
message(STATUS "The C compiler ID is: ${CMAKE_C_COMPILER_ID}")
message(STATUS "Is the C from GNU? ${CMAKE_COMPILER_IS_GNUCC}")
message(STATUS "The C compiler version is: ${CMAKE_C_COMPILER_VERSION}")
endif()
Observe that this example does not contain any targets, so there is nothing to build and we will only focus on the configuration step:
$ mkdir -p build
$ cd build
$ cmake ..
...
-- Is the C++ compiler loaded? 1
-- The C++ compiler ID is: GNU
-- Is the C++ from GNU? 1
-- The C++ compiler version is: 8.1.0
-- Is the C compiler loaded? 1
-- The C compiler ID is: GNU
-- Is the C from GNU? 1
-- The C compiler version is: 8.1.0
...
The output will of course depend on the available and chosen compilers and compiler versions.
CMake has the notion of build types or configurations, such as Debug, Release, and so forth. Within one configuration, one can collect related options or properties, such as compiler and linker flags, for a Debug or Release build. The variable governing the configuration to be used when generating the build system is CMAKE_BUILD_TYPE. This variable is empty by default, and the values recognized by CMake are:
In this recipe, we will show how the build type can be set for an example project:
cmake_minimum_required(VERSION 3.5 FATAL_ERROR)
project(recipe-07 LANGUAGES C CXX)
if(NOT CMAKE_BUILD_TYPE)
set(CMAKE_BUILD_TYPE Release CACHE STRING "Build type" FORCE)
endif()
message(STATUS "Build type: ${CMAKE_BUILD_TYPE}")
message(STATUS "C flags, Debug configuration: ${CMAKE_C_FLAGS_DEBUG}")
message(STATUS "C flags, Release configuration: ${CMAKE_C_FLAGS_RELEASE}")
message(STATUS "C flags, Release configuration with Debug info: ${CMAKE_C_FLAGS_RELWITHDEBINFO}")
message(STATUS "C flags, minimal Release configuration: ${CMAKE_C_FLAGS_MINSIZEREL}")
message(STATUS "C++ flags, Debug configuration: ${CMAKE_CXX_FLAGS_DEBUG}")
message(STATUS "C++ flags, Release configuration: ${CMAKE_CXX_FLAGS_RELEASE}")
message(STATUS "C++ flags, Release configuration with Debug info: ${CMAKE_CXX_FLAGS_RELWITHDEBINFO}")
message(STATUS "C++ flags, minimal Release configuration: ${CMAKE_CXX_FLAGS_MINSIZEREL}")
$ mkdir -p build
$ cd build
$ cmake ..
...
-- Build type: Release
-- C flags, Debug configuration: -g
-- C flags, Release configuration: -O3 -DNDEBUG
-- C flags, Release configuration with Debug info: -O2 -g -DNDEBUG
-- C flags, minimal Release configuration: -Os -DNDEBUG
-- C++ flags, Debug configuration: -g
-- C++ flags, Release configuration: -O3 -DNDEBUG
-- C++ flags, Release configuration with Debug info: -O2 -g -DNDEBUG
-- C++ flags, minimal Release configuration: -Os -DNDEBUG
$ cmake -D CMAKE_BUILD_TYPE=Debug ..
-- Build type: Debug
-- C flags, Debug configuration: -g
-- C flags, Release configuration: -O3 -DNDEBUG
-- C flags, Release configuration with Debug info: -O2 -g -DNDEBUG
-- C flags, minimal Release configuration: -Os -DNDEBUG
-- C++ flags, Debug configuration: -g
-- C++ flags, Release configuration: -O3 -DNDEBUG
-- C++ flags, Release configuration with Debug info: -O2 -g -DNDEBUG
-- C++ flags, minimal Release configuration: -Os -DNDEBUG
We have demonstrated how to set a default build type and how to override it from the command line. With this, we can control whether a project is built with optimization flags or with all optimizations turned off, and instead debugging information on. We have also seen what kind of flags are used for the various available configurations, as this depends on the compiler of choice. Instead of printing the flags explicitly during a run of CMake, one can also peruse the output of running cmake --system-information to find out what the presets are for the current combination of platform, default compiler, and language. In the next recipe, we will discuss how to extend or adjust compiler flags for different compilers and different build types.
We have shown how the variable CMAKE_BUILD_TYPE (documented at this link: https://cmake.org/cmake/help/v3.5/variable/CMAKE_BUILD_TYPE.html) defines the configuration of the generated build system. It is often helpful to build a project both in Release and Debug configurations, for example when assessing the effect of compiler optimization levels. For single-configuration generators, such as Unix Makefiles, MSYS Makefiles or Ninja, this requires running CMake twice, that is a full reconfiguration of the project. CMake however also supports multiple-configuration generators. These are usually project files offered by integrated-development environments, most notably Visual Studio and Xcode which can handle more than one configuration simultaneously. The available configuration types for these generators can be tweaked with the CMAKE_CONFIGURATION_TYPES variable which will accept a list of values (documentation available at this link: https://cmake.org/cmake/help/v3.5/variable/CMAKE_CONFIGURATION_TYPES.html).
The following CMake invocation with the Visual Studio:
$ mkdir -p build
$ cd build
$ cmake .. -G"Visual Studio 12 2017 Win64" -D CMAKE_CONFIGURATION_TYPES="Release;Debug"
will generate a build tree for both the Release and Debug configuration. You can then decide which of the two to build by using the --config flag:
$ cmake --build . --config Release
The previous recipes showed how to probe CMake for information on the compilers and how to tune compiler optimizations for all targets in your project. The latter task is a subset of the general need to control which compiler flags are used in your project. CMake offers a lot of flexibility for adjusting or extending compiler flags and you can choose between two main approaches:
In this recipe, we will show both approaches.
We will compile an example program to calculate the area of different geometric shapes. The code has a main function in a file called compute-areas.cpp:
#include "geometry_circle.hpp"
#include "geometry_polygon.hpp"
#include "geometry_rhombus.hpp"
#include "geometry_square.hpp"
#include <cstdlib>
#include <iostream>
int main() {
using namespace geometry;
double radius = 2.5293;
double A_circle = area::circle(radius);
std::cout << "A circle of radius " << radius << " has an area of " << A_circle
<< std::endl;
int nSides = 19;
double side = 1.29312;
double A_polygon = area::polygon(nSides, side);
std::cout << "A regular polygon of " << nSides << " sides of length " << side
<< " has an area of " << A_polygon << std::endl;
double d1 = 5.0;
double d2 = 7.8912;
double A_rhombus = area::rhombus(d1, d2);
std::cout << "A rhombus of major diagonal " << d1 << " and minor diagonal " << d2
<< " has an area of " << A_rhombus << std::endl;
double l = 10.0;
double A_square = area::square(l);
std::cout << "A square of side " << l << " has an area of " << A_square
<< std::endl;
return EXIT_SUCCESS;
}
The implementations of the various functions are contained in other files: each geometric shape has a header file and a corresponding source file. In total, we have four header files and five source files to compile:
.
├── CMakeLists.txt
├── compute-areas.cpp
├── geometry_circle.cpp
├── geometry_circle.hpp
├── geometry_polygon.cpp
├── geometry_polygon.hpp
├── geometry_rhombus.cpp
├── geometry_rhombus.hpp
├── geometry_square.cpp
└── geometry_square.hpp
We will not provide listings for all these files but rather refer the reader to https://github.com/dev-cafe/cmake-cookbook/tree/v1.0/chapter-01/recipe-08.
Now that we have the sources in place, our goal will be to configure the project and experiment with compiler flags:
cmake_minimum_required(VERSION 3.5 FATAL_ERROR)
project(recipe-08 LANGUAGES CXX)
message("C++ compiler flags: ${CMAKE_CXX_FLAGS}")
list(APPEND flags "-fPIC" "-Wall")
if(NOT WIN32)
list(APPEND flags "-Wextra" "-Wpedantic")
endif()
add_library(geometry
STATIC
geometry_circle.cpp
geometry_circle.hpp
geometry_polygon.cpp
geometry_polygon.hpp
geometry_rhombus.cpp
geometry_rhombus.hpp
geometry_square.cpp
geometry_square.hpp
)
target_compile_options(geometry
PRIVATE
${flags}
)
add_executable(compute-areas compute-areas.cpp)
target_compile_options(compute-areas
PRIVATE
"-fPIC"
)
target_link_libraries(compute-areas geometry)
In this example, the warning flags -Wall, -Wextra, and -Wpedantic will be added to the compile options for the geometry target; both the compute-areas and geometry targets will use the -fPIC flag. Compile options can be added with three levels of visibility: INTERFACE, PUBLIC, and PRIVATE.
The visibility levels have the following meaning:
The visibility levels of target properties are at the core of a modern usage of CMake and we will revisit this topic often and extensively throughout the book. Adding compile options in this way does not pollute the CMAKE_<LANG>_FLAGS_<CONFIG> global CMake variables and gives you granular control over what options are used on which targets.
How can we verify whether the flags are correctly used as we intended to? Or in other words, how can you discover which compile flags are actually used by a CMake project? One approach is the following and it uses CMake to pass additional arguments, in this case the environment variable VERBOSE=1, to the native build tool:
$ mkdir -p build
$ cd build
$ cmake ..
$ cmake --build . -- VERBOSE=1
... lots of output ...
[ 14%] Building CXX object CMakeFiles/geometry.dir/geometry_circle.cpp.o
/usr/bin/c++ -fPIC -Wall -Wextra -Wpedantic -o CMakeFiles/geometry.dir/geometry_circle.cpp.o -c /home/bast/tmp/cmake-cookbook/chapter-01/recipe-08/cxx-example/geometry_circle.cpp
[ 28%] Building CXX object CMakeFiles/geometry.dir/geometry_polygon.cpp.o
/usr/bin/c++ -fPIC -Wall -Wextra -Wpedantic -o CMakeFiles/geometry.dir/geometry_polygon.cpp.o -c /home/bast/tmp/cmake-cookbook/chapter-01/recipe-08/cxx-example/geometry_polygon.cpp
[ 42%] Building CXX object CMakeFiles/geometry.dir/geometry_rhombus.cpp.o
/usr/bin/c++ -fPIC -Wall -Wextra -Wpedantic -o CMakeFiles/geometry.dir/geometry_rhombus.cpp.o -c /home/bast/tmp/cmake-cookbook/chapter-01/recipe-08/cxx-example/geometry_rhombus.cpp
[ 57%] Building CXX object CMakeFiles/geometry.dir/geometry_square.cpp.o
/usr/bin/c++ -fPIC -Wall -Wextra -Wpedantic -o CMakeFiles/geometry.dir/geometry_square.cpp.o -c /home/bast/tmp/cmake-cookbook/chapter-01/recipe-08/cxx-example/geometry_square.cpp
... more output ...
[ 85%] Building CXX object CMakeFiles/compute-areas.dir/compute-areas.cpp.o
/usr/bin/c++ -fPIC -o CMakeFiles/compute-areas.dir/compute-areas.cpp.o -c /home/bast/tmp/cmake-cookbook/chapter-01/recipe-08/cxx-example/compute-areas.cpp
... more output ...
The preceding output confirms that the compile flags were correctly set according to our instructions.
The second approach to controlling compiler flags involves no modifications to CMakeLists.txt. If one wants to modify compiler options for the geometry and compute-areas targets in this project, it is as easy as invoking CMake with an additional argument:
$ cmake -D CMAKE_CXX_FLAGS="-fno-exceptions -fno-rtti" ..
As you might have guessed, this command will compile the project, deactivating exceptions and runtime type identification (RTTI).
The two approaches can also be coupled. One can use a basic set of flags globally, while keeping control of what happens on a per target basis. We can use CMakeLists.txt and running this command:
$ cmake -D CMAKE_CXX_FLAGS="-fno-exceptions -fno-rtti" ..
This will configure the geometry target with -fno-exceptions -fno-rtti -fPIC -Wall -Wextra -Wpedantic, while configuring compute-areas with -fno-exceptions -fno-rtti -fPIC.
Most of the time, flags are compiler-specific. Our current example will only work with GCC and Clang; compilers from other vendors will not understand many, if not all, of those flags. Clearly, if a project aims at being truly cross-platform, this problem has to be solved. There are three approaches to this.
The most typical approach will append a list of desired compiler flags to each configuration type CMake variable, that is, to CMAKE_<LANG>_FLAGS_<CONFIG>. These flags are set to what is known to work for the given compiler vendor, and will thus be enclosed in
if-endif clauses that check the CMAKE_<LANG>_COMPILER_ID variable, for example:
if(CMAKE_CXX_COMPILER_ID MATCHES GNU)
list(APPEND CMAKE_CXX_FLAGS "-fno-rtti" "-fno-exceptions")
list(APPEND CMAKE_CXX_FLAGS_DEBUG "-Wsuggest-final-types" "-Wsuggest-final-methods" "-Wsuggest-override")
list(APPEND CMAKE_CXX_FLAGS_RELEASE "-O3" "-Wno-unused")
endif()
if(CMAKE_CXX_COMPILER_ID MATCHES Clang)
list(APPEND CMAKE_CXX_FLAGS "-fno-rtti" "-fno-exceptions" "-Qunused-arguments" "-fcolor-diagnostics")
list(APPEND CMAKE_CXX_FLAGS_DEBUG "-Wdocumentation")
list(APPEND CMAKE_CXX_FLAGS_RELEASE "-O3" "-Wno-unused")
endif()
A more refined approach does not tamper with the CMAKE_<LANG>_FLAGS_<CONFIG> variables at all and rather defines project-specific lists of flags:
set(COMPILER_FLAGS)
set(COMPILER_FLAGS_DEBUG)
set(COMPILER_FLAGS_RELEASE)
if(CMAKE_CXX_COMPILER_ID MATCHES GNU)
list(APPEND CXX_FLAGS "-fno-rtti" "-fno-exceptions")
list(APPEND CXX_FLAGS_DEBUG "-Wsuggest-final-types" "-Wsuggest-final-methods" "-Wsuggest-override")
list(APPEND CXX_FLAGS_RELEASE "-O3" "-Wno-unused")
endif()
if(CMAKE_CXX_COMPILER_ID MATCHES Clang)
list(APPEND CXX_FLAGS "-fno-rtti" "-fno-exceptions" "-Qunused-arguments" "-fcolor-diagnostics")
list(APPEND CXX_FLAGS_DEBUG "-Wdocumentation")
list(APPEND CXX_FLAGS_RELEASE "-O3" "-Wno-unused")
endif()
Later on, it uses generator expressions to set compiler flags on a per-configuration and per-target basis:
target_compile_option(compute-areas
PRIVATE
${CXX_FLAGS}
"$<$<CONFIG:Debug>:${CXX_FLAGS_DEBUG}>"
"$<$<CONFIG:Release>:${CXX_FLAGS_RELEASE}>"
)
We have shown both approaches in the current recipe and have clearly recommended the latter (project-specific variables and target_compile_options) over the former (CMake variables).
Both approaches work and are widely used in many projects. However, they have shortcomings. As we have already mentioned, CMAKE_<LANG>_COMPILER_ID is not guaranteed to be defined for all compiler vendors. In addition, some flags might become deprecated or might have been introduced in a later version of the compiler. Similarly to CMAKE_<LANG>_COMPILER_ID, the CMAKE_<LANG>_COMPILER_VERSION variable is not guaranteed to be defined for all languages and vendors. Although checking on these variables is quite popular, we think that a more robust alternative would be to check whether a desired set of flags works with the given compiler, so that only effectively working flags are actually used in the project. Combined with the use of project-specific variables, target_compile_options, and generator expressions, this approach is quite powerful. We will show how to use this check-and-set pattern in Recipe 3, Writing a function to test and set compiler flags, in Chapter 7, Structuring Projects.
Programming languages have different standards available, that is, different versions that offer new and improved language constructs. Enabling new standards is accomplished by setting the appropriate compiler flag. We have shown in the previous recipe how this can be done, either on a per-target basis or globally. With its 3.1 version, CMake introduced a platform- and compiler-independent mechanism for setting the language standard for C++ and C: setting the <LANG>_STANDARD property for targets.
For the following example, we will require a C++ compiler compliant with the C++14 standard or later. The code for this recipe defines a polymorphic hierarchy of animals. We use std::unique_ptr for the base class in the hierarchy:
std::unique_ptr<Animal> cat = Cat("Simon");
std::unique_ptr<Animal> dog = Dog("Marlowe);
Instead of explicitly using constructors for the various subtypes, we use an implementation of the factory method. The factory is implemented using C++11 variadic templates. It holds a map of creation functions for each object in the inheritance hierarchy:
typedef std::function<std::unique_ptr<Animal>(const std::string &)> CreateAnimal;
It dispatches them based on a preassigned tag, so that creation of objects will look like the following:
std::unique_ptr<Animal> simon = farm.create("CAT", "Simon");
std::unique_ptr<Animal> marlowe = farm.create("DOG", "Marlowe");
The tags and creation functions are registered to the factory prior to its use:
Factory<CreateAnimal> farm;
farm.subscribe("CAT", [](const std::string & n) { return std::make_unique<Cat>(n); });
farm.subscribe("DOG", [](const std::string & n) { return std::make_unique<Dog>(n); });
We are defining the creation functions using C++11 lambda functions. Notice the use of std::make_unique to avoid introducing the naked new operator. This helper was introduced in C++14.
We will construct the CMakeLists.txt step by step and show how to require a certain standard (in this case C++14):
cmake_minimum_required(VERSION 3.5 FATAL_ERROR)
project(recipe-09 LANGUAGES CXX)
set(CMAKE_WINDOWS_EXPORT_ALL_SYMBOLS ON)
add_library(animals
SHARED
Animal.cpp
Animal.hpp
Cat.cpp
Cat.hpp
Dog.cpp
Dog.hpp
Factory.hpp
)
set_target_properties(animals
PROPERTIES
CXX_STANDARD 14
CXX_EXTENSIONS OFF
CXX_STANDARD_REQUIRED ON
POSITION_INDEPENDENT_CODE 1
)
add_executable(animal-farm animal-farm.cpp)
set_target_properties(animal-farm
PROPERTIES
CXX_STANDARD 14
CXX_EXTENSIONS OFF
CXX_STANDARD_REQUIRED ON
)
target_link_libraries(animal-farm animals)
$ mkdir -p build
$ cd build
$ cmake ..
$ cmake --build .
$ ./animal-farm
I'm Simon the cat!
I'm Marlowe the dog!
In steps 4 and 5, we set a number of properties for the animals and animal-farm targets:
CMake offers an even finer level of control over the language standard by introducing the concept of compile features. These are features introduced by the language standard, such as variadic templates and lambdas in C++11, and automatic return type deduction in C++14. You can ask for certain features to be available for specific targets with the target_compile_features() command and CMake will automatically set the correct compiler flag for the standard. It is also possible to have CMake generate compatibility headers for optional compiler features.
We have used if-elseif-endif constructs in previous recipes of this chapter. CMake also offers language facilities for creating loops: foreach-endforeach and while-endwhile. Both can be combined with break for breaking from the enclosing loop early. This recipe will show you how to use foreach to loop over a list of source files. We will apply such a loop to lower the compiler optimization for a set of source files without introducing a new target.
We will reuse the geometry example introduced in Recipe 8, Controlling compiler flags. Our goal will be to fine-tune the compiler optimization for some of the sources by collecting them into a list.
These are the detailed steps to follow in CMakeLists.txt:
cmake_minimum_required(VERSION 3.5 FATAL_ERROR)
project(recipe-10 LANGUAGES CXX)
add_library(geometry
STATIC
geometry_circle.cpp
geometry_circle.hpp
geometry_polygon.cpp
geometry_polygon.hpp
geometry_rhombus.cpp
geometry_rhombus.hpp
geometry_square.cpp
geometry_square.hpp
)
target_compile_options(geometry
PRIVATE
-O3
)
list(
APPEND sources_with_lower_optimization
geometry_circle.cpp
geometry_rhombus.cpp
)
message(STATUS "Setting source properties using IN LISTS syntax:")
foreach(_source IN LISTS sources_with_lower_optimization)
set_source_files_properties(${_source} PROPERTIES COMPILE_FLAGS -O2)
message(STATUS "Appending -O2 flag for ${_source}")
endforeach()
message(STATUS "Querying sources properties using plain syntax:")
foreach(_source ${sources_with_lower_optimization})
get_source_file_property(_flags ${_source} COMPILE_FLAGS)
message(STATUS "Source ${_source} has the following extra COMPILE_FLAGS: ${_flags}")
endforeach()
add_executable(compute-areas compute-areas.cpp)
target_link_libraries(compute-areas geometry)
$ mkdir -p build
$ cd build
$ cmake ..
...
-- Setting source properties using IN LISTS syntax:
-- Appending -O2 flag for geometry_circle.cpp
-- Appending -O2 flag for geometry_rhombus.cpp
-- Querying sources properties using plain syntax:
-- Source geometry_circle.cpp has the following extra COMPILE_FLAGS: -O2
-- Source geometry_rhombus.cpp has the following extra COMPILE_FLAGS: -O2
$ cmake --build . -- VERBOSE=1
The foreach-endforeach syntax can be used to express the repetition of certain tasks over a list of variables. In our case, we used it to manipulate, set, and get the compiler flags of specific files in the project. This CMake snippet introduced two additional new commands:
The foreach() construct can be used in four different ways:
In this chapter, we will cover the following recipes:
Although CMake is cross-platform and in our projects we strive for the source code to be portable across platforms, operating systems, and compilers, sometimes the source code is not fully portable; for example, when using vendor-dependent extensions, we may find it necessary to configure and/or build code slightly differently depending on the platform. This is particularly relevant for legacy code or when cross-compiling, a topic we will return to in Chapter 13, Alternative Generators and Cross-compilation. It can also be advantageous to know the processor instruction set to optimize performance for a specific target platform. This chapter presents recipes to detect such environments and provides recommendations for how to implement such solutions.
CMake is a set of cross-platform tools. Nevertheless, it can be very useful to know on which operating system (OS) the configuration or build step is executed. Such OS discovery can be used either to tweak CMake code for a particular OS, to enable conditional compilation depending on the OS, or to use compiler-specific extensions if available or necessary. In this recipe, we will demonstrate how to use CMake to detect the OS with an example that does not require compilation of any source code. For simplicity, we will only consider the configuration step.
We will demonstrate OS discovery with a very simple CMakeLists.txt:
cmake_minimum_required(VERSION 3.5 FATAL_ERROR)
project(recipe-01 LANGUAGES NONE)
if(CMAKE_SYSTEM_NAME STREQUAL "Linux")
message(STATUS "Configuring on/for Linux")
elseif(CMAKE_SYSTEM_NAME STREQUAL "Darwin")
message(STATUS "Configuring on/for macOS")
elseif(CMAKE_SYSTEM_NAME STREQUAL "Windows")
message(STATUS "Configuring on/for Windows")
elseif(CMAKE_SYSTEM_NAME STREQUAL "AIX")
message(STATUS "Configuring on/for IBM AIX")
else()
message(STATUS "Configuring on/for ${CMAKE_SYSTEM_NAME}")
endif()
Before testing it out, first examine the preceding code block and consider what behavior you expect on your system.
$ mkdir -p build
$ cd build
$ cmake ..
-- Configuring on/for Linux
CMake correctly defines CMAKE_SYSTEM_NAME for the target OS and therefore there is typically no need to use custom commands, tools, or scripts to query this information. The value of this variable can then be used to implement OS-specific conditionals and workarounds. On systems that have the uname command, this variable is set to the output of uname -s. The variable is set to "Darwin" on macOS. On Linux and Windows, it evaluates to "Linux" and "Windows", respectively. We now know how to execute a specific CMake code on a certain OS if we need to. Of course, we should try to minimize such customization in order to simplify migration to new platforms.
Ideally, we should avoid platform-dependent source code, but sometimes we have no choice – particularly when we are given code to configure and compile that we have not written ourselves. In this recipe, we will demonstrate how to use CMake to conditionally compile source code depending on the OS.
For this example, we will modify the hello-world.cpp example code from Chapter 1, From a Simple Executable to Libraries, Recipe 1, Compiling a single source file into an executable:
#include <cstdlib>
#include <iostream>
#include <string>
std::string say_hello() {
#ifdef IS_WINDOWS
return std::string("Hello from Windows!");
#elif IS_LINUX
return std::string("Hello from Linux!");
#elif IS_MACOS
return std::string("Hello from macOS!");
#else
return std::string("Hello from an unknown system!");
#endif
}
int main() {
std::cout << say_hello() << std::endl;
return EXIT_SUCCESS;
}
Let us build a corresponding CMakeLists.txt instance, which will enable us to conditionally compile the source code based on the target OS:
cmake_minimum_required(VERSION 3.5 FATAL_ERROR)
project(recipe-02 LANGUAGES CXX)
add_executable(hello-world hello-world.cpp)
if(CMAKE_SYSTEM_NAME STREQUAL "Linux")
target_compile_definitions(hello-world PUBLIC "IS_LINUX")
endif()
if(CMAKE_SYSTEM_NAME STREQUAL "Darwin")
target_compile_definitions(hello-world PUBLIC "IS_MACOS")
endif()
if(CMAKE_SYSTEM_NAME STREQUAL "Windows")
target_compile_definitions(hello-world PUBLIC "IS_WINDOWS")
endif()
Before continuing, first examine the preceding expressions and consider what behavior you expect on your system.
Now we are ready to test it out and to configure the project:
$ mkdir -p build
$ cd build
$ cmake ..
$ cmake --build .
$ ./hello-world
Hello from Linux!
On a Windows system, you will see Hello from Windows!; other operating systems will yield different outputs.
The interesting part in the hello-world.cpp example is the conditional compilation based on the preprocessor definitions IS_WINDOWS, IS_LINUX, or IS_MACOS:
std::string say_hello() {
#ifdef IS_WINDOWS
return std::string("Hello from Windows!");
#elif IS_LINUX
return std::string("Hello from Linux!");
#elif IS_MACOS
return std::string("Hello from macOS!");
#else
return std::string("Hello from an unknown system!");
#endif
}
These definitions are defined at configure time by CMake in CMakeLists.txt by using target_compile_definitions before being passed on to the preprocessor. We could have achieved a more compact expression without repeating if-endif statements and we will demonstrate this refactoring in the next recipe. We could also have joined the if-endif statements into one if-elseif-elseif-endif statement.
At this stage, we should point out that we could have set the definitions using add_definitions(-DIS_LINUX) (of course, adjusting the definition according to the platform in question) instead of using target_compile_definitions. The disadvantage of using add_definitions is that it modifies compile definitions for the entire project, whereas target_compile_definitions gives us the possibility to restrict both the scope of the definitions to a specific target, as well as to restrict visibility of these definitions by using the PRIVATE, PUBLIC, or INTERFACE qualifiers. These qualifiers have the same meaning they had for compiler flags, as we have seen already in Chapter 1, From a Simple Executable to Libraries, Recipe 8, Controlling compiler flags:
This recipe is similar to the previous one in the sense that we will use CMake to accommodate the compilation of conditional source code that is dependent on the environment: in this case, it will be dependent on the chosen compiler. Again, for the sake of portability, this is a situation that we try to avoid when writing new code, but it is also a situation that we are almost guaranteed to meet sooner or later, especially when using legacy code or when dealing with compiler-dependent tooling, such as sanitizers. From the recipes of this and the previous chapter, we have all the ingredients to achieve this. Nevertheless, it will be useful to discuss the problem of dealing with compiler-dependent source code since we will have the chance to introduce some new aspects of CMake.
In this recipe, we will start out with an example in C++, and later we will demonstrate a Fortran example and attempt to refactor and simplify the CMake code.
Let us consider the following hello-world.cpp source code:
#include <cstdlib>
#include <iostream>
#include <string>
std::string say_hello() {
#ifdef IS_INTEL_CXX_COMPILER
// only compiled when Intel compiler is selected
// such compiler will not compile the other branches
return std::string("Hello Intel compiler!");
#elif IS_GNU_CXX_COMPILER
// only compiled when GNU compiler is selected
// such compiler will not compile the other branches
return std::string("Hello GNU compiler!");
#elif IS_PGI_CXX_COMPILER
// etc.
return std::string("Hello PGI compiler!");
#elif IS_XL_CXX_COMPILER
return std::string("Hello XL compiler!");
#else
return std::string("Hello unknown compiler - have we met before?");
#endif
}
int main() {
std::cout << say_hello() << std::endl;
std::cout << "compiler name is " COMPILER_NAME << std::endl;
return EXIT_SUCCESS;
}
We will also use a corresponding Fortran example (hello-world.F90):
program hello
implicit none
#ifdef IS_Intel_FORTRAN_COMPILER
print *, 'Hello Intel compiler!'
#elif IS_GNU_FORTRAN_COMPILER
print *, 'Hello GNU compiler!'
#elif IS_PGI_FORTRAN_COMPILER
print *, 'Hello PGI compiler!'
#elif IS_XL_FORTRAN_COMPILER
print *, 'Hello XL compiler!'
#else
print *, 'Hello unknown compiler - have we met before?'
#endif
end program
We shall start out with the C++ example before moving on to the Fortran example:
cmake_minimum_required(VERSION 3.5 FATAL_ERROR)
project(recipe-03 LANGUAGES CXX)
add_executable(hello-world hello-world.cpp)
target_compile_definitions(hello-world PUBLIC "COMPILER_NAME=\"${CMAKE_CXX_COMPILER_ID}\"")
if(CMAKE_CXX_COMPILER_ID MATCHES Intel)
target_compile_definitions(hello-world PUBLIC "IS_INTEL_CXX_COMPILER")
endif()
if(CMAKE_CXX_COMPILER_ID MATCHES GNU)
target_compile_definitions(hello-world PUBLIC "IS_GNU_CXX_COMPILER")
endif()
if(CMAKE_CXX_COMPILER_ID MATCHES PGI)
target_compile_definitions(hello-world PUBLIC "IS_PGI_CXX_COMPILER")
endif()
if(CMAKE_CXX_COMPILER_ID MATCHES XL)
target_compile_definitions(hello-world PUBLIC "IS_XL_CXX_COMPILER")
endif()
The previous recipes have trained our eyes and now we can already anticipate the result:
$ mkdir -p build
$ cd build
$ cmake ..
$ cmake --build .
$ ./hello-world
Hello GNU compiler!
If you use a different compiler vendor, then this example code will provide a different greeting.
The if statements in the CMakeLists.txt file in the preceding example and the previous recipe seem repetitive, and as programmers, we do not like to repeat ourselves. Can we express this more compactly? Indeed we can! For this, let us turn to the Fortran example.
In the CMakeLists.txt file of the Fortran example, we need to do the following:
project(recipe-03 LANGUAGES Fortran)
add_executable(hello-world hello-world.F90)
target_compile_definitions(hello-world
PUBLIC "IS_${CMAKE_Fortran_COMPILER_ID}_FORTRAN_COMPILER"
)
The remaining behavior of the Fortran example is the same as in the C++ example.
The preprocessor definitions are defined at configure time by CMake in CMakeLists.txt and are passed on to the preprocessor. The Fortran example contains a very compact expression where we use the CMAKE_Fortran_COMPILER_ID variable to construct the preprocessor definition using target_compile_definitions. To accommodate this, we had to change the case of "Intel" from IS_INTEL_CXX_COMPILER to IS_Intel_FORTRAN_COMPILER. We could achieve the same for C or C++ by using the corresponding CMAKE_C_COMPILER_ID and CMAKE_CXX_COMPILER_ID variables. Please do note, however, that CMAKE_<LANG>_COMPILER_ID is not guaranteed to be defined for all compilers or languages.
The advent of 64-bit integer arithmetic in 1970s supercomputing and 64-bit addressing in the early 2000s for personal computers has widened the memory-addressing range, and significant resources have been invested into porting code that was hardcoded for 32-bit architectures to enable 64-bit addressing. A number of blog posts, such as https://www.viva64.com/en/a/0004/, are devoted to discussing typical issues and solutions in porting C++ code to 64-bit platforms. It is very much advisable to program in a way that avoids explicitly hardcoded limits, but you may be in a situation where you need to accommodate hardcoded limits in a code configured with CMake, and in this recipe, we wish to discuss options for detecting the host processor architecture.
We will use the following arch-dependent.cpp example source:
#include <cstdlib>
#include <iostream>
#include <string>
#define STRINGIFY(x) #x
#define TOSTRING(x) STRINGIFY(x)
std::string say_hello() {
std::string arch_info(TOSTRING(ARCHITECTURE));
arch_info += std::string(" architecture. ");
#ifdef IS_32_BIT_ARCH
return arch_info + std::string("Compiled on a 32 bit host processor.");
#elif IS_64_BIT_ARCH
return arch_info + std::string("Compiled on a 64 bit host processor.");
#else
return arch_info + std::string("Neither 32 nor 64 bit, puzzling ...");
#endif
}
int main() {
std::cout << say_hello() << std::endl;
return EXIT_SUCCESS;
}
Now let us turn to the CMake side. In the CMakeLists.txt file, we need to apply the following:
cmake_minimum_required(VERSION 3.5 FATAL_ERROR)
project(recipe-04 LANGUAGES CXX)
add_executable(arch-dependent arch-dependent.cpp)
if(CMAKE_SIZEOF_VOID_P EQUAL 8)
target_compile_definitions(arch-dependent PUBLIC "IS_64_BIT_ARCH")
message(STATUS "Target is 64 bits")
else()
target_compile_definitions(arch-dependent PUBLIC "IS_32_BIT_ARCH")
message(STATUS "Target is 32 bits")
endif()
if(CMAKE_HOST_SYSTEM_PROCESSOR MATCHES "i386")
message(STATUS "i386 architecture detected")
elseif(CMAKE_HOST_SYSTEM_PROCESSOR MATCHES "i686")
message(STATUS "i686 architecture detected")
elseif(CMAKE_HOST_SYSTEM_PROCESSOR MATCHES "x86_64")
message(STATUS "x86_64 architecture detected")
else()
message(STATUS "host processor architecture is unknown")
endif()
target_compile_definitions(arch-dependent
PUBLIC "ARCHITECTURE=${CMAKE_HOST_SYSTEM_PROCESSOR}"
)
$ mkdir -p build
$ cd build
$ cmake ..
...
-- Target is 64 bits
-- x86_64 architecture detected
...
$ cmake --build .
$ ./arch-dependent
x86_64 architecture. Compiled on a 64 bit host processor.
CMake defines the CMAKE_HOST_SYSTEM_PROCESSOR variable to contain the name of the processor it is currently running on. This can be set to "i386", "i686", "x86_64", "AMD64", and such like, depending, of course, on the CPU at hand. CMAKE_SIZEOF_VOID_P is defined to hold the size of a pointer to the void type. We can query both at the CMake level in order to modify targets or target compile definitions. Using preprocessor definitions, we can branch source code compilation based on the detected host processor architecture. As discussed in previous recipes, such customization should be avoided when writing new code, but sometimes it is useful when working with legacy code or when cross-compiling, which is the subject of Chapter 13, Alternative Generators and Cross-compilation.
In addition to CMAKE_HOST_SYSTEM_PROCESSOR, CMake also defines the CMAKE_SYSTEM_PROCESSOR variable. Whereas the former contains the name of the CPU CMake is currently running on, the latter will contain the name of the CPU we are currently building for. This is a subtle difference that plays a very fundamental role when cross-compiling. We will see more about cross-compilation in Chapter 13, Alternative Generators and Cross-compilation.
An alternative to letting CMake detect the host processor architecture is to use symbols defined within C or C++ and use CMake's try_run function to build and attempt to execute the source code (see Chapter 5, Configure-time and Build-time Operations, Recipe 8, Probing execution) that is branched by the preprocessor symbols. This returns well-defined errors that can be caught on the CMake side (this strategy is inspired by https://github.com/axr/solar-cmake/blob/master/TargetArch.cmake):
#if defined(__i386) || defined(__i386__) || defined(_M_IX86)
#error cmake_arch i386
#elif defined(__x86_64) || defined(__x86_64__) || defined(__amd64) || defined(_M_X64)
#error cmake_arch x86_64
#endif
This strategy is also the recommended one for detecting the target processor architecture, where CMake does not seem to offer a portable intrinsic solution.
Yet another alternative exists. It will only use CMake, doing away entirely with the preprocessor, at the expense of having a different source file for each case, which would then be set as the source file for the executable target arch-dependent using the target_sources CMake command:
add_executable(arch-dependent "")
if(CMAKE_HOST_SYSTEM_PROCESSOR MATCHES "i386")
message(STATUS "i386 architecture detected")
target_sources(arch-dependent
PRIVATE
arch-dependent-i386.cpp
)
elseif(CMAKE_HOST_SYSTEM_PROCESSOR MATCHES "i686")
message(STATUS "i686 architecture detected")
target_sources(arch-dependent
PRIVATE
arch-dependent-i686.cpp
)
elseif(CMAKE_HOST_SYSTEM_PROCESSOR MATCHES "x86_64")
message(STATUS "x86_64 architecture detected")
target_sources(arch-dependent
PRIVATE
arch-dependent-x86_64.cpp
)
else()
message(STATUS "host processor architecture is unknown")
endif()
This approach will clearly require more work for an existing project, since the source files will need to be separated. Moreover, code duplication between the different source files might certainly become a problem.
In this recipe, we will discuss how to discover the host processor instruction set with the help of CMake. This functionality has been added to CMake relatively recently and requires CMake 3.10 or later. The detected host system information can be used to either set corresponding compiler flags or to implement optional compilation of sources or source code generation depending on the host system. In this recipe, our goal will be to detect the host system information, pass it to the C++ source code using preprocessor definitions, and print the information to the output.
Our example C++ source file (processor-info.cpp) consists of the following:
#include "config.h"
#include <cstdlib>
#include <iostream>
int main() {
std::cout << "Number of logical cores: "
<< NUMBER_OF_LOGICAL_CORES << std::endl;
std::cout << "Number of physical cores: "
<< NUMBER_OF_PHYSICAL_CORES << std::endl;
std::cout << "Total virtual memory in megabytes: "
<< TOTAL_VIRTUAL_MEMORY << std::endl;
std::cout << "Available virtual memory in megabytes: "
<< AVAILABLE_VIRTUAL_MEMORY << std::endl;
std::cout << "Total physical memory in megabytes: "
<< TOTAL_PHYSICAL_MEMORY << std::endl;
std::cout << "Available physical memory in megabytes: "
<< AVAILABLE_PHYSICAL_MEMORY << std::endl;
std::cout << "Processor is 64Bit: "
<< IS_64BIT << std::endl;
std::cout << "Processor has floating point unit: "
<< HAS_FPU << std::endl;
std::cout << "Processor supports MMX instructions: "
<< HAS_MMX << std::endl;
std::cout << "Processor supports Ext. MMX instructions: "
<< HAS_MMX_PLUS << std::endl;
std::cout << "Processor supports SSE instructions: "
<< HAS_SSE << std::endl;
std::cout << "Processor supports SSE2 instructions: "
<< HAS_SSE2 << std::endl;
std::cout << "Processor supports SSE FP instructions: "
<< HAS_SSE_FP << std::endl;
std::cout << "Processor supports SSE MMX instructions: "
<< HAS_SSE_MMX << std::endl;
std::cout << "Processor supports 3DNow instructions: "
<< HAS_AMD_3DNOW << std::endl;
std::cout << "Processor supports 3DNow+ instructions: "
<< HAS_AMD_3DNOW_PLUS << std::endl;
std::cout << "IA64 processor emulating x86 : "
<< HAS_IA64 << std::endl;
std::cout << "OS name: "
<< OS_NAME << std::endl;
std::cout << "OS sub-type: "
<< OS_RELEASE << std::endl;
std::cout << "OS build ID: "
<< OS_VERSION << std::endl;
std::cout << "OS platform: "
<< OS_PLATFORM << std::endl;
return EXIT_SUCCESS;
}
This file includes config.h, which we will generate from config.h.in, given here:
#pragma once
#define NUMBER_OF_LOGICAL_CORES @_NUMBER_OF_LOGICAL_CORES@
#define NUMBER_OF_PHYSICAL_CORES @_NUMBER_OF_PHYSICAL_CORES@
#define TOTAL_VIRTUAL_MEMORY @_TOTAL_VIRTUAL_MEMORY@
#define AVAILABLE_VIRTUAL_MEMORY @_AVAILABLE_VIRTUAL_MEMORY@
#define TOTAL_PHYSICAL_MEMORY @_TOTAL_PHYSICAL_MEMORY@
#define AVAILABLE_PHYSICAL_MEMORY @_AVAILABLE_PHYSICAL_MEMORY@
#define IS_64BIT @_IS_64BIT@
#define HAS_FPU @_HAS_FPU@
#define HAS_MMX @_HAS_MMX@
#define HAS_MMX_PLUS @_HAS_MMX_PLUS@
#define HAS_SSE @_HAS_SSE@
#define HAS_SSE2 @_HAS_SSE2@
#define HAS_SSE_FP @_HAS_SSE_FP@
#define HAS_SSE_MMX @_HAS_SSE_MMX@
#define HAS_AMD_3DNOW @_HAS_AMD_3DNOW@
#define HAS_AMD_3DNOW_PLUS @_HAS_AMD_3DNOW_PLUS@
#define HAS_IA64 @_HAS_IA64@
#define OS_NAME "@_OS_NAME@"
#define OS_RELEASE "@_OS_RELEASE@"
#define OS_VERSION "@_OS_VERSION@"
#define OS_PLATFORM "@_OS_PLATFORM@"
We will use CMake to fill the definitions in config.h with sensible values for our platform and to compile our sample source file into an executable:
cmake_minimum_required(VERSION 3.10 FATAL_ERROR)
project(recipe-05 CXX)
add_executable(processor-info "")
target_sources(processor-info
PRIVATE
processor-info.cpp
)
target_include_directories(processor-info
PRIVATE
${PROJECT_BINARY_DIR}
)
foreach(key
IN ITEMS
NUMBER_OF_LOGICAL_CORES
NUMBER_OF_PHYSICAL_CORES
TOTAL_VIRTUAL_MEMORY
AVAILABLE_VIRTUAL_MEMORY
TOTAL_PHYSICAL_MEMORY
AVAILABLE_PHYSICAL_MEMORY
IS_64BIT
HAS_FPU
HAS_MMX
HAS_MMX_PLUS
HAS_SSE
HAS_SSE2
HAS_SSE_FP
HAS_SSE_MMX
HAS_AMD_3DNOW
HAS_AMD_3DNOW_PLUS
HAS_IA64
OS_NAME
OS_RELEASE
OS_VERSION
OS_PLATFORM
)
cmake_host_system_information(RESULT _${key} QUERY ${key})
endforeach()
configure_file(config.h.in config.h @ONLY)
$ mkdir -p build
$ cd build
$ cmake ..
$ cmake --build .
$ ./processor-info
Number of logical cores: 4
Number of physical cores: 2
Total virtual memory in megabytes: 15258
Available virtual memory in megabytes: 14678
Total physical memory in megabytes: 7858
Available physical memory in megabytes: 4072
Processor is 64Bit: 1
Processor has floating point unit: 1
Processor supports MMX instructions: 1
Processor supports Ext. MMX instructions: 0
Processor supports SSE instructions: 1
Processor supports SSE2 instructions: 1
Processor supports SSE FP instructions: 0
Processor supports SSE MMX instructions: 0
Processor supports 3DNow instructions: 0
Processor supports 3DNow+ instructions: 0
IA64 processor emulating x86 : 0
OS name: Linux
OS sub-type: 4.16.7-1-ARCH
OS build ID: #1 SMP PREEMPT Wed May 2 21:12:36 UTC 2018
OS platform: x86_64
The foreach loop in CMakeLists.txt queries values for a number of keys and defines corresponding variables. The core function of this recipe is cmake_host_system_information, which queries system information of the host system on which CMake runs. This function can be invoked with multiple keys in one function call, but in this case, we have used one function call per key. We then use these variables to configure the placeholders in config.h.in and generate config.h . This configuration is done with the configure_file command. Finally, config.h is included in processor-info.cpp, and once compiled, it will print the values to the screen. We will revisit this approach in Chapter 5, Configure-time and Build-time Operations, and Chapter 6, Generating Source Code.
For a more fine-grained processor instruction set detection, consider this module: https://github.com/VcDevel/Vc/blob/master/cmake/OptimizeForArchitecture.cmake. We would also like to note that, sometimes, the host building the code may not be the same as the host running the code. This is often the case on compute clusters where the login node architecture may differ from the architecture found on compute nodes. One way to solve this is to submit the configuration and compilation as a computation step and deploy it to the compute nodes.
The vector capabilities of modern processor architectures can dramatically enhance the performance of your code. This is particularly the case for certain classes of operations, and linear algebra is foremost among these. This recipe will show how to enable vectorization to speed up a simple executable using the Eigen C++ library for linear algebra.
We will use the Eigen C++ template library for linear algebra and show how to set up compiler flags to enable vectorization. The source code for this recipe the linear-algebra.cpp file:
#include <chrono>
#include <iostream>
#include <Eigen/Dense>
EIGEN_DONT_INLINE
double simple_function(Eigen::VectorXd &va, Eigen::VectorXd &vb) {
// this simple function computes the dot product of two vectors
// of course it could be expressed more compactly
double d = va.dot(vb);
return d;
}
int main() {
int len = 1000000;
int num_repetitions = 100;
// generate two random vectors
Eigen::VectorXd va = Eigen::VectorXd::Random(len);
Eigen::VectorXd vb = Eigen::VectorXd::Random(len);
double result;
auto start = std::chrono::system_clock::now();
for (auto i = 0; i < num_repetitions; i++) {
result = simple_function(va, vb);
}
auto end = std::chrono::system_clock::now();
auto elapsed_seconds = end - start;
std::cout << "result: " << result << std::endl;
std::cout << "elapsed seconds: " << elapsed_seconds.count() << std::endl;
}
We expect vectorization to speed up the execution of the dot product operation in simple_function.
According to the documentation of the Eigen library, it is sufficient to set the appropriate compiler flag to enable the generation of vectorized code. Let us look at CMakeLists.txt:
cmake_minimum_required(VERSION 3.5 FATAL_ERROR)
project(recipe-06 LANGUAGES CXX)
set(CMAKE_CXX_STANDARD 11)
set(CMAKE_CXX_EXTENSIONS OFF)
set(CMAKE_CXX_STANDARD_REQUIRED ON)
find_package(Eigen3 3.3 REQUIRED CONFIG)
include(CheckCXXCompilerFlag)
check_cxx_compiler_flag("-march=native" _march_native_works)
check_cxx_compiler_flag("-xHost" _xhost_works)
set(_CXX_FLAGS)
if(_march_native_works)
message(STATUS "Using processor's vector instructions (-march=native compiler flag set)")
set(_CXX_FLAGS "-march=native")
elseif(_xhost_works)
message(STATUS "Using processor's vector instructions (-xHost compiler flag set)")
set(_CXX_FLAGS "-xHost")
else()
message(STATUS "No suitable compiler flag found for vectorization")
endif()
add_executable(linear-algebra-unoptimized linear-algebra.cpp)
target_link_libraries(linear-algebra-unoptimized
PRIVATE
Eigen3::Eigen
)
add_executable(linear-algebra linear-algebra.cpp)
target_compile_options(linear-algebra
PRIVATE
${_CXX_FLAGS}
)
target_link_libraries(linear-algebra
PRIVATE
Eigen3::Eigen
)
$ mkdir -p build
$ cd build
$ cmake ..
...
-- Performing Test _march_native_works
-- Performing Test _march_native_works - Success
-- Performing Test _xhost_works
-- Performing Test _xhost_works - Failed
-- Using processor's vector instructions (-march=native compiler flag set)
...
$ cmake --build .
$ ./linear-algebra-unoptimized
result: -261.505
elapsed seconds: 1.97964
$ ./linear-algebra
result: -261.505
elapsed seconds: 1.05048
Most modern processors provide vector instruction sets. Carefully crafted code can exploit these and achieve enhanced performance with respect to non-vectorized code. The Eigen library has been written with vectorization explicitly in mind since linear algebra operations can greatly benefit from it. All we need to do is instruct the compiler to inspect the processor for us and generate the native set of instructions for the current architecture. Different compiler vendors use different flags to achieve this: the GNU compiler implements this by means of the -march=native flag, whereas the Intel compiler uses the -xHost flag. We then use the check_cxx_compiler_flag function offered by the CheckCXXCompilerFlag.cmake module:
check_cxx_compiler_flag("-march=native" _march_native_works)
This function accepts two arguments: the first one is the compiler flag to check, the second is a variable for storing the result, true or false, of the check. If the check is positive, we add the working flag to the _CXX_FLAGS variable, which will then be used to set the compiler flags for our executable target.
This recipe could be combined with the previous recipe; processor capabilities could be queried using cmake_host_system_information.
In this chapter, we will cover the following recipes:
Projects often depend on other projects and libraries. This chapter demonstrates how to detect external libraries, frameworks, and projects and how to link to these. CMake has a rather extensive set of prepackaged modules to detect the most commonly used libraries and programs, such as Python and Boost, for example. You can get a list of existing modules using cmake --help-module-list. However, not all libraries and programs are covered and from time to time you will have to provide your own detection scripts. In this chapter, we will discuss the necessary tools and discover the find family of CMake commands:
Python is a very popular dynamic language. Many projects package tools written in Python together with their main programs and libraries, or use Python scripts in the configuration or build process. In such cases, it is important to ensure that the runtime dependency on the Python interpreter is also satisfied. This recipe will show how to detect and use the Python interpreter at the configuration step. We will introduce the find_package command, which will be used throughout this chapter.
We will build up the CMakeLists.txt file step by step:
cmake_minimum_required(VERSION 3.5 FATAL_ERROR)
project(recipe-01 LANGUAGES NONE)
find_package(PythonInterp REQUIRED)
execute_process(
COMMAND
${PYTHON_EXECUTABLE} "-c" "print('Hello, world!')"
RESULT_VARIABLE _status
OUTPUT_VARIABLE _hello_world
ERROR_QUIET
OUTPUT_STRIP_TRAILING_WHITESPACE
)
message(STATUS "RESULT_VARIABLE is: ${_status}")
message(STATUS "OUTPUT_VARIABLE is: ${_hello_world}")
$ mkdir -p build
$ cd build
$ cmake ..
-- Found PythonInterp: /usr/bin/python (found version "3.6.5")
-- RESULT_VARIABLE is: 0
-- OUTPUT_VARIABLE is: Hello, world!
-- Configuring done
-- Generating done
-- Build files have been written to: /home/user/cmake-cookbook/chapter-03/recipe-01/example/build
find_package is a wrapper command for CMake modules written for discovering and setting up packages. These modules contain CMake commands to identify packages in standard locations on the system. The files for the CMake modules are called Find<name>.cmake and the commands they contain will be run internally when a call to find_package(<name>) is issued.
In addition to actually discovering the requested package on your system, find modules also set up a handful of useful variables, reflecting what was actually found, which you can use in your own CMakeLists.txt. In the case of the Python interpreter, the relevant module is FindPythonInterp.cmake, which is shipped with CMake, and sets the following variables:
It is possible to force CMake to look for specific versions of a package. For example, use this to request any version of the Python interpreter greater or equal to 2.7:
find_package(PythonInterp 2.7)
It is also possible to enforce that dependencies are satisfied:
find_package(PythonInterp REQUIRED)
In this case, CMake will abort configuration if no suitable executable for the Python interpreter is found in the usual lookup locations.
Sometimes, packages are not installed in standard locations and CMake might fail to locate them correctly. It is possible to tell CMake to look into certain specific locations to find certain software using the CLI switch -D to pass the appropriate option. In the case of the Python interpreter, you may configure with the following:
$ cmake -D PYTHON_EXECUTABLE=/custom/location/python ..
This will correctly identify the Python executable in the non-standard /custom/location/python installation directory.
Independently of detecting packages, we would like to mention a handy helper module for printing variables. In this recipe, we have used the following:
message(STATUS "RESULT_VARIABLE is: ${_status}")
message(STATUS "OUTPUT_VARIABLE is: ${_hello_world}")
A handy alternative for debugging is to use the following:
include(CMakePrintHelpers)
cmake_print_variables(_status _hello_world)
This produces the following output:
-- _status="0" ; _hello_world="Hello, world!"
For more documentation on convenience macros for printing properties and variables, see https://cmake.org/cmake/help/v3.5/module/CMakePrintHelpers.html.
The use of Python tools to analyze and manipulate output from compiled programs is nowadays widespread. However, there are also other, more powerful ways of combining an interpreted language such as Python with compiled languages such as C or C++. One way is to extend Python by providing new types and new functionalities on these types via C or C++ modules, compiled into shared libraries. This will be the topic of recipes in Chapter 9, Mixed-language Projects. Another approach is to embed the Python interpreter into a C or C++ program. Both approaches require the following:
All three components have to be pinned to the exact same version. We have demonstrated how to find the Python interpreter; in this recipe, we will show how to find the two missing ingredients for a successful embedding.
We will use a simple example of Python embedding into a C program that can be found on the Python documentation pages. The source file is called hello-embedded-python.c:
#include <Python.h>
int main(int argc, char *argv[]) {
Py_SetProgramName(argv[0]); /* optional but recommended */
Py_Initialize();
PyRun_SimpleString("from time import time,ctime\n"
"print 'Today is',ctime(time())\n");
Py_Finalize();
return 0;
}
This code samples will initialize an instance of the Python interpreter within the program and print the date using the time Python module.
These are the steps to follow in our CMakeLists.txt:
cmake_minimum_required(VERSION 3.5 FATAL_ERROR)
project(recipe-02 LANGUAGES C)
set(CMAKE_C_STANDARD 99)
set(CMAKE_C_EXTENSIONS OFF)
set(CMAKE_C_STANDARD_REQUIRED ON)
find_package(PythonInterp REQUIRED)
find_package(PythonLibs ${PYTHON_VERSION_MAJOR}.${PYTHON_VERSION_MINOR} EXACT REQUIRED)
add_executable(hello-embedded-python hello-embedded-python.c)
target_include_directories(hello-embedded-python
PRIVATE
${PYTHON_INCLUDE_DIRS}
)
target_link_libraries(hello-embedded-python
PRIVATE
${PYTHON_LIBRARIES}
)
$ mkdir -p build
$ cd build
$ cmake ..
...
-- Found PythonInterp: /usr/bin/python (found version "3.6.5")
-- Found PythonLibs: /usr/lib/libpython3.6m.so (found suitable exact version "3.6.5")
$ cmake --build .
$ ./hello-embedded-python
Today is Thu Jun 7 22:26:02 2018
The FindPythonLibs.cmake module will look in standard locations for the Python header and library. Since these are required dependencies of our project, configuration will stop with an error if these are not found.
Notice that we explicitly asked CMake to detect the installation of the Python executable. This is to ensure that executable, header, and library all have a matching version. This is paramount to ensure that there are no mismatches between versions that could cause crashes at runtime. We have achieved this by using PYTHON_VERSION_MAJOR and PYTHON_VERSION_MINOR, defined in FindPythonInterp.cmake:
find_package(PythonInterp REQUIRED)
find_package(PythonLibs ${PYTHON_VERSION_MAJOR}.${PYTHON_VERSION_MINOR} EXACT REQUIRED)
Using the EXACT keyword, we have constrained CMake to detect a particular, and in this case matching, version of the Python include files and libraries. For an even closer match, we could have used the precise PYTHON_VERSION_STRING:
find_package(PythonInterp REQUIRED)
find_package(PythonLibs ${PYTHON_VERSION_STRING} EXACT REQUIRED)
How do we make sure that the Python header and libraries are correctly located even when they are not in a standard installation directory? For the Python interpreter, it is possible to force CMake to look in specific directories by passing the PYTHON_LIBRARY and PYTHON_INCLUDE_DIR options via the -D option to the CLI. These options specify the following:
This ensures that the desired version of Python will be picked up.
It might be very difficult to exactly pin the Python interpreter and its development components to be of the exact same version. This is especially true for those cases where they are installed in non-standard locations or there is more than one version of each installed on your system. New Python detection modules have been added to CMake in its version 3.12 that are aimed at solving this vexing problem. The detection portion of our CMakeLists.txt would also be greatly simplified to:
find_package(Python COMPONENTS Interpreter Development REQUIRED)
We encourage you to read the documentation for the new module at: https://cmake.org/cmake/help/v3.12/module/FindPython.html
In the previous recipe, we showed how to detect the Python interpreter and how to compile a simple C program, embedding the Python interpreter. Both are fundamental tasks to get you off the ground when combining Python and a compiled language. Often, your code will depend on specific Python modules, be they Python tools, compiled programs embedding Python, or libraries extending it. For example, NumPy has become very popular in the scientific community for problems involving matrix algebra. In projects that depend on Python modules or packages, it is important to make sure that the dependency on these Python modules is satisfied. This recipe will show how to probe the user's environment to find specific Python modules and packages.
We will try a slightly more involved embedding example in a C++ program. The example is again taken from the Python online documentation (https://docs.python.org/3.5/extending/embedding.html#pure-embedding) and shows how to execute functions from a user-defined Python module by calling the compiled C++ executable.
The Python 3 example code (Py3-pure-embedding.cpp) contains the following source code (see https://docs.python.org/2/extending/embedding.html#pure-embedding for the corresponding Python 2 equivalent):
#include <Python.h>
int main(int argc, char *argv[]) {
PyObject *pName, *pModule, *pDict, *pFunc;
PyObject *pArgs, *pValue;
int i;
if (argc < 3) {
fprintf(stderr, "Usage: pure-embedding pythonfile funcname [args]\n");
return 1;
}
Py_Initialize();
PyRun_SimpleString("import sys");
PyRun_SimpleString("sys.path.append(\".\")");
pName = PyUnicode_DecodeFSDefault(argv[1]);
/* Error checking of pName left out */
pModule = PyImport_Import(pName);
Py_DECREF(pName);
if (pModule != NULL) {
pFunc = PyObject_GetAttrString(pModule, argv[2]);
/* pFunc is a new reference */
if (pFunc && PyCallable_Check(pFunc)) {
pArgs = PyTuple_New(argc - 3);
for (i = 0; i < argc - 3; ++i) {
pValue = PyLong_FromLong(atoi(argv[i + 3]));
if (!pValue) {
Py_DECREF(pArgs);
Py_DECREF(pModule);
fprintf(stderr, "Cannot convert argument\n");
return 1;
}
/* pValue reference stolen here: */
PyTuple_SetItem(pArgs, i, pValue);
}
pValue = PyObject_CallObject(pFunc, pArgs);
Py_DECREF(pArgs);
if (pValue != NULL) {
printf("Result of call: %ld\n", PyLong_AsLong(pValue));
Py_DECREF(pValue);
} else {
Py_DECREF(pFunc);
Py_DECREF(pModule);
PyErr_Print();
fprintf(stderr, "Call failed\n");
return 1;
}
} else {
if (PyErr_Occurred())
PyErr_Print();
fprintf(stderr, "Cannot find function \"%s\"\n", argv[2]);
}
Py_XDECREF(pFunc);
Py_DECREF(pModule);
} else {
PyErr_Print();
fprintf(stderr, "Failed to load \"%s\"\n", argv[1]);
return 1;
}
Py_Finalize();
return 0;
}
The Python code that we wish to embed (use_numpy.py) uses NumPy to set up a matrix with all matrix elements set to 1.0:
import numpy as np
def print_ones(rows, cols):
A = np.ones(shape=(rows, cols), dtype=float)
print(A)
# we return the number of elements to verify
# that the C++ code is able to receive return values
num_elements = rows*cols
return(num_elements)
In the following code, we wish to be able to check whether NumPy is available using CMake. We will first need to make sure that the Python interpreter, headers, and libraries are all available on our system. We will then move on to make sure that NumPy is available:
cmake_minimum_required(VERSION 3.5 FATAL_ERROR)
project(recipe-03 LANGUAGES CXX)
set(CMAKE_CXX_STANDARD 11)
set(CMAKE_CXX_EXTENSIONS OFF)
set(CMAKE_CXX_STANDARD_REQUIRED ON)
find_package(PythonInterp REQUIRED)
find_package(PythonLibs ${PYTHON_VERSION_MAJOR}.${PYTHON_VERSION_MINOR} EXACT REQUIRED)
execute_process(
COMMAND
${PYTHON_EXECUTABLE} "-c" "import re, numpy; print(re.compile('/__init__.py.*').sub('',numpy.__file__))"
RESULT_VARIABLE _numpy_status
OUTPUT_VARIABLE _numpy_location
ERROR_QUIET
OUTPUT_STRIP_TRAILING_WHITESPACE
)
if(NOT _numpy_status)
set(NumPy ${_numpy_location} CACHE STRING "Location of NumPy")
endif()
execute_process(
COMMAND
${PYTHON_EXECUTABLE} "-c" "import numpy; print(numpy.__version__)"
OUTPUT_VARIABLE _numpy_version
ERROR_QUIET
OUTPUT_STRIP_TRAILING_WHITESPACE
)
include(FindPackageHandleStandardArgs)
find_package_handle_standard_args(NumPy
FOUND_VAR NumPy_FOUND
REQUIRED_VARS NumPy
VERSION_VAR _numpy_version
)
add_executable(pure-embedding "")
target_sources(pure-embedding
PRIVATE
Py${PYTHON_VERSION_MAJOR}-pure-embedding.cpp
)
target_include_directories(pure-embedding
PRIVATE
${PYTHON_INCLUDE_DIRS}
)
target_link_libraries(pure-embedding
PRIVATE
${PYTHON_LIBRARIES}
)
add_custom_command(
OUTPUT
${CMAKE_CURRENT_BINARY_DIR}/use_numpy.py
COMMAND
${CMAKE_COMMAND} -E copy_if_different ${CMAKE_CURRENT_SOURCE_DIR}/use_numpy.py
${CMAKE_CURRENT_BINARY_DIR}/use_numpy.py
DEPENDS
${CMAKE_CURRENT_SOURCE_DIR}/use_numpy.py
)
# make sure building pure-embedding triggers the above custom command
target_sources(pure-embedding
PRIVATE
${CMAKE_CURRENT_BINARY_DIR}/use_numpy.py
)
$ mkdir -p build
$ cd build
$ cmake ..
-- ...
-- Found PythonInterp: /usr/bin/python (found version "3.6.5")
-- Found PythonLibs: /usr/lib/libpython3.6m.so (found suitable exact version "3.6.5")
-- Found NumPy: /usr/lib/python3.6/site-packages/numpy (found version "1.14.3")
$ cmake --build .
$ ./pure-embedding use_numpy print_ones 2 3
[[1. 1. 1.]
[1. 1. 1.]]
Result of call: 6
There are three new CMake commands in this recipe: execute_process and add_custom_command, which are always available, and find_package_handle_standard_args, which requires include(FindPackageHandleStandardArgs).
The execute_process command will execute one or more commands as child processes to the currently issued CMake command. The return value for the last child process will be saved into the variable passed as an argument to RESULT_VARIABLE, while the contents of the standard output and standard error pipes will be saved into the variables passed as arguments to OUTPUT_VARIABLE and ERROR_VARIABLE. execute_process allows us to execute arbitrary commands and use their results to infer the configuration of our system. In our case, we first use it to make sure that NumPy is available and then to obtain the version of the module.
The find_package_handle_standard_args command provides the standard tool for handling common operations related to finding programs and libraries installed on a given system. The version-related options, REQUIRED and EXACT, are all correctly handled without further CMake code when referring to this command. The additional options QUIET and COMPONENTS, which we will meet shortly, are also handled under the hood by this CMake command. In this recipe, we have used the following:
include(FindPackageHandleStandardArgs)
find_package_handle_standard_args(NumPy
FOUND_VAR NumPy_FOUND
REQUIRED_VARS NumPy
VERSION_VAR _numpy_version
)
The command will set the variable to signal that the module was found (NumPy_FOUND) when all required variables are set to valid file paths (NumPy). It will also set the version to the passed version variable ( _numpy_version) and print out status messages for the user:
-- Found NumPy: /usr/lib/python3.6/site-packages/numpy (found version "1.14.3")
In the present recipe, we have not used these variables further. What we could have done is to stop the configuration if NumPy_FOUND was returned as FALSE.
Finally, we should comment on the section of the code that copies use_numpy.py to the build directory:
add_custom_command(
OUTPUT
${CMAKE_CURRENT_BINARY_DIR}/use_numpy.py
COMMAND
${CMAKE_COMMAND} -E copy_if_different ${CMAKE_CURRENT_SOURCE_DIR}/use_numpy.py
${CMAKE_CURRENT_BINARY_DIR}/use_numpy.py
DEPENDS
${CMAKE_CURRENT_SOURCE_DIR}/use_numpy.py
)
target_sources(pure-embedding
PRIVATE
${CMAKE_CURRENT_BINARY_DIR}/use_numpy.py
)
We could have achieved the copying with a file(COPY ...) command. Here, we opted to use add_custom_command to make sure that the file gets copied every time it changes, not only the first time we run the configuration. We will return to add_custom_command in more detail in Chapter 5, Configure-time and Build-time Operations. Note also the target_sources command, which adds the dependency to ${CMAKE_CURRENT_BINARY_DIR}/use_numpy.py; this was done to make sure that building the pure-embedding target triggers the preceding custom command.
Many numerical codes rely heavily on matrix and vector operations. Think for example of matrix-vector and matrix-matrix products, the solution of linear system of equations, the calculation of eigenvalues and eigenvectors or singular-value decompositions. These operations might be so ubiquitous in the code base or might have to be run on such large data sets that the availability of efficient implementations becomes an absolute necessity in your code. Fortunately, there are libraries just for that: the basic linear algebra subprograms (BLAS) and the linear algebra package (LAPACK) offer standard APIs for many tasks involving linear algebraic manipulations. Different vendors provide different implementations, but all of them share the same API. While the actual programming languages for the underlying implementation of the math libraries varied over time (Fortran, C, Assembly), the remaining historical trace is the Fortran calling convention. Our task in this recipe will be to link against these libraries and show how to seamlessly work with a library written in a different language, considering the above-mentioned calling convention.
To demonstrate the detection and linking of math libraries, we wish to compile a C++ program that takes the dimension of a matrix as command-line input, generates a random square matrix A, a random vector b and solves the ensuing linear systems of equations: Ax = b. In addition, we will scale the random vector b by a random factor. The subroutines we need to use are DSCAL from BLAS, to perform the scaling and DGESV from LAPACK to find the solution of the linear system of equations. The listing for the example C++ code contains (linear-algebra.cpp):
#include "CxxBLAS.hpp"
#include "CxxLAPACK.hpp"
#include <iostream>
#include <random>
#include <vector>
int main(int argc, char **argv) {
if (argc != 2) {
std::cout << "Usage: ./linear-algebra dim" << std::endl;
return EXIT_FAILURE;
}
// Generate a uniform distribution of real number between -1.0 and 1.0
std::random_device rd;
std::mt19937 mt(rd());
std::uniform_real_distribution<double> dist(-1.0, 1.0);
// Allocate matrices and right-hand side vector
int dim = std::atoi(argv[1]);
std::vector<double> A(dim * dim);
std::vector<double> b(dim);
std::vector<int> ipiv(dim);
// Fill matrix and RHS with random numbers between -1.0 and 1.0
for (int r = 0; r < dim; r++) {
for (int c = 0; c < dim; c++) {
A[r + c * dim] = dist(mt);
}
b[r] = dist(mt);
}
// Scale RHS vector by a random number between -1.0 and 1.0
C_DSCAL(dim, dist(mt), b.data(), 1);
std::cout << "C_DSCAL done" << std::endl;
// Save matrix and RHS
std::vector<double> A1(A);
std::vector<double> b1(b);
int info;
info = C_DGESV(dim, 1, A.data(), dim, ipiv.data(), b.data(), dim);
std::cout << "C_DGESV done" << std::endl;
std::cout << "info is " << info << std::endl;
double eps = 0.0;
for (int i = 0; i < dim; ++i) {
double sum = 0.0;
for (int j = 0; j < dim; ++j)
sum += A1[i + j * dim] * b[j];
eps += std::abs(b1[i] - sum);
}
std::cout << "check is " << eps << std::endl;
return 0;
}
We are using the random library, introduced in C++11, to generate a random distribution between -1.0 and 1.0. C_DSCAL and C_DGESV are interfaces to the BLAS and LAPACK libraries, respectively, taking care of the name mangling in order to call these functions from a different programming language. This is done in the following interface files in combination with a CMake module which we will discuss further below.
The file CxxBLAS.hpp wraps the BLAS routine with extern "C" linkage:
#pragma once
#include "fc_mangle.h"
#include <cstddef>
#ifdef __cplusplus
extern "C" {
#endif
extern void DSCAL(int *n, double *alpha, double *vec, int *inc);
#ifdef __cplusplus
}
#endif
void C_DSCAL(size_t length, double alpha, double *vec, int inc);
The corresponding implementation file CxxBLAS.cpp contains:
#include "CxxBLAS.hpp"
#include <climits>
// see http://www.netlib.no/netlib/blas/dscal.f
void C_DSCAL(size_t length, double alpha, double *vec, int inc) {
int big_blocks = (int)(length / INT_MAX);
int small_size = (int)(length % INT_MAX);
for (int block = 0; block <= big_blocks; block++) {
double *vec_s = &vec[block * inc * (size_t)INT_MAX];
signed int length_s = (block == big_blocks) ? small_size : INT_MAX;
::DSCAL(&length_s, &alpha, vec_s, &inc);
}
}
The files CxxLAPACK.hpp and CxxLAPACK.cpp perform corresponding translations for the LAPACK calls.
The corresponding CMakeLists.txt contains the following building blocks:
cmake_minimum_required(VERSION 3.5 FATAL_ERROR)
project(recipe-04 LANGUAGES CXX C Fortran)
set(CMAKE_CXX_STANDARD 11)
set(CMAKE_CXX_EXTENSIONS OFF)
set(CMAKE_CXX_STANDARD_REQUIRED ON)
include(FortranCInterface)
FortranCInterface_VERIFY(CXX)
FortranCInterface_HEADER(
fc_mangle.h
MACRO_NAMESPACE "FC_"
SYMBOLS DSCAL DGESV
)
find_package(BLAS REQUIRED)
find_package(LAPACK REQUIRED)
add_library(math "")
target_sources(math
PRIVATE
CxxBLAS.cpp
CxxLAPACK.cpp
)
target_include_directories(math
PUBLIC
${CMAKE_CURRENT_SOURCE_DIR}
${CMAKE_CURRENT_BINARY_DIR}
)
target_link_libraries(math
PUBLIC
${LAPACK_LIBRARIES}
)
add_executable(linear-algebra "")
target_sources(linear-algebra
PRIVATE
linear-algebra.cpp
)
target_link_libraries(linear-algebra
PRIVATE
math
)
$ mkdir -p build
$ cd build
$ cmake ..
...
-- Detecting Fortran/C Interface
-- Detecting Fortran/C Interface - Found GLOBAL and MODULE mangling
-- Verifying Fortran/C Compiler Compatibility
-- Verifying Fortran/C Compiler Compatibility - Success
...
-- Found BLAS: /usr/lib/libblas.so
...
-- A library with LAPACK API found.
...
$ cmake --build .
$ ./linear-algebra 1000
C_DSCAL done
C_DGESV done
info is 0
check is 1.54284e-10
FindBLAS.cmake and FindLAPACK.cmake will look in standard locations for libraries offering the standard BLAS and LAPACK APIs. For the former, the module will look for the Fortran implementation of the SGEMM function, for single-precision matrix-matrix products for general matrices. For the latter, the module searches for the Fortran implementation of the CHEEV function, for the calculation of eigenvalues and eigenvectors of complex, Hermitian matrices. These lookups are carried out internally by compiling a small program calling these functions and trying to link against the candidate libraries. If that fails, it signals that a compliant library is not available on the system.
Every compiler performs name-mangling of symbols when generating machine code and unfortunately conventions for this operation are not universal, but compiler-dependent. To overcome this difficulty, we have used the FortranCInterface module (https://cmake.org/cmake/help/v3.5/module/FortranCInterface.html) to both verify that the Fortran and C/C++ compilers work together and to generate a Fortran-C interface header fc_mangle.h which is compatible with the compiler in question. The generated fc_mangle.h must then be included in the interface header files CxxBLAS.hpp and CxxLAPACK.hpp. We had to add C and Fortran support to the list of LANGUAGES in order to use FortranCInterface. Of course we could have defined own preprocessor definitions instead, however at the price of limited portability.
We will discuss the interoperability of Fortran and C more closely in Chapter 9, Mixed-language Projects.
Many numerical codes rely heavily on matrix algebra operations and it is important to correctly link against high-performance implementations of the BLAS and LAPACK APIs. There is a large variability in the way vendors package their libraries for different architectures and parallel environments. FindBLAS.cmake and FindLAPACK.cmake will most likely not be able to locate an existing library in all possible cases. If that happens, you can explicitly set the libraries from the CLI via the -D option.
Today, basically any computer on the market is a multi-core machine and for programs focusing on performance, we may have to focus on these multi-core CPUs and use concurrency in our programming models. OpenMP is the standard for shared-memory parallelism on multi-core CPUs. Existing programs often do not need to be radically modified or rewritten in order to benefit from OpenMP parallelization. Once the performance-critical sections in the code are identified, for example using a profiling tool, the programmer can add preprocessor directives that will instruct the compiler to generate parallel code for those regions.
In this recipe, we will show how to compile a program containing OpenMP directives, provided we use an OpenMP-aware compiler. Many Fortran, C, and C++ compilers exist that can take advantage of OpenMP parallelism. CMake provides very good support for OpenMP in combination with C, C++, or Fortran for relatively recent versions of CMake. This recipe will show you how to detect and link to OpenMP using imported targets for simple C++ and Fortran programs when using CMake 3.9 or above.
C and C++ programs can access OpenMP functionality by including the omp.h header file and by linking to the correct library. The compiler will generate parallel code according to preprocessor directives preceding the performance-critical sections. In this recipe, we will build the following example source code (example.cpp). This code sums integers from 1 to N, where N is given as a command-line argument:
#include <iostream>
#include <omp.h>
#include <string>
int main(int argc, char *argv[]) {
std::cout << "number of available processors: " << omp_get_num_procs()
<< std::endl;
std::cout << "number of threads: " << omp_get_max_threads() << std::endl;
auto n = std::stol(argv[1]);
std::cout << "we will form sum of numbers from 1 to " << n << std::endl;
// start timer
auto t0 = omp_get_wtime();
auto s = 0LL;
#pragma omp parallel for reduction(+ : s)
for (auto i = 1; i <= n; i++) {
s += i;
}
// stop timer
auto t1 = omp_get_wtime();
std::cout << "sum: " << s << std::endl;
std::cout << "elapsed wall clock time: " << t1 - t0 << " seconds" << std::endl;
return 0;
}
In Fortran, one needs to use the omp_lib module and link to the correct library. Use of parallel directives is once again possible in code comments preceding the performance-critical sections. The corresponding example.F90 contains the following:
program example
use omp_lib
implicit none
integer(8) :: i, n, s
character(len=32) :: arg
real(8) :: t0, t1
print *, "number of available processors:", omp_get_num_procs()
print *, "number of threads:", omp_get_max_threads()
call get_command_argument(1, arg)
read(arg , *) n
print *, "we will form sum of numbers from 1 to", n
! start timer
t0 = omp_get_wtime()
s = 0
!$omp parallel do reduction(+:s)
do i = 1, n
s = s + i
end do
! stop timer
t1 = omp_get_wtime()
print *, "sum:", s
print *, "elapsed wall clock time (seconds):", t1 - t0
end program
Our CMakeLists.txt for the C++ and Fortran examples will follow a template that is largely similar between the two languages:
cmake_minimum_required(VERSION 3.9 FATAL_ERROR)
project(recipe-05 LANGUAGES CXX)
set(CMAKE_CXX_STANDARD 11)
set(CMAKE_CXX_EXTENSIONS OFF)
set(CMAKE_CXX_STANDARD_REQUIRED ON)
find_package(OpenMP REQUIRED)
add_executable(example example.cpp)
target_link_libraries(example
PUBLIC
OpenMP::OpenMP_CXX
)
$ mkdir -p build
$ cd build
$ cmake ..
$ cmake --build .
$ ./example 1000000000
number of available processors: 4
number of threads: 4
we will form sum of numbers from 1 to 1000000000
sum: 500000000500000000
elapsed wall clock time: 1.08343 seconds
$ env OMP_NUM_THREADS=1 ./example 1000000000
number of available processors: 4
number of threads: 1
we will form sum of numbers from 1 to 1000000000
sum: 500000000500000000
elapsed wall clock time: 2.96427 seconds
Our simple example seems to work: the code compiled and linked, and we observe a speed-up when running on multiple cores. The fact that the speed-up is not a perfect multiple of OMP_NUM_THREADS is not our concern in this recipe, since we focus on the CMake aspect of a project which requires OpenMP. We have found linking to OpenMP to be extremely compact thanks to imported targets provided by a reasonably modern FindOpenMP module:
target_link_libraries(example
PUBLIC
OpenMP::OpenMP_CXX
)
We did not have to worry about compile flags or about include directories - these settings and dependencies are encoded in the definition of the library OpenMP::OpenMP_CXX which is of the IMPORTED type. As we mentioned in Recipe 3, Building and linking static and shared libraries, in Chapter 1, From a Simple Executable to Libraries, IMPORTED libraries are pseudo-targets that fully encode usage requirements for dependencies outside our own project. To use OpenMP one needs to set compiler flags, include directories, and link libraries. All of these are set as properties on the OpenMP::OpenMP_CXX target and transitively applied to our example target simply by using the target_link_libraries command. This makes using libraries within our CMake scripts exceedingly easy. We can print the properties of interface with the cmake_print_properties command, offered by the CMakePrintHelpers.cmake standard module:
include(CMakePrintHelpers)
cmake_print_properties(
TARGETS
OpenMP::OpenMP_CXX
PROPERTIES
INTERFACE_COMPILE_OPTIONS
INTERFACE_INCLUDE_DIRECTORIES
INTERFACE_LINK_LIBRARIES
)
Note that all properties of interest have the prefix INTERFACE_, because these properties usage requirements for any target wanting to interface and use the OpenMP target.
For CMake versions below 3.9, we would have to do a bit more work:
add_executable(example example.cpp)
target_compile_options(example
PUBLIC
${OpenMP_CXX_FLAGS}
)
set_target_properties(example
PROPERTIES
LINK_FLAGS ${OpenMP_CXX_FLAGS}
)
For CMake versions below 3.5, we might need to explicitly define compile flags for a Fortran project.
In this recipe, we have discussed C++ and Fortran, but the arguments and approach are valid also for a C project.
An alternative and often complementary approach to OpenMP shared-memory parallelism is the Message Passing Interface (MPI), which has become the de facto standard for modeling a program executing in parallel on a distributed memory system. Although modern MPI implementations allow shared-memory parallelism as well, a typical approach in high-performance computing is to use OpenMP within a compute node combined with MPI across compute nodes. The implementation of the MPI standard consists of the following:
This recipe will show how to find a suitable MPI implementation on your system in order to compile a simple MPI "Hello, World" program.
The example code (hello-mpi.cpp, downloaded from http://www.mpitutorial.com), which we will compile in this recipe, will initialize the MPI library, have every process print its name, and eventually finalize the library:
#include <iostream>
#include <mpi.h>
int main(int argc, char **argv) {
// Initialize the MPI environment. The two arguments to MPI Init are not
// currently used by MPI implementations, but are there in case future
// implementations might need the arguments.
MPI_Init(NULL, NULL);
// Get the number of processes
int world_size;
MPI_Comm_size(MPI_COMM_WORLD, &world_size);
// Get the rank of the process
int world_rank;
MPI_Comm_rank(MPI_COMM_WORLD, &world_rank);
// Get the name of the processor
char processor_name[MPI_MAX_PROCESSOR_NAME];
int name_len;
MPI_Get_processor_name(processor_name, &name_len);
// Print off a hello world message
std::cout << "Hello world from processor " << processor_name << ", rank "
<< world_rank << " out of " << world_size << " processors" << std::endl;
// Finalize the MPI environment. No more MPI calls can be made after this
MPI_Finalize();
}
In this recipe, we set out to find the MPI implementation: library, header files, compiler wrappers, and launcher. To do so, we will leverage the FindMPI.cmake standard CMake module:
cmake_minimum_required(VERSION 3.9 FATAL_ERROR)
project(recipe-06 LANGUAGES CXX)
set(CMAKE_CXX_STANDARD 11)
set(CMAKE_CXX_EXTENSIONS OFF)
set(CMAKE_CXX_STANDARD_REQUIRED ON)
find_package(MPI REQUIRED)
add_executable(hello-mpi hello-mpi.cpp)
target_link_libraries(hello-mpi
PUBLIC
MPI::MPI_CXX
)
$ mkdir -p build
$ cd build
$ cmake -D CMAKE_CXX_COMPILER=mpicxx ..
-- ...
-- Found MPI_CXX: /usr/lib/openmpi/libmpi_cxx.so (found version "3.1")
-- Found MPI: TRUE (found version "3.1")
-- ...
$ cmake --build .
$ mpirun -np 2 ./hello-mpi
Hello world from processor larry, rank 1 out of 2 processors
Hello world from processor larry, rank 0 out of 2 processors
Remember that the compiler wrapper is a thin layer around the compiler used to build the MPI library. Under the hood, it will call the same compiler and augment it with additional arguments, such as include paths and libraries, needed to successfully build a parallel program.
Which flags does the wrapper actually apply when compiling and linking a source file? We can probe this using the --showme option to the compiler wrapper. To find out the compiler flags we can use:
$ mpicxx --showme:compile
-pthread
Whereas to find out the linker flags we use the following:
$ mpicxx --showme:link
-pthread -Wl,-rpath -Wl,/usr/lib/openmpi -Wl,--enable-new-dtags -L/usr/lib/openmpi -lmpi_cxx -lmpi
Similarly to the previous OpenMP recipe, we have found the linking to MPI to be extremely compact thanks to the imported targets provided by a reasonably modern FindMPI module:
target_link_libraries(hello-mpi
PUBLIC
MPI::MPI_CXX
)
We did not have to worry about compile flags or about include directories - these settings and dependencies are already encoded as INTERFACE-type properties in the IMPORTED target provided by CMake.
And as discussed in the previous recipe, for CMake versions below 3.9, we would have to do a bit more work:
add_executable(hello-mpi hello-mpi.c)
target_compile_options(hello-mpi
PUBLIC
${MPI_CXX_COMPILE_FLAGS}
)
target_include_directories(hello-mpi
PUBLIC
${MPI_CXX_INCLUDE_PATH}
)
target_link_libraries(hello-mpi
PUBLIC
${MPI_CXX_LIBRARIES}
)
In this recipe, we have discussed C++, but the arguments and approach are equally valid for a C or Fortran project.
The BLAS library offers a standardized interface for common operations involving matrices and vectors. This interface was however standardized with the Fortran language in mind. While we have shown how these libraries can be used more or less directly from C++, it may be desirable to have a higher-level interface in modern C++ programs.
The header-only Eigen library uses template programming to offer such an interface. Its matrix and vector types are intuitive to use and even provide type checking at compile time, to ensure that incompatible matrix dimensions are not mixed. Dense and sparse matrix operations, such as matrix-matrix products, solvers for linear systems, and eigenvalue problems, are also implemented using expression templates for efficiency. From version 3.3, Eigen can be linked to the BLAS and LAPACK libraries, which provides the flexibility to offload certain operations to the implementation given in these libraries for additional performance.
This recipe will show how to find the Eigen library and to instruct it to use OpenMP parallelization and offload some of the work to the BLAS library.
In this example, we will compile a program that allocates a random square matrix and vector of dimension passed from the command line. We will then solve the linear system Ax=b using LU decomposition. We will use the following source code (linear-algebra.cpp):
#include <chrono>
#include <cmath>
#include <cstdlib>
#include <iomanip>
#include <iostream>
#include <vector>
#include <Eigen/Dense>
int main(int argc, char **argv) {
if (argc != 2) {
std::cout << "Usage: ./linear-algebra dim" << std::endl;
return EXIT_FAILURE;
}
std::chrono::time_point<std::chrono::system_clock> start, end;
std::chrono::duration<double> elapsed_seconds;
std::time_t end_time;
std::cout << "Number of threads used by Eigen: " << Eigen::nbThreads()
<< std::endl;
// Allocate matrices and right-hand side vector
start = std::chrono::system_clock::now();
int dim = std::atoi(argv[1]);
Eigen::MatrixXd A = Eigen::MatrixXd::Random(dim, dim);
Eigen::VectorXd b = Eigen::VectorXd::Random(dim);
end = std::chrono::system_clock::now();
// Report times
elapsed_seconds = end - start;
end_time = std::chrono::system_clock::to_time_t(end);
std::cout << "matrices allocated and initialized "
<< std::put_time(std::localtime(&end_time), "%a %b %d %Y
%r\n")
<< "elapsed time: " << elapsed_seconds.count() << "s\n";
start = std::chrono::system_clock::now();
// Save matrix and RHS
Eigen::MatrixXd A1 = A;
Eigen::VectorXd b1 = b;
end = std::chrono::system_clock::now();
end_time = std::chrono::system_clock::to_time_t(end);
std::cout << "Scaling done, A and b saved "
<< std::put_time(std::localtime(&end_time), "%a %b %d %Y %r\n")
<< "elapsed time: " << elapsed_seconds.count() << "s\n";
start = std::chrono::system_clock::now();
Eigen::VectorXd x = A.lu().solve(b);
end = std::chrono::system_clock::now();
// Report times
elapsed_seconds = end - start;
end_time = std::chrono::system_clock::to_time_t(end);
double relative_error = (A * x - b).norm() / b.norm();
std::cout << "Linear system solver done "
<< std::put_time(std::localtime(&end_time), "%a %b %d %Y %r\n")
<< "elapsed time: " << elapsed_seconds.count() << "s\n";
std::cout << "relative error is " << relative_error << std::endl;
return 0;
}
Matrix-vector multiplications and LU decompositions are implemented in Eigen, but can optionally be offloaded to the BLAS and LAPACK libraries. In this recipe, we only consider offloading to the BLAS library.
In this project, we will find the Eigen and BLAS libraries, as well as OpenMP, and instruct Eigen to use OpenMP parallelization and to offload part of the linear algebra work to the BLAS library:
cmake_minimum_required(VERSION 3.9 FATAL_ERROR)
project(recipe-07 LANGUAGES CXX)
set(CMAKE_CXX_STANDARD 11)
set(CMAKE_CXX_EXTENSIONS OFF)
set(CMAKE_CXX_STANDARD_REQUIRED ON)
find_package(OpenMP REQUIRED)
find_package(Eigen3 3.3 REQUIRED CONFIG)
if(TARGET Eigen3::Eigen)
message(STATUS "Eigen3 v${EIGEN3_VERSION_STRING} found in ${EIGEN3_INCLUDE_DIR}")
endif()
add_executable(linear-algebra linear-algebra.cpp)
find_package(BLAS)
if(BLAS_FOUND)
message(STATUS "Eigen will use some subroutines from BLAS.")
message(STATUS "See: http://eigen.tuxfamily.org/dox-devel/TopicUsingBlasLapack.html")
target_compile_definitions(linear-algebra
PRIVATE
EIGEN_USE_BLAS
)
target_link_libraries(linear-algebra
PUBLIC
${BLAS_LIBRARIES}
)
else()
message(STATUS "BLAS not found. Using Eigen own functions")
endif()
target_link_libraries(linear-algebra
PUBLIC
Eigen3::Eigen
OpenMP::OpenMP_CXX
)
$ mkdir -p build
$ cd build
$ cmake ..
-- ...
-- Found OpenMP_CXX: -fopenmp (found version "4.5")
-- Found OpenMP: TRUE (found version "4.5")
-- Eigen3 v3.3.4 found in /usr/include/eigen3
-- ...
-- Found BLAS: /usr/lib/libblas.so
-- Eigen will use some subroutines from BLAS.
-- See: http://eigen.tuxfamily.org/dox-devel/TopicUsingBlasLapack.html
$ cmake --build .
$ ./linear-algebra 1000
Number of threads used by Eigen: 4
matrices allocated and initialized Sun Jun 17 2018 11:04:20 AM
elapsed time: 0.0492328s
Scaling done, A and b saved Sun Jun 17 2018 11:04:20 AM
elapsed time: 0.0492328s
Linear system solver done Sun Jun 17 2018 11:04:20 AM
elapsed time: 0.483142s
relative error is 4.21946e-13
Eigen provides native CMake support, which makes it easy to set up a C++ project using it. Starting from version 3.3, Eigen ships CMake modules that export the appropriate target, Eigen3::Eigen, which we have used here.
You will have noticed the CONFIG option to the find_package command. This signals to CMake that the package search will not proceed through a FindEigen3.cmake module, but rather through the Eigen3Config.cmake, Eigen3ConfigVersion.cmake, and Eigen3Targets.cmake files provided by the Eigen3 package in the standard location, <installation-prefix>/share/eigen3/cmake. This package location mode is called "Config" mode and is more versatile than the Find<package>.cmake approach we have been using so far. For more information about "Module" mode versus "Config" mode, please consult the official documentation at https://cmake.org/cmake/help/v3.5/command/find_package.html.
Also note that while the Eigen3, BLAS, and OpenMP dependencies were declared as PUBLIC dependencies, the EIGEN_USE_BLAS compile definition was declared as PRIVATE. Instead of linking the executable directly, we could collect the library dependencies in a separate library target. Using the PUBLIC/PRIVATE keywords, we can then adjust the visibility of the corresponding flags and definitions to dependents of the library target.
CMake will look for config modules in a predefined hierarchy of locations. First off is CMAKE_PREFIX_PATH, while <package>_DIR is the next search path. Thus, if Eigen3 was installed in a non-standard location, we can use two alternatives to tell CMake where to look for it:
$ cmake -D CMAKE_PREFIX_PATH=<installation-prefix> ..
$ cmake -D Eigen3_DIR=<installation-prefix>/share/eigen3/cmake/
The Boost libraries are a collection of general-purpose C++ libraries. These libraries provide a lot of functionality that may be indispensable in a modern C++ project, but which is not yet available through the C++ standard. For example, Boost provides components for metaprogramming, handling optional arguments, and filesystem manipulations, among others. Many of these libraries have later been adopted by the C++11, C++14, and C++17 standards, but many Boost components are still the libraries of choice for code bases that have to keep compatibility with older compilers.
This recipe will show you how to detect and link against some components of the Boost libraries.
The source code we will compile is one of the examples for the filesystem library provided by Boost to interact with the filesystem. This library is conveniently cross-platform and abstracts the differences between operating systems and filesystems into a coherent, high-level API. The following example code (path-info.cpp) will accept a path as an argument and print a report about its components to the screen:
#include <iostream>
#include <boost/filesystem.hpp>
using namespace std;
using namespace boost::filesystem;
const char *say_what(bool b) { return b ? "true" : "false"; }
int main(int argc, char *argv[]) {
if (argc < 2) {
cout
<< "Usage: path_info path-element [path-element...]\n"
"Composes a path via operator/= from one or more path-element arguments\n"
"Example: path_info foo/bar baz\n"
#ifdef BOOST_POSIX_API
" would report info about the composed path foo/bar/baz\n";
#else // BOOST_WINDOWS_API
" would report info about the composed path foo/bar\\baz\n";
#endif
return 1;
}
path p;
for (; argc > 1; --argc, ++argv)
p /= argv[1]; // compose path p from the command line arguments
cout << "\ncomposed path:\n";
cout << " operator<<()---------: " << p << "\n";
cout << " make_preferred()-----: " << p.make_preferred() << "\n";
cout << "\nelements:\n";
for (auto element : p)
cout << " " << element << '\n';
cout << "\nobservers, native format:" << endl;
#ifdef BOOST_POSIX_API
cout << " native()-------------: " << p.native() << endl;
cout << " c_str()--------------: " << p.c_str() << endl;
#else // BOOST_WINDOWS_API
wcout << L" native()-------------: " << p.native() << endl;
wcout << L" c_str()--------------: " << p.c_str() << endl;
#endif
cout << " string()-------------: " << p.string() << endl;
wcout << L" wstring()------------: " << p.wstring() << endl;
cout << "\nobservers, generic format:\n";
cout << " generic_string()-----: " << p.generic_string() << endl;
wcout << L" generic_wstring()----: " << p.generic_wstring() << endl;
cout << "\ndecomposition:\n";
cout << " root_name()----------: " << p.root_name() << '\n';
cout << " root_directory()-----: " << p.root_directory() << '\n';
cout << " root_path()----------: " << p.root_path() << '\n';
cout << " relative_path()------: " << p.relative_path() << '\n';
cout << " parent_path()--------: " << p.parent_path() << '\n';
cout << " filename()-----------: " << p.filename() << '\n';
cout << " stem()---------------: " << p.stem() << '\n';
cout << " extension()----------: " << p.extension() << '\n';
cout << "\nquery:\n";
cout << " empty()--------------: " << say_what(p.empty()) << '\n';
cout << " is_absolute()--------: " << say_what(p.is_absolute()) <<
'\n';
cout << " has_root_name()------: " << say_what(p.has_root_name()) <<
'\n';
cout << " has_root_directory()-: " << say_what(p.has_root_directory()) << '\n';
cout << " has_root_path()------: " << say_what(p.has_root_path()) <<
'\n';
cout << " has_relative_path()--: " << say_what(p.has_relative_path()) << '\n';
cout << " has_parent_path()----: " << say_what(p.has_parent_path()) << '\n';
cout << " has_filename()-------: " << say_what(p.has_filename()) <<
'\n';
cout << " has_stem()-----------: " << say_what(p.has_stem()) << '\n';
cout << " has_extension()------: " << say_what(p.has_extension()) <<
'\n';
return 0;
}
Boost consists of many different libraries and these can be used almost independently from each other. Internally, CMake represents this library collection as a collection of components. The FindBoost.cmake module can search not only for the full installation of the library collection but also for particular components and their dependencies within the collection, if any. We will build up the corresponding CMakeLists.txt step by step:
cmake_minimum_required(VERSION 3.5 FATAL_ERROR)
project(recipe-08 LANGUAGES CXX)
set(CMAKE_CXX_STANDARD 11)
set(CMAKE_CXX_EXTENSIONS OFF)
set(CMAKE_CXX_STANDARD_REQUIRED ON)
find_package(Boost 1.54 REQUIRED COMPONENTS filesystem)
add_executable(path-info path-info.cpp)
target_link_libraries(path-info
PUBLIC
Boost::filesystem
)
The FindBoost.cmake module, which is used in this recipe, will try to locate the Boost libraries in standard system installation directories. Since we link to the imported Boost::filesystem target, CMake will automatically set the include directories and adjust the compile and link flags. In case the Boost libraries are installed in a non-standard location, one can pass the root of the Boost installation at configuration time using the BOOST_ROOT variable in order to point CMake to also search the non-standard path:
$ cmake -D BOOST_ROOT=/custom/boost/
Alternatively, one can pass both the BOOST_INCLUDEDIR and BOOST_LIBRARYDIR variables for the directories containing headers and libraries:
$ cmake -D BOOST_INCLUDEDIR=/custom/boost/include -D BOOST_LIBRARYDIR=/custom/boost/lib
We have so far discussed two ways of detecting external dependencies:
What if a certain dependency provides neither a find-module nor vendor-packaged CMake files? In this case, we are left with two options:
In this recipe, we will show how to leverage pkg-config from within CMake to locate the ZeroMQ messaging library. The next recipe, Detecting external libraries: II. Writing a find-module, will show how to write your own basic find-module for ZeroMQ.
The code we will build is an example from the ZeroMQ manual at http://zguide.zeromq.org/page:all. It consists of two source files, hwserver.c, and hwclient.c, which will be built into two separate executables. When executed, they will print the familiar "Hello, World" message.
This is a C project and we will use the C99 standard. We will build the CMakeLists.txt file step by step:
cmake_minimum_required(VERSION 3.6 FATAL_ERROR)
project(recipe-09 LANGUAGES C)
set(CMAKE_C_STANDARD 99)
set(CMAKE_C_EXTENSIONS OFF)
set(CMAKE_C_STANDARD_REQUIRED ON)
find_package(PkgConfig REQUIRED QUIET)
pkg_search_module(
ZeroMQ
REQUIRED
libzeromq libzmq lib0mq
IMPORTED_TARGET
)
if(TARGET PkgConfig::ZeroMQ)
message(STATUS "Found ZeroMQ")
endif()
add_executable(hwserver hwserver.c)
target_link_libraries(hwserver PkgConfig::ZeroMQ)
add_executable(hwclient hwclient.c)
target_link_libraries(hwclient PkgConfig::ZeroMQ)
$ mkdir -p build
$ cd build
$ cmake ..
$ cmake --build .
Current 0MQ version is 4.2.2
Connecting to hello world server…
Sending Hello 0…
Received World 0
Sending Hello 1…
Received World 1
Sending Hello 2…
...
Once pkg-config is found, CMake will provide two functions to wrap the functionality offered by this program:
These functions accept the REQUIRED and QUIET arguments, as find_package does. In more detail, our call to pkg_search_module is the following:
pkg_search_module(
ZeroMQ
REQUIRED
libzeromq libzmq lib0mq
IMPORTED_TARGET
)
Here, the first argument is the prefix that will be used to name the target that is storing the result of the search for the ZeroMQ library: PkgConfig::ZeroMQ. Notice that we need to pass different options for the names of the library on the system: libzeromq, libzmq, and lib0mq. This is due to the fact that different operating systems and package managers can choose different names for the same package.
This recipe complements the previous recipe, Detecting external libraries: I. Using pkg-config. We will show how to write a basic find-module to locate the ZeroMQ messaging library on your system so that the detection of the library can be made to work on non-Unix operating systems. We will reuse the same server-client sample code.
This is a C project and we will use the C99 standard. We will build the CMakeLists.txt file step by step:
cmake_minimum_required(VERSION 3.5 FATAL_ERROR)
project(recipe-10 LANGUAGES C)
set(CMAKE_C_STANDARD 99)
set(CMAKE_C_EXTENSIONS OFF)
set(CMAKE_C_STANDARD_REQUIRED ON)
list(APPEND CMAKE_MODULE_PATH ${CMAKE_CURRENT_SOURCE_DIR})
find_package(ZeroMQ REQUIRED)
add_executable(hwserver hwserver.c)
target_include_directories(hwserver
PRIVATE
${ZeroMQ_INCLUDE_DIRS}
)
target_link_libraries(hwserver
PRIVATE
${ZeroMQ_LIBRARIES}
)
add_executable(hwclient hwclient.c)
target_include_directories(hwclient
PRIVATE
${ZeroMQ_INCLUDE_DIRS}
)
target_link_libraries(hwclient
PRIVATE
${ZeroMQ_LIBRARIES}
)
The main CMakeLists.txt for this recipe differs from the one used in the previous recipe in the use of the FindZeroMQ.cmake module. This module searches for the ZeroMQ header files and libraries using the find_path and find_library CMake built-in commands and sets relevant variables using the find_package_handle_standard_args, as we did in Recipe 3, Detecting Python modules and packages.
if(NOT ZeroMQ_ROOT)
set(ZeroMQ_ROOT "$ENV{ZeroMQ_ROOT}")
endif()
if(NOT ZeroMQ_ROOT)
find_path(_ZeroMQ_ROOT NAMES include/zmq.h)
else()
set(_ZeroMQ_ROOT "${ZeroMQ_ROOT}")
endif()
find_path(ZeroMQ_INCLUDE_DIRS NAMES zmq.h HINTS ${_ZeroMQ_ROOT}/include)
set(_ZeroMQ_H ${ZeroMQ_INCLUDE_DIRS}/zmq.h)
function(_zmqver_EXTRACT _ZeroMQ_VER_COMPONENT _ZeroMQ_VER_OUTPUT)
set(CMAKE_MATCH_1 "0")
set(_ZeroMQ_expr "^[ \\t]*#define[ \\t]+${_ZeroMQ_VER_COMPONENT}[ \\t]+([0-9]+)$")
file(STRINGS "${_ZeroMQ_H}" _ZeroMQ_ver REGEX "${_ZeroMQ_expr}")
string(REGEX MATCH "${_ZeroMQ_expr}" ZeroMQ_ver "${_ZeroMQ_ver}")
set(${_ZeroMQ_VER_OUTPUT} "${CMAKE_MATCH_1}" PARENT_SCOPE)
endfunction()
_zmqver_EXTRACT("ZMQ_VERSION_MAJOR" ZeroMQ_VERSION_MAJOR)
_zmqver_EXTRACT("ZMQ_VERSION_MINOR" ZeroMQ_VERSION_MINOR)
_zmqver_EXTRACT("ZMQ_VERSION_PATCH" ZeroMQ_VERSION_PATCH)
if(ZeroMQ_FIND_VERSION_COUNT GREATER 2)
set(ZeroMQ_VERSION "${ZeroMQ_VERSION_MAJOR}.${ZeroMQ_VERSION_MINOR}.${ZeroMQ_VERSION_PATCH}")
else()
set(ZeroMQ_VERSION "${ZeroMQ_VERSION_MAJOR}.${ZeroMQ_VERSION_MINOR}")
endif()
if(NOT ${CMAKE_C_PLATFORM_ID} STREQUAL "Windows")
find_library(ZeroMQ_LIBRARIES
NAMES
zmq
HINTS
${_ZeroMQ_ROOT}/lib
${_ZeroMQ_ROOT}/lib/x86_64-linux-gnu
)
else()
find_library(ZeroMQ_LIBRARIES
NAMES
libzmq
"libzmq-mt-${ZeroMQ_VERSION_MAJOR}_${ZeroMQ_VERSION_MINOR}_${ZeroMQ_VERSION_PATCH}"
"libzmq-${CMAKE_VS_PLATFORM_TOOLSET}-mt-${ZeroMQ_VERSION_MAJOR}_${ZeroMQ_VERSION_MINOR}_${ZeroMQ_VERSION_PATCH}"
libzmq_d
"libzmq-mt-gd-${ZeroMQ_VERSION_MAJOR}_${ZeroMQ_VERSION_MINOR}_${ZeroMQ_VERSION_PATCH}"
"libzmq-${CMAKE_VS_PLATFORM_TOOLSET}-mt-gd-${ZeroMQ_VERSION_MAJOR}_${ZeroMQ_VERSION_MINOR}_${ZeroMQ_VERSION_PATCH}"
HINTS
${_ZeroMQ_ROOT}/lib
)
endif()
include(FindPackageHandleStandardArgs)
find_package_handle_standard_args(ZeroMQ
FOUND_VAR
ZeroMQ_FOUND
REQUIRED_VARS
ZeroMQ_INCLUDE_DIRS
ZeroMQ_LIBRARIES
VERSION_VAR
ZeroMQ_VERSION
)
Find-modules typically follow a specific pattern:
find_path(<VAR> NAMES name PATHS paths)
To summarize, when discovering packages there are four available routes:
The four alternative routes have been ranked by relevance, but each approach has its challenges.
Not all package vendors provide CMake discovery files, but it is becoming more common. This is due to the fact that exporting CMake targets makes it very easy for third-party code to consume additional dependencies imposed by libraries and/or programs that it depends on.
Find-modules have been the workhorse of dependency location in CMake since the very beginning. However, most of them still rely on setting variables consumed by the dependent, such as Boost_INCLUDE_DIRS, PYTHON_INTERPRETER, and so forth. This approach makes it difficult to redistribute your own package for third-parties and ensure that your dependencies are consistently met.
The approach using pkg-config can work very well since it has become a de facto standard for Unix-based systems. For this reason, however, it is not a fully cross-platform approach. Moreover, as the CMake documentation states, in some cases, the user can accidentally override package detection and lead pkg-config to supply incorrect information.
The very last resort is then to write your own find-module CMake script, as we have done in this recipe. This is doable and relies on the FindPackageHandleStandardArgs.cmake module we briefly discussed. However, writing a fully comprehensive find-module is far from trivial; there are many corner cases that are hard to discover, and we have shown an example of that when looking for the ZeroMQ library files on Unix and Windows platforms.
These concerns and difficulties are very well-known to all software developers, as witnessed by the lively discussions on the CMake mailing list: https://cmake.org/pipermail/cmake/2018-May/067556.html. pkg-config is accepted among Unix package developers, but it cannot be easily ported to not-Unix platforms. CMake configuration files are powerful, but not all software developers are familiar with the CMake syntax. The Common Package Specification project is a very recent attempt at unifying the pkg-config and CMake configuration files approaches for package discovery. You can find more information on the project's website: https://mwoehlke.github.io/cps/
In Chapter 10, Writing an Installer, we will discuss how to make your own package discoverable to third-party applications by using the first route outlined in the previous discussion: providing your own CMake discovery files alongside your project.
In this chapter, we will cover the following recipes:
Testing is a core component of the code development toolbox. Performing automated testing by using unit and integration tests not only helps the developer to detect functionality regressions early, but can also serve as a starting point for developers joining the project. It can help new developers to submit changes to the code project, with assurance that the expected functionality is preserved. For users of the code, automated tests can be essential when verifying that the installation preserves the functionality of the code. A nice byproduct of employing tests for units, modules, or libraries right from the start is that it can guide the programmer towards more modular and less complex code structures, using a pure, functional style, that minimizes and localizes global variables and the global state.
In this chapter, we will demonstrate how to integrate testing into the CMake build structure, using popular testing libraries and frameworks, with the following goals in mind:
In this recipe, we will introduce unit tests using CTest, the testing tool distributed as a part of CMake. In order to keep the focus on the CMake/CTest aspect and to minimize the cognitive load, we wish to keep the code that is to be tested as simple as possible. Our plan is to write and test code that can sum up integers, and nothing more. Just like in primary school, when we learned multiplication and division after learning how to add, at this point, our example code will only add and will only understand integers; it will not need to deal with floating point numbers. And, just as the young Carl Friedrich Gauss was tested by his teacher to sum all natural numbers from 1 to 100, we will ask our code to do the same-albeit without using the clever grouping trick employed by Gauss. To show that CMake does not impose any restrictions on the language to implement the actual tests, we will test our code using not only a C++ executable, but also using a Python script and a shell script. For simplicity, we will do this without using any testing libraries, but we will introduce C++ testing frameworks in later recipes in this chapter.
Our code example consists of three files. The implementation source file, sum_integers.cpp, does the work of summing up over a vector of integers, and returns the sum:
#include "sum_integers.hpp"
#include <vector>
int sum_integers(const std::vector<int> integers) {
auto sum = 0;
for (auto i : integers) {
sum += i;
}
return sum;
}
For this example, it does not matter whether this is the most elegant implementation of a sum over a vector. The interface is exported to our example library in sum_integers.hpp, as follows:
#pragma once
#include <vector>
int sum_integers(const std::vector<int> integers);
Finally, the main function is defined in main.cpp, which collects the command-line arguments from argv[], converts them into a vector of integers, calls the sum_integers function, and prints the result to the output:
#include "sum_integers.hpp"
#include <iostream>
#include <string>
#include <vector>
// we assume all arguments are integers and we sum them up
// for simplicity we do not verify the type of arguments
int main(int argc, char *argv[]) {
std::vector<int> integers;
for (auto i = 1; i < argc; i++) {
integers.push_back(std::stoi(argv[i]));
}
auto sum = sum_integers(integers);
std::cout << sum << std::endl;
}
Our goal is to test this code using a C++ executable (test.cpp), a Bash shell script (test.sh), and a Python script (test.py), to demonstrate that CMake does not really mind which programming or scripting language we prefer, as long as the implementation can return a zero or non-zero value that CMake can interpret as a success or failure, respectively.
In the C++ example (test.cpp), we verify that 1 + 2 + 3 + 4 + 5 equals 15, by calling sum_integers:
#include "sum_integers.hpp"
#include <vector>
int main() {
auto integers = {1, 2, 3, 4, 5};
if (sum_integers(integers) == 15) {
return 0;
} else {
return 1;
}
}
The Bash shell script test example calls the executable, which is received as a positional argument:
#!/usr/bin/env bash
EXECUTABLE=$1
OUTPUT=$($EXECUTABLE 1 2 3 4)
if [ "$OUTPUT" = "10" ]
then
exit 0
else
exit 1
fi
Also, the Python test script calls the executable (passed using the --executable command-line argument) directly, and allows it to be executed with the --short command-line argument:
import subprocess
import argparse
# test script expects the executable as argument
parser = argparse.ArgumentParser()
parser.add_argument('--executable',
help='full path to executable')
parser.add_argument('--short',
default=False,
action='store_true',
help='run a shorter test')
args = parser.parse_args()
def execute_cpp_code(integers):
result = subprocess.check_output([args.executable] + integers)
return int(result)
if args.short:
# we collect [1, 2, ..., 100] as a list of strings
result = execute_cpp_code([str(i) for i in range(1, 101)])
assert result == 5050, 'summing up to 100 failed'
else:
# we collect [1, 2, ..., 1000] as a list of strings
result = execute_cpp_code([str(i) for i in range(1, 1001)])
assert result == 500500, 'summing up to 1000 failed'
We will now describe, step by step, how to set up testing for our project, as follows:
cmake_minimum_required(VERSION 3.5 FATAL_ERROR)
project(recipe-01 LANGUAGES CXX)
set(CMAKE_CXX_STANDARD 11)
set(CMAKE_CXX_EXTENSIONS OFF)
set(CMAKE_CXX_STANDARD_REQUIRED ON)
find_package(PythonInterp REQUIRED)
find_program(BASH_EXECUTABLE NAMES bash REQUIRED)
# example library
add_library(sum_integers sum_integers.cpp)
# main code
add_executable(sum_up main.cpp)
target_link_libraries(sum_up sum_integers)
# testing binary
add_executable(cpp_test test.cpp)
target_link_libraries(cpp_test sum_integers)
enable_testing()
add_test(
NAME bash_test
COMMAND ${BASH_EXECUTABLE} ${CMAKE_CURRENT_SOURCE_DIR}/test.sh $<TARGET_FILE:sum_up>
)
add_test(
NAME cpp_test
COMMAND $<TARGET_FILE:cpp_test>
)
add_test(
NAME python_test_long
COMMAND ${PYTHON_EXECUTABLE} ${CMAKE_CURRENT_SOURCE_DIR}/test.py --executable $<TARGET_FILE:sum_up>
)
add_test(
NAME python_test_short
COMMAND ${PYTHON_EXECUTABLE} ${CMAKE_CURRENT_SOURCE_DIR}/test.py --short --executable $<TARGET_FILE:sum_up>
)
$ mkdir -p build
$ cd build
$ cmake ..
$ cmake --build .
$ ./sum_up 1 2 3 4 5
15
$ ctest
Test project /home/user/cmake-recipes/chapter-04/recipe-01/cxx-example/build
Start 1: bash_test
1/4 Test #1: bash_test ........................ Passed 0.01 sec
Start 2: cpp_test
2/4 Test #2: cpp_test ......................... Passed 0.00 sec
Start 3: python_test_long
3/4 Test #3: python_test_long ................. Passed 0.06 sec
Start 4: python_test_short
4/4 Test #4: python_test_short ................ Passed 0.05 sec
100% tests passed, 0 tests failed out of 4
Total Test time (real) = 0.12 sec
The two key commands here are enable_testing(), which enables testing for this directory and all subfolders within it (in this case, the entire project, since we place it in the main CMakeLists.txt), and add_test(), which defines a new test and sets the test name and the command to run; an example is as follows:
add_test(
NAME cpp_test
COMMAND $<TARGET_FILE:cpp_test>
)
In the preceding example, we employed a generator expression: $<TARGET_FILE:cpp_test>. Generator expressions are expressions that are evaluated at build system generation time. We will return to generator expressions in more detail in Chapter 5, Configure-time and Build-time Operations, Recipe 9, Fine-tuning configuration and compilation with generator expressions. At this point, we can state that $<TARGET_FILE:cpp_test> will be replaced by the full path to the cpp_test executable target.
Generator expressions are extremely convenient in the context of defining tests, because we do not have to explicitly hardcode the locations and names of the executables into the test definitions. It would be very tedious to achieve this in a portable way, since both the location of the executable and the executable suffix (for example, the .exe suffix on Windows) can vary between operating systems, build types, and generators. Using the generator expression, we do not have to explicitly know the location and name.
It is also possible to pass arguments to the test command to run; for example:
add_test(
NAME python_test_short
COMMAND ${PYTHON_EXECUTABLE} ${CMAKE_CURRENT_SOURCE_DIR}/test.py --short --executable $<TARGET_FILE:sum_up>
)
In this example, we run the tests sequentially (Recipe 8, Running tests in parallel, will show you how to shorten the total test time by executing tests in parallel), and the tests are executed in the same order that they are defined (Recipe 9, Running a subset of tests, will show you how to change the order or run a subset of tests). It is up to the programmer to define the actual test command, which can be programmed in any language supported by the operating system environment running the test set. The only thing that CTest cares about, in order to decide whether a test has passed or failed, is the return code of the test command. CTest follows the standard convention that a zero return code means success, and a non-zero return code means failure. Any script that can return zero or non-zero can be used to implement a test case.
Now that we know how to define and execute tests, it is also important that we know how to diagnose test failures. For this, we can introduce a bug into our code and let all of the tests fail:
Start 1: bash_test
1/4 Test #1: bash_test ........................***Failed 0.01 sec
Start 2: cpp_test
2/4 Test #2: cpp_test .........................***Failed 0.00 sec
Start 3: python_test_long
3/4 Test #3: python_test_long .................***Failed 0.06 sec
Start 4: python_test_short
4/4 Test #4: python_test_short ................***Failed 0.06 sec
0% tests passed, 4 tests failed out of 4
Total Test time (real) = 0.13 sec
The following tests FAILED:
1 - bash_test (Failed)
2 - cpp_test (Failed)
3 - python_test_long (Failed)
4 - python_test_short (Failed)
Errors while running CTest
If we then wish to learn more, we can inspect the file Testing/Temporary/LastTestsFailed.log. This file contains the full output of the test commands, and is the first place to look during a postmortem analysis. It is possible to obtain more verbose test output from CTest by using the following CLI switches:
CTest offers a very handy shortcut to rerun only the tests that have previously failed; the CLI switch to use is --rerun-failed, and it proves extremely useful during debugging.
Consider the following definition:
add_test(
NAME python_test_long
COMMAND ${PYTHON_EXECUTABLE} ${CMAKE_CURRENT_SOURCE_DIR}/test.py --executable $<TARGET_FILE:sum_up>
)
The preceding definition can be re-expressed by explicitly specifying the WORKING_DIRECTORY in which the script will be run, as follows:
add_test(
NAME python_test_long
COMMAND ${PYTHON_EXECUTABLE} test.py --executable $<TARGET_FILE:sum_up>
WORKING_DIRECTORY ${CMAKE_CURRENT_SOURCE_DIR}
)
We will also mention that test names can contain the / character, which may be useful when organizing related tests by name; for example:
add_test(
NAME python/long
COMMAND ${PYTHON_EXECUTABLE} test.py --executable $<TARGET_FILE:sum_up>
WORKING_DIRECTORY ${CMAKE_CURRENT_SOURCE_DIR}
)
Sometimes, we need to set environment variables for a test script. This can be achieved with set_tests_properties:
set_tests_properties(python_test
PROPERTIES
ENVIRONMENT
ACCOUNT_MODULE_PATH=${CMAKE_CURRENT_SOURCE_DIR}
ACCOUNT_HEADER_FILE=${CMAKE_CURRENT_SOURCE_DIR}/account/account.h
ACCOUNT_LIBRARY_FILE=$<TARGET_FILE:account>
)
This approach might not always be robust across different platforms, but CMake offers a way around this potential lack of robustness. The following snippet is equivalent to the one given above and invokes CMake, via CMAKE_COMMAND, to prepend environment variables before executing the actual Python test script:
add_test(
NAME
python_test
COMMAND
${CMAKE_COMMAND} -E env ACCOUNT_MODULE_PATH=${CMAKE_CURRENT_SOURCE_DIR}
ACCOUNT_HEADER_FILE=${CMAKE_CURRENT_SOURCE_DIR}/account/account.h
ACCOUNT_LIBRARY_FILE=$<TARGET_FILE:account>
${PYTHON_EXECUTABLE} ${CMAKE_CURRENT_SOURCE_DIR}/account/test.py
)
Once again, note the use of the generator expression $<TARGET_FILE:account> to pass the location of the library file without explicitly hardcoding paths.
We have executed the test set using the ctest command, but CMake will also create targets for the generator in question (make test for Unix Makefile generators, ninja test for the Ninja tool, or RUN_TESTS for Visual Studio). This means that there is yet another (almost) portable way to run the test step:
$ cmake --build . --target test
Unfortunately, this fails when using the Visual Studio generator where we have to use RUN_TESTS instead:
$ cmake --build . --target RUN_TESTS
In the previous recipe, we used an integer return code to signal success or failure in test.cpp. This is fine for simple tests, but typically, we would like to use a testing framework that offers an infrastructure to run more sophisticated tests with fixtures, comparisons with numerical tolerance, and better error reporting if a test fails. A modern and popular test library is Catch2 (https://github.com/catchorg/Catch2). One nice feature of this test framework is the fact that it can be included in your project as a single-header library, which makes compilation and updating the framework particularly easy. In this recipe, we will use CMake in combination with Catch2, to test the summation code introduced in the previous recipe.
We will keep the main.cpp, sum_integers.cpp, and sum_integers.hpp unchanged from the previous recipe, but will update the test.cpp:
#include "sum_integers.hpp"
// this tells catch to provide a main()
// only do this in one cpp file
#define CATCH_CONFIG_MAIN
#include "catch.hpp"
#include <vector>
TEST_CASE("Sum of integers for a short vector", "[short]") {
auto integers = {1, 2, 3, 4, 5};
REQUIRE(sum_integers(integers) == 15);
}
TEST_CASE("Sum of integers for a longer vector", "[long]") {
std::vector<int> integers;
for (int i = 1; i < 1001; ++i) {
integers.push_back(i);
}
REQUIRE(sum_integers(integers) == 500500);
}
We also need the catch.hpp header, which we can download from https://github.com/catchorg/Catch2 (we have used version 2.0.1) and place in the root of our project, alongside test.cpp.
To use the Catch2 library, we will modify CMakeLists.txt from the previous recipe, to perform the following steps:
# set minimum cmake version
cmake_minimum_required(VERSION 3.5 FATAL_ERROR)
# project name and language
project(recipe-02 LANGUAGES CXX)
# require C++11
set(CMAKE_CXX_STANDARD 11)
set(CMAKE_CXX_EXTENSIONS OFF)
set(CMAKE_CXX_STANDARD_REQUIRED ON)
# example library
add_library(sum_integers sum_integers.cpp)
# main code
add_executable(sum_up main.cpp)
target_link_libraries(sum_up sum_integers)
# testing binary
add_executable(cpp_test test.cpp)
target_link_libraries(cpp_test sum_integers)
enable_testing()
add_test(
NAME catch_test
COMMAND $<TARGET_FILE:cpp_test> --success
)
$ mkdir -p build
$ cd build
$ cmake ..
$ cmake --build .
$ ctest -V
UpdateCTestConfiguration from :/home/user/cmake-cookbook/chapter-04/recipe-02/cxx-example/build/DartConfiguration.tcl
UpdateCTestConfiguration from :/home/user/cmake-cookbook/chapter-04/recipe-02/cxx-example/build/DartConfiguration.tcl
Test project /home/user/cmake-cookbook/chapter-04/recipe-02/cxx-example/build
Constructing a list of tests
Done constructing a list of tests
Updating test list for fixtures
Added 0 tests to meet fixture requirements
Checking test dependency graph...
Checking test dependency graph end
test 1
Start 1: catch_test
1: Test command: /home/user/cmake-cookbook/chapter-04/recipe-02/cxx-example/build/cpp_test "--success"
1: Test timeout computed to be: 10000000
1:
1: ~~~~~~~~~~~~~~~~~~~~~~~~~~~~~~~~~~~~~~~~~~~~~~~~~~~~~~~~~~~~~~~~~~~
1: cpp_test is a Catch v2.0.1 host application.
1: Run with -? for options
1:
1: ----------------------------------------------------------------
1: Sum of integers for a short vector
1: ----------------------------------------------------------------
1: /home/user/cmake-cookbook/chapter-04/recipe-02/cxx-example/test.cpp:10
1: ...................................................................
1:
1: /home/user/cmake-cookbook/chapter-04/recipe-02/cxx-example/test.cpp:12:
1: PASSED:
1: REQUIRE( sum_integers(integers) == 15 )
1: with expansion:
1: 15 == 15
1:
1: ----------------------------------------------------------------
1: Sum of integers for a longer vector
1: ----------------------------------------------------------------
1: /home/user/cmake-cookbook/chapter-04/recipe-02/cxx-example/test.cpp:15
1: ...................................................................
1:
1: /home/user/cmake-cookbook/chapter-04/recipe-02/cxx-example/test.cpp:20:
1: PASSED:
1: REQUIRE( sum_integers(integers) == 500500 )
1: with expansion:
1: 500500 (0x7a314) == 500500 (0x7a314)
1:
1: ===================================================================
1: All tests passed (2 assertions in 2 test cases)
1:
1/1 Test #1: catch_test ....................... Passed 0.00 s
100% tests passed, 0 tests failed out of 1
Total Test time (real) = 0.00 sec
$ ./cpp_test --success
~~~~~~~~~~~~~~~~~~~~~~~~~~~~~~~~~~~~~~~~~~~~~~~~~~~~~~~~~~~~~~~~~~~
cpp_test is a Catch v2.0.1 host application.
Run with -? for options
-------------------------------------------------------------------
Sum of integers for a short vector
-------------------------------------------------------------------
/home/user/cmake-cookbook/chapter-04/recipe-02/cxx-example/test.cpp:10
...................................................................
/home/user/cmake-cookbook/chapter-04/recipe-02/cxx-example/test.cpp:12:
PASSED:
REQUIRE( sum_integers(integers) == 15 )
with expansion:
15 == 15
-------------------------------------------------------------------
Sum of integers for a longer vector
-------------------------------------------------------------------
/home/user/cmake-cookbook/chapter-04/recipe-02/cxx-example/test.cpp:15
...................................................................
/home/user/cmake-cookbook/chapter-04/recipe-02/cxx-example/test.cpp:20:
PASSED:
REQUIRE( sum_integers(integers) == 500500 )
with expansion:
500500 (0x7a314) == 500500 (0x7a314)
===================================================================
All tests passed (2 assertions in 2 test cases)
$ ./cpp_test --help
Since Catch2 is a single-header framework, no additional targets have to be defined and built. We only have to make sure that CMake can find catch.hpp, to build test.cpp. For convenience, we placed it in the same directory as test.cpp, but we could have chosen a different location and indicated that location by using target_include_directories. Yet another approach would be to wrap the header into an INTERFACE library. This can be done as illustrated in the Catch2 documentation (https://github.com/catchorg/Catch2/blob/master/docs/build-systems.md#cmake):
# Prepare "Catch" library for other executables set(CATCH_INCLUDE_DIR ${CMAKE_CURRENT_SOURCE_DIR}/catch) add_library(Catch INTERFACE) target_include_directories(Catch INTERFACE ${CATCH_INCLUDE_DIR})
We would have then linked against the library as follows:
target_link_libraries(cpp_test Catch)
We recall from the discussion in Recipe 3, Building and linking static and shared libraries, in Chapter 1, From a Simple Executable to Libraries that INTERFACE libraries are pseudo-targets offered by CMake that are useful to specify usage requirements for targets outside our project.
This was a simple example, with a focus on CMake. Catch2 offers much more, of course. For a full documentation of the Catch2 framework, visit https://github.com/catchorg/Catch2.
The Catch2 code repository contains a contributed CMake function to parse Catch tests and automatically create CMake tests, without explicitly typing add_test() functions; see https://github.com/catchorg/Catch2/blob/master/contrib/ParseAndAddCatchTests.cmake.
In this recipe, we will demonstrate how to implement unit testing using the Google Test framework, with the help of CMake. In contrast to the previous recipe, the Google Test framework is more than a header file; it is a library containing a couple of files that need to be built and linked against. We could place these alongside our code project, but to make the code project more lightweight, we will choose to download a well-defined version of the Google Test sources at configure time, and then build the framework and link against it. We will use the relatively new FetchContent module (available since CMake version 3.11). We will revisit FetchContent in Chapter 8, The Superbuild Pattern, where we will discuss how the module works under the hood, and where we will also illustrate how to emulate it by using ExternalProject_Add. This recipe is inspired by (and adapted from) the example at https://cmake.org/cmake/help/v3.11/module/FetchContent.html.
We will keep main.cpp, sum_integers.cpp, and sum_integers.hpp unchanged from the previous recipes, but will update the test.cpp source code, as follows:
#include "sum_integers.hpp"
#include "gtest/gtest.h"
#include <vector>
int main(int argc, char **argv) {
::testing::InitGoogleTest(&argc, argv);
return RUN_ALL_TESTS();
}
TEST(example, sum_zero) {
auto integers = {1, -1, 2, -2, 3, -3};
auto result = sum_integers(integers);
ASSERT_EQ(result, 0);
}
TEST(example, sum_five) {
auto integers = {1, 2, 3, 4, 5};
auto result = sum_integers(integers);
ASSERT_EQ(result, 15);
}
As indicated in the preceding code, we chose to explicitly place neither gtest.h nor other Google Test sources in our code project repository, but will download them at configure time by using the FetchContent module.
The following steps describe how you can set up a CMakeLists.txt step by step, to compile the executable and its corresponding test using GTest:
# set minimum cmake version
cmake_minimum_required(VERSION 3.11 FATAL_ERROR)
# project name and language
project(recipe-03 LANGUAGES CXX)
# require C++11
set(CMAKE_CXX_STANDARD 11)
set(CMAKE_CXX_EXTENSIONS OFF)
set(CMAKE_CXX_STANDARD_REQUIRED ON)
set(CMAKE_WINDOWS_EXPORT_ALL_SYMBOLS ON)
# example library
add_library(sum_integers sum_integers.cpp)
# main code
add_executable(sum_up main.cpp)
target_link_libraries(sum_up sum_integers)
option(ENABLE_UNIT_TESTS "Enable unit tests" ON)
message(STATUS "Enable testing: ${ENABLE_UNIT_TESTS}")
if(ENABLE_UNIT_TESTS)
# all the remaining CMake code will be placed here
endif()
include(FetchContent)
FetchContent_Declare(
googletest
GIT_REPOSITORY https://github.com/google/googletest.git
GIT_TAG release-1.8.0
)
FetchContent_GetProperties(googletest)
if(NOT googletest_POPULATED)
FetchContent_Populate(googletest)
# Prevent GoogleTest from overriding our compiler/linker options
# when building with Visual Studio
set(gtest_force_shared_crt ON CACHE BOOL "" FORCE)
# Prevent GoogleTest from using PThreads
set(gtest_disable_pthreads ON CACHE BOOL "" FORCE)
# adds the targers: gtest, gtest_main, gmock, gmock_main
add_subdirectory(
${googletest_SOURCE_DIR}
${googletest_BINARY_DIR}
)
# Silence std::tr1 warning on MSVC
if(MSVC)
foreach(_tgt gtest gtest_main gmock gmock_main)
target_compile_definitions(${_tgt}
PRIVATE
"_SILENCE_TR1_NAMESPACE_DEPRECATION_WARNING"
)
endforeach()
endif()
endif()
add_executable(cpp_test "")
target_sources(cpp_test
PRIVATE
test.cpp
)
target_link_libraries(cpp_test
PRIVATE
sum_integers
gtest_main
)
enable_testing()
add_test(
NAME google_test
COMMAND $<TARGET_FILE:cpp_test>
)
$ mkdir -p build
$ cd build
$ cmake ..
$ cmake --build .
$ ctest
Test project /home/user/cmake-cookbook/chapter-04/recipe-03/cxx-example/build
Start 1: google_test
1/1 Test #1: google_test ...................... Passed 0.00 sec
100% tests passed, 0 tests failed out of 1
Total Test time (real) = 0.00 sec
$ ./cpp_test
[==========] Running 2 tests from 1 test case.
[----------] Global test environment set-up.
[----------] 2 tests from example
[ RUN ] example.sum_zero
[ OK ] example.sum_zero (0 ms)
[ RUN ] example.sum_five
[ OK ] example.sum_five (0 ms)
[----------] 2 tests from example (0 ms total)
[----------] Global test environment tear-down
[==========] 2 tests from 1 test case ran. (0 ms total)
[ PASSED ] 2 tests.
The FetchContent module enables populating content at configure time, via any method supported by the ExternalProject module, and has become a standard part of CMake in its 3.11 version. Whereas ExternalProject_Add() downloads at build time (as seen in Chapter 8, The Superbuild Pattern), the FetchContent module makes content available immediately, such that the main project and the fetched external project (in this case, the Google Test) can be processed when CMake is first invoked, and can be nested using add_subdirectory.
To fetch Google Test sources, we have first declared the external content:
include(FetchContent)
FetchContent_Declare(
googletest
GIT_REPOSITORY https://github.com/google/googletest.git
GIT_TAG release-1.8.0
)
In this case, we fetched a Git repository with a specific tag (release-1.8.0), but we could also fetch an external project from a Subversion, Mercurial, or HTTP(S) source. For available options, consult the options of the corresponding ExternalProject_Add command at https://cmake.org/cmake/help/v3.11/module/ExternalProject.html.
We checked whether content population was already processed with the FetchContent_GetProperties() command, before calling FetchContent_Populate(); otherwise, FetchContent_Populate() would have thrown an error if it was called more than once.
The command FetchContent_Populate(googletest) populates the sources and defines googletest_SOURCE_DIR and googletest_BINARY_DIR, which we can use to process the Google Test project (using add_subdirectory(), since it happens to be a CMake project, as well):
add_subdirectory(
${googletest_SOURCE_DIR}
${googletest_BINARY_DIR}
)
The preceding defines the following targets: gtest, gtest_main, gmock, and gmock_main. In this recipe, we were only interested in the gtest_main target, as a library dependency for the unit test example:
target_link_libraries(cpp_test
PRIVATE
sum_integers
gtest_main
)
When building our code, we can see how it correctly triggers the configure and build steps for Google Test. One day, we will wish to upgrade to a later Google Test release, and the only line that we will probably need to change is the one detailing the GIT_TAG.
We have scraped the surface of FetchContent and its build-time cousin, ExternalProject_Add, and we will revisit these commands in Chapter 8, The Superbuild Pattern. For a detailed discussion of the available options, please consult https://cmake.org/cmake/help/v3.11/module/FetchContent.html.
In this recipe, we fetched the sources at configure time, but we could have also installed them on the system environment and used the FindGTest module to detect the library and header files (https://cmake.org/cmake/help/v3.5/module/FindGTest.html). From version 3.9, CMake also offers a GoogleTest module (https://cmake.org/cmake/help/v3.9/module/GoogleTest.html), which provides a gtest_add_tests function. This function can be used to automatically add tests, by scanning the source code for Google Test macros.
Obviously, Google Test has a myriad of features that are outside the scope of this recipe, as listed at https://github.com/google/googletest.
Boost test is another very popular unit testing framework in the C++ community, and in this example, we will demonstrate how to unit test our familiar summing example code using Boost test.
We will keep the main.cpp, sum_integers.cpp, and sum_integers.hpp unchanged from the previous recipes, but we will update test.cpp as a minimal example of a unit test using the Boost test library:
#include "sum_integers.hpp"
#include <vector>
#define BOOST_TEST_MODULE example_test_suite
#include <boost/test/unit_test.hpp>
BOOST_AUTO_TEST_CASE(add_example) {
auto integers = {1, 2, 3, 4, 5};
auto result = sum_integers(integers);
BOOST_REQUIRE(result == 15);
}
These are the steps to follow to build our project using Boost test:
# set minimum cmake version
cmake_minimum_required(VERSION 3.5 FATAL_ERROR)
# project name and language
project(recipe-04 LANGUAGES CXX)
# require C++11
set(CMAKE_CXX_STANDARD 11)
set(CMAKE_CXX_EXTENSIONS OFF)
set(CMAKE_CXX_STANDARD_REQUIRED ON)
# example library
add_library(sum_integers sum_integers.cpp)
# main code
add_executable(sum_up main.cpp)
target_link_libraries(sum_up sum_integers)
find_package(Boost 1.54 REQUIRED COMPONENTS unit_test_framework)
add_executable(cpp_test test.cpp)
target_link_libraries(cpp_test
PRIVATE
sum_integers
Boost::unit_test_framework
)
# avoid undefined reference to "main" in test.cpp
target_compile_definitions(cpp_test
PRIVATE
BOOST_TEST_DYN_LINK
)
enable_testing()
add_test(
NAME boost_test
COMMAND $<TARGET_FILE:cpp_test>
)
$ mkdir -p build
$ cd build
$ cmake ..
$ cmake --build .
$ ctest
Test project /home/user/cmake-recipes/chapter-04/recipe-04/cxx-example/build
Start 1: boost_test
1/1 Test #1: boost_test ....................... Passed 0.01 sec
100% tests passed, 0 tests failed out of 1
Total Test time (real) = 0.01 sec
$ ./cpp_test
Running 1 test case...
*** No errors detected
We have used find_package to detect the unit_test_framework component of Boost (see Chapter 3, Detecting External Libraries and Programs, Recipe 8, Detecting the Boost libraries). We have insisted that this component is REQUIRED, and the configuration will stop if it cannot be found in the system environment. The cpp_test target needs to know where to find Boost header files, and needs to be linked against the corresponding libraries; these are both provided by the IMPORTED library target, Boost::unit_test_framework, set by a successful call to find_package. We recall from the discussion in Recipe 3, Building and linking static and shared libraries, in Chapter 1, From a Simple Executable to Libraries that IMPORTED libraries are pseudo-targets offered by CMake to represent pre-existing dependencies and their usage requirements.
In this recipe, we assumed that Boost was installed on the system. Alternatively, we could have fetched and built the Boost dependency at compile-time (see Chapter 8, The Superbuild Pattern, Recipe 2, Managing dependencies with a superbuild: I. The Boost libraries). However, Boost is not a lightweight dependency. In our example code, we used only the most basic infrastructure, but Boost offers a wealth of features and options, and we will refer the interested reader to http://www.boost.org/doc/libs/1_65_1/libs/test/doc/html/index.html.
Memory defects, such as writing to or reading from memory beyond allocated bounds, or memory leaks (memory that is allocated, but never released), can create nasty bugs that are difficult to track down, and it is useful to detect them early. Valgrind (http://valgrind.org) is a popular and versatile tool to detect memory defects and memory leaks, and in this recipe, we will use Valgrind to alert us about memory problems when running tests using CMake/CTest (see Chapter 14, Testing Dashboards, for a discussion of the related AddressSanitizer and ThreadSanitizer).
For this recipe, we require three files. The first is the implementation that we wish to test (we can call the file leaky_implementation.cpp):
#include "leaky_implementation.hpp"
int do_some_work() {
// we allocate an array
double *my_array = new double[1000];
// do some work
// ...
// we forget to deallocate it
// delete[] my_array;
return 0;
}
We also need the corresponding header file (leaky_implementation.hpp):
#pragma once
int do_some_work();
And, we need the test file (test.cpp):
#include "leaky_implementation.hpp"
int main() {
int return_code = do_some_work();
return return_code;
}
We expect the test to pass, since the return_code is hardcoded to 0. However, we also hope to detect a memory leak, since we forgot to de-allocate my_array.
The following shows how to set up CMakeLists.txt to perform the dynamic analysis of the code:
cmake_minimum_required(VERSION 3.5 FATAL_ERROR)
project(recipe-05 LANGUAGES CXX)
set(CMAKE_CXX_STANDARD 11)
set(CMAKE_CXX_EXTENSIONS OFF)
set(CMAKE_CXX_STANDARD_REQUIRED ON)
add_library(example_library leaky_implementation.cpp)
add_executable(cpp_test test.cpp)
target_link_libraries(cpp_test example_library)
find_program(MEMORYCHECK_COMMAND NAMES valgrind)
set(MEMORYCHECK_COMMAND_OPTIONS "--trace-children=yes --leak-check=full")
# add memcheck test action
include(CTest)
enable_testing()
add_test(
NAME cpp_test
COMMAND $<TARGET_FILE:cpp_test>
)
$ ctest
Test project /home/user/cmake-recipes/chapter-04/recipe-05/cxx-example/build
Start 1: cpp_test
1/1 Test #1: cpp_test ......................... Passed 0.00 sec
100% tests passed, 0 tests failed out of 1
Total Test time (real) = 0.00 sec
$ ctest -T memcheck
Site: myhost
Build name: Linux-c++
Create new tag: 20171127-1717 - Experimental
Memory check project /home/user/cmake-recipes/chapter-04/recipe-05/cxx-example/build
Start 1: cpp_test
1/1 MemCheck #1: cpp_test ......................... Passed 0.40 sec
100% tests passed, 0 tests failed out of 1
Total Test time (real) = 0.40 sec
-- Processing memory checking output:
1/1 MemCheck: #1: cpp_test ......................... Defects: 1
MemCheck log files can be found here: ( * corresponds to test number)
/home/user/cmake-recipes/chapter-04/recipe-05/cxx-example/build/Testing/Temporary/MemoryChecker.*.log
Memory checking results:
Memory Leak - 1
We used find_program(MEMORYCHECK_COMMAND NAMES valgrind) to find Valgrind and set MEMORYCHECK_COMMAND to its full path. We also needed to explicitly include the CTest module to enable the memcheck test action, which we can employ by using ctest -T memcheck. Also, observe that we were able to pass options to Valgrind using set(MEMORYCHECK_COMMAND_OPTIONS "--trace-children=yes --leak-check=full"). The memory checking step creates a log file, which can be used to inspect the memory defect in detail.
This recipe can be used to report memory defects to a nightly testing dashboard, but we demonstrated here that this functionality can also be used independent of a testing dashboard. We will revisit discuss usage in conjunction with CDash in Chapter 14, Testing Dashboards.
For documentation on Valgrind and its features and options, see http://valgrind.org.
Ideally, we want all of our tests to always pass on every platform. However, we may want to test whether an expected failure or exception will occur in a controlled setting, and in that case, we would define the expected failure as a successful outcome. We believe that typically, this is a task that should be given to the test framework (such as Catch2 or Google Test), which should check for the expected failure and report successes to CMake. But, there may be situations where you wish to define a non-zero return code from a test as success; in other words, you may want to invert the definitions of success and failure. In this recipe, we will demonstrate such a situation.
The ingredient for this recipe will be a tiny Python script (test.py) that always returns 1, which CMake interprets as a failure:
import sys
# simulate a failing test
sys.exit(1)
Step by step, this is how to write CMakeLists.txt to accomplish our task:
cmake_minimum_required(VERSION 3.5 FATAL_ERROR)
project(recipe-06 LANGUAGES NONE)
find_package(PythonInterp REQUIRED)
enable_testing()
add_test(example ${PYTHON_EXECUTABLE} ${CMAKE_CURRENT_SOURCE_DIR}/test.py)
set_tests_properties(example PROPERTIES WILL_FAIL true)
$ mkdir -p build
$ cd build
$ cmake ..
$ cmake --build .
$ ctest
Test project /home/user/cmake-recipes/chapter-04/recipe-06/example/build
Start 1: example
1/1 Test #1: example .......................... Passed 0.00 sec
100% tests passed, 0 tests failed out of 1
Total Test time (real) = 0.01 sec
Using set_tests_properties(example PROPERTIES WILL_FAIL true), we set the property WILL_FAIL to true, which inverts success/failure. However, this feature should not be used to temporarily fix broken tests.
If you need more flexibility, you can use the test properties PASS_REGULAR_EXPRESSION and FAIL_REGULAR_EXPRESSION in combination with set_tests_properties. If these are set, the test output will be checked against a list of regular expressions given as arguments, and, if at least one of the regular expressions matches, the test either passes or fails, respectively. Many other properties can be set on tests. A full list of available properties can be found at https://cmake.org/cmake/help/v3.5/manual/cmake-properties.7.html#properties-on-tests.
Ideally, the test set should take only a short time, in order to motivate developers to run the test set often, and to make it possible (or easier) to test every commit (changeset). However, some tests might take longer or get stuck (for instance, due to a high file I/O load), and we may need to implement timeouts to terminate tests that go overtime, before they pile up and delay the entire test and deploy pipeline. In this recipe, we will demonstrate one way of implementing timeouts, which can be adjusted separately for each test.
The ingredient for this recipe will be a tiny Python script (test.py) that always returns 0. To keep it super simple and to maintain focus on the CMake aspect, the test script does nothing other than wait for two seconds; but, we can imagine that in real life, this test script would perform more meaningful work:
import sys
import time
# wait for 2 seconds
time.sleep(2)
# report success
sys.exit(0)
We need to inform CTest that tests need to be terminated if they go into overtime, as follows:
# set minimum cmake version
cmake_minimum_required(VERSION 3.5 FATAL_ERROR)
# project name
project(recipe-07 LANGUAGES NONE)
# detect python
find_package(PythonInterp REQUIRED)
# define tests
enable_testing()
# we expect this test to run for 2 seconds
add_test(example ${PYTHON_EXECUTABLE} ${CMAKE_CURRENT_SOURCE_DIR}/test.py)
set_tests_properties(example PROPERTIES TIMEOUT 10)
$ ctest
Test project /home/user/cmake-recipes/chapter-04/recipe-07/example/build
Start 1: example
1/1 Test #1: example .......................... Passed 2.01 sec
100% tests passed, 0 tests failed out of 1
Total Test time (real) = 2.01 sec
$ ctest
Test project /home/user/cmake-recipes/chapter-04/recipe-07/example/build
Start 1: example
1/1 Test #1: example ..........................***Timeout 10.01 sec
0% tests passed, 1 tests failed out of 1
Total Test time (real) = 10.01 sec
The following tests FAILED:
1 - example (Timeout)
Errors while running CTest
TIMEOUT is a handy property that can be used to specify a timeout for individual tests, by using set_tests_properties. If the test goes past that time, for whatever reason (the test has stalled or the machine is too slow), the test is terminated and marked as failed.
Most modern computers have four or more CPU cores. One fantastic feature of CTest is its ability to run tests in parallel, if you have more than one core available. This can significantly reduce the total time to test, and reducing the total test time is what really counts, to motivate developers to test frequently. In this recipe, we will demonstrate this feature and discuss how you can optimize the definition of your tests for maximum performance.
Let us assume that our test set contains tests labeled a, b, ..., j, each with a specific time duration:
| Tests | Duration (in time units) |
| a, b, c, d | 0.5 |
| e, f, g | 1.5 |
| h | 2.5 |
| i | 3.5 |
| j | 4.5 |
The time units can be minutes, but to keep it simple and short, we will use seconds. For simplicity, we can represent test a, which consumes 0.5 time units, with a Python script:
import sys
import time
# wait for 0.5 seconds
time.sleep(0.5)
# finally report success
sys.exit(0)
The other tests can be represented accordingly. We will place these scripts one directory below CMakeLists.txt, in a directory called test.
For this recipe, we need to declare a list of tests, as follows:
# set minimum cmake version
cmake_minimum_required(VERSION 3.5 FATAL_ERROR)
# project name
project(recipe-08 LANGUAGES NONE)
# detect python
find_package(PythonInterp REQUIRED)
# define tests
enable_testing()
add_test(a ${PYTHON_EXECUTABLE} ${CMAKE_CURRENT_SOURCE_DIR}/test/a.py)
add_test(b ${PYTHON_EXECUTABLE} ${CMAKE_CURRENT_SOURCE_DIR}/test/b.py)
add_test(c ${PYTHON_EXECUTABLE} ${CMAKE_CURRENT_SOURCE_DIR}/test/c.py)
add_test(d ${PYTHON_EXECUTABLE} ${CMAKE_CURRENT_SOURCE_DIR}/test/d.py)
add_test(e ${PYTHON_EXECUTABLE} ${CMAKE_CURRENT_SOURCE_DIR}/test/e.py)
add_test(f ${PYTHON_EXECUTABLE} ${CMAKE_CURRENT_SOURCE_DIR}/test/f.py)
add_test(g ${PYTHON_EXECUTABLE} ${CMAKE_CURRENT_SOURCE_DIR}/test/g.py)
add_test(h ${PYTHON_EXECUTABLE} ${CMAKE_CURRENT_SOURCE_DIR}/test/h.py)
add_test(i ${PYTHON_EXECUTABLE} ${CMAKE_CURRENT_SOURCE_DIR}/test/i.py)
add_test(j ${PYTHON_EXECUTABLE} ${CMAKE_CURRENT_SOURCE_DIR}/test/j.py)
$ mkdir -p build
$ cd build
$ cmake ..
$ ctest
Start 1: a
1/10 Test #1: a ................................ Passed 0.51 sec
Start 2: b
2/10 Test #2: b ................................ Passed 0.51 sec
Start 3: c
3/10 Test #3: c ................................ Passed 0.51 sec
Start 4: d
4/10 Test #4: d ................................ Passed 0.51 sec
Start 5: e
5/10 Test #5: e ................................ Passed 1.51 sec
Start 6: f
6/10 Test #6: f ................................ Passed 1.51 sec
Start 7: g
7/10 Test #7: g ................................ Passed 1.51 sec
Start 8: h
8/10 Test #8: h ................................ Passed 2.51 sec
Start 9: i
9/10 Test #9: i ................................ Passed 3.51 sec
Start 10: j
10/10 Test #10: j ................................ Passed 4.51 sec
100% tests passed, 0 tests failed out of 10
Total Test time (real) = 17.11 sec
$ ctest --parallel 4
Start 10: j
Start 9: i
Start 8: h
Start 5: e
1/10 Test #5: e ................................ Passed 1.51 sec
Start 7: g
2/10 Test #8: h ................................ Passed 2.51 sec
Start 6: f
3/10 Test #7: g ................................ Passed 1.51 sec
Start 3: c
4/10 Test #9: i ................................ Passed 3.63 sec
5/10 Test #3: c ................................ Passed 0.60 sec
Start 2: b
Start 4: d
6/10 Test #6: f ................................ Passed 1.51 sec
7/10 Test #4: d ................................ Passed 0.59 sec
8/10 Test #2: b ................................ Passed 0.59 sec
Start 1: a
9/10 Test #10: j ................................ Passed 4.51 sec
10/10 Test #1: a ................................ Passed 0.51 sec
100% tests passed, 0 tests failed out of 10
Total Test time (real) = 4.74 sec
We can see that in the parallel case, tests j, i, h, and e started at the same time. The reduction in total test time when running in parallel can be significant. Looking at the output from ctest --parallel 4, we can see that the parallel test run started with the longest tests, and ran the shortest tests at the end. Starting with the longest tests is a very good strategy. It is like packing moving boxes: we start with larger items, and fill in the gaps with smaller items. Comparing the stacking of the a-j tests on four cores, when starting with the longest, looks as follows:
--> time
core 1: jjjjjjjjj
core 2: iiiiiiibd
core 3: hhhhhggg
core 4: eeefffac
Running tests in the order in which they are defined looks as follows:
--> time
core 1: aeeeiiiiiii
core 2: bfffjjjjjjjjj
core 3: cggg
core 4: dhhhhh
Running the tests in the order in which they are defined takes more time overall, since it leaves two cores idle for most of the time (here, cores 3 and 4). How did CMake know which tests would take the longest? CMake knew the time cost for each test because we ran the test sequentially first, and this recorded the cost data for each test in the file Testing/Temporary/CTestCostData.txt, which looks as follows:
a 1 0.506776
b 1 0.507882
c 1 0.508175
d 1 0.504618
e 1 1.51006
f 1 1.50975
g 1 1.50648
h 1 2.51032
i 1 3.50475
j 1 4.51111
If we had started with the parallel test right after configuring the project, it would run the tests in the order in which they were defined, and on four cores, the total test time would be noticeably longer. What does this mean for us? Does it mean that we should order tests according to decreasing time costs? This is an option, but it turns out that there is another way; we can indicate the time cost for each test by ourselves:
add_test(a ${PYTHON_EXECUTABLE} ${CMAKE_CURRENT_SOURCE_DIR}/test/a.py)
add_test(b ${PYTHON_EXECUTABLE} ${CMAKE_CURRENT_SOURCE_DIR}/test/b.py)
add_test(c ${PYTHON_EXECUTABLE} ${CMAKE_CURRENT_SOURCE_DIR}/test/c.py)
add_test(d ${PYTHON_EXECUTABLE} ${CMAKE_CURRENT_SOURCE_DIR}/test/d.py)
set_tests_properties(a b c d PROPERTIES COST 0.5)
add_test(e ${PYTHON_EXECUTABLE} ${CMAKE_CURRENT_SOURCE_DIR}/test/e.py)
add_test(f ${PYTHON_EXECUTABLE} ${CMAKE_CURRENT_SOURCE_DIR}/test/f.py)
add_test(g ${PYTHON_EXECUTABLE} ${CMAKE_CURRENT_SOURCE_DIR}/test/g.py)
set_tests_properties(e f g PROPERTIES COST 1.5)
add_test(h ${PYTHON_EXECUTABLE} ${CMAKE_CURRENT_SOURCE_DIR}/test/h.py)
set_tests_properties(h PROPERTIES COST 2.5)
add_test(i ${PYTHON_EXECUTABLE} ${CMAKE_CURRENT_SOURCE_DIR}/test/i.py)
set_tests_properties(i PROPERTIES COST 3.5)
add_test(j ${PYTHON_EXECUTABLE} ${CMAKE_CURRENT_SOURCE_DIR}/test/j.py)
set_tests_properties(j PROPERTIES COST 4.5)
The COST parameter can be either an estimate or extracted from Testing/Temporary/CTestCostData.txt.
Instead of using ctest --parallel N, you can also use the environment variable CTEST_PARALLEL_LEVEL, and set it to the desired level.
In the previous recipe, we learned how to run tests in parallel with the help of CMake, and we discussed that it is advantageous to start with the longest tests. While this strategy minimizes the total test time, during the code development of a particular feature, or during debugging, we may not wish to run the entire test set. We may prefer to start with the longest tests, especially while debugging functionality that is exercised by a short test. For debugging and code development, we need the ability to only run a selected subset of tests. In this recipe, we will present strategies to accomplish that.
In this example, we assume that we have six tests in total; the first three tests are shorter, and have the names feature-a, feature-b, and feature-c. We also have three longer tests, with the names feature-d, benchmark-a, and benchmark-b. In this recipe, we can represent these tests with Python scripts, where we can adjust the sleep time:
import sys
import time
# wait for 0.1 seconds
time.sleep(0.1)
# finally report success
sys.exit(0)
The following is a detailed breakdown of the contents of our CMakeLists.txt:
cmake_minimum_required(VERSION 3.5 FATAL_ERROR)
# project name
project(recipe-09 LANGUAGES NONE)
# detect python
find_package(PythonInterp REQUIRED)
# define tests
enable_testing()
add_test(
NAME feature-a
COMMAND ${PYTHON_EXECUTABLE} ${CMAKE_CURRENT_SOURCE_DIR}/test/feature-a.py
)
add_test(
NAME feature-b
COMMAND ${PYTHON_EXECUTABLE} ${CMAKE_CURRENT_SOURCE_DIR}/test/feature-b.py
)
add_test(
NAME feature-c
COMMAND ${PYTHON_EXECUTABLE} ${CMAKE_CURRENT_SOURCE_DIR}/test/feature-c.py
)
add_test(
NAME feature-d
COMMAND ${PYTHON_EXECUTABLE} ${CMAKE_CURRENT_SOURCE_DIR}/test/feature-d.py
)
add_test(
NAME benchmark-a
COMMAND ${PYTHON_EXECUTABLE} ${CMAKE_CURRENT_SOURCE_DIR}/test/benchmark-a.py
)
add_test(
NAME benchmark-b
COMMAND ${PYTHON_EXECUTABLE} ${CMAKE_CURRENT_SOURCE_DIR}/test/benchmark-b.py
)
set_tests_properties(
feature-a
feature-b
feature-c
PROPERTIES
LABELS "quick"
)
set_tests_properties(
feature-d
benchmark-a
benchmark-b
PROPERTIES
LABELS "long"
)
$ mkdir -p build
$ cd build
$ cmake ..
$ ctest
Start 1: feature-a
1/6 Test #1: feature-a ........................ Passed 0.11 sec
Start 2: feature-b
2/6 Test #2: feature-b ........................ Passed 0.11 sec
Start 3: feature-c
3/6 Test #3: feature-c ........................ Passed 0.11 sec
Start 4: feature-d
4/6 Test #4: feature-d ........................ Passed 0.51 sec
Start 5: benchmark-a
5/6 Test #5: benchmark-a ...................... Passed 0.51 sec
Start 6: benchmark-b
6/6 Test #6: benchmark-b ...................... Passed 0.51 sec
100% tests passed, 0 tests failed out of 6
Label Time Summary:
long = 1.54 sec*proc (3 tests)
quick = 0.33 sec*proc (3 tests)
Total Test time (real) = 1.87 sec
Each test now has a name and a label. In CMake, all tests are numbered, so they also carry a unique number. Having defined the test label, we can now either run the entire set or run tests by their names (using regular expressions), their labels, or their numbers.
Running tests by their names (here, we run all tests with names matching feature) looks as follows:
$ ctest -R feature
Start 1: feature-a
1/4 Test #1: feature-a ........................ Passed 0.11 sec
Start 2: feature-b
2/4 Test #2: feature-b ........................ Passed 0.11 sec
Start 3: feature-c
3/4 Test #3: feature-c ........................ Passed 0.11 sec
Start 4: feature-d
4/4 Test #4: feature-d ........................ Passed 0.51 sec
100% tests passed, 0 tests failed out of 4
Running tests by their labels (here, we run all long tests) produces:
$ ctest -L long
Start 4: feature-d
1/3 Test #4: feature-d ........................ Passed 0.51 sec
Start 5: benchmark-a
2/3 Test #5: benchmark-a ...................... Passed 0.51 sec
Start 6: benchmark-b
3/3 Test #6: benchmark-b ...................... Passed 0.51 sec
100% tests passed, 0 tests failed out of 3
Running tests by their numbers (here, we run tests 2 to 4) yields:
$ ctest -I 2,4
Start 2: feature-b
1/3 Test #2: feature-b ........................ Passed 0.11 sec
Start 3: feature-c
2/3 Test #3: feature-c ........................ Passed 0.11 sec
Start 4: feature-d
3/3 Test #4: feature-d ........................ Passed 0.51 sec
100% tests passed, 0 tests failed out of 3
Try using $ ctest --help, and you will see a wealth of options to choose from to customize your testing.
This recipe was inspired by the work of Craig Scott, and we recommend the reader to also consult the corresponding blog post for more background, at https://crascit.com/2016/10/18/test-fixtures-with-cmake-ctest/. The motivation for this recipe was to demonstrate how to employ test fixtures. These are useful for more sophisticated tests that require setup actions before the test is run, and cleanup actions after it has completed (such as creating an example database, setting up a connection, disconnecting, cleaning up the test database, and so on). We want to make sure that running a test that requires a setup or cleanup action automatically triggers these steps in a predictable and robust way, without introducing code repetition. These setup and cleanup steps can be delegated to the testing framework, such as Google Test or Catch2, but here, we demonstrate how to implement test fixtures at the CMake level.
We will prepare four tiny Python scripts, and place them under the test directory: setup.py, feature-a.py, feature-b.py, and cleanup.py.
We start with a familiar CMakeLists.txt structure, with some additional steps, as follows:
# set minimum cmake version
cmake_minimum_required(VERSION 3.5 FATAL_ERROR)
# project name
project(recipe-10 LANGUAGES NONE)
# detect python
find_package(PythonInterp REQUIRED)
# define tests
enable_testing()
add_test(
NAME setup
COMMAND ${PYTHON_EXECUTABLE} ${CMAKE_CURRENT_SOURCE_DIR}/test/setup.py
)
set_tests_properties(
setup
PROPERTIES
FIXTURES_SETUP my-fixture
)
add_test(
NAME feature-a
COMMAND ${PYTHON_EXECUTABLE} ${CMAKE_CURRENT_SOURCE_DIR}/test/feature-a.py
)
add_test(
NAME feature-b
COMMAND ${PYTHON_EXECUTABLE} ${CMAKE_CURRENT_SOURCE_DIR}/test/feature-b.py
)
set_tests_properties(
feature-a
feature-b
PROPERTIES
FIXTURES_REQUIRED my-fixture
)
add_test(
NAME cleanup
COMMAND ${PYTHON_EXECUTABLE} ${CMAKE_CURRENT_SOURCE_DIR}/test/cleanup.py
)
set_tests_properties(
cleanup
PROPERTIES
FIXTURES_CLEANUP my-fixture
)
$ mkdir -p build
$ cd build
$ cmake ..
$ ctest
Start 1: setup
1/4 Test #1: setup ............................ Passed 0.01 sec
Start 2: feature-a
2/4 Test #2: feature-a ........................ Passed 0.01 sec
Start 3: feature-b
3/4 Test #3: feature-b ........................ Passed 0.00 sec
Start 4: cleanup
4/4 Test #4: cleanup .......................... Passed 0.01 sec
100% tests passed, 0 tests failed out of 4
$ ctest -R feature-a
Start 1: setup
1/3 Test #1: setup ............................ Passed 0.01 sec
Start 2: feature-a
2/3 Test #2: feature-a ........................ Passed 0.00 sec
Start 4: cleanup
3/3 Test #4: cleanup .......................... Passed 0.01 sec
100% tests passed, 0 tests failed out of 3
In this example, we defined a text fixture and called it my-fixture. We gave the setup test the FIXTURES_SETUP property and the cleanup test the FIXTURES_CLEANUP property, and, using FIXTURES_REQUIRED, we made sure that the tests feature-a and feature-b both required the setup and cleanup steps in order to be run. Binding these together ensures that we always enter and leave steps in a well-defined state.
For more background and an excellent motivation for using this technique for fixtures see https://crascit.com/2016/10/18/test-fixtures-with-cmake-ctest/.
In this chapter, we will cover the following recipes:
In this chapter, we will learn how to perform custom operations at configure time and build time. Let us briefly recall the notion of times as related to the workflow of a project managed by CMake:
The complete workflow and the corresponding times are depicted in the following figure:
This chapter is concerned with customizing the behavior at configure time and build time. We will learn how to use these commands:
When building some projects, we may need to interact with the host platform filesystem. The interaction with the files might be simply checking whether a file exists, creating a new file to store temporary information, creating or extracting an archive, and so forth. With CMake, we are not only able to generate the build system on different platforms, we are also able to perform these operations without complicated logic to abstract away the different operating systems. This recipe will show how to extract a previously downloaded archive in a portable way.
We will show how to extract the archive bundling the Eigen library and use the extracted source files to compile our project. In this recipe, we will reuse the linear algebra example linear-algebra.cpp from Chapter 3, . The recipe also assumes that the archive containing the source code for Eigen has been downloaded in the same directory as the project itself.
The project needs to unpack the Eigen archive and set the include directories for the target accordingly:
cmake_minimum_required(VERSION 3.5 FATAL_ERROR)
project(recipe-01 LANGUAGES CXX)
set(CMAKE_CXX_STANDARD 11)
set(CMAKE_CXX_EXTENSIONS OFF)
set(CMAKE_CXX_STANDARD_REQUIRED ON)
add_custom_target(unpack-eigen
ALL
COMMAND
${CMAKE_COMMAND} -E tar xzf ${CMAKE_CURRENT_SOURCE_DIR}/eigen-eigen-5a0156e40feb.tar.gz
COMMAND
${CMAKE_COMMAND} -E rename eigen-eigen-5a0156e40feb eigen-3.3.4
WORKING_DIRECTORY
${CMAKE_CURRENT_BINARY_DIR}
COMMENT
"Unpacking Eigen3 in ${CMAKE_CURRENT_BINARY_DIR}/eigen-3.3.4"
)
add_executable(linear-algebra linear-algebra.cpp)
add_dependencies(linear-algebra unpack-eigen)
target_include_directories(linear-algebra
PRIVATE
${CMAKE_CURRENT_BINARY_DIR}/eigen-3.3.4
)
Let us take a closer look at the invocation of add_custom_target:
add_custom_target(unpack-eigen
ALL
COMMAND
${CMAKE_COMMAND} -E tar xzf ${CMAKE_CURRENT_SOURCE_DIR}/eigen-eigen-5a0156e40feb.tar.gz
COMMAND
${CMAKE_COMMAND} -E rename eigen-eigen-5a0156e40feb eigen-3.3.4
WORKING_DIRECTORY
${CMAKE_CURRENT_BINARY_DIR}
COMMENT
"Unpacking Eigen3 in ${CMAKE_CURRENT_BINARY_DIR}/eigen-3.3.4"
)
We are introducing a target called unpack-eigen into our build system. The target will always be executed since we passed the ALL argument. The COMMAND argument lets you specify what commands to execute. In this example, we wish to extract the archive and rename the extracted directory to eigen-3.3.4. This is achieved with these two commands:
Notice how we are calling the CMake command itself, with the -E flag, to execute the actual work. For many common operations, CMake implements an interface common to all the operating systems it runs on. This allows the build system generation to be largely independent of the specific platform. The next argument in the add_custom_target command is the working directory, which in our example corresponds to the build directory: CMAKE_CURRENT_BINARY_DIR. The last argument, COMMENT, is used to specify what message CMake should print out when executing the custom target.
The command add_custom_target can be used whenever a series of custom commands with no output has to be executed during the build. As we have shown in this recipe, the custom target can be specified as a dependency of other targets in the project. Moreover, custom targets can also depend on other targets, thus offering the possibility to set up the order of execution in our build.
Using the -E flag to CMake, we can run many common operations in an operating system-agnostic fashion. The full list on the specific operating system can be obtained by running cmake -E or cmake -E help. For example, this is the summary of commands on a Linux system:
Usage: cmake -E <command> [arguments...]
Available commands:
capabilities - Report capabilities built into cmake in JSON format
chdir dir cmd [args...] - run command in a given directory
compare_files file1 file2 - check if file1 is same as file2
copy <file>... destination - copy files to destination (either file or directory)
copy_directory <dir>... destination - copy content of <dir>... directories to 'destination' directory
copy_if_different <file>... destination - copy files if it has changed
echo [<string>...] - displays arguments as text
echo_append [<string>...] - displays arguments as text but no new line
env [--unset=NAME]... [NAME=VALUE]... COMMAND [ARG]...
- run command in a modified environment
environment - display the current environment
make_directory <dir>... - create parent and <dir> directories
md5sum <file>... - create MD5 checksum of files
remove [-f] <file>... - remove the file(s), use -f to force it
remove_directory dir - remove a directory and its contents
rename oldname newname - rename a file or directory (on one volume)
server - start cmake in server mode
sleep <number>... - sleep for given number of seconds
tar [cxt][vf][zjJ] file.tar [file/dir1 file/dir2 ...]
- create or extract a tar or zip archive
time command [args...] - run command and return elapsed time
touch file - touch a file.
touch_nocreate file - touch a file but do not create it.
Available on UNIX only:
create_symlink old new - create a symbolic link new -> old
Running CMake generates the build system, thus specifying what commands the native build tools will have to execute to get your project built, and in which order. We have already seen how CMake runs many subtasks at configure time in order to find out the working compiler and necessary dependencies. In this recipe, we will discuss how to run custom commands at configure time by using the execute_process command.
We have already shown the use of execute_process when trying to find the NumPy Python module in Chapter 3, Detecting External Libraries and Programs, Recipe 3, Detecting Python modules and packages. In this example, we will use the execute_process command to find out whether a particular Python module (in this case, Python CFFI) is present, and if it is, we will discover its version:
cmake_minimum_required(VERSION 3.5 FATAL_ERROR)
project(recipe-02 LANGUAGES NONE)
find_package(PythonInterp REQUIRED)
# this is set as variable to prepare
# for abstraction using loops or functions
set(_module_name "cffi")
execute_process(
COMMAND
${PYTHON_EXECUTABLE} "-c" "import ${_module_name}; print(${_module_name}.__version__)"
OUTPUT_VARIABLE _stdout
ERROR_VARIABLE _stderr
OUTPUT_STRIP_TRAILING_WHITESPACE
ERROR_STRIP_TRAILING_WHITESPACE
)
if(_stderr MATCHES "ModuleNotFoundError")
message(STATUS "Module ${_module_name} not found")
else()
message(STATUS "Found module ${_module_name} v${_stdout}")
endif()
$ mkdir -p build
$ cd build
$ cmake ..
-- Found PythonInterp: /home/user/cmake-cookbook/chapter-05/recipe-02/example/venv/bin/python (found version "3.6.5")
-- Found module cffi v1.11.5
The execute_process command will spawn one or more child processes from within the currently executing CMake process, thus providing a powerful and convenient way of running arbitrary commands when configuring your project. It is possible to execute more than one command within one invocation of execute_process. Notice, however, that the output of each command will be piped into the next. The command accepts a number of arguments:
With these explanations, we can return to our example:
set(_module_name "cffi")
execute_process(
COMMAND
${PYTHON_EXECUTABLE} "-c" "import ${_module_name}; print(${_module_name}.__version__)"
OUTPUT_VARIABLE _stdout
ERROR_VARIABLE _stderr
OUTPUT_STRIP_TRAILING_WHITESPACE
ERROR_STRIP_TRAILING_WHITESPACE
)
if(_stderr MATCHES "ModuleNotFoundError")
message(STATUS "Module ${_module_name} not found")
else()
message(STATUS "Found module ${_module_name} v${_stdout}")
endif()
The command checks the output of python -c "import cffi; print(cffi.__version__)". If the module is not found, _stderr will contain ModuleNotFoundError, which we check for in the if-statement, and in this case we would print Module cffi not found. If the import is successful, the Python code will print the version of the module, which is piped into _stdout so that we can print the following:
message(STATUS "Found module ${_module_name} v${_stdout}")
In this example, we have only printed the result, but in a real project we could warn, abort the configuration, or set variables that could be queried to toggle certain configuration options.
It would be an interesting exercise to extend the code example to multiple Python modules, such as Cython, avoiding code repetition. One option could be to loop over the module names using foreach; another approach could be to abstract the code into a function or macro. We will discuss such abstractions in Chapter 7, Structuring Projects.
In Chapter 9, Mixed-language Projects, we will use Python CFFI and Cython, and the present recipe can serve as a useful and reusable code snippet to detect whether these packages are present.
Build targets for your projects might depend on the results of commands that can only be executed at build time, after the build system generation has been completed. CMake offers three options to execute custom commands at build time:
These three options enforce specific semantics and are not interchangeable. The next three recipes will clarify their use cases.
We will reuse the C++ example from Chapter 3, Detecting External Libraries and Programs, Recipe 4, Detecting the BLAS and LAPACK math libraries, to illustrate the use of the first variant of add_custom_command. In that code sample, we probed for existing BLAS and LAPACK libraries and compiled a tiny C++ wrapper library to call the Fortran implementation of the linear algebra routines we needed.
We will split the code into two portions. The source file for linear-algebra.cpp is unchanged compared to Chapter 3, Detecting External Libraries and Programs, Recipe 4, Detecting the BLAS and LAPACK math libraries, and will include headers from the linear algebra wrappers library and link against the compiled library. The sources of the library will, however, be packaged into a zipped tar archive shipped alongside the example project. The archive will be extracted at build time and the linear algebra wrapper library compiled before the executable.
Our CMakeLists.txt will have to contain a custom command to extract the sources for the linear algebra wrapper library. Let us look at it in detail:
cmake_minimum_required(VERSION 3.5 FATAL_ERROR)
project(recipe-03 LANGUAGES CXX Fortran)
set(CMAKE_CXX_STANDARD 11)
set(CMAKE_CXX_EXTENSIONS OFF)
set(CMAKE_CXX_STANDARD_REQUIRED ON)
find_package(BLAS REQUIRED)
find_package(LAPACK REQUIRED)
set(wrap_BLAS_LAPACK_sources
${CMAKE_CURRENT_BINARY_DIR}/wrap_BLAS_LAPACK/CxxBLAS.hpp
${CMAKE_CURRENT_BINARY_DIR}/wrap_BLAS_LAPACK/CxxBLAS.cpp
${CMAKE_CURRENT_BINARY_DIR}/wrap_BLAS_LAPACK/CxxLAPACK.hpp
${CMAKE_CURRENT_BINARY_DIR}/wrap_BLAS_LAPACK/CxxLAPACK.cpp
)
add_custom_command(
OUTPUT
${wrap_BLAS_LAPACK_sources}
COMMAND
${CMAKE_COMMAND} -E tar xzf ${CMAKE_CURRENT_SOURCE_DIR}/wrap_BLAS_LAPACK.tar.gz
COMMAND
${CMAKE_COMMAND} -E touch ${wrap_BLAS_LAPACK_sources}
WORKING_DIRECTORY
${CMAKE_CURRENT_BINARY_DIR}
DEPENDS
${CMAKE_CURRENT_SOURCE_DIR}/wrap_BLAS_LAPACK.tar.gz
COMMENT
"Unpacking C++ wrappers for BLAS/LAPACK"
VERBATIM
)
add_library(math "")
target_sources(math
PRIVATE
${CMAKE_CURRENT_BINARY_DIR}/wrap_BLAS_LAPACK/CxxBLAS.cpp
${CMAKE_CURRENT_BINARY_DIR}/wrap_BLAS_LAPACK/CxxLAPACK.cpp
PUBLIC
${CMAKE_CURRENT_BINARY_DIR}/wrap_BLAS_LAPACK/CxxBLAS.hpp
${CMAKE_CURRENT_BINARY_DIR}/wrap_BLAS_LAPACK/CxxLAPACK.hpp
)
target_include_directories(math
INTERFACE
${CMAKE_CURRENT_BINARY_DIR}/wrap_BLAS_LAPACK
)
target_link_libraries(math
PUBLIC
${LAPACK_LIBRARIES}
)
add_executable(linear-algebra linear-algebra.cpp)
target_link_libraries(linear-algebra
PRIVATE
math
)
$ mkdir -p build
$ cd build
$ cmake ..
$ cmake --build .
$ ./linear-algebra 1000
C_DSCAL done
C_DGESV done
info is 0
check is 4.35597e-10
Let us have a closer look at the invocation of add_custom_command:
add_custom_command(
OUTPUT
${wrap_BLAS_LAPACK_sources}
COMMAND
${CMAKE_COMMAND} -E tar xzf ${CMAKE_CURRENT_SOURCE_DIR}/wrap_BLAS_LAPACK.tar.gz
COMMAND
${CMAKE_COMMAND} -E touch ${wrap_BLAS_LAPACK_sources}
WORKING_DIRECTORY
${CMAKE_CURRENT_BINARY_DIR}
DEPENDS
${CMAKE_CURRENT_SOURCE_DIR}/wrap_BLAS_LAPACK.tar.gz
COMMENT
"Unpacking C++ wrappers for BLAS/LAPACK"
VERBATIM
)
add_custom_command adds rules to targets so that they know how to generate the output by executing the commands. Any target declared within the same directory of add_custom_command, that is, in the same CMakeLists.txt, and that uses any file in the output as its source file, will be given a rule to generate those files at build time. Dependencies between targets and custom commands are thus automatically handled at build system generation, while the actual generation of source files happens at build time.
In our specific case, the outputs are the sources contained in the zipped tar archive. To retrieve and use those files, the archive will have to be extracted at build time. This is achieved by using the CMake command itself with the -E flag, to achieve platform independence. The next command updates the timestamps of the extracted files. We do this to make sure we are not dealing with stale source files. WORKING_DIRECTORY specifies where to execute the commands. In our case, this is CMAKE_CURRENT_BINARY_DIR, which is the build directory currently being processed. The argument to the DEPENDS keyword lists dependencies to the custom command. In our case, the zipped tar archive is a dependency. The COMMENT field will be used by CMake to print status messages at build time. Finally, VERBATIM tells CMake to generate the right command for the specific generator and platform, thus ensuring full platform independence.
Let us also have a closer look at the way the library with the wrappers is created:
add_library(math "")
target_sources(math
PRIVATE
${CMAKE_CURRENT_BINARY_DIR}/wrap_BLAS_LAPACK/CxxBLAS.cpp
${CMAKE_CURRENT_BINARY_DIR}/wrap_BLAS_LAPACK/CxxLAPACK.cpp
PUBLIC
${CMAKE_CURRENT_BINARY_DIR}/wrap_BLAS_LAPACK/CxxBLAS.hpp
${CMAKE_CURRENT_BINARY_DIR}/wrap_BLAS_LAPACK/CxxLAPACK.hpp
)
target_include_directories(math
INTERFACE
${CMAKE_CURRENT_BINARY_DIR}/wrap_BLAS_LAPACK
)
target_link_libraries(math
PUBLIC
${LAPACK_LIBRARIES}
)
We declare a library target with no sources. This is because we then use target_sources to populate the sources of the target. This achieves the very important task of letting dependents on this target know what include directories and header files they need, in order to successfully use the library. The C++ source files are PRIVATE to the target, and hence only used in building the library. The header files are PUBLIC because both the target and its dependents will need to use them to successfully compile. The include directories are specified using target_include_directories with wrap_BLAS_LAPACK declared as INTERFACE, since only dependents on the math target will need it.
This form of the add_custom_command has two limitations:
The second limitation can be avoided by carefully introducing dependencies with add_dependencies, but the proper approach to circumvent both would be to use the add_custom_target command, as we will detail in the next recipe.
As we discussed in the previous recipe, add_custom_command has some limitations that can be circumvented by using add_custom_target. This CMake command will introduce new targets in the build system. These targets, in turn, execute commands that do not return an output, in contrast to add_custom_command. The commands add_custom_target and add_custom_command can be combined. With this, the custom target can be specified in a directory different than the one where its dependents are, and this can be very helpful when designing a modular CMake infrastructure for your project.
For this recipe, we will reuse the source code sample from the previous recipe. We will, however, modify the layout of the sources slightly. In particular, instead of storing the zipped tar archive in the top-level directory, we will place it inside a subdirectory called deps. This subdirectory contains its own CMakeLists.txt, which will be included by the main CMakeLists.txt.
We will start with the main CMakeLists.txt and later move to deps/CMakeLists.txt:
cmake_minimum_required(VERSION 3.5 FATAL_ERROR)
project(recipe-04 LANGUAGES CXX Fortran)
set(CMAKE_CXX_STANDARD 11)
set(CMAKE_CXX_EXTENSIONS OFF)
set(CMAKE_CXX_STANDARD_REQUIRED ON)
add_subdirectory(deps)
find_package(BLAS REQUIRED)
find_package(LAPACK REQUIRED)
set(MATH_SRCS
${CMAKE_CURRENT_BINARY_DIR}/wrap_BLAS_LAPACK/CxxBLAS.cpp
${CMAKE_CURRENT_BINARY_DIR}/wrap_BLAS_LAPACK/CxxLAPACK.cpp
${CMAKE_CURRENT_BINARY_DIR}/wrap_BLAS_LAPACK/CxxBLAS.hpp
${CMAKE_CURRENT_BINARY_DIR}/wrap_BLAS_LAPACK/CxxLAPACK.hpp
)
add_custom_target(BLAS_LAPACK_wrappers
WORKING_DIRECTORY
${CMAKE_CURRENT_BINARY_DIR}
DEPENDS
${MATH_SRCS}
COMMENT
"Intermediate BLAS_LAPACK_wrappers target"
VERBATIM
)
add_custom_command(
OUTPUT
${MATH_SRCS}
COMMAND
${CMAKE_COMMAND} -E tar xzf ${CMAKE_CURRENT_SOURCE_DIR}/wrap_BLAS_LAPACK.tar.gz
WORKING_DIRECTORY
${CMAKE_CURRENT_BINARY_DIR}
DEPENDS
${CMAKE_CURRENT_SOURCE_DIR}/wrap_BLAS_LAPACK.tar.gz
COMMENT
"Unpacking C++ wrappers for BLAS/LAPACK"
)
add_library(math "")
target_sources(math
PRIVATE
${MATH_SRCS}
)
target_include_directories(math
INTERFACE
${CMAKE_CURRENT_BINARY_DIR}/wrap_BLAS_LAPACK
)
# BLAS_LIBRARIES are included in LAPACK_LIBRARIES
target_link_libraries(math
PUBLIC
${LAPACK_LIBRARIES}
)
add_executable(linear-algebra linear-algebra.cpp)
target_link_libraries(linear-algebra
PRIVATE
math
)
With add_custom_target, users can execute custom commands within targets. This is subtly different from the add_custom_command recipe we have discussed previously. The target added by add_custom_target has no output and is thus always executed. It is thus possible to introduce a custom target in subdirectories, and still be able to refer to it in the top-level CMakeLists.txt.
In this example, we have extracted an archive of source files using a combination of add_custom_target and add_custom_command. These source files were later used to compile a library that we managed to link against in a different (parent) directory scope. In the construction of the CMakeLists.txt files, we briefly commented that the tarball is extracted under deps, one subdirectory below the build directory of the project. This is because in CMake, the structure of the build tree mimics the hierarchy of the source tree.
A remarkable detail in this recipe, which we should discuss, is the curious fact that we have marked the math library sources as PRIVATE:
set(MATH_SRCS
${CMAKE_CURRENT_BINARY_DIR}/wrap_BLAS_LAPACK/CxxBLAS.cpp
${CMAKE_CURRENT_BINARY_DIR}/wrap_BLAS_LAPACK/CxxLAPACK.cpp
${CMAKE_CURRENT_BINARY_DIR}/wrap_BLAS_LAPACK/CxxBLAS.hpp
${CMAKE_CURRENT_BINARY_DIR}/wrap_BLAS_LAPACK/CxxLAPACK.hpp
)
# ...
add_library(math "")
target_sources(math
PRIVATE
${MATH_SRCS}
)
# ...
Although these sources are PRIVATE, we compiled linear-algebra.cpp in the parent scope and this source code includes CxxBLAS.hpp and CxxLAPACK.hpp. Why is PRIVATE used here, and how was it possible to compile linear-algebra.cpp and build the executable? Had we marked the header files as PUBLIC, CMake would have stopped at CMake time with an error, "Cannot find source file", since the to-be-generated (extracted) source files do not exist in the file tree yet.
This is a known limitation (see https://gitlab.kitware.com/cmake/cmake/issues/14633, as well as a related blog post: https://samthursfield.wordpress.com/2015/11/21/cmake-dependencies-between-targets-and-files-and-custom-commands). We have worked around this limitation by declaring the sources PRIVATE. By doing this, we did not get any file dependencies on non-existent sources at CMake time. However, the CMake built-in C/C++ file dependency scanner picked them up at build time and the sources compiled and linked.
This recipe will show how to use the second signature of add_custom_command to perform custom operations without output. This is useful to perform certain operations right before or right after a specific target is built or linked. Since the custom commands are only executed if the target itself has to be built, we achieve target-level control over their execution. We will demonstrate this with an example where we print the link line of a target right before it is built, and then we measure the static size allocation of the compiled executable right after it has been compiled.
In this recipe, we will work with the following example Fortran code (example.f90):
program example
implicit none
real(8) :: array(20000000)
real(8) :: r
integer :: i
do i = 1, size(array)
call random_number(r)
array(i) = r
end do
print *, sum(array)
end program
The fact that this is Fortran code does not matter much for the discussion that will follow, but we have chosen Fortran since there is a lot of legacy Fortran code out there where static size allocations are an issue.
In this code, we define an array holding 20,000,000 double precision floats, and we expect this array to occupy 160 MB of memory. What we have done here is not recommended programming practice, since in general this memory will be consumed independently of whether it is used in the code. A much better approach would have been to allocate the array dynamically only when it is needed and deallocate it right afterwards.
The example code fills the array with random numbers and computes their sum - this was done to make sure that the array is really used and the compiler does not optimize the allocation away. We will measure the size of static allocation of the example binary with a Python script (static-size.py) wrapping around the size command:
import subprocess
import sys
# for simplicity we do not check number of
# arguments and whether the file really exists
file_path = sys.argv[-1]
try:
output = subprocess.check_output(['size', file_path]).decode('utf-8')
except FileNotFoundError:
print('command "size" is not available on this platform')
sys.exit(0)
size = 0.0
for line in output.split('\n'):
if file_path in line:
# we are interested in the 4th number on this line
size = int(line.split()[3])
print('{0:.3f} MB'.format(size/1.0e6))
To print the link line, we will use a second Python helper script (echo-file.py) to print the contents of a file:
import sys
# for simplicity we do not verify the number and
# type of arguments
file_path = sys.argv[-1]
try:
with open(file_path, 'r') as f:
print(f.read())
except FileNotFoundError:
print('ERROR: file {0} not found'.format(file_path))
Let us have a look at our CMakeLists.txt:
cmake_minimum_required(VERSION 3.5 FATAL_ERROR)
project(recipe-05 LANGUAGES Fortran)
find_package(PythonInterp REQUIRED)
if(NOT CMAKE_BUILD_TYPE)
set(CMAKE_BUILD_TYPE Release CACHE STRING "Build type" FORCE)
endif()
add_executable(example "")
target_sources(example
PRIVATE
example.f90
)
add_custom_command(
TARGET
example
PRE_LINK
COMMAND
${PYTHON_EXECUTABLE}
${CMAKE_CURRENT_SOURCE_DIR}/echo-file.py
${CMAKE_CURRENT_BINARY_DIR}/CMakeFiles/example.dir/link.txt
COMMENT
"link line:"
VERBATIM
)
add_custom_command(
TARGET
example
POST_BUILD
COMMAND
${PYTHON_EXECUTABLE}
${CMAKE_CURRENT_SOURCE_DIR}/static-size.py
$<TARGET_FILE:example>
COMMENT
"static size of executable:"
VERBATIM
)
$ mkdir -p build
$ cd build
$ cmake ..
$ cmake --build .
Scanning dependencies of target example
[ 50%] Building Fortran object CMakeFiles/example.dir/example.f90.o
[100%] Linking Fortran executable example
link line:
/usr/bin/f95 -O3 -DNDEBUG -O3 CMakeFiles/example.dir/example.f90.o -o example
static size of executable:
160.003 MB
[100%] Built target example
Once a library or executable target has been declared, one can latch additional commands onto the target by using add_custom_command. As we have seen, these commands will be executed at specific times, contextually to the execution of the target they are attached to. CMake understands the following options for the execution order of custom commands:
In this example, we have bolted on two custom commands to the executable target. The PRE_LINK command prints the content of ${CMAKE_CURRENT_BINARY_DIR}/CMakeFiles/example.dir/link.txt to the screen. This file contains the link command and in our example, the link line turned out to be this:
link line:
/usr/bin/f95 -O3 -DNDEBUG -O3 CMakeFiles/example.dir/example.f90.o -o example
We have used a Python wrapper for this to not depend on shell commands, which might not be portable.
In the second step, the POST_BUILD custom command called the Python helper script static-size.py with the generator expression $<TARGET_FILE:example> as argument. CMake will expand the generator expression to the target file path at generation time, that is, when the build system is generated. The Python script static-size.py in turn uses the size command to obtain the size of static allocation of the executable file, converts it to MB, and prints the result. In our case, we obtained the expected 160 MB:
static size of executable:
160.003 MB
One of the most common operations during build system generation is to assess what kind of system we are trying to build our project on. That means trying to find out which functionality works and which does not, and adapting the compilation of our project accordingly, either by signaling that dependencies are unmet or by enabling proper workarounds in our codebase. The next few recipes will show how to perform these operations with CMake. In particular, we will consider the following:
This recipe will show how to use the check_<lang>_source_compiles function from the corresponding Check<LANG>SourceCompiles.cmake standard module, in order to assess whether the given compiler can compile a predefined code snippet into an executable. The command can help you ascertain whether:
In this recipe, we will show how to detect the task loop feature of the OpenMP 4.5 standard for its use in a C++ executable. We will use a sample C++ source file to probe whether the compiler supports such a feature. CMake offers an additional command, try_compile, to probe compilation. This recipe will show how to use both approaches.
We will use both try_compile and check_cxx_source_compiles and compare how the two commands work:
cmake_minimum_required(VERSION 3.9 FATAL_ERROR)
project(recipe-06 LANGUAGES CXX)
set(CMAKE_CXX_STANDARD 11)
set(CMAKE_CXX_EXTENSIONS OFF)
set(CMAKE_CXX_STANDARD_REQUIRED ON)
find_package(OpenMP)
if(OpenMP_FOUND)
# ... <- the steps below will be placed here
else()
message(STATUS "OpenMP not found: no test for taskloop is run")
endif()
set(_scratch_dir ${CMAKE_CURRENT_BINARY_DIR}/omp_try_compile)
try_compile(
omp_taskloop_test_1
${_scratch_dir}
SOURCES
${CMAKE_CURRENT_SOURCE_DIR}/taskloop.cpp
LINK_LIBRARIES
OpenMP::OpenMP_CXX
)
message(STATUS "Result of try_compile: ${omp_taskloop_test_1}")
include(CheckCXXSourceCompiles)
file(READ ${CMAKE_CURRENT_SOURCE_DIR}/taskloop.cpp _snippet)
set(CMAKE_REQUIRED_LIBRARIES OpenMP::OpenMP_CXX)
check_cxx_source_compiles("${_snippet}" omp_taskloop_test_2)
unset(CMAKE_REQUIRED_LIBRARIES)
message(STATUS "Result of check_cxx_source_compiles: ${omp_taskloop_test_2}"
$ mkdir -p build
$ cd build
$ cmake ..
-- ...
-- Found OpenMP_CXX: -fopenmp (found version "4.5")
-- Found OpenMP: TRUE (found version "4.5")
-- Result of try_compile: TRUE
-- Performing Test omp_taskloop_test_2
-- Performing Test omp_taskloop_test_2 - Success
-- Result of check_cxx_source_compiles: 1
Both try_compile and check_cxx_source_compiles will compile and link a source file into an executable. If those operations succeed, then the output variable, omp_task_loop_test_1 for the former and omp_task_loop_test_2 for the latter, will be set to TRUE. The way this task is achieved is slightly different between the two commands, however. The check_<lang>_source_compiles family of commands is a simplified wrapper to the try_compile command. As such, it offers a minimal interface:
This minimal interface reflects the fact that the test compilation is carried out by generating and executing build and link commands directly within the CMake invocation.
The command try_compile offers a more complete interface and two different modes of operation:
try_compile is thus based on invoking CMake on a project, either one where the CMakeLists.txt is already existing (in the first mode of operation) or one where the file is generated on the fly based on the arguments passed to the try_compile.
Checks of the type outlined in this recipe are not always bulletproof and can generate both false positives and false negatives. As an example, you can try to comment out the lines containing CMAKE_REQUIRED_LIBRARIES and the example will still report "Success". The reason for this is that OpenMP pragmas will then be ignored by the compiler.
What should you do when you suspect that a wrong result is being returned? The CMakeOutput.log and CMakeError.log files in the CMakeFiles subdirectory of the build directory offer clues as to what went wrong. They report the standard output and standard error for operations run by CMake. If you suspect false positives, you should check the former, by searching for the variable set to hold the result of the compilation check. If you suspect false negatives, you should check the latter.
Debugging try_compile will require some care. CMake erases all files generated by that command, even if the check was unsuccessful. Fortunately, --debug-trycompile will prevent CMake from cleaning up. If there are multiple calls to try_compile in your code, you will only be able to debug them one at a time:
$ cmake -U <variable-name>
Setting compiler flags is critical to make sure that your code is compiled correctly. Different compiler vendors implement different flags for similar tasks. Even different compiler versions from the same vendor might present slight differences in the available flags. Sometimes, new flags are introduced that are extremely convenient to use for debugging or optimization purposes. In this recipe, we will show how to check that certain flags are available for the selected compiler.
Sanitizers (refer to https://github.com/google/sanitizers) have become incredibly useful tools for static and dynamic code analysis. By simply recompiling your code with the appropriate flags and linking against the necessary libraries, you can investigate and debug problems related to memory errors (address sanitizer), uninitialized reads (memory sanitizer), thread safety (thread sanitizer), and undefined behavior (undefined behavior sanitizer). Compared to similar analysis tools, sanitizers typically introduce a much smaller performance penalty and tend to give more detailed information on the problems detected. The drawback is that your code, and possibly parts of your toolchain, need to be recompiled with the additional flags.
In this recipe, we will set up a project to compile code with the different sanitizers activated and show how to check that the correct compiler flags are available.
Sanitizers have been available for a while with the Clang compiler and were later also introduced into the GCC toolset. They were designed for use with C and C++ programs, but recent versions of Fortran will understand the same flags and produce correctly instrumented libraries and executables. This recipe will however focus on a C++ example.
cmake_minimum_required(VERSION 3.5 FATAL_ERROR)
project(recipe-07 LANGUAGES CXX)
set(CMAKE_CXX_STANDARD 11)
set(CMAKE_CXX_EXTENSIONS OFF)
set(CMAKE_CXX_STANDARD_REQUIRED ON)
list(APPEND CXX_BASIC_FLAGS "-g3" "-O1")
include(CheckCXXCompilerFlag)
set(ASAN_FLAGS "-fsanitize=address -fno-omit-frame-pointer")
set(CMAKE_REQUIRED_FLAGS ${ASAN_FLAGS})
check_cxx_compiler_flag(${ASAN_FLAGS} asan_works)
unset(CMAKE_REQUIRED_FLAGS)
if(asan_works)
string(REPLACE " " ";" _asan_flags ${ASAN_FLAGS})
add_executable(asan-example asan-example.cpp)
target_compile_options(asan-example
PUBLIC
${CXX_BASIC_FLAGS}
${_asan_flags}
)
target_link_libraries(asan-example PUBLIC ${_asan_flags})
endif()
The full recipe source code also shows how to compile and link sample executables for the thread, memory, and undefined behavior sanitizers. These are not discussed in detail here, since we use the same pattern for the compiler flag checking.
The check_<lang>_compiler_flag functions are simply wrappers around the check_<lang>_source_compiles function, which we discussed in the previous recipe. These wrappers provide a shortcut for the common use case where it is not important to check whether a specific code snippet compiles, but whether the compiler understands a set of flags.
Compiler flags for sanitizers are a special case, in that they also need to be passed on to the linker. To achieve this with the check_<lang>_compiler_flag functions, we need to set the CMAKE_REQUIRED_FLAGS variable prior to the call. The flags passed as the first argument would otherwise only be used in the call to the compiler, resulting in a false negative.
One more point to notice in the current recipe is the use of string variables and lists to set compiler flags. Using string variables with the target_compile_options and target_link_libraries functions will result in a compiler and/or linker error. CMake will pass these options quoted, resulting in parsing errors. This justifies the need to express these options in terms of lists and the ensuing string manipulations, to replace spaces in string variables with semicolons. We recall, in fact, that lists in CMake are semicolon-separated strings.
We will revisit and generalize the pattern for testing and setting compiler flags in Chapter 7, Structuring Projects, Recipe 3, Writing a function to test and set compiler flags.
We have so far shown how to check that a given source snippet can be compiled by the chosen compiler and how to make sure that the desired compiler and linker flags are available. This recipe will show how to check whether a code snippet can be compiled, linked, and run on the current system.
The code sample for this recipe is a slight variation of Chapter 3, Detecting External Libraries and Programs, Recipe 9, Detecting external libraries: I. Using pkg-config. There, we showed how to find the ZeroMQ library on your system and link it into a C program. In this recipe, we will check that a small C program using the system UUID library on GNU/Linux can actually run, before generating the actual C++ program.
We wish to check whether the UUID system library on GNU/Linux can be linked against, before embarking on building our own C++ project. This can be achieved with the following series of steps:
cmake_minimum_required(VERSION 3.6 FATAL_ERROR)
project(recipe-08 LANGUAGES CXX C)
set(CMAKE_CXX_STANDARD 11)
set(CMAKE_CXX_EXTENSIONS OFF)
set(CMAKE_CXX_STANDARD_REQUIRED ON)
find_package(PkgConfig REQUIRED QUIET)
pkg_search_module(UUID REQUIRED uuid IMPORTED_TARGET)
if(TARGET PkgConfig::UUID)
message(STATUS "Found libuuid")
endif()
include(CheckCSourceRuns)
set(_test_uuid
"
#include <uuid/uuid.h>
int main(int argc, char * argv[]) {
uuid_t uuid;
uuid_generate(uuid);
return 0;
}
")
set(CMAKE_REQUIRED_LIBRARIES PkgConfig::UUID)
check_c_source_runs("${_test_uuid}" _runs)
unset(CMAKE_REQUIRED_LIBRARIES)
if(NOT _runs)
message(FATAL_ERROR "Cannot run a simple C executable using libuuid!")
endif()
add_executable(use-uuid use-uuid.cpp)
target_link_libraries(use-uuid
PUBLIC
PkgConfig::UUID
)
The check_<lang>_source_runs functions for C and C++ operate with the same general principles as check_<lang>_source_compiles, but add an extra step where the produced executable is actually run. As for check_<lang>_source_compiles, the execution of check_<lang>_source_runs can be directed by the following variables:
Since we used the imported target as produced by pkg_search_module, it was only necessary to set CMAKE_REQUIRES_LIBRARIES to PkgConfig::UUID, to also get the include directories correctly set.
Just as check_<lang>_source_compiles is a wrapper to try_compile, check_<lang>_source_runs is a wrapper to another, more powerful command in CMake: try_run. It is thus possible to write a CheckFortranSourceRuns.cmake module that offers the same functionality as the C and C++ modules by appropriately wrapping try_run.
CMake offers a domain-specific language to describe how to configure and build a project. It is natural that variables describing particular conditions are introduced and conditional statements based on this are included in CMakeLists.txt.
In this recipe, we will revisit generator expressions, which we used throughout Chapter 4, Creating and Running Tests, to compactly refer to explicit test executable paths. Generator expressions offer a powerful and compact pattern for logical and informational expressions that are evaluated during build system generation and produce information specific to each build configuration. In other words, generator expressions are useful to refer to information that is only known at generation time, but not known or difficult to know at configure time; this is particularly the case for filenames, file locations, and library file suffixes.
In this example, we will employ generator expressions to conditionally set a preprocessor definition and conditionally link to a message passing interface (MPI) library and allow us to build the same source code either sequentially or using MPI parallelism.
We will compile the following example source code (example.cpp):
#include <iostream>
#ifdef HAVE_MPI
#include <mpi.h>
#endif
int main() {
#ifdef HAVE_MPI
// initialize MPI
MPI_Init(NULL, NULL);
// query and print the rank
int rank;
MPI_Comm_rank(MPI_COMM_WORLD, &rank);
std::cout << "hello from rank " << rank << std::endl;
// initialize MPI
MPI_Finalize();
#else
std::cout << "hello from a sequential binary" << std::endl;
#endif /* HAVE_MPI */
}
The code contains preprocessor statements (#ifdef HAVE_MPI ... #else ... #endif) so that we can compile either a sequential or a parallel executable with the same source code.
When composing the CMakeLists.txt file, we will reuse some of the building blocks we encountered in Chapter 3, Detecting External Libraries and Programs, Recipe 6, Detecting the MPI parallel environment:
cmake_minimum_required(VERSION 3.9 FATAL_ERROR)
project(recipe-09 LANGUAGES CXX)
set(CMAKE_CXX_STANDARD 11)
set(CMAKE_CXX_EXTENSIONS OFF)
set(CMAKE_CXX_STANDARD_REQUIRED ON)
option(USE_MPI "Use MPI parallelization" ON)
if(USE_MPI)
find_package(MPI REQUIRED)
endif()
add_executable(example example.cpp)
target_link_libraries(example
PUBLIC
$<$<BOOL:${MPI_FOUND}>:MPI::MPI_CXX>
)
target_compile_definitions(example
PRIVATE
$<$<BOOL:${MPI_FOUND}>:HAVE_MPI>
)
if(MPI_FOUND)
include(CMakePrintHelpers)
cmake_print_properties(
TARGETS MPI::MPI_CXX
PROPERTIES INTERFACE_LINK_LIBRARIES
)
endif()
$ mkdir -p build_mpi
$ cd build_mpi
$ cmake ..
-- ...
--
Properties for TARGET MPI::MPI_CXX:
MPI::MPI_CXX.INTERFACE_LINK_LIBRARIES = "-Wl,-rpath -Wl,/usr/lib/openmpi -Wl,--enable-new-dtags -pthread;/usr/lib/openmpi/libmpi_cxx.so;/usr/lib/openmpi/libmpi.so"
$ cmake --build .
$ mpirun -np 2 ./example
hello from rank 0
hello from rank 1
$ mkdir -p build_seq
$ cd build_seq
$ cmake -D USE_MPI=OFF ..
$ cmake --build .
$ ./example
hello from a sequential binary
The build system for a project is generated by CMake in two phases: a configuration phase, where CMakeLists.txt is parsed, and a generation phase, where the build environment is actually generated. Generator expressions are evaluated in this second phase and can be used to tweak the build system with information that can only be known at generation time. Generator expressions are thus particularly useful when cross-compiling, where some of the information is only available after the CMakeLists.txt has been parsed, or in multi-configuration projects, where the build system is generated at once for all the different configurations the project can have, such as Debug and Release.
In our case, we will use generator expressions to conditionally set a link dependency and compile definition. For this, we can focus on these two expressions:
target_link_libraries(example
PUBLIC
$<$<BOOL:${MPI_FOUND}>:MPI::MPI_CXX>
)
target_compile_definitions(example
PRIVATE
$<$<BOOL:${MPI_FOUND}>:HAVE_MPI>
)
If MPI_FOUND is true, then $<BOOL:${MPI_FOUND}> will evaluate to 1. In this case, $<$<BOOL:${MPI_FOUND}>:MPI::MPI_CXX> will evaluate to MPI::MPI_CXX and the second generator expression will evaluate to HAVE_MPI. If we set USE_MPI to OFF, MPI_FOUND is false and both generator expressions evaluate to empty strings, and thus no link dependency is introduced and no preprocessor definition is set.
We could have achieved the same effect by introducing an if-statement:
if(MPI_FOUND)
target_link_libraries(example
PUBLIC
MPI::MPI_CXX
)
target_compile_definitions(example
PRIVATE
HAVE_MPI
)
endif()
This solution is a bit less compact but possibly a bit more readable. We can often re-express if-statements using generator expressions and the choice is often a matter of taste. However, generator expressions particularly shine when we need to access or manipulate explicit file paths, since these can be difficult to construct using variables and if-clauses, and in this case we clearly favor generator expressions for readability. This was the case in Chapter 4, Creating and Running Tests, where we used generator expressions to resolve the file path of a particular target. We will also appreciate generator expressions in Chapter 11, Packaging Projects.
CMake offers three types of generator expression:
For a full list of generator expressions, please consult https://cmake.org/cmake/help/latest/manual/cmake-generator-expressions.7.html.
In this chapter, we will cover the following recipes:
For most projects, the source code is tracked using a version control system; it typically serves as input for the build system, which transforms it into objects, libraries, and executables. In certain cases, we use the build system to generate source code during the configuration or build steps. This can be useful to fine-tune the source code based on information gathered in the configuration step, or to automatize an otherwise error-prone mechanical generation of repetitive code. Another frequent use case for generating source code is to record information about the configuration or compilation for reproducibility. In this chapter, we will illustrate various strategies to generate source code, using the powerful tools provided by CMake.
The most straightforward code generation happens at configure time. For example, CMake can detect the operating system and available libraries; based on that information, we can tailor what sources are built, to offer maximum performance to the end user of our library or program. In this and some of the following recipes, we will illustrate how to generate a simple source file that defines a function to report the build system configuration.
The code sample for this recipe is in Fortran and C, setting the stage for Chapter 9, Mixed-language Projects, where mixed-language programming will be discussed. The main program is a simple Fortran executable that calls a C function, print_info(), which will print the configuration information. It is worth noting that with Fortran 2003, the compiler will take care of name mangling (given a proper interface declaration of the C function), as seen in the simple example.f90 source file that we will use:
program hello_world
implicit none
interface
subroutine print_info() bind(c, name="print_info")
end subroutine
end interface
call print_info()
end program
The print_info() C function is defined in the template file, print_info.c.in. The variables starting and ending with @ will be substituted for their actual values at configure time:
#include <stdio.h>
#include <unistd.h>
void print_info(void) {
printf("\n");
printf("Configuration and build information\n");
printf("-----------------------------------\n");
printf("\n");
printf("Who compiled | %s\n", "@_user_name@");
printf("Compilation hostname | %s\n", "@_host_name@");
printf("Fully qualified domain name | %s\n", "@_fqdn@");
printf("Operating system | %s\n",
"@_os_name@, @_os_release@, @_os_version@");
printf("Platform | %s\n", "@_os_platform@");
printf("Processor info | %s\n",
"@_processor_name@, @_processor_description@");
printf("CMake version | %s\n", "@CMAKE_VERSION@");
printf("CMake generator | %s\n", "@CMAKE_GENERATOR@");
printf("Configuration time | %s\n", "@_configuration_time@");
printf("Fortran compiler | %s\n", "@CMAKE_Fortran_COMPILER@");
printf("C compiler | %s\n", "@CMAKE_C_COMPILER@");
printf("\n");
fflush(stdout);
}
In our CMakeLists.txt, we first have to collect the configuration options, and can then substitute their values for the corresponding placeholders in print_info.c.in; we compile both the Fortran and C sources into one executable:
cmake_minimum_required(VERSION 3.10 FATAL_ERROR)
project(recipe-01 LANGUAGES Fortran C)
execute_process(
COMMAND
whoami
TIMEOUT
1
OUTPUT_VARIABLE
_user_name
OUTPUT_STRIP_TRAILING_WHITESPACE
)
# host name information
cmake_host_system_information(RESULT _host_name QUERY HOSTNAME)
cmake_host_system_information(RESULT _fqdn QUERY FQDN)
# processor information
cmake_host_system_information(RESULT _processor_name QUERY PROCESSOR_NAME)
cmake_host_system_information(RESULT _processor_description QUERY PROCESSOR_DESCRIPTION)
# os information
cmake_host_system_information(RESULT _os_name QUERY OS_NAME)
cmake_host_system_information(RESULT _os_release QUERY OS_RELEASE)
cmake_host_system_information(RESULT _os_version QUERY OS_VERSION)
cmake_host_system_information(RESULT _os_platform QUERY OS_PLATFORM)
string(TIMESTAMP _configuration_time "%Y-%m-%d %H:%M:%S [UTC]" UTC)
configure_file(print_info.c.in print_info.c @ONLY)
add_executable(example "")
target_sources(example
PRIVATE
example.f90
${CMAKE_CURRENT_BINARY_DIR}/print_info.c
)
$ mkdir -p build
$ cd build
$ cmake ..
$ cmake --build .
$ ./example
Configuration and build information
-----------------------------------
Who compiled | somebody
Compilation hostname | laptop
Fully qualified domain name | laptop
Operating system | Linux, 4.16.13-1-ARCH, #1 SMP PREEMPT Thu May 31 23:29:29 UTC 2018
Platform | x86_64
Processor info | Unknown P6 family, 2 core Intel(R) Core(TM) i5-5200U CPU @ 2.20GHz
CMake version | 3.11.3
CMake generator | Unix Makefiles
Configuration time | 2018-06-25 15:38:03 [UTC]
Fortran compiler | /usr/bin/f95
C compiler | /usr/bin/cc
The command configure_file can copy files and replace their contents with variable values. In our example, we used configure_file to both modify the contents of our template file and copy it to a location where it could then be compiled into our executable. Let us look at our invocation of configure_file:
configure_file(print_info.c.in print_info.c @ONLY)
The first argument is the name of the scaffold: print_info.c.in. CMake assumes that the input file is located relative to the root directory of the project; that is, in ${CMAKE_CURRENT_SOURCE_DIR}/print_info.c.in. The second argument is the name of the configured file, which we chose to be print_info.c. The output file is assumed to be located relative to the project build directory; that is, in ${CMAKE_CURRENT_BINARY_DIR}/print_info.c.
When limiting the invocation to just two arguments, the input and output files, CMake will not only configure variables of the form @VAR@, but also those of the form ${VAR}. This can be inconvenient when ${VAR} is part of the syntax and should not be touched (such as in shell scripts). To instruct CMake in this regard, the option @ONLY should be passed to the invocation of configure_file, as we illustrated previously.
Note that the substitution of placeholders with values expects the variable names in CMake to be exactly the same as those used in the to-be configured file, and placed in between @-markers. Any CMake variable defined at the point where configure_file is invoked can be used. This includes all built-in CMake variables, such as CMAKE_VERSION or CMAKE_GENERATOR, in our example. Moreover, whenever the template file is modified, rebuilding the code will trigger a regeneration of the build system. In this way, the configured file will always be up to date.
In this recipe, we will revisit the previous example, and will again generate print_info.c from the template print_info.c.in. However, this time, we will imagine that the CMake function configure_file() has not been invented yet, and will emulate it with a Python script. The goal of this recipe is to learn how we can generate source code at configure time by using a now familiar example. Of course, we will probably favor configure_file() for a real project, but when faced with the challenge of generating sources using Python at configure time, we will know how to do it.
We should point out that this recipe has a serious limitation and cannot emulate configure_file() fully. The approach that we will present here cannot generate an automatic dependency which would regenerate print_info.c at build time. In other words, if you remove the generated print_info.c after the configure step, this file will not be regenerated and the build step will fail. To properly mimic the behavior of configure_file() we would require add_custom_command() and add_custom_target(), which we will use in the subsequent Recipe 3, Generating source code at build time using Python, where we will overcome this limitation.
In this recipe, we will use a relatively simple Python script which we will detail below. This script will read in print_info.c.in and replace the placeholders in the file with parameters passed to the Python script from CMake. For more sophisticated templating, we recommend external tools, such as Jinja (see http://jinja.pocoo.org).
The files print_info.c.in and example.f90 are unchanged with respect to the previous recipe. In addition, we will use a Python script, configurator.py, which provides one function:
def configure_file(input_file, output_file, vars_dict):
with input_file.open('r') as f:
template = f.read()
for var in vars_dict:
template = template.replace('@' + var + '@', vars_dict[var])
with output_file.open('w') as f:
f.write(template)
This function reads an input file, goes over all of the keys of a vars_dict dictionary, replaces the pattern @key@ with its corresponding value, and writes the results to an output file. The key-value pairs will be provided by CMake.
Similar to the previous recipe, we need to configure a template file, but this time, we will emulate the configure_file() function with a Python script. We keep the CMakeLists.txt largely unchanged, but we replace configure_file(print_info.c.in print_info.c @ONLY) with a set of commands, which we will introduce step by step:
set(_config_script
"
from pathlib import Path
source_dir = Path('${CMAKE_CURRENT_SOURCE_DIR}')
binary_dir = Path('${CMAKE_CURRENT_BINARY_DIR}')
input_file = source_dir / 'print_info.c.in'
output_file = binary_dir / 'print_info.c'
import sys
sys.path.insert(0, str(source_dir))
from configurator import configure_file
vars_dict = {
'_user_name': '${_user_name}',
'_host_name': '${_host_name}',
'_fqdn': '${_fqdn}',
'_processor_name': '${_processor_name}',
'_processor_description': '${_processor_description}',
'_os_name': '${_os_name}',
'_os_release': '${_os_release}',
'_os_version': '${_os_version}',
'_os_platform': '${_os_platform}',
'_configuration_time': '${_configuration_time}',
'CMAKE_VERSION': '${CMAKE_VERSION}',
'CMAKE_GENERATOR': '${CMAKE_GENERATOR}',
'CMAKE_Fortran_COMPILER': '${CMAKE_Fortran_COMPILER}',
'CMAKE_C_COMPILER': '${CMAKE_C_COMPILER}',
}
configure_file(input_file, output_file, vars_dict)
")
find_package(PythonInterp QUIET REQUIRED)
execute_process(
COMMAND
${PYTHON_EXECUTABLE} "-c" ${_config_script}
)
Let us examine the changes that we applied to CMakeLists.txt, by discussing them backwards.
We executed a Python script that generates print_info.c. To run the Python script, we first had to detect Python and construct the Python script. The Python script imports the configure_file function, which we defined in configurator.py. It requires that we provide it with file locations for reading and writing, as well as a dictionary holding CMake variables and their values as key-value pairs.
This recipe has shown an alternative way of generating a configuration report that can be compiled into an executable, or even a library target, by delegating the generation of sources to an external script. The first approach that we discussed in the previous recipe was cleaner and simpler, but with the approach that we have presented in this recipe, we have the flexibility to implement, in principle, any configure-time step that Python (or another language) allows. Using the present approach, we can perform actions that go beyond what cmake_host_system_information() currently provides.
However, we need to remember the limitation of this approach which cannot generate an automatic dependency which would regenerate print_info.c at build time. In the next recipe we will overcome this limitation.
It is possible to express this recipe more compactly. Instead of explicitly constructing vars_dict, which felt a bit repetitive, we could have used get_cmake_property(_vars VARIABLES) to obtain a list of all variables defined at this particular time, and could have looped over all elements of _vars to access their values:
get_cmake_property(_vars VARIABLES)
foreach(_var IN ITEMS ${_vars})
message("variable ${_var} has the value ${${_var}}")
endforeach()
Using this approach, it is possible to build vars_dict implicitly. However, care has to be taken to escape values that contain characters such as ";", which Python interprets as terminating an instruction.
Being able to generate source code at build time is a powerful feature in the toolbox of the pragmatic developer who wishes to generate possibly lengthy and repetitive code based on some rules, while at the same time avoiding tracking the generated code explicitly in the source code repository. We can, for instance, imagine generating different source code, based on the detected platform or architecture. Or, we can use the simplicity of Python to generate explicit and efficient C++ code at build time, based on the input that we gathered during the configuration step. Other relevant examples are parser generators, such as Flex (https://github.com/westes/flex) and Bison (https://www.gnu.org/software/bison/), meta-object compilers, such as Qt moc (http://doc.qt.io/qt-5/moc.html), and serialization frameworks, such as Google protobuf (https://developers.google.com/protocol-buffers/).
To provide a concrete example, we imagine that we need to write a code to verify whether a number is prime. Many algorithms exist, and we can, for instance, use the sieve of Eratosthenes to separate prime numbers from non-primes. If we have to verify many numbers, we will not want to run the sieve of Eratosthenes algorithm for every single one of them. What we would like to do instead is tabulate all prime numbers once, up to a certain limit, and use a table lookup to verify a large set of numbers.
In this example, we will generate the C++ code for the lookup table (a vector of prime numbers) by using Python at compile time. Of course, to solve this particular programming problem, we could also generate the lookup table using C++, and we could do it at runtime instead.
Let us start out with the following Python script, called generate.py. This script takes two command-line arguments - an integer that will limit the search, and an output filename:
"""
Generates C++ vector of prime numbers up to max_number
using sieve of Eratosthenes.
"""
import pathlib
import sys
# for simplicity we do not verify argument list
max_number = int(sys.argv[-2])
output_file_name = pathlib.Path(sys.argv[-1])
numbers = range(2, max_number + 1)
is_prime = {number: True for number in numbers}
for number in numbers:
current_position = number
if is_prime[current_position]:
while current_position <= max_number:
current_position += number
is_prime[current_position] = False
primes = (number for number in numbers if is_prime[number])
code = """#pragma once
#include <vector>
const std::size_t max_number = {max_number};
std::vector<int> & primes() {{
static std::vector<int> primes;
{push_back}
return primes;
}}
"""
push_back = '\n'.join([' primes.push_back({:d});'.format(x) for x in primes])
output_file_name.write_text(
code.format(max_number=max_number, push_back=push_back))
Our goal is to generate a header file, primes.hpp, at compile time, and include it in the following example code:
#include "primes.hpp"
#include <iostream>
#include <vector>
int main() {
std::cout << "all prime numbers up to " << max_number << ":";
for (auto prime : primes())
std::cout << " " << prime;
std::cout << std::endl;
return 0;
}
The following is a breakdown of the commands in CMakeLists.txt:
cmake_minimum_required(VERSION 3.5 FATAL_ERROR)
project(recipe-03 LANGUAGES CXX)
set(CMAKE_CXX_STANDARD 11)
set(CMAKE_CXX_EXTENSIONS OFF)
set(CMAKE_CXX_STANDARD_REQUIRED ON)
find_package(PythonInterp QUIET REQUIRED)
file(MAKE_DIRECTORY ${CMAKE_CURRENT_BINARY_DIR}/generated)
set(MAX_NUMBER "100" CACHE STRING "Upper bound for primes")
add_custom_command(
OUTPUT
${CMAKE_CURRENT_BINARY_DIR}/generated/primes.hpp
COMMAND
${PYTHON_EXECUTABLE} generate.py ${MAX_NUMBER} ${CMAKE_CURRENT_BINARY_DIR}/generated/primes.hpp
WORKING_DIRECTORY
${CMAKE_CURRENT_SOURCE_DIR}
DEPENDS
generate.py
)
add_executable(example "")
target_sources(example
PRIVATE
example.cpp
${CMAKE_CURRENT_BINARY_DIR}/generated/primes.hpp
)
target_include_directories(example
PRIVATE
${CMAKE_CURRENT_BINARY_DIR}/generated
)
$ mkdir -p build
$ cd build
$ cmake ..
$ cmake --build .
$ ./example
all prime numbers up to 100: 2 3 5 7 11 13 17 19 23 29 31 37 41 43 47 53 59 61 67 71 73 79 83 89 97
To generate the header file, we defined a custom command that executes the generate.py script and takes ${MAX_NUMBER} and the file path (${CMAKE_CURRENT_BINARY_DIR}/generated/primes.hpp) as arguments:
add_custom_command(
OUTPUT
${CMAKE_CURRENT_BINARY_DIR}/generated/primes.hpp
COMMAND
${PYTHON_EXECUTABLE} generate.py ${MAX_NUMBER} ${CMAKE_CURRENT_BINARY_DIR}/generated/primes.hpp
WORKING_DIRECTORY
${CMAKE_CURRENT_SOURCE_DIR}
DEPENDS
generate.py
)
In order to trigger the source code generation, we need to add it as a source code dependency in the definition of the executable, a task easily achieved with target_sources:
target_sources(example
PRIVATE
example.cpp
${CMAKE_CURRENT_BINARY_DIR}/generated/primes.hpp
)
In the preceding code, we do not have to define a new custom target. The header file will be generated as a dependency of example, and will be rebuilt every time the generate.py script changes. If the code generation script produces several source files, it is important that all generated files are listed as dependencies of some target.
We mentioned that all generated files should be listed as dependencies of some target. However, we might be in a situation where we do not know this list of files, since it is determined by the scripts generating the files, depending on input that we provide to the configuration. In this case, we might be tempted to use file(GLOB ...) to collect generated files into a list (see https://cmake.org/cmake/help/v3.5/command/file.html).
However, remember that file(GLOB ...) is executed at configure time, whereas code generation happens at build time. Therefore, we may need an additional level of indirection, where we place the file(GLOB ...) command in a separate CMake script which we execute at using ${CMAKE_COMMAND} -P, in order to get the list of generated files at build time.
Code versions matter, not only for reproducibility but also to document API capabilities or simplify support requests and bug reporting. The source code is typically under some version control, and additional semantic version numbers (see e.g. https://semver.org) can be attached using Git tags, for example. However, not only does the source code need to be versioned, but the executable needs to record the project version so that it can be printed to the code output or user interface.
In this example, we will define the version number inside of the CMake sources. Our goal is to record the program version to a header file at the moment when we configure the project. The generated header file can then be included in the code at the right place and time, to print the code version to the output file(s) or screen.
We will use the following C file (example.c) to print the version information:
#include "version.h"
#include <stdio.h>
int main() {
printf("This is output from code %s\n", PROJECT_VERSION);
printf("Major version number: %i\n", PROJECT_VERSION_MAJOR);
printf("Minor version number: %i\n", PROJECT_VERSION_MINOR);
printf("Hello CMake world!\n");
}
Here, we assume that PROJECT_VERSION_MAJOR, PROJECT_VERSION_MINOR, and PROJECT_VERSION are defined in version.h. Our goal is to generate version.h from the following scaffold, version.h.in:
#pragma once
#define PROJECT_VERSION_MAJOR @PROJECT_VERSION_MAJOR@
#define PROJECT_VERSION_MINOR @PROJECT_VERSION_MINOR@
#define PROJECT_VERSION_PATCH @PROJECT_VERSION_PATCH@
#define PROJECT_VERSION "v@PROJECT_VERSION@"
We will use preprocessor definitions, but we could also employ string or integer constants for more type safety (and we will demonstrate that later). From the CMake perspective, the approach is the same.
We will follow these steps to register the version in our template header file:
cmake_minimum_required(VERSION 3.5 FATAL_ERROR)
project(recipe-04 VERSION 2.0.1 LANGUAGES C)
configure_file(
version.h.in
generated/version.h
@ONLY
)
Finally, we define the executable and provide the target include path:
add_executable(example example.c)
target_include_directories(example
PRIVATE
${CMAKE_CURRENT_BINARY_DIR}/generated
)
When invoking the CMake project command with a VERSION argument, CMake will set the PROJECT_VERSION_MAJOR, PROJECT_VERSION_MINOR, and PROJECT_VERSION_PATCH for our project. The key command in this recipe is configure_file, which takes an input file (in this case, version.h.in) and generates an output file (in this case, generated/version.h) by expanding all placeholders between @ to their corresponding CMake variables. It replaces @PROJECT_VERSION_MAJOR@ with 2, and so on. With the keyword @ONLY, we limit configure_file to only expand @variables@, but to not touch ${variables}. The latter form is not used in version.h.in, but they frequently appear when configuring a shell script using CMake.
The generated header file can be included in our example code, and the version information is available to be printed:
$ mkdir -p build
$ cd build
$ cmake ..
$ cmake --build .
$ ./example
This is output from code v2.0.1
Major version number: 2
Minor version number: 0
Hello CMake world!
To make sure that the preprocessor variables are only defined if the CMake variable is considered a true constant, one can employ #cmakedefine instead of #define in the header files that are about to be configured, by using configure_file.
Depending on whether the CMake variable is defined and evaluates to a true constant, #cmakedefine YOUR_VARIABLE will then be replaced with either #define YOUR_VARIABLE ... or /* #undef YOUR_VARIABLE */. There is also #cmakedefine01, which will set a variable to either 0 or 1, depending on whether the variable is defined.
The goal of this recipe is similar to the previous one, but the starting point is different; our plan is to read the version information from a file, rather than setting it inside of CMakeLists.txt. The motivation for keeping the version in a separate file, outside of CMake sources, is to allow other build frameworks or development tools to use the information, independent of CMake, without duplicating the information in several files. One example of a build framework that you might like to employ in parallel to CMake is the Sphinx documentation framework, generating documentation and deploying it to the Read the Docs service to serve your code documentation online.
We will start with a file called VERSION, containing the following:
2.0.1-rc-2
This time, we will choose to go for more type safety, and will define PROGRAM_VERSION as a string constant in version.hpp.in:
#pragma once
#include <string>
const std::string PROGRAM_VERSION = "@PROGRAM_VERSION@";
We will include the generated version.hpp in the following example source code (example.cpp):
// provides PROGRAM_VERSION
#include "version.hpp"
#include <iostream>
int main() {
std::cout << "This is output from code v" << PROGRAM_VERSION
<< std::endl;
std::cout << "Hello CMake world!" << std::endl;
}
The following shows how to accomplish our task, step by step:
cmake_minimum_required(VERSION 3.5 FATAL_ERROR)
project(recipe-05 LANGUAGES CXX)
set(CMAKE_CXX_STANDARD 11)
set(CMAKE_CXX_EXTENSIONS OFF)
set(CMAKE_CXX_STANDARD_REQUIRED ON)
if(EXISTS "${CMAKE_CURRENT_SOURCE_DIR}/VERSION")
file(READ "${CMAKE_CURRENT_SOURCE_DIR}/VERSION" PROGRAM_VERSION)
string(STRIP "${PROGRAM_VERSION}" PROGRAM_VERSION)
else()
message(FATAL_ERROR "File ${CMAKE_CURRENT_SOURCE_DIR}/VERSION not found")
endif()
configure_file(
version.hpp.in
generated/version.hpp
@ONLY
)
add_executable(example example.cpp)
target_include_directories(example
PRIVATE
${CMAKE_CURRENT_BINARY_DIR}/generated
)
$ mkdir -p build
$ cd build
$ cmake ..
$ cmake --build .
$ ./example
This is output from code v2.0.1-rc-2
Hello CMake world!
We used the following construct to read the version string from a file called VERSION:
if(EXISTS "${CMAKE_CURRENT_SOURCE_DIR}/VERSION")
file(READ "${CMAKE_CURRENT_SOURCE_DIR}/VERSION" PROGRAM_VERSION)
string(STRIP "${PROGRAM_VERSION}" PROGRAM_VERSION)
else()
message(FATAL_ERROR "File ${CMAKE_CURRENT_SOURCE_DIR}/VERSION not found")
endif()
Here, we first check that this file exists, and issue an error message if it does not. If it exists, we read its contents into a variable called PROGRAM_VERSION, which we strip of any trailing whitespace. Once the variable PROGRAM_VERSION is set, it can be used to configure version.hpp.in to generate generated/version.hpp, as follows:
configure_file(
version.hpp.in
generated/version.hpp
@ONLY
)
Most modern source code repositories are tracked using Git as version control system, a fact that can be attributed to the huge popularity of the repository hosting platform GitHub. We will, therefore, use Git in this recipe; the motivation and implementation will, however, translate to other version control systems. If we look at Git as an example, the Git hash of a commit uniquely determines the state of the source code. Therefore, to uniquely brand the executable, we will try to burn the Git hash into the executable by recording the hash string in a header file that can be included and used at the right place in the code.
We will need two source files, both very similar to the previous recipe. One will be configured with the recorded hash (version.hpp.in), as follows:
#pragma once
#include <string>
const std::string GIT_HASH = "@GIT_HASH@";
We will also need an example source file (example.cpp), which will print the hash to the screen:
#include "version.hpp"
#include <iostream>
int main() {
std::cout << "This code has been configured from version " << GIT_HASH
<< std::endl;
}
This recipe also assumes that we are in a Git repository with at least one commit. So, initialize this example with git init, and create commits with git add <filename>, followed by git commit, in order to get a meaningful example.
The following illustrates the steps to record versioning information from Git:
cmake_minimum_required(VERSION 3.5 FATAL_ERROR)
project(recipe-06 LANGUAGES CXX)
set(CMAKE_CXX_STANDARD 11)
set(CMAKE_CXX_EXTENSIONS OFF)
set(CMAKE_CXX_STANDARD_REQUIRED ON)
# in case Git is not available, we default to "unknown"
set(GIT_HASH "unknown")
# find Git and if available set GIT_HASH variable
find_package(Git QUIET)
if(GIT_FOUND)
execute_process(
COMMAND ${GIT_EXECUTABLE} log -1 --pretty=format:%h
OUTPUT_VARIABLE GIT_HASH
OUTPUT_STRIP_TRAILING_WHITESPACE
ERROR_QUIET
WORKING_DIRECTORY
${CMAKE_CURRENT_SOURCE_DIR}
)
endif()
message(STATUS "Git hash is ${GIT_HASH}")
# generate file version.hpp based on version.hpp.in
configure_file(
version.hpp.in
generated/version.hpp
@ONLY
)
# example code
add_executable(example example.cpp)
# needs to find the generated header file
target_include_directories(example
PRIVATE
${CMAKE_CURRENT_BINARY_DIR}/generated
)
$ mkdir -p build
$ cd build
$ cmake ..
$ cmake --build .
$ ./example
This code has been configured from version d58c64f
We use find_package(Git QUIET) to detect whether Git is available on the system. If it is (if GIT_FOUND is true), we run a Git command: ${GIT_EXECUTABLE} log -1 --pretty=format:%h. This command gives us the short version of the current commit hash. Of course, we have full flexibility to run another Git command, instead. We ask the execute_process command to place the result of the command into a variable called GIT_HASH, which we subsequently strip of any trailing whitespace. With ERROR_QUIET, we ask the command to not stop the configuration if the Git command fails for some reason.
Since the Git command might fail (the source code might have been distributed outside of the Git repository) or Git might not even be available on the system, we wish to set a default for the variable, as follows:
set(GIT_HASH "unknown")
One problem with this recipe is that the Git hash is recorded at configure time, not at build time. In the next recipe, we will demonstrate how to implement the latter approach.
In the previous recipe, we recorded the state of the code repository (Git hash) at configure time, and it is very useful to have the state of the repository recorded in the executable. However, one unsatisfactory aspect of the previous approach is that if we changed branches or committed changes after having configured the code, the version record included in our source code could point to the wrong Git hash. In this recipe, we wish to go a step further and demonstrate how to record the Git hash (or, generally, perform other actions) at build time, to make sure that these actions are run every time we build the code, since we may configure only once but build several times.
We will use the same version.hpp.in as in the previous recipe, and will modify the example.cpp file only minimally, to make it clear that it prints a build-time Git hash:
#include "version.hpp"
#include <iostream>
int main() {
std::cout << "This code has been built from version " << GIT_HASH << std::endl;
}
Saving the Git information to the version.hpp header file at build time will require the following operations:
# in case Git is not available, we default to "unknown"
set(GIT_HASH "unknown")
# find Git and if available set GIT_HASH variable
find_package(Git QUIET)
if(GIT_FOUND)
execute_process(
COMMAND ${GIT_EXECUTABLE} log -1 --pretty=format:%h
OUTPUT_VARIABLE GIT_HASH
OUTPUT_STRIP_TRAILING_WHITESPACE
ERROR_QUIET
)
endif()
message(STATUS "Git hash is ${GIT_HASH}")
# generate file version.hpp based on version.hpp.in
configure_file(
${CMAKE_CURRENT_LIST_DIR}/version.hpp.in
${TARGET_DIR}/generated/version.hpp
@ONLY
)
# set minimum cmake version
cmake_minimum_required(VERSION 3.5 FATAL_ERROR)
# project name and language
project(recipe-07 LANGUAGES CXX)
# require C++11
set(CMAKE_CXX_STANDARD 11)
set(CMAKE_CXX_EXTENSIONS OFF)
set(CMAKE_CXX_STANDARD_REQUIRED ON)
# example code
add_executable(example example.cpp)
# needs to find the generated header file
target_include_directories(example
PRIVATE
${CMAKE_CURRENT_BINARY_DIR}/generated
)
add_custom_command(
OUTPUT
${CMAKE_CURRENT_BINARY_DIR}/generated/version.hpp
ALL
COMMAND
${CMAKE_COMMAND} -D TARGET_DIR=${CMAKE_CURRENT_BINARY_DIR} -P ${CMAKE_CURRENT_SOURCE_DIR}/git-hash.cmake
WORKING_DIRECTORY
${CMAKE_CURRENT_SOURCE_DIR}
)
# rebuild version.hpp every time
add_custom_target(
get_git_hash
ALL
DEPENDS
${CMAKE_CURRENT_BINARY_DIR}/generated/version.hpp
)
# version.hpp has to be generated
# before we start building example
add_dependencies(example get_git_hash)
In this recipe, we achieved the execution of CMake code at build time. For this, we defined a custom command:
add_custom_command(
OUTPUT
${CMAKE_CURRENT_BINARY_DIR}/generated/version.hpp
ALL
COMMAND
${CMAKE_COMMAND} -D TARGET_DIR=${CMAKE_CURRENT_BINARY_DIR} -P ${CMAKE_CURRENT_SOURCE_DIR}/git-hash.cmake
WORKING_DIRECTORY
${CMAKE_CURRENT_SOURCE_DIR}
)
We also defined a custom target, as follows:
add_custom_target(
get_git_hash
ALL
DEPENDS
${CMAKE_CURRENT_BINARY_DIR}/generated/version.hpp
)
The custom command invokes CMake to execute the git-hash.cmake CMake script. This is achieved by using the -P CLI switch, to pass the location of the script. Notice that we can pass options with the -D CLI switch, as we usually would. The git-hash.cmake script generates ${TARGET_DIR}/generated/version.hpp. The custom target is added to the ALL target, and depends on the output of the custom command. In other words, when we build the default target, we make sure that the custom command is run. Also, observe that the custom command has the ALL target as output. With that, we make sure that version.hpp is generated every time.
We could enhance the recipe in order to include extra information in addition to the recorded Git hash. It is not unusual to detect whether the build environment is "dirty", that is, whether it contains uncommitted changes and untracked files, or "clean". This information could be detected using git describe --abbrev=7 --long --always --dirty --tags. Depending on the ambition for reproducibility one could even record the full output of git status into a header file but we leave these enhancements as an exercise.
In this chapter, we will cover the following recipes:
In the previous chapters, we have discovered a number of building blocks to create projects configured and built using CMake. In this chapter, we will discuss how to combine these building blocks and introduce abstractions to avoid huge CMakeLists.txt files and minimize code repetition, global variables, global state, and explicit ordering. Our goal will be to present patterns for a modular CMake code structure and for limiting the scope of variables. We will discuss strategies that will also help us control CMake code complexity for medium to large code projects.
In any programming language, functions allow us to abstract (hide) details and avoid code repetition, and CMake is no exception. In this recipe, we will discuss macros and functions as an example, and we will introduce a macro to make it more convenient for us to define tests and set the ordering of tests. Instead of calling add_test and set_tests_properties to define each set and to set the expected COST of each test (Chapter 4, Creating and Running Tests, Recipe 8, Running tests in parallel), our goal is to define a macro that will be able to take care of both in one go.
We will start with the example presented in Chapter 4, Creating and Running Tests, Recipe 2, Defining a unit test using the Catch2 library. The main.cpp, sum_integers.cpp, and sum_integers.hpp files are unchanged and can be used to compute the sum of integers provided as command line arguments. The source code for the unit tests (test.cpp) is used unchanged, as well. We also require the Catch2 header file, catch.hpp. In contrast to Chapter 4, Creating and Running Tests, Recipe 2, Defining a unit test using the Catch2 library, we will structure the source files into subdirectories and form the following file tree (we will discuss the CMake code later):
.
├── CMakeLists.txt
├── src
│ ├── CMakeLists.txt
│ ├── main.cpp
│ ├── sum_integers.cpp
│ └── sum_integers.hpp
└── tests
├── catch.hpp
├── CMakeLists.txt
└── test.cpp
Let us follow the required steps:
cmake_minimum_required(VERSION 3.5 FATAL_ERROR)
project(recipe-01 LANGUAGES CXX)
set(CMAKE_CXX_STANDARD 11)
set(CMAKE_CXX_EXTENSIONS OFF)
set(CMAKE_CXX_STANDARD_REQUIRED ON)
include(GNUInstallDirs)
set(CMAKE_ARCHIVE_OUTPUT_DIRECTORY
${CMAKE_BINARY_DIR}/${CMAKE_INSTALL_LIBDIR})
set(CMAKE_LIBRARY_OUTPUT_DIRECTORY
${CMAKE_BINARY_DIR}/${CMAKE_INSTALL_LIBDIR})
set(CMAKE_RUNTIME_OUTPUT_DIRECTORY
${CMAKE_BINARY_DIR}/${CMAKE_INSTALL_BINDIR})
add_subdirectory(src)
enable_testing()
add_subdirectory(tests)
set(CMAKE_INCLUDE_CURRENT_DIR_IN_INTERFACE ON)
add_library(sum_integers sum_integers.cpp)
add_executable(sum_up main.cpp)
target_link_libraries(sum_up sum_integers)
add_executable(cpp_test test.cpp)
target_link_libraries(cpp_test sum_integers)
macro(add_catch_test _name _cost)
math(EXPR num_macro_calls "${num_macro_calls} + 1")
message(STATUS "add_catch_test called with ${ARGC} arguments: ${ARGV}")
set(_argn "${ARGN}")
if(_argn)
message(STATUS "oops - macro received argument(s) we did not expect: ${ARGN}")
endif()
add_test(
NAME
${_name}
COMMAND
$<TARGET_FILE:cpp_test>
[${_name}] --success --out
${PROJECT_BINARY_DIR}/tests/${_name}.log --durations yes
WORKING_DIRECTORY
${CMAKE_CURRENT_BINARY_DIR}
)
set_tests_properties(
${_name}
PROPERTIES
COST ${_cost}
)
endmacro()
set(num_macro_calls 0)
add_catch_test(short 1.5)
add_catch_test(long 2.5 extra_argument)
message(STATUS "in total there were ${num_macro_calls} calls to add_catch_test")
$ mkdir -p build
$ cd build
$ cmake ..
-- ...
-- add_catch_test called with 2 arguments: short;1.5
-- add_catch_test called with 3 arguments: long;2.5;extra_argument
-- oops - macro received argument(s) we did not expect: extra_argument
-- in total there were 2 calls to add_catch_test
-- ...
$ cmake --build .
$ ctest
Start 2: long
1/2 Test #2: long ............................. Passed 0.00 sec
Start 1: short
2/2 Test #1: short ............................ Passed 0.00 sec
100% tests passed, 0 tests failed out of 2
The new feature in this recipe is the add_catch_test macro. The macro expects two arguments, _name and _cost, and we can use these arguments inside the macro to call add_test and set_tests_properties. The leading underscores are our choice, but with this we indicate to the reader that these arguments have local scope and can only be accessed within the macro. Also, note that the macro automatically populates ${ARGC} (number of arguments) and ${ARGV} (list of arguments), and we verified this in the output:
-- add_catch_test called with 2 arguments: short;1.5
-- add_catch_test called with 3 arguments: long;2.5;extra_argument
The macro also defines ${ARGN}, which holds the list of arguments past the last expected argument. In addition, we can also address arguments with ${ARGV0}, ${ARGV1}, and so on. Observe how we caught the unexpected argument (extra_argument) in this call:
add_catch_test(long 2.5 extra_argument)
We have done that using the following:
set(_argn "${ARGN}")
if(_argn)
message(STATUS "oops - macro received argument(s) we did not expect: ${ARGN}")
endif()
In this if-check, we had to introduce a new variable and could not query ARGN directly since it is not a variable in the usual CMake sense. With this macro, we were not only able to define tests by their name and command but also indicate the expected cost, which led to the "long" test being started before the "short" test thanks to the COST property.
We could have implemented this using a function instead of a macro with the same syntax:
function(add_catch_test _name _cost)
...
endfunction()
The difference between macros and functions is their variable scope. Macros are executed in the scope of the caller whereas functions have own variable scope. In other words, if we need to set or modify variables that should be available to the caller, we typically use a macro. If no output variables are set or modified, we preferably use a function. We remark that it is possible to modify parent scope variables also in a function, but this has to be explicitly indicated using PARENT_SCOPE:
set(variable_visible_outside "some value" PARENT_SCOPE)
To demonstrate the scope, we have written the following call after the definition of the macro:
set(num_macro_calls 0)
add_catch_test(short 1.5)
add_catch_test(long 2.5 extra_argument)
message(STATUS "in total there were ${num_macro_calls} calls to add_catch_test")
Inside the macro, we increase num_macro_calls by 1:
math(EXPR num_macro_calls "${num_macro_calls} + 1")
And this is the output produced:
-- in total there were 2 calls to add_catch_test
If we changed the macro to a function, the tests would still work but num_macro_calls would remain 0 throughout the calls in the parent scope. It is useful to imagine CMake macros as being like functions, which are substituted directly into the place where they are called (inlined in the C language sense). It is useful to imagine CMake functions as black boxes where nothing comes back unless you explicitly define it as PARENT_SCOPE. Functions in CMake do not have return values.
It is possible to nest function calls in macros and macro calls in functions, but we need to carefully consider the scope of the variables. If a feature can be implemented using a function, then this is probably preferable to a macro since it gives more default control over the parent scope state.
We should also mention the use of CMAKE_INCLUDE_CURRENT_DIR_IN_INTERFACE in src/CMakeLists.txt:
set(CMAKE_INCLUDE_CURRENT_DIR_IN_INTERFACE ON)
This command adds the current directory to the INTERFACE_INCLUDE_DIRECTORIES property for all targets defined in this CMakeLists.txt file. In other words, we did not have to use target_include_directories to indicate the header file location for cpp_test.
Projects typically start with a single CMakeLists.txt file, but over time this file grows and in this recipe we will demonstrate one mechanism for splitting CMakeLists.txt up into smaller units. There are several motivations for splitting up CMakeLists.txt into modules that can be included in the main CMakeLists.txt or other modules:
In this recipe, we will demonstrate how to define and include a macro that allows us to get colored CMake output (for important status messages or warnings).
In this example, we will use two files, the main CMakeLists.txt and cmake/colors.cmake:
.
├── cmake
│ └── colors.cmake
└── CMakeLists.txt
The cmake/colors.cmake file contains definitions for colored output:
# colorize CMake output
# code adapted from stackoverflow: http://stackoverflow.com/a/19578320
# from post authored by https://stackoverflow.com/users/2556117/fraser
macro(define_colors)
if(WIN32)
# has no effect on WIN32
set(ColourReset "")
set(ColourBold "")
set(Red "")
set(Green "")
set(Yellow "")
set(Blue "")
set(Magenta "")
set(Cyan "")
set(White "")
set(BoldRed "")
set(BoldGreen "")
set(BoldYellow "")
set(BoldBlue "")
set(BoldMagenta "")
set(BoldCyan "")
set(BoldWhite "")
else()
string(ASCII 27 Esc)
set(ColourReset "${Esc}[m")
set(ColourBold "${Esc}[1m")
set(Red "${Esc}[31m")
set(Green "${Esc}[32m")
set(Yellow "${Esc}[33m")
set(Blue "${Esc}[34m")
set(Magenta "${Esc}[35m")
set(Cyan "${Esc}[36m")
set(White "${Esc}[37m")
set(BoldRed "${Esc}[1;31m")
set(BoldGreen "${Esc}[1;32m")
set(BoldYellow "${Esc}[1;33m")
set(BoldBlue "${Esc}[1;34m")
set(BoldMagenta "${Esc}[1;35m")
set(BoldCyan "${Esc}[1;36m")
set(BoldWhite "${Esc}[1;37m")
endif()
endmacro()
This is how we can use the color definitions to generate colored status messages:
cmake_minimum_required(VERSION 3.5 FATAL_ERROR)
project(recipe-02 LANGUAGES NONE)
list(APPEND CMAKE_MODULE_PATH "${CMAKE_CURRENT_SOURCE_DIR}/cmake")
include(colors)
define_colors()
message(STATUS "This is a normal message")
message(STATUS "${Red}This is a red${ColourReset}")
message(STATUS "${BoldRed}This is a bold red${ColourReset}")
message(STATUS "${Green}This is a green${ColourReset}")
message(STATUS "${BoldMagenta}This is bold${ColourReset}")
This is an example where no code is compiled and no language support is required, and we have indicated this by LANGUAGES NONE:
project(recipe-02 LANGUAGES NONE)
We defined the define_colors macro and placed it in cmake/colors.cmake. We chose to use a macro and not a function since we also wish to use the variables defined inside the macro in the scope of the call to change colors in the messages. We have included the macro and called define_colors using the following lines:
include(colors)
define_colors()
However, we also need to tell CMake where to look for the macro:
list(APPEND CMAKE_MODULE_PATH "${CMAKE_CURRENT_SOURCE_DIR}/cmake")
The include(colors) command instructs CMake to search ${CMAKE_MODULE_PATH} for a module with the name colors.cmake.
Instead of writing the following:
list(APPEND CMAKE_MODULE_PATH "${CMAKE_CURRENT_SOURCE_DIR}/cmake")
include(colors)
We could have used an explicit include as follows:
include(cmake/colors.cmake)
The recommended practice is to define macros or functions in modules and then call the macro or function. It is not good practice to use module includes as function calls. Including a module should not do more than defining functions and macros and discovering programs, libraries, and paths. The actual include command should not define or modify variables and the reason for this is that a repeated include, which may be accidental, should not introduce any unwanted side effects. In Recipe 5, Redefining functions and macros, we will create a guard against accidental includes.
In the previous two recipes, we used macros; in this recipe, we will use a function to abstract away details and avoid code repetition. In the example, we will implement a function that accepts a list of compiler flags. The function will try to compile a test code with these flags, one by one, and return the first flag that was understood by the compiler. By doing so, we will learn a couple of new features: functions, list manipulations, string manipulations, and checking whether compiler flags are supported by the compiler.
Following the recommended practice of the previous recipe, we will define the function in a module (set_compiler_flag.cmake), include the module, and then call the function. The module contains the following code, which we will discuss later:
include(CheckCCompilerFlag)
include(CheckCXXCompilerFlag)
include(CheckFortranCompilerFlag)
function(set_compiler_flag _result _lang)
# build a list of flags from the arguments
set(_list_of_flags)
# also figure out whether the function
# is required to find a flag
set(_flag_is_required FALSE)
foreach(_arg IN ITEMS ${ARGN})
string(TOUPPER "${_arg}" _arg_uppercase)
if(_arg_uppercase STREQUAL "REQUIRED")
set(_flag_is_required TRUE)
else()
list(APPEND _list_of_flags "${_arg}")
endif()
endforeach()
set(_flag_found FALSE)
# loop over all flags, try to find the first which works
foreach(flag IN ITEMS ${_list_of_flags})
unset(_flag_works CACHE)
if(_lang STREQUAL "C")
check_c_compiler_flag("${flag}" _flag_works)
elseif(_lang STREQUAL "CXX")
check_cxx_compiler_flag("${flag}" _flag_works)
elseif(_lang STREQUAL "Fortran")
check_Fortran_compiler_flag("${flag}" _flag_works)
else()
message(FATAL_ERROR "Unknown language in set_compiler_flag: ${_lang}")
endif()
# if the flag works, use it, and exit
# otherwise try next flag
if(_flag_works)
set(${_result} "${flag}" PARENT_SCOPE)
set(_flag_found TRUE)
break()
endif()
endforeach()
# raise an error if no flag was found
if(_flag_is_required AND NOT _flag_found)
message(FATAL_ERROR "None of the required flags were supported")
endif()
endfunction()
This is how we can use the set_compiler_flag function in our CMakeLists.txt:
cmake_minimum_required(VERSION 3.5 FATAL_ERROR)
project(recipe-03 LANGUAGES C CXX)
include(set_compiler_flag.cmake)
set_compiler_flag(
working_compile_flag C REQUIRED
"-foo" # this should fail
"-wrong" # this should fail
"-wrong" # this should fail
"-Wall" # this should work with GNU
"-warn all" # this should work with Intel
"-Minform=inform" # this should work with PGI
"-nope" # this should fail
)
message(STATUS "working C compile flag: ${working_compile_flag}")
set_compiler_flag(
working_compile_flag CXX REQUIRED
"-foo" # this should fail
"-g" # this should work with GNU, Intel, PGI
"/RTCcsu" # this should work with MSVC
)
message(STATUS "working CXX compile flag: ${working_compile_flag}")
$ mkdir -p build
$ cd build
$ cmake ..
-- ...
-- Performing Test _flag_works
-- Performing Test _flag_works - Failed
-- Performing Test _flag_works
-- Performing Test _flag_works - Failed
-- Performing Test _flag_works
-- Performing Test _flag_works - Failed
-- Performing Test _flag_works
-- Performing Test _flag_works - Success
-- working C compile flag: -Wall
-- Performing Test _flag_works
-- Performing Test _flag_works - Failed
-- Performing Test _flag_works
-- Performing Test _flag_works - Success
-- working CXX compile flag: -g
-- ...
The pattern that we have used here is:
From the output, we can see that the code checks each flag in the list and as soon as the check is successful, it prints the successful compile flag. Let us look inside the set_compiler_flag.cmake module. This module, in turn, includes three modules:
include(CheckCCompilerFlag)
include(CheckCXXCompilerFlag)
include(CheckFortranCompilerFlag)
These are standard CMake modules and CMake will locate them in ${CMAKE_MODULE_PATH}. These modules provide the check_c_compiler_flag, check_cxx_compiler_flag, and check_fortran_compiler_flag macros, respectively. Then comes the function definition:
function(set_compiler_flag _result _lang)
...
endfunction()
The set_compiler_flag function expects two arguments and we call them _result (this will hold the successful compile flag or the empty string "") and _lang (which specifies the language: C, C++, or Fortran).
We would like to be able to call the function like this:
set_compiler_flag(working_compile_flag C REQUIRED "-Wall" "-warn all")
This call has five arguments, but the function header only expects two. This means that REQUIRED, "-Wall", and "-warn all" will be placed in ${ARGN}. From ${ARGN}, we first build a list of flags using foreach. At the same time, we filter out REQUIRED from the list of flags and use it to set _flag_is_required:
# build a list of flags from the arguments
set(_list_of_flags)
# also figure out whether the function
# is required to find a flag
set(_flag_is_required FALSE)
foreach(_arg IN ITEMS ${ARGN})
string(TOUPPER "${_arg}" _arg_uppercase)
if(_arg_uppercase STREQUAL "REQUIRED")
set(_flag_is_required TRUE)
else()
list(APPEND _list_of_flags "${_arg}")
endif()
endforeach()
Now, we will loop over ${_list_of_flags}, try each flag, and if _flag_works is set to TRUE, we set _flag_found to TRUE and abort a further search:
set(_flag_found FALSE)
# loop over all flags, try to find the first which works
foreach(flag IN ITEMS ${_list_of_flags})
unset(_flag_works CACHE)
if(_lang STREQUAL "C")
check_c_compiler_flag("${flag}" _flag_works)
elseif(_lang STREQUAL "CXX")
check_cxx_compiler_flag("${flag}" _flag_works)
elseif(_lang STREQUAL "Fortran")
check_Fortran_compiler_flag("${flag}" _flag_works)
else()
message(FATAL_ERROR "Unknown language in set_compiler_flag: ${_lang}")
endif()
# if the flag works, use it, and exit
# otherwise try next flag
if(_flag_works)
set(${_result} "${flag}" PARENT_SCOPE)
set(_flag_found TRUE)
break()
endif()
endforeach()
The unset(_flag_works CACHE) line is there to make sure that the result of check_*_compiler_flag is not cached between calls using the same _flag_works result variable.
If a flag is found and _flag_works set to TRUE, we define the variable mapped to by _result:
set(${_result} "${flag}" PARENT_SCOPE)
This needs to be done with PARENT_SCOPE since we are modifying a variable that we wish to print and use outside the function body. Note, in addition, how we dereferenced the variable _result passed from parent scope using the ${_result} syntax. This is necessary to ensure that the working flag is set as value of the variable passed from parent scope when invoking the function, regardless of its name. If no flag is found and the REQUIRED keyword was provided, we stop the configuration with an error message:
# raise an error if no flag was found
if(_flag_is_required AND NOT _flag_found)
message(FATAL_ERROR "None of the required flags were supported")
endif()
We could have achieved this task with a macro, but with a function, we have more control over the scope. We know that the only variable that can be modified by the function is the result variable.
Also, note that some flags need to be set both at compile and link time by setting CMAKE_REQUIRED_FLAGS for the check_<LANG>_compiler_flag function to report success correctly. This was the case for the sanitizers, as we discussed in Chapter 5, Configure-time and Build-time Operations, Recipe 7, Probing compiler flags.
In the previous recipes, we explored functions and macros and used positional arguments. In this recipe, we will define a function with named arguments. We will enhance the example from Recipe 1, Code reuse with functions and macros and instead of defining tests using the following:
add_catch_test(short 1.5)
We will be able to call the following:
add_catch_test(
NAME
short
LABELS
short
cpp_test
COST
1.5
)
We will use the example from Recipe 1, Code reuse with functions and macros and keep the C++ sources unchanged and the file tree essentially the same:
.
├── cmake
│ └── testing.cmake
├── CMakeLists.txt
├── src
│ ├── CMakeLists.txt
│ ├── main.cpp
│ ├── sum_integers.cpp
│ └── sum_integers.hpp
└── tests
├── catch.hpp
├── CMakeLists.txt
└── test.cpp
We will introduce small modifications in the CMake code, as shown here:
list(APPEND CMAKE_MODULE_PATH "${CMAKE_CURRENT_SOURCE_DIR}/cmake")
add_executable(cpp_test test.cpp)
target_link_libraries(cpp_test sum_integers)
include(testing)
add_catch_test(
NAME
short
LABELS
short
cpp_test
COST
1.5
)
add_catch_test(
NAME
long
LABELS
long
cpp_test
COST
2.5
)
function(add_catch_test)
set(options)
set(oneValueArgs NAME COST)
set(multiValueArgs LABELS DEPENDS REFERENCE_FILES)
cmake_parse_arguments(add_catch_test
"${options}"
"${oneValueArgs}"
"${multiValueArgs}"
${ARGN}
)
message(STATUS "defining a test ...")
message(STATUS " NAME: ${add_catch_test_NAME}")
message(STATUS " LABELS: ${add_catch_test_LABELS}")
message(STATUS " COST: ${add_catch_test_COST}")
message(STATUS " REFERENCE_FILES: ${add_catch_test_REFERENCE_FILES}")
add_test(
NAME
${add_catch_test_NAME}
COMMAND
$<TARGET_FILE:cpp_test>
[${add_catch_test_NAME}] --success --out
${PROJECT_BINARY_DIR}/tests/${add_catch_test_NAME}.log --durations yes
WORKING_DIRECTORY
${CMAKE_CURRENT_BINARY_DIR}
)
set_tests_properties(${add_catch_test_NAME}
PROPERTIES
LABELS "${add_catch_test_LABELS}"
)
if(add_catch_test_COST)
set_tests_properties(${add_catch_test_NAME}
PROPERTIES
COST ${add_catch_test_COST}
)
endif()
if(add_catch_test_DEPENDS)
set_tests_properties(${add_catch_test_NAME}
PROPERTIES
DEPENDS ${add_catch_test_DEPENDS}
)
endif()
if(add_catch_test_REFERENCE_FILES)
file(
COPY
${add_catch_test_REFERENCE_FILES}
DESTINATION
${CMAKE_CURRENT_BINARY_DIR}
)
endif()
endfunction()
$ mkdir -p build
$ cd build
$ cmake ..
-- ...
-- defining a test ...
-- NAME: short
-- LABELS: short;cpp_test
-- COST: 1.5
-- REFERENCE_FILES:
-- defining a test ...
-- NAME: long
-- LABELS: long;cpp_test
-- COST: 2.5
-- REFERENCE_FILES:
-- ...
$ cmake --build .
$ ctest
The new aspects in this recipe are the named arguments so we can focus on the cmake/testing.cmake module. CMake provides the cmake_parse_arguments command, which we call with the function name (add_catch_test) options (in our case, none), one-value arguments (here, NAME and COST), and multi-value arguments (here, LABELS, DEPENDS, and REFERENCE_FILES):
function(add_catch_test)
set(options)
set(oneValueArgs NAME COST)
set(multiValueArgs LABELS DEPENDS REFERENCE_FILES)
cmake_parse_arguments(add_catch_test
"${options}"
"${oneValueArgs}"
"${multiValueArgs}"
${ARGN}
)
...
endfunction()
The cmake_parse_arguments command parses options and arguments, and defines the following in our case:
We can then query and use these variables inside our function. This approach gives us the chance to implement functions and macros with more robust interfaces and more readable function/macro calls.
Option keywords (which we have not used in this example) are defined by cmake_parse_arguments to either TRUE or FALSE. A further enhancement of the add_catch_test function could be to also provide the test command as a named argument, which we have omitted for the benefit of a more concise example.
We have mentioned that module includes should not be used as function calls since modules could be (accidentally) included multiple times. In this recipe, we will program our own simple include guard, which will warn us if we try to include a module multiple times. The built-in include_guard command is available in CMake since version 3.10 and behaves like #pragma once for C/C++ header files. For this version of CMake, we will discuss and demonstrate how functions and macros can be redefined. We will show how we can check the CMake version and for versions below 3.10, we will use our custom include guard.
In this example, we will use three files:
.
├── cmake
│ ├── custom.cmake
│ └── include_guard.cmake
└── CMakeLists.txt
The custom custom.cmake module contains the following code:
include_guard(GLOBAL)
message(STATUS "custom.cmake is included and processed")
We will discuss cmake/include_guard.cmake and CMakeLists.txt later.
This is a step-by-step breakdown of our three CMake files:
cmake_minimum_required(VERSION 3.5 FATAL_ERROR)
project(recipe-05 LANGUAGES NONE)
# (re)defines include_guard
include(cmake/include_guard.cmake)
macro(include_guard)
if (CMAKE_VERSION VERSION_LESS "3.10")
# for CMake below 3.10 we define our
# own include_guard(GLOBAL)
message(STATUS "calling our custom include_guard")
# if this macro is called the first time
# we start with an empty list
if(NOT DEFINED included_modules)
set(included_modules)
endif()
if ("${CMAKE_CURRENT_LIST_FILE}" IN_LIST included_modules)
message(WARNING "module ${CMAKE_CURRENT_LIST_FILE} processed more than once")
endif()
list(APPEND included_modules ${CMAKE_CURRENT_LIST_FILE})
else()
# for CMake 3.10 or higher we augment
# the built-in include_guard
message(STATUS "calling the built-in include_guard")
_include_guard(${ARGV})
endif()
endmacro()
include(cmake/custom.cmake)
include(cmake/custom.cmake)
$ mkdir -p build
$ cd build
$ cmake ..
-- calling the built-in include_guard
-- custom.cmake is included and processed
-- calling the built-in include_guard
-- calling our custom include_guard
-- custom.cmake is included and processed
-- calling our custom include_guard
CMake Warning at cmake/include_guard.cmake:7 (message):
module
/home/user/example/cmake/custom.cmake
processed more than once
Call Stack (most recent call first):
cmake/custom.cmake:1 (include_guard)
CMakeLists.txt:12 (include)
Our include_guard macro contains two branches, one for CMake below 3.10 and one for CMake 3.10 and higher:
macro(include_guard)
if (CMAKE_VERSION VERSION_LESS "3.10")
# ...
else()
# ...
endif()
endmacro()
If CMake version is below 3.10, we enter the first branch and an intrinsic include_guard is not available, so we define our own:
message(STATUS "calling our custom include_guard")
# if this macro is called the first time
# we start with an empty list
if(NOT DEFINED included_modules)
set(included_modules)
endif()
if ("${CMAKE_CURRENT_LIST_FILE}" IN_LIST included_modules)
message(WARNING "module ${CMAKE_CURRENT_LIST_FILE} processed more than once")
endif()
list(APPEND included_modules ${CMAKE_CURRENT_LIST_FILE})
If the macro is called the first time, then the included_modules variable is not defined so we set it to an empty list. We then check whether ${CMAKE_CURRENT_LIST_FILE} is an element of the included_modules list. If yes, we issue a warning. If no, we append ${CMAKE_CURRENT_LIST_FILE} to this list. In the CMake output, we can verify that a second include of the custom module indeed leads to the warning.
The situation is different for CMake 3.10 and higher; in this case, an intrinsic include_guard exists and we call it with the arguments received by our own macro:
macro(include_guard)
if (CMAKE_VERSION VERSION_LESS "3.10")
# ...
else()
message(STATUS "calling the built-in include_guard")
_include_guard(${ARGV})
endif()
endmacro()
Here, _include_guard(${ARGV}) points to the built-in include_guard. In this case, we have augmented the built-in command with a custom message ("calling the built-in include_guard"). This pattern provides us with a mechanism to redefine own or built-in functions and macros. This can be useful for debugging or logging purposes.
Deprecation is an important mechanism in the development of an evolving project to signal to developers that a function or macro or a variable will be removed or replaced at some point in the future. For a certain period, the function, macro, or variable will continue being accessible but signal a warning, which eventually can be elevated to an error.
We will start out with the following CMake project:
cmake_minimum_required(VERSION 3.5 FATAL_ERROR)
project(recipe-06 LANGUAGES NONE)
macro(custom_include_guard)
if(NOT DEFINED included_modules)
set(included_modules)
endif()
if ("${CMAKE_CURRENT_LIST_FILE}" IN_LIST included_modules)
message(WARNING "module ${CMAKE_CURRENT_LIST_FILE} processed more than once")
endif()
list(APPEND included_modules ${CMAKE_CURRENT_LIST_FILE})
endmacro()
include(cmake/custom.cmake)
message(STATUS "list of all included modules: ${included_modules}")
This code defines a custom include guard, includes a custom module (the same module as in the previous recipe), and prints the list of all included modules. For CMake 3.10 and higher, we now know from the previous recipe that there is a built-in include_guard. But instead of simply removing custom_include_guard and ${included_modules}, we will deprecate the macro and the variable with a deprecation warning, which at some point we can flip into a FATAL_ERROR to make the code stop and force the developers to switch to the built-in command.
Deprecating functions, macros, and variables can be done as follows:
function(deprecate_variable _variable _access)
if(_access STREQUAL "READ_ACCESS")
message(DEPRECATION "variable ${_variable} is deprecated")
endif()
endfunction()
if (CMAKE_VERSION VERSION_GREATER "3.9")
# deprecate custom_include_guard
macro(custom_include_guard)
message(DEPRECATION "custom_include_guard is deprecated - use built-in include_guard instead")
_custom_include_guard(${ARGV})
endmacro()
# deprecate variable included_modules
variable_watch(included_modules deprecate_variable)
endif()
$ mkdir -p build
$ cd build
$ cmake ..
-- custom.cmake is included and processed
-- list of all included modules: /home/user/example/cmake/custom.cmake
CMake Deprecation Warning at CMakeLists.txt:26 (message):
custom_include_guard is deprecated - use built-in include_guard instead
Call Stack (most recent call first):
cmake/custom.cmake:1 (custom_include_guard)
CMakeLists.txt:34 (include)
-- custom.cmake is included and processed
CMake Deprecation Warning at CMakeLists.txt:19 (message):
variable included_modules is deprecated
Call Stack (most recent call first):
CMakeLists.txt:9999 (deprecate_variable)
CMakeLists.txt:36 (message)
-- list of all included modules: /home/user/example/cmake/custom.cmake
Deprecating a function or a macro is equivalent to redefining it, as demonstrated in the previous recipe, and printing a message with DEPRECATION:
macro(somemacro)
message(DEPRECATION "somemacro is deprecated")
_somemacro(${ARGV})
endmacro()
Deprecating a variable can be achieved by first defining the following:
function(deprecate_variable _variable _access)
if(_access STREQUAL "READ_ACCESS")
message(DEPRECATION "variable ${_variable} is deprecated")
endif()
endfunction()
This function is then attached to the variable that is about to be deprecated:
variable_watch(somevariable deprecate_variable)
If in this case ${included_modules} is read (READ_ACCESS), then the deprecate_variable function issues the message with DEPRECATION.
In the remaining recipes of this chapter, we will discuss strategies to structure projects and limit the scope of variables and side effects with the goal to lower code complexity and simplify the maintenance of the project. In this recipe, we will split a project into several CMakeLists.txt files with limited scope, which will be processed using the add_subdirectory command.
Since we wish to show and discuss how to structure a non-trivial project, we need an example that is more than a "hello world" project. We will develop a relatively simple code that can compute and print elementary cellular automata:
Our code will be able to compute any of the 256 elementary cellular automata, for instance rule 90 (Wolfram code):
$ ./bin/automata 40 15 90
length: 40
number of steps: 15
rule: 90
*
* *
* *
* * * *
* *
* * * *
* * * *
* * * * * * * *
* *
* * * *
* * * *
* * * * * * * *
* * * *
* * * * * * * *
* * * * * * * *
* * * * * * * * * * * * * * * *
The structure of our example code project is as follows:
.
├── CMakeLists.txt
├── external
│ ├── CMakeLists.txt
│ ├── conversion.cpp
│ ├── conversion.hpp
│ └── README.md
├── src
│ ├── CMakeLists.txt
│ ├── evolution
│ │ ├── CMakeLists.txt
│ │ ├── evolution.cpp
│ │ └── evolution.hpp
│ ├── initial
│ │ ├── CMakeLists.txt
│ │ ├── initial.cpp
│ │ └── initial.hpp
│ ├── io
│ │ ├── CMakeLists.txt
│ │ ├── io.cpp
│ │ └── io.hpp
│ ├── main.cpp
│ └── parser
│ ├── CMakeLists.txt
│ ├── parser.cpp
│ └── parser.hpp
└── tests
├── catch.hpp
├── CMakeLists.txt
└── test.cpp
Here, we have split the code into many libraries to simulate a real-world medium to large project, where sources can be organized into libraries that are then linked into an executable.
The main function is in src/main.cpp:
#include "conversion.hpp"
#include "evolution.hpp"
#include "initial.hpp"
#include "io.hpp"
#include "parser.hpp"
#include <iostream>
int main(int argc, char *argv[]) {
// parse arguments
int length, num_steps, rule_decimal;
std::tie(length, num_steps, rule_decimal) = parse_arguments(argc, argv);
// print information about parameters
std::cout << "length: " << length << std::endl;
std::cout << "number of steps: " << num_steps << std::endl;
std::cout << "rule: " << rule_decimal << std::endl;
// obtain binary representation for the rule
std::string rule_binary = binary_representation(rule_decimal);
// create initial distribution
std::vector<int> row = initial_distribution(length);
// print initial configuration
print_row(row);
// the system evolves, print each step
for (int step = 0; step < num_steps; step++) {
row = evolve(row, rule_binary);
print_row(row);
}
}
The external/conversion.cpp file contains code to convert from decimal to binary. We simulate here that this code is provided by an "external" library outside of src:
#include "conversion.hpp"
#include <bitset>
#include <string>
std::string binary_representation(const int decimal) {
return std::bitset<8>(decimal).to_string();
}
The src/evolution/evolution.cpp file propagates the system in a time step:
#include "evolution.hpp"
#include <string>
#include <vector>
std::vector<int> evolve(const std::vector<int> row, const std::string rule_binary) {
std::vector<int> result;
for (auto i = 0; i < row.size(); ++i) {
auto left = (i == 0 ? row.size() : i) - 1;
auto center = i;
auto right = (i + 1) % row.size();
auto ancestors = 4 * row[left] + 2 * row[center] + 1 * row[right];
ancestors = 7 - ancestors;
auto new_state = std::stoi(rule_binary.substr(ancestors, 1));
result.push_back(new_state);
}
return result;
}
The src/initial/initial.cpp file produces the initial state:
#include "initial.hpp"
#include <vector>
std::vector<int> initial_distribution(const int length) {
// we start with a vector which is zeroed out
std::vector<int> result(length, 0);
// more or less in the middle we place a living cell
result[length / 2] = 1;
return result;
}
The src/io/io.cpp file contains a function to print a row:
#include "io.hpp"
#include <algorithm>
#include <iostream>
#include <vector>
void print_row(const std::vector<int> row) {
std::for_each(row.begin(), row.end(), [](int const &value) {
std::cout << (value == 1 ? '*' : ' ');
});
std::cout << std::endl;
}
The src/parser/parser.cpp file parses the command-line input:
#include "parser.hpp"
#include <cassert>
#include <string>
#include <tuple>
std::tuple<int, int, int> parse_arguments(int argc, char *argv[]) {
assert(argc == 4 && "program called with wrong number of arguments");
auto length = std::stoi(argv[1]);
auto num_steps = std::stoi(argv[2]);
auto rule_decimal = std::stoi(argv[3]);
return std::make_tuple(length, num_steps, rule_decimal);
}
And finally, tests/test.cpp contains two unit tests using the Catch2 library:
#include "evolution.hpp"
// this tells catch to provide a main()
// only do this in one cpp file
#define CATCH_CONFIG_MAIN
#include "catch.hpp"
#include <string>
#include <vector>
TEST_CASE("Apply rule 90", "[rule-90]") {
std::vector<int> row = {0, 1, 0, 1, 0, 1, 0, 1, 0};
std::string rule = "01011010";
std::vector<int> expected_result = {1, 0, 0, 0, 0, 0, 0, 0, 1};
REQUIRE(evolve(row, rule) == expected_result);
}
TEST_CASE("Apply rule 222", "[rule-222]") {
std::vector<int> row = {0, 0, 0, 0, 1, 0, 0, 0, 0};
std::string rule = "11011110";
std::vector<int> expected_result = {0, 0, 0, 1, 1, 1, 0, 0, 0};
REQUIRE(evolve(row, rule) == expected_result);
}
The corresponding header files contain the function signatures. One could argue that the project contains too many subdirectories for this little code example, but please remember that this is only a simplified example of a project typically containing many source files for each library, ideally organized into separate directories like here.
Let us dive into a detailed explanation of the CMake infrastructure needed:
cmake_minimum_required(VERSION 3.5 FATAL_ERROR)
project(recipe-07 LANGUAGES CXX)
set(CMAKE_CXX_STANDARD 11)
set(CMAKE_CXX_EXTENSIONS OFF)
set(CMAKE_CXX_STANDARD_REQUIRED ON)
include(GNUInstallDirs)
set(CMAKE_ARCHIVE_OUTPUT_DIRECTORY
${CMAKE_BINARY_DIR}/${CMAKE_INSTALL_LIBDIR})
set(CMAKE_LIBRARY_OUTPUT_DIRECTORY
${CMAKE_BINARY_DIR}/${CMAKE_INSTALL_LIBDIR})
set(CMAKE_RUNTIME_OUTPUT_DIRECTORY
${CMAKE_BINARY_DIR}/${CMAKE_INSTALL_BINDIR})
# defines targets and sources
add_subdirectory(src)
# contains an "external" library we will link to
add_subdirectory(external)
# enable testing and define tests
enable_testing()
add_subdirectory(tests)
add_executable(automata main.cpp)
add_subdirectory(evolution)
add_subdirectory(initial)
add_subdirectory(io)
add_subdirectory(parser)
target_link_libraries(automata
PRIVATE
conversion
evolution
initial
io
parser
)
add_library(conversion "")
target_sources(conversion
PRIVATE
${CMAKE_CURRENT_LIST_DIR}/conversion.cpp
PUBLIC
${CMAKE_CURRENT_LIST_DIR}/conversion.hpp
)
target_include_directories(conversion
PUBLIC
${CMAKE_CURRENT_LIST_DIR}
)
add_library(evolution "")
target_sources(evolution
PRIVATE
evolution.cpp
PUBLIC
${CMAKE_CURRENT_LIST_DIR}/evolution.hpp
)
target_include_directories(evolution
PUBLIC
${CMAKE_CURRENT_LIST_DIR}
)
add_executable(cpp_test test.cpp)
target_link_libraries(cpp_test evolution)
add_test(
NAME
test_evolution
COMMAND
$<TARGET_FILE:cpp_test>
)
$ mkdir -p build
$ cd build
$ cmake ..
$ cmake --build .
Scanning dependencies of target conversion
[ 7%] Building CXX object external/CMakeFiles/conversion.dir/conversion.cpp.o
[ 14%] Linking CXX static library ../lib64/libconversion.a
[ 14%] Built target conversion
Scanning dependencies of target evolution
[ 21%] Building CXX object src/evolution/CMakeFiles/evolution.dir/evolution.cpp.o
[ 28%] Linking CXX static library ../../lib64/libevolution.a
[ 28%] Built target evolution
Scanning dependencies of target initial
[ 35%] Building CXX object src/initial/CMakeFiles/initial.dir/initial.cpp.o
[ 42%] Linking CXX static library ../../lib64/libinitial.a
[ 42%] Built target initial
Scanning dependencies of target io
[ 50%] Building CXX object src/io/CMakeFiles/io.dir/io.cpp.o
[ 57%] Linking CXX static library ../../lib64/libio.a
[ 57%] Built target io
Scanning dependencies of target parser
[ 64%] Building CXX object src/parser/CMakeFiles/parser.dir/parser.cpp.o
[ 71%] Linking CXX static library ../../lib64/libparser.a
[ 71%] Built target parser
Scanning dependencies of target automata
[ 78%] Building CXX object src/CMakeFiles/automata.dir/main.cpp.o
[ 85%] Linking CXX executable ../bin/automata
[ 85%] Built target automata
Scanning dependencies of target cpp_test
[ 92%] Building CXX object tests/CMakeFiles/cpp_test.dir/test.cpp.o
[100%] Linking CXX executable ../bin/cpp_test
[100%] Built target cpp_test
$ ctest
Running tests...
Start 1: test_evolution
1/1 Test #1: test_evolution ................... Passed 0.00 sec
100% tests passed, 0 tests failed out of 1
We could have put all the code into one source file. This would be impractical; every edit would require a full recompilation. Splitting source files into smaller, more manageable units makes sense. We could have equally well compiled all sources into a single library or executable, but in practice, projects prefer to split the compilation of sources into smaller, well-defined libraries. This is done both to localize scope and simplify dependency scanning, but also to simplify code maintenance. This means that building a project out of many libraries as we have done here is a typical situation.
To discuss the CMake structure we can proceed bottom-up from the individual CMakeLists.txt files defining each library, such as src/evolution/CMakeLists.txt:
add_library(evolution "")
target_sources(evolution
PRIVATE
evolution.cpp
PUBLIC
${CMAKE_CURRENT_LIST_DIR}/evolution.hpp
)
target_include_directories(evolution
PUBLIC
${CMAKE_CURRENT_LIST_DIR}
)
These individual CMakeLists.txt files define libraries as close as possible to the sources. In this example, we first define the library name with add_library and then define its sources and include directories, as well as their target visibility: the implementation files (here evolution.cpp) are PRIVATE, whereas the interface header file evolution.hpp is defined as PUBLIC since we will access it in main.cpp and test.cpp. The advantage of defining targets as close as possible to the code is that code developers with knowledge of this library and possibly limited knowledge of the CMake framework only need to edit files in this directory; in other words, the library dependencies are encapsulated.
Moving one level up, the libraries are assembled in src/CMakeLists.txt:
add_executable(automata main.cpp)
add_subdirectory(evolution)
add_subdirectory(initial)
add_subdirectory(io)
add_subdirectory(parser)
target_link_libraries(automata
PRIVATE
conversion
evolution
initial
io
parser
)
This file, in turn, is referenced in the top-level CMakeLists.txt. This means that we have built our project from a tree of libraries using a tree of CMakeLists.txt files. This approach is typical for many projects and it scales to large projects without the need to carry lists of source files in global variables across directories. An added bonus of the add_subdirectory approach is that it isolates scopes since variables defined in a subdirectory are not automatically accessible in the parent scope.
One limitation of building a project using a tree of add_subdirectory calls is that CMake does not allow us to use target_link_libraries with targets that are defined outside of the current directory scope. This was not a problem for the example shown in this recipe. In the next recipe, we will demonstrate an alternative approach where we assemble the different CMakeLists.txt files not using add_subdirectory, but using module includes, which allows us to link to targets defined outside the current directory.
CMake can use the Graphviz graph visualization software (http://www.graphviz.org) to generate the dependency graph of a project:
$ cd build
$ cmake --graphviz=example.dot ..
$ dot -T png example.dot -o example.png
The generated diagram will show dependencies between targets in different directories:
Throughout the book, we have been building the code out-of-source to keep the source tree and build tree separate. This is the recommended practice to allow us to configure different builds (sequential or parallel, Debug or Release) with the same source code, without duplicating the source code and without spilling generated and object files across the source tree. With the following snippet, you can protect your project against in-source builds:
if(${PROJECT_SOURCE_DIR} STREQUAL ${PROJECT_BINARY_DIR})
message(FATAL_ERROR "In-source builds not allowed. Please make a new directory (called a build directory) and run CMake from there.")
endif()
It is useful to recognize that the structure of the build tree mimics the structure of the source tree. In our example here, it is rather instructive to insert the following message printout into src/CMakeLists.txt:
message("current binary dir is ${CMAKE_CURRENT_BINARY_DIR}")
When configuring the project to build, we will see that the printout refers to build/src.
We note that, as of version 3.12 of CMake, OBJECT libraries are another viable approach to organizing large projects. The only modification to our example would be in the CMakeLists.txt for the libraries. The sources would be compiled into object files: neither archived into a static archive, nor linked into a shared library. For example:
add_library(io OBJECT "")
target_sources(io
PRIVATE
io.cpp
PUBLIC
${CMAKE_CURRENT_LIST_DIR}/io.hpp
)
target_include_directories(io
PUBLIC
${CMAKE_CURRENT_LIST_DIR}
)
The top-level CMakeLists.txt remains unchanged: the automata executable target links these object files into the final executable. Usage requirements, such as include directories, compile flags, and link libraries set on the OBJECT libraries will correctly be inherited. For more details on this new feature of OBJECT libraries introduced in CMake 3.12 refer to the official documentation: https://cmake.org/cmake/help/v3.12/manual/cmake-buildsystem.7.html#object-libraries
In this recipe, we will discuss an alternative approach to the previous recipe and assemble the different CMakeLists.txt files without using add_subdirectory, but using module includes. This approach is inspired by https://crascit.com/2016/01/31/enhanced-source-file-handling-with-target_sources/ and allows us to use target_link_libraries to link to targets defined outside of the current directory.
We will use the same source code as in the previous recipe. The only changes will be in CMakeLists.txt files and we will discuss these changes in the following sections.
Let us look in detail at the various files needed by CMake:
cmake_minimum_required(VERSION 3.5 FATAL_ERROR)
project(recipe-08 LANGUAGES CXX)
set(CMAKE_CXX_STANDARD 11)
set(CMAKE_CXX_EXTENSIONS OFF)
set(CMAKE_CXX_STANDARD_REQUIRED ON)
include(GNUInstallDirs)
set(CMAKE_ARCHIVE_OUTPUT_DIRECTORY
${CMAKE_BINARY_DIR}/${CMAKE_INSTALL_LIBDIR})
set(CMAKE_LIBRARY_OUTPUT_DIRECTORY
${CMAKE_BINARY_DIR}/${CMAKE_INSTALL_LIBDIR})
set(CMAKE_RUNTIME_OUTPUT_DIRECTORY
${CMAKE_BINARY_DIR}/${CMAKE_INSTALL_BINDIR})
# defines targets and sources
include(src/CMakeLists.txt)
include(external/CMakeLists.txt)
enable_testing()
add_subdirectory(tests)
add_library(automaton "")
add_library(evolution "")
include(${CMAKE_CURRENT_LIST_DIR}/evolution/CMakeLists.txt)
include(${CMAKE_CURRENT_LIST_DIR}/initial/CMakeLists.txt)
include(${CMAKE_CURRENT_LIST_DIR}/io/CMakeLists.txt)
include(${CMAKE_CURRENT_LIST_DIR}/parser/CMakeLists.txt)
add_executable(automata "")
target_sources(automata
PRIVATE
${CMAKE_CURRENT_LIST_DIR}/main.cpp
)
target_link_libraries(automata
PRIVATE
automaton
conversion
)
target_sources(automaton
PRIVATE
${CMAKE_CURRENT_LIST_DIR}/evolution.cpp
PUBLIC
${CMAKE_CURRENT_LIST_DIR}/evolution.hpp
)
target_include_directories(automaton
PUBLIC
${CMAKE_CURRENT_LIST_DIR}
)
target_sources(evolution
PRIVATE
${CMAKE_CURRENT_LIST_DIR}/evolution.cpp
PUBLIC
${CMAKE_CURRENT_LIST_DIR}/evolution.hpp
)
target_include_directories(evolution
PUBLIC
${CMAKE_CURRENT_LIST_DIR}
)
target_sources(automaton
PRIVATE
${CMAKE_CURRENT_LIST_DIR}/initial.cpp
PUBLIC
${CMAKE_CURRENT_LIST_DIR}/initial.hpp
)
target_include_directories(automaton
PUBLIC
${CMAKE_CURRENT_LIST_DIR}
)
$ mkdir -p build
$ cd build
$ cmake ..
$ cmake --build build
$ ctest
Running tests...
Start 1: test_evolution
1/1 Test #1: test_evolution ................... Passed 0.00 sec
100% tests passed, 0 tests failed out of 1
In contrast to the previous recipe, we have defined three libraries:
In this example, we keep all targets available in the parent scope by referencing CMakeLists.txt files using include():
include(src/CMakeLists.txt)
include(external/CMakeLists.txt)
We can build a tree of includes, remembering that when stepping into subdirectories (src/CMakeLists.txt), we need to use paths relative to the parent scope:
include(${CMAKE_CURRENT_LIST_DIR}/evolution/CMakeLists.txt)
include(${CMAKE_CURRENT_LIST_DIR}/initial/CMakeLists.txt)
include(${CMAKE_CURRENT_LIST_DIR}/io/CMakeLists.txt)
include(${CMAKE_CURRENT_LIST_DIR}/parser/CMakeLists.txt)
With this, we can define and link to the targets anywhere within the file tree accessed via include() statements. However, we should choose to define them at a place that is most intuitive for maintainers and code contributors.
We can once again use CMake and Graphviz (http://www.graphviz.org/) to generate the dependency graph of this project:
$ cd build
$ cmake --graphviz=example.dot ..
$ dot -T png example.dot -o example.png
For the current setup, we obtain the following dependency graph:
We devote one recipe to the discussion of how to structure and organize Fortran projects for two reasons:
As we will see in this recipe, modern CMake allows us to express the configuration and build process in a very compact and modular way. As an example, we will use the elementary cellular automata from the previous two recipes, now ported to Fortran.
The file tree structure is very similar to the previous two recipes. We have replaced C++ with Fortran sources and in this case, we have no header files:
.
├── CMakeLists.txt
├── external
│ ├── CMakeLists.txt
│ ├── conversion.f90
│ └── README.md
├── src
│ ├── CMakeLists.txt
│ ├── evolution
│ │ ├── ancestors.f90
│ │ ├── CMakeLists.txt
│ │ ├── empty.f90
│ │ └── evolution.f90
│ ├── initial
│ │ ├── CMakeLists.txt
│ │ └── initial.f90
│ ├── io
│ │ ├── CMakeLists.txt
│ │ └── io.f90
│ ├── main.f90
│ └── parser
│ ├── CMakeLists.txt
│ └── parser.f90
└── tests
├── CMakeLists.txt
└── test.f90
The main program is in src/main.f90:
program example
use parser, only: get_arg_as_int
use conversion, only: binary_representation
use initial, only: initial_distribution
use io, only: print_row
use evolution, only: evolve
implicit none
integer :: num_steps
integer :: length
integer :: rule_decimal
integer :: rule_binary(8)
integer, allocatable :: row(:)
integer :: step
! parse arguments
num_steps = get_arg_as_int(1)
length = get_arg_as_int(2)
rule_decimal = get_arg_as_int(3)
! print information about parameters
print *, "number of steps: ", num_steps
print *, "length: ", length
print *, "rule: ", rule_decimal
! obtain binary representation for the rule
rule_binary = binary_representation(rule_decimal)
! create initial distribution
allocate(row(length))
call initial_distribution(row)
! print initial configuration
call print_row(row)
! the system evolves, print each step
do step = 1, num_steps
call evolve(row, rule_binary)
call print_row(row)
end do
deallocate(row)
end program
As in the previous recipe, we have placed the conversion module in external/conversion.f90:
module conversion
implicit none
public binary_representation
private
contains
pure function binary_representation(n_decimal)
integer, intent(in) :: n_decimal
integer :: binary_representation(8)
integer :: pos
integer :: n
binary_representation = 0
pos = 8
n = n_decimal
do while (n > 0)
binary_representation(pos) = mod(n, 2)
n = (n - binary_representation(pos))/2
pos = pos - 1
end do
end function
end module
The evolution library, which implements the time step, is artificially split into three files. The bulk is collected in src/evolution/evolution.f90:
module evolution
implicit none
public evolve
private
contains
subroutine not_visible()
! no-op call to demonstrate private/public visibility
call empty_subroutine_no_interface()
end subroutine
pure subroutine evolve(row, rule_binary)
use ancestors, only: compute_ancestors
integer, intent(inout) :: row(:)
integer, intent(in) :: rule_binary(8)
integer :: i
integer :: left, center, right
integer :: ancestry
integer, allocatable :: new_row(:)
allocate(new_row(size(row)))
do i = 1, size(row)
left = i - 1
center = i
right = i + 1
if (left < 1) left = left + size(row)
if (right > size(row)) right = right - size(row)
ancestry = compute_ancestors(row, left, center, right)
new_row(i) = rule_binary(ancestry)
end do
row = new_row
deallocate(new_row)
end subroutine
end module
The computation of ancestors is performed in src/evolution/ancestors.f90:
module ancestors
implicit none
public compute_ancestors
private
contains
pure integer function compute_ancestors(row, left, center, right) result(i)
integer, intent(in) :: row(:)
integer, intent(in) :: left, center, right
i = 4*row(left) + 2*row(center) + 1*row(right)
i = 8 - i
end function
end module
We also have an "empty" module in src/evolution/empty.f90:
module empty
implicit none
public empty_subroutine
private
contains
subroutine empty_subroutine()
end subroutine
end module
subroutine empty_subroutine_no_interface()
use empty, only: empty_subroutine
call empty_subroutine()
end subroutine
We will explain these choices in the next section.
The code for the starting condition is located in src/initial/initial.f90:
module initial
implicit none
public initial_distribution
private
contains
pure subroutine initial_distribution(row)
integer, intent(out) :: row(:)
row = 0
row(size(row)/2) = 1
end subroutine
end module
The src/io/io.f90 file contains a function to print a row:
module io
implicit none
public print_row
private
contains
subroutine print_row(row)
integer, intent(in) :: row(:)
character(size(row)) :: line
integer :: i
do i = 1, size(row)
if (row(i) == 1) then
line(i:i) = '*'
else
line(i:i) = ' '
end if
end do
print *, line
end subroutine
end module
The src/parser/parser.f90 file parses the command-line arguments:
module parser
implicit none
public get_arg_as_int
private
contains
integer function get_arg_as_int(n) result(i)
integer, intent(in) :: n
character(len=32) :: arg
call get_command_argument(n, arg)
read(arg , *) i
end function
end module
Finally, we have the test sources in tests/test.f90:
program test
use evolution, only: evolve
implicit none
integer :: row(9)
integer :: expected_result(9)
integer :: rule_binary(8)
integer :: i
! test rule 90
row = (/0, 1, 0, 1, 0, 1, 0, 1, 0/)
rule_binary = (/0, 1, 0, 1, 1, 0, 1, 0/)
call evolve(row, rule_binary)
expected_result = (/1, 0, 0, 0, 0, 0, 0, 0, 1/)
do i = 1, 9
if (row(i) /= expected_result(i)) then
print *, 'ERROR: test for rule 90 failed'
call exit(1)
end if
end do
! test rule 222
row = (/0, 0, 0, 0, 1, 0, 0, 0, 0/)
rule_binary = (/1, 1, 0, 1, 1, 1, 1, 0/)
call evolve(row, rule_binary)
expected_result = (/0, 0, 0, 1, 1, 1, 0, 0, 0/)
do i = 1, 9
if (row(i) /= expected_result(i)) then
print *, 'ERROR: test for rule 222 failed'
call exit(1)
end if
end do
end program
We will now discuss the corresponding CMake structure:
cmake_minimum_required(VERSION 3.5 FATAL_ERROR)
project(recipe-09 LANGUAGES Fortran)
include(GNUInstallDirs)
set(CMAKE_ARCHIVE_OUTPUT_DIRECTORY
${CMAKE_BINARY_DIR}/${CMAKE_INSTALL_LIBDIR})
set(CMAKE_LIBRARY_OUTPUT_DIRECTORY
${CMAKE_BINARY_DIR}/${CMAKE_INSTALL_LIBDIR})
set(CMAKE_RUNTIME_OUTPUT_DIRECTORY
${CMAKE_BINARY_DIR}/${CMAKE_INSTALL_BINDIR})
# defines targets and sources
add_subdirectory(src)
# contains an "external" library we will link to
add_subdirectory(external)
# enable testing and define tests
enable_testing()
add_subdirectory(tests)
add_executable(automata main.f90)
add_subdirectory(evolution)
add_subdirectory(initial)
add_subdirectory(io)
add_subdirectory(parser)
target_link_libraries(automata
PRIVATE
conversion
evolution
initial
io
parser
)
add_library(conversion "")
target_sources(conversion
PUBLIC
${CMAKE_CURRENT_LIST_DIR}/conversion.f90
)
add_library(initial "")
target_sources(initial
PUBLIC
${CMAKE_CURRENT_LIST_DIR}/initial.f90
)
add_library(evolution "")
target_sources(evolution
PRIVATE
empty.f90
PUBLIC
${CMAKE_CURRENT_LIST_DIR}/ancestors.f90
${CMAKE_CURRENT_LIST_DIR}/evolution.f90
)
add_executable(fortran_test test.f90)
target_link_libraries(fortran_test evolution)
add_test(
NAME
test_evolution
COMMAND
$<TARGET_FILE:fortran_test>
)
$ mkdir -p build
$ cd build
$ cmake ..
$ cmake --build .
Scanning dependencies of target conversion
[ 4%] Building Fortran object external/CMakeFiles/conversion.dir/conversion.f90.o
[ 8%] Linking Fortran static library ../lib64/libconversion.a
[ 8%] Built target conversion
Scanning dependencies of target evolution
[ 12%] Building Fortran object src/evolution/CMakeFiles/evolution.dir/ancestors.f90.o
[ 16%] Building Fortran object src/evolution/CMakeFiles/evolution.dir/empty.f90.o
[ 20%] Building Fortran object src/evolution/CMakeFiles/evolution.dir/evolution.f90.o
[ 25%] Linking Fortran static library ../../lib64/libevolution.a
[ 25%] Built target evolution
Scanning dependencies of target initial
[ 29%] Building Fortran object src/initial/CMakeFiles/initial.dir/initial.f90.o
[ 33%] Linking Fortran static library ../../lib64/libinitial.a
[ 33%] Built target initial
Scanning dependencies of target io
[ 37%] Building Fortran object src/io/CMakeFiles/io.dir/io.f90.o
[ 41%] Linking Fortran static library ../../lib64/libio.a
[ 41%] Built target io
Scanning dependencies of target parser
[ 45%] Building Fortran object src/parser/CMakeFiles/parser.dir/parser.f90.o
[ 50%] Linking Fortran static library ../../lib64/libparser.a
[ 50%] Built target parser
Scanning dependencies of target example
[ 54%] Building Fortran object src/CMakeFiles/example.dir/__/external/conversion.f90.o
[ 58%] Building Fortran object src/CMakeFiles/example.dir/evolution/ancestors.f90.o
[ 62%] Building Fortran object src/CMakeFiles/example.dir/evolution/evolution.f90.o
[ 66%] Building Fortran object src/CMakeFiles/example.dir/initial/initial.f90.o
[ 70%] Building Fortran object src/CMakeFiles/example.dir/io/io.f90.o
[ 75%] Building Fortran object src/CMakeFiles/example.dir/parser/parser.f90.o
[ 79%] Building Fortran object src/CMakeFiles/example.dir/main.f90.o
[ 83%] Linking Fortran executable ../bin/example
[ 83%] Built target example
Scanning dependencies of target fortran_test
[ 87%] Building Fortran object tests/CMakeFiles/fortran_test.dir/__/src/evolution/ancestors.f90.o
[ 91%] Building Fortran object tests/CMakeFiles/fortran_test.dir/__/src/evolution/evolution.f90.o
[ 95%] Building Fortran object tests/CMakeFiles/fortran_test.dir/test.f90.o
[100%] Linking Fortran executable
$ ctest
Running tests...
Start 1: test_evolution
1/1 Test #1: test_evolution ................... Passed 0.00 sec
100% tests passed, 0 tests failed out of 1
Following Recipe 7, Limiting scope with add_subdirectory, we will discuss the CMake structure from the bottom up, from the individual CMakeLists.txt files defining each library, such as src/evolution/CMakeLists.txt:
add_library(evolution "")
target_sources(evolution
PRIVATE
empty.f90
PUBLIC
${CMAKE_CURRENT_LIST_DIR}/ancestors.f90
${CMAKE_CURRENT_LIST_DIR}/evolution.f90
)
These individual CMakeLists.txt files define libraries as close as possible to the sources, following the same reasoning as in previous two recipes: code developers with knowledge of this library and possibly limited knowledge of the CMake framework only need to edit files in this directory: divide and conquer.
We first define the library name with add_library and then define its sources and include directories, as well as their target visibility. In this case, both ancestors.f90 and evolution.f90 are PUBLIC since their module interfaces are accessed outside the library, whereas the module interface of empty.f90 is not accessed outside the file and therefore we mark this source as PRIVATE.
Moving one level up, the libraries are assembled in src/CMakeLists.txt:
add_executable(automata main.f90)
add_subdirectory(evolution)
add_subdirectory(initial)
add_subdirectory(io)
add_subdirectory(parser)
target_link_libraries(automata
PRIVATE
conversion
evolution
initial
io
parser
)
This file, in turn, is referenced in the top-level CMakeLists.txt. This means that we have built our project from a tree of libraries using a tree of CMakeLists.txt files, added using add_subdirectory. As discussed in Recipe 7, Limiting scope with add_subdirectory, this approach scales to large projects without the need to carry lists of source files in global variables across directories, with the added bonus of isolating scopes and namespaces.
Comparing this Fortran example with the C++ version (Recipe 7), we can note that we had to do less CMake work in the Fortran case; we do not have to use target_include_directories since there are no header files and interfaces are communicated via the generated Fortran module files. Also, observe that we neither have to worry about the order of source files listed in target_sources, nor do we have to impose any explicit dependencies between libraries! CMake is able to infer Fortran module dependencies from the source file dependencies. Using target_sources in combination with PRIVATE and PUBLIC allows us to express interfaces in a compact and robust fashion.
In this recipe, we have not specified a directory where Fortran module files should be placed and we have kept this transparent. The location for module files can be specified by setting the CMAKE_Fortran_MODULE_DIRECTORY CMake variable. Note that it is also possible to set this as a target property, Fortran_MODULE_DIRECTORY, thus achieving a finer level of control. See https://cmake.org/cmake/help/v3.5/prop_tgt/Fortran_MODULE_DIRECTORY.html.
In this chapter, we will cover the following recipes:
Every project has to deal with dependencies and CMake makes it relatively easy to find out whether these dependencies are present on the system where we configure our project. Chapter 3, Detecting External Libraries and Programs, showed how to find dependencies installed on the system and we have used that same pattern so far. However, if dependencies are not satisfied, the most we can achieve is fail the configuration and alert the user of the reasons for such a failure. However, with CMake it is possible to organize our projects such that dependencies can be automatically fetched and built if they are not found on the system. This chapter will present and analyze the ExternalProject.cmake and FetchContent.cmake standard modules and their use in the superbuild pattern. The former allows us to retrieve the dependencies of our project at build time and has been a part of CMake for a long time. The latter module was added in version 3.11 of CMake and allows us to retrieve dependencies at configure time. With the superbuild pattern, we can effectively leverage CMake as an advanced package manager: within your project you will handle dependencies in the same manner, whether already available on the system or whether they need to be built from scratch. The next five recipes will walk you through the pattern and show how it can be used to fetch and build virtually any dependency.
This recipe will introduce the superbuild pattern with a very simple example. We will show how to use the ExternalProject_Add command to build a simple "Hello, World" program.
This recipe will build the "Hello, World" executable from the following source code (hello-world.cpp):
#include <cstdlib>
#include <iostream>
#include <string>
std::string say_hello() { return std::string("Hello, CMake superbuild world!"); }
int main() {
std::cout << say_hello() << std::endl;
return EXIT_SUCCESS;
}
The project is structured as follows, with a root CMakeLists.txt, and a src/CMakeLists.txt file:
.
├── CMakeLists.txt
└── src
├── CMakeLists.txt
└── hello-world.cpp
Let us first look at CMakeLists.txt in the root folder:
cmake_minimum_required(VERSION 3.5 FATAL_ERROR)
project(recipe-01 LANGUAGES CXX)
set(CMAKE_CXX_STANDARD 11)
set(CMAKE_CXX_EXTENSIONS OFF)
set(CMAKE_CXX_STANDARD_REQUIRED ON)
set_property(DIRECTORY PROPERTY EP_BASE ${CMAKE_BINARY_DIR}/subprojects)
include(ExternalProject)
ExternalProject_Add(${PROJECT_NAME}_core
SOURCE_DIR
${CMAKE_CURRENT_LIST_DIR}/src
CMAKE_ARGS
-DCMAKE_CXX_COMPILER=${CMAKE_CXX_COMPILER}
-DCMAKE_CXX_STANDARD=${CMAKE_CXX_STANDARD}
-DCMAKE_CXX_EXTENSIONS=${CMAKE_CXX_EXTENSIONS}
-DCMAKE_CXX_STANDARD_REQUIRED=${CMAKE_CXX_STANDARD_REQUIRED}
CMAKE_CACHE_ARGS
-DCMAKE_CXX_FLAGS:STRING=${CMAKE_CXX_FLAGS}
BUILD_ALWAYS
1
INSTALL_COMMAND
""
)
Let us now move on to src/CMakeLists.txt. Since we are adding our "Hello, World" sources as an external project, this is a full-fledged CMakeLists.txt file for a standalone project:
cmake_minimum_required(VERSION 3.5 FATAL_ERROR)
project(recipe-01_core LANGUAGES CXX)
add_executable(hello-world hello-world.cpp)
Configuring and building our project is done as usual:
$ mkdir -p build
$ cmake ..
$ cmake --build .
The structure of the build directory is now slightly more complex. In particular, we notice the subprojects folder with the following contents:
build/subprojects/
├── Build
│ └── recipe-01_core
│ ├── CMakeCache.txt
│ ├── CMakeFiles
│ ├── cmake_install.cmake
│ ├── hello-world
│ └── Makefile
├── Download
│ └── recipe-01_core
├── Install
│ └── recipe-01_core
├── Stamp
│ └── recipe-01_core
│ ├── recipe-01_core-configure
│ ├── recipe-01_core-done
│ ├── recipe-01_core-download
│ ├── recipe-01_core-install
│ ├── recipe-01_core-mkdir
│ ├── recipe-01_core-patch
│ └── recipe-01_core-update
└── tmp
└── recipe-01_core
├── recipe-01_core-cache-.cmake
├── recipe-01_core-cfgcmd.txt
└── recipe-01_core-cfgcmd.txt.in
recipe-01_core has been built into a subdirectory of build/subprojects, called Build/recipe-01_core, which is the EP_BASE we have set.
The hello-world executable has been created under Build/recipe-01_core. The additional subfolders tmp/recipe-01_core and Stamp/recipe-01_core contain temporary files, such as the CMake cache script recipe-01_core-cache-.cmake, and the stamp files for the various steps CMake has performed to build the external project.
The ExternalProject_Add command can be used to add sources from third parties. Our first example, however, shows how to manage our own project as an assembly of different CMake projects. In this example, both the root and the leaf CMakeLists.txt declared a CMake project, that is, both of them used the project command.
ExternalProject_Add has many options that can be used to fine-tune all aspects of the configuration and compilation of external projects. These options can be classified into the following:
TMP_DIR = <EP_BASE>/tmp/<name> STAMP_DIR = <EP_BASE>/Stamp/<name> DOWNLOAD_DIR = <EP_BASE>/Download/<name> SOURCE_DIR = <EP_BASE>/Source/<name> BINARY_DIR = <EP_BASE>/Build/<name> INSTALL_DIR = <EP_BASE>/Install/<name>
$ cmake -DCMAKE_CXX_COMPILER=g++ -DCMAKE_CXX_STANDARD=11
-DCMAKE_CXX_EXTENSIONS=OFF -DCMAKE_CXX_STANDARD_REQUIRED=ON
-C/home/roberto/Workspace/robertodr/cmake-cookbook/chapter-08/recipe-01/cxx-example/build/subprojects/tmp/recipe-01_core/recipe-01_core-cache-.cmake "-GUnix Makefiles" /home/roberto/Workspace/robertodr/cmake-cookbook/chapter-08/recipe-01/cxx-example/src
ExternalProject.cmake defines the command ExternalProject_Get_Property which, as the name suggests, is useful to retrieve properties of external projects. The properties on external projects are set when first invoking the ExternalProject_Add command. For example, retrieving the arguments to be passed to CMake when configuring recipe-01_core can be achieved with:
ExternalProject_Get_Property(${PROJECT_NAME}_core CMAKE_ARGS)
message(STATUS "CMAKE_ARGS of ${PROJECT_NAME}_core ${CMAKE_ARGS}")
We will explore in detail the flexibility of the ExternalProject_Add command in the following recipes. Sometimes, however, the external project we want to use might require additional, non-standard steps to be performed. For this reason, the ExternalProject.cmake module defines the following additional commands:
The Boost libraries provide a rich C++ programming infrastructure and are popular among C++ developers. We have already shown how to find the Boost libraries on our system in Chapter 3, Detecting External Libraries and Programs. Sometimes, however, the version of Boost required by your project might not be available on the system. This recipe will show how to leverage the superbuild pattern to ship your code with the confidence that a missing dependency will not stop the configuration. We will reuse the code example from Recipe 8, Detecting the Boost libraries, in Chapter 3, Detecting External Libraries and Programs, but reorganize it in the form of a superbuild. This will be the layout of the project:
.
├── CMakeLists.txt
├── external
│ └── upstream
│ ├── boost
│ │ └── CMakeLists.txt
│ └── CMakeLists.txt
└── src
├── CMakeLists.txt
└── path-info.cpp
You will notice that there are four CMakeLists.txt files in the project source tree. The following section will walk you through these.
We will begin with the root CMakeLists.txt:
cmake_minimum_required(VERSION 3.5 FATAL_ERROR)
project(recipe-02 LANGUAGES CXX)
set(CMAKE_CXX_STANDARD 11)
set(CMAKE_CXX_EXTENSIONS OFF)
set(CMAKE_CXX_STANDARD_REQUIRED ON)
set_property(DIRECTORY PROPERTY EP_BASE ${CMAKE_BINARY_DIR}/subprojects)
set(STAGED_INSTALL_PREFIX ${CMAKE_BINARY_DIR}/stage)
message(STATUS "${PROJECT_NAME} staged install: ${STAGED_INSTALL_PREFIX}")
list(APPEND BOOST_COMPONENTS_REQUIRED filesystem system)
set(Boost_MINIMUM_REQUIRED 1.61)
add_subdirectory(external/upstream)
include(ExternalProject)
ExternalProject_Add(${PROJECT_NAME}_core
DEPENDS
boost_external
SOURCE_DIR
${CMAKE_CURRENT_LIST_DIR}/src
CMAKE_ARGS
-DCMAKE_CXX_COMPILER=${CMAKE_CXX_COMPILER}
-DCMAKE_CXX_STANDARD=${CMAKE_CXX_STANDARD}
-DCMAKE_CXX_EXTENSIONS=${CMAKE_CXX_EXTENSIONS}
-DCMAKE_CXX_STANDARD_REQUIRED=${CMAKE_CXX_STANDARD_REQUIRED}
CMAKE_CACHE_ARGS
-DCMAKE_CXX_FLAGS:STRING=${CMAKE_CXX_FLAGS}
-DCMAKE_INCLUDE_PATH:PATH=${BOOST_INCLUDEDIR}
-DCMAKE_LIBRARY_PATH:PATH=${BOOST_LIBRARYDIR}
BUILD_ALWAYS
1
INSTALL_COMMAND
""
)
Let us now look at the CMakeLists.txt in external/upstream. This file simply adds the boost folder as an additional directory:
add_subdirectory(boost)
The CMakeLists.txt in external/upstream/boost describes the operations needed to satisfy the dependency on Boost. Our goal is simple, if the desired version is not installed, download the source archive and build it:
find_package(Boost ${Boost_MINIMUM_REQUIRED} QUIET COMPONENTS "${BOOST_COMPONENTS_REQUIRED}")
if(Boost_FOUND)
message(STATUS "Found Boost version ${Boost_MAJOR_VERSION}.${Boost_MINOR_VERSION}.${Boost_SUBMINOR_VERSION}")
add_library(boost_external INTERFACE)
else()
# ... discussed below
endif()
else()
message(STATUS "Boost ${Boost_MINIMUM_REQUIRED} could not be located, Building Boost 1.61.0 instead.")
if(CMAKE_CXX_COMPILER_ID MATCHES "GNU")
if(APPLE)
set(_toolset "darwin")
else()
set(_toolset "gcc")
endif()
elseif(CMAKE_CXX_COMPILER_ID MATCHES ".*Clang")
set(_toolset "clang")
elseif(CMAKE_CXX_COMPILER_ID MATCHES "Intel")
if(APPLE)
set(_toolset "intel-darwin")
else()
set(_toolset "intel-linux")
endif()
endif()
if(NOT "${BOOST_COMPONENTS_REQUIRED}" STREQUAL "")
# Replace unit_test_framework (used by CMake's find_package) with test (understood by Boost build toolchain)
string(REPLACE "unit_test_framework" "test" _b2_needed_components "${BOOST_COMPONENTS_REQUIRED}")
# Generate argument for BUILD_BYPRODUCTS
set(_build_byproducts)
set(_b2_select_libraries)
foreach(_lib IN LISTS _b2_needed_components)
list(APPEND _build_byproducts ${STAGED_INSTALL_PREFIX}/boost/lib/libboost_${_lib}${CMAKE_SHARED_LIBRARY_SUFFIX})
list(APPEND _b2_select_libraries --with-${_lib})
endforeach()
# Transform the ;-separated list to a ,-separated list (digested by the Boost build toolchain!)
string(REPLACE ";" "," _b2_needed_components "${_b2_needed_components}")
set(_bootstrap_select_libraries "--with-libraries=${_b2_needed_components}")
string(REPLACE ";" ", " printout "${BOOST_COMPONENTS_REQUIRED}")
message(STATUS " Libraries to be built: ${printout}")
endif()
include(ExternalProject)
ExternalProject_Add(boost_external
URL
https://sourceforge.net/projects/boost/files/boost/1.61.0/boost_1_61_0.zip
URL_HASH
SHA256=02d420e6908016d4ac74dfc712eec7d9616a7fc0da78b0a1b5b937536b2e01e8
DOWNLOAD_NO_PROGRESS
1
UPDATE_COMMAND
""
CONFIGURE_COMMAND
<SOURCE_DIR>/bootstrap.sh
--with-toolset=${_toolset}
--prefix=${STAGED_INSTALL_PREFIX}/boost
${_bootstrap_select_libraries}
BUILD_COMMAND
<SOURCE_DIR>/b2 -q
link=shared
threading=multi
variant=release
toolset=${_toolset}
${_b2_select_libraries}
LOG_BUILD
1
BUILD_IN_SOURCE
1
INSTALL_COMMAND
<SOURCE_DIR>/b2 -q install
link=shared
threading=multi
variant=release
toolset=${_toolset}
${_b2_select_libraries}
LOG_INSTALL
1
BUILD_BYPRODUCTS
"${_build_byproducts}"
)
set(
BOOST_ROOT ${STAGED_INSTALL_PREFIX}/boost
CACHE PATH "Path to internally built Boost installation root"
FORCE
)
set(
BOOST_INCLUDEDIR ${BOOST_ROOT}/include
CACHE PATH "Path to internally built Boost include directories"
FORCE
)
set(
BOOST_LIBRARYDIR ${BOOST_ROOT}/lib
CACHE PATH "Path to internally built Boost library directories"
FORCE
)
unset(_toolset)
unset(_b2_needed_components)
unset(_build_byproducts)
unset(_b2_select_libraries)
unset(_boostrap_select_libraries)
Finally, let us look at src/CMakeLists.txt. This file describes a standalone project:
cmake_minimum_required(VERSION 3.5 FATAL_ERROR)
project(recipe-02_core LANGUAGES CXX)
find_package(Boost 1.61 REQUIRED COMPONENTS filesystem)
add_executable(path-info path-info.cpp)
target_link_libraries(path-info
PUBLIC
Boost::filesystem
)
This recipe shows how the superbuild pattern can be harnessed to muster the dependencies of your project. Let us take another look at the layout of the project:
.
├── CMakeLists.txt
├── external
│ └── upstream
│ ├── boost
│ │ └── CMakeLists.txt
│ └── CMakeLists.txt
└── src
├── CMakeLists.txt
└── path-info.cpp
We have introduced four CMakeLists.txt files in the project source tree:
Let us start start the discussion with the external/upstream/boost/CMakeLists.txt file. Boost uses its own build system and hence we need to be slightly more verbose in our ExternalProject_Add to get everything set up correctly:
CONFIGURE_COMMAND
<SOURCE_DIR>/bootstrap.sh
--with-toolset=${_toolset}
--prefix=${STAGED_INSTALL_PREFIX}/boost
${_bootstrap_select_libraries}
Once Boost has been built, the ${STAGED_INSTALL_PREFIX}/boost folder in the build directory will contain our desired libraries. We need to pass this information down to our project, whose build system is generated in src/CMakeLists.txt. To achieve this goal, we pass two additional CMAKE_CACHE_ARGS in the ExternalProject_Add in the root CMakeLists.txt:
By setting these variables to our freshly built installation of Boost, we ensure that the dependency will be properly picked up.
The superbuild pattern can be used to manage fairly complex dependencies, for projects in all the languages supported by CMake. As demonstrated in the previous recipe, it is not necessary for the various subprojects to managed by CMake as well. In contrast to the previous recipe, the external subproject in this recipe will be a CMake project and will show how to download, build, and install the FFTW library using a superbuild. FFTW is a Fast Fourier Transform library, freely available at http://www.fftw.org.
The directory layout for this recipe shows the now familiar structure for a superbuild:
.
├── CMakeLists.txt
├── external
│ └── upstream
│ ├── CMakeLists.txt
│ └── fftw3
│ └── CMakeLists.txt
└── src
├── CMakeLists.txt
└── fftw_example.c
The code for our project, fftw_example.c, is located in the src subdirectory and will calculate the Fourier transform of a function defined in the source code.
Let us start from the root CMakeLists.txt. This file puts together the whole superbuild process:
cmake_minimum_required(VERSION 3.5 FATAL_ERROR)
project(recipe-03 LANGUAGES C)
set(CMAKE_C_STANDARD 99)
set(CMAKE_C_EXTENSIONS OFF)
set(CMAKE_C_STANDARD_REQUIRED ON)
set_property(DIRECTORY PROPERTY EP_BASE ${CMAKE_BINARY_DIR}/subprojects)
set(STAGED_INSTALL_PREFIX ${CMAKE_BINARY_DIR}/stage)
message(STATUS "${PROJECT_NAME} staged install: ${STAGED_INSTALL_PREFIX}")
add_subdirectory(external/upstream)
include(ExternalProject)
ExternalProject_Add(${PROJECT_NAME}_core
DEPENDS
fftw3_external
SOURCE_DIR
${CMAKE_CURRENT_LIST_DIR}/src
CMAKE_ARGS
-DFFTW3_DIR=${FFTW3_DIR}
-DCMAKE_C_STANDARD=${CMAKE_C_STANDARD}
-DCMAKE_C_EXTENSIONS=${CMAKE_C_EXTENSIONS}
-DCMAKE_C_STANDARD_REQUIRED=${CMAKE_C_STANDARD_REQUIRED}
CMAKE_CACHE_ARGS
-DCMAKE_C_FLAGS:STRING=${CMAKE_C_FLAGS}
-DCMAKE_PREFIX_PATH:PATH=${CMAKE_PREFIX_PATH}
BUILD_ALWAYS
1
INSTALL_COMMAND
""
)
The external/upstream subdirectory also contains a CMakeLists.txt:
add_subdirectory(fftw3)
The CMakeLists.txt in external/upstream/fftw3 takes care of our dependencies:
find_package(FFTW3 CONFIG QUIET)
find_package(FFTW3 CONFIG QUIET)
if(FFTW3_FOUND)
get_property(_loc TARGET FFTW3::fftw3 PROPERTY LOCATION)
message(STATUS "Found FFTW3: ${_loc} (found version ${FFTW3_VERSION})")
add_library(fftw3_external INTERFACE) # dummy
else()
# this branch will be discussed below
endif()
message(STATUS "Suitable FFTW3 could not be located. Downloading and building!")
include(ExternalProject)
ExternalProject_Add(fftw3_external
URL
http://www.fftw.org/fftw-3.3.8.tar.gz
URL_HASH
MD5=8aac833c943d8e90d51b697b27d4384d
DOWNLOAD_NO_PROGRESS
1
UPDATE_COMMAND
""
LOG_CONFIGURE
1
LOG_BUILD
1
LOG_INSTALL
1
CMAKE_ARGS
-DCMAKE_INSTALL_PREFIX=${STAGED_INSTALL_PREFIX}
-DBUILD_TESTS=OFF
CMAKE_CACHE_ARGS
-DCMAKE_C_FLAGS:STRING=$<$<BOOL:WIN32>:-DWITH_OUR_MALLOC>
)
include(GNUInstallDirs)
set(
FFTW3_DIR ${STAGED_INSTALL_PREFIX}/${CMAKE_INSTALL_LIBDIR}/cmake/fftw3
CACHE PATH "Path to internally built FFTW3Config.cmake"
FORCE
)
The CMakeLists.txt in the src folder is fairly compact:
cmake_minimum_required(VERSION 3.5 FATAL_ERROR)
project(recipe-03_core LANGUAGES C)
find_package(FFTW3 CONFIG REQUIRED)
get_property(_loc TARGET FFTW3::fftw3 PROPERTY LOCATION)
message(STATUS "Found FFTW3: ${_loc} (found version ${FFTW3_VERSION})")
add_executable(fftw_example fftw_example.c)
target_link_libraries(fftw_example
PRIVATE
FFTW3::fftw3
)
This recipe demonstrated how to download, build, and install an external project whose build system is managed by CMake. In contrast to the previous recipe, where a custom build system had to be used, this superbuild setup is rather compact. It is important to note the use of the CONFIG option to the find_package command; this tells CMake to first look for a FFTW3Config.cmake file in order to locate the FFTW3 library. Such a file exports the library as a target to be picked up by third-party projects. The target contains the version, configuration, and location of the library, that is, complete information on how the target was configured and built. In case the library is not installed on the system, we need to tell CMake where the FFTW3Config.cmake file is located. This can be done by setting the FFTW3_DIR variable. This was the very last step in the external/upstream/fftw3/CMakeLists.txt file, where, by using the GNUInstallDirs.cmake module, we set FFTW3_DIR as a cache variable to be picked up later on in the superbuild.
In Chapter 4, Creating and Running Tests, Recipe 3, Defining a unit test and linking against Google Test, we implemented unit testing using the Google Test framework and fetched the Google Test sources at configure time using the relatively new FetchContent module (available since CMake 3.11). In this chapter, we will revisit this recipe, focus less on the testing aspect, and dive a bit deeper into FetchContent, which provides a compact and versatile module to assemble project dependencies at configure time. For additional insight and for CMake below 3.11, we will also discuss how to emulate FetchContent using ExternalProject_Add at configure time.
In this recipe, we will build and test the same source files, main.cpp, sum_integers.cpp, sum_integers.hpp, and test.cpp, as in Chapter 4, Creating and Running Tests, Recipe 3, Defining a unit test and linking against Google Test. We will download all required Google Test sources at configure time using FetchContent or ExternalProject_Add and in this recipe only focus on the fetching of dependencies at configure time, not so much on the actual source code and its unit tests.
In this recipe, we will only focus on how to fetch the Google Test sources to build the gtest_main target. For a discussion on how this target is used to test the example sources, we refer the reader to Chapter 4, Creating and Running Tests, Recipe 3, Defining a unit test and linking against Google Test:
include(FetchContent)
FetchContent_Declare(
googletest
GIT_REPOSITORY https://github.com/google/googletest.git
GIT_TAG release-1.8.0
)
FetchContent_GetProperties(googletest)
if(NOT googletest_POPULATED)
FetchContent_Populate(googletest)
# ...
# adds the targets: gtest, gtest_main, gmock, gmock_main
add_subdirectory(
${googletest_SOURCE_DIR}
${googletest_BINARY_DIR}
)
# ...
endif()
$ mkdir -p build
$ cd build
$ cmake ..
build/
├── ...
├── _deps
│ ├── googletest-build
│ │ ├── ...
│ │ └── ...
│ ├── googletest-src
│ │ ├── ...
│ │ └── ...
│ └── googletest-subbuild
│ ├── ...
│ └── ...
└── ...
The FetchContent module enables populating content at configure time. In our case, we have fetched a Git repository with a well defined Git tag:
FetchContent_Declare(
googletest
GIT_REPOSITORY https://github.com/google/googletest.git
GIT_TAG release-1.8.0
)
The FetchContent module supports fetching content via any method supported by the ExternalProject module - in other words, via Subversion, Mercurial, CVS, or HTTP(S). The content name "googletest" was our choice and with this we will be able to reference the content when querying its properties, when populating directories, and later also when configuring the subproject. Before populating the project, we checked whether the content was already fetched, otherwise FetchContent_Populate() would have thrown an error if it was called more than once:
if(NOT googletest_POPULATED)
FetchContent_Populate(googletest)
# ...
endif()
Only then did we configure the subdirectory, which we can reference with the googletest_SOURCE_DIR and googletest_BINARY_DIR variables. They were set by FetchContent_Populate(googletest) and constructed based on the project name we gave when declaring the content:
add_subdirectory(
${googletest_SOURCE_DIR}
${googletest_BINARY_DIR}
)
The FetchContent module has a number of options (see https://cmake.org/cmake/help/v3.11/module/FetchContent.html) and here we can show one: how to change the default path into which the external project will be placed. Previously, we saw that by default the content is saved to ${CMAKE_BINARY_DIR}/_deps. We can change this location by setting FETCHCONTENT_BASE_DIR:
set(FETCHCONTENT_BASE_DIR ${CMAKE_BINARY_DIR}/custom)
FetchContent_Declare(
googletest
GIT_REPOSITORY https://github.com/google/googletest.git
GIT_TAG release-1.8.0
)
FetchContent has become a standard part of CMake in its 3.11 version. In the following code, we will try to emulate FetchContent using ExternalProject_Add at configure time. This will not only be practical for older CMake versions, it will hopefully also give us more insight into what is happening underneath the FetchContent layer and provide an interesting alternative to the typical build-time fetching of projects included using ExternalProject_Add. Our goal will be to write a fetch_git_repo macro and place it in fetch_git_repo.cmake so that we can fetch the content like this:
include(fetch_git_repo.cmake)
fetch_git_repo(
googletest
${CMAKE_BINARY_DIR}/_deps
https://github.com/google/googletest.git
release-1.8.0
)
# ...
# adds the targets: gtest, gtest_main, gmock, gmock_main
add_subdirectory(
${googletest_SOURCE_DIR}
${googletest_BINARY_DIR}
)
# ...
This feels similar to the use of FetchContent. Under the hood, we will use ExternalProject_Add. Let us now lift the hood and inspect the definition of fetch_git_repo in fetch_git_repo.cmake:
macro(fetch_git_repo _project_name _download_root _git_url _git_tag)
set(${_project_name}_SOURCE_DIR ${_download_root}/${_project_name}-src)
set(${_project_name}_BINARY_DIR ${_download_root}/${_project_name}-build)
# variables used configuring fetch_git_repo_sub.cmake
set(FETCH_PROJECT_NAME ${_project_name})
set(FETCH_SOURCE_DIR ${${_project_name}_SOURCE_DIR})
set(FETCH_BINARY_DIR ${${_project_name}_BINARY_DIR})
set(FETCH_GIT_REPOSITORY ${_git_url})
set(FETCH_GIT_TAG ${_git_tag})
configure_file(
${CMAKE_CURRENT_LIST_DIR}/fetch_at_configure_step.in
${_download_root}/CMakeLists.txt
@ONLY
)
# undefine them again
unset(FETCH_PROJECT_NAME)
unset(FETCH_SOURCE_DIR)
unset(FETCH_BINARY_DIR)
unset(FETCH_GIT_REPOSITORY)
unset(FETCH_GIT_TAG)
# configure sub-project
execute_process(
COMMAND
"${CMAKE_COMMAND}" -G "${CMAKE_GENERATOR}" .
WORKING_DIRECTORY
${_download_root}
)
# build sub-project which triggers ExternalProject_Add
execute_process(
COMMAND
"${CMAKE_COMMAND}" --build .
WORKING_DIRECTORY
${_download_root}
)
endmacro()
The macro receives the project name, download root, Git repository URL, and a Git tag. The macro defines ${_project_name}_SOURCE_DIR and ${_project_name}_BINARY_DIR, and we use a macro instead of a function since ${_project_name}_SOURCE_DIR and ${_project_name}_BINARY_DIR need to survive the scope of fetch_git_repo because we use them later in the main scope to configure the subdirectory:
add_subdirectory(
${googletest_SOURCE_DIR}
${googletest_BINARY_DIR}
)
Inside the fetch_git_repo macro, we wish to use ExternalProject_Add to fetch the external project at configure time and we achieve this with a trick in three steps:
cmake_minimum_required(VERSION 3.5 FATAL_ERROR)
project(fetch_git_repo_sub LANGUAGES NONE)
include(ExternalProject)
ExternalProject_Add(
@FETCH_PROJECT_NAME@
SOURCE_DIR "@FETCH_SOURCE_DIR@"
BINARY_DIR "@FETCH_BINARY_DIR@"
GIT_REPOSITORY
@FETCH_GIT_REPOSITORY@
GIT_TAG
@FETCH_GIT_TAG@
CONFIGURE_COMMAND ""
BUILD_COMMAND ""
INSTALL_COMMAND ""
TEST_COMMAND ""
)
Using configure_file, we generate a CMakeLists.txt file in which the previous placeholders are replaced by values defined in fetch_git_repo.cmake. Note that the previous ExternalProject_Add command is constructed to only fetch, not to configure, build, install, or test.
# configure sub-project
execute_process(
COMMAND
"${CMAKE_COMMAND}" -G "${CMAKE_GENERATOR}" .
WORKING_DIRECTORY
${_download_root}
)
# build sub-project which triggers ExternalProject_Add
execute_process(
COMMAND
"${CMAKE_COMMAND}" --build .
WORKING_DIRECTORY
${_download_root}
)
One nice aspect of this solution is that since the external dependency is not configured by ExternalProject_Add, we do not need to channel any configuration settings to the project via the ExternalProject_Add call. We can configure and build the module using add_subdirectory as if the external dependency was part of our project source tree. Brilliant disguise!
For a detailed discussion of the available FetchContent options, please consult https://cmake.org/cmake/help/v3.11/module/FetchContent.html.
The configure time ExternalProject_Add solution is inspired by the work and blog post of Craig Scott: https://crascit.com/2015/07/25/cmake-gtest/.
ExternalProject and FetchContent are two very powerful tools in your CMake arsenal. The previous recipes should have convinced you how versatile the superbuild approach is in managing projects with complex dependencies. We have so far shown how to use ExternalProject to handle the following:
The previous recipe showed how to use FetchContent to handle dependencies available from open source Git repositories. This recipe will show how to use ExternalProject to the same effect. This last recipe will introduce an example that will be reused in Recipe 4, Installing a superbuild, in Chapter 10, Writing an Installer.
The source tree for this superbuild should now feel familiar:
.
├── CMakeLists.txt
├── external
│ └── upstream
│ ├── CMakeLists.txt
│ └── message
│ └── CMakeLists.txt
└── src
├── CMakeLists.txt
└── use_message.cpp
The root directory has a CMakeLists.txt, which we already know will orchestrate the superbuild. The leaf directories src and external host our own source code and the CMake directives needed to satisfy the dependency on the message library, which we will build in this example.
The process of setting up a superbuild should by now feel familiar. Let us once again look at the necessary steps, starting with the root CMakeLists.txt:
cmake_minimum_required(VERSION 3.6 FATAL_ERROR)
project(recipe-05 LANGUAGES CXX)
set(CMAKE_CXX_STANDARD 11)
set(CMAKE_CXX_EXTENSIONS OFF)
set(CMAKE_CXX_STANDARD_REQUIRED ON)
if(NOT DEFINED CMAKE_BUILD_TYPE OR "${CMAKE_BUILD_TYPE}" STREQUAL "")
set(CMAKE_BUILD_TYPE Release CACHE STRING "Build type" FORCE)
endif()
message(STATUS "Build type set to ${CMAKE_BUILD_TYPE}")
set_property(DIRECTORY PROPERTY EP_BASE ${CMAKE_BINARY_DIR}/subprojects)
set(STAGED_INSTALL_PREFIX ${CMAKE_BINARY_DIR}/stage)
message(STATUS "${PROJECT_NAME} staged install: ${STAGED_INSTALL_PREFIX}")
add_subdirectory(external/upstream)
include(ExternalProject)
ExternalProject_Add(${PROJECT_NAME}_core
DEPENDS
message_external
SOURCE_DIR
${CMAKE_CURRENT_SOURCE_DIR}/src
CMAKE_ARGS
-DCMAKE_BUILD_TYPE=${CMAKE_BUILD_TYPE}
-DCMAKE_CXX_COMPILER=${CMAKE_CXX_COMPILER}
-DCMAKE_CXX_STANDARD=${CMAKE_CXX_STANDARD}
-DCMAKE_CXX_EXTENSIONS=${CMAKE_CXX_EXTENSIONS}
-DCMAKE_CXX_STANDARD_REQUIRED=${CMAKE_CXX_STANDARD_REQUIRED}
-Dmessage_DIR=${message_DIR}
CMAKE_CACHE_ARGS
-DCMAKE_CXX_FLAGS:STRING=${CMAKE_CXX_FLAGS}
-DCMAKE_PREFIX_PATH:PATH=${CMAKE_PREFIX_PATH}
BUILD_ALWAYS
1
INSTALL_COMMAND
""
)
The CMakeLists.txt in external/upstream only contains one command:
add_subdirectory(message)
Jumping into the message folder, we again see the usual commands for managing our dependency on the message library:
find_package(message 1 CONFIG QUIET)
get_property(_loc TARGET message::message-shared PROPERTY LOCATION)
message(STATUS "Found message: ${_loc} (found version ${message_VERSION})")
add_library(message_external INTERFACE) # dummy
message(STATUS "Suitable message could not be located, Building message instead.")
include(ExternalProject)
ExternalProject_Add(message_external
GIT_REPOSITORY
https://github.com/dev-cafe/message.git
GIT_TAG
master
UPDATE_COMMAND
""
CMAKE_ARGS
-DCMAKE_INSTALL_PREFIX=${STAGED_INSTALL_PREFIX}
-DCMAKE_BUILD_TYPE=${CMAKE_BUILD_TYPE}
-DCMAKE_CXX_COMPILER=${CMAKE_CXX_COMPILER}
-DCMAKE_CXX_STANDARD=${CMAKE_CXX_STANDARD}
-DCMAKE_CXX_EXTENSIONS=${CMAKE_CXX_EXTENSIONS}
-DCMAKE_CXX_STANDARD_REQUIRED=${CMAKE_CXX_STANDARD_REQUIRED}
CMAKE_CACHE_ARGS
-DCMAKE_CXX_FLAGS:STRING=${CMAKE_CXX_FLAGS}
TEST_AFTER_INSTALL
1
DOWNLOAD_NO_PROGRESS
1
LOG_CONFIGURE
1
LOG_BUILD
1
LOG_INSTALL
1
)
if(WIN32 AND NOT CYGWIN)
set(DEF_message_DIR ${STAGED_INSTALL_PREFIX}/CMake)
else()
set(DEF_message_DIR ${STAGED_INSTALL_PREFIX}/share/cmake/message)
endif()
file(TO_NATIVE_PATH "${DEF_message_DIR}" DEF_message_DIR)
set(message_DIR ${DEF_message_DIR}
CACHE PATH "Path to internally built messageConfig.cmake" FORCE)
Finally, let us look at the CMakeLists.txt in the src folder:
cmake_minimum_required(VERSION 3.6 FATAL_ERROR)
project(recipe-05_core
LANGUAGES CXX
)
set(CMAKE_CXX_STANDARD 11)
set(CMAKE_CXX_EXTENSIONS OFF)
set(CMAKE_CXX_STANDARD_REQUIRED ON)
find_package(message 1 CONFIG REQUIRED)
get_property(_loc TARGET message::message-shared PROPERTY LOCATION)
message(STATUS "Found message: ${_loc} (found version ${message_VERSION})")
add_executable(use_message use_message.cpp)
target_link_libraries(use_message
PUBLIC
message::message-shared
)
This recipe highlighted some new options to the ExternalProject_Add command:
The additional Test options understood by ExternalProject_Add are as follows:
These options assume that the external project manages testing using CTest. If the external project does not use CTest to manage testing, we can set the TEST_COMMAND option to execute tests.
Introducing the superbuild pattern even for modules that are part of your own project comes at the cost of introducing an additional layer, re-declaring small CMake projects, and passing configuration settings explicitly through ExternalProject_Add. The benefit of introducing this additional layer is a clear separation of variable and target scopes, which can help to manage complexity, dependencies, and namespaces in projects consisting of several components, where these components can be internal or external, and composed together by CMake.
In this chapter, we will cover the following recipes:
There are plenty of existing libraries that excel at very specific tasks. It's generally a very good idea to reuse such libraries in our own codebases, because we can rely on years of experience from other groups of experts. As computer architectures and compilers evolve, so do programming languages. Whereas years ago most scientific software was written in Fortran, nowadays C, C++, and interpreted languages – first and foremost Python – are taking the center stage. It is indeed more and more common to integrate code written in a compiled language with bindings to an interpreted language, since it affords the following benefits:
As we have consistently shown throughout the previous recipes, the project command can be used to set the languages used in the project via the LANGUAGES keyword. CMake has support for many – but not all – compiled programming languages. As of CMake 3.5, various flavors of assembly (such as ASM-ATT, ASM, ASM-MASM, and ASM-NASM), C, C++, Fortran, Java, RC (Windows Resource Compiler), and Swift are valid choices. CMake 3.8 added support for two more languages: C# and CUDA (see the release notes here: https://cmake.org/cmake/help/v3.8/release/3.8.html#languages).
In this chapter, we will show how to integrate codes written in different compiled (C, C++, and Fortran) and interpreted (Python) languages in a way that is portable and cross-platform. We will show how to leverage CMake and tools intrinsic to the different programming languages we aim to integrate.
Fortran has a venerated history as the language of high-performance computing. Many numerical linear algebra libraries are still written primarily in Fortran, as are many big number-crunching packages that need to preserve compatibility with legacy code amassed in the past decades. Whereas Fortran presents a very natural syntax for handling numerical arrays, it is lacking when it comes to interaction with the operating system, primarily because an interoperability layer with C, the de facto lingua franca of computer programming, was not mandated until the release of the Fortran 2003 standard. This recipe will show how to interface a Fortran code with both C system libraries and custom C code.
As shown in Chapter 7, Structuring Projects, we will structure our project as a tree. Each subdirectory has a CMakeLists.txt file with instructions pertaining to that directory. This allows us to confine as much information as possible within the leaf directories as in this example:
.
├── CMakeLists.txt
└── src
├── bt-randomgen-example.f90
├── CMakeLists.txt
├── interfaces
│ ├── CMakeLists.txt
│ ├── interface_backtrace.f90
│ ├── interface_randomgen.f90
│ └── randomgen.c
└── utils
├── CMakeLists.txt
└── util_strings.f90
In our case, we have a src subdirectory containing the sources, including bt-randomgen-example.f90, our executable. Two further subdirectories, interfaces and utils, contain more source code that will be compiled into libraries.
The source code in the interfaces subdirectory shows how to wrap the backtrace C system library. For example, the interface_backtrace.f90 contains:
module interface_backtrace
implicit none
interface
function backtrace(buffer, size) result(bt) bind(C, name="backtrace")
use, intrinsic :: iso_c_binding, only: c_int, c_ptr
type(c_ptr) :: buffer
integer(c_int), value :: size
integer(c_int) :: bt
end function
subroutine backtrace_symbols_fd(buffer, size, fd) bind(C, name="backtrace_symbols_fd")
use, intrinsic :: iso_c_binding, only: c_int, c_ptr
type(c_ptr) :: buffer
integer(c_int), value :: size, fd
end subroutine
end interface
end module
The above example shows the use of the following:
This subdirectory contains two more source files:
We have four CMakeLists.txt instances to look at: one root and tree leaves. Let us start with the root CMakeLists.txt:
cmake_minimum_required(VERSION 3.5 FATAL_ERROR)
project(recipe-01 LANGUAGES Fortran C)
set(CMAKE_ARCHIVE_OUTPUT_DIRECTORY ${CMAKE_CURRENT_BINARY_DIR}/lib)
set(CMAKE_LIBRARY_OUTPUT_DIRECTORY ${CMAKE_CURRENT_BINARY_DIR}/lib)
set(CMAKE_RUNTIME_OUTPUT_DIRECTORY ${CMAKE_CURRENT_BINARY_DIR}/bin)
set(CMAKE_Fortran_MODULE_DIRECTORY
${CMAKE_CURRENT_BINARY_DIR}/modules)
add_subdirectory(src)
add_subdirectory(interfaces)
add_subdirectory(utils)
In the interfaces subdirectory, we do the following:
include(FortranCInterface)
FortranCInterface_VERIFY()
find_package(Backtrace REQUIRED)
add_library(bt-randomgen-wrap SHARED "")
target_sources(bt-randomgen-wrap
PRIVATE
interface_backtrace.f90
interface_randomgen.f90
randomgen.c
)
target_link_libraries(bt-randomgen-wrap
PUBLIC
${Backtrace_LIBRARIES}
)
In the utils subdirectory, we have one more CMakeLists.txt. This is a one-liner: we create a new library target into which the source file in this subdirectory will be compiled. There are no dependencies for this target:
add_library(utils SHARED util_strings.f90)
Let us return to src/CMakeLists.txt:
add_executable(bt-randomgen-example bt-randomgen-example.f90)
target_link_libraries(bt-randomgen-example
PRIVATE
bt-randomgen-wrap
utils
)
Having identified the correct libraries to link to, we need to make sure that our program can correctly call the functions they define. Every compiler performs name mangling when generating machine code and, unfortunately, conventions for this operation are not universal, but compiler-dependent. FortranCInterface, which we have already encountered in Chapter 3, Detecting External Libraries and Programs, Recipe 4, Detecting the BLAS and LAPACK math libraries, checks the compatibility of the selected C compiler with the Fortran compiler. For our current purposes, name mangling is not really an issue. The Fortran 2003 standard defines a bind attribute for functions and subroutines that accepts an optional name argument. If this argument is provided, the compiler will generate symbols for those subroutines and functions using the name fixed by the programmers. For example, the backtrace function can be exposed to Fortran from C, preserving the name, as follows:
function backtrace(buffer, size) result(bt) bind(C, name="backtrace")
The CMake code in interfaces/CMakeLists.txt also showed that it is possible to create a library from source files in different languages. CMake is evidently able to do the following:
How does CMake determine which compiler to use? Specifying the LANGUAGES option to the project command will let CMake check for working compilers for the given languages on your system. When a target is added with lists of source files, CMake will appropriately determine the compiler based on the file extension. Hence, files terminating with .c will be compiled to object files using the C compiler already determined, whereas files terminating with .f90 (or .F90 if they need preprocessing) will be compiled using the working Fortran compiler. Similarly for C++, the .cpp or .cxx extensions will trigger usage of the C++ compiler. We have only listed some of the possible, valid file extensions for the C, C++, and Fortran languages, but CMake can recognize many more. What if the file extensions in your project are, for any reason, not among the ones that are recognized? The LANGUAGE source file property can be used to tell CMake which compiler to use on specific source files, like so:
set_source_files_properties(my_source_file.axx
PROPERTIES
LANGUAGE CXX
)
Finally, what about the linker? How does CMake determine the linker language for targets? For targets that do not mix programming languages, the choice is straightforward: invoke the linker via the compiler command that was used to generate the object files. If the targets do mix programming languages, as in our example, the linker language is chosen based on that whose preference value is highest among the ones available in the language mix. With our example mixing Fortran and C, the Fortran language has higher preference than the C language and is hence used as linker language. When mixing Fortran and C++, it is the latter to have higher preference and is hence used as the linker language. Much as with the compiler language, we can force CMake to use a specific linker language for our target via the corresponding LINKER_LANGUAGE property on targets:
set_target_properties(my_target
PROPERTIES
LINKER_LANGUAGE Fortran
)
Recipe 4, Detecting the BLAS and LAPACK math libraries, in Chapter 3, Detecting External Libraries and Programs, showed how to detect BLAS and LAPACK linear algebra libraries, written in Fortran, and how to use them in C++ code. Here we will revisit this recipe, but this time from a different angle: focusing less on detecting the external libraries but rather discussing the aspect of mixing C++ and Fortran and the name mangling in more depth.
In this recipe, we will reuse the sources from Chapter 3, Detecting External Libraries and Programs, Recipe 4, Detecting the BLAS and LAPACK math libraries. Although we will not modify the actual implementation sources or header files, we will modify the project tree structure following the recommendations discussed in Chapter 7, Structuring Projects, and arrive at the following source code structure:
.
├── CMakeLists.txt
├── README.md
└── src
├── CMakeLists.txt
├── linear-algebra.cpp
└── math
├── CMakeLists.txt
├── CxxBLAS.cpp
├── CxxBLAS.hpp
├── CxxLAPACK.cpp
└── CxxLAPACK.hpp
Here we have collected all the wrappers to BLAS and LAPACK, which provide the math library under src/math. The main program is linear-algebra.cpp. All sources are thus organized under the src subdirectory. To localize the scope, we have also split the CMake code over three CMakeLists.txt files, which we will discuss now.
This project mixes C++, which is the language of the main program, Fortran, because this is the language the libraries are written in, and C, which is needed to wrap the Fortran subroutines. In the root CMakeLists.txt file, we need to do the following:
cmake_minimum_required(VERSION 3.5 FATAL_ERROR)
project(recipe-02 LANGUAGES CXX C Fortran)
set(CMAKE_CXX_STANDARD 11)
set(CMAKE_CXX_EXTENSIONS OFF)
set(CMAKE_CXX_STANDARD_REQUIRED ON)
include(GNUInstallDirs)
set(CMAKE_ARCHIVE_OUTPUT_DIRECTORY
${CMAKE_BINARY_DIR}/${CMAKE_INSTALL_LIBDIR})
set(CMAKE_LIBRARY_OUTPUT_DIRECTORY
${CMAKE_BINARY_DIR}/${CMAKE_INSTALL_LIBDIR})
set(CMAKE_RUNTIME_OUTPUT_DIRECTORY
${CMAKE_BINARY_DIR}/${CMAKE_INSTALL_BINDIR})
set(CMAKE_Fortran_MODULE_DIRECTORY ${PROJECT_BINARY_DIR}/modules)
add_subdirectory(src)
The leaf file src/CMakeLists.txt adds yet another subdirectory, math, which contains the linear algebra wrappers. In src/math/CMakeLists.txt, we need to do the following:
find_package(BLAS REQUIRED)
find_package(LAPACK REQUIRED)
include(FortranCInterface)
FortranCInterface_VERIFY(CXX)
FortranCInterface_HEADER(
fc_mangle.h
MACRO_NAMESPACE "FC_"
SYMBOLS DSCAL DGESV
)
add_library(math "")
target_sources(math
PRIVATE
CxxBLAS.cpp
CxxLAPACK.cpp
)
target_include_directories(math
PUBLIC
${CMAKE_CURRENT_SOURCE_DIR}
${CMAKE_CURRENT_BINARY_DIR}
)
target_link_libraries(math
PUBLIC
${LAPACK_LIBRARIES}
)
Stepping back to src/CMakeLists.txt, we finally add an executable target and link it to our math library of BLAS/LAPACK wrappers:
add_executable(linear-algebra "")
target_sources(linear-algebra
PRIVATE
linear-algebra.cpp
)
target_link_libraries(linear-algebra
PRIVATE
math
)
Using find_package, we have identified the correct libraries to link to. As in the previous recipe, we need to make sure that our program can correctly call the functions they define. As in Chapter 3, Detecting External Libraries and Programs, Recipe 4, Detecting the BLAS and LAPACK math libraries, we face the problem of compiler-dependent name mangling of symbols. We use the FortranCInterface CMake module to check the compatibility of the selected C and C++ compilers with the Fortran compiler. We also use the FortranCInterface_HEADER function to generate a header file with macros to take care of name mangling of Fortran subroutines. This was achieved with the following code:
FortranCInterface_HEADER(
fc_mangle.h
MACRO_NAMESPACE "FC_"
SYMBOLS DSCAL DGESV
)
This command will generate the fc_mangle.h header file with name-mangling macros, as inferred from the Fortran compiler, and save it into the current binary directory, CMAKE_CURRENT_BINARY_DIR. We were careful to set CMAKE_CURRENT_BINARY_DIR as an include path for our math target. Consider the following generated fc_mangle.h:
#ifndef FC_HEADER_INCLUDED
#define FC_HEADER_INCLUDED
/* Mangling for Fortran global symbols without underscores. */
#define FC_GLOBAL(name,NAME) name##_
/* Mangling for Fortran global symbols with underscores. */
#define FC_GLOBAL_(name,NAME) name##_
/* Mangling for Fortran module symbols without underscores. */
#define FC_MODULE(mod_name,name, mod_NAME,NAME) __##mod_name##_MOD_##name
/* Mangling for Fortran module symbols with underscores. */
#define FC_MODULE_(mod_name,name, mod_NAME,NAME) __##mod_name##_MOD_##name
/* Mangle some symbols automatically. */
#define DSCAL FC_GLOBAL(dscal, DSCAL)
#define DGESV FC_GLOBAL(dgesv, DGESV)
#endif
The compiler in this example uses underscores for mangling. Since Fortran is case-insensitive, the subroutine might appear in either lowercase or uppercase, justifying the need to pass both cases to the macro. Notice that CMake will also generate macros for mangling symbols hidden behind Fortran modules.
Since we have carefully organized the sources into a library target and an executable target, we should comment on the use of the PUBLIC, INTERFACE, and PRIVATE visibility attributes for the targets. These are essential for a clean CMake project structure. As with sources, include directories, compile definitions, and options, the meaning of these attributes remains the same when used in conjunction with target_link_libraries:
Cython is an optimizing static compiler that allows to write C extensions for Python. Cython is a very powerful tool and uses the extended Cython programming language (based on Pyrex). A typical use case for Cython is speeding up Python code, but it can also be used to interface C/C++ with Python via a Cython layer. In this recipe, we will focus on the latter use case and demonstrate how to interface C/C++ and Python using Cython with the help of CMake.
As an example, we will use the following C++ code (account.cpp):
#include "account.hpp"
Account::Account() : balance(0.0) {}
Account::~Account() {}
void Account::deposit(const double amount) { balance += amount; }
void Account::withdraw(const double amount) { balance -= amount; }
double Account::get_balance() const { return balance; }
This code provides the following interface (account.hpp):
#pragma once
class Account {
public:
Account();
~Account();
void deposit(const double amount);
void withdraw(const double amount);
double get_balance() const;
private:
double balance;
};
Using this example code, we can create bank accounts that start with a balance of zero. We can deposit to and withdraw from an account and also query the account balance using get_balance(). The balance itself is a private member of the Account class.
Our goal is to be able to interact with this C++ class directly from Python – in other words, on the Python side, we wish to be able to do this:
account = Account()
account.deposit(100.0)
account.withdraw(50.0)
balance = account.get_balance()
To achieve this, we will need a Cython interface file (we will call this file account.pyx):
# describe the c++ interface
cdef extern from "account.hpp":
cdef cppclass Account:
Account() except +
void deposit(double)
void withdraw(double)
double get_balance()
# describe the python interface
cdef class pyAccount:
cdef Account *thisptr
def __cinit__(self):
self.thisptr = new Account()
def __dealloc__(self):
del self.thisptr
def deposit(self, amount):
self.thisptr.deposit(amount)
def withdraw(self, amount):
self.thisptr.withdraw(amount)
def get_balance(self):
return self.thisptr.get_balance()
Let us look at how to generate the Python interface:
# define minimum cmake version
cmake_minimum_required(VERSION 3.5 FATAL_ERROR)
# project name and supported language
project(recipe-03 LANGUAGES CXX)
# require C++11
set(CMAKE_CXX_STANDARD 11)
set(CMAKE_CXX_EXTENSIONS OFF)
set(CMAKE_CXX_STANDARD_REQUIRED ON)
if(NOT CMAKE_BUILD_TYPE)
set(CMAKE_BUILD_TYPE Release CACHE STRING "Build type" FORCE)
endif()
find_package(PythonInterp REQUIRED)
# directory cointaining UseCython.cmake and FindCython.cmake
list(APPEND CMAKE_MODULE_PATH ${CMAKE_CURRENT_SOURCE_DIR}/cmake-cython)
# this defines cython_add_module
include(UseCython)
# tells UseCython to compile this file as a c++ file
set_source_files_properties(account.pyx PROPERTIES CYTHON_IS_CXX TRUE)
# create python module
cython_add_module(account account.pyx account.cpp)
# location of account.hpp
target_include_directories(account
PRIVATE
${CMAKE_CURRENT_SOURCE_DIR}
)
# turn on testing
enable_testing()
# define test
add_test(
NAME
python_test
COMMAND
${CMAKE_COMMAND} -E env ACCOUNT_MODULE_PATH=$<TARGET_FILE_DIR:account>
${PYTHON_EXECUTABLE} ${CMAKE_CURRENT_SOURCE_DIR}/test.py
)
import os
import sys
sys.path.append(os.getenv('ACCOUNT_MODULE_PATH'))
from account import pyAccount as Account
account1 = Account()
account1.deposit(100.0)
account1.deposit(100.0)
account2 = Account()
account2.deposit(200.0)
account2.deposit(200.0)
account1.withdraw(50.0)
assert account1.get_balance() == 150.0
assert account2.get_balance() == 400.0
$ mkdir -p build
$ cd build
$ cmake ..
$ cmake --build .
$ ctest
Start 1: python_test
1/1 Test #1: python_test ...................... Passed 0.03 sec
100% tests passed, 0 tests failed out of 1
Total Test time (real) = 0.03 sec
In this recipe, we have interfaced Python and C++ using a relatively compact CMakeLists.txt file, but we have achieved this by using the FindCython.cmake and UseCython.cmake modules, which have been placed under cmake-cython. These modules are included using the following code:
# directory contains UseCython.cmake and FindCython.cmake
list(APPEND CMAKE_MODULE_PATH ${CMAKE_CURRENT_SOURCE_DIR}/cmake-cython)
# this defines cython_add_module
include(UseCython)
FindCython.cmake is included in UseCython.cmake and locates and defines ${CYTHON_EXECUTABLE}. The latter module defines the cython_add_module and cython_add_standalone_executable functions, which can be used to create Python modules and standalone executables, respectively. Both modules have been downloaded from https://github.com/thewtex/cython-cmake-example/tree/master/cmake.
In this recipe, we use cython_add_module to create a Python module library. Note how we set the non-standard CYTHON_IS_CXX source file property to TRUE, so that the cython_add_module function will know to compile pyx as a C++ file:
# tells UseCython to compile this file as a c++ file
set_source_files_properties(account.pyx PROPERTIES CYTHON_IS_CXX TRUE)
# create python module
cython_add_module(account account.pyx account.cpp)
The Python module is created inside ${CMAKE_CURRENT_BINARY_DIR}, and in order for the Python test.py script to locate it, we pass the relevant path with a custom environment variable, which is used inside test.py to set the PATH variable. Note how the COMMAND is set to call the CMake executable itself to set the local environment right before executing the Python script. This affords us platform-independence and avoids polluting the environment with spurious variables:
add_test(
NAME
python_test
COMMAND
${CMAKE_COMMAND} -E env ACCOUNT_MODULE_PATH=$<TARGET_FILE_DIR:account>
${PYTHON_EXECUTABLE} ${CMAKE_CURRENT_SOURCE_DIR}/test.py
)
We should also take a look at the account.pyx file, which is the interface file between Python and C++ and describes the C++ interface:
# describe the c++ interface
cdef extern from "account.hpp":
cdef cppclass Account:
Account() except +
void deposit(double)
void withdraw(double)
double get_balance()
You can see except + in the Account class constructor. This directive allows Cython to handle exceptions raised by the C++ code.
The account.pyx interface file also describes the Python interface:
# describe the python interface
cdef class pyAccount:
cdef Account *thisptr
def __cinit__(self):
self.thisptr = new Account()
def __dealloc__(self):
del self.thisptr
def deposit(self, amount):
self.thisptr.deposit(amount)
def withdraw(self, amount):
self.thisptr.withdraw(amount)
def get_balance(self):
return self.thisptr.get_balance()
We can see how the cinit constructor, the __dealloc__ destructor, and the deposit and withdraw methods, are matched with the corresponding C++ implementation counterparts.
To summarize, we have found a mechanism to couple Python and C++ by introducing a dependency on the Cython module. This module can preferably be installed by pip into a virtual environment or Pipenv, or by using Anaconda.
C could be coupled analogously. If we wish to take advantage of constructors and destructors, we could write a thin C++ layer around the C interface.
Typed Memoryviews offer the interesting functionality to map and access memory buffers allocated by C/C++ directly in Python, without creating any overhead: http://cython.readthedocs.io/en/latest/src/userguide/memoryviews.html. They make it possible to map NumPy arrays directly to C++ arrays.
The Boost libraries offer another popular alternative to interface C++ code with Python. This recipe will show how to use CMake for C++ projects that rely on Boost.Python to expose their functionality as a Python module. We will reuse the example from the previous recipe and attempt to interact with the same C++ implementation (account.cpp) as in the Cython example.
While we keep account.cpp unchanged, we modify the interface file from the previous recipe (account.hpp):
#pragma once
#define BOOST_PYTHON_STATIC_LIB
#include <boost/python.hpp>
class Account {
public:
Account();
~Account();
void deposit(const double amount);
void withdraw(const double amount);
double get_balance() const;
private:
double balance;
};
namespace py = boost::python;
BOOST_PYTHON_MODULE(account) {
py::class_<Account>("Account")
.def("deposit", &Account::deposit)
.def("withdraw", &Account::withdraw)
.def("get_balance", &Account::get_balance);
}
These are the required steps to use Boost.Python with your C++ project:
# define minimum cmake version
cmake_minimum_required(VERSION 3.5 FATAL_ERROR)
# project name and supported language
project(recipe-04 LANGUAGES CXX)
# require C++11
set(CMAKE_CXX_STANDARD 11)
set(CMAKE_CXX_EXTENSIONS OFF)
set(CMAKE_CXX_STANDARD_REQUIRED ON)
# we default to Release build type
if(NOT CMAKE_BUILD_TYPE)
set(CMAKE_BUILD_TYPE Release CACHE STRING "Build type" FORCE)
endif()
# for testing we will need the python interpreter
find_package(PythonInterp REQUIRED)
# we require python development headers
find_package(PythonLibs ${PYTHON_VERSION_MAJOR}.${PYTHON_VERSION_MINOR} EXACT REQUIRED)
# now search for the boost component
# depending on the boost version it is called either python,
# python2, python27, python3, python36, python37, ...
list(
APPEND _components
python${PYTHON_VERSION_MAJOR}${PYTHON_VERSION_MINOR}
python${PYTHON_VERSION_MAJOR}
python
)
set(_boost_component_found "")
foreach(_component IN ITEMS ${_components})
find_package(Boost COMPONENTS ${_component})
if(Boost_FOUND)
set(_boost_component_found ${_component})
break()
endif()
endforeach()
if(_boost_component_found STREQUAL "")
message(FATAL_ERROR "No matching Boost.Python component found")
endif()
# create python module
add_library(account
MODULE
account.cpp
)
target_link_libraries(account
PUBLIC
Boost::${_boost_component_found}
${PYTHON_LIBRARIES}
)
target_include_directories(account
PRIVATE
${PYTHON_INCLUDE_DIRS}
)
# prevent cmake from creating a "lib" prefix
set_target_properties(account
PROPERTIES
PREFIX ""
)
if(WIN32)
# python will not import dll but expects pyd
set_target_properties(account
PROPERTIES
SUFFIX ".pyd"
)
endif()
# turn on testing
enable_testing()
# define test
add_test(
NAME
python_test
COMMAND
${CMAKE_COMMAND} -E env ACCOUNT_MODULE_PATH=$<TARGET_FILE_DIR:account>
${PYTHON_EXECUTABLE} ${CMAKE_CURRENT_SOURCE_DIR}/test.py
)
$ mkdir -p build
$ cd build
$ cmake ..
$ cmake --build .
$ ctest
Start 1: python_test
1/1 Test #1: python_test ...................... Passed 0.10 sec
100% tests passed, 0 tests failed out of 1
Total Test time (real) = 0.11 sec
Instead of depending on the Cython module, this recipe now depends on locating the Boost libraries on the system, in combination with the Python development headers and library.
The Python development headers and library are searched for with the following:
find_package(PythonInterp REQUIRED)
find_package(PythonLibs ${PYTHON_VERSION_MAJOR}.${PYTHON_VERSION_MINOR} EXACT REQUIRED)
Note how we first searched for the interpreter and then for the development headers and libraries. Moreover, the search for PythonLibs asks for the exact same major and minor versions for the development headers and libraries as were found for the interpreter. This is necessary for ensuring that consistent versions of interpreter and libraries are used throughout the project. However, this command combination will not guarantee that an exactly matching version of the two will be found.
When locating the Boost.Python component, we have met the difficulty that the name of the component that we try to locate depends both on the Boost version and our Python environment. Depending on the Boost version, the component can be called python, python2, python3, python27, python36, python37, and so on. We have solved this problem by searching from specific to more generic names and only failing if no match can be located:
list(
APPEND _components
python${PYTHON_VERSION_MAJOR}${PYTHON_VERSION_MINOR}
python${PYTHON_VERSION_MAJOR}
python
)
set(_boost_component_found "")
foreach(_component IN ITEMS ${_components})
find_package(Boost COMPONENTS ${_component})
if(Boost_FOUND)
set(_boost_component_found ${_component})
break()
endif()
endforeach()
if(_boost_component_found STREQUAL "")
message(FATAL_ERROR "No matching Boost.Python component found")
endif()
Discovery and usage of the Boost libraries can be tweaked by setting additional CMake variables. For example, CMake offers the following options:
Another new aspect introduced by this recipe is the use of the MODULE option to the add_library command. We already know from Recipe 3, Building and linking shared and static libraries, in Chapter 1, From a Simple Executable to Libraries, that CMake accepts the following options as valid second argument to add_library:
The MODULE option introduced here will generate a plugin library; that is, a Dynamic Shared Object (DSO) that is not linked dynamically into any executable, but can still be loaded at runtime. Since we are extending Python with our own functionality written in C++, the Python interpreter will need to be able to load our library at runtime. This can be achieved by using the MODULE option to add_library and by preventing the addition of any prefix (for example, lib on Unix systems) to the name of our library target. The latter operation is carried out by setting the appropriate target property, like so:
set_target_properties(account
PROPERTIES
PREFIX ""
)
One aspect of all recipes that demonstrate the interfacing of Python and C++ is that we need to describe to the Python code how to hook up to the C++ layer and to list the symbols which should be visible to Python. We also have the possibility to (re)name these symbols. In the previous recipe, we did this in a separate account.pyx file. When using Boost.Python, we describe the interface directly in the C++ code, ideally close to the definition of the class or function we wish to interface:
BOOST_PYTHON_MODULE(account) {
py::class_<Account>("Account")
.def("deposit", &Account::deposit)
.def("withdraw", &Account::withdraw)
.def("get_balance", &Account::get_balance);
}
The BOOST_PYTHON_MODULE template is included from <boost/python.hpp> and is responsible for creating the Python interface. The module will expose an Account Python class that maps to the C++ class. In this case, we do not have to explicitly declare a constructor and destructor – these are created for us and called automatically when the Python object is created:
myaccount = Account()
The destructor is called when the object goes out of scope and is collected by the Python garbage collection. Also, observe how BOOST_PYTHON_MODULE exposes the deposit, withdraw, and get_balance functions, and maps them to the corresponding C++ class methods.
This way, the compiled module can be found by Python when placed in PYTHONPATH. In this recipe, we have achieved a relatively clean separation between the Python and C++ layers. The Python code is not restricted in functionality, does not require type annotation or rewriting of names, and remains pythonic:
from account import Account
account1 = Account()
account1.deposit(100.0)
account1.deposit(100.0)
account2 = Account()
account2.deposit(200.0)
account2.deposit(200.0)
account1.withdraw(50.0)
assert account1.get_balance() == 150.0
assert account2.get_balance() == 400.0
In this recipe, we rely on Boost being installed on the system and so the CMake code tries to detect the corresponding library. Alternatively, we could have shipped the Boost sources together with our project and build this dependency as part of the project. Boost is a portable way to interface Python with C(++). The portability with respect to compiler support and C++ standard however comes at a price: Boost.Python is not a lightweight dependency. In the following recipe, we will discuss a lightweight alternative to Boost.Python.
In the previous recipe, we have used Boost.Python to interface Python with C(++). In this recipe, we will try to interface Python with C++ using pybind11 as a lightweight alternative that makes use of C++11 features and therefore requires a compiler with C++11 support. As an additional variation to the previous recipe we will demonstrate how to fetch the pybind11 dependency at configure time and build our project including a Python interface using the FetchContent approach, which we met in Chapter 4, Creating and Running Tests, Recipe 3, Define a unit test and linking against Google Test, and discussed in Chapter 8, The Superbuild Pattern, Recipe 4, Managing dependencies with a superbuild: III. The Google Test framework. In Chapter 11, Packaging Projects, Recipe 2, Distributing a C++/Python project built with CMake/pybind11 via PyPI, we will revisit this example and show how to package it and make it installable with pip.
We will keep account.cpp unchanged with respect to the previous two recipes and only modify account.hpp:
#pragma once
#include <pybind11/pybind11.h>
class Account {
public:
Account();
~Account();
void deposit(const double amount);
void withdraw(const double amount);
double get_balance() const;
private:
double balance;
};
namespace py = pybind11;
PYBIND11_MODULE(account, m) {
py::class_<Account>(m, "Account")
.def(py::init())
.def("deposit", &Account::deposit)
.def("withdraw", &Account::withdraw)
.def("get_balance", &Account::get_balance);
}
We will follow the pybind11 documentation "Building with CMake" (https://pybind11.readthedocs.io/en/stable/compiling.html#building-with-cmake) and introduce the pybind11 CMake code using add_subdirectory. However, we will not place the pybind11 source code explicitly into our project directory, but rather demonstrate how to fetch pybind11 sources at configure time using FetchContent (https://cmake.org/cmake/help/v3.11/module/FetchContent.html).
For better code reuse in the next recipe, we will also place all sources into a subdirectory and use the following project layout:
.
├── account
│ ├── account.cpp
│ ├── account.hpp
│ ├── CMakeLists.txt
│ └── test.py
└── CMakeLists.txt
Let us analyze in detail the contents of the various CMakeLists.txt files in this project:
# define minimum cmake version
cmake_minimum_required(VERSION 3.11 FATAL_ERROR)
# project name and supported language
project(recipe-05 LANGUAGES CXX)
# require C++11
set(CMAKE_CXX_STANDARD 11)
set(CMAKE_CXX_EXTENSIONS OFF)
set(CMAKE_CXX_STANDARD_REQUIRED ON)
find_package(PythonInterp REQUIRED)
add_subdirectory(account)
# turn on testing
enable_testing()
# define test
add_test(
NAME
python_test
COMMAND
${CMAKE_COMMAND} -E env ACCOUNT_MODULE_PATH=$<TARGET_FILE_DIR:account>
${PYTHON_EXECUTABLE} ${CMAKE_CURRENT_SOURCE_DIR}/account/test.py
)
include(FetchContent)
FetchContent_Declare(
pybind11_sources
GIT_REPOSITORY https://github.com/pybind/pybind11.git
GIT_TAG v2.2
)
FetchContent_GetProperties(pybind11_sources)
if(NOT pybind11_sources_POPULATED)
FetchContent_Populate(pybind11_sources)
add_subdirectory(
${pybind11_sources_SOURCE_DIR}
${pybind11_sources_BINARY_DIR}
)
endif()
add_library(account
MODULE
account.cpp
)
target_link_libraries(account
PUBLIC
pybind11::module
)
set_target_properties(account
PROPERTIES
PREFIX "${PYTHON_MODULE_PREFIX}"
SUFFIX "${PYTHON_MODULE_EXTENSION}"
)
$ mkdir -p build
$ cd build
$ cmake ..
$ cmake --build .
$ ctest
Start 1: python_test
1/1 Test #1: python_test ...................... Passed 0.04 sec
100% tests passed, 0 tests failed out of 1
Total Test time (real) = 0.04 sec
The functionality and use of pybind11 is very similar to Boost.Python, the bonus being that pybind11 is a more lightweight dependency – although we will require C++11 support from the compiler. The interface definition in account.hpp is rather similar to that in the previous recipe:
#include <pybind11/pybind11.h>
// ...
namespace py = pybind11;
PYBIND11_MODULE(account, m) {
py::class_<Account>(m, "Account")
.def(py::init())
.def("deposit", &Account::deposit)
.def("withdraw", &Account::withdraw)
.def("get_balance", &Account::get_balance);
}
Again, we can clearly recognize how Python methods are mapped to C++ functions. The library that interprets PYBIND11_MODULE is defined in the imported target pybind11::module, which we have included using the following:
add_subdirectory(
${pybind11_sources_SOURCE_DIR}
${pybind11_sources_BINARY_DIR}
)
There are two differences with respect to the previous recipe:
One solution for this challenge is to use the FetchContent module, which fetches the pybind11 sources and CMake infrastructure at configure time so that we can reference it using add_subdirectory. Using the FetchContent pattern, we can now assume that pybind11 is available within the build tree, which allows us to build and link the Python module:
add_library(account
MODULE
account.cpp
)
target_link_libraries(account
PUBLIC
pybind11::module
)
We use the following command to make sure that the Python module library gets a well-defined prefix and suffix, compatible with the Python environment:
set_target_properties(account
PROPERTIES
PREFIX ${PYTHON_MODULE_PREFIX}
SUFFIX ${PYTHON_MODULE_EXTENSION}
)
The rest of the top-level CMakeLists.txt file is testing (we use the same test.py as in the previous recipe).
We could have included the pybind11 sources as part of our project source code repository, which would simplify the CMake structure and remove the requirement to have network access to the pybind11 sources at compile time. Alternatively, we could have defined the pybind11 source path as a Git submodule (https://git-scm.com/book/en/v2/Git-Tools-Submodules) to simplify the updating of the pybind11 source dependency.
In our example, we have solved this using FetchContent, which provides a very compact approach to referencing a CMake subproject without explicitly tracking its sources. Also, we could have solved this recipe using the so-called superbuild approach (see Chapter 8, The Superbuild Pattern).
To see how you can expose simple functions, define docstrings, map memory buffers, and find further reading, we refer to the pybind11 documentation: https://pybind11.readthedocs.io.
In the previous three recipes, we have discussed Cython, Boost.Python, and pybind11 as tools to interface Python and C++ providing a modern and clean approach. The main interface in the previous recipes was a C++ interface. However, we may be in a situation where we do not have a C++ interface to hook on to and where we would like to interface Python with Fortran or other languages.
In this recipe, we will demonstrate an alternative approach for interfacing Python using the Python C Foreign Function Interface (CFFI; see also https://cffi.readthedocs.io). Since C is the lingua franca of programming languages and most programming languages (including Fortran) are able to talk to a C interface, Python CFFI is a tool to couple Python with a large number of languages. A very nice feature of Python CFFI is that the resulting interface is thin and non-intrusive, meaning that it neither restricts the Python layer in language features, nor does it impose any restrictions on the code below the C layer, apart from requiring a C interface.
In this recipe, we will apply Python CFFI to couple Python and C++ via a C interface using the bank account example introduced in preceding recipe. Our goal is to arrive at a context-aware interface where we can instantiate several bank accounts, each carrying its internal state. We will conclude this recipe by commenting on how to couple Python and Fortran using Python CFFI. In Chapter 11, Packaging Projects, Recipe 3, Distributing a C/Fortran/Python project built with CMake/CFFI via PyPI, we will revisit this example and show how to package it and make it installable with pip.
We will require a couple of files for this recipe. Let us start with the C++ implementation and interface. We will place these in a subdirectory called account/implementation. The implementation file (cpp_implementation.cpp) is similar to that in previous recipes but contains additional assert statements, since we will keep the state of the object in an opaque handle and we will have to make sure that the object is created before we try to access it:
#include "cpp_implementation.hpp"
#include <cassert>
Account::Account() {
balance = 0.0;
is_initialized = true;
}
Account::~Account() {
assert(is_initialized);
is_initialized = false;
}
void Account::deposit(const double amount) {
assert(is_initialized);
balance += amount;
}
void Account::withdraw(const double amount) {
assert(is_initialized);
balance -= amount;
}
double Account::get_balance() const {
assert(is_initialized);
return balance;
}
The interface file (cpp_implementation.hpp) contains the following:
#pragma once
class Account {
public:
Account();
~Account();
void deposit(const double amount);
void withdraw(const double amount);
double get_balance() const;
private:
double balance;
bool is_initialized;
};
In addition, we isolate a C—C++ interface (c_cpp_interface.cpp). This will be the interface we will try to hook into with Python CFFI:
#include "account.h"
#include "cpp_implementation.hpp"
#define AS_TYPE(Type, Obj) reinterpret_cast<Type *>(Obj)
#define AS_CTYPE(Type, Obj) reinterpret_cast<const Type *>(Obj)
account_context_t *account_new() {
return AS_TYPE(account_context_t, new Account());
}
void account_free(account_context_t *context) { delete AS_TYPE(Account, context); }
void account_deposit(account_context_t *context, const double amount) {
return AS_TYPE(Account, context)->deposit(amount);
}
void account_withdraw(account_context_t *context, const double amount) {
return AS_TYPE(Account, context)->withdraw(amount);
}
double account_get_balance(const account_context_t *context) {
return AS_CTYPE(Account, context)->get_balance();
}
One directory up, under account, we describe the C interface (account.h):
/* CFFI would issue warning with pragma once */
#ifndef ACCOUNT_H_INCLUDED
#define ACCOUNT_H_INCLUDED
#ifndef ACCOUNT_API
#include "account_export.h"
#define ACCOUNT_API ACCOUNT_EXPORT
#endif
#ifdef __cplusplus
extern "C" {
#endif
struct account_context;
typedef struct account_context account_context_t;
ACCOUNT_API
account_context_t *account_new();
ACCOUNT_API
void account_free(account_context_t *context);
ACCOUNT_API
void account_deposit(account_context_t *context, const double amount);
ACCOUNT_API
void account_withdraw(account_context_t *context, const double amount);
ACCOUNT_API
double account_get_balance(const account_context_t *context);
#ifdef __cplusplus
}
#endif
#endif /* ACCOUNT_H_INCLUDED */
We also describe the Python interface, which we will comment on below (__init__.py):
from subprocess import check_output
from cffi import FFI
import os
import sys
from configparser import ConfigParser
from pathlib import Path
def get_lib_handle(definitions, header_file, library_file):
ffi = FFI()
command = ['cc', '-E'] + definitions + [header_file]
interface = check_output(command).decode('utf-8')
# remove possible \r characters on windows which
# would confuse cdef
_interface = [l.strip('\r') for l in interface.split('\n')]
ffi.cdef('\n'.join(_interface))
lib = ffi.dlopen(library_file)
return lib
# this interface requires the header file and library file
# and these can be either provided by interface_file_names.cfg
# in the same path as this file
# or if this is not found then using environment variables
_this_path = Path(os.path.dirname(os.path.realpath(__file__)))
_cfg_file = _this_path / 'interface_file_names.cfg'
if _cfg_file.exists():
config = ConfigParser()
config.read(_cfg_file)
header_file_name = config.get('configuration', 'header_file_name')
_header_file = _this_path / 'include' / header_file_name
_header_file = str(_header_file)
library_file_name = config.get('configuration', 'library_file_name')
_library_file = _this_path / 'lib' / library_file_name
_library_file = str(_library_file)
else:
_header_file = os.getenv('ACCOUNT_HEADER_FILE')
assert _header_file is not None
_library_file = os.getenv('ACCOUNT_LIBRARY_FILE')
assert _library_file is not None
_lib = get_lib_handle(definitions=['-DACCOUNT_API=', '-DACCOUNT_NOINCLUDE'],
header_file=_header_file,
library_file=_library_file)
# we change names to obtain a more pythonic API
new = _lib.account_new
free = _lib.account_free
deposit = _lib.account_deposit
withdraw = _lib.account_withdraw
get_balance = _lib.account_get_balance
__all__ = [
'__version__',
'new',
'free',
'deposit',
'withdraw',
'get_balance',
]
This is a handful of files, but, as we will see, most of this interface work is generic and reusable and the actual interface is rather thin. To summarize, this is the layout of our project:
.
├── account
│ ├── account.h
│ ├── CMakeLists.txt
│ ├── implementation
│ │ ├── c_cpp_interface.cpp
│ │ ├── cpp_implementation.cpp
│ │ └── cpp_implementation.hpp
│ ├── __init__.py
│ └── test.py
└── CMakeLists.txt
Let us now use CMake to combine these files to form a Python module:
# define minimum cmake version
cmake_minimum_required(VERSION 3.5 FATAL_ERROR)
# project name and supported language
project(recipe-06 LANGUAGES CXX)
# require C++11
set(CMAKE_CXX_STANDARD 11)
set(CMAKE_CXX_EXTENSIONS OFF)
set(CMAKE_CXX_STANDARD_REQUIRED ON)
# specify where to place libraries
include(GNUInstallDirs)
set(CMAKE_LIBRARY_OUTPUT_DIRECTORY
${CMAKE_BINARY_DIR}/${CMAKE_INSTALL_LIBDIR})
# interface and sources
add_subdirectory(account)
# turn on testing
enable_testing()
# require python
find_package(PythonInterp REQUIRED)
# define test
add_test(
NAME
python_test
COMMAND
${CMAKE_COMMAND} -E env ACCOUNT_MODULE_PATH=${CMAKE_CURRENT_SOURCE_DIR}
ACCOUNT_HEADER_FILE=${CMAKE_CURRENT_SOURCE_DIR}/account/account.h
ACCOUNT_LIBRARY_FILE=$<TARGET_FILE:account>
${PYTHON_EXECUTABLE} ${CMAKE_CURRENT_SOURCE_DIR}/account/test.py
)
add_library(account
SHARED
implementation/c_cpp_interface.cpp
implementation/cpp_implementation.cpp
)
target_include_directories(account
PRIVATE
${CMAKE_CURRENT_SOURCE_DIR}
${CMAKE_CURRENT_BINARY_DIR}
)
include(GenerateExportHeader)
generate_export_header(account
BASE_NAME account
)
$ mkdir -p build
$ cd build
$ cmake ..
$ cmake --build .
$ ctest
Start 1: python_test
1/1 Test #1: python_test ...................... Passed 0.14 sec
100% tests passed, 0 tests failed out of 1
While the previous recipes required us to explicitly declare the Python—C interface and to map Python names to C(++) symbols, Python CFFI infers this mapping on its own from the C header file (in our case, account.h). The only thing we need to provide to our Python CFFI layer is the header file describing the C interface and a shared library containing the symbols. We have done this using environment variable set in the main CMakeLists.txt file, and these environment variables are queried in __init__.py:
# ...
def get_lib_handle(definitions, header_file, library_file):
ffi = FFI()
command = ['cc', '-E'] + definitions + [header_file]
interface = check_output(command).decode('utf-8')
# remove possible \r characters on windows which
# would confuse cdef
_interface = [l.strip('\r') for l in interface.split('\n')]
ffi.cdef('\n'.join(_interface))
lib = ffi.dlopen(library_file)
return lib
# ...
_this_path = Path(os.path.dirname(os.path.realpath(__file__)))
_cfg_file = _this_path / 'interface_file_names.cfg'
if _cfg_file.exists():
# we will discuss this section in chapter 11, recipe 3
else:
_header_file = os.getenv('ACCOUNT_HEADER_FILE')
assert _header_file is not None
_library_file = os.getenv('ACCOUNT_LIBRARY_FILE')
assert _library_file is not None
_lib = get_lib_handle(definitions=['-DACCOUNT_API=', '-DACCOUNT_NOINCLUDE'],
header_file=_header_file,
library_file=_library_file)
# ...
The get_lib_handle function opens and parses the header file (using ffi.cdef), loads the library (using ffi.dlopen), and returns the library object. The preceding file is in principle generic, and can be reused without modification for other projects interfacing Python and C or other languages using Python CFFI.
The _lib library object could be exported directly, but we do one additional step so that the Python interface feels more pythonic when used Python-side:
# we change names to obtain a more pythonic API
new = _lib.account_new
free = _lib.account_free
deposit = _lib.account_deposit
withdraw = _lib.account_withdraw
get_balance = _lib.account_get_balance
__all__ = [
'__version__',
'new',
'free',
'deposit',
'withdraw',
'get_balance',
]
With this change, we can write the following:
import account
account1 = account.new()
account.deposit(account1, 100.0)
The alternative would be less intuitive:
from account import lib
account1 = lib.account_new()
lib.account_deposit(account1, 100.0)
Note how we are able to instantiate and track isolated contexts with our context-aware API:
account1 = account.new()
account.deposit(account1, 10.0)
account2 = account.new()
account.withdraw(account1, 5.0)
account.deposit(account2, 5.0)
In order to import the account Python module, we need to provide the ACCOUNT_HEADER_FILE and ACCOUNT_LIBRARY_FILE environment variables, as we do for the test:
add_test(
NAME
python_test
COMMAND
${CMAKE_COMMAND} -E env ACCOUNT_MODULE_PATH=${CMAKE_CURRENT_SOURCE_DIR}
ACCOUNT_HEADER_FILE=${CMAKE_CURRENT_SOURCE_DIR}/account/account.h
ACCOUNT_LIBRARY_FILE=$<TARGET_FILE:account>
${PYTHON_EXECUTABLE} ${CMAKE_CURRENT_SOURCE_DIR}/account/test.py
)
In Chapter 11, Packaging Projects, we will discuss how to create a Python package that can be installed with pip where the header and library files will be installed in well-defined locations so that we do not have to define any environment variables to use the Python module.
Having discussed the Python aspect of the interface, let us now consider the C-side of the interface. The essence of account.h is this section:
struct account_context;
typedef struct account_context account_context_t;
ACCOUNT_API
account_context_t *account_new();
ACCOUNT_API
void account_free(account_context_t *context);
ACCOUNT_API
void account_deposit(account_context_t *context, const double amount);
ACCOUNT_API
void account_withdraw(account_context_t *context, const double amount);
ACCOUNT_API
double account_get_balance(const account_context_t *context);
The opaque handle, account_context, holds the state of the object. ACCOUNT_API is defined in account_export.h, which is generated by CMake in account/interface/CMakeLists.txt:
include(GenerateExportHeader)
generate_export_header(account
BASE_NAME account
)
The account_export.h export header defines the visibility of the interface functions and makes sure this is done in a portable way. We will discuss this point in further detail in Chapter 10, Writing an Installer. The actual implementation can be found in cpp_implementation.cpp. It contains the is_initialized boolean, which we can check to make sure that API functions are called in the expected order: the context should not be accessed before it is created or after it is freed.
When designing a Python—C interface, it is important to carefully consider on which side to allocate arrays: arrays can be allocated either on the Python side and passed to the C(++) implementation, or they can be allocated on the C(++) implementation that returns a pointer. The latter approach is convenient for situations where the buffer sizes are a priori not known. However, returning pointers to arrays allocated C(++)-side can be problematic since it can lead to memory leaks due to Python garbage collection, which does not "see" the allocated arrays. We recommend to design the C API such that arrays can be allocated outside and passed to the C implementation. These arrays can then be allocated within __init__.py, as in this example:
from cffi import FFI
import numpy as np
_ffi = FFI()
def return_array(context, array_len):
# create numpy array
array_np = np.zeros(array_len, dtype=np.float64)
# cast a pointer to its data
array_p = _ffi.cast("double *", array_np.ctypes.data)
# pass the pointer
_lib.mylib_myfunction(context, array_len, array_p)
# return the array as a list
return array_np.tolist()
The return_array function returns a Python list. Since we have done all the allocation work on the Python side, we do not have to worry about memory leaks and can leave the cleanup to the garbage collection.
For a Fortran example, we refer the reader to the following recipe repository: https://github.com/dev-cafe/cmake-cookbook/tree/v1.0/chapter-09/recipe-06/fortran-example. The main difference compared to the C++ implementation is that the account library is compiled from a Fortran 90 source file that we account for in account/CMakeLists.txt:
add_library(account
SHARED
implementation/fortran_implementation.f90
)
The context is kept in a user-defined type:
type :: account
private
real(c_double) :: balance
logical :: is_initialized = .false.
end type
The Fortran implementation is able to resolve symbols and methods defined in the unchanged account.h by using the iso_c_binding module:
module account_implementation
use, intrinsic :: iso_c_binding, only: c_double, c_ptr
implicit none
private
public account_new
public account_free
public account_deposit
public account_withdraw
public account_get_balance
type :: account
private
real(c_double) :: balance
logical :: is_initialized = .false.
end type
contains
type(c_ptr) function account_new() bind (c)
use, intrinsic :: iso_c_binding, only: c_loc
type(account), pointer :: f_context
type(c_ptr) :: context
allocate(f_context)
context = c_loc(f_context)
account_new = context
f_context%balance = 0.0d0
f_context%is_initialized = .true.
end function
subroutine account_free(context) bind (c)
use, intrinsic :: iso_c_binding, only: c_f_pointer
type(c_ptr), value :: context
type(account), pointer :: f_context
call c_f_pointer(context, f_context)
call check_valid_context(f_context)
f_context%balance = 0.0d0
f_context%is_initialized = .false.
deallocate(f_context)
end subroutine
subroutine check_valid_context(f_context)
type(account), pointer, intent(in) :: f_context
if (.not. associated(f_context)) then
print *, 'ERROR: context is not associated'
stop 1
end if
if (.not. f_context%is_initialized) then
print *, 'ERROR: context is not initialized'
stop 1
end if
end subroutine
subroutine account_withdraw(context, amount) bind (c)
use, intrinsic :: iso_c_binding, only: c_f_pointer
type(c_ptr), value :: context
real(c_double), value :: amount
type(account), pointer :: f_context
call c_f_pointer(context, f_context)
call check_valid_context(f_context)
f_context%balance = f_context%balance - amount
end subroutine
subroutine account_deposit(context, amount) bind (c)
use, intrinsic :: iso_c_binding, only: c_f_pointer
type(c_ptr), value :: context
real(c_double), value :: amount
type(account), pointer :: f_context
call c_f_pointer(context, f_context)
call check_valid_context(f_context)
f_context%balance = f_context%balance + amount
end subroutine
real(c_double) function account_get_balance(context) bind (c)
use, intrinsic :: iso_c_binding, only: c_f_pointer
type(c_ptr), value, intent(in) :: context
type(account), pointer :: f_context
call c_f_pointer(context, f_context)
call check_valid_context(f_context)
account_get_balance = f_context%balance
end function
end module
This recipe and solution has been inspired by Armin Ronacher's post, "Beautiful Native Libraries", http://lucumr.pocoo.org/2013/8/18/beautiful-native-libraries/.
In this chapter, we will cover the following recipes:
In previous chapters, we have shown how to configure, build, and test our projects using CMake. Installing projects is an equally important part of the developer's toolbox, and this chapter will demonstrate how to achieve that. The recipes in this chapter cover the install-time operations outlined in the following diagram:
We will walk you through the various steps to be taken in refining the installation of a simple C++ project: from making sure that important files built in your project are copied over to the right directories, to ensuring that other projects depending on your work can detect it using CMake. The four recipes in this chapter will build upon the simple example given in Chapter 1, From a Simple Executable to Libraries, Recipe 3, Building and linking shared and static libraries. There we tried to build a very simple library and link it into an executable. We also showed how to build both a static and a shared library out of the same source files. In this chapter, we will go a bit deeper and discuss and formalize what happens at install time.
In this very first recipe, we will introduce our small project and some of the basic concepts that will be used also in the subsequent recipes. Installing files, libraries, and executables is a very basic task, but it can present some pitfalls. We will walk you through these and show you how to effectively avoid many of them with CMake.
The code from Chapter 1, From a Simple Executable to Libraries, Recipe 3, Building and linking shared and static libraries, is used almost unaltered: we will only add a dependency on the UUID library. This dependency is conditional, and if the UUID library is not found, we will exclude the code using it via the preprocessor. The code is properly organized into its own src subdirectory. The layout of the project is as follows:
.
├── CMakeLists.txt
├── src
│ ├── CMakeLists.txt
│ ├── hello-world.cpp
│ ├── Message.cpp
│ └── Message.hpp
└── tests
└── CMakeLists.txt
We can already see that we have a root CMakeLists.txt with one leaf under the src subdirectory and another under the tests subdirectory.
The Message.hpp header file contains the following:
#pragma once
#include <iosfwd>
#include <string>
class Message {
public:
Message(const std::string &m) : message_(m) {}
friend std::ostream &operator<<(std::ostream &os, Message &obj) {
return obj.printObject(os);
}
private:
std::string message_;
std::ostream &printObject(std::ostream &os);
};
std::string getUUID();
This is the corresponding implementation in Message.cpp:
#include "Message.hpp"
#include <iostream>
#include <string>
#ifdef HAVE_UUID
#include <uuid/uuid.h>
#endif
std::ostream &Message::printObject(std::ostream &os) {
os << "This is my very nice message: " << std::endl;
os << message_ << std::endl;
os << "...and here is its UUID: " << getUUID();
return os;
}
#ifdef HAVE_UUID
std::string getUUID() {
uuid_t uuid;
uuid_generate(uuid);
char uuid_str[37];
uuid_unparse_lower(uuid, uuid_str);
uuid_clear(uuid);
std::string uuid_cxx(uuid_str);
return uuid_cxx;
}
#else
std::string getUUID() { return "Ooooops, no UUID for you!"; }
#endif
Finally, the sample hello-world.cpp executable is as follows:
#include <cstdlib>
#include <iostream>
#include "Message.hpp"
int main() {
Message say_hello("Hello, CMake World!");
std::cout << say_hello << std::endl;
Message say_goodbye("Goodbye, CMake World");
std::cout << say_goodbye << std::endl;
return EXIT_SUCCESS;
}
Let us first go through the root CMakeLists.txt file:
# CMake 3.6 needed for IMPORTED_TARGET option
# to pkg_search_module
cmake_minimum_required(VERSION 3.6 FATAL_ERROR)
project(recipe-01
LANGUAGES CXX
VERSION 1.0.0
)
# <<< General set up >>>
set(CMAKE_CXX_STANDARD 11)
set(CMAKE_CXX_EXTENSIONS OFF)
set(CMAKE_CXX_STANDARD_REQUIRED ON)
message(STATUS "Project will be installed to ${CMAKE_INSTALL_PREFIX}")
if(NOT CMAKE_BUILD_TYPE)
set(CMAKE_BUILD_TYPE Release CACHE STRING "Build type" FORCE)
endif()
message(STATUS "Build type set to ${CMAKE_BUILD_TYPE}")
include(GNUInstallDirs)
set(CMAKE_ARCHIVE_OUTPUT_DIRECTORY
${PROJECT_BINARY_DIR}/${CMAKE_INSTALL_LIBDIR})
set(CMAKE_LIBRARY_OUTPUT_DIRECTORY
${PROJECT_BINARY_DIR}/${CMAKE_INSTALL_LIBDIR})
set(CMAKE_RUNTIME_OUTPUT_DIRECTORY
${PROJECT_BINARY_DIR}/${CMAKE_INSTALL_BINDIR})
# Offer the user the choice of overriding the installation directories
set(INSTALL_LIBDIR ${CMAKE_INSTALL_LIBDIR} CACHE PATH "Installation directory for libraries")
set(INSTALL_BINDIR ${CMAKE_INSTALL_BINDIR} CACHE PATH "Installation directory for executables")
set(INSTALL_INCLUDEDIR ${CMAKE_INSTALL_INCLUDEDIR} CACHE PATH "Installation directory for header files")
if(WIN32 AND NOT CYGWIN)
set(DEF_INSTALL_CMAKEDIR CMake)
else()
set(DEF_INSTALL_CMAKEDIR share/cmake/${PROJECT_NAME})
endif()
set(INSTALL_CMAKEDIR ${DEF_INSTALL_CMAKEDIR} CACHE PATH "Installation directory for CMake files")
# Report to user
foreach(p LIB BIN INCLUDE CMAKE)
file(TO_NATIVE_PATH ${CMAKE_INSTALL_PREFIX}/${INSTALL_${p}DIR} _path )
message(STATUS "Installing ${p} components to ${_path}")
unset(_path)
endforeach()
add_subdirectory(src)
enable_testing()
add_subdirectory(tests)
We now move on to analyze the src/CMakeLists.txt leaf. This file defines the actual targets to build:
# Search for pkg-config and UUID
find_package(PkgConfig QUIET)
if(PKG_CONFIG_FOUND)
pkg_search_module(UUID uuid IMPORTED_TARGET)
if(TARGET PkgConfig::UUID)
message(STATUS "Found libuuid")
set(UUID_FOUND TRUE)
endif()
endif()
add_library(message-shared SHARED "")
target_sources(message-shared
PRIVATE
${CMAKE_CURRENT_LIST_DIR}/Message.cpp
)
target_compile_definitions(message-shared
PUBLIC
$<$<BOOL:${UUID_FOUND}>:HAVE_UUID>
)
target_link_libraries(message-shared
PUBLIC
$<$<BOOL:${UUID_FOUND}>:PkgConfig::UUID>
)
set_target_properties(message-shared
PROPERTIES
POSITION_INDEPENDENT_CODE 1
SOVERSION ${PROJECT_VERSION_MAJOR}
OUTPUT_NAME "message"
DEBUG_POSTFIX "_d"
PUBLIC_HEADER "Message.hpp"
MACOSX_RPATH ON
WINDOWS_EXPORT_ALL_SYMBOLS ON
)
add_executable(hello-world_wDSO hello-world.cpp)
target_link_libraries(hello-world_wDSO
PUBLIC
message-shared
)
The src/CMakeLists.txt file contains also the installation directives. Before considering these, we need to fix the RPATH for our executable:
# Prepare RPATH
file(RELATIVE_PATH _rel ${CMAKE_INSTALL_PREFIX}/${INSTALL_BINDIR} ${CMAKE_INSTALL_PREFIX})
if(APPLE)
set(_rpath "@loader_path/${_rel}")
else()
set(_rpath "\$ORIGIN/${_rel}")
endif()
file(TO_NATIVE_PATH "${_rpath}/${INSTALL_LIBDIR}" message_RPATH)
set_target_properties(hello-world_wDSO
PROPERTIES
MACOSX_RPATH ON
SKIP_BUILD_RPATH OFF
BUILD_WITH_INSTALL_RPATH OFF
INSTALL_RPATH "${message_RPATH}"
INSTALL_RPATH_USE_LINK_PATH ON
)
install(
TARGETS
message-shared
hello-world_wDSO
ARCHIVE
DESTINATION ${INSTALL_LIBDIR}
COMPONENT lib
RUNTIME
DESTINATION ${INSTALL_BINDIR}
COMPONENT bin
LIBRARY
DESTINATION ${INSTALL_LIBDIR}
COMPONENT lib
PUBLIC_HEADER
DESTINATION ${INSTALL_INCLUDEDIR}/message
COMPONENT dev
)
The CMakeLists.txt file in the tests directory contains simple directives to ensure that the "Hello, World" executable runs correctly:
add_test(
NAME test_shared
COMMAND $<TARGET_FILE:hello-world_wDSO>
)
Let us now configure, build, and install the project and look at the result. As soon as any installation directives are added, CMake generates a new target called install that will run the installation rules:
$ mkdir -p build
$ cd build
$ cmake -G"Unix Makefiles" -DCMAKE_INSTALL_PREFIX=$HOME/Software/recipe-01
$ cmake --build . --target install
The contents of the build directory on GNU/Linux will be the following:
build
├── bin
│ └── hello-world_wDSO
├── CMakeCache.txt
├── CMakeFiles
├── cmake_install.cmake
├── CTestTestfile.cmake
├── install_manifest.txt
├── lib64
│ ├── libmessage.so -> libmessage.so.1
│ └── libmessage.so.1
├── Makefile
├── src
├── Testing
└── tests
One the other hand, at the install prefix, you can find the following structure:
$HOME/Software/recipe-01/
├── bin
│ └── hello-world_wDSO
├── include
│ └── message
│ └── Message.hpp
└── lib64
├── libmessage.so -> libmessage.so.1
└── libmessage.so.1
This means that the locations given in the installation directives are relative to the CMAKE_INSTALL_PREFIX instance given by the user.
There are three salient points to this recipe that we need to discuss in more detail:
What is a good layout for the installation of your project? As long as you are the only consumer of your project, this question only has limited relevance. However, as soon as you start shipping to the outside world, it will be expected that you provide a sensible layout when installing your project. Fortunately, there are standards that we can adhere to and CMake can help us with that. Effectively, what the GNUInstallDirs.cmake module does is to define a set of variables. These variables are the names of the subdirectories where different types of files should be installed. In our example we used the following:
The user might, however, want to override these choices. We allowed for that with the following stanza in the root CMakeLists.txt file:
# Offer the user the choice of overriding the installation directories
set(INSTALL_LIBDIR ${CMAKE_INSTALL_LIBDIR} CACHE PATH "Installation directory for libraries")
set(INSTALL_BINDIR ${CMAKE_INSTALL_BINDIR} CACHE PATH "Installation directory for executables")
set(INSTALL_INCLUDEDIR ${CMAKE_INSTALL_INCLUDEDIR} CACHE PATH "Installation directory for header files")
This effectively redefines the INSTALL_BINDIR, INSTALL_LIBDIR, and INSTALL_INCLUDEDIR convenience variables to be used within our project. We also define the additional INSTALL_CMAKEDIR variable, but its role will be discussed in detail in the next few recipes.
Let us have a closer look at the properties set on the shared library target. We had to set the following:
Let us now discuss RPATH. We are linking our hello-world_wDSO executable to libmessage.so.1. This means that when the executable is called, the shared library will be loaded. Thus the information on the location of the library needs to be encoded somewhere in order for the loader to do its job successfully. There are two approaches regarding the location of the library:
The latter approach is preferable and more robust. However, which path should be chosen when setting the RPATH of the dynamic shared object? We need to make sure that running the executable always finds the correct shared library, regardless of whether it is run in the build tree or in the install tree. This is achieved by setting the RPATH related properties for the hello-world_wDSO target to look for a path relative to the location of the executable itself, either via the $ORIGIN (on GNU/Linux) or @loader_path (on macOS) variables:
# Prepare RPATH
file(RELATIVE_PATH _rel ${CMAKE_INSTALL_PREFIX}/${INSTALL_BINDIR} ${CMAKE_INSTALL_PREFIX})
if(APPLE)
set(_rpath "@loader_path/${_rel}")
else()
set(_rpath "\$ORIGIN/${_rel}")
endif()
file(TO_NATIVE_PATH "${_rpath}/${INSTALL_LIBDIR}" message_RPATH)
Once the message_RPATH variable is set, the target properties will do the rest of the job:
set_target_properties(hello-world_wDSO
PROPERTIES
MACOSX_RPATH ON
SKIP_BUILD_RPATH OFF
BUILD_WITH_INSTALL_RPATH OFF
INSTALL_RPATH "${message_RPATH}"
INSTALL_RPATH_USE_LINK_PATH ON
)
Let us examine this command in detail:
Finally, let us consider the installation directives. We need to install an executable, one library, and one header file. Executables and libraries are build targets, so we use the TARGETS option to the install command. Install rules for multiple targets can be set at once: CMake is aware of what kind of targets they are; that is, whether they are executables, shared libraries, or static libraries:
install(
TARGETS
message-shared
hello-world_wDSO
Executables will be installed in RUNTIME DESTINATION, which we set to ${INSTALL_BINDIR}. Shared libraries are installed to LIBRARY DESTINATION, which we set to ${INSTALL_LIBDIR}. Static libraries would be installed to ARCHIVE DESTINATION, which we also set to ${INSTALL_LIBDIR}:
ARCHIVE
DESTINATION ${INSTALL_LIBDIR}
COMPONENT lib
RUNTIME
DESTINATION ${INSTALL_BINDIR}
COMPONENT bin
LIBRARY
DESTINATION ${INSTALL_LIBDIR}
COMPONENT lib
Note that we not only specified DESTINATION, but also COMPONENT. When installing the project with the cmake --build . --target install command, all components were installed, as expected. However, it might be sometimes desirable to only install some of them. This is what the COMPONENT keyword can help us with. For example, to only install libraries, we can run the following:
$ cmake -D COMPONENT=lib -P cmake_install.cmake
Since the Message.hpp header file was set as a public header of the project, we can use the PUBLIC_HEADER keyword to install it along the other targets to the chosen destination: ${INSTALL_INCLUDEDIR}/message. Users of the library can now include the header with: #include <message/Message.hpp>, provided the proper location is passed to the compiler with the -I option.
The various destinations in the installation directives are interpreted as relative paths, unless an absolute path is used. But relative to what? There are different ways in which CMake can compute the absolute path, depending on what tool is triggering the installation. When using cmake --build . --target install, as we have done, paths will be computed relative to CMAKE_INSTALL_PREFIX. However, when using CPack, absolute paths will be computed relative to CPACK_PACKAGING_INSTALL_PREFIX. Usage of CPack will be shown in Chapter 11, Packaging Projects, Recipe 1, Generating source and binary packages.
Setting the RPATH correctly can be rather tricky, but it is essential for third-party users. By default, CMake sets the RPATH of executables assuming they will be run from the build tree. However, upon installation, the RPATH is cleared, leading to trouble when a user would like to run hello-world_wDSO. Using the ldd tool on Linux, we can inspect the hello-world_wDSO executable in the build tree to see where the loader will look for libmessage.so:
libmessage.so.1 => /home/user/cmake-cookbook/chapter-10/recipe-01/cxx-example/build/lib64/libmessage.so.1 (0x00007f7a92e44000)
Running ldd hello-world_wDSO in the installation prefix would result instead in the following:
libmessage.so.1 => Not found
This is clearly wrong. However, it would be equally wrong to always hardcode the RPATH to point to the build tree or to the installation prefix: any of the two locations could be erased resulting in corrupted executables. The solution presented here sets the RPATH differently for the executable in the build tree and in the installation prefix, so that it will always point to where "it makes sense"; that is, as close to the executable as possible. Running ldd in the build tree shows the same output:
libmessage.so.1 => /home/roberto/Workspace/robertodr/cmake-cookbook/chapter-10/recipe-01/cxx-example/build/lib64/libmessage.so.1 (0x00007f7a92e44000)
On the other hand, in the installation prefix, we now get the following:
libmessage.so.1 => /home/roberto/Software/ch10r01/bin/../lib64/libmessage.so.1 (0x00007fbd2a725000)
We have used the CMake install command with the TARGETS signature, since we needed to install build targets. The command has, however, four additional signatures:
Let us imagine that the small library that we have introduced has become hugely popular, with many people using it. However, some clients would also like a static library to be available with the installation. Other clients have noticed that all symbols are visible in the shared library. Best practices dictate that shared libraries only expose the minimal amount of symbols, thus limiting the visibility to the outside world of objects and functions defined in the code. We want to make sure that by default all symbols defined in our shared library are hidden from the outside world. This will force contributors to the project to clearly delimit the interface between the library and external codes, since they will have to explicit mark all symbols that also meant to be used outside of the project. As such, we wish to do the following:
Recipe 3, Building and linking static and shared libraries, in Chapter 1, From a Simple Executable to Libraries, already showed that CMake offers functionality to achieve the first point in a platform-independent way. We did not, however, address the issue of symbol visibility. We will revisit both points with the present recipe.
We will still use mostly the same code as in the previous recipe, but we will need to modify src/CMakeLists.txt and the Message.hpp header file. The latter will include the new, autogenerated header file, messageExport.h:
#pragma once
#include <iosfwd>
#include <string>
#include "messageExport.h"
class message_EXPORT Message {
public:
Message(const std::string &m) : message_(m) {}
friend std::ostream &operator<<(std::ostream &os, Message &obj) {
return obj.printObject(os);
}
private:
std::string message_;
std::ostream &printObject(std::ostream &os);
};
std::string getUUID();
The message_EXPORT preprocessor directive was introduced in the declaration of the Message class. This directive will let the compiler generate symbols that are visible to the users of the library.
Apart from the name of the project, the root CMakeLists.txt file is unchanged. Let us first look at the CMakeLists.txt file in the src subdirectory, where all the additional work actually happens. We will highlight the changes with respect to the file in the previous recipe:
add_library(message-shared SHARED "")
target_sources(message-shared
PRIVATE
${CMAKE_CURRENT_LIST_DIR}/Message.cpp
)
target_compile_definitions(message-shared
PUBLIC
$<$<BOOL:${UUID_FOUND}>:HAVE_UUID>
)
target_link_libraries(message-shared
PUBLIC
$<$<BOOL:${UUID_FOUND}>:PkgConfig::UUID>
)
set_target_properties(message-shared
PROPERTIES
POSITION_INDEPENDENT_CODE 1
CXX_VISIBILITY_PRESET hidden
VISIBILITY_INLINES_HIDDEN 1
SOVERSION ${PROJECT_VERSION_MAJOR}
OUTPUT_NAME "message"
DEBUG_POSTFIX "_d"
PUBLIC_HEADER "Message.hpp;${CMAKE_BINARY_DIR}/${INSTALL_INCLUDEDIR}/messageExport.h"
MACOSX_RPATH ON
)
include(GenerateExportHeader)
generate_export_header(message-shared
BASE_NAME "message"
EXPORT_MACRO_NAME "message_EXPORT"
EXPORT_FILE_NAME "${CMAKE_BINARY_DIR}/${INSTALL_INCLUDEDIR}/messageExport.h"
DEPRECATED_MACRO_NAME "message_DEPRECATED"
NO_EXPORT_MACRO_NAME "message_NO_EXPORT"
STATIC_DEFINE "message_STATIC_DEFINE"
NO_DEPRECATED_MACRO_NAME "message_NO_DEPRECATED"
DEFINE_NO_DEPRECATED
)
target_include_directories(message-shared
PUBLIC
${CMAKE_BINARY_DIR}/${INSTALL_INCLUDEDIR}
)
Now we can turn our attention to the generation of the static library:
add_library(message-static STATIC "")
target_sources(message-static
PRIVATE
${CMAKE_CURRENT_LIST_DIR}/Message.cpp
)
target_compile_definitions(message-static
PUBLIC
message_STATIC_DEFINE
$<$<BOOL:${UUID_FOUND}>:HAVE_UUID>
)
target_include_directories(message-static
PUBLIC
${CMAKE_BINARY_DIR}/${INSTALL_INCLUDEDIR}
)
target_link_libraries(message-static
PUBLIC
$<$<BOOL:${UUID_FOUND}>:PkgConfig::UUID>
)
set_target_properties(message-static
PROPERTIES
POSITION_INDEPENDENT_CODE 1
ARCHIVE_OUTPUT_NAME "message"
DEBUG_POSTFIX "_sd"
RELEASE_POSTFIX "_s"
PUBLIC_HEADER "Message.hpp;${CMAKE_BINARY_DIR}/${INSTALL_INCLUDEDIR}/messageExport.h"
)
add_executable(hello-world_wAR hello-world.cpp)
target_link_libraries(hello-world_wAR
PUBLIC
message-static
)
install(
TARGETS
message-shared
message-static
hello-world_wDSO
hello-world_wAR
ARCHIVE
DESTINATION ${INSTALL_LIBDIR}
COMPONENT lib
RUNTIME
DESTINATION ${INSTALL_BINDIR}
COMPONENT bin
LIBRARY
DESTINATION ${INSTALL_LIBDIR}
COMPONENT lib
PUBLIC_HEADER
DESTINATION ${INSTALL_INCLUDEDIR}/message
COMPONENT dev
)
This recipe demonstrates how to set the visibility of symbols for a shared library. The best practice is to keep all symbols hidden by default, explicitly exposing only those symbols that we want to be used by dependents on our library. This is achieved in two steps. First of all, we need to instruct the compiler to hide symbols. Of course, different compilers will have different options available, and directly setting these by hand in our CMakeLists.txt would not be cross-platform. CMake offers a robust and cross-platform way of setting symbol visibility by setting two properties on the shared library target:
On Windows, this is the default behavior. Recall, in fact, that we needed to override it in the previous recipe by setting the WINDOWS_EXPORT_ALL_SYMBOLS property to ON.
How do we mark the symbols we want to be visible? This is determined by the preprocessor, and we thus need to provide preprocessor macros that expand to visibility attributes that the given compiler on the chosen platform will understand. Once again, CMake comes to the rescue with the GenerateExportHeader.cmake module file. This module defines the generate_export_header function, which we invoked as follows:
include(GenerateExportHeader)
generate_export_header(message-shared
BASE_NAME "message"
EXPORT_MACRO_NAME "message_EXPORT"
EXPORT_FILE_NAME "${CMAKE_BINARY_DIR}/${INSTALL_INCLUDEDIR}/messageExport.h"
DEPRECATED_MACRO_NAME "message_DEPRECATED"
NO_EXPORT_MACRO_NAME "message_NO_EXPORT"
STATIC_DEFINE "message_STATIC_DEFINE"
NO_DEPRECATED_MACRO_NAME "message_NO_DEPRECATED"
DEFINE_NO_DEPRECATED
)
The function generates the messageExport.h header file, which will contain the preprocessor macros needed. The file is generated in the directory ${CMAKE_BINARY_DIR}/${INSTALL_INCLUDEDIR}, as requested via the EXPORT_FILE_NAME option. If this option is left empty, the header file would be generated in the current binary directory. The first argument to this function is an existing target, message-shared in our case. Basic invocation of the function only requires passing the name of an existing target. Optional arguments, for fine-grained control of all of the generated macros, can also be passed:
On GNU/Linux and using the GNU compiler, CMake will generate the following messageExport.h export header:
#ifndef message_EXPORT_H
#define message_EXPORT_H
#ifdef message_STATIC_DEFINE
# define message_EXPORT
# define message_NO_EXPORT
#else
# ifndef message_EXPORT
# ifdef message_shared_EXPORTS
/* We are building this library */
# define message_EXPORT __attribute__((visibility("default")))
# else
/* We are using this library */
# define message_EXPORT __attribute__((visibility("default")))
# endif
# endif
# ifndef message_NO_EXPORT
# define message_NO_EXPORT __attribute__((visibility("hidden")))
# endif
#endif
#ifndef message_DEPRECATED
# define message_DEPRECATED __attribute__ ((__deprecated__))
#endif
#ifndef message_DEPRECATED_EXPORT
# define message_DEPRECATED_EXPORT message_EXPORT message_DEPRECATED
#endif
#ifndef message_DEPRECATED_NO_EXPORT
# define message_DEPRECATED_NO_EXPORT message_NO_EXPORT message_DEPRECATED
#endif
#if 1 /* DEFINE_NO_DEPRECATED */
# ifndef message_NO_DEPRECATED
# define message_NO_DEPRECATED
# endif
#endif
#endif
We can prepend the classes and functions to be exposed to users with the message_EXPORT macro. Deprecation can be achieved by prepending with the message_DEPRECATED macro.
The static library is built out of the same sources. However, all symbols are supposed to be visible in the static archive, and as can be seen from the contents of the messageExport.h header file, the message_STATIC_DEFINE macro comes to the rescue. Once the target has been declared, we set it as a compile definition. The additional target properties on the static library are as follows:
It is good practice to hide internal symbols when building a shared library. This means that the library shrinks in size, because what you expose to the user is less than what you have in the library. This defines the Application Binary Interface (ABI), which most of the time should coincide with the Application Programming Interface (API). This is done in two stages:
Static libraries are just archives of object files. Thus one compiles sources into object files and then the archiver bundles them into an archive. There is no notion of ABI: all symbols are visible by default and the visibility flags for the compiler do not affect static archiving. However, if you are going to build a shared and static library from the same source files, you need a way to give meaning to the message_EXPORT preprocessor variable that now appears in the code in both cases. This is where the GenerateExportHeader.cmake module comes in. It will define a header with all the logic for giving the proper definition of this preprocessor variable. For shared libraries, it will be what is needed by the given combination of platform and compiler. Note that the meaning will also change based on whether we are building or using the shared library. Fortunately, CMake takes care of this for us without further intervention. For static libraries, it will expand to an empty string doing what we expect: nothing.
The attentive reader will have noticed that building the static and shared libraries as shown here will actually require to compile the sources twice. This was not an expensive operation for our simple example, but it can clearly become quite onerous, even for projects that are only slightly bigger than our example. Why did we choose this approach over the one using OBJECT libraries shown in Recipe 3, Building and linking static and shared libraries, in Chapter 1, From a Simple Executable to Libraries? OBJECT libraries take care of the first step in compiling the library: from sources to object files. In that step, the preprocessor intervenes and will evaluate message_EXPORT. Since the compilation of OBJECT libraries happens once, message_EXPORT is either evaluated to a value compatible with building the shared or the static library. Thus to avoid ambiguities, we chose the more robust approach of compiling twice, letting the preprocessor evaluate the visibility variable correctly.
We can imagine that our message library has been a huge success in the open source community. People like it a lot and use it in their own projects to print their messages to screen. Users particularly like the fact that each printed message gets a unique identifier. But users would also like the library to be more easily discoverable, once they compile and install it on their systems. This recipe will show how CMake can let us export our targets so that other projects using CMake can pick them up easily.
The source code is unchanged with respect to the previous recipe and the structure of the project is as follows:
.
├── cmake
│ └── messageConfig.cmake.in
├── CMakeLists.txt
├── src
│ ├── CMakeLists.txt
│ ├── hello-world.cpp
│ ├── Message.cpp
│ └── Message.hpp
└── tests
├── CMakeLists.txt
└── use_target
├── CMakeLists.txt
└── use_message.cpp
Notice that we have added a cmake subdirectory containing a messageConfig.cmake.in file. This file will contain our exported targets. We have also added a test to check whether the installation and export of the project work as intended.
Once again, the root CMakeLists.txt file is unchanged with respect to the previous recipe. Moving onto the leaf directory src containing our sources:
# Search for pkg-config and UUID
find_package(PkgConfig QUIET)
if(PKG_CONFIG_FOUND)
pkg_search_module(UUID uuid IMPORTED_TARGET)
if(TARGET PkgConfig::UUID)
message(STATUS "Found libuuid")
set(UUID_FOUND TRUE)
endif()
endif()
add_library(message-shared SHARED "")
include(GenerateExportHeader)
generate_export_header(message-shared
BASE_NAME "message"
EXPORT_MACRO_NAME "message_EXPORT"
EXPORT_FILE_NAME "${CMAKE_BINARY_DIR}/${INSTALL_INCLUDEDIR}/messageExport.h"
DEPRECATED_MACRO_NAME "message_DEPRECATED"
NO_EXPORT_MACRO_NAME "message_NO_EXPORT"
STATIC_DEFINE "message_STATIC_DEFINE"
NO_DEPRECATED_MACRO_NAME "message_NO_DEPRECATED"
DEFINE_NO_DEPRECATED
)
target_sources(message-shared
PRIVATE
${CMAKE_CURRENT_LIST_DIR}/Message.cpp
)
target_compile_definitions(message-shared
PUBLIC
$<$<BOOL:${UUID_FOUND}>:HAVE_UUID>
INTERFACE
$<INSTALL_INTERFACE:USING_message>
)
target_include_directories(message-shared
PUBLIC
$<BUILD_INTERFACE:${CMAKE_BINARY_DIR}/${INSTALL_INCLUDEDIR}>
$<INSTALL_INTERFACE:${INSTALL_INCLUDEDIR}>
)
target_link_libraries(message-shared
PUBLIC
$<$<BOOL:${UUID_FOUND}>:PkgConfig::UUID>
)
set_target_properties(message-shared
PROPERTIES
POSITION_INDEPENDENT_CODE 1
CXX_VISIBILITY_PRESET hidden
VISIBILITY_INLINES_HIDDEN 1
SOVERSION ${PROJECT_VERSION_MAJOR}
OUTPUT_NAME "message"
DEBUG_POSTFIX "_d"
PUBLIC_HEADER "Message.hpp;${CMAKE_BINARY_DIR}/${INSTALL_INCLUDEDIR}/messageExport.h"
MACOSX_RPATH ON
)
The same is done for the message-static library target:
add_library(message-static STATIC "")
target_sources(message-static
PRIVATE
${CMAKE_CURRENT_LIST_DIR}/Message.cpp
)
target_compile_definitions(message-static
PUBLIC
message_STATIC_DEFINE
$<$<BOOL:${UUID_FOUND}>:HAVE_UUID>
INTERFACE
$<INSTALL_INTERFACE:USING_message>
)
target_include_directories(message-static
PUBLIC
$<BUILD_INTERFACE:${CMAKE_BINARY_DIR}/${INSTALL_INCLUDEDIR}>
$<INSTALL_INTERFACE:${INSTALL_INCLUDEDIR}>
)
target_link_libraries(message-static
PUBLIC
$<$<BOOL:${UUID_FOUND}>:PkgConfig::UUID>
)
set_target_properties(message-static
PROPERTIES
POSITION_INDEPENDENT_CODE 1
ARCHIVE_OUTPUT_NAME "message"
DEBUG_POSTFIX "_sd"
RELEASE_POSTFIX "_s"
PUBLIC_HEADER "Message.hpp;${CMAKE_BINARY_DIR}/${INSTALL_INCLUDEDIR}/messageExport.h"
)
add_executable(hello-world_wDSO hello-world.cpp)
target_link_libraries(hello-world_wDSO
PUBLIC
message-shared
)
# Prepare RPATH
file(RELATIVE_PATH _rel ${CMAKE_INSTALL_PREFIX}/${INSTALL_BINDIR} ${CMAKE_INSTALL_PREFIX})
if(APPLE)
set(_rpath "@loader_path/${_rel}")
else()
set(_rpath "\$ORIGIN/${_rel}")
endif()
file(TO_NATIVE_PATH "${_rpath}/${INSTALL_LIBDIR}" message_RPATH)
set_target_properties(hello-world_wDSO
PROPERTIES
MACOSX_RPATH ON
SKIP_BUILD_RPATH OFF
BUILD_WITH_INSTALL_RPATH OFF
INSTALL_RPATH "${message_RPATH}"
INSTALL_RPATH_USE_LINK_PATH ON
)
add_executable(hello-world_wAR hello-world.cpp)
target_link_libraries(hello-world_wAR
PUBLIC
message-static
)
We are now ready to look at the installation rules:
install(
TARGETS
message-shared
message-static
hello-world_wDSO
hello-world_wAR
EXPORT
messageTargets
ARCHIVE
DESTINATION ${INSTALL_LIBDIR}
COMPONENT lib
RUNTIME
DESTINATION ${INSTALL_BINDIR}
COMPONENT bin
LIBRARY
DESTINATION ${INSTALL_LIBDIR}
COMPONENT lib
PUBLIC_HEADER
DESTINATION ${INSTALL_INCLUDEDIR}/message
COMPONENT dev
)
install(
EXPORT
messageTargets
NAMESPACE
"message::"
DESTINATION
${INSTALL_CMAKEDIR}
COMPONENT
dev
)
include(CMakePackageConfigHelpers)
write_basic_package_version_file(
${CMAKE_CURRENT_BINARY_DIR}/messageConfigVersion.cmake
VERSION ${PROJECT_VERSION}
COMPATIBILITY SameMajorVersion
)
configure_package_config_file(
${PROJECT_SOURCE_DIR}/cmake/messageConfig.cmake.in
${CMAKE_CURRENT_BINARY_DIR}/messageConfig.cmake
INSTALL_DESTINATION ${INSTALL_CMAKEDIR}
)
install(
FILES
${CMAKE_CURRENT_BINARY_DIR}/messageConfig.cmake
${CMAKE_CURRENT_BINARY_DIR}/messageConfigVersion.cmake
DESTINATION
${INSTALL_CMAKEDIR}
)
What are the contents of the cmake/messageConfig.cmake.in template file? The header of this file serves as documentation for its users. Let us look at the actual CMake commands:
@PACKAGE_INIT@
include("${CMAKE_CURRENT_LIST_DIR}/messageTargets.cmake")
check_required_components(
"message-shared"
"message-static"
"message-hello-world_wDSO"
"message-hello-world_wAR"
)
if(NOT WIN32)
if(NOT TARGET PkgConfig::UUID)
find_package(PkgConfig REQUIRED QUIET)
pkg_search_module(UUID REQUIRED uuid IMPORTED_TARGET)
endif()
endif()
Let us try this out:
$ mkdir -p build
$ cd build
$ cmake -DCMAKE_INSTALL_PREFIX=$HOME/Software/recipe-03 ..
$ cmake --build . --target install
The install tree has the following structure:
$HOME/Software/recipe-03/
├── bin
│ ├── hello-world_wAR
│ └── hello-world_wDSO
├── include
│ └── message
│ ├── messageExport.h
│ └── Message.hpp
├── lib64
│ ├── libmessage_s.a
│ ├── libmessage.so -> libmessage.so.1
│ └── libmessage.so.1
└── share
└── cmake
└── recipe-03
├── messageConfig.cmake
├── messageConfigVersion.cmake
├── messageTargets.cmake
└── messageTargets-release.cmake
You will notice that a share subdirectory has appeared and it contains all the files that we have asked CMake to autogenerate. From now on, the users of our message library will be able to locate the message library by doing this in their own CMakeLists.txt file, provided that they set the message_DIR CMake variable to point to the share/cmake/message directory in the install tree:
find_package(message 1 CONFIG REQUIRED)
This recipe has covered a lot of ground; let us make sense of it. CMake targets are a very useful abstraction for the operations that the build system will perform. Using the PRIVATE, PUBLIC, and INTERFACE keywords, we can set how targets within the same project will interact with each other. In practice, this lets us define how dependencies of target A will affect target B, which depends on A. The full power of this mechanism can be appreciated when other projects want to use a library as a dependency. If the proper CMake configuration files are made available by the library maintainers, then all dependencies can be easily resolved with very few CMake commands.
This problem can be solved by following the pattern outlined in the recipe for the message-static, message-shared, hello-world_wDSO, and hello-world_wAR targets. We will analyze the CMake commands for the message-shared target alone, but the discussion here is general:
if(WIN32 AND NOT CYGWIN)
set(DEF_INSTALL_CMAKEDIR CMake)
else()
set(DEF_INSTALL_CMAKEDIR share/cmake/${PROJECT_NAME})
endif()
set(INSTALL_CMAKEDIR ${DEF_INSTALL_CMAKEDIR} CACHE PATH "Installation directory for CMake files")
The final part of our CMakeLists.txt generates the configuration files. After including the CMakePackageConfigHelpers.cmake module, this is done in three steps:
Clients of the message library are now very happy since they can finally install the library on their system and have CMake discover it for them with minimal modifications to their own CMakeLists.txt:
find_package(message VERSION 1 REQUIRED)
Clients can now configure their project with the following:
$ cmake -Dmessage_DIR=/path/to/message/share/cmake/message ..
The tests included with our example show how to check that the installation of the targets went according to plan. Looking at the structure of the tests folder we notice the use_target subdirectory:
tests/
├── CMakeLists.txt
└── use_target
├── CMakeLists.txt
└── use_message.cpp
This directory contains a small project that uses the exported targets. The interesting part is in the CMakeLists.txt file specifying the tests:
add_test(
NAME use-target_configure
COMMAND
${CMAKE_COMMAND} -H${CMAKE_CURRENT_LIST_DIR}/use_target
-B${CMAKE_CURRENT_BINARY_DIR}/build_use-target
-G${CMAKE_GENERATOR}
-Dmessage_DIR=${CMAKE_INSTALL_PREFIX}/${
INSTALL_CMAKEDIR}
-DCMAKE_BUILD_TYPE=$<CONFIGURATION>
)
set_tests_properties(use-target_configure
PROPERTIES
FIXTURES_SETUP use-target
)
add_test(
NAME use-target_build
COMMAND
${CMAKE_COMMAND} --build ${CMAKE_CURRENT_BINARY_DIR}/build_use-target
--config $<CONFIGURATION>
)
set_tests_properties(use-target_build
PROPERTIES
FIXTURES_REQUIRED use-target
)
set(_test_target)
if(MSVC)
set(_test_target "RUN_TESTS")
else()
set(_test_target "test")
endif()
add_test(
NAME use-target_test
COMMAND
${CMAKE_COMMAND} --build ${CMAKE_CURRENT_BINARY_DIR}/build_use-target
--target ${_test_target}
--config $<CONFIGURATION>
)
set_tests_properties(use-target_test
PROPERTIES
FIXTURES_REQUIRED use-target
)
unset(_test_target)
add_test(
NAME use-target_cleanup
COMMAND
${CMAKE_COMMAND} -E remove_directory ${CMAKE_CURRENT_BINARY_DIR}/build_use-target
)
set_tests_properties(use-target_cleanup
PROPERTIES
FIXTURES_CLEANUP use-target
)
Note that these tests can only be run after the project has been installed.
Our example message library has become a huge success, and many other programmers use it and are very happy with it. You want to use it in your own project too, but are unsure how to manage the dependency properly. You could ship the source code for the message library with your own code, but what if the library is already installed on the system? Chapter 8, The Superbuild Pattern, showed that this is a typical scenario for a superbuild, but you are unsure on how to install such a project. This recipe will walk you through the details of installing a superbuild.
This recipe will build a simple executable linking against the message library. The layout of the project is as follows:
├── cmake
│ ├── install_hook.cmake.in
│ └── print_rpath.py
├── CMakeLists.txt
├── external
│ └── upstream
│ ├── CMakeLists.txt
│ └── message
│ └── CMakeLists.txt
└── src
├── CMakeLists.txt
└── use_message.cpp
The main CMakeLists.txt file coordinates the superbuild. The external subdirectory contains CMake instructions to handle the dependencies. The cmake subdirectory contains a Python script and a template CMake script. These will be used to fine-tune the installation, the CMake script being first configured and then executed to call the Python script to print the RPATH for the installed use_message executable:
import shlex
import subprocess
import sys
def main():
patcher = sys.argv[1]
elfobj = sys.argv[2]
tools = {'patchelf': '--print-rpath', 'chrpath': '--list', 'otool': '-L'}
if patcher not in tools.keys():
raise RuntimeError('Unknown tool {}'.format(patcher))
cmd = shlex.split('{:s} {:s} {:s}'.format(patcher, tools[patcher], elfobj))
rpath = subprocess.run(
cmd,
bufsize=1,
stdout=subprocess.PIPE,
stderr=subprocess.PIPE,
universal_newlines=True)
print(rpath.stdout)
if __name__ == "__main__":
main()
Printing the RPATH can easily be done with platform-native tools that we will discuss later on in this recipe.
Finally, the src subdirectory contains the CMakeLists.txt and source file for the actual project we want to compile. The use_message.cpp source file contains the following:
#include <cstdlib>
#include <iostream>
#ifdef USING_message
#include <message/Message.hpp>
void messaging() {
Message say_hello("Hello, World! From a client of yours!");
std::cout << say_hello << std::endl;
Message say_goodbye("Goodbye, World! From a client of yours!");
std::cout << say_goodbye << std::endl;
}
#else
void messaging() {
std::cout << "Hello, World! From a client of yours!" << std::endl;
std::cout << "Goodbye, World! From a client of yours!" << std::endl;
}
#endif
int main() {
messaging();
return EXIT_SUCCESS;
}
We will start by looking at the root CMakeLists.txt file, which is coordinating the superbuild:
cmake_minimum_required(VERSION 3.6 FATAL_ERROR)
project(recipe-04
LANGUAGES CXX
VERSION 1.0.0
)
# <<< General set up >>>
set(CMAKE_CXX_STANDARD 11)
set(CMAKE_CXX_EXTENSIONS OFF)
set(CMAKE_CXX_STANDARD_REQUIRED ON)
if(NOT CMAKE_BUILD_TYPE)
set(CMAKE_BUILD_TYPE Release CACHE STRING "Build type" FORCE)
endif()
message(STATUS "Build type set to ${CMAKE_BUILD_TYPE}")
message(STATUS "Project will be installed to ${CMAKE_INSTALL_PREFIX}")
include(GNUInstallDirs)
set(CMAKE_ARCHIVE_OUTPUT_DIRECTORY
${PROJECT_BINARY_DIR}/${CMAKE_INSTALL_LIBDIR})
set(CMAKE_LIBRARY_OUTPUT_DIRECTORY
${PROJECT_BINARY_DIR}/${CMAKE_INSTALL_LIBDIR})
set(CMAKE_RUNTIME_OUTPUT_DIRECTORY
${PROJECT_BINARY_DIR}/${CMAKE_INSTALL_BINDIR})
# Offer the user the choice of overriding the installation directories
set(INSTALL_LIBDIR ${CMAKE_INSTALL_LIBDIR} CACHE PATH "Installation directory for libraries")
set(INSTALL_BINDIR ${CMAKE_INSTALL_BINDIR} CACHE PATH "Installation directory for executables")
set(INSTALL_INCLUDEDIR ${CMAKE_INSTALL_INCLUDEDIR} CACHE PATH "Installation directory for header files")
if(WIN32 AND NOT CYGWIN)
set(DEF_INSTALL_CMAKEDIR CMake)
else()
set(DEF_INSTALL_CMAKEDIR share/cmake/${PROJECT_NAME})
endif()
set(INSTALL_CMAKEDIR ${DEF_INSTALL_CMAKEDIR} CACHE PATH "Installation directory for CMake files")
# Report to user
foreach(p LIB BIN INCLUDE CMAKE)
file(TO_NATIVE_PATH ${CMAKE_INSTALL_PREFIX}/${INSTALL_${p}DIR} _path )
message(STATUS "Installing ${p} components to ${_path}")
unset(_path)
endforeach()
set_property(DIRECTORY PROPERTY EP_BASE ${CMAKE_BINARY_DIR}/subprojects)
set(STAGED_INSTALL_PREFIX ${CMAKE_BINARY_DIR}/stage)
message(STATUS "${PROJECT_NAME} staged install: ${STAGED_INSTALL_PREFIX}")
add_subdirectory(external/upstream)
include(ExternalProject)
ExternalProject_Add(${PROJECT_NAME}_core
DEPENDS
message_external
SOURCE_DIR
${CMAKE_CURRENT_SOURCE_DIR}/src
CMAKE_ARGS
-DCMAKE_INSTALL_PREFIX=${STAGED_INSTALL_PREFIX}
-DCMAKE_BUILD_TYPE=${CMAKE_BUILD_TYPE}
-DCMAKE_CXX_COMPILER=${CMAKE_CXX_COMPILER}
-DCMAKE_CXX_FLAGS=${CMAKE_CXX_FLAGS}
-DCMAKE_CXX_STANDARD=${CMAKE_CXX_STANDARD}
-DCMAKE_CXX_EXTENSIONS=${CMAKE_CXX_EXTENSIONS}
-DCMAKE_CXX_STANDARD_REQUIRED=${CMAKE_CXX_STANDARD_REQUIRED}
-Dmessage_DIR=${message_DIR}
CMAKE_CACHE_ARGS
-DCMAKE_PREFIX_PATH:PATH=${CMAKE_PREFIX_PATH}
BUILD_ALWAYS
1
)
enable_testing()
add_test(
NAME
check_use_message
COMMAND
${STAGED_INSTALL_PREFIX}/${INSTALL_BINDIR}/use_message
)
install(
DIRECTORY
${STAGED_INSTALL_PREFIX}/
DESTINATION
.
USE_SOURCE_PERMISSIONS
)
if(UNIX)
set(PRINT_SCRIPT "${CMAKE_CURRENT_LIST_DIR}/cmake/print_rpath.py")
configure_file(cmake/install_hook.cmake.in install_hook.cmake @ONLY)
install(
SCRIPT
${CMAKE_CURRENT_BINARY_DIR}/install_hook.cmake
)
endif()
You will have noticed that -Dmessage_DIR=${message_DIR} has been passed as a CMake argument to our own project. This will correctly set the location of the message library dependency. The value of message_DIR is defined in the CMakeLists.txt file under the external/upstream/message directory. This file handles the dependency on the message library – let us see how:
find_package(message 1 CONFIG QUIET)
if(message_FOUND)
get_property(_loc TARGET message::message-shared PROPERTY LOCATION)
message(STATUS "Found message: ${_loc} (found version ${message_VERSION})")
add_library(message_external INTERFACE) # dummy
else()
include(ExternalProject)
message(STATUS "Suitable message could not be located, Building message instead.")
ExternalProject_Add(message_external
GIT_REPOSITORY
https://github.com/dev-cafe/message.git
GIT_TAG
master
UPDATE_COMMAND
""
CMAKE_ARGS
-DCMAKE_INSTALL_PREFIX=${STAGED_INSTALL_PREFIX}
-DCMAKE_BUILD_TYPE=${CMAKE_BUILD_TYPE}
-DCMAKE_CXX_COMPILER=${CMAKE_CXX_COMPILER}
CMAKE_CACHE_ARGS
-DCMAKE_CXX_FLAGS:STRING=${CMAKE_CXX_FLAGS}
TEST_AFTER_INSTALL
1
DOWNLOAD_NO_PROGRESS
1
LOG_CONFIGURE
1
LOG_BUILD
1
LOG_INSTALL
1
)
if(WIN32 AND NOT CYGWIN)
set(DEF_message_DIR ${STAGED_INSTALL_PREFIX}/CMake)
else()
set(DEF_message_DIR ${STAGED_INSTALL_PREFIX}/share/cmake/message)
endif()
file(TO_NATIVE_PATH "${DEF_message_DIR}" DEF_message_DIR)
set(message_DIR ${DEF_message_DIR}
CACHE PATH "Path to internally built messageConfig.cmake" FORCE)
endif()
We are finally ready to compile our own project and successfully link it against the message library, be it already available on the system or freshly built for the purpose. Since this is a superbuild, the code under the src subdirectory is a fully standalone CMake project:
cmake_minimum_required(VERSION 3.6 FATAL_ERROR)
project(recipe-04_core
LANGUAGES CXX
)
set(CMAKE_CXX_STANDARD 11)
set(CMAKE_CXX_EXTENSIONS OFF)
set(CMAKE_CXX_STANDARD_REQUIRED ON)
include(GNUInstallDirs)
set(CMAKE_ARCHIVE_OUTPUT_DIRECTORY
${CMAKE_BINARY_DIR}/${CMAKE_INSTALL_LIBDIR})
set(CMAKE_LIBRARY_OUTPUT_DIRECTORY
${CMAKE_BINARY_DIR}/${CMAKE_INSTALL_LIBDIR})
set(CMAKE_RUNTIME_OUTPUT_DIRECTORY
${CMAKE_BINARY_DIR}/${CMAKE_INSTALL_BINDIR})
find_package(message 1 CONFIG REQUIRED)
get_property(_loc TARGET message::message-shared PROPERTY LOCATION)
message(STATUS "Found message: ${_loc} (found version ${message_VERSION})")
add_executable(use_message use_message.cpp)
target_link_libraries(use_message
PUBLIC
message::message-shared
)
# Prepare RPATH
file(RELATIVE_PATH _rel ${CMAKE_INSTALL_PREFIX}/${CMAKE_INSTALL_BINDIR} ${CMAKE_INSTALL_PREFIX})
if(APPLE)
set(_rpath "@loader_path/${_rel}")
else()
set(_rpath "\$ORIGIN/${_rel}")
endif()
file(TO_NATIVE_PATH "${_rpath}/${CMAKE_INSTALL_LIBDIR}" use_message_RPATH)
set_target_properties(use_message
PROPERTIES
MACOSX_RPATH ON
SKIP_BUILD_RPATH OFF
BUILD_WITH_INSTALL_RPATH OFF
INSTALL_RPATH "${use_message_RPATH}"
INSTALL_RPATH_USE_LINK_PATH ON
)
install(
TARGETS
use_message
RUNTIME
DESTINATION ${CMAKE_INSTALL_BINDIR}
COMPONENT bin
)
Let us now look at the contents of the install_hook.cmake.in template CMake script:
set(_executable ${CMAKE_INSTALL_PREFIX}/@INSTALL_BINDIR@/use_message)
set(_patcher)
list(APPEND _patchers chrpath patchelf otool)
foreach(p IN LISTS _patchers)
find_program(${p}_FOUND
NAMES
${p}
)
if(${p}_FOUND)
set(_patcher ${p})
message(STATUS "ELF patching tool ${_patcher} FOUND")
break()
endif()
endforeach()
if(NOT _patcher)
message(FATAL_ERROR "ELF patching tool NOT FOUND!\nPlease install one of chrpath, patchelf or otool")
find_package(PythonInterp REQUIRED QUIET)
execute_process(
COMMAND
${PYTHON_EXECUTABLE} @PRINT_SCRIPT@ "${_patcher}"
"${_executable}"
RESULT_VARIABLE _res
OUTPUT_VARIABLE _out
ERROR_VARIABLE _err
OUTPUT_STRIP_TRAILING_WHITESPACE
)
if(_res EQUAL 0)
message(STATUS "RPATH for ${_executable} is ${_out}")
else()
message(STATUS "Something went wrong!")
message(STATUS "Standard output from print_rpath.py: ${_out}")
message(STATUS "Standard error from print_rpath.py: ${_err}")
message(FATAL_ERROR "${_patcher} could NOT obtain RPATH for ${_executable}")
endif()
endif()
execute_process(
COMMAND ${_executable}
RESULT_VARIABLE _res
OUTPUT_VARIABLE _out
ERROR_VARIABLE _err
OUTPUT_STRIP_TRAILING_WHITESPACE
)
if(_res EQUAL 0)
message(STATUS "Running ${_executable}:\n ${_out}")
else()
message(STATUS "Something went wrong!")
message(STATUS "Standard output from running ${_executable}:\n ${_out}")
message(STATUS "Standard error from running ${_executable}:\n ${_err}")
message(FATAL_ERROR "Something went wrong with ${_executable}")
endif()
The superbuild is a very useful pattern in our CMake toolbox. It lets us manage complex projects by separating them into smaller, more manageable subprojects. In addition, we can use CMake as a package manager for the project we are building. CMake can search for our dependencies and, in case they are not found on the system, freshly build them for us. The basic pattern requires three CMakeLists.txt files:
We will first consider the configuration of the superbuild when the dependency on the message library is not already satisfied:
$ mkdir -p build
$ cd build
$ cmake -DCMAKE_INSTALL_PREFIX=$HOME/Software/recipe-04 ..
We will let CMake find the library for us, and this is the output we obtain:
-- The CXX compiler identification is GNU 7.3.0
-- Check for working CXX compiler: /nix/store/gqg2vrcq7krqi9rrl6pphvsg81sb8pjw-gcc-wrapper-7.3.0/bin/g++
-- Check for working CXX compiler: /nix/store/gqg2vrcq7krqi9rrl6pphvsg81sb8pjw-gcc-wrapper-7.3.0/bin/g++ -- works
-- Detecting CXX compiler ABI info
-- Detecting CXX compiler ABI info - done
-- Detecting CXX compile features
-- Detecting CXX compile features - done
-- Project will be installed to /home/roberto/Software/recipe-04
-- Build type set to Release
-- Installing LIB components to /home/roberto/Software/recipe-04/lib64
-- Installing BIN components to /home/roberto/Software/recipe-04/bin
-- Installing INCLUDE components to /home/roberto/Software/recipe-04/include
-- Installing CMAKE components to /home/roberto/Software/recipe-04/share/cmake/recipe-04
-- recipe-04 staged install: /home/roberto/Workspace/robertodr/cmake-cookbook/chapter-10/recipe-04/cxx-example/build/stage
-- Suitable message could not be located, Building message instead.
-- Configuring done
-- Generating done
-- Build files have been written to: /home/roberto/Workspace/robertodr/cmake-cookbook/chapter-10/recipe-04/cxx-example/build
As instructed, CMake reports the following:
If the library is already at a known location on the system, we can pass the
-Dmessage_DIR option to CMake:
$ cmake -DCMAKE_INSTALL_PREFIX=$HOME/Software/use_message -Dmessage_DIR=$HOME/Software/message/share/cmake/message ..
And, in fact, the library was found and imported. Only build operations for our own project will be performed:
-- The CXX compiler identification is GNU 7.3.0
-- Check for working CXX compiler: /nix/store/gqg2vrcq7krqi9rrl6pphvsg81sb8pjw-gcc-wrapper-7.3.0/bin/g++
-- Check for working CXX compiler: /nix/store/gqg2vrcq7krqi9rrl6pphvsg81sb8pjw-gcc-wrapper-7.3.0/bin/g++ -- works
-- Detecting CXX compiler ABI info
-- Detecting CXX compiler ABI info - done
-- Detecting CXX compile features
-- Detecting CXX compile features - done
-- Project will be installed to /home/roberto/Software/recipe-04
-- Build type set to Release
-- Installing LIB components to /home/roberto/Software/recipe-04/lib64
-- Installing BIN components to /home/roberto/Software/recipe-04/bin
-- Installing INCLUDE components to /home/roberto/Software/recipe-04/include
-- Installing CMAKE components to /home/roberto/Software/recipe-04/share/cmake/recipe-04
-- recipe-04 staged install: /home/roberto/Workspace/robertodr/cmake-cookbook/chapter-10/recipe-04/cxx-example/build/stage
-- Checking for one of the modules 'uuid'
-- Found message: /home/roberto/Software/message/lib64/libmessage.so.1 (found version 1.0.0)
-- Configuring done
-- Generating done
-- Build files have been written to: /home/roberto/Workspace/robertodr/cmake-cookbook/chapter-10/recipe-04/cxx-example/build
The final installation rule for the project will copy the contents of the staged installation prefix to CMAKE_INSTALL_PREFIX:
install(
DIRECTORY
${STAGED_INSTALL_PREFIX}/
DESTINATION
.
USE_SOURCE_PERMISSIONS
)
Note the use of . rather than the ${CMAKE_INSTALL_PREFIX} absolute path, such that this rule can be understood properly also by the CPack tool. Usage of CPack will be shown in Chapter 11, Packaging Projects, Recipe 1, Generating source and binary packages.
The recipe-04_core project builds a simple executable target that links against the message shared library. As discussed earlier in this chapter, the RPATH needs to be set properly in order for the executable to run correctly. Recipe 1 in this chapter showed how to achieve just that with the help of CMake and the same pattern was reused here in the CMakeLists.txt handling the creation of the use_message executable:
file(RELATIVE_PATH _rel ${CMAKE_INSTALL_PREFIX}/${CMAKE_INSTALL_BINDIR} ${CMAKE_INSTALL_PREFIX})
if(APPLE)
set(_rpath "@loader_path/${_rel}")
else()
set(_rpath "\$ORIGIN/${_rel}")
endif()
file(TO_NATIVE_PATH "${_rpath}/${CMAKE_INSTALL_LIBDIR}" use_message_RPATH)
set_target_properties(use_message
PROPERTIES
MACOSX_RPATH ON
SKIP_BUILD_RPATH OFF
BUILD_WITH_INSTALL_RPATH OFF
INSTALL_RPATH "${use_message_RPATH}"
INSTALL_RPATH_USE_LINK_PATH ON
)
To check that this is indeed enough, we can use a platform-native tool to print the RPATH of the installed executable. We wrap the call to the tool into a Python script, with is further wrapped into a CMake script. Eventually, the CMake script is invoked as an installation rule with the SCRIPT keyword:
if(UNIX)
set(PRINT_SCRIPT "${CMAKE_CURRENT_LIST_DIR}/cmake/print_rpath.py")
configure_file(cmake/install_hook.cmake.in install_hook.cmake @ONLY)
install(
SCRIPT
${CMAKE_CURRENT_BINARY_DIR}/install_hook.cmake
)
endif()
This additional script is executed at the very end of the installation process:
$ cmake --build build --target install
and on a GNU/Linux system we would see the following output:
Install the project...
-- Install configuration: "Release"
-- Installing: /home/roberto/Software/recipe-04/.
-- Installing: /home/roberto/Software/recipe-04/./lib64
-- Installing: /home/roberto/Software/recipe-04/./lib64/libmessage.so
-- Installing: /home/roberto/Software/recipe-04/./lib64/libmessage_s.a
-- Installing: /home/roberto/Software/recipe-04/./lib64/libmessage.so.1
-- Installing: /home/roberto/Software/recipe-04/./include
-- Installing: /home/roberto/Software/recipe-04/./include/message
-- Installing: /home/roberto/Software/recipe-04/./include/message/Message.hpp
-- Installing: /home/roberto/Software/recipe-04/./include/message/messageExport.h
-- Installing: /home/roberto/Software/recipe-04/./share
-- Installing: /home/roberto/Software/recipe-04/./share/cmake
-- Installing: /home/roberto/Software/recipe-04/./share/cmake/message
-- Installing: /home/roberto/Software/recipe-04/./share/cmake/message/messageTargets-release.cmake
-- Installing: /home/roberto/Software/recipe-04/./share/cmake/message/messageConfigVersion.cmake
-- Installing: /home/roberto/Software/recipe-04/./share/cmake/message/messageConfig.cmake
-- Installing: /home/roberto/Software/recipe-04/./share/cmake/message/messageTargets.cmake
-- Installing: /home/roberto/Software/recipe-04/./bin
-- Installing: /home/roberto/Software/recipe-04/./bin/hello-world_wAR
-- Installing: /home/roberto/Software/recipe-04/./bin/use_message
-- Installing: /home/roberto/Software/recipe-04/./bin/hello-world_wDSO
-- ELF patching tool chrpath FOUND
-- RPATH for /home/roberto/Software/recipe-04/bin/use_message is /home/roberto/Software/recipe-04/bin/use_message: RUNPATH=$ORIGIN/../lib64:/home/roberto/Workspace/robertodr/cmake-cookbook/chapter-10/recipe-04/cxx-example/build/stage/lib64:/nix/store/di389pfcw2krnmh8nmkn55d1rnzmba37-CMake-Cookbook/lib64:/nix/store/di389pfcw2krnmh8nmkn55d1rnzmba37-CMake-Cookbook/lib:/nix/store/mjs2b8mmid86lvbzibzdlz8w5yrjgcnf-util-linux-2.31.1/lib:/nix/store/2kcrj1ksd2a14bm5sky182fv2xwfhfap-glibc-2.26-131/lib:/nix/store/4zd34747fz0ggzzasy4icgn3lmy89pra-gcc-7.3.0-lib/lib
-- Running /home/roberto/Software/recipe-04/bin/use_message:
This is my very nice message:
Hello, World! From a client of yours!
...and here is its UUID: a8014bf7-5dfa-45e2-8408-12e9a5941825
This is my very nice message:
Goodbye, World! From a client of yours!
...and here is its UUID: ac971ef4-7606-460f-9144-1ad96f713647
In this chapter, we will cover the following recipes:
Up to this point, we have compiled and installed (example) software packages "from sources" – this meant fetching the project via Git, and executing the configure, build, test, and install steps manually. However, in practice, software packages are often rather installed using package managers, such as Apt, DNF, Pacman, pip, and Conda. We need to be able to distribute our code projects in various formats: as source archives or as binary installer.
This is what we refer to as packaging time in the now familiar scheme showing the various phases of a project using CMake:
In this chapter, we will explore different packaging strategies. We will first discuss packaging using the tool CPack in the CMake family. We will also provide recipes for packaging and uploading CMake projects to the Python Package Index (PyPI, https://pypi.org) and the Anaconda Cloud (https://anaconda.org) – these are standard and popular platforms for distributing packages via the package managers pip and Conda (https://conda.io/docs/), respectively. For PyPI, we will demonstrate how to package and distribute mixed C++/Python or C/Fortran/Python projects. For Conda, we will show how to package C++ projects with dependencies on other libraries.
If your code is open source, users will expect to be able to download the sources for your project and build by themselves using your perfectly tailored CMake scripts. Of course, the packaging operation could be done with a script, but CPack offers a more compact and portable alternative. This recipe will guide you through the creation of a number of packaging alternatives:
We will use the source code for the message library presented in Chapter 10, Writing an Installer, Recipe 3, Exporting your targets. The project tree consists of the following directories and files:
.
├── cmake
│ ├── coffee.icns
│ ├── Info.plist.in
│ └── messageConfig.cmake.in
├── CMakeCPack.cmake
├── CMakeLists.txt
├── INSTALL.md
├── LICENSE
├── src
│ ├── CMakeLists.txt
│ ├── hello-world.cpp
│ ├── Message.cpp
│ └── Message.hpp
└── tests
├── CMakeLists.txt
└── use_target
├── CMakeLists.txt
└── use_message.cpp
Since the emphasis in this recipe will be on effective usage of CPack, we will not comment on the source code itself. We will only add packaging directives in CMakeCPack.cmake, which we will discuss in a moment. In addition, we have added INSTALL.md and a LICENSE file: they contain installation instructions and the license for the project and are required by the packaging directives.
Let us look at the packaging directives that need to be added to this project. We will collect them in CMakeCPack.cmake, which is included at the end of CMakeLists.txt using include(CMakeCPack.cmake):
set(CPACK_PACKAGE_NAME "${PROJECT_NAME}")
set(CPACK_PACKAGE_VENDOR "CMake Cookbook")
set(CPACK_PACKAGE_DESCRIPTION_FILE "${PROJECT_SOURCE_DIR}/INSTALL.md")
set(CPACK_PACKAGE_DESCRIPTION_SUMMARY "message: a small messaging library")
set(CPACK_RESOURCE_FILE_LICENSE "${PROJECT_SOURCE_DIR}/LICENSE")
set(CPACK_PACKAGING_INSTALL_PREFIX "/opt/${PROJECT_NAME}")
set(CPACK_PACKAGE_VERSION_MAJOR "${PROJECT_VERSION_MAJOR}")
set(CPACK_PACKAGE_VERSION_MINOR "${PROJECT_VERSION_MINOR}")
set(CPACK_PACKAGE_VERSION_PATCH "${PROJECT_VERSION_PATCH}")
set(CPACK_SOURCE_IGNORE_FILES "${PROJECT_BINARY_DIR};/.git/;.gitignore")
set(CPACK_SOURCE_GENERATOR "ZIP;TGZ")
set(CPACK_GENERATOR "ZIP;TGZ")
if(UNIX)
if(CMAKE_SYSTEM_NAME MATCHES Linux)
list(APPEND CPACK_GENERATOR "DEB")
set(CPACK_DEBIAN_PACKAGE_MAINTAINER "robertodr")
set(CPACK_DEBIAN_PACKAGE_SECTION "devel")
set(CPACK_DEBIAN_PACKAGE_DEPENDS "uuid-dev")
list(APPEND CPACK_GENERATOR "RPM")
set(CPACK_RPM_PACKAGE_RELEASE "1")
set(CPACK_RPM_PACKAGE_LICENSE "MIT")
set(CPACK_RPM_PACKAGE_REQUIRES "uuid-devel")
endif()
endif()
if(WIN32 OR MINGW)
list(APPEND CPACK_GENERATOR "NSIS")
set(CPACK_NSIS_PACKAGE_NAME "message")
set(CPACK_NSIS_CONTACT "robertdr")
set(CPACK_NSIS_ENABLE_UNINSTALL_BEFORE_INSTALL ON)
endif()
if(APPLE)
list(APPEND CPACK_GENERATOR "Bundle")
set(CPACK_BUNDLE_NAME "message")
configure_file(${PROJECT_SOURCE_DIR}/cmake/Info.plist.in Info.plist @ONLY)
set(CPACK_BUNDLE_PLIST ${CMAKE_CURRENT_BINARY_DIR}/Info.plist)
set(CPACK_BUNDLE_ICON ${PROJECT_SOURCE_DIR}/cmake/coffee.icns)
endif()
message(STATUS "CPack generators: ${CPACK_GENERATOR}")
include(CPack)
We can now configure the project as usual:
$ mkdir -p build
$ cd build
$ cmake ..
With the following command, we can list the available targets (the example output is obtained on a GNU/Linux system with Unix Makefiles as generator):
$ cmake --build . --target help
The following are some of the valid targets for this Makefile:
... all (the default if no target is provided)
... clean
... depend
... install/strip
... install
... package_source
... package
... install/local
... test
... list_install_components
... edit_cache
... rebuild_cache
... hello-world
... message
We can see that the package and package_source targets are available. The source packages can be generated with the following command:
$ cmake --build . --target package_source
Run CPack packaging tool for source...
CPack: Create package using ZIP
CPack: Install projects
CPack: - Install directory: /home/user/cmake-cookbook/chapter-11/recipe-01/cxx-example
CPack: Create package
CPack: - package: /home/user/cmake-cookbook/chapter-11/recipe-01/cxx-example/build/recipe-01-1.0.0-Source.zip generated.
CPack: Create package using TGZ
CPack: Install projects
CPack: - Install directory: /home/user/cmake-cookbook/chapter-11/recipe-01/cxx-example
CPack: Create package
CPack: - package: /home/user/cmake-cookbook/chapter-11/recipe-01/cxx-example/build/recipe-01-1.0.0-Source.tar.gz generated.
Similarly, we can build the binary packages:
$ cmake --build . --target package
And, in our case, we obtained the following list of binary packages:
message-1.0.0-Linux.deb
message-1.0.0-Linux.rpm
message-1.0.0-Linux.tar.gz
message-1.0.0-Linux.zip
CPack can be used to generate many different types of packages for distribution. When generating the build system, the CPack instructions we listed in CMakeCPack.cmake are used to generate a CPackConfig.cmake file in the build directory. When running the CMake command for the package or package_source targets, CPack is automatically invoked with the autogenerated configuration file as argument. Indeed, these two new targets are simple rules that wrap calls to CPack. Much as CMake, CPack also has a concept of generators. Whereas generators in the context of CMake are the tools that will be used to generate the native build scripts, for example, Unix Makefiles or Visual Studio project files, in the context of CPack these are the tools to be used for packaging. We listed these, exercising particular care for the different platforms, using the CPACK_SOURCE_GENERATOR and the CPACK_GENERATOR variables for the source and binary packages, respectively. Thus the Debian packaging utilities will be invoked for the DEB package generator, whereas the appropriate archiving tool on the given platform will be invoked for the TGZ generator. We can invoke CPack directly from the build directory and select which generator to use with the -G command-line option. The RPM package can be generated with the following:
$ cd build
$ cpack -G RPM
CPack: Create package using RPM
CPack: Install projects
CPack: - Run preinstall target for: recipe-01
CPack: - Install project: recipe-01
CPack: Create package
CPackRPM: Will use GENERATED spec file: /home/user/cmake-cookbook/chapter-11/recipe-01/cxx-example/build/_CPack_Packages/Linux/RPM/SPECS/recipe-01.spec
CPack: - package: /home/user/cmake-cookbook/chapter-11/recipe-01/cxx-example/build/recipe-01-1.0.0-Linux.rpm generated.
For any distribution, be it source or binary, we need to package only those contents that will be strictly necessary for the end user, hence the entire build directory and any other file related to version control will have to be excluded from the list of files to be packaged. In our example, the exclusion list was declared with the following command:
set(CPACK_SOURCE_IGNORE_FILES "${PROJECT_BINARY_DIR};/.git/;.gitignore")
We also need to specify basic information about our package, such as the name, a short description, and the version. This information is set by means of CMake variables, which are then passed on to CPack when including the corresponding module.
Let us look in detail at the instructions for the different kinds of packages we can generate for our example project.
In our example, we decided to use the TGZ and ZIP generators for the source archive. These will result in .tar.gz and .zip archives, respectively. We can inspect the contents of the generated .tar.gz file:
$ tar tzf recipe-01-1.0.0-Source.tar.gz
recipe-01-1.0.0-Source/opt/
recipe-01-1.0.0-Source/opt/recipe-01/
recipe-01-1.0.0-Source/opt/recipe-01/cmake/
recipe-01-1.0.0-Source/opt/recipe-01/cmake/coffee.icns
recipe-01-1.0.0-Source/opt/recipe-01/cmake/Info.plist.in
recipe-01-1.0.0-Source/opt/recipe-01/cmake/messageConfig.cmake.in
recipe-01-1.0.0-Source/opt/recipe-01/CMakeLists.txt
recipe-01-1.0.0-Source/opt/recipe-01/src/
recipe-01-1.0.0-Source/opt/recipe-01/src/Message.hpp
recipe-01-1.0.0-Source/opt/recipe-01/src/CMakeLists.txt
recipe-01-1.0.0-Source/opt/recipe-01/src/Message.cpp
recipe-01-1.0.0-Source/opt/recipe-01/src/hello-world.cpp
recipe-01-1.0.0-Source/opt/recipe-01/LICENSE
recipe-01-1.0.0-Source/opt/recipe-01/tests/
recipe-01-1.0.0-Source/opt/recipe-01/tests/CMakeLists.txt
recipe-01-1.0.0-Source/opt/recipe-01/tests/use_target/
recipe-01-1.0.0-Source/opt/recipe-01/tests/use_target/CMakeLists.txt
recipe-01-1.0.0-Source/opt/recipe-01/tests/use_target/use_message.cpp
recipe-01-1.0.0-Source/opt/recipe-01/INSTALL.md
As expected, only the contents of the source tree are included. Notice that the INSTALL.md and LICENSE files are also included, as specified by means of the CPACK_PACKAGE_DESCRIPTION_FILE and CPACK_RESOURCE_FILE_LICENSE variables.
When creating binary archives, CPack will package the contents of the targets described in our CMakeCPack.cmake file as described by the installation instructions. Thus in our example the hello-world executable, the message shared library, and the corresponding header files will all be packaged in the .tar.gz and .zip formats. In addition, also the CMake configuration files will be packaged. This is very useful for other projects that will need to link against our library. The installation prefix used in the package may differ from the one used when installing the project from the build tree. The CPACK_PACKAGING_INSTALL_PREFIX variable may be used to achieve this. In our example, we set it to a specific location on the system: /opt/recipe-01.
We can analyze the contents of the generated .tar.gz archive:
$ tar tzf recipe-01-1.0.0-Linux.tar.gz
recipe-01-1.0.0-Linux/opt/
recipe-01-1.0.0-Linux/opt/recipe-01/
recipe-01-1.0.0-Linux/opt/recipe-01/bin/
recipe-01-1.0.0-Linux/opt/recipe-01/bin/hello-world
recipe-01-1.0.0-Linux/opt/recipe-01/share/
recipe-01-1.0.0-Linux/opt/recipe-01/share/cmake/
recipe-01-1.0.0-Linux/opt/recipe-01/share/cmake/recipe-01/
recipe-01-1.0.0-Linux/opt/recipe-01/share/cmake/recipe-01/messageConfig.cmake
recipe-01-1.0.0-Linux/opt/recipe-01/share/cmake/recipe-01/messageTargets-hello-world.cmake
recipe-01-1.0.0-Linux/opt/recipe-01/share/cmake/recipe-01/messageConfigVersion.cmake
recipe-01-1.0.0-Linux/opt/recipe-01/share/cmake/recipe-01/messageTargets-hello-world-release.cmake
recipe-01-1.0.0-Linux/opt/recipe-01/share/cmake/recipe-01/messageTargets-release.cmake
recipe-01-1.0.0-Linux/opt/recipe-01/share/cmake/recipe-01/messageTargets.cmake
recipe-01-1.0.0-Linux/opt/recipe-01/include/
recipe-01-1.0.0-Linux/opt/recipe-01/include/message/
recipe-01-1.0.0-Linux/opt/recipe-01/include/message/Message.hpp
recipe-01-1.0.0-Linux/opt/recipe-01/include/message/messageExport.h
recipe-01-1.0.0-Linux/opt/recipe-01/lib64/
recipe-01-1.0.0-Linux/opt/recipe-01/lib64/libmessage.so
recipe-01-1.0.0-Linux/opt/recipe-01/lib64/libmessage.so.1
We expect the configuration for each platform-native binary installer to be slightly different. These differences can be managed with CPack within a single CMakeCPack.cmake, as we have done in our example.
For GNU/Linux, the stanza configures both the DEB and RPM generators:
if(UNIX)
if(CMAKE_SYSTEM_NAME MATCHES Linux)
list(APPEND CPACK_GENERATOR "DEB")
set(CPACK_DEBIAN_PACKAGE_MAINTAINER "robertodr")
set(CPACK_DEBIAN_PACKAGE_SECTION "devel")
set(CPACK_DEBIAN_PACKAGE_DEPENDS "uuid-dev")
list(APPEND CPACK_GENERATOR "RPM")
set(CPACK_RPM_PACKAGE_RELEASE "1")
set(CPACK_RPM_PACKAGE_LICENSE "MIT")
set(CPACK_RPM_PACKAGE_REQUIRES "uuid-devel")
endif()
endif()
Our example depends on the UUID library, and the CPACK_DEBIAN_PACKAGE_DEPENDS and CPACK_RPM_PACKAGE_REQUIRES options let us specify dependencies between our package and others in the database. We can use the dpkg and rpm programs to analyze the contents of the generated .deb and .rpm packages, respectively.
Note that CPACK_PACKAGING_INSTALL_PREFIX also affects these package generators: our package will be installed to /opt/recipe-01.
CMake truly provides support for cross-platform and portable build systems. The following stanza will create an installer using the Nullsoft Scriptable Install System (NSIS):
if(WIN32 OR MINGW)
list(APPEND CPACK_GENERATOR "NSIS")
set(CPACK_NSIS_PACKAGE_NAME "message")
set(CPACK_NSIS_CONTACT "robertdr")
set(CPACK_NSIS_ENABLE_UNINSTALL_BEFORE_INSTALL ON)
endif()
Finally, the following stanza will enable the Bundle packager if we are building the project on macOS:
if(APPLE)
list(APPEND CPACK_GENERATOR "Bundle")
set(CPACK_BUNDLE_NAME "message")
configure_file(${PROJECT_SOURCE_DIR}/cmake/Info.plist.in Info.plist @ONLY)
set(CPACK_BUNDLE_PLIST ${CMAKE_CURRENT_BINARY_DIR}/Info.plist)
set(CPACK_BUNDLE_ICON ${PROJECT_SOURCE_DIR}/cmake/coffee.icns)
endif()
In the macOS example, we first need to configure a property list file for the package, something achieved by the configure_file command. The location of Info.plist and the icon for the package are then set as variables for CPack.
Instead of listing the CPack configuration settings in CMakeCPack.cmake as we have done for simplicity, we could have placed the per-generator settings of CPACK_* variables in a separate file, such as CMakeCPackOptions.cmake, and included these settings into CMakeCPack.cmake using set(CPACK_PROJECT_CONFIG_FILE "${PROJECT_SOURCE_DIR}/CMakeCPackOptions.cmake"). This file can also be configured at CMake time and then included at CPack time, providing a clean way to configure multi-format package generators (see also: https://cmake.org/cmake/help/v3.6/module/CPack.html).
As with all tools in the CMake family, CPack is powerful and versatile and offers much more flexibility and options than what we have shown in this recipe. The interested reader should read the official documentation for the command-line interface to CPack (https://cmake.org/cmake/help/v3.6/manual/cpack.1.html) and the manual pages, which detail the additional generators that CPack knows how to use to package projects (https://cmake.org/cmake/help/v3.6/module/CPack.html).
In this recipe, we will take the pybind11 example from Chapter 9, Mixed-language Projects, Recipe 5, Building C++ and Python projects using pybind11, as a starting point, add relevant install targets and pip packaging information and upload the project to PyPI. Our goal will be to arrive at a project that can be installed using pip and runs CMake and fetches the pybind11 dependency under the hood.
To distribute a package via PyPI, you will need a user account at https://pypi.org, but it is possible to first exercise with installations from a local path.
Our starting point is the pybind11 example from Chapter 9, Mixed-language Projects, Recipe 5, Building C++ and Python projects using pybind11, which contains a top-level CMakeLists.txt file and an account/CMakeLists.txt file that configures the account example targets and uses the following project tree:
.
├── account
│ ├── account.cpp
│ ├── account.hpp
│ ├── CMakeLists.txt
│ └── test.py
└── CMakeLists.txt
In this recipe, we will keep account.cpp, account.hpp, and the test.py script unchanged. We will modify account/CMakeLists.txt and add a couple of files for pip to be able to build and install the package. For this, we will require three additional files in the root directory: README.rst, MANIFEST.in, and setup.py.
README.rst contains documentation about the project:
Example project
===============
Project description in here ...
MANIFEST.in lists files that should be installed along the Python modules and packages:
include README.rst CMakeLists.txt
recursive-include account *.cpp *.hpp CMakeLists.txt
And, finally, setup.py contains instructions for building and installing the project:
import distutils.command.build as _build
import os
import sys
from distutils import spawn
from distutils.sysconfig import get_python_lib
from setuptools import setup
def extend_build():
class build(_build.build):
def run(self):
cwd = os.getcwd()
if spawn.find_executable('cmake') is None:
sys.stderr.write("CMake is required to build this package.\n")
sys.exit(-1)
_source_dir = os.path.split(__file__)[0]
_build_dir = os.path.join(_source_dir, 'build_setup_py')
_prefix = get_python_lib()
try:
cmake_configure_command = [
'cmake',
'-H{0}'.format(_source_dir),
'-B{0}'.format(_build_dir),
'-DCMAKE_INSTALL_PREFIX={0}'.format(_prefix),
]
_generator = os.getenv('CMAKE_GENERATOR')
if _generator is not None:
cmake_configure_command.append('-
G{0}'.format(_generator))
spawn.spawn(cmake_configure_command)
spawn.spawn(
['cmake', '--build', _build_dir, '--target', 'install'])
os.chdir(cwd)
except spawn.DistutilsExecError:
sys.stderr.write("Error while building with CMake\n")
sys.exit(-1)
_build.build.run(self)
return build
_here = os.path.abspath(os.path.dirname(__file__))
if sys.version_info[0] < 3:
with open(os.path.join(_here, 'README.rst')) as f:
long_description = f.read()
else:
with open(os.path.join(_here, 'README.rst'), encoding='utf-8') as f:
long_description = f.read()
_this_package = 'account'
version = {}
with open(os.path.join(_here, _this_package, 'version.py')) as f:
exec(f.read(), version)
setup(
name=_this_package,
version=version['__version__'],
description='Description in here.',
long_description=long_description,
author='Bruce Wayne',
author_email='bruce.wayne@example.com',
url='http://example.com',
license='MIT',
packages=[_this_package],
include_package_data=True,
classifiers=[
'Development Status :: 3 - Alpha',
'Intended Audience :: Science/Research',
'Programming Language :: Python :: 2.7',
'Programming Language :: Python :: 3.6'
],
cmdclass={'build': extend_build()})
We will place __init__.py into the account subdirectory:
from .version import __version__
from .account import Account
__all__ = [
'__version__',
'Account',
]
We will also place version.py into the account subdirectory:
__version__ = '0.0.0'
This means that we will arrive at the following file structure for our project:
.
├── account
│ ├── account.cpp
│ ├── account.hpp
│ ├── CMakeLists.txt
│ ├── __init__.py
│ ├── test.py
│ └── version.py
├── CMakeLists.txt
├── MANIFEST.in
├── README.rst
└── setup.py
This recipe builds on top of Chapter 9, Mixed-language Projects, Recipe 5, Building C++ and Python projects using pybind11. Let us see how in detail:
First, we extend account/CMakeLists.txt. The only addition is the last directive, which specifies the install target:
install(
TARGETS
account
LIBRARY
DESTINATION account
)
And that's it! With the install target and the README.rst, MANIFEST.in, setup.py, __init__.py, and version.py files in place, we are ready to test the installation of our example code which is interfaced using pybind11:
$ pipenv install /path/to/cxx-example
$ pipenv run python
>>> from account import Account
>>> account1 = Account()
>>> account1.deposit(100.0)
>>> account1.deposit(100.0)
>>> account1.withdraw(50.0)
>>> print(account1.get_balance())
150.0
The ${CMAKE_CURRENT_BINARY_DIR} directory contains the compiled account.cpython-36m-x86_64-linux-gnu.so Python module built using pybind11, but note that its name depends on the operating system (in this case, 64-bit Linux) and the Python environment (in this case, Python 3.6). The setup.py script will run CMake under the hood and install the Python module into the correct path, depending on the selected Python environment (system Python or Pipenv or Virtual Environment). But now we have two challenges when installing the module:
We can solve this by using the following install target, where setup.py will define the install target location:
install(
TARGETS
account
LIBRARY
DESTINATION account
)
Here we instruct CMake to install the compiled Python module file into the account subdirectory relative to the install target location (Chapter 10, Writing an Installer, discusses in detail how the target location can be set). The latter will be set by setup.py by defining CMAKE_INSTALL_PREFIX to point to the right path depending on the Python environment.
Let us now inspect how we achieve this in setup.py; we will start from the bottom of the script:
setup(
name=_this_package,
version=version['__version__'],
description='Description in here.',
long_description=long_description,
author='Bruce Wayne',
author_email='bruce.wayne@example.com',
url='http://example.com',
license='MIT',
packages=[_this_package],
include_package_data=True,
classifiers=[
'Development Status :: 3 - Alpha',
'Intended Audience :: Science/Research',
'Programming Language :: Python :: 2.7',
'Programming Language :: Python :: 3.6'
],
cmdclass={'build': extend_build()})
The script contains a number of placeholders and hopefully self-explaining directives, but here we will focus on the last directive, cmdclass, where we extend the default build step by a custom function, which we call extend_build. This function subclasses the default build step:
def extend_build():
class build(_build.build):
def run(self):
cwd = os.getcwd()
if spawn.find_executable('cmake') is None:
sys.stderr.write("CMake is required to build this package.\n")
sys.exit(-1)
_source_dir = os.path.split(__file__)[0]
_build_dir = os.path.join(_source_dir, 'build_setup_py')
_prefix = get_python_lib()
try:
cmake_configure_command = [
'cmake',
'-H{0}'.format(_source_dir),
'-B{0}'.format(_build_dir),
'-DCMAKE_INSTALL_PREFIX={0}'.format(_prefix),
]
_generator = os.getenv('CMAKE_GENERATOR')
if _generator is not None:
cmake_configure_command.append('-G{0}'.format(_generator))
spawn.spawn(cmake_configure_command)
spawn.spawn(
['cmake', '--build', _build_dir, '--target', 'install'])
os.chdir(cwd)
except spawn.DistutilsExecError:
sys.stderr.write("Error while building with CMake\n")
sys.exit(-1)
_build.build.run(self)
return build
First, the function checks whether CMake is available on the system. The core of the function executes two CMake commands:
cmake_configure_command = [
'cmake',
'-H{0}'.format(_source_dir),
'-B{0}'.format(_build_dir),
'-DCMAKE_INSTALL_PREFIX={0}'.format(_prefix),
]
_generator = os.getenv('CMAKE_GENERATOR')
if _generator is not None:
cmake_configure_command.append('-G{0}'.format(_generator))
spawn.spawn(cmake_configure_command)
spawn.spawn(
['cmake', '--build', _build_dir, '--target', 'install'])
Here we have the possibility to change the default generator used by setting the CMAKE_GENERATOR environment variable. The install prefix is defined as follows:
_prefix = get_python_lib()
The get_python_lib function imported from distutils.sysconfig provides the root directory for the install prefix. The cmake --build _build_dir --target install command builds and installs our project in one step in a portable way. The reason why we use the name _build_dir instead of simply build is that your project might already contain a build directory when testing the local install, which would conflict with a fresh installation. For packages already uploaded to PyPI, the name of the build directory does not make a difference.
Now that we have the local install tested, we are ready to upload the package to PyPI. But, before we do that, make sure that the metadata in setup.py (such as the name of the project, and the contact and license information) is reasonable, and that the project name is not already taken on PyPI. It is also good practice to first test upload to and download from the PyPI test instance (https://test.pypi.org) before uploading to https://pypi.org.
Before the upload, we need to create a file called .pypirc in the home directory containing (replace yourusername and yourpassword):
[distutils]account
index-servers=
pypi
pypitest
[pypi]
username = yourusername
password = yourpassword
[pypitest]
repository = https://test.pypi.org/legacy/
username = yourusername
password = yourpassword
We will proceed in two steps. First, we create the distribution locally:
$ python setup.py sdist
In the second step, we upload the generated distribution data using Twine (we install Twine into a local Pipenv):
$ pipenv run twine upload dist/* -r pypitest
Uploading distributions to https://test.pypi.org/legacy/
Uploading yourpackage-0.0.0.tar.gz
As a next step, try to install from the test instance into an isolated environment:
$ pipenv shell
$ pip install --index-url https://test.pypi.org/simple/ yourpackage
Once this is working, we are ready to upload to production PyPI:
$ pipenv run twine upload dist/* -r pypi
This recipe is a mashup of the previous recipe and Chapter 9, Mixed-language Projects, Recipe 6, Mixing C, C++, Fortran, and Python using Python CFFI. We will reuse many building blocks from the previous recipe, but instead of using pybind11, we will use Python CFFI to provide the Python interface. In this recipe, our goal is to share a Fortran project via PyPI, but instead of Fortran, it could equally be a C or C++ project or any language exposing a C interface.
We will start out with the following file tree:
.
├── account
│ ├── account.h
│ ├── CMakeLists.txt
│ ├── implementation
│ │ └── fortran_implementation.f90
│ ├── __init__.py
│ ├── interface_file_names.cfg.in
│ ├── test.py
│ └── version.py
├── CMakeLists.txt
├── MANIFEST.in
├── README.rst
└── setup.py
The top-level CMakeLists.txt file and all sources below account, except account/CMakeLists.txt, are unchanged from how they appeared in Chapter 9, Mixed-language Projects, Recipe 6, Mixing C, C++, Fortran, and Python using Python CFFI. We will shortly discuss the small changes we need to apply to account/CMakeLists.txt. The README.rst file is identical with the previous recipe. The setup.py script contains one extra line compared to the previous recipe (the line containing install_requires=['cffi']):
# ... up to this line the script is unchanged
setup(
name=_this_package,
version=version['__version__'],
description='Description in here.',
long_description=long_description,
author='Bruce Wayne',
author_email='bruce.wayne@example.com',
url='http://example.com',
license='MIT',
packages=[_this_package],
install_requires=['cffi'],
include_package_data=True,
classifiers=[
'Development Status :: 3 - Alpha',
'Intended Audience :: Science/Research',
'Programming Language :: Python :: 2.7',
'Programming Language :: Python :: 3.6'
],
cmdclass={'build': extend_build()})
MANIFEST.in lists files that should be installed along with the Python modules and packages and contains the following:
include README.rst CMakeLists.txt
recursive-include account *.h *.f90 CMakeLists.txt
Under the account subdirectory, we see two new files. Again, there is a version.py file holding the project version for setup.py:
__version__ = '0.0.0'
The subdirectory also holds the interface_file_names.cfg.in file, which we will be discussing soon:
[configuration]
header_file_name = account.h
library_file_name = $<TARGET_FILE_NAME:account>
Let usdiscuss the steps necessary to achieve the packaging:
file(
GENERATE OUTPUT ${CMAKE_CURRENT_BINARY_DIR}/interface_file_names.cfg
INPUT ${CMAKE_CURRENT_SOURCE_DIR}/interface_file_names.cfg.in
)
set_target_properties(account
PROPERTIES
PUBLIC_HEADER "account.h;${CMAKE_CURRENT_BINARY_DIR}/account_export.h"
RESOURCE "${CMAKE_CURRENT_BINARY_DIR}/interface_file_names.cfg"
)
install(
TARGETS
account
LIBRARY
DESTINATION account/lib
RUNTIME
DESTINATION account/lib
PUBLIC_HEADER
DESTINATION account/include
RESOURCE
DESTINATION account
)
And that's it! With the install target and the additional files in place, we are ready to test the installation. For this, create a new directory somewhere on your computer and we will test the installation there.
$ pipenv install /path/to/fortran-example
$ pipenv run python
>>> import account
>>> account1 = account.new()
>>> account.deposit(account1, 100.0)
>>> account.deposit(account1, 100.0)
>>> account.withdraw(account1, 50.0)
>>> print(account.get_balance(account1))
150.0
The extension to install mixed-language projects using Python CFFI and CMake compared to Chapter 9, Mixed-language Projects, Recipe 6, Mixing C, C++, Fortran, and Python using Python CFFI consists of two additional steps:
The structure of setup.py is almost identical to the previous recipe, and we refer you to the previous recipe for a discussion of this file. The only addition was a line containing install_requires=['cffi'] to make sure that installing our example package also fetches and installs the required Python CFFI. The setup.py script will automatically install __init__.py and version.py, since these are referenced from the setup.py script. MANIFEST.in is slightly changed to package not only README.rst and CMake files, but also the header and Fortran source files:
include README.rst CMakeLists.txt
recursive-include account *.h *.f90 CMakeLists.txt
We have three challenges in this recipe to package a CMake project that uses Python CFFI with setup.py:
Let us start with the last point: we don't know the exact name, but upon build system generation CMake does and therefore we use the generator expression in interface_file_names.cfg.in to expand the placeholder:
[configuration]
header_file_name = account.h
library_file_name = $<TARGET_FILE_NAME:account>
This input file is used to generate ${CMAKE_CURRENT_BINARY_DIR}/interface_file_names.cfg:
file(
GENERATE OUTPUT ${CMAKE_CURRENT_BINARY_DIR}/interface_file_names.cfg
INPUT ${CMAKE_CURRENT_SOURCE_DIR}/interface_file_names.cfg.in
)
We then define the two header files as PUBLIC_HEADER (see also Chapter 10, Writing an Installer) and the configuration file as RESOURCE:
set_target_properties(account
PROPERTIES
PUBLIC_HEADER "account.h;${CMAKE_CURRENT_BINARY_DIR}/account_export.h"
RESOURCE "${CMAKE_CURRENT_BINARY_DIR}/interface_file_names.cfg"
)
Finally, we install the library, header files, and the configuration file to a structure relative to a path defined by setup.py:
install(
TARGETS
account
LIBRARY
DESTINATION account/lib
RUNTIME
DESTINATION account/lib
PUBLIC_HEADER
DESTINATION account/include
RESOURCE
DESTINATION account
)
Note that we set DESTINATION for both LIBRARY and RUNTIME to point to account/lib. This is important for Windows, where shared libraries have executable entry points and therefore we have to specify both.
The Python package will be able to find these files thanks to this section in account/__init__.py:
# this interface requires the header file and library file
# and these can be either provided by interface_file_names.cfg
# in the same path as this file
# or if this is not found then using environment variables
_this_path = Path(os.path.dirname(os.path.realpath(__file__)))
_cfg_file = _this_path / 'interface_file_names.cfg'
if _cfg_file.exists():
config = ConfigParser()
config.read(_cfg_file)
header_file_name = config.get('configuration', 'header_file_name')
_header_file = _this_path / 'include' / header_file_name
_header_file = str(_header_file)
library_file_name = config.get('configuration', 'library_file_name')
_library_file = _this_path / 'lib' / library_file_name
_library_file = str(_library_file)
else:
_header_file = os.getenv('ACCOUNT_HEADER_FILE')
assert _header_file is not None
_library_file = os.getenv('ACCOUNT_LIBRARY_FILE')
assert _library_file is not None
In this case, _cfg_file will be found and parsed and setup.py will find the header file under include and the library under lib and pass these on to CFFI to construct the library object. This is also the reason why we have used lib as the install target DESTINATION and not CMAKE_INSTALL_LIBDIR, which otherwise might confuse account/__init__.py.
For follow-up steps for getting the package to the PyPI test and production instances, we refer the reader to the previous recipe since these steps are analogous.
While PyPI is a standard and popular platform to distribute Python packages, Anaconda (https://anaconda.org) is more general in the sense that it allows to not only distribute Python or mixed-language projects with a Python interface but also allows packaging and dependency management for non-Python projects. In this recipe, we will prepare a Conda package for a very simple C++ example project configured and built using CMake without dependencies other than C++. In the next recipe, we will prepare and discuss a more complex Conda package.
Our goal will be to package the following simple example code (example.cpp):
#include <iostream>
int main() {
std::cout << "hello from your conda package!" << std::endl;
return 0;
}
This is how to proceed, step by step:
cmake_minimum_required(VERSION 3.5 FATAL_ERROR)
project(recipe-04 LANGUAGES CXX)
set(CMAKE_CXX_STANDARD 11)
set(CMAKE_CXX_EXTENSIONS OFF)
set(CMAKE_CXX_STANDARD_REQUIRED ON)
add_executable(hello-conda "")
target_sources(hello-conda
PRIVATE
example.cpp
)
install(
TARGETS
hello-conda
DESTINATION
bin
)
.
├── CMakeLists.txt
├── conda-recipe
│ └── meta.yaml
└── example.cpp
package:
name: conda-example-simple
version: "0.0.0"
source:
path: ../ # this can be changed to git-url
build:
number: 0
binary_relocation: true
script:
- cmake -H. -Bbuild_conda -G "${CMAKE_GENERATOR}" -DCMAKE_INSTALL_PREFIX=${PREFIX} # [not win]
- cmake -H. -Bbuild_conda -G "%CMAKE_GENERATOR%" -DCMAKE_INSTALL_PREFIX="%LIBRARY_PREFIX%" # [win]
- cmake --build build_conda --target install
requirements:
build:
- cmake >=3.5
- {{ compiler('cxx') }}
about:
home: http://www.example.com
license: MIT
summary: "Summary in here ..."
$ conda build conda-recipe
$ conda install --use-local conda-example-simple
$ hello-conda
hello from your conda package!
$ conda remove conda-example-simple
The install target in CMakeLists.txt is an essential component to this recipe:
install(
TARGETS
hello-conda
DESTINATION
bin
)
This target makes sure that the binary is installed in ${CMAKE_INSTALL_PREFIX}/bin. The prefix variable is defined by Conda in the build step of meta.yaml:
build:
number: 0
binary_relocation: true
script:
- cmake -H. -Bbuild_conda -G "${CMAKE_GENERATOR}"
-DCMAKE_INSTALL_PREFIX=${PREFIX} # [not win]
- cmake -H. -Bbuild_conda -G "%CMAKE_GENERATOR%"
-DCMAKE_INSTALL_PREFIX="%LIBRARY_PREFIX%" # [win]
- cmake --build build_conda --target install
The build step configures the project, sets the install prefix to ${PREFIX} (intrinsic variable set by Conda), builds, and installs the project. The motivation to call the build directory build_conda is similar to the previous recipes: a specific build directory name makes it easier to experiment with local installs based on directories that might already contain a directory called build.
By installing the package into the Anaconda environment, we made the executable available to the system.
The configuration file meta.yaml can be used to specify build, test, and install steps for projects of in principle any complexity. Please refer to the official documentation for an in-depth discussion: https://conda.io/docs/user-guide/tasks/build-packages/define-metadata.html.
For an upload of a Conda package to the Anaconda cloud, please follow the official Anaconda cloud documentation: https://docs.anaconda.com/anaconda-cloud/user-guide/. Also, consider Miniconda as a lightweight alternative to Anaconda: https://conda.io/miniconda.html.
In this recipe, we will build on the findings of the previous recipe and prepare a more realistic and sophisticated Conda package for an example CMake project that will depend on and utilize the implementation of the DGEMM function, for matrix-matrix multiplication, available in the Intel Math Kernel Library (MKL). Intel MKL is made available as a Conda package. This recipe will provide us with a toolset to prepare and share Conda packages with dependencies.
For this recipe, we will use the same file naming and directory structure as in the previous simple Conda recipe:
.
├── CMakeLists.txt
├── conda-recipe
│ └── meta.yaml
└── example.cpp
The example source file (example.cpp) performs a matrix-matrix multiplication and compares the result returned by the MKL library against a "noddy" implementation:
#include "mkl.h"
#include <cassert>
#include <cmath>
#include <iostream>
#include <random>
int main() {
// generate a uniform distribution of real number between -1.0 and 1.0
std::random_device rd;
std::mt19937 mt(rd());
std::uniform_real_distribution<double> dist(-1.0, 1.0);
int m = 500;
int k = 1000;
int n = 2000;
double *A = (double *)mkl_malloc(m * k * sizeof(double), 64);
double *B = (double *)mkl_malloc(k * n * sizeof(double), 64);
double *C = (double *)mkl_malloc(m * n * sizeof(double), 64);
double *D = new double[m * n];
for (int i = 0; i < (m * k); i++) {
A[i] = dist(mt);
}
for (int i = 0; i < (k * n); i++) {
B[i] = dist(mt);
}
for (int i = 0; i < (m * n); i++) {
C[i] = 0.0;
}
double alpha = 1.0;
double beta = 0.0;
cblas_dgemm(CblasRowMajor,
CblasNoTrans,
CblasNoTrans,
m,
n,
k,
alpha,
A,
k,
B,
n,
beta,
C,
n);
// D_mn = A_mk B_kn
for (int r = 0; r < m; r++) {
for (int c = 0; c < n; c++) {
D[r * n + c] = 0.0;
for (int i = 0; i < k; i++) {
D[r * n + c] += A[r * k + i] * B[i * n + c];
}
}
}
// compare the two matrices
double r = 0.0;
for (int i = 0; i < (m * n); i++) {
r += std::pow(C[i] - D[i], 2.0);
}
assert(r < 1.0e-12 && "ERROR: matrices C and D do not match");
mkl_free(A);
mkl_free(B);
mkl_free(C);
delete[] D;
std::cout << "MKL DGEMM example worked!" << std::endl;
return 0;
}
We also need a modified meta.yaml. However, the only change compared to the previous recipe is a line listing the mkl-devel dependency under requirements:
package:
name: conda-example-dgemm
version: "0.0.0"
source:
path: ../ # this can be changed to git-url
build:
number: 0
script:
- cmake -H. -Bbuild_conda -G "${CMAKE_GENERATOR}"
-DCMAKE_INSTALL_PREFIX=${PREFIX} # [not win]
- cmake -H. -Bbuild_conda -G "%CMAKE_GENERATOR%"
-DCMAKE_INSTALL_PREFIX="%LIBRARY_PREFIX%" # [win]
- cmake --build build_conda --target install
requirements:
build:
- cmake >=3.5
- {{ compiler('cxx') }}
host:
- mkl-devel 2018
about:
home: http://www.example.com
license: MIT
summary: "Summary in here ..."
These are the steps to follow to prepare our package:
cmake_minimum_required(VERSION 3.5 FATAL_ERROR)
project(recipe-05 LANGUAGES CXX)
set(CMAKE_CXX_STANDARD 11)
set(CMAKE_CXX_EXTENSIONS OFF)
set(CMAKE_CXX_STANDARD_REQUIRED ON)
add_executable(dgemm-example "")
target_sources(dgemm-example
PRIVATE
example.cpp
)
add_library(IntelMKL INTERFACE)
target_compile_options(IntelMKL
INTERFACE
$<$<OR:$<CXX_COMPILER_ID:GNU>,$<CXX_COMPILER_ID:AppleClang>>:-m64>
)
find_path(_mkl_h
NAMES
mkl.h
HINTS
${CMAKE_INSTALL_PREFIX}/include
)
target_include_directories(IntelMKL
INTERFACE
${_mkl_h}
)
message(STATUS "MKL header file FOUND: ${_mkl_h}")
find_library(_mkl_libs
NAMES
mkl_rt
HINTS
${CMAKE_INSTALL_PREFIX}/lib
)
message(STATUS "MKL single dynamic library FOUND: ${_mkl_libs}")
find_package(Threads QUIET)
target_link_libraries(IntelMKL
INTERFACE
${_mkl_libs}
$<$<OR:$<CXX_COMPILER_ID:GNU>,$<CXX_COMPILER_ID:AppleClang>>:Threads::Threads>
$<$<OR:$<CXX_COMPILER_ID:GNU>,$<CXX_COMPILER_ID:AppleClang>>:m>
)
include(CMakePrintHelpers)
cmake_print_properties(
TARGETS
IntelMKL
PROPERTIES
INTERFACE_COMPILE_OPTIONS
INTERFACE_INCLUDE_DIRECTORIES
INTERFACE_LINK_LIBRARIES
)
target_link_libraries(dgemm-example
PRIVATE
IntelMKL
)
install(
TARGETS
dgemm-example
DESTINATION
bin
)
$ conda build conda-recipe
$ conda install --use-local conda-example-dgemm
$ dgemm-example
MKL DGEMM example worked!
$ conda remove conda-example-dgemm
The only change in meta.yaml compared to the previous recipe is the mkl-devel dependency. The challenge from the CMake perspective is to locate the MKL libraries that are installed by Anaconda. Fortunately, we know that they are located in ${CMAKE_INSTALL_PREFIX}. The Intel MKL link line advisor available online (https://software.intel.com/en-us/articles/intel-mkl-link-line-advisor/) can be used to look up how to link MKL into our project depending on the platform and compiler chosen. We have decided to wrap this information into an INTERFACE library. This solution is ideal for the case of MKL: the library is not a target created by our project, or any subproject, but it still needs to be dealt with in a possibly very convoluted manner; that is: setting compiler flags, include directories, and link libraries. CMake INTERFACE libraries are targets in the build system, but do not create any build output, at least directly. However, since they are targets, we may set their properties on them. Just as "real" targets, they can also be installed, exported, and imported.
First of all, we declare a new library called IntelMKL with the INTERFACE attribute. We then need to set properties as needed and we follow the pattern of calling the appropriate CMake command on the target with the INTERFACE attribute, using the following:
The properties we have just set on the IntelMKL target can be printed out for the user by means of the cmake_print_properties command. Finally, we link against the IntelMKL target. As expected, this will set compiler flags, include directories, and link libraries as necessary to compile successfully:
target_link_libraries(dgemm-example
PRIVATE
IntelMKL
)
The Anaconda cloud contains a wealth of packages. With the preceding recipes, it is possible and relatively simple to build Conda packages for CMake projects that may depend on other Conda packages. Explore the possibility and share your software packages for others to build on your developments!
In this chapter, we will cover the following recipes:
Documentation is essential in all software projects: for users, to explain how to obtain and build the code and to illustrate how to use your code or library effectively, and also for developers, to describe the internal details of your library and to help other programmers get involved with and contribute to your project. This chapter will show how to use CMake to build code documentation, using two popular frameworks: Doxygen and Sphinx.
Doxygen (http://www.doxygen.nl) is a very popular source code documentation tool. You can add documentation tags as comments in your code. Running Doxygen will extract these comments and create the documentation in a format defined in the Doxyfile configuration file. Doxygen can output HTML, XML, and even LaTeX or PDF. This recipe will show you how to use CMake to build your Doxygen documentation.
We will use a simplified version of the message library presented in previous chapters. The source tree is organized as follows:
.
├── cmake
│ └── UseDoxygenDoc.cmake
├── CMakeLists.txt
├── docs
│ ├── Doxyfile.in
│ └── front_page.md
└── src
├── CMakeLists.txt
├── hello-world.cpp
├── Message.cpp
└── Message.hpp
We still have our sources under the src subdirectory, and we have custom CMake modules in the cmake subdirectory. Since our emphasis is on the documentation, we have removed the dependency on UUID and simplified the source code. The most significant differences are the numerous code comments in the header file:
#pragma once
#include <iosfwd>
#include <string>
/*! \file Message.hpp */
/*! \class Message
* \brief Forwards string to screen
* \author Roberto Di Remigio
* \date 2018
*/
class Message {
public:
/*! \brief Constructor from a string
* \param[in] m a message
*/
Message(const std::string &m) : message_(m) {}
/*! \brief Constructor from a character array
* \param[in] m a message
*/
Message(const char *m) : message_(std::string(m)) {}
friend std::ostream &operator<<(std::ostream &os, Message &obj) {
return obj.printObject(os);
}
private:
/*! The message to be forwarded to screen */
std::string message_;
/*! \brief Function to forward message to screen
* \param[in, out] os output stream
*/
std::ostream &printObject(std::ostream &os);
};
These comments are in the format /*! */, and include some special tags, which are understood by Doxygen (see http://www.stack.nl/~dimitri/doxygen/manual/docblocks.html).
First, let us discuss the CMakeLists.txt file in the root directory:
cmake_minimum_required(VERSION 3.5 FATAL_ERROR)
project(recipe-01 LANGUAGES CXX)
set(CMAKE_CXX_STANDARD 11)
set(CMAKE_CXX_EXTENSIONS OFF)
set(CMAKE_CXX_STANDARD_REQUIRED ON)
include(GNUInstallDirs)
set(CMAKE_ARCHIVE_OUTPUT_DIRECTORY
${CMAKE_BINARY_DIR}/${CMAKE_INSTALL_LIBDIR})
set(CMAKE_LIBRARY_OUTPUT_DIRECTORY
${CMAKE_BINARY_DIR}/${CMAKE_INSTALL_LIBDIR})
set(CMAKE_RUNTIME_OUTPUT_DIRECTORY
${CMAKE_BINARY_DIR}/${CMAKE_INSTALL_BINDIR})
list(APPEND CMAKE_MODULE_PATH "${CMAKE_SOURCE_DIR}/cmake")
include(UseDoxygenDoc)
add_subdirectory(src)
The CMakeLists.txt file in the src subdirectory contains the following building blocks:
add_library(message STATIC
Message.hpp
Message.cpp
)
add_executable(hello-world hello-world.cpp)
target_link_libraries(hello-world
PUBLIC
message
)
In the last stanza in the root CMakeLists.txt file, we call the add_doxygen_doc function. This adds a new docs target that will invoke Doxygen to build our documentation:
add_doxygen_doc(
BUILD_DIR
${CMAKE_CURRENT_BINARY_DIR}/_build
DOXY_FILE
${CMAKE_CURRENT_SOURCE_DIR}/docs/Doxyfile.in
TARGET_NAME
docs
COMMENT
"HTML documentation"
)
Finally, let us look at the UseDoxygenDoc.cmake module, where the add_doxygen_doc function is defined:
find_package(Perl REQUIRED)
find_package(Doxygen REQUIRED)
function(add_doxygen_doc)
set(options)
set(oneValueArgs BUILD_DIR DOXY_FILE TARGET_NAME COMMENT)
set(multiValueArgs)
cmake_parse_arguments(DOXY_DOC
"${options}"
"${oneValueArgs}"
"${multiValueArgs}"
${ARGN}
)
# ...
endfunction()
configure_file(
${DOXY_DOC_DOXY_FILE}
${DOXY_DOC_BUILD_DIR}/Doxyfile
@ONLY
)
add_custom_target(${DOXY_DOC_TARGET_NAME}
COMMAND
${DOXYGEN_EXECUTABLE} Doxyfile
WORKING_DIRECTORY
${DOXY_DOC_BUILD_DIR}
COMMENT
"Building ${DOXY_DOC_COMMENT} with Doxygen"
VERBATIM
)
message(STATUS "Added ${DOXY_DOC_TARGET_NAME} [Doxygen] target to build documentation")
We can configure the project as usual:
$ mkdir -p build
$ cd build
$ cmake ..
$ cmake --build .
The documentation can be built by invoking our custom docs target:
$ cmake --build . --target docs
You will notice that a _build subdirectory will have appeared in the build tree. This contains the HTML documentation that Doxygen has generated from your source files. Opening index.html with your favorite browser will show the Doxygen welcome page.
If you navigate to the class list, you can for instance browse the documentation for the Message class:
CMake does not support documentation building by default. However, we can use add_custom_target to perform arbitrary operations, and this is the mechanism that we leveraged in the present recipe. The important point to note is that we need to make sure that the tools necessary to build the documentation (Doxygen and Perl in this particular case) are available on the system.
In addition, note that the UseDoxygenDoc.cmake custom module only does the following:
The actual creation of the docs target is left to a later invocation of the add_doxygen_doc function. This is an explicit is better than implicit pattern, which we consider a good CMake practice: do not use module inclusion to perform macro-like (or function-like) actions.
We have implemented add_doxygen_doc by using a function, and not a macro, in order to limit the scope and possible side-effects of variable definitions. In this particular case, both a function and a macro would work (and would yield the same result), but we recommend preferring functions over macros unless variables in the parent scope need to be modified.
Sphinx is a Python program and a very popular documentation system (http://www.sphinx-doc.org). When used with Python projects, it can parse the source file for so-called docstrings and automatically produce documentation pages for functions and classes. However, Sphinx is not limited to Python, and can also parse reStructuredText, Markdown plain-text files, and generate HTML, ePUB, or PDF documentation. Coupled with the online Read the Docs service (https://readthedocs.org), it offers a great way to quickly get started with writing and deploying documentation. This recipe will show you how to use CMake to build documentation based on Sphinx.
We wish to build a simple website documenting our messaging library. The source tree now looks as follows:
.
├── cmake
│ ├── FindSphinx.cmake
│ └── UseSphinxDoc.cmake
├── CMakeLists.txt
├── docs
│ ├── conf.py.in
│ └── index.rst
└── src
├── CMakeLists.txt
├── hello-world.cpp
├── Message.cpp
└── Message.hpp
We have some custom modules in the cmake subdirectory, and the docs subdirectory contains the main page for our website in a plain-text reStructuredText format, index.rst, and a Python template file, conf.py.in, with settings for Sphinx. This file can be autogenerated using the sphinx-quickstart utility, which is a part of the Sphinx installation.
Compared to the previous recipe, we will modify the root CMakeLists.txt file, and will also implement a function (add_sphinx_doc):
list(APPEND CMAKE_MODULE_PATH "${CMAKE_SOURCE_DIR}/cmake")
include(UseSphinxDoc)
add_sphinx_doc(
SOURCE_DIR
${CMAKE_CURRENT_SOURCE_DIR}/docs
BUILD_DIR
${CMAKE_CURRENT_BINARY_DIR}/_build
CACHE_DIR
${CMAKE_CURRENT_BINARY_DIR}/_doctrees
HTML_DIR
${CMAKE_CURRENT_BINARY_DIR}/sphinx_html
CONF_FILE
${CMAKE_CURRENT_SOURCE_DIR}/docs/conf.py.in
TARGET_NAME
docs
COMMENT
"HTML documentation"
)
The UseSphinxDoc.cmake module follows the same explicit is better than implicit pattern that we used in the previous recipe:
find_package(PythonInterp REQUIRED)
find_package(Sphinx REQUIRED)
function(add_sphinx_doc)
set(options)
set(oneValueArgs
SOURCE_DIR
BUILD_DIR
CACHE_DIR
HTML_DIR
CONF_FILE
TARGET_NAME
COMMENT
)
set(multiValueArgs)
cmake_parse_arguments(SPHINX_DOC
"${options}"
"${oneValueArgs}"
"${multiValueArgs}"
${ARGN}
)
# ...
endfunction()
configure_file(
${SPHINX_DOC_CONF_FILE}
${SPHINX_DOC_BUILD_DIR}/conf.py
@ONLY
)
add_custom_target(${SPHINX_DOC_TARGET_NAME}
COMMAND
${SPHINX_EXECUTABLE}
-q
-b html
-c ${SPHINX_DOC_BUILD_DIR}
-d ${SPHINX_DOC_CACHE_DIR}
${SPHINX_DOC_SOURCE_DIR}
${SPHINX_DOC_HTML_DIR}
COMMENT
"Building ${SPHINX_DOC_COMMENT} with Sphinx"
VERBATIM
)
message(STATUS "Added ${SPHINX_DOC_TARGET_NAME} [Sphinx] target to build documentation")
$ mkdir -p build
$ cd build
$ cmake ..
$ cmake --build . --target docs
This will produce the HTML documentation in the SPHINX_DOC_HTML_DIR subdirectory of the build tree. Once again, you can use your favorite browser to open index.html and see the shiny (but still sparse) documentation:
Once again, we leveraged the power of add_custom_target to add an arbitrary build target to our build system. In this case, the documentation will be built using Sphinx. Since Sphinx is a Python program that can be extended with other Python modules, the docs target will depend on the Python interpreter. We make sure that dependencies are satisfied by using find_package. Note that the FindSphinx.cmake module is not yet a standard CMake module; a copy of it is included with the project source, under the cmake subdirectory.
We have a C++ project, and thus, Doxygen is the ideal choice to generate source code documentation. However, we also wish to publish user-facing documentation, explaining, for example, our design choices. We would rather use Sphinx for that, because the generated HTML will also work on mobile devices, and because we can deploy the documentation to Read the Docs (https://readthedocs.org). This recipe will illustrate how to use the Breathe plugin (https://breathe.readthedocs.io) to bridge Doxygen and Sphinx.
The source tree for this recipe is similar to the two previous recipes:
.
├── cmake
│ ├── FindPythonModule.cmake
│ ├── FindSphinx.cmake
│ └── UseBreathe.cmake
├── CMakeLists.txt
├── docs
│ ├── code-reference
│ │ ├── classes-and-functions.rst
│ │ └── message.rst
│ ├── conf.py.in
│ ├── Doxyfile.in
│ └── index.rst
└── src
├── CMakeLists.txt
├── hello-world.cpp
├── Message.cpp
└── Message.hpp
The docs subdirectory now contains both a Doxyfile.in and a conf.py.in template file, with settings for Doxygen and Sphinx, respectively. In addition, we also have a code-reference subdirectory.
The files following code-reference contain Breathe instructions, to include Doxygen-generated documentation in Sphinx:
Messaging classes
=================
Message
-------
.. doxygenclass:: Message
:project: recipe-03
:members:
:protected-members:
:private-members:
This will output the documentation for the Message class.
The CMakeLists.txt file in the src directory is unchanged. The only changes in the root CMakeLists.txt file are as follows:
list(APPEND CMAKE_MODULE_PATH "${CMAKE_SOURCE_DIR}/cmake")
include(UseBreathe)
add_breathe_doc(
SOURCE_DIR
${CMAKE_CURRENT_SOURCE_DIR}/docs
BUILD_DIR
${CMAKE_CURRENT_BINARY_DIR}/_build
CACHE_DIR
${CMAKE_CURRENT_BINARY_DIR}/_doctrees
HTML_DIR
${CMAKE_CURRENT_BINARY_DIR}/html
DOXY_FILE
${CMAKE_CURRENT_SOURCE_DIR}/docs/Doxyfile.in
CONF_FILE
${CMAKE_CURRENT_SOURCE_DIR}/docs/conf.py.in
TARGET_NAME
docs
COMMENT
"HTML documentation"
)
Let us examine the UseBreatheDoc.cmake module. This follows the same explicit is better than implicit pattern that we described in the two previous recipes. The module is described in detail, as follows:
find_package(Doxygen REQUIRED)
find_package(Perl REQUIRED)
find_package(PythonInterp REQUIRED)
find_package(Sphinx REQUIRED)
include(FindPythonModule)
find_python_module(breathe REQUIRED)
function(add_breathe_doc)
set(options)
set(oneValueArgs
SOURCE_DIR
BUILD_DIR
CACHE_DIR
HTML_DIR
DOXY_FILE
CONF_FILE
TARGET_NAME
COMMENT
)
set(multiValueArgs)
cmake_parse_arguments(BREATHE_DOC
"${options}"
"${oneValueArgs}"
"${multiValueArgs}"
${ARGN}
)
# ...
endfunction()
configure_file(
${BREATHE_DOC_CONF_FILE}
${BREATHE_DOC_BUILD_DIR}/conf.py
@ONLY
)
configure_file(
${BREATHE_DOC_DOXY_FILE}
${BREATHE_DOC_BUILD_DIR}/Doxyfile
@ONLY
)
add_custom_target(${BREATHE_DOC_TARGET_NAME}
COMMAND
${SPHINX_EXECUTABLE}
-q
-b html
-c ${BREATHE_DOC_BUILD_DIR}
-d ${BREATHE_DOC_CACHE_DIR}
${BREATHE_DOC_SOURCE_DIR}
${BREATHE_DOC_HTML_DIR}
COMMENT
"Building ${BREATHE_DOC_TARGET_NAME} documentation with Breathe, Sphinx and Doxygen"
VERBATIM
)
message(STATUS "Added ${BREATHE_DOC_TARGET_NAME} [Breathe+Sphinx+Doxygen] target to build documentation")
$ mkdir -p build
$ cd build
$ cmake ..
$ cmake --build . --target docs
The documentation will be available in the BREATHE_DOC_HTML_DIR subdirectory of the build tree. After firing up your browser to open the index.html file, you can navigate to the documentation for the Message class:
You will note that both Doxygen and Sphinx are run, despite the fact that only the invocation to Sphinx was given when declaring the custom BREATHE_DOC_TARGET_NAME target. This is thanks to the following settings, defined in the conf.py file for Sphinx:
def run_doxygen(folder):
"""Run the doxygen make command in the designated folder"""
try:
retcode = subprocess.call("cd {}; doxygen".format(folder), shell=True)
if retcode < 0:
sys.stderr.write(
"doxygen terminated by signal {}".format(-retcode))
except OSError as e:
sys.stderr.write("doxygen execution failed: {}".format(e))
def setup(app):
run_doxygen('@BREATHE_DOC_BUILD_DIR@')
Doxygen will generate XML output that the Breathe plugin will be able to render in a form consistent with the chosen Sphinx documentation style.
In this chapter, we will cover the following recipes:
CMake does not build executables and libraries on its own. Instead, CMake configures a project and generates files used by another build tool or framework to build the project. On GNU/Linux and macOS, CMake typically generates Unix Makefiles, but a number of alternatives exist. On Windows, these are typically Visual Studio project files or MinGW or MSYS Makefiles. CMake includes a wide range of generators for native command-line build tools or integrated development environments (IDEs). You can read more about them at the following link: https://cmake.org/cmake/help/latest/manual/cmake-generators.7.html.
These generators can be selected using cmake -G, for instance:
$ cmake -G "Visual Studio 15 2017"
Not all generators are available on every platform and, depending on the platform where CMake runs, typically only a subset is available. To see a list of all available generators on the current platform, type the following:
$ cmake -G
In this chapter, we will not cycle through all the available generators but we note that most recipes in this book have been tested using the Unix Makefiles, MSYS Makefiles, Ninja, and Visual Studio 15 2017 generators. In this chapter, we will focus on developing on/for the Windows platform. We will demonstrate how to build a CMake project directly using Visual Studio 15 2017, without using the command line. We will also discuss how to cross-compile a Windows executable on a Linux or macOS system.
While earlier versions of Visual Studio required developers to edit source code and run CMake commands in different windows, Visual Studio 2017 introduces built-in support for CMake projects (https://aka.ms/cmake), which allows for the entire coding, configuring, building, and testing workflow to happen within the same IDE. In this recipe, we will test this and build a simple "hello world" CMake example project directly using Visual Studio 2017, without resorting to the command line.
First, we will use the Windows platform and download and install Visual Studio Community 2017 (https://www.visualstudio.com/downloads/). At the time of writing, this version is freely available with a 30-day trial period. The steps which we will follow are also nicely explained in this video: https://www.youtube.com/watch?v=_lKxJjV8r3Y.
When running the installer, make sure to select Desktop development with C++ on the left panel and also verify that Visual C++ tools for CMake is checked on the Summary panel to the right:
In Visual Studio 2017 15.4, you can also build code for the Linux platform. For this, select Linux development with C++ under Other Toolsets:
With this option enabled, you can target both Windows and Linux machines from within Visual Studio provided you have configured access to a Linux server. However, we will not demonstrate this approach in this chapter.
In this recipe, we will build a Windows binary on Windows, and our goal will be to configure and build the following example code (hello-world.cpp):
#include <cstdlib>
#include <iostream>
#include <string>
const std::string cmake_system_name = SYSTEM_NAME;
int main() {
std::cout << "Hello from " << cmake_system_name << std::endl;
return EXIT_SUCCESS;
}
To create the corresponding source code, please follow these steps:
# set minimum cmake version
cmake_minimum_required(VERSION 3.5 FATAL_ERROR)
# project name and language
project(recipe-01 LANGUAGES CXX)
set(CMAKE_CXX_STANDARD 11)
set(CMAKE_CXX_EXTENSIONS OFF)
set(CMAKE_CXX_STANDARD_REQUIRED ON)
include(GNUInstallDirs)
set(CMAKE_ARCHIVE_OUTPUT_DIRECTORY
${CMAKE_BINARY_DIR}/${CMAKE_INSTALL_LIBDIR})
set(CMAKE_LIBRARY_OUTPUT_DIRECTORY
${CMAKE_BINARY_DIR}/${CMAKE_INSTALL_LIBDIR})
set(CMAKE_RUNTIME_OUTPUT_DIRECTORY
${CMAKE_BINARY_DIR}/${CMAKE_INSTALL_BINDIR})
# define executable and its source file
add_executable(hello-world hello-world.cpp)
# we will print the system name in the code
target_compile_definitions(hello-world
PUBLIC
"SYSTEM_NAME=\"${CMAKE_SYSTEM_NAME}\""
)
install(
TARGETS
hello-world
DESTINATION
${CMAKE_INSTALL_BINDIR}
)
We have seen that Visual Studio 2017 nicely interfaces to CMake, and we have been able to configure and build the code from within the IDE. In addition to the build step, we could have run install or test steps. These are accessible by right-clicking on CMakeLists.txt (right panel).
However, the configuration step was run automatically and we might prefer to modify configuration options. We would also like to know the actual build and install paths so that we can test our executable. For this, we can select CMake | Change CMake Settings, and we arrive at the following screen:
In the top-left panel, we can now inspect and modify the generator (in this case, Ninja), settings, arguments, as well as paths. The build path is highlighted in the preceding screenshot. The settings are grouped into build types (x86-Debug, x86-Release, and so on) and we can toggle between these build types in the middle of the top panel bar.
Now that we know the actual build path, we can test the compiled executable:
$ ./hello-world.exe
Hello from Windows
The build and install paths can, of course, be adjusted.
In this recipe, we will reuse the "Hello World" example from the previous recipe and cross-compile the code from Linux or macOS to Windows. In other words, we will configure and compile the code on Linux or macOS and obtain an executable for the Windows platform.
We start with a simple hello world example (hello-world.cpp):
#include <cstdlib>
#include <iostream>
#include <string>
const std::string cmake_system_name = SYSTEM_NAME;
int main() {
std::cout << "Hello from " << cmake_system_name << std::endl;
return EXIT_SUCCESS;
}
We will also use the unchanged CMakeLists.txt from the previous recipe:
# set minimum cmake version
cmake_minimum_required(VERSION 3.5 FATAL_ERROR)
# project name and language
project(recipe-01 LANGUAGES CXX)
set(CMAKE_CXX_STANDARD 11)
set(CMAKE_CXX_EXTENSIONS OFF)
set(CMAKE_CXX_STANDARD_REQUIRED ON)
include(GNUInstallDirs)
set(CMAKE_ARCHIVE_OUTPUT_DIRECTORY
${CMAKE_BINARY_DIR}/${CMAKE_INSTALL_LIBDIR})
set(CMAKE_LIBRARY_OUTPUT_DIRECTORY
${CMAKE_BINARY_DIR}/${CMAKE_INSTALL_LIBDIR})
set(CMAKE_RUNTIME_OUTPUT_DIRECTORY
${CMAKE_BINARY_DIR}/${CMAKE_INSTALL_BINDIR})
# define executable and its source file
add_executable(hello-world hello-world.cpp)
# we will print the system name in the code
target_compile_definitions(hello-world
PUBLIC
"SYSTEM_NAME=\"${CMAKE_SYSTEM_NAME}\""
)
install(
TARGETS
hello-world
DESTINATION
${CMAKE_INSTALL_BINDIR}
)
To cross-compile the source code, we will need to install a cross-compiler for C++ and optionally for C and Fortran. One option is to use packaged MinGW compilers. As an alternative to packaged cross-compilers, we can also build a suite of cross-compilers from sources using MXE (the M cross environment): http://mxe.cc.
We will create three files in this cross-compilation "hello world" example following these steps:
# the name of the target operating system
set(CMAKE_SYSTEM_NAME Windows)
# which compilers to use
set(CMAKE_CXX_COMPILER i686-w64-mingw32-g++)
# adjust the default behaviour of the find commands:
# search headers and libraries in the target environment
set(CMAKE_FIND_ROOT_PATH_MODE_INCLUDE ONLY)
set(CMAKE_FIND_ROOT_PATH_MODE_LIBRARY ONLY)
# search programs in the host environment
set(CMAKE_FIND_ROOT_PATH_MODE_PROGRAM NEVER)
$ mkdir -p build
$ cd build
$ cmake -D CMAKE_TOOLCHAIN_FILE=toolchain.cmake ..
-- The CXX compiler identification is GNU 5.4.0
-- Check for working CXX compiler: /home/user/mxe/usr/bin/i686-w64-mingw32.static-g++
-- Check for working CXX compiler: /home/user/mxe/usr/bin/i686-w64-mingw32.static-g++ -- works
-- Detecting CXX compiler ABI info
-- Detecting CXX compiler ABI info - done
-- Detecting CXX compile features
-- Detecting CXX compile features - done
-- Configuring done
-- Generating done
-- Build files have been written to: /home/user/cmake-recipes/chapter-13/recipe-01/cxx-example/build
$ cmake --build .
Scanning dependencies of target hello-world
[ 50%] Building CXX object CMakeFiles/hello-world.dir/hello-world.cpp.obj
[100%] Linking CXX executable bin/hello-world.exe
[100%] Built target hello-world
Hello from Windows
Since we configure and build the code on a host environment (in this case, GNU/Linux or macOS) that is different than the target environment (Windows), we need to provide CMake with information about the target environment which we have encoded in the toolchain.cmake file (https://cmake.org/cmake/help/latest/manual/cmake-toolchains.7.html#cross-compiling).
First and foremost, we provide the name of the target operating system:
set(CMAKE_SYSTEM_NAME Windows)
Then, we specify the compiler(s), for instance:
set(CMAKE_C_COMPILER i686-w64-mingw32-gcc)
set(CMAKE_CXX_COMPILER i686-w64-mingw32-g++)
set(CMAKE_Fortran_COMPILER i686-w64-mingw32-gfortran)
In this simple example, we did not have to detect any libraries or header files but, if we had to, we would specify the root path using the following:
set(CMAKE_FIND_ROOT_PATH /path/to/target/environment)
The target environment can, for instance, be the one provided by an MXE installation.
Finally, we adjust the default behavior of the find commands. We instruct CMake to search headers and libraries in the target environment:
set(CMAKE_FIND_ROOT_PATH_MODE_INCLUDE ONLY)
set(CMAKE_FIND_ROOT_PATH_MODE_LIBRARY ONLY)
And to search programs in the host environment:
set(CMAKE_FIND_ROOT_PATH_MODE_PROGRAM NEVER)
For a more detailed discussion of the various options, see https://cmake.org/cmake/help/latest/manual/cmake-toolchains.7.html#cross-compiling.
In this recipe, we will apply what we have learned in the previous recipe, albeit to a more interesting and realistic example: we will cross-compile a Windows binary which is parallelized using OpenMP.
We will use the unmodified source code from Chapter 3, Detecting External Libraries and Programs, Recipe 5, Detecting the OpenMP parallel environment. The example code sums up all natural numbers up to N (example.cpp):
#include <iostream>
#include <omp.h>
#include <string>
int main(int argc, char *argv[]) {
std::cout << "number of available processors: " << omp_get_num_procs()
<< std::endl;
std::cout << "number of threads: " << omp_get_max_threads() << std::endl;
auto n = std::stol(argv[1]);
std::cout << "we will form sum of numbers from 1 to " << n << std::endl;
// start timer
auto t0 = omp_get_wtime();
auto s = 0LL;
#pragma omp parallel for reduction(+ : s)
for (auto i = 1; i <= n; i++) {
s += i;
}
// stop timer
auto t1 = omp_get_wtime();
std::cout << "sum: " << s << std::endl;
std::cout << "elapsed wall clock time: " << t1 - t0 << " seconds" << std::endl;
return 0;
}
The CMakeLists.txt file is largely unchanged with respect to Chapter 3, Detecting External Libraries and Programs, Recipe 5, Detecting the OpenMP parallel environment, except there is an additional install target:
# set minimum cmake version
cmake_minimum_required(VERSION 3.9 FATAL_ERROR)
# project name and language
project(recipe-02 LANGUAGES CXX)
set(CMAKE_CXX_STANDARD 11)
set(CMAKE_CXX_EXTENSIONS OFF)
set(CMAKE_CXX_STANDARD_REQUIRED ON)
include(GNUInstallDirs)
set(CMAKE_ARCHIVE_OUTPUT_DIRECTORY
${CMAKE_BINARY_DIR}/${CMAKE_INSTALL_LIBDIR})
set(CMAKE_LIBRARY_OUTPUT_DIRECTORY
${CMAKE_BINARY_DIR}/${CMAKE_INSTALL_LIBDIR})
set(CMAKE_RUNTIME_OUTPUT_DIRECTORY
${CMAKE_BINARY_DIR}/${CMAKE_INSTALL_BINDIR})
find_package(OpenMP REQUIRED)
add_executable(example example.cpp)
target_link_libraries(example
PUBLIC
OpenMP::OpenMP_CXX
)
install(
TARGETS
example
DESTINATION
${CMAKE_INSTALL_BINDIR}
)
With the following steps, we will manage to cross-compile an OpenMP-parallelized Windows executable:
# the name of the target operating system
set(CMAKE_SYSTEM_NAME Windows)
# which compilers to use
set(CMAKE_CXX_COMPILER i686-w64-mingw32-g++)
# adjust the default behaviour of the find commands:
# search headers and libraries in the target environment
set(CMAKE_FIND_ROOT_PATH_MODE_INCLUDE ONLY)
set(CMAKE_FIND_ROOT_PATH_MODE_LIBRARY ONLY)
# search programs in the host environment
set(CMAKE_FIND_ROOT_PATH_MODE_PROGRAM NEVER)
$ mkdir -p build
$ cd build
$ cmake -D CMAKE_TOOLCHAIN_FILE=toolchain.cmake ..
-- The CXX compiler identification is GNU 5.4.0
-- Check for working CXX compiler: /home/user/mxe/usr/bin/i686-w64-mingw32.static-g++
-- Check for working CXX compiler: /home/user/mxe/usr/bin/i686-w64-mingw32.static-g++ -- works
-- Detecting CXX compiler ABI info
-- Detecting CXX compiler ABI info - done
-- Detecting CXX compile features
-- Detecting CXX compile features - done
-- Found OpenMP_CXX: -fopenmp (found version "4.0")
-- Found OpenMP: TRUE (found version "4.0")
-- Configuring done
-- Generating done
-- Build files have been written to: /home/user/cmake-recipes/chapter-13/recipe-02/cxx-example/build
$ cmake --build .
Scanning dependencies of target example
[ 50%] Building CXX object CMakeFiles/example.dir/example.cpp.obj
[100%] Linking CXX executable bin/example.exe
[100%] Built target example
$ set OMP_NUM_THREADS=1
$ example.exe 1000000000
number of available processors: 2
number of threads: 1
we will form sum of numbers from 1 to 1000000000
sum: 500000000500000000
elapsed wall clock time: 2.641 seconds
$ set OMP_NUM_THREADS=2
$ example.exe 1000000000
number of available processors: 2
number of threads: 2
we will form sum of numbers from 1 to 1000000000
sum: 500000000500000000
elapsed wall clock time: 1.328 seconds
We have successfully built an executable for parallel execution on the Windows platform using cross-compilation with a simple toolchain. We were able to specify the number of OpenMP threads by setting OMP_NUM_THREADS. Going from 1 thread to 2 threads, we have observed a reduction of runtime from 2.6 to 1.3 seconds. For a discussion of the toolchain file, please see the previous recipe.
It is possible to cross-compile for a set of target platforms, for instance, Android. For examples, we refer the reader to https://cmake.org/cmake/help/latest/manual/cmake-toolchains.7.html.
In this chapter, we will cover the following recipes:
CDash is a web service used to aggregate the test results reported by CTest during a test run or nightly testing, or in a continuous integration setting. Reporting to the dashboard is what we refer to as CDash time, as illustrated by the following diagram:
In this chapter, we will demonstrate recipes to report test results to a CDash dashboard. We will discuss strategies for reporting test coverage, as well as memory defects and data races collected with tools such as the AddressSanitizer and the ThreadSanitizer, respectively.
There are two ways to report to CDash: either through the test target of a build or by using a CTest script. We will demonstrate the test target route in the first two recipes and will use the CTest script route in the last two recipes.
The installation of CDash requires a web server (Apache, NGINX, or IIS) with PHP and SSL enabled, and access to a MySQL or PostgreSQL database server. It is outside of the scope of this book to discuss the setup of a CDash web service in detail; we refer the reader to its official documentation, at https://public.kitware.com/Wiki/CDash:Installation.
Installing a CDash instance is not a requirement for producing the recipes in this chapter since Kitware offers two public dashboards (https://my.cdash.org and https://open.cdash.org). We will reference the former in the recipes.
For readers that decide to install their own CDash instance, we recommend using a MySQL backend, since this seems to be the configuration used by https://my.cdash.org and https://open.cdash.org, and also seems to be better tested by the community.
In this recipe, we will extend the test example of Recipe 1, Creating a simple unit test, from Chapter 4, Creating and Running Tests, and deploy the test result to https://my.cdash.org/index.php?project=cmake-cookbook, which we created for this book on the public dashboard (https://my.cdash.org) provided to the community by Kitware.
We will start by reusing the example source code from Recipe 1, Creating a simple unit test, in Chapter 4, Creating and Running Tests, which sums integers given as command-line arguments. The example consists of three source files: main.cpp, sum_integers.cpp, and sum_integers.hpp. These sources are unchanged. We will also reuse the file test.cpp from Chapter 4, Creating and Running Tests, but will rename it to test_short.cpp. We will extend the example with test_long.cpp, containing the following code:
#include "sum_integers.hpp"
#include <numeric>
#include <vector>
int main() {
// creates vector {1, 2, 3, ..., 999, 1000}
std::vector<int> integers(1000);
std::iota(integers.begin(), integers.end(), 1);
if (sum_integers(integers) == 500500) {
return 0;
} else {
return 1;
}
}
We will then organize these files into the following file tree:
.
├── CMakeLists.txt
├── CTestConfig.cmake
├── src
│ ├── CMakeLists.txt
│ ├── main.cpp
│ ├── sum_integers.cpp
│ └── sum_integers.hpp
└── tests
├── CMakeLists.txt
├── test_long.cpp
└── test_short.cpp
We will now describe how to configure, build, test, and finally, submit the test results for our example project to the dashboard:
# example library
add_library(sum_integers "")
target_sources(sum_integers
PRIVATE
sum_integers.cpp
PUBLIC
${CMAKE_CURRENT_LIST_DIR}/sum_integers.hpp
)
target_include_directories(sum_integers
PUBLIC
${CMAKE_CURRENT_LIST_DIR}
)
# main code
add_executable(sum_up main.cpp)
target_link_libraries(sum_up sum_integers)
add_executable(test_short test_short.cpp)
target_link_libraries(test_short sum_integers)
add_executable(test_long test_long.cpp)
target_link_libraries(test_long sum_integers)
add_test(
NAME
test_short
COMMAND
$<TARGET_FILE:test_short>
)
add_test(
NAME
test_long
COMMAND
$<TARGET_FILE:test_long>
)
# set minimum cmake version
cmake_minimum_required(VERSION 3.5 FATAL_ERROR)
# project name and language
project(recipe-01 LANGUAGES CXX)
# require C++11
set(CMAKE_CXX_STANDARD 11)
set(CMAKE_CXX_EXTENSIONS OFF)
set(CMAKE_CXX_STANDARD_REQUIRED ON)
# process src/CMakeLists.txt
add_subdirectory(src)
enable_testing()
# allow to report to a cdash dashboard
include(CTest)
# process tests/CMakeLists.txt
add_subdirectory(tests)
set(CTEST_DROP_METHOD "http")
set(CTEST_DROP_SITE "my.cdash.org")
set(CTEST_DROP_LOCATION "/submit.php?project=cmake-cookbook")
set(CTEST_DROP_SITE_CDASH TRUE)
$ mkdir -p build
$ cd build
$ cmake ..
$ cmake --build .
$ ctest --dashboard Experimental
Site: larry
Build name: Linux-c++
Create new tag: 20180408-1449 - Experimental
Configure project
Each . represents 1024 bytes of output
. Size of output: 0K
Build project
Each symbol represents 1024 bytes of output.
'!' represents an error and '*' a warning.
. Size of output: 0K
0 Compiler errors
0 Compiler warnings
Test project /home/user/cmake-recipes/chapter-15/recipe-01/cxx-example/build
Start 1: test_short
1/2 Test #1: test_short ....................... Passed 0.00 sec
Start 2: test_long
2/2 Test #2: test_long ........................ Passed 0.00 sec
100% tests passed, 0 tests failed out of 2
Total Test time (real) = 0.01 sec
Performing coverage
Cannot find any coverage files. Ignoring Coverage request.
Submit files (using http)
Using HTTP submit method
Drop site:http://my.cdash.org/submit.php?project=cmake-cookbook
Uploaded: /home/user/cmake-recipes/chapter-14/recipe-01/cxx-example/build/Testing/20180408-1449/Build.xml
Uploaded: /home/user/cmake-recipes/chapter-14/recipe-01/cxx-example/build/Testing/20180408-1449/Configure.xml
Uploaded: /home/user/cmake-recipes/chapter-14/recipe-01/cxx-example/build/Testing/20180408-1449/Test.xml
Submission successful
A high-level overview of the workflow shows that CTest runs the tests and records results locally in XML files. These XML files are then sent to the CDash server, where they can be browsed and analyzed. We can obtain more details about the passed or failed tests (in this example, there are no failed tests) by clicking on the 2 under Pass, as shown in the preceding screenshot. The details, as shown in the following screenshot, record information about the machine that ran the tests, as well as timing information. Again, the test output for individual tests can be browsed online.
CTest supports three different running submission modes: Experimental, Nightly, and Continuous. We have used ctest --dashboard Experimental, and thus, the test results appear under Experimental. The Experimental mode is useful for testing the current state of the code, for debugging a new dashboard script (see Recipes 3 and 4 in this chapter), or for debugging a CDash server or project. The Nightly mode will update (or down-date) the code to the repository snapshot closest to the latest nightly start time, which can be set in CTestConfig.cmake; it gives all nightly tests in a project that receives frequent updates a well-defined reference point. For instance, the nightly start time can be set to midnight, Coordinated Universal Time, as follows:
set(CTEST_NIGHTLY_START_TIME "00:00:00 UTC")
The Continuous mode is useful for a continuous integration workflow and will update the code to the latest version.
In this recipe, we deployed to CDash directly from the test target. It is possible to use a dedicated CTest script instead, and we will demonstrate this approach later in this chapter, in the upcoming Recipes 3 and 4.
CDash allows you to monitor not only whether tests are passing or failing, but also the test timing. You can configure margins for test timing: if a test takes more time than allotted, it will be marked as failing. This is useful for benchmark tests, to automatically detect performance degradation in test timing when refactoring code.
See the official CDash documentation for a detailed discussion of CDash definitions and configuration settings, at https://public.kitware.com/Wiki/CDash:Documentation.
In this recipe, we will measure the test coverage and report it to the CDash dashboard, where we will be able to browse the test coverage analysis line-by-line, in order to identify untested or unused code.
We will extend the source code of the previous recipe with a minor change in src/sum_integers.cpp, where we will add a function - sum_integers_unused:
#include "sum_integers.hpp"
#include <vector>
int sum_integers(const std::vector<int> integers) {
auto sum = 0;
for (auto i : integers) {
sum += i;
}
return sum;
}
int sum_integers_unused(const std::vector<int> integers) {
auto sum = 0;
for (auto i : integers) {
sum += i;
}
return sum;
}
Our goal is to detect this unused code with a test coverage analysis, by using gcov (https://gcc.gnu.org/onlinedocs/gcc/Gcov.html). Apart from the preceding modification, we will use the unmodified sources of the previous recipe.
Through the following steps, we will enable coverage analysis and upload the results to the dashboard:
option(ENABLE_COVERAGE "Enable coverage" ON)
if(ENABLE_COVERAGE)
if(CMAKE_CXX_COMPILER_ID MATCHES GNU)
message(STATUS "Coverage analysis with gcov enabled")
target_compile_options(sum_integers
PUBLIC
-fprofile-arcs -ftest-coverage -g
)
target_link_libraries(sum_integers
PUBLIC
gcov
)
else()
message(WARNING "Coverage not supported for this compiler")
endif()
endif()
$ mkdir -p build
$ cd build
$ cmake ..
$ cmake --build . --target Experimental
Performing coverage
Processing coverage (each . represents one file):
...
Accumulating results (each . represents one file):
...
Covered LOC: 14
Not covered LOC: 7
Total LOC: 21
Percentage Coverage: 66.67%
Submit files (using http)
Using HTTP submit method
Drop site:http://my.cdash.org/submit.php?project=cmake-cookbook
Uploaded: /home/user/cmake-recipes/chapter-14/recipe-02/cxx-example/build/Testing/20180408-1530/Build.xml
Uploaded: /home/user/cmake-recipes/chapter-14/recipe-02/cxx-example/build/Testing/20180408-1530/Configure.xml
Uploaded: /home/user/cmake-recipes/chapter-14/recipe-02/cxx-example/build/Testing/20180408-1530/Coverage.xml
Uploaded: /home/user/cmake-recipes/chapter-14/recipe-02/cxx-example/build/Testing/20180408-1530/CoverageLog-0.xml
Uploaded: /home/user/cmake-recipes/chapter-14/recipe-02/cxx-example/build/Testing/20180408-1530/Test.xml
Submission successful
The test coverage analysis is summarized with a percentage of 66.67%. To get further insights, we can click on the percentage and obtain a coverage analysis for the two subdirectories, as follows:
By browsing the subdirectory links, we can inspect the test coverage percentage for individual files, and can even browse a line-by-line summary (for example, src/sum_integers.cpp):
The green lines have been traversed when running the test suite, whereas the red lines have not. Through this, we can not only identify unused/untested code (with the function sum_integers_unused) but can also see how often each line has been traversed. For instance, the code line sum += i has been visited 1,005 times (5 times during test_short, and 1,000 times during test_long). Test coverage analysis is an indispensable companion to automated testing, and CDash provides us with an interface to browse and analyze the results graphically in the browser.
For further reading, we recommend the following blog post, which discusses additional coverage features in CDash: https://blog.kitware.com/additional-coverage-features-in-cdash/.
AddressSanitizer (ASan) is a memory error detector for C++, C, and Fortran. It can find memory defects, such as use after free, use after return, use after scope, buffer overflows, initialization order bugs, and memory leaks (see https://github.com/google/sanitizers/wiki/AddressSanitizer). AddressSanitizer is a part of LLVM, starting with version 3.1, and is a part of GCC, starting with version 4.8. In this recipe, we will fabricate two bugs in our code, which may go undetected in a normal test run. To detect these bugs, we will couple CTest with dynamic analysis by using AddressSanitizer, and will report the defects to CDash.
In this example, we will use two source files and two tests, as follows:
.
├── CMakeLists.txt
├── CTestConfig.cmake
├── dashboard.cmake
├── src
│ ├── buggy.cpp
│ ├── buggy.hpp
│ └── CMakeLists.txt
└── tests
├── CMakeLists.txt
├── leaky.cpp
└── use_after_free.cpp
The file buggy.cpp contains two buggy functions, as follows:
#include "buggy.hpp"
#include <iostream>
int function_leaky() {
double *my_array = new double[1000];
// do some work ...
// we forget to deallocate the array
// delete[] my_array;
return 0;
}
int function_use_after_free() {
double *another_array = new double[1000];
// do some work ...
// deallocate it, good!
delete[] another_array;
// however, we accidentally use the array
// after it has been deallocated
std::cout << "not sure what we get: " << another_array[123] << std::endl;
return 0;
}
These functions are exposed in the corresponding header file (buggy.hpp):
#pragma once
int function_leaky();
int function_use_after_free();
The test source, leaky.cpp, verifies the return code from function_leaky:
#include "buggy.hpp"
int main() {
int return_code = function_leaky();
return return_code;
}
Correspondingly, use_after_free.cpp checks the return value of function_use_after_free, as follows:
#include "buggy.hpp"
int main() {
int return_code = function_use_after_free();
return return_code;
}
We need to compile our code with particular flags to take advantage of ASan. Then, we will run tests and submit them to the dashboard. Let us take a look at how to do this:
add_library(buggy "")
target_sources(buggy
PRIVATE
buggy.cpp
PUBLIC
${CMAKE_CURRENT_LIST_DIR}/buggy.hpp
)
target_include_directories(buggy
PUBLIC
${CMAKE_CURRENT_LIST_DIR}
)
option(ENABLE_ASAN "Enable AddressSanitizer" OFF)
if(ENABLE_ASAN)
if(CMAKE_CXX_COMPILER_ID MATCHES GNU)
message(STATUS "AddressSanitizer enabled")
target_compile_options(buggy
PUBLIC
-g -O1 -fsanitize=address -fno-omit-frame-pointer
)
target_link_libraries(buggy
PUBLIC
asan
)
else()
message(WARNING "AddressSanitizer not supported for this compiler")
endif()
endif()
foreach(_test IN ITEMS leaky use_after_free)
add_executable(${_test} ${_test}.cpp)
target_link_libraries(${_test} buggy)
add_test(
NAME
${_test}
COMMAND
$<TARGET_FILE:${_test}>
)
endforeach()
# set minimum cmake version
cmake_minimum_required(VERSION 3.5 FATAL_ERROR)
# project name and language
project(recipe-03 LANGUAGES CXX)
# require C++11
set(CMAKE_CXX_STANDARD 11)
set(CMAKE_CXX_EXTENSIONS OFF)
set(CMAKE_CXX_STANDARD_REQUIRED ON)
# process src/CMakeLists.txt
add_subdirectory(src)
enable_testing()
# allow to report to a cdash dashboard
include(CTest)
# process tests/CMakeLists.txt
add_subdirectory(tests)
set(CTEST_DROP_METHOD "http")
set(CTEST_DROP_SITE "my.cdash.org")
set(CTEST_DROP_LOCATION "/submit.php?project=cmake-cookbook")
set(CTEST_DROP_SITE_CDASH TRUE)
set(CTEST_PROJECT_NAME "example")
cmake_host_system_information(RESULT _site QUERY HOSTNAME)
set(CTEST_SITE ${_site})
set(CTEST_BUILD_NAME "${CMAKE_SYSTEM_NAME}-${CMAKE_HOST_SYSTEM_PROCESSOR}")
set(CTEST_SOURCE_DIRECTORY "${CTEST_SCRIPT_DIRECTORY}")
set(CTEST_BINARY_DIRECTORY "${CTEST_SCRIPT_DIRECTORY}/build")
include(ProcessorCount)
ProcessorCount(N)
if(NOT N EQUAL 0)
set(CTEST_BUILD_FLAGS -j${N})
set(ctest_test_args ${ctest_test_args} PARALLEL_LEVEL ${N})
endif()
ctest_start(Experimental)
ctest_configure(
OPTIONS
-DENABLE_ASAN:BOOL=ON
)
ctest_build()
ctest_test()
set(CTEST_MEMORYCHECK_TYPE "AddressSanitizer")
ctest_memcheck()
ctest_submit()
$ ctest -S dashboard.cmake -D CTEST_CMAKE_GENERATOR="Unix Makefiles"
Each . represents 1024 bytes of output
. Size of output: 0K
Each symbol represents 1024 bytes of output.
'!' represents an error and '*' a warning.
. Size of output: 1K
In this recipe, we successfully reported memory bugs to the Dynamic Analysis section of the dashboard. We can gain further insights by browsing the defects (under Defect Count):
By clicking on the individual links, it is possible to browse the full output.
Note that it is also possible to generate the AddressSanitizer report locally. In this example, we need to set ENABLE_ASAN, as follows:
$ mkdir -p build
$ cd build
$ cmake -DENABLE_ASAN=ON ..
$ cmake --build .
$ cmake --build . --target test
Start 1: leaky
1/2 Test #1: leaky ............................***Failed 0.07 sec
Start 2: use_after_free
2/2 Test #2: use_after_free ...................***Failed 0.04 sec
0% tests passed, 2 tests failed out of 2
Running the leaky test executable directly produces the following:
$ ./build/tests/leaky
=================================================================
==18536==ERROR: LeakSanitizer: detected memory leaks
Direct leak of 8000 byte(s) in 1 object(s) allocated from:
#0 0x7ff984da1669 in operator new[](unsigned long) /build/gcc/src/gcc/libsanitizer/asan/asan_new_delete.cc:82
#1 0x564925c93fd2 in function_leaky() /home/user/cmake-recipes/chapter-14/recipe-03/cxx-example/src/buggy.cpp:7
#2 0x564925c93fb2 in main /home/user/cmake-recipes/chapter-14/recipe-03/cxx-example/tests/leaky.cpp:4
#3 0x7ff98403df49 in __libc_start_main (/usr/lib/libc.so.6+0x20f49)
SUMMARY: AddressSanitizer: 8000 byte(s) leaked in 1 allocation(s).
Correspondingly, we can obtain detailed output by running the use_after_free executable directly, as follows:
$ ./build/tests/use_after_free
=================================================================
==18571==ERROR: AddressSanitizer: heap-use-after-free on address 0x6250000004d8 at pc 0x557ffa8b0102 bp 0x7ffe8c560200 sp 0x7ffe8c5601f0
READ of size 8 at 0x6250000004d8 thread T0
#0 0x557ffa8b0101 in function_use_after_free() /home/user/cmake-recipes/chapter-14/recipe-03/cxx-example/src/buggy.cpp:28
#1 0x557ffa8affb2 in main /home/user/cmake-recipes/chapter-14/recipe-03/cxx-example/tests/use_after_free.cpp:4
#2 0x7ff1d6088f49 in __libc_start_main (/usr/lib/libc.so.6+0x20f49)
#3 0x557ffa8afec9 in _start (/home/user/cmake-recipes/chapter-14/recipe-03/cxx-example/build/tests/use_after_free+0xec9)
0x6250000004d8 is located 984 bytes inside of 8000-byte region [0x625000000100,0x625000002040)
freed by thread T0 here:
#0 0x7ff1d6ded5a9 in operator delete[](void*) /build/gcc/src/gcc/libsanitizer/asan/asan_new_delete.cc:128
#1 0x557ffa8afffa in function_use_after_free() /home/user/cmake-recipes/chapter-14/recipe-03/cxx-example/src/buggy.cpp:24
#2 0x557ffa8affb2 in main /home/user/cmake-recipes/chapter-14/recipe-03/cxx-example/tests/use_after_free.cpp:4
#3 0x7ff1d6088f49 in __libc_start_main (/usr/lib/libc.so.6+0x20f49)
previously allocated by thread T0 here:
#0 0x7ff1d6dec669 in operator new[](unsigned long) /build/gcc/src/gcc/libsanitizer/asan/asan_new_delete.cc:82
#1 0x557ffa8affea in function_use_after_free() /home/user/cmake-recipes/chapter-14/recipe-03/cxx-example/src/buggy.cpp:19
#2 0x557ffa8affb2 in main /home/user/cmake-recipes/chapter-14/recipe-03/cxx-example/tests/use_after_free.cpp:4
#3 0x7ff1d6088f49 in __libc_start_main (/usr/lib/libc.so.6+0x20f49)
SUMMARY: AddressSanitizer: heap-use-after-free /home/user/cmake-recipes/chapter-14/recipe-03/cxx-example/src/buggy.cpp:28 in function_use_after_free()
Shadow bytes around the buggy address:
0x0c4a7fff8040: fd fd fd fd fd fd fd fd fd fd fd fd fd fd fd fd
0x0c4a7fff8050: fd fd fd fd fd fd fd fd fd fd fd fd fd fd fd fd
0x0c4a7fff8060: fd fd fd fd fd fd fd fd fd fd fd fd fd fd fd fd
0x0c4a7fff8070: fd fd fd fd fd fd fd fd fd fd fd fd fd fd fd fd
0x0c4a7fff8080: fd fd fd fd fd fd fd fd fd fd fd fd fd fd fd fd
=>0x0c4a7fff8090: fd fd fd fd fd fd fd fd fd fd fd[fd]fd fd fd fd
0x0c4a7fff80a0: fd fd fd fd fd fd fd fd fd fd fd fd fd fd fd fd
0x0c4a7fff80b0: fd fd fd fd fd fd fd fd fd fd fd fd fd fd fd fd
0x0c4a7fff80c0: fd fd fd fd fd fd fd fd fd fd fd fd fd fd fd fd
0x0c4a7fff80d0: fd fd fd fd fd fd fd fd fd fd fd fd fd fd fd fd
0x0c4a7fff80e0: fd fd fd fd fd fd fd fd fd fd fd fd fd fd fd fd
Shadow byte legend (one shadow byte represents 8 application bytes):
Addressable: 00
Partially addressable: 01 02 03 04 05 06 07
Heap left redzone: fa
Freed heap region: fd
Stack left redzone: f1
Stack mid redzone: f2
Stack right redzone: f3
Stack after return: f5
Stack use after scope: f8
Global redzone: f9
Global init order: f6
Poisoned by user: f7
Container overflow: fc
Array cookie: ac
Intra object redzone: bb
ASan internal: fe
Left alloca redzone: ca
Right alloca redzone: cb
==18571==ABORTING
If we test without the AddressSanitizer (ENABLE_ASAN is OFF by default), no error is reported in the following example:
$ mkdir -p build_no_asan
$ cd build_no_asan
$ cmake ..
$ cmake --build .
$ cmake --build . --target test
Start 1: leaky
1/2 Test #1: leaky ............................ Passed 0.00 sec
Start 2: use_after_free
2/2 Test #2: use_after_free ................... Passed 0.00 sec
100% tests passed, 0 tests failed out of 2
Indeed, leaky will just waste memory, whereas use_after_free may result in non-deterministic failures. One way to debug these failures is to use valgrind (http://valgrind.org).
In contrast to the previous two recipes, we have used a CTest script to configure, build, and test the code, and to submit the report to the dashboard. To understand how this recipe works, take a closer look at the dashboard.cmake script. First, we define the project name and set the host reporting and the build name, as follows:
set(CTEST_PROJECT_NAME "example")
cmake_host_system_information(RESULT _site QUERY HOSTNAME)
set(CTEST_SITE ${_site})
set(CTEST_BUILD_NAME "${CMAKE_SYSTEM_NAME}-${CMAKE_HOST_SYSTEM_PROCESSOR}")
In our case, the CTEST_BUILD_NAME evaluates to Linux-x86_64. In your case, you may observe a different result, depending on your operating system.
Next, we specify paths for the source and build directories:
set(CTEST_SOURCE_DIRECTORY "${CTEST_SCRIPT_DIRECTORY}")
set(CTEST_BINARY_DIRECTORY "${CTEST_SCRIPT_DIRECTORY}/build")
We could set the generator to Unix Makefiles:
set(CTEST_CMAKE_GENERATOR "Unix Makefiles")
However, for a more portable test script, we prefer to provide the generator via the command line, as follows:
$ ctest -S dashboard.cmake -D CTEST_CMAKE_GENERATOR="Unix Makefiles"
The next code snippet in dashboard.cmake figures out the number of available cores on the machine and sets the parallel level of the test step to the number of available cores, in order to minimize the total test time:
include(ProcessorCount)
ProcessorCount(N)
if(NOT N EQUAL 0)
set(CTEST_BUILD_FLAGS -j${N})
set(ctest_test_args ${ctest_test_args} PARALLEL_LEVEL ${N})
endif()
Next, we start the testing step and configure the code, with ENABLE_ASAN set to ON:
ctest_start(Experimental)
ctest_configure(
OPTIONS
-DENABLE_ASAN:BOOL=ON
)
The remaining commands in dashboard.cmake map to the build, test, memcheck, and submit steps:
ctest_build()
ctest_test()
set(CTEST_MEMORYCHECK_TYPE "AddressSanitizer")
ctest_memcheck()
ctest_submit()
The attentive reader will have noticed that we did not search for the AddressSanitizer on our system prior to linking our target against it. A real-world, complete use case would have done that, to avoid unpleasant surprises during the linking stage. We will remind the reader that we showed a method to probe for the availability of sanitizers in Recipe 7, Probing compiler flags, in Chapter 5, Configure-time and Build-time Operations.
For more AddressSanitizer documentation and examples, see https://github.com/google/sanitizers/wiki/AddressSanitizer. AddressSanitizer is not limited to C and C++. For a Fortran example, we refer the reader to the code repository at https://github.com/dev-cafe/cmake-cookbook/tree/v1.0/chapter-14/recipe-03/fortran-example.
The following blog post discusses examples of how to add support for dynamic analysis tools, and it inspired the present recipe: https://blog.kitware.com/ctest-cdash-add-support-for-new-dynamic-analysis-tools/.
In this recipe, we will reuse the approach from the previous example, but use ThreadSanitizer, or TSan, in combination with CTest and CDash, to identify data races and report these to a CDash dashboard. The documentation for ThreadSanitizer can be found online, at https://github.com/google/sanitizers/wiki/ThreadSanitizerCppManual.
In this recipe, we will work with the following example code (example.cpp):
#include <chrono>
#include <iostream>
#include <thread>
static const int num_threads = 16;
void increase(int i, int &s) {
std::this_thread::sleep_for(std::chrono::seconds(1));
std::cout << "thread " << i << " increases " << s++ << std::endl;
}
int main() {
std::thread t[num_threads];
int s = 0;
// start threads
for (auto i = 0; i < num_threads; i++) {
t[i] = std::thread(increase, i, std::ref(s));
}
// join threads with main thread
for (auto i = 0; i < num_threads; i++) {
t[i].join();
}
std::cout << "final s: " << s << std::endl;
return 0;
}
In this example code, we start 16 threads, and each of these threads calls the increase function. The increase function sleeps for one second, then prints and increments an integer, s. We anticipate that this example code will manifest data races, because all threads read and modify the same address, without any explicit synchronization or coordination. In other words, we expect that the final s, which is printed at the end of the code, may differ from run to run. The code is buggy, and we will try to identify the data race with the help of ThreadSanitizer. Without running ThreadSanitizer, we may not see any problems with the code:
$ ./example
thread thread 0 increases 01 increases 1
thread 9 increases 2
thread 4 increases 3
thread 10 increases 4
thread 2 increases 5
thread 3 increases 6
thread 13 increases 7
thread thread 7 increases 8
thread 14 increases 9
thread 8 increases 10
thread 12 increases 11
thread 15 increases 12
thread 11 increases 13
5 increases 14
thread 6 increases 15
final s: 16
Let us go through the necessary steps in detail, as follows:
cmake_minimum_required(VERSION 3.5 FATAL_ERROR)
project(recipe-04 LANGUAGES CXX)
set(CMAKE_CXX_STANDARD 11)
set(CMAKE_CXX_EXTENSIONS OFF)
set(CMAKE_CXX_STANDARD_REQUIRED ON)
find_package(Threads REQUIRED)
add_executable(example example.cpp)
target_link_libraries(example
PUBLIC
Threads::Threads
)
option(ENABLE_TSAN "Enable ThreadSanitizer" OFF)
if(ENABLE_TSAN)
if(CMAKE_CXX_COMPILER_ID MATCHES GNU)
message(STATUS "ThreadSanitizer enabled")
target_compile_options(example
PUBLIC
-g -O1 -fsanitize=thread -fno-omit-frame-pointer -fPIC
)
target_link_libraries(example
PUBLIC
tsan
)
else()
message(WARNING "ThreadSanitizer not supported for this compiler")
endif()
endif()
enable_testing()
# allow to report to a cdash dashboard
include(CTest)
add_test(
NAME
example
COMMAND
$<TARGET_FILE:example>
)
set(CTEST_DROP_METHOD "http")
set(CTEST_DROP_SITE "my.cdash.org")
set(CTEST_DROP_LOCATION "/submit.php?project=cmake-cookbook")
set(CTEST_DROP_SITE_CDASH TRUE)
set(CTEST_PROJECT_NAME "example")
cmake_host_system_information(RESULT _site QUERY HOSTNAME)
set(CTEST_SITE ${_site})
set(CTEST_BUILD_NAME "${CMAKE_SYSTEM_NAME}-${CMAKE_HOST_SYSTEM_PROCESSOR}")
set(CTEST_SOURCE_DIRECTORY "${CTEST_SCRIPT_DIRECTORY}")
set(CTEST_BINARY_DIRECTORY "${CTEST_SCRIPT_DIRECTORY}/build")
include(ProcessorCount)
ProcessorCount(N)
if(NOT N EQUAL 0)
set(CTEST_BUILD_FLAGS -j${N})
set(ctest_test_args ${ctest_test_args} PARALLEL_LEVEL ${N})
endif()
ctest_start(Experimental)
ctest_configure(
OPTIONS
-DENABLE_TSAN:BOOL=ON
)
ctest_build()
ctest_test()
set(CTEST_MEMORYCHECK_TYPE "ThreadSanitizer")
ctest_memcheck()
ctest_submit()
$ ctest -S dashboard.cmake -D CTEST_CMAKE_GENERATOR="Unix Makefiles"
Each . represents 1024 bytes of output
. Size of output: 0K
Each symbol represents 1024 bytes of output.
'!' represents an error and '*' a warning.
. Size of output: 0K
The core ingredients for this recipe are in the following section of CMakeLists.txt:
option(ENABLE_TSAN "Enable ThreadSanitizer" OFF)
if(ENABLE_TSAN)
if(CMAKE_CXX_COMPILER_ID MATCHES GNU)
message(STATUS "ThreadSanitizer enabled")
target_compile_options(example
PUBLIC
-g -O1 -fsanitize=thread -fno-omit-frame-pointer -fPIC
)
target_link_libraries(example
PUBLIC
tsan
)
else()
message(WARNING "ThreadSanitizer not supported for this compiler")
endif()
endif()
The ingredients are also in the updated steps in dashboard.cmake:
# ...
ctest_start(Experimental)
ctest_configure(
OPTIONS
-DENABLE_TSAN:BOOL=ON
)
ctest_build()
ctest_test()
set(CTEST_MEMORYCHECK_TYPE "ThreadSanitizer")
ctest_memcheck()
ctest_submit()
As in the previous recipe, we can also inspect the output from ThreadSanitizer locally:
$ mkdir -p build
$ cd build
$ cmake -DENABLE_TSAN=ON ..
$ cmake --build .
$ cmake --build . --target test
Start 1: example
1/1 Test #1: example ..........................***Failed 1.07 sec
0% tests passed, 1 tests failed out of 1
$ ./build/example
thread 0 increases 0
==================
WARNING: ThreadSanitizer: data race (pid=24563)
... lots of output ...
SUMMARY: ThreadSanitizer: data race /home/user/cmake-recipes/chapter-14/recipe-04/cxx-example/example.cpp:9 in increase(int, int&)
It would be a natural step to apply TSan on an OpenMP code, but please note that OpenMP is known to generate false positives under TSan, in some cases. For the Clang compilers, a workaround would be to recompile the compiler itself, and its libomp, with -DLIBOMP_TSAN_SUPPORT=TRUE. In general, using sanitizers in a sensible way may require a recompilation of the entire tool-stack, in order to avoid false positives. This will probably be the case for a C++ project using pybind11; we would need to recompile Python with the sanitizers enabled to get anything meaningful. Alternatively, the Python binding can be left out from the sanitizing by using sanitizer suppression, as explained at https://github.com/google/sanitizers/wiki/ThreadSanitizerSuppressions. This may not be possible if, for example, a shared library is called by both by a sanitized binary and a Python plugin.
The following blog post discusses examples of how to add support for dynamic analysis tools, and it inspired the present recipe: https://blog.kitware.com/ctest-cdash-add-support-for-new-dynamic-analysis-tools/.
In the final chapter of this book, we will combine a number of different building blocks that we have discussed in the previous chapters and apply them to a real-life project. Our goal will be to demonstrate step-by-step how to port a non-trivial project to CMake and discuss the steps involved in such a process. We will provide recommendations for porting your own projects or adding CMake support to legacy code, be it from Autotools, from hand-written configure scripts and Makefiles, or from Visual Studio project files.
To have a tangible and realistic example, we will use the source code behind the popular editor Vim (https://www.vim.org) and attempt to port the configuration and compilation from Autotools to CMake.
To keep the discussion and the examples relatively simple, we will not attempt to present a full port to CMake for the entire Vim code with all options. Instead, we will single out and discuss the most important aspects and only build a core version of Vim, without support for a graphical user interface (GUI). Nevertheless, we will arrive at a working version of Vim, configured, built, and tested with CMake and the other tools we have presented in the book.
The following topics will be covered in this chapter:
We will first show where to find our example online and then discuss the porting example step by step.
We will start from the v8.1.0290 release tag of the Vim source code repository (https://github.com/vim/vim) and base our work on the Git commit hash b476cb7. The following steps can be reproduced by cloning the source code repository of Vim and checking out that particular version of the code:
$ git clone --single-branch -b v8.1.0290 https://github.com/vim/vim.git
Alternatively, our solution can be found on the cmake-support branch at https://github.com/dev-cafe/vim and cloned to your computer using this:
$ git clone --single-branch -b cmake-support https://github.com/dev-cafe/vim
In this example, we will emulate a ./configure --enable-gui=no configuration in CMake, built with the GNU compiler collection.
For comparison with our solution later, and for additional inspiration, we encourage readers to also study the Neovim project (https://github.com/neovim/neovim), which is a fork of the traditional Vi editor and provides a CMake build system.
As a start, we create a top-level CMakeLists.txt in the root directory of the source code repository where we set the minimum CMake version, the project name, and supported languages, in this case C:
cmake_minimum_required(VERSION 3.5 FATAL_ERROR)
project(vim LANGUAGES C)
Before adding any targets or sources, we can already set the default build type. In this case, we default to the Release configuration, which will turn on certain compiler optimizations:
if(NOT CMAKE_BUILD_TYPE)
set(CMAKE_BUILD_TYPE Release CACHE STRING "Build type" FORCE)
endif()
We also use portable install directory variables, as defined for GNU software:
include(GNUInstallDirs)
set(CMAKE_ARCHIVE_OUTPUT_DIRECTORY
${CMAKE_BINARY_DIR}/${CMAKE_INSTALL_LIBDIR})
set(CMAKE_LIBRARY_OUTPUT_DIRECTORY
${CMAKE_BINARY_DIR}/${CMAKE_INSTALL_LIBDIR})
set(CMAKE_RUNTIME_OUTPUT_DIRECTORY
${CMAKE_BINARY_DIR}/${CMAKE_INSTALL_BINDIR})
As a sanity check, we can already try to configure and build the project, but so far there are no targets so the output from the build step will be empty:
$ mkdir -p build
$ cd build
$ cmake ..
$ cmake --build .
We will start adding targets in a moment to put more flesh on the bones.
A very nice feature of CMake is that we build out-of-source, the build directory can be any directory, and it does not have to be a subdirectory of the project directory. This means that we can port a project to CMake while not intruding into the previous/present configuration and build mechanism. For the migration of a non-trivial project, it is very useful that CMake files can coexist with other build frameworks to allow a gradual migration, both in terms of options, features, and portability, and to allow the developer community to adapt to the new framework. To allow both traditional and CMake configurations to coexist for a while, a typical strategy is to collect all CMake code in CMakeLists.txt files and all auxiliary CMake source files under a cmake subdirectory. In our example, we will not introduce a cmake subdirectory, but rather keep auxiliary files closer to the targets and sources requiring them, but we will take care to keep almost all files used by the traditional Autotools build unmodified, with one exception: we will apply few modifications in order to place autogenerated files under the build directory and not in the source tree.
Before we add any targets to the configuration, it is often useful to first capture a record of what the traditional build does, and save the output of the configuration and the build step into a log file. For our Vim example, this can be done using the following:
$ ./configure --enable-gui=no
... lot of output ...
$ make > build.log
In our case (the complete content of build.log is not shown here), we are able to verify which sources are compiled and which compile flags are used (-I. -Iproto
-DHAVE_CONFIG_H -g -O2 -U_FORTIFY_SOURCE -D_FORTIFY_SOURCE=1). From the log file, we can deduce the following:
When gradually moving targets and commands to the CMake side, it will be useful to print values of variables using the message command:
message(STATUS "for debugging printing the value of ${some_variable}")
By adding options, targets, sources, and dependencies while debugging using message, we will inch our way towards a working build.
Find out which options the traditional configuration offers to the users (for example, by running ./configure --help). The Vim project offers a very long list of options and flags and to keep the discussion in this chapter simple, we will implement only four of the options on the CMake side:
--disable-netbeans Disable NetBeans integration support.
--disable-channel Disable process communication support.
--enable-terminal Enable terminal emulation support.
--with-features=TYPE tiny, small, normal, big or huge (default: huge)
We will also ignore any GUI support and emulate --enable-gui=no, since it would complicate the example without significantly adding to the learning outcome.
We will place the following options and defaults in CMakeLists.txt:
option(ENABLE_NETBEANS "Enable netbeans" ON)
option(ENABLE_CHANNEL "Enable channel" ON)
option(ENABLE_TERMINAL "Enable terminal" ON)
We will emulate the --with-features flag using a variable, FEATURES, that can be defined with cmake -D FEATURES=value. We make sure that if FEATURES is not set, it defaults to "huge":
if(NOT FEATURES)
set(FEATURES "huge" CACHE STRING
"FEATURES chosen by the user at CMake configure time")
endif()
We also make sure that users provide a valid value for FEATURES:
list(APPEND _available_features "tiny" "small" "normal" "big" "huge")
if(NOT FEATURES IN_LIST _available_features)
message(FATAL_ERROR "Unknown features: \"${FEATURES}\". Allowed values are: ${_available_features}.")
endif()
set_property(CACHE FEATURES PROPERTY STRINGS ${_available_features})
The last line, containing set_property(CACHE FEATURES PROPERTY STRINGS ${_available_features}), has the nice effect that when configuring the project using cmake-gui, the user is presented with a selection field for FEATURES listing all available features that we have defined already (see also https://blog.kitware.com/constraining-values-with-comboboxes-in-cmake-cmake-gui/).
The options can either be placed in the top-level CMakeLists.txt (as we have done here) or they can be defined close to the targets that query ENABLE_NETBEANS, ENABLE_CHANNEL, ENABLE_TERMINAL, and FEATURES. The former strategy has the advantage that options are listed in one place and one does not need to traverse a tree of CMakeLists.txt files to find the definition of an option. Since we have not defined any targets yet, we can start with keeping the options in a central file, but we may later move the option definition closer to the targets to localize scope and arrive at more reusable CMake building blocks.
Let us add some sources. In the Vim example, sources are under src and to keep the main CMakeLists.txt readable and maintainable, we will create a new file, src/CMakeLists.txt, and process this file in its own directory scope by adding this to the main CMakeLists.txt:
add_subdirectory(src)
Inside src/CMakeLists.txt, we could start out defining the executable target and listing all sources that we have extracted from build.log:
add_executable(vim
arabic.c beval.c buffer.c blowfish.c crypt.c crypt_zip.c dict.c diff.c digraph.c edit.c eval.c evalfunc.c ex_cmds.c ex_cmds2.c ex_docmd.c ex_eval.c ex_getln.c farsi.c fileio.c fold.c getchar.c hardcopy.c hashtab.c if_cscope.c if_xcmdsrv.c list.c mark.c memline.c menu.c misc1.c misc2.c move.c mbyte.c normal.c ops.c option.c os_unix.c auto/pathdef.c popupmnu.c pty.c quickfix.c regexp.c screen.c search.c sha256.c spell.c spellfile.c syntax.c tag.c term.c terminal.c ui.c undo.c userfunc.c window.c libvterm/src/encoding.c libvterm/src/keyboard.c libvterm/src/mouse.c libvterm/src/parser.c libvterm/src/pen.c libvterm/src/screen.c libvterm/src/state.c libvterm/src/unicode.c libvterm/src/vterm.c netbeans.c channel.c charset.c json.c main.c memfile.c message.c version.c
)
This is a start. In this case, the code will not even configure since the list of sources contains generated files. Before we discuss generated files and link dependencies, we will split this long list up a bit to limit the scope of target dependencies and to make the project more manageable. We will also make it easier for CMake to scan source file dependencies and avoid a very long link line if we group them to targets.
For the Vim example, we can gain further insight into the grouping of sources from src/Makefile and src/configure.ac. From these files, we can deduce that most sources are basic and required. Some sources are optional (netbeans.c should only be built if ENABLE_NETBEANS is ON and channel.c should only be built when ENABLE_CHANNEL is ON). In addition, we can probably group all sources under src/libvterm/ and make their compilation optional with ENABLE_TERMINAL.
With this, we reorganize the CMake structure to the following tree structure:
.
├── CMakeLists.txt
└── src
├── CMakeLists.txt
└── libvterm
└── CMakeLists.txt
The top-level file adds src/CMakeLists.txt with add_subdirectory(src). The src/CMakeLists.txt file now contains three targets (one executable and two libraries), each carrying compile definitions and include directories. We first define the executable:
add_executable(vim
main.c
)
target_compile_definitions(vim
PRIVATE
"HAVE_CONFIG_H"
)
Then, we define the required sources:
add_library(basic_sources "")
target_sources(basic_sources
PRIVATE
arabic.c beval.c blowfish.c buffer.c charset.c
crypt.c crypt_zip.c dict.c diff.c digraph.c
edit.c eval.c evalfunc.c ex_cmds.c ex_cmds2.c
ex_docmd.c ex_eval.c ex_getln.c farsi.c fileio.c
fold.c getchar.c hardcopy.c hashtab.c if_cscope.c
if_xcmdsrv.c json.c list.c main.c mark.c
memfile.c memline.c menu.c message.c misc1.c
misc2.c move.c mbyte.c normal.c ops.c
option.c os_unix.c auto/pathdef.c popupmnu.c pty.c
quickfix.c regexp.c screen.c search.c sha256.c
spell.c spellfile.c syntax.c tag.c term.c
terminal.c ui.c undo.c userfunc.c version.c
window.c
)
target_include_directories(basic_sources
PRIVATE
${CMAKE_CURRENT_LIST_DIR}/proto
${CMAKE_CURRENT_LIST_DIR}
${CMAKE_CURRENT_BINARY_DIR}
)
target_compile_definitions(basic_sources
PRIVATE
"HAVE_CONFIG_H"
)
target_link_libraries(vim
PUBLIC
basic_sources
)
Then, we define the optional sources:
add_library(extra_sources "")
if(ENABLE_NETBEANS)
target_sources(extra_sources
PRIVATE
netbeans.c
)
endif()
if(ENABLE_CHANNEL)
target_sources(extra_sources
PRIVATE
channel.c
)
endif()
target_include_directories(extra_sources
PUBLIC
${CMAKE_CURRENT_LIST_DIR}/proto
${CMAKE_CURRENT_BINARY_DIR}
)
target_compile_definitions(extra_sources
PRIVATE
"HAVE_CONFIG_H"
)
target_link_libraries(vim
PUBLIC
extra_sources
)
The file also optionally processes and links src/libvterm/ with the following code:
if(ENABLE_TERMINAL)
add_subdirectory(libvterm)
target_link_libraries(vim
PUBLIC
libvterm
)
endif()
The corresponding src/libvterm/CMakeLists.txt contains the following:
add_library(libvterm "")
target_sources(libvterm
PRIVATE
src/encoding.c
src/keyboard.c
src/mouse.c
src/parser.c
src/pen.c
src/screen.c
src/state.c
src/unicode.c
src/vterm.c
)
target_include_directories(libvterm
PUBLIC
${CMAKE_CURRENT_LIST_DIR}/include
)
target_compile_definitions(libvterm
PRIVATE
"HAVE_CONFIG_H"
"INLINE="
"VSNPRINTF=vim_vsnprintf"
"IS_COMBINING_FUNCTION=utf_iscomposing_uint"
"WCWIDTH_FUNCTION=utf_uint2cells"
)
We have extracted the compile definitions from the recorded build.log. The advantage of the tree structure is that targets are defined close to where sources are located. If we decide to refactor the code and rename or move directories, the CMake files describing the targets have the chance to move with the sources.
Our example code still does not even configure (unless this is tried after a successful Autotools build):
$ mkdir -p build
$ cd build
$ cmake ..
-- The C compiler identification is GNU 8.2.0
-- Check for working C compiler: /usr/bin/cc
-- Check for working C compiler: /usr/bin/cc -- works
-- Detecting C compiler ABI info
-- Detecting C compiler ABI info - done
-- Detecting C compile features
-- Detecting C compile features - done
-- Configuring done
CMake Error at src/CMakeLists.txt:12 (add_library):
Cannot find source file:
auto/pathdef.c
Tried extensions .c .C .c++ .cc .cpp .cxx .cu .m .M .mm .h .hh .h++ .hm
.hpp .hxx .in .txx
We need to generate auto/pathdef.c (and other files), which we will consider in the next section.
It turns out that for the Vim code example, we need to generate three files at configure time, src/auto/pathdef.c, src/auto/config.h, and src/auto/osdef.h:
This situation is rather common. We will need to configure a file based on CMake variables, perform a number of platform checks to generate config.h, and execute a script at configure time. In particular, the platform checks are very common for projects striving for portability to accommodate the subtle differences between operating systems.
In the original layout, files are generated under the src folder. We do not like this approach and we will do it differently in our example CMake port: these files will be generated in the build directory. The reason for this is that generated files often depend on the chosen options, compiler, or build type and we wish to keep the ability to configure multiple builds with the same source. To enable generation in the build directory, we will have to apply minimal changes to the script which generates one of the files listed before.
We will collect functions that generate these files in src/autogenerate.cmake, include this module, and call these functions in src/CMakeLists.txt before defining the executable target:
# generate config.h, pathdef.c, and osdef.h
include(autogenerate.cmake)
generate_config_h()
generate_pathdef_c()
generate_osdef_h()
add_executable(vim
main.c
)
# ...
The included src/autogenerate.cmake contains other includes for functionality that we will require to probe header files, functions, and libraries, as well as the three functions:
include(CheckTypeSize)
include(CheckFunctionExists)
include(CheckIncludeFiles)
include(CheckLibraryExists)
include(CheckCSourceCompiles)
function(generate_config_h)
# ... to be written
endfunction()
function(generate_pathdef_c)
# ... to be written
endfunction()
function(generate_osdef_h)
# ... to be written
endfunction()
We choose to generate files with functions rather than in macros or "naked" CMake code. As we discussed in previous chapters, this sidesteps many pitfalls:
The config.h file is generated from src/config.h.in, which contains preprocessor flags that are configured depending on the system capabilities:
/* Define if we have EBCDIC code */
#undef EBCDIC
/* Define unless no X support found */
#undef HAVE_X11
/* Define when terminfo support found */
#undef TERMINFO
/* Define when termcap.h contains ospeed */
#undef HAVE_OSPEED
/* ... */
An example generated from src/config.h can start like this example (definitions can differ depending on the environment):
/* Define if we have EBCDIC code */
/* #undef EBCDIC */
/* Define unless no X support found */
#define HAVE_X11 1
/* Define when terminfo support found */
#define TERMINFO 1
/* Define when termcap.h contains ospeed */
/* #undef HAVE_OSPEED */
/* ... */
A great resource for platform checks is this page: https://www.vtk.org/Wiki/CMake:How_To_Write_Platform_Checks.
In src/configure.ac, we can examine which platform checks we need to perform to set corresponding preprocessor definitions.
We will make use of #cmakedefine (https://cmake.org/cmake/help/v3.5/command/configure_file.html?highlight=cmakedefine) and to make sure we do not break the existing Autotools build, we will copy config.h.in to config.h.cmake.in and change all #undef SOME_DEFINITION to #cmakedefine SOME_DEFINITION @SOME_DEFINITION@.
In the generate_config_h function, we first define a couple of variables:
set(TERMINFO 1)
set(UNIX 1)
# this is hardcoded to keep the discussion in the book chapter
# which describes the migration to CMake simpler
set(TIME_WITH_SYS_TIME 1)
set(RETSIGTYPE void)
set(SIGRETURN return)
find_package(X11)
set(HAVE_X11 ${X11_FOUND})
Then, we perform a couple of type size checks:
check_type_size("int" VIM_SIZEOF_INT)
check_type_size("long" VIM_SIZEOF_LONG)
check_type_size("time_t" SIZEOF_TIME_T)
check_type_size("off_t" SIZEOF_OFF_T)
Then, we loop over functions and check whether the system is able to resolve them:
foreach(
_function IN ITEMS
fchdir fchown fchmod fsync getcwd getpseudotty
getpwent getpwnam getpwuid getrlimit gettimeofday getwd lstat
memset mkdtemp nanosleep opendir putenv qsort readlink select setenv
getpgid setpgid setsid sigaltstack sigstack sigset sigsetjmp sigaction
sigprocmask sigvec strcasecmp strerror strftime stricmp strncasecmp
strnicmp strpbrk strtol towlower towupper iswupper
usleep utime utimes mblen ftruncate
)
string(TOUPPER "${_function}" _function_uppercase)
check_function_exists(${_function} HAVE_${_function_uppercase})
endforeach()
We verify whether a particular library contains a particular function:
check_library_exists(tinfo tgetent "" HAVE_TGETENT)
if(NOT HAVE_TGETENT)
message(FATAL_ERROR "Could not find the tgetent() function. You need to install a terminal library; for example ncurses.")
endif()
Then, we loop over header files and check whether they are available:
foreach(
_header IN ITEMS
setjmp.h dirent.h
stdint.h stdlib.h string.h
sys/select.h sys/utsname.h termcap.h fcntl.h
sgtty.h sys/ioctl.h sys/time.h sys/types.h
termio.h iconv.h inttypes.h langinfo.h math.h
unistd.h stropts.h errno.h sys/resource.h
sys/systeminfo.h locale.h sys/stream.h termios.h
libc.h sys/statfs.h poll.h sys/poll.h pwd.h
utime.h sys/param.h libintl.h libgen.h
util/debug.h util/msg18n.h frame.h sys/acl.h
sys/access.h sys/sysinfo.h wchar.h wctype.h
)
string(TOUPPER "${_header}" _header_uppercase)
string(REPLACE "/" "_" _header_normalized "${_header_uppercase}")
string(REPLACE "." "_" _header_normalized "${_header_normalized}")
check_include_files(${_header} HAVE_${_header_normalized})
endforeach()
Then, we translate CMake options from the main CMakeLists.txt to preprocessor definitions:
string(TOUPPER "${FEATURES}" _features_upper)
set(FEAT_${_features_upper} 1)
set(FEAT_NETBEANS_INTG ${ENABLE_NETBEANS})
set(FEAT_JOB_CHANNEL ${ENABLE_CHANNEL})
set(FEAT_TERMINAL ${ENABLE_TERMINAL})
And finally, we check whether we are able to compile a particular code snippet:
check_c_source_compiles(
"
#include <sys/types.h>
#include <sys/stat.h>
int
main ()
{
struct stat st;
int n;
stat(\"/\", &st);
n = (int)st.st_blksize;
;
return 0;
}
"
HAVE_ST_BLKSIZE
)
The defined variables are then used to configure src/config.h.cmake.in to config.h, which concludes the generate_config_h function:
configure_file(
${CMAKE_CURRENT_LIST_DIR}/config.h.cmake.in
${CMAKE_CURRENT_BINARY_DIR}/auto/config.h
@ONLY
)
We generate pathdef.c from src/pathdef.c.in:
#include "vim.h"
char_u *default_vim_dir = (char_u *)"@_default_vim_dir@";
char_u *default_vimruntime_dir = (char_u *)"@_default_vimruntime_dir@";
char_u *all_cflags = (char_u *)"@_all_cflags@";
char_u *all_lflags = (char_u *)"@_all_lflags@";
char_u *compiled_user = (char_u *)"@_compiled_user@";
char_u *compiled_sys = (char_u *)"@_compiled_sys@";
The generate_pathdef_c function configures src/pathdef.c.in, but we leave out link flags for simplicity:
function(generate_pathdef_c)
set(_default_vim_dir ${CMAKE_INSTALL_PREFIX})
set(_default_vimruntime_dir ${_default_vim_dir})
set(_all_cflags "${CMAKE_C_COMPILER} ${CMAKE_C_FLAGS}")
if(CMAKE_BUILD_TYPE STREQUAL "Release")
set(_all_cflags "${_all_cflags} ${CMAKE_C_FLAGS_RELEASE}")
else()
set(_all_cflags "${_all_cflags} ${CMAKE_C_FLAGS_DEBUG}")
endif()
# it would require a bit more work and execute commands at build time
# to get the link line into the binary
set(_all_lflags "undefined")
if(WIN32)
set(_compiled_user $ENV{USERNAME})
else()
set(_compiled_user $ENV{USER})
endif()
cmake_host_system_information(RESULT _compiled_sys QUERY HOSTNAME)
configure_file(
${CMAKE_CURRENT_LIST_DIR}/pathdef.c.in
${CMAKE_CURRENT_BINARY_DIR}/auto/pathdef.c
@ONLY
)
endfunction()
Finally, we generate osdef.h using the following function:
function(generate_osdef_h)
find_program(BASH_EXECUTABLE bash)
execute_process(
COMMAND
${BASH_EXECUTABLE} osdef.sh ${CMAKE_CURRENT_BINARY_DIR}
WORKING_DIRECTORY
${CMAKE_CURRENT_LIST_DIR}
)
endfunction()
In order to generate osdef.h in ${CMAKE_CURRENT_BINARY_DIR}/src/auto instead of src/auto, we had to adapt osdef.sh to accept ${CMAKE_CURRENT_BINARY_DIR} as a command line argument.
Inside osdef.sh, we check whether this argument is given:
if [ $# -eq 0 ]
then
# there are no arguments
# assume the target directory is current directory
target_directory=$PWD
else
# target directory is provided as argument
target_directory=$1
fi
And then, we generate ${target_directory}/auto/osdef.h. To do so, we also had to adjust the following compilation line inside osdef.sh:
$CC -I. -I$srcdir -I${target_directory} -E osdef0.c >osdef0.cc
We have now all generated files in place, so let us retry the build. We should be able to configure and compile the sources, but we will not be able to link:
$ mkdir -p build
$ cd build
$ cmake ..
$ cmake --build .
...
Scanning dependencies of target vim
[ 98%] Building C object src/CMakeFiles/vim.dir/main.c.o
[100%] Linking C executable ../bin/vim
../lib64/libbasic_sources.a(term.c.o): In function `set_shellsize.part.12':
term.c:(.text+0x2bd): undefined reference to `tputs'
../lib64/libbasic_sources.a(term.c.o): In function `getlinecol':
term.c:(.text+0x902): undefined reference to `tgetent'
term.c:(.text+0x915): undefined reference to `tgetent'
term.c:(.text+0x935): undefined reference to `tgetnum'
term.c:(.text+0x948): undefined reference to `tgetnum'
... many other undefined references ...
Again, we can take the log file from the Autotools compilation and, in particular, the link line as inspiration to resolve the missing dependencies by adding the following code to src/CMakeLists.txt:
# find X11 and link to it
find_package(X11 REQUIRED)
if(X11_FOUND)
target_link_libraries(vim
PUBLIC
${X11_LIBRARIES}
)
endif()
# a couple of more system libraries that the code requires
foreach(_library IN ITEMS Xt SM m tinfo acl gpm dl)
find_library(_${_library}_found ${_library} REQUIRED)
if(_${_library}_found)
target_link_libraries(vim
PUBLIC
${_library}
)
endif()
endforeach()
Observe how we can add one library dependency to the target at a time and do not have to construct and carry around a list of libraries in a variable, which would produce more brittle CMake code since the variable could get corrupted on the way, in particular for larger projects.
With this change, the code compiles and links:
$ cmake --build .
...
Scanning dependencies of target vim
[ 98%] Building C object src/CMakeFiles/vim.dir/main.c.o
[100%] Linking C executable ../bin/vim
[100%] Built target vim
We can now try to execute the compiled binary and edit some files with our newly compiled version of Vim!
Let us now try to adjust the compiler flags to mirror the reference build.
So far, we have not defined any custom compiler flags, but from the reference Autotools build, we remember that the code was compiled with -g -U_FORTIFY_SOURCE
-D_FORTIFY_SOURCE=1 -O2 using the GNU C compiler.
Our first approach could be to define the following:
if(CMAKE_C_COMPILER_ID MATCHES GNU)
set(CMAKE_C_FLAGS "${CMAKE_C_FLAGS} -g -U_FORTIFY_SOURCE -D_FORTIFY_SOURCE=1 -O2")
endif()
And, we would place this code on top of src/CMakeLists.txt, right before generating source files (since pathdef.c uses ${CMAKE_C_FLAGS}):
# <- we will define flags right here
include(autogenerate.cmake)
generate_config_h()
generate_pathdef_c()
generate_osdef_h()
A slight improvement to the compiler flag definitions would be to define -O2 as a Release configuration flag and to turn off optimization for a Debug configuration:
if(CMAKE_C_COMPILER_ID MATCHES GNU)
set(CMAKE_C_FLAGS "${CMAKE_C_FLAGS} -g -U_FORTIFY_SOURCE
-D_FORTIFY_SOURCE=1")
set(CMAKE_C_FLAGS_RELEASE "-O2")
set(CMAKE_C_FLAGS_DEBUG "-O0")
endif()
Please verify with make VERBOSE=1 that the build uses the expected flags.
In this particular example project, all source files use the same compile flags. For other projects, we may prefer to not define compile flags globally as we have done above, but to define flags individually for each target using target_compile_options. The advantage would be more flexibility and more local scope. The price to pay in our example here would probably be unnecessary code duplication.
Let us now discuss how to port tests from the reference build to our CMake build.
If the project that is being ported contains a test target or any form of automated testing or test scripts, the first step will again be to run the traditional test step and record the commands used. For the Vim project, the place to start is src/testdir/Makefile. It will probably make sense to define tests on the CMake side close to src/testdir/Makefile and the test scripts, and we will choose to define tests in src/testdir/CMakeLists.txt. To process such a file, we must reference it in src/CMakeLists.txt:
add_subdirectory(testdir)
We should also enable the test target in the top-level CMakeLists.txt, right before processing src/CMakeLists.txt:
# enable the test target
enable_testing()
# process src/CMakeLists.txt in its own scope
add_subdirectory(src)
So far, the test target is empty before we populate src/testdir/CMakeLists.txt with add_test directives. The minimum to specify in add_test is a test name and a command to run. The command can be any script written in any language. The essential part for CMake is that the script returns zero if the test is successful and non-zero if the test fails. For more details, we refer the reader to Chapter 4, Creating and Running Tests. In the case of Vim, we will need a bit more to accommodate multi-step tests, which we will discuss in the next section.
The targets in src/testdir/Makefile indicate that the Vim code runs tests as multi-step tests: first the vim executable processes a script and produces an output file, then in a second step the output file is compared with a reference file and if these files do not differ, the test is successful. Temporary files are then removed in a third step. This can probably not be fitted into a single add_test command in a portable way since add_test can only execute one command. One solution would be to define the test steps in a Python script and to execute the Python script with some arguments. The alternative we will present here, which is also cross-platform, is to define the test steps in a separate CMake script and to execute this script from add_test. We will define the test steps in src/testdir/test.cmake:
function(execute_test _vim_executable _working_dir _test_script)
# generates test.out
execute_process(
COMMAND ${_vim_executable} -f -u unix.vim -U NONE --noplugin --not-a-term -s dotest.in ${_test_script}.in
WORKING_DIRECTORY ${_working_dir}
)
# compares test*.ok and test.out
execute_process(
COMMAND ${CMAKE_COMMAND} -E compare_files ${_test_script}.ok test.out
WORKING_DIRECTORY ${_working_dir}
RESULT_VARIABLE files_differ
OUTPUT_QUIET
ERROR_QUIET
)
# removes leftovers
file(REMOVE ${_working_dir}/Xdotest)
# we let the test fail if the files differ
if(files_differ)
message(SEND_ERROR "test ${_test_script} failed")
endif()
endfunction()
execute_test(${VIM_EXECUTABLE} ${WORKING_DIR} ${TEST_SCRIPT})
Again, we choose a function over a macro to make sure variables do not escape the function scope. We will process this script, which will call the execute_test function. However, we have to make sure that ${VIM_EXECUTABLE}, ${WORKING_DIR}, and ${TEST_SCRIPT} are defined from outside. These are defined in src/testdir/CMakeLists.txt:
add_test(
NAME
test1
COMMAND
${CMAKE_COMMAND} -D VIM_EXECUTABLE=$<TARGET_FILE:vim>
-D WORKING_DIR=${CMAKE_CURRENT_LIST_DIR}
-D TEST_SCRIPT=test1
-P ${CMAKE_CURRENT_LIST_DIR}/test.cmake
WORKING_DIRECTORY
${PROJECT_BINARY_DIR}
)
The Vim project has many tests but in this example, we have ported only one (test1) as a proof of concept.
We can give at least two recommendations for porting tests. First, to make sure that the test does not always report success, verify that the test fails if you break the code or change the reference data. Second, add COST estimates to tests so that when run in parallel, longer tests are started first to minimize the total test time (see Chapter 4, Creating and Running Tests, Recipe 8, Running tests in parallel).
We can now configure, compile, link, and test the code, but we are missing the install target, which we will add in this section.
This is the Autotools approach to building and installing code:
$ ./configure --prefix=/some/install/path
$ make
$ make install
And this is the CMake way:
$ mkdir -p build
$ cd build
$ cmake -D CMAKE_INSTALL_PREFIX=/some/install/path ..
$ cmake --build .
$ cmake --build . --target install
To add an install target, we add the following snippet in src/CMakeLists.txt:
install(
TARGETS
vim
RUNTIME DESTINATION
${CMAKE_INSTALL_BINDIR}
)
In this example, we only install the executable. The Vim project installs a large number of files along with the binary (symbolic links and documentation files). To keep this section digestible, we don't install all other files in this example migration. For your own project, you should verify that the result of the install step matches the install target of the legacy build framework.
After a successful port to CMake, the next step should be to localize the scope of targets and variables even further: consider moving options, targets, and variables closer to where they are used and modified. Avoid global variables since they will enforce an order to CMake commands, and this order may not be evident and will lead to a brittle CMake code. One approach to enforcing the separation of variable scopes is to divide larger projects into CMake projects, which are composed using the superbuild pattern (see Chapter 8, The Superbuild Pattern). Consider splitting large CMakeLists.txt files into smaller modules.
The next steps can be to test the configuration and compilation on other platforms and operating systems in order to generalize and bullet-proof the CMake code and make it more portable.
Finally, when migrating projects to a new build framework, the developer community needs to adapt to it too. Help your colleagues with training, documentation, and code review. The hardest part in porting code to CMake can be to change the habits of humans.
Let us summarize what we have achieved in this chapter and what we learned.
In this chapter, we have discussed how to port a project to CMake. We have considered the Vim project as an example and added the following files:
.
├── CMakeLists.txt
└── src
├── autogenerate.cmake
├── CMakeLists.txt
├── config.h.cmake.in
├── libvterm
│ └── CMakeLists.txt
├── pathdef.c.in
└── testdir
├── CMakeLists.txt
└── test.cmake
The changes can be browsed online: https://github.com/dev-cafe/vim/compare/b476cb7...cmake-support.
This was an incomplete proof of concept port to CMake, where we left out many options and tweaks for simplicity and tried to focus on the most salient features and steps.
We would like to conclude this discussion by pointing out some common pitfalls when moving to CMake.
If you enjoyed this book, you may be interested in these other books by Packt:
Mastering Qt 5 - Second Edition
Guillaume Lazar, Robin Penea
ISBN: 978-1-78899-539-9
Learn QT 5
Nicholas Sherriff
ISBN: 978-1-78847-885-4
Please share your thoughts on this book with others by leaving a review on the site that you bought it from. If you purchased the book from Amazon, please leave us an honest review on this book's Amazon page. This is vital so that other potential readers can see and use your unbiased opinion to make purchasing decisions, we can understand what our customers think about our products, and our authors can see your feedback on the title that they have worked with Packt to create. It will only take a few minutes of your time, but is valuable to other potential customers, our authors, and Packt. Thank you!