Table of Contents for
Spring Microservices in Action
 Spring Microservices in Action
Published by
Manning Publications, 2017
Spring Microservices in Action
Published by
Manning Publications, 2017
- Cover
- Spring Microservices in Action
- Copyright
- Spring Microservices in Action
- Brief Table of Contents
- Table of Contents
- Preface
- Acknowledgments
- About this Book
- About the Author
- About the Cover Illustration
- Chapter 1. Welcome to the cloud, Spring
- Chapter 2. Building microservices with Spring Boot
- Chapter 3. Controlling your configuration with Spring Cloud configuration server
- Chapter 4. On service discovery
- Chapter 5. When bad things happen: client resiliency patterns with Spring Cloud and Netflix Hystrix
- Chapter 6. Service routing with Spring Cloud and Zuul
- Chapter 7. Securing your microservices
- Chapter 8. Event-driven architecture with Spring Cloud Stream
- Chapter 9. Distributed tracing with Spring Cloud Sleuth and Zipkin
- Chapter 10. Deploying your microservices
- Appendix A. Running a cloud on your desktop
- Appendix B. OAuth2 grant types
- Index
- List of Figures
- List of Tables
- List of Listings
Appendix A. Running a cloud on your desktop
- Listing the software needed to run the code in this book
- Downloading the source code from GitHub for each chapter
- Compiling and packaging the source code using Maven
- Building and provisioning the Docker images used in each chapter
- Launching the Docker images compiled by the build using Docker Compose
I had two goals when laying out the code examples in this book and choosing the runtime technologies needed to deploy the code. The first goal was make sure that the code examples were consumable and easy to set up. Remember, a microservices application has multiple moving parts, and setting up these parts to run cleanly with minimal effort for the reader can be difficult if there is not some forethought.
The second goal was for each chapter to be completely standalone so that you could pick any chapter in the book and have a complete runtime environment available that encapsulates all the services and software needed to run the code examples in the chapter without dependencies on other chapters.
To this end, you’ll see the following technology and patterns used throughout every chapter in this book:
- All projects use Apache Maven (http://maven.apache.org) as the build tool for the chapters. Each service is built using a Maven project structure and each service structure is consistently laid chapter to chapter.
- All services developed in the chapter compile to a Docker (http://docker.io) container image. Docker is an amazing runtime virtualization engine that runs on Windows, OS X, and Linux. Using Docker, I can build a complete runtime environment on the desktop that includes the application services and all the infrastructure needed to support the services. Also, Docker, unlike more proprietary virtualization technologies, is easily portable across multiple cloud providers. I’m using Spotify’s Docker Maven plugin (https://github.com/spotify/docker-maven-plugin) to integrate the building of Docker container with the Maven build process.
- To start the services after they’ve compiled into Docker images, I use Docker Compose to start the services as a group. I’ve purposely avoided more sophisticated Docker orchestration tools such as Kubernetes (https://github.com/kubernetes/kubernetes) or Mesos (http://mesos.apache.org/) to keep the chapter examples straightforward and portable.
All provisioning of the Docker images is done with simple shell scripts.
A.1. Required software
To build the software for all chapters, you’ll need to have the following software installed on your desktop. It’s important to note that these are the versions of software I worked with for the book. The software may work with other versions, but this is what I built the code with:
- Apache Maven (http://apache.maven.org)—I used version 3.3.9 of Maven. I chose Maven because while other build tools such as Gradle are extremely popular, Maven is still the predominant build tool in use in the Java ecosystem. All code examples in this book were compiled with Java version 1.8.
- Docker (http://docker.com)—I built the code examples in this book using Docker V1.12. The code examples in this book will work with earlier versions of Docker, but you may have to switch to the version 1 docker-compose links format if you want to use this code with earlier versions of Docker.
- Git Client (http://git-scm.com)—All the source code for this book is stored in a GitHub repository. For the book, I used version 2.8.4 of the Git client.
I’m not going to walk through how to install each of these components. Each of the software packages listed in the bulleted list has simple installation instructions and should be installable with minimal effort. Docker has a GUI client for installation.
A.2. Downloading the projects from GitHub
All the source code for the book is in my GitHub repository (http://github.com/carnellj). Each chapter in the book has its own source code repository. Here’s a listing of all the GitHub repositories used in the book:
- Chapter 1 (Welcome to the cloud, Spring)—http://github.com/carnellj/spmia-chapter1
- Chapter 2 (Introduction to microservices)—http://github.com/carnellj/spmia-chapter2
- Chapter 3 (Spring Cloud Config)—http://github.com/carnellj/spmia-chapter3andhttp://github.com/carnellj/config-repo
- Chapter 4 (Spring Cloud/Eureka)—http://github.com/carnellj/spmia-chapter4
- Chapter 5 (Spring Cloud/Hystrix)—http://github.com/carnellj/spmia-chapter5
- Chapter 6 (Spring Cloud/Zuul)—http://github.com/carnellj/spmia-chapter6
- Chapter 7 (Spring Cloud/Oauth2)—http://github.com/carnellj/spmia-chapter7
- Chapter 8 (Spring Cloud Stream)—http://github.com/carnellj/spmia-chapter8
- Chapter 9 (Spring Cloud Sleuth)—http://github.com/carnellj/spmia-chapter9
- Chapter 10 (Deployment)—http://github.com/carnellj/spmia-chapter10 and http://github.com/carnellj/chapter-10-platform-tests
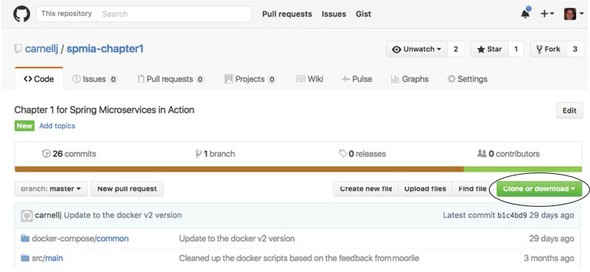
With GitHub, you can download the files as a zip file using the web UI. Every GitHub repository will have a download button on it. Figure A.1 shows where the download button is in the GitHub repository for chapter 1.
Figure A.1. The GitHub UI allows you to download a project as a zip file.
If you’re a command-line user, you can install the git client and clone the project. For example, if you wanted to download chapter 1 from GitHub using the git client, you could open a command line and issue the following command:
git clone https://github.com/carnellj/spmia-chapter1.git
This will download all the chapter 1 project files into a directory called spmia-chapter1 in the directory you ran the git command from.
A.3. Anatomy of each chapter
Every chapter in the book has one or more services associated with it. Each service in a chapter has its own project directory. For instance, if you look at chapter 6 (http://github.com/carnellj/spmia-chapter6), you’ll see that there are seven services in it. These services are
- confsvr—Spring Cloud Config server
- eurekasvr—Spring Cloud/with Eureka
- licensing-service—Eagle Eye Licensing service
- organization-service—Eagle Organization service
- orgservice-new—New test version of the EagleEye service
- specialroutes-service—A/B routing service
- zuulsvr—EagleEye Zuul service
Every service directory in a chapter is structured as a Maven-based build project. Inside each project is a src/main directory with the following sub-directories:
- java—This directory contains the Java source code used to build the service.
- docker—This directory contains two files needed to build a Docker image for each service. The first file will always be called Dockerfile and contains the step-by-step instructions used by Docker to build the Docker image. The second file, run.sh, is a custom Bash script that runs inside the Docker container. This script ensures that the service doesn’t start until certain key dependencies (database is up and running) become available.
- resources—The resources directory contains all the services’ application.yml files. While application configuration is stored in the Spring Cloud Config, all services have configuration that’s stored locally in the application.yml. Also, the resources directory will contain a schema.sql file containing all the SQL commands used to create the tables and pre-load data for the services into the Postgres database.
A.4. Building and compiling the projects
Because all chapters in the book follow the same structure and use Maven as their build tool, it becomes extremely simple to build the source code. Every chapter has at the root of the directory a pom.xml that acts as parent pom for all the sub-chapters. If you want to compile the source code and build the Docker images for all the projects within a single chapter, you need to run the following at the root of the chapter:
mvn clean package docker:build
This will execute the Maven pom.xml file in each of the service directories. It will also build the Docker images locally.
If you want to build a single service within the chapter, you can change to that specific service directory and run the mvn clean package docker:build command.
A.5. Building the Docker image
During the build process, all the services in the book are packaged as Docker images. This process is carried out by the Spotify Maven plugin. For an example of this plugin in action, you can look at the chapter 3 licensing service’s pom.xml file (chapter3/licensing-service). The following listing shows the XML fragment that configures this plugin in each service’s pom.xml file.
Listing A.1. Spotify Docker Maven plugin used to create Dockerimage
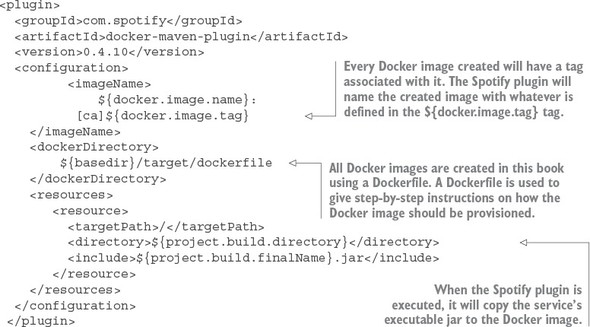
The XML fragment does three things:
- It copies the executable jar for the service, along with the contents of the src/main/docker directory, to target/docker.
- It executes the Dockerfile defined in the target/docker directory. The Dockerfile is a list of commands that are executed whenever a new Docker image for that service is provisioned.
- It pushes the Docker image to the local Docker image repository that’s installed when you install Docker.
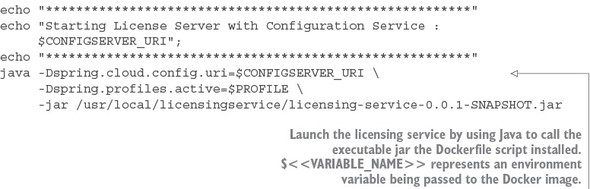
The following listing shows the contents of the Dockerfile from your licensing service.
Listing A.2. Dockerfile prepares Docker image
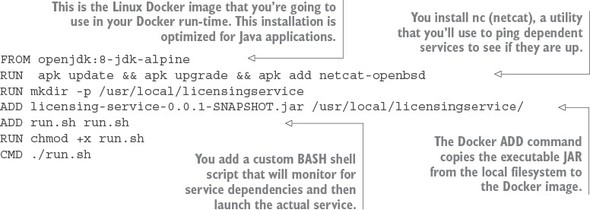
In the Dockerfile from this listing you’re provisioning your instance using Alpine Linux (https://alpinelinux.org/). Alpine Linux is a small Linux distribution that’s often used to build Docker images. The Alpine Linux image you’re using already has Java JDK installed on it.
When you’re provisioning your Docker image, you’re going to install a command-line utility called nc. The nc command is used to ping a server and see if a specific port is online. You’re going to use it in your run.sh command script to ensure that before you launch your service, all its dependent services (for example, the database and the Spring Cloud Config service) have started. The nc command does this by watching the ports the dependent services listen on. This installation of nc is done via the RUN apk update && apk upgrade && apk add netcat-openbsd, running the services using Docker Compose.
Next, your Dockerfile will make a directory for the licensing service’s executable jar file and then copy the jar file from the local file system to a directory that was created on the Docker image. This is all done via the ADD licensing-service-0.0.1-SNAPSHOT.jar/usr/local/licensingservice/.
The next step in the provisioning process is to install the run.sh script via the ADD command. The run.sh script is a custom script I wrote that launches the target service when the Docker image is started. It uses the nc command to listen for the ports of any key service dependencies that the licensing service needs and then blocks until those dependencies are started.
The following listing shows how the run.sh is used to launch the licensing service.
Listing A.3. run.sh script used to launch the licensing service
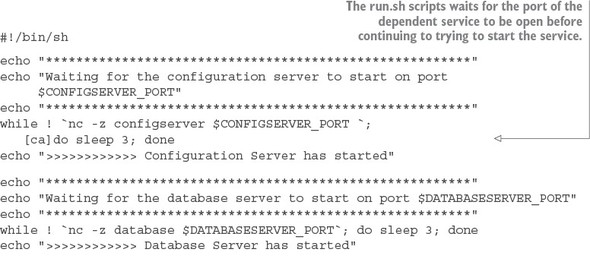
Once the run.sh command is copied to your licensing service Docker image, the CMD./run.sh Docker command is used to tell Docker to execute the run.sh launch script when the actual image starts.
Note
I’m giving you a high-level overview of how Docker provisions an image. If you want to learn more about Docker in depth, I suggest looking at Jeff Nickoloff’s Docker in Action (Manning, 2016) or Adrian Mouat’s Using Docker (O’Reilly, 2016). Both books are excellent Docker resources.
A.6. Launching the services with Docker Compose
After the Maven build has been executed, you can now launch all the services for the chapter by using Docker Compose. Docker Compose is installed as part of the Docker installation process. It’s a service orchestration tool that allows you to define services as a group and then launch together as a single unit. Docker Compose includes capabilities for also defining environment variables with each service.
Docker Compose uses a YAML file for defining the services that are going to be launched. Each chapter in this book has a file called “<<chapter>>/docker/common/docker-compose.yml”. This file contains the service definitions used to launch the services in the chapter. Let’s look at the docker-compose.yml file used in chapter 3. The following listing shows the contents of this file.
Listing A.4. The docker-compose.yml file defines the services that are to be launched

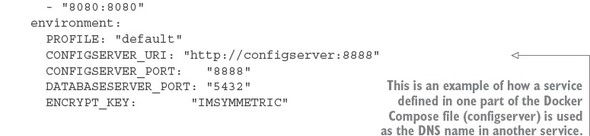
In the docker-compose.yml from listing A.4, we see three services being defined (configserver, database, and licensing service). Each service has a Docker image defined with it using the image tag. As each service starts, it will expose ports through the port tag and then pass environment variables to the starting Docker container via the environment tag.
Go ahead and start your Docker containers by executing the following command from the root of chapter directory pulled down from GitHub:
docker-compose –f docker/common/docker-compose.yml up
When this command is issued, docker-compose starts all the services defined in the docker-compose.yml file. Each service will print its standard out to the console. Figure A.2 shows the output from the docker-compose.yml file in chapter 3.
Figure A.2. All output from the started Docker containers is written to standard out.
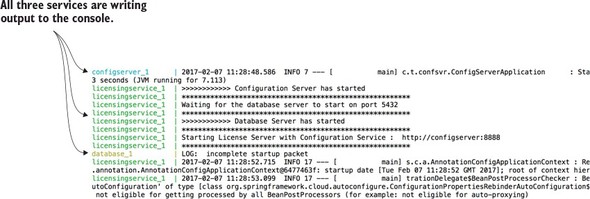
Tip
Every line written to standard out by a service started using Docker Compose will have the name of the service printed to standard out. When you’re launching a Docker Compose orchestration, finding errors being printed out can be painful. If you want to look at the output for a Docker-based service, start your docker-compose command in detached mode with the –d option (docker-compose -f docker/common/docker-compose.yml up –d). Then you can look at the specific logs for that container by issuing the docker-compose command with the logs option (docker-compose -f docker/common/docker-compose.yml logs -f licensingservice).
All the Docker containers used this in this book are ephemeral—they won’t retain their state when they’re started and stopped. Keep this in mind if you start playing with code and you see your data disappear after your restart your containers. If you want to make your Postgres database persistent between the starting and stopping of containers, I’d point you to the Postgres Docker notes (https://hub.docker.com/_/postgres/).