Table of Contents for
Spring Microservices in Action
 Spring Microservices in Action
Published by
Manning Publications, 2017
Spring Microservices in Action
Published by
Manning Publications, 2017
- Cover
- Spring Microservices in Action
- Copyright
- Spring Microservices in Action
- Brief Table of Contents
- Table of Contents
- Preface
- Acknowledgments
- About this Book
- About the Author
- About the Cover Illustration
- Chapter 1. Welcome to the cloud, Spring
- Chapter 2. Building microservices with Spring Boot
- Chapter 3. Controlling your configuration with Spring Cloud configuration server
- Chapter 4. On service discovery
- Chapter 5. When bad things happen: client resiliency patterns with Spring Cloud and Netflix Hystrix
- Chapter 6. Service routing with Spring Cloud and Zuul
- Chapter 7. Securing your microservices
- Chapter 8. Event-driven architecture with Spring Cloud Stream
- Chapter 9. Distributed tracing with Spring Cloud Sleuth and Zipkin
- Chapter 10. Deploying your microservices
- Appendix A. Running a cloud on your desktop
- Appendix B. OAuth2 grant types
- Index
- List of Figures
- List of Tables
- List of Listings
Chapter 7. Securing your microservices
- Learning why security matters in a microservice environment
- Understanding the OAuth2 standard
- Setting up and configuring a Spring-based OAuth2 service
- Performing user authentication and authorization with OAuth2
- Protecting your Spring microservice using OAuth2
- Propagating your OAuth2 access token between services
Security. The mention of the word will often cause an involuntary groan from the developer who hears it. You’ll hear them mutter and curse under their breath, “It’s obtuse, hard to understand, and even harder to debug.” Yet you won’t find any developer (except maybe for inexperienced developers) say that that they don’t worry about security.
A secure application involves multiple layers of protection, including
- Ensuring that the proper user controls are in place so that you can validate that a user is who they say they are and that they have permission to do what they’re trying to do
- Keeping the infrastructure the service is running on patched and up-to-date to minimize the risk of vulnerabilities.
- Implementing network access controls so that a service is only accessible through well-defined ports and accessible to a small number of authorized servers
This chapter is only going to deal with the first bullet point in this list: how to authenticate that the user calling your microservice is who they say they are and determine whether they’re authorized to carry out the action they’re requesting from your microservice. The other two topics are extremely broad security topics that are outside the scope of this book.
To implement authorization and authentication controls, you’re going to use Spring Cloud security and the OAuth2 (Open Authentication) standard to secure your Spring-based services. OAuth2 is a token-based security framework that allows a user to authenticate themselves with a third-party authentication service. If the user successfully authenticates, they will be presented a token that must be sent with every request. The token can then be validated back to the authentication service. The main goal behind OAuth2 is that when multiple services are called to fulfill a user’s request, the user can be authenticated by each service without having to present their credentials to each service processing their request. Spring Boot and Spring Cloud each provide an out-of-the-box implementation of an OAuth2 service and make it extremely easy to integrate OAuth2 security into your service.
Note
In this chapter, we’ll show you how to protect your microservices using OAuth2; however, a full-blown OAuth2 implementation also requires a front-web application to enter your user credentials. We won’t be going through how to set up the front-end application because that’s out of scope for a book on microservices. Instead, we’ll use a REST client, like POSTMAN, to simulate the presentation of credentials. For a good tutorial on how to configure your front-end application, I recommend you look at the following Spring tutorial: https://spring.io/blog/2015/02/03/sso-with-oauth2-angular-js-and-spring-security-part-v.
The real power behind OAuth2 is that it allows application developers to easily integrate with third-party cloud providers and do user authentication and authorization with those services without having to constantly pass the user’s credentials to the third-party service. Cloud providers such as Facebook, GitHub, and Salesforce all support OAuth2 as a standard.
Before we get into the technical details of protecting our services with OAuth2, let’s walk through the OAuth2 architecture.
7.1. Introduction to OAuth2
OAuth2 is a token-based security authentication and authorization framework that breaks security down into four components. These four components are
- A protected resource— This is the resource (in our case, a microservice) you want to protect and ensure that only authenticated users who have the proper authorization can access.
- A resource owner—A resource owner defines what applications can call their service, which users are allowed to access the service, and what they can do with the service. Each application registered by the resource owner will be given an application name that identifies the application along with an application secret key. The combination of the application name and the secret key are part of the credentials that are passed when authenticating an OAuth2 token.
- An application— This is the application that’s going to call the service on a behalf of a user. After all, users rarely invoke a service directly. Instead, they rely on an application to do the work for them.
- OAuth2 authentication server—The OAuth2 authentication server is the intermediary between the application and the services being consumed. The OAuth2 server allows the user to authenticate themselves without having to pass their user credentials down to every service the application is going to call on behalf of the user.
The four components interact together to authenticate the user. The user only has to present their credentials. If they successfully authenticate, they’re issued an authentication token that can be passed from service to service. This is shown in figure 7.1.
Figure 7.1. OAuth2 allows a user to authenticate without constantly having to present credentials.
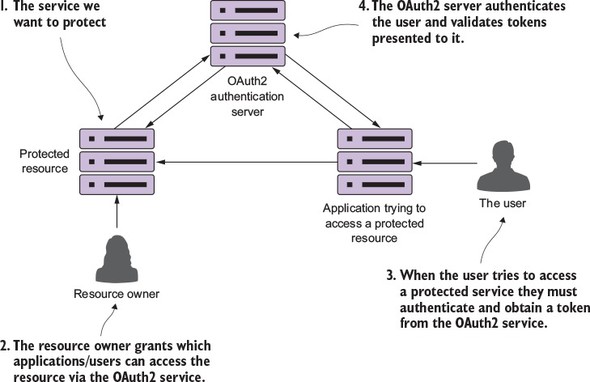
OAuth2 is a token-based security framework. A user authenticates against the OAuth2 server by providing their credentials along with the application that they’re using to access the resource. If the user’s credentials are valid, the OAuth2 server provides a token that can be presented every time a service being used by the user’s application tries to access a protected resource (the microservice).
The protected resource can then contact the OAuth2 server to determine the validity of the token and retrieve what roles a user has assigned to them. Roles are used to group related users together and to define what resources that group of users can access. For the purposes of this chapter, you’re going to use OAuth2 and roles to define what service endpoints and what HTTP verbs a user can call on an endpoint.
Web service security is an extremely complicated subject. You have to understand who’s going to call your services (internal users to your corporate network, external users), how they’re going to call your service (internal web-based client, mobile device, web application outside your corporate network), and what actions they’re going to take with your code. OAuth2 allows you to protect your REST-based services across these different scenarios through different authentication schemes called grants. The OAuth2 specification has four types of grants:
- Password
- Client credential
- Authorization code
- Implicit
We aren’t going to walk through each of these grant types or provide code examples for each grant type. That’s simply too much material to cover in one chapter. Instead, I’ll do the following:
- Discuss how your microservices service can use OAuth2 through one of the simpler OAuth2 grant types (the password grant type).
- Use JavaScript web tokens to provide a more robust OAuth2 solution and establish a standard for encoding information in a OAuth2 token.
- Walk through other security considerations that need to be taken into account when building microservices.
I do provide overview material on the other OAuth2 grant types in appendix B, “OAuth2 grant types.” If you’re interested in diving into more detail on the OAuth2 spec and how to implement all the grant types, I highly recommend Justin Richer and Antonio Sanso’s book, OAuth2 in Action (Manning, 2017), which is a comprehensive explanation of OAuth2.
7.2. Starting small: using Spring and OAuth2 to protect a single endpoint
To understand how to set up the authentication and authorization pieces of OAuth2, you’re going to implement the OAuth2 password grant type. To implement this grant, you’ll do the following:
- Set up a Spring-Cloud-based OAuth2 authentication service.
- Register a faux EagleEye UI application as an authorized application that can authenticate and authorize user identities with your OAuth2 service.
- Use OAuth2 password grant to protect your EagleEye services. You’re not going to build a UI for EagleEye, so instead you’ll simulate a user logging in to use POSTMAN to authenticate against your EagleEye OAuth2 service.
- Protect the licensing and organization service so that they can only be called by an authenticated user.
7.2.1. Setting up the EagleEye OAuth2 authentication service
Like all the examples in this book’s chapters, your OAuth2 authentication service is going to be another Spring Boot service. The authentication service will authenticate the user credentials and issue a token. Every time the user tries to access a service protected by the authentication service, the authentication service will validate that the OAuth2 token was issued by it and that it hasn’t expired. The authentication service will be the equivalent of the authentication service in figure 7.1.
To get started, you’re going to set up two things:
- The appropriate Maven build dependencies needed for your bootstrap class
- A bootstrap class that will act as an entry point to the service
You can find all code examples for the authentication service in the authentication-service directory. To set up an OAuth2 authentication server, you need the following Spring Cloud dependencies in the authentication-service/pom.xml file:
<dependency>
  <groupId>org.springframework.cloud</groupId>
  <artifactId>spring-cloud-security</artifactId>
</dependency>

<dependency>
  <groupId>org.springframework.security.oauth</groupId>
  <artifactId>spring-security-oauth2</artifactId>
</dependency>
The first dependency, spring-cloud-security, brings in the general Spring and Spring Cloud security libraries. The second dependency, spring-security-oauth2, pulls in the Spring OAuth2 libraries.
Now that the Maven dependencies are defined, you can work on the bootstrap class. This class can be found in the authentication-service/src/main/java/com/thoughtmechanix/authentication/Application.java class. The following listing shows the code for the Application.java class.
Listing 7.1. The authentication-service bootstrap class
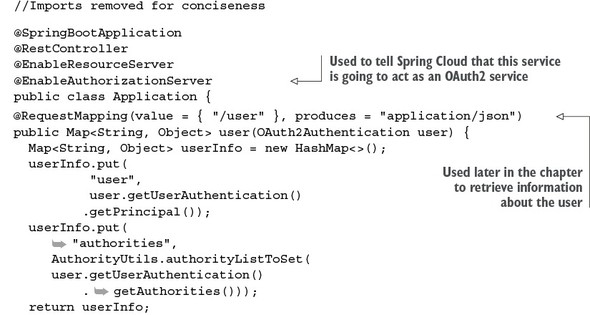

The first thing to note in this listing is the @EnableAuthorizationServer annotation. This annotation tells Spring Cloud that this service will be used as an OAuth2 service and to add several REST-based endpoints that will be used in the OAuth2 authentication and authorization processes.
The second thing you’ll see in listing 7.1 is the addition of an endpoint called /user (which maps to /auth/user). You’ll use this endpoint later in the chapter when you’re trying to access a service protected by OAuth2. This endpoint is called by the protected service to validate the OAuth2 access token and retrieve the assigned roles of the user accessing the protected service. I’ll discuss this endpoint in greater detail later in the chapter.
7.2.2. Registering client applications with the OAuth2 service
At this point you have an authentication service, but haven’t defined any applications, users, or roles within the authentication server. You can begin by registering the EagleEye application with your authentication service. To do this you’re going to set up an additional class in your authentication service called authentication-service/src/main/java/com/thoughtmechanix/authentication/security/OAuth2 Config.java.
This class will define what applications are registered with your OAuth2 authentication service. It’s important to note that just because an application is registered with your OAuth2 service, it doesn’t mean that the service will have access to any protected resources.
I’ve often found that developers “mix and match” the meaning of the terms authentication and authorization. Authentication is the act of a user proving who they are by providing credentials. Authorization determines whether a user is allowed to do what they’re trying to do. For instance, the user Jim could prove his identity by providing a user ID and password, but he may not be authorized to look at sensitive data such as payroll data. For the purposes of our discussion, a user must be authenticated before authorization takes place.
The OAuth2Config class defines what applications and the user credentials the OAuth2 service knows about. In the following listing you can see the OAuth2Config.java code.
Listing 7.2. OAuth2Config service defines what applications can use your service
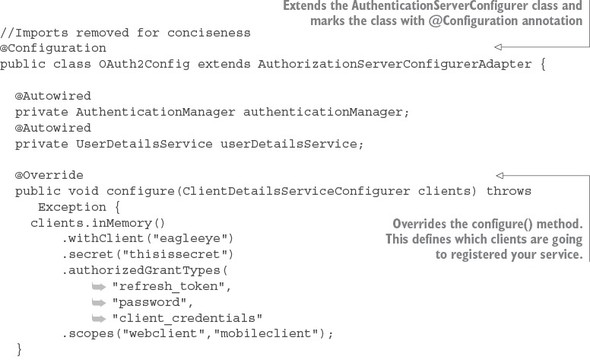
The first thing to notice in the code is that you’re extending Spring’s AuthenticationServerConfigurer class and then marking the class with a @Configuration annotation. The AuthenticationServerConfigurer class is a core piece of Spring Security. It provides the basic mechanisms for carrying out key authentication and authorization functions. For the OAuth2Config class you’re going to override two methods. The first method, configure(), is used to define what client applications are registered with your authentication service. The configure() method takes a single parameter called clients of type ClientDetails-ServiceConfigurer. Let’s start walking through the code in the configure() method in a little more detail. The first thing you do in this method is register which client applications are allowed to access services protected by the OAuth2 service. I’m using “access” here in the broadest terms, because you control what the users of the client applications can do later by checking whether the user that the service is being invoked for is authorized to take the actions they’re trying to take:
clients.inMemory()
    .withClient("eagleeye")
    .secret("thisissecret")
    .authorizedGrantTypes("password",
                            "client_credentials")
    .scopes("webclient","mobileclient");
"client_credentials")
.scopes("webclient","mobileclient");
The ClientDetailsServiceConfigurer class supports two different types of stores for application information: an in-memory store and a JDBC store. For the purposes of this example, you’re going to use the clients.inMemory() store.
The two method calls withClient() and secret() provide the name of the application (eagleeye) that you’re registering along with a secret (a password, thisissecret) that will be presented when the EagleEye application calls your OAuth2 server to receive an OAuth2 access token.
The next method, authorizedGrantTypes(), is passed a comma-separated list of the authorization grant types that will be supported by your OAuth2 service. In your service, you’ll support the password and client credential grants.
The scopes() method is used to define the boundaries that the calling application can operate in when they’re asking your OAuth2 server for an access token. For instance, Thoughtmechanix might offer two different versions of the same application, a web-based application and a mobile phone based application. Each of these apps can use the same client name and secret key to ask for access to resources protected by the OAuth2 server. However, when the apps ask for a key, they need to define the specific scope they are operating in. By defining the scope, you can write authorization rules specific to the scope the client application is working in.
For instance, you might have a user who can access the EagleEye application with both the web-based client and the mobile-phone of the application. Each version of the application does the following:
- Offers the same functionality
- Is a “trusted application” where ThoughtMechanix owns both the EagleEye front-end applications and the end user services
Thus you’re going to register the EagleEye application with the same application name and secret key, but the web application will only use the “webclient” scope while the mobile phone version of the application will use the “mobileclient” scope. By using scope, you can then define authorization rules in your protected services that can limit what actions a client application can take based on the application they are logging in with. This will be regardless of what permissions the user has. For example, you might want to restrict what data a user can see based on whether they’re using a browser inside the corporate network versus browsing using an application on a mobile device. The practice of restricting data based on the access mechanism of the data is common when dealing with sensitive customer information (such as health records or tax information).
At this point you’ve registered a single application, EagleEye, with your OAuth2 server. However, because you’re using a password grant, you need to set up user accounts and passwords for those users before you start.
7.2.3. Configuring EagleEye users
You’ve defined and stored application-level key names and secrets. You’re now going to set up individual user credentials and the roles that they belong to. User roles will be used to define the actions a group of users can do with a service.
Spring can store and retrieve user information (the individual user’s credentials and the roles assigned to the user) from an in-memory data store, a JDBC-backed relational database, or an LDAP server.
Note
I want to be careful here in terms of definition. The OAuth2 application information for Spring can store its data in an in-memory or relational database. The Spring user credentials and security roles can be stored in an in-memory database, relational database, or LDAP (Active Directory) server. To keep things simple because our primary purpose is to walk through OAuth2, you’re going to use an in-memory data store.
For the code examples in this chapter, you’re going to define user roles using an in-memory data store. You’re going to define two user accounts: john.carnell and william.woodward. The john.carnell account will have the role of USER and the william.woodward account will have the role of ADMIN.
To configure your OAuth2 server to authenticate user IDs, you have to set up a new class: authentication-service/src/main/com/thoughtmechanix/authentication/security/WebSecurityConfigurer.java. The following listing shows the code for this class.
Listing 7.3. Defining the User ID, password and roles for your application
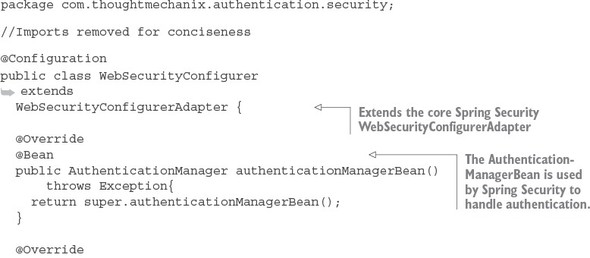
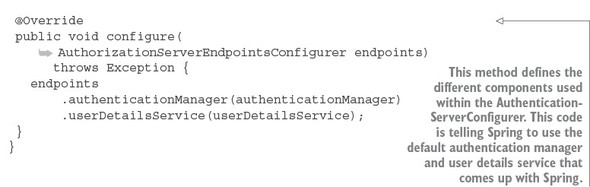
Like other pieces of the Spring Security framework, to set up users (and their roles), start by extending the WebSecurityConfigurerAdapter class and mark it with the @Configuration annotation. Spring Security is implemented in a fashion similar to how you snap Lego blocks together to build a toy car or model. As such, you need to provide the OAuth2 server a mechanism to authenticate users and return the user information about the authenticating user. This is done by defining two beans in your Spring WebSecurityConfigurerAdapter implementation: authentication-ManagerBean() and userDetailsServiceBean(). These two beans are exposed by using the default authentication authenticationManagerBean() and user-DetailsServiceBean() methods from the parent WebSecurityConfigurerAdapter class.
As you’ll remember from listing 7.2, these beans are injected into the configure--(AuthorizationServerEndpointsConfigurer endpoints) method shown in the OAuth2Config class:
public void configure( AuthorizationServerEndpointsConfigurer endpoints)
These two beans are used to configure the /auth/oauth/token and /auth/user endpoints that we’ll see in action shortly.
7.2.4. Authenticating the user
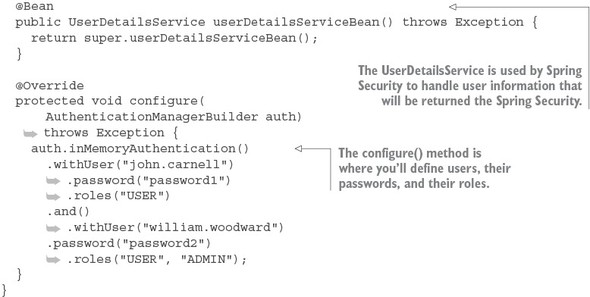
At this point you have enough of your base OAuth2 server functionality in place to perform application and user authentication for the password grant flow. Now you’ll simulate a user acquiring an OAuth2 token by using POSTMAN to POST to the http://localhost:8901/auth/oauth/token endpoint and provide the application, secret key, user ID, and password.
First, you need to set up POSTMAN with the application name and secret key. You’re going to pass these elements to your OAuth2 server endpoint using basic authentication. Figure 7.2 shows how POSTMAN is set up to execute a basic authentication call.
Figure 7.2. Setting up basic authentication using the application key and secret
However, you’re not ready to make the call to get the token yet. Once the application name and secret key are configured, you need to pass in the following information in the service as HTTP form parameters:
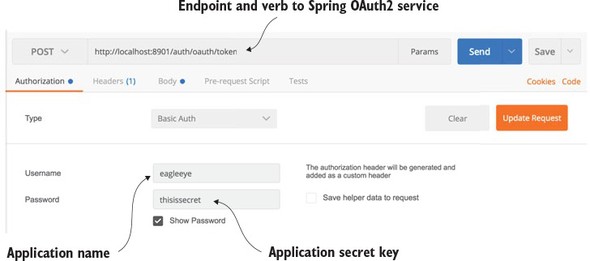
- grant_type—The OAuth2 grant type you’re executing. In this example, you’ll use a password grant.
- Scope—The applications scope. Because you only defined two legitimate scopes when you registered the application (webclient and mobileclient) the value passed in must be one of these two scopes.
- Username—Name of the user logging in.
- Password—Password of the user logging in.
Unlike other REST calls in this book, the parameters in this list will not be passed in as a JavaScript body. The OAuth2 standard expects all parameters passed to the token generation endpoint to be HTTP form parameters. Figure 7.3 shows how HTTP form parameters are configured for your OAuth2 call.
Figure 7.3. When requesting a OAuth2 token, the user’s credentials are passed in as HTTP form Parameters to the /auth/oauth/token endpoint.
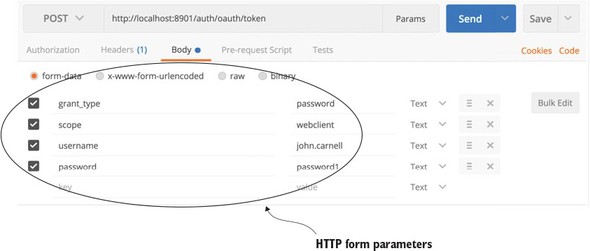
Figure 7.4 shows the JavaScript payload that’s returned from the /auth/oauth/token call.
Figure 7.4. Payload returned after a successful client credential validation

The payload returned contains five attributes:
- access_token—The OAuth2 token that will be presented with each service call the user makes to a protected resource.
- token_type—The type of token. The OAuth2 specification allows you to define multiple token types. The most common token type used is the bearer token. We won’t cover any of the other token types in this chapter.
- refresh_token—Contains a token that can be presented back to the OAuth2 server to reissue a token after it has been expired.
- expires_in—This is the number of seconds before the OAuth2 access token expires. The default value for authorization token expiration in Spring is 12 hours.
- Scope—The scope that this OAuth2 token is valid for.
Now that you have a valid OAuth2 access token, we can use the /auth/user endpoint that you created in your authentication service to retrieve information about the user associated with the token. Later in the chapter, any services that are going to be protected resources will call the authentication service’s /auth/user endpoint to validate the token and retrieve the user information.
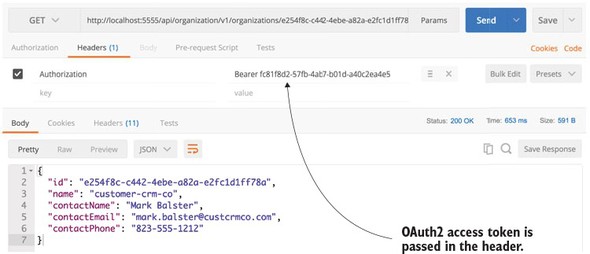
Figure 7.5 shows what the results would be if you called the /auth/user endpoint. As you look at figure 7.5, notice how the OAuth2 access token is passed in as an HTTP header.
Figure 7.5. Looking up user information based on the issued OAuth2 token
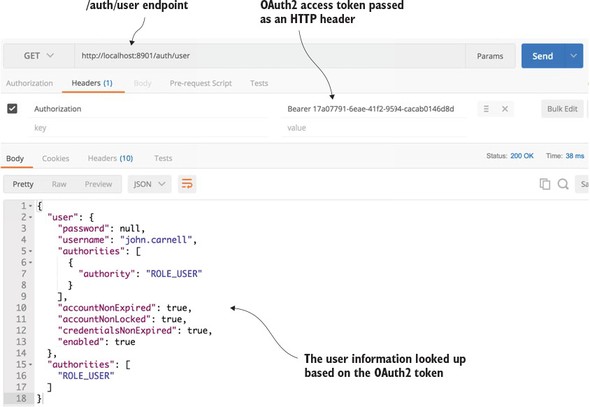
In figure 7.5 you’re issuing a HTTP GET against the /auth/user endpoint. However, any time you call an OAuth2 protected endpoint (including the OAuth2 /auth/user endpoint) you need to pass along the OAuth2 access token. To do this, always create an HTTP header called Authorization and with a value of Bearer XXXXX. In the case of your call in figure 7.5, the HTTP header will be of the value Bearer e9decabc-165b-4677-9190-2e0bf8341e0b. The access token passed in is the access token returned when you called the /auth/oauth/token endpoint in figure 7.4.
If the OAuth2 access token is valid, the /auth/user endpoint will return information about the user, including what roles are assigned to them. For instance, from figure 7.10, you can see that the user john.carnell has the role of USER.
Note
Spring assigns the prefix of ROLE_to user’s roles, so ROLE_USER means that john.carnell has the USER role.
7.3. Protecting the organization service using OAuth2
Once you’ve registered an application with your OAuth2 authentication service and set up individual user accounts with roles, you can begin exploring how to protect a resource using OAuth2. While the creation and management of OAuth2 access tokens is the responsibility of the OAuth2 server, in Spring, the definition of what user roles have permissions to do what actions occurs at the individual service level.
To set up a protected resource, you need to take the following actions:
- Add the appropriate Spring Security and OAuth2 jars to the service you’re protecting
- Configure the service to point to your OAuth2 authentication service
- Define what and who can access the service
Let’s start with one of the simplest examples of setting up a protected resource by taking your organization service and ensuring that it can only be called by an authenticated user.
7.3.1. Adding the Spring Security and OAuth2 jars to the individual services
As usual with Spring microservices, you have to add a couple of dependencies to the organization service’s Maven organization-service/pom.xml file. Two dependencies are being added: Spring Cloud Security and Spring Security OAuth2. The Spring Cloud Security jars are the core security jars. They contain framework code, annotation definitions, and interfaces for implementing security within Spring Cloud. The Spring Security OAuth2 dependency contains all the classes needed to implement an OAuth2 authentication service. The maven entries for these two dependencies are
<dependency>
  <groupId>org.springframework.cloud</groupId>
  <artifactId>spring-cloud-security</artifactId>
</dependency>
<dependency>
  <groupId>org.springframework.security.oauth</groupId>
  <artifactId>spring-security-oauth2</artifactId>
</dependency>
7.3.2. Configuring the service to point to your OAuth2 authentication service
Remember that once you set up the organization service as a protected resource, every time a call is made to the service, the caller has to include the Authentication HTTP header containing an OAuth2 access token to the service. Your protected resource then has to call back to the OAuth2 service to see if the token is valid.
You define the callback URL in your organization service’s application.yml file as the property security.oauth2.resource.userInfoUri. Here’s the callback configuration used in the organization service’s application.yml file.
security:
 oauth2:
  resource:
    userInfoUri: http://localhost:8901/auth/user
As you can see from the security.oauth2.resource.userInfoUri property, the callback URL is to the /auth/user endpoint. This endpoint was discussed earlier in the chapter in section 7.2.4, “Authenticating the user.”
Finally, you also need to tell the organization service that it’s a protected resource. Again, you do this by adding a Spring Cloud annotation to the organization service’s bootstrap class. The organization service’s bootstrap code is shown in the next listing and can be found in the organization-service/src/main/java/com/thoughtmechanix/organization/Application.java class.
Listing 7.4. Configuring the bootstrap class to be a protected resource
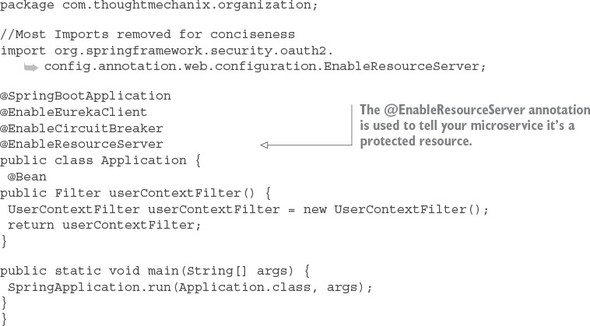
The @EnableResourceServer annotation tells Spring Cloud and Spring Security that the service is a protected resource. The @EnableResourceServer enforces a filter that intercepts all incoming calls to the service, checks to see if there’s an OAuth2 access token present in the incoming call’s HTTP header, and then calls back to the callback URL defined in the security.oauth2.resource.userInfoUri to see if the token is valid. Once it knows the token is valid, the @EnableResourceServer annotation also applies any access control rules over who and what can access a service.
7.3.3. Defining who and what can access the service
You’re now ready to begin defining the access control rules around the service. To define access control rules, you need to extend a Spring ResourceServerConfigurerAdapter class and override the classes configure() method. In the organization service, your ResourceServerConfiguration class is located in organization service/src/main/java/com/thoughtmechanix/organization/security/ResourceServerConfiguration.java. Access rules can range from extremely coarse-grained (any authenticated user can access the entire service) to fine-grained (only the application with this role, accessing this URL through a DELETE is allowed).
We discuss every permutation of Spring Security’s access control rules, but we can look at several of the more common examples. These examples include protecting a resource so that
- Only authenticated users can access a service URL
- Only users with a specific role can access a service URL
Protecting a service by an authenticated user
The first thing you’re going to do is protect the organization service so that it can only be accessed by an authenticated user. The following listing shows how you can build this rule into the ResourceServerConfiguration.java class.
Listing 7.5. Restricting access to only authenticated users
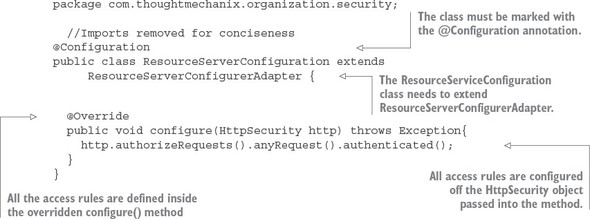
All access rules are going to be defined inside the configure() method. You’ll use the HttpSecurity class passed in by Spring to define your rules. In this example, you’re going to restrict all access to any URL in the organization service to authenticated users only.
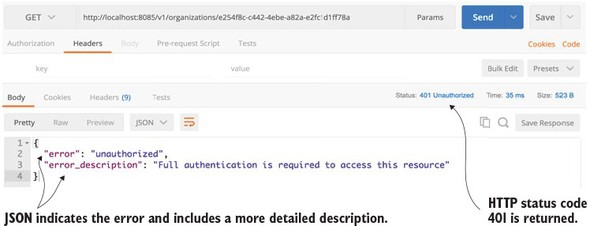
If you were to access the organization service without an OAuth2 access token present in the HTTP header, you’d get a 401 HTTP response code along with a message indicating that a full authentication to the service is required.
Figure 7.6 shows the output of a call to the organization service without the OAuth2 HTTP header.
Figure 7.6. Trying to call the organization service will result in a failed call.
Next, you’ll call the organization service with an OAuth2 access token. To get an access token, see section 7.2.4, “Authenticating the user,” on how to generate the OAuth2 token. You want to cut and paste the value of the access_token field from the returned JavaScript call out to the /auth/oauth/token endpoint and use it in your call to the organization service. Remember, when you call the organization service, you need to add an HTTP header called Authorization with the value Bearer access_token value.
Figure 7.7 shows the callout to the organization service, but this time with an OAuth2 access token passed to it.
Figure 7.7. Passing in the OAuth2 access token on the call to the organization service
This is probably one of the simplest use cases for protecting an endpoint using OAuth2. Next, you’ll build on this and restrict access to a specific endpoint to a specific role.
Protecting a service via a specific role
In the next example, you’re going to lock down the DELETE call on your organization service to only those users with ADMIN access. As you’ll remember from section 7.2.3, “Configuring some EagleEye Users,” you created two user accounts that could access EagleEye services: john.carnell and william.woodward. The john.carnell account had the role of USER assigned to it. The william.woodward account had the USER role and the ADMIN role.
The following listing shows how to set up the configure() method to restrict access to the DELETE endpoint to only those authenticated users who have the ADMIN role.
Listing 7.6. Restricting deletes to the ADMIN role only
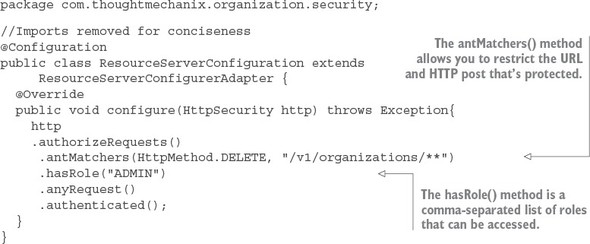
In listing 7.6 you’re restricting the DELETE call on any endpoint starting with /v1/organizations in your service to the ADMIN role.:
.authorizeRequests()
  .antMatchers(HttpMethod.DELETE, "/v1/organizations/**")
  .hasRole("ADMIN")
The antMatcher() method can take a comma-separated list of endpoints. These endpoints can use a wildcard style notation for defining the endpoints you want to access. For instance, if you want to restrict any of the DELETE calls regardless of the version in the URL name, you could use a * in place of the version number in your URL definitions:
.authorizeRequests()
  .antMatchers(HttpMethod.DELETE, "/*/organizations/**")
.hasRole("ADMIN")
The last part of the authorization rule definition still defines that any other endpoint in your service needs to be access by an authenticated user:
.anyRequest()
.authenticated();
Now, if you were to get an OAuth2 token for the user john.carnell (password: password1) and try to call the DELETE endpoint for the organization service (http://-localhost:8085/v1/organizations/e254f8c-c442-4ebe-a82a-e2fc1d1ff78a), you’d get a 401 HTTP status code on the call and an error message indicating that the access was denied. The JavaScript text returned by your call would be
{
 "error": "access_denied",
 "error_description": "Access is denied"
}
If you tried the exact same call using the william.woodward user account (password: password2) and its OAuth2 token, you’d see a successful call would returned (a HTTP Status Code 204 – Not Content), and that organization would be deleted by the organization service.
At this point we’ve looked at two simple examples of calling and protecting a single service (the organization service) with OAuth2. However, often in a microservices environment, you’re going to have multiple service calls used to carry out a single transaction. In these types of situations, you need to ensure that that the OAuth2 access token is propagated from service call to service call.
7.3.4. Propagating the OAuth2 access token
To demonstrate propagating an OAuth2 token between services, we’re now going to see how to protect your licensing service with OAuth2. Remember, the licensing service calls the organization service to lookup information. The question becomes, how do you propagate the OAuth2 token from one service to another?
You’re going to set up a simple example where you’re going to have the licensing service call the organization service. Building on the examples from chapter 6, both services are running behind a Zuul gateway.
Figure 7.8 shows the basic flow of how an authenticated user’s OAuth2 token is going to flow through the Zuul gateway, to the licensing service, and then down to the organization service.
Figure 7.8. The OAuth2 token has to be carried throughout the entire call chain.
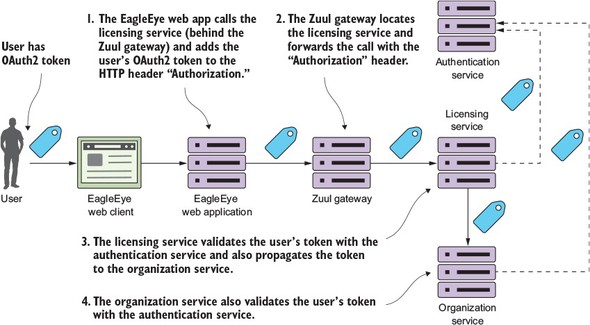
The following activity occurs in figure 7.8:
- The user has already authenticated against the OAuth2 server and places a call to the EagleEye web application. The user’s OAuth2 access token is stored in the user’s session. The EagleEye web application needs to retrieve some licensing data and will make a call to the licensing service REST endpoint. As part of the call to the licensing REST endpoint, the EagleEye web application will add the OAuth2 access token via the HTTP Header “Authorization”. The licensing service is only accessible behind a Zuul services gateway.
- Zuul will look up the licensing service endpoint and then forward the call onto one of the licensing services servers. The services gateway will need to copy the “Authorization” HTTP header from the incoming call and ensure that the “Authorization” HTTP header is forwarded onto the new endpoint.
- The licensing service will receive the incoming call. Because the licensing service is a protected resource, the licensing service will validate the token with EagleEye’s OAuth2 service and then check the user’s roles for the appropriate permissions. As part of its work, the licensing service invokes the organization service. In doing this call, the licensing service needs to propagate the user’s OAuth2 access token to the organization service.
- When the organization service receives the call, it will again take the “Authorization” HTTP header token and validate the token with the EagleEye OAuth2 server.
To implement these flows, you need to do two things. First, you need to modify your Zuul services gateway to propagate the OAuth2 token to the licensing service. By default, Zuul won’t forward sensitive HTTP headers such as Cookie, Set-Cookie, and Authorization to downstream services. To allow Zuul to propagate the “Authorization” HTTP header, you need to set the following configuration in your Zuul services gateway’s application.yml or Spring Cloud Config data store:
zuul.sensitiveHeaders: Cookie,Set-Cookie
This configuration is a blacklist of the sensitive headers that Zuul will keep from being propagated to a downstream service. The absence of the Authorization value in the previous list means Zuul will allow it through. If you don’t set the zuul.sensitiveHeaders property at all, Zuul will automatically block all three values from being propagated (Cookie, Set-Cookie, and Authorization).
Zuul can automatically propagate downstream OAuth2 access tokens and authorize incoming requests against the OAuth2 service by using the @EnableOAuth2Sso annotation. I purposely haven’t used this approach because my goal in this chapter is to show the basics of how OAuth2 works without adding another level of complexity (or debugging). While the configuration of the Zuul service’s gateway isn’t overly complicated, it would have added significantly more content to an already large chapter. If you’re interested in having a Zuul services gateway participate in Single Sign On (SSO), the Spring Cloud Security documentation has a short but comprehensive tutorial that covers the setup of the Spring server (http://cloud.spring.io/spring-cloud-security/spring-cloud-security.html).
The next thing you need to do is configure your licensing service to be an OAuth2 resource service and set up any authorization rules you want for the service. We’re not going to discuss in detail the licensing service configuration because we already discussed authorization rules in section 7.3.3, “Defining who and what can access the service.”
Finally, all you need to do is modify how the code in the licensing service calls the organization service. You need to ensure that the “Authorization” HTTP header is injected into the application call out to the Organization service. Without Spring Security, you’d have to write a servlet filter to grab the HTTP header off the incoming licensing service call and then manually add it to every outbound service call in the licensing service. Spring OAuth2 provides a new Rest Template class that supports OAuth2 calls. The class is called OAuth2RestTemplate. To use the OAuth2Rest-Template class you first need to expose it as a bean that can be auto-wired into a service calling another OAuth2 protected services. You do this in the licensing-service/src/main/java/com/thoughtmechanix/licenses/-Application.java class:
@Bean
 public OAuth2RestTemplate oauth2RestTemplate(
        OAuth2ClientContext oauth2ClientContext,
        OAuth2ProtectedResourceDetails details) {
        return new OAuth2RestTemplate(details, oauth2ClientContext);
    }
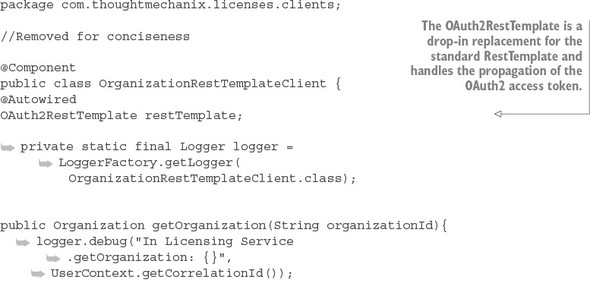
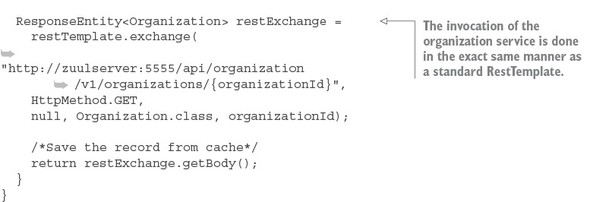
To see the OAuth2RestTemplate class in action you can look in the licensing--service/src/main/java/com/thoughtmechanix/licenses/clients/OrganizationRestTemplate.java class. The following listing shows how OAuth2 RestTemplate is auto-wired into this class.
Listing 7.7. Using the OAuth2RestTemplate to propagate the OAuth2 access token
7.4. JavaScript Web Tokens and OAuth2
OAuth2 is a token-based authentication framework, but ironically it doesn’t provide any standards for how the tokens in its specification are to be defined. To rectify the lack of standards around OAuth2 tokens, a new standard is emerging called JavaScript Web Tokens (JWT). JWT is an open standard (RFC-7519) proposed by the Internet Engineering Task Force (IETF) that attempts to provide a standard structure for OAuth2 tokens. JWT tokens are
- Small— JWT tokens are encoded to Base64 and can be easily passed via a URL, HTTP header, or an HTTP POST parameter.
- Cryptographically signed— A JWT token is signed by the authenticating server that issues it. This means you can be guaranteed that the token hasn’t been tampered with.
- Self-contained— Because a JWT token is cryptographically signed, the microservice receiving the service can be guaranteed that the contents of the token are valid. There’s no need to call back to the authenticating service to validate the contents of the token because the signature of the token can be validated and the contents (such as the expiration time of the token and the user information) can be inspected by the receiving microservice.
- Extensible— When an authenticating service generates a token, it can place additional information in the token, before the token is sealed. A receiving service can decrypt the token payload and retrieve that additional context out of it.
Spring Cloud Security supports JWT out of the box. However, to use and consume JWT tokens, your OAuth2 authentication service and the services being protected by the authentication service must be configured in a different fashion. The configuration isn’t difficult, so let’s walk through the change.
Note
I’ve chosen to keep the JWT configuration on a separate branch (called JWT_Example) in the GitHub repository for this chapter (https://github.com/carnellj/spmia-chapter7) because the standard Spring Cloud Security OAuth2 configuration and JWT-based OAuth2 configuration require different configuration classes.
7.4.1. Modifying the authentication service to issue JavaScript Web Tokens
For both the authentication service and the two microservices (licensing and organization service) that are going to be protected by OAuth2, you’ll need to add a new Spring Security dependency to their Maven pom.xml files to include the JWT OAuth2 libraries. This new dependency is
<dependency>
    <groupId>org.springframework.security</groupId>
    <artifactId>spring-security-jwt</artifactId>
</dependency>
After the Maven dependency is added, you need to first tell your authentication service how it’s going to generate and translate JWT tokens. To do this, you’re going to set up in the authentication service a new configuration class called authentication--service/src/java/com/thoughtmechanix/authentication/security/JWT TokenStoreConfig.java. The following listing shows the code for the class.
Listing 7.8. Setting up the JWT token store
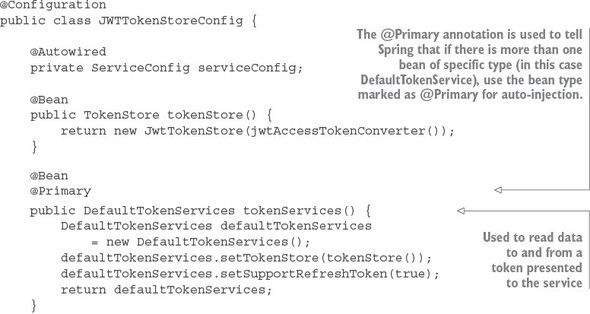
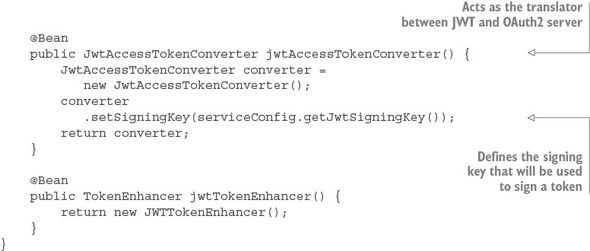
The JWTTokenStoreConfig class is used to define how Spring will manage the creation, signing, and translation of a JWT token. The tokenServices() method is going to use Spring security’s default token services implementation, so the work here is rote. The jwtAccessTokenConverter() method is the one we want to focus on. It defines how the token is going to be translated. The most important thing to note about this method is that you’re setting the signing key that will be used to sign your token.
For this example, you’re going to use a symmetrical key, which means both the authentication service and the services protected by the authentication service must share the same key between all of the services. The key is nothing more than a random string of values that’s store in the authentication services Spring Cloud Config entry (https://github.com/carnellj/config-repo/blob/master/authenticationservice/authenticationservice.yml). The actual value for the signing key is
signing.key: "345345fsdgsf5345"
Note
Spring Cloud Security supports symmetrical key encryption and asymmetrical encryption using public/private keys. We’re not going to walk through setting up JWT using public/private keys. Unfortunately, little official documentation exists on the JWT, Spring Security, and public/private keys. If you’re interested in how to do this, I highly recommend you look at Baeldung.com (http://www.baeldung.com/spring-security-oauth-jwt). They do an excellent job of explaining JWT and public/private key setup.
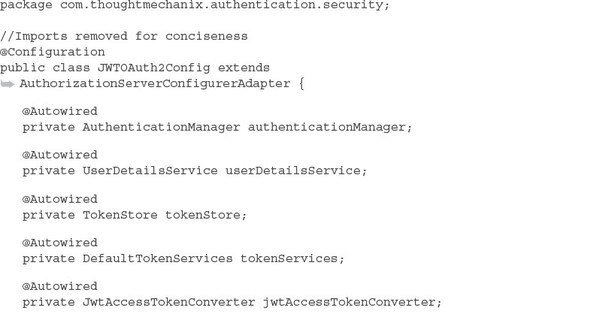
In the JWTTokenStoreConfig from listing 7.8, you defined how JWT tokens were going to be signed and created. You now need to hook this into your overall OAuth2 service. In listing 7.2 you used the OAuth2Config class to define the configuration of your OAuth2 service. You set up the authentication manager that was going to be used by your service along with the application name and secrets. You’re going to replace the OAuth2Config class with a new class called authentication--service/src/main/java/com/thoughtmechanix/authentication/security/JWTOAuth2Config.java.
The following listing shows code for the JWTOAuth2Config class.
Listing 7.9. Hooking JWT into your authentication service via the JWTOAuth2Config class

Now, if you rebuild your authentication service and restart it, you should see a JWT-based token returned. Figure 7.9 shows the results of your call to the authentication service now that it uses JWT.
Figure 7.9. The access and refresh tokens from your authentication call are now JWT tokens.
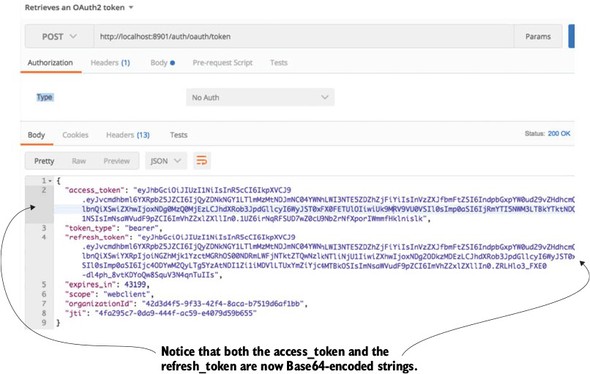
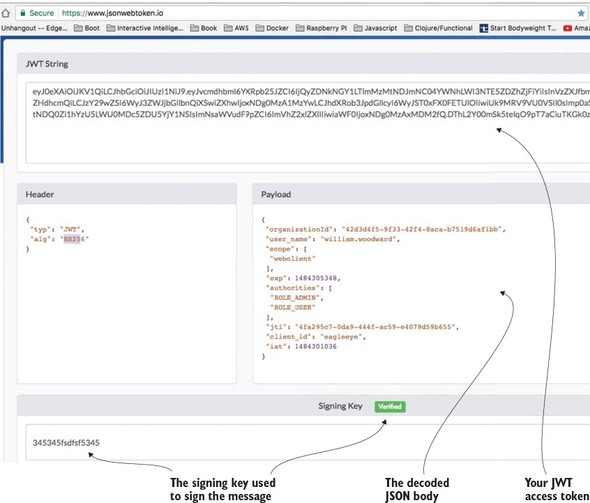
The actual token itself isn’t directly returned as JavaScript. Instead, the JavaScript body is encoded using a Base64 encoding. If you’re interested in seeing the contents of a JWT token, you can use online tools to decode the token. I like to use an online tool from a company called Stormpath. Their tool, http://jsonwebtoken.io, is an online JWT decoder. Figure 7.10 shows the output from the decoded token.
Figure 7.10. Using http://jswebtoken.io allows you to decode the contents.
Note
It’s extremely important to understand that your JWT tokens are signed, but not encrypted. Any online JWT tool can decode the JWT token and expose its contents. I bring this up because the JWT specification does allow you extend the token and add additional information to the token. Don’t expose sensitive or Personally Identifiable Information (PII) in your JWT tokens.
7.4.2. Consuming JavaScript Web Tokens in your microservices
You now have your OAuth2 authentication service creating JWT tokens. The next step is to configure your licensing and organization services to use JWT. This is a trivial exercise that requires you to do two things:
- Add the spring-security-jwt dependency to both the licensing service and the organization service’s pom.xml file. (See the beginning of section 7.4.1, “Modifying the authentication service to issue JavaScript Web Tokens,” for the exact Maven dependency that needs to be added.)
- Set up a JWTTokenStoreConfig class in both the licensing and organization services. This class is almost the exact same class used the authentication service (see listing 7.8). I’m not going to go over the same material again, but you can see examples of the JWTTokenStoreConfig class in both the licensing-service/src/main/com/thoughtmechanix/licensing-service/security/JWTTokenStoreConfig.java and organization-service/src/main/com/thoughtmechanix/organization-service/security/JWTTokenStoreConfig.java classes.
You need to do one final piece of work. Because the licensing service calls the organization service, you need to ensure that the OAuth2 token is propagated. This is normally done via the OAuth2RestTemplate class; however, the OAuth2RestTemplate class doesn’t propagate JWT-based tokens. To make sure that your licensing service does this, you need to add a custom RestTemplate bean that will perform this injection for you. This custom RestTemplate can found in the licensing-service/src/main/java/com/thoughtmechanix/licenses/Application.java class. The following listing shows this custom bean definition.
Listing 7.10. Creating a custom RestTemplate class to inject the JWT token
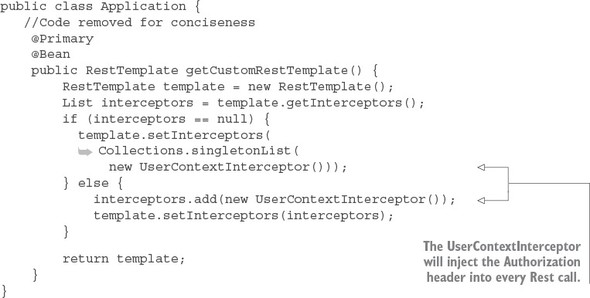
In the previous code you’re defining a custom RestTemplate bean that will use a ClientHttpRequestInterceptor. Recall from chapter 6 that the Client-Http-RequestInterceptor is a Spring class that allows you to hook in functionality to be executed before a REST-based call is made. This interceptor class is a variation of the UserContextInterceptor class you defined in chapter 6. This class is in the licensing-service/src/main/java/com/thoughtmechanix/licenses/utils/UserContextInterceptor.java. The following listing shows this class.
Listing 7.11. The UserContextInterceptor will inject the JWT token into your REST calls
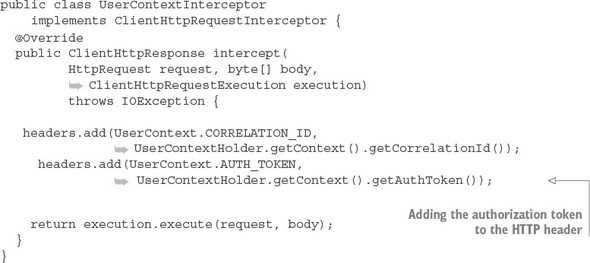
The UserContextInterceptor is using several of the utility classes from chapter 6. Remember, every one of your service uses a custom servlet filter (called User-ContextFilter) to parse out the authentication token and correlation ID from the HTTP header. In listing 7.11, you’re using the UserContext.AUTH_TOKEN value already parsed to populate the outgoing HTTP call.
That’s it. With these pieces in place, you can now call the licensing service (or organization service) and place the Base64-encoded JWT encoded in your HTTP Authorization header the value Bearer <<JWT-Token>>, and your service will properly read and validate the JWT token.
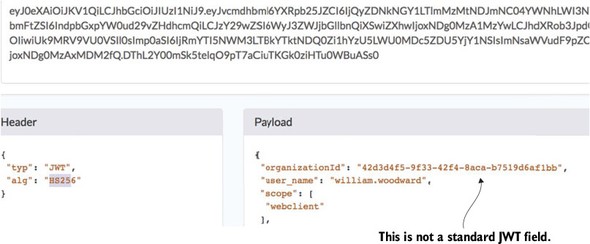
7.4.3. Extending the JWT Token
If you look closely at the JWT token in figure 7.10, you’ll notice the EagleEye organizationId field. (Figure 7.11 shows a more zoomed-in shot of the JWT Token shown earlier in figure 7.10.) This isn’t a standard JWT token field. It’s one I added by injecting a new field into the JWT token as it was being created.
Figure 7.11. An example of extending the JWT token with a organizationId
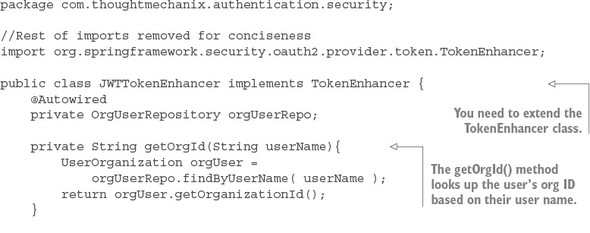
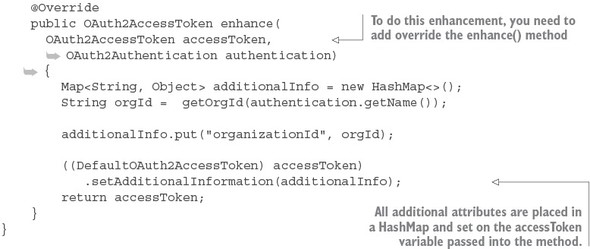
Extending a JWT token is easily done by adding a Spring OAuth2 token enhancer class to your authentication service. The source for this class can found in the authentication-service/src/main/java/com/thoughtmechanix/authentication/security/JWTTokenEnhancer.java class. The following listing shows this code.
Listing 7.12. Using a JWT token enhancer class to add a custom field
The last thing you need to do is tell your OAuth2 service to use your JWTToken-Enhancer class. You first need to expose a Spring bean for your JWTTokenEnhancer class. Do this by adding a bean definition to the JWTTokenStoreConfig class that was defined in listing 7.8:
package com.thoughtmechanix.authentication.security;

@Configuration
public class JWTTokenStoreConfig {
    //Rest of class removed for conciseness
    @Bean
    public TokenEnhancer jwtTokenEnhancer() {
        return new JWTTokenEnhancer();
    }
}
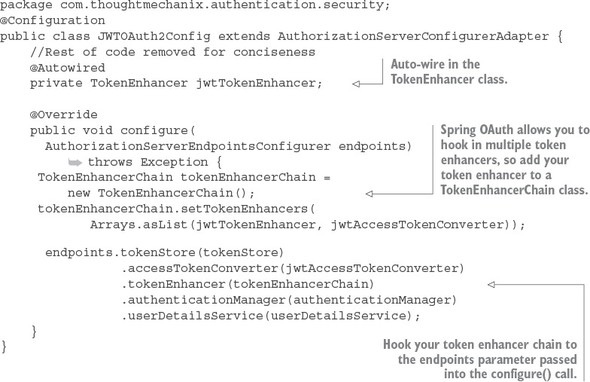
Once you’ve exposed the JWTTokenEnhancer as a bean, you can hook it into the JWTOAuth2Config class from listing 7.9. This is done in the configure() method of the class. The following listing shows the modification to the configure() method of the JWTOAuth2Config class.
Listing 7.13. Hooking in your TokenEnhancer
At this point you’ve added a custom field to your JWT token. The next question you should have is, “How do I parse a custom field out of a JWT token?”
7.4.4. Parsing a custom field out of a JavaScript token
We’re going to turn to your Zuul gateway for an example of how to parse out a custom field in the JWT token. Specifically, you’re going to modify the TrackingFilter class we introduced in chapter 6 to decode the organizationId field out of the JWT token flowing through gateway.
To do this you’re going to pull in a JWT parser library and add to the Zuul server’s pom.xml file. Multiple token parsers are available and I chose the JJWT library (https://-github.com/jwtk/jjwt) to do the parsing. The Maven dependency for the library is
<dependency>
  <groupId>io.jsonwebtoken</groupId>
  <artifactId>jjwt</artifactId>
  <version>0.7.0</version>
</dependency>
Once the JJWT library is added, you can add a new method to your zuulsvr/src/main/java/com/thoughtmechanix/zuulsvr/filters/TrackingFilter.java class called get-OrganizationId(). The following listing shows this new method.
Listing 7.14. Parsing the organizationId out of your JWT Token
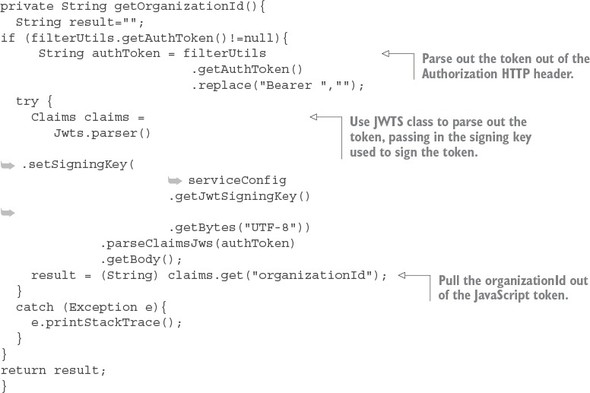
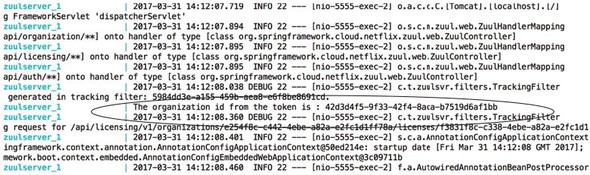
Once the getOrganizationId() function is implemented, you added a System.out.println to the run() method on the TrackingFilter to print out the organizationId parsed from your JWT token that’s flowing through the Zuul gateway, so you call any gateway-enabled REST endpoint. I used GET http://localhost:5555/api/licensing/v1/organizations/e254f8c-c442-4ebe-a82a-e2fc1d1ff78a/licenses/f3831f8c-c338-4ebe-a82a-e2fc1d1ff78a. Remember, when you make this call, you still need to set up all the HTTP form parameters and the HTTP authorization header to include the Authorization header and the JWT token.
Figure 7.12 shows the output to the command-line console displaying your parsed organizationId.
Figure 7.12. The Zuul server parses out the organization ID from the JWT token as it passes through.
7.5. Some closing thoughts on microservice security
While this chapter has introduced you to the OAuth2 specification and how you can use Spring Cloud security to implement an OAuth2 authentication service, OAuth2 is only one piece of the microservice security puzzle. As you build your microservices for production use, you should be building your microservices security around the following practices:
- Use HTTPS/Secure Sockets Layer (SSL) for all service communication.
- All service calls should go through an API gateway.
- Zone your services into a public API and private API.
- Limit the attack surface of your microservices by locking down unneeded network ports.
Figure 7.13 shows how these different pieces fit together. Each of the bulleted items in the list maps to the numbers in figure 7.13.
Figure 7.13. A microservice security architecture is more than implementing OAuth2.
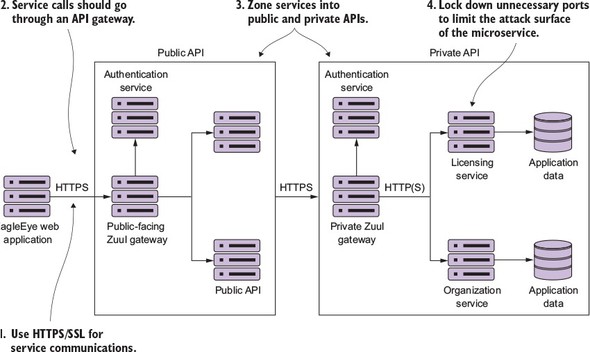
Let’s examine each of the topic areas enumerated in the previous list and diagrams in more detail.
Use HTTPS/Secure Sockets Layer (SSL) for all service communication
In all the code examples in this book, you’ve been using HTTP because HTTP is a simple protocol and doesn’t require setup on every service before you can start using the service.
In a production environment, your microservices should communicate only through the encrypted channels provided through HTTPS and SSL. The configuration and setup of the HTTPS can be automated through your DevOps scripts.
Note
If your application needs to meet Payment Card Industry (PCI) compliance for credit card payments, you’ll be required to implement HTTPS for all service communication. Building all your services to use HTTPS early on is much easier than doing a migration project after your application and microservices are in production.
Use a services gateway to access your microservices
The individual servers, service endpoints, and ports your services are running on should never be directly accessible to the client. Instead, use a services gateway to act as an entry point and gatekeeper for your service calls. Configure the network layer on the operating system or container your microservices are running in to only accept traffic from the services gateway.
Remember, the services gateway can act as a policy enforcement point (PEP) that can be enforced against all services. Putting service calls through a services gateway such as Zuul allows you to be consistent in how you’re securing and auditing your services. A service gateway also allows you to lock down what port and endpoints you’re going to expose to the outside world.
Zone your services into a public API and private API
Security in general is all about building layers of accessing and enforcing the concept of least privilege. Least privilege is the concept that a user should have the bare minimum network access and privileges to do their day-to-day job. To this end, you should implement least-privilege by separating your services into two distinct zones: public and private.
The public zone contains the public APIs that will be consumed by clients (EagleEye application). Public API microservices should carry out narrow tasks that are workflow-oriented. Public API microservices tend to be service aggregators, pulling data and carrying out tasks across multiple services.
Public microservices should be behind their own services gateway and have their own authentication service for performing OAuth2 authentication. Access to public services by client applications should go through a single route protected by the services gateway. In addition, the public zone should have its own authentication service.
The private zone acts as a wall to protect your core application functionality and data. The private zone should only be accessible through a single well-known port and should be locked down to only accept network traffic from the network subnet that the private services are running. The private zone should have its own services gateway and authentication service. Public API services should authenticate against the private zones authentication service. All application data should at least be in the private zone’s network subnet and only accessible by microservices residing in the private zone.
Many organizations take the approach that their security model should have a hard outer center, with a softer inner surface. What this means is that once traffic is inside the private API zone, communication between services in the private zone can be unencrypted (no HTTPS) and not require an authentication mechanism. Most of the time, this is done for convenience and developer velocity. The more security you have in place, the harder it is to debug problems, increasing the overall complexity of managing your application.
I tend to take a paranoid view of the world. (I worked in financial services for eight years, so paranoia comes with the territory.) I’d rather trade off the additional complexity (which can be mitigated through DevOps scripts) and enforce that all services running in my private API zone use SSL and are authenticated against the authentication service running in the private zone. The question that you have to ask yourself is, How willing are you to see your organization on the front page of your local newspaper because of a network breach?
Limit the attack surface of your microservices by locking down un- nneeded network ports
Many developers don’t take a hard look at the absolute minimum number of ports they need to open for their services to function. Configure the operating system your service is running on to only allow the inbound and outbound access to ports needed by your service or a piece of infrastructure needed by your service (monitoring, log aggregation).
Don’t focus only on inbound access ports. Many developers forget to lock down their outbound ports. Locking down your outbound ports can prevent data from being leaked off your service in the event that the service itself has been compromised by an attacker. Also, make sure you look at network port access in both your public and private API zones.
7.6. Summary
- OAuth2 is a token-based authentication framework to authenticate users.
- OAuth2 ensures that each microservice carrying out a user request doesn’t need to be presented with user credentials with every call.
- OAuth2 offers different mechanisms for protecting web services calls. These mechanisms are called grants.
- To use OAuth2 in Spring, you need to set up an OAuth2-based authentication service.
- Each application that wants to call your services needs to be registered with your OAuth2 authentication service.
- Each application will have its own application name and secret key.
- User credentials and roles are in memory or a data store and accessed via Spring security.
- Each service must define what actions a role can take.
- Spring Cloud Security supports the JavaScript Web Token (JWT) specification.
- JWT defines a signed, JavaScript standard for generating OAuth2 tokens.
- With JWT, you can inject custom fields into the specification.
- Securing your microservices involves more than just using OAuth2. You should
- Use HTTPS to encrypt all calls between services.
- Use a services gateway to narrow the number of access points a service can be reached through.
- Limit the attack surface for a service by limiting the number of inbound and outbound ports on the operating system that the service is running on.