Table of Contents for
Spring Microservices in Action
 Spring Microservices in Action
Published by
Manning Publications, 2017
Spring Microservices in Action
Published by
Manning Publications, 2017
- Cover
- Spring Microservices in Action
- Copyright
- Spring Microservices in Action
- Brief Table of Contents
- Table of Contents
- Preface
- Acknowledgments
- About this Book
- About the Author
- About the Cover Illustration
- Chapter 1. Welcome to the cloud, Spring
- Chapter 2. Building microservices with Spring Boot
- Chapter 3. Controlling your configuration with Spring Cloud configuration server
- Chapter 4. On service discovery
- Chapter 5. When bad things happen: client resiliency patterns with Spring Cloud and Netflix Hystrix
- Chapter 6. Service routing with Spring Cloud and Zuul
- Chapter 7. Securing your microservices
- Chapter 8. Event-driven architecture with Spring Cloud Stream
- Chapter 9. Distributed tracing with Spring Cloud Sleuth and Zipkin
- Chapter 10. Deploying your microservices
- Appendix A. Running a cloud on your desktop
- Appendix B. OAuth2 grant types
- Index
- List of Figures
- List of Tables
- List of Listings
Chapter 2. Building microservices with Spring Boot
- Learning the key characteristics of a microservice
- Understanding how microservices fit into a cloud architecture
- Decomposing a business domain into a set of microservices
- Implementing a simple microservice using Spring Boot
- Understanding the perspectives for building microservice-based applications
- Learning when not to use microservices
The history of software development is littered with the tales of large development projects that after an investment of millions of dollars and hundreds of thousands of software developer hours, and with many of the best and brightest minds in the industry working on them, somehow never managed to deliver anything of value to their customers and literally collapsed under their own complexity and weight.
These mammoth projects tended to follow large, traditional waterfall development methodologies that insisted that all the application’s requirements and design be defined at the beginning of the project. So much emphasis was placed on getting all the specifications for the software “correct” that there was little leeway to meet new business requirements, or refactor and learn from mistakes made in the early stages of development.
The reality, though, is that software development isn’t a linear process of definition and execution, but rather an evolutionary one where it takes several iterations of communicating with, learning from, and delivering to the customer before the development team truly understands the problem at hand.
Compounding the challenges of using traditional waterfall methodologies is that many times the granularity of the software artifacts being delivered in these projects are
- Tightly coupled— The invocation of business logic happens at the programming-language level instead of through implementation-neutral protocols such as SOAP and REST. This greatly increases the chance that even a small change to an application component can break other pieces of the application and introduce new bugs.
- Leaky— Most large software applications manage different types of data. For instance, a customer relationship management (CRM) application might manage customer, sales, and product information. In a traditional model, this data is kept in the same data model and within the same data store. Even though there are obvious boundaries between the data, too often it’s tempting for a team from one domain to directly access the data that belongs to another team. This easy access to data creates hidden dependencies and allows implementation details of one component’s internal data structures to leak through the entire application. Even small changes to a single database table can require a significant number of code changes and regression-testing throughout the entire application.
- Monolithic— Because most of the application components for a traditional application reside in a single code base that’s shared across multiple teams, any time a change to the code is made, the entire application has to be recompiled, rerun through an entire testing cycle, and redeployed. Even small changes to the application’s code base, whether they’re new customer requirements or bug fixes, become expensive and time-consuming, and large changes become nearly impossible to do in a timely fashion.
A microservice-based architecture takes a different approach to delivering functionality. Specifically, microservice-based architectures have these characteristics:
- Constrained— Microservices have a single set of responsibilities and are narrow in scope. Microservices embrace the UNIX philosophy that an application is nothing more than a collection of services where each service does one thing and does that one thing really well.
- Loosely coupled— A microservice-based application is a collection of small services that only interact with one another through a non–implementation specific interface using a non-proprietary invocation protocol (for example, HTTP and REST). As long as the interface for the service doesn’t change, the owners of the microservice have more freedom to make modifications to the service than in a traditional application architecture.
- Abstracted— Microservices completely own their data structures and data sources. Data owned by a microservice can only be modified by that service. Access control to the database holding the microservice’s data can be locked down to only allow the service access to it.
- Independent— Each microservice in a microservice application can be compiled and deployed independently of the other services used in the application. This means changes can be isolated and tested much more easily than with a more heavily interdependent, monolithic application.
Why are these microservice architecture attributes important to cloud-based development? Cloud-based applications in general have the following:
- A large and diverse user base— Different customers want different features, and they don’t want to have to wait for a long application release cycle before they can start using these features. Microservices allow features to be delivered quickly, because each service is small in scope and accessed through a well-defined interface.
- Extremely high uptime requirements— Because of the decentralized nature of microservices, microservice-based applications can more easily isolate faults and problems to specific parts of an application without taking down the entire application. This reduces overall downtime for applications and makes them more resistent to problems.
- Uneven volume requirements— Traditional applications deployed within the four walls of a corporate data center usually have consistent usage patterns that emerge over time. This makes capacity planning for these types of applications simple. But in a cloud-based application, a simple tweet on Twitter or a post on Slashdot can drive demand for a cloud-based application through the roof. Because microservice applications are broken down into small components that can be deployed independently of one another, it’s much easier to focus on the components that are under load and scale those components horizontally across multiple servers in a cloud.
This chapter provides you with the foundation you need to target and identify microservices in your business problem, build the skeleton of a microservice, and then understand the operational attributes that need to be in place for a microservice to be deployed and managed successfully in production.
To successfully design and build microservices, you need to approach microservices as if you’re a police detective interviewing witnesses to a crime. Even though every witness saw the same events take place, their interpretation of the crime is shaped by their background, what was important to them (for example, what motivates them), and what environmental pressures were brought to bear at that moment they witnessed the event. Participants each have their own perspectives (and biases) of what they consider important.
Like a successful police detective trying to get to the truth, the journey to build a successful microservice architecture involves incorporating the perspectives of multiple individuals within your software development organization. Although it takes more than technical people to deliver an entire application, I believe that the foundation for successful microservice development starts with the perspectives of three critical roles:
- The architect— The architect’s job is to see the big picture and understand how an application can be decomposed into individual microservices and how the microservices will interact to deliver a solution.
- The software developer— The software developer writes the code and understands in detail how the language and development frameworks for the language will be used to deliver a microservice.
- The DevOps engineer— The DevOps engineer brings intelligence to how the services are deployed and managed throughout not only production, but also all the nonproduction environments. The watchwords for the DevOps engineer are consistency and repeatability in every environment.
In this chapter, I’ll demonstrate how to design and build a set of microservices from the perspective of each of these roles using Spring Boot and Java. By the time the chapter concludes, you’ll have a service that can be packaged and deployed to the cloud.
2.1. The architect’s story: designing the microservice architecture
An architect’s role on a software project is to provide a working model of the problem that needs to be solved. The job of the architect is to provide the scaffolding against which developers will build their code so that all the pieces of the application fit together.
When building a microservices architecture, a project’s architect focuses on three key tasks:
- Decomposing the business problem
- Establishing service granularity
- Defining the service interfaces
2.1.1. Decomposing the business problem
In the face of complexity, most people try to break the problem on which they’re working into manageable chunks. They do this so they don’t have to try to fit all the details of the problem in their heads. Instead, they break the problem down abstractly into a few key parts and then look for the relationships that exist between these parts.
In a microservices architecture, the architect breaks the business problem into chunks that represent discrete domains of activity. These chunks encapsulate the business rules and the data logic associated with a particular part of the business domain.
Although you want microservices to encapsulate all the business rules for carrying out a single transaction, this isn’t always feasible. You’ll often have situations where you need to have groups of microservices working across different parts of the business domain to complete an entire transaction. An architect teases apart the service boundaries of a set of microservices by looking at where the data domain doesn’t seem to fit together.
For example, an architect might look at a business flow that’s to be carried out by code and realize that they need both customer and product information. The presence of two discrete data domains is a good indication that multiple microservices are at play. How the two different parts of the business transaction interact usually becomes the service interface for the microservices.
Breaking apart a business domain is an art form rather than a black-and-white science. Use the following guidelines for identifying and decomposing a business problem into microservice candidates:
- Describe the business problem, and listen to the nouns you’re using to describe the problem. Using the same nouns over and over in describing the problem is usually an indication of a core business domain and an opportunity for a microservice. Examples of target nouns for the EagleEye domain from chapter 1 might look something like contracts, licenses, and assets.
- Pay attention to the verbs. Verbs highlight actions and often represent the natural contours of a problem domain. If you find yourself saying “transaction X needs to get data from thing A and thing B,” that usually indicates that multiple services are at play. If you apply to EagleEye the approach of watching for verbs, you might look for statements such as, “When Mike from desktop services is setting up a new PC, he looks up the number of licenses available for software X and, if licenses are available, installs the software. He then updates the number of licenses used in his tracking spreadsheet.” The key verbs here are looks and updates.
- Look for data cohesion. As you break apart your business problem into discrete pieces, look for pieces of data that are highly related to one another. If suddenly, during the course of your conversation, you’re reading or updating data that’s radically different from what you’ve been discussing so far, you potentially have another service candidate. Microservices should completely own their data.
Let’s take these guidelines and apply them to a real-world problem. Chapter 1 introduced an existing software product called EagleEye that’s used for managing software assets such as software licenses and secure socket layer (SSL) certificates. These items are deployed to various servers throughout an organization.
EagleEye is a traditional monolithic web application that’s deployed to a J2EE application server residing within a customer’s data center. Your goal is to tease apart the existing monolithic application into a set of services.
You’re going to start by interviewing all the users of the EagleEye application and discussing with them how they interact and use EagleEye. Figure 2.1 captures a summary of the conversations you might have with the different business customers. By looking at how the users of EagleEye interact with the application and how the data model for the application is broken out, you can decompose the EagleEye problem domain into the following microservice candidates.
Figure 2.1. Interview the EagleEye users, and understand how they do their day-to-day work.
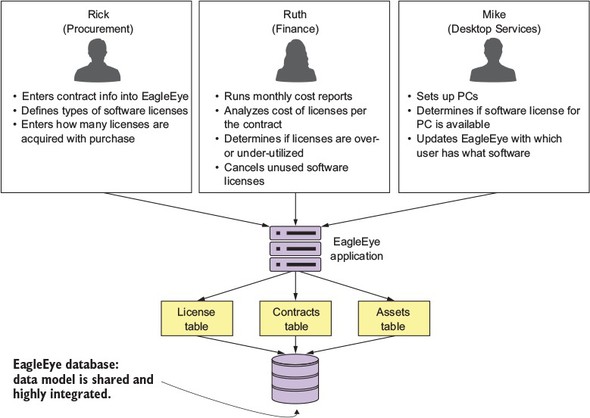
In the figure, I’ve highlighted a number of nouns and verbs that have come up during conversations with the business users. Because this is an existing application, you can look at the application and map the major nouns back to tables in the physical data model. An existing application may have hundreds of tables, but each table will usually map back to a single set of logical entities.
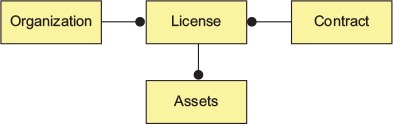
Figure 2.2 shows a simplified data model based on conversations with EagleEye customers. Based on the business interviews and the data model, the microservice candidates are organization, license, contract, and assets services.
Figure 2.2. A simplified EagleEye data model
2.1.2. Establishing service granularity
Once you have a simplified data model, you can begin the process of defining what microservices you’re going to need in the application. Based on the data model in figure 2.2, you can see the potential for four microservices based on the following elements:
- Assets
- License
- Contract
- Organization
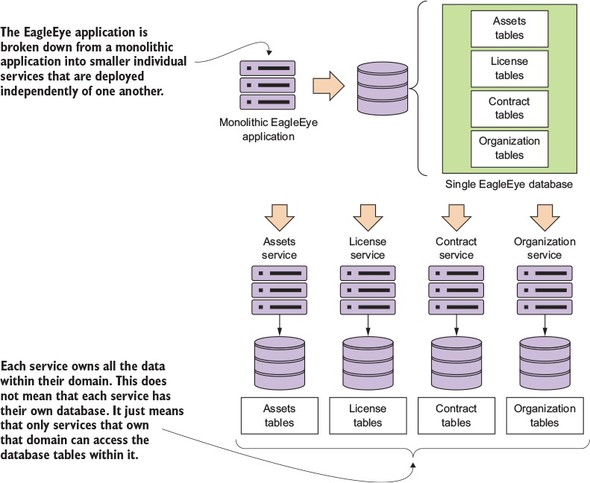
The goal is to take these major pieces of functionality and extract them into completely self-contained units that can be built and deployed independently of each other. But extracting services from the data model involves more than repackaging code into separate projects. It’s also about teasing out the actual database tables the services are accessing and only allowing each individual service to access the tables in its specific domain. Figure 2.3 shows how the application code and the data model become “chunked” into individual pieces.
Figure 2.3. You use the data model as the basis for decomposing a monolithic application into microservices.
After you’ve broken a problem domain down into discrete pieces, you’ll often find yourself struggling to determine whether you’ve achieved the right level of granularity for your services. A microservice that’s too coarse- or fine-grained will have a number of telltale attributes that we’ll discuss shortly.
When you’re building a microservice architecture, the question of granularity is important, but you can use the following concepts to determine the correct solution:
- It’s better to start broad with your microservice and refactor to smaller services— It’s easy to go overboard when you begin your microservice journey and make everything a microservice. But decomposing the problem domain into small services often leads to premature complexity because microservices devolve into nothing more than fine-grained data services.
- Focus first on how your services will interact with one another— This will help establish the coarse-grained interfaces of your problem domain. It’s easier to refactor from being too coarse-grained to being too fine-grained.
- Service responsibilities will change over time as your understanding of the problem domain grows— Often, a microservice gains responsibilities as new application functionality is requested. What starts as a single microservice might grow into multiple services, with the original microservice acting as an orchestration layer for these new services and encapsulating their functionality from other parts of the application.
How do you know whether your microservices are the right size? If a microservice is too coarse-grained, you’ll likely see the following:
A service with too many responsibilities—The general flow of the business logic in the service is complicated and seems to be enforcing an overly diverse array of business rules.
The service is managing data across a large number of tables—A microservice is the system of record for the data it manages. If you find yourself persisting data to multiple tables or reaching out to tables outside of the immediate database, this is a clue the service is too big. I like to use the guideline that a microservice should own no more than three to five tables. Any more, and your service is likely to have too much responsibility.
Too many test cases—Services can grow in size and responsibility over time. If you have a service that started with a small number of test cases and ends up with hundreds of unit and integration test cases, you might need to refactor.
What about a microservice that’s too fine-grained?
The microservices in one part of the problem domain breed like rabbits—If everything becomes a microservice, composing business logic out of the services becomes complex and difficult because the number of services needed to get a piece of work done grows tremendously. A common smell is when you have dozens of microservices in an application and each service interacts with only a single database table.
Your microservices are heavily interdependent on one another—You find that the microservices in one part of the problem domain keep calling back and forth between each other to complete a single user request.
Your microservices become a collection of simple CRUD (Create, Replace, Update, Delete) services—Microservices are an expression of business logic and not an abstraction layer over your data sources. If your microservices do nothing but CRUD-related logic, they’re probably too fine-grained.
A microservices architecture should be developed with an evolutionary thought process where you know that you aren’t going to get the design right the first time. That’s why it’s better to start with your first set of services being more coarse-grained than fine-grained. It’s also important not to be dogmatic with your design. You may run into physical constraints on your services where you’ll need to make an aggregation service that joins data together because two separate services will be too chatty, or where no clear boundaries exist between the domain lines of a service.
In the end, take a pragmatic approach and deliver, rather than waste time trying to get the design perfect and then have nothing to show for your effort.
2.1.3. Talking to one another: service interfaces
The last part of the of the architect’s input is about defining how the microservices in your application are going to talk with one another. When building business logic with microservices, the interfaces for the services should be intuitive and developers should get a rhythm of how all the services work in the application by learning one or two of the services in the application.
In general, the following guidelines can be used for thinking about service interface design:
- Embrace the REST philosophy— The REST approach to services is at heart the embracing of HTTP as the invocation protocol for the services and the use of standard HTTP verbs (GET, PUT, POST, and DELETE). Model your basic behaviors around these HTTP verbs.
- Use URI’s to communicate intent— The URI you use as endpoints for the service should describe the different resources in your problem domain and provide a basic mechanism for relationships of resources within your problem domain.
- Use JSON for your requests and responses— JavaScript Object Notation (in other words, JSON) is an extremely lightweight data-serialization protocol and is much easier to consume then XML.
- Use HTTP status codes to communicate results— The HTTP protocol has a rich body of standard response codes to indicate the success or failure of a service. Learn these status codes and most importantly use them consistently across all your services.
All the basic guidelines drive to one thing, making your service interfaces easy to understand and consumable. You want a developer to sit down and look at the service interfaces and start using them. If a microservice isn’t easy to consume, developers will go out of their way to work around and subvert the intention of the architecture.
2.2. When not to use microservices
We’ve spent this chapter talking about why microservices are a powerful architectural pattern for building applications. But I haven’t touched on when you shouldn’t use microservices to build your applications. Let’s walk through them:
- Complexity building distributed systems
- Virtual server/container sprawl
- Application type
- Data transactions and consistency
2.2.1. Complexity of building distributed systems
Because microservices are distributed and fine-grained (small), they introduce a level of complexity into your application that wouldn’t be there in more monolithic applications. Microservice architectures require a high degree of operational maturity. Don’t consider using microservices unless your organization is willing to invest in the automation and operational work (monitoring, scaling) that a highly distributed application needs to be successful.
2.2.2. Server sprawl
One of the most common deployment models for microservices is to have one microservice instance deployed on one server. In a large microservices-based application, you might end up with 50 to 100 servers or containers (usually virtual) that have to be built and maintained in production alone. Even with the lower cost of running these services in the cloud, the operational complexity of having to manage and monitor these servers can be tremendous.
Note
The flexibility of microservices has to be weighed against the cost of running all of these servers.
2.2.3. Type of application
Microservices are geared toward reusability and are extremely useful for building large applications that need to be highly resilient and scalable. This is one of the reasons why so many cloud-based companies have adopted microservices. If you’re building small, departmental-level applications or applications with a small user base, the complexity associated with building on a distributed model such as microservices might be more expense then it’s worth.
2.2.4. Data transformations and consistency
As you begin looking at microservices, you need to think through the data usage patterns of your services and how service consumers are going to use them. A microservice wraps around and abstracts away a small number of tables and works well as a mechanism for performing “operational” tasks such as creating, adding, and performing simple (non-complex) queries against a store.
If your applications need to do complex data aggregation or transformation across multiple sources of data, the distributed nature of microservices will make this work difficult. Your microservices will invariably take on too much responsibility and can also become vulnerable to performance problems.
Also keep in mind that no standard exists for performing transactions across microservices. If you need transaction management, you will need to build that logic yourself. In addition, as you’ll see in chapter 7, microservices can communicate amongst themselves by using messages. Messaging introduces latency in data updates. Your applications need to handle eventual consistency where updates that are applied to your data might not immediately appear.
2.3. The developer’s tale: building a microservice with Spring Boot and Java
When building a microservice, moving from the conceptual space to the implementation space requires a shift in perspective. Specifically, as a developer, you need to establish a basic pattern of how each of the microservices in your application is going to be implemented. While each service is going to be unique, you want to make sure that you’re using a framework that removes boilerplate code and that each piece of your microservice is laid out in the same consistent fashion.
In this section, we’ll explore the developer’s priorities in building the licensing microservice from your EagleEye domain model. Your licensing service is going to be written using Spring Boot. Spring Boot is an abstraction layer over the standard Spring libraries that allows developers to quickly build Groovy- and Java-based web applications and microservices with significantly less ceremony and configuration than a full-blown Spring application.
For your licensing service example, you’ll use Java as your core programming language and Apache Maven as your build tool.
Over the next several sections you’re going to
- Build the basic skeleton of the microservice and a Maven script to build the application
- Implement a Spring bootstrap class that will start the Spring container for the microservice and initiate the kick-off of any initialization work for the class
- Implement a Spring Boot controller class for mapping an endpoint to expose the endpoints of the service
2.3.1. Getting started with the skeleton project
To begin, you’ll create a skeleton project for the licensing. You can either pull down the source code down from GitHub (https://github.com/carnellj/spmia-chapter2) or create a licensing-service project directory with the following directory structure:
- licensing-service
- src/main/java/com/thoughtmechanix/licenses
- controllers
- model
- services
- resources
Once you’ve pulled down or created this directory structure, begin by writing your Maven script for the project. This will be the pom.xml file located at the root of the project directory. The following listing shows the Maven POM file for your licensing service.
Listing 2.1. Maven pom file for the licensing service
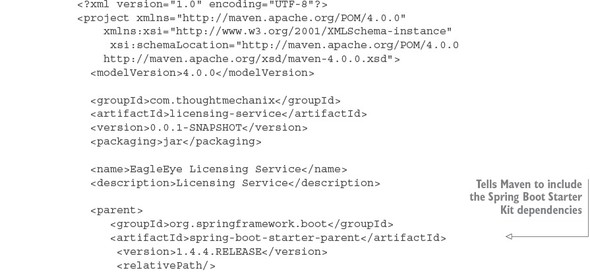
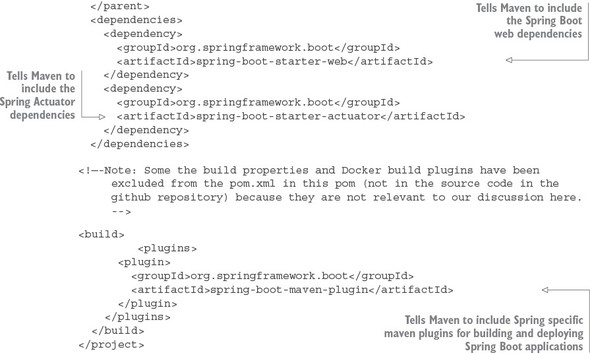
We won’t go through the entire script in detail, but note a few key areas as we begin. Spring Boot is broken into many individual projects. The philosophy is that you shouldn’t have to “pull down the world” if you aren’t going to use different pieces of Spring Boot in your application. This also allows the various Spring Boot projects to release new versions of code independently of one another. To help simplify the life of the developers, the Spring Boot team has gathered related dependent projects into various “starter” kits. In part 1 of the Maven POM you tell Maven that you need to pull down version 1.4.4 of the Spring Boot framework
In parts 2 and 3 of the Maven file, you identify that you’re pulling down the Spring Web and Spring Actuator starter kits. These two projects are at the heart of almost any Spring Boot REST-based service. You’ll find that as you build more functionality into your services, the list of these dependent projects becomes longer.
Also, Spring Source has provided Maven plugins that simplify the build and deployment of the Spring Boot applications. Step 4 tells your Maven build script to install the latest Spring Boot Maven plugin. This plugin contains a number of add-on tasks (such as spring-boot:run) that simplify your interaction between Maven and Spring Boot.
Finally, you’ll see a comment that sections of the Maven file have been removed. For the sake of the trees, I didn’t include the Spotify Docker plugins in listing 2.1.
Note
Every chapter in this book includes Docker files for building and deploying the application as Docker containers. You can find details of how to build these Docker images in the README.md file in the code sections of each chapter.
2.3.2. Booting your Spring Boot application: writing the Bootstrap class
Your goal is to get a simple microservice up and running in Spring Boot and then iterate on it to deliver functionality. To this end, you need to create two classes in your licensing service microservice:
- A Spring Bootstrap class that will be used by Spring Boot to start up and initialize the application
- A Spring Controller class that will expose the HTTP endpoints that can be invoked on the microservice
As you’ll see shortly, Spring Boot uses annotations to simplify setting up and configuring the service. This becomes evident as you look at the bootstrap class in the following listing. This bootstrap class is in the src/main/java/com/thoughtmechanix/licenses/Application.java file.
Listing 2.2. Introducing the @SpringBootApplication annotation
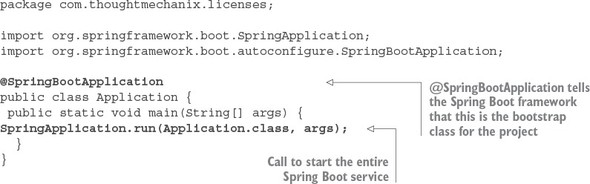
The first thing to note in this code is the use of the @SpringBootApplication annotation. Spring Boot uses this annotation to tell the Spring container that this class is the source of bean definitions for use in Spring. In a Spring Boot application, you can define Spring Beans by
- Annotating a Java class with a @Component, @Service or @Repository annotation tag
- Annotating a class with a @Configuration tag and then defining a constructor method for each Spring Bean you want to build with a @Bean tag.
Under the covers, the @SpringBootApplication annotation marks the Application class in listing 2.2 as a configuration class, then begins auto-scanning all the classes on the Java class path for other Spring Beans.
The second thing to note is the Application class’s main() method. In the main() method, the SpringApplication.run(Application.class, args), the call starts the Spring container and returns a Spring ApplicationContext object. (You aren’t doing anything with the ApplicationContext, so it isn’t shown in the code.)
The easiest thing to remember about the @SpringBootApplication annotation and the corresponding Application class is that it’s the bootstrap class for the entire microservice. Core initialization logic for the service should be placed in this class.
2.3.3. Building the doorway into the microservice: the Spring Boot controller
Now that you’ve gotten the build script out of the way and implemented a simple Spring Boot Bootstrap class, you can begin writing your first code that will do something. This code will be your Controller class. In a Spring boot application, a Controller class exposes the services endpoints and maps the data from an incoming HTTP request to a Java method that will process the request.
All the microservices in this book follow the REST approach to building your services. An in-depth discussion of REST is outside of the scope this book,[1] but for your purposes, all the services you build will have the following characteristics:
Probably the most comprehensive coverage of the design of REST services is the book REST in Practice by Ian Robinson, et al (O’Reilly, 2010).
Use HTTP as the invocation protocol for the service—The service will be exposed via HTTP endpoint and will use the HTTP protocol to carry data to and from the services.
Map the behavior of the service to standard HTTP verbs—REST emphasizes having services map their behavior to the HTTP verbs of POST, GET, PUT, and DELETE verbs. These verbs map to the CRUD functions found in most services.
Use JSON as the serialization format for all data going to and from the service—This isn’t a hard-and-fast principle for REST-based microservices, but JSON has become lingua franca for serializing data that’s going to be submitted and returned by a microservice. XML can be used, but many REST-based applications make heavy use of JavaScript and JSON (JavaScript Object Notation). JSON is the native format for serializing and deserializing data being consumed by JavaScript-based web front-ends and services.
Use HTTP status codes to communicate the status of a service call—The HTTP protocol has developed a rich set of status codes to indicate the success or failure of a service. REST-based services take advantage of these HTTP status codes and other web-based infrastructure, such as reverse proxies and caches, which can be integrated with your microservices with relative ease.
HTTP is the language of the web and using HTTP as the philosophical framework for building your service is a key to building services in the cloud.
Your first controller class is located in src/main/java/com/thoughtmechanix/licenses/controllers/LicenseServiceController.java. This class will expose four HTTP endpoints that will map to the POST, GET, PUT, and DELETE verbs.
Let’s walk through the controller class and look at how Spring Boot provides a set of annotations that keeps the effort needed to expose your service endpoints to a minimum and allows you to focus on building the business logic for the service. We’ll start by looking at the basic controller class definition without any class methods in it yet. The following listing shows the controller class that you built for your licensing service.
Listing 2.3. Marking the LicenseServiceController as a Spring RestController
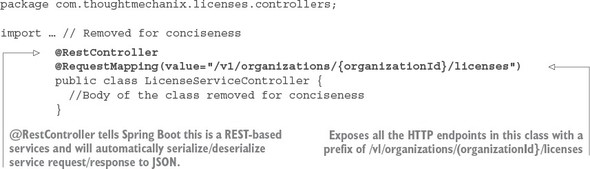
We’ll begin our exploration by looking at the @RestController annotation. The @RestController is a class-level Java annotation and tells the Spring Container that this Java class is going to be used for a REST-based service. This annotation automatically handles the serialization of data passed into the services as JSON or XML (by default the @RestController class will serialize returned data into JSON). Unlike the traditional Spring @Controller annotation, the @RestController annotation doesn’t require you as the developer to return a ResponseBody class from your controller class. This is all handled by the presence of the @RestController annotation, which includes the @ResponseBody annotation.
Multiple protocols can be used to send data back and forth between HTTP-based microservices. JSON has emerged as the de facto standard for several reasons.
First, compared to other protocols such as the XML-based SOAP (Simple Object Access Protocol), it’s extremely lightweight in that you can express your data without having much textual overhead.
Second, it’s easily read and consumed by a human being. This is an underrated quality for choosing a serialization protocol. When a problem arises, it’s critical for developers to look at a chunk of JSON and quickly, visually process what’s in it. The simplicity of the protocol makes this incredibly easy to do.
Third, JSON is the default serialization protocol used in JavaScript. Since the dramatic rise of JavaScript as a programming language and the equally dramatic rise of Single Page Internet Applications (SPIA) that rely heavily on JavaScript, JSON has become a natural fit for building REST-based applications because it’s what the front-end web clients use to call services.
Other mechanisms and protocols are more efficient than JSON for communicating between services. The Apache Thrift (http://thrift.apache.org) framework allows you to build multi-language services that can communicate with one another using a binary protocol. The Apache Avro protocol (http://avro.apache.org) is a data serialization protocol that converts data back and forth to a binary format between client and server calls.
If you need to minimize the size of the data you’re sending across the wire, I recommend you look at these protocols. But it has been my experience that using straight-up JSON in your microservices works effectively and doesn’t interpose another layer of communication to debug between your service consumers and service clients.
The second annotation shown in listing 2.3 is the @RequestMapping annotation. You can use the @RequestMapping annotation as a class-level and method-level annotation. The @RequestMapping annotation is used to tell the Spring container the HTTP endpoint that the service is going to expose to the world. When you use the class-level @RequestMapping annotation, you’re establishing the root of the URL for all the other endpoints exposed by the controller.
In listing 2.3, the @RequestMapping(value="/v1/organizations/{organizationId}/licenses") uses the value attribute to establish the root of the URL for all endpoints exposed in the controller class. All service endpoints exposed in this controller will start with /v1/organizations/{organizationId}/licenses as the root of their endpoint. The {organizationId} is a placeholder that indicates how you expect the URL to be parameterized with an organizationId passed in every call. The use of organizationId in the URL allows you to differentiate between the different customers who might use your service.
Now you’ll add the first method to your controller. This method will implement the GET verb used in a REST call and return a single License class instance, as shown in the following listing. (For purposes of this discussion you’ll instantiate a Java class called License.)
Listing 2.4. Exposing an individual GET HTTP endpoint
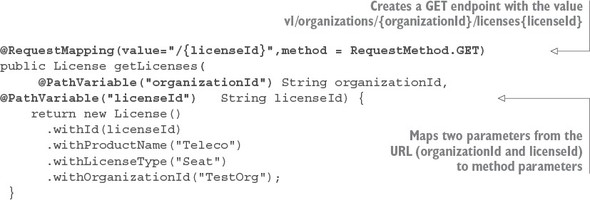
The first thing you’ve done in this listing is annotate the getLicenses() method with a method level @RequestMapping annotation, passing in two parameters to the annotation: value and method. With a method-level @RequestMapping annotation, you’re building on the root-level annotation specified at the top of the class to match all HTTP requests coming to the controller with the endpoint /v1/organizations/{organizationId}/licences/{licensedId}. The second parameter of the annotation, method, specifies the HTTP verb that the method will be matched on. In the previous example, you’re matching on the GET method as represented by the RequestMethod.GET enumeration.
The second thing to note about listing 2.4 is that you use the @PathVariable annotation in the parameter body of the getLicenses() method. (2) The @Path-Variable annotation is used to map the parameter values passed in the incoming URL (as denoted by the {parameterName} syntax) to the parameters of your method. In your code example from listing 2.4, you’re mapping two parameters from the URL, organizationId and licenseId, to two parameter-level variables in the method:
@PathVariable("organizationId") String organizationId,
@PathVariable("licenseId")   String licenseId)
Before you get too far down the path of writing microservices, make sure that you (and potentially other teams in your organization) establish standards for the endpoints that will be exposed via your services. The URLs (Uniform Resource Locator) for the microservice should be used to clearly communicate the intent of the service, the resources the service manages, and the relationships that exist between the resources managed within the service. I’ve found the following guidelines useful for naming service endpoints:
- Use clear URL names that establish what resource the service represents— Having a canonical format for defining URLs will help your API feel more intuitive and easier to use. Be consistent in your naming conventions.
- Use the URL to establish relationships between resources— Oftentimes you’ll have a parent-child relationship between resources within your microservices where the child doesn’t exist outside the context of the parent (hence you might not have a separate microservice for the child). Use the URLs to express these relationships. But if you find that your URLs tend to be excessively long and nested, your microservice may be trying to do too much.
- Establish a versioning scheme for URLS early— The URL and its corresponding endpoints represent a contract between the service owner and consumer of the service. One common pattern is to prepend all endpoints with a version number. Establish your versioning scheme early and stick to it. It’s extremely difficult to retrofit versioning to URLS after you already have several consumers using them.
At this point you have something you can call as a service. From a command line window, go to your project directory where you’ve downloaded the sample code and execute the following Maven command:
mvn spring-boot:run
As soon as you hit the Return key, you should see Spring Boot launch an embedded Tomcat server and start listening on port 8080.
Figure 2.4. The licensing service starting successfully

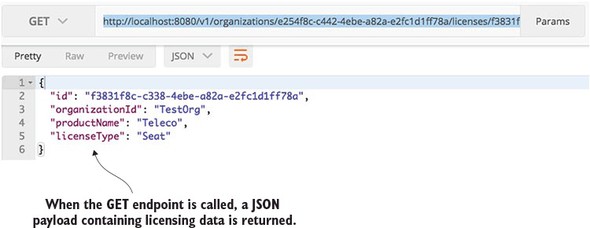
Once the service is started, you can directly hit the exposed endpoint. Because your first method exposed is a GET call, you can use a number of methods for invoking the service. My preferred method is to use a chrome-based tool like POSTMAN or CURL for calling the service. Figure 2.5 shows a GET performed on the http://localhost:8080/v1/organizations/e254f8c-c442-4ebe-a82a-e2fc1d1ff78a/licenses/f3831f8c-c338-4ebe-a82a-e2fc1d1ff78a endpoint.
Figure 2.5. Your licensing service being called with POSTMAN
At this point you have a running skeleton of a service. But from a development perspective, this service isn’t complete. A good microservice design doesn’t eschew segregating the service into well-defined business logic and data access layers. As you progress in later chapters, you’ll continue to iterate on this service and delve further into how to structure it.
Let’s switch to the final perspective: exploring how a DevOps engineer would operationalize the service and package it for deployment to the cloud.
2.4. The DevOps story: building for the rigors of runtime
For the DevOps engineer, the design of the microservice is all about managing the service after it goes into production. Writing the code is often the easy part. Keeping it running is the hard part.
While DevOps is a rich and emerging IT field, you’ll start your microservice development effort with four principles and build on these principles later in the book. These principles are
- A microservice should be self-contained and independently deployable with multiple instances of the service being started up and torn down with a single software artifact.
- A microservice should be configurable. When a service instance starts up, it should read the data it needs to configure itself from a central location or have its configuration information passed on as environment variables. No human intervention should be required to configure the service.
- A microservice instance needs to be transparent to the client. The client should never know the exact location of a service. Instead, a microservice client should talk to a service discovery agent that will allow the application to locate an instance of a microservice without having to know its physical location.
- A microservice should communicate its health. This is a critical part of your cloud architecture. Microservice instances will fail and clients need to route around bad service instances.
These four principles expose the paradox that can exist with microservice development. Microservices are smaller in size and scope, but their use introduces more moving parts in an application, especially because microservices are distributed and running independently of each other in their own distributed containers. This introduces a high degree of coordination and more opportunities for failure points in the application.
From a DevOps perspective, you must address the operational needs of a microservice up front and translate these four principles into a standard set of lifecycle events that occur every time a microservice is built and deployed to an environment. The four principles can be mapped to the following operational lifecycle steps:
- Service assembly— How do you package and deploy your service to guarantee repeatability and consistency so that the same service code and runtime is deployed exactly the same way?
- Service bootstrapping— How do you separate your application and environment-specific configuration code from the runtime code so you can start and deploy a microservice instance quickly in any environment without human intervention to configure the microservice?
- Service registration/discovery— When a new microservice instance is deployed, how do you make the new service instance discoverable by other application clients?
- Service monitoring— In a microservices environment it’s extremely common for multiple instances of the same service to be running due to high availability needs. From a DevOps perspective, you need to monitor microservice instances and ensure that any faults in your microservice are routed around and that ailing service instances are taken down.
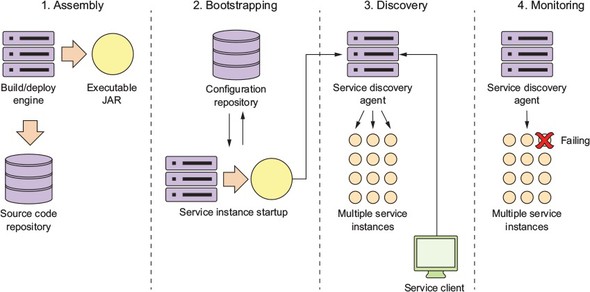
Figure 2.6 shows how these four steps fit together.
Figure 2.6. When a microservice starts up, it goes through multiple steps in its lifecycle.
One of my biggest hopes with this book is that you realize that a successful microservice architecture requires strong application development and DevOps practices. One of the most succinct summaries of these practices can be found in Heroku’s Twelve-Factor Application manifesto (https://12factor.net/). This document provides 12 best practices you should always keep in the back of your mind when building microservices. As you read this book, you’ll see these practices intertwined into the examples. I’ve summarized them as follows:
Codebase—All application code and server provisioning information should be in version control. Each microservice should have its own independent code repository within the source control systems.
Dependencies—Explicitly declare the dependencies your application uses through build tools such as Maven (Java). Third-party JAR dependence should be declared using their specific version numbers. This allows your microservice to always be built using the same version of libraries.
Config—Store your application configuration (especially your environment-specific configuration) independently from your code. Your application configuration should never be in the same repository as your source code.
Backing services—Your microservice will often communicate over a network to a database or messaging system. When it does, you should ensure that at any time, you can swap out your implementation of the database from an in-house managed service to a third-party service. In chapter 10, we demonstrate this when you move your services away from a locally managed Postgres database to one managed by Amazon.
Build, release, run—Keep your build, release, and run pieces of deploying your application completely separate. Once code is built, the developer should never make changes to the code at runtime. Any changes need to go back to the build process and be redeployed. A built service is immutable and cannot be changed.
Processes—Your microservices should always be stateless. They can be killed and replaced at any timeout without the fear that a loss-of-a-service instance will result in data loss.
Port binding—A microservice is completely self-contained with the runtime engine for the service packaged in the service executable. You should run the service without the need for a separated web or application server. The service should start by itself on the command line and be accessed immediately through an exposed HTTP port.
Concurrency—When you need to scale, don’t rely on a threading model within a single service. Instead, launch more microservice instances and scale out horizontally. This doesn’t preclude using threading within your microservice, but don’t rely on it as your sole mechanism for scaling. Scale out, not up.
Disposability—Microservices are disposable and can be started and stopped on demand. Startup time should be minimized and processes should shut down gracefully when they receive a kill signal from the operating system.
Dev/prod parity—Minimize the gaps that exist between all of the environments in which the service runs (including the developer’s desktop). A developer should use the same infrastructure locally for the service development in which the actual service will run. It also means that the amount of time that a service is deployed between environments should be hours, not weeks. As soon as code is committed, it should be tested and then promoted as quickly as possible from Dev all the way to Prod.
Logs—Logs are a stream of events. As logs are written out, they should be streamable to tools, such as Splunk (http://splunk.com) or Fluentd (http://fluentd.org), that will collate the logs and write them to a central location. The microservice should never be concerned about the mechanics of how this happens and the developer should visually look at the logs via STDOUT as they’re being written out.
Admin processes—Developers will often have to do administrative tasks against their services (data migration or conversion). These tasks should never be ad hoc and instead should be done via scripts that are managed and maintained through the source code repository. These scripts should be repeatable and non-changing (the script code isn’t modified for each environment) across each environment they’re run against.
2.4.1. Service assembly: packaging and deploying your microservices
From a DevOps perspective, one of the key concepts behind a microservice architecture is that multiple instances of a microservice can be deployed quickly in response to a change application environment (for example, a sudden influx of user requests, problems within the infrastructure, and so on).
To accomplish this, a microservice needs to be packaged and installable as a single artifact with all of its dependencies defined within it. This artifact can then be deployed to any server with a Java JDK installed on it. These dependencies will also include the runtime engine (for example, an HTTP server or application container) that will host the microservice.
This process of consistently building, packaging, and deploying is the service assembly (step 1 in figure 2.6). Figure 2.7 shows additional details about the service assembly step.
Figure 2.7. In the Service Assembly step, source code is compiled and packaged with its runtime engine.
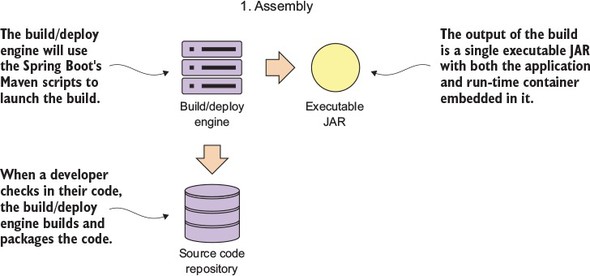
Fortunately, almost all Java microservice frameworks will include a runtime engine that can be packaged and deployed with the code. For instance, in the Spring Boot example in figure 2.7, you can use Maven and Spring Boot to build an executable Java jar file that has an embedded Tomcat engine built right into the JAR. In the following command-line example, you’re building the licensing service as an executable JAR and then starting the JAR file from the command-line:
mvn clean package && java –jar target/licensing-service-0.0.1-SNAPSHOT.jar
For certain operation teams, the concept of embedding a runtime environment right in the JAR file is a major shift in the way they think about deploying applications. In a traditional J2EE enterprise organization, an application is deployed to an application server. This model implies that the application server is an entity in and of itself and would often be managed by a team of system administrators who managed the configuration of the servers independently of the applications being deployed to them.
This separation of the application server configuration from the application introduces failure points in the deployment process, because in many organizations the configuration of the application servers isn’t kept under source control and is managed through a combination of the user interface and home-grown management scripts. It’s too easy for configuration drift to creep into the application server environment and suddenly cause what, on the surface, appear to be random outages.
The use of a single deployable artifact with the runtime engine embedded in the artifact eliminates many of these opportunities for configuration drift. It also allows you to put the whole artifact under source control and allows the application team to be able to better reason through how their application is built and deployed.
2.4.2. Service bootstrapping: managing configuration of your microservices
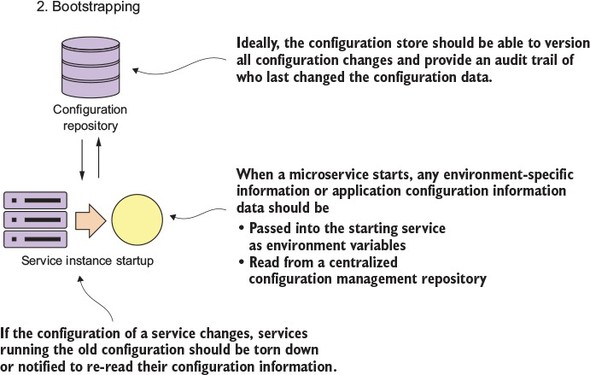
Service bootstrapping (step 2 in figure 2.6) occurs when the microservice is first starting up and needs to load its application configuration information. Figure 2.8 provides more context for the bootstrapping processing.
Figure 2.8. As a service starts (boot straps), its reads its configuration from a central repository.
As any application developer knows, there will be times when you need to make the runtime behavior of the application configurable. Usually this involves reading your application configuration data from a property file deployed with the application or reading the data out of a data store such as a relational database.
Microservices often run into the same type of configuration requirements. The difference is that in microservice application running in the cloud, you might have hundreds or even thousands of microservice instances running. Further complicating this is that the services might be spread across the globe. With a high number of geographically dispersed services, it becomes unfeasible to redeploy your services to pick up new configuration data.
Storing the data in a data store external to the service solves this problem, but microservices in the cloud offer a set of unique challenges:
- Configuration data tends to be simple in structure and is usually read frequently and written infrequently. Relational databases are overkill in this situation because they’re designed to manage much more complicated data models then a simple set of key-value pairs.
- Because the data is accessed on a regular basis but changes infrequently, the data must be readable with a low level of latency.
- The data store has to be highly available and close to the services reading the data. A configuration data store can’t go down completely, because it would become a single-point of failure for your application.
In chapter 3, I show how to manage your microservice application configuration data using things like a simple key-value data store.
2.4.3. Service registration and discovery: how clients communicate with - your microservices
From a microservice consumer perspective, a microservice should be location-transparent, because in a cloud-based environment, servers are ephemeral. Ephemeral means the servers that a service is hosted on usually have shorter lives then a service running in a corporate data center. Cloud-based services can be started and torn down quickly with an entirely new IP address assigned to the server on which the services are running.
By insisting that services are treated as short-lived disposable objects, microservice architectures can achieve a high-degree of scalability and availability by having multiple instances of a service running. Service demand and resiliency can be managed as quickly as the situation warrants. Each service has a unique and non-permanent IP address assigned to it. The downside to ephemeral services is that with services constantly coming up and down, managing a large pool of ephemeral services manually or by hand is an invitation to an outage.
A microservice instance needs to register itself with the third-party agent. This registration process is called service discovery (see step 3, service discovery, in figure 2.6; see figure 2.9 for details on this process). When a microservice instance registers with a service discovery agent, it will tell the discovery agent two things: the physical IP address or domain address of the service instance, and a logical name that an application can use to look up in a service. Certain service discovery agents will also require a URL back to the registering service that can be used by the service discovery agent to perform health checks.
Figure 2.9. A service discovery agent abstracts away the physical location of a service.
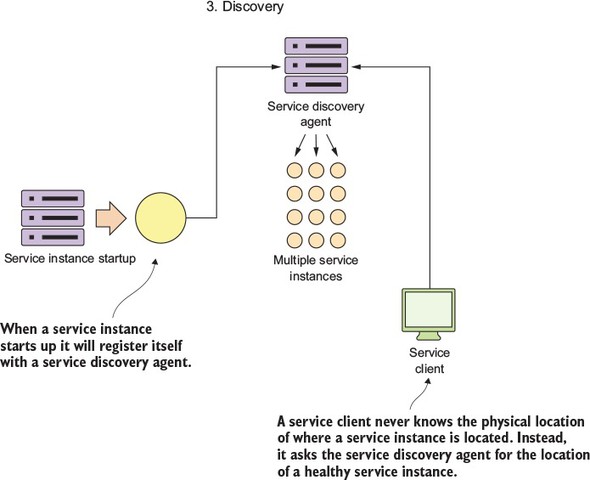
The service client then communicates with the discovery agent to look up the service’s location.
2.4.4. Communicating a microservice’s health
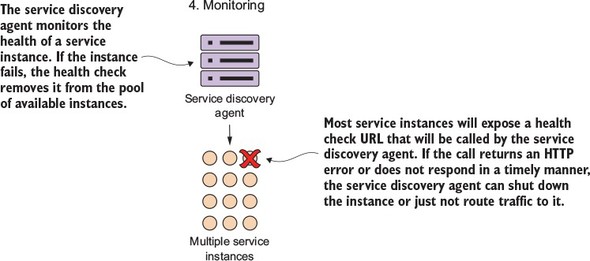
A service discovery agent doesn’t act only as a traffic cop that guides the client to the location of the service. In a cloud-based microservice application, you’ll often have multiple instances of a service running. Sooner or later, one of those service instances will fail. The service discovery agent monitors the health of each service instance registered with it and removes any service instances from its routing tables to ensure that clients aren’t sent a service instance that has failed.
After a microservice has come up, the service discovery agent will continue to monitor and ping the health check interface to ensure that that service is available. This is step 4 in figure 2.6. Figure 2.10 provides context for this step.
Figure 2.10. The service discovery agent uses the exposes health URL to check microservice health.
By building a consistent health check interface, you can use cloud-based monitoring tools to detect problems and respond to them appropriately.
If the service discovery agent discovers a problem with a service instance, it can take corrective action such as shutting down the ailing instance or bringing additional service instances up.
In a microservices environment that uses REST, the simplest way to build a health check interface is to expose an HTTP end-point that can return a JSON payload and HTTP status code. In a non-Spring-Boot-based microservice, it’s often the developer’s responsibility to write an endpoint that will return the health of the service.
In Spring Boot, exposing an endpoint is trivial and involves nothing more than modifying your Maven build file to include the Spring Actuator module. Spring Actuator provides out-of-the-box operational endpoints that will help you understand and manage the health of your service. To use Spring Actuator, you need to make sure you include the following dependencies in your Maven build file:
<dependency>
  <groupId>org.springframework.boot</groupId>
  <artifactId>spring-boot-starter-actuator</artifactId>
</dependency>
If you hit the http://localhost:8080/health endpoint on the licensing service, you should see health data returned. Figure 2.11 provides an example of the data returned.
Figure 2.11. A health check on each service instance allows monitoring tools to determine if the service instance is running.
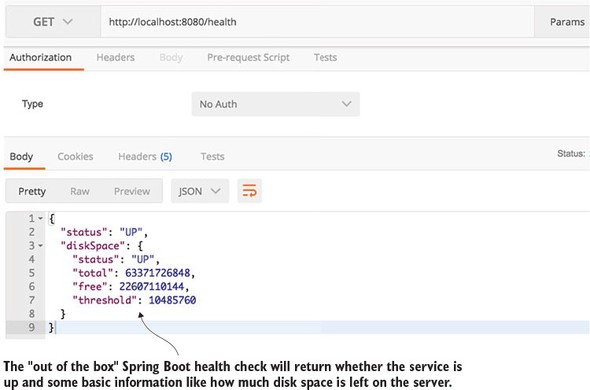
As you can see in figure 2.11, the health check can be more than an indicator of what’s up and down. It also can give information about the state of the server on which the microservice instance is running. This allows for a much richer monitoring experience.[2]
Spring Boot offers a significant number of options for customizing your health check. For more details on this, please check out the excellent book Spring Boot in Action (Manning Publications, 2015). Author Craig Walls gives an exhaustive overview of all the different mechanisms for configuring Spring Boot Actuators.
2.5. Pulling the perspectives together
Microservices in the cloud seem deceptively simple. But to be successful with them, you need to have an integrated view that pulls the perspective of the architect, the developer, and DevOps engineer together into a cohesive vision. The key takeaways for each of these perspectives are
- Architect— Focus on the natural contours of your business problem. Describe your business problem domain and listen to the story you’re telling. Target microservice candidates will emerge. Remember, too, that it’s better to start with a “coarse-grained” microservice and refactor back to smaller services than to start with a large group of small services. Microservice architectures, like most good architectures, are emergent and not preplanned to-the-minute.
- Software engineer— The fact that the service is small doesn’t mean good design principles get thrown out the window. Focus on building a layered service where each layer in the service has discrete responsibilities. Avoid the temptation to build frameworks in your code and try to make each microservice completely independent. Premature framework design and adoption can have massive maintenance costs later in the lifecycle of the application.
- DevOps engineer— Services don’t exist in a vacuum. Establish the lifecycle of your services early. The DevOps perspective needs to focus not only on how to automate the building and deployment of a service, but also on how to monitor the health of the service and react when something goes wrong. Operationalizing a service often takes more work and forethought than writing business logic.
2.6. Summary
- To be successful with microservices, you need to integrate in the architect’s, software developer’s, and DevOps’ perspectives.
- Microservices, while a powerful architectural paradigm, have their benefits and tradeoffs. Not all applications should be microservice applications.
- From an architect’s perspective, microservices are small, self-contained, and distributed. Microservices should have narrow boundaries and manage a small set of data.
- From a developer’s perspective, microservices are typically built using a REST-style of design, with JSON as the payload for sending and receiving data from the service.
- Spring Boot is the ideal framework for building microservices because it lets you build a REST-based JSON service with a few simple annotations.
- From a DevOp’s perspective, how a microservice is packaged, deployed, and monitored are of critical importance.
- Out of the box, Spring Boot allows you to deliver a service as a single executable JAR file. An embedded Tomcat server in the producer JAR file hosts the service.
- Spring Actuator, which is included with the Spring Boot framework, exposes information about the operational health of the service along with information about the services runtime.