Table of Contents for
Spring Microservices in Action
 Spring Microservices in Action
Published by
Manning Publications, 2017
Spring Microservices in Action
Published by
Manning Publications, 2017
- Cover
- Spring Microservices in Action
- Copyright
- Spring Microservices in Action
- Brief Table of Contents
- Table of Contents
- Preface
- Acknowledgments
- About this Book
- About the Author
- About the Cover Illustration
- Chapter 1. Welcome to the cloud, Spring
- Chapter 2. Building microservices with Spring Boot
- Chapter 3. Controlling your configuration with Spring Cloud configuration server
- Chapter 4. On service discovery
- Chapter 5. When bad things happen: client resiliency patterns with Spring Cloud and Netflix Hystrix
- Chapter 6. Service routing with Spring Cloud and Zuul
- Chapter 7. Securing your microservices
- Chapter 8. Event-driven architecture with Spring Cloud Stream
- Chapter 9. Distributed tracing with Spring Cloud Sleuth and Zipkin
- Chapter 10. Deploying your microservices
- Appendix A. Running a cloud on your desktop
- Appendix B. OAuth2 grant types
- Index
- List of Figures
- List of Tables
- List of Listings
Chapter 3. Controlling your configuration with Spring Cloud configuration server
- Separating service configuration from service code
- Configuring a Spring Cloud configuration server
- Integrating a Spring Boot microservice
- Encrypting sensitive properties
At one point or another, a developer will be forced to separate configuration information from their code. After all, it has been drilled into their heads since school that they shouldn’t hard-code values into the application code. Many developers will use a constants class file in their application to help centralize all their configuration in one place. Application configuration data written directly into the code is often problematic because every time a change to the configuration has to be made the application has to be recompiled and/or redeployed. To avoid this, developers will separate the configuration information from the application code completely. This makes it easy to make changes to configuration without going through a recompile process, but also introduces complexity because you now have another artifact that needs to be managed and deployed with the application.
Many developers will turn to the lowly property file (or YAML, JSON, or XML) to store their configuration information. This property file will sit out on a server often containing database and middleware connection information and metadata about the application that will drive the application’s behavior. Segregating your application into a property file is easy and most developers never do any more operationalization of their application configuration then placing their configuration file under source control (if that) and deploying it as part of their application.
This approach might work with a small number of applications, but it quickly falls apart when dealing with cloud-based applications that may contain hundreds of microservices, where each microservice in turn might have multiple service instances running.
Suddenly configuration management becomes a big deal as application and operations team in a cloud-based environment have to wrestle with a rat’s nest of which configuration files go where. Cloud-based microservices development emphasizes
- Completely separating the configuration of an application from the actual code being deployed
- Building the server and the application and an immutable image that never changes as it’s promoted through your environments
- Injecting any application configuration information at startup time of the server through either environment variables or through a centralized repository the application’s microservices read on startup
This chapter will introduce you to the core principles and patterns needed to manage application configuration data in a cloud-based microservice application.
3.1. On managing configuration (and complexity)
Managing application configuration is critical for microservices running in the cloud because microservice instances need to be launched quickly with minimal human intervention. Every time a human being needs to manually configure or touch a service to get it deployed is an opportunity for configuration drift, an unexpected outage and a lag-time in responding to scalability challenges with the application.
Let’s begin our discussion about application configuration management by establishing four principles we want to follow:
- Segregate— We want to completely separate the services configuration information from the actual physical deployment of a service. Application configuration shouldn’t be deployed with the service instance. Instead, configuration information should either be passed to the starting service as environment variables or read from a centralized repository when the service starts.
- Abstract— Abstract the access of the configuration data behind a service interface. Rather than writing code that directly accesses the service repository (that is, read the data out of a file or a database using JDBC), have the application use a REST-based JSON service to retrieve the configuration data.
- Centralize— Because a cloud-based application might literally have hundreds of services, it’s critical to minimize the number of different repositories used to hold configuration information. Centralize your application configuration into as few repositories as possible.
- Harden— Because your application configuration information is going to be completely segregated from your deployed service and centralized, it’s critical that whatever solution you utilize can be implemented to be highly available and redundant.
One of the key things to remember is that when you separate your configuration information outside of your actual code, you’re creating an external dependency that will need to be managed and version controlled. I can’t emphasize enough that the application configuration data needs to be tracked and version-controlled because mismanaged application configuration is a fertile breeding ground for difficult-to-detect bugs and unplanned outages.
I’ve experienced firsthand the dangers of not having a strategy for managing your application configuration data. While working at a Fortune 500 financial services company, I was asked to help bring a large WebSphere upgrade project back on track. The company in question had more than 120 applications on WebSphere and needed to upgrade their infrastructure from WebSphere 6 to WebSphere 7 before the entire application environment went end-of-life in terms of maintenance by the vendor.
The project had already been going on for a year and had only one out of 120 applications deployed. The project had cost a million dollars of effort in people and hardware costs, and with its current trajectory was on track to take another two years to finish the upgrade.
When I started working with the application team, one (and just one) of the major problems I uncovered was that the application team managed all their configuration for their databases and the endpoints for their services inside of property files. These property files were managed by hand and weren’t under source control. With 120 applications spread across four environments and multiple WebSphere nodes for each application, this rat’s nest of configuration files led to the team trying to migrate 12,000 configuration files that were spread across hundreds of servers and applications running on the server. (You’re reading that number right: 12,000.) These files were only for application configuration, not even application server configuration.
I convinced the project sponsor to take two months to consolidate all the application information down to a centralized, version-controlled configuration repository with 20 configuration files. When I asked the framework team how things got to the point where they had 12,000 configuration files, the lead engineer on the team said that originally they designed their configuration strategy around a small group of applications. However, the number of web applications built and deployed exploded over five years, and even though they begged for money and time to rework their configuration management approach, their business partners and IT leaders never considered it a priority.
Not spending the time up front to figure out how you’re going to do configuration management can have real (and costly) downstream impacts.
3.1.1. Your configuration management architecture
As you’ll remember from chapter 2, the loading of configuration management for a microservice occurs during the bootstrapping phase of the microservice. As a reminder, figure 3.1 shows the microservice lifecycle.
Figure 3.1. The application configuration data is read during the service bootstrapping phase.
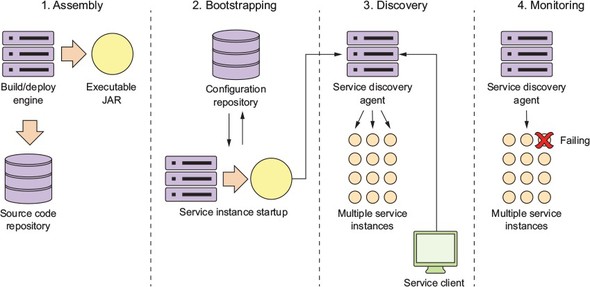
Let’s take the four principles we laid out earlier in section 3.1 (segregate, abstract, centralize, and harden) and see how these four principles apply when the service is bootstrapping. Figure 3.2 explores the bootstrapping process in more detail and shows how a configuration service plays a critical role in this step.
Figure 3.2. Configuration management conceptual architecture
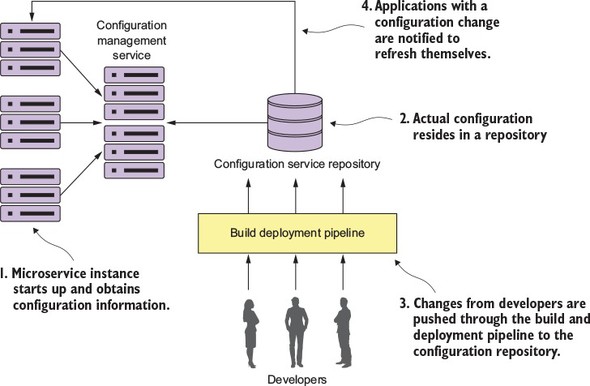
In figure 3.2, you see several activities taking place:
- When a microservice instance comes up, it’s going to call a service endpoint to read its configuration information that’s specific to the environment it’s operating in. The connection information for the configuration management (connection credentials, service endpoint, and so on) will be passed into the microservice when it starts up.
- The actual configuration will reside in a repository. Based on the implementation of your configuration repository, you can choose to use different implementations to hold your configuration data. The implementation choices can include files under source control, a relational database, or a key-value data store.
- The actual management of the application configuration data occurs independently of how the application is deployed. Changes to configuration management are typically handled through the build and deployment pipeline where changes of the configuration can be tagged with version information and deployed through the different environments.
- When a configuration management change is made, the services that use that application configuration data must be notified of the change and refresh their copy of the application data.
At this point we’ve worked through the conceptual architecture that illustrates the different pieces of a configuration management pattern and how these pieces fit together. We’re now going to move on to look at the different solutions for the pattern and then see a concrete implementation.
3.1.2. Implementation choices
Fortunately, you can choose among a large number of battle-tested open source projects to implement a configuration management solution. Let’s look at several of the different choices available and compare them. Table 3.1 lays out these choices.
Table 3.1. Open source projects for implementing a configuration management system
|
Project Name |
Description |
Characteristics |
|---|---|---|
| Etcd | Open source project written in Go. Used for service discovery and key-value management. Uses the raft (https://raft.github.io/) protocol for its distributed computing model. | Very fast and scalable Distributable Command-line driven Easy to use and setup |
| Eureka | Written by Netflix. Extremely battle-tested. Used for both service discovery and key-value management. | Distribute key-value store. Flexible; takes effort to set up Offers dynamic client refresh out of the box |
| Consul | Written by Hashicorp. Similar to Etcd and Eureka in features, but uses a different algorithm for its distributed computing model (SWIM protocol; https://www.cs.cornell.edu/~asdas/research/dsn02-swim.pdf). | Fast Offers native service discovery with the option to integrate directly with DNS Doesn’t offer client dynamic refresh right out of the box |
| ZooKeeper | An Apache project that offers distributed locking capabilities. Often used as a configuration management solution for accessing key-value data. | Oldest, most battle-tested of the solutions The most complex to use Can be used for configuration management, but should be considered only if you’re already using ZooKeeper in other pieces of your architecture |
| Spring Cloud configuration server | An open source project that offers a general configuration management solution with different back ends. It can integrate with Git, Eureka, and Consul as a back end. | Non-distributed key/value store Offers tight integration for Spring and non-Spring services Can use multiple back ends for storying configuration data including a shared filesystem, Eureka, Consul, and Git |
All the solutions in table 3.1 can easily be used to build a configuration management solution. For the examples in this chapter and throughout the rest of the book, you’ll use Spring Cloud configuration server. I chose this solution for several reasons, including the following:
- Spring Cloud configuration server is easy to set up and use.
- Spring Cloud configuration integrates tightly with Spring Boot. You can literally read all your application’s configuration data with a few simple-to-use annotations.
- Spring Cloud configuration server offers multiple back ends for storing configuration data. If you’re already using tools such as Eureka and Consul, you can plug them right into Spring Cloud configuration server.
- Of all the solutions in table 3.1, Spring Cloud configuration server can integrate directly with the Git source control platform. Spring Cloud configuration’s integration with Git eliminates an extra dependency in your solutions and makes versioning your application configuration data a snap. The other tools (Etcd, Consul, Eureka) don’t offer any kind of native versioning, and if you wanted that, you’d have to build it yourself. If your shop uses Git, the use of Spring Cloud configuration server is an attractive option.
For the rest of this chapter, you’re going to
- Set up a Spring Cloud configuration server and demonstrate two different mechanisms for serving application configuration data—one using the filesystem and another using a Git repository
- Continue to build out the licensing service to retrieve data from a database
- Hook the Spring Cloud configuration service into your licensing service to serve up application configuration data
3.2. Building our Spring Cloud configuration server
The Spring Cloud configuration server is a REST-based application that’s built on top of Spring Boot. It doesn’t come as a standalone server. Instead, you can choose to either embed it in an existing Spring Boot application or start a new Spring Boot project with the server embedded it.
The first thing you need to do is set up a new project directory called confsvr. Inside the consvr directory you’ll create a new Maven file that will be used to pull down the JARs necessary to start up on your Spring Cloud configuration server. Rather than walk through the entire Maven file, I’ll list the key parts in the following listing.
Listing 3.1. Setting up the pom.xml for the Spring Cloud configuration server
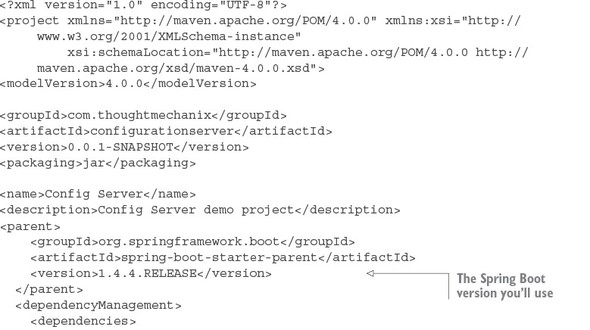
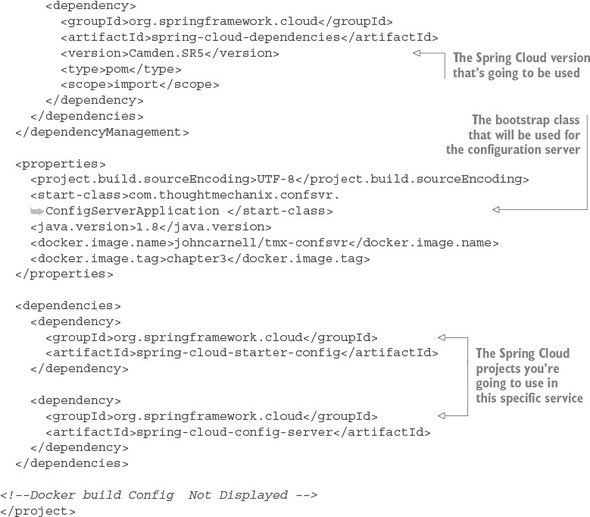
In the Maven file in this previous listing, you start out by declaring the version of Spring Boot you’re going to use for your microservice (version 1.4.4). The next important part of the Maven definition is the Spring Cloud Configuration parent BOM (Bill of Materials) that you’re going to use. Spring Cloud is a massive collection of independent projects all moving with their own releases. This parent BOM contains all the third-party libraries and dependencies that are used in the cloud project and the version numbers of the individual projects that make up that version. In this example, you’re using version Camden.SR5 of Spring Cloud. By using the BOM definition, you can guarantee that you’re using compatible versions of the subprojects in Spring Cloud. It also means that you don’t have to declare version numbers for your sub-dependencies. The rest of the example in listing 3.1 deals with declaring the specific Spring Cloud dependencies that you’ll use in the service. The first dependency is the spring-cloud-starter-config dependency that’s used by all Spring Cloud projects. The second dependency is the spring-cloud-config-server starter project. This contains the core libraries for the spring-cloud-config-server.
Spring Cloud uses a non-traditional mechanism for labeling Maven projects. Spring Cloud is a collection of independent subprojects. The Spring Cloud team does their releases through what they call the “release train.” All the subprojects that make up Spring Cloud are packaged under one Maven bill of materials (BOM) and released as a whole. The Spring Cloud team has been using the name of London subway stops as the name of their releases, with each incrementing major release giving a London subway stop that has the next highest letter. There have been three releases: Angel, Brixton, and Camden. Camden is by far the newest release, but still has multiple release candidate branches for the subprojects within it.
One thing to note is that Spring Boot is released independently of the Spring Cloud release train. Therefore, different versions of Spring Boot are incompatible with different releases of Spring Cloud. You can see the version dependences between Spring Boot and Spring Cloud, along with the different subproject versions contained within the release train, by referring to the Spring Cloud website (http://projects.spring.io/spring-cloud/).
You still need to set up one more file to get the core configuration server up and running. This file is your application.yml file and is in the confsvr/src/main/resources directory. The application.yml file will tell your Spring Cloud configuration service what port to listen to and where to locate the back end that will serve up the configuration data.
You’re almost ready to bring up your Spring Cloud configuration service. You need to point the server to a back-end repository that will hold your configuration data. For this chapter, you’ll use the licensing service that you began to build in chapter 2 as an example of how to use Spring Cloud Config. To keep things simple, you’ll set up application configuration data for three environments: a default environment for when you run the service locally, a dev environment, and a production environment.
In Spring Cloud configuration, everything works off a hierarchy. Your application configuration is represented by the name of the application and then a property file for each environment you want to have configuration information for. In each of these environments, you’ll set up two configuration properties:
- An example property that will be used directly by your licensing service
- The database configuration for the Postgres database you’ll use to store licensing service data
Figure 3.3 illustrates how you’ll set up and use the Spring Cloud configuration service. One thing to note is that as you build out your config service, it will be another microservice running in your environment. Once it’s set up, the contents of the service can be access via a http-based REST endpoint.
Figure 3.3. Spring Cloud configuration exposes environment-specific properties as HTTP-based endpoints.
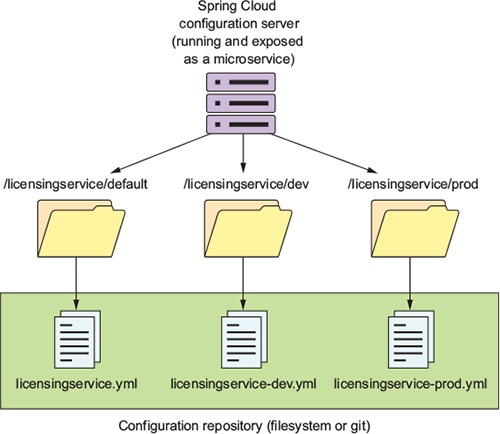
The naming convention for the application configuration files are appname-env.yml. As you can see from the diagram in figure 3.3, the environment names translate directly into the URLs that will be accessed to browse configuration information. Later, when you start the licensing microservice example, the environment you want to run the service against is specified by the Spring Boot profile that you pass in on the command-line service startup. If a profile isn’t passed in on the command line, Spring Boot will always default to the configuration data contained in the application.yml file packaged with the application.
Here’s an example of some of the application configuration data you’ll serve up for the licensing service. This is the data that will be contained within the confsvr/src/main/resources/config/licensingservice/licensingservice.yml file that was referred to in figure 3.3. Here’s part of the contents of this file:
tracer.property: "I AM THE DEFAULT"
spring.jpa.database: "POSTGRESQL"
spring.datasource.platform:  "postgres"
spring.jpa.show-sql: "true"
spring.database.driverClassName: "org.postgresql.Driver"
spring.datasource.url: "jdbc:postgresql://database:5432/eagle_eye_local"
spring.datasource.username: "postgres"

spring.datasource.password: "p0stgr@s"
spring.datasource.testWhileIdle: "true"
spring.datasource.validationQuery: "SELECT 1"
spring.jpa.properties.hibernate.dialect: "org.hibernate.dialect.PostgreSQLDialect"
I advise against using a filesystem-based solution for medium-to-large cloud applications. Using the filesystem approach means that you need to implement a shared file mount point for all cloud configuration servers that want to access the application configuration data. Setting up shared filesystem servers in the cloud is doable, but it puts the onus of maintaining this environment on you.
I’m showing the filesystem approach as the easiest example to use when getting your feet wet with Spring Cloud configuration server. In a later section, I’ll show how to configure Spring Cloud configuration server to use a cloud-based Git provider like Bitbucket or GitHub to store your application configuration.
3.2.1. Setting up the Spring Cloud Config Bootstrap class
Every Spring Cloud service covered in this book always needs a bootstrap class that will be used to launch the service. This bootstrap class will contain two things: a Java main() method that acts as the entry point for the Service to start in, and a set of Spring Cloud annotations that tell the starting service what kind of Spring Cloud behaviors it’s going to launch for the service.
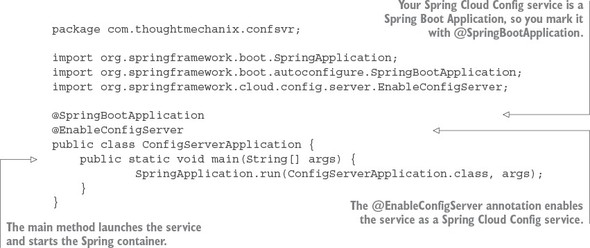
The following listing shows the confsvr/src/main/java/com/thought mechanix/confsvr/Application.java class that’s used as the bootstrap class for your configuration service.
Listing 3.2. The bootstrap class for your Spring Cloud Config server
Next you’ll set up your Spring Cloud configuration server with our simplest example: the filesystem.
3.2.2. Using Spring Cloud configuration server with the filesystem
The Spring Cloud configuration server uses an entry in the confsvr/src/main/resources/application.yml file to point to the repository that will hold the application configuration data. Setting up a filesystem-based repository is the easiest way to accomplish this.
To do this, add the following information to the configuration server’s application.yml file. The following listing shows the contents of your Spring Cloud configuration server’s application.yml file.
Listing 3.3. Spring Cloud configuration’s application.yml file
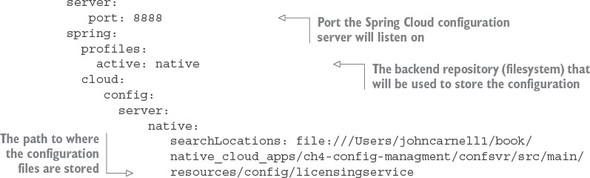
In the configuration file in this listing, you started by telling the configuration server what port number it should listen to for all requests for configuration:
server:
   port: 8888
Because you’re using the filesystem for storing application configuration information, you need to tell Spring Cloud configuration server to run with the “native” profile:
profiles:
   active: native
The last piece in the application.yml file provides Spring Cloud configuration with the directory where the application data resides:
server:
   native:
      searchLocations: file:///Users/johncarnell1/book/spmia_code/chapter3-code/confsvr/src/main/resources/config
The important parameter in the configuration entry is the searchLocations attribute. This attribute provides a comma separated list of the directories for each application that’s going to have properties managed by the configuration server. In the previous example, you only have the licensing service configured.
Note
Be aware that if you use the local filesystem version of Spring Cloud Config, you’ll need to modify the spring.cloud.config.server.native.searchLocations attribute to reflect your local file path when running your code locally.
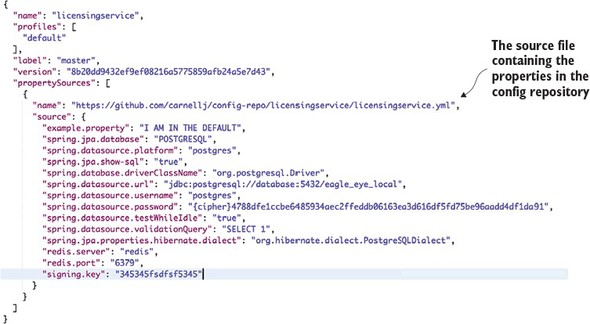
You now have enough work done to start the configuration server. Go ahead and start the configuration server using the mvn spring-boot:run command. The server should now come up with the Spring Boot splash screen on the command line. If you point your browser over to http://localhost:8888/licensingservice/default, you’ll see JSON payload being returned with all of properties contained within the licensingservice.yml file. Figure 3.4 shows the results of calling this endpoint.
Figure 3.4. Retrieving default configuration information for the licensing service
If you want to see the configuration information for the dev-based licensing service environment, hit the GET http://localhost:8888/licensingservice/dev endpoint. Figure 3.5 shows the result of calling this endpoint.
Figure 3.5. Retrieving configuration information for the licensing service using the dev profile
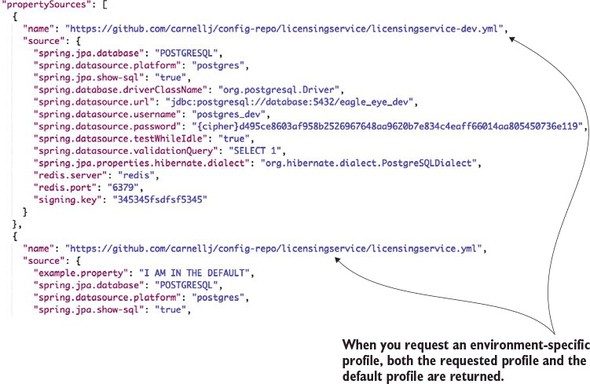
If you look closely, you’ll see that when you hit the dev endpoint, you’re returning back both the default configuration properties for the licensing service and the dev licensing service configuration. The reason why Spring Cloud configuration is returning both sets of configuration information is that the Spring framework implements a hierarchical mechanism for resolving properties. When the Spring Framework does property resolution, it will always look for the property in the default properties first and then override the default with an environment-specific value if one is present.
In concrete terms, if you define a property in the licensingservice.yml file and don’t define it in any of the other environment configuration files (for example, the licensingservice-dev.yml), the Spring framework will use the default value.
Note
This isn’t the behavior you’ll see by directly calling the Spring Cloud configuration REST endpoint. The REST endpoint will return all configuration values for both the default and environment specific value that was called.
Let’s see how you can hook up the Spring Cloud configuration server to your licensing microservice.
3.3. Integrating Spring Cloud Config with a Spring Boot client
In the previous chapter, you built a simple skeleton of your licensing service that did nothing more than return a hardcoded Java object representing a single licensing record from your database. In the next example, you’ll build out the licensing service and talk to a Postgres database holding your licensing data.
You’re going to communicate with the database using Spring Data and map your data from the licensing table to a POJO holding the data. Your database connection and a simple property are going to be read out of Spring Cloud configuration server. Figure 3.6 shows what’s going to happen between the licensing service and the Spring Cloud configuration service.
Figure 3.6. Retrieving configuration information using the dev profile
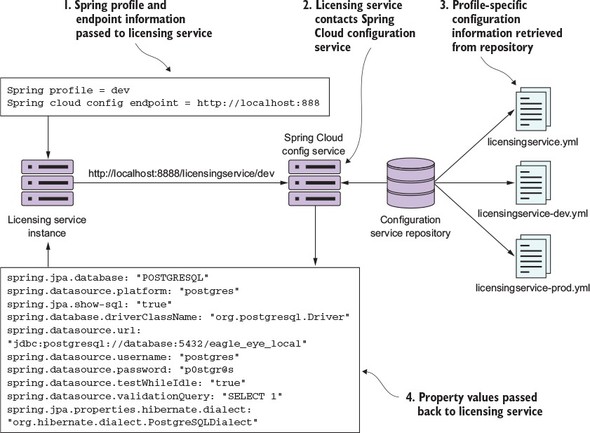
When the licensing service is first started, you’ll pass it via the command line two pieces of information: the Spring profile and the endpoint the licensing service should use to communicate with the Spring Cloud configuration service. The Spring profile value maps to the environment of the properties being retrieved for the Spring service. When the licensing service first boots up, it will contact the Spring Cloud Config service via an endpoint built from the Spring profile passed into it. The Spring Cloud Config service will then use the configured back end config repository (filesystem, Git, Consul, Eureka) to retrieve the configuration information specific to the Spring profile value passed in on the URI. The appropriate property values are then passed back to the licensing service. The Spring Boot framework will then inject these values into the appropriate parts of the application.
3.3.1. Setting up the licensing service Spring Cloud Config server dependencies
Let’s change our focus from the configuration server to the licensing service. The first thing you need to do is add a couple of more entries to the Maven file in your licensing service. The entries that need to be added are shown in the following listing.
Listing 3.4. Additional Maven dependencies needed by the licensing service
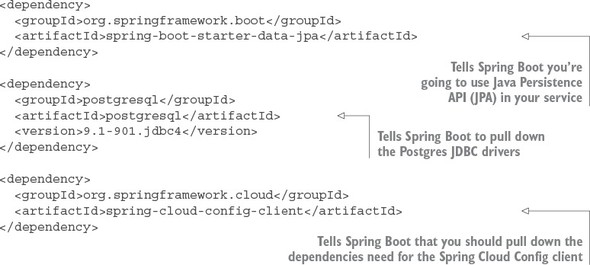
The first and second dependencies, spring-boot-starter-data-jpa and PostgreSQL, import the Spring Data Java Persistence API (JPA) and the Postgres JDBC drivers. The last dependency, the spring-cloud-config-client, contains all the classes needed to interact with the Spring Cloud configuration server.
3.3.2. Configuring the licensing service to use Spring Cloud Config
After the Maven dependencies have been defined, you need to tell the licensing service where to contact the Spring Cloud configuration server. In a Spring Boot service that uses Spring Cloud Config, configuration information can be set in one of two configuration files: bootstrap.yml and application.yml.
The bootstrap.yml file reads the application properties before any other configuration information used. In general, the bootstrap.yml file contains the application name for the service, the application profile, and the URI to connect to a Spring Cloud Config server. Any other configuration information that you want to keep local to the service (and not stored in Spring Cloud Config) can be set locally in the services in the application.yml file. Usually, the information you store in the application.yml file is configuration data that you might want to have available to a service even if the Spring Cloud Config service is unavailable. Both the bootstrap.yml and application.yml files are stored in a projects src/main/resources directory.
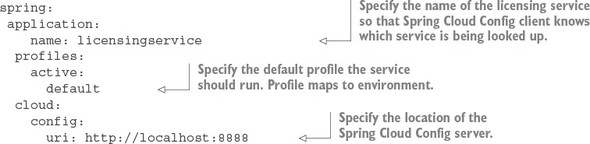
To have the licensing service communicate with your Spring Cloud Config service, you need to add a licensing-service/src/main/resources/bootstrap.yml file and set three properties: spring.application.name, spring.profiles.active, and spring.cloud.config.uri.
The licensing services bootstrap.yml file is shown in the following listing.
Listing 3.5. Configuring the licensing services bootstrap.yml
Note
The Spring Boot applications support two mechanisms to define a property: YAML (Yet another Markup Language) and a “.” separated property name. We chose YAML (Yet Another Markup Language) as the means for configuring our application. The hierarchical format of YAML property values map directly to the spring.application.name, spring.profiles.active, and spring.cloud.config.uri names.
The spring.application.name is the name of your application (for example, licensingservice) and must map directly to the name of the directory within your Spring Cloud configuration server. For the licensing service, you want a directory on the Spring Cloud configuration server called licensingservice.
The second property, the spring.profiles.active, is used to tell Spring Boot what profile the application should run as. A profile is a mechanism to differentiate the configuration data consumed by the Spring Boot application. For the licensing service’s profile, you’ll support the environment the service is going to map directly to in your cloud configuration environment. For instance, by passing in dev as our profile, the Spring Cloud config server will use the dev properties. If you set a profile, the licensing service will use the default profile.
The third and last property, the spring.cloud.config.uri, is the location where the licensing service should look for the Spring Cloud configuration server endpoint. By default, the licensing service will look for the configuration server at http://localhost:8888. Later in the chapter you’ll see how to override the different properties defined in the boostrap.yml and application.yml files on application startup. This will allow you to tell the licensing microservice which environment it should be running in.
Now, if you bring up the Spring Cloud configuration service, with the corresponding Postgres database running on your local machine, you can launch the licensing service using its default profile. This is done by changing to the licensing-services directory and issuing the following commands:
mvn spring-boot: run
By running this command without any properties set, the licensing server will automatically attempt to connect to the Spring Cloud configuration server using the endpoint (http://localhost:8888) and the active profile (default) defined in the bootstrap.yml file of the licensing service.
If you want to override these default values and point to another environment, you can do this by compiling the licensingservice project down to a JAR and then run the JAR with a -D system property override. The following command line call demonstrates how to launch the licensing service with a non-default profile:
java  -Dspring.cloud.config.uri=http://localhost:8888 \
      -Dspring.profiles.active=dev \
      -jar target/licensing-service-0.0.1-SNAPSHOT.jar
With the previous command line, you’re overriding the two parameters: spring.cloud.config.uri and spring.profiles.active. With the -Dspring.cloud.config.uri=http://localhost:8888 system property, you’re pointing to a configuration server running away from your local box.
Note
If you try to run the licensing service downloaded from the GitHub repository (https://github.com/carnellj/spmia-chapter3) from your desktop using the previous Java command, it will fail because you don’t have a desktop Postgres server running and the source code in the GitHub repository is using encryption on the config server. We’ll cover using encryption later in the chapter. The previous example demonstrates how to override Spring properties via the command line.
With the –Dspring.profiles.active=dev system property, you’re telling the licensing service to use the dev profile (read from the configuration server) to connect to a dev instance of a database.
In the examples you’re hard-coding the values to pass in to the –D parameter values. In the cloud, most of the application config data you need will be in your configuration server. However, for the information you need to start your service (such as the data for the configuration server), you’d start the VM instance or Docker container and pass in an environment variable.
All the code examples for each chapter can be completely run from within Docker containers. With Docker, you simulate different environments through environment-specific Docker-compose files that orchestrate the startup of all of your services. Environment-specific values needed by the containers are passed in as environment variables to the container. For example, to start your licensing service in a dev environment, the docker/dev/docker-compose.yml file contains the following entry for the licensing-service:
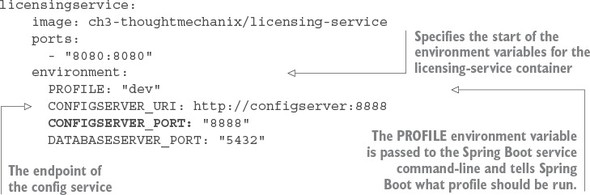
The environment entry in the file contains the values of two variables PROFILE, which is the Spring Boot profile the licensing service is going to run under. The CONFIGSERVER_URI is passed to your licensing service and defines the Spring Cloud configuration server instance the service is going to read its configuration data from.
In your startup scripts that are run by the container, you then pass these environment variables as –D parameters to our JVMS starting the application. In each project, you bake a Docker container, and that Docker container uses a startup script that starts the software in the container. For the licensing service, the startup script that gets baked into the container can be found at licensing-service/src/main/docker/run.sh. In the run.sh script, the following entry starts your licensing-service JVM:
echo "********************************************************"
echo "Starting License Server with Configuration Service :  $CONFIGSERVER_URI";
echo "********************************************************"
java -Dspring.cloud.config.uri=$CONFIGSERVER_URI
-Dspring.profiles.active=$PROFILE -jar /usr/local/licensingservice/licensing-service-0.0.1-SNAPSHOT.jar
Because you enhance all your services with introspection capabilities via Spring Boot Actuator, you can confirm the environment you are running against by hitting http://localhost:8080/env. The /env endpoint will provide a complete list of the configuration information about the service, including the properties and endpoints the service has booted with, as shown in figure 3.7.
Figure 3.7. The configuration the licensing service loads can be checked by calling the /env endpoint.
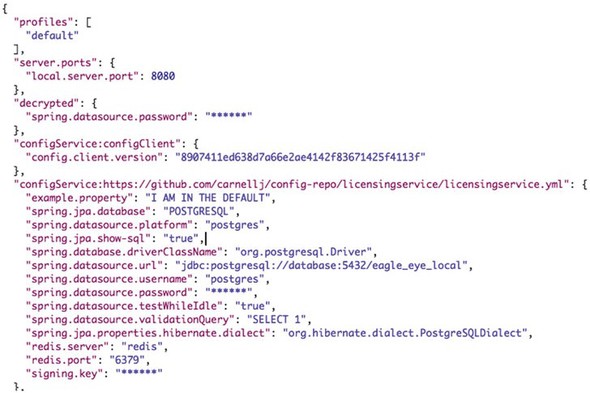
The key thing to note from figure 3.7 is that the active profile for the licensing service is dev. By inspecting the returned JSON, you can also see that the Postgres database being returned is a development URI of jdbc:postgresql://database:5432/eagle_eye_dev.
Every organization is going to have different rules about how to implement security around their services. Many organizations believe services shouldn’t broadcast any information about themselves and won’t allow things like a /env endpoint to be active on a service as they believe (rightfully so) that this will provide too much information for a potential hacker. Spring Boot provides a wealth of capabilities on how to configure what information is returned by the Spring Actuators endpoints that are the outside the scope of this book. Craig Walls’ excellent book, Spring Boot in Action, covers this subject in detail, and I highly recommend that you review your corporate security policies and Walls’ book to provide the right level of detail you want exposed through Spring Actuator.
3.3.3. Wiring in a data source using Spring Cloud configuration server
At this point, you have the database configuration information being directly injected into your microservice. With the database configuration set, configuring your licensing microservice becomes an exercise in using standard Spring components to build and retrieve the data from the Postgres database. The licensing service has been refactored into different classes with each class having separate responsibilities. These classes are shown in table 3.2.
Table 3.2. Licensing Service Classes and Locations
|
Class Name |
Location |
|---|---|
| License | licensing-service/src/main/java/com/thoughtmechanix/licenses/model |
| LicenseRepository | licensing-service/src/main/java/com/thoughtmechanix/licenses/repository |
| LicenseService | licensing-service/src/main/java/com/thoughtmechanix/licenses/services |
The License class is the model class that will hold the data retrieved from your licensing database. The following listing shows the code for the License class.
Listing 3.6. The JPA model code for a single license record
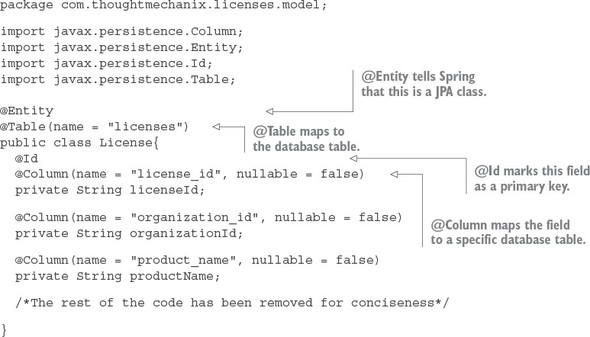
The class uses several Java Persistence Annotations (JPA) that help the Spring Data framework map the data from the licenses table in the Postgres database to the Java object. The @Entity annotation lets Spring know that this Java POJO is going to be mapping objects that will hold data. The @Table annotation tells Spring/JPA what database table should be mapped. The @Id annotation identifies the primary key for the database. Finally, each one of the columns from the database that is going to be mapped to individual properties is marked with a @Column attribute.
The Spring Data and JPA framework provides your basic CRUD methods for accessing a database. If you want to build methods beyond that, you can use a Spring Data Repository interface and basic naming conventions to build those methods. Spring will at startup parse the name of the methods from the Repository interface, convert them over to a SQL statement based on the names, and then generate a dynamic proxy class under the covers to do the work. The repository for the licensing service is shown in the following listing.
Listing 3.7. LicenseRepository interface defines the query methods
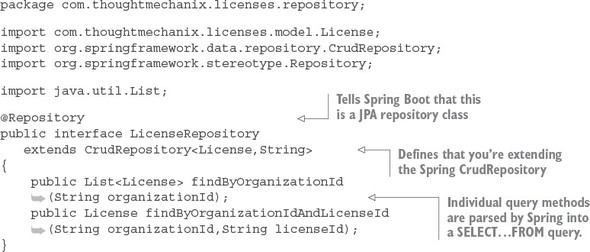
The repository interface, LicenseRepository, is marked with the @Repository annotation which tells Spring that it should treat this interface as a repository and generate a dynamic proxy for it. Spring offers different types of repositories for data access. You’ve chosen to use the Spring CrudRepository base class to extend your LicenseRepository class. The CrudRepository base class contains basic CRUD methods. In addition to the CRUD method extended from CrudRepository, you’ve added two custom query methods for retrieving data from the licensing table. The Spring Data framework will pull apart the name of the methods to build a query to access the underlying data.
Note
The Spring Data framework provides an abstraction layer over various database platforms and isn’t limited to relational databases. NoSQL databases such as MongoDB and Cassandra are also supported.
Unlike the previous incarnation of the licensing service in chapter 2, you’ve now separated the business and data access logic for the licensing service out of the LicenseController and into a standalone Service class called LicenseService.
Listing 3.8. LicenseService class used to execute database commands
package com.thoughtmechanix.licenses.services;

import com.thoughtmechanix.licenses.config.ServiceConfig;
import com.thoughtmechanix.licenses.model.License;
import com.thoughtmechanix.licenses.repository.LicenseRepository;
import org.springframework.beans.factory.annotation.Autowired;
import org.springframework.stereotype.Service;

import java.util.List;
import java.util.UUID;

@Service
public class LicenseService {

    @Autowired
    private LicenseRepository licenseRepository;

    @Autowired
    ServiceConfig config;

    public License getLicense(String organizationId,String licenseId) {
        License license = licenseRepository.findByOrganizationIdAndLicenseId(
organizationId, licenseId);
        return license.withComment(config.getExampleProperty());
    }

    public List<License> getLicensesByOrg(String organizationId){
        return licenseRepository.findByOrganizationId( organizationId );
    }

    public void saveLicense(License license){
        license.withId( UUID.randomUUID().toString());
        licenseRepository.save(license);
    }
      /*Rest of the code removed for conciseness*/
}
The controller, service, and repository classes are wired together using the standard Spring @Autowired annotation.
3.3.4. Directly Reading Properties using the @Value Annotation
In the LicenseService class in the previous section, you might have noticed that you’re setting the license.withComment() value in the getLicense() code with a value from the config.getExampleProperty() class. The code being referred to is shown here:
public License getLicense(String organizationId,String licenseId) {
       License license = licenseRepository.findByOrganizationIdAndLicenseId(
organizationId, licenseId);
return license.withComment(config.getExampleProperty());
    }
If you look at the licensing-service/src/main/java/com/thoughtmechanix/licenses/config/ServiceConfig.java class, you’ll see a property annotated with the @Value annotation. The following listing shows the @Value annotation being used.
Listing 3.9. ServiceConfig used to centralize application properties
package com.thoughtmechanix.licenses.config;

import org.springframework.beans.factory.annotation.Value;
import org.springframework.stereotype.Component;

@Component
public class ServiceConfig{

  @Value("${example.property}")
  private String exampleProperty;

  public String getExampleProperty(){
    return exampleProperty;
  }
}
While Spring Data “auto-magically” injects the configuration data for the database into a database connection object, all other properties must be injected using the @Value annotation. With the previous example, the @Value annotation pulls the example.property from the Spring Cloud configuration server and injects it into the example.property attribute on the ServiceConfig class.
Tip
While it’s possible to directly inject configuration values into properties in individual classes, I’ve found it useful to centralize all of the configuration information into a single configuration class and then inject the configuration class into where it’s needed.
3.3.5. Using Spring Cloud configuration server with Git
As mentioned earlier, using a filesystem as the backend repository for Spring Cloud configuration server can be impractical for a cloud-based application because the development team has to set up and manage a shared filesystem that’s mounted on all instances of the Cloud configuration server.
Spring Cloud configuration server integrates with different backend repositories that can be used to host application configuration properties. One I’ve used successfully is to use Spring Cloud configuration server with a Git source control repository.
By using Git you can get all the benefits of putting your configuration management properties under source control and provide an easy mechanism to integrate the deployment of your property configuration files in your build and deployment pipeline.
To use Git, you’d swap out the filesystem back configuration in the configuration service’s bootstrap.yml file with the following listing’s configuration.
Listing 3.10. Spring Cloud config bootstrap.yml
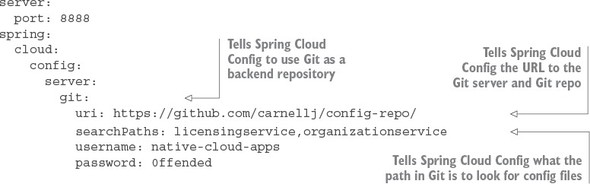
The three key pieces of configuration in the previous example are the spring.cloud.config.server, spring.cloud.config.server.git.uri, and the spring.cloud.config.server.git.searchPaths properties. The spring.cloud.config.server property tells the Spring Cloud configuration server to use a non-filesystem-based backend repository. In the previous example you’re going to connect to the cloud-based Git repository, GitHub.
The spring.cloud.config.server.git.uri properties provide the URL of the repository you’re connecting to. Finally, the spring.cloud.config.server.git.searchPaths property tells the Spring Cloud Config server the relative paths on the Git repository that should be searched when the Cloud configuration server comes up. Like the filesystem version of the configuration, the value in the spring.cloud.config.server.git.seachPaths attribute will be a comma-s-eparated list for each service hosted by the configuration service.
3.3.6. Refreshing your properties using Spring Cloud configuration server
One of the first questions that comes up from development teams when they want to use the Spring Cloud configuration server is how can they dynamically refresh their applications when a property changes. The Spring Cloud configuration server will always serve the latest version of a property. Changes made to a property via its underlying repository will be up-to-date.
However, Spring Boot applications will only read their properties at startup time, so property changes made in the Spring Cloud configuration server won’t be automatically picked up by the Spring Boot application. Spring Boot Actuator does offer a @RefreshScope annotation that will allow a development team to access a /refresh endpoint that will force the Spring Boot application to reread its application configuration. The following listing shows the @RefreshScope annotation in action.
Listing 3.11. The @RefreshScope annotation
package com.thoughtmechanix.licenses;

import org.springframework.boot.SpringApplication;
import org.springframework.boot.autoconfigure.SpringBootApplication;
import org.springframework.cloud.context.config.annotation.RefreshScope;


@SpringBootApplication
@RefreshScope
public class Application {
    public static void main(String[] args) {
        SpringApplication.run(Application.class, args);
    }
}
Note a couple of things about the @RefreshScope annotation. First, the annotation will only reload the custom Spring properties you have in your application configuration. Items such as your database configuration that are used by Spring Data won’t be reloaded by the @RefreshScope annotation. To perform the refresh, you can hit the http://<yourserver>:8080/refresh endpoint.
When using Spring Cloud configuration service with microservices, one thing you need to consider before you dynamically change properties is that you might have multiple instances of the same service running, and you’ll need to refresh all of those services with their new application configurations. There are several ways you can approach this problem:
Spring Cloud configuration service does offer a “push”-based mechanism called Spring Cloud Bus that will allow the Spring Cloud configuration server to publish to all the clients using the service that a change has occurred. Spring Cloud configuration requires an extra piece of middleware running (RabbitMQ). This is an extremely useful means of detecting changes, but not all Spring Cloud configuration backends support the “push” mechanism (that is, the Consul server).
In the next chapter you’ll use Spring Service Discovery and Eureka to register all instances of a service. One technique I’ve used to handle application configuration refresh events is to refresh the application properties in Spring Cloud configuration and then write a simple script to query the service discovery engine to find all instances of a service and call the /refresh endpoint directly.
Finally, you can restart all the servers or containers to pick up the new property. This is a trivial exercise, especially if you’re running your services in a container service such as Docker. Restarting Docker containers literally takes seconds and will force a reread of the application configuration.
Remember, cloud-based servers are ephemeral. Don’t be afraid to start new instances of a service with their new configuration, direct traffic to the new services, and then tear down the old ones.
3.4. Protecting sensitive configuration information
By default, Spring Cloud configuration server stores all properties in plain text within the application’s configuration files. This includes sensitive information such as database credentials.
It’s an extremely poor practice to keep sensitive credentials stored as plain text in your source code repository. Unfortunately, it happens far more often than you think. Spring Cloud Config does give you the ability to encrypt your sensitive properties easily. Spring Cloud Config supports using both symmetric (shared secret) and asymmetric encryption (public/private key).
We’re going to see how to set up your Spring Cloud configuration server to use encryption using with a symmetric key. To do this you’ll need to
- Download and install the Oracle JCE jars needed for encryption
- Set up an encryption key.
- Encrypt and decrypt a property.
- Configure microservices to use encryption on the client side
3.4.1. Download and install Oracle JCE jars needed for encryption
To begin, you need to download and install Oracle’s Unlimited Strength Java Cryptography Extension (JCE). This isn’t available through Maven and must be downloaded from Oracle Corporation.[1] Once you’ve downloaded the zip files containing the JCE jars, you must do the following:
http://www.oracle.com/technetwork/java/javase/downloads/jce8-download-2133166.html. This URL might be subject to change. A quick search on Google for Java Cryptography Extensions should always return you the right values.
- Locate your $JAVA_HOME/jre/lib/security directory.
- Back up the local_policy.jar and US_export_policy.jar files in the $JAVA_HOME/jre/lib/security directory to a different location.
- Unzip the JCE zip file you downloaded from Oracle.
- Copy the local_policy.jar and US_export_policy.jar to your $JAVA_HOME/jre/lib/security directory.
- Configure Spring Cloud Config to use encryption.
I’ve walked through the manual steps you need to install JCE on your laptop. Because we use Docker to build all our services as Docker containers, I’ve scripted the download and installation of these JAR files in the Spring Cloud Config Docker container. The following OS X shell script snippet shows how I automated this using the curl (https://curl.haxx.se/) command-line tool:
cd /tmp/
curl –k-LO "http://download.oracle.com/otn-pub/java/jce/8/jce_policy-8.zip"
     -H 'Cookie: oraclelicense=accept-securebackup-cookie' &&  unzip jce_policy-8.zip
rm jce_policy-8.zip
yes |cp -v /tmp/UnlimitedJCEPolicyJDK8/*.jar /usr/lib/jvm/java-1.8-openjdk/jre/lib/security/
I’m not going to walk through all of the details, but basically I use CURL to download the JCE zip files (note the Cookie header parameter passed via the -H attribute on the curl command) and then unzip the files and copy them to the /usr/lib/jvm/java-1.8-openjdk/jre/lib/security directory in my Docker container.
If you look at the src/main/docker/Dockerfile file in the source code for this chapter, you can see an example of this scripting in action.
3.4.2. Setting up an encryption key
Once the JAR files are in place, you need to set a symmetric encryption key. The symmetric encryption key is nothing more than a shared secret that’s used by the encrypter to encrypt a value and the decrypter to decrypt a value. With the Spring Cloud configuration server, the symmetric encryption key is a string of characters you select that’s passed to the service via an operating system environment variable called ENCRYPT_KEY. For the purposes of this book you’ll always set the ENCRYPT_KEY environment variable to be
export ENCRYPT_KEY=IMSYMMETRIC
Note two things regarding symmetric keys:
- Your symmetric key should be 12 or more characters long and ideally be a random set of characters.
- Don’t lose your symmetric key. Once you’ve encrypted something with your encrypted key, you can’t unencrypt it.
For the purposes of this book, I did two things that I wouldn’t normally recommend in a production deployment:
- I set the encryption key to be a phrase. I wanted to keep the key simple so that I could remember it and it would fit nicely in reading the text. In a real-world deployment, I’d use a separate encryption key for each environment I was deploying to and I’d use random characters as my key.
- I’ve hardcoded the ENCRYPT_KEY environment variable directly in the Docker files used within the book. I did this so that you as the reader could download the files and start them up without having to remember to set an environment variable. In a real runtime environment, I would reference the ENCRYPT_KEY as an operating system environment variable inside my Dockerfile. Be aware of this and don’t hardcode your encryption key inside your Dockerfiles. Remember, your Dockerfiles are supposed to be kept under source control.
3.4.3. Encrypting and decrypting a property
You’re now ready to begin encrypting properties for use in Spring Cloud Config. You’ll encrypt the licensing services Postgres database password you’ve been using to access EagleEye data. This property, called spring.datasource.password, is currently set as plain text to be the value p0stgr@s.
When you fire up your Spring Cloud Config instance, Spring Cloud Config detects that the ENCRYPT_KEY environment variable is set and automatically adds two new endpoints (/encrypt and /decrypt) to the Spring Cloud Config service. You’ll use the /encrypt endpoint to encrypt the p0stgr@s value.
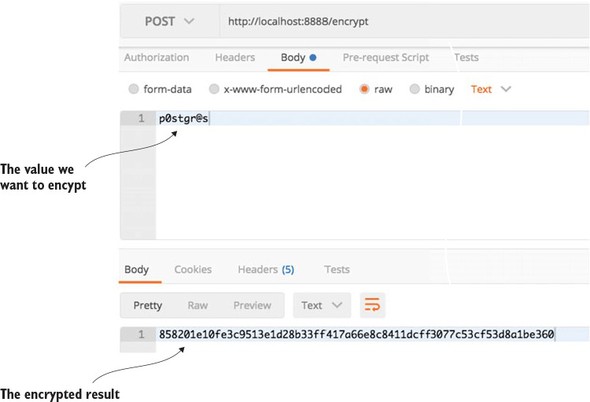
Figure 3.8 shows how to encrypt the p0stgr@s value using the /encrypt endpoint and POSTMAN. Please note that whenever you call the /encrypt or /decrypt endpoints, you need to make sure you do a POST to these endpoints.
Figure 3.8. Using the /encrypt endpoint you can encrypt values.
If you wanted to decrypt the value, you’d use the /decrypt endpoint passing in the encrypted string in the call.
You can now add the encrypted property to your GitHub or filesystem-based configuration file for the licensing service using the following syntax:
spring.datasource.password:"{cipher} 858201e10fe3c9513e1d28b33ff417a66e8c8411dcff3077c53cf53d8a1be360"
Spring Cloud configuration server requires all encrypted properties to be prepended with a value of {cipher}. The {cipher} value tells Spring Cloud configuration server it’s dealing with an encrypted value. Fire up your Spring Cloud configuration server and hit the GET http://localhost:8888/licensingservice/default endpoint.
Figure 3.9 shows the results of this call.
Figure 3.9. While the spring.datasource.password is encrypted in the property file, it’s decrypted when the configuration for the licensing service is retrieved. This is still problematic.
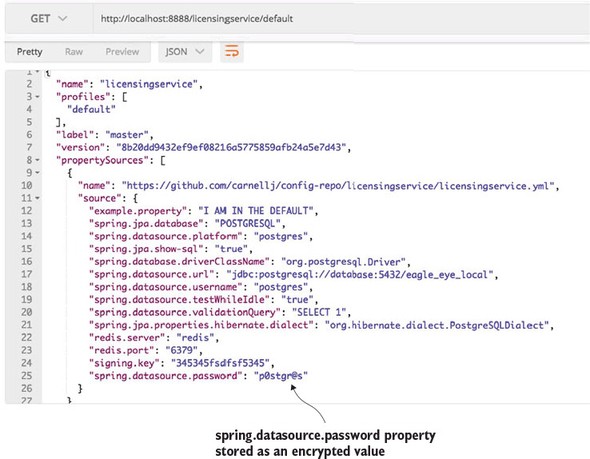
You’ve made the spring.datasource.password more secure by encrypting the property, but you still have a problem. The database password is exposed as plain text when you hit the http://localhost:8888/licensingservice/default endpoint.
By default, Spring Cloud Config will do all the property decryption on the server and pass the results back to the applications consuming the properties as plain, unencrypted text. However, you can tell Spring Cloud Config to not decrypt on the server and make it the responsibility of the application retrieving the configuration data to decrypt the encrypted properties.
3.4.4. Configure microservices to use encryption on the client side
To enable client side decryption of properties, you need to do three things:
- Configure Spring Cloud Config to not decrypt properties on the server side.
- Set the symmetric key on the licensing server.
- Add the spring-security-rsa JARs to the licensing services pom.xml file.
The first thing you need to do is disable the server-side decryption of properties in Spring Cloud Config. This is done by setting the Spring Cloud Config’s src/main/resources/application.yml file to set the property spring.cloud.config.server.encrypt.enabled: false. That’s all you have to do on the Spring Cloud Config server.
Because the licensing service is now responsible for decrypting the encrypted properties, you need to first set the symmetric key on the licensing service by making sure that the ENCRYPT_KEY environment variable is set with the same symmetric key (for example, IMSYMMETRIC) that you used with your Spring Cloud Config server.
Next you need to include the spring-security-rsa JAR dependencies in with licensing service:
<dependency>
   <groupId>org.springframework.security</groupId>
   <artifactId>spring-security-rsa</artifactId>
</dependency>
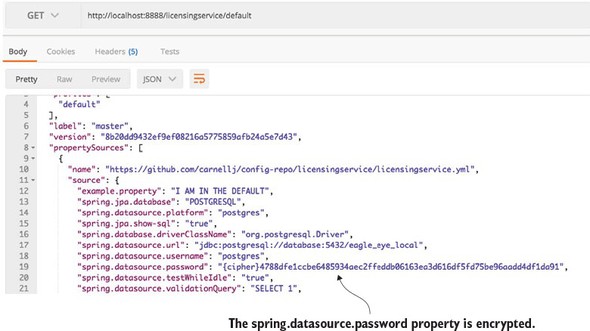
These JAR files contain the Spring code needed to decrypt the encrypted properties being retrieved from Spring Cloud Config. With these changes in place, you can start the Spring Cloud Config and licensing services. If you hit the http://localhost:8888/licensingservice/default endpoint you’ll see the spring.datasource.password returned in it is encrypted form. Figure 3.10 shows the output from the call.
Figure 3.10. With client-side decryption turned on, sensitive properties will no longer be returned in plain text from the Spring Cloud Config REST call. Instead, the property will be decrypted by the calling service when it loads its properties from Spring Cloud Config.
3.5. Closing thoughts
Application configuration management might seem like a mundane topic, but it’s of critical importance in a cloud-based environment. As we’ll discuss in more detail in later chapters, it’s critical that your applications and the servers they run on be immutable and that the entire server being promoted is never manually configured between environments. This flies in the face of traditional deployment models where you deploy an application artifact (for example, a JAR or WAR file) along with its property files to a “fixed” environment.
With a cloud-based model, the application configuration data should be segregated completely from the application, with the appropriate configuration data needs injected at runtime so that the same server/application artifact are consistently promoted through all environments.
3.6. Summary
- Spring Cloud configuration server allows you to set up application properties with environment specific values.
- Spring uses Spring profiles to launch a service to determine what environment properties are to be retrieved from the Spring Cloud Config service.
- Spring Cloud configuration service can use a file-based or Git-based application configuration repository to store application properties.
- Spring Cloud configuration service allows you to encrypt sensitive property files using symmetric and asymmetric encryption.