Table of Contents for
Spring Microservices in Action
 Spring Microservices in Action
Published by
Manning Publications, 2017
Spring Microservices in Action
Published by
Manning Publications, 2017
- Cover
- Spring Microservices in Action
- Copyright
- Spring Microservices in Action
- Brief Table of Contents
- Table of Contents
- Preface
- Acknowledgments
- About this Book
- About the Author
- About the Cover Illustration
- Chapter 1. Welcome to the cloud, Spring
- Chapter 2. Building microservices with Spring Boot
- Chapter 3. Controlling your configuration with Spring Cloud configuration server
- Chapter 4. On service discovery
- Chapter 5. When bad things happen: client resiliency patterns with Spring Cloud and Netflix Hystrix
- Chapter 6. Service routing with Spring Cloud and Zuul
- Chapter 7. Securing your microservices
- Chapter 8. Event-driven architecture with Spring Cloud Stream
- Chapter 9. Distributed tracing with Spring Cloud Sleuth and Zipkin
- Chapter 10. Deploying your microservices
- Appendix A. Running a cloud on your desktop
- Appendix B. OAuth2 grant types
- Index
- List of Figures
- List of Tables
- List of Listings
Chapter 6. Service routing with Spring Cloud and Zuul
- Using a services gateway with your microservices
- Implementing a service gateway using Spring Cloud and Netflix Zuul
- Mapping microservice routes in Zuul
- Building filters to use correlation ID and tracking
- Dynamic routing with Zuul
In a distributed architecture like a microservices one, there will come a point where you’ll need to ensure that key behaviors such as security, logging, and tracking of users across multiple service calls occur. To implement this functionality, you’ll want these attributes to be consistently enforced across all of your services without the need for each individual development team to build their own solutions. While it’s possible to use a common library or framework to assist with building these capabilities directly in an individual service, doing so has three implications.
First, it’s difficult to consistently implement these capabilities in each service being built. Developers are focused on delivering functionality, and in the whirlwind of day-to-day activity they can easily forget to implement service logging or tracking. (I personally am guilty of this.) Unfortunately, for those of us working in a heavily regulated industry, such as financial services or healthcare, showing consistent and documented behavior in your systems is often a key requirement for complying with government regulations.
Second, properly implementing these capabilities is a challenge. Things like microservice security can be a pain to set up and configure with each service being implemented. Pushing the responsibilities to implement a cross-cutting concern like security down to the individual development teams greatly increases the odds that someone will not implement it properly or will forget to do it.
Third, you’ve now created a hard dependency across all your services. The more capabilities you build into a common framework shared across all your services, the more difficult it is to change or add behavior in your common code without having to recompile and redeploy all your services. This might not seem like a big deal when you have six microservices in your application, but it’s a big deal when you have a larger number of services, perhaps 30 or more. Suddenly an upgrade of core capabilities built into a shared library becomes a months-long migration process.
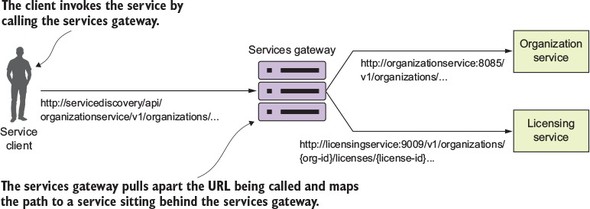
To solve this problem, you need to abstract these cross-cutting concerns into a service that can sit independently and act as a filter and router for all the microservice calls in your application. This cross-cutting concern is called a services gateway. Your service clients no longer directly call a service. Instead, all calls are routed through the service gateway, which acts as a single Policy Enforcement Point (PEP), and are then routed to a final destination.
In this chapter, we’re going to see how to use Spring Cloud and Netflix’s Zuul to implement a services gateway. Zuul is Netflix’s open source services gateway implementation. Specifically, we’re going to look at how to use Spring Cloud and Zuul to
- Put all service calls behind a single URL and map those calls using service discovery to their actual service instances
- Inject correlation IDs into every service call flowing through the service gateway
- Inject the correlation ID back from the HTTP response sent back from the client
- Build a dynamic routing mechanism that will route specific individual organizations to a service instance endpoint that’s different than what everyone else is using
Let’s dive into more detail on how a services gateway fits into the overall microservices being built in this book.
6.1. What is a services gateway?
Until now, with the microservices you’ve built in earlier chapters, you’ve either directly called the individual services through a web client or called them programmatically via a service discovery engine such as Eureka.
Figure 6.1. Without a services gateway, the service client will call distinct endpoints for each service.

A service gateway acts as an intermediary between the service client and a service being invoked. The service client talks only to a single URL managed by the service gateway. The service gateway pulls apart the path coming in from the service client call and determines what service the service client is trying to invoke. Figure 6.2 illustrates how like a “traffic” cop directing traffic, the service gateway directs the user to a target microservice and corresponding instance. The service gateway sits as the gatekeeper for all inbound traffic to microservice calls within your application. With a service gateway in place, your service clients never directly call the URL of an individual service, but instead place all calls to the service gateway.
Figure 6.2. The service gateway sits between the service client and the corresponding service instances. All service calls (both internal-facing and external) should flow through the service gateway.
Because a service gateway sits between all calls from the client to the individual services, it also acts as a central Policy Enforcement Point (PEP) for service calls. The use of a centralized PEP means that cross-cutting service concerns can be implemented in a single place without the individual development teams having to implement these concerns. Examples of cross-cutting concerns that can be implemented in a service gateway include
- Static routing— A service gateway places all service calls behind a single URL and API route. This simplifies development as developers only have to know about one service endpoint for all of their services.
- Dynamic routing— A service gateway can inspect incoming service requests and, based on data from the incoming request, perform intelligent routing based on who the service caller is. For instance, customers participating in a beta program might have all calls to a service routed to a specific cluster of services that are running a different version of code from what everyone else is using.
- Authentication and authorization— Because all service calls route through a service gateway, the service gateway is a natural place to check whether the caller of a service has authenticated themselves and is authorized to make the service call.
- Metric collection and logging— A service gateway can be used to collect metrics and log information as a service call passes through the service gateway. You can also use the service gateway to ensure that key pieces of information are in place on the user request to ensure logging is uniform. This doesn’t mean that shouldn’t you still collect metrics from within your individual services, but rather a services gateway allows you to centralize collection of many of your basic metrics, like the number of times the service is invoked and service response time.
Earlier in chapter 4 when I introduced Eureka, I talked about how centralized load balancers can be single point of failure and a bottleneck for your services. A service gateway, if not implemented correctly, can carry the same risk. Keep the following in mind as you build your service gateway implementation.
Load balancers are still useful when out in front of individual groups of services. In this case, a load balancer sitting in front of multiple service gateway instances is an appropriate design and ensures your service gateway implementation can scale. Having a load balancer sit in front of all your service instances isn’t a good idea because it becomes a bottleneck.
Keep any code you write for your service gateway stateless. Don’t store any information in memory for the service gateway. If you aren’t careful, you can limit the scalability of the gateway and have to ensure that the data gets replicated across all service gateway instances.
Keep the code you write for your service gateway light. The service gateway is the “chokepoint” for your service invocation. Complex code with multiple database calls can be the source of difficult-to-track-down performance problems in the service gateway.
Let’s now look at how to implement a service gateway using Spring Cloud and Netflix Zuul.
6.2. Introducing Spring Cloud and Netflix Zuul
Spring Cloud integrates with the Netflix open source project Zuul. Zuul is a services gateway that’s extremely easy to set up and use via Spring Cloud annotations. Zuul offers a number of capabilities, including
- Mapping the routes for all the services in your application to a single URL— Zuul isn’t limited to a single URL. In Zuul, you can define multiple route entries, making the route mapping extremely fine-grained (each service endpoint gets its own route mapping). However, the first and most common use case for Zuul is to build a single entry point through which all service client calls will flow.
- Building filters that can inspect and act on the requests coming through the gateway— These filters allow you to inject policy enforcement points in your code and perform a wide number of actions on all of your service calls in a consistent fashion.
To get started with Zuul, you’re going to do three things:
- Set up a Zuul Spring Boot project and configure the appropriate Maven dependences.
- Modify your Spring Boot project with Spring Cloud annotations to tell it that it will be a Zuul service.
- Configure Zuul to communicate with Eureka (optional).
6.2.1. Setting up the Zuul Spring Boot project
If you’ve been following the chapters sequentially in this book, the work you’re about to do should be familiar. To build a Zuul server, you need to set up a new Spring Boot service and define the corresponding Maven dependencies. You can find the project source code for this chapter in the GitHub repository for this book (https://github.com/carnellj/spmia-chapter6). Fortunately, little is needed to set up Zuul in Maven. You only need to define one dependency in your zuulsvr/pom.xml file:
<dependency>
  <groupId>org.springframework.cloud</groupId>
  <artifactId>spring-cloud-starter-zuul</artifactId>
</dependency>
This dependency tells the Spring Cloud framework that this service will be running Zuul and initialize Zuul appropriately.
6.2.2. Using Spring Cloud annotation for the Zuul service
After you’ve defined the maven dependencies, you need to annotate the bootstrap class for the Zuul services. The bootstrap class for the Zuul service implementation can be found in the zuulsvr/src/main/java/com/thoughtmechanix/zuulsvr/Application.java class.
Listing 6.1. Setting up the Zuul Server bootstrap class
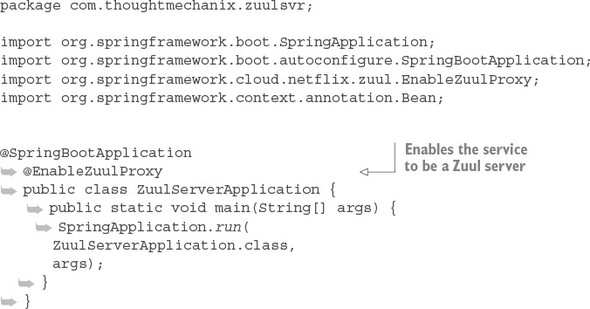
That’s it. There’s only one annotation that needs to be in place: @EnableZuulProxy.
Note
If you look through the documentation or have auto-complete turned on, you might notice an annotation called @EnableZuulServer. Using this annotation will create a Zuul Server that doesn’t load any of the Zuul reverse proxy filters or use Netflix Eureka for service discovery. (We’ll get into the topic of Zuul and Eureka integration shortly.) @EnableZuulServer is used when you want to build your own routing service and not use any Zuul pre-built capabilities. An example of this would be if you wanted to use Zuul to integrate with a service discovery engine other than Eureka (for example, Consul). We’ll only use the @EnableZuulProxy annotation in this book.
6.2.3. Configuring Zuul to communicate with Eureka
The Zuul proxy server is designed by default to work on the Spring products. As such, Zuul will automatically use Eureka to look up services by their service IDs and then use Netflix Ribbon to do client-side load balancing of requests from within Zuul.
Note
I often read chapters out of order in a book, jumping to the specific topics I’m most interested in. If you do the same and don’t know what Netflix Eureka and Ribbon are, I suggest you read chapter 4 before proceeding much further. Zuul uses those technologies heavily to carry out work, so understanding the service discovery capabilities that Eureka and Ribbon bring to the table will make understanding Zuul that much easier.
The last step in the configuration process is to modify your Zuul server’s zuulsvr/src/main/resources/application.yml file to point to your Eureka server. The following listing shows the Zuul configuration needed for Zuul to communicate with Eureka. The configuration in the listing should look familiar because it’s the same configuration we walked through in chapter 4.
Listing 6.2. Configuring the Zuul server to talk to Eureka
eureka:
 instance:
  preferIpAddress: true
 client:
  registerWithEureka: true
  fetchRegistry: true
  serviceUrl:
    defaultZone: http://localhost:8761/eureka/
6.3. Configuring routes in Zuul
Zuul at its heart is a reverse proxy. A reverse proxy is an intermediate server that sits between the client trying to reach a resource and the resource itself. The client has no idea it’s even communicating to a server other than a proxy. The reverse proxy takes care of capturing the client’s request and then calls the remote resource on the client’s behalf.
In the case of a microservices architecture, Zuul (your reverse proxy) takes a microservice call from a client and forwards it onto the downstream service. The service client thinks it’s only communicating with Zuul. For Zuul to communicate with the downstream clients, Zuul has to know how to map the incoming call to a downstream route. Zuul has several mechanisms to do this, including
- Automated mapping of routes via service discovery
- Manual mapping of routes using service discovery
- Manual mapping of routes using static URLs
6.3.1. Automated mapping routes via service discovery
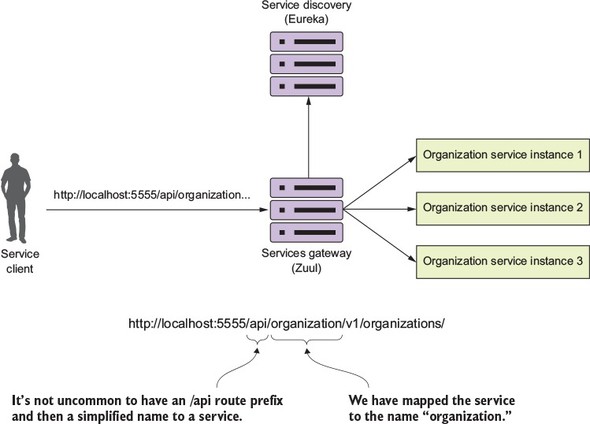
All route mappings for Zuul are done by defining the routes in the zuulsvr/src/main/resources/application.yml file. However, Zuul can automatically route requests based on their service IDs with zero configuration. If you don’t specify any routes, Zuul will automatically use the Eureka service ID of the service being called and map it to a downstream service instance. For instance, if you wanted to call your organizationservice and used automated routing via Zuul, you would have your client call the Zuul service instance, using the following URL as the endpoint:
http://localhost:5555/organizationservice/v1/organizations/e254f8c-c442-4ebe-a82a-e2fc1d1ff78a
Your Zuul server is accessed via http://localhost:5555. The service you’re trying (organizationservice) to invoke is represented by the first part of the endpoint path in the service.
Figure 6.3 illustrates this mapping in action.
Figure 6.3. Zuul will use the organizationservice application name to map requests to organization service instances.
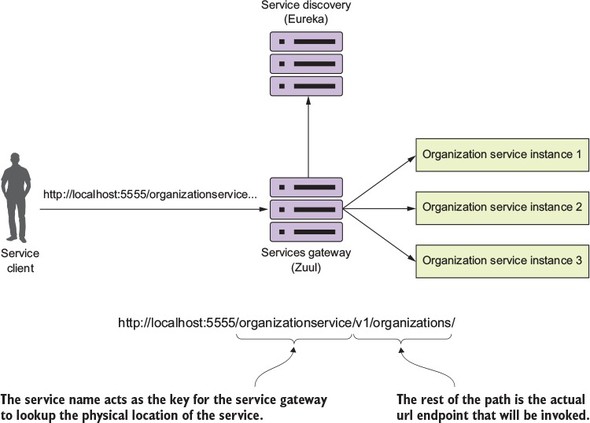
The beauty of using Zuul with Eureka is that not only do you now have a single endpoint that you can make calls through, but with Eureka, you can also add and remove instances of a service without ever having to modify Zuul. For instance, you can add a new service to Eureka, and Zuul will automatically route to it because it’s communicating with Eureka about where the actual physical services endpoints are located.
If you want to see the routes being managed by the Zuul server, you can access the routes via the /routes endpoint on the Zuul server. This will return a listing of all the mappings on your service. Figure 6.4 shows the output from hitting http://localhost:5555/routes.
Figure 6.4. Each service that’s mapped in Eureka will now be mapped as a Zuul route.
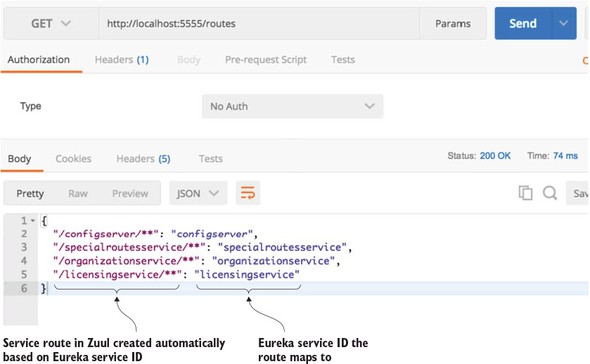
In figure 6.4 the mappings for the services registered with Zuul are shown on the left-hand side of the JSON body returned from the /route calls. The actual Eureka service IDs the routes map to are shown on the right.
6.3.2. Mapping routes manually using service discovery
Zuul allows you to be more fine-grained by allowing you to explicitly define route mappings rather than relying solely on the automated routes created with the service’s Eureka service ID. Suppose you wanted to simplify the route by shortening the organization name rather than having your organization service accessed in Zuul via the default route of /organizationservice/v1/organizations/{organization-id}. You can do this by manually defining the route mapping in zuulsvr/src/main/resources/application.yml:
zuul:
  routes:
   organizationservice: /organization/**
By adding this configuration, you can now access the organization service by hitting the /organization/v1/organizations/{organization-id} route. If you check the Zuul server’s endpoint again, you should see the results shown in figure 6.5.
Figure 6.5. The results of the Zuul /routes call with a manual mapping of the organization service
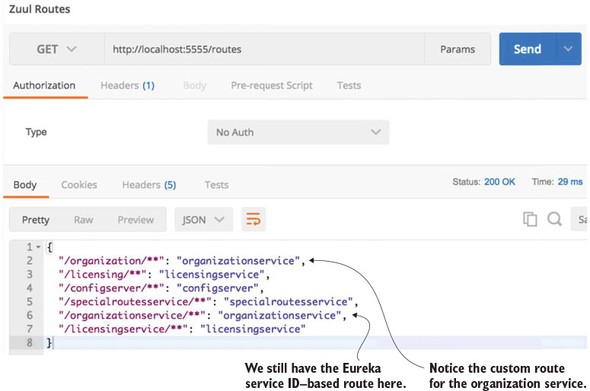
If you look carefully at figure 6.5 you’ll notice that two entries are present for the organization service. The first service entry is the mapping you defined in the application.yml file: "organization/**": "organizationservice". The second service entry is the automatic mapping created by Zuul based on the organization service’s Eureka ID: "/organizationservice/**": "organizationservice".
Note
When you use automated route mapping where Zuul exposes the service based solely on the Eureka service ID, if no instances of the service are running, Zuul will not expose the route for the service. However, if you manually map a route to a service discovery ID and there are no instances registered with Eureka, Zuul will still show the route. If you try to call the route for the non-existent service, Zuul will return a 500 error.
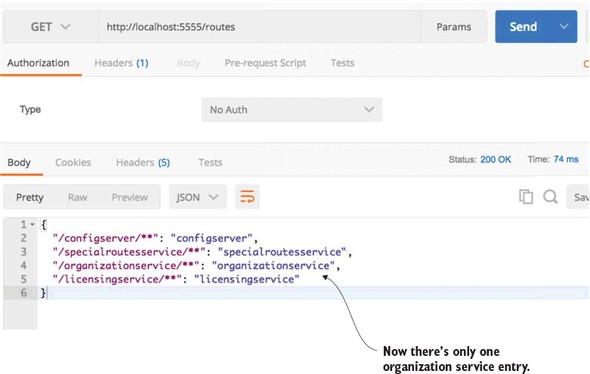
If you want to exclude the automated mapping of the Eureka service ID route and only have available the organization service route that you’ve defined, you can add an additional Zuul parameter to your application.yml file, called ignored-services. The following code snippet shows how the ignored-services attribute can be used to exclude the Eureka service ID organizationservice from the automated mappings done by Zuul:
zuul:
 ignored-services: 'organizationservice'
 routes:
  organizationservice: /organization/**
The ignored-services attribute allows you to define a comma-separated list of Eureka service-IDs that you want to exclude from registration. Now, when your call the /routes endpoint on Zuul, you should only see the organization service mapping you’ve defined. Figure 6.6 shows the outcome of this mapping.
Figure 6.6. Only one organization service is now defined in Zuul.
If you want to exclude all Eureka-based routes, you can set the ignored--services attribute to “*”.
A common pattern with a service gateway is to differentiate API routes vs. content routes by prefixing all your service calls with a type of label such as /api. Zuul supports this by using the prefix attribute in the Zuul configuration. Figure 6.7 lays out conceptually what this mapping prefix will look like.
Figure 6.7. Using a prefix, Zuul will map a /api prefix to every service it manages.
In the following listing, we’ll see how to set up specific routes to your individual organization and Licensing services, exclude all of the eureka-generated services, and prefix your services with a /api prefix.
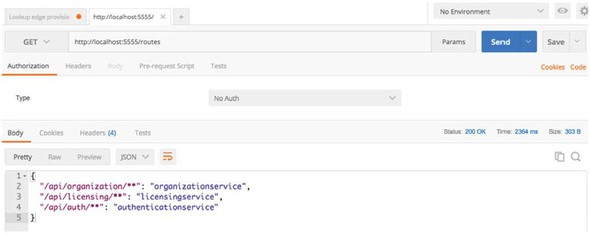
Listing 6.3. Setting up custom routes with a prefix

Once this configuration is done and the Zuul service has been reloaded, you should see the following two entries when hitting the /route endpoint: /api/organization and /api/licensing. Figure 6.8 shows these entries.
Figure 6.8. Your routes in Zuul now have an /api prefix.
Let’s now look at how you can use Zuul to map to static URLs. Static URLs are URLs that point to services that aren’t registered with a Eureka service discovery engine.
6.3.3. Manual mapping of routes using static URLs
Zuul can be used to route services that aren’t managed by Eureka. In these cases, Zuul can be set up to directly route to a statically defined URL. For example, let’s imagine that your license service is written in Python and you want to still proxy it through Zuul. You’d use the Zuul configuration in the following listing to achieve this.
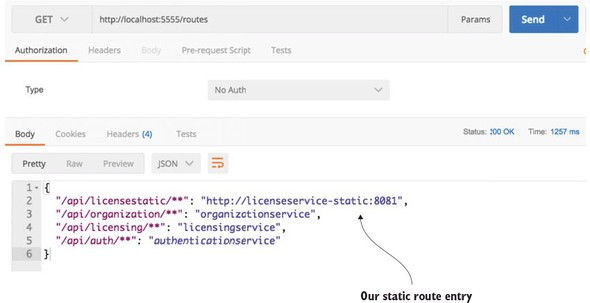
Listing 6.4. Mapping the licensing service to a static route

Figure 6.9. You’ve now mapped a static route to your licensing service.
Once this configuration change has been made, you can hit the /routes endpoint and see the static route added to Zuul. Figure 6.10 shows the results from the /routes listing.
Figure 6.10. You now see that the /api/licensestatic now maps to a service ID called licensestatic
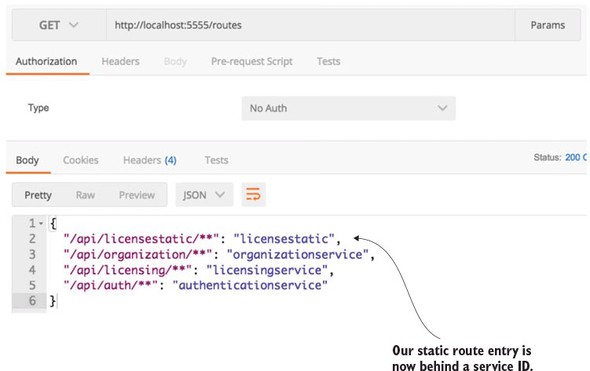
At this point, the licensestatic endpoint won’t use Eureka and will instead directly route the request to the http://licenseservice-static:8081 endpoint. The problem is that by bypassing Eureka, you only have a single route to point requests at. Fortunately, you can manually configure Zuul to disable Ribbon integration with Eureka and then list the individual service instances that ribbon will load balance against. The following listing shows this.
Listing 6.5. Mapping licensing service statically to multiple routes
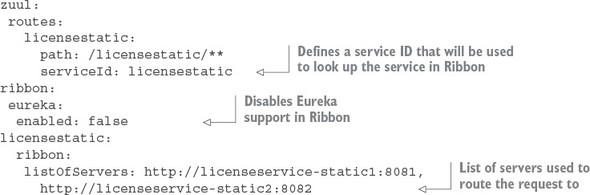
Once this configuration is in place, a call to the /routes endpoint now shows that the /api/licensestatic route has been mapped to a service ID called licensestatic. Figure 6.10 shows this.
The problem with statically mapping routes and disabling Eureka support in Ribbon is that you’ve disabled Ribbon support for all your services running through your Zuul service gateway. This means that more load will be placed on your Eureka servers because Zuul can’t use Ribbon to cache the look-up of services. Remember, Ribbon doesn’t call Eureka every time it makes a call. Instead, it caches the location of the service instances locally and then checks with Eureka periodically for changes. With Ribbon out of the picture, Zuul will call Eureka every time it needs to resolve the location of a service.
Earlier in the chapter, I talked about how you might end up with multiple service gateways where different routing rules and policies would be enforced based on the type of services being called. For non-JVM applications, you could set up a separate Zuul server to handle these routes. However, I’ve found that with non-JVM-based languages, you’re better off setting up a Spring Cloud “Sidecar” instance. The Spring Cloud sidecar allows you to register non-JVM services with a Eureka instance and then proxy them through Zuul. I don’t cover Spring Sidecar in this book because you’re not writing any non-JVM services, but it’s extremely easy to set up a sidecar instance. Directions on how to do so can be found at the Spring Cloud website (http://cloud.spring.io/spring-cloud-netflix/spring-cloud-netflix.html#spring-cloud-ribbon-without-eureka).
6.3.4. Dynamically reload route configuration
The next thing we’re going to look at in terms of configuring routes in Zuul is how to dynamically reload routes. The ability to dynamically reload routes is useful because it allows you to change the mapping of routes without having to recycle the Zuul server(s). Existing routes can be modified quickly and new routes added within have to go through the act of recycling each Zuul server in your environment. In chapter 3, we covered how to use Spring Cloud Configuration service to externalize a microservices configuration data. You can use Spring Cloud configuration to externalize Zuul routes. In the EagleEye examples you can set up a new application folder in your config-repo (http://github.com/carnellj/config-repo) called zuulservice. Like your organization and licensing services, you’ll create three files—zuulservice.yml, zuulservice-dev.yml, and zuulservice-prod.yml—that will hold your route configuration.
To be consistent with the examples in the chapter 3 configuration, I’ve changed the route formats to move from a hierarchical format to the “.” format. The initial route configuration will have a single entry in it:
zuul.prefix=/api
If you hit the /routes endpoint, you should see all your Eureka-based services currently shown in Zuul with the prefix of /api. Now, if you wanted to add new route mappings on the fly, all you have to do is make the changes to the config file and then commit them back to the Git repository where Spring Cloud Config is pulling its configuration data from. For instance, if you wanted to disable all Eureka-based service registration and only expose two routes (one for the organization and one for the licensing service), you could modify the zuulservice-*.yml files to look like this:
zuul.ignored-services: '*'
zuul.prefix: /api
zuul.routes.organizationservice: /organization/**
zuul.routes.organizationservice: /licensing/**
Then you can commit the changes to GitHub. Zuul exposes a POST-based endpoint route /refresh that will cause it to reload its route configuration. Once this /refresh is hit, if you then hit the /routes endpoint, you’ll see that the two new routes are exposed and all the Eureka-based routes are gone.
6.3.5. Zuul and service timeouts
Zuul uses Netflix’s Hystrix and Ribbon libraries to help prevent long-running service calls from impacting the performance of the services gateway. By default, Zuul will terminate and return an HTTP 500 error for any call that takes longer than one second to process a request. (This is the Hystrix default.) Fortunately, you can configure this behavior by setting the Hystrix timeout properties in your Zuul server’s configuration.
To set the Hystrix timeout for all of the services running through Zuul, you can use the hystrix.command.default.execution.isolation.thread.timeoutInMilliseconds property. For instance, if you wanted to set the default Hystrix time out to be 2.5 seconds, you could use the following configuration in your Zuul’s Spring Cloud config file:
zuul.prefix:  /api
zuul.routes.organizationservice: /organization/**
zuul.routes.licensingservice: /licensing/**
zuul.debug.request: true
hystrix.command.default.execution.isolation.thread.timeoutInMilliseconds: 2500
If you need to set the Hystrix timeout for specific service, you can replace the default part of the property with the Eureka service ID name of the service whose timeout you want to override. For instance, if you wanted to change only the licensingservice’s timeout to three seconds and leave the rest of the services to use the default Hystrix timeout, you could use something like this in your configuration:
hystrix.command.licensingservice.execution.isolation.thread.timeoutInMilliseconds: 3000
Finally, you need to be aware of one other timeout property. While you’ve overridden the Hystrix timeout, the Netflix Ribbon also times out any calls that take longer than five seconds. While I highly recommend you revisit the design of any call that takes longer than five seconds, you can override the Ribbon timeout by setting the following property: servicename.ribbon.ReadTimeout. For example, if you wanted to override the licensingservice to have a seven-second timeout, you’d use the following configuration:
hystrix.command.licensingservice.execution.isolation.thread.timeoutInMilliseconds: 7000 licensingservice.ribbon.ReadTimeout: 7000
Note
For configurations longer than five seconds you have to set both the Hystrix and the Ribbon timeouts.
6.4. The real power of Zuul: filters
While being able to proxy all requests through the Zuul gateway does allow you to simplify your service invocations, the real power of Zuul comes into play when you want to write custom logic that will be applied against all the service calls flowing through the gateway. Most often this custom logic is used to enforce a consistent set of application policies like security, logging, and tracking against all the services.
These application policies are considered cross-cutting concerns because you want them to be applied to all the services in your application without having to modify each service to implement them. In this fashion, Zuul filters can be used in a similar way as a J2EE servlet filter or a Spring Aspect that can intercept a wide body of behaviors and decorate or change the behavior of the call without the original coder being aware of the change. While a servlet filter or Spring Aspect is localized to a specific service, using Zuul and Zuul filters allows you implement cross-cutting concerns across all the services being routed through Zuul.
Zuul allows you to build custom logic using a filter within the Zuul gateway. A filter allows you to implement a chain of business logic that each service request passes through as it’s being implemented.
Zuul supports three types of filters:
- Pre-filters— A pre-filter is invoked before the actual request to the target destination occurs with Zuul. A pre-filter usually carries out the task of making sure that the service has a consistent message format (key HTTP headers are in place, for example) or acts as a gatekeeper to ensure that the user calling the service is authenticated (they are who they say they are) and authorized (they can do what they’re requesting to do).
- Post filters— A post filter is invoked after the target service has been invoked and a response is being sent back to the client. Usually a post filter will be implemented to log the response back from the target service, handle errors, or audit the response for sensitive information.
- Route filters— The route filter is used to intercept the call before the target service is invoked. Usually a route filter is used to determine if some level of dynamic routing needs to take place. For instance, later in the chapter you’ll use a route-level filter that will route between two different versions of the same service so that a small percentage of calls to a service are routed to a new version of a service rather than the existing service. This will allow you to expose a small number of users to new functionality without having everyone use the new service.
Figure 6.11 shows how the pre-, post, and route filters fit together in terms of processing a service client’s request.
Figure 6.11. The pre-, route, and post filters form a pipeline in which a client request flows through. As a request comes into Zuul, these filters can manipulate the incoming request.
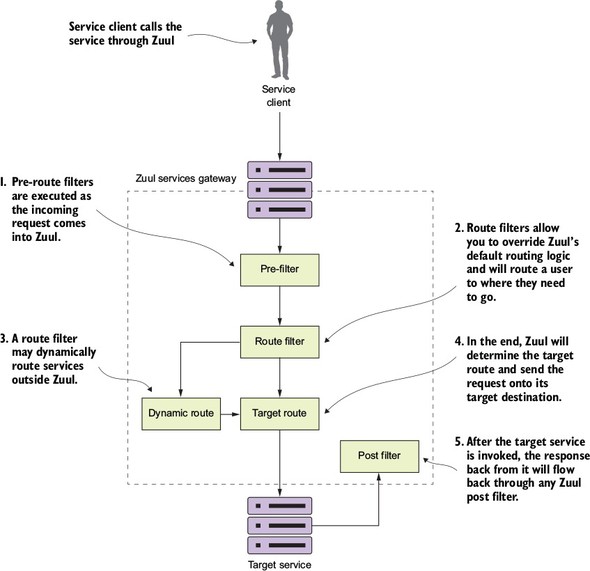
If you follow the flow laid out in figure 6.11, you’ll see everything start with a service client making a call to a service exposed through the service gateway. From there the following activities take place:
- Any pre-filters defined in the Zuul gateway will be invoked by Zuul as a request enters the Zuul gateway. The pre-filters can inspect and modify a HTTP request before it gets to the actual service. A pre-filter cannot redirect the user to a different endpoint or service.
- After the pre-filters are executed against the incoming request by Zuul, Zuul will execute any defined route filters. Route filters can change the destination of where the service is heading.
- If a route filter wants to redirect the service call to a place other than where the Zuul server is configured to send the route, it can do so. However, a Zuul route filter doesn’t do an HTTP redirect, but will instead terminate the incoming HTTP request and then call the route on behalf of the original caller. This means the route filter has to completely own the calling of the dynamic route and can’t do an HTTP redirect.
- If the route filter doesn’t dynamically redirect the caller to a new route, the Zuul server will send the route to the originally targeted service.
- After the target service has been invoked, the Zuul Post filters will be invoked. A post filter can inspect and modify the response back from the invoked service.
The best way to understand how to implement Zuul filters is to see them in use. To this end, in the next several sections you’ll build a pre-, route, and post filter and then run service client requests through them.
Figure 6.12 shows how these filters will fit together in processing requests to your EagleEye services.
Figure 6.12. Zuul filters provide centralized tracking of service calls, logging, and dynamic routing. Zuul filters allows you to enforce custom rules and policies against microservice calls.
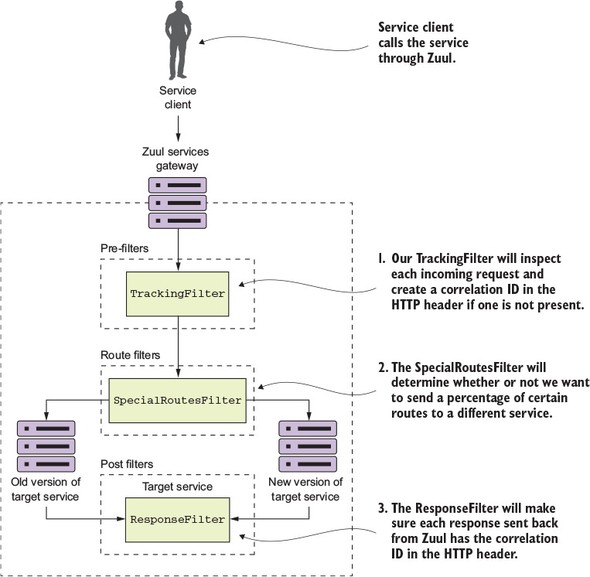
Following the flow of figure 6.12, you’ll see the following filters being used:
- TrackingFilter—The TrackingFilter will be a pre-filter that will ensure that every request flowing from Zuul has a correlation ID associated with it. A correlation ID is a unique ID that gets carried across all the microservices that are executed when carrying out a customer request. A correlation ID allows you to trace the chain of events that occur as a call goes through a series of microservice calls.
- SpecialRoutesFilter—The SpecialRoutesFilter is a Zuul routes filter that will check the incoming route and determine if you want to do A/B testing on the route. A/B testing is a technique in which a user (in this case a service) is randomly presented with two different versions of services using the same service. The idea behind A/B testing is that new features can be tested before they’re rolled out to the entire user base. In our example, you’re going to have two different versions of the same organization service. A small number of users will be routed to the newer version of the service, while the majority of users will be routed to the older version of the service.
- ResponseFilter—The ResponseFilter is a post filter that will inject the correlation ID associated with the service call into the HTTP response header being sent back to the client. This way, the client will have access to the correlation ID associated with the request they made.
6.5. Building your first Zuul pre-filter generating correlation IDs
Building filters in Zuul is an extremely simple activity. To begin, you’ll build a Zuul pre-filter, called the TrackingFilter, that will inspect all incoming requests to the gateway and determine whether there’s an HTTP header called tmx-correlation-id present in the request. The tmx-correlation-id header will contain a unique GUID (Globally Universal Id) that can be used to track a user’s request across multiple microservices.
Note
We discussed the concept of a correlation ID in chapter 5. Here we’re going to walk through in more detail how to use Zuul to generate a correlation ID. If you skipped around in the book, I highly recommend you look at chapter 5 and read the section on Hystrix and Thread context. Your implementation of correlation IDs will be implemented using ThreadLocal variables and there’s extra work to do to have ThreadLocal variables work with Hystrix.
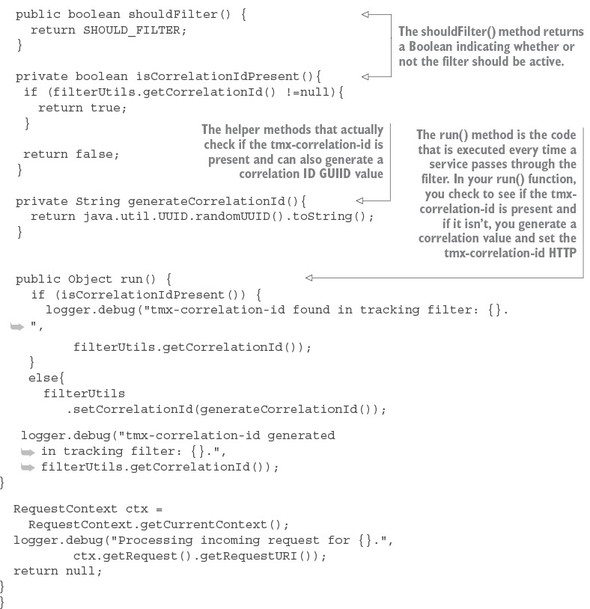
If the tmx-correlation-id isn’t present on the HTTP header, your Zuul TrackingFilter will generate and set the correlation ID. If there’s already a correlation ID present, Zuul won’t do anything with the correlation ID. The presence of a correlation ID means that this particular service call is part of a chain of service calls carrying out the user’s request. In this case, your TrackingFilter class will do nothing.
Let’s go ahead and look at the implementation of the TrackingFilter in the following listing. This code can also be found in the book samples in zuulsvr/src/main/java/com/thoughtmechanix/zuulsvr/filters/TrackingFilter.java.
Listing 6.6. Zuul pre-filter for generating correlation IDs
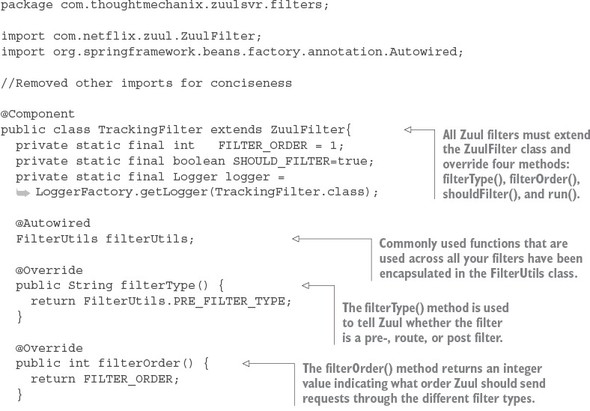
To implement a filter in Zuul, you have to extend the ZuulFilter class and then override four methods: filterType(), filterOrder(), shouldFilter(), and run(). The first three methods in this list describe to Zuul what type of filter you’re building, what order it should be run in compared to the other filters of its type, and whether it should be active. The last method, run(), contains the business logic the filter is going to implement.
You’ve implemented a class called FilterUtils. This class is used to encapsulate common functionality used by all your filters. The FilterUtils class is located in the zuulsvr/src/main/java/com/thoughtmechanix/zuulsvr/FilterUtils.java. We’re not going to walk through the entire FilterUtils class, but the key methods we’ll discuss here are the getCorrelationId() and setCorrelationId() functions. The following listing shows the code for the FilterUtils getCorrelationId() method.
Listing 6.7. Retrieving the tmx-correlation-id from the HTTP headers
public String getCorrelationId(){
  RequestContext ctx = RequestContext.getCurrentContext();

  if (ctx.getRequest()
        .getHeader(CORRELATION_ID) !=null) {
 return ctx.getRequest()
           .getHeader(CORRELATION_ID);
  }
  else{
 return ctx.getZuulRequestHeaders()
           .get(CORRELATION_ID);
  }
}
The key thing to notice in listing 6.7 is that you first check to see if the tmx-correlation-ID is already set on the HTTP Headers for the incoming request. You do this using the ctx.getRequest().getHeader(CORRELATION_ID) call.
Note
In a normal Spring MVC or Spring Boot service, the RequestContext would be of type org.springframework.web.servletsupport.Request- Context. However, Zuul gives a specialized RequestContext that has several additional methods for accessing Zuul-specific values. This request context is part of the com.netflix.zuul.context package.
If it isn’t there, you then check the ZuulRequestHeaders. Zuul doesn’t allow you to directly add or modify the HTTP request headers on an incoming request. If we add the tmx-correlation-id and then try to access it again later in the filter, it won’t be available as part of the ctx.getRequestHeader() call. To work around this, you use the FilterUtils getCorrelationId() method. You may remember that earlier in the run() method on your TrackingFilter class, you did exactly this with the following code snippet:
else{
  filterUtils.setCorrelationId(generateCorrelationId());
  logger.debug("tmx-correlation-id generated
   in tracking filter: {}.",
  filterUtils.getCorrelationId());
}
The setting of the tmx-correlation-id occurs with the FilterUtils set-CorrelationId() method:
public void setCorrelationId(String correlationId){
  RequestContext ctx =
    RequestContext.getCurrentContext();
  ctx.addZuulRequestHeader(CORRELATION_ID, correlationId);
}
In the FilterUtils setCorrelationId() method, when you want to add a value to the HTTP request headers, you use the RequestContext’s addZuulRequestHeader() method. This method will maintain a separate map of HTTP headers that were added while a request was flowing through the filters with your Zuul server. The data contained within the ZuulRequestHeader map will be merged when the target service is invoked by your Zuul server.
6.5.1. Using the correlation ID in your service calls
Now that you’ve guaranteed that a correlation ID has been added to every microservice call flowing through Zuul, how do you ensure that
- The correlation-ID is readily accessible to the microservice that’s being invoked
- Any downstream service calls the microservice might make also propagate the correlation-ID on to the downstream call
To implement this, you’re going to build a set of three classes into each of your microservices. These classes will work together to read the correlation ID (along with other information you’ll add later) off the incoming HTTP request, map it to a class that’s easily accessible and useable by the business logic in the application, and then ensure that the correlation ID is propagated to any downstream service calls.
Figure 6.13 demonstrates how these different pieces are going to be built out using your licensing service.
Figure 6.13. A set of common classes are used so that the correlation ID can be propagated to downstream service calls.
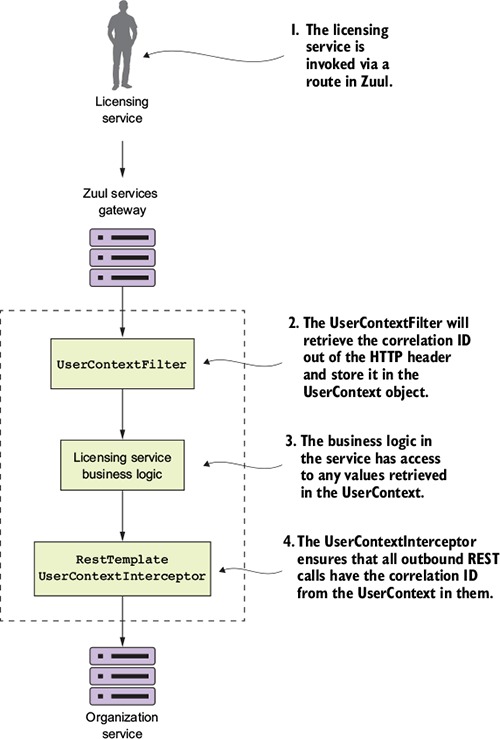
Let’s walk through what’s happening in figure 6.13:
- When a call is made to the licensing service through the Zuul gateway, the TrackingFilter will inject a correlation ID into the incoming HTTP header for any calls coming into Zuul.
- The UserContextFilter class is a custom HTTP ServletFilter. It maps a correlation ID to the UserContext class. The UserContext class is stored values in thread-local storage for use later in the call.
- The licensing service business logic needs to execute a call to the organization service.
- A RestTemplate is used to invoke the organization service. The Rest-Template will use a custom Spring Interceptor class (UserContext-Interceptor) to inject the correlation ID into the outbound call as an HTTP header.
The subject of whether you should use common libraries across your microservices is a gray area in microservice design. Microservice purists will tell you that you shouldn’t use a custom framework across your services because it introduces artificial dependencies in your services. Changes in business logic or a bug can introduce wide scale refactoring of all your services. On the other side, other microservice practitioners will say that a purist approach is impractical because certain situations exist (like the previous UserContextFilter example) where it makes sense to build a common library and share it across services.
I think there’s a middle ground here. Common libraries are fine when dealing with infrastructure-style tasks. If you start sharing business-oriented classes, you’re asking for trouble because you’re breaking down the boundaries between the services.
I seem to be breaking my own advice with the code examples in this chapter, because if you look at all the services in the chapter, they all have their own copies of the UserContextFilter, UserContext, and UserContextInterceptor classes. The reason I took a share-nothing approach here is that I don’t want to complicate the code examples in this book by having to create a shared library that would have to be published to a third-party Maven repository. Hence, all the classes in the utils package of the service are shared across all the services.
UserContextFilter: intercepting the incoming HTTP request
The first class you’re going to build is the UserContextFilter class. This class is an HTTP servlet filter that will intercept all incoming HTTP requests coming into the service and map the correlation ID (and a few other values) from the HTTP request to the UserContext class. The following listing shows the code for the UserContext class. The source for this class can be found in licensing-service/src/main/java/com/thoughtmechanix/licenses/utils/UserContextFilter.java.
Listing 6.8. Mapping the correlation ID to the UserContext class
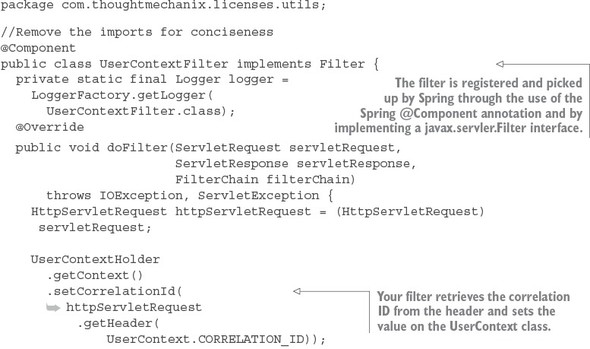
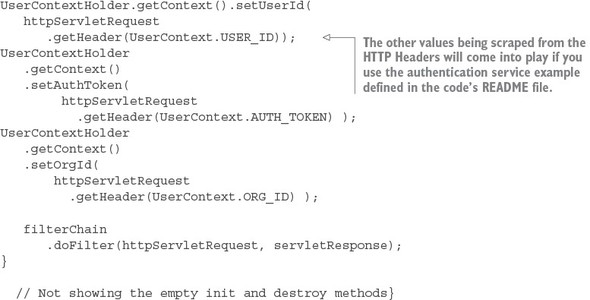
Ultimately, the UserContextFilter is used to map the HTTP header values you’re interested in into a Java class, UserContext.
UserContext: making the HTTP headers easily accessible to the service
The UserContext class is used to hold the HTTP header values for an individual service client request being processed by your microservice. It consists of a getter/setter method that retrieves and stores values from java.lang.ThreadLocal. The following listing shows the code from the UserContext class. The source for this class can be found in licensing-service/src/main/java/com/thoughtmechanix/-licenses/utils/UserContext.java.
Listing 6.9. Storing the HTTP header values inside the UserContext class
@Component
public class UserContext {
    public static final String CORRELATION_ID = "tmx-correlation-id";
    public static final String AUTH_TOKEN     = "tmx-auth-token";
    public static final String USER_ID        = "tmx-user-id";
    public static final String ORG_ID         = "tmx-org-id";
    private String correlationId= new String();
    private String authToken= new String();
    private String userId = new String();
    private String orgId = new String();

    public String getCorrelationId() { return correlationId;}
    public void setCorrelationId(String correlationId) {
      this.correlationId = correlationId;}

    public String getAuthToken() { return authToken;}
    public void setAuthToken(String authToken) {
      this.authToken = authToken;}

    public String getUserId() { return userId;}
    public void setUserId(String userId) { this.userId = userId;}

    public String getOrgId() { return orgId;}
    public void setOrgId(String orgId) {this.orgId = orgId;
  }
}
Now the UserContext class is nothing more than a POJO holding the values scraped from the incoming HTTP request. You use a class called zuulsvr/src/main/java/com/thoughtmechanix/zuulsvr/filters/UserContextHolder.java to store the UserContext in a ThreadLocal variable that is accessible in any method being invoked by the thread processing the user’s request. The code for UserContextHolder is shown in the following listing.
Listing 6.10. The UserContextHolder stores the UserContext in a ThreadLocal
public class UserContextHolder {
  private static final ThreadLocal<UserContext> userContext
      = new ThreadLocal<UserContext>();

  public static final UserContext getContext(){
        UserContext context = userContext.get();

        if (context == null) {
            context = createEmptyContext();
            userContext.set(context);
        }

        return userContext.get();
  }

  public static final void setContext(UserContext context) {
    Assert.notNull(context,
     "Only non-null UserContext instances are permitted");
        userContext.set(context);
    }

    public static final UserContext createEmptyContext(){
        return new UserContext();
    }
}
Custom RestTemplate and UserContextInteceptor: ensuring that the - correlation ID gets propagated forward
The last piece of code that we’re going to look at is the UserContextInterceptor class. This class is used to inject the correlation ID into any outgoing HTTP-based service requests being executed from a RestTemplate instance. This is done to ensure that you can establish a linkage between service calls.
To do this you’re going to use a Spring Interceptor that’s being injected into the RestTemplate class. Let’s look at the UserContextInterceptor in the following listing.
Listing 6.11. All outgoing microservice calls have the correlation ID injected into them
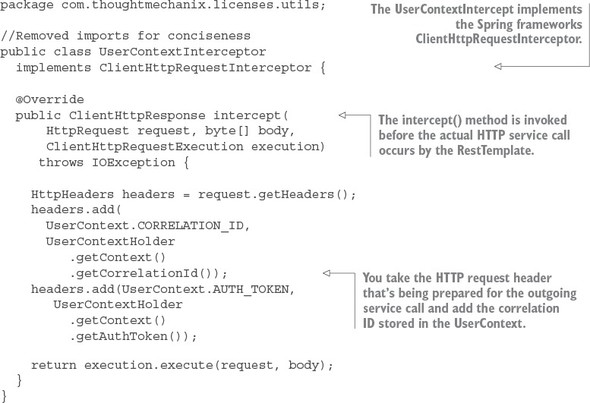
To use the UserContextInterceptor you need to define a RestTemplate bean and then add the UserContextInterceptor to it. To do this, you’re going to add your own RestTemplate bean definition to the licensing-service/src/main/java/com/thoughtmechanix/licenses/Application.java class. The following listing shows the method that’s added to this class.
Listing 6.12. Adding the UserContextInterceptor to the RestTemplate class

With this bean definition in place, any time you use the @Autowired annotation and inject a RestTemplate into a class, you’ll use the RestTemplate created in listing 6.11 with the UserContextInterceptor attached to it.
Now that you have correlation ID’s being passed to each service, it’s possible to trace a transaction as it flows through all the services involved in the call. To do this you need to ensure that each service logs to a central log aggregation point that captures log entries from all of your services into a single point. Each log entry captured in the log aggregation service will have a correlation ID associated to each entry. Implementing a log aggregation solution is outside the scope of this chapter, but in chapter 9, we’ll see how to use Spring Cloud Sleuth. Spring Cloud Sleuth won’t use the TrackingFilter that you built here, but it will use the same concepts of tracking the correlation ID and ensuring that it’s injected in every call.
6.6. Building a post filter receiving correlation IDs
Remember, Zuul executes the actual HTTP call on behalf of the service client. Zuul has the opportunity to inspect the response back from the target service call and then alter the response or decorate it with additional information. When coupled with capturing data with the pre-filter, a Zuul post filter is an ideal location to collect metrics and complete any logging associated with the user’s transaction. You’ll want to take advantage of this by injecting the correlation ID that you’ve been passing around to your microservices back to the user.
You’re going to do this by using a Zuul post filter to inject the correlation ID back into the HTTP response headers being passed back to the caller of the service. This way, you can pass the correlation ID back to the caller without ever having to touch the message body. The following listing shows the code for building a post filter. This code can be found in zuulsvr/src/main/java/com/thoughtmechanix/zuulsvr/filters/ResponseFilter.java.
Listing 6.13. Injecting the correlation ID into the HTTP response
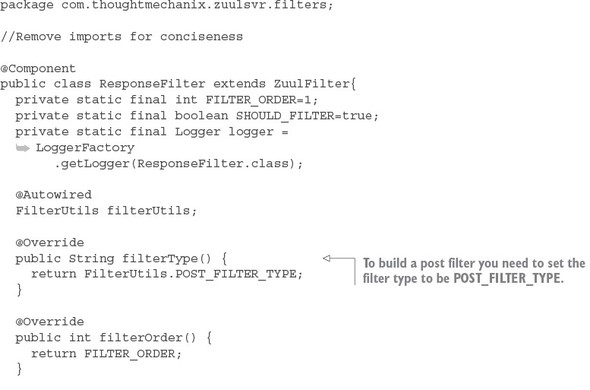

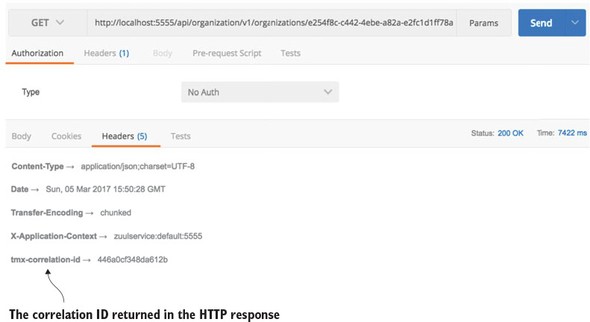
Once the ResponseFilter has been implemented, you can fire up your Zuul service and call the EagleEye licensing service through it. Once the service has completed, you’ll see a tmx-correlation-id on the HTTP response header from the call. Figure 6.14 shows the tmx-correlation-id being sent back from the call.
Figure 6.14. The tmx-correlation-id has been added to the response headers sent back to the service client.
Up until this point, all our filter examples have dealt with manipulating the service client calls before and after it has been routed to its target destination. For our last filter example, let’s look at how you can dynamically change the target route you want to send the user to.
6.7. Building a dynamic route filter
The last Zuul filter we’ll look at is the Zuul route filter. Without a custom route filter in place, Zuul will do all its routing based on the mapping definitions you saw earlier in the chapter. However, by building a Zuul route filter, you can add intelligence to how a service client’s invocation will be routed.
In this section, you’ll learn about Zuul’s route filter by building a route filter that will allow you to do A/B testing of a new version of a service. A/B testing is where you roll out a new feature and then have a percentage of the total user population use that feature. The rest of the user population still uses the old service. In this example, you’re going to simulate rolling out a new version of the organization service where you want 50% of the users go to the old service and 50% of the users to go to the new service.
To do this you’re going to build a Zuul route filter, called SpecialRoutes-Filter, that will take the Eureka service ID of the service being called by Zuul and call out to another microservice called SpecialRoutes. The SpecialRoutes service will check an internal database to see if the service name exists. If the targeted service name exists, it will return a weight and target destination of an alternative location for the service. The SpecialRoutesFilter will then take the weight returned and, based on the weight, randomly generate a number that will be used to determine whether the user’s call will be routed to the alternative organization service or to the organization service defined in the Zuul route mappings. Figure 6.15 shows the flow of what happens when the SpecialRoutesFilter is used.
Figure 6.15. The flow of a call to the organization service through the SpecialRoutesFilter
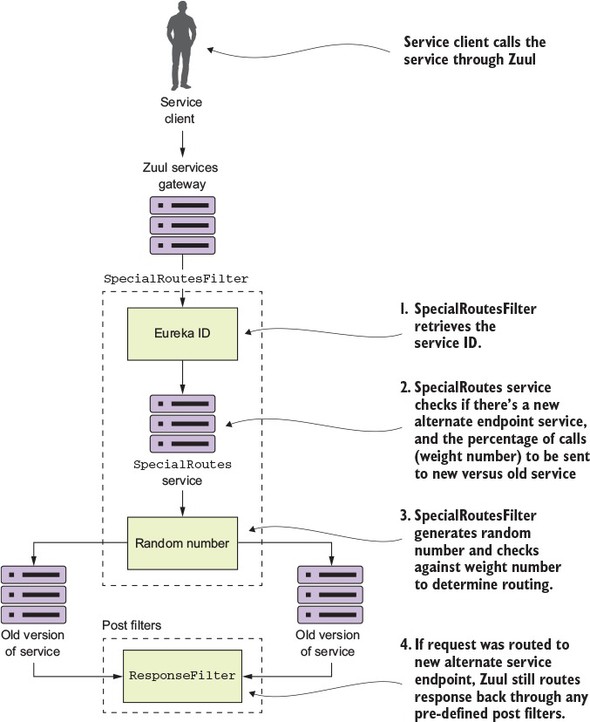
In figure 6.15, after the service client has called a service “fronted” by Zuul, the SpecialRoutesFilter takes the following actions:
- The SpecialRoutesFilter retrieves the service ID for the service being called.
- The SpecialRoutesFilter calls the SpecialRoutes service. The Special- Routes service checks to see if there’s an alternative endpoint defined for the targeted endpoint. If a record is found, it will contain a weight that will tell Zuul the percentage of service calls that should be sent to the old service and the new service.
- The SpecialRoutesFilter then generates a random number and compares that against the weight returned by the SpecialRoutes service. If the randomly generated number is under the value of the alternative endpoint weight, SpecialRoutesFilter sends the request to the new version of the service.
- If the SpecialRoutesFilter sends the request to new version of the service, Zuul maintains the original predefined pipelines and sends the response back from the alternative service endpoint through any defined post filters.
6.7.1. Building the skeleton of the routing filter
We’re going to start walking through the code you used to build the SpecialRoutesFilter. Of all the filters we’ve looked at so far, implementing a Zuul route filter requires the most coding effort, because with a route filter you’re taking over a core piece of Zuul functionality, routing, and replacing it with your own functionality. We’re not going to go through the entire class in detail here, but rather work through the pertinent details.
The SpecialRoutesFilter follows the same basic pattern as the other Zuul filters. It extends the ZuulFilter class and sets the filterType() method to return the value of “route”. I’m not going to go into any more explanation of the filter-Order() and shouldFilter() methods as they’re no different from the previous filters discussed earlier in the chapter. The following listing shows the route filter skeleton.
Listing 6.14. The skeleton of your route filter
package com.thoughtmechanix.zuulsvr.filters;

@Component
public class SpecialRoutesFilter extends ZuulFilter {
  @Override
  public String filterType() {
    return filterUtils.ROUTE_FILTER_TYPE;
  }

  @Override
  public int filterOrder() {}
  @Override
  public boolean shouldFilter() {}
  @Override
  public Object run() {}
}
6.7.2. Implementing the run() method
The real work for the SpecialRoutesFilter begins in the run() method of the code. The following listing shows the code for this method.
Listing 6.15. The run() method for the SpecialRoutesFilter is where the work begins

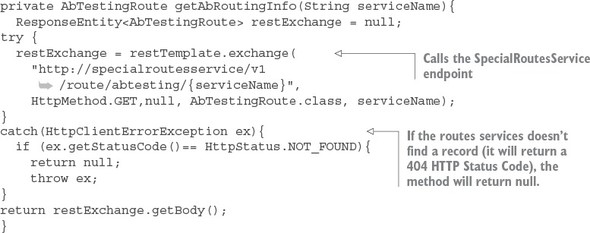
The general flow of code in listing 6.15 is that when a route request hits the run() method in the SpecialRoutesFilter, it will execute a REST call to the SpecialRoutes service. This service will execute a lookup and determine if a routing record exists for the Eureka service ID of the target service being called. The call out to SpecialRoutes service is done in the getAbRoutingInfo() method. The get-AbRoutingInfo() method is shown in the following listing.
Listing 6.16. Invoking the SpecialRouteservice to see if a routing record exists
Once you’ve determined that there’s a routing record present for the target service, you need to determine whether you should route the target service request to the alternative service location or to the default service location statically managed by the Zuul route maps. To make this determination, you call the useSpecialRoute() method. The following listing shows this method.
Listing 6.17. Determining whether to use the alternative service route
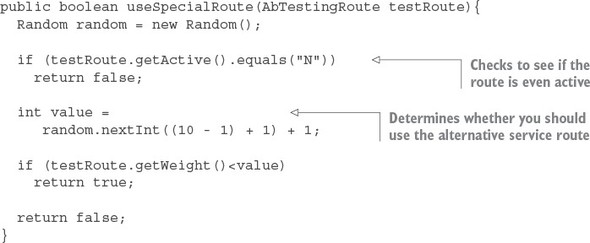
This method does two things. First, the method checks the active field on the AbTestingRoute record returned from the SpecialRoutes service. If the record is set to "N," useSpecialRoute() method shouldn’t do anything because you don’t want to do any routing at this moment. Second, the method generates a random number between 1 and 10. The method will then check to see if the weight of the return route is less than the randomly generated number. If the condition is true, the useSpecialRoute method returns true indicating you do want to use the route.
Once you’ve determined that you do want to route the service request coming into the SpecialRoutesFilter, you’re going to forward the request onto the target service.
6.7.3. Forwarding the route
The actual forwarding of the route to the downstream service is where the majority of the work occurs in the SpecialRoutesFilter. While Zuul does provide helper functions to make this task easier, the majority of the work still lies with the developer. The forwardToSpecialRoute() method does the forwarding work for you. The code in this method borrows heavily from the source code for the Spring Cloud SimpleHost-RoutingFilter class. While we’re not going to go through all of the helper functions called in the forwardToSpecialRoute() method, we’ll walk through the code in this method, as shown in the following listing.
Listing 6.18. The forwardToSpecialRoute invokes the alternative service
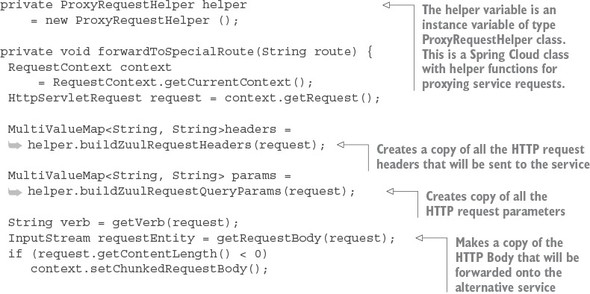
The key takeaway from the code in listing 6.18 is that you’re copying all of the values from the incoming HTTP request (the header parameters, HTTP verb, and the body) into a new request that will be invoked on the target service. The forwardToSpecial-Route() method then takes the response back from the target service and sets it on the HTTP request context used by Zuul. This is done via the setResponse() helper method (not shown). Zuul uses the HTTP request context to return the response back from the calling service client.
6.7.4. Pulling it all together
Now that you’ve implemented the SpecialRoutesFilter you can see it an action by calling the licensing service. As you may remember from earlier chapters, the licensing service calls the organization service to retrieve the contact data for the organization.
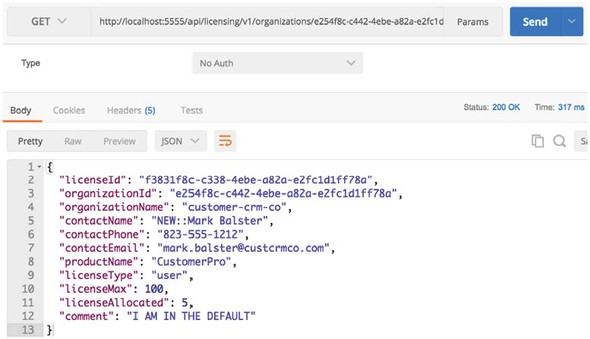
In the code example, the specialroutesservice has a database record for the organization service that will route the requests for calls to the organization service 50% of the time to the existing organization service (the one mapped in Zuul) and 50% of the time to an alternative organization service. The alternative organization service route returned from the SpecialRoutes service will be http://orgservice-new and will not be accessible directly from Zuul. To differentiate between the two services, I’ve modified the organization service(s) to pre-pend the text “OLD::” and “NEW::” to contact names returned by the organization service.
If you now hit the licensing service endpoint through Zuul
http://localhost:5555/api/licensing/v1/organizations/e254f8c-c442-4ebe-a82a-e2fc1d1ff78a/licenses/f3831f8c-c338-4ebe-a82a-e2fc1d1ff78a
you should see the contactName returned from the licensing service call flip between the OLD:: and NEW:: values. Figure 6.16 shows this.
Figure 6.16. When you hit the alternative organization service, you see NEW prepended to the contactName.
A Zuul routes filter does take more effort to implement then a pre- or post filter, but it’s also one of the most powerful parts of Zuul because you’re able to easily add intelligence to the way your services are routed.
6.8. Summary
- Spring Cloud makes it trivial to build a services gateway.
- The Zuul services gateway integrates with Netflix’s Eureka server and can automatically map services registered with Eureka to a Zuul route.
- Zuul can prefix all routes being managed, so you can easily prefix your routes with something like /api.
- Using Zuul, you can manually define route mappings. These route mappings are manually defined in the applications configuration files.
- By using Spring Cloud Config server, you can dynamically reload the route mappings without having to restart the Zuul server.
- You can customize Zuul’s Hystrix and Ribbon timeouts at global and individual service levels.
- Zuul allows you to implement custom business logic through Zuul filters. Zuul has three types of filters: pre-, post, and routing Zuul filters.
- Zuul pre-filters can be used to generate a correlation ID that can be injected into every service flowing through Zuul.
- A Zuul post filter can inject a correlation ID into every HTTP service response back to a service client.
- A custom Zuul route filter can perform dynamic routing based on a Eureka service ID to do A/B testing between different versions of the same service.