Table of Contents for
Spring Microservices in Action
 Spring Microservices in Action
Published by
Manning Publications, 2017
Spring Microservices in Action
Published by
Manning Publications, 2017
- Cover
- Spring Microservices in Action
- Copyright
- Spring Microservices in Action
- Brief Table of Contents
- Table of Contents
- Preface
- Acknowledgments
- About this Book
- About the Author
- About the Cover Illustration
- Chapter 1. Welcome to the cloud, Spring
- Chapter 2. Building microservices with Spring Boot
- Chapter 3. Controlling your configuration with Spring Cloud configuration server
- Chapter 4. On service discovery
- Chapter 5. When bad things happen: client resiliency patterns with Spring Cloud and Netflix Hystrix
- Chapter 6. Service routing with Spring Cloud and Zuul
- Chapter 7. Securing your microservices
- Chapter 8. Event-driven architecture with Spring Cloud Stream
- Chapter 9. Distributed tracing with Spring Cloud Sleuth and Zipkin
- Chapter 10. Deploying your microservices
- Appendix A. Running a cloud on your desktop
- Appendix B. OAuth2 grant types
- Index
- List of Figures
- List of Tables
- List of Listings
Chapter 4. On service discovery
- Explaining why service discovery is important to any cloud-based application environment
- Understanding the pros and cons of service discovery vs. the more traditional load-balancer approach
- Setting up a Spring Netflix Eureka server
- Registering a Spring-Boot-based microservice with Eureka
- Using Spring Cloud and Netflix’s Ribbon library to use client-side load balancing
In any distributed architecture, we need to find the physical address of where a machine is located. This concept has been around since the beginning of distributed computing and is known formally as service discovery. Service discovery can be something as simple as maintaining a property file with the addresses of all the remote services used by an application, or something as formalized (and complicated) as a UDDI (Universal Description, Discovery, and Integration) repository.[1]
Service discovery is critical to microservice, cloud-based applications for two key reasons. First, it offers the application team the ability to quickly horizontally scale up and down the number of service instances running in an environment. The service consumers are abstracted away from the physical location of the service via service discovery. Because the service consumers don’t know the physical location of the actual service instances, new service instances can be added or removed from the pool of available services.
This ability to quickly scale services without disrupting the service consumers is an extremely powerful concept, because it moves a development team used to building monolithic, single-tenant (for example, one customer) applications away from thinking about scaling only in terms of adding bigger, better hardware (vertical scaling) to the more powerful approach to scaling by adding more servers (horizontal scaling).
A monolithic approach usually drives development teams down the path of over-buying their capacity needs. Capacity increases come in clumps and spikes and are rarely a smooth steady path. Microservices allow us to scale up/down new service instances. Service discovery helps abstract that these deployments are occurring away from the service consumer.
The second benefit of service discovery is that it helps increase application resiliency. When a microservice instance becomes unhealthy or unavailable, most service discovery engines will remove that instance from its internal list of available services. The damage caused by a down service will be minimized because the service discovery engine will route services around the unavailable service.
We’ve gone through the benefits of service discovery, but what’s the big deal about it? After all, can’t we use tried-and-true methods such as DNS (Domain Name Service) or a load balancer to help facilitate service discovery? Let’s walk through why that won’t work with a microservices-based application, particularly one that’s running in the cloud.
4.1. Where’s my service?
Whenever you have an application calling resources spread across multiple servers, it needs to locate the physical location of those resource. In the non-cloud world, this service location resolution was often solved through a combination of DNS and a network load balancer. Figure 4.1 illustrates this model.
Figure 4.1. A traditional service location resolution model using DNS and a load balancer
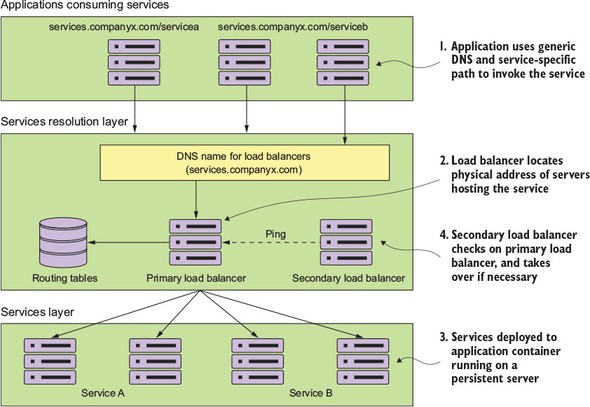
An application needs to invoke a service located in another part of the organization. It attempts to invoke the service by using a generic DNS name along with a path that uniquely represents the service that the application was trying to invoke. The DNS name would resolve to a commercial load balancer, such as the popular F5 load balancer (http://f5.com) or an open source load balancer such as HAProxy (http://haproxy.org).
The load balancer, upon receiving the request from the service consumer, locates the physical address entry in a routing table based on the path the user was trying to access. This routing table entry contains a list of one or more servers hosting the service. The load balancer then picks one of the servers in the list and forwards the request onto that server.
Each instance of a service is deployed to one or more application servers. The number of these application servers was often static (for example, the number of application servers hosting a service didn’t go up and down) and persistent (for example, if a server running an application server crashed, it would be restored to the same state it was at the time of the crash, and would have the same IP and configuration that it had previously.)
To achieve a form of high availability, a secondary load balancer is sitting idle and pinging the primary load balancer to see if it’s alive. If it isn’t alive, the secondary load balancer becomes active, taking over the IP address of the primary load balancer and beginning serving requests.
While this type of model works well with applications running inside of the four walls of a corporate data center and with a relatively small number of services running on a group of static servers, it doesn’t work well for cloud-based microservice applications. Reasons for this include
- Single point of failure— While the load balancer can be made highly available, it’s a single point of failure for your entire infrastructure. If the load balancer goes down, every application relying on it goes down too. While you can make a load balancer highly available, load balancers tend to be centralized chokepoints within your application infrastructure.
- Limited horizontal scalability— By centralizing your services into a single cluster of load balancers, you have limited ability to horizontally scale your load-balancing infrastructure across multiple servers. Many commercial load balancers are constrained by two things: their redundancy model and licensing costs. Most commercial load balancers use a hot-swap model for redundancy so you only have a single server to handle the load, while the secondary load balancer is there only for fail-over in the case of an outage of the primary load balancer. You are, in essence, constrained by your hardware. Second, commercial load balancers also have restrictive licensing models geared toward a fixed capacity rather than a more variable model.
- Statically managed— Most traditional load balancers aren’t designed for rapid registration and de-registration of services. They use a centralized database to store the routes for rules and the only way to add new routes is often through the vendor’s proprietary API (Application Programming Interface).
- Complex— Because a load balancer acts as a proxy to the services, service consumer requests have to have their requests mapped to the physical services. This translation layer often added a layer of complexity to your service infrastructure because the mapping rules for the service have to be defined and deployed by hand. In a traditional load balancer scenario, this registration of new service instances was done by hand and not at startup time of a new service instance.
These four reasons aren’t a general indictment of load balancers. They work well in a corporate environment where the size and scale of most applications can be handled through a centralized network infrastructure. In addition, load balancers still have a role to play in terms of centralizing SSL termination and managing service port security. A load balancer can lock down inbound (ingress) and outbound (egress) port access to all the servers sitting behind it. This concept of least network access is often a critical component when trying to meet industry-standard certification requirements such as PCI (Payment Card Industry) compliance.
However, in the cloud where you have to deal with massive amounts of transactions and redundancy, a centralized piece of network infrastructure doesn’t ultimately work as well because it doesn’t scale effectively and isn’t cost-efficient. Let’s now look at how you can implement a robust-service discovery mechanism for cloud-based applications.
4.2. On service discovery in the cloud
The solution for a cloud-based microservice environment is to use a service-discovery mechanism that’s
- Highly available— Service discovery needs to be able to support a “hot” clustering environment where service lookups can be shared across multiple nodes in a service discovery cluster. If a node becomes unavailable, other nodes in the cluster should be able to take over.
- Peer-to-peer— Each node in the service discovery cluster shares the state of a service instance.
- Load balanced— Service discovery needs to dynamically load balance requests across all service instances to ensure that the service invocations are spread across all the service instances managed by it. In many ways, service discovery replaces the more static, manually managed load balancers used in many early web application implementations.
- Resilient— The service discovery’s client should “cache” service information locally. Local caching allows for gradual degradation of the service discovery feature so that if service discovery service does become unavailable, applications can still function and locate the services based on the information maintained in its local cache.
- Fault-tolerant— Service discovery needs to detect when a service instance isn’t healthy and remove the instance from the list of available services that can take client requests. It should detect these faults with services and take action without human intervention.
In the following section(s) we’re going to
- Walk through the conceptual architecture of how a cloud-based service discovery agent will work
- Show how client-side caching and load-balancing allows a service to continue to function even when the service discovery agent is unavailable
- See how to implement service discovery using Spring Cloud and Netflix’s Eureka service discovery agent
4.2.1. The architecture of service discovery
To begin our discussion around service discovery architecture, we need to understand four concepts. These general concepts are shared across all service discovery implementations:
- Service registration— How does a service register with the service discovery agent?
- Client lookup of service address— What’s the means by which a service client looks up service information?
- Information sharing— How is service information shared across nodes?
- Health monitoring— How do services communicate their health back to the service discovery agent?
Figure 4.2 shows the flow of these four bullets and what typically occurs in a service discovery pattern implementation.
Figure 4.2. As service instances are added/removed, they will update the service discovery agent and become available to process user requests.
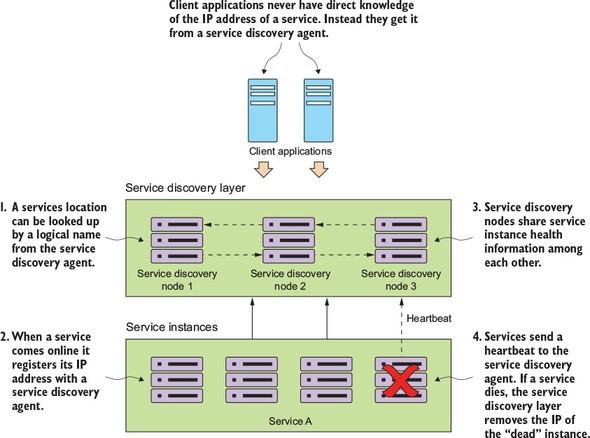
In figure 4.2, one or more service discovery nodes have been started. These service discovery instances are usually unique and don’t have a load balancer that sits in front of them.
As service instances start up, they’ll register their physical location, path, and port that they can be accessed by with one or more service discovery instances. While each instance of a service will have a unique IP address and port, each service instance that comes up will register under the same service ID. A service ID is nothing more than a key that uniquely identifies a group of the same service instances.
A service will usually only register with one service discovery service instance. Most service discovery implementations use a peer-to-peer model of data propagation where the data around each service instance is communicated to all the other nodes in the cluster.
Depending on the service discovery implementation, the propagation mechanism might use a hard-coded list of services to propagate to or use a multi-casting protocol like the “gossip”[2] or “infection-style”[3] protocol to allow other nodes to “discover” changes in the cluster.
Finally, each service instance will push to or have pulled from its status by the service discovery service. Any services failing to return a good health check will be removed from the pool of available service instances.
Once a service has registered with a service discovery service, it’s ready to be used by an application or service that needs to use its capabilities. Different models exist for a client to “discover” a service. A client can rely solely on the service discovery engine to resolve service locations each time a service is called. With this approach, the service discovery engine will be invoked every time a call to a registered microservice instance is made. Unfortunately, this approach is brittle because the service client is completely dependent on the service discovery engine to be running to find and invoke a service.
A more robust approach is to use what’s called client-side load balancing.[4] Figure 4.3 illustrates this approach.
Figure 4.3. Client-side load balancing caches the location of the services so that the service client doesn’t have to contact service discovery on every call.
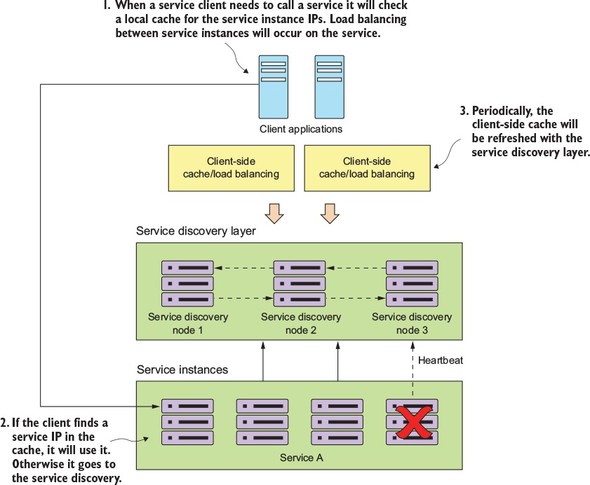
In this model, when a consuming actor needs to invoke a service
- It will contact the service discovery service for all the service instances a service consumer is asking for and then cache data locally on the service consumer’s machine.
- Each time a client wants to call the service, the service consumer will look up the location information for the service from the cache. Usually client-side caching will use a simple load balancing algorithm like the “round-robin” load balancing algorithm to ensure that service calls are spread across multiple service instances.
- The client will then periodically contact the service discovery service and refresh its cache of service instances. The client cache is eventually consistent, but there’s always a risk that between when the client contacts the service discovery instance for a refresh and calls are made, calls might be directed to a service instance that isn’t healthy. If, during the course of calling a service, the service call fails, the local service discovery cache is invalidated and the service discovery client will attempt to refresh its entries from the service discovery agent.
Let’s now take the generic service discovery pattern and apply it to your EagleEye problem domain.
4.2.2. Service discovery in action using Spring and Netflix Eureka
Now you’re going to implement service discovery by setting up a service discovery agent and then registering two services with the agent. You’ll then have one service call another service by using the information retrieved by service discovery. Spring Cloud offers multiple methods for looking up information from a service discovery agent. We’ll also walk through the strengths and weakness of each approach.
Once again, the Spring Cloud project makes this type of setup trivial to undertake. You’ll use Spring Cloud and Netflix’s Eureka service discovery engine to implement your service discovery pattern. For the client-side load balancing you’ll use Spring Cloud and Netflix’s Ribbon libraries.
In the previous two chapters, you kept your licensing service simple and included the organization name for the licenses with the license data. In this chapter, you’ll break the organization information into its own service.
When the licensing service is invoked, it will call the organization service to retrieve the organization information associated with the designated organization ID. The actual resolution of the organization service’s location will be held in a service discovery registry. For this example, you’ll register two instances of the organization service with a service discovery registry and then use client-side load balancing to look up and cache the registry in each service instance. Figure 4.4 shows this arrangement:
- As the services are bootstrapping, the licensing and organization services will also register themselves with the Eureka Service. This registration process will tell Eureka the physical location and port number of each service instance along with a service ID for the service being started.
- When the licensing service calls to the organization service, it will use the Net-flix Ribbon library to provide client-slide load balancing. Ribbon will contact the Eureka service to retrieve service location information and then cache it locally.
- Periodically, the Netflix Ribbon library will ping the Eureka service and refresh its local cache of service locations.
Figure 4.4. By implementing client-side caching and Eureka with the licensing and organization services, you can lessen the load on the Eureka servers and improve client stability if Eureka becomes unavailable.
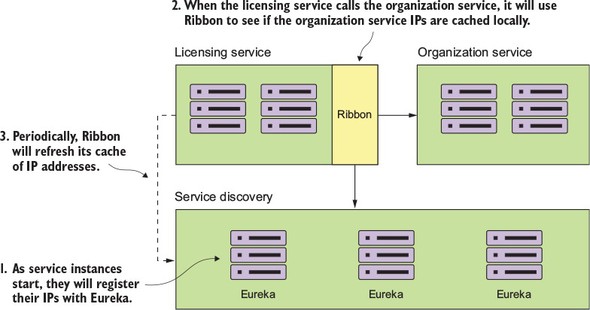
Any new organization services instance will now be visible to the licensing service locally, while any non-healthy instances will be removed from the local cache.
Next, you’ll implement this design by setting up your Spring Cloud Eureka service.
4.3. Building your Spring Eureka Service
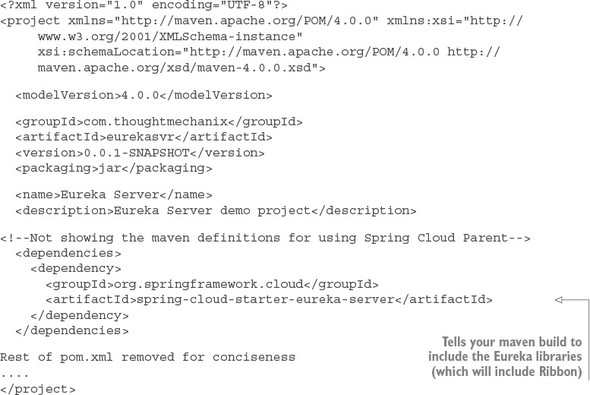
In this section, you’ll set up our Eureka service using Spring Boot. Like the Spring Cloud configuration service, setting up a Spring Cloud Eureka Service starts with building a new Spring Boot project and applying annotations and configurations. Let’s begin with your maven pom.xml.[5] The following listing shows the Eureka service dependencies you’ll need for the Spring Boot project you’re setting up.
All source code in this chapter can be downloaded from GitHub (https://github.com/carnellj/spmia-chapter4). The Eureka service is in the chapter 4/eurekasvr example. All services in this chapter were built using Docker and Docker Compose so they can be brought up in a single instance.
Listing 4.1. Adding dependencies to your pom.xml
You’ll then need to set up the src/main/resources/application.yml file with the configuration needed to set up the Eureka service running in standalone mode (for example, no other nodes in the cluster), as shown in the next listing.
Listing 4.2. Setting up your Eureka configuration in the application.yml file
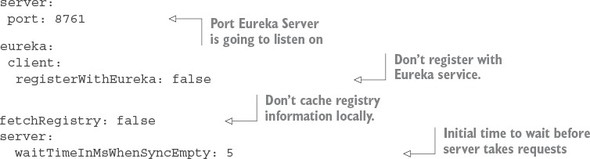
The key properties being set are the server.port attribute that sets the default port used for the Eureka service. The eureka.client.registerWithEureka attribute tells the service not to register with a Eureka service when the Spring Boot Eureka application starts because this is the Eureka service. The eureka.client.fetchRegistry attribute is set to false so that when the Eureka service starts, it doesn’t try to cache its registry information locally. When running a Eureka client, you’ll want to change this value for the Spring Boot services that are going to register with Eureka.
You’ll notice that the last attribute, eureka.server.waitTimeInMsWhenSync Empty, is commented out. When you’re testing your service locally you should uncomment this line because Eureka won’t immediately advertise any services that register with it. It will wait five minutes by default to give all of the services a chance to register with it before advertising them. Uncommenting this line for local testing will help speed up the amount of time it will take for the Eureka service to start and show services registered with it.
Individual services registering will take up to 30 seconds to show up in the Eureka service because Eureka requires three consecutive heartbeat pings from the service spaced 10 seconds apart before it will say the service is ready for use. Keep this in mind as you’re deploying and testing your own services.
The last piece of setup work you’re going to do in setting up your Eureka service is adding an annotation to the application bootstrap class you’re using to start your Eureka service. For the Eureka service, the application bootstrap class can be found in the src/main/java/com/thoughtmechanix/eurekasvr/EurekaServer-Application.java class. The following listing shows where to add your annotations.
Listing 4.3. Annotating the bootstrap class to enable the Eureka server
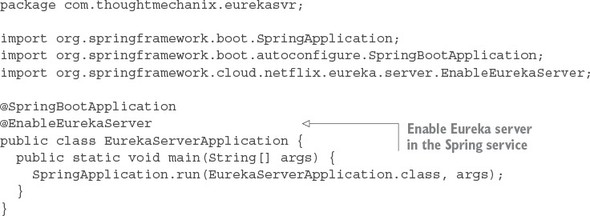
You use only one new annotation to tell your service to be a Eureka service; that’s @EnableEurekaServer. At this point you can start up the Eureka service by running the mvn spring-boot:run or run docker-compose (see appendix A) to start the service. Once this command is run, you should have a running Eureka service with no services registered in it. Next you’ll build out the organization service and register it with your Eureka service.
4.4. Registering services with Spring Eureka
At this point you have a Spring-based Eureka server up and running. In this section, you’ll configure your organization and licensing services to register themselves with your Eureka server. This work is done in preparation for having a service client look up a service from your Eureka registry. By the time you’re done with this section, you should have a firm understanding of how to register a Spring Boot microservice with Eureka.
Registering a Spring Boot-based microservice with Eureka is an extremely simple exercise. For the purposes of this chapter, we’re not going to walk through all of the Java code involved with writing the service (we purposely kept that amount of code small), but instead focus on registering the service with the Eureka service registry you created in the previous section.
The first thing you need to do is add the Spring Eureka dependency to your organization service’s pom.xml file:

The only new library that’s being used is the spring-cloud-starter-eureka library. The spring-cloud-starter-eureka artifact holds the jar files that Spring Cloud will use to interact with your Eureka service.
After you’ve set up your pom.xml file, you need to tell Spring Boot to register the organization service with Eureka. This registration is done via additional configuration in the organization service’s src/main/java/resources/application.yml file, as shown in the following listing.
Listing 4.4. Modifying your organization service’s application.yml to talk to Eureka
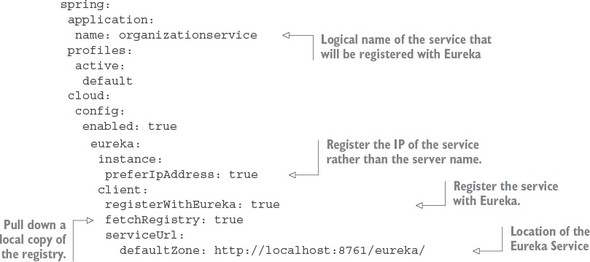
Every service registered with Eureka will have two components associated with it: the application ID and the instance ID. The application ID is used to represent a group service instance. In a Spring-Boot-based microservice, the application ID will always be the value set by the spring.application.name property. For your organization service, your spring.application.name is creatively named organizationservice. The instance ID will be a random number meant to represent a single service instance.
Note
Remember that normally the spring.application.name property goes in the bootstrap.yml file. I’ve included it in the application.yml for illustrative purposes. The code will work with the spring.application.name but the proper place long-term for this attribute is the bootstrap.yml file.
The second part of your configuration provides how and where the service should register with the Eureka service. The eureka.instance.preferIpAddress property tells Eureka that you want to register the service’s IP address to Eureka rather than its hostname.
By default, Eureka will try to register the services that contact it by hostname. This works well in a server-based environment where a service is assigned a DNS-backed host name. However, in a container-based deployment (for example, Docker), containers will be started with randomly generated hostnames and no DNS entries for the containers.
If you don’t set the eureka.instance.preferIpAddress to true, your client applications won’t properly resolve the location of the hostnames because there will be no DNS entry for that container. Setting the preferIpAddress attribute will inform the Eureka service that client wants to be advertised by IP address.
Personally, we always set this attribute to true. Cloud-based microservices are supposed to be ephemeral and stateless. They can be started up and shut down at will. IP addresses are more appropriate for these types of services.
The eureka.client.registerWithEureka attribute is the trigger to tell the organization service to register itself with Eureka. The eureka.client.fetchRegistry attribute is used to tell the Spring Eureka Client to fetch a local copy of the registry. Setting this attribute to true will cache the registry locally instead of calling the Eureka service with every lookup. Every 30 seconds, the client software will re-contact the Eureka service for any changes to the registry.
The last attribute, the eureka.serviceUrl.defaultZone attribute, holds a comma-separated list of Eureka services the client will use to resolve to service locations. For our purposes, you’re only going to have one Eureka service.
Setting up multiple URL services isn’t enough for high availability. The eureka.serviceUrl.defaultZone attribute only provides a list of Eureka services for the client to communicate with. You also need to set up the Eureka services to replicate the contents of their registry with each other.
A group of Eureka registries communicate with each other using a peer-to-peer communication model where each Eureka service has to be configured to know about the other nodes in the cluster. Setting up a Eureka cluster is outside of the scope of this book. If you’re interested in setting up a Eureka cluster, please visit the Spring Cloud project’s website for further information.[6]
At this point you’ll have a single service registered with your Eureka service.
You can use Eureka’s REST API to see the contents of the registry. To see all the instances of a service, hit the following GET endpoint:
http://<eureka service>:8761/eureka/apps/<APPID>
For instance, to see the organization service in the registry you can call http://-localhost:8761/eureka/apps/organizationservice.
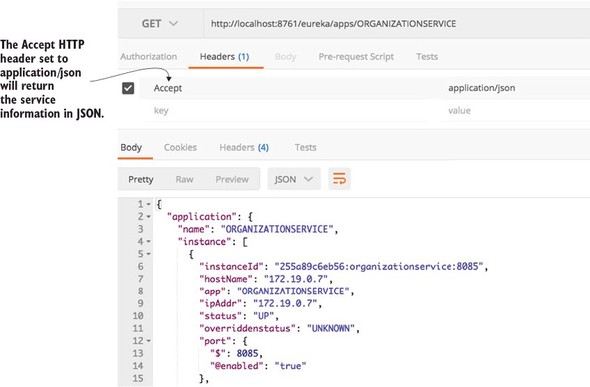
The default format returned by the Eureka service is XML. Eureka can also return the data in figure 4.5 as a JSON payload, but you have to set the Accept HTTP header to be application/json. An example of the JSON payload is shown in figure 4.6.
Figure 4.5. Calling the Eureka REST API to see the organization will show the IP address of the service instances registered in Eureka, along with the service status.
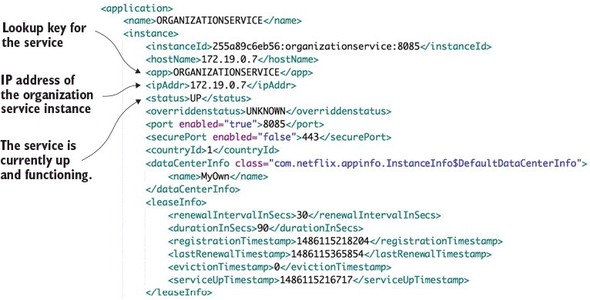
Figure 4.6. Calling the Eureka REST API with the results being JSON
When a service registers with Eureka, Eureka will wait for three successive health checks over the course of 30 seconds before the service becomes available via a Eureka. This warm-up period throws developers off because they think that Eureka hasn’t registered their services if they try to call their service immediately after the service has been launched. This is evident in our code examples running in the Docker environment, because the Eureka service and the application services (licensing and organization services) all start up at the same time. Be aware that after starting the application, you may receive 404 errors about services not being found, even though the service itself has started. Wait 30 seconds before trying to call your services.
In a production environment, your Eureka services will already be running and if you’re deploying an existing service, the old services will still be in place to take requests.
4.5. Using service discovery to look up a service
You now have the organization service registered with Eureka. You can also have the licensing service call the organization service without having direct knowledge of the location of any of the organization services. The licensing service will look up the physical location of the organization by using Eureka.
For our purposes, we’re going to look at three different Spring/Netflix client libraries in which a service consumer can interact with Ribbon. These libraries will move from the lowest level of abstraction for interacting with Ribbon to the highest. The libraries we’ll explore include
- Spring Discovery client
- Spring Discovery client enabled RestTemplate
- Netflix Feign client
Let’s walk through each of these clients and see their use in the context of the licensing service. Before we start into the specifics of the client, I wrote a few convenience classes and methods in the code so you can play with the different client types using the same service endpoint.
First, I’ve modified the src/main/java/com/thoughtmechanix/licenses/controllers/LicenseServiceController.java to include a new route for the license services. This new route will allow you to specify the type of client you want to invoke the service with. This is a helper route so that as we explore each of the different methods for invoking the organization service via Ribbon, you can try each mechanism through a single route. The following listing shows the code for the new route in the LicenseServiceController class.
Listing 4.5. Calling the licensing service with different REST Clients
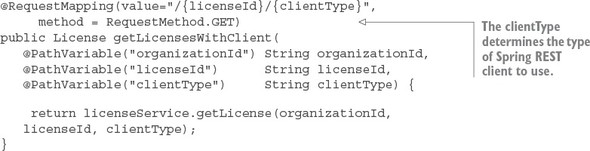
In this code, the clientType parameter passed on the route will drive the type of client we’re going to use in the code examples. The specific types you can pass in on this route include
- Discovery— Uses the discovery client and a standard Spring RestTemplate class to invoke the organization service
- Rest— Uses an enhanced Spring RestTemplate to invoke the Ribbon-based service
- Feign— Uses Netflix’s Feign client library to invoke a service via Ribbon
Note
Because I’m using the same code for all three types of client, you might see situations where you’ll see annotations for certain clients even when they don’t seem to be needed. For example, you’ll see both the @EnableDiscoveryClient and @EnableFeignClients annotations in the code, even when the text is only explaining one of the client types. This is so I can use one code base for my examples. I’ll call out these redundancies and code whenever they are encountered.
In the src/main/java/com/thoughtmechanix/licenses/services/License Service.java class, I’ve added a simple method called retrieveOrgInfo() that will resolve based on the clientType passed into the route the type of client that will be used to look up an organization service instance. The getLicense() method on the LicenseService class will use retrieveOrgInfo() to retrieve the organization data from the Postgres database.
Listing 4.6. getLicense() function will use multiple methods to perform a REST call
public License getLicense(String organizationId, String licenseId, String clientType) {
    License license = licenseRepository.findByOrganizationIdAndLicenseId(
              organizationId, licenseId);

    Organization org = retrieveOrgInfo(organizationId, clientType);

    return license
        .withOrganizationName( org.getName())
        .withContactName( org.getContactName())
        .withContactEmail( org.getContactEmail() )
        .withContactPhone( org.getContactPhone() )
        .withComment(config.getExampleProperty());
  }
You can find each of the clients we built using the Spring DiscoveryClient, the Spring RestTemplate, or the Feign libraries in the src/main/java/com/thoughtmechanix/licenses/clients package of the licensing-service source code.
4.5.1. Looking up service instances with Spring DiscoveryClient
The Spring DiscoveryClient offers the lowest level of access to Ribbon and the services registered within it. Using the DiscoveryClient, you can query for all the services registered with the ribbon client and their corresponding URLs.
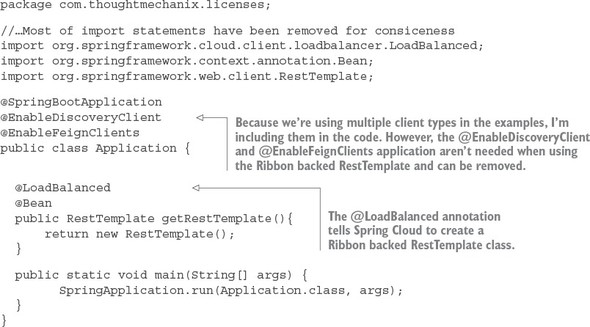
Next, you’ll build a simple example of using the DiscoveryClient to retrieve one of the organization service URLs from Ribbon and then call the service using a standard RestTemplate class. To begin using the DiscoveryClient, you first need to annotate the src/main/java/com/thoughtmechanix/licenses/Application.java class with the @EnableDiscoveryClient annotation, as shown in the next listing.
Listing 4.7. Setting up the bootstrap class to use the Eureka Discovery Client
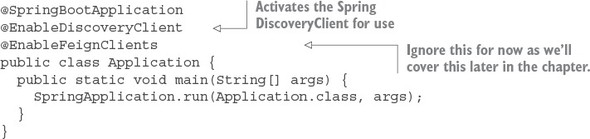
The @EnableDiscoveryClient annotation is the trigger for Spring Cloud to enable the application to use the DiscoveryClient and Ribbon libraries. The @EnableFeignClients annotation can be ignored for now as we’ll be covering it shortly.
Now, let’s look at your implementation of the code that calls the organization service via the Spring DiscoveryClient, as shown in the following listing. You can find this in src/main/java/com/thoughtmechanix/licenses/OrganizationDiscovery Client.java.
Listing 4.8. Using the DiscoveryClient to look up information
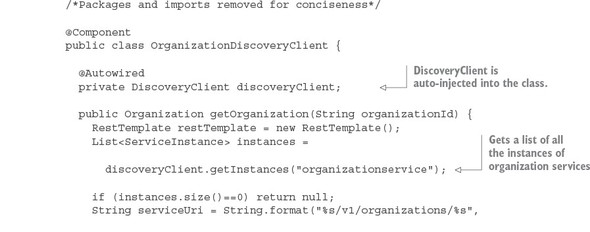

The first item of interest in the code is the DiscoveryClient. This is the class you’ll use to interact with Ribbon. To retrieve all instances of the organization services registered with Eureka, you can use the getInstances() method, passing in the key of service you’re looking for, to retrieve a list of ServiceInstance objects.
The ServiceInstance class is used to hold information about a specific instance of a service including its hostname, port and URI.
In listing 4.8, you take the first ServiceInstance class in your list to build a target URL that can then be used to call your service. Once you have a target URL, you can use a standard Spring RestTemplate to call your organization service and retrieve data.
I’m walking through the DiscoveryClient to be completed in our discussion of building service consumers with Ribbon. The reality is that you should only use the DiscoveryClient directly when your service needs to query Ribbon to understand what services and service instances are registered with it. There are several problems with this code including the following:
You aren’t taking advantage of Ribbon’s client side load-balancing—By calling the DiscoveryClient directly, you get back a list of services, but it becomes your responsibility to choose which service instances returned you’re going to invoke.
You’re doing too much work—Right now, you have to build the URL that’s going to be used to call your service. It’s a small thing, but every piece of code that you can avoid writing is one less piece of code that you have to debug.
Observant Spring developers might have noticed that you’re directly instantiating the RestTemplate class in the code. This is antithetical to normal Spring REST invocations, as normally you’d have the Spring Framework inject the RestTemplate the class using it via the @Autowired annotation.
You instantiated the RestTemplate class in listing 4.8 because once you’ve enabled the Spring DiscoveryClient in the application class via the @EnableDiscoveryClient annotation, all RestTemplates managed by the Spring framework will have a Ribbon-enabled interceptor injected into them that will change how URLs are created with the RestTemplate class. Directly instantiating the RestTemplate class allows you to avoid this behavior.
In summary, there are better mechanisms for calling a Ribbon-backed service.
4.5.2. Invoking services with Ribbon-aware Spring RestTemplate
Next, we’re going to see an example of how to use a RestTemplate that’s Ribbon-aware. This is one of the more common mechanisms for interacting with Ribbon via Spring. To use a Ribbon-aware RestTemplate class, you need to define a Rest-Template bean construction method with a Spring Cloud annotation called @LoadBalanced. For the licensing service, the method that will be used to create the RestTemplate bean can be found in src/main/java/com/thoughtmechanix/licenses/Application.java.
The following listing shows the getRestTemplate() method that will create the Ribbon-backed Spring RestTemplate bean.
Listing 4.9. Annotating and defining a RestTemplate construction method
Note
In early releases of Spring Cloud, the RestTemplate class was automatically backed by Ribbon. It was the default behavior. However, since Spring Cloud Release Angel, the RestTemplate in Spring Cloud is no longer backed by Ribbon. If you want to use Ribbon with the RestTemplate, you must explicitly annotate it using the @LoadBalanced annotation.
Now that the bean definition for the Ribbon-backed RestTemplate class is defined, any time you want to use the RestTemplate bean to call a service, you only need to auto-wire it into the class using it.
Using the Ribbon-backed RestTemplate class pretty much behaves like a standard Spring RestTemplate class, except for one small difference in how the URL for target service is defined. Rather than using the physical location of the service in the RestTemplate call, you’re going to build the target URL using the Eureka service ID of the service you want to call.
Let’s see this difference by looking at the following listing. The code for this listing can be found in the src/main/java/com/thoughtmechanix/licenses/-clients/OrganizationRestTemplate.java class.
Listing 4.10. Using a Ribbon-backed RestTemplate to call a service
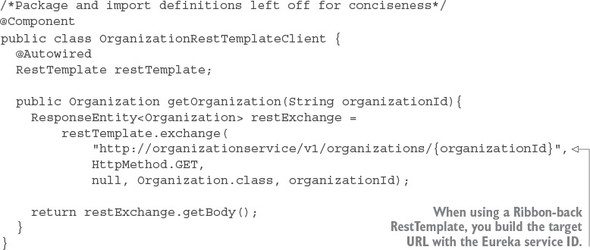
This code should look somewhat similar to the previous example, except for two key differences. First, the Spring Cloud DiscoveryClient is nowhere in sight. Second, the URL being used in the restTemplate.exchange() call should look odd to you:
restTemplate.exchange(

  "http://organizationservice/v1/organizations/{organizationId}",
   HttpMethod.GET,
 null, Organization.class, organizationId);
The server name in the URL matches the application ID of the organizationservice key that you registered the organization service with in Eureka:
http://{applicationid}/v1/organizations/{organizationId}
The Ribbon-enabled RestTemplate will parse the URL passed into it and use whatever is passed in as the server name as the key to query Ribbon for an instance of a service. The actual service location and port are completely abstracted from the developer.
In addition, by using the RestTemplate class, Ribbon will round-robin load balance all requests among all the service instances.
4.5.3. Invoking services with Netflix Feign client
An alternative to the Spring Ribbon-enabled RestTemplate class is Netflix’s Feign client library. The Feign library takes a different approach to calling a REST service by having the developer first define a Java interface and then annotating that interface with Spring Cloud annotations to map what Eureka-based service Ribbon will invoke. The Spring Cloud framework will dynamically generate a proxy class that will be used to invoke the targeted REST service. There’s no code being written for calling the service other than an interface definition.
To enable the Feign client for use in your licensing service, you need to add a new annotation, @EnableFeignClients, to the licensing service’s src/main/java/com/thoughtmechanix/licenses/Application.java class. The following listing shows this code.
Listing 4.11. Enabling the Spring Cloud/Netflix Feign client in the licensing service

Now that you’ve enabled the Feign client for use in your licensing service, let’s look at a Feign client interface definition that can be used to call an endpoint on the organization service. The following listing shows an example. The code in this listing can be found in the src/main/java/com/thoughtmechanix/licenses/clients/OrganizationFeignClient.java class.
Listing 4.12. Defining a Feign interface for calling the organization service
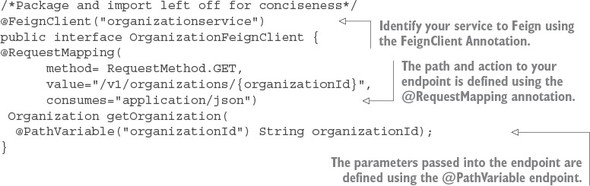
You start the Feign example by using the @FeignClient annotation and passing it the name of the application id of the service you want the interface to represent. Next you’ll define a method, getOrganization(), in your interface that can be called by the client to invoke the organization service.
How you define the getOrganization() method looks exactly like how you would expose an endpoint in a Spring Controller class. First, you’re going to define a @RequestMapping annotation for the getOrganization() method that will map the HTTP verb and endpoint that will be exposed on the organization service invocation. Second, you’ll map the organization ID passed in on the URL to an organizationId parameter on the method call, using the @PathVariable annotation. The return value from the call to the organization service will be automatically mapped to the Organization class that’s defined as the return value for the getOrganization() method.
To use the OrganizationFeignClient class, all you need to do is autowire and use it. The Feign Client code will take care of all the coding work for you.
When you use the standard Spring RestTemplate class, all service calls’ HTTP status codes will be returned via the ResponseEntity class’s getStatusCode() method. With the Feign Client, any HTTP 4xx – 5xx status codes returned by the service being called will be mapped to a FeignException. The FeignException will contain a JSON body that can be parsed for the specific error message.
Feign does provide you the ability to write an error decoder class that will map the error back to a custom Exception class. Writing this decoder is outside the scope of this book, but you can find examples of this in the Feign GitHub repository at (https://github.com/Netflix/feign/wiki/Custom-error-handling).
4.6. Summary
- The service discovery pattern is used to abstract away the physical location of services.
- A service discovery engine such as Eureka can seamlessly add and remove service instances from an environment without the service clients being impacted.
- Client-side load balancing can provide an extra level of performance and resiliency by caching the physical location of a service on the client making the service call.
- Eureka is a Netflix project that when used with Spring Cloud, is easy to set up and configure.
- You used three different mechanisms in Spring Cloud, Netflix Eureka, and Netflix Ribbon to invoke a service. These mechanisms
included
- Using a Spring Cloud service DiscoveryClient
- Using Spring Cloud and Ribbon-backed RestTemplate
- Using Spring Cloud and Netflix’s Feign client