Table of Contents for
Express in Action: Writing, building, and testing Node.js applications
 Express in Action: Writing, building, and testing Node.js applications
Published by
Manning Publications, 2016
Express in Action: Writing, building, and testing Node.js applications
Published by
Manning Publications, 2016
- Cover
- Express in Action: Writing, building, and testing Node.js applications
- Copyright
- Brief Table of Contents
- Table of Contents
- Preface
- Acknowledgments
- About this Book
- About the Cover Illustration
- Part 1. Intro
- Chapter 1. What is Express?
- Chapter 2. The basics of Node.js
- Chapter 3. Foundations of Express
- Part 2. Core
- Chapter 4. Middleware
- Chapter 5. Routing
- Chapter 6. Building APIs
- Chapter 7. Views and templates: Pug and EJS
- Part 3. Express in Context
- Chapter 8. Persisting your data with MongoDB
- Chapter 9. Testing Express applications
- Chapter 10. Security
- Chapter 11. Deployment: assets and Heroku
- Chapter 12. Best practices
- Appendix. Other helpful modules
- Index
- List of Figures
- List of Listings
Chapter 12. Best practices
- Benefits of simplicity in your code
- Structuring your app’s files
- Using the npm shrinkwrap command to lock down dependency versions for reliability (and the benefits of doing so)
- Avoiding installing modules globally
It’s time to bring this book to a close.
If this book were a tragedy, we’d probably end with a dramatic death. If it were a comedy, we might have a romantic wedding. Unfortunately, this is a book about Express, a topic not known for its drama and romance. The best you’ll get is this: a set of best practices for large Express applications. I’ll do my best to make it romantic and dramatic.
With small applications, organization doesn’t matter much. You can fit your app in a single file or a handful of small files. But as your apps become larger, these considerations become more important. How should you organize your files so that your codebase is easy to work with? What kind of conventions should you adhere to in order to best support a team of developers?
In this final chapter, I’ll do my best to share my experience. Very little of this chapter will be strictly factual; I’ll lend opinions to the unopinionated philosophy of Express with respect to what it takes to build a medium-to-large application with it.
I’ll make sure to repeat this disclaimer, but remember: This chapter is mostly opinions and conventions I’ve found. You may disagree or find that your application doesn’t fit into these molds. That’s the beauty of Express—you have a lot of flexibility.
This might not be as emotional as a comedy or a tragedy, but I’ll do my best.
12.1. Simplicity
In this chapter of my opinions, let me offer an overarching one before we delve into specifics. There are lots of best practices for maintaining large codebases, but I think they all boil down to one thing: simplicity. More explicitly, your code should be easy for other developers to follow and you should minimize how much context a person has to keep in their head.
In order to understand an Express application, you already have to know a lot. You have to be reasonably proficient in the JavaScript programming language in order to read the code; you have to understand how HTTP works in order to understand routing; you have to understand Node and its evented I/O; and you have to understand all of Express’s features like routing, middleware, views, and more. Each of these things take a long time to learn and likely builds on experience from earlier in your career. It’s a huge pile of stuff to keep in your head! Your applications should try to add to that massive pile of required knowledge as little as possible.
I think we’ve all written code (I certainly have) that’s an intertwined mess that only we can hope to understand. I like to imagine one of those corkboards covered with pictures, all interconnected in a web of red string. Here are a couple of ways to see how deep the rabbit hole of your code goes:
- Look at a piece of your code—maybe it’s a route handler or a middleware function—and ask yourself how many other things you’d need to know in order to understand it. Does it depend on a middleware earlier in the stack? How many different database models does it depend on? How many routers deep are you? How many files have you looked at to get to this point?
- How confused are your fellow developers? How quickly could they add a feature to your app? If they’re confused and unable to work quickly, that might mean that your code is too intertwined.
You have to be pretty rigorous about simplicity, especially because Express is so flexible and unopinionated. We’ll talk about some of these methods (and others) in this chapter, but a lot of it is more nebulous, so keep this in mind!
All right, enough with this abstract stuff! Let’s talk about specifics.
12.2. File structure pattern
Express applications can be organized however you please. You could put everything into one giant file if you wanted to. As you might imagine, this might not make for an easily maintainable application.
Despite the fact that Express is unopinionated, most Express applications I’ve worked with have a similar structure to the one in figure 12.1. (This is very similar to the kinds of applications that are generated with the official express-generator. This is no coincidence!)
Figure 12.1. A common folder structure for Express applications
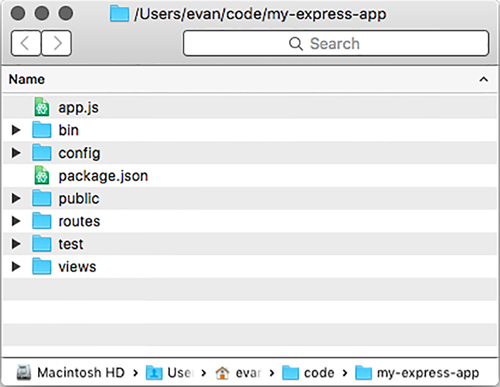
Here are all of the common files in an Express application of this structure:
- package.json should come as no surprise—it’s present in every Node project. This will have all of the app’s dependencies as well as all of your npm scripts. You’ve seen different incarnations of this file throughout the book and it’s not different in a big app.
- app.js is the main application code—the entry point. This is where you call express() to instantiate a new Express application. It is also where you put middleware that’s common to all routes, like security or static file middleware. This file doesn’t start the app, as you’ll see—it assigns the app to module.exports.
- bin is a folder that holds executable scripts relevant to your application. There’s often just one (listed here), but sometimes more are required.
- bin/www is an executable Node script that requires your app (from app.js) and starts it. Calling npm start should run this script.
- config is a folder that’ll hold any configuration for your app. It’s often full of JSON files that specify things like default port numbers or localization strings.
- public is a folder that’s served by static file middleware. It’ll have any static files inside—HTML pages, text files, images, videos, and so on. The static file middleware will also serve any of public’s subfolders. The HTML5 Boilerplate at https://html5boilerplate.com/, for example, presents a good selection of common static files you might add here.
- routes is a folder that holds numerous JavaScript files, each one exporting an Express router. You might have a router for all URLs that start with /users and another for all that start with /photos. Chapter 5 has all the details about routers and routing—check out section 5.3 for examples of how this works.
- test is a folder that holds all of your test code. Chapter 9 has all the juicy details about this.
- views is a folder that holds all of your views. Typically they’re written in EJS or Pug, as shown in chapter 7, but there are many other templating languages you can use.
The best way to see an app that has most of these conventions is by using the official Express application generator. You can install this with npm install -g express-generator. Once it’s installed, you can run express my-new-app and it’ll create a folder called my-express-app with a skeleton app set up, as shown in figure 12.1.
Although these are just patterns and conventions, patterns like this tend to emerge in Express applications I’ve seen.
12.3. Locking down dependency versions
Node has far and away the best dependency system I’ve used. A coworker said, in describing Node and npm: “They nailed it.”
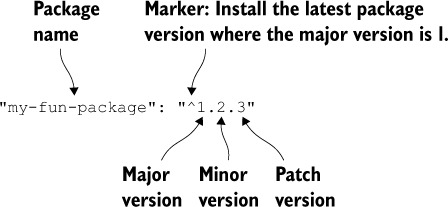
npm uses semantic versioning (sometimes shortened to semver) for all of its packages. Versions are broken up into three numbers: major, minor, and patch. For example, version 1.2.3 is major version 1, minor version 2, and patch version 3.
In the rules of semantic versioning, a major version upgrade can have a change that is considered breaking. A breaking change is one where old code wouldn’t be compatible with new code. For example, code that worked in Express major version 3 doesn’t necessarily work with major version 4. Minor version changes are, by contrast, not breaking. They generally mean a new feature that doesn’t break existing code. Patch versions are for, well, patches—they’re reserved for bug fixes and performance enhancements. Patches shouldn’t break your code; they should generally make things better.
Major version zero
There’s one asterisk to this: basically anything goes if the major version is 0. The whole package is considered to be unstable at that point.
By default, when you npm install --save a package, it downloads the latest version from the npm registry and then puts an optimistic version number in your package.json file. That means that if someone else on your team runs npm install in the project (or if you’re reinstalling), they might get a newer version than the one you originally downloaded. That new version can have a higher minor version or higher patch version, but it can’t have a higher major version. That means that it doesn’t download the absolute latest version of a package; it downloads the latest version that should still be compatible. Figure 12.2 expands on this.
Figure 12.2. How optimistic versioning looks in package.json
All good, right? If all packages adhere to semantic versioning, you should always want to get the latest compatible version so that you have all the latest features and have all the newest bug fixes.
But here’s the rub: not all packages adhere perfectly to semantic versioning. Usually, it’s because people use packages in ways the original developers don’t intend. Perhaps you’re relying on an untested feature or weird quirk in the library that’s overlooked by the developers. You can’t really blame these people—no programmer has a clean, bug-free track record, especially when other developers are using their code in unexpected ways.
I find that 99% of the time, this isn’t an issue. The modules I use tend to be good about semantic versioning, and npm’s optimistic versioning works well. But when I’m deploying a business-critical application into production (also known as the real world), I like to lock down my dependency versions to minimize any potential hiccups. I don’t want things to break with a new version of a package!
There are two ways to lock versions down: one is simple but less thorough and the other is very thorough.
12.3.1. The simple way: eschewing optimistic versioning
A quick way to solve this problem is by obliterating optimistic versioning in your package.json. Optimistic versioning in your package.json file might look something like the following listing.
Listing 12.1. Example of optimistic versioning in your package.json
// ...
"dependencies": {
  "express": "^5.0.0",
  "ejs": "~2.3.2"
}
// ...
The ^ character indicates optimistic versioning is allowed. You’ll get all patch and minor updates. The ~ character indicates a slightly less optimistic versioning. You’ll get only patch updates.
If you’re editing your package.json, you can specify the dependency to an exact version. The previous example would look like this next listing.
Listing 12.2. Example of omitting optimistic versioning in a package.json
// ...
"dependencies": {
  "express": "5.0.0",
  "ejs": "2.3.2"
}
// ...
Removing the ^ and ~ characters from the version number indicates only that specific version of the package should be downloaded and used. These edits are relatively easy to do and can lock a package down to a specific version.
If you’re installing new packages, you can turn off npm’s optimistic versioning by changing the --save flag to –save-exact. For example, npm install --save express becomes npm install --save-exact express. This will install the latest version of Express, just like always, but it won’t mark it optimistically in your package.json—it’ll specify an exact version.
This simple solution has a drawback: it doesn’t pin down the version of subdependencies (the dependencies of your dependencies). The following listing shows the dependency tree of Express.
Listing 12.3. Express’s (big!) dependency tree
your-express-app@0.0.0
└─┬ express@5.0.0
  ├─┬ accepts@1.2.12
  │ ├─┬ mime-types@2.1.6
  │ │ └── mime-db@1.18.0
  │ └── negotiator@0.5.3
  ├── array-flatten@1.1.0
  ├── content-disposition@0.5.0
  ├── content-type@1.0.1
  ├── cookie@0.1.3
  ├── cookie-signature@1.0.6
  ├─┬ debug@2.2.0
  │ └── ms@0.7.1
  ├── depd@1.0.1
  ├── escape-html@1.0.2
  ├── etag@1.7.0
  ├─┬ finalhandler@0.4.0
  │ └── unpipe@1.0.0
  ├── fresh@0.3.0
  ├── merge-descriptors@1.0.0
  ├── methods@1.1.1

  ├─┬ on-finished@2.3.0
  │ └── ee-first@1.1.1
  ├── parseurl@1.3.0
  ├── path-is-absolute@1.0.0
  ├── path-to-regexp@0.1.6
  ├─┬ proxy-addr@1.0.8
  │ ├── forwarded@0.1.0
  │ └── ipaddr.js@1.0.1
  ├── qs@4.0.0
  ├── range-parser@1.0.2
  ├─┬ router@1.1.3
  │ ├── array-flatten@1.1.1
  │ ├── path-to-regexp@0.1.7
  │ └── setprototypeof@1.0.0
  ├─┬ send@0.13.0
  │ ├── destroy@1.0.3
  │ ├─┬ http-errors@1.3.1
  │ │ └── inherits@2.0.1
  │ ├── mime@1.3.4
  │ ├── ms@0.7.1
  │ └── statuses@1.2.1
  ├── serve-static@1.10.0
  ├─┬ type-is@1.6.8
  │ ├── media-typer@0.3.0
  │ └─┬ mime-types@2.1.6
  │   └── mime-db@1.18.0
  ├── utils-merge@1.0.0
└── vary@1.0.1
I ran into a problem when trying to use the Backbone.js library. I wanted to pin to an exact version of Backbone, which was easy: I specified the version. But in Backbone’s package.json (which is out of my control) it specified a version of Underscore.js that was optimistically versioned. That means that I could get a new version of Underscore if I reinstalled my packages, and more dangerously, I could get a new version of Underscore when deploying my code to the real world. Your dependency tree could look like this one day
your-express-app@0.0.0
└─┬ backbone@1.2.3
  └── underscore@1.0.0
but if Underscore updated, it could look like this on another day:
your-express-app@0.0.0
└─┬ backbone@1.2.3
  └── underscore@1.1.0
Note the difference in Underscore’s version.
With this method, there’s no way to ensure that the versions of your subdependencies (or subsubdependencies, and so on) are pinned down. This might be okay, or it might not be. If it’s not, you can use a nice feature of npm called shrinkwrap.
12.3.2. The thorough way: npm’s shrinkwrap command
The problem with the previous solution is that it doesn’t lock down subdependency versions. npm has a subcommand called shrinkwrap that solves this problem.
Let’s say you’ve run npm install and everything works just fine. You’re at a state where you want to lock down your dependencies. At this point, run a single command from somewhere in your project:
npm shrinkwrap
You can run this in any Node project that has a package.json file and dependencies. If all goes well, there will be a single line of output: wrote npm-shrinkwrap.json. (If it fails, it’s likely because you’re executing this from a non-project directory or are missing a package.json file.)
Look at the file in the next listing. You’ll see that it has a list of dependencies, their versions, and then those dependencies’ dependencies, and so on. The listing shows a snippet of a project that only has Express installed.
Listing 12.4. Snippet of an example npm-shrinkwrap.json file
{
  "dependencies": {
    "express": {
      "version": "5.0.0",
      // ...
      "dependencies": {
        "accepts": {
          "version": "1.2.12",
          // ...
          "dependencies": {
            "mime-types": {
              "version": "2.1.6",
              // ...
              "dependencies": {
                "mime-db": {
                  "version": "1.18.0",
                  // ...
                }
              }
            },
            "negotiator": {
              "version": "0.5.3",
              // ...
            }
          }
        },
        // ...
The main thing to notice is that the whole dependency tree is specified, not just the top layer like in package.json.
The next time you issue npm install, it won’t look at the packages in package.json—it’ll look at the files in npm-shrinkwrap.json and install from there. Every time npm install runs, it looks for the shrinkwrap file and tries to install from there. If you don’t have one (as we haven’t for the rest of this book), it’ll look at package.json.
As with package.json, you typically check npm-shrinkwrap.json into version control. This allows all developers on the project to keep the same package versions, which is the whole point of shrink-wrapping!
12.3.3. Upgrading and adding dependencies
This is all good once you’ve locked in your dependencies, but you probably don’t want to freeze all of your dependencies forever. You might want to get bug fixes or patches or new features—you just want it to happen on your terms.
To update or add a dependency, you’ll need to run npm install with a package name and a package version. For example, if you’re updating Express from 4.12.0 to 4.12.1, you’ll run npm install express@4.12.1. If you want to install a new package (Helmet, for example), run npm install helmet. This will update the version or add the package in your node_modules folder, and you can start testing. Once it all looks good to you, you can run npm shrinkwrap again to lock in that dependency version.
Sometimes, shrink-wrapping isn’t for you. You might want to get all of the latest and greatest features and patches without having to update manually. Sometimes, though, you want the security of having the same dependencies across all installations of your project.
12.4. Localized dependencies
Let’s keep talking about dependencies but with a different angle. npm allows you to install packages globally on your system that execute as commands. There are a few popular ones, like Bower, Grunt, Mocha, and more. There’s nothing wrong with doing this; there are a lot of tools that you need to install globally on your system. This means that to run the Grunt command, you can type grunt from anywhere on your computer.
But you can encounter drawbacks when someone new comes into your project. Take Grunt, for example. Two problems can occur when installing Grunt globally:
- A new developer doesn’t have Grunt installed on their system at all. This means that you’ll have to tell them to install it in your Readme or in some other documentation.
- What if they have Grunt installed but it’s the wrong version? You could imagine them having a version of Grunt that’s either too old or too new, which could lead to weird errors that might be tough to track down.
There’s a pretty easy solution to these two problems: install Grunt as a dependency of your project, not globally.
In chapter 9, we used Mocha to use as a test framework. We could’ve installed this globally, but we didn’t—we installed it locally to our project.
When you install Mocha, it installs the mocha executable command into node_modules/.bin/mocha. You can get at it in one of two ways: by executing it directly or by putting it inside an npm script.
12.4.1. Invoking commands directly
The simplest way is to invoke these commands directly. This is pretty darn easy, although it’s a bit of typing: type the path to the command. If you’re trying to run Mocha, run node_modules/.bin/mocha. If you’re trying to run Bower, run node_modules/.bin/bower. (On Windows, running Mocha would be node_modules\.bin\mocha.) There’s not much to this conceptually!
12.4.2. Executing commands from npm scripts
The other way to do this is by adding the command as an npm script. Once again, let’s say that you want to run Mocha. The next listing shows how you’d specify that as an npm script.
Listing 12.5. Specifying Mocha as an npm script
// ...
"scripts": {
  "test": "mocha"
},
// ...
When you type npm test, the mocha command is magically run. Let’s resurface a diagram from chapter 9 that explains how this works; see figure 12.3.
Figure 12.3. Typing npm test flows through a few steps before executing the command.
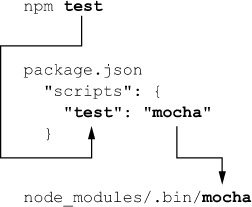
This is generally useful when you want to run the same kind of command over and over. It also keeps dependencies out of your global list!
12.5. Summary
- Simplicity is a high-level goal for software in general. You should be rigorous about removing complexity in your software.
- There is a folder and file structure that emerges for most Express applications.
- For maximum reliability, you should lock down the versions of your dependencies. This has some disadvantages—namely, you won’t be automatically running the latest and greatest code—but it has the advantage that your code won’t be automatically upgraded without your knowledge.
- Installing dependencies locally will help keep your system clean and your projects reproducible. You’ll use npm scripts to do this.
Now it’s time to go out and build cool things with Express!