Table of Contents for
Express in Action: Writing, building, and testing Node.js applications
 Express in Action: Writing, building, and testing Node.js applications
Published by
Manning Publications, 2016
Express in Action: Writing, building, and testing Node.js applications
Published by
Manning Publications, 2016
- Cover
- Express in Action: Writing, building, and testing Node.js applications
- Copyright
- Brief Table of Contents
- Table of Contents
- Preface
- Acknowledgments
- About this Book
- About the Cover Illustration
- Part 1. Intro
- Chapter 1. What is Express?
- Chapter 2. The basics of Node.js
- Chapter 3. Foundations of Express
- Part 2. Core
- Chapter 4. Middleware
- Chapter 5. Routing
- Chapter 6. Building APIs
- Chapter 7. Views and templates: Pug and EJS
- Part 3. Express in Context
- Chapter 8. Persisting your data with MongoDB
- Chapter 9. Testing Express applications
- Chapter 10. Security
- Chapter 11. Deployment: assets and Heroku
- Chapter 12. Best practices
- Appendix. Other helpful modules
- Index
- List of Figures
- List of Listings
Chapter 11. Deployment: assets and Heroku
This chapter covers
- LESS for improving your CSS
- Browserify for packaging JavaScript, letting you share code between client and server
- connect-assets as an alternative to Grunt for compiling and serving CSS and JavaScript
- Deploying your applications to Heroku for the real internet
It’s time to put your applications into the real world. The first part of this chapter will discuss assets. If you’re building any sort of website, it’s very likely that you’ll be serving both CSS and JavaScript. It’s common to concatenate and minify these assets for performance. It’s also common to code in languages that compile to CSS (like SASS and LESS), just as it’s common to code in languages that transpile to JavaScript (like CoffeeScript or TypeScript), or to concatenate and minify JavaScript. Debates quickly turn into flame wars when talking about things like this; should you use LESS or SASS? Is CoffeeScript a good thing? Whichever you choose, I’ll show you how to use a few of these tools to package up your assets for the web.
The rest of this chapter will show you how to build your Express applications and then put them online. There are lots of deployment options, but you’ll use one that’s easy and free to try: Heroku. You’ll add a few small things to your app and deploy an Express app into the wild.
After this chapter, you’ll
- Develop CSS with more ease using the LESS preprocessor
- Use Browserify to use require in the browser, just like in Node
- Minify your assets to make the smallest files possible
- Use Grunt to run this compilation and much more
- Use Express middleware (connect-assets) as an alternative to this Grunt workflow
- Know how to deploy Express applications to the web with Heroku
11.1. LESS, a more pleasant way to write CSS
Harken back to chapter 1, where we talked about the motivations for Express. In short, we said that Node.js is powerful but its syntax can be a little cumbersome and it can be a bit limited. That’s why Express was made—it doesn’t fundamentally change Node; it smooths it out a bit.
In that way, LESS and CSS are a lot like Express and Node. In short, CSS is a powerful layout tool but its syntax can be cumbersome and limited. That’s why LESS was made—it doesn’t fundamentally change CSS; it smooths it out a bit.
CSS is a powerful tool for laying out web pages, but it’s missing a number of features that people wanted. For example, developers want to reduce repetition in their code with constant variables instead of hard-coded values; variables are present in LESS but not CSS. LESS extends CSS and adds a number of powerful features.
Unlike Express, LESS is actually its own language. That means that it has to be compiled down into CSS in order to be used by web browsers—browsers don’t speak LESS, they speak CSS.
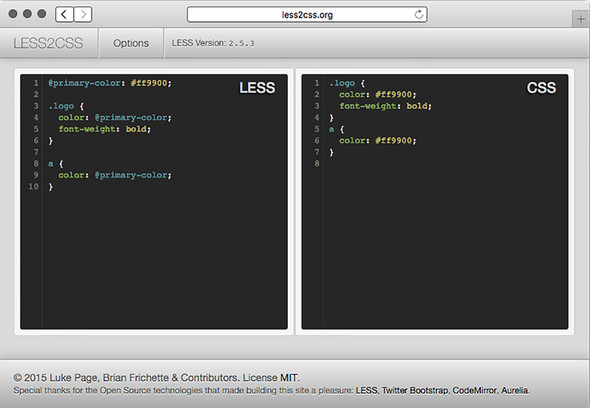
You’ll see two ways to compile LESS to CSS in Express applications. For now, while you’re trying LESS, visit http://less2css.org/. On the left side of the page, you’ll be able to type LESS code, and compiled CSS will appear on the right, as shown in figure 11.1.
Figure 11.1. less2css.org in action
We’ll go through a few examples in the following sections and you can try them out on that website. When it’s time to integrate LESS into your Express apps, we’ll move to a better, automated method.
LESS is feature-filled, but it has five major points:
- Variables. Allow you to define things like colors once and use them everywhere.
- Functions. Allow you to manipulate variables (darkening a color by 10%, for example).
- Nesting selectors. Allow you to structure your stylesheet more like your HTML and reduce repetition.
- Mixins. Allow you to define reusable components and use them in various selectors.
- Includes. Allow you to split your stylesheets into multiple files (much like require in Node).
We’ll do a very quick run-through of these major features. LESS is pretty complicated and we won’t talk about every detail. If you’re interested in the nitty-gritty features of LESS, look at its documentation at http://lesscss.org/.
11.1.1. Variables
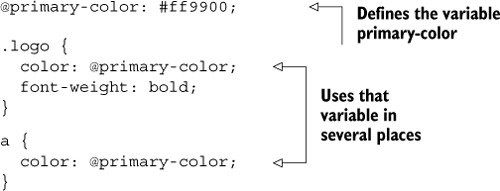
CSS doesn’t have variables. If your website’s link color is #29A1A4, for example, and you decide you want to change it to #454545, you’d have to search for it everywhere in your CSS file and change it. If you want to experiment with a color that’s used in many different places, you’ll be doing find-replace, which can lead to reliability issues. It’s also unclear to other developers which color is which; where is that color used in various places?
LESS added variables to CSS, allowing you to solve this kind of problem. Let’s say you want to define your site’s primary color as #FF9900. In LESS, you might do something like what’s shown in the following listing.
Listing 11.1. Variables in LESS
If you run the LESS code in listing 11.1 through a LESS compiler (like the one at http://less2css.org/), the CSS shown in the next listing will be produced.
Listing 11.2. The compiled CSS from listing 11.1
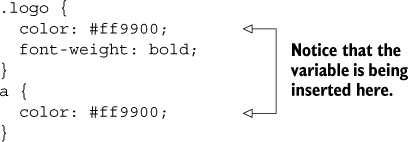
As you can see, the variable is being inserted into the resulting CSS. Now, if you want to change the primary color of your site, you only have to do it in one place: the variable at the top.
You might also notice that LESS looks much like CSS, and that’s intentional—it’s a strict superset of the language. That means that any valid CSS is valid LESS (but not the other way around). Thus you can easily import your existing CSS stylesheets into LESS and everything will work.
11.1.2. Functions
LESS also has functions, which allow you to manipulate variables and values just like you could in a programming language like JavaScript. Like a typical programming language, there are a number of built-in functions that can help you out. Unlike a typical programming language, however, these functions are all built into the language. You can’t define your own; you’ll have to use another feature called mixins, which we’ll talk about in the next section.
LESS has a number of functions that you can use to manipulate colors. For example, imagine your links (your <a> tags) have a base color. When you hover over them, they should get lighter. When you click them, they should get darker. In LESS, functions and variables make this easy, as the next listing shows.
Listing 11.3. Using functions to lighten and darken colors
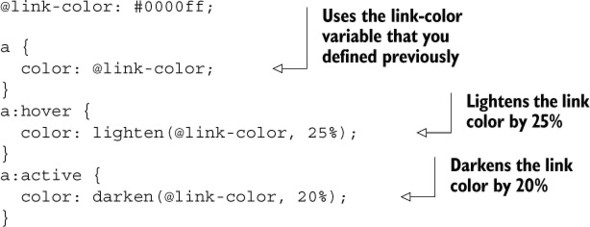
After you compile this LESS into CSS, you’ll get something like the following listing.
Listing 11.4. The compiled CSS from listing 11.3
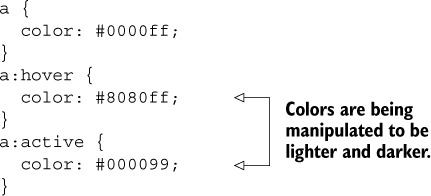
As you can see, LESS makes it easier to lighten and darken colors. Yes, you could have written that CSS yourself, but choosing the lightened and darkened colors would have been a bit of a hassle.
A slew of other functions are built into LESS. http://lesscss.org/functions/ lists them all.
11.1.3. Mixins
Perhaps you’re reading this section wishing you could define your own functions; why does LESS get all of the power? Enter mixins, a way of defining reusable CSS declarations that you can use throughout your stylesheets.
Perhaps the most common example is with vendor prefixing. If you want to use the CSS border-radius property, you have to prefix it to make sure it works in Chrome, Firefox, Internet Explorer, Safari, and the like. You’ve probably seen something like this:
.my-element {
  -webkit-border-radius: 5px;
  -moz-border-radius: 5px;
  -ms-border-radius: 5px;
  border-radius: 5px;
}
In CSS, if you want to use border-radius and have it work on all browsers, you’ll need the vendor prefixes. You’ll have to write all of those every time you use border-radius. This can get tedious and is error-prone.
In LESS, rather than define the border-radius and then make several vendor-prefixed copies, you can define a mixin, or a reusable component that you can use in multiple declarations, as shown in the next listing. They look much like functions in other programming languages.
Listing 11.5. Mixins in LESS
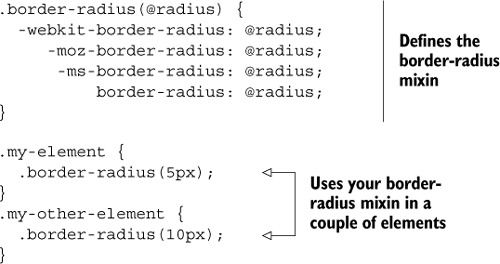
Now, if you run that LESS through a compiler, it produces the CSS in the following listing.
Listing 11.6. The compiled CSS from listing 11.5
.my-element {
  -webkit-border-radius: 5px;
  -moz-border-radius: 5px;
  -ms-border-radius: 5px;
  border-radius: 5px;
}
.my-other-element {
  -webkit-border-radius: 10px;
  -moz-border-radius: 10px;
  -ms-border-radius: 10px;
  border-radius: 10px;
}
As you can see, the mixin is expanded into the tedious vendor-prefixed declarations so that you don’t have to write them every time.
11.1.4. Nesting
In HTML, your elements are nested. Everything goes inside the <html> tag, and then your content goes into the <body> tag. Inside the body, you might have a <header> with a <nav> for navigation. Your CSS doesn’t exactly mirror this; if you wanted to style your header and the navigation inside of your header, you might write CSS like this next listing.
Listing 11.7. CSS example with no nesting
header {
  background-color: blue;
}
header nav {
  color: yellow;
}
In LESS, listing 11.7 would be improved to this listing.
Listing 11.8. A simple LESS nesting example
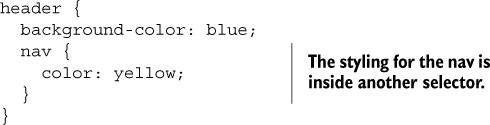
LESS improves CSS to allow for nested rulesets. This means that your code will be shorter, more readable, and a better mirror of your HTML.
Nesting the parent selectors
Nested rulesets can refer to their parent element. This is useful in lots of places, and a good example is links and their hover states. You might have a selector for a, a:visited, a:hover, and a:active. In CSS, you might do this with four separate selectors. In LESS, you’ll define an outer selector and three inner selectors, one for each link state. It might look something like this.
Listing 11.9. Referring to parent selectors in LESS
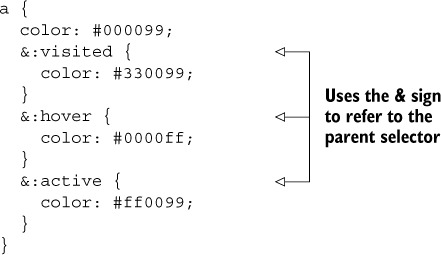
LESS nesting can do simple things like nesting your selectors to match your HTML, but it can also nest selectors in relation to the parent selectors.
11.1.5. Includes
As your site gets bigger and bigger, you’ll start to have more and more styles. In CSS, you can break your code into multiple files, but this incurs the performance penalty of multiple HTTP requests.
LESS allows you to split your styles into multiple files, which are all concatenated into one CSS file at compilation time, saving performance. This means that developers can split their variables and mixins into separate files as needed, making for more modular code. You could also make one LESS file for the homepage, one for the user profiles page, and so on.
The syntax is quite simple:

11.1.6. Alternatives to LESS
At this point in the book, it should come as no surprise: there’s more than one way to do CSS preprocessing. The elephant in the room is LESS’s biggest “rival,” Sass. Sass is very similar to LESS; both have variables, mixins, nested selectors, includes, and integration with Express. As far as the languages go, they’re pretty similar. Sass isn’t originally a Node project, but it’s very popular and has done a solid job integrating itself into the Node world. You can check it out at http://sass-lang.com/.
Most readers will want to use either LESS or Sass. Although we’ll use LESS in this book, you can usually substitute the word “LESS” for the word “Sass” and it will be the same. LESS and Sass vary slightly in syntax, but they’re largely the same conceptually and in how you integrate them with Express.
There are smaller-time CSS preprocessors that aim to fundamentally change CSS in one way or another. Stylus makes CSS’s syntax a lot nicer and Roole adds a number of powerful features, and although they are both great, they aren’t as popular as LESS or Sass.
Other CSS preprocessors like Myth and cssnext take a different angle. Rather than try to make a new language that compiles to CSS, they compile upcoming versions of CSS to current-day CSS. For example, the next version of CSS has variables, so these preprocessors compile this new syntax into current-day CSS.
11.2. Using Browserify to require modules in the browser
In short, Browserify (http://browserify.org/) is a tool for packaging JavaScript that allows you to use the require function just like you do in Node. And I love Browserify. I want to get that out of the way. Freakin’ love this thing.
I once heard someone describe browser-based programming as hostile. I love making client-side projects, but I must admit that there are a lot of potholes in the road: browser inconsistencies, no reliable module system, an overwhelming number of varying-quality packages, no real choice of programming language ... the list goes on. Sometimes it’s great, but sometimes it sucks! Browserify solves the module problem in a clever way: it lets you require modules exactly like you would in Node (in contrast to things like RequireJS, which are asynchronous and require an ugly callback). This is powerful for a couple of reasons.
This lets you easily define modules. If Browserify sees that evan.js requires cake.js and burrito.js, it’ll package up cake.js and burrito.js and concatenate them into the compiled output file.
Second, it’s almost completely consistent with Node modules. This is huge—both Node-based and browser-based JavaScript can require Node modules, letting you share code between server and client with no extra work. You can even require most native Node modules in the browser, and many Node-isms like __dirname are resolved.
I could write sonnets about Browserify. This thing is truly great. Let me show it to you.
11.2.1. A simple Browserify example
Let’s say you want to write a web page that generates a random color and sets the background to that color. Maybe you want to be inspired for the next great color scheme.
You’re going to use an npm module called random-color (at https://www.npmjs.com/package/random-color), which generates a random RGB color string. If you check out the source code for this module, you’ll see that it knows nothing about the browser—it’s only designed to work with Node’s module system.
Make a new folder to build this. You’ll make a package.json that looks something like this next listing (your package versions may vary).
Listing 11.10. package.json for your simple Browserify example
{
  "private": true,
  "scripts": {
    "build-my-js": "browserify main.js -o compiled.js"
  },
  "dependencies": {
    "browserify": "^7.0.0",
    "random-color": "^0.0.1"
  }
}
Run npm install and then create a file called main.js. Put the following inside.
Listing 11.11. main.js for your simple Browserify example
var randomColor = require("random-color");
document.body.style.background = randomColor();
Note that this file uses the require statement, but it’s made for the browser, which doesn’t have that natively. Get ready for your little mind to be blown!
Finally, define a simple HTML file in the same directory with the following contents (it doesn’t matter what you call it, so long as it ends in .html).
Listing 11.12. HTML file for your simple Browserify example
<!DOCTYPE html>
<html>
<body>
  <script src="compiled.js"></script>
</body>
</html>
Now, if you save all that and run npm run build-my-js, Browserify will compile main.js into a new file, compiled.js. Open the HTML file you saved to see a web page that generates random colors every time you refresh!
You can open compiled.js to see that your code is there, as is the random-color module. The code will be ugly, but here’s what it looks like:
(function e(t,n,r){function s(o,u){if(!n[o]){if(!t[o]){var a=typeof
require=="function"&&require;if(!u&&a)return a(o,!0);if(i) return i(o,!0);var
f=new Error("Cannot find module '"+o+
"'");throw f.code="MODULE_NOT_FOUND",f}var l=n[o]={
exports:{}};t[o][0].call(l.exports,function(e){var n=t[o] [1][e];return
s(n?n:e)},l,l.exports,e,t,n,r)}return n[o].exports}var i=typeof
require=="function"&&require;for(var o=0;o<r.length;o++)s(r[o]); return
s})({1:[function(require,module,exports){ var randomColor = require("random-
color"); document.body.style.backgroundColor = randomColor();

},{"random-color":2}],2:[function(require,module,exports){
var random = require("rnd");

module.exports = color;

function color (max, min) {
  max || (max = 255);
  return 'rgb(' + random(max, min) + ', ' + random(max, min) + ', ' + random(max, min) + ')';
}

},{"rnd":3}],3:[function(require,module,exports){
module.exports = random;

function random (max, min) {
  max || (max = 999999999999);
  min || (min = 0);

  return min + Math.floor(Math.random() * (max - min));
}

},{}]},{},[1]);
They’re both wrapped in a bit of Browserify stuff to fake Node’s module system, but they’re there ... and most importantly, they work! You can now require Node modules in the browser.
Browserify is so great. Love it.
Note
Although you can require a number of utility libraries (even the built-in ones), there are some things you can’t fake in the browser and therefore can’t use in Browserify. For example, you can’t run a web server in the browser, so some of the http module is off limits. But many things like util or modules you write are totally fair game!
As you write your code with Browserify, you’ll want a nicer way to build this than having to run the build command every single time. Let’s check out a tool that helps you use Browserify, LESS, and much, much more.
11.3. Using Grunt to compile, minify, and more
We’ve taken a look at LESS and Browserify, but we haven’t yet found an elegant way to wire them into our Express apps.
We’ll look at two ways to handle this, with Grunt and connect-assets. Grunt (http://gruntjs.com/) calls itself “The JavaScript Task Runner,” which is exactly what it sounds like: it runs tasks. If you’ve ever used Make or Rake, Grunt will seem familiar.
Grunt defines a framework onto which you define tasks. Like Express, Grunt is a minimal framework. It can’t do much alone; you’ll need to install and configure other tasks for Grunt to run. These tasks include compiling CoffeeScript or LESS or SASS, concatenating JavaScript and CSS, running tests, and plenty more. You can find a full list of tasks at http://gruntjs.com/plugins, but you’ll be using four today: compiling and concatenating JavaScript with Browserify, compiling LESS into CSS, minifying JavaScript and CSS, and using watch to keep you from typing the same commands over and over again.
Let’s start by installing Grunt.
11.3.1. Installing Grunt
These instructions will deviate a bit from the official Grunt instructions. The documentation will tell you to install Grunt globally, but I believe that you should install everything locally if you can. This allows you to install multiple versions of Grunt on your system and doesn’t pollute your globally installed packages. We’ll talk more about these best practices in chapter 12.
Every project has a package.json. If you want to add Grunt to a project, you’ll want to define a new script so that you can run the local Grunt, as shown in the following listing.
Listing 11.13. A script for running the local Grunt
...
"scripts": {
  "grunt": "grunt"
},
...
If you’d like to follow along with these examples, you can make a new project with a barebones package.json like this one.
Listing 11.14. A barebones package.json for these examples
{
  "private": true,
  "scripts": {
    "grunt": "grunt"
  }
}
Grunt isn’t set up yet, but when it is, this allows you to type npm run grunt to run the local Grunt.
Next, you’ll want to npm install grunt --save-dev and npm install grunt-cli --save-dev (or just npm install grunt grunt-cli --save-dev) to save Grunt and its command-line tool as local dependencies.
Then, you’ll want to create something called a Gruntfile, which Grunt examines to figure out what it should do. The Gruntfile lives at the root of your project (in the same folder as your package.json) and is called Gruntfile.js.
The next listing is a Hello World Gruntfile. When you run Grunt, it will look at this Gruntfile, find the appropriate task, and run the code inside.
Listing 11.15. A skeleton Gruntfile
module.exports = function(grunt) {

  grunt.registerTask("default", "Say Hello World.", function() {
    grunt.log.write("Hello world!");
  });

};
To try this out, type npm run grunt into your terminal. You should see the following output:
Running "default" task
Hello, world!
Done, without errors.
Grunt is now running the "hello world" task!
Unfortunately, Hello World isn’t of much use to you. Let’s look at more useful tasks you can define. If you’d like to follow along, look at this book’s code samples at https://github.com/EvanHahn/Express.js-in-Action-code/tree/master/Chapter_11/grunt-examples.
11.3.2. Compiling LESS with Grunt
When you learned about LESS earlier in this chapter, I recommended a website that compiles your code live, in front of you. That’s great for learning and it’s useful to make sure your code is being compiled correctly, but it’s hardly an automated solution. You don’t want to have to put all of your code into a website, copy-paste the resulting CSS, and copy it into a CSS file! Let’s make Grunt do it. (If you’re not using LESS, there are other Grunt tasks for your favorite preprocessor. Just search the Grunt plugins page at http://gruntjs.com/plugins.)
Start by writing a simple LESS file, shown in the next listing, which you’ll compile to CSS with Grunt.
Listing 11.16. A simple LESS file (in my_css/main.less)
article {
  display: block;
  h1 {
    font-size: 16pt;
    color: #900;
  }
  p {
    line-height: 1.5em;
  }
}
That should translate to the CSS shown in the next listing.
Listing 11.17. Listing 11.16 compiled to CSS
article {
  display: block;
}
article h1 {
  font-size: 16pt;
  color: #900;
}
article p {
  line-height: 1.5em;
}
And if you minify that CSS, it should look like this listing.
Listing 11.18. minified
article{display: block}article h1{font-size:16pt; color:#900}article p{line-
height:1.5em}
You can use a third-party LESS task for Grunt to get there! Start by installing this Grunt LESS task with npm install grunt-contrib-less --save-dev. Next, add the following to your Gruntfile.
Listing 11.19. A Gruntfile with LESS
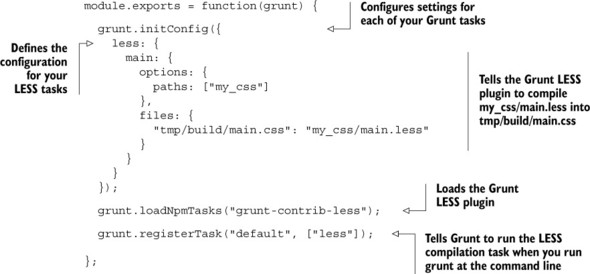
Now, when you run Grunt with npm run grunt, your LESS will be compiled into tmp/build/main.css. After doing that, you’ll need to make sure to serve that file.
Serving these compiled assets
Now that you’ve compiled something, you need to serve it to your visitors! You’ll use Express’s static middleware to do that. Add tmp/build as part of your middleware stack, as shown in the next listing.
Listing 11.20. Static middleware with compiled files
var express = require("express");
var path = require("path");

var app = express();

app.use(express.static(path.resolve(__dirname, "public")));
app.use(express.static(path.resolve(__dirname, "tmp/build")));

app.listen(3000, function() {
  console.log("App started on port 3000.");
});
Now, you can serve files from public and compiled files from tmp/build.
Note
You likely don’t want to commit compiled files into your repository, so you have to store them into a directory that you’ll later ignore with version control. If you’re using Git, add tmp to your .gitignore to make sure that your compiled assets aren’t put into version control. Some people do like to commit these, so do what’s right for you.
11.3.3. Using Browserify with Grunt
Browserify, in its wisdom, has Grunt integration, so you can automate the process of compiling your client-side JavaScript. Browserify ... what an amazing piece of technology.
Start by installing grunt-browserify, a Grunt task for Browserify. Install it by running npm install grunt-browserify --save-dev, and then fill in Gruntfile.js with this listing.
Listing 11.21. A Gruntfile with Browserify
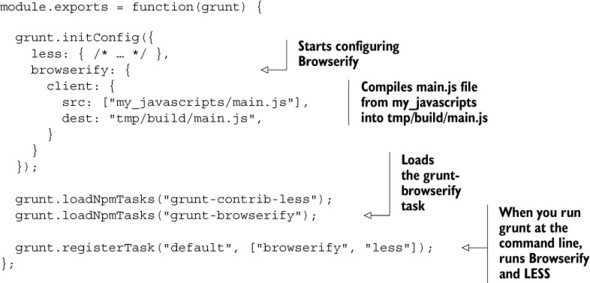
Now, when you run Grunt with npm run grunt, this will compile main.js in a folder called my_javascripts into tmp/build/main.js. If you’ve followed the steps from the LESS guide shown previously, this should already be served!
11.3.4. Minifying the JavaScript with Grunt
Unfortunately, Browserify doesn’t minify your JavaScript for you, its only blemish. You should do that to reduce file sizes and load times as best you can.
UglifyJS is a popular JavaScript minifier that crushes your code down to tiny sizes. You’ll be using a Grunt task that takes advantage of UglifyJS to minify your already Browserified code, called grunt-contrib-uglify. You can read more about it at https://www.npmjs.com/package/grunt-contrib-uglify.
Install the Grunt task with npm install grunt-contrib-uglify --save-dev. Then, add the following code to your Gruntfile.
Listing 11.22. A Gruntfile with Browserify, LESS, and Uglify
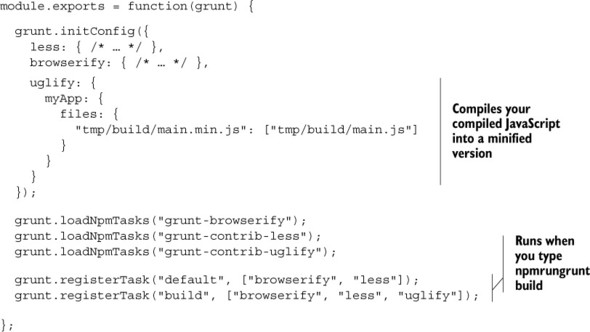
npm run grunt won’t do anything different than it did before—it’ll run the default task, which in turns runs the Browserify and LESS tasks. But when you run npm run grunt build, you’ll run both the Browserify task and the Uglify task. Now your JavaScript will be minified!
11.3.5. Using Grunt watch
While you’re developing, you don’t want to have to run npm run grunt every time you edit a file. There’s a Grunt task that watches your files and reruns any Grunt tasks when a change occurs. Enter grunt-contrib-watch. Let’s use it to autocompile any CSS and JavaScript whenever they change.
Start by installing the task with npm install grunt-contrib-watch --save-dev, and then add stuff to your Gruntfile as in the next listing.
Listing 11.23. A Gruntfile with watching added
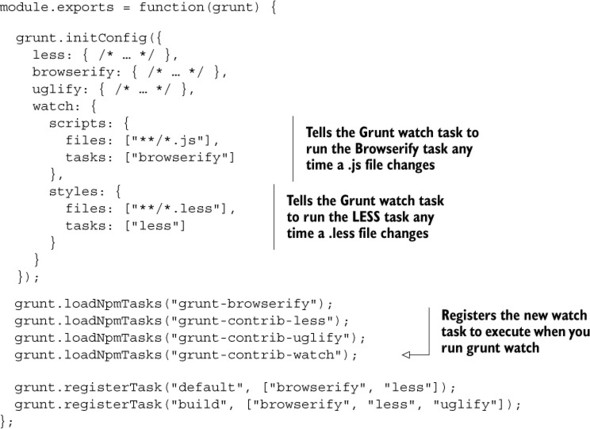
In this example, you specify all files to watch and tasks to run when they change—it’s that simple. Now, when you run npm run grunt watch, Grunt will watch your files and compile your CSS/JavaScript as needed. If you change a file with the .less file extension, the LESS task will run (but no other tasks will); this is because you’ve configured .less files to trigger that task. I find this super useful for development and strongly recommend it.
11.3.6. Other helpful Grunt tasks
We’ve looked at a few Grunt tasks here, but there are loads more. You can find the full list on Grunt’s website at http://gruntjs.com/plugins, but here are a few that might be helpful at some point:
- grunt-contrib-sass is the Sass version of the LESS plugin you used. If you’d rather use Sass or SCSS, give this a look.
- grunt-contrib-requirejs uses the Require.js module system instead of Browserify. If that sounds better to you, you can use it instead.
- grunt-contrib-concat concatenates files, which is a low-tech but popular solution for lots of problems.
- grunt-contrib-imagemin minifies images (like JPEGs and PNGs). If you want to save bandwidth, this is a good tool.
- grunt-contrib-coffee lets you write CoffeeScript instead of JavaScript for your client-side code.
11.4. Using connect-assets to compile LESS and CoffeeScript
I don’t love Grunt, to be quite honest. I include it in the book because it’s incredibly popular and powerful, but I find the code verbose and a little confusing. There’s another solution for Express users: a piece of middleware called connect-assets (at https://github.com/adunkman/connect-assets).
connect-assets can concatenate, compile to, and minify JavaScript and CSS. It supports CoffeeScript, Stylus, LESS, SASS, and even some EJS. It doesn’t support Browserify and isn’t as configurable as build tools like Grunt or Gulp, but it’s very easy to use.
connect-assets is heavily inspired by the Sprockets asset pipeline from the Ruby on Rails world. If you’ve used that, this will be quite familiar, but if you haven’t, don’t worry.
A reminder about Connect
Connect is another web framework for Node, and in short, Express middleware is compatible with Connect middleware. A lot of Express-compatible middleware has connect in the name like connect-assets.
11.4.1. Getting everything installed
You’ll need to npm install connect-assets --save and any other compilers you’ll need:
- coffee-script for CoffeeScript support
- stylus for Stylus support
- less for LESS support
- node-sass for SASS support
- ejs for some EJS support
- uglify-js for JavaScript minification
- csswring for CSS minification
The last two won’t be used by default in development mode but will be in production. If you don’t change the default options and forget to install those, your app will fail in production. Make sure to get those installed! To install LESS, run npm install less --save.
You’ll also need to pick a directory for your assets to live in. By default, connect-assets will look for your CSS-related assets in assets/css and your JavaScript-related assets in assets/js, but this is configurable. I recommend using the defaults while you’re getting started, so make a directory called assets and put the css and js directories inside.
11.4.2. Setting up the middleware
The middleware has quick-start options that make it easy to get started, but I strongly recommend configuring things. For example, one of the configuration options can keep connect-assets from muddying the global namespace, which it does by default. The following listing shows what a simple application setup might look like.
Listing 11.24. Setting up the connect-assets middleware
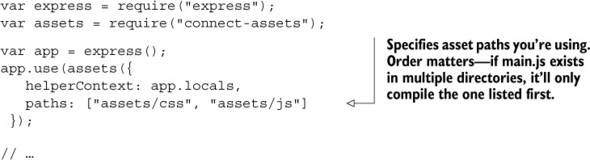
This middleware has a number of sensible defaults. For example, it will enable minification and caching in production but disable them in development. You can override this configuration if you want; check the documentation for more detailed instructions. We do override one default, which is the helperContext. By default, connect-assets attaches its helpers to the global object. Instead, we attach them to app.locals so that we don’t pollute the global namespace but still have access to the helpers from views.
Now that you’ve set up the middleware, you’ll need to link to those assets from views.
11.4.3. Linking to assets from views
connect-assets provides two major helper functions to your views: js and css. js("myfile") will generate a <script> tag that corresponds to myfile. The css helper will do the same but for CSS, with a <link> tag. They return the HTML to include the most recent version of your assets, which means that they’ll append a long hash to the name to make sure your browser doesn’t use old cached assets.
If you’re using Pug to render your views, you’ll reference them from your views like this:
!= css("my-css-file")
!= js("my-javascript-file")
If you’re using EJS instead, it’s pretty similar. You reference connect-assets’s helpers from your views like this:
<%- css("my-css-file") %>
<%- js("my-javascript-file") %>
If you’re using another view engine, you’ll need to make sure you aren’t escaping HTML when you do this, because these helpers are spitting out raw HTML tags that shouldn’t be escaped. In any case, these will spit out something like this
<link rel="stylesheet" href="/assets/my-css-file-{{SOME LONG HASH}}.css">
<script src="/assets/my-javascript-file-{{SOME LONG HASH}}.js>
and your assets will be loaded!
11.4.4. Concatenating scripts with directives
You can’t concatenate CSS files this way. Instead, you should use the @import syntax in your CSS preprocessor (like LESS or Sass). But connect-assets lets you concatenate JavaScript files using specially formatted comments.
Let’s say that your JavaScript file requires jQuery. All you have to do is define a comment that starts with //= require and then connect-assets will concatenate those files for you magically:
//= require jquery
$(function() {
  // do what you need to do with jQuery
...
And that’s concatenation. It’s that easy.
Now that we’ve looked at two ways to compile your assets, let’s look at how to deploy your applications to the real web with Heroku.
11.5. Deploying to Heroku
Heroku’s website has buzzwords like “cloud platform” and “built by developers for developers.” To us, it’s a way to deploy our Node.js applications onto the real internet for free. No more localhost:3000! You’ll be able to have your apps on the real life internet.
Essentially, when you deploy your site, you’re sending your code to be run somewhere. In this case, when you deploy to Heroku, you’ll be sending code to Heroku’s servers and they’ll run your Express applications.
Like everything, there are a lot of ways to deploy your site. Heroku may not be the best option for you. We choose it here because it’s relatively simple and it costs nothing to get started.
11.5.1. Getting Heroku set up
First, you’ll need to get a Heroku account. Visit www.heroku.com and sign up (if you don’t have an account). The signup process should be fairly straightforward if you’ve ever signed up for any account online. Figure 11.2 shows their homepage.
Figure 11.2. Heroku’s homepage

Next, you’ll want to download and install the Heroku Toolbelt from https://toolbelt.heroku.com/. Follow the instructions for your specific OS. Installing the Heroku Toolbelt on your computer will install three things:
- Heroku client. A command-line tool for managing Heroku apps. You’ll use it to create and manage your Express apps.
- Foreman. Another command-line tool. You’ll use it to define how you want your applications to run.
- Git. The version control system that you may already have installed.
Once you’ve installed it, there’s one last thing to do: authenticate your computer with Heroku. Open a command line and type heroku login. This will ask you for your Heroku username and password.
Once you’ve done all that, Heroku should be set up.
11.5.2. Making a Heroku-ready app
Let’s make a simple Hello World application and deploy it to Heroku, shall we?
To set up your app for Heroku, you don’t have to do too much different from what you normally would. Although there are a few commands you’ll need to run in order to deploy, the only changes you’ll need to make are
- Make sure to start the app on process.env.PORT.
- Make sure your package.json lists a Node version.
- Create a file that will be run when Heroku starts your app (called a Procfile). In our simple app, this file will be only one line.
- Add a file called .gitignore to your project.
Now create a simple app and make sure you cross off these things.
The Express part of this Hello World application should be pretty easy for you at this point in the book, and there’s not much special you have to do to make sure that it works for Heroku; it’s only a line or two.
First, define your package.json, as in the following listing.
Listing 11.25. package.json for your Heroku Express app
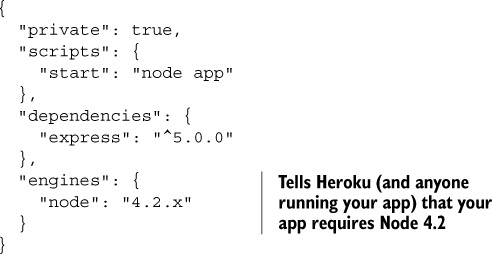
Nothing too new there except for the definition of which Node version to use. Next, define app.js, where your Hello World code resides, as shown in the next listing.
Listing 11.26. A Hello World Express app (app.js)
var express = require("express");

var app = express();

app.set("port", process.env.PORT || 3000);

app.get("/", function(req, res) {
  res.send("Hello world!");
});

app.listen(app.get("port"), function() {
  console.log("App started on port " + app.get("port"));
});
Once again, not much is new. The only Heroku-specific thing here is how the port is set. Heroku will set an environment variable for the port, which you’ll access through process.env.PORT. If you never deal with that variable, you won’t be able to start your app on Heroku on the proper port.
The next part is the most foreign thing you’ve seen so far: a Procfile. It might sound like a complicated new Heroku concept, but it’s really simple. When you run your app, you type npm start into your command line. The Procfile codifies that and tells Heroku to run npm start when your app begins. Create a file in the root of your directory and call it Procfile (capital P, no file extension):
web: npm start
That’s not too bad, right? Heroku is pretty nice.
As a last step, add a file that tells Git to ignore certain files. We don’t need to push node_modules to your server, so make sure you ignore that file:
node_modules
Now that you have your application all ready to go, you can deploy it.
11.5.3. Deploying your first app
The first thing you’ll need to do, if you haven’t done it already, is put your app under version control with Git. I’m going to assume you at least know the basics of Git, but if you don’t, check out Try Git at https://try.github.io.
To set up a Git project in this directory, type git init. Then use git add . to add all of your files and git commit –m "Initial commit" to commit those changes to your Git project. Once that’s all ready to go, type the following command:
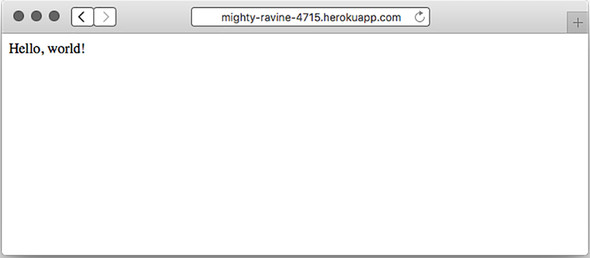
heroku create
This will set up a new URL for your Heroku app. The names it generates are always a bit wacky—I got mighty-ravine-4205.herokuapp.com—but that’s the price you pay for free hosting. You can change the URL or associate a domain name you own with a Heroku address, but we won’t go into that here.
Next, tell your newly created Heroku app that it’s a production Node environment. You’ll do this by setting the NODE_ENV environment variable on Heroku’s servers. Set that variable by running this command:
heroku config:set NODE_ENV=production
When you ran heroku create, Heroku added a remote Git server. When you push your code to Heroku, Heroku will deploy your app (or redeploy it if you’ve already deployed). This is just one Git command:
git push heroku master
This will first push your code to Heroku’s servers and then set up their servers with all of your dependencies. You’ll run git push heroku master every time you want to redeploy; that’s really the only command you’ll run more than once. There’s just one last thing to do—tell Heroku that it should run your app with one process so that it’ll actually run on a real computer:
heroku ps:scale web=1
Suddenly, your app will be running on the real internet, as shown in figure 11.3. You can type heroku open to open your app in your browser and see it running. You can send this link to your friends. No more localhost, baby!
Figure 11.3. Your Hello World app running on Heroku
11.5.4. Running Grunt on Heroku
If you’re using connect-assets to compile your assets, then Heroku will work just fine (assuming you’ve installed all of the dependencies properly). But if you want to use Grunt (or another task runner like Gulp), you’ll need to run Grunt to build your assets when you deploy your site.
There’s a little trick you can use to make this work, which leverages a nice little feature of npm: the post install script. Heroku will run npm install when you deploy your app, and you can tell Heroku to run Grunt right after that in order to build all of your assets. This is a simple manner of adding another script to your package.json, as the next listing shows.
Listing 11.27. Running Grunt in a postinstall script
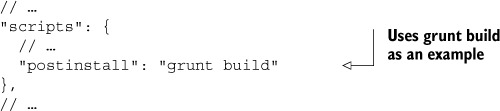
Now, when anyone (including Heroku) runs npm install, grunt build will run.
11.5.5. Making your server more crash resistant
No offense, but your server might just crash. It could be that you run out of memory, or that you have an uncaught exception, or that a user has found a way to break your server. If you’ve ever had this happen while you’re developing, you’ve probably seen that an error sends your server process screeching to a halt. While you’re developing, this is pretty helpful—you want to be aware that your app doesn’t work! In production, however, it’s much more likely that you want your app to work at all costs. If you have a crash, you’ll want your app to be resilient and restart.
You saw Forever in the chapter about security, but here’s a refresher: it’s a tool to keep your server up and running, even in the face of crashes. Instead of typing node app.js, you’ll type forever app.js. Then, if your app crashes, Forever will restart it.
First, run npm install forever --save to install Forever as a dependency. Now, you run forever app.js to start your server. You could add this to the Procfile or change your npm start script, but I like to add a new script to package.json.
Open your scripts in package.json and add the code in the following listing.
Listing 11.28. Defining a script for running your server in production
// ...
"scripts": {
  // ...
  "production": "forever app.js"
},
// ...
Now, when you run npm run production, your app will start with Forever. The next step is to get Heroku to run this script, and that’s just a simple matter of changing your Procfile:
web: npm run production
After this change, Heroku will run your app with Forever and keep your app restarting after crashes.
As always with Heroku, commit these changes into Git. (You’ll need to add your files with git add . and then commit them with git commit –m "Your commit message here!"). Once that’s done, you can deploy them to Heroku with git push heroku master.
You can use Forever in any kind of deployment, not just Heroku. Some of your deployment configuration will have to change depending on your server setup, but you can use Forever wherever you choose to deploy.
11.6. Summary
- LESS is a language that compiles to CSS. It adds a lot of conveniences like variables and mixins.
- Browserify is a tool for packaging JavaScript to run in the browser. It packages files so that you can use Node.js’s module system in the browser, allowing you to share code between your client and your server.
- Grunt is a generic task runner that can do lots of things. One of the things you’ll do with Grunt is compile CSS with LESS and package JavaScript with Browserify.
- connect-assets is an alternative to Grunt in some ways and allows you to compile CSS and JavaScript using Express middleware.
- Heroku is one of many cloud application platforms that allow you to easily deploy your Express applications to the real world.