Table of Contents for
Express in Action: Writing, building, and testing Node.js applications
 Express in Action: Writing, building, and testing Node.js applications
Published by
Manning Publications, 2016
Express in Action: Writing, building, and testing Node.js applications
Published by
Manning Publications, 2016
- Cover
- Express in Action: Writing, building, and testing Node.js applications
- Copyright
- Brief Table of Contents
- Table of Contents
- Preface
- Acknowledgments
- About this Book
- About the Cover Illustration
- Part 1. Intro
- Chapter 1. What is Express?
- Chapter 2. The basics of Node.js
- Chapter 3. Foundations of Express
- Part 2. Core
- Chapter 4. Middleware
- Chapter 5. Routing
- Chapter 6. Building APIs
- Chapter 7. Views and templates: Pug and EJS
- Part 3. Express in Context
- Chapter 8. Persisting your data with MongoDB
- Chapter 9. Testing Express applications
- Chapter 10. Security
- Chapter 11. Deployment: assets and Heroku
- Chapter 12. Best practices
- Appendix. Other helpful modules
- Index
- List of Figures
- List of Listings
Chapter 2. The basics of Node.js
- Installing Node.js and using its module system
- Using package.json to describe your project’s metadata
- Using npm to install packages with npm install
- Doing two things at once with Node
- Using Node’s built-in http module to build a simple web server
In chapter 1, we described Node.js, explaining that it’s JavaScript, asynchronous, and has a rich set of third-party modules. If you’re like me, you didn’t totally understand these things when you first started with Node. This chapter aims to give the intro to Node that I wish I had: short and sweet. (From here forward, I’ll refer to Node.js simply as Node.)
Note
I’m assuming that you know a fair bit of JavaScript and that you don’t want an extremely thorough knowledge of Node from this chapter. I’m also going to assume that you have a working understanding of how to use the command line. If this whirlwind introduction to Node is a little too whirlwind, I recommend Node.js in Action by Mike Cantelon, et al. (Manning Publications, 2013) at www.manning.com/cantelon/.
Let’s get started.
2.1. Installing Node
A theme of the JavaScript world is an overwhelming number of choices, and Node’s installation is no exception; there are numerous ways to get Node running on your system.
The official downloads page at http://nodejs.org/download/ has a number of links for pretty much every platform—Windows, Mac, and Linux. The choice of platform should be obvious—choose the one for your operating system. If you’re not sure if your system is 32-bit or 64-bit, search the web for the answer because you’ll get a lot of performance benefits from choosing 64-bit if it’s available. Mac and Windows users have the option to download a binary or an installer, and I recommend the latter.
If you have a package manager on your system, you can use that instead. Node is available on package managers such as apt-get, Homebrew, and Chocolatey. You can check out the official “Installing Node.js via package manager” guide at https://github.com/joyent/node/wiki/Installing-Node.js-via-package-manager.
If you’re on Mac or Linux, I highly recommend the Node Version Manager (NVM), found at https://github.com/creationix/nvm. NVMW at https://github.com/hakobera/nvmw is a port for Windows users. These programs allow you to easily switch between Node versions, which is great if you want to have the stable version of Node and the exciting experimental prerelease versions. It also allows you to easily upgrade Node when new versions are released. NVM has a couple of other benefits that I like, too: it’s trivial to uninstall, and it doesn’t need administrator (root) access to install it on your system.
NVM is a one-line install that you can copy-paste and run from the instructions at https://github.com/creationix/nvm (or https://github.com/hakobera/nvmw for the Windows version). In any case, install Node!
2.1.1. Running your first Node script
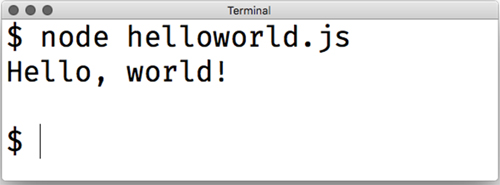
However you chose to install Node, it’s time to run something. Let’s build the classic Hello World. Create a file called helloworld.js and put the following inside.
Listing 2.1. helloworld.js
console.log("Hello, world!");
You call the console.log function with the argument you want to print: the string "Hello, world!". If you’ve ever used the console when writing browser-based JavaScript, this should look familiar.
To run this, type node helloworld.js. (You may have to cd into the directory where helloworld.js lives.) If everything works well, you should see the text appear on the screen. The output will look something like figure 2.1.
Figure 2.1. The result of running our “Hello, world!” code
2.2. Using modules
Most programming languages have a way of including the code in file A from inside file B so that you can split your code into multiple files. C and C++ have #include; Python has import; Ruby and PHP have require. Some languages like C# do this kind of cross-file communication implicitly at compile time.
For most of its life, the JavaScript language didn’t have an official way of doing this. To solve this problem, people built things that concatenated JavaScript files into one file or built dependency loaders like RequireJS. A lot of web developers simply fill their webpages with <script> tags.
Node wanted to solve this problem elegantly, and its developers implemented a standard module system called CommonJS. At its core, CommonJS lets you include code from one file in another.
There are three major components to this module system: requiring built-in modules, requiring third-party modules, and making your own modules. Let’s see how they work.
2.2.1. Requiring built-in modules
Node has a number of built-in modules, ranging from filesystem access in a module called fs to utility functions in a built-in module called util.
A common task when building web applications with Node is parsing the URL. When a browser sends a request to your server, it will ask for a specific URL, such as the homepage or the about page. These URLs come in as strings, but you’ll often want to parse them to get more information about them. Node has a built-in URL parser module; let’s use it to see how to require packages.
Node’s built-in url module exposes a few functions, but the big kahuna is a function called parse. It takes a URL string and extracts useful information, like the domain or the path.
You’ll use Node’s require function to use the url module. require is similar to keywords like import or include in other languages. require takes the name of a package as a string argument and returns a package. There’s nothing special about the object that’s returned—it’s often an object, but it could be a function or a string or a number. The next listing shows how you might use the url module.
Listing 2.2. Requiring Node’s url module
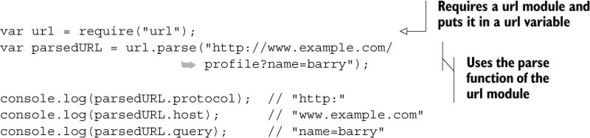
In this example, require("url") returns an object that has the parse function attached. Then you can use it as you would any object!
If you save this as url-test.js, you can run it with node url-test.js. It will print the protocol, host, and query of the example URL.
Most of the time when you’re requiring a module, you’ll put in a variable that has the same name as the module itself. The previous example puts the url module in a variable of the same name: url.
But you don’t have to do that. You could have put it in a variable with a different name, if you wanted. The following listing illustrates that.
Listing 2.3. Requiring things into different variable names
var theURLModule = require("url");

var parsedURL = theURLModule.parse("http://example.com");
// ...
It’s a loose convention to give the variables the same name as what you’re requiring to prevent confusion, but there’s nothing enforcing that in code.
2.2.2. Requiring third-party modules with package.json and npm
Node has several built-in modules, but they’re rarely enough; third-party packages are indispensable when making applications. And this is a book about a third-party module, after all, so you should definitely know how to use them!
The first thing we need to talk about is package.json. Every Node project sits in a folder, and at the root of every Node project there’s a file called package.json. (When I say “every Node project,” I mean every single one, from third-party packages to applications. You’ll likely never build a Node project without one.)
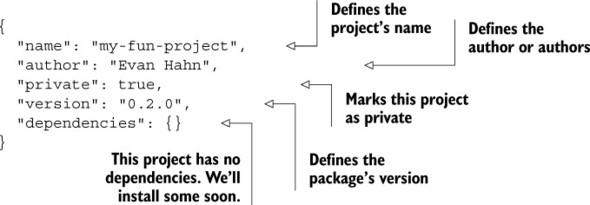
“package dot json” is a pretty simple JSON file that defines project metadata like the name of the project, its version, and its authors. It also defines the project’s dependencies.
Let’s make a simple app. Make a new folder and save the following code to package.json.
Listing 2.4. A simple package.json file
Now that you’ve defined your package, you can install its dependencies. When you install Node, you actually get two programs: Node (as you might expect) and something called npm (deliberately lowercase). npm is an official helper for Node that helps you with your Node projects.
npm is often called the “Node Package Manager,” but its unabbreviated name has never been explicitly stated—its website randomly shows names like “Never Poke Monkeys” or “Nine Putrid Mangos.” It may evade the “package manager” moniker because it does much more than that, but package management is perhaps its biggest feature, which you’ll use now.
Let’s say you want to use Mustache (see https://mustache.github.io/), a little templating system. It lets you turn template strings into real strings. An example explains it best; see the following listing.
Listing 2.5. An example of the Mustache templating system
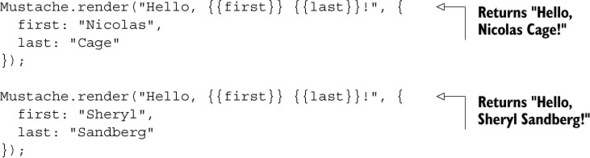
Let’s say that you want to write a simple Node application that greets Nicolas Cage with the Mustache module.
From the root of this directory, run npm install mustache --save. (You must run this command from the root of this directory so that npm knows where to put things.) This command creates a folder in this directory called node_modules. Then it downloads the latest version of the Mustache package and puts it into this new node_modules folder (look inside to check it out). The --save flag adds it to your package.json. Your package.json file should look similar to the one in the next listing, but it will now have the latest version of the Mustache package.
Listing 2.6. A simple package.json file
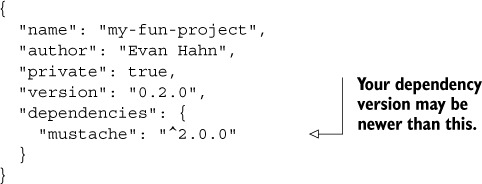
If you left off the --save flag, you’d see the new node_modules folder and it would have Mustache inside, but nothing would be present in your package.json. The reason you want dependencies listed in your package.json is so that someone else can install the dependencies later if you give them the project—they need only to run npm install with no arguments. Node projects typically have dependencies listed in their package.json but they don’t come with the actual dependency files (they don’t include the node_modules folder).
Now that you’ve installed it, you can use the Mustache module from your code, as shown in the listing that follows.
Listing 2.7. Using the Mustache module

Save this code mustache-test.js and run it with node mustache-test.js. You should see the text “Hi, Nicolas Cage!” appear.
And that’s it! Once it’s installed into node_modules, you can use Mustache just like you would a built-in module. Node knows how to require modules inside the node_modules folder.
When you’re adding dependencies, you can also manually edit package.json and then run npm install. You can also install specific versions of dependencies or install them from places other than the official npm registry; see more at the npm install documentation (https://docs.npmjs.com/cli/install).
npm does much more than just install dependencies. For example, it allows you to autogenerate your package.json file. You can create package.json by hand, but npm can do it for you.
In your new project directory, you can type npm init. It will ask you a bunch of questions about your project—project name, author, version—and when it’s finished, it will save a new package.json. There’s nothing sacred about this generated file; you can change it all you want. But npm can save you a bit of time when creating these package.json files.
2.2.3. Defining your own modules
We’ve been using other people’s modules for this whole chapter—you’ll now learn how to define your own. Let’s say you want a function that returns a random integer between 0 and 100. Without any module magic, that function might look like the next listing.
Listing 2.8. A function that returns a random integer between 0 and 100
var MAX = 100;

function randomInteger() {
  return Math.floor((Math.random() * MAX));
}
This shouldn’t be too earth-shattering; this might be how you’d write that function in a browser context. But in Node, you can’t save this into a file and call it a day; you need to choose a variable to export, so that when other files require this one, they know what to grab. In this case, you’ll be exporting randomInteger. Try saving this into a file called random-integer.js, as shown next.
Listing 2.9. random-integer.js

The last line is the only thing that might be foreign to someone new to Node. You can export only one variable, and you’ll choose it by setting module.exports to it. In this case, the variable you’re exporting is a function. In this module, MAX is not exported, so that variable won’t be available to anyone who requires this file. Nobody will be able to require it—it’ll stay private to the module.
Remember
module.exports can be anything you want. Anything to which you can assign a variable can be assigned to module.exports. It’s a function in this example, but it’s often an object. It could even be a string or a number or an array if you’d like.
Now, let’s say you want to use your new module. In the same directory as random-integer.js, save a new file, as shown in the next listing. It doesn’t matter what you call it (so long as it’s not random-integer.js), so let’s call it print-three-random-integers.js.
Listing 2.10. Using our module from another file

You can now require it just like any other module, but you have to specify the path using the dot syntax. Other than that, it’s exactly the same! You can use it as you would another module.
You can run this code just like any other, by running node print-three-random-integers.js. If you did everything correctly, it’ll print three random numbers between 0 and 100.
You might try running node random-integer.js, and you’ll notice that it doesn’t appear to do anything. It exports a module, but defining a function doesn’t mean the function will run and print anything to the screen.
Note
This book only covers making local modules within a project. If you’re interested in publishing open source packages for everyone to use, check out the guide on my website at http://evanhahn.com/make-an-npm-baby.
That’s a quick intro to Node’s module system.
2.3. Node: an asynchronous world
In chapter 1, we discussed the asynchronous nature of Node. I used a “let’s bake muffins” analogy. While I’m preparing the batter for my muffins, I can’t do other substantive things: I can’t read a book, I can’t prepare more batter, and so on. But once I put the muffins in the oven, I can do other things. I don’t just stand there staring at the oven until it beeps—I could go for a jog. When the oven beeps, I’m back on muffin duty and I’m occupied again.
A key point here is that I’m never doing two things at once. Even if multiple things are happening at once (I could be jogging while the muffins are baking), I’m doing only one thing at a time. This is because the oven isn’t me—it’s an external resource; see figure 2.2.
Figure 2.2. Comparing an asynchronous world (like Node) to a synchronous one
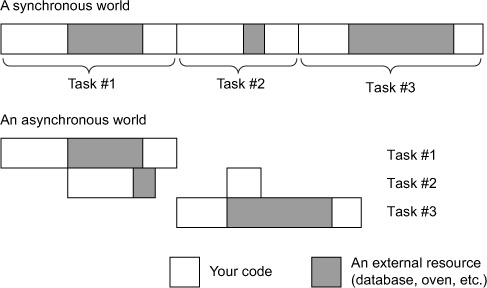
Node’s asynchronous model works similarly. A browser might request a 100 MB cat picture from your Node-powered web server. You begin to load this big photo from the hard disk. As far as you’re concerned, the hard disk is an external resource, so you ask it for the file and then you can move on to other things while you wait for it to load.
While you’re loading that file, a second request comes in. You don’t have to wait for the first request to finish completely—while you’re waiting for the hard disk to finish what it was working on, you can start parsing the second request. Once again, Node is never really doing two things at once, but when an external resource is working on something, you’re not held up waiting.
The two most common external resources you’ll deal with in Express are
- Anything involving the filesystem —Like reading and writing files from your hard drive
- Anything involving a network —Like receiving requests, sending responses, or sending your own requests over the internet
Conceptually, that’s about it.
In code, these asynchronous things are handled by callbacks. You’ve probably done something like this if you’ve ever done an AJAX request on a web page; you send a request and pass a callback. When the browser has finished your request, it’ll call your callback. Node works the same way.
Let’s say you’re reading a file called myfile.txt from disk. When you’ve finished reading the whole file, you want to print the number of times the letter X appears in the file. The next listing shows how that might work.
Listing 2.11. Reading a file from disk
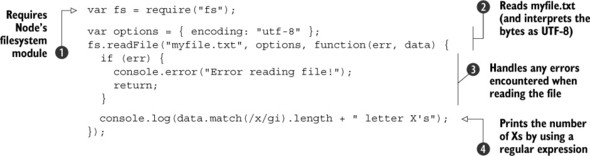
Let’s step through this code. You require Node’s built-in filesystem module  . This has tons of functions for various tasks on the filesystem, most commonly reading and writing files. In this example,
you’ll use its readFile method.
. This has tons of functions for various tasks on the filesystem, most commonly reading and writing files. In this example,
you’ll use its readFile method.
Next, you set options that you’ll pass into fs.readFile. You call it with the filename (myfile.txt)  , the options you just created, and a callback. When the file has been read off of disk, Node will jump into your callback.
Most callbacks in Node are called with an error as their first argument. If all goes well, the err argument will be null. But if things don’t go so well (maybe the file didn’t exist or was corrupted)  , the err argument will have some value. It’s a best practice to handle those errors. Sometimes the errors don’t completely halt your
program and you can continue on, but you often handle the error and then break out of the callback by throwing an error or
returning. This is a common Node practice, and you’ll see it almost everywhere you see a callback.
, the err argument will have some value. It’s a best practice to handle those errors. Sometimes the errors don’t completely halt your
program and you can continue on, but you often handle the error and then break out of the callback by throwing an error or
returning. This is a common Node practice, and you’ll see it almost everywhere you see a callback.
Once you know you don’t have any errors, you print out the number of Xs  in the file. You use a little regular expression trick to do this.
Okay, pop quiz: what would happen if you added a console.log statement at the very end of this file, like the one shown in the next listing?
Listing 2.12. Adding a console.log after the asynchronous operations
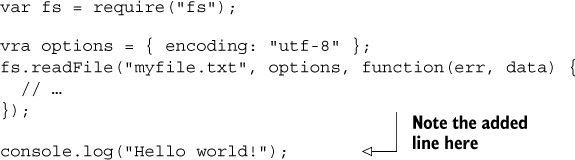
Because this file-reading operation is asynchronous, you’ll see “Hello world!” before you see any results from the file. This is because the external resource—the filesystem—hasn’t gotten back to you yet.
This is how Node’s asynchronous model can be super helpful. While an external resource is handling something, you can continue on to other code. In the context of web applications, that means that you can parse many more requests at once.
Note
There’s a fantastic video on how callbacks and the event loop work in JavaScript (both in Node and in the browsers). If you’re interested in understanding the nitty-gritty details, I very strongly recommend Philip Roberts’s “What the heck is the event loop anyway?” at https://www.youtube.com/watch?v=8aGhZQkoFbQ.
2.4. Building a web server with Node: the http module
Understanding the big concepts in Node will help you understand the built-in module that’s most important to Express: its http module. It’s the module that makes it possible to develop web servers with Node, and it’s what Express is built on.
Node’s http module has various features (making requests to other servers, for instance) but we’ll use its HTTP server component: a function called http.create-Server. This function takes a callback that’s called every time a request comes into your server, and it returns a server object. The following listing contains a very simple server that sends “Hello world” with every request (which you can save into myserver.js if you’d like to run it).
Listing 2.13. A simple “hello world” web server with Node
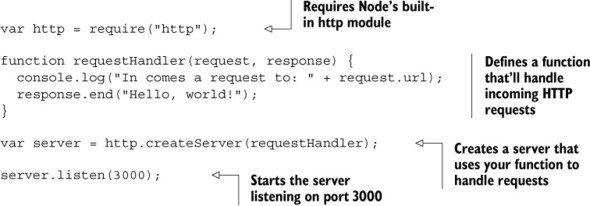
This code is split up into four chunks. The first chunk requires the http module and puts it into a variable called http. You saw this previously with the url module and the filesystem module—this is exactly the same.
Next, you define a request handler function. Nearly every bit of code in this book is either a request handler function or a way to call one, so listen up! These request handler functions take two arguments: an object that represents the request (often shortened to req) and an object that represents the response (often shortened to res). The request object has things like the URL that the browser requested (did they request the homepage or the about page?), or the type of browser visiting your page (called the user-agent), or things like that. You call methods on the response object and Node will package the bytes and send them across the internet.
The rest of the code points Node’s built-in HTTP server at the request handler function and starts it on port 3000.
What about HTTPS?
Node also comes with a module called https. It’s very similar to the http module, and creating a web server with it is almost identical. If you decide to swap things out later, it should take less than two minutes if you know how to use HTTPS. If you don’t know much about HTTPS, don’t worry about this.
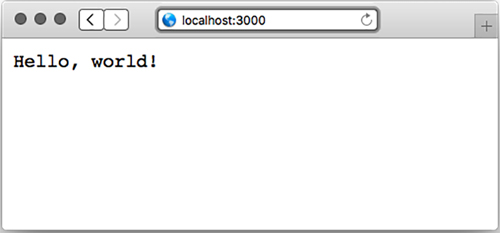
You can try saving the previous code into a file called myserver.js. To run the server, type node myserver.js (or just node myserver). Now, if you visit http://localhost:3000 in your browser, you’ll see something like figure 2.3.
Figure 2.3. A simple Hello World app
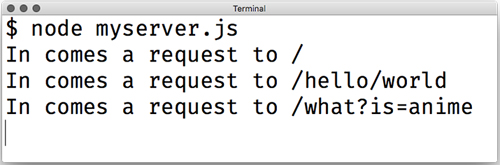
You’ll also notice that something appears in your console every time you visit a page. Try visiting a few other URLs: http://localhost:3000/ or http://localhost:3000/hello/world or http://localhost:3000/what?is=anime. The output will change in the console, but your server won’t do anything different and will always just say “Hello, world!” Figure 2.4 shows what your console might look like.
Figure 2.4. The console from your Hello World app might look something like this.
Notice that the request URL doesn’t include “localhost:3000” anywhere. That might be a little unintuitive, but this is pretty helpful, as it turns out. This allows you to deploy your application anywhere, from your local server to your favorite .com address. It’ll work without any changes.
You could imagine parsing the request URL. You might do something like the following listing.
Listing 2.14. Parsing the request URL with a request handler function
// ...

function requestHandler(req, res) {
  if (req.url === "/") {
    res.end("Welcome to the homepage!");
  } else if (req.url === "/about") {
    res.end("Welcome to the about page!");
  } else {
    res.end("Error! File not found.");

  }
}
// ...
You could imagine building your entire site in this one request handler function. For very small sites, this might be easy, but you could see this function getting huge and unwieldy pretty quickly. You might want a framework to help you clean up this HTTP server—things could get messy! That’s where Express will come in.
2.5. Summary
- There are a number of ways to install Node. I recommend using a version manager so that you can easily change versions and upgrade as needed.
- Node’s module system makes use of a global function called require and a global object called module.exports. The two make for a straightforward module system.
- You can use npm to install third-party packages from the npm registry.
- Node.js has evented I/O. This means that when an event happens (such as an incoming web request), a function (or set of functions) is called.
- Node has a built-in module called http. It is useful for building web applications.