Table of Contents for
Express in Action: Writing, building, and testing Node.js applications
 Express in Action: Writing, building, and testing Node.js applications
Published by
Manning Publications, 2016
Express in Action: Writing, building, and testing Node.js applications
Published by
Manning Publications, 2016
- Cover
- Express in Action: Writing, building, and testing Node.js applications
- Copyright
- Brief Table of Contents
- Table of Contents
- Preface
- Acknowledgments
- About this Book
- About the Cover Illustration
- Part 1. Intro
- Chapter 1. What is Express?
- Chapter 2. The basics of Node.js
- Chapter 3. Foundations of Express
- Part 2. Core
- Chapter 4. Middleware
- Chapter 5. Routing
- Chapter 6. Building APIs
- Chapter 7. Views and templates: Pug and EJS
- Part 3. Express in Context
- Chapter 8. Persisting your data with MongoDB
- Chapter 9. Testing Express applications
- Chapter 10. Security
- Chapter 11. Deployment: assets and Heroku
- Chapter 12. Best practices
- Appendix. Other helpful modules
- Index
- List of Figures
- List of Listings
Chapter 8. Persisting your data with MongoDB
- Using Mongoose, an official MongoDB library for controlling the database with Node
- Securely creating user accounts using bcrypt
- Using Passport for user authentication.
I have three favorite chapters in this book.
My very favorite is chapter 3, where we discuss the foundations of Express. I like that chapter because the goal is to really explain Express. In my opinion, it’s the most important chapter of the book, because it explains the framework conceptually.
Chapter 10 is my second favorite. As you’ll see, it discusses security, and I love putting a hacker hat on and trying to break Express applications. It’s a lot of fun (and, incidentally, terribly important).
This chapter is my final favorite. Why? Because after this chapter, your applications will feel real. No more dinky example apps. No more data that quickly disappears. Your Express applications will have user accounts, blog posts, friend requests, calendar appointments—all with the power of data persistence.
Nearly every application has some kind of data, be it blog posts or user accounts or cat pictures. As we’ve discussed, Express is generally an unopinionated framework. Fitting in with this mantra, Express doesn’t dictate how you store your data. So how should we approach it?
You could store your application’s data in memory, by setting variables. Chapter 3’s guestbook example stored the guestbook entries in an array, for example. Although this is useful in very simple cases, it has a number of disadvantages. For one, if your server stops (either because you manually stop it or because it crashes), your data is gone. And if you grow to hundreds of millions of data points, you’ll run out of memory. This method also runs into issues when you have multiple servers running your application, because data can be on one machine but not the other.
You could try to store your application’s data in files, by writing to a file or multiple files. This is how many databases work internally, after all. But that leaves you to figure out how to structure and query that data. How do you save your data? How do you efficiently get data out of those files when you need it? You might wind up building a database of your own, which is a huge headache. And once again, this doesn’t magically work with multiple servers.
We’ll need another plan. And that’s why we choose software designed for this purpose: a database. Our database of choice is MongoDB.
8.1. Why MongoDB?
MongoDB (often shortened to Mongo) is a popular database that’s wiggled its way into the hearts of many Node developers. Its pairing with Express is beloved enough to have spawned the acronym MEAN, for Mongo, Express, Angular (a front-end JavaScript framework), and Node. In this book, we’ll be discussing everything but the A of that acronym—the MEN stack, if you will.
At this point, you may be asking, “There are a lot of choices for databases out there, like SQL or Apache Cassandra or Couchbase. Why choose Mongo?” That’s a good question! In general, web applications store their data in one of two kinds of databases: relational and non-relational.
Typically, relational databases are a lot like spreadsheets. Their data is structured, and each entry is generally a row in a table. They’re a bit like strongly typed languages such as Java, where each entry must fit into rigid requirements (called a schema). Most relational databases can be controlled with some derivative of SQL, the Structured Query Language; you likely have heard of MySQL or SQL Server or PostgreSQL. The terms relational databases and SQL databases are often used interchangeably.
Non-relational databases are often called NoSQL databases. (NoSQL means anything that isn’t SQL, but it tends to refer to a certain class of database.) I like to imagine NoSQL as a different technology and a fist-up cry against the status quo. Perhaps NoSQL is tattooed on a protester’s arm. In any case, NoSQL databases are different from relational databases in that they’re generally not structured like a spreadsheet. They’re generally a bit less rigid than SQL databases. They’re very much like JavaScript in this way; JavaScript is generally less rigid. In general, NoSQL databases feel a bit more like JavaScript than SQL databases.
For this reason, we’ll use a NoSQL database. The NoSQL database we’ll use is Mongo. But why choose that one?
For one, Mongo is popular. That isn’t in itself a merit, but it has a few benefits. You won’t have trouble finding help online. It’s also useful to know; it’s used in lots of places by lots of people. Mongo is also a mature project. It’s been around since 2007 and is trusted by companies like eBay, Craigslist, and Orange. You won’t be using buggy, unsupported software.
Mongo is popular in part because it’s mature, feature filled, and reliable. It’s written in performant C++ and is trusted by myriad users.
Although Mongo isn’t written in JavaScript, its native shell uses JavaScript. That means that when you open Mongo to play around in the command line, you send it commands with JavaScript. It’s pretty nice to be able to talk to the database with a language you’re already using.
I also chose Mongo for this chapter because I think it’s easier to learn than SQL for a JavaScript developer. SQL is a powerful programming language unto itself, but you already know JavaScript!
I hardly believe that Mongo is the right choice for all Express applications. Relational databases are incredibly important and can be used well with Express, and other NoSQL databases like CouchDB are also powerful. But Mongo fits well with the Express ecosystem and is relatively easy to learn (compared to SQL), which is why I chose it for this chapter.
Note
If you’re like me, you know SQL and want to use it for your Express projects. This chapter will cover Mongo, but if you’re looking for a helpful SQL tool, check out Sequelize at http://sequelizejs.com/. It interfaces with many SQL databases and has a number of helpful features. In this chapter, we’ll deal heavily with a module called Mongoose; for your reference as you read, Mongoose is to Mongo as Sequelize is to SQL. Keep that in mind if you want to use SQL!
8.1.1. How Mongo works
Before we start, let’s talk about how Mongo works. Most applications have one database, like Mongo. These databases are hosted by servers. A Mongo server can have many databases on it, but there is generally one database per application. If you’re developing only one application on your computer, you’ll likely have only one Mongo database. (These databases can be replicated across multiple servers, but you treat them as if they’re one database.)
To access these databases, you’ll run a Mongo server. Clients will talk to these servers, viewing and manipulating the database. There are client libraries for most programming languages; these libraries are called drivers and let you talk to the database in your favorite programming language. In this book, we’ll be using the Node driver for Mongo.
Every database will have one or more collections. I like to think of collections as fancy arrays. A blog application might have a collection for blog posts, or a social network might have a collection for user profiles. They’re like arrays in that they’re giant lists, but you can also query them (“Give me all users in this collection older than age 18,” for example) much more easily than arrays.
Every collection will have any number of documents. Documents aren’t technically stored as JSON, but you can think of them that way; they’re basically objects with various properties. Documents are things like users and blog posts; there’s one document per thing. Documents don’t have to have the same properties, even if they’re in the same collection—you could theoretically have a collection filled with completely different objects (although you seldom do this in practice).
Documents look a lot like JSON, but they’re technically Binary JSON, or BSON. You almost never deal with BSON directly; rather, you’ll translate to and from JavaScript objects. The specifics of BSON encoding and decoding are a little different from JSON. BSON also supports a few types that JSON does not, like dates, timestamps, and undefined values. Figure 8.1 shows how things are put together.
Figure 8.1. Hierarchy of Mongo’s databases, collections, and documents
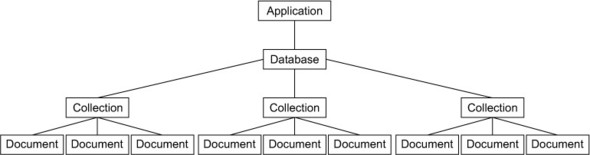
One last important point: Mongo adds a unique _id property to every document. Because these IDs are unique, two documents are the same if they have the same _id property, and you can’t store two documents with the same ID in the same collection. This is a miscellaneous point but an important one that we’ll come back to!
8.1.2. For you SQL users out there
If you come from a relational/SQL background, many of Mongo’s structures map one-to-one with structures from the SQL world. (If you’re not familiar with SQL, you can skip this section.)
Documents in Mongo correspond with rows or records in SQL. In an application with users, each user would correspond to one document in Mongo or one row in SQL. In contrast to SQL, Mongo doesn’t enforce any schema at the database layer, so it’s not invalid in Mongo to have a user without a last name or an email address that’s a number.
Collections in Mongo correspond to SQL’s tables. Mongo’s collections contain many documents, whereas SQL’s tables contain many rows. Once again, Mongo’s collections don’t enforce a schema, unlike SQL. In addition, these documents can embed other documents, unlike in SQL—blog posts could contain the comments, which would likely be two tables in SQL. In a blog application, there would be one Mongo collection for blog posts or one SQL table. Each Mongo collection contains many documents, where each SQL table contains many rows or records.
Databases in Mongo are very similar to databases in SQL. Generally, there’s one database per application. Mongo databases can contain many collections, whereas SQL databases can contain many tables. A social networking site would likely have just one of these databases in SQL, Mongo, or another type of database.
For a full list of translations from SQL terminology to Mongo terminology (queries, too), check out the official SQL to MongoDB Mapping Chart at http://docs.mongodb.org/manual/reference/sql-comparison/index.html.
8.1.3. Setting up Mongo
You’ll want to install Mongo locally so that you can use it while you’re developing. If you’re on OSX and aren’t sure you want to use the command line, I’m a big fan of Mongo.app. Instead of wrangling the command line, you simply launch an application that runs in the menu bar at the top right of your screen. You can tell when it’s running and when it’s not, easily start up a console, and shut it down effortlessly. You can download it at http://mongoapp.com/.
If you’re on OSX and would prefer to use the command line, you can use the Homebrew package manager to install Mongo with a simple brew install mongodb. If you’re using MacPorts, sudo port install mongodb will do the job. If you’re not using a package manager and you don’t want to use Mongo.app, you can download it from the Mongo downloads page at www.mongodb.org/downloads.
If you’re on Ubuntu Linux, Mongo’s website has helpful instructions at http://docs.mongodb.org/manual/tutorial/install-mongodb-on-ubuntu/. If you’re using a Debian distribution like Mint (or Debian), check out the official documentation at http://docs.mongodb.org/manual/tutorial/install-mongodb-on-debian/. Other Linux users can check out http://docs.mongodb.org/manual/tutorial/install-mongodb-on-linux/ for various installations.
If you’re a Windows user or on any of the OSes I didn’t mention, the Mongo downloads page will help you. You can either download it from their website or scroll down to the bottom of that page to see other package managers that have Mongo. Take a look at www.mongodb.org/downloads. If you can, make sure you download the 64-bit version; the 32-bit version has a limit on storage space.
Throughout this book, we’ll assume that your Mongo database is at localhost:27017/test. Port 27017 is the default port and the default database is one called test, but your results may vary. If you can’t connect to your database, check your specific installation for help.
8.2. Talking to Mongo from Node with Mongoose
You’ll need a library that will let you talk to Mongo from Node, and therefore from Express. There are a number of lower-level modules, but you’d like something easy to use and feature filled. What should you use?
Look no further than Mongoose (http://mongoosejs.com/), an officially supported library for talking to Mongo from Node. To quote its documentation:
Mongoose provides a straight-forward, schema-based solution to modeling your application data and includes built-in type casting, validation, query building, business logic hooks and more, out of the box.
In other words, Mongoose gives you much more than merely talking to the database. You’ll learn how it works by creating a simple website with user accounts.
8.2.1. Setting up your project
To learn the topics in this chapter, you’ll develop a very simple social network application. This app will let users register new profiles, edit those profiles, and browse each other’s profiles. You’ll call it Learn About Me, for lack of a creative name, or LAM for short.
Your site will have a few pages on it:
- The homepage, which will list all users. Clicking a user in the list will take you to their profile page.
- The profile page will show the user’s display name (or username if no display name is defined), the date they joined the site, and their biography. A user can edit their own profile, but only when they’re logged in.
- The page to sign up for a new account and a page to log into an account.
- After signing up, users will be able to edit their display names and biographies, but only when they’re logged in.
As always, create a new directory for this project. You’ll need to create a package file with metadata about our project and its dependencies. Create a package.json file and put the code from the following listing inside.
Listing 8.1. package.json for LAM
{
  "name": "learn-about-me",
  "private": true,
  "scripts": {
    "start": "node app"
  },
  "dependencies": {
    "bcrypt-nodejs": "0.0.3",
    "body-parser": "^1.6.5",
    "connect-flash": "^0.1.1",
    "cookie-parser": "^1.3.2",

    "ejs": "^1.0.0",
    "express": "^5.0.0",
    "express-session": "^1.7.6",
    "mongoose": "^3.8.15",
    "passport": "^0.2.0",
    "passport-local": "^1.0.0"
  }
}
After you’ve created this file, run npm install to install our slew of dependencies. You’ll see what each dependency does as you chug through the rest of the chapter, so if any of them are unclear, don’t worry. As usual, we’ve set this up so that npm start will start our app (which you’ll save into app.js).
The bcrypt-node module
This example (listing 8.1) uses a module called bcrypt-node. This module is written in pure JavaScript just like most other modules so it’s easy to install. There’s another module on the npm registry called bcrypt, which requires some C code to be compiled. Compiled C code will be faster than pure JavaScript, but it can cause issues if your computer isn’t set up correctly for compiling C code. We use bcrypt-node in this example to avoid those issues here.
When it’s time to get more speed, you should switch to the bcrypt module. Luckily, the faster module is almost identical once it’s installed, so it should be quick to swap it out.
Now it’s time to start putting things into databases.
8.2.2. Creating a user model
As we’ve discussed, Mongo stores everything in BSON, which is a binary format. A simple Hello World BSON document might look like this internally:
\x16\x00\x00\x00\x02hello\x00\x06\x00\x00\x00world\x00\x00
A computer can deal with all that mumbo-jumbo, but that’s hard to read for humans like us. We want something we can easily understand, which is why developers have created the concept of a database model. A model is a representation of a database record as a nice object in your programming language of choice. In this case, our models will be JavaScript objects.
Models can serve as simple objects that store database values, but they often have things like data validation, extra methods, and more. As you’ll see, Mongoose has a lot of those features.
In this example, you’ll be building a model for users. These are the properties user objects should have:
- Username —A unique name. This will be required.
- Password —This will also be required.
- Time joined —A record of when the user joined the site.
- Display name —A name that’s displayed instead of the username. This will be optional.
- Biography —An optional bunch of text that’s displayed on the user’s profile page.
To specify this in Mongoose, you must define a schema, which contains information about properties, methods, and more. (Personally, I don’t think schema is the right word; it’s a lot more like a class or a prototype.) It’s pretty easy to translate these English terms into Mongoose code.
Create a folder called models in the root of your project, and create a new file called user.js inside that folder. To start, put the contents from the following listing in that file.
Listing 8.2. Defining the user schema (in models/user.js)
var mongoose = require("mongoose");
var userSchema = mongoose.Schema({
  username: { type: String, required: true, unique: true },
  password: { type: String, required: true },
  createdAt: { type: Date, default: Date.now },
  displayName: String,
  bio: String
});
After you require Mongoose, it’s pretty straightforward to define your fields. As you can see, you define the username as username, the password as password, the time joined as createdAt, the display name as displayName, and the biography as bio. Notice that some fields are required, some are unique, some have default values, and others are simply a declaration of their types.
Once you’ve created the schema with the properties, you can add methods. The first you’ll add is simple: get the user’s name. If the user has defined a display name, return that; otherwise, return their username. The next listing shows how to add that.
Listing 8.3. Adding a simple method to the user model (in models/user.js)
...

userSchema.methods.name = function() {
  return this.displayName || this.username;
};
You’ll also want to make sure you store the password securely. You could store the password in plain text in your database, but that has a number of security issues. What if someone hacked your database? They’d get all the passwords! You also want to be responsible administrators and not be able to see your users’ passwords in the clear. In order to ensure that you never store the real password, you’ll apply a one-way hash to it using the bcrypt algorithm.
To start using bcrypt, add the require statement to the top of your file. Bcrypt works by running a part of the algorithm many times to give you a secure hash, but that number of times is configurable. The higher the number, the more secure the hash but the longer it will take. You’ll use a value of 10 for now, as shown in the next listing, but you could increase that number for higher security (but, once again, slower speed).
Listing 8.4. Requiring bcrypt (in models/user.js)
var bcrypt = require("bcrypt-nodejs");
var SALT_FACTOR = 10;
After you’ve defined your schema, you’ll define a pre-save action. Before you save your model to the database, you’ll run code that will hash the password. The next listing show how that looks.
Listing 8.5. Pre-save action to hash the password (in models/user.js)
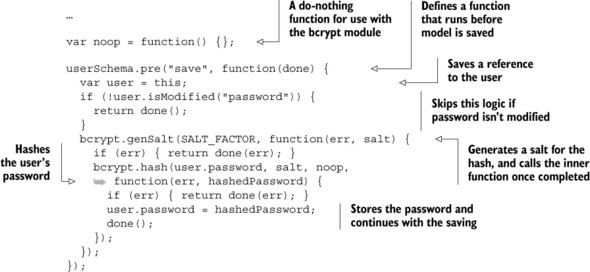
Now, you never have to call any fancy logic to hash the password for the database—it’ll happen every time you save the model into Mongo.
You’ll need to write code to compare the real password to a password guess. When a user logs in, you’ll need to make sure the password they typed is correct. The following listing defines another method on the model to do this.
Listing 8.6. Checking the user’s password (in models/user.js)
...

userSchema.methods.checkPassword = function(guess, done) {
  bcrypt.compare(guess, this.password, function(err, isMatch) {
    done(err, isMatch);
  });
};
Now you’ll be storing your users’ passwords securely.
Note that we use bcrypt.compare instead of a simple equality check (with something like ===). This is for security reasons—it helps keep us safe from a complicated hacker trick called a timing attack.
Once you’ve defined your schema with its properties and methods, you’ll need to attach that schema to an actual model. It takes only one line to do this, and because you’re defining this user model in a file, you’ll make sure to export it into module.exports so other files can require it. Here’s how to do that.
Listing 8.7. Creating and exporting the user model (in models/user.js)
...

var User = mongoose.model("User", userSchema);
module.exports = User;
That’s how you define a user model. The next listing shows what the full file will look like when you’re finished.
Listing 8.8. Finished models/user.js
var bcrypt = require("bcrypt-nodejs");
var mongoose = require("mongoose");

var SALT_FACTOR = 10;

var userSchema = mongoose.Schema({
  username: { type: String, required: true, unique: true },
  password: { type: String, required: true },
  createdAt: { type: Date, default: Date.now },
  displayName: String,
  bio: String,
});

var noop = function() {};

userSchema.pre("save", function(done) {

  var user = this;

  if (!user.isModified("password")) {
    return done();
  }

  bcrypt.genSalt(SALT_FACTOR, function(err, salt) {
    if (err) { return done(err); }
    bcrypt.hash(user.password, salt, noop, function(err, hashedPassword) {
      if (err) { return done(err); }
      user.password = hashedPassword;
      done();
    });
  });

});


userSchema.methods.checkPassword = function(guess, done) {
  bcrypt.compare(guess, this.password, function(err, isMatch) {
    done(err, isMatch);
  });
};

userSchema.methods.name = function() {
  return this.displayName || this.username;
};

var User = mongoose.model("User", userSchema);

module.exports = User;
8.2.3. Using your model
Now that you’ve defined your model, you’ll want to ... well, use it! You’ll want to do things like list users, edit profiles, and register new accounts. Although defining the model and its schema can be a little hairy, using it could hardly be easier; let’s see how.
In order to start using it, first create a simple app.js in the root of your project that will set up your app. This is incomplete and you’ll come back and fill in some more later, but for now, the following listing show what you’ll do.
Listing 8.9. app.js, to start
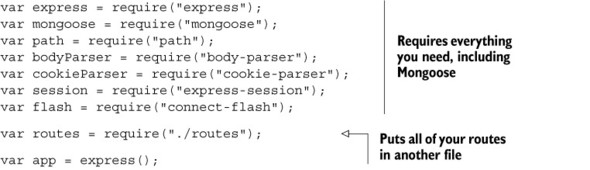
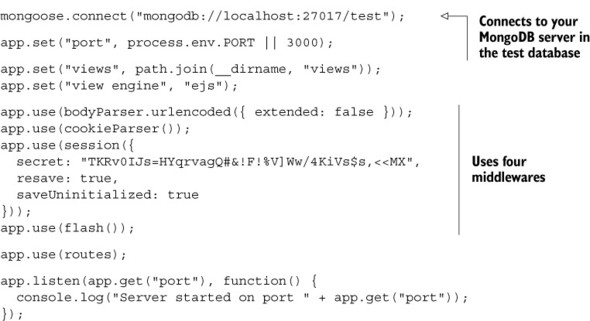
In listing 8.9, you specified that you’re going to be using an external routes file. You need to define that too. Create routes.js in the root of your project, as shown in the next listing.
Listing 8.10. routes.js, to start
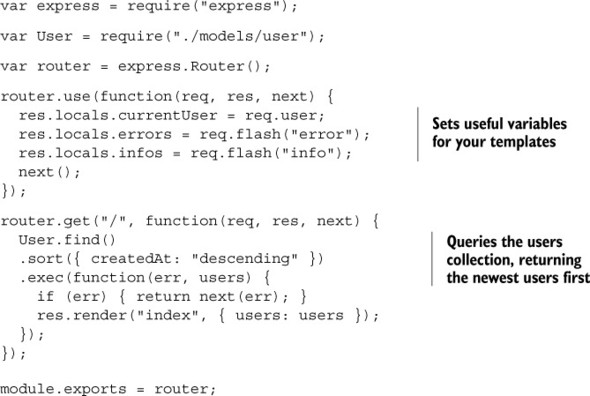
These two files have a couple of things you haven’t seen before. First, you’re connecting to your Mongo database with Mongoose, using mongoose.connect. You simply pass an address and Mongoose does the rest. Depending on how you’ve installed Mongo, this URL might be different; for example, the server could be at localhost:12345/learn_about_me_db. Without this line, you won’t be able to interact with the database.
Second, you’re grabbing a list of users with User.find. Then you sort these results by the createdAt property, and then you run the query with exec. You don’t actually run the query until exec is called. As you’ll see, you can also specify a callback in find to skip having to use exec, but then you can’t do things like sorting.
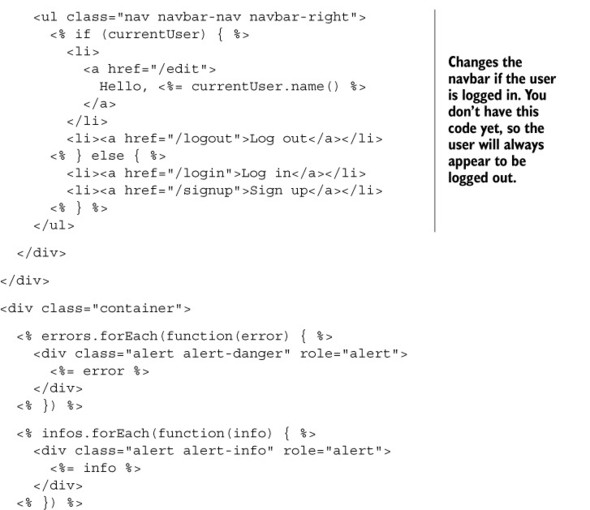
Let’s create the homepage view. Create the views directory, where you’ll put three files inside. The first will be _header.ejs, which is the HTML that will appear at the beginning of every page, as shown in the next listing.
Listing 8.11. views/_header.ejs
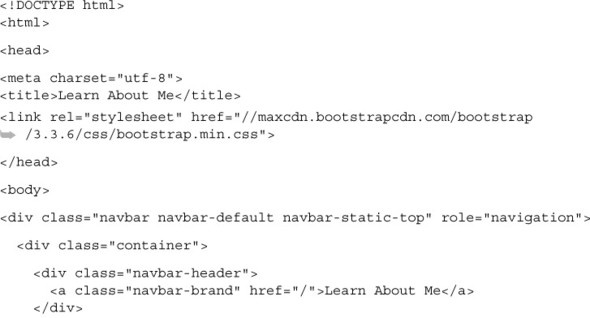
You may notice that this file starts with an underscore. It’s not header.ejs; it’s _header.ejs. This is a common convention: views that aren’t rendered directly start with underscores. You’d never render the header directly—another view would include the header.
Next, you’ll create the footer in _footer.ejs, as shown here.
Listing 8.12. views/_footer.ejs
</div>
</body>
</html>
Finally, create index.ejs, which is the actual homepage, as shown in the next listing. This will pull from the users variable that you’re passed when you render this view.
Listing 8.13. views/index.ejs
<% include _header %>

<h1>Welcome to Learn About Me!</h1>

<% users.forEach(function(user) { %>

  <div class="panel panel-default">
    <div class="panel-heading">
      <a href="/users/<%= user.username %>">
        <%= user.name() %>
      </a>
    </div>
    <% if (user.bio) { %>
      <div class="panel-body"><%= user.bio %></div>
    <% } %>
  </div>

<% }) %>

<% include _footer %>
If you save everything, start your Mongo server, issue npm start, and visit localhost:3000 in your browser, you won’t see much, but you’ll see a homepage that looks something like the one in figure 8.2.
Figure 8.2. The empty LAM homepage
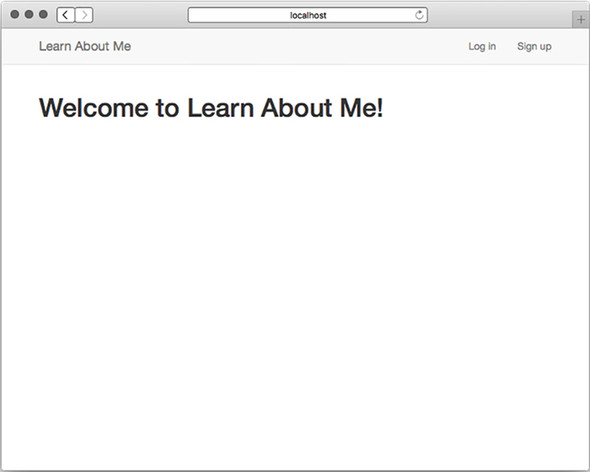
If you’re not getting any errors, that’s great! That means you’re querying your Mongo database and getting all of the users in there—there just happen to be no users at the moment.
Now add two more routes to your page: one for the sign-up page and one to do the actual signing up. In order to use that, you’ll need to make sure you use the body-parser middleware to parse form data. First, we’ll add body-parser to app.js, as seen next.
Listing 8.14. Adding body-parser middleware (to app.js)

Setting body-parser’s extended option to false makes the parsing simpler and more secure. The next listing shows how to add sign-up routes in routes.js.
Listing 8.15. Adding sign-up routes (in routes.js)
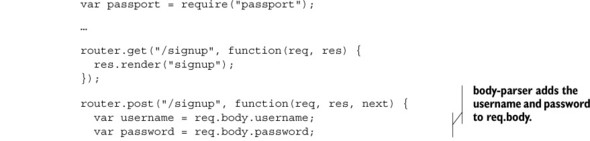
The previous code effectively saves new users to your database. Next add a UI to this by creating views/signup.ejs, as shown in the following listing.
Listing 8.16. views/signup.ejs
<% include _header %>

<h1>Sign up</h1>

<form action="/signup" method="post">
  <input name="username" type="text" class="form-control"
     placeholder="Username" required autofocus>
  <input name="password" type="password" class="form-control"
     placeholder="Password" required>
  <input type="submit" value="Sign up" class="btn btn-primary btn-block">
</form>

<% include _footer %>
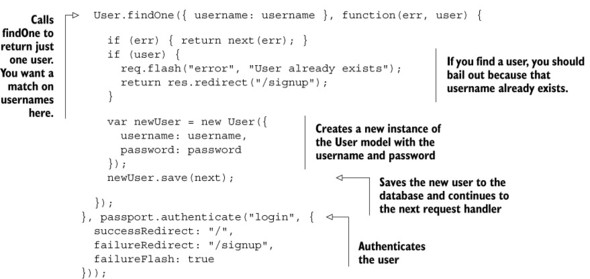
Now, when you submit this form, it’ll talk to the server code and sign up a new user. Start up the server with npm start and go to the sign-up page (at localhost:3000/signup). Create a few accounts and you’ll see them appear on the homepage. You can see our sign-up page in figure 8.3 and the homepage after a few users have been created in figure 8.4.
Figure 8.3. The Learn About Me (LAM) sign-up page
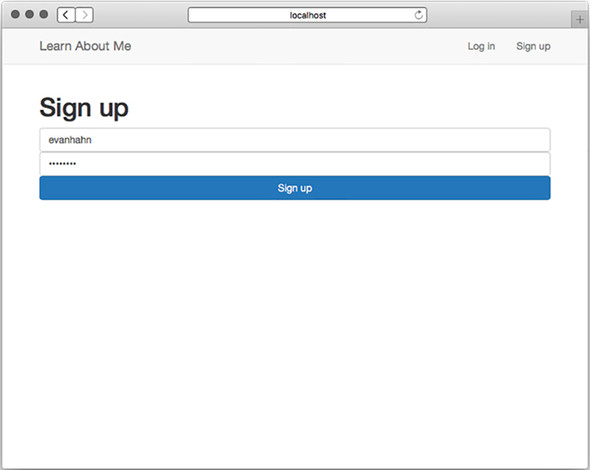
Figure 8.4. An early LAM homepage, after creating a few users
The last bit of business before you have to code logging in and logging out is the viewing of profiles. You’ll add just one more route for that, and that’ll look like the code in the next listing.
Listing 8.17. The profiles route (in routes.js)
...

router.get("/users/:username", function(req, res, next) {
  User.findOne({ username: req.params.username }, function(err, user) {
    if (err) { return next(err); }
    if (!user) { return next(404); }
    res.render("profile", { user: user });
  });
});
...
Once again, you’ll be using findOne, but in this case you’ll actually pass the user you find into the view. Speaking of which, profile.ejs will look something like this next listing.
Listing 8.18. views/profile.ejs

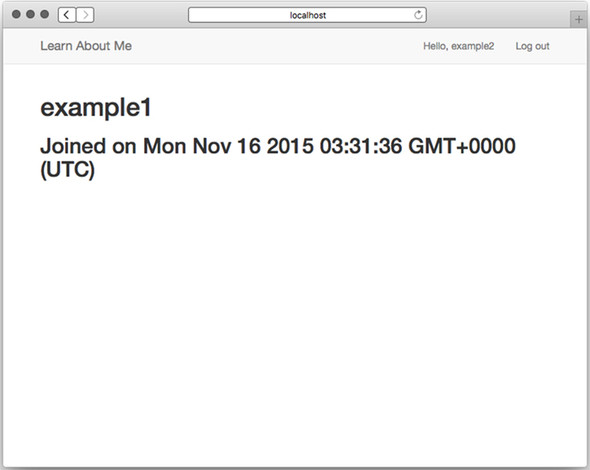
Now you can create and view user profiles, as shown in figure 8.5. Next, you’ll need to add login and logout so that users can edit their existing profiles. Let’s see how that works.
Figure 8.5. The LAM profile page
8.3. Authenticating users with Passport
In this chapter, you’ve been creating Learn About Me, a website that lets users create and browse profiles. You’ve implemented the homepage, the view profile page, and the sign-up page.
But right now, your app knows nothing special about your User models. They have no authentication, so they might as well be Cake models or Burrito models—you can view and create them just as you could another object. You’ll want to implement user authentication. To do this you’ll need a login page, the notion of a currently logged-in user (which you’ve seen as currentUser in a few places), and the actual verification of passwords.
For this, you’ll choose Passport. To quote its documentation, “Passport is authentication middleware for Node. It is designed to serve a singular purpose: authenticate requests.” You’ll be dropping this middleware into your application and writing a little code to wire up your users, and you’ll be in business. Passport takes away a lot of the headache.
Remember that Passport doesn’t dictate how you authenticate your users; it’s there only to provide helpful boilerplate code. It’s like Express in that way. In this chapter, we’ll look at how to use Passport to authenticate users stored in a Mongo database, but Passport also supports authentication with providers like Facebook, Google, Twitter, and over 100 more. It’s extremely modular and powerful!
8.3.1. Setting up Passport
When setting up Passport, you’ll need to do three things:
1. Set up the Passport middleware. This is pretty easy.
2. Tell Passport how to serialize and deserialize users. This is a short amount of code that effectively translates a user’s session into an actual user object.
3. Tell Passport how to authenticate users. In this case, this is the bulk of your code, which will instruct Passport how to talk to your Mongo database.
Let’s get started.
Setting up the Passport middleware
To initialize Passport, you’ll need to set up three official Express middlewares, a third-party middleware, and then two Passport middlewares. For your reference, they’re listed here:
- body-parser—parses HTML forms
- cookie-parser—handles the parsing of cookies from browsers and is required for user sessions
- express-session—Stores user sessions across different browsers
- connect-flash—Shows error messages
- passport.initialize—Initializes the Passport module (as you’ll learn)
- passport.session—Handles Passport sessions (as you’ll learn)
You’ve already included some of these middlewares: body-parser, cookie-parser, express-session, and connect-flash.
After those, make sure you require Passport, and then you’ll use two middleware functions it provides. Put these at the top of your application (and make sure you require them, too), as shown in the following listing.
Listing 8.19. Setting up the middleware for Passport (in app.js)
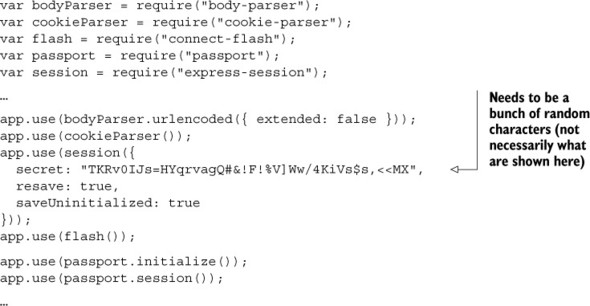
There are three options we pass to express-session:
- secret allows each session to be encrypted from the clients. This deters hackers from hacking into users’ cookies. As noted, it needs to be a bunch of random characters.
- resave is option required by the middleware. When it’s set to true, the session will be updated even when it hasn’t been modified.
- saveUninitialized is another required option. This resets sessions that are uninitialized.
Once you’ve set that up, you’ll be ready to move on to the next step: telling Passport how to extract users from the session.
Serializing and deserializing users
Passport needs to know how to serialize and deserialize users. In other words, you’ll need to translate a user’s session into an actual user object and vice-versa. Passport’s documentation does a better job describing it than I could:
In a typical web application, the credentials used to authenticate a user will only be transmitted during the login request. If authentication succeeds, a session will be established and maintained via a cookie set in the user’s browser.
Each subsequent request will not contain credentials, but rather the unique cookie that identifies the session. In order to support login sessions, Passport will serialize and deserialize user instances to and from the session.
To keep your code separated, you’ll be defining a new file called setuppassport.js. This file will export a single function that will, not surprisingly, set up this Passport stuff. Create setuppassport.js and require it from app.js, as shown in the listing that follows.
Listing 8.20. Requiring and using Passport setup (in app.js)
...

var setUpPassport = require("./setuppassport");

...

var app = express();
mongoose.connect("mongodb://localhost:27017/test");
setUpPassport();

...
Now, you can fill in your Passport setup.
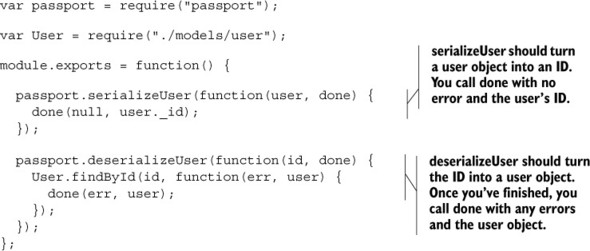
Because all of your user models have a unique _id property, you’ll use that as your translation. First, make sure you require your user model. Next, instruct Passport how to serialize and deserialize users from their ID, as in the next listing. This code can be placed before or after the Passport middleware; place it where you’d like.
Listing 8.21. Serializing and deserializing users (in setuppassport.js)
Now, once the session is dealt with, it’s time to do the hard part: the actual authentication.
The real authentication
The final part of Passport is setting up a strategy. Some strategies include authentication with sites like Facebook or Google; the strategy you’ll use is a local strategy. In short, that means the authentication is up to you, which means you’ll have to write a little Mongoose code.
First, require the Passport local strategy into a variable called LocalStrategy, as in the following listing.
Listing 8.22. Requiring the Passport LocalStrategy (in setuppassport.js)
...
var LocalStrategy = require("passport-local").Strategy;
...
Next, tell Passport how to use that local strategy. Your authentication code will run through the following steps:
1. Look for a user with the supplied username.
2. If no user exists, then your user isn’t authenticated; say that you’ve finished with the message “No user has that username!”
3. If the user does exist, compare their real password with the password you supply. If the password matches, return the current user. If it doesn’t, return “Invalid password.”
Now, let’s take that English and translate it into Passport code, as shown here.
Listing 8.23. Your Passport local strategy (in setuppassport.js)
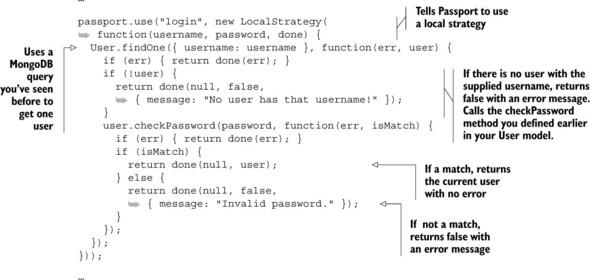
As you can see, you instantiate a LocalStrategy. Once you’ve done that, you call the done callback whenever you’re done! You’ll return the user object if it’s found and false otherwise.
The routes and the views
Finally, you need to set up the rest of the views. You still need these:
1. Logging in
2. Logging out
3. Profile editing (when you’re logged in)
Let’s start with logging in. The GET route will be really straightforward; just render the view, as follows.
Listing 8.24. GET /login (in routes.js)
...

router.get("/login", function(req, res) {
  res.render("login");
});
...
And this is what the view, at login.ejs, will look like. It’ll just be a simple form accepting a username and password and then sending a POST request to /login, as shown in the next listing.
Listing 8.25. views/login.ejs
<% include _header %> <h1>Log in</h1> <form action="/login" method="post"> <input name="username" type="text" class="form-control"placeholder="Username" required autofocus> <input name="password" type="password" class="form-control"
Next, you’ll define the handler for a POST to /login. This will deal with Passport’s authentication. Make sure to require it at the top of your file, as shown here.
Listing 8.26. Do the login (in routes.js)
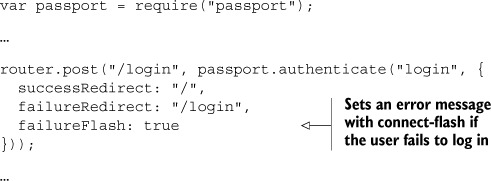
passport.authenticate returns a request handler function that you pass instead one you write yourself. This lets you redirect to the right spot, depending on whether the user successfully logged in.
Logging out is also trivial with Passport. All you have to do is call req.logout, a new function added by Passport, as shown in the next listing.
Listing 8.27. Logging out (in routes.js)
...

router.get("/logout", function(req, res) {
  req.logout();
  res.redirect("/");
});
...
Passport will populate req.user and connect-flash will populate some flash values. You added this code a while ago, but take a look at it now, because you’ll likely understand it better; see the following listing.
Listing 8.28. Passing data to views (in routes.js)
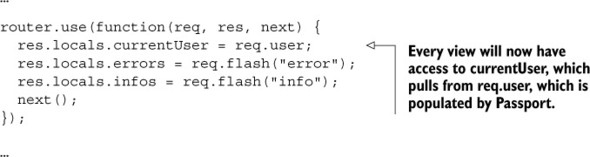
Now you can log in and out. All you have left to do is the edit page.
Next, let’s make some utility middleware that ensures users are authenticated. You won’t use this middleware yet; you’ll just define it so that other routes down the line can use it. You’ll call it ensureAuthenticated, and you’ll redirect to the login page if the user isn’t authenticated, as shown in the next listing.
Listing 8.29. Middleware for determining if the user is authenticated (in routes.js)
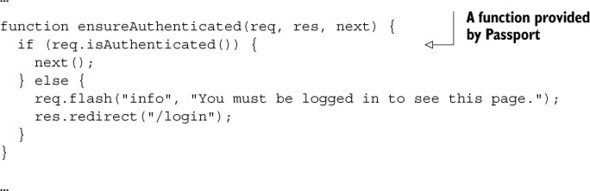
Now you’ll use this middleware to create the Edit profile page.
When you GET the edit page, you’ll just render the view, but you want to make sure the user is authenticated before you do that. All you have to do is pass ensure-Authenticated to your route, and then it’s business as usual. Here’s how you’d do that.
Listing 8.30. GET /edit (in router.js)

As you can see, everything is as you’ve seen before, except you place your middleware right before your request handler.
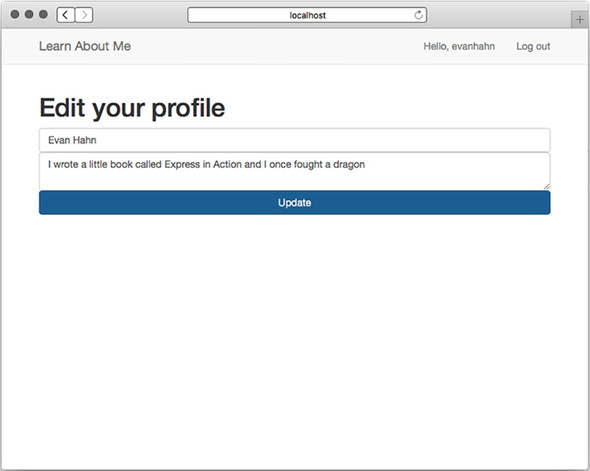
Let’s define the edit view now. This will be in edit.ejs, and it will be a simple form that allows users to change their display name and biography; see the next listing.
Listing 8.31. views/edit.ejs
<% include _header %> <h1>Edit your profile</h1> <form action="/edit" method="post"> <input name="displayname" type="text" class="form-control"
Now, handle that form with a POST handler. This will also ensure authentication with ensureAuthenticated, and it will otherwise update your model and save it to your Mongo database, as shown in the following listing.
Listing 8.32. POST /edit (in routes.js)
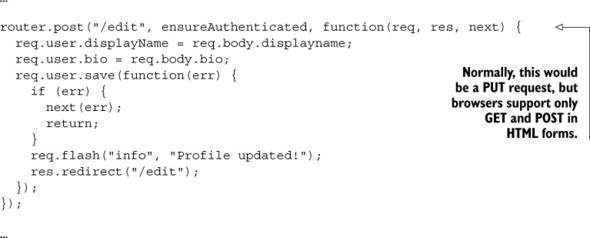
There’s nothing fancy here; all you do is update the user in your Mongo database. Remember that Passport populates req.user for you.
Suddenly, you have your profile editor, as shown in figure 8.6.
Figure 8.6. Profile editor
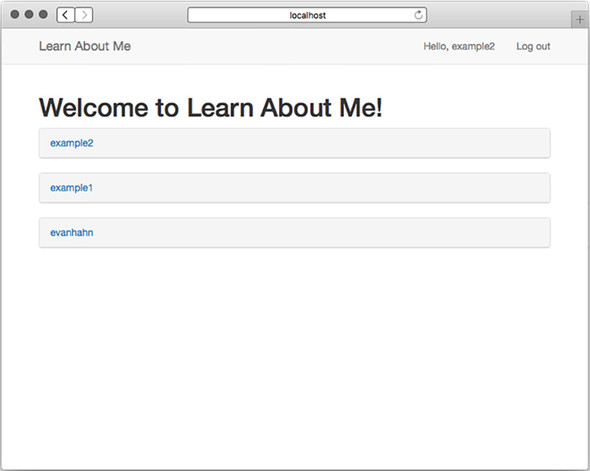
Now that you can edit profiles, go ahead and create some fake users and edit their profiles. Check out Learn About Me, your mostly finished app, in figure 8.7.
Figure 8.7. The LAM homepage
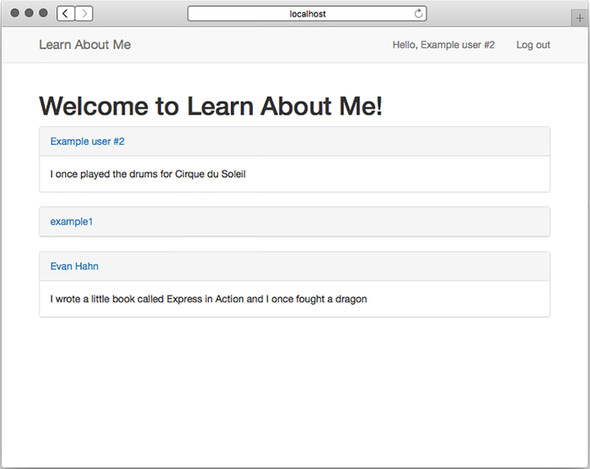
And now you have a real app!
8.4. Summary
- Mongo is a database that lets you store arbitrary documents.
- Mongoose is an official Mongo library for Node. It works well with Express.
- To securely create user accounts, you need to make sure you never store passwords directly. You’ll use the bcrypt module to help us do this.
- You’ll use Passport to authenticate users, making sure they’re logged in before they can perform certain operations.