Table of Contents for
Express in Action: Writing, building, and testing Node.js applications
 Express in Action: Writing, building, and testing Node.js applications
Published by
Manning Publications, 2016
Express in Action: Writing, building, and testing Node.js applications
Published by
Manning Publications, 2016
- Cover
- Express in Action: Writing, building, and testing Node.js applications
- Copyright
- Brief Table of Contents
- Table of Contents
- Preface
- Acknowledgments
- About this Book
- About the Cover Illustration
- Part 1. Intro
- Chapter 1. What is Express?
- Chapter 2. The basics of Node.js
- Chapter 3. Foundations of Express
- Part 2. Core
- Chapter 4. Middleware
- Chapter 5. Routing
- Chapter 6. Building APIs
- Chapter 7. Views and templates: Pug and EJS
- Part 3. Express in Context
- Chapter 8. Persisting your data with MongoDB
- Chapter 9. Testing Express applications
- Chapter 10. Security
- Chapter 11. Deployment: assets and Heroku
- Chapter 12. Best practices
- Appendix. Other helpful modules
- Index
- List of Figures
- List of Listings
Chapter 7. Views and templates: Pug and EJS
This chapter covers
- Express’s view system
- The EJS templating language
- The Pug templating language
In the previous chapters, you learned what Express is, how Express works, and how to use its routing feature. Starting in this chapter, you’re going to stop learning about Express.
Well, okay, not exactly. You’ll still be using Express to power your applications, but as we’ve discussed so far, Express is unopinionated and requires a lot of third-party accessories to make a full-fledged application. In this chapter and beyond, you’ll start digging into some of these modules, learning how they work, and how they can make your applications lovely.
In this chapter we’ll talk about views, which give you a convenient way to dynamically generate content (usually HTML). You’ve seen a view engine before; EJS has helped you inject special variables into HTML. But although EJS provided a conceptual understanding of views, we never really explored everything that Express (and the other view engines) had to offer. You’ll learn the many ways to inject values into templates; see the features of EJS, Pug, and other Express-compatible view engines; and explore subtleties in the world of views. Let’s get started.
Jade Now Pug
Pug was originally called Jade, but was changed for legal reasons. The project has been renamed, but Jade is still used in a lot of code. During the transition period, you’ll have to remember both names.
7.1. Express’s view features
Before I begin, let me define a term I’ll be using a lot: view engine. When I say view engine, I basically mean “module that does the actual rendering of views.” Pug and EJS are view engines, and there are many others.
American singer-songwriter India Arie has an excellent song called “Brown Skin.” About brown skin she sings, “I can’t tell where yours begins, I can’t tell where mine ends.” Similarly, when I first started using Express views, I was confused where Express ended and the view engines began. Luckily, it’s not too difficult.
Express is unopinionated about which view engine you use. As long as the view engine exposes an API that Express expects, you’re good to go. Express offers a convenience function to help you render your views; let’s take a look.
7.1.1. A simple view rendering
You’ve seen simple examples of how to render views before, but in case you need a refresher, the following listing provides an app that renders a simple EJS view.
Listing 7.1. Simple view rendering example
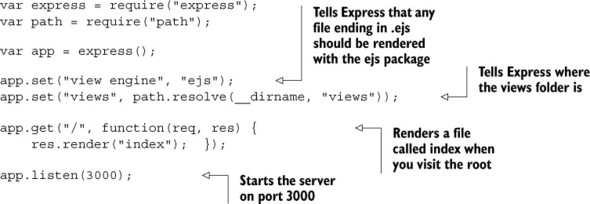
Once you’ve done an npm install of EJS (and Express, of course), this should work. When you visit the root, it’ll find views/index.ejs and render it with EJS. You’ll do something like this 99% of the time: one view engine all the time. But things can get more complicated if you decide to mix things up.
7.1.2. A complicated view rendering
The next listing is a complex example of rendering a view from a response, using two view engines: Pug and EJS. This should illustrate how crazy things can get.
Listing 7.2. Complex rendering example
var express = require("express");
var path = require("path");
var ejs = require("ejs");

var app = express();

app.locals.appName = "Song Lyrics";

app.set("view engine", "jade");
app.set("views", path.resolve(__dirname, "views"));
app.engine("html", ejs.renderFile);

app.use(function(req, res, next) {
  res.locals.userAgent = req.headers["user-agent"];
  next();
});

app.get("/about", function(req, res) {
  res.render("about", {
    currentUser: "india-arie123"
  });
});

app.get("/contact", function(req, res) {
  res.render("contact.ejs");
});

app.use(function(req, res) {
  res.status(404);
  res.render("404.html", {
    urlAttempted: req.url
  });
});

app.listen(3000);
Here’s what happens when you call render in these three cases. Although it looks complicated at a high level, it is only a number of straightforward steps:
1. Express builds up the context object every time you call render. These context objects will get passed to the view engines when it’s time to render. These are effectively the variables available to views.
It first adds all the properties from app.locals, an object available to every request. Then it adds all the properties in res.locals, overwriting anything added from app.locals if it was present. Finally, it adds the properties of the object passed to render (once again overwriting any previously added properties). At the end of the day, if you visit /about, you’ll create a context object with three properties: appName, userAgent, and currentUser. /contact will only have appName and userAgent in its context; the 404 handler will have appName, userAgent, and urlAttempted.
2. You decide whether view caching is enabled. View caching might sound like Express caches the entire view-rendering process, but it doesn’t; it caches only the lookup of the view file and its assignment to the proper view engine. For example, it will cache the lookup of views/my_view.ejs and figure out that this view uses EJS, but it won’t cache the actual render of the view. A bit misleading.
It decides whether view caching is enabled in two ways, only one of which is documented.
- The documented way —There’s an option that you can set on the app. If app.enabled("view cache") is truthy, Express will cache the lookup of the view. By default, this is disabled in development mode and enabled in production, but you can change it yourself with app.enable("view cache") or app.disable("view cache").
- The undocumented way —If the context object generated in the previous step has a truthy property called cache, then caching will be enabled for that view. This overrides any application settings. This enables you to cache on a view-by-view basis, but I think it’s more important to know that it’s there so that you can avoid doing it unintentionally.
3. You look up where the view file resides and what view engine to use. In this case, you want to turn about into /path/to/my/app/views/about.jade + Pug and contact.ejs into /path/to/my/app/views/contact.ejs + EJS. The 404 handler should associate 404.html with EJS by looking at your earlier call to app.engine. If you’ve already done this lookup and view caching is enabled, you’ll pull from the cache and skip to the final step. If not, you’ll continue on.
4. If you don’t supply a file extension (as with about in the previous step) Express appends the default you specify. In this case, “about” becomes about.jade but contact.ejs and 404.html stay the same. If you don’t supply an extension and don’t supply a default view engine, Express will throw an error. Otherwise, it’ll continue on.
5. Express looks at your file extension to determine which engine to use. If it matches any engine you’ve already specified, it will use that. In this case, it will match Pug for about.jade because it’s the default. contact.ejs will try to require("ejs") based on the file extension. You explicitly assigned 404.html to EJS’s renderFile function, so it will use that.
6. Express looks the file up in your views directory. If it doesn’t find the file, it throws an error, but it will continue if it finds something.
7. Express caches all the lookup logic if it should. If view caching is enabled, you cache all this lookup logic for next time.
8. You render the view. This calls out to the view engine and is literally one line in Express’s source code. This is where the view engine takes over and produces actual HTML (or whatever you’d like).
This turns out to be a bit hairy, but the 99% case is pick one view engine and stick with it, so you’re likely to be shielded from most of this complexity.
Express’s default content type is HTML, so if you don’t do anything special, res.render will render your responses and send them to the client as HTML. Most of the time, I find this to be enough. But it doesn’t have to be this way. You can render plain text, XML, JSON, or whatever you want. Just change the content-type by changing the parameter to res.type:
app.get("/", function(req, res) {
  res.type("text");
  res.render("myview", {
    currentUser: "Gilligan"
  });
});
There are often better ways to render some of these things—res.json, for example, should be used instead of a view that renders JSON—but this is another way to do it.
7.1.3. Making all view engines compatible with Express: Consolidate.js
We’ve talked about view engines like EJS and Pug, but there are plenty more that you might want to choose. You might have heard of Mustache, Handlebars, or Underscore.js’s templating. You might also want to use a Node port of other templating languages like Jinja2 or HAML.
Many of these view engines, such as EJS and Pug, will work with Express out of the box. Others don’t have an Express-compatible API and need to be wrapped in something Express can understand.
Enter Consolidate.js (https://github.com/tj/consolidate.js), a library that wraps a ton of view engines to be compatible with Express. It has support for the classics like EJS, Pug, Mustache, Handlebars, and Hogan. It supports a ton of others, too, in case you’re using a more obscure/hipster view engine. You can see the whole list of supported engines on the project’s page.
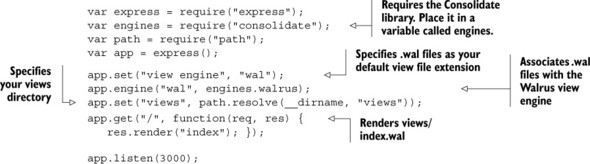
Let’s say you’re using Walrus, a JavaScript view engine that’s not compatible with Express out of the box. You’ll need to use Consolidate to make this compatible with Express.
After installing Walrus and Consolidate (with npm install walrus consolidate), you’ll be able to use Walrus with Express, as shown in the next listing.
Listing 7.3. Rendering with Walrus
I recommend using Consolidate instead of trying to wrangle non-compatible view engines yourself.
7.2. Everything you need to know about EJS
One of the simplest and most popular view engines out there is called EJS (Embedded JavaScript.) It can do templating for simple strings, HTML, plain text—you name it. It lightly integrates itself with whatever tool you use. It works in the browser and Node. If you’ve ever used ERB from the Ruby world, you’ll find that EJS is very similar. In any case, it’s pretty simple.
Two Versions of EJS
There are two versions of EJS maintained by two different groups of people. They’re similar but not identical. The one we’ll be using is by TJ Holowaychuck, the creator of Express. If you look for a package called ejs on npm, this is the one you’ll find. But if you visit http://embeddedjs.com/, you’ll find a very similar library with the same name. A lot of the functionality is the same, but it’s a different library, last updated in 2009. It doesn’t work in Node, and it has some debatably sexist sentences in its documentation. Avoid it!
7.2.1. The syntax of EJS
EJS can be used for templating HTML, but it can be used for anything. Look at a short bit of EJS in the following listing, and see what that looks like when you render it.
Listing 7.4. An EJS template
Hi <%= name %>! You were born in <%= birthyear %>, so that means you're<%= (new Date()).getFullYear() - birthyear %> years old. <% if (career) { -%> <%=: career | capitalize %> is a cool career! <% } else { -%> Haven't started a career yet? That's cool. <% } -%> Oh, let's read your bio: <%- bio %> See you later!
If you pass the following context to EJS
{
  name: "Tony Hawk",
  birthyear: 1968,
  career: "skateboarding",
  bio: "<b>Tony Hawk</b> is the coolest skateboarder around."
}
then you’ll get the following result (as of 2015, anyway):
Hi Tony Hawk!
You were born in 1968, so that means you're 47 years old.
Skateboarding is a cool career!
Oh, let's read your bio: Tony Hawk is the coolest skateboarder around. See you later!
This little example shows four major features of EJS: JavaScript that’s evaluated, escaped, and printed; JavaScript that’s evaluated but not printed; JavaScript that’s evaluated and printed (but not escaped for HTML); and filters.
You can print the results of JavaScript expressions in two ways: <% expression %> prints the result of the expression; <%- expression %> prints the result of the expression and escapes any HTML entities that might be inside. In general, I’d recommend using the latter option when you can, because it’s more secure.
You can also run arbitrary JavaScript and keep it from being printed. This is useful for things like loops and conditionals, as you saw in the previous example. This is done with <% expression %>. As you can see, you can use brackets to group loops and conditionals across multiple lines. You can also avoid adding extraneous newlines with <% expression -%> (note the hyphen at the end).
Appending a colon (:) to an output will allow filters to be applied. Filters take the output of an expression and filter it to change the output. The previous example used the capitalization filter, but there are plenty of others, and you can define your own (as you’ll see in just a moment).
Note
If you want to play around with EJS, I made Try EJS (https://evanhahn.github.io/try-EJS/), a simple browser app. I’ll admit it’s not polished, but it’s sufficient for just messing with EJS in your browser and seeing the rendered output.
Including other EJS templates within your own
EJS also lets you include other EJS templates. This is incredibly useful because you can add headers and footers to pages and split out common widgets, among other reasons. If you find yourself writing the same code several times, it might be time to use EJS’s include feature.
Let’s look at two examples. First, let’s imagine you have pages that all share the same header and footer. Rather than duplicate everything over and over again, you could create a header EJS file, a footer EJS file, and your pages that go between the header and footer. The following listing shows how a header file (saved at header.ejs) might look.
Listing 7.5. A header EJS file
<!DOCTYPE html>
<html>
<head>
  <meta charset="utf-8">
  <link rel="stylesheet" href="/the.css">

  <title><%= appTitle %>/title>
</head>
<body>
  <header>
    <h1><%= appTitle %>
  </header>
Then, you’d define a footer in footer.ejs, as shown in the next listing.
Listing 7.6. A footer EJS file
<footer>
  All content copyright <%= new Date().getFullYear() %> <%= appName %>.
</footer>
</body>
</html>
Now that you’ve defined your header and footer, you can include it in subpages pretty easily, as shown in the next listing.
Listing 7.7. Including a header and footer from EJS
<% include header %>
  <h1>Welcome to my page!</h1>
  <p>This is a pretty cool page, I must say.</p>
<% include footer %>
You use include to, well, include other EJS files. Notice that you don’t use <%= ... %> or <%- ... %>; everything is finally printed by EJS, not you.
You could also imagine using this to build a widget. Let’s say you had a widget that showed user profiles. Given an object called user, this template would spit out HTML for that user. The listing that follows shows how userwidget.ejs might look.
Listing 7.8. A user widget in userwidget.ejs
<div class="user-widget">
  <img src="<%= user.profilePicture %>">
  <div class="user-name"><%= user.name %></div>
  <div class="user-bio"><%= user.bio %></div>

</div>
Now you can use that template when rendering the current user
<% user = currentUser %>
<% include userwidget %>
or you can use it when rendering a list of users.
<% userList.forEach(function(user) { %>
  <% include userwidget %>
<% } %>
EJS’s include is versatile; it can be used to create templates or to render subviews many times.
Adding your own filters
There are 22 built-in filters, ranging from mathematic operations to array/string reversal to sorting. They’re often enough for your needs, but sometimes you’ll want to add your own.
Assuming you’ve required EJS into a variable called ejs, you simply add a property to ejs.filters. If you’re frequently summing arrays, you might find it useful to make your own custom array summer filter. The next listing shows how you might add such a filter.
Listing 7.9. Adding an EJS filter to sum an array
ejs.filters.sum = function(arr) {
  var result = 0;
  for (var i = 0; i < arr.length; i ++) {
    result += arr[i];
  }
  return result;
};
Now you can use it just like any other filter.
<%=: myarray | sum %>
Pretty simple. There are lots of filters you could dream up—code them as you need them.
7.3. Everything you need to know about Pug
View engines like Handlebars, Mustache, and EJS don’t completely replace HTML—they augment it with new features. This is really nice if you have designers, for example, who’ve already learned HTML and don’t want to learn a whole new language. It’s also useful for non-HTML-like templating solutions. If you’re in this sort of situation, Pug is probably the wrong choice.
But Pug offers other features. It allows you to write far fewer lines of code, and the lines you write are much prettier. Doctypes are easy; tags are nested by indentation, not close tags. It has a number of EJS-style features built into the language, like conditionals and loops. It’s more to learn but more powerful.
7.3.1. The syntax of Pug
Languages like HTML are nested. There’s a root element (<html>) and then various sub-elements (like <head> and <body>), which each have their own sub-elements ... and so on. HTML and XML choose to have an open (<a>) and a close (</a>) for each element.
Pug takes a different approach by using indentation and a different syntax for HTML. The next listing shows a simple web page that uses Pug.
Listing 7.10. A simple Pug example
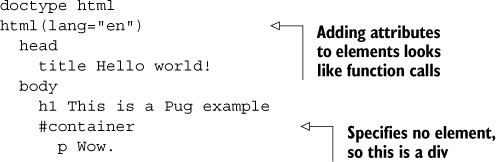
This listing turns into the following HTML.
Listing 7.11. Listing 7.10 rendered as HTML
<!DOCTYPE html>
<html lang="en">
  <head>
    <title>Hello world!</title>
  </head
  <body>
    <h1>This is a Pug example</h1>
    <div id="container">
      <p>Wow.</p>
    </div>
  </body>
</html>
You can play around with Pug on the project’s homepage (http://jade-lang.com/)—try experimenting to see what happens!
7.3.2. Layouts in Pug
Layouts are an important feature of any templating language. They allow you to include, in one form or another, other HTML. This lets you define your header and footer once and then include them on pages where you need them.
A very common case is to define a layout file for your pages. That way, everything can have a consistent header and footer while allowing the content to change per page.
As a first step, you define the master layout. This is the Pug common to every page, like a header and footer. This master layout defines empty blocks that are filled in by any pages that use this master layout. The following listing is an example.
This simple layout file will be shared by all of your pages.
Listing 7.12. A simple layout file for Pug
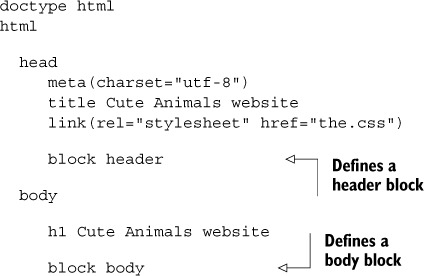
Notice how you defined two blocks with block header and block body. These will get filled in by other Pug files that use this layout. Save that file into layout.jade. You can use these in real pages that use this layout, like in the next listing.
Listing 7.13. Using a Pug layout file
extends layout.jade
block body
  p Welcome to my cute animals page!
That will render the following HTML.
Listing 7.14. The output of using a Pug layout
<!DOCTYPE html>
<html>
  <head>
    <meta charset="utf-8">
    <title>Cute Animals website</title>
    <link rel="stylesheet" href="the.css">
  </head>
  <body>
    <h1>Cute Animals website</h1>
    <p>Welcome to my cute animals page!</p>
  </body>
</html>
Notice that you put something in a block when you extend a layout and it’s magically inserted. Also notice that you don’t have to use a block just because it’s defined—you never touch the header block because you don’t need to.
If you wanted to, you could define another page that uses this layout very easily, as shown in the next listing.
Listing 7.15. Using a Pug layout file again
extends layout.jade
block body
  p This is another page using the layout.
  img(src="cute_dog.jpg" alt="A cute dog!")
  p Isn't that a cute dog!
Layouts let you separate out common components, which means you don’t have to write the same code over and over again.
7.3.3. Mixins in Pug
Pug has another cool feature called mixins which are functions you define in your Pug file to cut down on repetitive tasks.
Let’s reimplement the user widget example from the EJS section. You’ll make a widget that’s given an object called user and returns an HTML widget for that user. The following listing shows how you might do that.
Listing 7.16. A user widget mixin
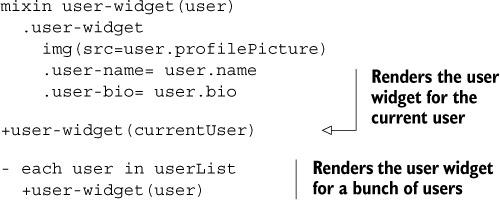
This would render the user widget for the currentUser and for every other user in the userList. No duplicated code for you!
That’s all that we’ll look at with Pug. For more about Pug’s syntax, check out Pug’s reference documentation at http://jade-lang.com/reference/.
7.4. Summary
- Express has a view system that can dynamically render HTML pages. You call res.render to dynamically render a view with some variables. Before doing this, you must configure Express to use the right view engine in the right folder.
- The EJS templating language is a light layer on top of HTML that adds the ability to dynamically generate HTML with pieces of JavaScript.
- The Pug templating language is a reimagining of HTML that lets you dynamically render HTML with a whole new language. It attempts to remove verbosity and typing.