Table of Contents for
Express in Action: Writing, building, and testing Node.js applications
 Express in Action: Writing, building, and testing Node.js applications
Published by
Manning Publications, 2016
Express in Action: Writing, building, and testing Node.js applications
Published by
Manning Publications, 2016
- Cover
- Express in Action: Writing, building, and testing Node.js applications
- Copyright
- Brief Table of Contents
- Table of Contents
- Preface
- Acknowledgments
- About this Book
- About the Cover Illustration
- Part 1. Intro
- Chapter 1. What is Express?
- Chapter 2. The basics of Node.js
- Chapter 3. Foundations of Express
- Part 2. Core
- Chapter 4. Middleware
- Chapter 5. Routing
- Chapter 6. Building APIs
- Chapter 7. Views and templates: Pug and EJS
- Part 3. Express in Context
- Chapter 8. Persisting your data with MongoDB
- Chapter 9. Testing Express applications
- Chapter 10. Security
- Chapter 11. Deployment: assets and Heroku
- Chapter 12. Best practices
- Appendix. Other helpful modules
- Index
- List of Figures
- List of Listings
Chapter 3. Foundations of Express
This chapter covers
- The four main features of Express:
- Middleware for letting a request flow through multiple headers
- Routing for handling a request at a specific spot
- Convenience methods and properties
- Views for dynamically rendering HTML
As you saw in the previous chapter, Node.js comes with a number of built-in modules, one of which is called http. Node’s http module allows you to build an HTTP server that responds to HTTP requests from browsers (and more). In short, the http module lets you build websites with Node.
Although you can build full web servers with nothing but Node’s built-in http module, you might not want to. As we discussed in chapter 1 and as you saw in chapter 2, the API exposed by the http module is pretty minimal and doesn’t do a lot of heavy lifting for you.
That’s where Express comes in: it’s a helpful third-party module (that is, not bundled with Node). When you get right down to it, Express is an abstraction layer on top of Node’s built-in HTTP server. You could, in theory, write everything with plain vanilla Node and never touch Express. But as you’ll see, Express smooths out a lot of the difficult parts and says “Don’t worry; you don’t need to deal with this ugly part. I’ll handle this!” In other words, it’s magic!
In this chapter, we’ll build on your Node knowledge and make an effort to really understand Express. We’ll talk about its relationship to bare Node, discuss the concepts of middleware and routing, and teach you about the other nice features Express provides. In future chapters, we’ll go more in depth; this chapter will give a code-heavy overview of the framework.
At a high level, Express provides four major features, which you’ll be learning about in this chapter:
- Middleware —In contrast to vanilla Node, where your requests flow through only one function, Express has a middleware stack, which is effectively an array of functions.
- Routing —Routing is a lot like middleware, but the functions are called only when you visit a specific URL with a specific HTTP method. For example, you could only run a request handler when the browser visits yourwebsite.com/about.
- Extensions to request and response objects —Express extends the request and response objects with extra methods and properties for developer convenience.
- Views —Views allow you to dynamically render HTML. This both allows you to change the HTML on the fly and to write the HTML in other languages.
You’ll build a simple guestbook in this chapter to get a feel for these four features.
3.1. Middleware
One of Express’s biggest features is called middleware. Middleware is very similar to the request handlers you saw in vanilla Node (accepting a request and sending back a response), but middleware has one important difference: rather than having just one handler, middleware allows for many to happen in sequence.
Middleware has a variety of applications, which we’ll explore in this section. For example, one middleware could log all requests and then continue onto another middleware that sets special HTTP headers for every request, which could then continue farther. Although you could do this with one large request handler, you’ll see that it’s often preferable to decompose these disparate tasks into separate middleware functions. If this is confusing now, don’t worry—we’ll have some helpful diagrams and get into some concrete examples.
Analogs in other frameworks
Middleware isn’t unique to Express; it’s present in a lot of other places in different forms. Middleware is present in other web application frameworks like Python’s Django or PHP’s Laravel. Ruby web applications also have this concept, often called Rack middleware. This concept may not be radically new to you, though Express has its own flavor of middleware.
Let’s start rewriting the Hello World application using Express’s middleware feature. You’ll see that it has far fewer lines of code, which can help speed up development time and reduce the number of potential bugs.
3.1.1. Hello World with Express
Let’s set up a new Express project. Make a new directory and put a file called package.json inside. Recall that package.json is how you store information about a Node project. It lists simple data like the project’s name and author, and it contains information about its dependencies. Start with a skeleton package.json, as shown in the following listing.
Listing 3.1. A bare-bones package.json
{
  "name": "hello-world",
  "author": "Your Name Here!",
  "private": true,
  "dependencies": {}
}
Install Express and save it to your package.json:
npm install express --save
Running this command will find Express in the directory of third-party Node packages and fetch the latest version. It will put it in a folder called node_modules. Adding --save to the installation command will save it under the dependencies key of package.json. After running this command, your package.json will look something like the next listing.
Listing 3.2. package.json after installing Express with the --save flag
{
  "name": "hello-world",
  "author": "Your Name Here!",
  "private": true,
  "dependencies": {
    "express": "^5.0.0"
  }
}
All right, now you’re ready. Save this file into app.js, as in the following listing.
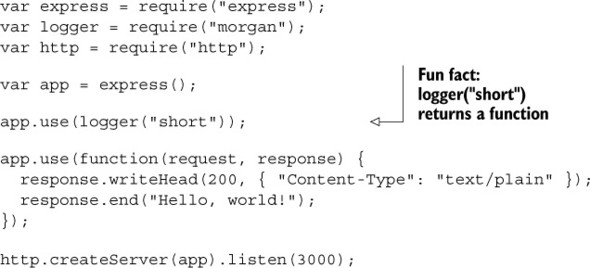
Listing 3.3. Hello, World with Express
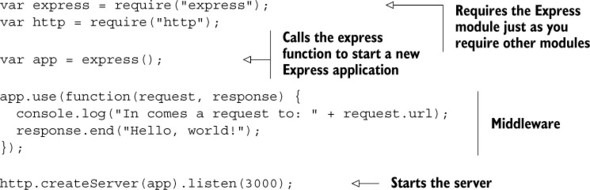
Now let’s step through this. First, you require Express. You then require Node’s http module just as you did before. You’re ready.
Then you make a variable called app as you did before, but instead of creating the server, you call express(), which returns a request handler function. This is important: it means that you can pass the result into http.createServer just like before.
Remember the request handler we had in the previous chapter, with vanilla Node? It looked like this:
function requestHandler(request, response) {
  console.log("In comes a request to: " + request.url);
  response.end("Hello, world!");
}
We have a similar function in this example (in fact, I copy-pasted it). It’s also passed a request and a response object, and you interact with them in the same way.
Next, you create the server and start listening. Recall that http.createServer took a function before, so guess what—app is just a function. It’s an Express-made request handler that starts going through all the middleware until the end. At the end of the day, it’s just a request handler function like before.
Note
You’ll see people using app.listen(3000), which defers to http.create-Server.app.listen is just shorthand, like how you’ll shorten request to req and response to res in following chapters.
3.1.2. How middleware works at a high level
In Node’s HTTP server, every request goes through one big function. This looks like the following listing.
Listing 3.4. A Node request handler function
function requestHandler(request, response) {
  console.log("In comes a request to: " + request.url);
  response.end("Hello, world!");
}
In a world without middleware, you’d find yourself having one master request function that handles everything. If you were to draw the flow of your application, it might look like figure 3.1.
Figure 3.1. A request without middleware

Every request goes through just one request handler function, which eventually generates the response. That’s not to say that the master handler function can’t call other functions, but at the end of the day, the master function responds to every request.
With middleware, rather than having your request pass through one function you write, it passes through an array of functions you write called a middleware stack. It might look like figure 3.2.
Figure 3.2. A request with middleware
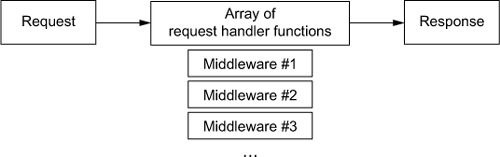
Okay, so Express lets you execute an array of functions instead of only one. What might some of these functions be? And why might you want this?
Let’s take another look at an example from chapter 1: an application that authenticates users. If they’re authenticated, it shows them secret information. All the while, your server is logging every request that comes into your server, authenticated or not.
This app might have three middleware functions: one that does logging, one that does authentication, and one that responds with secret information. The logging middleware will log every request and continue on to the next middleware; the authentication middleware will continue only if the user is authorized; the final middleware will always respond, and it won’t continue on because nothing follows it.
There are two possible ways a request could flow through this simple app, as shown in figure 3.3.
Figure 3.3. Two requests flowing through middleware functions. Note that middleware sometimes continues on but sometimes responds to requests.
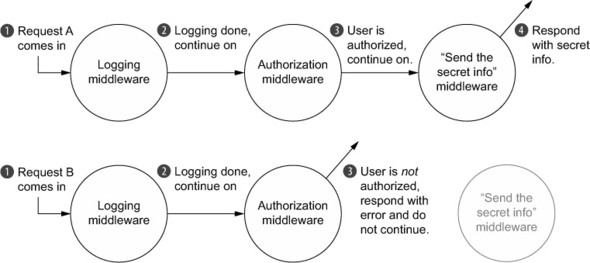
Each middleware function can modify the request or the response, but it doesn’t always have to. Eventually, some middleware should respond to the request. It could be the first one; it could be the last. If none of them respond, then the server will hang and the browser will sit alone, without a response.
This is powerful because you can split your application into many small parts, rather than having one behemoth. These components become easier to compose and reorder, and it’s also easy to pull in third-party middleware.
You’ll see examples that will (hopefully!) make all of this clearer.
3.1.3. Middleware code that’s passive
Middleware can affect the response, but it doesn’t have to. For example, the logging middleware from the previous section doesn’t need to send different data—it only needs to log the request and move on.
Let’s start by building a completely useless middleware function and then move on from there. The next listing shows what an empty middleware function looks like.
Listing 3.5. Empty middleware that does nothing

When you start a server, you start at the topmost middleware and work your way to the bottom. So if you wanted to add simple logging to our app, you could do it, as shown next.
Listing 3.6. Logging middleware
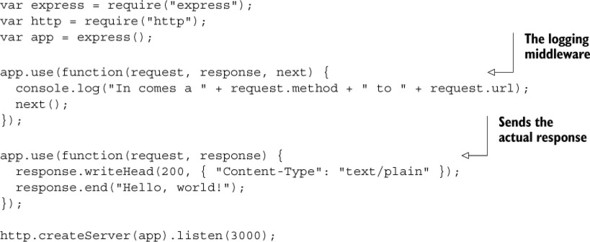
Run this app and visit http://localhost:3000. In the console, you’ll see that your server is logging your requests (refresh to see). You’ll also see your “Hello, world!” in the browser.
Note that anything that works in the vanilla Node server also works in middleware. For example, you can inspect request.method in a vanilla Node web server, without Express. Express doesn’t get rid of it—it’s right there as it was before. If you want to set the statusCode of the response, you can do that too. Express adds some more things to these objects, but it doesn’t remove anything.
The previous example shows middleware that doesn’t change the request or the response—it logs the request and always continues. Although this kind of middleware can be useful, middleware can also change the request or response objects.
3.1.4. Middleware code that changes the request and response
Not all middleware should be passive, though—the rest of the middleware from our example doesn’t work that way; they actually need to change the response.
Let’s try writing the authentication middleware that we mentioned before. We’ll choose a weird authentication scheme for simplicity: you’re only authenticated if you visit on an even-numbered minute of the hour (which would be 12:00, 12:02, 12:04, 12:06, and so on). Recall that you can use the modulo operator (%) to help determine whether a number is divisible by another. You add this middleware to your application in the next listing.
Listing 3.7. Adding fake authentication middleware

When a request comes in, it will always go through the middleware in the same order in which you use them. First, it will start with the logging middleware. Then, if you’re visiting in an even-numbered minute, you’ll continue on to the next middleware and see the secret information. But if you’re visiting at any of the other minutes of the hour, you’ll stop and never continue on.
3.1.5. Third-party middleware libraries
Like many parts of programming, it’s often the case that someone else has done what you’re trying to do. You can write your own middleware, but it’s common to find that the functionality you want is already available in somebody else’s middleware. Let’s look at a couple of examples of helpful third-party middleware.
Morgan: logging middleware
Let’s remove your logger and use Morgan, a nice logger for Express that has far more features, as shown in listing 3.8. Loggers are pretty helpful for a number of reasons. First, they’re one way to see what your users are doing. This isn’t the best way to do things like marketing analytics, but it’s really useful when your app crashes for a user and you’re not sure why. I also find it helpful when developing—you can see when a request comes into your server. If something is wrong, you can use Morgan’s logging as a sanity check. You can also see how long your server takes to respond to do performance analysis.
Run npm install morgan --save and give this a try (saving it into app.js again).
Listing 3.8. Using Morgan for logging (in app.js)
Visit http://localhost:3000 and you’ll see some logging! Thanks, Morgan.
Express’s static middleware
There’s more middleware out there than Morgan. It’s common for web applications to need to send static files over the wire. These include things like images or CSS or HTML—content that isn’t dynamic.
express.static ships with Express and helps you serve static files. The simple act of sending files turns out to be a lot of work, because there are a lot of edge cases and performance considerations to think about. Express to the rescue!
Let’s say you want to serve files out of a directory called public. The next listing shows how you might do that with Express’s static middleware.
Listing 3.9. Using express.static (in app.js)
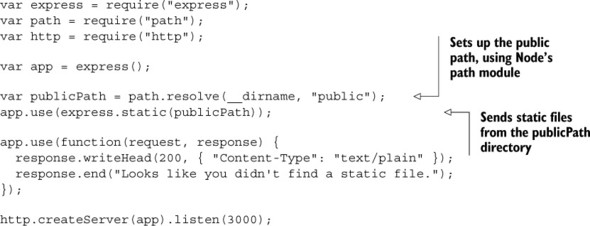
Now, any file in the public directory will be shown. You can put anything in there that you please and the server will send it. If no matching file exists in the public folder, it’ll go on to the next middleware, and say “Looks like you didn’t find a static file.” If a matching file is found, express.static will send it off and stop the middleware chain.
What’s all that business about path.resolve? Why can’t you just say /public? The short answer is that you could, but it’s not cross-platform.
On Mac and Linux, you want this directory:
/public
But on Windows, you want this directory:
\public
Node’s built-in path module will make sure that things run smoothly on Windows, Mac, and Linux.
Finding more middleware
I’ve shown Morgan and Express’s static middleware, but there are more. Here are a few other helpful ones:
- connect-ratelimit —Lets you throttle connections to a certain number of requests per hour. If someone is sending numerous requests to your server, you can start giving them errors to stop them from bringing your site down.
- Helmet —Helps you add HTTP headers to make your app safer against certain kinds of attacks. We’ll explore it in later chapters. (I’m a contributor to Helmet, so I definitely recommend it!)
- cookie-parser —Parses browser cookies.
- response-time —Sends the X-Response-Time header so you can debug the performance of your application.
We’ll explore many of these middleware options further in the next chapter.
If you’re looking for more middleware, you’ll have luck searching for “Express middleware,” but you should also search for “Connect middleware.” There’s another framework called Connect that’s like Express but only does middleware. Connect middleware is compatible with Express, so if the “Express middleware” search isn’t fruitful, try searching for “Connect middleware.”
3.2. Routing
Routing is a way to map requests to specific handlers depending on their URL and HTTP verb. You could imagine having a homepage and an about page and a 404 page. Routing can do all of this. I think this is better explained with code than with English, so look at the following listing.
Listing 3.10. Express routing example
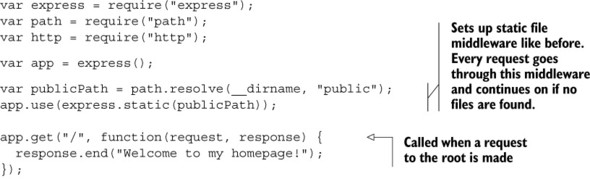
After the basic requires, you add your static file middleware (as you’ve seen before). This will serve any files in a folder called public.
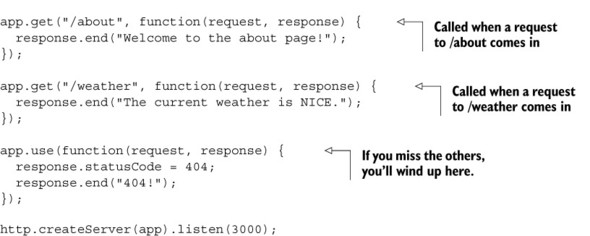
The three calls to app.get are Express’s magical routing system. They could also be app.post, which respond to POST requests, or PUT, or any of the HTTP verbs. (We’ll talk more about these other HTTP verbs in later chapters.) The first argument is a path, like /about or /weather or simply /, the site’s root. The second argument is a request handler function similar to what you saw earlier in the middleware section.
They’re the same request handler functions you’ve seen before. They work just like middleware; it’s a matter of when they’re called.
These routes can get smarter. In addition to matching fixed routes, they can match more complex ones (imagine a regular expression or more complicated parsing), as shown in the next listing.
Listing 3.11. Grabbing data from routes

It’s no coincidence that this who is the specified part in the first route. Express will pull the value from the incoming URL and set it to the name you specify.
Restart your server and visit localhost:3000/hello/earth for the following message: Hello, earth. Note that this won’t work if you add something after the slash. For example, localhost:3000/hello/entire/earth will give a 404 error.
It’s likely that you’ve seen this sort of behavior all over the internet. You’ve likely seen websites where you can visit a URL for a specific user. For example, if your username were ExpressSuperHero, the URL for your user page might look something like this:
https://mywebsite.com/users/ExpressSuperHero
Using Express, rather than defining a route for every single possible username (or article, or photo, or whatever), you define one route that matches all of them.
The docs also show an example that uses regular expressions to do even more complex matching, and you can do lots of other stuff with this routing. For a conceptual understanding, I’ve said enough. We’ll explore this in far more detail in chapter 5. But it gets more cool.
3.3. Extending request and response
Express augments the request and response objects that you’re passed in every request handler. The old stuff is still there, but Express adds some new stuff too! The API docs (http://expressjs.com/api.html) explain everything, but let’s look at a couple of examples.
One nicety Express offers is the redirect method. The following listing shows how it might work.
Listing 3.12. Using redirect
response.redirect("/hello/world");
response.redirect("http://expressjs.com");
If you were just using Node, response would have no method called redirect; Express adds it to the response object for you. You can do this in vanilla Node, but it’s a lot more code.
Express adds methods like sendFile, which lets you send a whole file, as the following listing shows.
Listing 3.13. sendFile example
response.sendFile("/path/to/cool_song.mp3");
Once again, the sendFile method isn’t available in vanilla Node; Express adds it for you. And just like the redirect example shown previously, you can do this in vanilla Node, but it’s a lot more code.
It’s not only the response object that gets conveniences—the request object gets a number of other cool properties and methods, like request.ip to get the IP address or the request.get method to get incoming HTTP headers.
Let’s use some of these things to build middleware that blocks an evil IP address. Express makes this pretty easy, as shown here.
Listing 3.14. Blacklisting an IP
var express = require("express");
var app = express();

var EVIL_IP = "123.45.67.89";

app.use(function(request, response, next) {
  if (request.ip === EVIL_IP) {
    response.status(401).send("Not allowed!");
  } else {
    next();
  }
});

// ... the rest of your app ...
Notice that you’re using req.ip, a function called res.status(), and res.send(). None of these are built into vanilla Node—they’re all extensions added by Express. Conceptually, there’s not much to know here, other than the fact that Express extends the request and response.
We’ve looked at a few niceties in this chapter, but I don’t want to give you the full laundry list here. For every nice feature that Express gives you, you can check out its API documentation at http://expressjs.com/4x/api.html.
3.4. Views
Websites are built with HTML. They’ve been built that way for a long, long time. Although single-page apps are en vogue (and totally possible with Express), it’s often the case that you want the server to dynamically generate HTML. You might want to serve HTML that greets the currently logged-in user, or maybe you want to dynamically generate a data table.
A number of different view engines are available. There’s EJS (which stands for Embedded JavaScript), Handlebars, Pug, and more. There are even ports of templating languages from other programming worlds, like Swig and HAML. All of these have one thing in common: at the end of the day, they spit out HTML.
For the rest of these examples, we’ll use EJS. I chose EJS because it’s a popular option made by the people who created Express. I hope you’ll like it, but if you don’t, there are plenty of alternatives, which we’ll discuss in chapter 7.
The next listing shows what it looks like to set up views.
Listing 3.15. Setting up views with Express
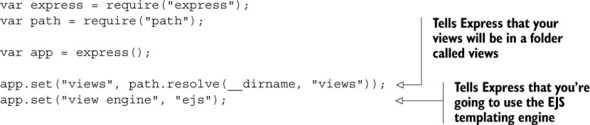
We’ll add more to this file in a moment. The first block is the same as always: require what you need to. Then you say, “My views are in a folder called views.” After that, you say, “Use EJS.” EJS (documentation at https://github.com/tj/ejs) is a templating language that compiles to HTML. Make sure to install it with npm install ejs --save.
Now, you’ve set up these views on the Express side. How do you use them? What is this EJS business? Let’s start by making a file called index.ejs and put it into a directory called views. It might look like the next listing.
Listing 3.16. A simple EJS file
<!DOCTYPE html>
<html>
  <head>
    <meta charset="utf-8">
    <title>Hello, world!</title>
  </head>
<body>
  <%= message %>
</body>
</html>
This should look exactly like HTML to you, but for the one weird bit inside the body tag. EJS is a superset of HTML, so everything that’s valid HTML is valid EJS. But EJS also adds a few new features, like variable interpolation. <%= message %> will interpolate a variable called message, which you’ll pass when you render the view from Express. Here’s what that looks like.
Listing 3.17. Rendering a view from Express
app.get("/", function(request, response) {
  response.render("index", {
    message: "Hey everyone! This is my webpage."
  });
});
Express adds a method to response, called render. It basically looks at the view engine and views directory (which you defined earlier) and renders index.ejs with the variables you pass in.
The code in the next listing would render the HTML shown.
Listing 3.18. A simple EJS file, rendered

EJS is a popular solution to views, but there are a number of other options, which we’ll explore in later chapters. Now let’s work through an example.
3.5. Example: putting it all together in a guestbook
If you’re like me, you saw the internet in its early days; awkward animated GIFs, crufty code, and Times New Roman on every page. In this chapter, we’ll resurrect one component from that bygone era: the guestbook. A guestbook is pretty simple: users can write new entries in the online guestbook, and they can browse others’ entries.
Let’s use all that you’ve learned to build a more real application for this guestbook. It turns out that all of these things will come in handy! Your site will have two pages:
- A homepage that lists all of the previously posted guestbook entries
- A page with an “add new entry” form
That’s it! Before you start, you have to get set up. Ready?
3.5.1. Getting set up
Start a new project. Make a new folder, and inside, make a file called package.json. It should look something like this next listing.
Listing 3.19. package.json for the guestbook
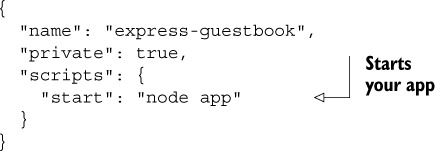
You can add other fields (like author or version), but for this example, you don’t need much. Now, install your dependencies as you did before and save them into package.json:
npm install express morgan body-parser ejs --save
These modules should look familiar to you, except for body-parser. Your app will need to post new guestbook entries in HTTP POST requests, so you’ll need to parse the body of the POST; that’s where body will come in.
Check to make sure that Express, Morgan, body-parser, and EJS have been saved into package.json. If they haven’t, make sure you’ve added the --save flag.
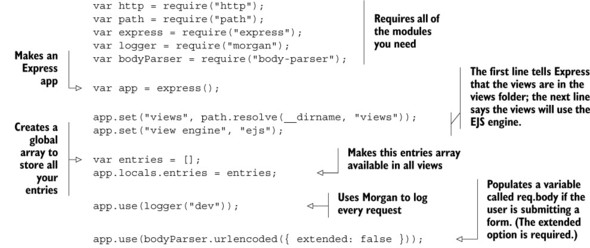
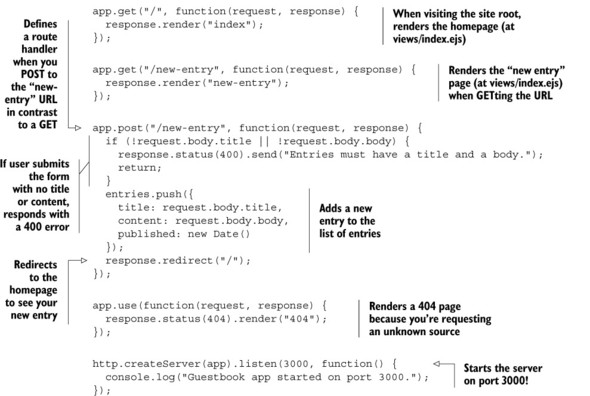
3.5.2. The main app code
Now that you’ve installed all of your dependencies, create app.js and put the following app inside.
Listing 3.20. The Express guestbook, in app.js
3.5.3. Creating the views
We’ve referenced a few views here, so let’s fill those in. Create a folder called views, and then create the header in views/header.ejs, as shown in the next listing.
Listing 3.21. header.ejs
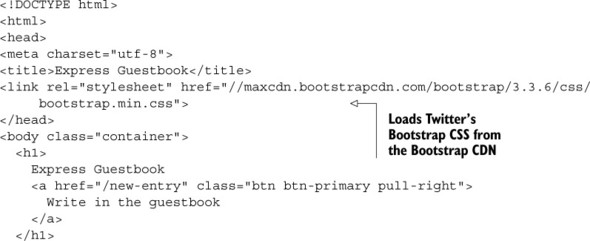
Notice that you use Twitter Bootstrap for styling, but you could easily replace it with your own CSS. The most important part is that this is the header; this HTML will appear at the top of every page.
Note
In short, Bootstrap is a bunch of CSS and JavaScript that provides a lot of default styling. You can absolutely write navbars and buttons and header CSS yourself, but Bootstrap helps you get up and running quickly. You can find out more at http://getbootstrap.com/.
Next, create the simple footer in views/footer.ejs, which will appear at the bottom of every page, as follows.
Listing 3.22. footer.ejs
</body>
</html>
Now that you’ve defined the common header and footer, you can define the three views: the homepage, the “add a new entry” page, and the 404 page. Save the code in the following listing into views/index.ejs.
Listing 3.23. index.ejs
<% include header %>
<% if (entries.length) { %>
  <% entries.forEach(function(entry) { %>
    <div class="panel panel-default">
      <div class="panel-heading">
        <div class="text-muted pull-right">
          <%= entry.published %>
        </div>
        <%= entry.title %>
      </div>
      <div class="panel-body">
        <%= entry.body %>
      </div>
    </div>
  <% }) %>
<% } else { %>
  No entries! <a href="/new-entry">Add one!</a>
<% } %>
<% include footer %>
Save the next listing into views/new-entry.ejs.
Listing 3.24. new-entry.ejs
<% include header %>

<h2>Write a new entry</h2>

<form method="post" role="form">
  <div class="form-group">
    <label for="title">Title</label>

    <input type="text" class="form-control" id="title"
     name="title" placeholder="Entry title" required>
  </div>
  <div class="form-group">
    <label for="content">Entry text</label>
    <textarea class="form-control" id="body" name="body"
     placeholder="Love Express! It's a great tool for
     building websites." rows="3" required></textarea>
  </div>
  <div class="form-group">
    <input type="submit" value="Post entry" class="btn btn-primary">
  </div>
</form>

<% include footer %>
name="title" placeholder="Entry title" required>
</div>
<div class="form-group">
<label for="content">Entry text</label>
<textarea class="form-control" id="body" name="body"
placeholder="Love Express! It's a great tool for
building websites." rows="3" required></textarea>
</div>
<div class="form-group">
<input type="submit" value="Post entry" class="btn btn-primary">
</div>
</form>
<% include footer %>
Save the following into views/404.ejs.
Listing 3.25. 404.ejs
<% include header %>
<h2>404! Page not found.</h2>
<% include footer %>
And that’s all your views!
3.5.4. Start it up
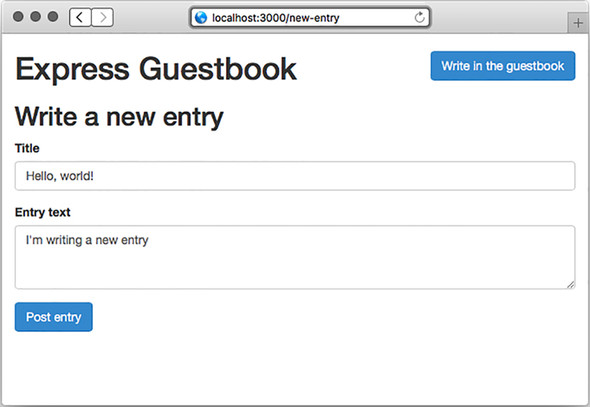
Now, npm start your app, and visit http://localhost:3000 to see your guestbook, as shown in figure 3.4. Figure 3.5 shows the page to write a new entry in the guestbook.
Figure 3.4. The guestbook homepage
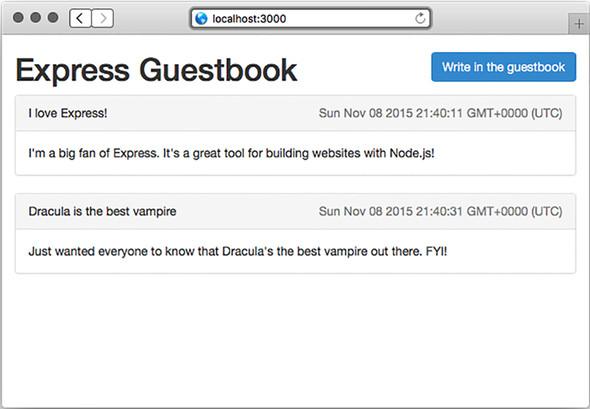
Figure 3.5. The page to write a new entry in the guestbook
Look at that! What a beautiful little guestbook. It reminds me of the 1990s.
Let’s review the parts of this little project:
- You use a middleware function to log all requests, which helps you do debugging. You also use a middleware at the end to serve the 404 page.
- You use Express’s routing to direct users to the homepage, the “add a new entry” view, and the POST for adding a new entry.
- You use Express and EJS to render pages. EJS lets you dynamically create HTML; you use this to dynamically display the content.
3.6. Summary
- Express sits on top of Node’s HTTP functionality. It abstracts away a lot of its rough edges.
- Express has a middleware feature that allows you to pipeline a single request through a series of decomposed functions.
- Express’s routing feature lets you map certain HTTP requests to certain functionality. For example, when visiting the homepage, certain code should be run.
- Express’s view-rendering features let you dynamically render HTML pages.
- Many templating engines have been ported to work with Express. A popular one is called EJS, which is the simplest for folks who know already HTML.