Table of Contents for
Express in Action: Writing, building, and testing Node.js applications
 Express in Action: Writing, building, and testing Node.js applications
Published by
Manning Publications, 2016
Express in Action: Writing, building, and testing Node.js applications
Published by
Manning Publications, 2016
- Cover
- Express in Action: Writing, building, and testing Node.js applications
- Copyright
- Brief Table of Contents
- Table of Contents
- Preface
- Acknowledgments
- About this Book
- About the Cover Illustration
- Part 1. Intro
- Chapter 1. What is Express?
- Chapter 2. The basics of Node.js
- Chapter 3. Foundations of Express
- Part 2. Core
- Chapter 4. Middleware
- Chapter 5. Routing
- Chapter 6. Building APIs
- Chapter 7. Views and templates: Pug and EJS
- Part 3. Express in Context
- Chapter 8. Persisting your data with MongoDB
- Chapter 9. Testing Express applications
- Chapter 10. Security
- Chapter 11. Deployment: assets and Heroku
- Chapter 12. Best practices
- Appendix. Other helpful modules
- Index
- List of Figures
- List of Listings
Chapter 5. Routing
- Simple and pattern-matching routing
- Using middleware with routing
- Serving static files with express.static, Express’s built-in static file middleware
- Using Express with Node’s built-in HTTPS module
As you’ve seen, routing is one of Express’s big features, allowing you to map different requests to different request handlers. In this chapter, we’ll go far more in depth. We’ll look at routing in detail, show how to use Express with HTTPS, explore Express 4’s new routers features, and more. We’ll also build a couple of routing-centric applications, one of which will be a running example throughout the remainder of the book.
In this chapter, I’ll tell you everything there is to know about routing in Express.
5.1. What is routing?
Let’s imagine you’re building the homepage for Olivia Example. She’s a great lady and you’re honored to build her website.
If you’re using a browser to visit example.com/olivia, here’s what the first part of the raw HTTP request might look like:
GET /olivia http/1.1
That HTTP request has a verb (GET), a URI (/olivia), and the HTTP version (1.1). When you’re routing, you take the pair consisting of the verb and the URI and map it to a request handler. You basically say, “Hey, Express! When you see a GET request to /about_me, run this code. And when you see a POST request to /new_user, run this other code.”
That’s pretty much it—routing maps verbs and URIs to specific code. Let’s look at a simple example.
5.1.1. A simple routing example
Let’s say you want to write a simple Express application that responds to the previous HTTP request (an HTTP GET to /olivia). You’ll call methods on your Express app, as shown in the following listing.
Listing 5.1. A simple Express app that shows Olivia’s homepage
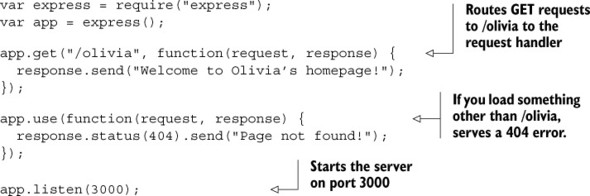
The real meat of this example is on the third line: when you get HTTP GET requests to /olivia, you run the specified request handler. To hammer this home: you’ll ignore this if you see a GET request to some other URI, and you’ll also ignore this if you see a non-GET request to /olivia.
This is a pretty simple example (hence the title of this section). Let’s take a look at more complex routing features.
5.2. The features of routing
So we’ve just looked at a simple example of routing. Conceptually, it’s not too crazy: it maps an HTTP verb + URI combo to a request handler. This lets you map things like GET /about or POST /user/log_in to a specific bit of code. This is great!
But we’re greedy. If Express were a vat of ice cream, we wouldn’t be satisfied with one scoop. We want more scoops. We want sprinkles. We want chocolate sauce. We want more routing features.
Note
Some other frameworks (Ruby on Rails, for example) have a centralized routing file where all routes are defined in one place. Express is not this way—routes can be defined in numerous places.
5.2.1. Grabbing parameters to routes
The routes you’ve just seen could be expressed in code with a strict equality operator (===); is the user visiting /olivia? That’s very useful, but it doesn’t give you all the expressive power you might want.
Imagine you’ve been tasked to make a website that has user profiles, and imagine that every user has a numeric ID. You want the URL for user #1 to be /users/1. User #2 should be found at /users/2, and so on. Rather than define, in code, a new route for every single new user (which would be crazy), you can define one route for everything that starts with /users/ and then has an ID.
The simplest way
The simplest way to grab a parameter is by putting it in your route with a colon in front of it. To grab the value, you’ll look inside the params property of the request, as shown in the next listing.
Listing 5.2. The simplest parameter

In this example, you see how to grab parameters from a more dynamic route. The code will match what you want: things like /users/123 and /users/8. But although it won’t match a parameter-less /users/ or /users/123/posts, it probably still matches more than what you want. It will also match /users/cake and /users/horse_ebooks. If you want to be more specific, you have a few options.
Note
Although you’ll often want to be more specific with your parameter definitions, it might very well be that this is fine for your purposes. You might want to allow /users/123 and /users/count_dracula. Even if you want to allow only numeric parameters, you might prefer to have validation logic right in the route. As you’ll see, there are other ways to do it, but that might be just fine for you.
5.2.2. Using regular expressions to match routes
Express allows you to specify your routes as strings and to specify them as regular expressions. This gives you more control over the routes you specify. You can also use regular expressions to match parameters, as you’ll see.
Note
Regular expressions can get a little hairy. They scared me when I first started working with them, but I found that fear greatly reduced by the entry on the Mozilla Developer Network. If you need help, I strongly recommend checking it out at https://developer.mozilla.org/en-US/docs/Web/JavaScript/Guide/Regular_Expressions.
Let’s imagine that you want to match things like /users/123 or /users/456 but not /users/olivia. You can code this into a regular expression and grab the number to boot, as shown in the next listing.
Listing 5.3. Using regular expressions for numeric routes

This is one way to enforce the “the user ID must be an integer” constraint. Like the previous example, it’s passed in as a string, so you have to convert it to a number (and probably to a user object farther down the line).
Regular expressions can be a little difficult to read, but you can use them to define much more complex routes than these. You might want, for example, to define a route that looks for ranges; that is, if you visit /users/100-500, you can see a list of users from IDs 100 to 500. Regular expressions make this relatively easy to express (no pun intended), as shown here.
Listing 5.4. Using regular expressions for complex routes

You can daydream about the number of possibilities this opens up. For example, I once had to define a route that matched UUIDs (versions 3 and 4). If you’re not familiar, a UUID is a long string of hex digits that looks like this:
xxxxxxxx-xxxx-4xxx-yxxx-xxxxxxxxxxxx
where x is any hex digit and y is 8, 9, A, or B. Let’s say you want to write a route that matches any UUID. It might look something like the next listing.
Listing 5.5. UUID-matching routes with a regexp
var horribleRegexp = /^([0-9a-f]{8}-[0-9a-f]{4}-
 4[0-9a-f]{3}-[89ab][0-9a-f]{3}-[0-9a-f]{12})$/i;

app.get(horribleRegexp, function(req, res) {
  var uuid = req.params[0];
  // ...
});
4[0-9a-f]{3}-[89ab][0-9a-f]{3}-[0-9a-f]{12})$/i;
app.get(horribleRegexp, function(req, res) {
var uuid = req.params[0];
// ...
});
I could fill hundreds of pages with more examples, but I won’t. The key takeaway here: you can use regular expressions to define your routes.
5.2.3. Grabbing query arguments
Another common way to dynamically pass information in URLs is to use query strings. You’ve probably seen query strings every time you’ve done a search on the internet. For example, if you searched for “javascript-themed burrito” on Google, you’d see a URL like this: https://www.google.com/search?q=javascript-themed%20burrito.
This is passing a query. If Google were written in Express (it’s not), it might handle a query as shown in the following listing.
Listing 5.6. Handling a search query string
app.get("/search", function(req, res) {
  // req.query.q == "javascript-themed burrito"
  // ...
});
This is pretty similar to how you handle parameters, but it allows you to grab this style of query.
Note
There’s a common security bug with query parameters, unfortunately. If you visit ?arg=something, then req.query.arg will be a string. But if you go to ?arg=something&arg=somethingelse, then req.query.arg will be an array. We’ll discuss coping with these types of issues in detail in chapter 8. In general, you’ll want to make sure that you don’t blindly assume something is a string or an array.
5.3. Using routers to split up your app
It’s likely that as your application grows, so will your number of routes. Your collaborative cat-photo montage site might start with routes for static files and for images, but you might later add user accounts, chat, forums, and the like. Your number of routes can get unwieldy.
Express 4 added routers, a feature to help ease these growing pains. To quote the Express documentation:
A router is an isolated instance of middleware and routes. Routers can be thought of as “mini” applications only capable of performing middleware and routing. Every express application has a built-in app router.
Routers behave like middleware and can be “.use()d” by the app in other routers. In other words, routers allow you to chunk your big app into numerous mini-apps that you can later put together. For small apps, this might be overkill, but as soon as you think, “This app.js file is getting big,” it’s time to think about breaking down your app with routers. Listing 5.7 shows how to use routers from the main app file.
Note
Routers really shine when you’re building a bigger application. I don’t want to build a huge application in this section, so this example will have some spots that you should fill in with your imagination.
Listing 5.7. Routers in action: the main app
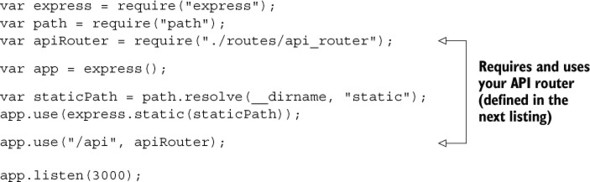
As you can see, you use your API router just like middleware because routers are basically middleware. In this case, any URL that starts with /api will be sent straight to your router. That means that /api/users and /api/message will use your router code, but something like /about/celinedion will not.
Now, define your router, as follows. Think of it as a subapplication.
Listing 5.8. A sample router definition (at routes/api_router.js)
var express = require("express");

var ALLOWED_IPS = [
  "127.0.0.1",
  "123.456.7.89"
];

var api = express.Router();

api.use(function(req, res, next) {
  var userIsAllowed = ALLOWED_IPS.indexOf(req.ip) !== -1;
  if (!userIsAllowed) {
    res.status(401).send("Not authorized!");
  } else {
    next();
  }
});

api.get("/users", function(req, res) { /* ... */ });
api.post("/user", function(req, res) { /* ... */ });

api.get("/messages", function(req, res) { /* ... */ });
api.post("/message", function(req, res) { /* ... */ });

module.exports = api;
This looks a lot like a mini-application; it supports middleware and routes. The main difference is that it can’t stand alone; it has to be plugged into a grown-up app. Routers can do the same routing that big apps can do and they can use middleware.
You could imagine making a router with many subrouters. Maybe you want to make an API router that further defers to a users router and a messages router or perhaps something else
5.4. Serving static files
Unless you are building a web server that’s 100% API (and I do mean 100%), you’re probably going to send a static file or two. Maybe you have some CSS to send, maybe you have a single-page app that needs static files sent, or maybe you’re a donut enthusiast and have gigabytes of donut photos to serve your hungry viewers.
You’ve seen how to send static files before, but let’s explore it in more depth.
5.4.1. Static files with middleware
We’ve sent static files with middleware before, but don’t roll your eyes yet—we’re going to dive just a little deeper. We went over this in chapter 2, so I won’t preach the benefits of this stuff. The following listing is a review of the code example we used in chapter 2.
Listing 5.9. A simple example of express.static
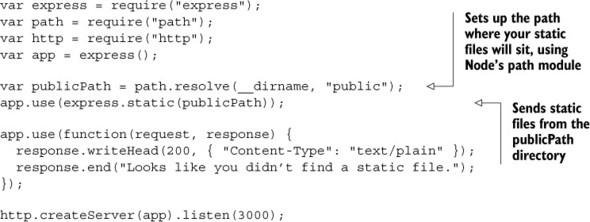
Recall that path.resolve helps keep your path resolution cross-platform (things are different on Windows and Mac and Linux). Also recall that this is much better than doing it all yourself. If any of this is unclear, refer to chapter 2.
Now let’s go deeper.
Changing the paths for clients
It’s common that you’ll want to serve files at the root of your site. For example, if your URL is http://jokes.edu and you’re serving jokes.txt, the path will be http://jokes.edu/jokes.txt.
But you might also want to mount static files at a different URL for clients. For example, you might want a folder full of offensive-but-hilarious photos to look like it’s in a folder called offensive, so a user might visit http://jokes.edu/offensive/photo123.jpg. How might you do this?
Express to the rescue! Middleware can be mounted at a given prefix. In other words, you can make a middleware respond only if it starts with /offensive. The next listing shows how that’s done.
Listing 5.10. Mounting static file middleware
// ...
var photoPath = path.resolve(__dirname, "offensive-photos-folder");
app.use("/offensive", express.static(photoPath));
// ...
Now web browsers and other clients can visit your offensive photos at a path other than the root. Note that this can be done for any middleware, not only the static file middleware. Perhaps the biggest example is the one you just saw: mounting Express’s routers at a prefix.
Routing with multiple static file directories
I frequently find myself with static files in multiple directories. For example, I sometimes have static files in a folder called public and another in a folder called user_uploads. How can you do this with Express?
Express solves this problem with the built-in middleware feature, and because express.static is middleware, you can just apply it multiple times. Here’s how you might do that.
Listing 5.11. Serving static files from multiple directories

Now, let’s imagine four scenarios and see how this code deals with them:
- The user requests a resource that isn’t in the public folder or the user_uploads folder. Both static middleware functions will continue on to the next routes and middleware.
- The user requests a resource that’s in the public folder. The first middleware will send the file and no following routes or middleware functions will be called.
- The user requests a resource that’s in the user_uploads folder but not the public folder. The first middleware will continue on (it’s not in public), so the second middleware will pick it up. After that, no other middleware or route will be called.
- The user requests a resource that’s in both the public folder and the user_uploads folder. Because the public-serving middleware is first, users will get the file in public and users will never be able to reach the matching file in the user_uploads folder.
As always, you can mount middleware at different paths to avoid the issue presented in the fourth option. The next listing shows how you might do that.
Listing 5.12. Serving static files from multiple directories without conflict
// ...

app.use("/public", express.static(publicPath));
app.use("/uploads", express.static(userUploadsPath));

// ...
Now, if image.jpg is in both folders, you’ll be able to grab it from the public folder at /public/image.jpg and from the user_uploads folder in /uploads/image.jpg.
5.4.2. Routing to static files
It’s possible that you’ll want to send static files with a route. You might want to send a user’s profile picture if they visit /users/123/profile_photo. The static middleware has no way of knowing about this, but Express has a nice way of doing this, which uses a lot of the same internal mechanisms as the static middleware.
Let’s say you want to send profile pictures when someone visits /users/:userid/profile_photo. Let’s also say that you have a magic function called getProfilePhoto-Path that takes a user ID and returns the path to their profile picture. The following listing shows how to do that.
Listing 5.13. Sending profile pictures
app.get("/users/:userid/profile_photo", function(req, res) {
  res.sendFile(getProfilePhotoPath(req.params.userid));
});
In chapter 2, you saw that this would be a big headache without Express. You’d have to open the file, figure out its content type (HTML, plain text, image, ...), its file size, and so on. Express’s sendFile does all of this for you and lets you send files easily. You can use this to send any file you want.
5.5. Using Express with HTTPS
As discussed earlier in the chapter, HTTPS adds a secure layer to HTTP (although nothing is invincible). This secure layer is called TLS (Transport Layer Security) or SSL (Secure Sockets Layer). The names are used interchangeably, but TLS is technically the successor to SSL.
I won’t go into the crazy math involved, but TLS uses what’s called public-key cryptography which works like this: every peer has a public key that they share with everybody and a private key that they share with nobody. If I want to send something to you, I encrypt the message with my private key (probably somewhere on my computer) and your public key (publicly available to anyone). I can then send you messages that look like garbage to any eavesdroppers, and you decrypt them with your private key and my public key. Through crazy cool math, we can have a secure conversation even if everyone is listening to us, and we never had to agree on some kind of secret code beforehand.
If this is a bit confusing, just remember that both peers have a private key and a public key. In TLS, the public key also has a special property called a certificate. If I’m talking to you, you’ll present me with your certificate (a.k.a. your public key), and I’ll make sure it’s actually you by making sure a certificate authority says “Yeah, that’s you.” Your browser has a list of certificate authorities that it trusts; companies like VeriSign and Google run these certificate authorities, known as CAs.
I imagine certificate authorities as a bodyguard. When I’m talking to somebody, I look up at my bodyguard and say “Hey, is this person who they say they are?” My bodyguard looks down at me and gives a small nod or maybe a shake of the head.
Note
Some hosting providers like Heroku will do all the HTTPS for you so that you don’t have to worry about it. This section is useful only if you have to do HTTPS yourself!
First, you’ll need to generate your public and private keys using OpenSSL. If you’re on Windows, grab a binary from https://www.openssl.org/related/binaries.html. It should come preinstalled on Mac OS X. If you’re on a Linux machine with a package manager (like Arch, Gentoo, Ubuntu, or Debian) and it’s not already installed, install it with your OS’s package manager. You can check if OpenSSL is installed by typing openssl version at your command prompt. From there, you’ll run the following two commands:
openssl genrsa -out privatekey.pem 1024
openssl req -new -key privatekey.pem -out request.pem
The first command generates your private key into privatekey.pem; anyone can do this. The next command generates a certificate-signing request. It’ll ask you a bunch of information and then spit out a file into request.pem. From here, you have to request a certificate from a CA. Several groups on the internet are working on Let’s Encrypt, a free and automated CA. You can check out the service at https://letsencrypt.org/. If you’d prefer a different certificate authority, you can shop around online.
Once you have a certificate, you can use Node’s built-in HTTPS module with Express, as shown in the following listing. It’s very similar to the HTTP module, but you’ll have to supply your certificate and private key.
Listing 5.14. Using HTTPS with an Express app

Other than the fact that you have to pass the private key and certificate as arguments, this is very similar to the http.createServer you’ve seen before. If you want to run both an HTTP server and an HTTPS server, start both, as shown next.
Listing 5.15. Using HTTP and HTTPS with Express
var express = require("express");
var http = require("http");
var https = require("https");
var fs = require("fs");

var app = express();

// ... define your app ...

var httpsOptions = {
  key: fs.readFileSync("path/to/private/key.pem"),
  cert: fs.readFileSync("path/to/certificate.pem")
};
http.createServer(app).listen(80);
https.createServer(httpsOptions, app).listen(443)
All you need do is run both servers on different ports, and you’re finished. That’s HTTPS.
5.6. Putting it all together: a simple routing demo
Let’s take what you’ve learned and build a simple web application that returns the temperature by your United States ZIP Code.
Note
I’m an American, so this example will use the US-style postal code, called a ZIP Code. ZIP Codes are five digits long and can give you a pretty good ballpark location. There are 42,522 of them, and the United States covers 3.7 million square miles, so each ZIP Code covers about 87 square miles on average. Because we’re going to use ZIP Codes, this example will work only in the United States. It shouldn’t be too much of a stretch to make a similar application that works elsewhere (if you’re inspired, you could try using the HTML5 Geolocation API).
This application will have two parts: a homepage that asks the user for their ZIP Code and a route that sends the temperature as JSON.
Let’s get started.
5.6.1. Setting up
For this application, you’ll use four Node packages: Express (obviously), ForecastIO (for grabbing weather data from the free API called Forecast.io), Zippity-do-dah (for turning ZIP Codes into latitude/longitude pairs), and EJS (for rendering HTML views). (These are some pretty good names, right? Especially Zippity-do-dah.)
Make a new Express application. You’ll want to make sure the package.json looks something like the following listing when it’s time to start.
Listing 5.16. package.json for this application
{
  "name": "temperature-by-zip",
  "private": true,
  "scripts": {
    "start": "node app.js"
  },
  "dependencies": {
    "ejs": "^2.3.1",
    "express": "^5.0.0",
    "forecastio": "^0.2.0",
    "zippity-do-dah": "0.0.x"
  }
}
Make sure you have all of these dependencies installed by running npm install in your application’s directory.
On the client, you’ll depend on jQuery and a minimal CSS framework called Pure (http://purecss.io/). It’s likely that you already know about jQuery, but Pure is a bit more obscure (most everything is more obscure than jQuery). Pure gives you a little bit of styling for text and forms, similar to Twitter’s Bootstrap. The difference with Pure is that it’s far more lightweight, which better suits this kind of application.
Make two directories: one called public and one called views.
Next, get an API key from Forecast.io at https://developer.forecast.io. Register for an account. At the bottom of the dashboard page is your API key, which is a string of 32 characters. You’ll need to copy this API key into your code in just a moment, so make sure you have it available. You’re now ready to get started.
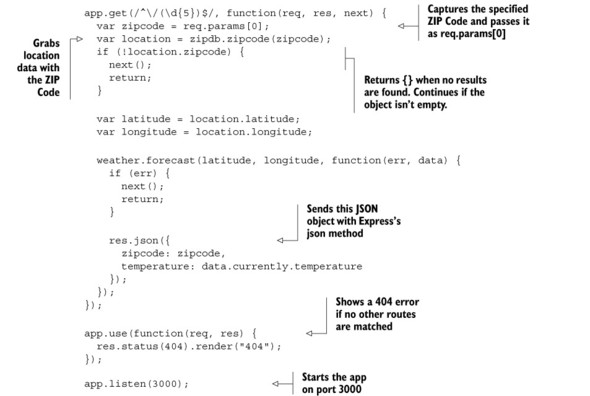
5.6.2. The main app code
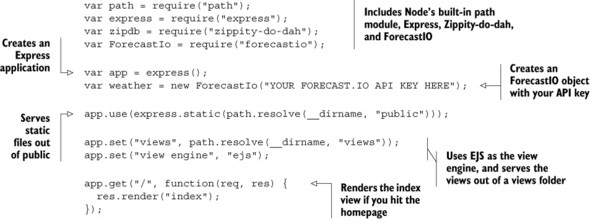
Now that you’re all set up, it’s time to code. Let’s start with the main application JavaScript. If you followed the example at the end of chapter 2, this business should be familiar. Create app.js and put the code from the following listing inside it.
Listing 5.17. app.js
Now you need to fill in the client. This means making some views with EJS, and as you’ll see, you’ll add a splash of CSS and a bit of client-side JavaScript.
5.6.3. The two views
There are two views in this application: the 404 page and the homepage. You want your site to look consistent across pages, so make a template. You’ll need to make a header and a footer.
Let’s start with the header. Save the following listing into a file called header.ejs.
Listing 5.18. views/header.ejs
<!DOCTYPE html> <html> <head> <meta charset="utf-8"> <title>Temperature by ZIP code</title> <link rel="stylesheet" href="http://yui.yahooapis.com/pure/0.4.2/pure-min.css">
Next, close off the page in footer.ejs, as shown in the next listing.
Listing 5.19. views/footer.ejs
</body>
</html>
Now that you have your template, you can fill in the simple 404 page (as 404.ejs), as shown in the next listing.
Listing 5.20. views/404.ejs
<% include header %>
  <h1>404 error! File not found.</h1>
<% include footer %>
The index homepage isn’t too complex, either. Save it as index.ejs.
Listing 5.21. views/index.ejs
<% include header %>

<h1>What's your ZIP code?</h1>

<form class="pure-form">
  <fieldset>
    <input type="number" name="zip" placeholder="12345"
     autofocus required>
    <input type="submit" class="pure-button
     pure-button-primary" value="Go">
  </fieldset>
</form>

<script src="//ajax.googleapis.com/ajax/libs/
 jquery/2.1.1/jquery.min.js"></script>
<script src="/main.js"></script>

<% include footer %>
There are a couple of references to the Pure CSS framework in the index code; all they do is apply styling so your page looks a little better.
Speaking of styling, you’ll need to fill in main.css that you specified in the layout. Save the code in the following listing into public/main.css.
Listing 5.22. public/main.css
html {
  display: table;
  width: 100%;
  height: 100%;
}
body {
  display: table-cell;
  vertical-align: middle;
  text-align: center;
}
This CSS effectively centers the page’s content, both horizontally and vertically. This isn’t a CSS book, so don’t worry if you don’t understand exactly what’s going on here.
Now you have everything other than your client-side JavaScript. You can try to npm start this app right now. You should be able to see the homepage at http://localhost:3000 and the 404 page at http://localhost:3000/some/garbage/url, and the weather should load 12345’s temperature as JSON at http://localhost:3000/12345.
Finish it off with your client-side JavaScript, as shown in the next listing. Save this stuff in public/main.js.
Listing 5.23. public/main.js

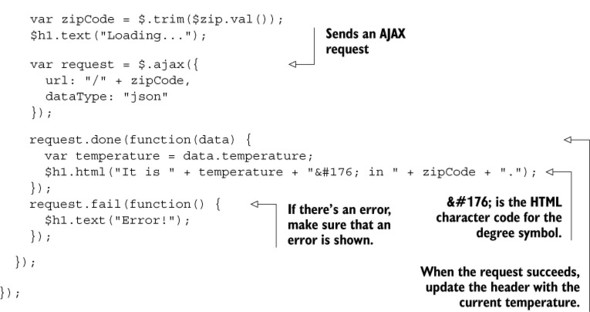
The key part of this is the AJAX request that’s sent to your server. If you’ve typed 12345 into the ZIP Code field, you’ll make a request to /12345.
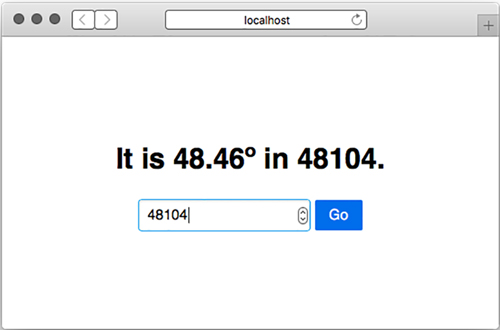
5.6.4. The application in action
With that, you can start the application with npm start. Visit http://localhost:3000, type in a ZIP Code, and watch the temperature appear, as shown in figure 5.1.
Figure 5.1. Temperature by ZIP Code in action
That’s your simple application. It takes advantage of Express’s helpful routing features and serves HTML views, JSON, and static files.
If you’d like, you can extend this application to work with more than US ZIP Codes, or show more than the temperature, or add API documentation, or add better error handling, or maybe more!
5.7. Summary
- Routing is a mapping of an HTTP verb (like GET or POST) and a URI (like /users/123).
- Routing can map to a simple string. It can also match against patterns or regular expressions.
- Express has the ability to parse query strings.
- As a convenience, Express has a built-in middleware for serving static files.
- Routers can be used to split your application into many smaller applications, which is useful for code organization.
- You can use Express with HTTPS by starting the server with your certificates.