Table of Contents for
Express in Action: Writing, building, and testing Node.js applications
 Express in Action: Writing, building, and testing Node.js applications
Published by
Manning Publications, 2016
Express in Action: Writing, building, and testing Node.js applications
Published by
Manning Publications, 2016
- Cover
- Express in Action: Writing, building, and testing Node.js applications
- Copyright
- Brief Table of Contents
- Table of Contents
- Preface
- Acknowledgments
- About this Book
- About the Cover Illustration
- Part 1. Intro
- Chapter 1. What is Express?
- Chapter 2. The basics of Node.js
- Chapter 3. Foundations of Express
- Part 2. Core
- Chapter 4. Middleware
- Chapter 5. Routing
- Chapter 6. Building APIs
- Chapter 7. Views and templates: Pug and EJS
- Part 3. Express in Context
- Chapter 8. Persisting your data with MongoDB
- Chapter 9. Testing Express applications
- Chapter 10. Security
- Chapter 11. Deployment: assets and Heroku
- Chapter 12. Best practices
- Appendix. Other helpful modules
- Index
- List of Figures
- List of Listings
Chapter 6. Building APIs
- Using Express to build an API
- HTTP methods and how they respond to common CRUD operations
- Versioning your API using Express’s routers
- Understanding HTTP status codes
Friends, gather round. This chapter marks a new beginning. Today, we exit the abstract but critical core Express and enter the real world. For the rest of this book, we’ll be building much more real systems atop Express. We’ll start with APIs.
API is a pretty broad term. It stands for application programming interface, which doesn’t demystify the term much. If it were up to me (obviously it isn’t), I’d rename it something like software interface. A UI is meant to be consumed by human users, but a software interface is meant to be consumed by code. At some level, all UIs sit on top of software interfaces—that is, on top of some APIs.
At a high level, APIs are ways for one piece of code to talk to another piece of code. This could mean a computer talking to itself or a computer talking to another computer over a network. For example, a video game might consume an API that allows the code to draw graphics to the screen. You’ve seen a few methods available in the Express API, like app.use or app.get. These are interfaces that you as a programmer can use to talk to other code.
There are also computer-to-computer APIs. These happen over a network and usually over the internet. These computers may be running different programming languages and/or different OSes, so common ways have been developed for them to communicate. Some send plain text, others might choose JSON or XML. They might send things over HTTP or over another protocol like FTP. Either way, both parties have to agree that they’re going to send data a certain way. In this chapter, the APIs you create will use JSON.
We’ll talk about APIs that interact that you can build with Express. These APIs will take HTTP requests and respond with JSON data.
By the end of this chapter, other programmers will be able to build applications that use your JSON APIs. We’ll also discuss how to design good APIs. The core principle behind good API design is to do what developers consuming your API expect. You can meet most of these expectations by following the HTTP specification. Rather than instruct you to read a long, dry (but very interesting) specification document, I’ll tell you the parts you need to know so that you can write a good API.
Just like the nebulous concepts of good code versus bad code, there aren’t a lot of hard lines in the sand here. A lot of this is open to your interpretation. You could come up with many examples where you might want to deviate from these established best practices, but remember: the goal is to do what other developers expect. Let’s get started.
6.1. A basic JSON API example
Let’s talk about a simple JSON API and how it could be used so that you see a concrete example of the kind of thing you’ll be building.
Imagine a simple API that takes a time zone string like "America/Los_Angeles" or "Europe/London" and returns a string that represents the current time in that time zone (like "2015-04-07T20:09:58-07:00"). Notice that these strings aren’t things that a human would naturally type or be able to easily read—they’re for a computer to understand.
Your API might accept an HTTP request to this URL:
/timezone?tz=America+Los_Angeles
and your API server might respond with JSON, like this:
{
  "time": "2015-06-09T16:20:00+01:00",
  "zone": "America/Los_Angeles"
}
You could imagine writing simple applications that used this API. These applications could run on a variety of platforms, and as long as they communicated with this API and could parse JSON (which most platforms can), they could build whatever they wanted.
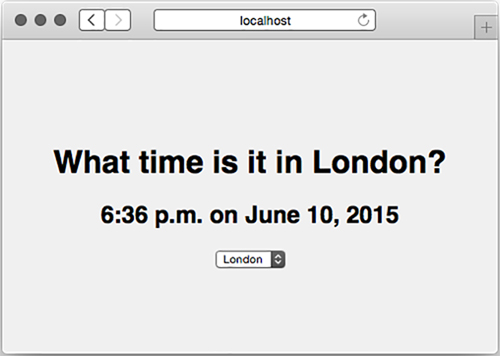
You could build a simple web page that consumed this API, as shown in figure 6.1. It might send AJAX requests to your server, parse the JSON, and display it in the HTML.
Figure 6.1. A website that consumes our JSON API
You could also build a mobile application, as shown in figure 6.2. It would make a request to your API server, parse the JSON, and display the results on the screen.
Figure 6.2. A mobile app that uses your API

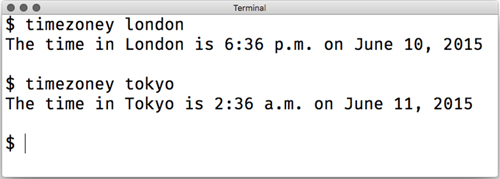
You could even build a command-line tool that runs in the terminal, like in figure 6.3. Once again, it would make a request to the API server, parse the JSON, and display the results for humans in the terminal.
Figure 6.3. Terminal-based applications can consume a JSON API.
The point is this: if you make an API that takes requests from computers and spits out responses for computers (not humans), you can build UIs atop that API. You did this in the previous chapter with the weather app—it used an API to get weather data and display it to the user.
6.2. A simple Express-powered JSON API
Now that you know what an API is, let’s build a simple one with Express. The fundamentals of an Express API are pretty straightforward: take a request, parse it, and respond with a JSON object and an HTTP status code. You’ll use middleware and routing to take requests and parse them, and you’ll use Express’s conveniences to respond to requests.
Note
Technically, APIs don’t have to use JSON—they can use other data interchange formats like XML or plain text. JSON has the best Express integration, plays nicely with browser-based JavaScript, and is one of the most popular API choices, so we’ll use it here. You can use other formats if you want to.
Let’s build a simple API that generates random integers. This might seem a bit of a contrived example, but you might want a consistent random number generator across multiple platforms (iOS, Android, web, and more) and you don’t want to write the same code. The API will have these characteristics:
- Anyone who requests the API must send a minimum value and a maximum value.
- Your service will parse those values, calculate your random number, and send it back as JSON.
You might think that JSON is overkill for this situation—why not stick to plain text?—but sending JSON is a skill we’ll need and we want to make it easy to expand your functionality later.
To build this project, you’ll follow these steps:
1. Create a package.json to describe the metadata of your app.
2. Create a file called app.js, which will contain all of your code.
3. Create an Express application in app.js and attach a single route that gives a random number.
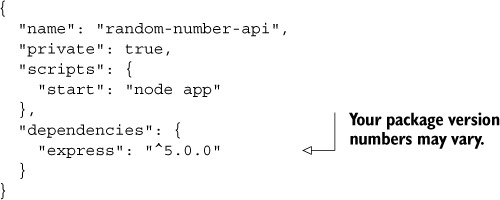
Let’s get started. As usual, to start a project, make a new folder and create a package.json. You can create this file by running npm init or you can manually type out the file. In any case, you’ll want to create it and install Express. Your package.json should look something like the following listing.
Listing 6.1. package.json for your random number project
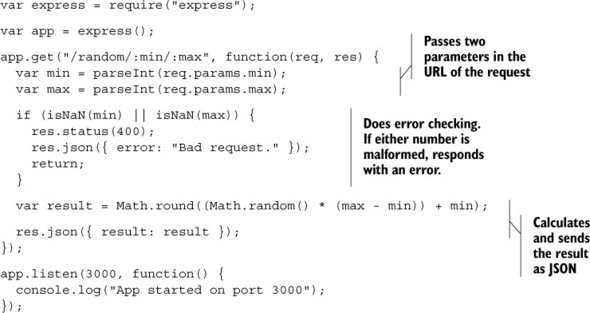
Next, you’ll want to create app.js. Create it in the root of your project and put the following code inside.
Listing 6.2. Your random number app
If you start this app and visit http://localhost:3000/random/10/100, you’ll see a JSON response with a random number between 10 and 100. It will look something like figure 6.4.
Figure 6.4. Testing your API in your browser. Try refreshing and you’ll see different numbers.

Let’s step through this code. The first two lines require Express and create a new Express application, as you’ve seen before.
Next, you create a route handler for GET requests. This will take requests like /random/10/100, or /random/50/52, but it will also handle requests like /random/foo/bar. You’ll have to make sure that both fields are numbers, and you’ll do that soon.
Next, you parse out the numbers using the built-into-JavaScript parseInt function. This function either returns a number or NaN. If either of the values is NaN, you show an error to the user. Let’s look at these five lines in detail, in the listing that follows, because they’re pretty important.
Listing 6.3. Drilling down into the error handler
if (isNaN(min) || isNaN(max)) {
  res.status(400);
  res.json({ error: "Bad request." });
  return;
}
The first line checks if either of the numbers is NaN, meaning it’s badly formatted. If it is, you do three things:
1. Set the HTTP status code to 400. If you’ve ever seen a 404 error, this is only a variant: it signals that something about the user’s request was bad. We’ll talk more about it later in this chapter.
2. Send a JSON object. In this case, you send an object that has the error.
3. Return. If you didn’t return, you’d continue on to the rest of the function and you’d send the request twice, and Express would start throwing nasty errors.
As a final step, you calculate the result and send it as JSON.
This is a pretty basic API, but it shows the fundamentals of building an API with Express: parsing requests, setting HTTP status codes, and sending JSON.
Now that you know the fundamentals, you can start learning more about building bigger, better APIs.
6.3. Create, read, update, delete APIs
There’s a common application pattern: create, read, update, and delete. It’s shortened to CRUD, which is a fun word.
Lots of applications use CRUD. For example, imagine a photo-sharing app that has no user accounts; anyone can upload photos. Here’s how you might envision that in CRUD style:
- Users can upload photos; this is the create step.
- Users can browse photos; this is the read part.
- Users can update photos, perhaps by giving them different filters or changing captions; this would be an update.
- Users can delete photos from the website. This would be, well, a delete.
You could imagine lots of your favorite applications fitting into this model, from photo sharing to social networks to file storage.
Before we can talk about how CRUD fits into APIs, we need to talk about something called HTTP methods, also known as HTTP verbs.
6.3.1. HTTP verbs (also known as HTTP methods)
The HTTP spec defines methods like this:
The Method token indicates the method to be performed on the resource identified by the Request-URI. The method is case-sensitive.
Ugh, that’s hard to read.
A human might understand it this way: a client sends an HTTP request to the server with a method. The client can choose any method it wants, but there are a handful that are used. The server sees that method and responds accordingly.
There’s nothing baked into HTTP that prevents it from defining any method you want, but web applications typically use the following four:
- GET —The most common HTTP method anyone uses. As the name suggests, it gets resources. When you load someone’s homepage, you GET it. When you load an image, you GET it. GET methods shouldn’t change the state of your app; the other methods do that. Idempotence is important to GET requests. Idempotent is a fancy word that means doing it once should be no different than doing it many times. If you GET an image once and refresh 500 times, the image should never change. The response can change—a page could change based on a changing stock price or a new time of day—but GETs shouldn’t cause that change. That’s idempotent.
- POST —Generally used to request a change to the state of the server. You POST a blog entry; you POST a photo to your favorite social network; you POST when you sign up for a new account on a website. POST is used to create records on servers, not modify existing records. POST is also used for actions, like buy this item. Unlike GET, POST is non-idempotent. That means that the state will change the first time you POST, and the second time, and the third time, and so on.
- PUT —A better name might be update or change. If I’ve published (POSTed) a job profile online and later want to update it, I would PUT those changes. I could PUT changes to a document, or to a blog entry, or to something else. (You don’t use PUT to delete entries, though; that’s what DELETE is for, as you’ll see.) PUT has another interesting part; if you try to PUT changes to a record that doesn’t exist, the server can (but doesn’t have to) create that record. You probably wouldn’t want to update a profile that doesn’t exist, but you might want to update a page on a personal website whether or not it exists. PUT is idempotent. Let’s say I’m “Evan Hahn” on a website but I want to change it to Max Fightmaster. I don’t PUT “change name from Evan Hahn to Max Fightmaster”; I PUT “change my name to Max Fightmaster”; I don’t care what it was before. This allows it to be idempotent. I could do this once or 500 times, and my name would still be Max Fightmaster. It is idempotent in this way.
- DELETE —Probably the easiest to describe because its name is obvious. Like PUT, you basically specify DELETE record 123. You could DELETE a blog entry, or DELETE a photo, or DELETE a comment. DELETE is idempotent in the same way that PUT is. Let’s say I’ve accidentally published (POSTed) an embarrassing photo of me wearing a lampshade over my head. If I don’t want it on there, I can DELETE it. Now it’s gone! It doesn’t matter whether I ask for it to be deleted once or 500 times; it’s going to be gone. (Phew!)
There’s nothing that strictly enforces these constraints—you could theoretically use GET requests to do what POST requests should do—but it’s bad practice and against the HTTP specification. It’s not what people expect. Many browsers also have different behaviors depending on the type of HTTP request, so you always make an effort to use the right ones.
HTTP specifies a number of other verbs, but I’ve never had a need to stray very far from those four.
Verbs or Methods?
The specification for HTTP 1.0 and 1.1 uses the word method when describing this concept, so I suppose that’s technically correct. Verb is also used. For our purposes, I’ll mostly call them verbs because that’s what the Express documentation says. Know that you can use both (and that the nitpicky should call them methods).
In Express, you’ve already seen how to handle different HTTP verbs. To refresh your memory, the next listing contains a simple application that responds to each different verb with a little message.
Listing 6.4. Handling different HTTP verbs
var express = require("express");

var app = express();

app.get("/", function(req, res) {
  res.send("you just sent a GET request, friend");
});

app.post("/", function(req, res) {
  res.send("a POST request? nice");
});

app.put("/", function(req, res) {
  res.send("i don't see a lot of PUT requests anymore");
});

app.delete("/", function(req, res) {
  res.send("oh my, a DELETE??");
});

app.listen(3000, function() {
  console.log("App is listening on port 3000");
});
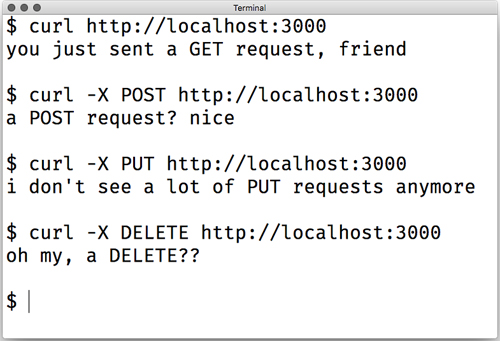
If you start this application (if it’s saved as app.js, run node app.js), you can use the handy cURL command-line tool to try sending different requests. cURL sends GET requests by default, but you can use its -X argument to send other verbs. For example, curl -X PUT http://localhost:3000 will send a PUT request. Figure 6.5 shows how this looks.
Figure 6.5. Using the cURL tool to send different requests to our server
This should all be review from previous chapters: you can handle different HTTP methods with different handlers.
6.3.2. CRUD applications with HTTP methods
Recalling our photo-sharing app, here’s how you might envision that in CRUD style:
- Users can upload photos; this is the create step.
- Users can browse photos; this is the read part.
- Users can update photos, perhaps by giving them different filters or changing captions; this is an update.
- Users can delete photos from the website; this is the delete part.
If you’re like me, you didn’t immediately see the connection between CRUD and the four main HTTP verbs I listed previously. But if GET is for reading resources, and POST is for creating resources...whoa! You realize the following:
- Create corresponds to POST
- Read corresponds to GET
- Update corresponds to PUT
- Delete corresponds to DELETE
The four main HTTP methods lend themselves pretty well to CRUD-style applications, which are very common on the web.
There’s a little bit of debate about which HTTP verbs correspond to which CRUD operations. Most people agree that read corresponds to GET and delete corresponds to DELETE, but create and update are murkier.
Because PUT can create records just like POST can, you could say that PUT better corresponds to create. PUT can create and update records, so why not put it in both spots?
Similarly, the PATCH method (which we haven’t yet mentioned) sometimes takes the update role. To quote the specification, “the PUT method is already defined to overwrite a resource with a complete new body, and cannot be reused to do partial changes.” PATCH allows you to partially overwrite a resource. PATCH was only formally defined in 2010, so it’s relatively new on the HTTP scene, which is why it’s less used. In any case, some people think PATCH is better suited to update than PUT.
Because HTTP doesn’t specify this stuff too strictly, it’s up to you to decide what you want to do. In this book, we’ll be using the convention shown previously, but know that the expectations are a little murky here.
6.4. API versioning
Let me walk you through a scenario. You design a public API for your time zone app and it becomes a big hit. People all over the world are using it to find times all across the globe. It’s working well.
But, after a few years, you want to update your API. You want to change something, but there’s a problem: if you make changes, all of the people using your API will have to update their code. What do you do? Do you make the changes you want to make and break old users, or does your API stagnate and never stay up to date?
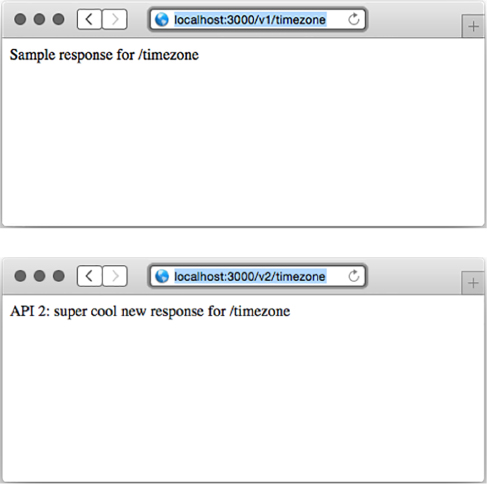
There’s a solution to all of this: version your API. All you have to do is add version information to your API. So a request that comes into this URL might be for version 1 of your API
/v1/timezone
and a request coming into version 2 of your API might visit this URL:
/v2/timezone
This allows you to make changes to your API by simply making a new version. Now, if someone wants to upgrade to version 2, they’ll do it by consciously changing their code, not having a version pulled out from under them.
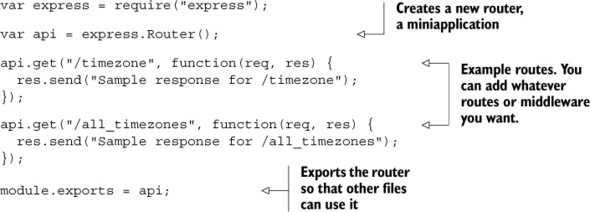
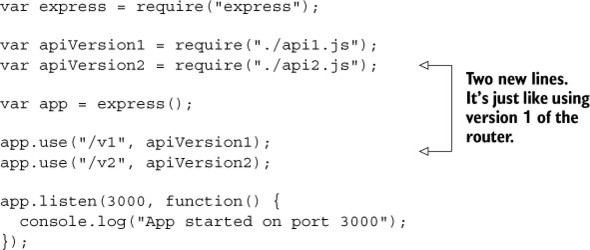
Express makes this kind of separation pretty easy through its use of routers, which you saw in the previous chapter. To create version 1 of your API, you can create a router that handles that version exclusively. The file might be called api1.js and look like the following listing.
Listing 6.5. Version 1 of your API, in api1.js
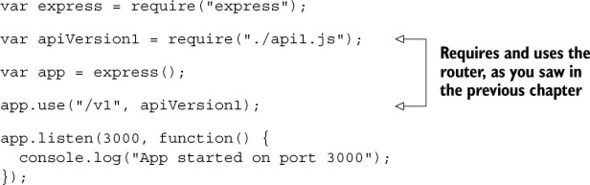
Notice that v1 doesn’t appear anywhere in the routes. To use this router in your app, you’ll create a full application and use the router from your main app code. It might look like the next listing.
Listing 6.6. The main app code in app.js
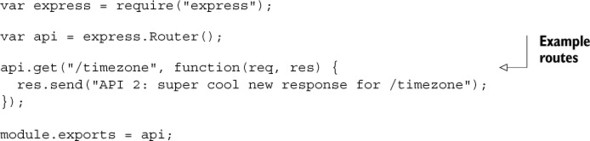
Many moons later, you decide to implement version 2 of your API. It might live in api2.js. It would also be a router, just like api1.js, and might look like the following listing.
Listing 6.7. Version 2 of your API, in api2.js
Now, to add version 2 of your API to the app, simply require and use it just like version 1, as shown in this listing.
Listing 6.8. The main app code in app.js
You can try visiting these new URLs in your browser to make sure that the versioned API works, as shown in figure 6.6.
Figure 6.6. Testing the two API versions in your browser
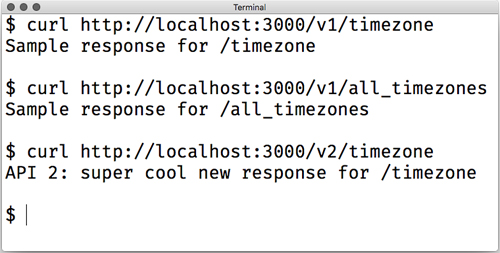
You can also use the cURL tool to test your app at the command line, as shown in figure 6.7.
Figure 6.7. Testing your versioned API using the cURL command-line tool
As you saw in the previous chapter, routers let you segment different routes into different files. Versioned APIs are a great example of the utility of routers.
6.5. Setting HTTP status codes
Every HTTP response comes with an HTTP status code. The most famous one is 404, which stands for “resource not found.” You’ve likely seen 404 errors when visiting a URL that the server can’t find—maybe you’ve clicked an expired link or typed a URL incorrectly.
Although 404 is the most famous, 200, defined as OK, is perhaps the most common. Unlike 404, you don’t usually see the text 200 on the web page when you’re browsing the web. Every time you successfully load a web page or an image or a JSON response, you probably get a status code of 200.
There are a lot more HTTP status codes than 404 and 200, each with a different meaning. There are a handful of 100 codes (like 100 and 101) and several in the 200s, 300s, 400s, and 500s. The ranges aren’t filled; that is, the first four codes are 100, 101, 102, skipping all the way to 200.
Each range has a certain theme. Steve Losh sent a great tweet that summarizes them (which I had to paraphrase a bit), as told from the perspective of the server:
HTTP status ranges in a nutshell:
1xx: hold on
2xx: here you go
3xx: go away
4xx: you messed up
5xx: I messed up
@stevelosh, https://twitter.com/stevelosh/status/372740571749572610
I love that summary. (The real one is a bit more vulgar.)
Beyond the 60 or so codes in the specification (https://tools.ietf.org/html/rfc7231-section-6), HTTP doesn’t define any more. You can specify your own—HTTP allows it—but it typically isn’t done. Remember the first principle of good API design; defining your own HTTP status codes wouldn’t be what people expect. People expect you to stick to the usual suspects.
Wikipedia has a great list of every standard (and some nonstandard) HTTP response code at https://en.wikipedia.org/wiki/List_of_HTTP_status_codes, but there are a few that pertain to building an API with Express. We’ll go through each range and explain common HTTP codes you should be setting in your applications.
What About HTTP 2?
Most HTTP requests are HTTP 1.1 requests, with a handful of them still using version 1.0. HTTP 2, the next version of the standard, is slowly being implemented and rolled out across the web. Luckily, most of the changes happen at a low level and you don’t have to deal with them. HTTP 2 does define one new status code—421—but that shouldn’t affect you much.
But first, how do you set HTTP status codes in Express?
6.5.1. Setting HTTP status codes
In Express, the default status code is 200. If a user visits a URL where no resource is found and your server doesn’t have a request handler for it, Express will send a 404 error. If you have some other error in your server, Express will send a 500 error.
But you want to have control of what status code you get, so Express gives it to you. Express adds a method called status to the HTTP response object. All you have to do is call it with the number of your status code and you’ll be in business.
This method might be called inside a request handler as shown in the following listing.
Listing 6.9. Setting the HTTP status code in Express
// ...

res.status(404);

// ...
This method is chainable, so you can pair it with things like the json to set the status code and send some JSON in one line, as shown in the next listing.
Listing 6.10. Setting the HTTP status code and sending some JSON
res.status(404).json({ error: "Resource not found!" });

// This is equivalent to:
res.status(404);
res.json({ error: "Resource not found!" });
The API isn’t too complicated.
Express extends the raw HTTP response object that Node gives you. Although you should follow the Express way of doing things when you’re using Express, you might be reading code that sets the status code, as in the next listing.
Listing 6.11. Setting the status code the raw way
res.statusCode = 404;
You sometimes see this code when reading through middleware or when someone is using the raw Node APIs instead of the Express ones.
6.5.2. The 100 range
There are only two official status codes in the 100 range: 100 (Continue) and 101 (Switching Protocols). You’ll likely never deal with these yourself. If you do, check the specification or the list on Wikipedia.
Look at that! You are already one-fifth of the way through the status codes.
6.5.3. The 200 range
Steve Losh summarized the 200 range as “here you go.” The HTTP spec defines several status codes in the 200 range, but four of them are by far the most common.
200: OK
200 is the most common HTTP status code on the web by a long shot. HTTP calls status code 200 OK, and that’s pretty much what it means: everything about this request and response went through just fine. Generally, if you’re sending the whole response just fine and there aren’t any errors or redirects (which you’ll see in the 300s section), then you’ll send a 200 code.
201: Created
Code 201 is very similar to 200, but it’s for a slightly different use case. It’s common for a request to create a resource (usually with a POST or a PUT request). This might be creating a blog post, sending a message, or uploading a photo. If the creation succeeds and everything’s fine, you’ll want to send a 201 code. This is a bit nuanced, but it’s typically the correct status code for the situation.
202: Accepted
Just as 201 is a variant of 200, 202 is a variant of 201.
I hope I’ve beaten it into your head by now: asynchronousity is a big part of Node and Express. Sometimes you’ll asynchronously queue a resource for creation but it won’t be created yet.
If you’re pretty sure that the request wants to create a valid resource (perhaps you’ve checked that the data is valid) but you haven’t created it yet, you can send a 202 status code. It effectively tells the client, Hey, you’re all good, but I haven’t made the resource yet.
Sometimes you’ll want to send 201 codes and other times you’ll want to send 202; it depends on the situation.
204: No Content
204 is the delete version of 201. When you create a resource, you typically send a 201 or a 202 message. When you delete something, you often don’t have anything to respond with other than Yeah, this was deleted. That’s when you typically send a 204 code. There are a few other times when you don’t need to send any kind of response back, but deletion is the most common use case.
6.5.4. The 300 range
There are several status codes in the 300 range, but you’ll really only set three of them, and they all involve redirects.
301: Moved Permanently
HTTP status code 301 means Don’t visit this URL anymore; see another URL. 301 responses are accompanied with an HTTP header called Location, so you know where to go next.
You’ve probably been browsing the web and have been redirected—this probably happened because of a 301 code. This usually occurs because the page has moved.
303: See Other
HTTP status code 303 is also a redirect, but it’s a bit different. Just like code 200 is for regular requests and 201 is for requests where a resource is created, 301 is for regular requests and 303 is for requests where a resource is created and you want to redirect to a new page.
307: Temporary Redirect
There’s one last redirect status code: 307. Like the 301 code, you’ve probably been browsing the web and been redirected because of a 307 code. They’re similar, but they have an important distinction. 301 signals Don’t visit this URL ever again; see another URL; 307 signals See another URL just for now. This might be used for temporary maintenance on a URL.
6.5.5. The 400 range
The 400 range is the largest, and it generally means that something about the request was bad. In other words, the client made a mistake and it’s not the server’s fault. There are a lot of different errors here.
401 and 403: unauthorized and forbidden errors
There are two different errors for failed client authentication: 401 (Unauthorized) and 403 (Forbidden). The words unauthorized and forbidden sound pretty similar—what’s the difference?
In short, a 401 error occurs when the user isn’t logged in. A 403 error occurs when the user is logged in as a valid user, but they don’t have permissions to do what they’re trying to do.
Imagine a website where you couldn’t see any of it unless you logged in. This website also has an administrator panel, but not all users can administer the site. Until you logged in, you’ll see 401 errors. Once you logged in, you’ll stop seeing 401 errors. If you tried to visit the administrator panel as a non-admin user, you’d see 403 errors.
Send these response codes when the user isn’t authorized to do whatever they’re doing.
404: Not Found
I don’t think I have to tell you much about 404—you’ve probably run into it when browsing the web. One thing I found a little surprising about 404 errors is that you can visit a valid route but still get a 404 error.
For example, let’s say you want to visit a user’s page. The homepage for User #123 is at /users/123. But if you mistype and visit /users/1234 and no user exists with ID 1234, you’ll get a 404 error.
Other errors
There are a lot of other client errors you can run into—far too many to enumerate here. Visit the list of status codes at https://en.wikipedia.org/wiki/List_of_HTTP_status_codes to find the right status code for you.
When in doubt about which client error code to use, send a 400 Bad Request error. It’s a generic response to any kind of bad request. Typically, it means that the request has malformed input—a missing parameter, for example. Although there might be a status code that better describes the client error, 400 will do the trick.
6.5.6. The 500 range
The final range in the HTTP specification is the 500 range, and although there are several errors in this range, the most important one is 500: Internal Server Error. Unlike 400 errors, which are the client’s fault, 500 errors are the server’s fault. They can be for any number of reasons, from an exception to a broken connection to a database error.
Ideally, you should never be able to cause a 500 error from the client—that would mean that your client could cause bugs in your server.
If you catch an error and it really does seem to be your fault, then you can respond with a 500 error. Unlike the rest of the status codes where you want to be as descriptive as possible, it’s often better to be vague and say “Internal Server Error”; that way hackers can’t know where the weaknesses in your system lie. We’ll talk much more about this in chapter 10 when we talk about security.
6.6. Summary
- An API in the context of Express is a web service that accepts requests and returns structured data (JSON in many cases).
- The fundamentals of building an API with Express involve using its JSON and routing features heavily.
- HTTP methods and how they relate to common application actions. GET typically corresponds to reading, POST typically corresponds to creation, PUT typically corresponds to changing, and DELETE typically responds to removal.
- Versioning your API is helpful for compatibility. Express’s router feature helps you create different versions of your API.
- There are lots of HTTP status codes (code 404 is perhaps the most famous). A good API uses these status codes properly.