Table of Contents for
Express in Action: Writing, building, and testing Node.js applications
 Express in Action: Writing, building, and testing Node.js applications
Published by
Manning Publications, 2016
Express in Action: Writing, building, and testing Node.js applications
Published by
Manning Publications, 2016
- Cover
- Express in Action: Writing, building, and testing Node.js applications
- Copyright
- Brief Table of Contents
- Table of Contents
- Preface
- Acknowledgments
- About this Book
- About the Cover Illustration
- Part 1. Intro
- Chapter 1. What is Express?
- Chapter 2. The basics of Node.js
- Chapter 3. Foundations of Express
- Part 2. Core
- Chapter 4. Middleware
- Chapter 5. Routing
- Chapter 6. Building APIs
- Chapter 7. Views and templates: Pug and EJS
- Part 3. Express in Context
- Chapter 8. Persisting your data with MongoDB
- Chapter 9. Testing Express applications
- Chapter 10. Security
- Chapter 11. Deployment: assets and Heroku
- Chapter 12. Best practices
- Appendix. Other helpful modules
- Index
- List of Figures
- List of Listings
Chapter 9. Testing Express applications
- How testing helps you to be more confident about your code’s behavior
- Common testing practices
- Running tests in Node.js with Mocha and Chai
- Using Mocha and SuperTest and Cheerio
Writing reliable code can be difficult. Even small software can be too complex for one person, which can create bugs. Developers have come up with a number of tricks to try to squash these errors. Compilers and syntax checkers automatically scan your code for potential bugs; peer code reviews let other people look at what’s written to see if they can spot errors; style guides can keep teams of developers on the same page. These are all helpful tricks you play that keep your code more reliable and bug-free.
Another powerful way to tackle bugs is with automated testing. Automated testing lets you codify (literally!) how you want your software to behave and lets you say, “My code works!” with much more confidence. It lets you refactor code without worrying if you broke something, and it gives you easy feedback about where your code fails.
You want these benefits for your Express applications. By the end of this chapter, you’ll
- Understand the motivation for testing at a high level
- Understand the types of testing
- Be able to do test-driven development (TDD), understanding and using the red-green-refactor model of development
- Write, run, and organize tests for general Node.js code to make sure your functions and models work as intended (using tools called Mocha and Chai)
- Test your Express applications to make sure your servers are behaving as they should (with a module called SuperTest)
- Test HTML responses to make sure your views are generating the correct HTML (using a jQuery-like module called Cheerio)
Let’s get started putting these components together.
9.1. What is testing and why is it important?
It should come as no surprise that there’s often a disconnect between how you envision your code behaving and how it actually behaves. No programmer has ever written bug-free code 100% of the time; this is part of our profession.
If you were writing a simple calculator, for example, you’d know in your head that you want it to do addition, subtraction, multiplication, and division. You can test these by hand every time you make a change—after making this change, does 1 plus 1 still equal 2? Does 12 divided by 3 still equal 4?—but this can be tedious and error-prone.
You can write automated tests, which effectively puts these requirements into code. You write code that says make sure, with my calculator, that 1 + 1 = 2 and that 12 ÷ 3 = 4. This is effectively a specification for your program, but it’s not written in English; it’s written in code for the computer, which means that you can automatically verify it. Testing is usually short for automated testing, and it simply means running test code that verifies your real code.
This automatic verification has a number of advantages. Most importantly, you can be much more confident about your code’s reliability. If you’ve written a rigorous specification that a computer can automatically run against your program, you can be much more confident about its correctness once you’ve written it.
It’s also really helpful when you want to change your code. A common problem is that you have a functioning program, but you want some part of it to be rewritten (perhaps to be optimized or cleaned up). Without tests, you’ll have to manually verify that your old code behaves like the new code. With good automated tests, you can be confident that this refactoring doesn’t break anything.
Automated testing is also a lot less tedious. Imagine if, every time you wanted to test your calculator, you had to make sure that 1 + 1 = 2, 1 – 1 = 0, 1 – 3 = –2 and so on. It’d get old pretty fast! Computers are fantastic at handling tedium like this. In short: you write tests so you can automatically verify that your code (probably) works.
9.1.1. Test-driven development
Imagine you’re writing a little JavaScript that resizes images to proper dimensions, a common task in web applications. When passed an image and dimensions, your function will return the image resized to those dimensions. Perhaps your boss has assigned this task, or perhaps it’s your own impetus, but in any case, the specifications are pretty clear.
Let’s say that the previous paragraphs have moved you, that I’ve convinced you to write automated tests for this. When do you write the tests? You could write the image resizer and then write the tests, but you could also switch things up and write the tests first.
Writing tests first has a number of advantages. When you write tests first, you’re literally codifying your specification. When you’ve finished writing your tests, you’ve told the computer how to ask, “Is my code finished yet?” If you have any failing tests, then your code isn’t conforming to the specification. If all of your tests pass, then you know that your code works as you specified. Writing the code first might mislead you and you’ll write incomplete tests.
You’ve probably used an API that’s really pleasant to work with. The code is simple and intuitive. When you write tests first, you’re forced to think about how your code should work before you’ve even written it. This can help you design what some people call dream code, the easiest interface to your code. TDD can help you see the big picture about how your code should work and make for a more elegant design.
This “write tests first” philosophy is called test-driven development, shortened to TDD. It’s so named because your tests dictate how your code forms.
TDD can really help you, but sometimes it can slow you down. If your specifications are unclear, you could spend a lot of time writing tests, only to realize that you don’t want to implement what you set out to! Now you have all of these useless tests and a lot of wasted time. TDD can limit your flexibility, especially if your specifications are a little foggy. And if you’re not writing tests at all, then TDD is contrary to your very philosophy!
Some folks use TDD for all their development—test first or go home. Others are hugely against it. It’s not a silver bullet, nor is it a deadly poison; decide whether TDD is right for you and your code. We’ll be using TDD in this chapter, but don’t take that as an unconditional endorsement. It’s good for some situations and not so good for others.
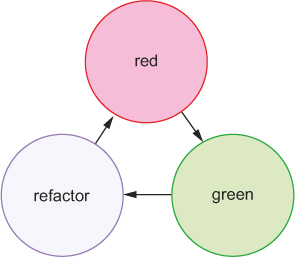
How TDD works: red, green, refactor
The TDD cycle usually works in three repeating steps, called red, green, refactor, as shown in figure 9.1:
1. The red step. Because it’s TDD, you write your tests first. When you write these tests before you write any of the real code, none of your tests will pass—how could they when no real code has been written? During the red step, you write all of your tests and run them to watch them all fail. This step is so named for the red color that you usually see when you have a failing test.
2. The green step. Now that you’ve written all of your tests, you begin to fill in the real code to satisfy all the tests. As you make progress, your tests will slowly go from red (failing) to green (passing). Like the previous step, it’s called the green step because you typically see green for a passing test. Once you’re all green (all of your tests pass), you’re ready for the step 3.
3. The refactor step. If all of your tests are green, that means all of your code works, but it might not be perfect. Perhaps one of your functions is slow or you’ve chosen bad variable names. Like a writer cleaning up a draft of a book, you go back and clean up the code. Because you have all of your tests, you can refactor without worrying that you’re breaking some unforeseen part of your code.
4. Repeat the process. You probably haven’t written all of your code for the project, so go back to step 1 and write tests for the next part.
Figure 9.1. The repeating redgreen-refactor cycle of TDD
Here’s how you might use red-green-refactor for your image resizer:
- The red step. You’d write some of your tests. For example, if you pass it a JPEG image, your function should return a JPEG image; if you pass it a PNG image, your function should return a PNG image. These tests aren’t complete, but it’s a good starting point.
- The green step. Now that you have some tests, you’ll fill in the code to make your tests pass. Note that you haven’t written any tests that say that you should resize the image, only that you should return the same file type. So you don’t write the image resizing yet! You simply return the image and all of your tests can pass.
- The refactor step. Once all of your tests pass, you can go back and clean up the code you’ve written. You might have cut corners in the previous step or you might be able to make your code faster. This is your chance to clean things up and make sure the tests still pass.
- Repeat the process. Go back to the red step and add failing tests for resizing JPEG images, then implement JPEG resizing to make the tests green, then refactor, and repeat.
9.1.2. Cardinal rule: when in doubt, test
In short, you can almost never have too many tests. As you can likely imagine, successful tests don’t necessarily mean that your code works, but it’s a good start. For example, if you were testing a function, you could test that the function is a function. That’s a very valid thing to test, but if it’s your only test, then you might be misled into thinking that your code works when all of your tests succeed.
Because of that, you want to test as much of your code as you can. You want to poke at every (reasonable) nook and cranny of your software to make sure it performs as you expect. The more passing tests you have, the more you approach certainty that your code works as you expect. You can never be 100% sure—something might break somewhere along the line that you didn’t think of—but if you’ve thrown everything you can possibly think of at your code, it’s probably working.
Testing can make you more confident about your code, but it’s just one method. As we discussed at the beginning of the chapter, there are plenty of other methods like peer reviews and code linters. An extension of testing to further boost your confidence is the idea of code coverage.
Code coverage tools see how much of your code is covered by your tests. You could imagine writing 10 passing tests for your code but completely ignoring one of your functions, which is totally broken! Code coverage tools tell you what parts of your code are untouched by tests and therefore untested. In the Node world, the prevailing code coverage tool seems to be Istanbul (https://github.com/gotwarlost/istanbul). We won’t cover it here, but if you’re looking for even greater confidence, take a look at Istanbul.
Lost time is among the only reasons not to write tests. This is both lost time for the computer—some tests can be computationally expensive—and lost time for you as a human being—it takes time to type the tests.
9.2. Introducing the Mocha testing framework
Just as it’s possible to write web servers with only Node, it’s possible to write tests with only Node. You could create a file that checked a bunch of conditions to make sure everything was working as normal, and then you could output the results with console.log. Like using Express, you might find this raw method to be verbose and find yourself having to write a lot of boilerplate code just to write tests.
Mocha (https://mochajs.org/) is a testing framework that helps to reduce some of this headache. (It’s written by the creator of Express, by the way.) It gives you a nice syntax for organizing your tests and has several other features like asynchronous test support and easy-to-read output. It’s not specifically tied to Express, so you can use it to test Express applications, JavaScript functions, database models, and anything else that runs inside the Node runtime.
Before we start testing Express applications, let’s test a simple function to see how it’s done. Imagine you want to write a function called capitalize that sets the first character of a string in an uppercase letter and makes the rest of the string lowercase. For example, "hello, WORLD" would become "Hello world".
9.2.1. How does Node.js testing work?
Testing in Node.js applications has three major parts: the real code (written by you), the testing code (written by you), and the test runner (usually a third-party module, probably not written by you):
- The real code is whatever you want to test. This might be a function, or a database model, or an Express server. In a Node.js context, this is anything that assigns something to module.exports.
- The test code tests your real code. This will require whatever you want to test and then start asking questions about it. Does the function return what it should return? Do your objects behave as they should?
- The test runner is an executable that runs on your computer. It looks at your test code and runs it. Test runners commonly print out things like “These tests succeeded, these tests failed, and here’s how” or “The tests took 100 milliseconds to run.” You’ll be using Mocha in this chapter, but you might’ve used Jasmine or QUnit in your JavaScript career. You might’ve used RSpec or JUnit in another life.
Both the real code and your test code live in the same repository. You’ll also define Mocha (your test runner) as a dependency, and you’ll install it locally in your repository.
9.2.2. Setting up Mocha and the Chai assertion library
Let’s take a stab at writing a first version of this. Create a new directory and create one file inside, capitalize.js. Then put the code from the following listing inside it.
Listing 9.1. A first version of the capitalize function (in capitalize.js)
function capitalize(str) {
  var firstLetter = str[0].toUpperCase();
  var rest = str.slice(1).toLowerCase();
  return firstLetter + rest;
}

module.exports = capitalize;
If you eyeball the code, it looks like it should work, but you need to write tests to become more confident about that.
Create a package.json file in the same directory, which should contain the following code.
Listing 9.2. The package.json for the capitalize function
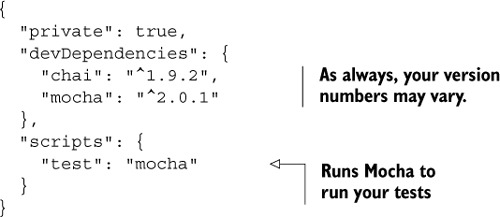
You’re using two modules here: Mocha (www.mochajs.org) and Chai (http://chaijs.com). Mocha is a testing framework. If you’ve ever used other JavaScript testing frameworks like Jasmine, this should be familiar. At the end of the day, it’s the thing that actually runs your tests. It’s the syntax you use to say “Here’s what I’m testing, let me set it up, here’s where I test thing A, here’s where I test thing B, and so on.”
Chai is an assertion library. There are a number of assertion libraries (including one built into Node). Whereas Mocha lays out the tests, Chai (almost literally) says, “I expect the helloWorld function to return 'hello, world'.” The actual syntax is expect(helloWorld()).to.equal("hello, world"), which reads a lot like the previous English. If helloWorld works and returns "hello, world", your tests will pass. If it doesn’t return "hello, world", an error will appear, telling you that things aren’t as you expect.
Mocha waits for an assertion library to throw an error. If no error is thrown, the test passes. If an error is thrown, the test fails. That’s why you use Chai—it’s a nice way to throw errors when your tests fail.
The distinction between Mocha and Chai is important. Mocha is the test runner, so there’s an actual executable that runs (you don’t ever type node my_tests.js nor do you ever require it). Mocha injects global variables into your code—as you’ll see, these globals exist to structure each of your tests. Inside of each of these tests, you use Chai to actually test your code. When you test your capitalization library, you’ll use Mocha to break your tests into pieces like “The capitalization library capitalizes single words” and “The capitalization library doesn’t break if you pass it the empty string.” At the Chai level, you’ll call your capitalization library and make sure that your module’s output matches what you expect.
9.2.3. What happens when you run your tests
As you might expect, you’ll want to run these tests written with Mocha and Chai in order to make sure that your code works. How do you do this?
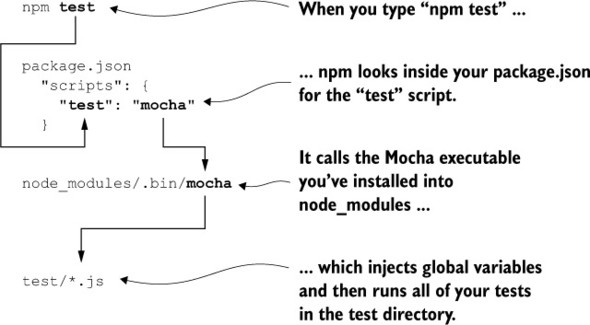
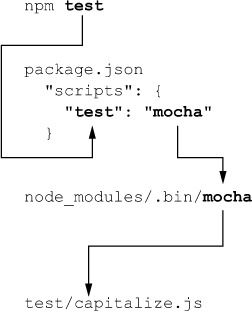
First, as shown in listing 9.2, you’ve defined the test script in your package.json. This allows you to type npm test into the command line. This runs Mocha, which in turn runs your tests, as you can see in figure 9.2.
Figure 9.2. What happens when you type npm test into your command line
You have everything set up. It’s time to start writing your tests.
9.2.4. Writing your first test with Mocha and Chai
Now that you’ve written a first version of your capitalization function, you’ll write a test to see if it works. Create a folder called test in the root of your project; this is where your test code will live. Inside that directory, create a file for testing your capitalization; I called mine capitalize.js. Put the code from the following listing inside.
Listing 9.3. Your first test for capitalize (in test/capitalize.js)
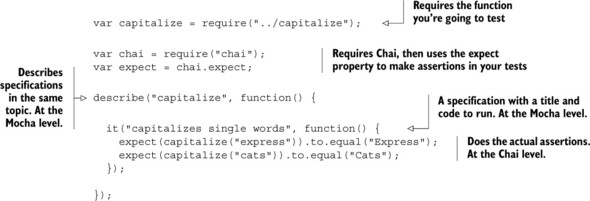
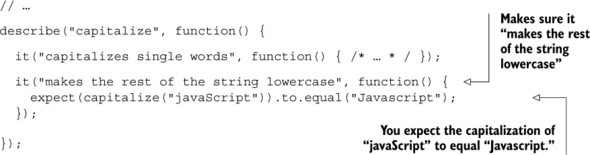
So what’s going on here? First, you require your module so that you can test it. Next, you require Chai and use its expect property so that you can use it to make assertions later on.
Next, you describe a suite of tests. This is basically a component of your application; this could be a class or just a slew of functions. This suite is called “capitalize”; it’s English, not code. In this case, this suite describes the capitalization function.
Inside this suite, you define a test (you’ll add more in a moment). It’s a JavaScript function that says what some piece of your program should do. It says it in plain English (“It capitalizes single words”) and in code. For each suite, you can have a number of tests for tests you want to do.
Finally, inside the test, you expect the result of capitalize("express") to equal "Express", and the same capitalization should happen for "cats".
With respect to your code, running npm test goes through a flow like that shown in figure 9.3.
Figure 9.3. Typing npm test will produce this flow and ultimately end up running the code inside test/capitalize.js.
If you go to the root of your project and type npm test, you’ll see something like the following output:
capitalize
  ✓ capitalizes single words

1 passing (9ms)
That means you’ve run one test, and it passes! Congratulations—you’ve written your first test. You don’t know that everything works 100%, but you know that it properly capitalizes the first letter of two different words.
You’re not out of the woods yet; there are more tests to write to become more confident that your code works.
9.2.5. Adding more tests
You’ve written a single test so far, and it’s showed you that your code isn’t totally broken. But you don’t know if it works on more complex inputs. What would happen if you passed it a string with no letters? What about an empty string? You can see that you’re capitalizing the first letter, but are you lowercasing the rest of the string? Let’s add more tests to test the unhappy paths.
Start by adding another relatively simple test: does it make the rest of the string lowercase? You’ll leave everything from before and add a new test to test/capitalize.js, as shown in the next listing.
Listing 9.4. Another test for capitalize (in test/capitalize.js)
You can run your tests with npm test (npm t for short), and you should see something like this:
capitalize
  ✓ capitalizes single words
  ✓ makes the rest of the string lowercase

2 passing (10ms)
Cool! Now you’re more confident that you’re capitalizing the first letter and lowercasing the rest of the string. But you’re not safe yet.
What about adding a test for the empty string? Capitalizing the empty string should only return the empty string, right? Write the test in the following listing to see if that happens.
Listing 9.5. Testing capitalization of the empty string (in test/capitalize.js)
// ...

describe("capitalize", function() {

  // ...

  it("leaves empty strings alone", function() {
    expect(capitalize("")).to.equal("");
  });

});
Run npm test again to run this new test (and all the others). You should see something like the following output:
capitalize
  ✓ capitalizes single words
  ✓ makes the rest of the string lowercase
  1) leaves empty strings alone


2 passing (10ms)
1 failing

1) capitalize leaves empty strings alone:
   TypeError: Cannot call method 'toUpperCase' of undefined
    at capitalize (/path/to/capitalizeproject/capitalize.js:2:28)
    ...
Uh oh! Looks like there’s a red/failing test. Let’s examine it to see what’s wrong.
First, you can see that the error occurs when you run the “leaves empty strings alone” test. The error is a TypeError, and it’s telling you that you can’t call toUpperCase on undefined. You can also see a stack trace, which starts on line 2 of capitalize.js. Here’s the line that’s causing the error:
var firstLetter = str[0].toUpperCase();
Looks like str[0] is undefined when you pass the empty string, so you’ll need to make sure it’s defined. Replace the use of square brackets with the charAt method. Your new-and-improved function should look the one in the next listing.
Listing 9.6. The new capitalize.js
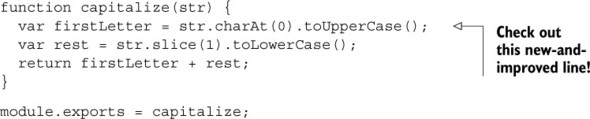
Rerun your tests with npm test and you should see everything green!
capitalize
  ✓ leaves empty strings alone
  ✓ capitalizes single words
  ✓ makes the rest of the string lowercase

3 passing (11ms)
You can add a few more tests to make sure your code is robust. You’ll add a test that doesn’t try to capitalize any letters. You’ll also make sure it properly capitalizes multiword strings. You should also make sure it leaves a string alone if it’s already properly capitalized. The new tests in the following listing should pass with the code you already have.
Listing 9.7. New tests for capitalization (in test/capitalize.js)
// ...

it("leaves strings with no words alone", function() {
  expect(capitalize("  ")).to.equal("  ");
  expect(capitalize("123")).to.equal("123");
});


it("capitalizes multiple-word strings", function() {
  expect(capitalize("what is Express?")).to.equal("What is express?");
  expect(capitalize("i love lamp")).to.equal("I love lamp");
});

it("leaves already-capitalized words alone", function() {
  expect(capitalize("Express")).to.equal("Express");
  expect(capitalize("Evan")).to.equal("Evan");
  expect(capitalize("Catman")).to.equal("Catman");
});

// ...
Run npm test and you should see your tests pass.
Finally, you’ll try to throw one more curveball at your function: the String object. Every JavaScript style guide will warn you against using the String object—it’s bad news that can cause unexpected behavior, like they say about == or eval. It’s possible that you don’t even know about this feature of JavaScript, which is for the best, because you should never use it.
Unfortunately, there are inexperienced programmers out there (and others are, sadly, fools). Some of them might be using your code. You could argue that bugs are their fault, but you could also argue that your code shouldn’t be the problem. That’s why you should test your function with the String object, just in case. Let’s write one last test that uses the String object, as shown in the next listing.
Listing 9.8. Testing with the String object
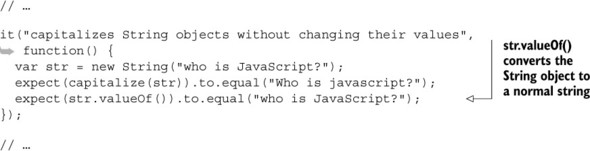
You have seven tests for your little capitalization function; run npm test one last time to make sure they all pass:
capitalize
  ✓ leaves empty strings alone
  ✓ leaves strings with no words alone
  ✓ capitalizes single words
  ✓ makes the rest of the string lowercase
  ✓ capitalizes multiple-word strings
  ✓ leaves already-capitalized words alone
  ✓ capitalizes String objects without changing their values

7 passing (13ms)
Look at you! You’re now pretty sure your capitalization function works, even when passed a variety of odd strings.
9.2.6. More features of Mocha and Chai
So far, you’ve only seen how you can use Mocha and Chai to test equality. Effectively, you’ve used a glorified equality operator. But these two modules can do much more than that. We won’t go through all of the options here, but we’ll look at a couple of examples.
Running code before each test
It’s common to run setup code before you run your assertions. Perhaps you’re defining a variable to be manipulated or spooling up your server. If you’re doing this setup across many tests, you can use the Mocha beforeEach function to help reduce the amount of repeated code.
Let’s say you’ve made a User model and you want to test it. In every single test, you’re creating a User object and want to test it. The next listing shows how you might do that.
Listing 9.9. Using Mocha’s beforeEach feature
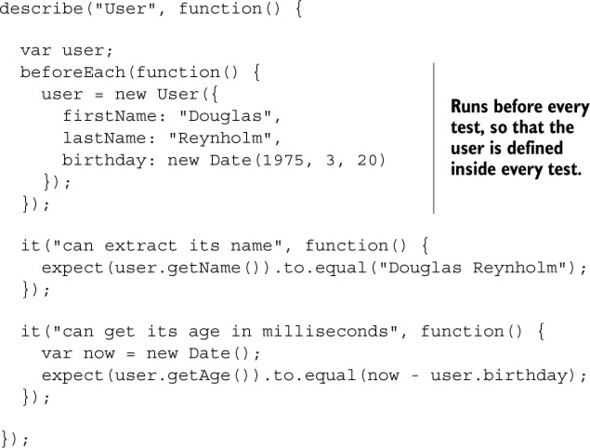
The code in the previous listing tests some of the functionality of an imaginary User object, but it doesn’t have code to redefine an example User object inside every test (inside every it block); it defines them in a beforeEach block, which redefines the user before running each test.
Testing for errors
If you pass a string to your capitalization function, everything should work normally. But if you pass a non-string, like a number or undefined, you want your function to throw some kind of error. You can use Chai to test this, as shown in the next listing.
Listing 9.10. Using Chai to test for errors
// ...

it("throws an error if passed a number", function() {
  expect(function() { capitalize(123); }).to.throw(Error);
});

// ...
This will test that calling capitalize with 123 throws an error. The only tricky bit is that you have to wrap it in a function. This is because you don’t want your test code to create an error—you want that error to be caught by Chai.
Reversing tests
You might want to test that a value equals another value or that a function throws an error, but you might also want to test that a value doesn’t equal another value or that a function doesn’t throw an error. In the spirit of Chai’s almost-readable-as-English syntax, you can use .not to reverse your test, as shown in the following listing.
Let’s say that you want to make sure that capitalizing “foo” doesn’t equal “foo.” This is a bit of a contrived example, but you might want to make sure that your capitalization function does something.
Listing 9.11. Negating tests

We’ve only begun to scratch the surface of what Chai can do. For more of its features, check out the documentation at http://chaijs.com/api/bdd/.
9.3. Testing Express servers with SuperTest
The previous techniques are useful for testing business logic like model behavior or utility functions. These are often called unit tests; they test discrete units of your app. But you might also want to test the routes or middleware of your Express applications. You might want to make sure that your API endpoints are returning the values they should, or that you’re serving static files, or a number of other things. These are often called integration tests because they test the integrated system as a whole, rather than individual pieces in isolation.
You’ll use the SuperTest module (https://github.com/visionmedia/supertest) to accomplish this. SuperTest spools up your Express server and sends requests to it. Once the requests come back, you can make assertions about the response. For example, you might want to make sure that you get an HTTP 200 status code when you send a GET request to the homepage. SuperTest will send that GET request to the homepage and then, when you get the response, make sure it has 200 as its HTTP status code. You can use this to test the middleware or routes that you define in your application.
Most browsers send a header called User-Agent that identifies the type of browser to the server. This is often how websites serve mobile versions of sites to you if you’re on a mobile device: a server can see that you’re on a mobile device and send you a different version of the page.
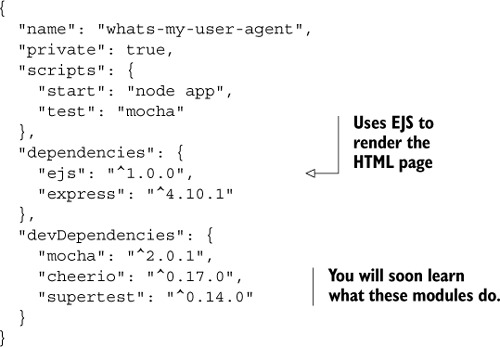
Let’s build “What’s My User Agent?” a simple application for getting the User Agent string of your users. It will support a classic HTML view when you visit it in a browser. You’ll also be able to get the user’s User Agent as plain text. There will be just one route for these two responses. If a visitor comes to the root of your site (at /) and doesn’t request HTML (as most web browsers would), they’ll be shown their User Agent as plain text. If they visit the same URL but their Accepts header mentions HTML (as web browsers do), they’ll be given their User Agent as an HTML page. Create a new directory for this project, and create a package file in the folder, as shown in the listing that follows.
Listing 9.12. package.json for “What’s My User Agent?”
In the previous examples, you wrote your code and then wrote the tests. In this example, you’ll flip it around and do TDD. You know what you want your application to do, so you can write the tests right now without worrying about how you implement it. Your tests will fail at first, because you won’t have written any real code! After your tests are written, you’ll go back and fill in the application to make your tests pass.
The TDD approach isn’t always the best; sometimes you aren’t quite sure what your code should look like, so it’d be a bit of a waste to write tests. There are huge flame wars online about the pros and cons of TDD; I won’t reiterate them here, but you’ll try TDD for this example.
You’ll write tests for the two major parts of this application:
- The plain-text API
- The HTML view
You’ll start by testing the plain-text API.
9.3.1. Testing a simple API
Because it’s the simpler, you’ll start by testing the plain-text API. In plain English, this test will need to send a request to your server at the / route, so the server knows that you want plain text in the first place. You’ll want to assert that (1) the response is the right User Agent string and (2) the response comes back as plain text. Let’s codify this English into Mocha tests.
Create a folder called test for all your tests, and create a file for testing the plain-text API; I called mine txt.js. Inside, put the skeleton shown in the following listing.
Listing 9.13. Skeleton of plain-text tests (in test/txt.js)
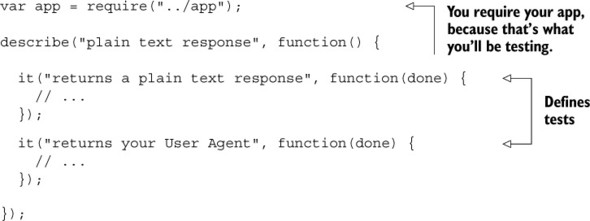
So far, this is just a skeleton, but it’s not too different from what you had before when you were testing your capitalization module. You’re requireing your app (which you haven’t written yet), describing a suite of tests (plain-text mode, in this case), and then defining two tests, one making sure you get a plain-text response and another that you get the correct User-Agent string.
Let’s fill in the first test, to make sure that your application returns a plain-text response. Remember: what you’re testing doesn’t yet exist. You’re going to write the tests, watch them fail, and then fill in the real code to make your tests pass.
Your first test will need to make a request to the server, making sure to set the Accept header to text/plain, and once it gets a response from the server, your test should ensure that it comes back as text/plain. The SuperTest module will help you with this, so require it at the top of your file. Then you’ll use SuperTest to make requests to your server and see if it gives you the response you want. All of this is shown in the next listing.
Listing 9.14. Using SuperTest to check the response (in test/txt.js)
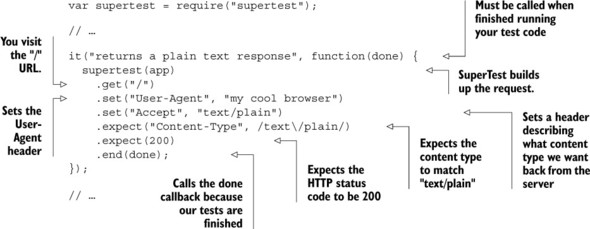
Notice how you use SuperTest to test your application. It’s not quite like Chai in that it reads like English, but it should be pretty straightforward. Here’s what you’re doing with SuperTest, line by line:
- You wrap your app up by calling supertest with app as an argument. This returns a SuperTest object.
- You call get on that SuperTest object with the route you want to request; in this case, you want the application’s root (at “/”).
- You set options on this request; in this case, you’re setting the HTTP Accept header to text/plain and the User-Agent header to "my cool browser". You call set multiple times because you want to set multiple headers.
- In the first call to expect, you say “I want the Content-Type to match 'text/plain'.” Notice that this is a regular expression, not a string. You want to be a little flexible here; the Content-Type could be “text/plain”, or it could be “text/plain; charset=utf-8” or something like that. You want to test for the plain-text content type but not for the specific character set because it’s ASCII in this case, which is the same in most character encodings.
- In the second call to expect, you’re making sure you get the HTTP status code of 200, meaning “OK.” You could imagine writing a test for a nonexistent resource, where you’d expect the status code to be 404 or any of the other many HTTP status codes.
- Finally, you call end with done. done is a callback function passed to you by Mocha, which you use to signal that asynchronous tests (like this one) are all done.
Next, you’ll fill in your second test to make sure that your application is returning the right User Agent. It’ll look pretty similar to the previous one, but you’ll test the response body. Fill in your second test like this.
Listing 9.15. Testing that your app returns the right User Agent string (in test/txt.js)
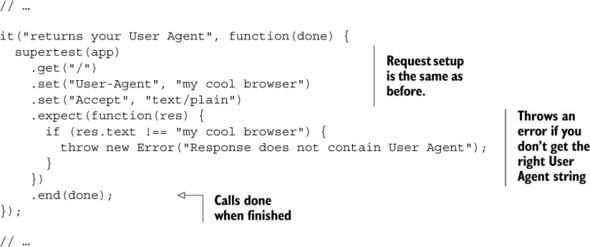
The first three lines of this test and the last line should look similar to before; you set up SuperTest to test your app, and when you’ve finished testing things, you call done.
The middle part calls expect with a function this time. This function throws an error if res.text (the text that your application returns) isn’t equal to the User-Agent header you passed in. If it is equal, then the function simply finishes with no fuss.
One last thing: you have some duplicate code here. In this test, you’re always making the same request to your server: the same application, the same route, and the same headers. What if you didn’t have to repeat yourself? Enter Mocha’s beforeEach feature, as shown in the next listing.
Listing 9.16. Reducing repetition in code with beforeEach (in test/txt.js)
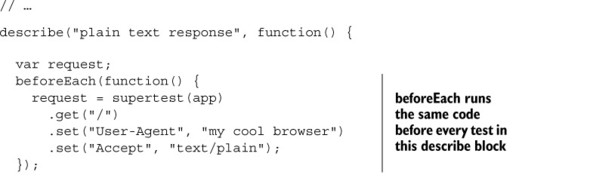
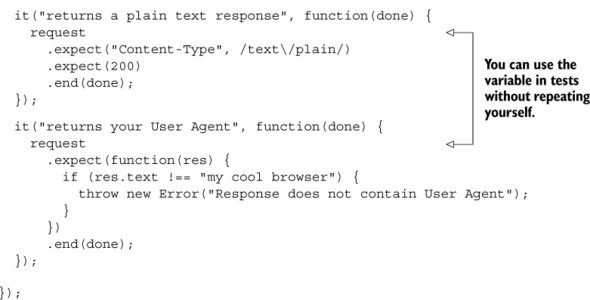
As you can see, you’re using beforeEach to remove repeated code. The benefits of this really start to show as you have many tests with the same setup every time.
Now that you’ve written your two tests, you can run them with npm test as a sanity check. Because you haven’t made the file where your app will live, you should get an error that contains something like “Cannot find module ‘../app’.” This is exactly what you’d expect at this point: you’ve written the tests but no real code, so how in the world could your tests pass? This is the red step in the red-green-refactor cycle.
You can make the errors a little better by creating app.js in the root of your project and putting a skeleton Express app inside, like this.
Listing 9.17. Skeleton of app.js
var express = require("express");

var app = express();

module.exports = app;
Your tests will still fail when running npm test. Your errors might look something like this:
html response
  1) returns an HTML response
  2) returns your User Agent

plain text response
  3) returns a plain text response
  4) returns your User Agent

0 passing (68ms)
4 failing

1) html response returns an HTML response:
   Error: expected 200 "OK", got 404 "Not Found"
     ...


2) html response returns your User Agent:
   TypeError: Cannot read property 'trim' of null
     ...

3) plain text response returns a plain text response:
   Error: expected "Content-Type" matching /text\/plain/, got "text/html;
   charset=utf-8"
     ...

4) plain text response returns your User Agent:
   Error: Response does not contain User Agent

     ...
No doubt, these are errors. But these errors are already leagues better than “Cannot find module.” You can see that real things are being tested here.
Let’s write your application to make these tests go from red (failing) to green (passing).
9.3.2. Filling in the code for your first tests
Now that it’s time to write real code, put the code from the following listing inside app.js in the root of your project.
Listing 9.18. First draft of app.js
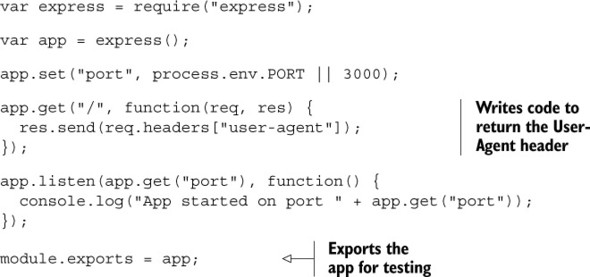
The last line is the only thing that might seem new: you export the app. Normally, when you’re running a file (like node app.js), you don’t need to export the app because you don’t think of it as a module. But when you’re testing the application, you’ll need to export it so that the outside world can poke at it and test it.
If you run npm test now, you’ll see something like the following output:
plain text response
  1) returns a plain text response
  ✓ returns your User Agent

1 passing (29ms)
1 failing


1) plain text response returns a plain text response:
   Error: expected "Content-Type" matching /text\/plain/, got "text/html;
     charset=utf-8"
    at Test.assert ...
    ...
This is good! You’re not completely finished because only half of your tests pass, but it looks like you’re returning the right User Agent. Add just one more line to make all of your tests pass, as shown in the next listing.
Listing 9.19. Making app.js return plain text
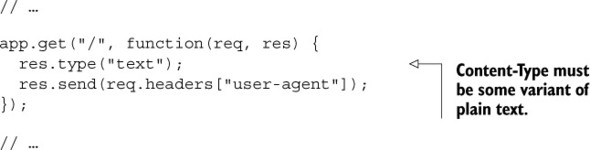
Now, when you run npm test, you’ll see all of your tests pass!
plain text response
  ✓ returns a plain text response
  ✓ returns your User Agent

2 passing (38ms)
This is great; you’re now returning the plain-text responses you desire. Now you’re finished with the green step in the red-green-refactor cycle. In this case the final refactor step is simple: you don’t have to do anything. Your code is so short and sweet that it doesn’t need much of a cleanup yet.
But wait, didn’t you also want to return HTML responses? Your tests shouldn’t be passing yet, should they? You’re right, wise reader. Let’s write more tests and go back to the red step.
9.3.3. Testing HTML responses
As we’ve seen, if the user requests plain text, they’ll get plain text. But if they want HTML, they should get HTML, but they’re getting only plain text right now. To fix this the TDD way, you’ll write tests to make sure the HTML stuff works, you’ll watch those tests fail, and then you’ll fill in the rest of the code.
Create test/html.js, which will hold the tests for the HTML part of your server. The skeleton for this file will look pretty similar to what you’ve seen in the plain-text part of your tests, but the innards of one of them will look different. The next listing shows the skeleton of the HTML tests.
Listing 9.20. Testing your HTML responses (in test/html.js)
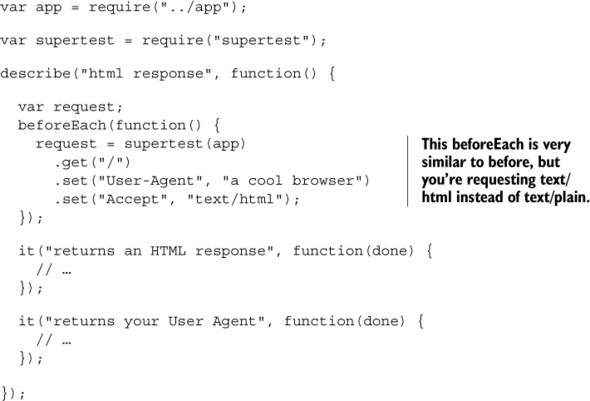
So far, this should look a lot like the code you had from your plain-text tests. You’re requiring the app and SuperTest; you’re doing some test setup in a beforeEach block; you’re making sure you’re getting HTML back and also the right User Agent.
The first test in this file also looks pretty darn similar to the first one you wrote in the other file. Let’s fill it in now, as shown in the next listing.
Listing 9.21. Testing for an HTML response (in test/html.js)
// ...

it("returns an HTML response", function(done) {
  request
    .expect("Content-Type", /html/)
    .expect(200)
    .end(done);
});

// ...
This is very similar to before. You’re testing for a response that contains html and you want the HTTP status code to be 200.
The next test is where things are different. First, you’ll write the code to get the HTML response from the server. This next listing should look pretty similar to what you’ve seen before.
Listing 9.22. Getting the HTML response (in test/html.js)
// ...

it("returns your User Agent", function(done) {
  request
    .expect(function(res) {
      var htmlResponse = res.text;
      // ...
    })
    .end(done);
});

// ...
But now it’s time to do something with that HTML. You don’t just want the User Agent string to show up somewhere in the HTML. You want it to show up inside a specific HTML tag. Your response will look something like the one in the following listing.
Listing 9.23. What you might be looking for in your HTML responses
<!DOCTYPE html>
<html>
<head>
  <meta charset="utf-8">
</head>
<body>
  <h1>Your User Agent is:</h1>
  <p class="user-agent">Mozilla/5.0 (Windows NT 6.1; WOW64; rv:28.0) Gecko/
     20100101 Firefox/36.0</p>
</body>
</html>
You don’t care too much about most of this HTML; the thing you want to test is inside something with the class user-agent. How do you get it out?
Enter Cheerio (https://cheeriojs.github.io/cheerio/), the final dependency from our list of devDependencies. In short, Cheerio is jQuery for Node. That might sound silly—why would you need to deal with the DOM (Document Object Model) in an environment that doesn’t have a DOM?—but it’s exactly what you need here. You need to be able to look through the HTML and find the User Agent inside. If you were in the browser, you could use jQuery to do this. Because you’re in Node, you’ll use Cheerio, which will be very familiar to anyone who knows jQuery. You’ll use Cheerio to parse the HTML, find where the User Agent should be, and make sure that it’s valid.
Start by requiring Cheerio at the top of your test file, and then you’ll use Cheerio to parse the HTML you get from your server, as shown here.
Listing 9.24. Parsing HTML with Cheerio (in test/html.js)
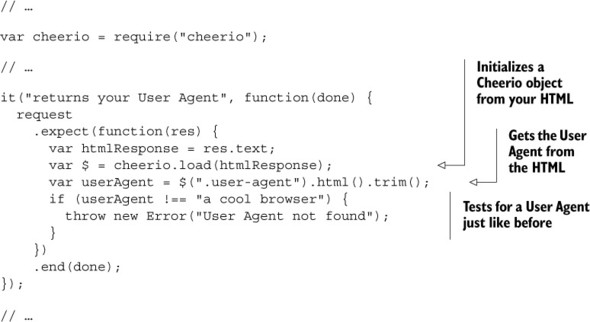
Here, you use Cheerio to parse your HTML and make sense of it as you do with jQuery. Once you’ve parsed the HTML and gotten the value you want, you can run your tests just like before! Cheerio makes parsing HTML easy, and you can use it to test HTML responses.
Now that you’ve written your two tests, you can run npm test. You should see your plain-text tests pass as before, but your new HTML tests will fail because you haven’t written the code yet—this is the red step. Let’s make those tests pass.
If you’ve been following along so far, the code for this shouldn’t be too crazy. You’ll make changes to your request handler and render an EJS view that will contain the User Agent as your test expects.
First, you need to modify your app.js. You’ll set up EJS as your view engine and then render the HTML view when the client wants HTML, as shown in the following listing.
Listing 9.25. Filling in app.js to support HTML responses
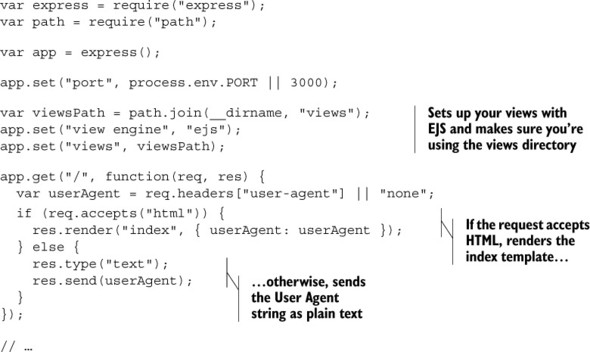
This code shouldn’t be too wild if you’ve seen views before. You’re setting up EJS as your view engine, assigning a path to it, and then rendering a view if the user requests it.
The last thing you’ll need to do is define the EJS view. Create views/index.ejs and put the following code inside.
Listing 9.26. views/index.ejs
<!DOCTYPE html>
<html>
<head>
  <meta charset="utf-8">
  <style>
  html {
    font-family: sans-serif;
    text-align: center;
  }
  </style>
</head>
<body>
  <h2>Your User Agent is:</h2>
  <h1 class="user-agent">
    <%= userAgent %>
  </h1>
</body>
</html>
It’s time for the big moment. Run all of your tests with npm test, and you should see a sea of positivity:
html response
  ✓ returns an HTML response
  ✓ returns your User Agent

plain text response
  ✓ returns a plain text response
  ✓ returns your User Agent

4 passing (95ms)
All of your tests pass! It’s all green! Happy days! Now you know how to test an application with Mocha, Chai, SuperTest, and Cheerio.
The biggest takeaway from this chapter isn’t a series of tools; it’s the fact that through testing, you can be much more confident about your application’s behavior. When you write code, you want your code to work as you intend. That’s often hard to do, but with testing, you can be a little surer that things work as you intend.
9.4. Summary
- You want to test because you want to be more confident about your code.
- There are a few kinds of testing, from low-level unit tests to high-level integration tests.
- Test-driven development (TDD) is a development style where you write the tests before you write the real code. Typically, you work in the red-green-refactor cycle: red while your tests fail, green after your tests are passing, and refactor your code once things work.