Table of Contents for
Responsive Web Design with Adobe Photoshop
 Responsive Web Design with Adobe Photoshop
Published by
Adobe Press, 2015
Responsive Web Design with Adobe Photoshop
Published by
Adobe Press, 2015
- Cover Page
- Title Page
- Copyright Page
- Acknowledgments
- Contents
- 1. Photoshop’s New Groove
- 2. How Did We Get Here?
- 3. The Case for Designing in the Browser
- 4. A Plea for Photoshop–Browser Harmony
- 5. Vetting Direction
- 6. Establishing Style
- 7. Establishing the System
- 8. Getting Back into Photoshop with Page Layers
- 9. Extracting Your Way Out of Photoshop
- 10. Extending Photoshop
- 11. Remembering Etiquette
- 12. Adopting a Completely New Workflow
- Index
- Responsive Web Design with Adobe Photoshop
10. Extending Photoshop
As we’ve been weaving between Photoshop and the browser, it may have occurred to you that efficiency is of critical importance. It’s kind of like when I need to go to Home Depot or when my wife goes to Target: We always know what we need to get, but we’ll never get anything done if we spend forever and a day shopping for it.
On its own, Photoshop can be an efficient tool for web design. However, the variety of workflows it needs to support makes it difficult to optimize it for every application. Just think of the different projects and clients we work for. While some of us are designing minimal and flat marketing sites, others are making detailed dashboards and complex interfaces reliant on icons.
I don’t know what end of the spectrum you fall on. That’s why you might find this chapter the most valuable of the bunch.
Building the “You” Version of Photoshop
If you really want to work efficiently in Photoshop, you’ll need to tailor it to your specific needs by leveraging some of the thousands of plug-ins and extensions out there. Trying to find a decent plug-in can be like finding a needle in a haystack. People have been making extensions for Photoshop seemingly forever, so trying to sort through what’s valuable and what will infect your computer with a virus can be overwhelming.
Don’t fear. I’ve selected a few of my favorites in this chapter (and I hope I’ve earned your trust by this point).
Let’s break down these helpful tools into the following categories:
![]() Artwork: Plug-ins for quicker, easier, and more accurate comping
Artwork: Plug-ins for quicker, easier, and more accurate comping
![]() Color: Alternatives to the baked-in color picker
Color: Alternatives to the baked-in color picker
![]() Assets: Plug-ins that generate icons and code
Assets: Plug-ins that generate icons and code
![]() Prototyping: Useful services for infusing interactivity
Prototyping: Useful services for infusing interactivity
![]() Organization: Utilities for keeping things tidy
Organization: Utilities for keeping things tidy
If you’re like me, you may have the impulse to use this as a checklist and install every last one. I can’t speak to what that might do to the performance of Photoshop or your computer, but I can say that it’s probably not the most effective way to customize Photoshop. The way to get the most use out of these plug-ins is to find the ones that will help you the most and just keep the rest on your radar for a time when you might need them in the future. Having too many options for workflow efficiency can be confusing and actually slow you down (not that I’ve had that happen or anything).
I won’t guarantee it, but I’m confident at least one of these extensions will significantly change the way you use Photoshop for the better.
Artwork
At the core of what we do in Photoshop is creating artwork. While it’s likely you won’t find a plug-in out there to do your job for you, there’s a handful that can provide shortcuts to finding what you need to make a beautiful design.
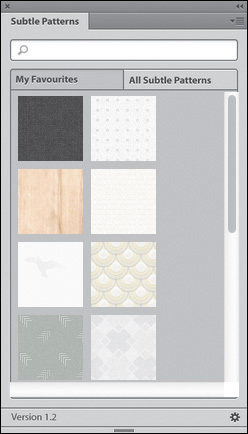
Subtle Patterns
Price: $11.99
If you’ve ever used textures or background patterns in your artwork, you know how difficult it is to find a reliable collection to choose from. A while ago, I stumbled on Atle Mo’s Subtle Patterns, a collection of extremely tastefully done patterns ready to be used on the Web in PNG format or downloaded as a PAT file (Photoshop pattern). While the web app is easy to use, downloading each one individually in Photoshop is an arduous task, to say the least.
The Subtle Patterns plug-in (see Figure 10.1) makes the online library available from within Photoshop. Applying patterns is also nondestructive to your original artwork because Subtle Patterns will create a separate Pattern Fill layer for you to manipulate. Other functions of the plug-in include a quick search and a favorites menu.
CC Market
Before you start scouring the Web for free brushes, vectors, and icons, save yourself some sanity by checking out the Creative Cloud Market (see Figure 10.2). It’s accessible from within your Creative Cloud panel in the menu bar.
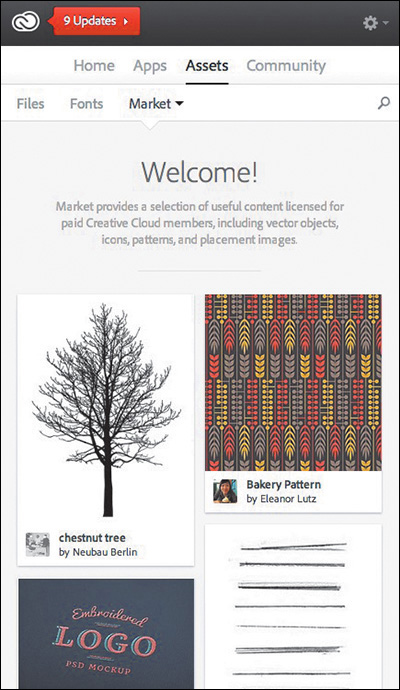
The market comprises contributions from artists around the globe, and I’ve found it to be of much higher quality than any free asset site. It’s included in your Creative Cloud subscription and fully licensed for your personal and commercial work. It’s a little-known resource that could end up being a crucial part of your next project.
Price: Free
What bothers me most when I see an unsolicited redesign of an application like Facebook is the use of cheesy, albeit perfect, stock photography for user content. We’ve all done it to some extent before: searched Google Images for a profile picture or snagged one from iStockPhoto.com. It’s true that these are often just placeholder images, but while we may be showing what’s ideal, is it realistic? Does the design hold up with “ordinary” photos?
The creators of Random User (www.randomuser.me) created a free service to provide designers with realistic user data and integrated it with Photoshop with their plug-in, Random User Generator (see Figure 10.3). If you design apps or dashboard interfaces, this is an essential extension to have in your toolkit.
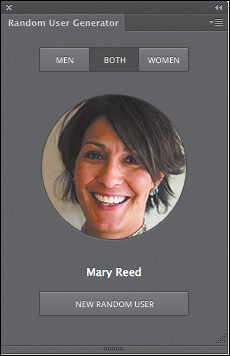
Price: Free
Granted, Social Kit (see Figure 10.4) has a very specific use case, but it’s worth including. If you’re in charge of maintaining your company’s social media presence or need to show a client what theirs might look like, this plug-in will save you boatloads of time.
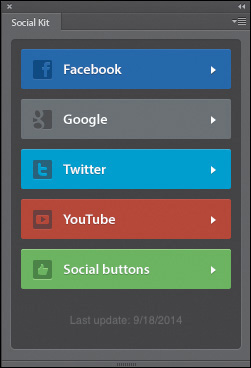
Figure 10.4 With Social Kit you get social network profile templates without the pain of creating them from scratch.
Because there are no sandboxes to preview design tweaks to a social network profile, comping in Photoshop is your best option. Instead of creating a blank profile from scratch or struggling to find what free Facebook template is up-to-date, Social Kit does the work for you. Just select the network and template you need from the plug-in panel and cry happy tears as you save 20 minutes of work re-creating a template that’s bound to be obsolete in the next month or two.
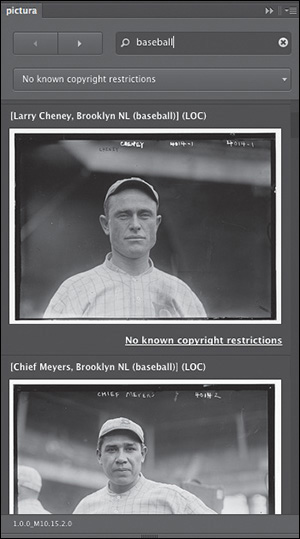
Pictura
Price: Free
I’m sure you’re all familiar with the process of finding a placeholder photo from a stock site, saving it to your desktop, and opening it in Photoshop. It’s not an incredibly inefficient process, but being able to stay in one environment instead of three would be helpful.
Pictura (see Figure 10.5) is a free plug-in from Source that brings the photography stored on Flickr into Photoshop. The convenience of searching from within Photoshop is magnified only when you consider how strong Flickr is as a stock photo resource. Because Pictura allows you to filter by license, you have a legitimate photo asset library without ever needing to jump out to the browser.
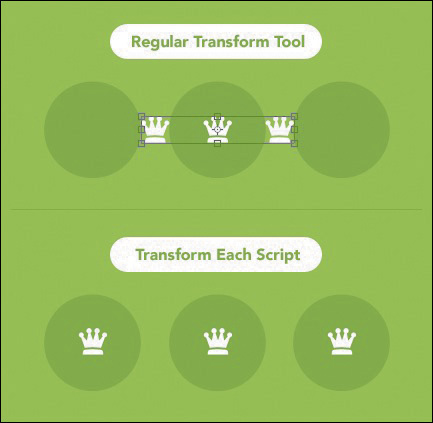
Transform Each
Price: Free
Each Adobe application has its little quirks, and the transform functions in Illustrator and Photoshop are great examples. Whereas Illustrator allows you to resize multiple items and maintain their horizontal and vertical origins, Photoshop takes the group of items and resizes from the collective center.
Kamil Khadeyev, who runs a fantastic blog aptly named Captain Awesome, made a script for Photoshop called Transform Each (see Figure 10.6) that will emulate the Illustrator transformation of each item. It’s a small quirk to be sure but one that could save you a lot of time nevertheless.
DevRocket
Price: $19 for a personal license, $99 for teams
DevRocket (see Figure 10.7) is the quintessential time-saving extension if you design apps for iOS. It’s as multifaceted as it is beautifully crafted. Its primary functions include premade canvas settings and templates for all iOS device sizes, presets for each icon size, native previews, and easy asset generation for 1x, 2x, and 3x resolutions.

My favorite of the bunch are the native preview options since it’s so easy to design in a silo environment with no context for how a screen would look on an iPhone, how an icon would look like on a home screen, or how information would look on the App Store. With a few clicks, you can preview your work in any of these beautifully rendered contexts.
Price: Free
Bjango cofounder Marc Edwards is as much of an authority on Photoshop as you’ll find anywhere, and he knows a thing or two about proper file setup. He’s created a series of Photoshop actions (see Figure 10.8) to save you tons of time on small tasks such as creating backgrounds, resizing assets, and modifying the size of your canvas.
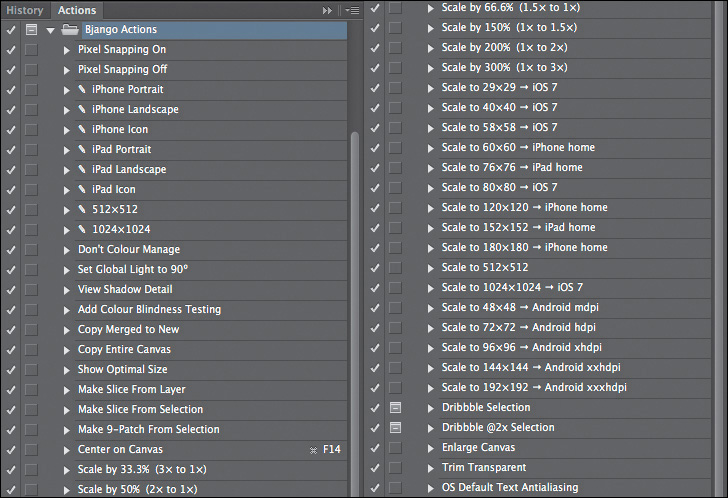
These actions are so comprehensive that it would be silly to list them here, so do yourself a favor and download them today.
WebZap
Price: $19 for a personal license, $99 for teams
Should you find yourself in need of comping a layout (hey, I never said you couldn’t, just that there are better ways of bringing your clients into the design process), you can save yourself a lot of time by using WebZap from Norm Sheeran of UI Parade (see Figure 10.9). WebZap comes complete with some useful premade layouts to get designing instead of deer-stuck-in-the-headlights phase when you open a blank document.
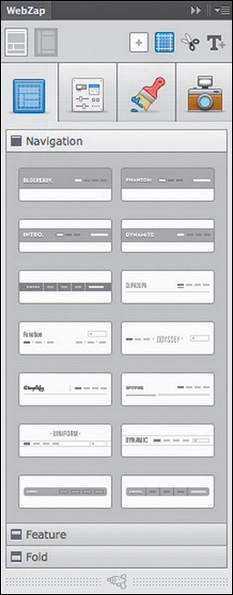
Nestled in WebZap is an incredibly useful feature for text styling that allows you to assign HTML tags like <h1>, <h2>, and <p> for easy global formatting. It’s similar to character styles, but I especially appreciate the nod to web nomenclature.
Composer
Price: Free
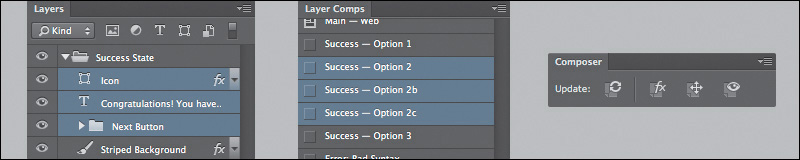
If you use Layer Comps (I’m more of a Smart Objects kind of guy), you’ve probably noticed that it’s hard to keep control over shared elements between them. Any layers you change on one aren’t reflected on others, but sometimes that’s not advantageous for editing multiple Layer Comps at once.
Jason Foral developed Composer as a script to solve this challenge (see Figure 10.10). Composer is a set of four commands that give you the control that’s missing natively over Layer Comps: the ability to update layer effects, position, visibility, or all three.
Layout Wrapper
Price: Free
Too easily lost in our Photoshop artwork is the presentation of it. Just as DevRocket gives you a preview of iOS environments, Layout Wrapper frames your work in a Safari browser (see Figure 10.11). It’s a small detail to be certain, but presenting your Photoshop work in the context it will live in is a best practice of web design. This script makes it painless.
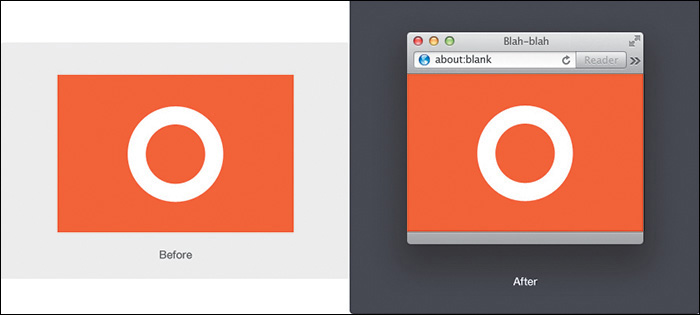
Figure 10.11 LayoutWrapper lets you show off your work in the browser, without actually being in the browser.
Price: Free
When you try to rotate a path in Photoshop, you wind up with jagged edges. If you haven’t noticed this phenomenon, draw a rectangle, give it a thick stroke like a photo frame would have, and then rotate it. That stair-stepping along the edges is less than ideal, and workarounds tend to involve rasterizing your vectors prior to rotation. No, thank you.
RotateMe (see Figure 10.12) is a Photoshop action that smooths these unsightly edges while still maintaining vector status. It’s particularly handy for icon designers who use rotation in Photoshop to achieve various shapes.

Color
Choosing the right color in Photoshop isn’t always the easiest task. The default color picker is adequate, but extending it to make a cohesive palette is downright impossible, so we’ll need to look elsewhere. Although some of these options are solely browser-based, they do allow quick copy functions to get you right back into Photoshop.
0to255
Price: Free
0to255 is my color picker of choice (see Figure 10.13). If you have a similar style and choose primarily monochromatic color schemes for your interfaces, having the hex values for lighter and darker shades of a base color is essential. Lighter shades can map to hover states of links and buttons, while darker shades can be used as backgrounds.
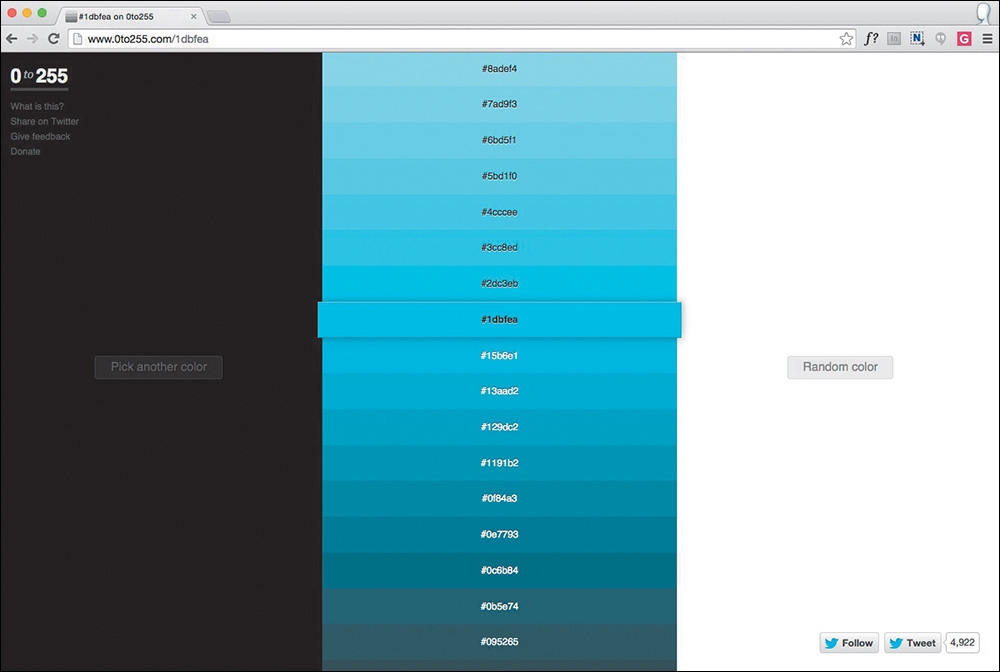
0to255 is a color variation app by Shaun Chapman that displays shades of a color, lightening to white and darkening to black in increments of 3 percent. Macaw is the only design app I’ve seen to integrate this type of selection in its native color picker, and while it may be destined for Photoshop one day, 0to255.com is a great tab to keep open in your browser.
Tip
Defining these values is easily achieved in Sass via mixins. For example, using color: darken($purple, 20); will darken the defined color purple by 20 percent.
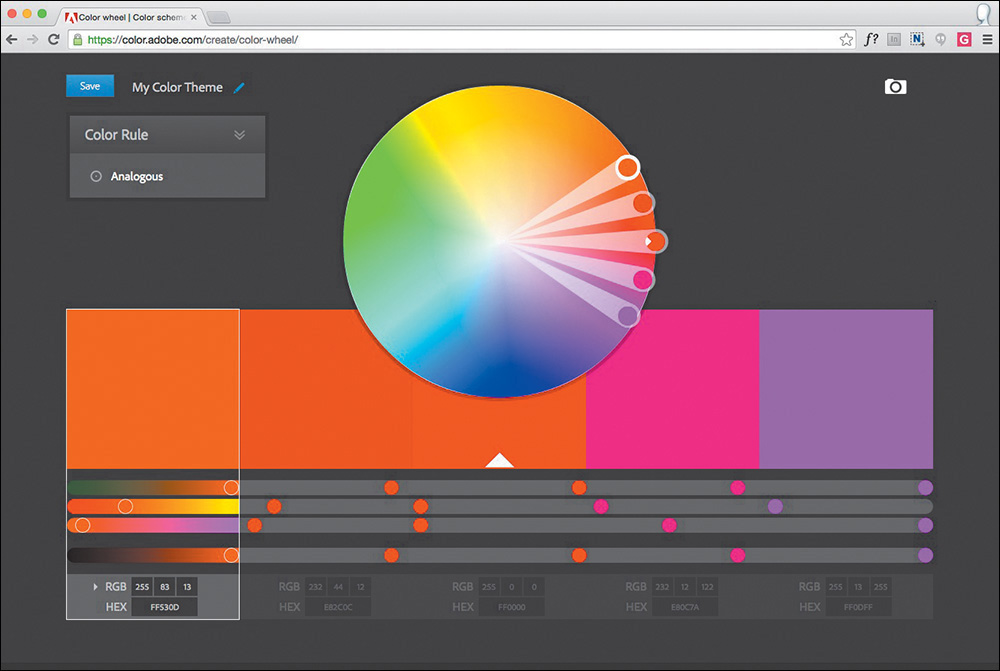
Adobe Color (formerly Kuler)
Price: Free for everyone, but only Adobe ID holders can save palettes
Crowdsourcing color palettes can be a beautiful thing, especially when so many people end up contributing. With seemingly endless options, Adobe Color is a vast collection of online themes that can be synced to apps like Photoshop and Illustrator (see Figure 10.14). Similarly, any themes created within Photoshop can be saved and made available to the public through the web app. If nothing else, playing with the color wheel is a hoot.
Price: Free
If you’ve ever stood in awe of a beautiful sunset, magnificent artwork, or the view atop a mountain (who hasn’t?), your designer brain can’t help but long to derive a color palette. An iOS device and Adobe Color CC (see Figure 10.15) make it all possible—just snap a photo with your camera and pull out those inspiring tones.
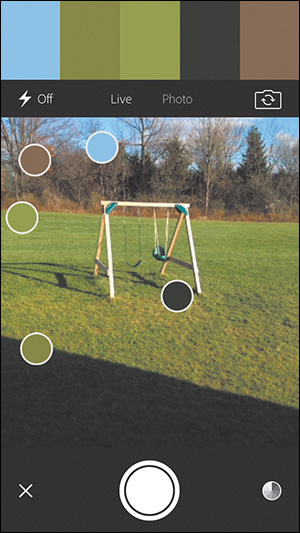
Adobe Color CC is a companion app to the web version with the same name, which means you’ll be able to share the themes you capture from your iPhone. If it sounds somewhat useful to you, give it a try. It’s way more addicting than you could possibly imagine.
Coolorus
Price: $11.99 for a single license (two computers)
If terms like gamut, harmony, and luminosity get you excited, you’ll most certainly want snag Coolorus (see Figure 10.16). If the native color options in Photoshop lack the control you seek, this is your plug-in, without a doubt.
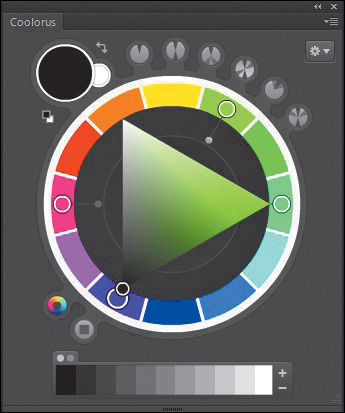
Coolorus has tons of modes and features for creating robust palettes or adjusting color on the canvas. Do you recall my crush on 0to255’s shade picker? That’s just one of Coolorus’ options. Sadly, Coolorus has had a difficult time transitioning to the HTML5-based panels of CC 2014, but a promise of its development is enough to color me, and many others, intrigued.
Assets
Asset integration, inspiration, and generation are common features of Photoshop extensions, but there are some truly helpful ones in the bunch. With the growing popularity of icon services, you can bet there’s some decent Photoshop integration.
Additionally, the fact that Photoshop can generate CSS is surely a sign of the times. Some plug-in developers have taken this a step further, as you can imagine, and created similar generation functions for different needs.
iOS Hat
Price: $19.99
It’s wild that tools exist to translate the Photoshop canvas to complex programming languages. Foremost among these tools is iOS Hat (see Figure 10.17), which should appeal to any of the following audiences: iOS developers who inherit PSDs, designers looking to learn the basics of Objective-C and/or Swift, and unicorns who develop their own iOS app designs.
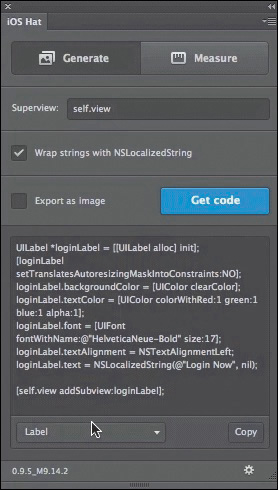
iOS Hat has two primary functions. The first, titled Generate, allows you to extract code or PNGs ready for implementation. The second, titled Measure, provides code for dimensions and spatial relationships. iOS Hat is truly impressive and worth looking into, even if you’re just curious about how your design gets coded by someone else.
OtherIcons
Price: Plug-in is free; individual icon sets vary from free to $10 each
Jumping out to the browser to find icons can be a hassle, especially when you’re in a nice groove designing in Photoshop. Icon community OtherIcons has a plug-in that brings its content conveniently into a Photoshop panel for you to peruse (see Figure 10.18).
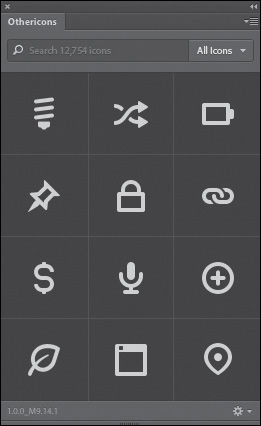
Icon packs vary in price, though there are some that are free to get you started. The quality of the icons makes it quite possible that Othericons eliminates your Photoshop-to-browser-to-Photoshop icon workflow.
Price: $19 for a personal license, $99 for teams
Icon fonts have become a popular alternative to placing tons of individual <img> tags. If you’re detailing your icons in Photoshop, Glifo makes packaging them up easy as pie. Select all your icon layers and then click Create Icon Font in Glifo’s panel, and your Glifo will generate a serviceable icon font (see Figure 10.19).

It’s as simple as it sounds. Have fun with all the time you saved not having to export each individual asset.
Price: Free with account
For personal projects or ones with modest budgets, free icons are undoubtedly appealing. FlatIcon is a community of icons sourced by more than 50 authors, and their plug-in brings 500+ icon packs to Photoshop for your convenience (see Figure 10.20). Don’t underestimate the quality of the content, either.
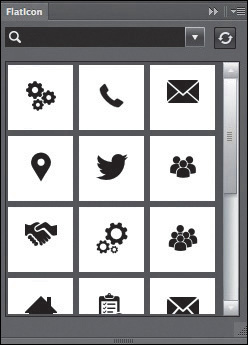
Figure 10.20 You’ve never seen so many free icons in one place as you will in FlatIcon. Now it’s in Photoshop.
TinyPNG
Price: Free
TinyPNG (see Figure 10.21) is a web app that will take your PNGs from Photoshop and magically reduce their size through some black-magic compression methods. Having relied on this service for years, you could imagine my excitement when I found out the company offers this app as a Photoshop plug-in.
Unlike other extensions that appear in panels, TinyPNG is an Export option found by going to File > Export > TinyPNG. Since it’s not currently integrated with Generator, it’ll take some scripting to automate its use, but it’s totally possible.
ImageOptim
Price: Free
ImageOptim (see Figure 10.22) is a Mac app for compressing any image file and in some cases drastically reducing file size. It’s a good practice to run your exported assets through ImageOptim before using them on a live site.

Even if the time savings are low, your pages will load a fraction quicker, which could make all the difference between someone sticking around or leaving.
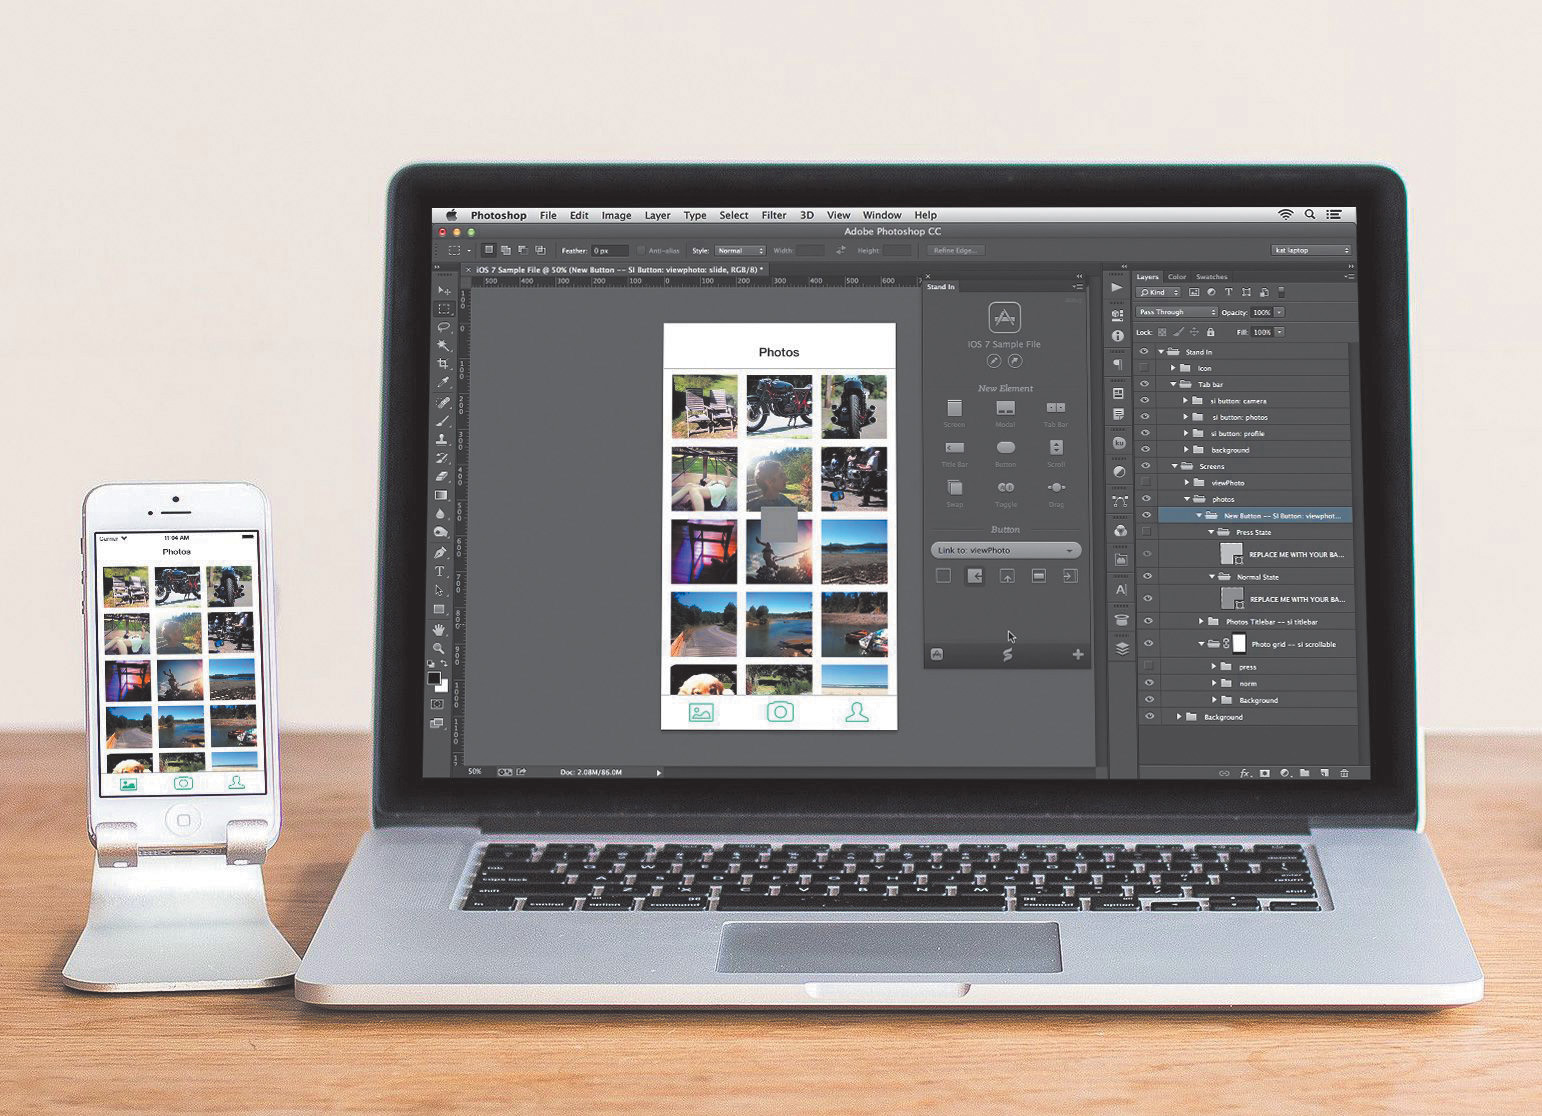
Prototyping
When we looked at Photoshop’s pain points in Chapter 2, lack of interactivity was a major one. While there’s still a facade between Photoshop and the browser, some services provide unique ways of previewing your content. Also, here’s a fun fact: Each one of these prototyping services leverages Adobe Generator.
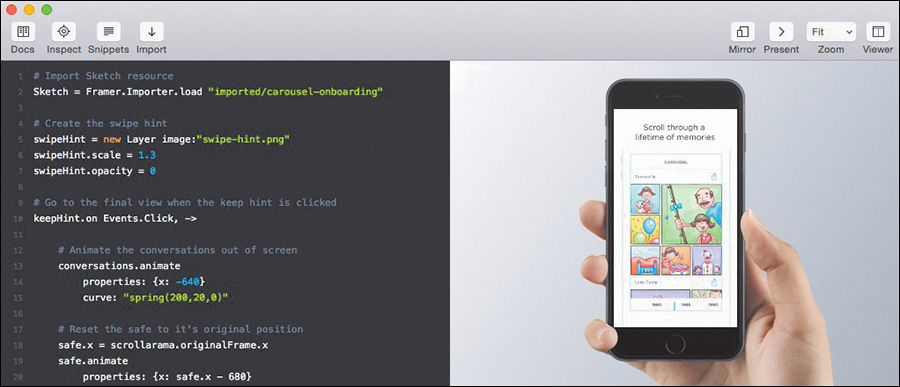
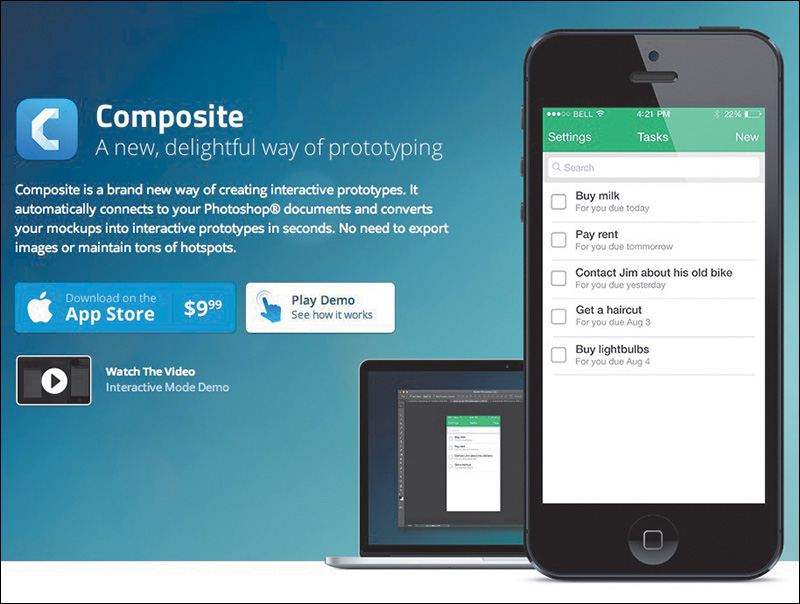
Framer, Composite, and Stand In
Price: $79.99
Price: $9.99 in the iTunes App Store
Price: $25/month for individuals, $100/month for teams of five and more
Framer (see Figure 10.23), Composite (see Figure 10.24), and Stand In (see Figure 10.25) take Photoshop artwork and create mobile prototypes that are ready for interaction on a connected device. iOS and Android designers will find these tools especially useful for previewing screenflows without needing to commit to development. The differences between the apps are subtle, and in the case of Framer, Photoshop integration is just one of many features. Fortunately, each product has a free demo or trial.
Price: Free for your first project; plans range from $15/month (3 projects) to $100/month (unlimited projects and team use)
InVision has truly taken the design industry by storm recently, and considering their pedigree of customers, it’s no wonder. Companies like Adobe, Airbnb, Yahoo, eBay, and Evernote all use InVision to prototype Photoshop artwork prior to development. Whereas the previous prototyping tools I mentioned are mobile-specific, InVision will add interactivity to any size design.
Beyond their prototyping service, InVision offers a free Photoshop plug-in named LiveShare (see Figure 10.26), and it’s quite magical. Whereas traditional screenshare tools lack the means for on-screen annotation and collaboration, LiveShare is chock-full of such features. Not only can invitees draw and type on your mirrored comp, but you can hop back into Photoshop, make a change on the fly, and see it reflected in the meeting.
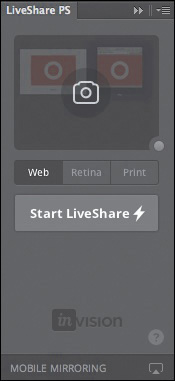
Just think of how incredibly helpful this is for teams with remote employees who can’t gather around someone’s desk in the office to critique or offer art direction.
Organization
I’m not sure working in Photoshop has ever been a tidy operation by default. Much effort goes into constructing a design in an easy manner you can reference later. Here are some fun ways of automating some rather mundane processes.
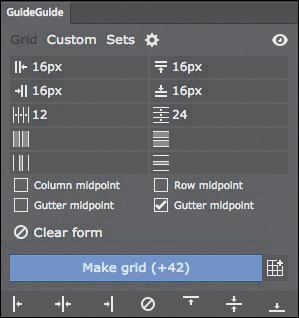
GuideGuide
Price: Free
A little while back, a hilarious GIF went around where a designer was trying to place a guide and, because of snapping, they kept placing it a pixel either above or below their desired value. It’s a frustration most of us share because the smallest flick of the wrist immediately after releasing the mouse can derail an otherwise perfectly placed guide.
Cameron McEfee is a life-saver. His plug-in, aptly named GuideGuide, will place guides based on numeric values, selections, or mathematic equations (see Figure 10.27). Simply put, it takes the guesswork out of a task where precision is essential.
Price: Free
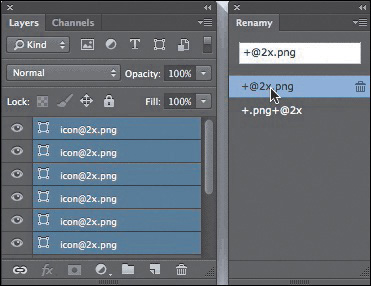
Renamy (see Figure 10.28) is a mass-layer renaming plug-in sure to help keep you organized. More importantly, Renamy is a practical way to set up your PSD for Generator’s extraction of assets.
Price: Free
If you’re handing off an element collage or comp to another designer or developer, chances are they’re looking to grab style information. While Extract is a great way to accomplish the task, Ink from Chrometaphore will detail design specifications on a separate layer (technically, a folder) of your PSD (see Figure 10.29).
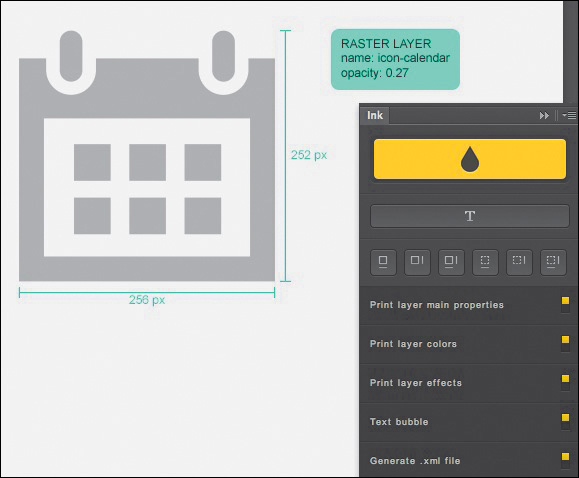
Ink is the ultimate documentation plug-in for Photoshop since it grabs specs on type, effects, color, and dimensions. For a developer who doesn’t have Photoshop, providing them an exported static image with Ink’s documentation is genius.
psdiff
Price: Free
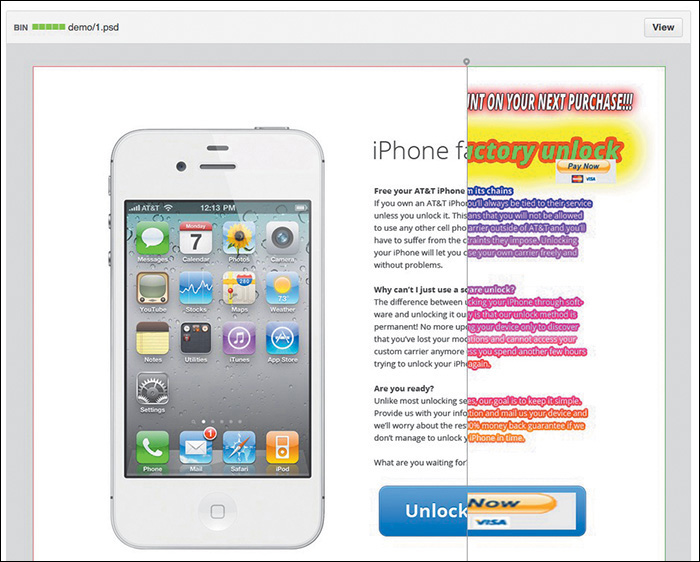
If your team uses GitHub, you probably have PSDs hanging around your project repositories with no way to preview them like you would HTML & CSS files. Better yet, GitHub doesn’t provide an easy way to track their changes.
psdiff is a brilliant fix to this problem (see Figure 10.30). It’s a tool you can install as a Git hook, which will export a PNG any time a PSD is saved. Now, anyone on your team can see the latest state of a PSD without ever having to open Photoshop.
Miscellaneous Photoshoppery
While every tool covered so far can bring efficiency to your workflow, none of them can make you more proficient in Photoshop on its own. Becoming a Photoshop ninja takes time, and there are some really fun sites dedicated to helping you learn it backward and forward.
ShortcutFoo
Price: Free
ShortcutFoo (see Figure 10.31) is one of my favorite web apps for no other reason than I’m hilariously bad at keyboard shortcuts. Trust me, if you think you’re good, Shortcut Foo will most likely put you to shame.
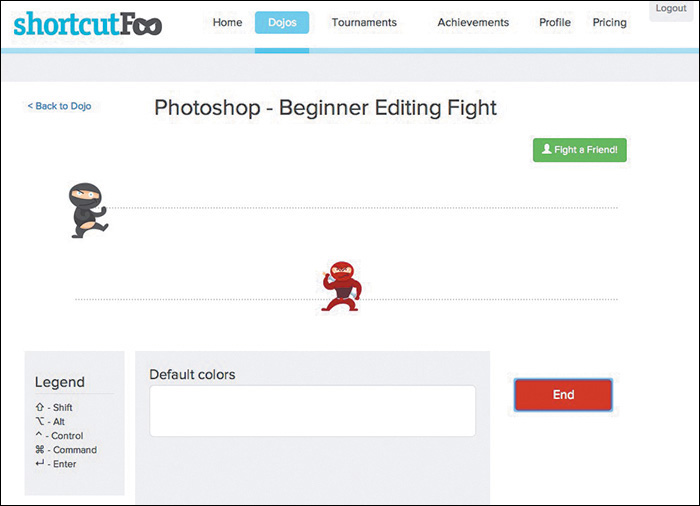
It’s an entertaining way to learn some impressive keyboard moves spread over three stages: Learn, Fight, and Test. The Learn phase is no-pressure, at-your-own-pace instruction. Fight puts you up against the computer in a duel that Bruce Lee would have difficulty with. Test is the final exam to prove your mastery. Shortcut Foo also has courses for the command line and Git, among others, in case you really want to impress your friends.
Photoshop Secrets
Price: Free
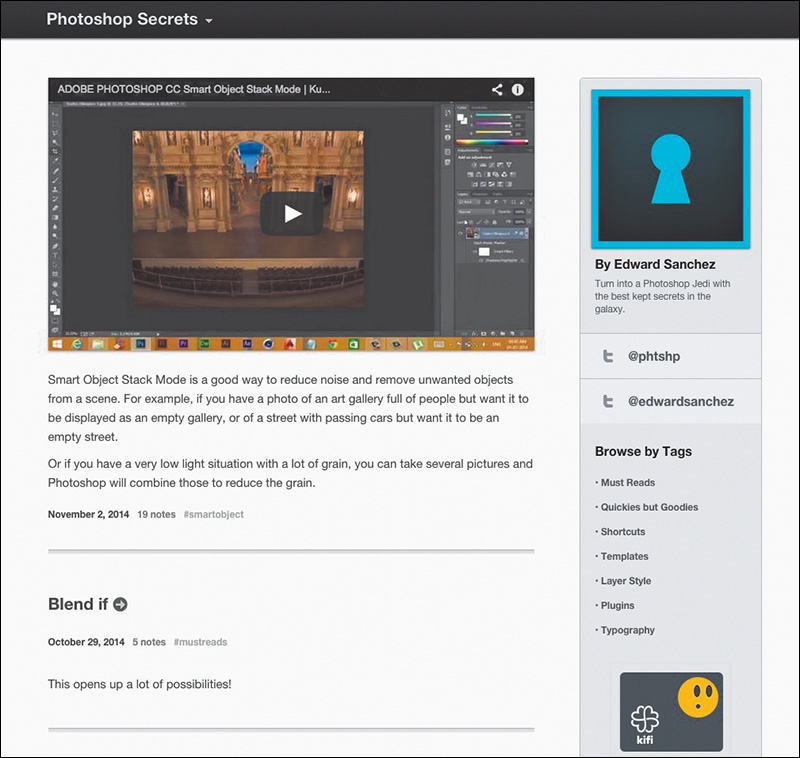
Edward Sanchez does a fantastic job keeping his readership up-to-date with little-known features and tricks on his blog, Photoshop Secrets (see Figure 10.32). His posts include detailed tutorials and simple links to useful tools to circumvent lengthy workflows.
Phew. The amazing thing is, this list only scratches the surface of the array of amazing Photoshop extensions currently available, so if there’s a specific pain point of your workflow, you can most likely find a plug-in to help. With most offered for free or at modest price points, these small add-ons can save you significant time.
Of course, there are some process points you can adjust to save more time that have nothing to do with Photoshop’s features or extensions, as you’ll discover in Chapter 11.