Table of Contents for
Responsive Web Design with Adobe Photoshop
 Responsive Web Design with Adobe Photoshop
Published by
Adobe Press, 2015
Responsive Web Design with Adobe Photoshop
Published by
Adobe Press, 2015
- Cover Page
- Title Page
- Copyright Page
- Acknowledgments
- Contents
- 1. Photoshop’s New Groove
- 2. How Did We Get Here?
- 3. The Case for Designing in the Browser
- 4. A Plea for Photoshop–Browser Harmony
- 5. Vetting Direction
- 6. Establishing Style
- 7. Establishing the System
- 8. Getting Back into Photoshop with Page Layers
- 9. Extracting Your Way Out of Photoshop
- 10. Extending Photoshop
- 11. Remembering Etiquette
- 12. Adopting a Completely New Workflow
- Index
- Responsive Web Design with Adobe Photoshop
9. Extracting Your Way Out of Photoshop
My hope is that Page Layers, explored in Chapter 8, gives you a reasonable way to go from the browser to Photoshop. Now you can turn your attention to the opposite: taking all the assets you’ve created or adjusted in Photoshop and bringing them back out to the browser.
Prior to Photoshop CC, the options weren’t great. Anything beyond a simple CSS tweak posed a challenge, especially if it involved exporting an image. How many times have you saved a PNG only to find out there’s a hairline or two of built-in padding throwing off its positioning? Worse yet are the times you forgot to turn off a layer that makes its way into your exported graphic.
Efficiently extracting assets from Photoshop is crucial to an RWD workflow. If you stumble here, it’s bound to cost you considerable time you could spend doing something else. The whole point of getting back into Photoshop is to refine your ideas quicker than you can in code. If the process of getting out of Photoshop nullifies the time spent in it, you might as well have never gone back in the first place.
Thankfully, this chapter demonstrates how Photoshop CC is built to help you save significant time in this area. To fully understand how, and why, let’s take a look at the previous set of options.
Asset Extraction Is Like Pulling Teeth
“Pulling teeth” is just about the best analogy I can make for saving out images or useful information from Photoshop. Unfortunately, the pain isn’t exclusive to the exporter (you) but shared with the lucky individual who inherits your work (your developer, if it’s not you as well). Every method, hacky or otherwise, has its share of inefficiencies, as described in the following sections.
Crop and Save
The most apparent way to churn out images from Photoshop, and one I adopted for many years, was to crop around each item individually and save it as an image (JPEG or PNG).
If there’s only one asset to export, this isn’t a terrible method. It’s quick and relatively easy to do. It’s only when there are multiple assets to crop that the process becomes arduous. Still, some designers prefer the amount of control they have over defining the bounds of the crop on a case-by-case basis.
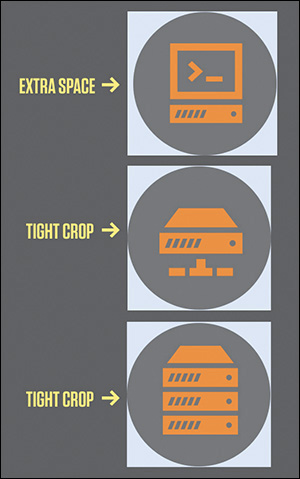
Speaking of the crop, I find it incredibly difficult to consistently match the edges of my asset. For example, the icons shown in Figure 9.1 have no square edges to align to. I did a decent job of making the last two snug, but you can see that the first exported image has a hairline of extra space to the left, which drives my developer nuts trying to align it with the others.
On closer inspection, there’s a barely visible blue background behind the icons (see Figure 9.2). I must have forgotten to turn off that layer. No problem; I’ll just go back and re-crop everything all over again. There’s no better use of my time, I’m sure.

Figure 9.2 Icons with and without the faint blue background layer that should have been turned off. Whoops.
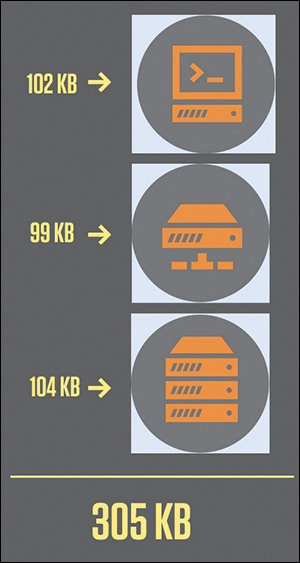
The king of this comedy of errors is the Save function. Save in Photoshop will return an uncompressed version of your work. I’ve just made these tiny icons 100KB each (see Figure 9.3). Ouch. Now for the piece de resistance: mistakenly saving the cropped artwork as my PSD and closing the document, only to find out when I re-open it that everything is lost. Double ouch. Infinity ouch, even.
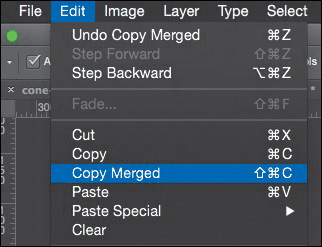
Copy Merged
Copy Merged (see Figure 9.4) is a technique similar to cropping, with an added twist. Draw a rectangular marquee around the graphic you want, choose Edit > Copy Merged (Command/Ctrl+Shift+C), and then paste it into a new document by choosing File > New. The primary advantage this approach has over cropping is not having to worry about saving a cropped PSD. Otherwise, it still suffers from the afflictions of mis-cropping (technically, mis-selecting) and tediousness across multiple assets.
Save for Web
If you listen closely, right now, you can hear the sound of someone’s Photoshop crashing. The moment you choose Save for Web and see the beach ball of death in Mac OS X (see Figure 9.5), so many thoughts run through your head. When was the last time I saved this? Did I ever save this? Maybe I’ll just leave Photoshop to process this for a while and come back later.
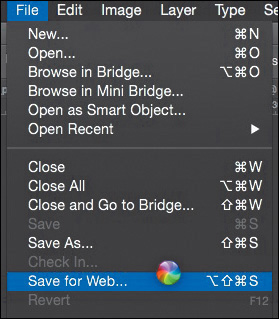
I’m not sure why, but historically, Save for Web has always given Photoshop a performance problem. While I can’t say reliably that Photoshop CC has addressed this, there are other drawbacks to using the feature. Unless you want to roll with the cropping or Copy Merged method, slicing is your best bet for a Save for Web workflow (see Figure 9.6). I’m not sure about you, but I’ve never been able to get slices exactly where I want them. They always snap to the edge of a different element or end up one pixel off.
At best, setting up slices makes for more effort than I’m willing to spend. Save for Web will helpfully compress your assets, but it’s not the fastest workflow to employ.
We need a lightning-quick way to get this stuff out of Photoshop, not one that relies on our ability to align rules, guides, and selections.
Adobe Generator
The addition of Adobe Generator in Photoshop CC will save you pain and valuable time. Generator is an engine built into Photoshop that’s capable of extracting assets in real time. Here’s the easiest example of its use:
1. Append any layer name with a file extension, such as sample.jpg or sample.png.
2. Choose File > Generate > Image Assets.
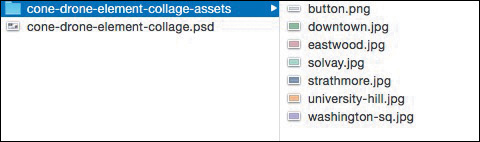
A folder with your PSD’s name and the suffix “-assets” will appear in the directory where your PSD lives, full of any files you’ve specified as layer names.
Generator has provided an immediate alternative, and improvement, to the aforementioned extraction methods and should give the efficiency you need in getting back to the browser. Let’s break down how it works and how to get the most out of it.
Auto-magic Generation
The first time I used Generator, its real-time generation of image assets blew me away. Saving your PSD isn’t required; any change you make to a layer that has a file extension in its layer name is immediately reflected in the exported file. Because this updating is happening in the background, you can continue to focus your attention on editing your artwork in Photoshop without having to stop and complete export settings each time you want an asset.
This is a fairly radical concept compared to traditional workflows, which hinged on refining all of your work prior to exporting everything at once. Once the Generator switch is on, it’ll continue to monitor your layers and pump out assets or edits to those assets until you switch it off (see Figure 9.7).
This feature has its greatest potential if your assets are being generated to a development folder. As soon as an icon is changed in Photoshop, it’s reflected on the Web. That kind of relationship between Photoshop and the browser didn’t exist before Adobe introduced Generator. Some designer may opt for a layer of control between generated assets and a live or development site simply because automatically overwriting files can be kind of scary. Nevertheless, it’s exciting to see this line of communication opened.
Pixel Precision
Upon first use, I still had some skepticism about relying on Generator. How trustworthy was it? The test it needed to pass was one of precision. My assumption was that the images it exported were rough estimates of their bounds, meaning that there’d be some unwanted empty space baked in. To my surprise, assets are cropped to their exact edges, with not one pixel of padding (see Figure 9.8). Phew.
Welcome to the party, Generator.
Speaking Fluent Generator
Generator can be basic or advanced, depending on your needs. Let’s take a look at each file format it can produce and its options.
Tip
Generator compresses assets using an open source utility called ImageMagick, independent of the compression methods of Save As or Save for Web. It’s helpful to make this distinction in case you’re wondering why the quality values aren’t 1–12 like they are in Save As.
JPEG
By default, a layer named “sample.jpg” will export as a compressed JPEG at 90 percent quality. Should you prefer a different quality setting, naming your layer “sample.jpg10%” will export a JPEG at 10 percent quality, naming it “sample.jpg20%” will export at 20 percent quality, and so on. You can also use quality values of 1–10, such as sample.jpg5, sample.jpg6, and so on.
PNG
Tagging a layer with .png will generate a PNG 32 with alpha transparency by default. If you desire a PNG 24, name your layer “sample.png24,” or for a PNG 8, name it “sample.png8.”
GIF
You can also generate GIFs from Photoshop by tagging your layer “sample.gif.” There aren’t any compression options to set, and Generator will export with alpha transparency.
Whereas JPEG and PNG images are bound to the dimensions they’re exported as, SVGs can scale to their Hypertext Markup Language (HTML) container independent of the size they were created at (see Figure 9.9). That’s because SVG is a format based on Extensible Markup Language (XML) that draws the shape in the browser.

Using SVG to Change Color
One major advantage of using SVGs is the ability to manipulate color dynamically with CSS. Instead of exporting separate images for a default state and a hover state of an image (think: icons), CSS can change the fill when necessary (see Figure 9.10).
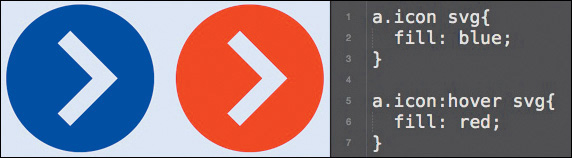
Figure 9.10 The hover state is being controlled by CSS, not a separate image or background position.
Multiple Formats
Producing a fallback PNG for an SVG is a one-step process with Generator, a major advantage over multistep processes in Illustrator or other programs. Here’s an example of a single layer name that will produce multiple files:
“sample.svg, sample.png”
Simple, right? You can even replace the comma with a plus sign (+), should you so desire.
Sizes
Let’s take that a bit further. For non-SVG assets that you’d like to scale for high-density displays such as Apple’s Retina screens, you’ll need to be able to increase or decrease the size of your artwork in Photoshop accordingly. Again, Generator makes this a cakewalk.
“sample.jpg, 200% sample.jpg”
This will produce two JPGs, one double the size of the other. Producing assets for high-density displays does take some consideration before you start building artwork. For instance, doubling the size of a raster image like a photograph will produce blurry results. Instead, starting with a photograph fit for Retina screens and reducing it by half should give you proper images for both screens.
“sample.jpg, 50% sample.jpg”
Here are two last notes on sizing your images with Generator: Multiple formats are allowed (“sample.jpg, sample.png”), as well as sizing files by dimension rather than percentage (“300x300 sample.png”). Dimensions will default to pixels, but you can specify having them rendered as in, cm, or mm for inches, centimeters, or millimeters, respectively.
Groups
If you want to get really fancy, place a file extension on a group folder in Photoshop. The result? One merged asset of the contents of the group. This is especially useful for photo manipulations strewn across multiple layers.
Exporting to Folders
It’s possible you wouldn’t want to dump all your assets in the same folder. At WSOL, we separate our images by use: We have a “content” folder for any images intended to be uploaded through the CMS and a “ui” folder for any images that are part of the templates. Instead of sorting through your generated assets folder, leverage the power of Generator to do the job for you.
“content/photo.jpg” places photo.jpg inside the folder named “content.”
“ui/icon-star.png” places icon-star.png inside the folder named “ui.”
Generator also supports subfolders, should you want to be extra-organized.
Layer Naming as a Practice
A counterpoint to the convenience of Generator often comes from designers who don’t name their layers in the first place. Essentially, are you saving any more time having to name all your layers in the end than selecting each layer and Save for Web?
Your time savings are most likely minimal, at best.
That’s where the beauty of Generator is for me. If you name your layers as you go, you can experience significant time savings. Generator, albeit indirectly, advocates for better organization on the part of the designer. I’ll discuss the benefits of such “etiquette” in Chapter 11, but naming your layers as you create them has a direct impact on how efficient the Generator workflow can be.
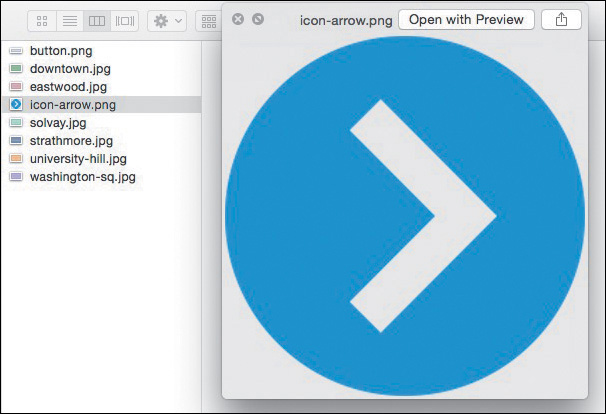
Beyond organization, Generator also goes hand in hand with naming your layers accurately. Generic layer names like “button” or “Shape” don’t make for easy filenames to employ on your site. What kind of button? What function does the shape have? Instead, thinking in terms of filenames will help identify their use in development. I much prefer “button-primary.png” over “button.png” and prefer “icon-arrow.png” over “Shape.png.”
Adobe Generator is clearly a powerful tool for speeding up your workflow. I’ve covered only the current Photoshop manifestation of it, image assets. Some of third-party services I’ll cover in Chapter 10 leverage it in unique ways as well. The future is bright for this feature, especially if it can continue to build on the communication between Photoshop and the browser.
Extract Assets
If you like the concept of Generator, you’ll love a new feature called Extract Assets. Essentially a UI layer on top of Generator, Extract Assets provides a dialog to choose all of the convenient options I’ve just discussed (see Figure 9.11). You can choose to extract assets a layer at a time or add a group’s entire contents to be generated.
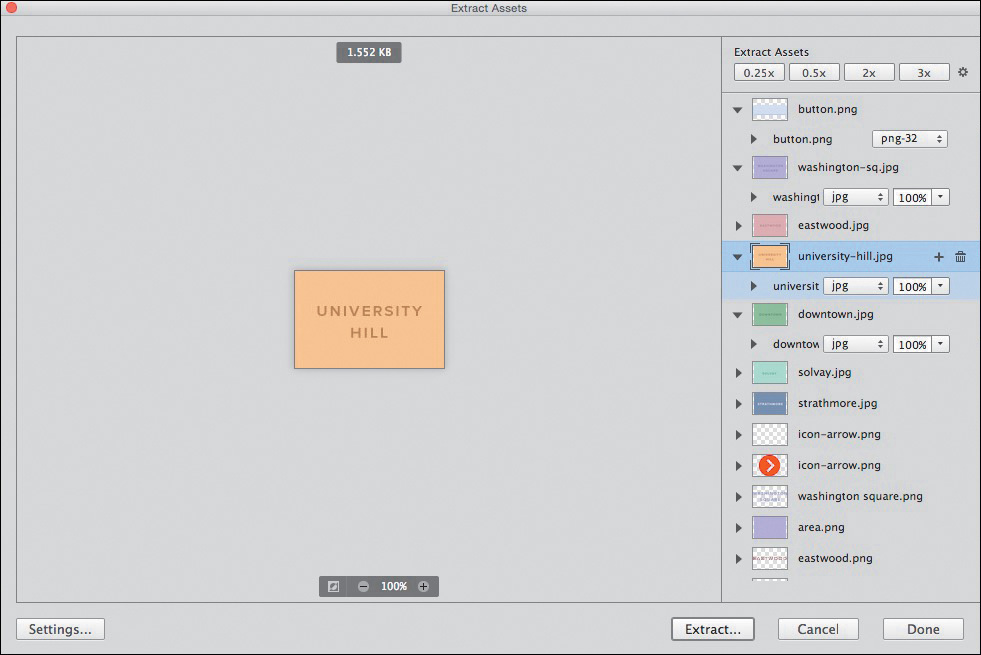
Extract Assets will rename your layers with the Generator syntax for you. That means that whenever you change a tagged layer’s appearance, it will be automatically reflected in the generated file.
If automatically generated assets don’t sound appealing to you, in the lower left of the Extract Assets dialog, click Settings, and deselect the “Automatically generate assets when updating document” check box.
Setup
You’ll find the Extract Assets menu by choosing File > Extract Assets or by selecting one or multiple layers, right-clicking in the Layers panel, and choosing Extract Assets. If no layers are selected or tagged when you choose Extract Assets from the File menu, you’ll be prompted to select a layer before proceeding. Via keyboard shortcut, it’s Cmd+Option+Shift+W (Mac OS) or Ctrl+Alt+Shift+W (Windows).
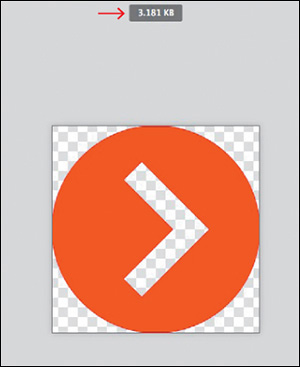
The dialog has a similar appearance to Save for Web, showing a preview of the selected layer on the left and an options panel on the right. Now that you have an eye on minimizing file size through image optimization, pay attention to the value just above the image preview; it’s a live preview of the expected file size (see Figure 9.12).
Tip
Didn’t name your layer something filename-friendly to begin with? No worries—you can rename it from within the Extract Assets dialog.
The options start with Asset Resolution presets of 0.25x, 0.5x, 2x, and 3x. For greater control over the sizes, suffixes, and folder names of additional resolutions, choose Settings in the lower left.
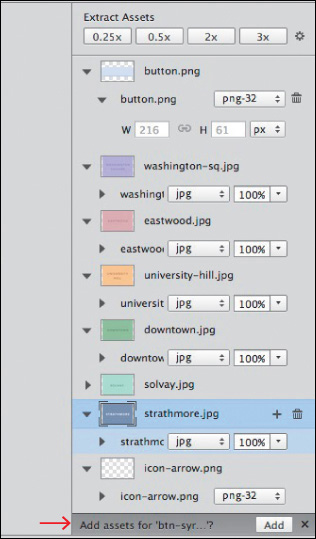
If you’re like me, you’ll select a bunch of layers and select Extract Assets only to realize you’re missing one. Fortunately, Photoshop makes it easy to keep the dialog open and select the missing one from the Layers panel. As soon as you do, you’ll see a message in the lower right of the Extract Assets dialog that says “Add Assets for ‘Your-Layer-Name’?” Choose Add, and you’re all set (see Figure 9.13).
Extract Assets provides a friendly interface for those familiar and, more importantly, unfamiliar with Generator. Developers can go into your comp or element collage to grab any necessary images. The only assumption you make here is that your developer has a copy of Photoshop too.
But what if they don’t?
Extract
Think for a moment about the types of things you or someone you work with needs from a PSD. Typically, it has little to do with specific layout. You’re looking to grab small images, color values, and font settings. Even if you do have Photoshop, it’s not always convenient to open it just to procure this kind of information.
I’m happy to report there is an alternative, and it’s called Extract.
Integrated into Creative Cloud, Extract is an online service that reads the content of a PSD sans Photoshop. All someone needs to use it is a Creative Cloud account, even a free one. Let’s take a look at extracting the most out of the service. (See what I did there? OK, I’ll stop.)
Setup
To start using Extract, go to your Creative Cloud profile by signing into Adobe.com. Under Assets, select Files. Choose an existing PSD or upload one by choosing Actions > Upload. By default, the next screen you’ll see is Extract view (see Figure 9.14).
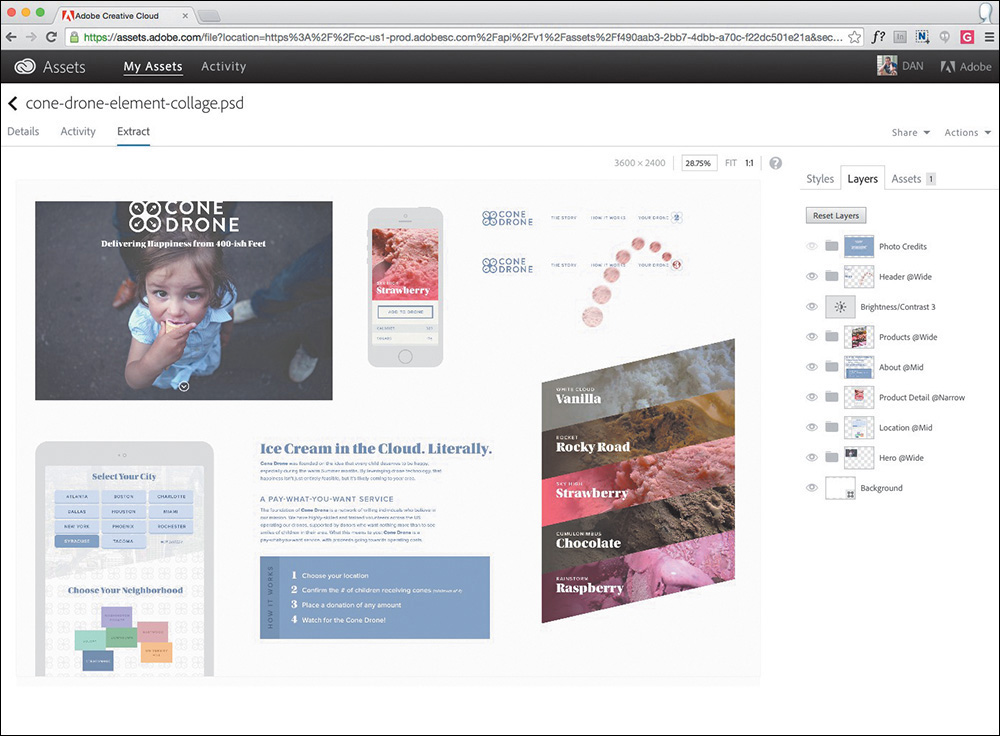
Figure 9.14 Extract lives in the browser and is free to all Creative Cloud members, making for easy adoption among teams.
The left portion of the app shows the PSD, while the right holds all the valuable information worth extracting. Choosing a layer, or multiple layers, in the PSD updates the information on the right. Simultaneously, a blue box with quick actions such as Copy CSS or Download will appear upon choosing a layer.
Tip
You can combine multiple elements into one image by holding Shift and selecting them first and then pressing the download arrow.
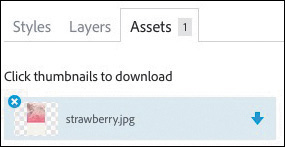
Downloading Assets via Libraries
Extracting images is a straightforward but involved process in Extract. Start by selecting any element on the PSD. In the blue box that appears, click the arrow on the far right. In the next dialog, give the image a name and choose a file format. If you so choose, there’s even a 2x option at the bottom for high-density displays.
At this point, you might assume that choosing Save downloads the image. However, the image makes a pit stop in your Assets tab over in the right sidebar, from which you can then download the image. Why the middle man? Extract adds it to your Creative Cloud assets for easy sharing with your team or retrieving later (see Figure 9.15). This is genius. Often, client logos or vital UI pieces end up becoming permanent residents of my Downloads folder. If I’m extracting assets for a project, odds are someone else on my team can use them as well, or I’ll just end up losing them in a sea of other files. By proactively and automatically organizing my assets as I extract them, Adobe is providing both a safeguard and a reference.
Fortunately, extracted images aren’t dumped in one huge folder of assets; rather, they’re placed in a folder specific to current PSD’s name.
Extracting Values
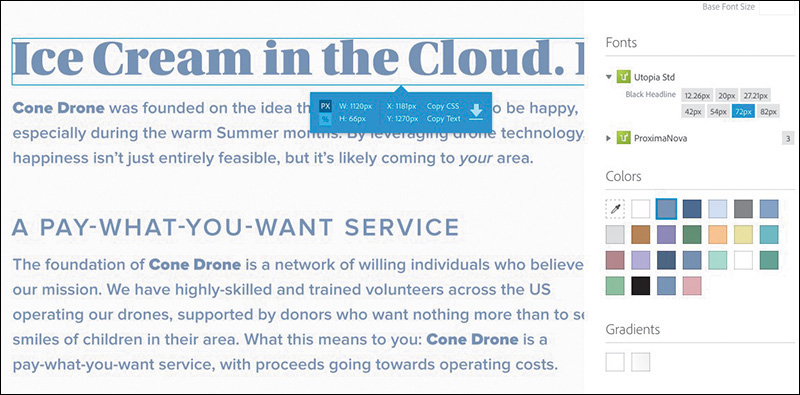
By default, anything you download from Extract is an image, but images don’t represent all that we’re trying to extract on their own. We’re also interested in fonts and colors.
You’ll find a list of fonts used in your PSD in the right sidebar, under Fonts. If the font happens to be sourced by Typekit, clicking the Typekit icon will bring you to the representative font page on Typekit’s site. In addition to font name, the Font inspector displays the various sizes used within the entire document, which may be handy when attempting to create a style guide.
Likewise, colors are listed in the right sidebar (see Figure 9.16). Extract scans your document and displays swatches of solids and gradients to choose from. Clicking one will show you where in the PSD the colors originated from. Additionally, color options are given within a pop-up dialog, such as Color Mode (RGB, Hex, and HSL) for easy copying. Again, this is super-helpful for establishing a style guide.
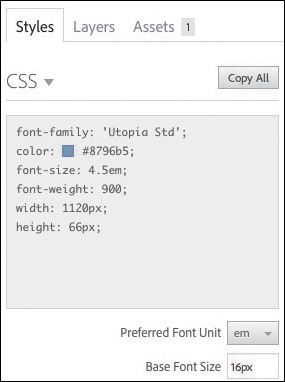
Generating CSS
Extract provides suggested CSS in multiple places, in an effort to make the transition from Photoshop to code even easier. The first and most prominent place is at the top of the Styles tab. Choose an element from the PSD to see its CSS generated here.
At the least, each element will have a height and width specified, which you may opt not to use with the goal of flexible media. Remember, neither Extract nor Photoshop can assume responsive web design, so any height, width, or relational space between objects are given relative to a fixed-width canvas. Type will have font family, weight, and size specified, while vector and raster graphics can have background colors and much more.
The second place you can grab CSS from is within the blue box that originates from choosing an element. Toward the right is a Copy All option, which, predictably, copies the CSS straight to your clipboard (see Figure 9.17).
Photoshop’s CSS Generation
In addition to Extract, Photoshop also has a Copy CSS function you may not have noticed. It’s located under Layer in your menu bar (see Figure 9.18).
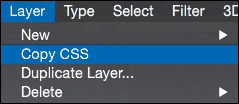
Figure 9.18 It’s been around for a little while now, but many people are unfamiliar with pulling CSS straight from Photoshop.
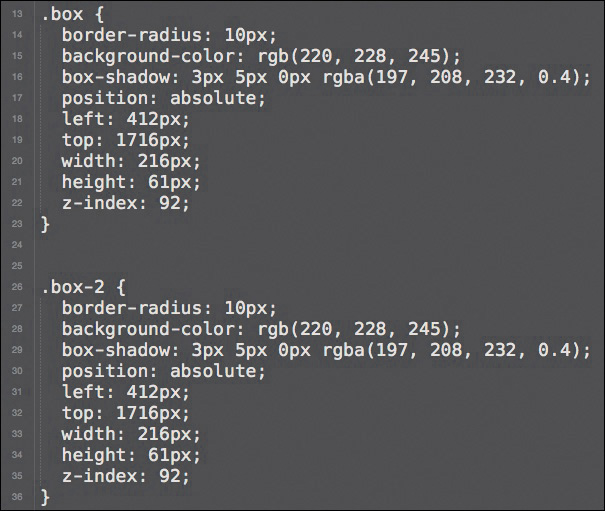
To be fair, I don’t recommend relying on the CSS generated by either application blindly. A best practice of writing CSS is to be as concise and succinct as possible, and unfortunately, Photoshop and Extract won’t take into account other elements on the canvas when it returns CSS for one. For example, you may have two boxes with exactly the same dimensions, drop shadows, borders, and rounded corners, except one has a red background and the other blue. Figure 9.19 shows how Photoshop will write the CSS for each.
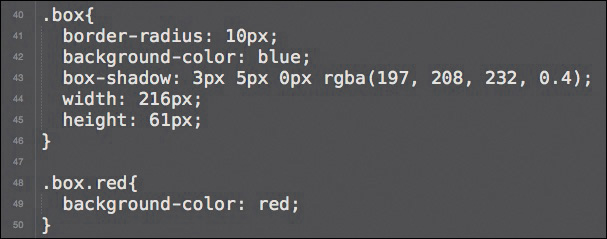
Here is perhaps a more efficient way: leveraging a class to one difference between the two boxes instead of duplicating all of the same attributes (see Figure 9.20).
Photoshop and Extract will get you quite far with the CSS they generate, but you’ll want to go back and check how you may be able to make it more efficient in the context of other elements.
At this point, you’ve gotten everything out of Photoshop that you need to and ideally much quicker than you had in the past. Generator and Extract Assets are becoming essential to most Photoshop workflows, no matter the style exercise or comp. I encourage you to get familiar with them since I think you’ll be saying goodbye to Save for Web in the near future.
I’m not sure about you, but all this talk about more efficient alternatives has me confident that Photoshop can stay in our workflows—so much so, in fact, that I want to push it further. What else is out there that can speed up the typical Photoshop tasks?