Table of Contents for
Mastering Linux Security and Hardening

Version ebook / Retour

Cover image for bash Cookbook, 2nd Edition Mastering Linux Security and Hardening by Donald A. Tevault Published by Packt Publishing, 2018
  1. Mastering Linux Security and Hardening
  2. Title Page
  3. Copyright and Credits
  4. Mastering Linux Security and Hardening
  5. Packt Upsell
  6. Why subscribe?
  7. PacktPub.com
  8. Contributors
  9. About the author
  10. About the reviewer
  11. Packt is searching for authors like you
  12. Table of Contents
  13. Preface
  14. Who this book is for
  15. What this book covers
  16. To get the most out of this book
  17. Download the color images
  18. Conventions used
  19. Get in touch
  20. Reviews
  21. Running Linux in a Virtual Environment
  22. The threat landscape
  23. So, how does this happen?
  24. Keeping up with security news
  25. Introduction to VirtualBox and Cygwin
  26. Installing a virtual machine in VirtualBox
  27. The EPEL repository on the CentOS virtual machine
  28. Configuring a network for VirtualBox virtual machines
  29. Creating a virtual machine snapshot with VirtualBox
  30. Using Cygwin to connect to your virtual machines
  31. Installing Cygwin on your Windows host
  32. Summary
  33. Securing User Accounts
  34. The dangers of logging in as the root user
  35. The advantages of using sudo
  36. Setting up sudo privileges for full administrative users
  37. Method 1 – adding users to a predefined admin group
  38. Method 2 – creating an entry in the sudo policy file
  39. Setting up sudo for users with only certain delegated privileges
  40. Hands-on lab for assigning limited sudo privileges
  41. Advanced tips and tricks for using sudo
  42. The sudo timer
  43. Hands-on lab for disabling the sudo timer
  44. Preventing users from having root shell access
  45. Preventing users from using shell escapes
  46. Preventing users from using other dangerous programs
  47. Limiting the user's actions with commands
  48. Letting users run as other users
  49. Locking down users' home directories the Red Hat or CentOS way
  50. Locking down users' home directories the Debian/Ubuntu way
  51. useradd on Debian/Ubuntu
  52. adduser on Debian/Ubuntu
  53. Hands-on lab for configuring adduser
  54. Enforcing strong password criteria
  55. Installing and configuring pwquality
  56. Hands-on lab for setting password complexity criteria
  57. Setting and enforcing password and account expiration
  58. Configuring default expiry data for useradd – for Red Hat or CentOS only
  59. Setting expiry data on a per-account basis, with useradd and usermod
  60. Setting expiry data on a per-account basis, with chage
  61. Hands-on lab for setting account and password expiry data
  62. Preventing brute-force password attacks
  63. Configuring the pam_tally2 PAM module
  64. Hands-on lab for configuring pam_tally2
  65. Locking user accounts
  66. Using usermod to lock a user account
  67. Using passwd to lock user accounts
  68. Locking the root user account
  69. Setting up security banners
  70. Using the motd file
  71. Using the issue file
  72. Using the issue.net file
  73. Summary
  74. Securing Your Server with a Firewall
  75. An overview of iptables
  76. Basic usage of iptables
  77. Hands-on lab for basic iptables usage
  78. Uncomplicated Firewall for Ubuntu systems
  79. Basic usage of ufw
  80. Hands-on lab for basic ufw usage
  81. firewalld for Red Hat systems
  82. Verifying the status of firewalld
  83. firewalld zones
  84. firewalld services
  85. Adding ports to a firewalld zone
  86. firewalld rich language rules
  87. Hands-on lab for firewalld commands
  88. nftables – a more universal type of firewall system
  89. nftables tables and chains
  90. Getting started with nftables
  91. Using nft commands
  92. Hands-on lab for nftables on Ubuntu
  93. Summary
  94. Encrypting and SSH Hardening
  95. GNU Privacy Guard
  96. Creating your GPG keys
  97. Symmetrically encrypting your own files
  98. Hands-on lab – combining gpg and tar for encrypted backups
  99. Using private and public keys for asymmetric encryption and signing
  100. Signing a file without encryption
  101. Encrypting partitions with Linux Unified Key Setup – LUKS
  102. Disk encryption during operating system installation
  103. Adding an encrypted partition with LUKS
  104. Configuring the LUKS partition to mount automatically
  105. Encrypting directories with eCryptfs
  106. Home directory and disk encryption during Ubuntu installation
  107. Encrypting a home directory for a new user account
  108. Creating a private directory within an existing home directory
  109. Encrypting other directories with eCryptfs
  110. Encrypting the swap partition with eCryptfs
  111. Using VeraCrypt for cross-platform sharing of encrypted containers
  112. Getting and installing VeraCrypt
  113. Creating and mounting a VeraCrypt volume in console mode
  114. Using VeraCrypt in GUI mode
  115. Ensuring that SSH protocol 1 is disabled
  116. Creating and managing keys for password-less logins
  117. Creating a user's SSH key set
  118. Transferring the public key to the remote server
  119. Disabling root user login
  120. Disabling username/password logins
  121. Setting up a chroot environment for SFTP users
  122. Creating a group and configuring the sshd_config file
  123. Hands-on lab – setting up a chroot directory for sftpusers group
  124. Summary
  125. Mastering Discretionary Access Control
  126. Using chown to change ownership of files and directories
  127. Using chmod to set permissions values on files and directories
  128. Setting permissions with the symbolic method
  129. Setting permissions with the numerical method
  130. Using SUID and SGID on regular files
  131. The security implications of the SUID and SGID permissions
  132. Finding spurious SUID or SGID files
  133. Hands-on lab – searching for SUID and SGID files
  134. Preventing SUID and SGID usage on a partition
  135. Using extended file attributes to protect sensitive files
  136. Setting the a attribute
  137. Setting the i attribute
  138. Hands-on lab – setting security-related extended file attributes
  139. Summary
  140. Access Control Lists and Shared Directory Management
  141. Creating an access control list for either a user or a group
  142. Creating an inherited access control list for a directory
  143. Removing a specific permission by using an ACL mask
  144. Using the tar --acls option to prevent the loss of ACLs during a backup
  145. Creating a user group and adding members to it
  146. Adding members as we create their user accounts
  147. Using usermod to add an existing user to a group
  148. Adding users to a group by editing the /etc/group file
  149. Creating a shared directory
  150. Setting the SGID bit and the sticky bit on the shared directory
  151. Using ACLs to access files in the shared directory
  152. Setting the permissions and creating the ACL
  153. Charlie tries to access Vicky's file with an ACL set for Cleopatra
  154. Hands-on lab – creating a shared group directory
  155. Summary
  156. Implementing Mandatory Access Control with SELinux and AppArmor
  157. How SELinux can benefit a systems administrator
  158. Setting security contexts for files and directories
  159. Installing the SELinux tools
  160. Creating web content files with SELinux enabled
  161. Fixing an incorrect SELinux context
  162. Using chcon
  163. Using restorecon
  164. Using semanage
  165. Hands-on lab – SELinux type enforcement
  166. Troubleshooting with setroubleshoot
  167. Viewing setroubleshoot messages
  168. Using the graphical setroubleshoot utility
  169. Troubleshooting in permissive mode
  170. Working with SELinux policies
  171. Viewing the Booleans
  172. Configuring the Booleans
  173. Protecting your web server
  174. Protecting network ports
  175. Creating custom policy modules
  176. Hands-on lab – SELinux Booleans and ports
  177. How AppArmor can benefit a systems administrator
  178. Looking at AppArmor profiles
  179. Working with AppArmor command-line utilities
  180. Troubleshooting AppArmor problems
  181. Summary
  182. Scanning, Auditing, and Hardening
  183. Installing and updating ClamAV and maldet
  184. Installing ClamAV and maldet
  185. Configuring maldet
  186. Updating ClamAV and maldet
  187. Scanning with ClamAV and maldet
  188. SELinux considerations
  189. Scanning for rootkits with Rootkit Hunter
  190. Installing and updating Rootkit Hunter
  191. Scanning for rootkits
  192. Controlling the auditd daemon
  193. Creating audit rules
  194. Auditing a file for changes
  195. Auditing a directory
  196. Auditing system calls
  197. Using ausearch and aureport
  198. Searching for file change alerts
  199. Searching for directory access rule violations
  200. Searching for system call rule violations
  201. Generating authentication reports
  202. Using predefined rules sets
  203. Applying OpenSCAP policies with oscap
  204. Installing OpenSCAP
  205. Viewing the profile files
  206. Scanning the system
  207. Remediating the system
  208. Using SCAP Workbench
  209. More about OpenSCAP profiles
  210. Applying an OpenSCAP profile during system installation
  211. Summary
  212. Vulnerability Scanning and Intrusion Detection
  213. Looking at Snort and Security Onion
  214. Obtaining and installing Snort
  215. Graphical interfaces for Snort
  216. Getting Snort in prebuilt appliances
  217. Using Security Onion
  218. Scanning and hardening with Lynis
  219. Installing Lynis on Red Hat/CentOS
  220. Installing Lynis on Ubuntu
  221. Scanning with Lynis
  222. Finding vulnerabilities with OpenVAS
  223. Web server scanning with Nikto
  224. Nikto in Kali Linux
  225. Installing and updating Nikto on Linux
  226. Scanning a web server with Nikto
  227. Summary
  228. Security Tips and Tricks for the Busy Bee
  229. Auditing system services
  230. Auditing system services with systemctl
  231. Auditing network services with netstat
  232. Auditing network services with Nmap
  233. Port states
  234. Scan types
  235. Password-protecting the GRUB 2 bootloader
  236. Resetting the password for Red Hat/CentOS
  237. Resetting the password for Ubuntu
  238. Preventing kernel parameter edits on Red Hat/CentOS
  239. Preventing kernel parameter edits on Ubuntu
  240. Password-protecting boot options
  241. Disabling the submenu for Ubuntu
  242. Password-protecting boot option steps for both Ubuntu and Red Hat
  243. Securely configuring BIOS/UEFI
  244. Using a security checklist for system setup
  245. Summary
  246. Other Books You May Enjoy
  247. Leave a review – let other readers know what you think

Scanning with Lynis

Lynis commands work the same regardless of which operating system that you want to scan. The only difference is that if you're running it from the archive file that you downloaded from the website, you would cd into the lynis directory and precede the lynis commands with a ./.  (That's because, for security reasons, your own home directory isn't in the path setting that allows the shell to automatically find executable files.)

To scan your system that has Lynis installed, follow this:

sudo lynis audit system

To scan a system on which you just downloaded the archive file, follow this:

cd lynis
sudo ./lynis audit system

Running Lynis from the shell script in your home directory presents you with this message:

donnie@ubuntu:~/lynis$ sudo ./lynis audit system
[sudo] password for donnie:


[!] Change ownership of /home/donnie/lynis/include/functions to 'root' or similar (found: donnie with UID 1000).

Command:
# chown 0:0 /home/donnie/lynis/include/functions

[X] Security check failed

Why do I see this error?
-------------------------------
This is a protection mechanism to prevent the root user from executing user created files. The files may be altered, or including malicious pieces of script.

What can I do?
---------------------
Option 1) Check if a trusted user created the files (e.g. due to using Git, Homebrew or similar).
If you trust these files, you can decide to continue this run by pressing ENTER.

Option 2) Change ownership of the related files (or full directory).

Commands (full directory):
# cd ..
# chown -R 0:0 lynis
# cd lynis
# ./lynis audit system

[ Press ENTER to continue, or CTRL+C to cancel ]

That's not hurting anything, so you can just hit Enter to continue. Or, if seeing this message really bothers you, you can change ownership of the Lynis files to the root user, as the message tells you. For now, I'll just press Enter.

Running a Lynis scan in this manner is similar to running an OpenSCAP scan against a generic security profile. The major difference is that OpenSCAP has an automatic remediation feature, but Lynis doesn't. Lynis tells you what it finds and suggests how to fix what it perceives to be a problem, but it doesn't fix anything for you.

Space doesn't permit me to show the entire scan output, but I can show you a couple of example snippets:

[+] Boot and services
------------------------------------
- Service Manager [ systemd ]
- Checking UEFI boot [ DISABLED ]
- Checking presence GRUB [ OK ]
- Checking presence GRUB2 [ FOUND ]
- Checking for password protection [ WARNING ]
- Check running services (systemctl) [ DONE ]
Result: found 21 running services
- Check enabled services at boot (systemctl) [ DONE ]
Result: found 28 enabled services
- Check startup files (permissions) [ OK ]

The warning message shows that I don't have password protection for my GRUB2 bootloader. That may or may not be a big deal because the only way someone can exploit that is to gain physical access to the machine. If it's a server that's locked away in a room that only a few trusted personnel can access, then I'm not going to worry about it, unless rules from an applicable regulatory agency dictate that I do. If it's a desktop machine that's out in an open cubicle, then I would definitely fix that. (We'll look at GRUB password protection in Chapter 10, Security Tips and Tricks for the Busy Bee.)

In the File systems section, we see some items with the SUGGESTION flag:

[+] File systems
------------------------------------
- Checking mount points
- Checking /home mount point [ SUGGESTION ]
- Checking /tmp mount point [ SUGGESTION ]
- Checking /var mount point [ SUGGESTION ]
- Query swap partitions (fstab) [ OK ]
- Testing swap partitions [ OK ]
- Testing /proc mount (hidepid) [ SUGGESTION ]
- Checking for old files in /tmp [ OK ]
- Checking /tmp sticky bit [ OK ]
- ACL support root file system [ ENABLED ]
- Mount options of / [ NON DEFAULT ]
- Checking Locate database [ FOUND ]
- Disable kernel support of some filesystems
- Discovered kernel modules: cramfs freevxfs hfs hfsplus jffs2 udf

Exactly what Lynis suggests comes near the end of the output:

. . .
. . .

* To decrease the impact of a full /home file system, place /home on a separated partition [FILE-6310]
https://cisofy.com/controls/FILE-6310/

* To decrease the impact of a full /tmp file system, place /tmp on a separated partition [FILE-6310]
https://cisofy.com/controls/FILE-6310/

* To decrease the impact of a full /var file system, place /var on a separated partition [FILE-6310]
https://cisofy.com/controls/FILE-6310/
. . .
. . .

The last thing we'll look at is the scan details section at the end of the output:

  Lynis security scan details:

Hardening index : 67 [############# ]
Tests performed : 218
Plugins enabled : 0

Components:
- Firewall [V]
- Malware scanner [X]

Lynis Modules:
- Compliance Status [?]
- Security Audit [V]
- Vulnerability Scan [V]

Files:
- Test and debug information : /var/log/lynis.log
- Report data : /var/log/lynis-report.dat

For Components, there's a red X by Malware Scanner. That's because I don't have ClamAV or maldet installed on this machine, so Lynis couldn't do a virus scan.

For Lynis Modules, we see a question mark by Compliance Status. That's because this feature is reserved for the Enterprise version of Lynis, which requires a paid subscription. As we saw in the previous chapter, you have OpenSCAP profiles to make a system compliant with several different security standards, and it doesn't cost you anything. With Lynis, you have to pay for the compliance profiles, but you have a wider range from which to choose. In addition to the compliance profiles that OpenSCAP offers, Lynis also offers profiles for HIPAA and Sarbanes-Oxley compliance.

If you're based here in the United States, you most surely know what HIPAA and Sarbanes-Oxley are and whether they apply to you. If you're not in the United States, then you probably don't need to worry about them.

Having said that, if you work in the healthcare industry, even if you're not in the United States, the HIPAA profile can give you guidance about how to protect private data for patients.

The last thing I want to say about Lynis is about the Enterprise version. In this screenshot from their website, you can see the current pricing and the differences between the different subscription plans:

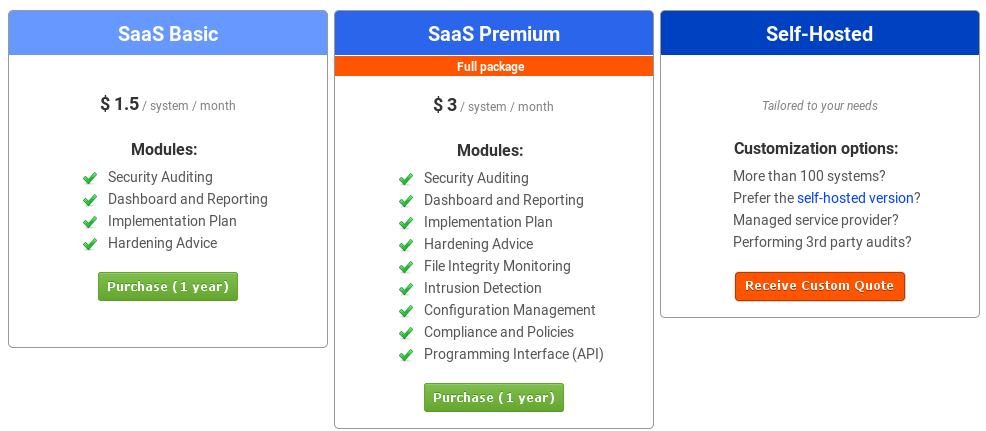
As you can see, you have choices.

You'll find information about pricing at this website:
https://cisofy.com/pricing/.

That pretty much wraps it up for our discussion of Lynis. Next, let's look at an external vulnerability scanner.