
Our new license plate field type could be added to an entity type, but there would be no way users can use it. For this, we will need at least a widget. A given field type can work, however, with multiple widgets. So, let's create that default license plate widget plugin we referenced in the annotation of the field type, which belongs in the Plugin/Field/FieldWidget namespace of our module:
namespace Drupal\license_plate\Plugin\Field\FieldWidget;

use Drupal\Core\Field\FieldItemListInterface;
use Drupal\Core\Field\WidgetBase;
use Drupal\Core\Form\FormStateInterface;

/**
 * Plugin implementation of the 'default_license_plate_widget' widget.
 *
 * @FieldWidget(
 *   id = "default_license_plate_widget",
 *   label = @Translation("Default license plate widget"),
 *   field_types = {
 *     "license_plate"
 *   }
 * )
 */
class DefaultLicensePlateWidget extends WidgetBase {}
Again, we started by examining the annotation and class parents for just a bit. We will notice nothing particularly complicated, except maybe the field_types key, which specifies the FieldType plugin IDs this widget can work with. Just as a field type can have more than one widget, a widget can work with more than one field type. Also, it's important that we specify it here, otherwise we site builders won't be able to use this widget with our field type.
We extended WidgetBase, which implements the obligatory WidgetInterface and provides some common defaults for all its subclasses.
The first thing we can do inside the class is handle our settings. First, we will define what settings this widget has and set the default values for these settings:
/**
 * {@inheritdoc}
 */
public static function defaultSettings() {
  return [
    'number_size' => 60,
    'code_size' => 5,
    'fieldset_state' => 'open',
    'placeholder' => [
      'number' => '',
      'code' => '',
    ],
  ] + parent::defaultSettings();
}
Here, we have some settings specific to how the form widget would be configured for our field. We will use the first two settings mentioned in the preceding code to limit the size of the form element. It will not actually prevent users from filling in longer values, but will be a good indication for them as to how long the values should be. Then, we have the fieldset_state setting, which we will use to indicate whether the form fieldset we use to group the two license place textfields is by default open or closed. We will see that in a minute. Lastly, each of these textfields can have a placeholder value (potentially). So, we have that setting as well. Do note that these are all settings we make up and that make sense for our field. You can add your own if you want.
Next, we have the form used to configure these settings (as part of the widget configuration):
/**
 * {@inheritdoc}
 */
public function settingsForm(array $form, FormStateInterface $form_state) {
  $elements = [];

  $elements['number_size'] = [
    '#type' => 'number',
    '#title' => t('Size of plate number textfield'),
    '#default_value' => $this->getSetting('number_size'),
    '#required' => TRUE,
    '#min' => 1,
    '#max' => $this->getFieldSetting('number_max_length'),
  ];

  $elements['code_size'] = [
    '#type' => 'number',
    '#title' => t('Size of plate code textfield'),
    '#default_value' => $this->getSetting('code_size'),
    '#required' => TRUE,
    '#min' => 1,
    '#max' => $this->getFieldSetting('code_max_length'),
  ];

  $elements['fieldset_state'] = [
    '#type' => 'select',
    '#title' => t('Fieldset default state'),
    '#options' => [
      'open' => t('Open'),
      'closed' => t('Closed')
    ],
    '#default_value' => $this->getSetting('fieldset_state'),
    '#description' => t('The default state of the fieldset which contains the two plate fields: open or closed')
  ];

  $elements['placeholder'] = [
    '#type' => 'details',
    '#title' => t('Placeholder'),
    '#description' => t('Text that will be shown inside the field until a value is entered. This hint is usually a sample value or a brief description of the expected format.'),
  ];

  $placeholder_settings = $this->getSetting('placeholder');
  $elements['placeholder']['number'] = [
    '#type' => 'textfield',
    '#title' => t('Number field'),
    '#default_value' => $placeholder_settings['number'],
  ];
  $elements['placeholder']['code'] = [
    '#type' => 'textfield',
    '#title' => t('Code field'),
    '#default_value' => $placeholder_settings['code'],
  ];

  return $elements;
}
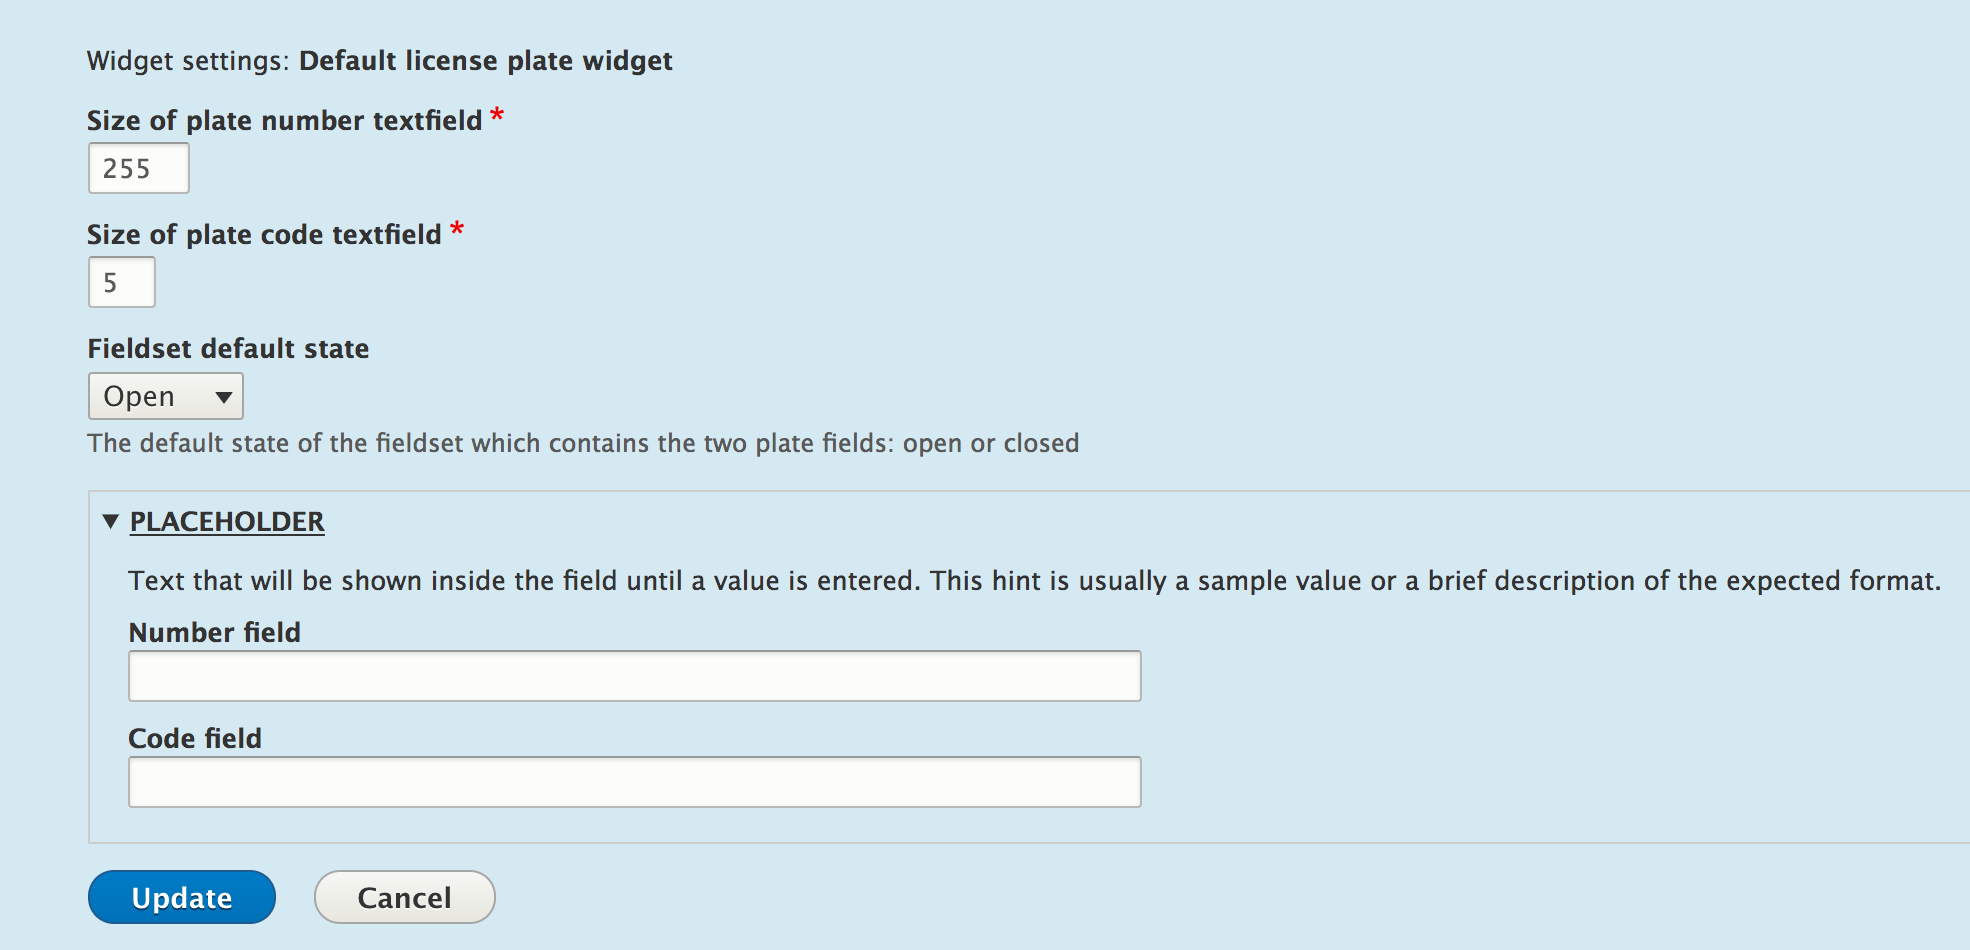
We have to return the elements for our widget settings, which will then be added to a bigger form (passed as an argument). There is nothing special about the first three form elements. We have two number fields and a select list to control the first three settings we saw in our defaults. For the first two settings, we want the numbers to be positive and max out at the same maximum length we have set in the storage. We don't want the widget exceeding that length. However, if we want, we can shorten the size of the element.
The textfields for the two placeholder values are wrapped inside a details form element. The latter is a fieldset that can be open or closed and can contain other form elements. We will use the same to wrap the actual textfields with which users will input license plate data.
The preceding form will look like this when users configure the widget:
Lastly, we have the summary of the settings the widget, which will be displayed in the "Manage form display" page for our field:
/**
 * {@inheritdoc}
 */
public function settingsSummary() {
  $summary = [];

  $summary[] = t('License plate size: @number (for number) and @code (for code)', ['@number' => $this->getSetting('number_size'), '@code' => $this->getSetting('code_size')]);
  $placeholder_settings = $this->getSetting('placeholder');
  if (!empty($placeholder_settings['number']) && !empty($placeholder_settings['code'])) {
    $placeholder = $placeholder_settings['number'] . ' ' . $placeholder_settings['code'];
    $summary[] = t('Placeholder: @placeholder', ['@placeholder' => $placeholder]);
  }
  $summary[] = t('Fieldset state: @state', ['@state' => $this->getSetting('fieldset_state')]);

  return $summary;
}
This method needs to return an array of strings that will make up the settings summary. That is what we will do now--reading all of our settings values and listing them out in a human-friendly way. The end result will look something like this:

Next, we will have to implement the core of the field widget plugins--the actual form used for inputting the field data:
/**
 * {@inheritdoc}
 */
public function formElement(FieldItemListInterface $items, $delta, array $element, array &$form, FormStateInterface $form_state) {
  $element['details'] = [
    '#type' => 'details',
    '#title' => $element['#title'],
    '#open' => $this->getSetting('fieldset_state') == 'open' ? TRUE : FALSE,
    '#description' => $element['#description'],
  ] + $element;

  $placeholder_settings = $this->getSetting('placeholder');
  $element['details']['code'] = [
    '#type' => 'textfield',
    '#title' => t('Plate code'),
    '#default_value' => isset($items[$delta]->code) ? $items[$delta]->code : NULL,
    '#size' => $this->getSetting('code_size'),
    '#placeholder' => $placeholder_settings['code'],
    '#maxlength' => $this->getFieldSetting('code_max_length'),
    '#description' => '',
    '#required' => $element['#required'],
  ];

  $element['details']['number'] = [
    '#type' => 'textfield',
    '#title' => t('Plate number'),
    '#default_value' => isset($items[$delta]->number) ? $items[$delta]->number : NULL,
    '#size' => $this->getSetting('number_size'),
    '#placeholder' => $placeholder_settings['number'],
    '#maxlength' => $this->getFieldSetting('number_max_length'),
    '#description' => '',
    '#required' => $element['#required'],
  ];

  return $element;
}
This is a bit more complicated at first glance, but we'll break it down, and you'll see that it actually makes sense with what you've been learning in the previous chapters.
The first argument passed to this method is the entire list of values for this field. Remember that each field can have multiple values, hence the usage of the FieldItemListInterface instance to hold them. So, from there, we can get the values of any of the items in the list. The second argument is the actual delta of the item in the list, which we can use to pinpoint the one for which the form is being built (in order to retrieve the default value). Then, we have an $element array, which we should actually return, but which contains some pieces of data already prepared for us based on the field configuration. For example, when creating a field, if we set it to be required, then this $element already contains the form property #required => TRUE. Likewise, it contains the weight of the field (compared to the others on the entity type), the #title property, and many others. I recommend that you debug that array and see what's in it. Also, you can look inside WidgetBase::formMultipleElments() and WidgetBase::formSingleElement() and see how this array is prepared. Lastly, we get the form definition and form state information of the larger form our field element gets embedded in.
So, what we are doing inside the method is getting a bit creative with the data that we have. One value fields would typically just extend the $element array, and then the method would simply return that. However, we have two values we want to wrap inside a nice collapsible fieldset, so we create a details element for that.
It is on this element that we copy over the field title and description the user has specified when creating the field, which is prepared for us in the $element array. This is because those relate to the entire field, not just one of the values. Moreover, we also set the default #open state to whatever was stored in the widget settings. Lastly, to all this, we add the rest of the values found in the $elements array because we want to inherit them as well.
Next, within our details element, we can add the two textfields for the license plate code and number. For both of these, we use the widget settings to set the element size and placeholder value, as well as a maximum length value equal to the field item storage. This is what will prevent users from providing values that are longer than what the database columns can handle. The default value for the two form elements will be set to the actual field values of these properties, retrieved from the list of items using the current delta key. Finally, we set the #required property to whatever the user has configured for this field. This property would be useless on the parent details element, so we have to move it down to the actual text fields, and that's pretty much it.
The last method we can implement, and in our case, have to, is one that prepares the field values a bit when submitting:
/**
 * {@inheritdoc}
 */
public function massageFormValues(array $values, array $form, FormStateInterface $form_state) {
  foreach ($values as &$value) {
    $value['number'] = $value['details']['number'];
    $value['code'] = $value['details']['code'];
    unset($value['details']);
  }

  return $values;
}
Here's what happens. From our property definitions, our field expects two properties--number and code. However, submitting this form will present only one property called "details" because that is what we arbitrarily named our fieldset form element, which contains the properties inside. Also, since we made this choice, we will need to now massage the submitted values a bit to match the expected properties. In other words, we have to bring the number and code properties to the top level of the $values array and unset the details element, as it's no longer needed upon submission. So, now, the field receives the array in the following format:
$values = [
  'number' => 'My number',
  'code' => 'My code'
];
If you remember, this is incidentally also what we would pass to the set() method of the field if we wanted to set this value on the field. Take a look at the following example:
$node->set('field_license_plate', ['code' => 'NY', 'number' => '63676']);
With that, our widget is done; well, not quite. We again forgot about the configuration schema. Let's not do that again. In the same file as we did the field storage schema, we can add the definition for the widget settings:
field.widget.settings.default_license_plate_widget:
  type: mapping
  label: 'Default license plate widget settings'
  mapping:
    number_size:
      type: integer
      label: 'Number size'
    code_size:
      type: integer
      label: 'Code size'
    fieldset_state:
      type: string
      label: 'The state of the fieldset which contains the two fields: open/closed'
    placeholder:
      type: mapping
      label: 'The placeholders for the two fields'
      mapping:
        number:
          type: string
          label: 'The placeholder for the number field'
        code:
          type: string
          label: 'The placeholder for the code field'
It works just like before--a dynamic schema name that starts with field.widget.settings. and has the actual plugin ID at the end, and inside, we have a property mapping as we've seen before. With this, we are really done.