Table of Contents for
Pro Photo Colorizing with GIMP
 Pro Photo Colorizing with GIMP
Published by
Apress, 2016
Pro Photo Colorizing with GIMP
Published by
Apress, 2016
- Cover
- Frontmatter
- 1. Getting Familiar with GIMP, Tonal Adjustments, and Basic Colorizing Techniques
- 1. An Overview of GIMP 2.8
- 2. An Introduction to Tonal Adjustments
- 3. Colorizing Simple Objects
- 2. Intermediate and Advanced Color
- 4. Colorizing with Greater Complexity
- 5. Colorizing Skin, Hair, and Eyes
- 6. Colorizing Portraits and Snapshots
- 3. Artistic Colorizing Techniques
- 7. Creating an Old-Fashioned Look
- 8. Selective Colorizing
- 9. Colorizing Using Patterns and Color Overlays
- 10. Converting Color Images into Black and White
- Backmatter
Phillip Whitt
Pro Photo Colorizing with GIMP

Phillip Whitt
Columbus, Georgia, USA
Any source code or other supplementary materials referenced by the author in this text is available to readers at www.apress.com . For detailed information about how to locate your book’s source code, go to www.apress.com/source-code/ .
ISBN 978-1-4842-1948-5
e-ISBN 978-1-4842-1949-2
DOI 10.1007/978-1-4842-1949-2
Library of Congress Control Number: 2016949451
© Phillip Whitt 2016
Pro Photo Colorizing with GIMP
Managing Director: Welmoed Spahr
Acquisitions Editor: Ben Renow-Clarke
Development Editor: Matthew Moodie
Technical Reviewer: Garry Patchett
Editorial Board: Steve Anglin, Pramila Balen, Laura Berendson, Aaron Black, Louise Corrigan, Jonathan Gennick, Celestin Suresh John, Nikhil Karkal, Robert Hutchinson, James Markham, Matthew Moodie, Natalie Pao, Gwenan Spearing
Coordinating Editor: Nancy Chen
Copy Editor: April Rondeau
Compositor: SPi Global
Indexer: SPi Global
For information on translations, please e-mail rights@apress.com or visit www.apress.com .
Apress and friends of ED books may be purchased in bulk for academic, corporate, or promotional use. eBook versions and licenses are also available for most titles. For more information, reference our Special Bulk Sales–eBook Licensing web page at www.apress.com/bulk-sales .
This work is subject to copyright. All rights are reserved by the Publisher, whether the whole or part of the material is concerned, specifically the rights of translation, reprinting, reuse of illustrations, recitation, broadcasting, reproduction on microfilms or in any other physical way, and transmission or information storage and retrieval, electronic adaptation, computer software, or by similar or dissimilar methodology now known or hereafter developed.
Trademarked names, logos, and images may appear in this book. Rather than use a trademark symbol with every occurrence of a trademarked name, logo, or image we use the names, logos, and images only in an editorial fashion and to the benefit of the trademark owner, with no intention of infringement of the trademark.The use in this publication of trade names, trademarks, service marks, and similar terms, even if they are not identified as such, is not to be taken as an expression of opinion as to whether or not they are subject to proprietary rights.
While the advice and information in this book are believed to be true and accurate at the date of publication, neither the authors nor the editors nor the publisher can accept any legal responsibility for any errors or omissions that may be made. The publisher makes no warranty, express or implied, with respect to the material contained herein.
Printed on acid-free paper
This book is dedicated to my lovely wife, Sally, and my wonderful daughter, Myra. They demonstrated a great deal of patience with me for isolating myself for many weeks as I worked on this book.
Introduction
The pioneering of photography in the 1800s was a technological leap for that time. For the first time it was possible to freeze moments and capture imagery the way it actually appeared—at least for the most part. As photography grew more commonplace, the cameras of the time became capable of capturing images with remarkable clarity and detail. I’m often amazed at how sharp the detail is in photographs from that time period.
The missing element in those early days of photography was, of course, color. Most photographs in those days were black and white (called grayscale in the world of digital imaging). Adding color by toning (such as sepia) became more common, but the image was still monochromatic, meaning it was comprised of one color.
While not in widespread use, there were several techniques developed that did indeed produce color images of varying quality shortly after the advent of photography. In fact, one of the first color photographs was created in the mid-1800s.
In the early 1900s, a Russian chemist and photographer named Sergey Prokudin-Gorsky produced a number of photographic images in stunning color. He used a method of photographing the subject through red, green, and blue color filters onto glass negative plates. The three color separations were then projected through color filters, creating a color composite—a photographic image in living color. To see samples of Sergey Prokudin-Gorsky’s work, just log on to this page at the Library of Congress website: http://www.loc.gov/pictures/collection/prok/ .
It would still be some time before color photography became widely available. Before it did, a common method of adding color to photographs was by applying tinted oils (Figure I-1 ). Although not very common today, hand tinting photographs is still practiced and offered as a specialty service (a company called Marshall still manufactures photo-colorizing oils specifically for hand tinting).
Figure I-1. A hand-tinted photograph from the late 1800s
Who This Book Is For
This book is aimed primarily at anyone interested in digital photo colorization—mainly at those who may be new to image editing but have an interest in bringing black and white photos into the world of color. You may be a genealogist, amateur or professional photographer, or retouch artist. You could also be a grandmother who’s been appointed as the keeper of the family photos and would like to add color to those old black and white photos of your family from the early to mid-twentieth century.
This book teaches the reader a number of colorizing techniques using a software program called GIMP, which stands for GNU Image Manipulation Program. It is a free and open-source alternative to the Adobe flagship program. Although Photoshop is still at the top of the heap, GIMP is nonetheless a very powerful alternative program capable of advanced editing.
The fact that GIMP is free and open-source software means it falls under the terms of the GNU General Public License. This means GIMP is free to download, use, make copies of and share with others, and (for those with coding skills) modify. You can acquire a copy of the GNU General Public License here: https://www.gimp.org/about/COPYING .
Chapter 1 provides a basic overview of GIMP for readers who may have dabbled in image editing, but for those who are completely new to image editing, a downloadable Supplemental Beginner’s Guide is available in PDF form which can be obtained from the Source Code/Downloads tab from this Apress page: http://www.apress.com/9781484219485?gtmf=s . It provides an introduction to many of the tools and dialogs that will be used throughout the book. I also recommend GIMP for Absolute Beginners by Jan Smith, with Roman Joost (Apress, 2012), as an excellent companion book.
Why Colorize Black and White Images?
There are many people who believe black and white images should remain just as they are. In their view, colorizing these images somehow violates the purity of the photograph. In my experience as a photo restoration artist, I frequently encounter people of this opinion, which I certainly respect. I believe it’s really a matter of preference.
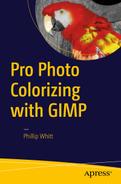
On the flip side, I also have numerous customers who request the colorization of black and white family photos. The images usually have some special significance that the addition of color helps make complete. For these people, adding color has a way of making the image seem a little more real and less like it’s in the distant past (Figure I-2 ). For my older customers, it’s often a photo taken during childhood and they want to recreate the memory as completely as possible.
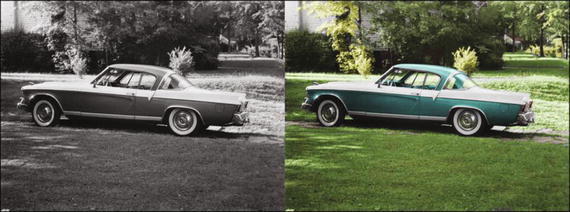
Figure I-2. Colorized images can seem less like they are from the distant past
When digital imaging became so widespread in the not too distant past, altering photos reached a new level. Damaged photos could now be seamlessly restored to their former glory. Images could be reworked to remove people or objects. Adding color without the messiness of tinted oils was now possible. For the photographer who offers retouching and restoration services, the ability to colorize photos can be a useful skill to possess.
Choosing Colors
When colorizing a black and white image, how does one know what colors to use? When a client hires me to colorize an old monochrome image of a family member, they can usually indicate the hair and eye colors, and often the color of the clothing worn.
In the past, people usually dressed up to have portraits taken. It’s not unusual for elderly clients who are mothers (and sometimes fathers) of adult children to know exactly what color a certain dress was or the colors of a little boy’s outfit. The more details that can be provided, the more accurate a colorization project will be.
Some types of clothing (such as military or police uniforms) can be researched on the Internet or at the library. In those cases, you’ll usually find a suitable reference to draw upon. Some types of clothing won’t be quite as easy to figure out. However, it is possible to use colors that are perfectly suitable, but not necessarily the actual original colors.
The man in Figure I-3 is my late father-in-law (you’ll colorize this image in Chapter 6 ). The picture was taken in the early 1950s, and as was typical in those days, most of the family photos were in black and white.
Figure I-3. The suit and tie colorized with colors that were common during the early 1950s
After doing some research, I actually found a listing for a suit and tie from the same time period listed on eBay with very similar colors to the ones in this example. Even though the colors I chose may not have been the actual ones, at least they were used in men’s suits at the time.
Adobe Photoshop expert and colorist Dana Keller (whose work is second to none, in my opinion) was kind enough to lend this advice on achieving historical accuracy when colorizing photographs:
“In order to preserve as much authenticity as possible, researching colors is a must. When researching the colors of, for example, military uniforms or old advertising or period decor, information can often be found online or in various historical resources. Libraries are a great source for researching these topics. But since it’s impossible to research everything, colorizing then turns to some educated guesswork.
First, gray values hint at what the possible colors could be. Then, with some context clues and working historical knowledge of the photograph content, you can begin to build a realistic portrayal of what the scene could have looked like to the photographer at that moment. The key word there is could. There will always be a significant margin for inaccuracy and some ‘artistic license’ in colorization. But researching (if at all possible) does go a long way in helping to achieve a more believable image. Thankfully, the availability of color photographs began to increase significantly in the ’40s and ’50s, so there are a great number of color references that are available to assist in accurately colorizing mid-century photos.”
To see Mr. Keller’s work, visit his website at http://www.danarkeller.com/ .
Developing Your Own Style of Working
The steps provided for each tutorial are presented in the way I normally work. Essentially, the parameters are laid out for you (such as layer opacities, color numeric inputs, etc.). You’ll notice at the end of each tutorial that there is a before and after example of the photo. If you follow the steps closely, you should achieve similar results. It’s almost like painting by numbers, but a bit more complex.
However, as you gain experience and proficiency (and work on projects outside of this book), you’ll eventually develop your own ways of doing things. There are often multiple ways of approaching a project that achieve similar results.
In addition, not everyone has the same eye for color. Unless they are following specific instructions, five different people colorizing the same image will likely end up with five different, but excellent, results.
Copy with Caution
If you are learning the art of digital photo restoration for professional purposes, you’ll have to be careful when duplicating and editing some images to avoid committing copyright infringement. Because I’m not an attorney, I can’t really offer this as specific legal advice; it is more a general cautionary guide for you to keep in mind. You should consult an attorney who specializes in intellectual property law for legal specifics.
On occasion, a customer will request retouching or modifying of a professionally shot portrait. Legally, the photographer who took the picture owns the copyright to the image (unless other arrangements were agreed upon beforehand). When possible, have the customer obtain written permission from the photographer or studio that owns the copyright before proceeding with any work. Naturally, some portraits will be decades old, and the photographer will have passed on or closed his/her business, or there simply may not be any way of knowing who the photographer is. In those cases, it’s probably a moot issue.
It’s good practice to have the customer sign a waiver (your attorney can help you draft one) releasing you from any copyright infringement liability. However, if the picture is obviously the work of a professional (especially a local photographer), obtaining permission to edit the image is very important. Photographers can be very protective of their work (trust me, I know), and you can’t really blame them. If it happened to get back to him or her that you were editing his or her work, a lawsuit might follow. (I personally know of a photo lab owner who was almost sued over just such an incident.)
Many people believe that because they paid for the photography service and prints, they own the copyright to those images. It can sometimes be difficult to convey the concept that the photographer (or studio that employs him or her) owns the copyright. However, it’s important that you do. Customers won’t always understand why they need to obtain permission or sign a waiver, but you must legally protect yourself. It’s also just professional courtesy to ask for permission to edit someone else’s work.
Be sure to remember these important points:
When possible, have the customer sign a waiver releasing you from any potential copyright infringement. Most of the images you work with will be family snapshots or an old portrait that was the work of a professional. It may be impossible to identify the photographer.
When it’s obvious that a photo is the work of a professional, obtain permission from the copyright owner to edit the image, if at all possible. There is usually an embossed signature at the bottom-right corner of a photo and a “Do Not Copy” warning on the back.
Consult an attorney when you need more-specific legal advice . It pays to be careful.
Mac Users
The tutorials in this book use several Windows/Linux keyboard shortcuts. If you are a Mac user, the Mac equivalents are shown in Table I-1 .
Table I-1. Mac/Windows Keyboard Shortcut Equivalents
Editing | ||
|---|---|---|
Function | Mac OS | Windows |
Cut to clipboard | Command + X | Control + X |
Copy to clipboard | Command + C | Control + C |
Paste from clipboard | Command + V | Control + V |
Undo | Command + Z | Control + Z |
Contextual Menus | Control + Click | Right-click |
Colorizing is a fun and rewarding activity. Now, if you are ready to begin, proceed to Chapter 1 to learn the basics of GIMP.
Acknowledgments
I’d first like to thank Ben Renow-Clarke for the opportunity to create this work. I’d also like to thank Nancy Chen for her invaluable assistance during the process of writing this book—she’s a professional of the highest degree.
I’d also like to thank Garry Patchett for his professional and expert guidance as technical reviewer. Mr. Patchett is highly skilled and very thorough in his work, and this book is the better for it.
Contents
- Part 1: Getting Familiar with GIMP, Tonal Adjustments, and Basic Colorizing Techniques
- Chapter 1: An Overview of GIMP 2.8
- Chapter 2: An Introduction to Tonal Adjustments
- Chapter 3: Colorizing Simple Objects
- Part 2: Intermediate and Advanced Color
- Part 3: Artistic Colorizing Techniques
- Appendix: Additional Resources for GIMP and Digital Colorizing
- GIMP Resources
- The Official GIMP Website Tutorials Page
- GIMP’s Official Google+ Page
- Partha’s Place
- GIMP Magazine
- gimpusers.com
- Photo Retouching, Editing, and Restoration
- RetouchPRO
- Whitt’s Image Works Free Digital Portrait Backgrounds
- Examples of Colorized Photos
- Dana Keller (History in Color)
- Colorization: The Colorization of Old Black and White Photos
- Index
Contents at a Glance
- About the Author
- About the Technical Reviewer
- Acknowledgments
- Introduction
- Part 1: Getting Familiar with GIMP, Tonal Adjustments, and Basic Colorizing Techniques
- Chapter 1: An Overview of GIMP 2.8
- Chapter 2: An Introduction to Tonal Adjustments
- Chapter 3: Colorizing Simple Objects
- Part 2: Intermediate and Advanced Color
- Chapter 4: Colorizing with Greater Complexity
- Chapter 5: Colorizing Skin, Hair, and Eyes
- Chapter 6: Colorizing Portraits and Snapshots
- Part 3: Artistic Colorizing Techniques
- Chapter 7: Creating an Old-Fashioned Look
- Chapter 8: Selective Colorizing
- Chapter 9: Colorizing Using Patterns and Color Overlays
- Chapter 10: Converting Color Images into Black and White
- Appendix: Additional Resources for GIMP and Digital Colorizing
- Index
About the Author and About the Technical Reviewer
About the Author

Phillip Whitt is a professional digital retouch and restoration artist, graphic designer, writer, and author. His love for everything related to photography began when he was ten years old. His favorite aunt gave him her old Kodak Brownie camera, and the joy he felt upon seeing his first developed photographs sparked a new hobby. His foray into digital image editing began in the 1990s with the purchase of his first flatbed scanner, which came bundled with a basic image-editing program. Fixing a few family photographs soon led to a new passion and profession which he continues to enjoy to this day.
Mr. Whitt has digitally edited countless photos and has served a number of professional clients over the years, such as photographers, photo labs, and camera outlets.
About the Technical Reviewer
Garry Patchett has worked in IT and engineering for more than twenty years designing products, creating software, and administering and documenting systems. With a master’s degree in project management, he is a dedicated “systems nerd” whose interests vary from the technological to the philosophical. Garry is currently working freelance and is involved in various open-source projects.