In this chapter, we’ll cover the following:
Colorizing various skin tones
Colorizing hair
Colorizing eyes
I must admit that in the early days of my career as a digital retoucher, I often found it difficult to achieve natural-looking results when colorizing people in black and white photos. It took a little time to develop an eye for what looked right after numerous trial and error attempts. The goal of this chapter is to help you achieve good results while minimizing trial and error.
There are many variations of skin, hair, and eye color. Without some guidance (or knowing the people in the photo), much of it is guesswork—particularly when no color reference photo exists. I usually rely on the customer to provide the specific color details of the skin complexion and hair and eye color of the subject(s).
I’ve provided a rudimentary color reference chart (found in the Chapter 5 Practice Images folder) for skin, hair, and eyes that will provide you with basic tones or colors to start with (Figure 5-1). In most cases they’ll work as they are, but the results can be fine-tuned if needed by using the Hue-Saturation dialog or adjusting the layer opacity, as we’ll see shortly.
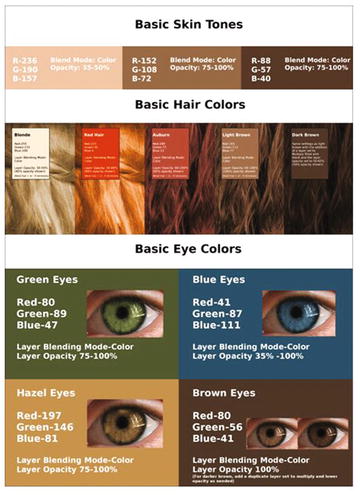
Figure 5-1. Basic color chart for skin, hair, and eyes found in the Chapter 5 Practice Images folder
The numeric inputs for each are provided, or the Eyedropper tool can be used to quickly sample the color. There are also charts available with a wider variety skin and hair colors. Just download Bruce Beard’s Skintones Color Chart and Hair Color Chart from RetouchPro: http://www.retouchpro.com/forums/html.php?file=bbcolorcharts.html .
Tutorial 11: Colorizing Different Skin Tones
In the upcoming tutorial, we’ll practice colorizing the faces of three people from different ethnic and racial backgrounds. The colors provided will work for colorizing people in a wide array of black and white photos.
To do this tutorial, follow these steps:
1. Open the Ch_5 Face Colorizations.jpg file found in the Chapter 5 Practice Images folder.
2. Duplicate the background layer (Layer ➤ Duplicate Layer) and rename the duplicate layer Copy, or leave it as is.
3. Use the Eyedropper tool (making sure the “Sample Merged” option is checked) to sample the color directly above the man on the left-hand side of the image to change the foreground color (Figure 5-2).
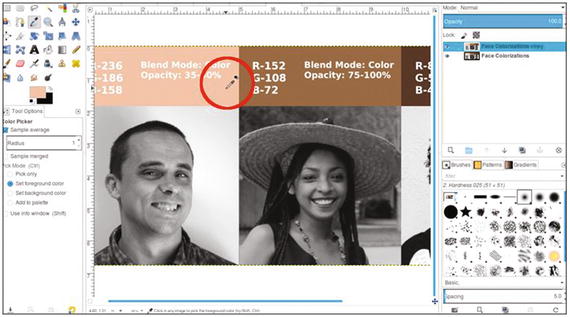
Figure 5-2. Use the Eyedropper tool to sample the color
4. Create a new layer (Layer ➤ New Layer) and make sure Layer Fill Type is set to Transparency. Change the blending mode to Color and lower the opacity to 40%. Rename the new layer Light/Caucasian Skin Color.
5. Using the Bucket Fill tool, fill the layer with the foreground color.
6. Add a layer mask (Layer ➤ Mask ➤ Add Layer Mask) initialized to black (the fill color will disappear until it’s revealed by painting in the layer mask). Click the layer mask to make it active.
7. Using a brush with the 2.Hardness 025 setting and white as the active color, paint in the layer mask to reveal the skin color. Use a small brush around the eyes, eyebrows, and hairline (Figure 5-3). It’s okay to reveal the flesh color in the lips, as a layer of red will be applied later.
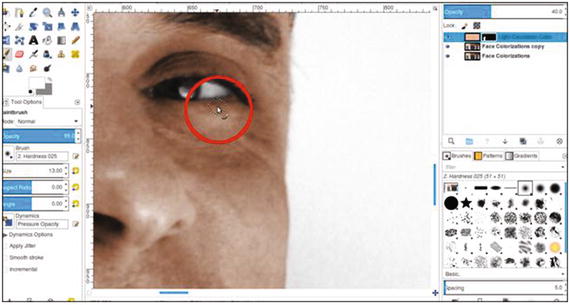
Figure 5-3. Reveal the flesh color by painting in the layer mask
Note
Sometimes it can be difficult to distinguish where the flesh ends and the hairline begins (this is also the case with flesh and lips, and eyebrows). The next chapter will take a closer look at those issues and how to deal with them.
8. We’ll now apply some subtle enhancements so the skin tone won’t look flat. Create a new layer (Layer ➤ New Layer) and make sure Layer Fill Type is set to Transparency. Change the blending mode to Color and lower the opacity to 40%. Rename the new layer Subtle Red.
9. Change the foreground color to red (R-255, G-0, B-0). Click OK.
10. Using the Paintbrush tool with the 2.Hardness 025 setting, paint some red on the cheeks, forehead, nose, ears, and chin (don’t worry about how bright the red is now—it’s only temporary). In Caucasian people (as well as other races), there is often some degree of red in these facial areas (Figure 5-4).
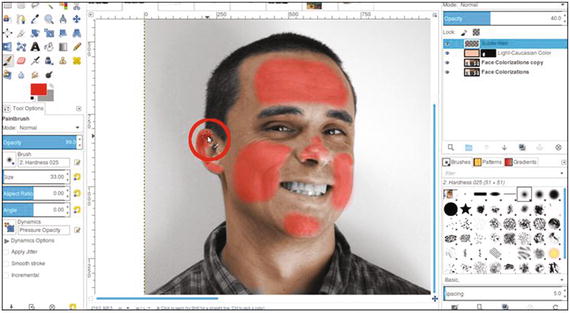
Figure 5-4. Apply red to enhance skin tone. The bright color is only temporary.
11. Lower the layer’s opacity to around 5%. Click the eyeball icon to toggle it off and on several times to see the difference (Figure 5-5).
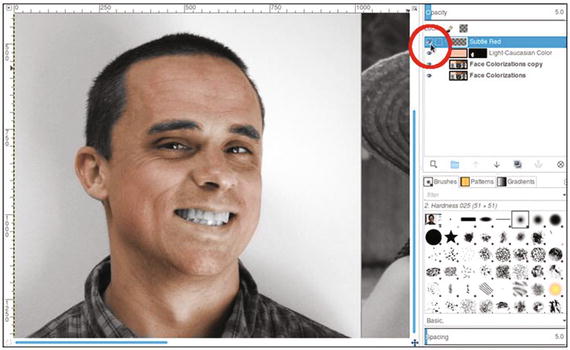
Figure 5-5. Toggle the layer off and on to notice how the red enhances the skin tone and helps it look less flat.
12. Create a new layer (Layer ➤ New Layer) and make sure Layer Fill Type is set to Transparency. Change the blending mode to Color. Rename the new layer Lips.
13. Make sure that red is still the foreground color and paint the lips. Lower the layer opacity to 10%.
14. Create a new layer (Layer ➤ New Layer) and make sure Layer Fill Type is set to Transparency. Change the blending mode to Color. Rename the new layer Teeth.
15. Change the foreground color to an ivory color (R-255, G-249, B-233). Apply the color to the teeth, then lower the layer opacity to 10% (Figure 5-6).
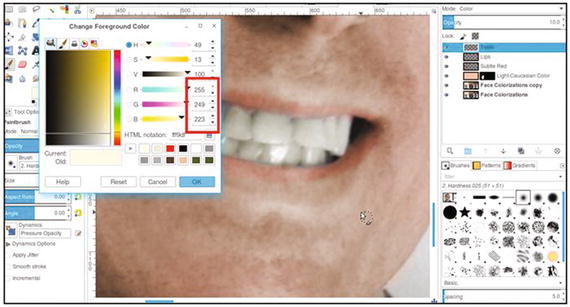
Figure 5-6. Apply a slight bit of color to the teeth.
Colorizing Skin (Center Image)
1. To colorize the face, neck and chest area, and arm of the young woman in the center, repeat the previous steps as you did before, with the following caveats:
After repeating step 4 from the previous tutorial, rename the fill layer Middle eastern/Asian Skin Color (this color formula also works well for light-skinned people of African lineage or people of Hispanic origin).
Reuse the Lips and Teeth layers for this subject.
Lower the fill layer’s opacity to 75-85%.
2. Use a small brush to reveal the skin color around the nose ring and the beads (Figure 5-7).
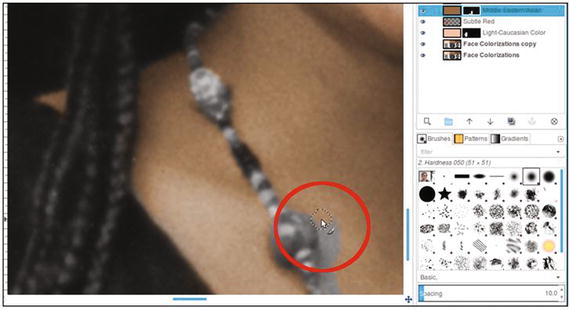
Figure 5-7. Use a small brush to work around the beads
3. Repeat applying red to the lips and ivory to the teeth on the respective layers, as was done previously.
The result should look something like what is shown in Figure 5-8.

Figure 5-8. Colorizing the center image of a young woman
Colorizing Skin (Right-Hand Image)
1. To colorize the image of the young woman on the right, repeat steps 3 to 11, with the following caveats:
Change the foreground color by using the Eyedropper tool to sample the color above the young woman on the right.
Rename the fill layer African American/Dark Skin Color.
Lower the fill layer’s opacity to 85%.
The hairs in her eyebrows are much finer than those in the previous two subjects, so instead of painting in the layer mask with black, use a light gray (R-176, G-176, B-176) for a partially transparent result (Figure 5-9).
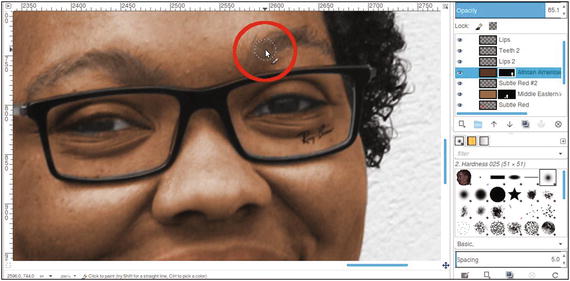
Figure 5-9. Reveal partial color in fine eyebrow hairs
We will be using new layers for the lips and teeth for this subject. Rename the layers to be used to apply the coloring for the lips and teeth accordingly (Lips 2 and Teeth 2).
2. Change the foreground color to red and apply the red to the lips (on the Lips 2 layer).
3. Lower the layer opacity to around 8%. We’re going for just the slightest hint of red (Figure 5-10).
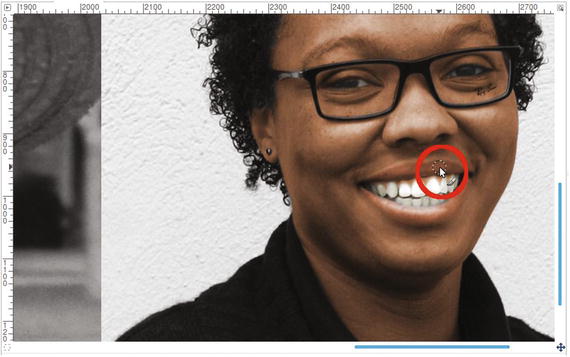
Figure 5-10. Applying the slightest hint of red to the lips
4. Apply ivory to the teeth (Teeth 2 layer). The layer opacity should be around 10%.
Tutorial 12: Colorizing Hair
In the upcoming tutorial, we’ll practice colorizing hair. While hair color can vary widely, we’ll practice applying a few basic colors.
To do this tutorial, follow these steps:
1. Open the Ch_5 Hair Colorization.jpg file found in the Chapter 5 Practice Images folder.
2. Duplicate the background layer (Layer ➤ Duplicate Layer) and rename the duplicate layer Copy, or leave it as is.
3. Use the Eyedropper tool (making sure the “Sample Merged” option is checked) to sample the color from the square on the far left (the pale yellow square in the Blonde category).
4. Create a new layer (Layer ➤ New Layer) and make sure Layer Fill Type is set to Transparency. Change the blending mode to Color and lower the opacity to 35%. Rename the new layer Blonde.
5. Using a brush with the 2.Hardness 025 setting and a large diameter (100–150 pixels), apply the color to the hair (Figure 5-11).
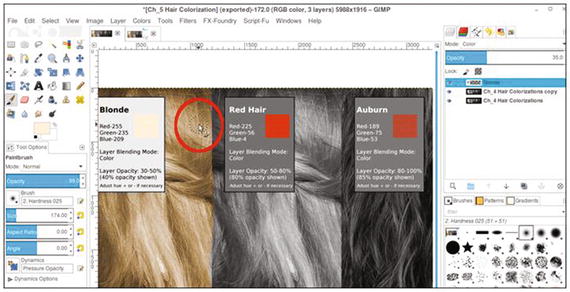
Figure 5-11. Apply the blonde color
6. Repeat steps 3 to 5 for each hair color that follows. Rename each new layer accordingly (Red hair, Auburn, etc.). Use the layer blending mode and opacity range indicated for each hair color (Figure 5-12). Don’t be overly concerned with painting accurately within the lines; the purpose is to see the resulting hair color.
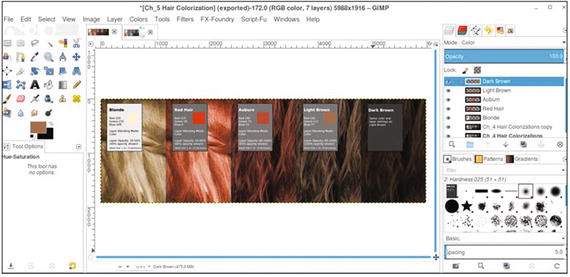
Figure 5-12. Remaining hair colors applied
It would be a good idea to see what range of shades is possible. Experiment with the Hue-Saturation dialog on each layer to make minute color adjustments, and adjust the layer opacity settings to observe how the color behaves. We’ll see how to color hair in portraits (and handle strands of hair) in the next chapter.
Tutorial 13: Colorizing Eyes
In the upcoming tutorial, we’ll practice colorizing eyes. Like skin and hair, eye color can also vary greatly. For this tutorial, we’ll stay with the basics.
To do this tutorial, follow these steps:
1. Open the Ch_5 Basic Eye Colors.jpg file found in the Chapter 5 Practice Images folder.
2. Duplicate the background layer (Layer ➤ Duplicate Layer) and rename the duplicate layer Copy, or leave it as is.
3. Use the Eyedropper tool (make sure the “Sample Merged” option is checked) to sample the color from the square in the area designated Green Eyes.
4. Create a new layer (Layer ➤ New Layer) and make sure Layer Fill Type is set to Transparency. Change the blending mode to Color and lower the opacity to 75%. Rename the new layer Green.
5. Using a brush with the 2.Hardness 050 setting and a medium diameter (60–65 pixels), apply the green to the eye (Figure 5-13).
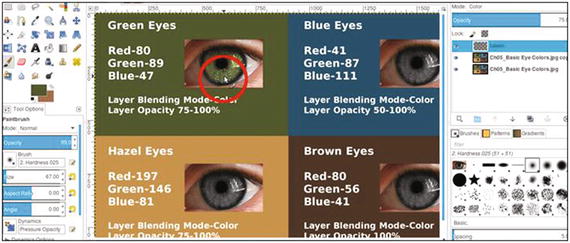
Figure 5-13. Apply green eye color
6. Repeat steps 3 to 5 for each eye color that follows. Rename each new layer accordingly (Blue, Hazel, and Brown). Use the layer blending mode and opacity range indicated for each eye color (Figure 5-14). To achieve darker brown eyes, simply using a darker color won’t work. Adding an extra layer set to “Multiply” will darken them when needed. The opacity can be lowered to achieve the desired outcome.
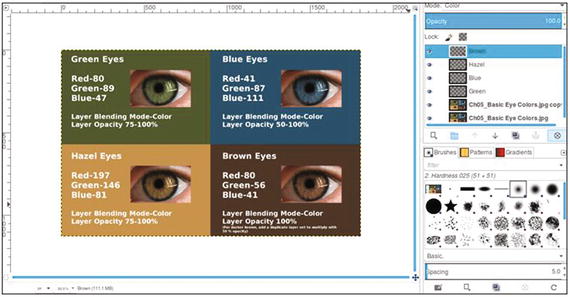
Figure 5-14. Eye colors applied
As you did with the previous tutorial, it would be a good idea to see what range is possible. Experiment with the Hue-Saturation dialog on each layer to make minute color adjustments, and adjust the layer opacity settings to observe how the color behaves.
Summary
In this chapter, you practiced colorizing the skin of a few people of different racial backgrounds. Also covered was colorizing several basic hair colors, such as blonde, red hair, auburn, light brown, and dark brown.
The last thing was to apply basic eye colors, such as green, blue, hazel, and brown. In the next chapter, we’ll colorize several portraits and snapshots.