In this chapter, we’ll cover:
Black and white conversion using the Desaturate dialog
Black and white conversion using the Channel Mixer
Black and white conversion using the Decompose dialog
In this chapter we’ll go in a different direction, turning color images into stunning black and white. There are a number of reasons why someone might want to make such a conversion: for use in black and white publications, artistic expression, and so on.
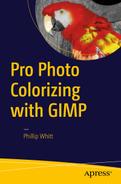
It might seem that converting a color image into black and white is just a matter of draining the color away. You can simply use the Hue-Saturation dialog and reduce the color saturation to zero. While that does work in the sense that it removes color, it can sometimes leave behind an image that is flat, dull, or even unnatural looking, depending on the colors in the original image (see Figure 10-1). There is usually some tweaking required to achieve optimal results.
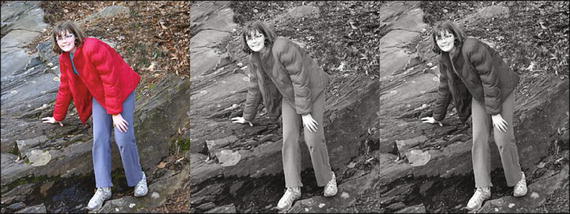
Figure 10-1. The middle image was converted by simply lowering the saturation to zero, while the right-hand image is the result of more fine-tuning in the conversion process
An ideal black and white image has a wide range of grays, with deep, rich shadows for the darkest areas and bright highlights that are not washed out to pure white (except for specular highlights, which are extremely bright, such as the reflection of light off of chrome).
Tutorial 26: Converting Color to Black and White Using the Desaturate Dialog
The first method of converting a color image to black and white is relatively straightforward. If you recall, we used this function in Chapter 8 for selective colorization. Now, we’ll take a closer look at this dialog’s full range of abilities. Desaturate generally works well for making quick conversions on images with a good tonal range. The image of this old church is a prime example—it has good contrast with highlights that aren’t too bright and good middle tones (Figure 10-2).
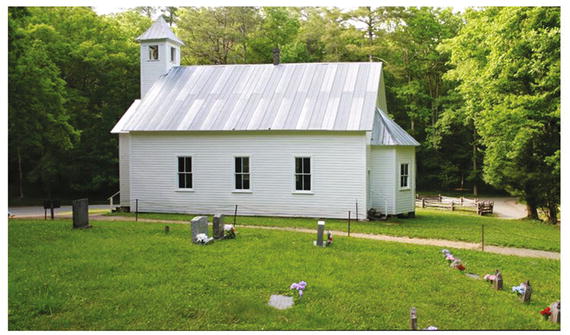
Figure 10-2. A color image with good contrast
To convert this image, follow these steps:
1. Open the Ch10_Old Church.jpg file located in the Chapter 10 Practice Images folder.
2. Duplicate the background layer and rename the duplicate Black and White Layer. Open the Desaturate dialog (Colors Menu ➤ Desaturate). This is different from the Hue-Saturation dialog. It offers a choice of shades of gray, based on lightness, luminosity, or an average (Figure 10-3).
Figure 10-3. The Desaturate dialog offers some limited but useful options for converting color images to black and white
Determining which option to choose really depends on what looks best to you. As with many aspects of image editing, there is an element of subjectivity involved. Personally, I had trouble choosing between the Luminosity and Average settings, but in the end I thought Luminosity looked the best (there is a bit more detail in the shadow areas).
In this case, using the Desaturate dialog worked very well for a quick conversion (Figure 10-4).
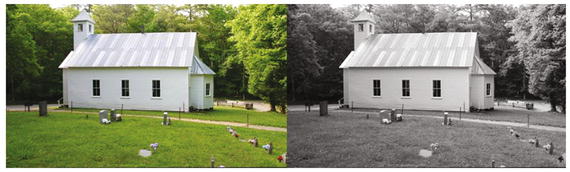
Figure 10-4. Before and after comparison
Tutorial 27: Converting Color to Black and White Using the Channel Mixer
The Channel Mixer is used for adjusting the value of each color channel (red, green, and blue). It is often used for making corrections in color images. By choosing Monochrome, the tonal values of each can be individually adjusted and mixed, offering a greater degree of control for converting color into black and white.
Before using the Channel Mixer, let’s take a quick look at what color channels are. An RGB color image is a composite of three “storage bins,” or channels of color data, one each for red, green, and blue. Note where each color is represented by the brighter areas in each color channel (Figure 10-5)

Figure 10-5. Color channels store color data for an RGB image
The Channel Mixer is a fairly complex tool and takes some time and practice to master. But you can end up with superb color to black and white conversions by using this feature.
To convert this image, follow these steps:
1. Open the Ch10_Girl by Big Rock.jpg file found in the Chapter 10 Practice Images folder.
2. Duplicate the background layer and rename the duplicate Black and White Layer.
3. Open the Channel Mixer dialog (Colors Menu ➤ Components ➤ Channel Mixer). Check the “Monochrome” and “Preserve Luminosity” options. The “Preserve Luminosity” option reduces the luminosities of the color channels while keeping a good visual ratio between them; this prevents the image from “blowing out” (Figure 10-6).
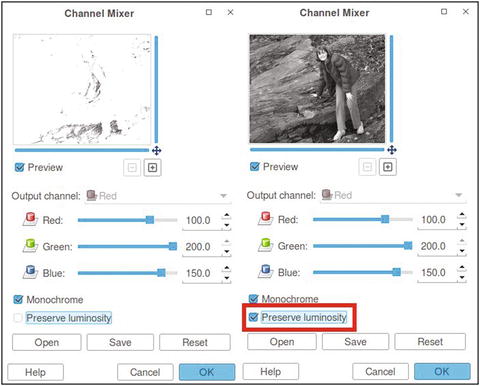
Figure 10-6. The “Preserve Luminosity” option prevents the image from blowing out while making adjustments
4. I found that by leaving the Red setting at 100 and increasing the Green to 200 and Blue to 150, the girl’s coat darkened some, creating better contrast between it and the rock in the background (Figure 10-7).
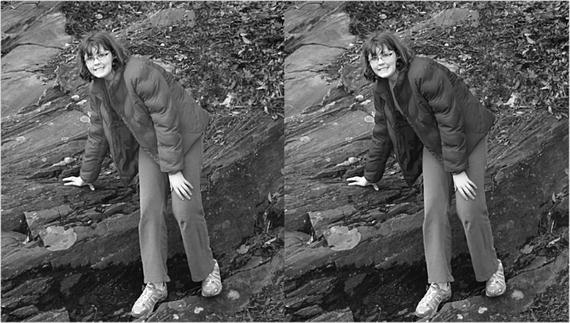
Figure 10-7. Fine-tuning color to black and white conversions with the Channel Mixer creates an image with improved contrast
This method is worth investing some time and practice in, if using the Desaturate function doesn’t give you the results you want.
Tutorial 28: Converting Color to Black and White Using the Decompose Dialog
The Decompose dialog separates the color image into color channels as separate layers.
We’ll convert this wedding photo (Figure 10-8) into black and white by working with the Decompose dialog and using layer masks to reveal some of the tonality of the underlying layers.
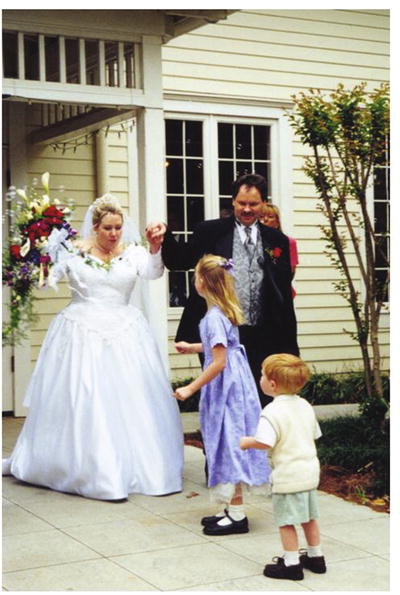
Figure 10-8. A wedding color photo that would look great as a black and white image
To convert this image, follow these steps:
1. Open the Ch10_Just Married 2000.jpg file found in the Chapter 10 Practice Images folder.
2. Open the Decompose dialog (Colors Menu ➤ Components ➤ Decompose). Choose the default RGB Color Model setting and select the “Decompose to Layers” option. This creates a new separate file and extracts the channels as layers (Figure 10-9). You’ll be using this file for the rest of the tutorial, so you can close the Ch10_Just Married image now.
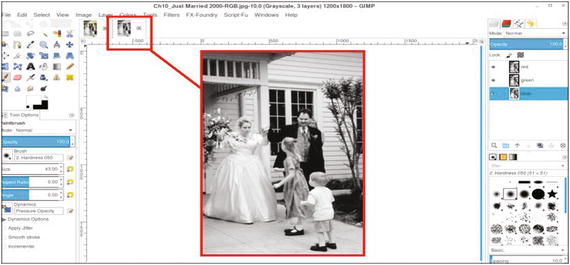
Figure 10-9. The Decompose dialog creates a separate file with the color channels extracted as layers
Note
The Decompose dialog is also capable of extracting channels from other color models, such as CMYK, LAB, and HSV, to name a few. Although these color models aren’t relevant to this book, they are to other aspects of image editing. Color models are fully explained in the GIMP User Manual.
3. The image will appear in black and white, with the red channel on top (Figure 10-10). Some of the tonal quality is too light in the red layer (such as the bride’s face and the children’s heads), so we’ll need to reveal some of the tonal value from the underlying green layer (to reveal the underlying green layer, click the eyeball icon next to the red layer to hide it; Figure 10-10).
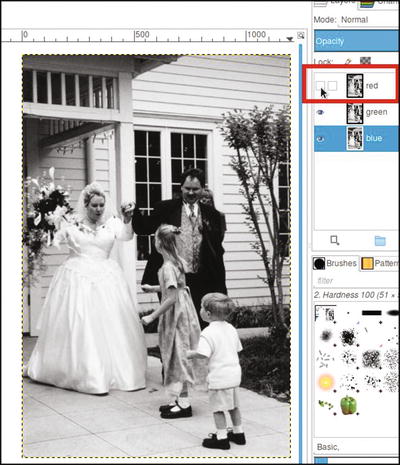
Figure 10-10. Clicking on the eyeball icon hides the red layer and reveals the green one beneath it
4. Reveal the red layer and right-click on it to add a layer mask, initialized to white, from the drop-down menu.
5. Click the layer mask to make it active.
6. Using a soft brush (2.Hardness 025 setting) and 25–35% gray as the active color, paint the faces of the bride and groom and the red flowers to reveal some of the tonal information of the layer (green) underneath (Figure 10-11).
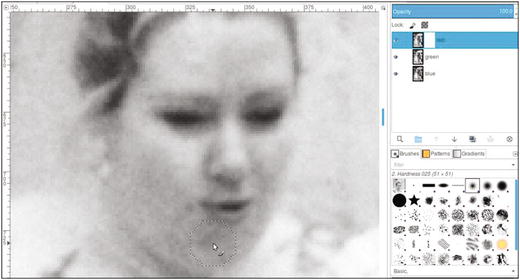
Figure 10-11. Painting in the layer mask with 25–30% gray reveals a little of the tonality of the underlying green layer
7. Use black to paint the heads of the children and the top of the small tree (Figure 10-12).
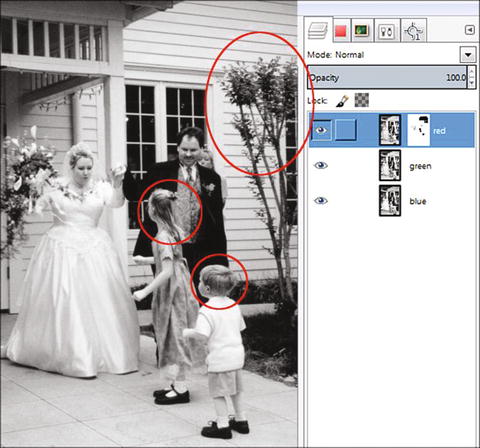
Figure 10-12. Painting in the layer mask with black reveals the tonality of the underlying green layer
The method just described uses the best tonal information of two channels extracted to layers. If the darker tones of the blue layer had been required, it would have been necessary to add a layer mask to the green layer and paint the same areas in both the red and green layers.
As we’ve seen in these tutorials, achieving good color to black and white conversions requires some degree of manual control, but it’s worth it to take the time to practice. You’ll develop a keen ability to create aesthetically pleasing black and white images (Figure 10-13). If desired, save the image as an XCF file for future reference.
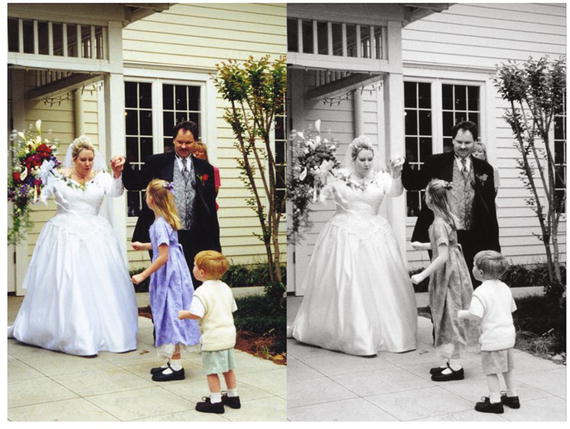
Figure 10-13. Before and after comparison
Summary
While this book deals primarily with colorizing images, this chapter goes in the opposite direction, converting color images into black and white (grayscale). We’ve gone over a few techniques that achieve better results than just lowering the saturation to zero.
The Desaturate dialog offers three options: Lightness, Luminosity, and Average. The Channel Mixer offers a high degree of control by adjusting the tonal value of each color channel. The Decompose dialog separates the image into the RGB color channels as layers. The layer mask offers control by selectively revealing or concealing tonal values, letting you use the best tonal value of each channel.
Closing Thoughts
Colorizing can be a very enjoyable and challenging aspect of photo editing. GIMP is an excellent program for adding color to black and white images, whether you want to achieve a realistic look, a nostalgic hand-tinted look, or something more fun and artistic.
If you’re new to colorizing (and discover you enjoy it), you can stay busy and have fun for a lifetime!