In this chapter, we will cover the following topics:
Colorizing solid fabric
Colorizing a metal vase
Colorizing a rose and stem
Colorizing wood and brass
Colorizing candy
This chapter is where the fun begins! You’ll get your feet wet by colorizing several simple objects with some easy-to-use techniques. Just follow the step-by-step instructions closely and you’ll be on your way to mastering image colorization.
If you haven’t downloaded the practice images yet, go ahead and do that now. The link can be obtained from the Source Code/Downloads Tab from the Apress page found here: www.apress.com/9781484219485?gtmf=s in the introduction to this book.
Although saving these practice images after completing the tutorials is optional, it’s important to develop the habit of saving your own work as layered XCF files. There will be times you’ll need to make revisions in your work, and having access to each layer is much easier than reworking an image that has been flattened (all the layers merged into a single image).
If you are completely new to GIMP and need an in-depth guide on how to save and export files, please refer to the downloadable PDF Supplemental Beginner’s Guide found here: www.apress.com/9781484219485?gtmf=s (click the Source Code tab to download).
The lessons that follow in the first two chapters will show you a few processes for colorizing, but the color values are provided for you. In Chapter 5, we’ll look closer at how to determine what colors to use in your own projects.
Tutorial 1: Colorizing Solid Fabric
This tutorial is a simple exercise that can be done in just a few clicks of the mouse. It only involves one hue, so you’ll use the Colorize feature found in the colors menu (Colors ➤ Colorize).
Note
The Colorize dialog has three settings: Hue (the feature that actually colorizes by adding a color tint. The color is changed by moving the slider.); Saturation controls the color intensity—increasing it makes it bolder and decreasing it makes it more muted; Lightness controls the brightness level.
To do Tutorial 1, follow these steps :
1. Open the file Ch_3 Fabric.jpg found in the Practice Images folder.
2. Duplicate the original layer (Layer ➤ Duplicate Layer).
3. Right-click the duplicate layer and select Edit Layer Attributes. Rename the layer Fabric Color (Figure 3-1).
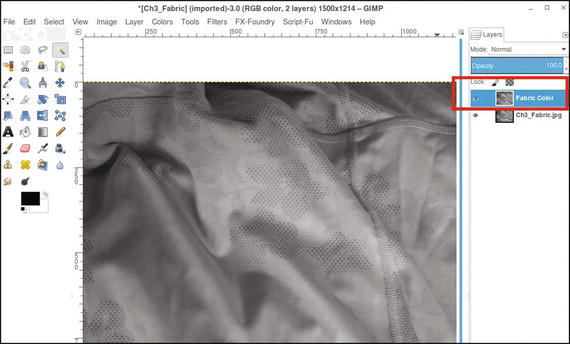
Figure 3-1. Duplicate the background layer and rename it Fabric Color
4. Open the Colorize dialog (Colors ➤ Colorize). To achieve the purple hue shown (Figure 3-2), move the Hue slider until the numeric value displays around 270 (for this exercise, it doesn’t have to be exact, but you can use the up and down arrows to nudge the numeric value into place). If you want to experiment, move the slider around to see the full range of hues available.
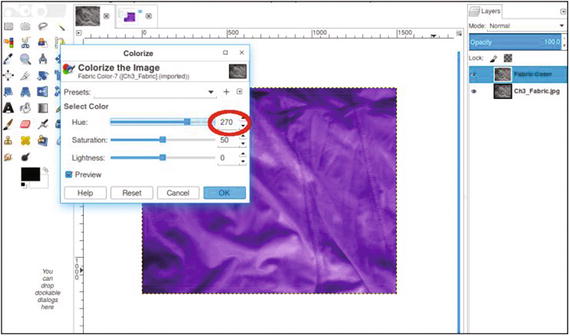
Figure 3-2. Use the Colorize dialog to give the image a purple hue
This is a straightforward method of adding color to grayscale images. In this case, the image takes up the entire frame, so the process is quick and easy. Compared to the grayscale version, it looks as though it was photographed as a color image (Figure 3-3). If desired, save the layered image as an XCF file for future reference. For a more in-depth look at saving and exporting files, refer to the downloadable PDF Supplemental Beginner’s Guide found here: www.apress.com/9781484219485?gtmf=s (click the Source Code tab to download).
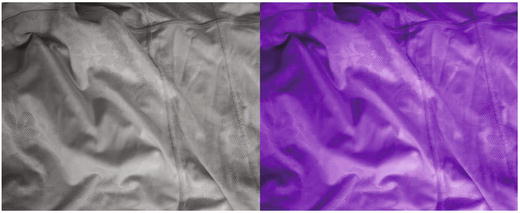
Figure 3-3. Before and after comparison
Saving this image is optional. If you want to save it for future reference, it would be a good idea to create a folder and keep it there.
Tutorial 2: Colorizing a Metal Vase
One of the great things about a program as powerful as GIMP is that there are often multiple methods of achieving the same result. While the Colorize dialog is a very effective way of colorizing objects, using layers can essentially do the same colorizing job. Lowering the layer’s opacity provides a degree of control over the results by making the color less intense when the outcome is too strong.
To do Tutorial 2, follow these steps :
1. Open the file Ch_3 Antique Brass Vase.jpg found in the Practice Images folder.
2. Duplicate the original layer (Layer ➤ Duplicate Layer).
3. Right-click the duplicate layer and select Edit Layer Attributes. Rename the layer Background Copy, or leave it as is.
4. Create a new layer (Layer ➤ New Layer) and make sure Layer Fill Type is set to Transparency.
5. Name this layer Brass Color. Change the blending mode from Normal to Overlay (Figure 3-4; the Mode setting is just above the Opacity setting in the layers palette).
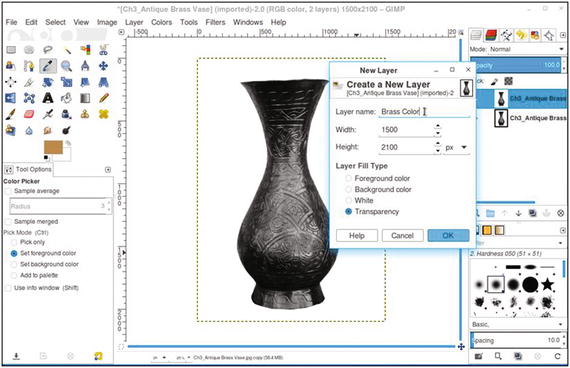
Figure 3-4. Creating a new layer to add the brass color to the vase
6. Click on the foreground color swatch (located under the tool icons in the toolbox) to open the Change the Foreground Color dialog. To duplicate the exact color used in this tutorial, just enter the numeric values as follows—R-225, G-184, B-60—then click OK (Figure 3-5). If you are completely new to GIMP, there is a more in-depth look at this dialog and its background equivalent in the downloadable PDF Supplemental Beginner’s Guide found here: www.apress.com/9781484219485?gtmf=s (click the Source Code tab to download).
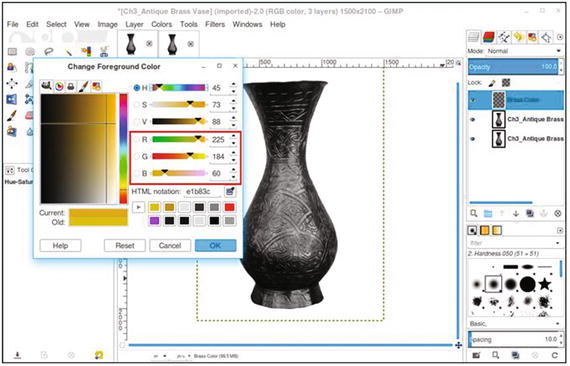
Figure 3-5. Enter the numeric values indicated to achieve the brass/gold color used in this lesson
7. Make sure the layer is active, then click in the image using the Bucket Fill tool. The vase will now be colorized with a brass appearance (the color won’t be applied to the background because it is pure white). (Figure 3-6).
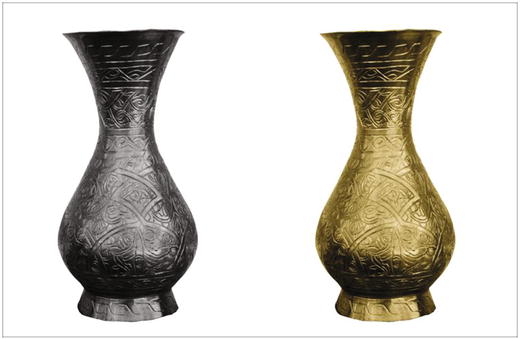
Figure 3-6. Before and after comparison
Tutorial 3: Colorizing a Rose and Stem
In this tutorial, you’ll get to work with two colors by working with the image of a rose (albeit, an artificial one).
To do Tutorial 3, follow these steps:
1. Open the file Ch_3 Rose.jpg found in the Chapter 3 Practice Images folder.
2. Duplicate the background layer (Layer ➤ Duplicate Layer).
3. Right-click the duplicate layer and select Edit Layer Attributes. Rename the layer Background Copy, or leave it as is.
4. Create a new layer (Layer ➤ New Layer) and name it Stem–Leaf Colorize. Change the blending mode from Normal to Overlay.
5. Click on the foreground color to open the Change Foreground Color dialog. To duplicate the green hue used in this tutorial, input the numeric values as follows: R-0, G-83, B-4 (Figure 3-7). Click OK.

Figure 3-7. Enter the numeric values indicated to achieve the green color used in this lesson
6. Use the Bucket Fill tool and click in the image (making sure the layer named Stem-Leaf Color is active). The entire rose will now be colorized (Figure 3-8). Don’t worry—the rosebud and heart will only be green temporarily.

Figure 3-8. Filling the layer colorizes the rose
7. Next, create another new layer and name it Rosebud-Heart Color. Change the blending mode to Color.
8. Open the Change Foreground Color dialog. Oftentimes, the color you need will be in the color tabs, eliminating the need to input values numerically. Create a pure red hue by clicking the red tab as shown in Figure 3-9.
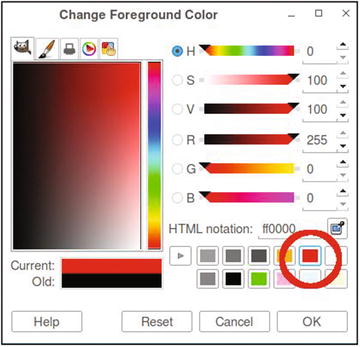
Figure 3-9. Use the tab to change the foreground color to red
9. Select the Bucket Fill tool and click in the image (making sure the layer named Rosebud-Heart Color is active).
10. The entire rose will now be colorized red. Lower the layer’s opacity to around 80–85% to avoid the color’s being too intense.
11. Create a layer mask (Layer ➤ Mask ➤ Add Layer Mask). To initialize the layer mask, choose the “Black (full transparency)” radio button, as shown in Figure 3-10.
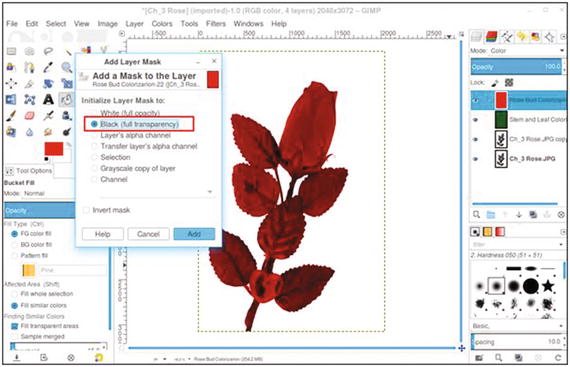
Figure 3-10. Initializing the layer mask to “Black (full transparency).”
12. The red colorization will now be hidden by the layer mask. Click in the layer mask to make it active (there will be a thick white border around the icon).
13. To reveal the red in the rosebud and heart, use the Paintbrush tool (P) and a round nib.
14. Select the 2.Hardness 050 setting. Using white as the active color, paint within the image to reveal the red in the rosebud (Figure 3-11). You’ll need to make the brush small enough to paint around the leaf. Paint in small stokes so that any mistakes can be more easily undone. Use the Zoom tool to magnify the image so as to see small details.
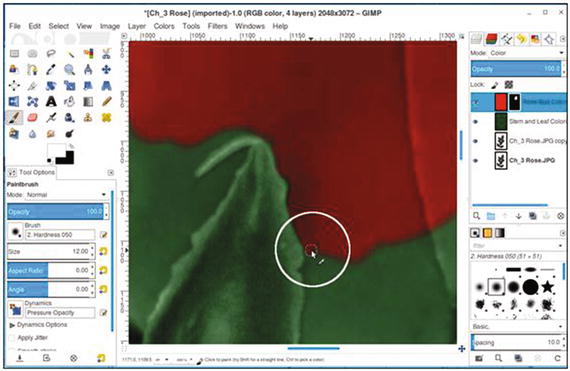
Figure 3-11. Use the Paintbrush tool to reveal the red in the rosebud
15. Paint in the heart to reveal the red (Figure 3-12).
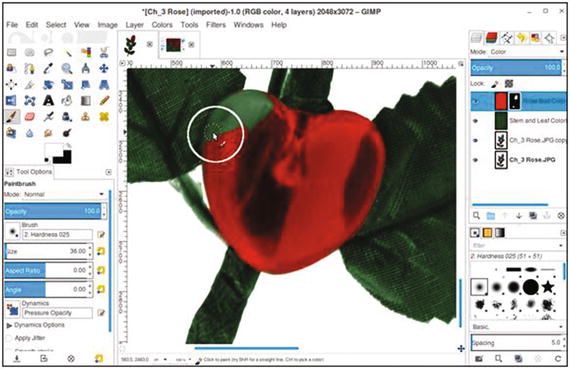
Figure 3-12. Use the Paintbrush tool to reveal the red in the heart
When you’ve finished, you’ll have a reasonably realistic-looking colorization of the rose (Figure 3-13). This lesson utilized the layer mask, which you’ll use in most of your colorizing projects in this book. It’s a very useful feature for colorizing, and I’m sure you’ll see how helpful it will be in your own projects. If desired, save the layered image as an XCF file for future reference.
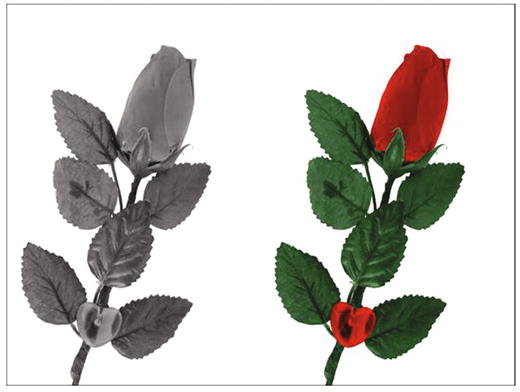
Figure 3-13. Before and after comparison
Tutorial 4: Colorizing Wood and Brass
In this tutorial, you’ll colorize a decorative brass cabinet pull and the surrounding wood. This lesson requires some intricate brushwork, using the layer mask to add the brass coloring.
To do Tutorial 4, follow these steps:
1. Open the file Ch3_Wood and Brass.jpg located in the Chapter 3 Practice Images folder.
2. Duplicate the background layer (Layer ➤ Duplicate Layer) and rename it Background Copy, or leave it as is.
3. Create a new layer (Layer ➤ New Layer) and name it Wood Color. Change the blending mode from Normal to Color.
4. Click on the foreground color to open the Change Foreground Color dialog. To duplicate the wood color used in this tutorial, input the numeric values as follows: R-174, G-71, B-11. Click OK.
5. Select the Bucket Fill tool (Shift + B) and click in the image (making sure the layer named Wood Color is active). The entire image will now be colorized. To help prevent the color from being too intense, lower the layer’s opacity to around 70%.
6. Create a new layer (Layer ➤ New Layer) and make sure Layer Fill Type is set to Transparency. Name it Brass Color. Change the blending mode from Normal to Color.
7. Click on the foreground color to open the Change Foreground Color dialog. To duplicate the brass color used in this tutorial, input the numeric values as follows: R-225, G-184, B-60. Click OK.
8. Select the Bucket Fill tool and click in the image (making sure the layer named Wood Color is active). The entire image will now be colorized yellow. Lower the layer’s opacity to around 75%. The image will now be filled with a yellow hue.
9. Create a layer mask (Layer ➤ Mask ➤ Add Layer Mask). To initialize the layer mask, choose the “Black (full transparency)” option. This will hide the pixels of the Brass Color layer. Click in the layer mask to make it active (it will have a thick white border around the icon).
10. To reveal the brass in the cabinet pull, use the Paintbrush tool (P) and select the 2.Hardness 050 setting. Using white as the active color, zoom in as needed and paint within the image to reveal the brass color. You’ll need to make the brush size small in order to paint in and around the pull (Figure 3-14). The white highlights won’t pick up any color, so you can brush right over them.
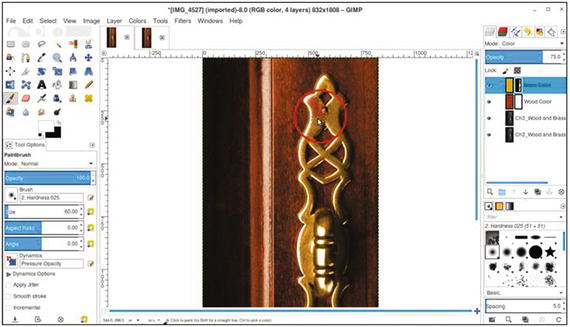
Figure 3-14. Revealing the brass color in the cabinet pull
When you’ve finished, you’ll have a reasonably realistic-looking colorization of the cabinet pull and surrounding wood (Figure 3-15). If desired, save the layered file for future reference.
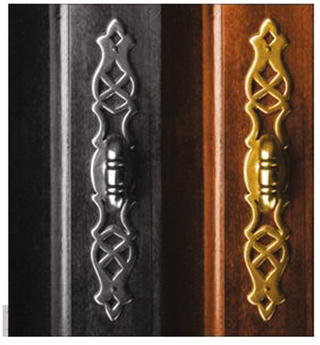
Figure 3-15. Before and after comparison
Tutorial 5: Colorizing Candy
In this tutorial, you’ll colorize a ceramic tray and an assortment of lollipops of various colors. This tutorial will definitely be more involved than the previous ones.
To do Tutorial 5, follow these steps :
1. Open the file Ch3_Lollipops.jpg located in the Chapter 3 Practice Images folder.
2. Duplicate the background layer (Layer ➤ Duplicate Layer) and rename it Background Copy, or leave it as is.
3. Create a new layer (Layer ➤ New Layer) and name it Tray Color. Change the blending mode from Normal to Overlay.
4. Click on the foreground color to open the Change Foreground Color dialog. To duplicate the blue color used in this tutorial, input the numeric values as follows: R-0, G-216, B-255. Click OK.
5. Select the Bucket Fill tool and click within the image (making sure the layer named Tray Color is active). The entire image will now be colorized blue. Lower the layer’s opacity to around 85%.
6. Create a layer mask (Layer ➤ Mask ➤ Add Layer Mask). To initialize the layer mask, choose the “White (full opacity)” option.
7. You’ll notice that the lollipop stems have picked up a blue tint, which needs to be removed. Click the layer mask to activate it, and select the Paintbrush tool (P), with black set as the active color.
8. Paint in the stems and the cast shadows to remove the blue colorization. To speed the process up, use a brush sized at 52 (diameter in pixels) and the 2.Hardness 075 setting. Click on one end of a stem and hold the Shift key down while moving the cursor to the other end (Figure 3-16). Click to make the paint stroke. Reduce the brush size and clean up any stray blue that’s left.
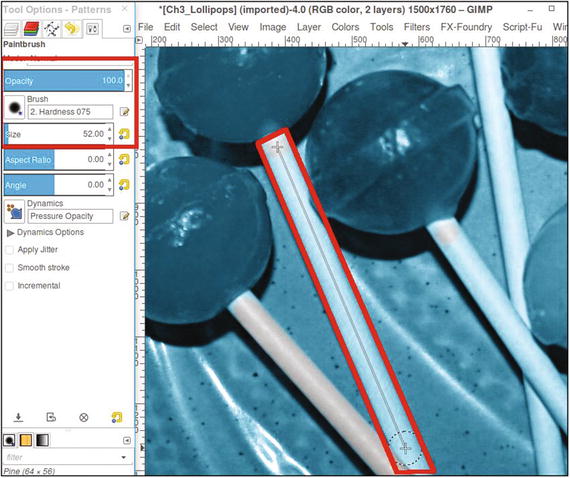
Figure 3-16. Remove the blue colorization from the stems and shadows
9. Open the Ch3_Candy Color Guide.jpg found in the Chapter 3 Practice Images folder for reference (or just refer to Figure 3-17) to colorize the rest of the tutorial. It provides the numeric input values for the red, green, and blue channels, the layer blending modes to use, and the layer opacities .
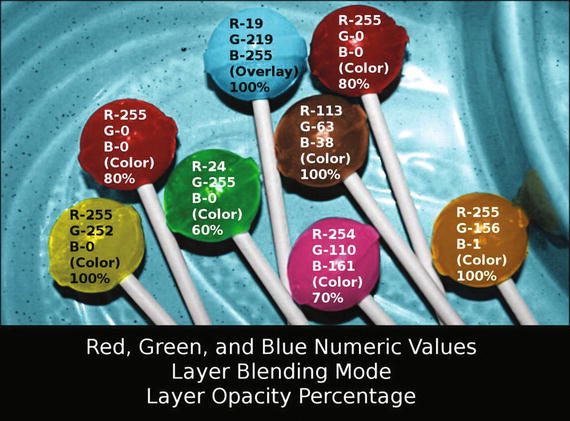
Figure 3-17. To duplicate the colors I used, refer to this color guide
Note
This tutorial requires the addition of a layer mask (activated to “Black”) to each layer for the candy color. You have some experience creating layers and layer masks from previous lessons, but I’ve provided a layered file in the native GIMP XCF file format in the Chapter 3 Practice Images folder. If needed, you can open it with GIMP to actually see the layers for reference.
10. After you’ve applied color to the candy, one area to pay attention to is the addition of the color reflection for the right-most lollipop on the tray. Just paint in the layer mask with a light gray (about 20–30%) to add a subtle color splash (Figure 3-18).
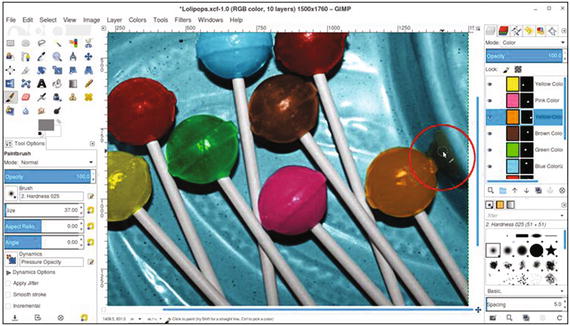
Figure 3-18. Paint in the layer mask with a light gray to reveal a subtle reflection of color
After you’ve finished, you should end up with a realistic-looking tray of candy (Figure 3-19).

Figure 3-19. Before and after comparison
Summary
If you’ve successfully completed the tutorials in this chapter, then congratulations! You’re well on your way to becoming an expert colorization artist. As you undoubtedly noticed, each lesson was just a little harder than the one before.
The usefulness of the layer mask should now be readily apparent—it offers a great deal of precision when colorizing images.
Now, proceed to Chapter 4 to learn how to colorize objects that are a bit more complex.