Table of Contents for
Responsive Web Design Toolkit
 Responsive Web Design Toolkit
Published by
Focal Press, 2015
Responsive Web Design Toolkit
Published by
Focal Press, 2015
- Cover
- Responsive Web Design Toolkit
- Responsive Web Design Toolkit
- Title
- Copyright
- Contents
- Dedication
- Assembling a Toolbox of Success
- Chapter 1: Responsive Web Design
- Chapter 2: Introducing the Engineering Process
- Chapter 3: Localhost, the Best Host
- Chapter 4: Apache Web Server
- Chapter 5: Connecting Devices to Your Computer
- Chapter 6: Virtual Hosts: Making Many Out of One
- Chapter 7: Get Together on GitHub
- Chapter 8: Google Chrome: Browsing a Page and Reading Its Code
- Chapter 9: Surviving CSS by Thriving With Sass
- Chapter 10: Google Analytics: Measuring Your UX With Analytics
- Chapter 11: Responsive Screen-Capture Project
- Chapter 12: Looking Around the Toolbox
- Appendix
- Index
Chapter 7
Get Together on GitHub
Introduction
Where can you get the most freshly brewed code for your favorite library, framework, or tool? We all know about the various homepages hosting these time-saving tools, but what about the VIPs? Where do they go? Isn’t there somewhere extra special—an amazing place all the cool kids hang out? Where they pass among themselves the latest and greatest updates to their finest creations?
No, of course not—that’s absurd to think. There’s no special, amazing, exclusive club for the elite open-source creators to join forces and dominate the world. It’s all publically available to everyone on GitHub. If you’ve never heard of GitHub, then you’re in for the start of a fun journey in which you can quickly lose yourself. Even if you do know of this social coding site, there are details and tips found in this chapter for using it in ways you might not have expected.
GitHub is a valuable place to easily access the source code for the most current developer tools. One of the commonly used libraries for front-end web development is jQuery. You know it as well as I do because it’s a de facto standard in our industry. We have visited its friendly and informative homepage for updates and instructions. Clearly found in the page’s upper right-hand corner is a download link. Everyone is only one click away from getting this incredibly helpful library.
When you download jQuery from their web site, you’re getting its source code in final form, efficiently compiled and ready for production. It’s a great service for all of us. Many other libraries, tools, and frameworks follow this model. Another way exists. When you download jQuery from GitHub, you’re getting the raw, uncompressed source code.
Many of your favorite tools are hosted on GitHub. Visiting that site, you can download the complete source code in active development by the programmers dedicated to improving most every tool that strikes your interest. Access to knowledge like this can be incredibly powerful. Reading through the original source code to any project offers insights such as:
- How to organize a complicated work
- What logic exactly triggers in any function you use
- Best practices for generally developing algorithms
The value doesn’t stop here. Some of the most useful source code you could take advantage of doesn’t have a well-polished landing page as you’ve come to expect. Plenty of work is housed on GitHub for public consumption and only mentioned by its author in a modest fashion, perhaps announced by a tweet or brief article on a blog. Understanding how to find these rare gems on a social-focused source code host like GitHub is a sure way for you to power up and rise above your competition.
The Git in GitHub is the name of a particular type of revision control system (RCS) that makes up a client/server system for storing the source code that makes up a project.
Let’s go look around on GitHub for tools that can become obvious advantages for you. We’ll pull down a few tools, review reasons software engineers have flocked to GitHub, and examine ways to access GitHub. Try them and find out which becomes an outstanding addition to your creative toolbox.
Tool: Responsive Design Testing
One of the key ways responsive web design is totally different than anything else is that it must show a single page in many ways. Media query rules in the selector styles held within a CSS file shift your markup HTML around, potentially dramatically, based on the screen size of the reader. You need to think of your overall content but pour it into each of the device form factors you’re choosing to support. Keeping all of the images of this site at once in your head is tough to say the least. It is especially tough to keep straight as the minor stuff gets tweaked and polished over time.
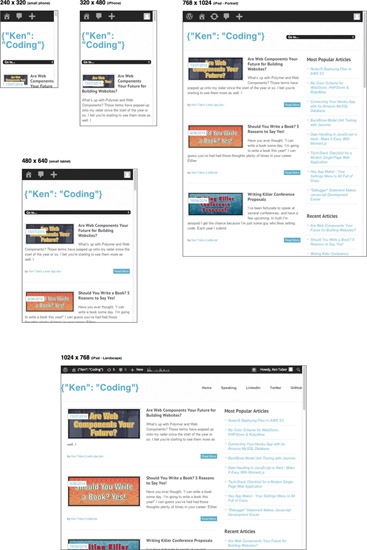
Author Matt Kersley has created Responsive Design Testing, a fantastic tool that helps you see the big picture of your website. It unpacks your responsive design as a series of interactive snapshots, framed side by side, at each of the major screen sizes. Having an overview like this is a great way to compare and contrast how your work flows and breaks according to your style rules in context with one another.
Look at the project here:

Browse the project’s page on GitHub. It’s worth taking a moment to examine the major sections on the page:
- A list of all the source files that make up the tool’s project
- A pane subtitled README.markdown that documents an introduction and description of the project (you’ll notice this filename and presentation style is a convention among authors)
- A “Download ZIP” button
- A “Clone in Desktop” button
- An input labeled “HTTPS clone URL”
This is the web interface to GitHub, and you’ll come to recognize it. Projects hosted here will have the same homepage layout. Once you learn to navigate GitHub for one project, you’ve learned it for every other.
Introductory Way of Using GitHub
Your browser becomes your access point into GitHub via its web interface. As you look around the previously mentioned project, you can click on any of the files held within it to see its contents. Read through the code; select it to copy and paste for use through your text editor. This is useful if you want to quickly take a peek at a particular file and all right for this project because it’s made up of a few files.
What if a project has many more files and folders contained within it? Don’t inspect them one at a time. Look for the button labeled “Download ZIP” and push it. Receive the project files sorted into folders bundled up in a single, compressed archive exactly as you expect it ought to behave. Uncompress and expand the.zip file on your computer and view it in your browser to see what it can do. The next page shows a quick example of what the testing tool looks like on my machine viewing a site that I’ve built.
My point here is to briefly introduce this useful project to you. Give it some time and decide if you want to incorporate it into your power toolbox of success. You might find that it’s a solid tool for quickly gaining an overall impression of how your website work is progressing across the device sizes you’re targeting. Using it can help you answer sanity-check questions such as: Are breaking points clicking in with the CSS media query rules? Are fluid images properly scaling within their parent containers? How does the shape of content compare among a handful of viewing sizes?
Play with the project you’ve downloaded and consider whether you should make changes to it. You have the complete source code sitting on your machine, after all. What are some interesting ways to change it? I have some ideas:
- Add another viewport size that matches a device you want to support
- Have it default to your site’s URL
- Tweak the colors to match your typical tools and make it feel more familiar
None of these tweaks feels useful enough to suggest back to the project’s owner. At the same time, they’re incredibly helpful to you, well worth your time to investigate, and easily possible.
More importantly, this is a fine jumping-off point into GitHub. Just think of how many creative authors inventing projects are hosting them publically on this socially driven site.
Why Do Software Engineers Like GitHub?
If you’ve already heard about GitHub and know a bit about it, you’ll know it’s popular with software engineers and programmers. You might be wondering why that is. I’ll take a pass at explaining why I think it’s a great place to house my code:
- The fact that GitHub is functional, reliable, and cloud based means I can get to it and my project code everywhere I want.
- It’s based on Git, a fundamentally unique and exciting way of controlling source code revisions within a team (or even an individual).
- Social interaction has a place: I can star (like), watch (follow), and fork (share) projects.
- Collaboration tools make it easy to invite fellow creators into a project.
- You can open up the development process with wiki (documentation), issues (bugs and regressions), and pull requests (fixes and improvements).
- It can be made private when I need to keep special projects close to me.
Revision control systems are crucial for allowing a team or even an individual to track changes to files over time. If we can go back through the history of a file, we can tell when a bug was introduced and more clearly identify the change and revert it out to get working again. We can see which teammates are contributing to a project and how. We can mark the repository with a tag when a significant event occurs, for example an important release. That gives us an archival-quality bookmark we can return to or a note for what to test that will soon go out the door for public use.
The terms “project,” “source code,” “codebase,” “repo,” and “repository” all seem interchangeable. Which is the right word to use here? In fact, they can all be right depending on the listener and from what era she started her career.
It seems obvious professional builders would want source control, right? This didn’t always happen, of course. Lots of projects happen without it at all. Scary dangerous! Some teams simply exchanged code by copying their latest files to a floppy disk and handing it over. That was called “sneaker net,” and we laugh at it now. Having a copy of working project source code on another computer, like a server, is incredibly valuable—especially when the server is routinely backed up automatically.
Git does one better, and everyone on the team with the project is a server. It’s what’s known as a distributed system, and it is one of the fundamental ways Git is a novel invention. It also means that for a solo worker, there is a way to have a Git project on your work computer, commit changes to it, and have a revision history to go back to for safety’s sake, even without it being on a remote server. Check that out one day when you want to learn a pro tip.
Hiring practices have changed since GitHub was spun up into the public. I’ve seen GitHub involvement viewed as a supplement when candidates are considered for job openings. So much of programming is the code written, and companies want to see what the prospective teammate’s code looks like. Open-source technology is key to most companies’ technology stack, and seeing a candidate’s contribution to the community makes an impression on interviewers. Some will debate if a GitHub account and commit history will replace the resume.
I’m intrigued by GitHub’s financial model. My simple understanding of it is that they’ll let us host projects on their site for free, but they’re public and open to everyone. Public projects are open for reading, but permission to write to them is strictly controlled by their owners. If we want private repos that are hidden and invitation only, we can subscribe and pay based on the number needed. That’s what I do, if you’re wondering. I have a monthly subscription that allows me a small number of private projects that I want. I have more public projects than private ones. One of the public projects holds all the source code examples in this book. Give it a look, clone the repo, play with it, and share the link.

Intermediate Way of Using Git (and GitHub)
If the introductory way of using GitHub is through its web interface, then what’s the next step? I’ll say it’s downloading a stand-alone application that has full support for the Git command flow. We’ll keep it simple as to what Git commands we use now to get you started.
Of course, software engineers traditionally work in the plain-text, command-line world more than anyone. Chapter 11 reviews that state of mind, tradition, and purpose. Git began its life as a command-line tool, and many companies have sprung up that produce excellent applications with full graphical user interfaces (GUIs) matching your expectations of a modern program. Here is a list of some of them. Check them out and pull down a few to give them a test run to see which is best for you:
- GitHub for Mac, GitHub for Windows
- SourceTree (for Mac and Windows)
- SmartGit (for Mac and Windows)
- Tower (for Mac only)
To start with, I’ll simply recommend that you download and install GitHub’s program (also called a client). It’s free, fully functional, and well documented. Once you download and install the GitHub client, you must sign up with GitHub to download source code from a project you’re interested in using. In the Git world, this means you will “clone” a project, which makes a copy on your work computer.
When you look at a GitHub project on its web page, as we did earlier, you’ll notice a button called “Clone in Desktop” that’s suddenly very interesting to us. Click it and notice that it calls up your GitHub client app and confirms with you before it pulls down a complete copy of the project’s code. Now you have a duplicate of it with which to play to your heart’s content. Don’t be concerned if you make changes to the files now stored on your computer. Anything you do is kept local and private. You can’t mess up the original author’s work because she keeps control of it as the owner and maintainer. If you ever make changes that completely break your local copy, remember that you can always delete it and start over. Make a new folder and again clone the original project repository.
Project code by nature is collaborative. It takes a few people with distinct skills to properly build it. GitHub introduces a social interface through its project web pages that offers watch (follow), star (like), fork (share), and pull requests for approval (write permission).
As an introduction to GitHub, you might have downloaded the ZIP file for a repo. With this client app, you will have access to many new features. Two of them are immediately worth learning:
- View history to see what users have made file changes in the past
- Synch (Git calls this a pull) to download all the files changed since the last time you did this or since the first time you cloned the project repository
There are many more Git commands that this client app exposes you to, but resist using them until you want to make changes and submit them back to the project owner(s). The next section gets into more detail on the Git workflow, but it becomes complicated quickly. Don’t look into it until you’re ready to take on some training time. I encourage you to do it, but wait for an opportunity to open up in your schedule and you can devote dedicated brain sweat to it.
There’s an interactive tutorial where you can learn the basics:

A Git client like the GitHub application mentioned here is a great tool. Because it exists on its own, we can call it a stand-alone app. It stands on its own as a tool dedicated to this sole purpose. You might wonder if Git support can be built into another tool, and yes it can. For example, a more complicated and fully featured way to edit code is called an integrated development environment (IDE), and it’s worth pointing out several well-known ones on the various operating systems that support Git access:
- Visual Studio (Microsoft)
- XCode (Apple)
- WebStorm (JetBrains)
- Eclipse
If this doesn’t mean much to you now, then no problem, but in the future, it might be a good thing for you to look out for while you’re building websites.
Advanced Way of Using Git (and GitHub) Command Line
When Git was first created, all its tools were command line only. This is a classic interface for programmers, and many still prefer using Git that way. Several Git apps that offer friendly graphical user interfaces are listed in this chapter and are highly recommended for your use. What follows here is a chance to catch a glimpse of what some of the command-line tools look like given a few commonplace workflows.
When you’re curious to learn more about Git revision control, use the following descriptions for context and background in your research. Don’t think that you need to learn how to use the command line immediately. It’s not at all productive for you, and honestly I rely on my IDE of choice for its semi–GUI based access to Git commands. This is mostly a demonstration to satisfy your curiosity.
Download a Project for the First Time by Cloning It.
- From a web browser, navigate to the URL for this book’s GitHub project:

- Look on the page and see all the facts and stats that are common for any project hosted on GitHub. Look for an entry field with the label “HTTPS clone URL.” You’ll see a button beside it with a clipboard icon. Click this, and the project’s clone link is copied to the system clipboard. We’ll use this to download a copy of the project source code.
- From the command line, change directory into the folder where you keep your projects. For my example, it’s cd trees
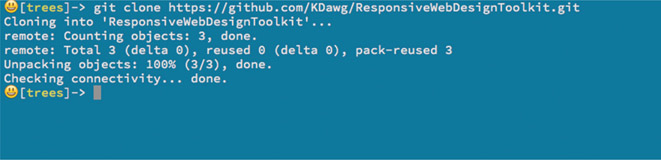
- Enter this command to download a copy of the project: git clone https://github.com/KDawg/ResponsiveWebDesignToolkit.git
Update a Previously Cloned Project to Guarantee All the Latest and Greatest is Available:
- From the command line, change directory into the folder where the project’s files are stored from a prior Git clone
- Enter this command to download the latest and greatest version all of the changes made since you last updated: git pull
- You’ll see real-time stats from Git as it collects all changes, compares your local copy with the origin server, and brings across all differences. If no new changes are available, it simply reports “Already up-to-date.”

Creating a New File
What do I do to create a file and upload it to the project? This is mentioned in the chapter and left as a bit of a future assignment for you to research when it’s important. That’s because this chapter aims to help you find, get, and use projects. Steps you find here are easily adapted to your Git client app of choice.
- From the command line, change directory into the folder where the project’s files are stored from a prior Git clone and where you’ve edited a file
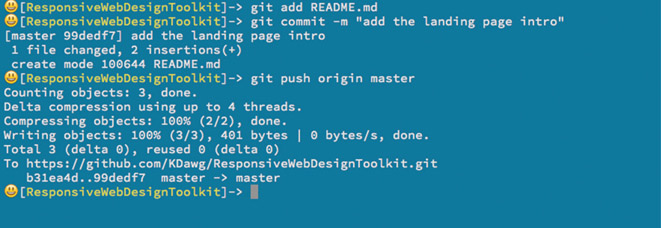
- Add the changed file that tells Git what you will send up: git add README.md
- Commit the changed file(s) with this: git commit-m “add the landing page URL”, which stores the changed files in a complete copy of the project repo stored on your computer
- Upload the files to the remote server with this: git push origin master, which takes all the files previously committed from your local server up to the origin master that sits on GitHub and refers to a branch of the code, which is by default the master branch
Making Changes to a Public Project
What if I change a file by fixing a bug or tweaking it with enhancements? Get completely current with the project, branch from master, make changes, and then upload it for eventual approval with a pull request.
- From the command line, change directory into the folder where the project’s files are stored from a prior Git clone
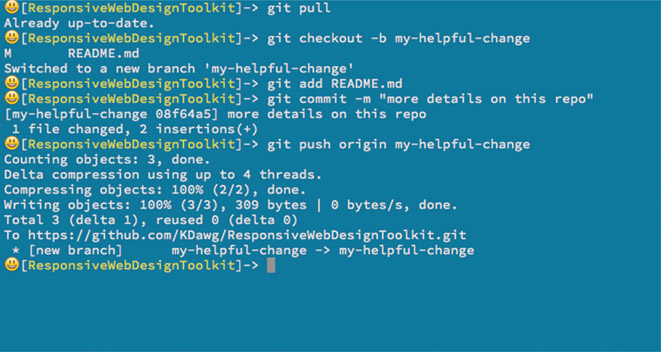
- Get completely current with all the most recent changes: git pull
- Make a branch from the default branch, called master, that will contain all your changes wrapped with a bow: git checkout-b my-helpful-change
- Edit various files
- Add the changed file by telling git what you will send up: git add README.md
- Commit the changed file(s) with this: git commit-m “added more detail on the booga booga”, which in fact stores the changed files in a complete copy of the project repo stored on your computer
- Push the files up to the remote server with this: git push origin my-helpful-change, which takes all the files previously committed from your local server up to the original GitHub server, but this time in a particular branch of code.
- Here’s a collaborative bit. On the project’s webpage interface, you can click on the “branches” tab and see the branch you’ve just pushed up to the project repo. Click on the “New pull request” button to announce to the project maintainer that you have changes you want her to review and merge with into master branch. If she approves of the changes and merges the pull quest, you’ve just made the world a better place!
This process is incredibly useful when working on a project that you own with your team. It’s worth going through the professional discipline of merging any changes to the project via a pull request.
A pull request is the perfect place to do a code review. A code review is when one engineer reviews another engineer’s changes, double-checking that changes are all good to go. I recommend putting multiple people on a pull request. For example, assign a new hire or someone unfamiliar with the feature, giving them a chance to look around and learn more.
Tool: Responsizer.JS
Here’s another tool that you can pull down from GitHub by cloning a copy of it. If you drop Responsizer.JS into your webpage, you’ll see it drawing the browser’s reported width of your website in pixels. It’s useful real-time feedback to you while reviewing your layout and testing the CSS rules.

Certainly several desktop browsers have developer tools built in that report the window’s dimensions in pixels. Does that make this a bit obsolete? Maybe on desktop browsers. However, the browser developer tools usually aren’t available while testing on real mobile hardware. Seeing this little JavaScript report to you the exact width of the screen is a win for establishing and reviewing breaking points in your media queries.
Download it and drop it into your locally hosted website project and give it a go. It needs jQuery to work properly. Here’s a brief example of how you’d add it at the bottom of your index.html —just like any other script file.

You’ll see it respond quickly as it draws a centered box top aligned to your website as viewed in a browser. It changes color as it detects the width hitting one of the commonly accepted device breaking points. Here are a few examples of what it looks like.

What if you don’t want that flash of color when it detects one of its predetermined boundaries? Change it. Page through the code and shut it down. What if you have another device width in mind and you want to add it? That change is even easier to do as you read the code. The power is yours while the source code is on your machine. Make it your own and personalize it.
Showing this to you is meant to inspire ideas in your head about tooling. If something doesn’t exist and you could benefit from its existence, spend a little time and make it. Pull in a buddy and pair up on it to make the work go faster and catch more ideas to make it better. Browser tools are surely huge efforts put on by companies with great teams and budgets, but you and I can knock out little tools like these in an afternoon. Fine-tuning it from time to time is great fun. When you show it off to colleagues at work or at a meetup, you’ll gain inspiration for bolting on new features.
Building tools may seem inconvenient, but as you use them, you’ll feel happier and more productive. Automation is a goal I’m always on the look out for. If I do something routinely, I want to craft a little tool that removes the tedium of doing the task, especially if it’s a task that leads to outcomes that help me put quality features and updates into the hands of my customers.
When you make something fantastic and useful, no matter how small, consider offering it up to the open-source community. Publishing it on GitHub is a perfectly fine idea.
Creating a New Project on GitHub
There are many tutorials on the Internet for using Git and GitHub. I’m not here to explain how to use them in detail but, rather, why you’d want to. These are high-level steps for making a repo and filling it with your code.
- Log in to github.com.
- Create a new repo.
- Clone it on your local machine using your Git client app.
- Create and write various source files using your code editor or IDE of choice.
- Add the files using your Git client.
- Commit the files.
- Push your committed files using your Git client.
The instructions change a bit based on which tool you eventually choose, but the fundamental idea remains the same.
Practice this on a side project to become smart and confident. It’s worth the time, and it’s nice to take an opportunity to learn on a low-stress hobby project. Then, when the time comes to perform in front of a group, you’ll have real experience to guide your actions.
As you make changes locally to your project’s files, you’ll want to:
- Add each of the changed files in your Git client app
- Commit all of them (happens at once) using your Git client
- Push the changes in your Git client
Seems like I only told you to go to the GitHub website once, and that was to first create the project. The remainder is done on your workstation while you’re in the daily grind of your creative workflow.
Another reason you’ll navigate around the GitHub web interface is if you ever need to delete a project. You’ll find detailed instructions on how to remove a project on their website.
Tool: Git
You know what would be a fun source code to clone and look at? The code for Git itself. Can we get Git? You already know the answer. Yes! Here’s a link to the GitHub project page:

Feel free to open it up in your web browser and have a look around. From the project’s description, I gather this is only a mirror. Mirrors are known to be copies that are reflected from an originating source hosted on some other server. I’m not exactly sure where that other server is, the more active master one, but that’s all right. The point here is just to have a bit of a laugh while looking around at it.
Cloning a copy of this is done as easily as any other lesson that you’ve taken on in this chapter. What’s the point of having all of this source code? I’m not exactly sure, but it’s fun knowing we can do it. It looks as though most of the source is written in the system-level C programming language. That’s even less instructive for you, but that’s how it goes on the Internet. There is lots of code, lots of languages, lots of thoughts and points of view. Would we have it any other way? No! For surely diversity breeds strength and success.
Just Look Around
There’s so much code in the open-source world, how can you connect with something interesting? How can you discover a truly new idea to dig into? You can start by browsing GitHub Explore:

There you’ll find collections of code projects on display and organized around subjects GitHub curators want to bubble up to the surface. You’ll find some of the most popular projects grouped by region, entertaining subjects, utilities, and anything else under the sun. It’s worth spending time there just to see what’s new, and what’s new to you.
Ever Onward
We’ve had fun going through some smaller tools so far. Each is clearly meant to arrive at a particular outcome and solve a problem for its users. What about the really amazing, famous, super-popular libraries, frameworks, and tools? Do those exist out on GitHub? Can you see exactly what’s under the hood of your favorite open-source project? Yes! To serve as inspiration and tempt your curious mind, here are links to some of the biggies hosted out on GitHub:
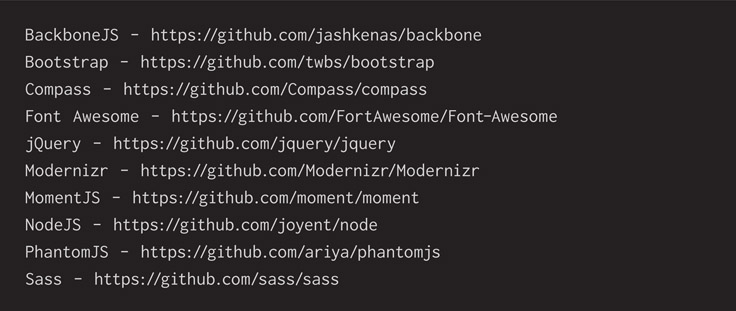
Take your time and look around each of them. See what goes into all of them, their organization, their algorithms, their data structures, and the people who pour their time into them. Watch the subtle changes as live development progresses.
Have a look at the Issues section of each project. You’ll see public discussions of which bugs are fixed first and which pull requests are accepted as the latest changes.
Most of these tools have well-maintained landing pages that keep up to date with deliverables. Can you get more current work from these GitHub project sites? Generally yes, but is it worth it? Maybe not for the big ones, but surely for the smaller tools that don’t have well-produced landing pages. That said, even the big projects have fun insights to look at on the project page:
- If you know there’s a bug you want stomped, you can at least read through the discussions going on in the Issues page.
- Keep an eye on the wiki pages, because they might have more details from the developers than what’s on the project stand-alone landing pages.
- Have fun looking at pull requests to see activity happening as community members suggest changes to the owning maintainers.
One day, when you’re ready, join in on any or all of those sections. Report a bug and a way to reproduce it. Even better, submit a fix to a bug. Even a small one such as documentation is welcome by these tireless project committers, because I believe many of them work on open-source projects in their spare time. Quality help is always welcome.
Alternatives to GitHub
By now you know that GitHub meets my daily professional needs. I use it, and so too do many of my colleagues and most of the open-source projects I use. There are enough alternatives that we have a real choice in the matter of hosting projects. Don’t be confused, however, if open-source tools you are curious about are missing from GitHub. They might be found on an alternative, competing open-source hosting service such as:
- Bitbucket
- Project Locker
- CodePlex
- CloudForge
- Assembla
- SourceForge
Each source-code hosting provider has a different set of features. Some focus on public source-code hosting, while others specialize in private source-code hosting, and most support both. Some focus on Git, others on Subversion, and so forth. Some even provide enterprise editions if you have big company needs.
You and your team might be happy with any of these. Try out a few. You owe it to yourselves to make a well-informed decision. Please don’t pick one in the mad rush as a project starts just to mark a checkbox done on a task list. Due diligence is your friend, and picking the tool that’s the best fit with your team will amplify your skills in the best way possible.
Does Git have alternatives? Yes. The basic idea of a revision control system that helps teams purposefully manage their source code has existed for decades. Alternatives include Subversion, CVS, Mercurial, and other proprietary systems.
Read Now and Write Out Something One Day
A common theme in this book is empowering artists, designers, and developers to examine and reach for the tools historically kept in the domain of software engineers. Source control and Git and GitHub are further examples of this. Look into them and use them well. Search for the open-source tools you use and think of how source control can help you if you’re not yet using it.
In Chapter 2, I called for you to share a useful library with the world. Here’s a place that your work, big or small, can live. It’s social coding, and people will find it. To help folks discover your work, write about it. No need to formally invest in time-consuming promotion, but tweet, post on Facebook, and write a blog article. Get it out there and see what amazing things will happen. Help push forward the state of the art with a cool little hack. Don’t hold back your good ideas, thinking it’s all been done before by super-intelligent beings who drop genius from their fingertips onto their keyboards every morning over a cup of coffee.
Surely coffee is involved, but remember that some overworked creative person just like yourself started every incredible piece of software that you use daily. If you don’t think much of your lovingly handcrafted artisanal code, someone else might think it’s fantastic and exactly what they need at the right time. Put it out there, and it might become the next big thing! Even if you’re only solving a simple problem, I believe the world continues to need needle, thread, and an awesome pattern printed on cotton more than it needs silk couture.
When you do write code to share, consider that you’re an author, and an author’s job is to communicate effectively. I think that means writing with an intent in mind and clearly guiding the reader toward it. When we communicate, we ought to convey meaning.
Robert C. Martin reminds us in his book:
As systems become more complex, they take more and more time for a developer to understand, and there is an ever greater opportunity for a misunderstanding. There, code should clearly express the intent of its author. The clearer the author can make the code, the less time others will have to spend understanding it. This will reduce defects and shrink the cost of maintenance.
Robert C. Martin, Clean Code: A Handbook of Agile Software Craftsmanship (Boston: Pearson Education Inc., 2009, p. 175)
Although his meaning might be in the context of a large body of source code written by many people over a long time, we can still draw inspiration from it. Even a relatively small amount of code ought to be written well. Taking the time to be clear benefits ourselves and the community we’re serving. Also ensure that when shipping something out, you don’t accidentally let slip private information—for example, a secret client code or application programming interface (API) key that you and your company signed up for.
I want to fill your core imagination with all the encouragement possible to build that custom piece of software. Take time to explore GitHub. See if someone else has scratched the same itch you have and already made the thing you were about to start cobbling together. If it’s out there already, then use what’s made. If it’s nearly what you want, clone the repo and make some tweaks to it to fit your purpose. Once you’re sure the code is functional, reliable, and simple, reach out to the original author and tell them the good news of your improvements. Perhaps they’d like to work with you to pull in your changes and formalize them inside their project.
Open-source technology is often built out in the open. It could start private, but at some point, it must be opened to the public. I believe once a project becomes sufficiently popular, the requests for bug fixes, optimizations, and feature enhancements come rolling in to the owner at a steady flow. If these projects are conducted during night hours and over the weekends, they’re going to want help. Desiring help means engaging in a public collaboration process, and that generally winds up in a place like GitHub. Seeing the development occur could give you additional context when revisions and updates appear on the project’s formal product landing webpage.
Contribute to your favorite projects. It could be very simple to start. Report a bug with a snippet of code that casually proves the point. Offer a fix to a bug. Sometimes that’s as simple as a change to the documentation. If you see another user like yourself report a blocker in the Issues page and you know a workaround, offer it up to them. At least it could help them make progress while the programmers make final corrections. If you’re a designer and the tool’s creators are all engineers, offer them some firsthand context for how you use their tool and suggest changes they might not have considered. They might be happy and encouraged to hear from you, and your ideas could become industry best practices.