Table of Contents for
Responsive Web Design Toolkit
 Responsive Web Design Toolkit
Published by
Focal Press, 2015
Responsive Web Design Toolkit
Published by
Focal Press, 2015
- Cover
- Responsive Web Design Toolkit
- Responsive Web Design Toolkit
- Title
- Copyright
- Contents
- Dedication
- Assembling a Toolbox of Success
- Chapter 1: Responsive Web Design
- Chapter 2: Introducing the Engineering Process
- Chapter 3: Localhost, the Best Host
- Chapter 4: Apache Web Server
- Chapter 5: Connecting Devices to Your Computer
- Chapter 6: Virtual Hosts: Making Many Out of One
- Chapter 7: Get Together on GitHub
- Chapter 8: Google Chrome: Browsing a Page and Reading Its Code
- Chapter 9: Surviving CSS by Thriving With Sass
- Chapter 10: Google Analytics: Measuring Your UX With Analytics
- Chapter 11: Responsive Screen-Capture Project
- Chapter 12: Looking Around the Toolbox
- Appendix
- Index
Chapter 11
Responsive Screen-Capture Project
Let’s Build Something Cool
The point of this chapter is reaching up into the open-source world and pulling down a tool called PhantomJS. Incorporating it into your toolbox will take a steady hand. It has unique applications for critiquing, testing, and documenting your websites.
Fundamentally, PhantomJS is a web browser that doesn’t show you what it’s looking at. You drive it on the command line, and it reports on what you ask it about. Questions are formed via small JavaScript scripts.
Some of this is going to seem advanced, and it’s going to involve installing tools and writing code. It’s all right, though. Hang in there and keep up with the explanations, because it’s worth it. By the time we’re done, you’re going to have a useful creation that helps you in ways I can’t predict. It’s going to open up your ideas of what’s possible and power up your thinking for changes to this system and new inventions into the future.
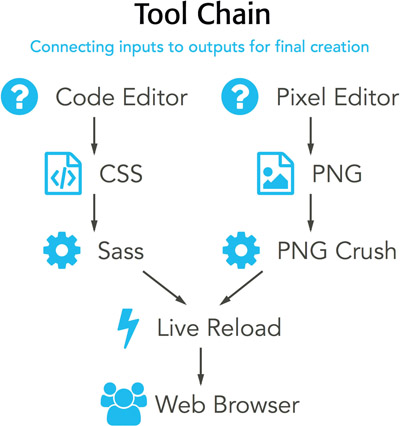
Build a Customized Tool Chain
There’s an idea of a tool chain. Computers are good at running a tool, taking its output, and directing it into another one. Chaining tools together by redirecting one’s output into the next one’s input is theoretically endless, and the computer makes it possible. Remixing your original data through a custom tool chain creates super-interesting outcomes.
Assembling this specific tool chain is something of a green-field project. There are no real constraints from previous work or required demands. Restrictions only come from our own imaginations. While we stay optimistic, we can dream it, plan it, and build it into being. No need to let little glitches turn into big worries, because everything can be figured out over time. Much of being an engineer is believing that something can be done. Otherwise I wouldn’t show up to work each day, because work is just too complicated to think about continuing. Have a strong heart and keep moving forward. There’s always another way!
Why Programmers Use Command-Line Tools
Why does it seem like engineers and programmers like command-line tools? What is it about the text-only interface of a Terminal window or a DOS prompt that makes them satisfied? Happy even?
Thirty years ago, the creators of the UNIX operating system articulated a set of beliefs around how programs should work, and that has influenced the way programmers have built software tools ever since. Really, it’s how we see the world. Each program is made to solve a single, small problem very well. You can solve bigger problems by chaining these small utilities together. By making the output of one the input into another, you can combine them. Any complex machine, like an automobile engine, is made up of individual pieces operating together in perfect union.
Command-line tools are functional, reliable, and simple. Simplicity is a key design decision, because writing one of these things means you can start and finish it. No need for feature creep, tacking on more and more abilities over time. A command-line tool’s usability is defined by how well it plays with other tools.
It’s an assembly-line process. Success comes from the fact that computer systems are excellent at following a clearly written, step-by-step process over and over again. It’s the heart of what makes writing a computer program possible. Human beings think they’re good at following directions, but when a process must be done repeatedly, they get bored, and boredom leads to mistakes. Computers never get bored; they excel at routine.
PhantomJS
PhantomJS is an open-source project built and maintained by a team of volunteers. It’s a command-line tool, naturally, but what’s special about it is that it’s a fully functional web browser without a user interface. Surely that sounds unusual. Browsers are built to allow people to read well-designed pages full of beautifully rendered graphics and useful prose. When run on a command line, PhantomJS doesn’t show a single pixel of a page—it’s a headless browser. I’ll explain why you would want this later. Just believe me, even though the page is unseen, it exists virtually in the tool’s memory.
PhantomJS offers a few ways of getting at that unseen page sitting in its imagination via some lightweight programming. Some code is necessary, but it’s brief, and it’s easier to understand once we get into the real practical use if it. Coding is done in JavaScript, which is great, because it’s a daily-use tool for you given its popularity on the web. Any chance of writing some code is a good thing. I feel like it’s always worth getting better at the core languages of the web. Every exercise we complete improves our mastery of our craft.
Why is PhantomJS called headless? Today, computers are things in front of us. Laptops, phones, and tablets are our personal computers. In the beginning, they were huge contraptions behind locked doors. The way programmers interacted with them was through a keyboard-and-monitor set tethered to the mainframe via a network connection. This setup was called a head. PhantomJS doesn’t need a monitor or observer for its results to work perfectly fine.
Headless Website Testing
PhantomJS is great for testing that a website is behaving the way you expect it to. Engineers can write small scripts that simulate user interaction and check that everything responds as it should. PhantomJS reads your script and plays back all the user interactions for you in the virtual page. We gain confidence in our work by testing it in this way, because anytime we make a change, we can just run our PhantomJS script to confirm that nothing broke. The more tests, the stronger the confidence.
If you want to take testing to the next level, you could integrate a testing framework—such as Jasmine, Mocha, or QUnit—to help set up the conditions for the test, compare results against expected ones, and report how many of the tests succeeded and failed.
Network Monitoring
Building websites that quickly respond to their users is crucial. As an engineer, I’m very interested in knowing more about performance, optimization, and scaling as more people show up to have a look at my websites. Building a tool that uses PhantomJS to load a popular page while measuring how long it takes to load is a fantastic thing. Because it’s driven on the command line, I can automate this process. Then I could launch it morning, noon, and night every day of the week to see if my site is slower at any particular time. I can record how long every resource takes to load, seeking culprits for holding up page rendering. As a record of results grows over time, trends reveal how my site’s speed is doing and whether certain resources are taking too long to stream across the network from server to browser.
Screen Shots
PhantomJS can take a screen shot of your website, so we can automate the process of taking screen shots. Why would we want to do that? There are lots of good reasons you’ll find useful, and we’ll review those soon. First, we’ll install PhantomJS, and then we’ll write a little bit of JavaScript to control it from the command line. The way it generates a page image is by using the WebKit rendering engine, and that is some of the technology historically used by Chrome and Safari.
Installing PhantomJS
You’ll want to install PhantomJS once you’ve read through this chapter and decided that it’s a powerful tool to add to your professional toolbox. Please look to the download page on the official website for instructions on installing PhantomJS:

I believe the information you’ll read there is clearly written and current. There’s no need for this book to duplicate that effort. On that page, you’ll find information regarding downloading and installing this tool on both Windows and OS X.
Designers and developers on OS X have an alternative choice. It’s one that I use and want to highlight. Opening a Terminal window and issuing the command brew install phantomjs is another way of installing PhantomJS. “Brew” is short for Homebrew, a package manager. Engineers have the idea of making app installs, updates, and deletions easier. Once again, it’s on the command line, and I advise you not to let it intimidate you. I recommend embracing the command line at your own pace and letting it add value to your creative workflow. Instructions on how to install Homebrew are available at http://brew.sh/.
Beginning Way of Using PhantomJS
We’re going to write a brief program that uses PhantomJS for taking a screen shot of a website saved to a file.
PhantomJS installed on your development environment is like a miniature shiny robot awaiting your orders. It’s time to make it do your bidding. For that, we’ll need to write a brief JavaScript program that feeds it commands to follow. Much of the JavaScript is simply assigning useful values to a collection of well-named variables, accessing the PhantomJS module, and calling a couple of its functions. In principle, it’s straightforward yet powerful.
In a source-code text editor or IDE of your choice, enter the following JavaScript code and save it out to a work folder where you keep your experimental tools. Save it with the filename SimplePageScreenShot.js.

Running this app ought to be a simple matter of:
- From the command line, change directory into the folder in which you have saved the program
- Enter the command phantomjs SimplePageScreenShot.js and wait a few seconds for it to work
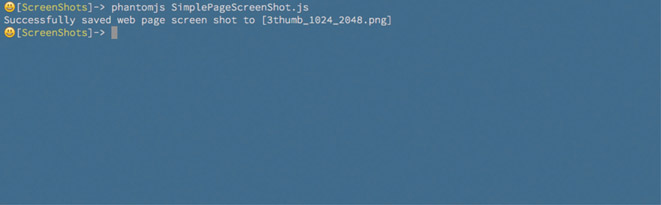
- You’ll find a newly created image file called 3thumb_1024_2048.png. Feel free to open it in your favorite viewer and have a look
Let’s review what the code does to ensure it makes sense to you. As we conduct the code reading, you’ll see obvious places where you can change it and learn what it can do.
These lines in the program set up three basic configuration options for telling PhantomJS what makes up our image. The variable names are descriptive enough to be self-commenting. URL is the website you want to have a picture of, and this can be your work-in-progress web-site running on localhost. The WIDTH and HEIGHT are, of course, the pixel size of the imaginary browser window viewing this website. Note that PhantomJS will respect the width configuration but will in fact use whatever height is necessary to fit the page’s content. We’ll consider that a benefit for now, but I will also show you a way to cut that with authority in our next section. These are good variables to play with as you experiment with this brief program.

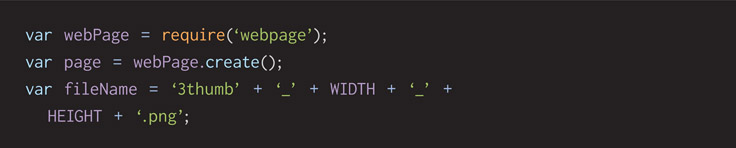
This section reaches for a library called webpage, requiring it into our program by a module name and assigning it to a variable for use later. This library of code comes bundled with PhantomJS. Next, a page object is created. We calculate a filename for the snapshot image file based on a few well-known variables. It’s a relatively unique pattern that makes sense, but change it as you like.
This uses the PhantomJS page object to tell how big we want the virtual page rendered. We access a function on the page object called open, giving it the website URL that we want it to reference and a function that’s run once the webpage is fully rendered. This is known as a callback function, and it is a key bit of why JavaScript is powerful. Libraries can be called, we let them go off and work for as long as they need to, and then they come back to our program when they’re complete and have results for us to act upon.

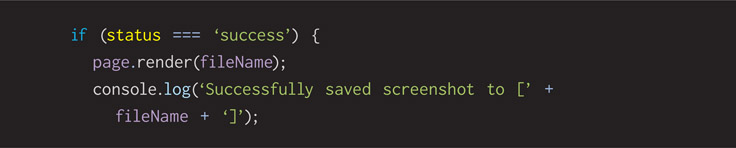
Here, the PhantomJS comes back to our program through the callback function, having passed it an argument called status. Checking status is important for knowing if the website was rendered correctly. We check the value in the status variable against what we know the documentation tells us. Expect that PhantomJS sends in the word “success” if things are good and it has a page drawn in its imaginary browser. If that’s true, we tell the page to save itself out to a file given the filename we came up with already.
To improve the user experience a little, we provide friendly feedback, printing a simple success message out to the command-line window.

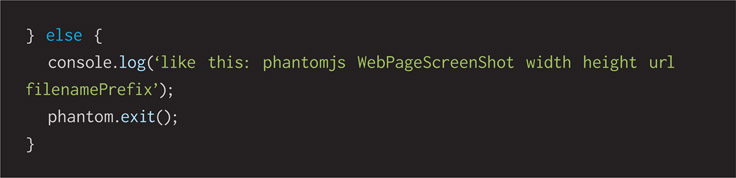
If the status variable doesn’t have the word “success” in it, we know PhantomJS failed to generate a webpage in its memory. We don’t exactly know why, but we’ll trust the result and print a message telling our user something went wrong. That way they can try it again in case of a random network glitch or reread the source code to inspect it for a defect. Could have been a typo when writing the JavaScript.

Either way, we need to tell PhantomJS to clean up after itself by calling the exit function. Then our program naturally comes to an end.

That’s all rather exciting, isn’t it? Spend some time reading through the code to ensure you know what’s happening. Change the URL, WIDTH, and HEIGHT variables to other websites at different devices sizes. Watch how this changes the program’s behavior.
If you want to take a quick look at the PhantomJS programming documentation, have a look at this page, for example. It shows how to use some of the functions shown in the example computer program.

This website documents the overall PhantomJS API, and the URL details the render function in particular. An interesting thing you’ll see listed is how many other file formats are available. I choose PNG because it has space-saving compression without any loss of quality. Have a look at the API reference and find out what other files you can use. Give them a quick try if you like to gain extra experience.
API is an acronym for application programming interface. APIs have changed over time, but fundamentally, they are a way for a third party to offer up a bundle of code to serve our needs. Ultimately, it’s a library with a well-documented way of talking to it.
Polishing Pass?
How can we improve this program? Lots of ways. For example, the width, height, and URL are all fixed in place with hard-coded values. That means the program will do the exact same thing every time we run it. Changing its behavior means changing lines of code in an editor. That might be fine for the program author, but it’s too inflexible to be a friendly experience for another user, especially one not as technical as we are. Hard-coding values defeats the eventual goal of crafting automation tools. In the next section, we’ll improve upon this program, extending it and making it a more generally useful tool.
Intermediate Way of Using PhantomJS Screen Shots
Let’s build on the previous SimplePageScreenShot.js program to improve it for flexibility. We’ll have it look for command-line arguments that a user can tell it width, height, URL, and filename prefix. All the things that were hard coded before can now be changed every time it’s run. This makes it more useful for you and your teammates and opens it up for future automation scripts.
In a source-code text editor, or IDE, of your choice, enter the following JavaScript code and save it out to a work folder in which you keep your experimental tools. Save it with the filename WebPageScreenShot.js.
Running this app ought to be a simple matter of:
- From the command line, change directory into the folder in which you have saved the program
- Enter the command phantomjs WebPageScreenShot.js 1280 1024 http://www.threethumbisland.com 3thumb and wait a few seconds for it to work
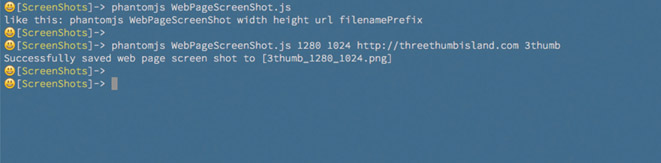
- You’ll find a newly created image file called 3thumb_1280_1024.png. Feel free to open it in your favorite viewer and have a look
Let’s review what the code does to ensure it makes sense to you. As we conduct the code reading, you’ll see obvious places where you can change it to fit your needs.
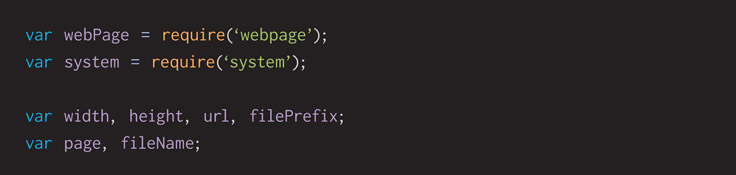
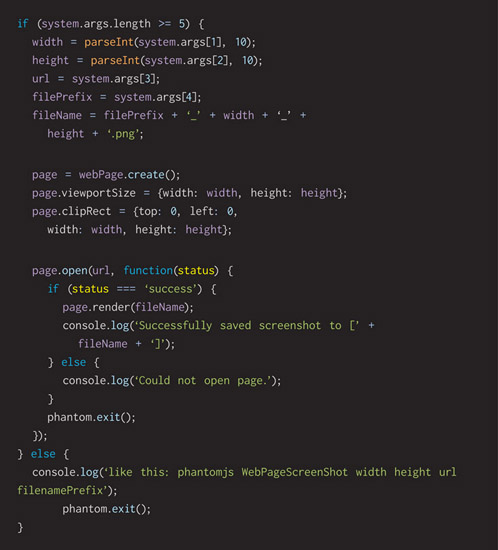
These lines reach out for the PhantomJS webpage library by requiring it into your program by a module name. Another helper module is brought in from the basic NodeJS system libraries. Both are assigned to variables for use later.

Several variables are declared and given obvious names that clearly communicate a useful idea to the reader.

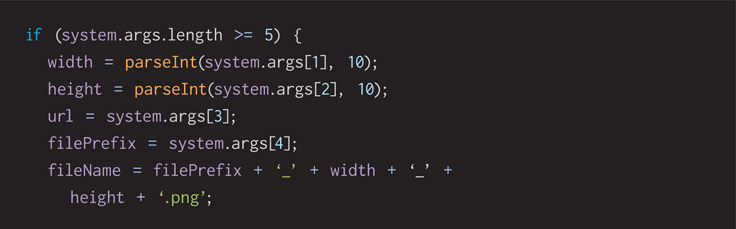
Our program expects four specific user inputs. Command-line tools refer to these as arguments. Using the system module lets us look at its args attribute and see that it holds an array of arguments passed into the program. We access that array’s length attribute ensuring it has at least five entries.

If we expect four arguments, why check the array for five entries? Because PhantomJS always inserts the running program filename as the first entry. How do I know that? Admittedly, I expect that to happen given what I know as an engineer who has built command-line tools in other languages. Better than that is documentation:

Given that there are enough arguments passed to our program, we pull them out and store them so they’re prepared for use. It seems like the system.args is already a variable that stores these user options. Must we store each of these in our own variables? No. I recommend it as a code style because it makes the program easier for a reader to understand. Assigning the value of strangely named system.args[1] into one named width suddenly reveals much meaning for future maintainers. Sometimes that’s overworked and tired future you or another teammate once you’ve left the company. The function parseInt turns the command-line argument from a text string into a number.
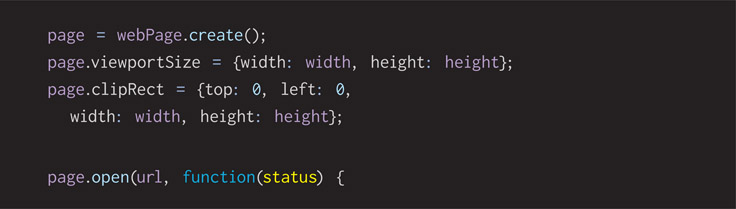
We use the PhantomJS webpage module to create a page object. Then we tell it how big we want the virtual page rendered. The clipRect attribute is new and interesting. Using it, we tell PhantomJS to physically cut the virtually rendered page down to size. If we didn’t, PhantomJS would let the height go as long as the website delivers content to view.
We access a function on the page object called open and give it the website URL we want it to reference and a function that’s run once the webpage is fully rendered. This is known as a callback function, and it is a key bit of why JavaScript is powerful. Libraries can be called, we let them go off and work for as long as they need to, and then they come back to our program when they’re complete and have results for us to act upon.
Here the PhantomJS comes back to our program through the callback function, having passed it an argument called status. Checking status is important for showing if the website was rendered correctly. We check the value in the status variable against what we know the documentation tells us. Expect that PhantomJS sends in the word “success” if things are good and it has a page drawn in its imaginary browser. If that’s true, we tell the page to save itself out to a file given the filename we came up with already.
As friendly feedback, we print out to the terminal window a simple text prompt. It’s not a GUI by any stretch of the imagination, but it helps improve the user experience in the reliable way that we can.
If the status variable doesn’t have the word “success” in it, we know PhantomJS failed to generate a webpage in its memory. We don’t exactly know why, but we’ll trust the result and print out a text prompt that tells our user something went wrong. That way they can try it again in case of a random network glitch or reread the source code and inspect it for a defect. Could have been a typo when writing the JavaScript.

No matter if the webpage opening was a success or failure, we need to clean up after ourselves, telling PhantomJS we’re done with it by calling its exit function. Then our program naturally comes to an end.

This is the matching “else” to the logic checking if five command-line arguments are passed into the program. When too few or too many are found, we simple write a reminder to our users that tells them what they must do to get the program to work properly.
This is a solid improvement to the SimplePageScreenShot.js program introduced in the previous section. Try running it a few different ways, testing the logic and checking if enough arguments are given. Test various websites with various widths and heights that match handheld devices you know. See how the saved pictures render and respond to the sizes you give.
Polishing Pass?
Can this program be improved? Yes, of course. Every creative work can be polished. One thing that comes to mind is checking if the command-line arguments sent into it are valid. User input can’t be trusted. Good people make simple mistakes, and bad people conduct malicious attacks. All user input ought to be validated before use. For example:
- Are the width and height arguments actually numbers? Are they zero, negative, or outrageously large?
- Is the URL argument formatted the way a URL ought to be?
- Is the filename prefix a valid string that our operating system allows for a filename? What if someone sends in emoji characters?
Advanced Way of Using PhantomJS
Now that we’ve written code that enables us to take a screen shot of a website with predefined settings and rewritten it to dynamically let our user choose what they want, let’s iterate and improve. Let’s write a little program that calls our dynamic WebPageScreenShot.JS several times with an array of command-line arguments. Let’s automate this process to take several pictures at once.
In a source-code text editor, or IDE, of your choice, enter the following JavaScript code and save it out to a work folder in which you keep your experimental tools. Save it with the filename MultiShot.js.
Running this app ought to be a simple matter of:
- From the command line, change directory into the folder in which you saved the program
- Enter the command phantomjs MultiShot.js and wait a few seconds for it to work
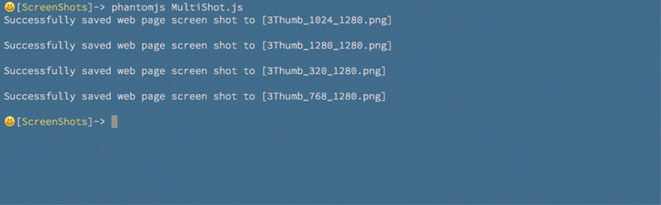
- You’ll find four newly created image files starting with 3 thumb in their names. Feel free to open any of them in your favorite viewer and have a look. You’ll see a list like this:

Let’s review what the code does to ensure it makes sense to you. As we conduct the code reading, you’ll see obvious places where you can change it and learn what it does.
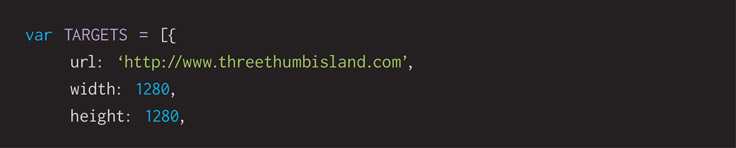
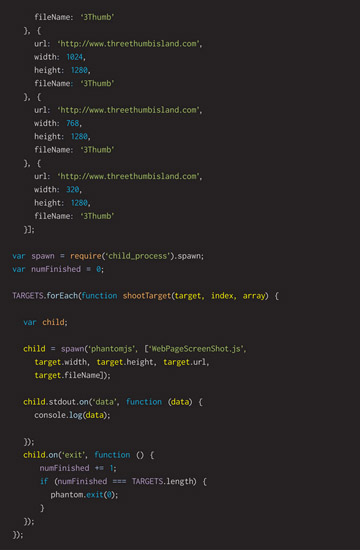
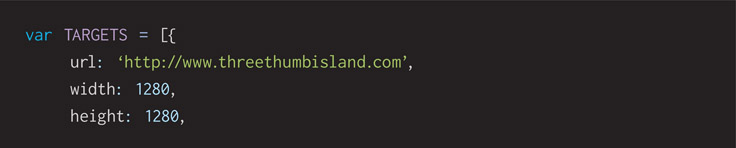
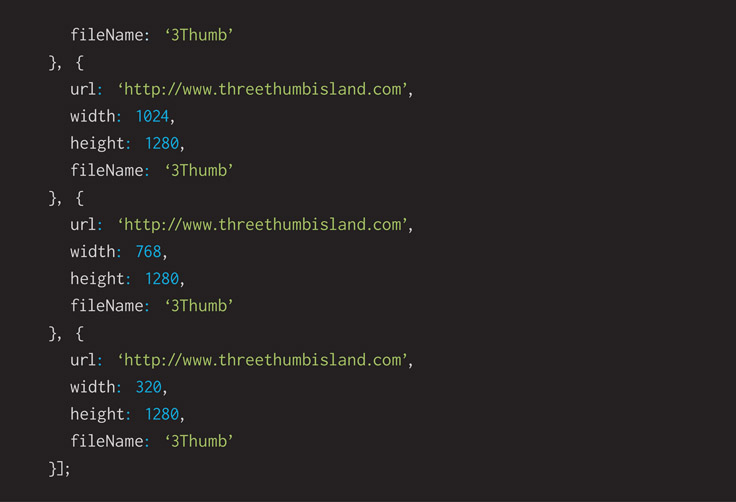
Configuring this program starts with the variable named TARGETS. It’s an array of objects that represents list of websites the program will tell PhantomJS to snapshot, at what size, and the filename prefix. This can be as long or as short as you want it to be. Pick your work-in-progress website running on localhost, an inspirational one out on the Internet, or a customer’s existing site that you want to redo.
Exercising some code style rules, I’ve named this variable with all uppercase letters, signifying that it is a constant and ought not to be changed by the program as it runs.
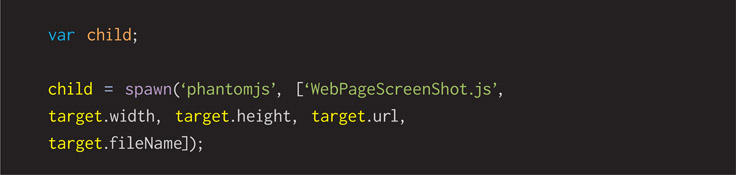
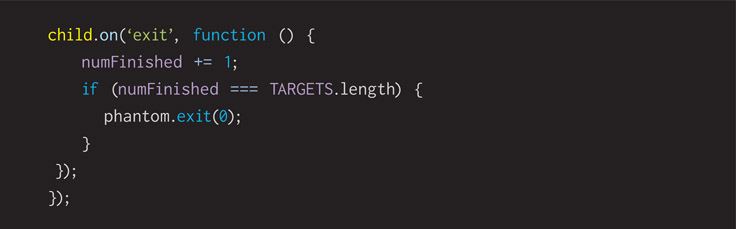
This section includes another module from PhantomJS that has to do with a way to run another program from within this one. Engineers use the term “spawn” to represent a program that comes from another. “Process” has to do with a program running on a computer, and “child” refers to the nature of a program coming from another. We might call the original program a parent.
An important variable called numFinish is set to 0. This program counts as it sees child screen shot programs finishing and exiting.

JavaScript has a forEach function attached to arrays. Using it lets us send a little function that’s called by every element stored in the array. Several arguments are sent into the function. It’s just the way it works.

Here we use the PhantomJS spawn library required into our program. It has two parameters: the program to run and an array of command-line arguments sent to it. In this case, the program is PhantomJS and the array of values is the WebPageScreenShot.JS program we wrote earlier and all of the elements of the particular target from the overall array of TARGETS. Using the forEach function on the array guarantees that we can see each and every target object one at a time.
Children have a few functions available to them, and using the on function lets us attach callback functions that listen for events. The first event is when data come from stdout. As an engineer, I learned years ago that stdout is a contraction for “standard out”—text coming out from a command-line utility. We’ve done that earlier by using the console.log function to write text.
Using it in this way grabs output from the child program and displays it from this program as if it were the author. We redirect output to give feedback that reassures our user that things are happening.

When a child program finishes, the next event handler is tickled, and we keep count. When we’ve seen the same number finish that were started, we tell PhantomJS to clean up after itself, and we exit. It’s all done.
I like this example because it shows how we built a simple tool and then built another tool that uses the first one. Composing programs from smaller ones is a great way to save time and effort. Automation removes the friction of everyday boredom from human beings who think they’re good at following directions but in fact are very bad at it. They want to have their opinions heard and get creative as they do things. Often that’s the magic of people, but in this case, it’s a variable to be optimized away. We’d rather have the computer tirelessly do the repetitive task and let us interpret the reports it provides.
How does it report? Let’s take a look at what these automated screens provide and how you might use them.
Use This Power Tool
Now that we have this tool—in fact, several tools—at our disposal, how do we use them? Are they ready? Yes, most assuredly, but don’t let that stop you from working on them and improving them over time. Here are several ways you can use them based on what I’ve experienced. I’m also including ideas I heard from some community friends when I showed this work to them.
Internal Design Critiques
Gather the team around a wall with printouts of your latest and greatest screen shots. Provide a survey of how the website design looks across a breadth of device shapes. Use this focus time to build shared understanding of what’s been done. Hand out pads of sticky notes and black markers to everyone, ask for their comments, and stick them on the printouts to move forward with purpose.
Weekly Design Comp Deliverables to Customers
When visiting clients for status updates, bring an assortment of printouts of screen shots that show how their upcoming site will look across a series of devices. Choose device sizes that represent their customers. Let them see how their company’s content will read on phones, tablets, and laptops. No need for surprises once their site has gone live. Educate them early, and discover incorrect assumptions as soon as possible.
Usability Testing Handouts
Run a usability test to find out how potential customers understand a site. Present a collection of printouts of your site at various sizes and ask a participant if they could figure out how to do a series of useful actions. Will they understand how an off-screen menu operates? Do they see the shopping cart options? Does a screen shrink away key call-to-action buttons that they will miss? Find out these bad user-experience issues as early as possible. Corrections are always cheaper and easier before the site goes live.
Give each test subject their own fresh set of printouts and encourage them to talk through their internal thoughts and mark up the pages. Bring these back to your designers, product owners, and developers to let them see what your test subjects saw. Mistakes are never failures if we choose to learn from them.
History Album
Imagine keeping an audit trail of these screen shots. Storage space is cheap, after all.
Compare present-day screen shots to past ones. Watch how your website has progressed over time and how your design is evolving.
Presenting a trail of images that shows how a website has changed over time is powerful. Most things will get better over time, so pay attention to the few things that get worse. Now is the time to revert to the old way if it was better. You can more easily make these judgments when everything is side by side.
Admire polish. Show off your history album at the celebration launch party.
Brag Book
It’s great to have a physical portfolio to show a perspective client or employer. Sitting down for a meeting in person and showing all your past work is a fantastic way to learn if a new job is a match. Use this tool to generate screen shots of your best work across a sample of typical devices sizes. Let your work speak for your attention to detail, design layout, content strategy, and overall professional level of owning results. Always be ready to demo your best work. Post these to your online portfolio as well.
Imagemagick
Let’s bring in another tool to process data for us. It’s called ImageMagick and is used for image processing and manipulation. Saying it’s one tool isn’t correct because it’s a bundle of several tools that serve unique individual purposes. Of course, they all run on the command line. Each of them is interesting because each can be used in a script, or simple program, to automate steps, as computers are so good at doing. What data would I want them to process? Website screen shots that our tools write.
One of the tools in the ImageMagick set is particularly interesting to me. It’s called compare, and it allows us to give it two images and it will compare them. How? By conducting image processing on them to figure out the differences between them, if any. Its output is a third file that displays any and all differences between your two images. “Fantastic and powerful” is what comes to my mind given a history of screen shots from your website.
About Image Processing
Image processing works because all pictures stored on the computer are collections of pixels. You know pixels very well by this time in your career. When you’re editing an image, you’ll see each pixel stacked up in column-and-row format to make up any image.
When you’re saving a file out from ImageMagick, you can pick its file type and the compression algorithm it uses. You want to choose this based on the type of image it is. If it’s UI or a logo, you should go with a PNG. If it’s a photo, you should go with a JPEG. Why? Photos can lose a lot of data and still look fine, while UI elements and logos typically can’t. Compression lets the PNG format keep its files smaller than raw ones, but it never throws away pixels while shrinking them—it’s lossless compression. Throwing away pixels from a picture might seem unusual to you, but in fact, the JPEG file format has a highly compressed scheme that does—it’s lossy compression. Depending on how high you crank up the compression factor, more pixel detail is removed by its algorithm in pursuit of maximum space saving.
Comparing images stored in the JPEG file format is a problem because they will always give false positives. Plenty of pixel drift will happen between any two images, even when they start from the same source, every time they’re saved to JPEG. It’s the nature of the powerful math behind the compressor that makes the files so small.
For these reasons, I typically prefer the PNG image format.
Installing Imagemagick
You’ll want to install ImageMagick once you’ve read through this chapter and decided that it’s a powerful tool to add to your professional toolbox. Please look to the download page on the creators’ official website for instructions on installing ImageMagick:

I believe the information you’ll read there is clearly written and current. There’s no need for this book to duplicate that effort. On that page, you’ll find information regarding downloading and installing this tool on both OS X and Windows.
Comparing Two Images
The math behind comparing two images consists of reading both image files and stepping through their pixels row by row, column by column. Each RGB (red, green, blue) color is compared to the opposing mate on the other image. Producing accurate results means comparing two images of the same size and color depth (8-bit, 16-bit, 24-bit color).
Computers are perfect for following steps like comparing in this precise manner. Humans say they can compare two images and tell us the difference, but in fact we’re not good at it at all. We get bored, we interpret images based on point of view, and we’re biased, meaning we’ll go hard or take it easy when comparing based on our emotional attachment to the image’s contents or creator.
As a computer program compares each pixel color, it will use a low-level mathematical operator called XOR. It’s an example of binary logic. Binary is the yes-or-no answer that fundamentally powers a computer to its core. XOR, shorthand for exclusive or, is the perfect tool for comparative image processing. This table shows how it works at the lowest level of a computer’s digital brain:
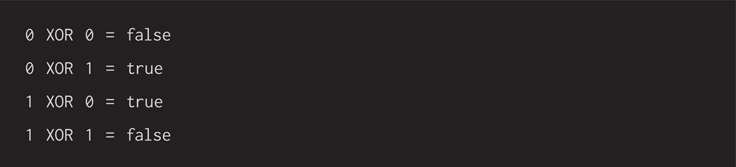
Every image file has pixels, each of those pixels has a red, green, and blue color, and each of those can be broken down into zeroes and ones. When an XOR between two numbers is true or false, it lets the image-processing tool decide how to act. If this binary math doesn’t exactly make sense to you, then please trust me on this one, and let’s keep moving forward.
Visual Differencing
ImageMagick’s compare tool considers two images and writes a third file that annotates distortions between the inputs. Using it is as simple as:
- From the command line, change directory into the folder in which you have saved the images
- Enter the command compare picture1.png picture2.png picture3.png and wait a few seconds for it to work
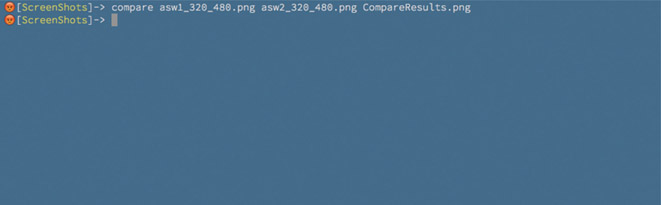
- You’ll find a newly created image file called picture3.png that compares the two images. Feel free to open it in your favorite viewer and have a look at what it found. You’ll see a fuzzy red color every place it found a difference between the two images.
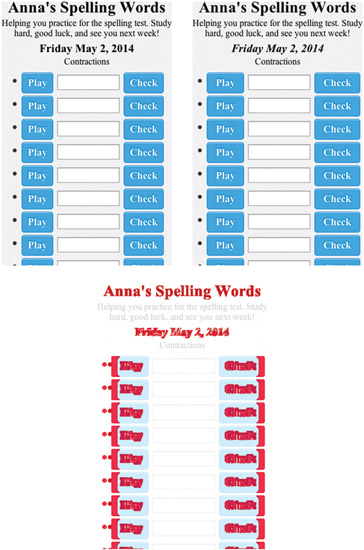
In the example’s results, you’ll see two apparently similar screen shots of a website I’m running on my localhost. Ask a human what the differences are and they might say they see none, while others will notice something obvious. Our tireless computer shows exactly the differences based on various CSS tweaks I made—for example, minor tweaks to padding, font color, and an italics style.
I demoed this tool at a conference once. After the session, an audience member told me that their website has a lot of reddish colors, the same color ImageMagick defaults to when showing the differences between two images. He guessed it would be hard to recognize what was supposed to be there and what wasn’t. At the time, I didn’t know if the compare tool would write out a comparison image showing differences in another color. But it can! I’ve looked up the answer, and you can use the argument—highlight-color.
Use This Power Tool
Another powerful tool is available to you with this comparing utility. How can you use it? Engineers are seemingly always creating logic bugs. Every change we make gives us another chance to make a human error, and we look to test for newly introduced glitches and bugs. Quality-assurance testers call those regressions. It suggests something has gone backward in its capability.
Can we make visual bugs? Absolutely, and anytime we significantly change the CSS to update a design, there’s a chance of doing so. CSS is a programming language, and like any, it sets us up for making errors while we’re building software with it. If we’re taking screen shots regularly with MultiShot.JS and WebPageScreenShot.JS, we have an audit trail. Comparing daily changes against well-known past successes, we can casually find out if there are visual differences. Then we can decide if those reports are good or bad. Expected changes are fine, but surprises must be validated.
Alternatives for Image Diffing
If you have screen shots created with PhantomJS but you don’t want to use ImageMagick to create the comparison image, there are GUI tools to help with that:
- Kaleidoscope is a file-comparison application available for purchase on OS X. The product website describes how you can use it for spotting the differences between two text files, such as source code, but it’s also visual. Instead of using the ImageMagick command-line tool, you could replace it with Kaleidoscope.
- Beyond Compare is another commercial app with image file comparison. It’s available for MS Windows, and you could use it instead of ImageMagick. It shows the visual differences between two images.
Alternatives for PhantomJS
SlimerJS is a headless browser that runs on the command line and uses JavaScript for extra scripting control. The Gecko engine performs all rendering, and that’s the same one that powers Firefox. Gecko is very similar to PhantomJS, which uses WebKit. It could be considered a replacement for PhantomJS.
Extending PhantomJS
CasperJS is a library that makes it easier to use PhantomJS by providing a helpful high-level interface. Writing scripts to automate everything you want to do with a headless browser might be simpler with CasperJS.
Commandeering the Command Line
Engineers’ tools often seem unfriendly and hard to understand—much like the people who create them. Joking aside, I hope you’ve seen here how many useful tools exist in the world. It’s well worth your time to experiment with them, learn them well, and gain confidence in this environment. You’ll see that routine tasks are accomplished quickly, especially when automation is brought into the mix. The JavaScript programs you wrote controlling PhantomJS are solid examples of how you can automatically generate website screen shots for documentation, team critiques, and client delivery.
Perhaps I’m comfortable with the command line because I grew up with it. My computing career started decades ago, when there weren’t any graphical user interfaces. It was absolutely a case of do or die for me. Today, we have a choice, but history influences our present selections. We can use these command-line tools manually, on a timer, or automated by build tools that detect source-code changes submitted to revision control systems.
Being lazy should be a point of pride. We invest a little time early on, creating automation, it pays off big over time. Time saved comes as a result of the virtual software robots we make do our bidding without our direct intervention or constant scrutiny.