Table of Contents for
The Adobe Photoshop Layers Book: Harnessing Photoshop's Most Powerful Tool, covers Photoshop CS3
 The Adobe Photoshop Layers Book: Harnessing Photoshop's Most Powerful Tool, covers Photoshop CS3
Published by
Focal Press, 2007
The Adobe Photoshop Layers Book: Harnessing Photoshop's Most Powerful Tool, covers Photoshop CS3
Published by
Focal Press, 2007
- Cover
- Halftitle
- Title
- Copyright
- Dedication
- Contents
- Acknowledgements
- Introduction
- Chapter 1: The Basics of Layers: Layer Functions and Creation
- Chapter 2: Layer Management: Concepts of a Layer-Based Workflow
- Chapter 3: Object and Image Area Isolation in Layers
- Chapter 4: Masking: Enhanced Area Isolation
- Chapter 5: Applying Layer Effects
- Chapter 6: Exploring Layer Modes
- Chapter 7: Advanced Blending with Blend If
- Chapter 8: Breaking Out Components
- Chapter 9: Taking an Image through the Process
- Chapter 10: Making a Layered Collage or Composite Image
- Index
We have looked at quite a lot of things that layers can do, and the important thing now is to continue to follow through using the techniques you have learned. We looked at the entire process of evaluating and correcting an image in Chapter 9. One step beyond just working out the issues with a single image is combining images for a finished result.
In this chapter, the emphasis is on considering the idea of collage and compositing, and how to be creative in implementing changes and additions to images using the power of layers.
We have touched on using layers for image correction, adjustment, isolation, masking, and how to use layers to manage and group corrections. In reality, collage and composite are just an extension of that. First we’ll look at the idea of composite and collage, and how you go about collecting images for each.
This speaks to the difference somewhat of what collage and composite images are.
What Is a Collage?
Collage is supposedly derived from the French word coller, which means ‘to paste’. We started with the simple idea of pasting, and here we come full circle, returning to the earliest techniques to produce the most complex results. A collage is simply a collection of images, used in part or whole or cropped out to specific areas, and combined or pasted together to create a collective visual. In other words, in making a collage you gather source materials and past them together. It’s that simple. Simple in idea, but complex, often very complex, in execution.
A collage can be anything from the old grade-school exercise of taking out a bunch of old magazines and cutting out images then pasting them to a larger sheet of paper to far more elaborate adventures in imaging. The photographic equivalent is taking a group of pictures, extracting the interesting parts and combining them to achieve a result. It can be simple collection of images (say a grouping of family photos) to more organized themes, clever compositing, or completely haphazard. It can be humorous, serious, realistic, surreal, artistic and more. When you are bored or have a moment to exercise some creative muscles, it can be great fun.
Guidelines for Collage
Because collage can follow many forms and none are right or wrong, guidelines for making a collage can only be general. You have to supply the image choices and creative direction. Below, find my 5C’s of collage:
1. Collect your images: You can do this in a variety of ways from going out and shooting new images to rummaging through old files. At the very least you should be using at least two images … there is not really an upper limit except for what time allows.
2. Create your canvas: Create a new image about two times the size of the finished project. This will give you some layout space to work with and elbow room for placement of the images. You can crop the image down later (or use a cropping layer as described in Chapter 9) or you may find you just end up filling the space! At the very least this should be two times the width and height of the largest image you plan to use.
3. Correct your images: Never neglect to make changes in individual images just because you are going to composite them. Advantages you have for layer corrections especially will be lost if you wait till later.
4. Clip out and composite: Like scissors to a magazine, you have the layer tools to start snipping up your images. Make selections and masks to isolate image areas that you will be using in the final collage, and move those components to the canvas created in step 2.
5. Compose: With all the images in the new canvas you can spend some time adjusting positions, compositing, blending, correcting and meshing. There is no limit to what you can attempt, and this step can take many hours depending on the complexity of what you are attempting.
Things to keep in mind:
• Collage doesn’t have to appear flat and can include effects (e.g. drop shadows) and patterns (like scrapbooking) instead of just images.
• Some image parts, objects or components may have to be built to make any composited part of an image work within the new context.
• Color needs to work together. Color can change! When you isolate image components, you are giving yourself the opportunity to orchestrate the whole scene. Take that opportunity to control the colors and how they fit together as well as the components.
• Be cognizant of light and direction. If you are putting together a wholly new object, you need to note that the lighting and light direction don’t conflict with each other. The lighting on all elements of your scene should match or it will appear unnatural.
An Example Collage
Collage can be a great way to find purpose for those images you would possibly otherwise think belong in the digital trash. In a way it can be like cloud gazing where you stare at images until something pops into your head; or you can come at it with a purpose from the outset. The images may not need to be superior or even on a common theme, but shots that can be somehow managed and merged. For example, take a look at the grouping of shots in Figure 10.1.
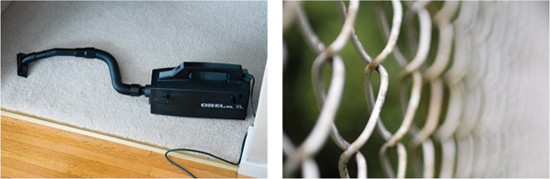
FIG 10.1 There is nothing particularly connected about these shots, some are common, and some not so good at all …
While there is very little central theme to the images selected here, each had something that is central and singular. In this case it is possible set to work just snipping out the objects, and let imagination take over. For example, this might be the source for a somewhat other-worldly scene where the vacuum is given life, adorned with wings from the butterfly, making its rounds to a bright flower with a strangely twisted stem. To create the scene you might start by creating a new image and then by grouping image elements for the butterfly vacuum, and then make the strange flower (see Figure 10.2).
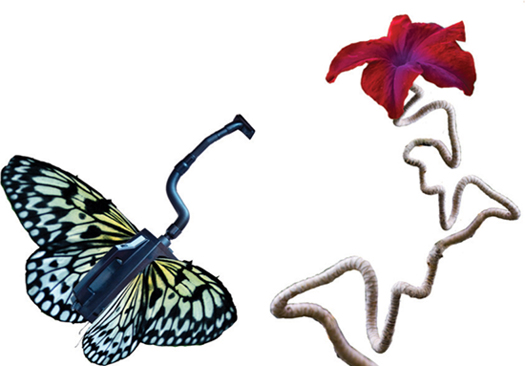
FIG 10.2 Components can be assembled from separate parts before combining them into the whole.
Once the major components are created, they can be fit together in a cohesive whole in the strange terrain. Every one of the techniques required to complete the result was covered in this book. Feel free to open the sample images from the CD and attempt to replicate the result or make your own/different collage with the same photos (Figure 10.3).
 I would be glad to see creative collage made either with these sample images or from other groupings. See the website (http://photoshopcs.com) for information about collage contests!
Shooting Multiple Source Images
In times of image trouble one of the greatest options to have is the availability of more than one source image to work with. If you take several shots of the same scene, you are really safeguarding yourself for any corrections you might have to make. For example, if you are taking a posed family shot, taking several images of the same exact setup can give you the source to replaced blinking eyes, turned heads, cliché gestures and the like.
This same philosophy works to help you fix any number of other problems. If you are on a trip to a scenic spot and you think you got the shot, take the same one again. Chances are you won’t be coming back all too soon and if you find your hand was a little shaky in the first frame, you’ll have possibly saved the shot by squeezing off one more. Other images can be used for patching, copy/pasting and otherwise fixing a variety of things that go wrong.

FIG 10.3 This surrealistic scene was built from the five images in Figure 10.1.
Creating a Panorama
Similar to the idea of collage and composite is creating a panorama. You can do this in situations where you don’t have a wide angle to tackle the image you want, or to give you greater resolution in the result by stitching together consecutive shots taken in a horizontal or vertical plain. Images shot for a panorama are taken in a series – usually in quick succession – and the series of images are connected to create a continuous landscape. The photos are usually taken in a vertical or horizontal pan to capture a broader or taller area than you would normally get in a single frame with whatever lens you are using. Because you take several overlapping images shot in succession (perhaps using a tilt (vertical movement) or pan (horizontal movement) of a tripod), your resulting image will have more image information once stitched together and can be enlarged more than a single frame of the same scene (Figure 10.4).
Good panoramas are a little tricky to shoot and often tricky to stitch together seamlessly. Lighting conditions change as you pivot the camera, and cameras in any type of auto-exposure mode will try to compensate for that between shots. This leaves you with a lot of tone and color changes to correct in post-processing. The obvious solution is to shut off auto-exposure modes and shoot with manual exposure. Taking some care while shooting the source images for the panorama will help simplify processing. Instead of looking forward to corrections, avoid at least a few by switching the camera to a manual mode first – before shooting any of the images. This will keep the exposure setting the same for each frame in your panorama, and will make matching the exposure of the individual frames easier, and your work at the computer a lot quicker later. Setting your camera up on a tripod for the movement can also help by keeping the frames mostly aligned. When you shoot the frames, you will want 30–50% overlap to give yourself plenty of room to blend one image into the next as you stitch them together.
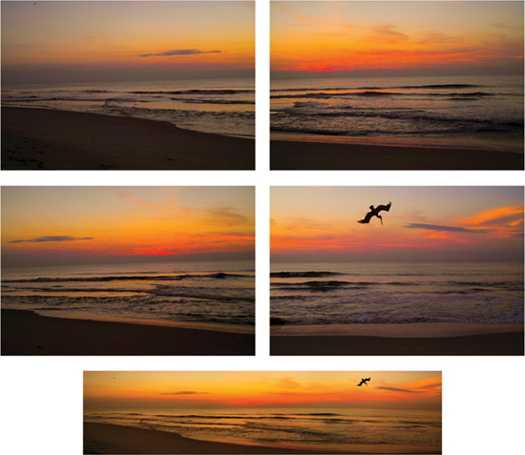
FIG 10.4 This series of images can be stitched together to make the complete panorama.
During editing to make these images stitch together smoothly, you will likely have to pull out all the stops and use almost all we’ve done so far to get a good result. If you open the source images (Sample16.a.psd, Sample16.b.psd, Sample16.c.psd, Sample16.d.psd), you will notice some noise in the images and the color may need a little correction … though it is possible to forgo most of these corrections until after the images are stitched together.
The basic set of steps for completing a panorama are this:
1. Collect your images: Purposely shoot a series of images that overlap by 30% or more for the purpose of creating your panorama.
2. Create your canvas: Create a new image about two times the height of your images and wide enough to fit all the images in the series. As with collage, you leave some layout space to work with and elbow room for placement of the images.
3. Compile and collate your images: Get all the images into the new canvas and order them in series. If the series was shot horizontally, start stacking the images in layers with the rightmost image on the bottom of the layer stack, and work left in the panorama as you add layers so they remain organized in the layer stack. If the series was shot vertically, stack from bottom to top. Ordering in layers will help organize your plan.
4. Blend: The seam between images can be blended in a variety of different ways. The easiest technique (the panorama plugin in elements is based on this) is simply making a gradient blend at the seam from black to white. Layer masks are recommended. Varying opacity during the blending process can help you see better where edges match.
5. Correct: Once you have the panorama stitched together you need to treat it like a single image. You’ll want to go through all the steps of correction from levels and cropping to spot corrections to be sure you are making the best image.
You can try stitching together the sample images provided on the CD for this panorama, and you can see the corrections I made in the completed file Sample16.psd. The most telling part of the sample will be the masking used for blending the edges of the consecutive shots. Masking helps make some otherwise tricky transitions simple. Waves – like lines in a topographical map – might not want to easily fit together from shot to shot. But overlaps, masking, blending, and the power of layers can help you create a seamless result.
Summary
This chapter has lacked a bit of direction, quite by design. We have covered some of the basic concepts of composite and collage as a way to think beyond the boundaries of the confines of single snapshots, and have covered the techniques needed earlier in the book. You have been supplied with the images you need and the outline of what to do, and the intent was to leave the details in your hands. If you get stuck, samples on the CD (Sample15.psd and Sample16.psd) should hold a clue to the answers you are looking for. Trying to complete the collage and composites are an opportunity to explore techniques discussed throughout the book before you have to go at it more completely on your own. The core of this chapter lies in taking a broader view of images. Objects and image can be combined not just within their own spatial area, but with other images to expand the borders of what is possible well beyond the scope of viewfinder.
So you see that with panoramas, and blending edges we have truly come full circle. Panorama stitching is quite like trying to put together the pieces of a puzzle, or like blending the edges of a map to stitch together a series of scans – as I told of all the way back in the introduction to this book. Hopefully now that you have seen what layers have to offer and how they can enable you to do things with images that would otherwise be far more difficult without layers, you have a map for your future of working with images in Photoshop.
I like to always think that the end of my books are always just the beginning. As you have time to work with layers, using this book as a starting place and reference, you should grow well beyond what we’ve looked at to expand your horizons.
As you continue to explore Photoshop layers, please visit the book’s website (http://www.photoshopcs.com) and visit the Layer forums online to ask questions, and get answers about layers and other Photoshop issues. This author is bound to be there fairly often as well! I look forward to seeing you there.