Table of Contents for
The Adobe Photoshop Layers Book: Harnessing Photoshop's Most Powerful Tool, covers Photoshop CS3
 The Adobe Photoshop Layers Book: Harnessing Photoshop's Most Powerful Tool, covers Photoshop CS3
Published by
Focal Press, 2007
The Adobe Photoshop Layers Book: Harnessing Photoshop's Most Powerful Tool, covers Photoshop CS3
Published by
Focal Press, 2007
- Cover
- Halftitle
- Title
- Copyright
- Dedication
- Contents
- Acknowledgements
- Introduction
- Chapter 1: The Basics of Layers: Layer Functions and Creation
- Chapter 2: Layer Management: Concepts of a Layer-Based Workflow
- Chapter 3: Object and Image Area Isolation in Layers
- Chapter 4: Masking: Enhanced Area Isolation
- Chapter 5: Applying Layer Effects
- Chapter 6: Exploring Layer Modes
- Chapter 7: Advanced Blending with Blend If
- Chapter 8: Breaking Out Components
- Chapter 9: Taking an Image through the Process
- Chapter 10: Making a Layered Collage or Composite Image
- Index
The greatest benefit to using layers is that you get tremendous flexibility in controlling image changes, and the ability to revisit, adjust and view changes at any time later in the correction process. You can also store the changes to see what you did, and create techniques by examining your process. The biggest drawback to layers – besides learning to harness the tremendous number of options – is bulking image file size, and organizing an ever-lengthening layer stack. This chapter looks at how to use layers as a means of managing your approach to correcting images and keeping those changes organized by incorporating layers as the core of your workflow.
Talking about managing layers before talking about using them is really a chicken and egg scenario: it could be argued that it is more important to know what to do with them than how to manage them. However, my thought is simply this: start with good fundamental practice in using layers, and it will be more natural to use them in a way that is most beneficial to your images.
Managing layers starts with knowing how to create them – as we looked at briefly in the previous chapter – and continues with knowing how and when to combine them to save file size, and group and arrange them to keep them and your image corrections effective and organized. Making the effort to keep things organized may take a little more time at first, but, like all maintenance and organization, will help in the long haul to keep you on track, and becomes more natural as you do it consistently. For example, when you make a meal, you might follow a recipe. This can save you from goofing up dinner entirely. Along the way you might make some adjustments to taste depending on your level of confidence, or depart from the recipe entirely once you are more sure of what you are doing. The recipe acts like a fall-back or outline of a basic plan.
When you follow an organized plan for using layers, they end up being not only a means of correction and an organizational tool for those corrections, but a means of driving corrections, organizing the correction workflow and acting as a history of image correction. Effectively managing layers and layer content will help keep your corrections on track, will allow you the flexibility to step back and forward in corrections, and will keep your images from bulking up to ridiculous size unnecessarily. Just like a recipe, layers act as a plan for getting to where you want to go.
To look at layers as part of a total process, we’ll begin with an outline of an approach to image editing and outline a basic tool set that you will use in conjunction with layers. Then we’ll look at more theoretical applications of Layers for organization and image correction, and how layers factor into and direct the process of correction.
The Outline for Image Editing
For the sake of putting layers in the context of process, we’ll look at a complete outline for processing images from beginning to end. Layers are crucial to every stage of correction. Our outline will look a bit beyond just the process of correction to be sure the process is considered from end-to-end: from monitor to print. Consider this outline as your plan for editing images and use it as a roadmap in making all your image corrections – especially if you do not have your own plan in place.
The steps to image editing are segmented into several distinct parts: setup, capture, evaluation, editing/correction and purposing/output. Setup encompasses all necessary steps for preparing your equipment for capture, image editing and output. Capture is gathering your digital source images to use in editing and output. Evaluation is consideration of what you will be doing with the image and the steps you will be taking in correction. Correction and editing is manipulation of the source image captures according to your evaluations and in preparation for output. Purposing and output encompasses all manner of final use of images in display, in print to different media and processes (inkjet, offset, light process), or for a monitor (web pages, video). Though layers are only involved directly in the editing stage, the other stages all affect the choices you make in the correction and editing, so it is valuable to have a quick look at the entire process in more detail.
Setup
Setup is everything you need to do to prepare for image editing. Being sure your capture device, system and editing program are set up correctly and that you have considered the purpose or use of the image. This is important to ensure you will get the results you want.
• Be sure your computer system is ready for image editing with Photoshop. You will need to consider the requirements for running Photoshop, such as how much RAM your computer has and the speed of the processor. Check the requirements (find these on the packaging, or on the Adobe website). You will also want to have significant free disk space, and establish a backup routine (and have the appropriate media on hand). Concerns for your computer setup may extend to having a firewall in place, virus protection and image-editing input devices.
 You are not limited to using a mouse when editing images, and other devices may be more to your liking. Image-editing input device possibilities include trackballs (http://aps8.com/trackball.html) and graphic pen/tablet combinations (http://aps8.com/wacom.html). I rarely use a mouse for serious image editing.
• Calibrate your monitor, and create a custom ICC profile. The custom profile is usually made during the calibration process, and helps Photoshop compensate for color display. Calibration is an essential step in color management.
Calibration devices such as the ColorVision Spyder 2 Pro (http://aps8.com/spyder.html) can simplify calibration, make it more accurate, help manage ICC profiles and make color management less of a chore.
• Set up Photoshop. This includes setting up color management preferences, preferences for scratch disks/memory usage, and testing output. Photoshop is a memory hog, and it is not unheard of to dedicate a drive to the sole purpose of being a Photoshop scratch disk. Giving Photoshop a lot of room to do what it does ensures your best chance of getting the results you intend consistently, and that your system functions optimally.
• Have a system for archiving. Be prepared to archive the original image files safely when you download them from the camera and before you begin work on them. This may require consideration of archiving media and equipment. Archiving is crucial to a safe workflow where you always work with a copy of an image to do all of your image editing. If any step in the editing goes awry, you will want to be able to return to the original image to start over. Working on copies will also give you the opportunity to repurpose the original in the future or take advantage of new and emerging technologies that might help you get more from the original image capture. DVD drives, CDROM, RAID arrays, tape backup, external drives and even online storage can all be considered in keeping your images safe.
• Consider the final purpose of the image: resolution, size, color, file type and purpose. This can affect your other choices in setup. You may work at different resolutions and in different color modes throughout the image-editing process for specific purposes, but knowing what you need from the outset of the project can help you work smarter, with less possibility of getting into situations where you compromise image integrity.
• Be prepared to make the best use of your camera. Know your camera settings and controls. Nothing will do more to help you get the best shot than knowing how to work your camera. This will include becoming familiar with your camara’s unique settings. If you use accessories, knowing how they function is important as well. One of the most important camera accessories is the owner’s manual. Be sure to put yours to good use, and read it several times from cover to cover – or at least those sections written in your own language! Remember to bring all necessary equipment if you’ll be shooting in the field: have ample memory on hand to take all the shots you want, and ample power (several sets of new or newly charged batteries).
I have several 1 GB or 2 GB cards on hand whenever I shoot (see http://aps8.com/1gb.html, or http://aps8.com/2gb.html). In addition I carry a 80 GB Wolverine portable hard drive that reads 7 types of memory card and can be powered by battery (http://aps8.com/wolvarine.html). Between these, I can store about 12,000 shots without downloading to my computer.
• Learn about scanner features and scanner software. Software and features on scanners can often vary drastically between makes and models. Just like being familiar with your camera and settings, knowing what your scanner model can do and your options for scanning will help you get the most from the images that you scan. If using a scanner, again, make friends with your manual. Color calibration and profile building specifically for the scanner may also be appropriate steps to take at the point of setup.
Capture
With setup completed, you will want to take the utmost care in the actual capture of your images so that the result will be most useful and of the highest quality. Starting with the best source image leads to the opportunity to achieve the best result.
• Take command of your camera to get the best shot. This includes working with settings such as aperture and shutter speed, as well as controlling other qualities of capture such as depth-of-field and framing. Proper settings extend to use of other accessories such as flash, and also mechanics like holding the camera perfectly still as you depress the shutter, or moving evenly as you track the camera to follow motion or create special effects. Knowing the settings is only half the battle, practice using the modes and settings and creating interest in your captures will improve your photographic technique and enhance the improvements possible with Photoshop. There is nothing that can substitute for good source images.
• Capture additional frames. Don’t be afraid to snap the shutter with your camera pointed at any subject that you might later use for retouching, compositional changes or enhancements. If you don’t take a photo, you will not have the source to work with. For example, if shooting a group portrait you might take 3–5 shots of the group to be sure smiles are in place, eyes are open, poses are acceptable – you want to captured enough source images to make necessary enhancement and replacement easy. If shooting a high-contrast scene, you may want to make one exposure for the highlights and one for the shadows so you can merge the results later. Don’t be too quick to delete potentially useful images just because they are not perfect in preview. You should have plenty of memory for more images (take a second look at your steps for preparation), and weed out the clunkers in Photoshop where you can give then a fair look.
• Control scanner settings to get the best scans. Settings for optimal scanning will often be achieved manually or via some manual intervention. In the case of scanning, resolution, color mode, white point and more, may be choices you will need to make to optimize results. Most scanners have auto modes, but the best scans are often made with scanners that allow manual adjustment during the process of scanning.
Evaluation
Actually looking at your images on screen and carefully evaluating them is what determines which steps you take in making corrections. You should take a moment to jot down some notes as to what you hope to accomplish with your changes. The result of the evaluation should be a short list of things you want to improve or change. A set plan has the additional benefit of keeping you on track and helping you make order out of the potential chaos of what tools and techniques to employ, and may also keep you from distracting and fruitless experimentation (Figure 2.1).
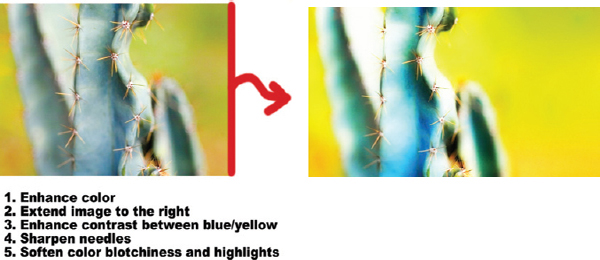
FIG 2.1 Making notes on a rough print of your image may help your evaluation and keep goals in mind.
• Consider tone and color. This analysis can include determining qualities like the image type (high key, low key, high contrast), but more generally you will want to consider the dynamic range, how vivid the image is, the exposure, saturation and color balance/color cast.
• Consider cropping and do a horizon check. Cropping can be used to solve compositional problems as well as removing distractions or simply reshaping an image. A common problem in landscape photos is a tilted horizon, and this can often easily be fixed with a cropping adjustment.
• Consider small scale enhancements and adjustments to fix damage, eliminate dust or debris and possibly remove distractions.
• Consider imaging heroics. What I consider ‘heroics’ are corrections that go well outside the normal path of your workflow. Changing composition considerably (e.g., moving or adding a complex object to an image, compositing several images into something much different, and possibly some instances of HDR (High Dynamic Range) compositing), manually enhancing edge sharpness, recreating objects, etc., are all heroic efforts to make an image. These changes are usually very complex, require many steps in adjustment, a lot of skill and many layers. Experimentation also be considered heroics.
• Consider image enhancements. Once an image is refined through more obvious corrections, you may want to add softness, sharpening, saturation, other general qualitative adjustments to enhance the image, or add graphic elements, like framing. These enhancements may not be part of the original image.
Editing and Correction
At this stage of image editing, you will take specific steps to achieve the goals set during your evaluation. This is where you will actually employ layers as a core tool in organizing and executing the steps necessary to complete your corrections.
• Make general color and tonal adjustments. This means doing tonal and color adjustments that will not use selection or masking. Specifically you will rely on levels for most of this general correction. Other tools to consider are Hue/Saturation and Color Balance.
• Make general damage corrections, such as eliminating dust from scans, fixing cracks and holes in scanned images and reducing digital noise.
• Make general compositional changes including cropping, compositing and simple replacement or removal of objects.
• Make heroic changes to the image. This can include reshaping objects, broad compositional enhancement, experimentation or even collage.
• Make targeted corrections to the image using selection and masking. Usually you will want to exercise all general color and tone corrections before singling areas of the image for complicated masking correction.
• Make enhancements to the image for sharpness, softness, saturation, brightness and other generalized ‘final touch’ effects like framing, adding copyright, etc.
• Save the layered Red, Green and Blue (RGB) version of the image so you can return to the image for additional changes, repurposing, or to explore the techniques used. Be sure to give the file a new name when saving, so you do not save over the original.
Purposing and Output
Finalizing the image to target a specific output type. You may need to do this segment more than once if an image will be used on a website and in print.
• Simplify the image as appropriate for use in the medium you have selected. This step may include flattening the image or merging layers, altering the color mode, or removing extraneous image information (paths, channels, alphas, etc., don’t worry if you don’t know what all those things are). During the process of simplifying, be sure to retain all components that may be important to your output, like vectors for high-resolution offset printing.
• Optimize the image resolution and color for output/use. Make color, tonal and color space adjustments if necessary, and resize the image according to the target resolution. This step can include such changes as setting white and black points and making device-specific color changes.
• Save the image in output file format. Not all files are alike. Some services and output devices will require specific file types, and some file content will require file types that retain qualities you have created in the image (e.g., vector components). Make considerations for profile handling as part of your workflow and intended output, and be cognizant of whether or not you will embed a profile.
• Package the image on proper media for output use. Archive a copy of it along with the working version saved with layers so it can be reused if necessary.
This checklist may seem long, but each step will often not be very involved. Some steps you will do naturally, some take just a moment, and some are just reminders for maintaining a positive workflow. Practicing correction by following the steps in the list can ensure that you make all adjustments and corrections that you intend to do in achieving your goals for the image.
Photoshop’s Essential Tools List
While it is still perhaps a little outside of the focus of the main focus of layers, a sort of master tool list can also be handy. This list is comprised of tools that you will want to be aware of and competent using in order to get the most out of your corrections with layers and Photoshop in general. When an electrician has to climb a telephone pole to fix a problem, he/she doesn’t bring every tool. The practical, handy tools go in the belt, and up the pole they go, ready to handle any problem. The real trick is knowing what tools will handle any job so you can put those in your belt and to cut down to the essentials so you can focus on the task.
With a core set of tools you’ll be able to focus on learning just those tools rather than trying to grasp the function, use and nuances of each and every tool on every menu. When you have less to remember, that leaves far less to get lost in by randomly exploring tools and functions. Exploration and experimentation can be left until you have more expertise, time or interest. With a lighter tool belt you’ll have everything you need when you climb the pole, and you’ll be sure to get the job done without coming down to waste time foraging around in the van for more tools.
The Mythical ‘Read My Mind’ and ‘Do It For Me’ Tools
In talking with people about Photoshop, one tool that they always seem to have thought they read about in a tutorial, or saw at a conference, or read about in a book is the Read My Mind tool or the Do It For Me tool, and sometimes even the Read My Mind and Do It For Me tool. One thing that users often seem to hope, and maybe never give up on, is that Photoshop will sometimes be able to do the thinking. It is terribly frustrating when you get an idea of how a result will look in your head and you use the buttons and functions you thought you should and then don’t end up with the result you expected. If you are able to imagine how you want something to look, it means you have a good imagination and eventually Photoshop will work out well for you. However, the tools never do the thinking for you, and never know what you see in your mind’s eye.
Really, you almost never want the computer to do it for you. The reality of using Photoshop is that automated tools for correction will usually make approximations. You are never hard wired to Photoshop, and the program itself isn’t much of an artist – regardless of what you pay for it or what version you own. You may think you can depend on it to make images better, but really all it does is enable you to make images better. It never sees the images it works on, it just performs calculations that were developed by the designers, and sometimes what those tools will do to a particular image may be difficult to predict – even once you have a lot of experience. Most of the unpredictable tools are exactly the ones we steer away from in the tool list supplied here. To dispel the rumors: there are no tools that think for you. No matter how elegantly they work, tools will not not ‘read your mind’ or ‘do it for you’ and certainly none will do both – whatever the task. That is as it should be (Figure 2.2).

FIG 2.2 The only tools that attempt to automate corrections are those that you probably shouldn’t use.
The following list is categorized into External Applications, Commands, Functions, Freehand Tools and Filters. Each is explained more fully by section. You can use other tools or additional applications as you explore Photoshop, consult tutorials, or develop your own workflow, but this list will be comprehensive in reflecting what you absolutely need.
External Applications
External applications are the additional software items that you add to your system to enhance processing. There are a plethora of addons you can install for Photoshop, some free and some for a cost, that claim to add on to what Photoshop already does. These may come in the form of plug-ins, actions, scripts, custom shapes and brushes, etc. Some of these additions may be valuable additions (like those included with this book). Some will be good for users who are already very familiar with the tools in Photoshop, know what they want to accomplish with the program, and are looking for a specific enhancement. Generally, the wealth of available add-ons and plug-ins may seem tempting, but many plug-in and add-ons just duplicate or repackage functionality already in Photoshop, sucking in users on claims that they are the ‘Do It for Me’ tool.
There are really very few external software applications that you need to work with Photoshop. Those that you do need are mostly a given. You will need a computer that has operating system software capable of running Photoshop. You will also sometimes need drivers that are provided by the vendor of the additional equipment you purchase (for your printer, camera, backup systems/drives) or other manufacturer software to run hardware and devices. A few things you will need that are less obvious are software utilities to calibrate your monitor, and build an ICC profile. Some things you may want, like additional editing software, image management, etc. are not necessary, and they shouldn’t be allowed to cloud the picture.
The best overall plan in managing peripheral applications is similar to the limiting your tool list: keep it simple to keep complexity and potential variables to a minimum. More software means more to learn, so put all the non-essential software aside. If you have trouble with your computer system, the first place to start troubleshooting is by eliminating extra software and peripherals – or simply not adding them as variables in the first place.
Adobe Gamma (PC) Display Calibrator Assistant (Mac) or another monitor calibration system |
Adobe Gamma can be found on PC systems in the Control Panel; Display Calibrator Assistant can be found on Mac systems in the Displays System Preferences by clicking the Color and then Calibrate buttons. Both of these utilities do easy monitor calibration and ICC profile generation in one process. Alternatives to these free options already included with your existing software are calibration systems, like ColorVision Spyder, or other hardware calibration device for your monitor (see http://aps8.com/spyder.html). These devices are more reliable than software-only solutions. |
Monitor calibration and creating profiles can help you stabilize your workflow and get better color matching between your monitor and output. If you have problems with output color, the solution will likely start with good monitor calibration. |
|
Device Software |
Scanner, digital camera, printer, card reader, backup/DVD/CD/RAID drivers and software that enables you to access additional hardware that you will be connecting to your system to access or store images. See user manuals and installation instruction materials for each device you add to the system for more information. |
Photoshop Help |
Help>Photoshop Help, or press F1. This can be a reliable resource for basic information on using Photoshop features and functions and is a great place to begin exploration of any Photoshop tool, and the price is right (free). Depending on your choices during the installation of Photoshop, this feature may require additional installation. |
Commands
Commands are simple functions – essentially single step – used to achieve a result. I say ‘essentially’ because you may have to address a dialog to get the result accomplished. For example, if you open an image, you will need to use the Open command. In the Open dialog, you will have to browse to find the image you want to open.
Most commands will be found on the program menus, and can be invoked by shortcuts.
Functions
Functions are more complex than simple commands that have a definitive, one-step goal. Using functions you will have to determine how to apply settings achieve results, usually using multiple controls and function features to determine the final outcome. Adjustment of more than one control is usually necessary, and nothing can be achieved using the defaults.
Levels |
Layer>New Adjustment Layer>Levels. Command+L / Ctrl+L opens a Levels dialog, but creates no adjustment layer. View image histograms as part of the Levels dialog box display. Use simple sliders to adjust tonal dynamic range and balance image color. Helps image contrast and color. |
|
Color Balance |
Layer>New Adjustment Layer>Color Balance. Command+B / Ctrl+B opens a Color Balance dialog, but creates no adjustment layer. Adjust color by balancing the influence of color opposites for highlights, midtones and shadows. Helps remove color casts and stubborn flatness in some images. |
|
Hue/Saturation Layer |
Layer>New Adjustment Layer>Hue Saturation. Command+U / Ctrl+U opens a Hue/Saturation dialog, but does not create a Hue/Saturation adjustment layer. Adjust color by using slider controls to alter hue, increase/decrease saturation, and affect general lightness and darkness. Most effective when used to enhance color saturation. |
|
Layer Mask |
Layer>Layer Mask>Reveal All (no shortcut). Customize visible image areas without permanently erasing content. Very useful for blending in pasted image areas, molding/fitting parts of a collage or composite. Often used in conjunction with Selection (Polygon Lasso, Magic Wand), Fill and/or the Paint Brush tool. |
|
Blending Options |
Layer>Layer Style>Blending Option, or double-click a content layer. Either action will open the Layer Style screen. From this screen you can control many options, like General Blending (Mode and Opacity), Advanced Blending (Fill Opacity, Channel Targeting), Blend If (conditional blending based on layer content) and Layer Styles (effects/styles assigned to the layer). This is a very powerful command center for controlling layers and how they interact. Can be used for a wide variety of content blending and effects. |
Freehand Tools
The Toolbar has many freehand tools on it that you will use infrequently or not at all. By freehand, I mean that the application is controlled by your input device and the position of the cursor.
For all of these tools, be aware that options on the Options bar will affect the way the tools are applied. For basics about options for each of these tools, look them up by searching Help for ‘[tool name] options’.
Filters
Filters are an area of the program menus that get explored extensively by newer users, who often flock there to try out special effects and put some pizzazz into their images. The foray into filters is usually one that is hit or miss, and while you can spend innumerable hours applying different filters and settings, in reality, you get less pizzazz from filters than you get from shooting better images.
Filters listed here are few, because it is often difficult to predict exactly how some filters will behave and what benefit you will get from the result of applying it. These filters are the practical ones that you will use for image correction, fix damage and create simple effects. They are not ‘wow’ filters that will create instantly interesting effects. Before you do anything to make fantastic effects you want to have complete control of your image. These filters provide you with a means of control.
Add Noise filter |
Filter>Noise>Add Noise. Adds digital noise to an image. Useful for roughening up tones that are unnaturally smooth, such as areas painted with a Fill or Paint Brush Tool. Sometimes used in conjunction with Gaussian Blur. |
|
Gaussian Blur filter |
Filter>Blur>Gaussian Blur. Blends adjacent pixels to create a blurring effect. Useful for smoothing out tones that are unnaturally rough, over-sharpened, or for creating focus effects (e.g., soft focus, depth-of-field). |
|
Unsharp Masking |
Filter>Sharpen>Unsharp Mask. Allows users to adjust both local and fine contrast in the image to affect the appearance of sharpness, improve edge definition and enhance contrast in color and tone. |
Looking over these lists of tools and depending on how you count, there are just about 30 tools to keep in mind for editing your images. That may sound like a lot, but it is a fraction of the total number of tools yet it is a complete tool belt that will help you get through any image-editing situation. Be sure to become familiar with these if you are not already.
Exploring New Tools
One of the reasons users find Photoshop daunting is that they try to learn too much – or even all of it – at once. A better approach for most people will be to learn a tool at a time. If there are tools in the list here with which you are not familiar, note them, and give yourself the opportunity to explore them one a day, for half an hour. Read about the tools in Photoshop’s Help (in Photoshop, press Command+/ or Ctrl+/), then open an image and explore the tool by applying it. Don’t look so much for expert results as the opportunity to learn how the tool behaves. That experience will go a long way toward incorporating it into your workflow. Fifteen or twenty minutes a day for a month would cover this entire list, but chances are you are familiar with many of them already if you are reading this book.
The Logic of Layers
Now that we have outlined a basic workflow and a basic toolbox, it is time to start wrapping the process of working with images around layers. As mentioned in Chapter 1, layers are a vehicle for instituting non-destructive change in images. In other words, you can keep the original image information intact while making virtual changes over it. Working with layers as a primary tool allows you to reverse any change. Used correctly, layers are a far more powerful tool than Undo or Histories. With Layers it is possible not just to undo or reverse sequential changes, but you can adjust the editing sequence and intensity of applied changes as you go by re-ordering layers, adjusting opacity and toggling visibility. The power of layers is greater if you approach them with a solid understanding of when to use them, and how to organize them with naming, grouping, merging, duplication, clipping and linking.
When to Create a New Layer
Some layers will force themselves on you. For example, when you use the paste command, Photoshop will create a new layer. This is usually as it should be. Ideally you will want to create a new layer for every change that you intend to make in an image. That is, if you are going to make a general color adjustment, make a new layer; if you are going to sharpen, make a new layer; if you are going to make a spot change to any image area, make a new layer; if you are making dust corrections to a scan, make a new layer (not one for each speck, but one for all of them).
The goal of layer creation is to keep each logical step in the process separated so you can return to the image in the future, see what you did, and perhaps reverse or re-create these changes and the process in another image. That is, layers can be used to archive your workflow in steps that you took to achieve the result, they can help you save time and effort if you want to make a change in the developed image without having to redo all the corrections, and they can provide a means of learning from your own efforts by reviewing your process – now or years from now.
Naming Layers
A very important means of keeping layers under control is being consistent with layer naming. When new layers are created, they are created with a generic name (e.g., Layer+number, or they may be named for the type of adjustment layer). Several practices can help you make better use of layer names: naming the layer by purpose, entering parameters used and numbering the order of creation.
Naming the layer by purpose is simply typing in a name that has to do with what you used the layer to accomplish. For example, a layer used for dust removal would be named ‘Dust Removal’; a layer used to isolate an object would be named for the object. When using functions like Gaussian Blur on a layer to soften an area, you may want to note the settings used in the layer name. Finally, you might also consider numbering the layers. Though you will often work from the bottom of the stack upward in order, that will not always be the case. See Figure 2.3 for a simple example of layer naming according to suggested practice.
FIG 2.3 Following the number order of the layers, you can track what was done to this image to achieve the result by looking at the layer names. All of these techniques are things we will touch on in later chapters.
This type of simple naming scheme has potential to be very helpful in that it can help you know what a layer is for without having to examine the content (e.g., shutting off other layers, increasing the size of the thumbnails, zooming in). Naming layers as you go to hint at what they are will help keep them organized and let them act as an outline or running history for your editing procedures. In that way, investing some time up front helps save lots of time later on in reproducing or duplicating results without extensive trial and error.
While including some information in the layer name makes sense, including too much information can make the layer names bulky and difficult to read.
There are several ways to edit layer names. You can often change them when creating the layer, but you can also edit the names after the layers are created. It is time to take a look at working with layer names. The following exercise has no other goal than to explore the various opportunities for naming, there will ultimately be no change in the visual appearance of the image on screen.
Try It Now
1. Open an image, and flatten it if it is not flattened already (choose Flatten from the Layer menu).
2. Choose Duplicate Layer from the Layers menu. This will open the Duplicate Layer dialog with the As field pre-named Background Copy (see Figure 2.4).
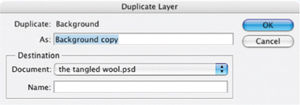
FIG 2.4 Duplicating a layer with the Duplicate Layer command creates an exact replica of the layer being duplicated but adds the word ‘copy’ to the name.
3. Change the As field by typing over the current default name. Change the name to 1 Duplicate Background, and click OK. This will close the dialog, and create a duplicate of the Background layer with the new name in the layers palette.
4. Hold down the Option / Alt key and then in the Layers palette, click-and-drag the 1 Duplicate Background layer to the Create a New Layer button at the bottom of the palette. This will open the Duplicate Layer dialog and allow you to rename the new layer. Name this layer 2 Duplicate of the Duplicate, and click OK. Clicking OK will close the dialog and create a new layer at the top of the stack identical to the other two, but in name.
Had you not held down the Option / Alt key when dragging in the previous step, the result would have been to create the layer without opening the Duplicate Layer dialog.
5. Open the Layers palette menu (find the menu button at the upper right of the palette) and choose Layer Properties. The Layer Properties dialog will appear. Change the name of the layer to 2 Duplicate Background II. Click OK to accept the changes and close the dialog. Note the name will change for the current layer in the Layers palette.
6. Double-click the Background layer in the layers palette. This will open the New Layer dialog with the Name Layer 0. Click OK to accept the changes. You could have changed the name there, but you will change your mind shortly.
7. Double-click directly on the name Layer 0 in the Layers palette. The name of the layer will highlight in the palette (see Figure 2.5). You can type in a name change at this point. Call it Original Background, and then press Enter or Return on your keyboard to accept the changes.
There are alternatives for getting to the Layer Properties. Option / Alt and double-clicking on a layer will open the Layer Properties. You can also open a menu for the layer: on Mac, hold down the Control key and click on a layer (not a Background); on a PC, right-click on a layer. Note that if you click on the layer or thumbnail, you will get different menus.
Any of these methods of naming your layers may come in handy at various points in the process of editing. You will develop favorites with experience. But the bigger point is to use layer naming opportunities to note what step(s) a layer contains at a glance.
Leave this image open, we’ll use it in a moment for another quick exercise with layer grouping.
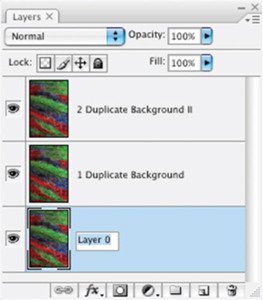
FIG 2.5 Directly changing layer names on the palette is possible as well by simply double-clicking directly on the name.
Grouping Layers
When you begin to work with layers extensively, things will start to get unwieldy. It may sound funny to those who currently don’t use layers a lot, but you can easily end up with hundreds of layers in an image. For some of the advertising photography work I have done, which requires intense correction of models (changing face, body shape and contour, along with color correction, pore reduction, lens correction and the like), it often requires several submissions of an image, with revisions. I make a habit of saving every step in the hours of intense correction, so it is unnecessary to start over again when the revisions come back. Trying to repeat everything from scratch is not a very pleasant thought. The working version of images could end up with hundreds of layers and often several images in various editing stages that would be used for different parts of a composite. More recently I was designing a web interface for a web application, and the demo image had over 2000 layers. They almost become addictive.
One thing that happens when you get a lot of layers in an image is that they get confusing just to look at. Equally problematic is scrolling to the layers you need as you can’t see them all on the screen at one time once you get over 25 or so – depending on the size and resolution of your screen and the Layer palette settings for the thumbnail size. To keep a bulking layer stack more manageable, you can store layers in layer groups. Groups work like folders in a file structure, they allow you to expand and collapse view of the content so you can choose to see what layers are in a group, or hide them (see Figure 2.6).
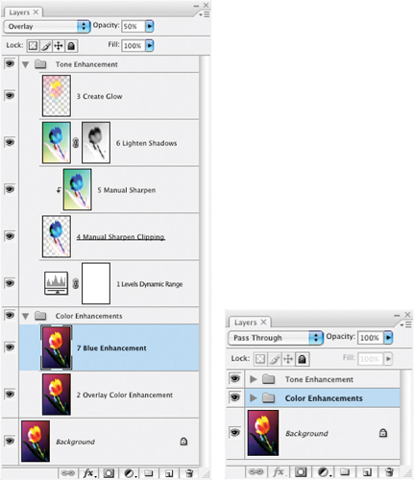
FIG 2.6 The toggle to the left of the folder allows you to expand view of the layers in the group. These two screen shots represent exactly the same image.
You can both create a layer group from existing layers, or create a group and add the layers as you go. At any time you can show/hide the content of the groups, duplicate and move them like any other layer (even between images), and they can be nested up to 5 deep. A little practice with them will get you familiar with how they work. Again, the goal of this exercise is just to experience groups, not to change the image in any way. Do this exercise continuing from the point where we left off in the previous exercise (Figure 2.7):
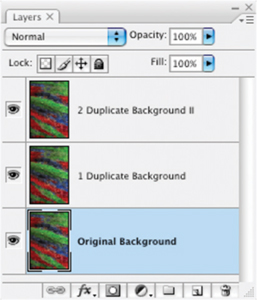
FIG 2.7 The layers palette from the previous exercise should look like this.
Try It Now
1. Highlight the two upper layers (2 Duplicate Background II and 1 Duplicate Background). To highlight one layer at a time on PC hold down the Ctrl key and click the layers in the layers palette; on Mac hold down the Command key and click the layers in the layers palette. You can also highlight multiple consecutive layers at once by clicking the upper layer to highlight it, and then Shift-clicking the lower (or vice-versa).
Highlighting layers one-at-a-time is useful for selecting layers that are not consecutive.
2. Choose New Group From Layers from the layers palette menu. This will open the New Group from Layers dialog that will allow you to rename the group. Accept the default group name (Group 1) by clicking OK.
3. Click-and-drag the Group 1 group to the Create a New Group button at the bottom of the layers palette. When you release, this will immediately create a new group containing the old group. If you toggle the view for the old group (Group 1), you will see the originally grouped layers inside Group 1, inside Group 2 (see Figure 2.8).
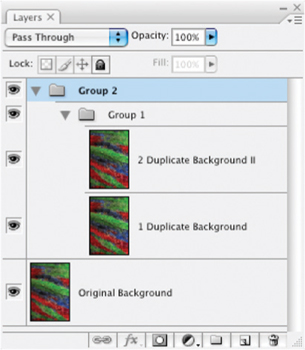
FIG 2.8 Photoshop creates a group from the contents dragged to the Create a New Group button.
4. Now drag Group 1 to the Create a New Layer button. This will duplicate Group 1 as Group 1 Copy, and it will remain inside Group 2 (see Figure 2.9).
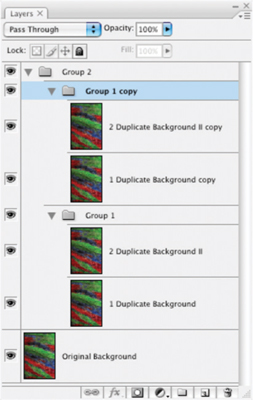
FIG 2.9 Using Create a New Layer with layer groups simply duplicates the grouping just as it would duplicate a layer.
5. Click-and-drag Group 1 Copy over Group 1. As you drag the cursor, note when Group 1 highlights (see Figure 2.10) and release the mouse button. This will move Group 1 Copy inside Group 1.
Layers in any group remain fully editable. The advantage is that the groups can be collapsed so there is less to search through, and groups can be organized so you can quickly find what you need. If you find all this naming by ‘Group’ a little confusing, please see the previous exercise, and exercise your right to rename the groups as you please. Perhaps this illustrates the benefit of naming layers as you go as well.
Again, leave this image open and available for use with the next exercise.
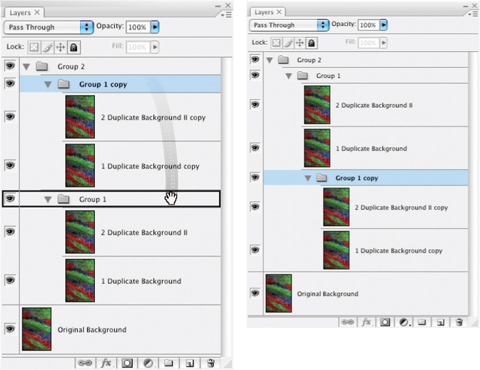
FIG 2.10 Groups can be moved like layers as well and inserted into other groups.
Be aware that the order of how you create and stack layers sometimes matters to the result. Moving layers around in the stack willy-nilly just to accomplish a neat grouping may have an effect on the image result. Always view the image on screen while moving layers to be sure the layer movement doesn’t affect the image result!
Merging Layers
There are reasons to create layers, and there are reasons to delete and combine them. Combining layers in Photoshop is referred to as merging. Merging combines the content of two or more layers into a single layer. This saves on file size and simplifies the organization of the layers.
Smart Objects
New to Photoshop CS2, Smart Objects are similar to Groups in function but the content is handled in quite a different way. You can merge layers into a Smart Object similar to the way you create a layer group (see the Convert to Smart Object command on the layers palette menu), and the resulting Smart Object acts like a merged layer. The kicker is, the contents in the layer are not actually merged: it is stored in a separate PSB image. You can still access the content and make changes. To edit the content, you double-click the Smart Object layer and the content of the object will open as another image. You can then save the object as a PSB (Photoshop Object) and use the objects in other images.
Smart Objects can be really handy if there is some type of layer grouping that you use in different images. For example, say in your exploration of layers you hit on a combination of adjustment layers that seems to you to correct every image you took in a photo session. You could create a smart object from the layers, save it, and then incorporate it into all of the other images from the session. Other more probable uses are developing templates for snapshots. For example, say you were elected to shoot your son or daughter’s team pictures. You might make a frame like a baseball, softball, or soccer sports card, and then import it to the individual team player shots like a template.
To create a Smart Object, highlight the layers you want to group (on Windows hold down the Ctrl key and click the layers in the layers palette; on Mac hold down the Command key and click the layers in the layers palette), then choose Group Into New Smart Object from the layers palette menu.
Layers can be merged from various groupings: linked layers, grouped layers, visible layers, active (highlighted) groupings and simple pairs can all be merged. Usually you will want to merge layers that do the same thing but somehow end up separate, or you will want to merge layers which you otherwise really don’t have a good reason to keep separate. Lets use the image from the last example starting from where we left off.
Try It Now
1. With the Group 1 Copy layer active, choose Merge Group from the Layers menu. This is the same as pressing Command+E / Ctrl+E. The content of the group will be merged into a single layer named Group 1 Copy.
By active I mean to click on the layer so that it is highlighted in the layers palette. An active layer is the ‘live’ layer in your image, or the layer you are currently working on. Often problems that occur in applying changes happen because the wrong layer is active. Your first place to check when a change doesn’t behave as you expect should be to look at which layer you have active and be sure it is the layer you really want to work on.
2. Click on the 1 Duplicate Background layer in the layers palette to make it the active layer, then choose Merge Down from the Layers menu. You will notice that the menu item you are choosing is in exactly the same place as Merge Group was in step 1. The merge commands are named with context sensitivity, and the names will change according to the actions that are available. Note that the resulting layer from the merge is Group 1 Copy, as per the lower layer in the merge.
3. Undo the changes from the last step by pressing Command+Z / Ctrl+Z (you can also step back in the History or choose Undo from the Edit menu). This will restore the 1 Duplicate Background layer.
4. With the 1 Duplicate Background layer active, hold down the Shift key and click the Group 1 Copy layer. Both the 1 Duplicate Background and the Group 1 Copy layer should appear highlighted (see Figure 2.11).
5. Again, choose Merge Layers from the layers menu as in step 2. Note that the resulting layer is named 1 Duplicate Background, as per the upper layer in the merge. If you compare steps 2 and 5, the dominant name changes depending on how you merge layers.

FIG 2.11 Highlighted layers (in blue) are both currently active.
6. Choose Flatten Image from the Layers menu. This is the ultimate merge. The entire contents of the image will be merged as a Background layer (whether or not one existed in the image previously).
While it is all well and good to merge these layers and groups to see how they react, it is important to remember that you are performing permanent adjustments that will prevent you from further editing of individual layers that are merged.
7. Choose the Type tool, set a color and font (size and style) and click on the image to make a new type layer. Make the font large and bold – a little over-sized as it will come in handy later (the next exercise). Type in your copyright (e.g., Copyright © 2007 Richard Lynch). For an ‘appropriate color’ use a light color on a dark image or a dark color on a light image.
8. Press Command+E / Ctrl+E.
9. Choose the Move tool (press V) and move the copyright into position.
Wait…can’t do that? How about just deleting the copyright. But you can’t do that either. Perhaps that drives home the idea. You had superfluous layers in the image before – just duplicates of what was there. You could create more and merge and it didn’t make a difference, and actually it was better that you ended up removing them. However, when you have your copyright, you’ll want to be able to move it around and maybe shut off the view for it or remove it for some purposes. If you merge it with another layer, the content becomes permanently affixed. You want to keep all distinct changes separate so you have the opportunity to move or delete them when necessary.
Just so you know you aren’t too far up a creek without a paddle:
10. Press Command+Z / Ctrl+Z
11. Move the copyright where it belongs using the move tool (press the V key)
Undo (step 10) to get back to two layers (background and type layers) so you can edit the image the way you want without having to start all over.
Navigating Layers There are ways to move layers in the layers palette and navigate in the layers palette using just keystrokes. Some of the more common ones you might use are the following: |
||
Purpose |
Mac Shortcut |
Windows Shortcut |
Move an active layer up in the layer stack |
Command+] |
Ctrl+] |
Move an active layer down in the layer stack |
Command+[ |
Ctrl+[ |
Move an active layer to the top of the layer stack (or layer group) |
Command+Shift+] |
Ctrl+Shift+] |
Move an active layer to the bottom of the layer stack(or layer group) |
Command+Shift+[ |
Ctrl+Shift+[ |
Select the next layer up in the layer stack |
Option+] |
Alt+] |
Select the next layer down in the layer stack |
Option+[ |
Alt+[ |
Select the next layer up in the layer stack (keeping the current layer(s) selected) |
Option+Shift+] |
Alt+Shift+] |
Select the next layer down in the layer stack (keeping the current layer(s) selected) |
Option+Shift+[ |
Alt+Shift+[ |
Select the top layer in the layer stack |
Option+. |
Alt+. |
Select the bottom layer in the layer stack |
Option+, |
Alt+, |
Clipping Layers
Probably one of my favorite layer types (and not everyone will share this preference) is the clipping layer. It is really just an easy way to target changes so they affect the content of one particular layer. That is, say you have an object that you have separated into a layer above the Background. You would like to make a change to the object, but not the Background. While there are several potential solutions, clipping layers offer the opportunity to target an adjustment only to that layer.
The implications are slightly more broad reaching than simply being an alternative to masking. You can use clipping layers as masks, and again, as organizational tools for your corrections. The best way to see them work is through example, so let’s see what they do in a simple exercise. Continue with the same image you were using in the previous exercise.
Try It Now
1. Duplicate the Background layer in the previous exercise, and name it 2 Inverted Background.
2. Press Command+Shift+] / Ctrl+Shift+] to move the 2 Inverted Background layer to the top of the stack (Command+] / Ctrl+] would work just as well in this case, but I chose the other command as it is specifically designated to move the layer to the top of the stack).
3. Press Command+Option+G / Alt+Ctrl+G to create a clipping group from the Copyright type layer and the 2 Inverted Background layer.
Earlier versions of Photoshop (and Elements) use the simpler Command+G / Ctrl+G for creating a clipping group, but that shortcut is assigned to Groups as of Photoshop CS3.
4. Press Command+I / Ctrl+I to invert the content of the layer. The copyright should appear as reversed/negative against the background. Your layers should look like Figure 2.12.
5. Choose the Move tool and be sure the preference for Auto-select is unchecked. The pull down menu next to auto select should be set to Layer. Click on the Copyright layer to make it active and move the text around while watching the appearance of the image. The type layer acts like a canvas for the inverted layer content.
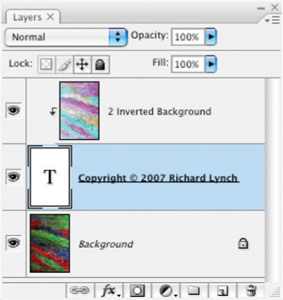
FIG 2.12 After step 4, there should be three layers as pictured here.
You can go much further with this by stacking multiple corrections in the clipping group. Each will act on the content of the bottom layer in the group in order of the stack. Hold on to that image one more time to continue into the next exercise…
Linked Layers
One final potential organizational tool is layer linking. It is really somewhat subservient to other types of layer organization (like groups). Linking allows you to make layers behave as a unit, whether consecutive or not (unlike Groups). This can be handy for moving layers both up and down in the layer stack and in unison on the layer plain.
Try It Now
1. With the Copyright type layer still active, hold the Shift key and click the 2 Inverted Background layer in the layers palette. This will highlight both layers.
2. Click the Link Layers button (looks like a chain) at the bottom left of the layers palette. A linking icon will appear to the right of both layers indicating that they are linked.
3. Click on the Copyright type layer so that it is the only one active.
4. Choose the Move tool and move the type layer around while watching the appearance of the image. You should notice that, unlike the previous result, the type will not change color as it moves. That is because the layer it is linked to is moving with it. All layers in a linked grouping will move at the same time.
5. Choose Select Linked Layers from the Layers palette menu. This will select all layers linked to the currently active layer (in this case, just the one above, but as many as you would otherwise want to link). This offers an option for quickly selecting a stack of linked layers – handy if you need to adjust their position in the layer stack.
6. Close the image without saving. Closing the image without saving will stop you from saving over your original.
Summary
While we have done nothing glamorous here as far as exercises for image editing, we have begun to explore some of the more serious basic functionality of layer creation and organization. With what you have learned here you should begin to see some possibilities for organizing your layers in three types of groups (Groups, Clipping Groups and Linking), and should begin to see the flexibility of adjusting content in the layer stack. Coupled with layer naming, you have all the tools you need to keep your layers in order and sensible as a record of your corrections. We will look at examples throughout the book that reinforce these basic exercises in real-world editing situations and applications, starting with the very next chapter.